

Page 1

AN3240
Application note
Ultrasound HV pulser demonstration board
Introduction
This application note describes all the possible demo applications helpful in carrying out a
full evaluation of STHV748 functions.
The STHV748 high-voltage, high-speed pulser generator features four independent
channels. It is designed for medical ultrasound applications, but can also be used for other
piezoelectric, capacitive, or MEMS transducers.
The device contains a controller logic interface circuit, level translators, MOSFET gate
drivers, noise blocking diodes, and high-power P-channel and N-channel MOSFETs as
output stages for each channel. There is also a clamping-to-ground circuitry, anti-leakage,
an anti-memory effect block, a thermal sensor, and a HV receiver switch (HVR_SW), which
guarantees a strong decoupling during the transmission phase.
Moreover, the STHV748 includes self-biasing and thermal shutdown blocks (see block
diagram in Figure 1). Each channel can support up to five active output levels with two half
bridges. The output stage of each channel is able to provide ±2 A peak output current. In
order to reduce power dissipation during continuous wave mode, the peak current is limited
to 0.6 A (a dedicated half bridge is used).
December 2010 Doc ID 17689 Rev 1 1/32
www.st.com
Page 2

Contents AN3240
Contents
1 STHV748 - pinout configuration . . . . . . . . . . . . . . . . . . . . . . . . . . . . . . . . 5
2 STHV748 block diagram and truth table . . . . . . . . . . . . . . . . . . . . . . . . . 7
3 STHV748 PCB demo description . . . . . . . . . . . . . . . . . . . . . . . . . . . . . . . 9
4 PCB demo description . . . . . . . . . . . . . . . . . . . . . . . . . . . . . . . . . . . . . . 10
4.0.1 Capacitances and resistances list . . . . . . . . . . . . . . . . . . . . . . . . . . . . . 11
5 Operating supply conditions . . . . . . . . . . . . . . . . . . . . . . . . . . . . . . . . . 15
5.1 Load selection . . . . . . . . . . . . . . . . . . . . . . . . . . . . . . . . . . . . . . . . . . . . . 16
5.2 Fixed STHV748 pins on PCB demo . . . . . . . . . . . . . . . . . . . . . . . . . . . . . 17
6 Demonstration kit composition . . . . . . . . . . . . . . . . . . . . . . . . . . . . . . . 18
6.1 Method 1 (flexible - based on BNC PCB adapter) . . . . . . . . . . . . . . . . . . 18
6.1.1 How to drive the STHV748 for method 1 . . . . . . . . . . . . . . . . . . . . . . . . 19
6.2 Method 2 (use of the motherboard based on the STM3210E-EVAL) . . . . 20
6.2.1 Motherboard communication setting . . . . . . . . . . . . . . . . . . . . . . . . . . . 21
6.2.2 Motherboard driving performance for the PCB demo . . . . . . . . . . . . . . 22
6.2.3 Turn on demo system . . . . . . . . . . . . . . . . . . . . . . . . . . . . . . . . . . . . . . 24
6.2.4 Turn off demo system . . . . . . . . . . . . . . . . . . . . . . . . . . . . . . . . . . . . . . 26
6.2.5 Acquisition examples of PW, CW and PC mode . . . . . . . . . . . . . . . . . . 27
6.3 Method 3 (LabView interface - use of the HSDIO PCB connector) . . . . . 29
7 Revision history . . . . . . . . . . . . . . . . . . . . . . . . . . . . . . . . . . . . . . . . . . . 31
2/32 Doc ID 17689 Rev 1
Page 3

AN3240 List of tables
List of tables
Table 1. Pinout configuration table . . . . . . . . . . . . . . . . . . . . . . . . . . . . . . . . . . . . . . . . . . . . . . . . . . . 5
Table 2. STHV748 truth table . . . . . . . . . . . . . . . . . . . . . . . . . . . . . . . . . . . . . . . . . . . . . . . . . . . . . . . 7
Table 3. Capacitances and resistances list . . . . . . . . . . . . . . . . . . . . . . . . . . . . . . . . . . . . . . . . . . . 11
Table 4. C1 head connector pin vs STHV748 pinout . . . . . . . . . . . . . . . . . . . . . . . . . . . . . . . . . . . . 14
Table 5. DC working supply conditions. . . . . . . . . . . . . . . . . . . . . . . . . . . . . . . . . . . . . . . . . . . . . . . 15
Table 6. Current consumption in CW mode, @ 5 MHz, HVP/M1=±5 V, no-load . . . . . . . . . . . . . . . 15
Table 7. Power-up sequence . . . . . . . . . . . . . . . . . . . . . . . . . . . . . . . . . . . . . . . . . . . . . . . . . . . . . . 15
Table 8. Special pin connections . . . . . . . . . . . . . . . . . . . . . . . . . . . . . . . . . . . . . . . . . . . . . . . . . . . 17
Table 9. STM3210E-EVAL pin configuration table . . . . . . . . . . . . . . . . . . . . . . . . . . . . . . . . . . . . . . 21
Table 10. Document revision history . . . . . . . . . . . . . . . . . . . . . . . . . . . . . . . . . . . . . . . . . . . . . . . . . 31
Doc ID 17689 Rev 1 3/32
Page 4

List of figures AN3240
List of figures
Figure 1. STHV748 single channel block diagram. . . . . . . . . . . . . . . . . . . . . . . . . . . . . . . . . . . . . . . . 7
Figure 2. PCB demo schematic . . . . . . . . . . . . . . . . . . . . . . . . . . . . . . . . . . . . . . . . . . . . . . . . . . . . . 10
Figure 3. PCB top layout . . . . . . . . . . . . . . . . . . . . . . . . . . . . . . . . . . . . . . . . . . . . . . . . . . . . . . . . . . 13
Figure 4. C1 (CONN1) head connector description . . . . . . . . . . . . . . . . . . . . . . . . . . . . . . . . . . . . . . 13
Figure 5. PCB demo image . . . . . . . . . . . . . . . . . . . . . . . . . . . . . . . . . . . . . . . . . . . . . . . . . . . . . . . . 14
Figure 6. Load configuration schematic . . . . . . . . . . . . . . . . . . . . . . . . . . . . . . . . . . . . . . . . . . . . . . . 16
Figure 7. Demonstration kit composition (PCB demo plus BNC PCB adapter) . . . . . . . . . . . . . . . . . 18
Figure 8. PCB adapter image, top layout and top schematic. . . . . . . . . . . . . . . . . . . . . . . . . . . . . . . 18
Figure 9. Demonstration kit system image . . . . . . . . . . . . . . . . . . . . . . . . . . . . . . . . . . . . . . . . . . . . . 19
Figure 10. Inputs set of generators for PW mode (4 cycles - TX0 pulser Chx) . . . . . . . . . . . . . . . . . . 19
Figure 11. Diodes LED status on the PCB adapter which indicates IN4=1 and IN3=0 . . . . . . . . . . . . 20
Figure 12. Demonstration kit based on the STM3210E-EVAL system . . . . . . . . . . . . . . . . . . . . . . . . 20
Figure 13. Demonstration kit based on the STM3210E-EVAL system image . . . . . . . . . . . . . . . . . . . 21
Figure 14. STM3210E-EVAL pin connection . . . . . . . . . . . . . . . . . . . . . . . . . . . . . . . . . . . . . . . . . . . . 21
Figure 15. PW mode functions. . . . . . . . . . . . . . . . . . . . . . . . . . . . . . . . . . . . . . . . . . . . . . . . . . . . . . . 22
Figure 16. CW mode functions . . . . . . . . . . . . . . . . . . . . . . . . . . . . . . . . . . . . . . . . . . . . . . . . . . . . . . 23
Figure 17. PC mode functions . . . . . . . . . . . . . . . . . . . . . . . . . . . . . . . . . . . . . . . . . . . . . . . . . . . . . . . 23
Figure 18. Supply connection for demonstration kit with the STM3210E-EVAL . . . . . . . . . . . . . . . . . 23
Figure 19. Main menu on STM3210E-EVAL display . . . . . . . . . . . . . . . . . . . . . . . . . . . . . . . . . . . . . . 24
Figure 20. Main menu selection on the STM3210E-EVAL display . . . . . . . . . . . . . . . . . . . . . . . . . . . 25
Figure 21. Example of “Continuous Mode” selection on the STM3210E-EVAL display. . . . . . . . . . . . 25
Figure 22. Exit the mode selected on the STM3210E-EVAL display . . . . . . . . . . . . . . . . . . . . . . . . . . 26
Figure 23. Reset key on the STM3210E-EVAL . . . . . . . . . . . . . . . . . . . . . . . . . . . . . . . . . . . . . . . . . . 26
Figure 24. PW mode (HVP0=60 V HVM0=-60 V 100 W//300 pF) . . . . . . . . . . . . . . . . . . . . . . . . . . . . 27
Figure 25. CW mode HVP1=5 V HVM1=-5 V 100 W//300 pF . . . . . . . . . . . . . . . . . . . . . . . . . . . . . . . 27
Figure 26. CW mode HVP1=10 V HVM1=-10 V 100 W//300 pF . . . . . . . . . . . . . . . . . . . . . . . . . . . . . 28
Figure 27. PC mode HVP0=60 V HVM0=-60 V 100 W//300 pF. . . . . . . . . . . . . . . . . . . . . . . . . . . . . . 28
Figure 28. LabView equipment used to develop the STHV749 . . . . . . . . . . . . . . . . . . . . . . . . . . . . . . 29
Figure 29. STHV748 LabView PC control panel . . . . . . . . . . . . . . . . . . . . . . . . . . . . . . . . . . . . . . . . . 30
Figure 30. STHV748 demo system for LabView evaluation . . . . . . . . . . . . . . . . . . . . . . . . . . . . . . . . 30
4/32 Doc ID 17689 Rev 1
Page 5

AN3240 STHV748 - pinout configuration
1 STHV748 - pinout configuration
Table 1. Pinout configuration table
Pin number Pin name
1AGND
2 RIF_HVM1_1
3HVM1_A
4HVM0_A
5HVOUT_A
6 HVP0_A
7 RIF_HVP1_1
8 HVP1_A
9 HVP1_B
10 RIF_HVP0_1
11 HVP0_B
12 HVOUT_B
13 HVM0_B
14 HVM1_B
15 RIF_HVM0_1
16 D_CTR
17 IN4
18 IN1_B
19 IN2_B
20 IN3_B
21 VDDP_1
22 GND_PWR_3
23 XDCR_B
24 LVOUT_B
25 LVOUT_C
26 XDCR_C
27 GND_PWR_2
28 VDDM_1
29 IN3_C
30 IN2_C
31 IN1_C
32 THSD
Doc ID 17689 Rev 1 5/32
Page 6
STHV748 - pinout configuration AN3240
Table 1. Pinout configuration table (continued)
Pin number Pin name
33 AGND_1
34 RIF_HVM1
35 HVM1_C
36 HVM0_C
37 HVOUT_C
38 HVP0_C
39 RIF_HVP1
40 HVP1_C
41 HVP1_D
42 RIF_HVP0
43 HVP0_D
44 HVOUT_D
45 HVM0_D
46 HVM1_D
47 RIF_HVM0
48 DGND
49 DVDD
50 IN1_D
51 IN2_D
52 IN3_D
53 VDDP
54 GND_PWR_1
55 XDCR_D
56 LVOUT_D
57 LVOUT_A
58 XDCR_A
59 GND_PWR
60 VDDM
61 IN3_A
62 IN2_A
63 IN1_A
64 EN
6/32 Doc ID 17689 Rev 1
Page 7
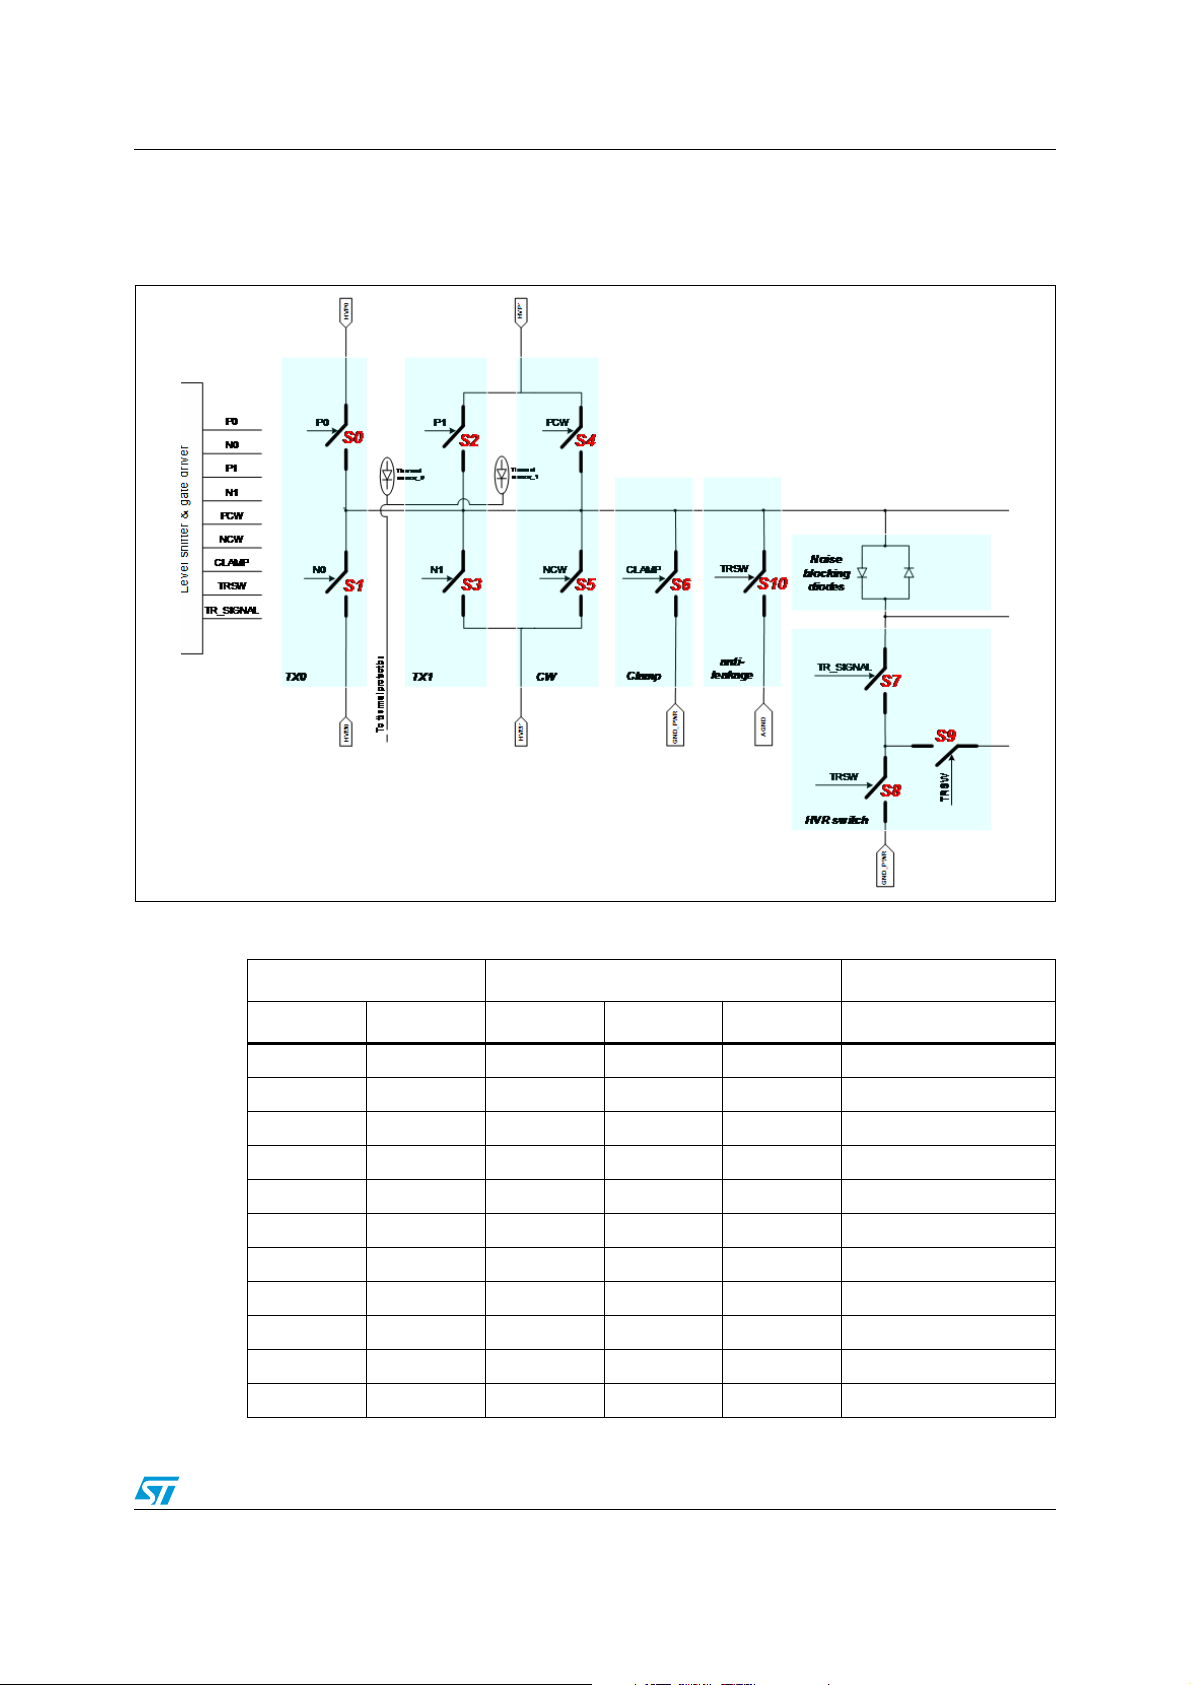
AN3240 STHV748 block diagram and truth table
2 STHV748 block diagram and truth table
Figure 1. STHV748 single channel block diagram
Table 2. STHV748 truth table
Global Per channel State
THSD IN4 IN3 IN2 IN1
1 x x 0 0 Clamp
10001 HVM0
10010 HVP0
1x011 HVR_SW
10101 HVM1
10110 HVP1
10111 HZ
11111 HVR_SW
11001Max HVM0 & HVM1
1 1 0 1 0 Max HVP0 & HVP1
11101 CW HVM1
Doc ID 17689 Rev 1 7/32
Page 8

STHV748 block diagram and truth table AN3240
Table 2. STHV748 truth table (continued)
Global Per channel State
THSD IN4 IN3 IN2 IN1
11110 CW HVP1
0xxxx HZ
8/32 Doc ID 17689 Rev 1
Page 9

AN3240 STHV748 PCB demo description
3 STHV748 PCB demo description
The STHV748 PCB demo can drive four transducers as 4-channel transmitters/receivers for
ultrasound and other applications. The demo board consists of one STHV748 in a 64-lead
9x9x1 mm QFN package.
The STHV748 can deliver up to a ±2.0 A source and sink current to a capacitive transducer.
It is designed for medical ultrasound imaging and ultrasound material NDT applications.
The STHV748 output waveforms can be displayed directly for each channel Ch A/B/C/D
using an oscilloscope by connecting the scope probe to the J1, J2, J3, and J4 jumpers,
moreover, the user can select whether or not to connect the onboard equivalent load, a 300
pF 200 V capacitor paralleled with a 100 Ω, 2 W resistor (or alternatively, 200 Ω//50 pF -
200 Ω//250 pF - no-load). A coaxial cable can also be used to easily connect the user
transducer.
IN1/2/3/4, for each channel available in IC, is controlled via the 13 pins of the C1 (CONN1)
head connector on the board (34 pins).
The main issues in this PCB design are the capacitance values, to ensure good filtering and
an effective decoupling between the low voltage inputs (IN1, IN2, IN3, IN4, and EN for each
channel) and the HV switching signals (XDCR, HVOUT, etc.,) which is ensured by the layer
separation used.
Doc ID 17689 Rev 1 9/32
Page 10
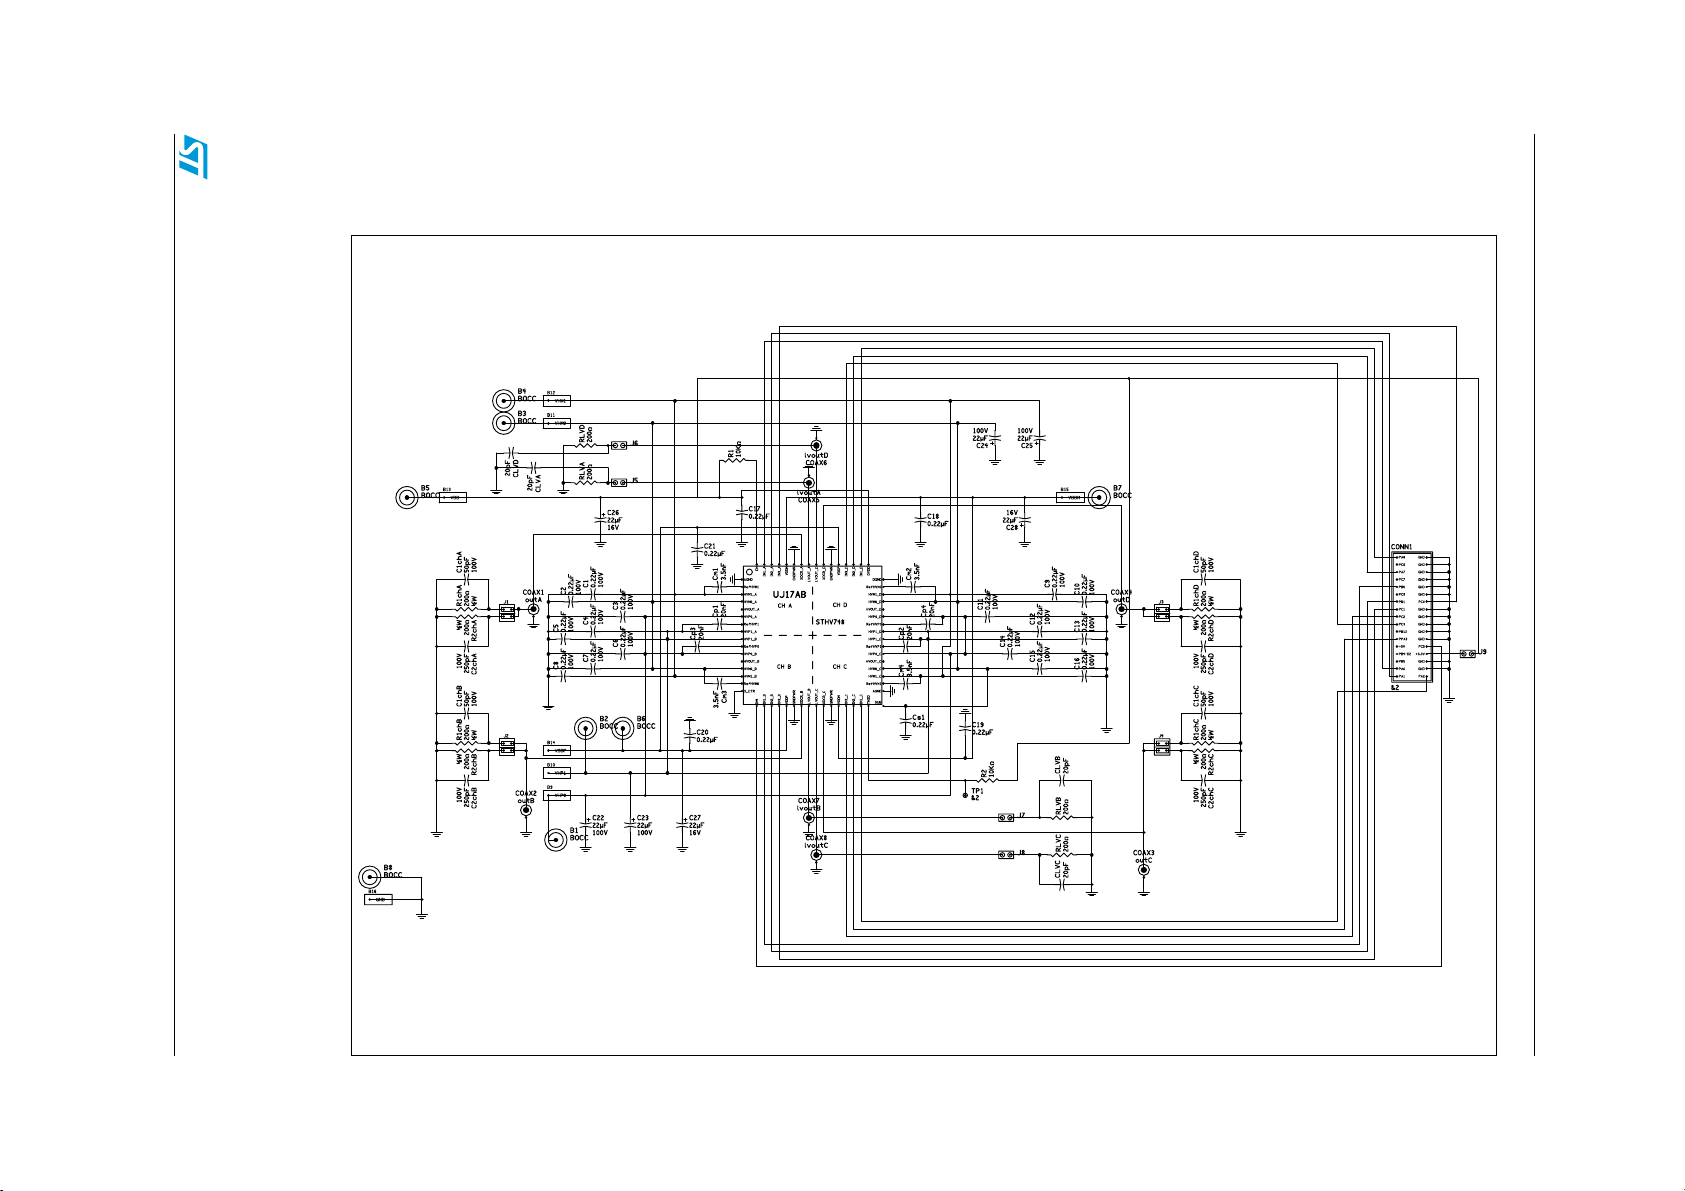
4 PCB demo description
Figure 2. PCB demo schematic
Doc ID 17689 Rev 1 10/32
AN3240 PCB demo description
!-V
Page 11

AN3240 PCB demo description
4.0.1 Capacitances and resistances list
Table 3. Capacitances and resistances list
Name Type Value Class
C2ChD SMC0805 250 pF 100 V
C3 SMC1206 0.22 µF 100 V
C4 SMC1206 0.22 µF 100 V
C5 SMC1206 0.22 µF 100 V
C6 SMC1206 0.22 µF 100 V
C7 SMC1206 0.22 µF 100 V
C8 SMC1206 0.22 µF 100 V
C9 SMC1206 0.22 µF 100 V
CLVA SMC0805 20 pF LV
CLVB SMC0805 20 pF LV
CLVC SMC0805 20 pF LV
CLVD SMC0805 20 pF LV
Cm1 SMC0603 3.5 nF LV
Cm2 SMC0603 3.5 nF LV
Cm3 SMC0603 3.5 nF LV
Cm4 SMC0603 3.5 nF LV
Cp1 SMC0603 20 nF LV
Cp2 SMC0603 20 nF LV
Cp3 SMC0603 20 nF LV
Cp4 SMC0603 20 nF LV
Cs1 SMC1206 0.22 µF 100 V
R1 SM0805 10 kΩ LV
R10 SM2010 50 Ω 250 mW
R11 SM2010 50 Ω 250 mW
R12 SM2010 50 Ω 250 mW
R13 SM0805 75 Ω LV
R14 SM0805 75 Ω LV
R15 SM0805 75 Ω LV
R16 SM0805 75 Ω LV
R1ChA SM2512 200 Ω 2 W
R1ChB SM2512 200 Ω 2 W
(1)
R1ChC SM2512 200 Ω 2 W
R1ChD SM2512 200 Ω 2 W
Doc ID 17689 Rev 1 11/32
Page 12

PCB demo description AN3240
Table 3. Capacitances and resistances list (continued)
Name Type Value Class
R2 SM0805 10 kΩ LV
R2ChA SM2512 200 Ω 2 W
R2ChB SM2512 200 Ω 2 W
R2ChC SM2512 200 Ω 2 W
R2ChD SM2512 200 Ω 2 W
R3 SM2010 50 Ω 250 mW
R4 SM2010 50 Ω 250 mW
R5 SM2010 50 Ω 250 mW
R6 SM2010 50 Ω 250 mW
R7 SM2010 50 Ω 250 mW
R8 SM2010 50 Ω 250 mW
R9 SM2010 50 Ω 250 mW
RLVA SM0805 200 Ω LV
RLVB SM0805 200 Ω LV
RLVC SM0805 200 Ω LV
RLVD SM0805 200 Ω LV
C1 SMC1206 0.22 µF 100 V
C10 SMC1206 0.22 µF 100 V
C11 SMC1206 0.22 µF 100 V
C12 SMC1206 0.22 µF 100 V
C13 SMC1206 0.22 µF 100 V
C14 SMC1206 0.22 µF 100 V
C15 SMC1206 0.22 µF 100 V
C16 SMC1206 0.22 µF 100 V
C17 SMC0603 0.22 µF LV
C18 SMC0603 0.22 µF LV
C19 SMC0603 0.22 µF LV
C1ChA SMC0805 50 pF 100 V
C1ChB SMC0805 50 pF 100 V
C1ChC SMC0805 50 pF 100 V
C1ChD SMC0805 50 pF 100 V
C2 SMC1206 0.22 µF 100 V
C20 SMC0603 0.22 µF LV
C21 SMC0603 0.22 µF LV
C22 SMCVF 22 µF 100 V
12/32 Doc ID 17689 Rev 1
Page 13

AN3240 PCB demo description
Table 3. Capacitances and resistances list (continued)
Name Type Value Class
C23 SMCVF 22 µF 100 V
C24 SMCVF 22 µF 100 V
C25 SMCVF 22 µF 100 V
C26 SMCVC 22 µF 16 V
C27 SMCVC 22 µF 16 V
C28 SMCVC 22 µF 16 V
C2ChA SMC0805 250 pF 100 V
C2ChB SMC0805 250 pF 100 V
C2ChC SMC0805 250 pF 100 V
1. LV stands for Low voltage class
Figure 3. PCB top layout
Figure 4. C1 (CONN1) head connector description
Doc ID 17689 Rev 1 13/32
Page 14

PCB demo description AN3240
Table 4. C1 head connector pin vs STHV748 pinout
Channel
A
C
B
D
All channel 26 IN4 17
CN1-pin (head
connector)
31 IN1_A 63
33 IN2_A 62
14 IN3_A 61
34 IN1_C 31
23 IN2_C 30
17 IN3_C 29
9IN1_B18
13 IN2_B 19
15 IN3_B 20
1 IN1_D 50
5 IN2_D 51
19 IN3_D 52
STHV748 pin name STHV748 pin number
Figure 5. PCB demo image
14/32 Doc ID 17689 Rev 1
Page 15

AN3240 Operating supply conditions
5 Operating supply conditions
Table 5. DC working supply conditions
Operating supply voltages
Symbol Parameter Min Typ Max Value
VDDP Positive supply voltage 2.7 3 3.6 V
VDDM Negative supply voltage -2.7 -3 -3.6 V
VDD Positive logic voltage 2.4 3 Min(3.6,VDDP+0.3) V
HVP0 TX0 high voltage positive supply 95 V
HVP1 TX1 high voltage positive supply 95 V
HVM0 TX0 high voltage negative supply -95 V
HVM1 TX1 high voltage negative supply -95 V
Warning: The high voltage pins must be HVP0 ≥ HVP1 and HVM1 ≥
HVM0
Table 6. Current consumption in CW mode, @ 5 MHz, HVP/M1=±5 V, no-load
Current consumption
Symbol Parameter value
IVDDP Positive supply current 8.6 mA
IVDDM Negative supply current 13.5 mA
IDVDD Positive logic current 0.11 mA
IHVP1 TX1 high voltage positive supply current 14.5 mA
IHVM1 TX1 high voltage negative supply current 11 mA
Table 7. Power-up sequence
Power up sequence
1 VDDP
2VDDM or VDD
3 VDD or VDDM
4HVM0
5 HVP0
Doc ID 17689 Rev 1 15/32
Page 16

Operating supply conditions AN3240
Table 7. Power-up sequence (continued)
Power up sequence
6 HVM1 or HVP1
7 HVP1 or HVM1
Note: VDD: Logic voltage, 0 to 3 V (B5 conn.)
VDDP: Positive supply voltage 0 to 3 V (B6 conn.)
VDDM :Negative supply voltage -3 V to 0 (B7 conn.)
HVM0: TX0 high voltage negative supply, (B3 conn.)
HVP0:TX0 High voltage positive supply, (B1 conn.)
HVM1:TX1 high voltage negative supply, (B4 conn.)
HVP1:TX1 High voltage positive supply, (B2 conn.)
5.1 Load selection
It is possible to select the following load configuration for each channel (ChA/B/C/D) using
J1, J2, J3, and J4:
● 100 Ω // 300 pF
● 200 Ω // 50 pF
● 200 Ω // 250 pF
● No-load
Figure 6. Load configuration schematic
16/32 Doc ID 17689 Rev 1
Page 17

AN3240 Operating supply conditions
5.2 Fixed STHV748 pins on PCB demo
In order to clarify some special pin behavior, a short explanation is given:
EN allows the minimizing of the power consumption. If EN=0, the self-voltage reference is
not supplied. By supplying the reference externally, the total power consumption is reduced.
THSD is a thermal flag. The output stage of the THSD pin is a Nch-MOS open-drain, so it is
necessary to connect the external pull-up resistance (R2≥10 kΩ) to the positive low-voltage
supply (see Figure 2). If the internal temperature surpasses 160 °C, THSD goes down and
puts all the channels into HZ state. By externally forcing THSD to a positive low-voltage
supply, the thermal protection is disabled.
D_CTR can be used to optimize 2nd HD performance by tuning the fall propagation delay
(TDF - see the datasheet, STHV748; 5-level, ±90 V, 2 A high speed pulser with four
independent channels). If D_CTR is equal to ground, TDF has the nominal value. If D_CTR
is being varied from 2 V to 4.2 V, TDF can be changed from -1 ns to +600 ps, with respect to
the nominal value.
EXPOSED-PAD is internally connected to the substrate. It can be floating or connected to a
100 V capacitance toward ground, in order to reduce noise during the receiving phase. The
fixed configuration of the PCB application pins described is given in Tab le 8 .
Table 8. Special pin connections
Special pins on the PCB demo
Name Description Status on board
Enable pin
With EN=1, the IC internally generates the reference
voltages on REF_HVP1/0 (7, 10, 39, 42-pin) and
REF_HVM1/0 (2, 15, 34, 47-pin). These voltages are set
EN 64-pin
THSD 32-pin Thermal shutdown pin
D_CTR 16-pin Delay control pin Not active – forced directly to ground
EXPOSED-PAD Substrate
VDDP below HVP and VDDP above HVM, respectively:
REF_HVM# = HVM# + VDDP
REF_HVP# = HVP# - VDDP
When EN=0, it is required that an external voltage is
applied to REF_HVM# and REF_HVP# pins (see the
STHV748 datasheet).
Active – forced to 3 V through
R1=10 kΩ
Active – forced to 3 V through R2=10
kΩ. The user can monitor the THSD
status on TP1 (test point)
Not active – connected to ground
through Cs1=0.22 µF
Doc ID 17689 Rev 1 17/32
Page 18

Demonstration kit composition AN3240
6 Demonstration kit composition
There are essentially 3 methods to drive the STHV748 demo board, for each of them the
user must connect a custom PCB adapter, via the C1 connector, to drive the IC pulser.
6.1 Method 1 (flexible - based on BNC PCB adapter)
In this case, the demo board, described in Section 3, is being connected up, via the C1
connector, to a custom PCB adapter with 8 BNC connectors. A couple of BNC are dedicated
to IN1 and IN2 for each channel and usable for the external waveforms generator. In
addition, 2 switches are dedicated to connecting IN3 and IN4 to 0V or VDD, in accordance
with the truth table (see Tab l e 2 and Figure 8). The composition of the demonstration kit is
shown in Figure 7 and 9.
Figure 7. Demonstration kit composition (PCB demo plus BNC PCB adapter)
Figure 8. PCB adapter image, top layout and top schematic
18/32 Doc ID 17689 Rev 1
!-V
Page 19

AN3240 Demonstration kit composition
Figure 9. Demonstration kit system image
6.1.1 How to drive the STHV748 for method 1
The user simply needs a clock generator (or an AVG) in a way to drive pins IN1 and IN2 with
a proper time pulse width, consequently, it is possible to fix a truth table state for XDCR
using the 2 switches on the PCB adapter connected to VDD supply or GND, which control
IN3 and IN4. See the example diagram below (Figure 10):
Figure 10. Inputs set of generators for PW mode (4 cycles - TX0 pulser Chx)
,1
,1
9'&JHQHUDWRU
9'&JHQHUDWRU
([WHUQDOVHWRIJHQHUHWRUV
IRU3:PRGHF\FOHV
&+
&+
,1
,1
9
,1
,1
9
+93
;'&5
+90
7
7BFO
!-V
Note: The DC generators, shown in Figure 10, are symbolic, in the truth table the VDD voltage is
selected by the user through the J9 jumper on the PCB demo, which supplies the switches
on the PCB adapter.
In Figure 10, an example of a TX0 pulser in PW mode setting, is described. It is possible to
pass easily to a TX1 pulser PW mode in the same example shown in Figure 10, in fact, it is
enough to change the IN3 status, through the switch on the PCB adapter, from 0 to VDD
(IN4=0 - not touched). This simple commutation on switch IN3 allows 4 cycles for the TX1
pulser.
Doc ID 17689 Rev 1 19/32
Page 20

Demonstration kit composition AN3240
In the same manner the user fixes the other states, such as CW mode (IN3=VDD,
IN4=VDD) or MaxHV0 and HV1 mode (IN3=0, IN4=VDD), by just changing the switch
position on the PCB adapter.
The status of switches IN3 and IN4 is being monitored by two SMD LED diodes, for each
switch, on the PCB adapter (D1 red and D2 green close to IN3, D3 red and D4 green close
to IN4).
As shown in Figure 11, the red light near the switch indicates state 1 (when VDD voltage is
active, the switch button is in the left position) while the green light indicates state 0 (when 0
is active, the switch button is in the right position).
Figure 11. Diodes LED status on the PCB adapter which indicates IN4=1 and IN3=0
When the switch button is in the center position the status is on HZ.
6.2 Method 2 (use of the motherboard based on the STM3210EEVAL)
The demo kit, in this solution, is made up of a motherboard based on the STM3210E-EVAL
plus the PCB demo mentioned into Section 3 (see Figure 12). It doesn't require any manual
driving because the STM3210E-EVAL microcontroller is programmed to deliver some demo
patterns.
Figure 12. Demonstration kit based on the STM3210E-EVAL system
20/32 Doc ID 17689 Rev 1
Page 21

AN3240 Demonstration kit composition
Figure 13. Demonstration kit based on the STM3210E-EVAL system image
6.2.1 Motherboard communication setting
The STM3210E-EVAL system communicates with the PCB demo through the C1 connector,
following the signal setting represented in Figure 14.
Figure 14. STM3210E-EVAL pin connection
Table 9. STM3210E-EVAL pin configuration table
Channel
A
Gates
(motherboard side)
PA 0 3 1 I N1 _ A 6 3
PA 1 3 3 I N2 _ A 6 2
PC0 14 IN3_A 61
CN1-pin
(motherboard side)
STHV748 pin name STHV748 pin number
Doc ID 17689 Rev 1 21/32
Page 22

Demonstration kit composition AN3240
Table 9. STM3210E-EVAL pin configuration table (continued)
Channel
C
B
D
All
channel
Gates
(motherboard side)
PA 2 3 4 I N 1 _C 3 1
PA 3 2 3 I N 2 _C 3 0
PC2 17 IN3_C 29
PB0 9 IN1_B 18
PB1 13 IN2_B 19
PC1 15 IN3_B 20
PA 6 1 I N 1_ D 5 0
PA 7 5 I N 2_ D 5 1
PC3 19 IN3_D 52
PC5 26 IN4 17
CN1-pin
(motherboard side)
STHV748 pin name STHV748 pin number
6.2.2 Motherboard driving performance for the PCB demo
The STM3210E-EVAL demonstration board (motherboard) has been programmed to show
the STHV748’s main functions. In particular, the firmware installed into the internal memory
allows the PCB demo to be driven in a way that the STHV748 pulser performs an example
of three work conditions:
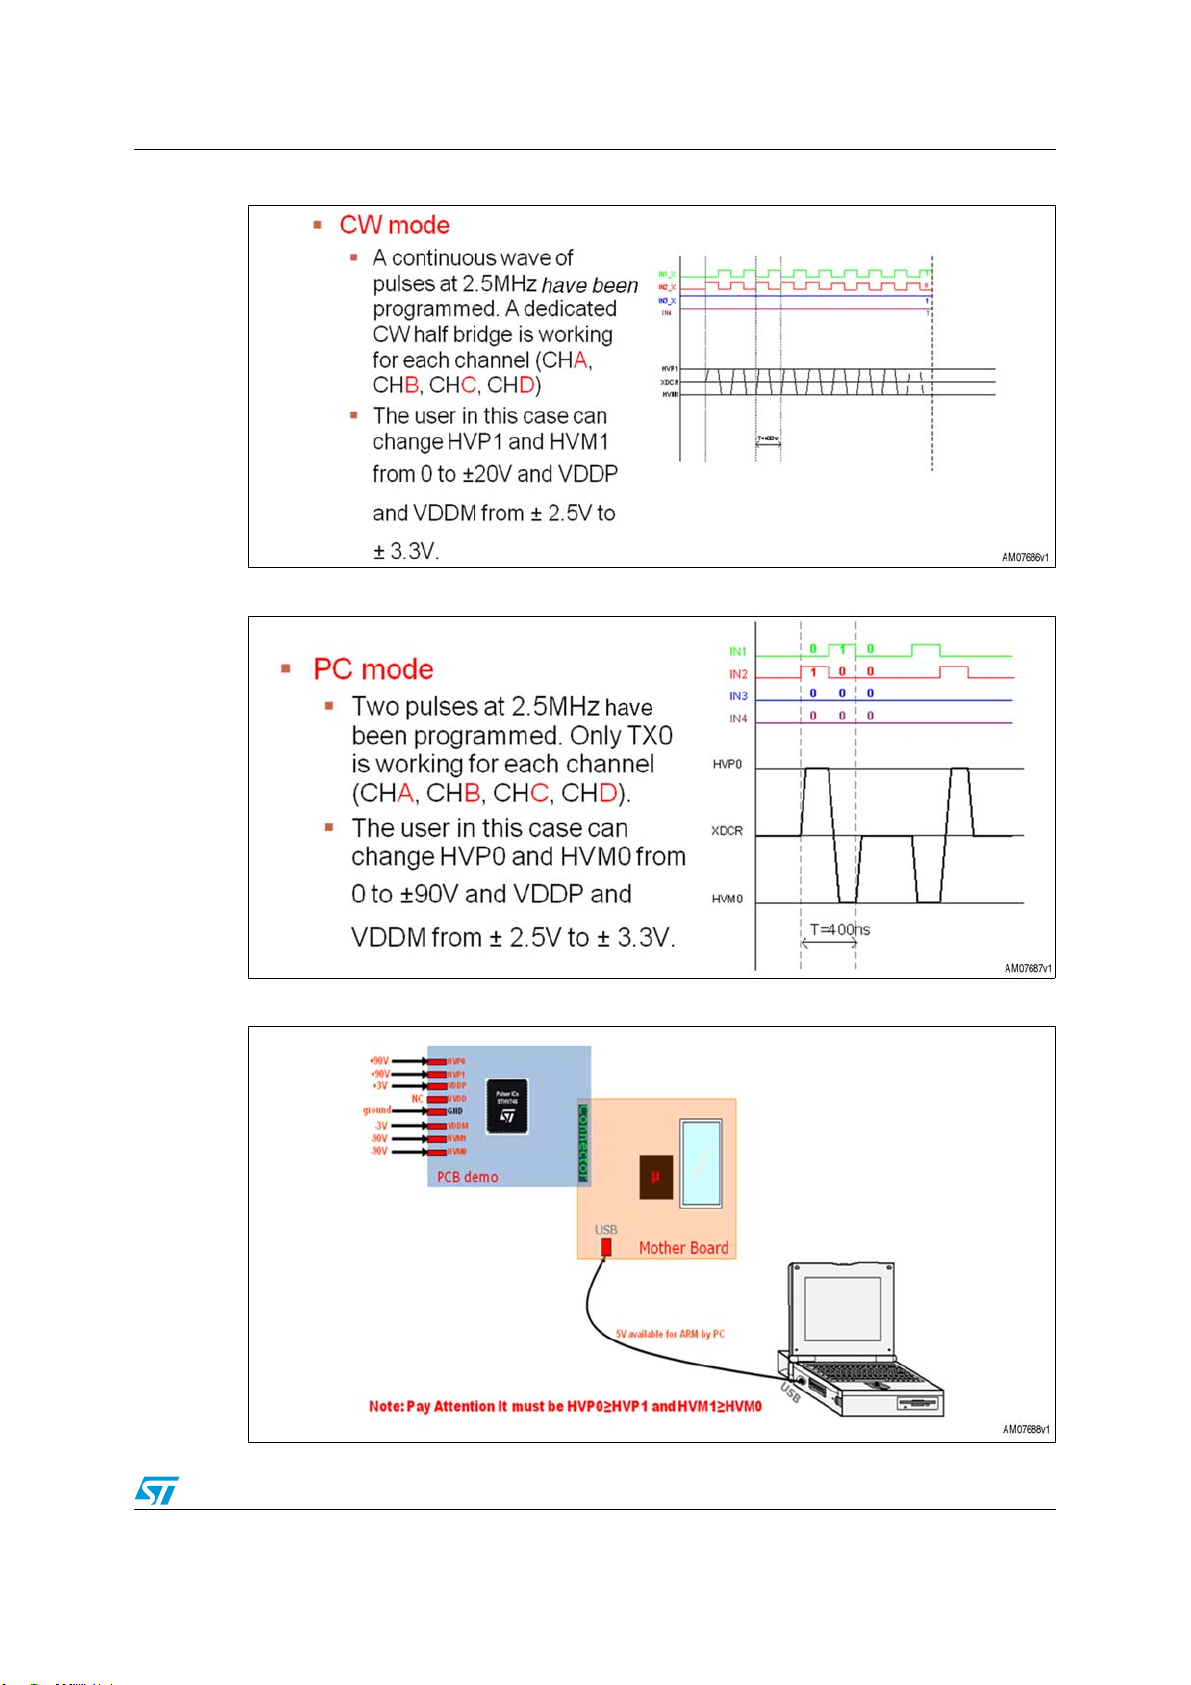
● Pulse wave mode (PW), (see Figure 15)
● Continuous wave mode (CW), (see Figure 16)
● Pulse cancellation mode (PC), (see Figure 17)
Figure 15. PW mode functions
22/32 Doc ID 17689 Rev 1
Page 23
AN3240 Demonstration kit composition
Figure 16. CW mode functions
Figure 17. PC mode functions
Figure 18. Supply connection for demonstration kit with the STM3210E-EVAL
Doc ID 17689 Rev 1 23/32
Page 24

Demonstration kit composition AN3240
6.2.3 Turn on demo system
1. First step:
Connect all supplies as indicated in Figure 18 based on the following power up sequence
(see Ta bl e 7):
– 1st USB connection (power supply for the motherboard and digital supply DVDD
for the STHV748)
– 2nd analog low voltage connections for the daughter board (VDDP=+3 V,
VDDM=-3 V)
– 3rd high voltage power supply connections for the daughter board (HVP0/1=+90 V,
HVM0/1=-90 V)
2. Second step:
– After the power supply connections, the onboard display appears as follows
(Figure 19):
Figure 19. Main menu on STM3210E-EVAL display
3. Third step:
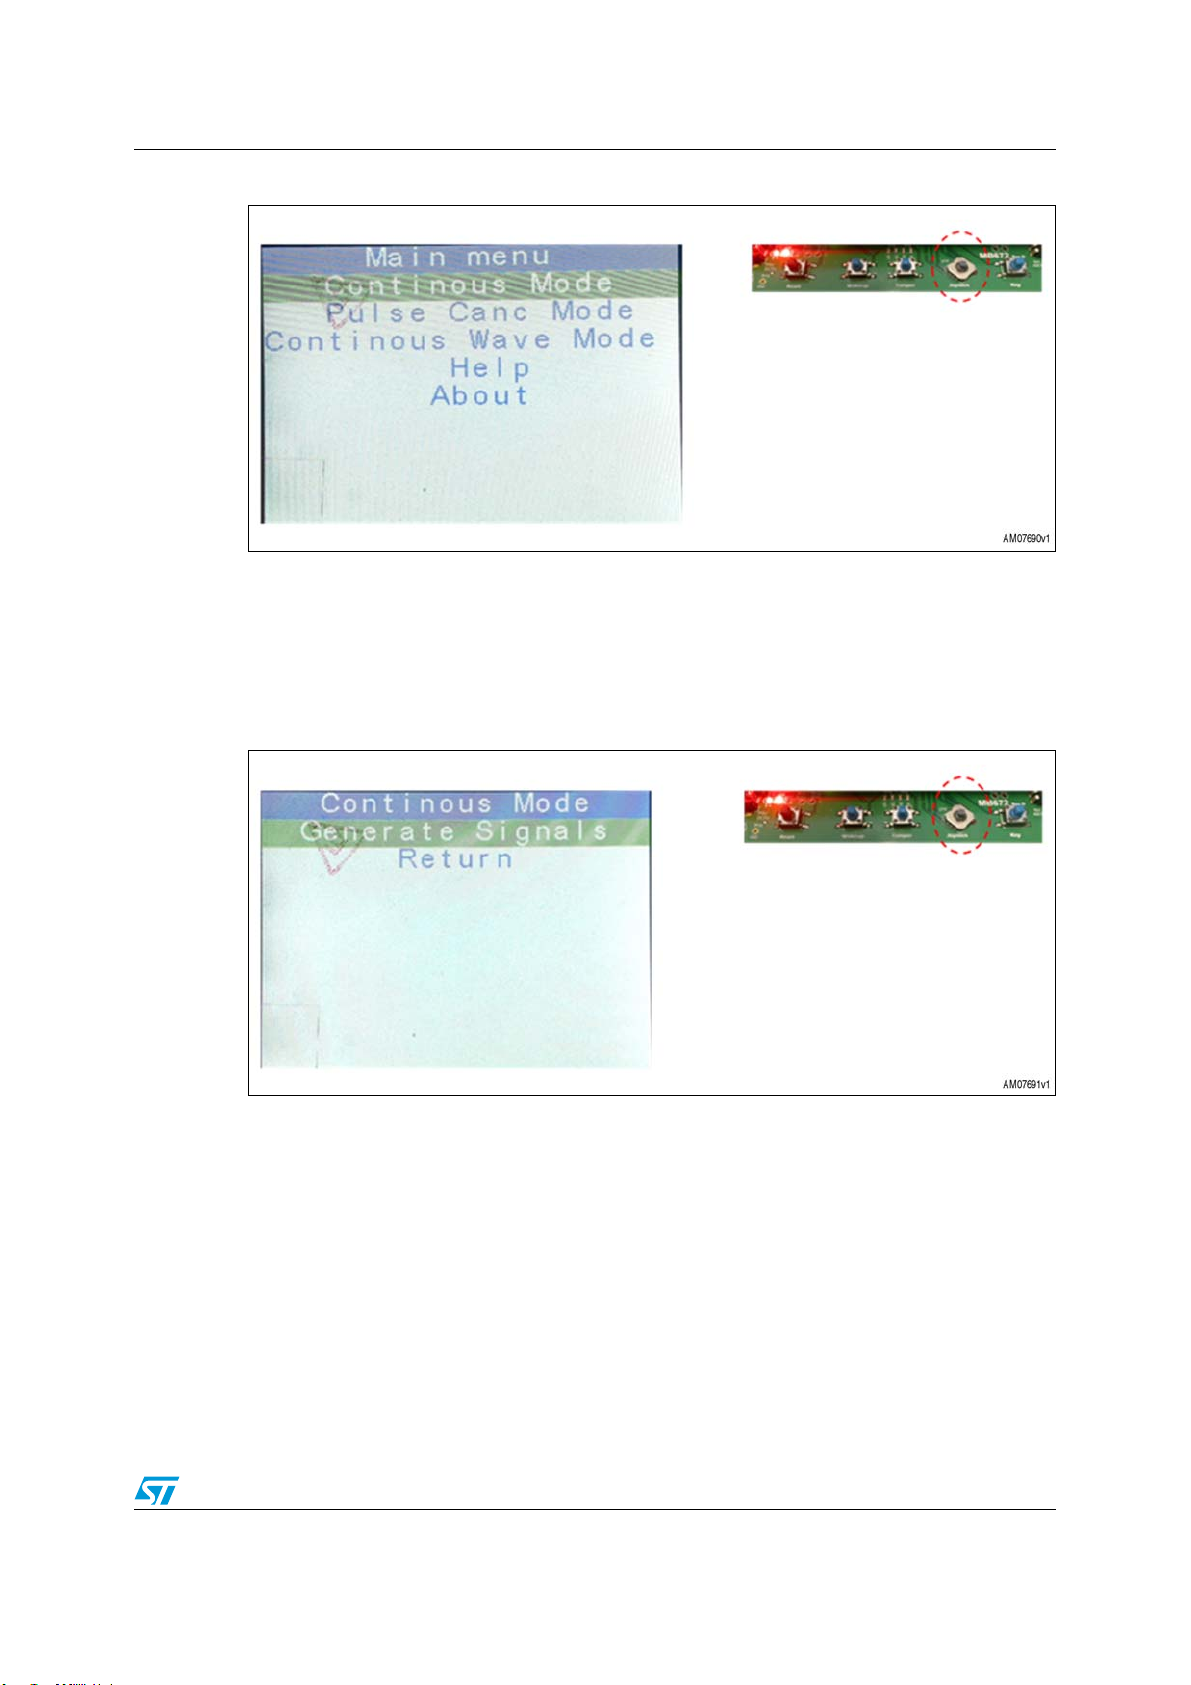
– By moving the “Joystick” key up and down the user can select one of the three
modes available (PW, CW or PC mode) in the “Main menu”. When the user has
selected a mode the Joystick key must be pressed to descend into the mode menu
(see Figure 20).
24/32 Doc ID 17689 Rev 1
Page 25
AN3240 Demonstration kit composition
Figure 20. Main menu selection on the STM3210E-EVAL display
– Assuming that the user has descended into the “Continuous Mode” menu, it is
possible to manage the PW mode. In fact, by moving the Joystick key “Generate
Signals” can be selected (see Figure 21). The Joystick key must now be pressed
to run the PW mode function. If the user wants to change the choice, it is enough
to select and press “Return” to go to the main menu and choose another function,
such as CW or PC.
Figure 21. Example of “Continuous Mode” selection on the STM3210E-EVAL display
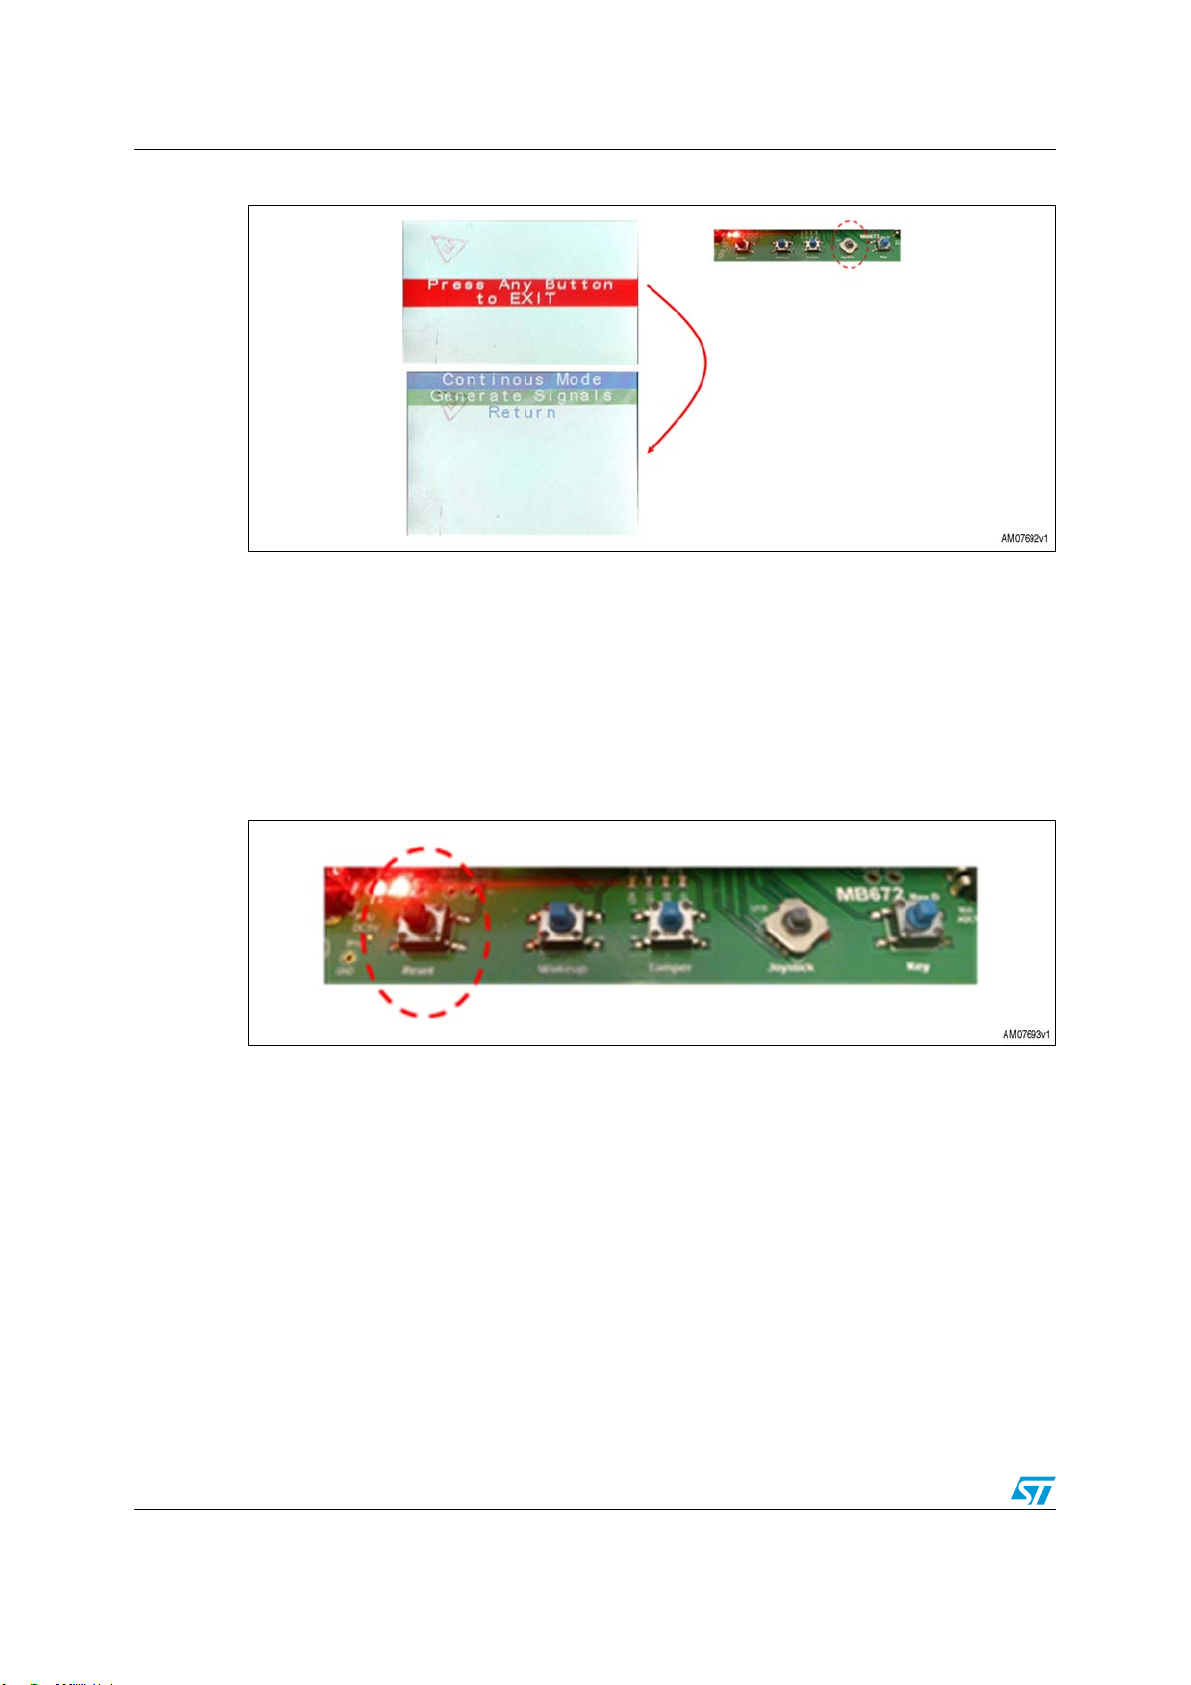
– After having run the mode, the user can stop the “Continuous Mode” and return to
the previous menu just by pressing the Joystick key on the board (see Figure 22).
Doc ID 17689 Rev 1 25/32
Page 26
Demonstration kit composition AN3240
Figure 22. Exit the mode selected on the STM3210E-EVAL display
6.2.4 Turn off demo system
4. Fourth step
Demo off can be executed by following the power down sequence:
– 1st high voltage power off (HVP0/1=+90 V, HVM0/1=-90 V)
– 2nd low voltage power off (VDDP=+3 V, VDDM=-3 V)
– 3rd unplug the USB connection (power off supply for the motherboard)
Figure 23. Reset key on the STM3210E-EVAL
26/32 Doc ID 17689 Rev 1
Page 27

AN3240 Demonstration kit composition
6.2.5 Acquisition examples of PW, CW and PC mode
Figure 24. PW mode (HVP0=60 V HVM0=-60 V 100 Ω//300 pF)
Figure 25. CW mode HVP1=5 V HVM1=-5 V 100 Ω//300 pF
Doc ID 17689 Rev 1 27/32
Page 28

Demonstration kit composition AN3240
Figure 26. CW mode HVP1=10 V HVM1=-10 V 100 Ω//300 pF
Figure 27. PC mode HVP0=60 V HVM0=-60 V 100 Ω//300 pF
28/32 Doc ID 17689 Rev 1
Page 29
AN3240 Demonstration kit composition
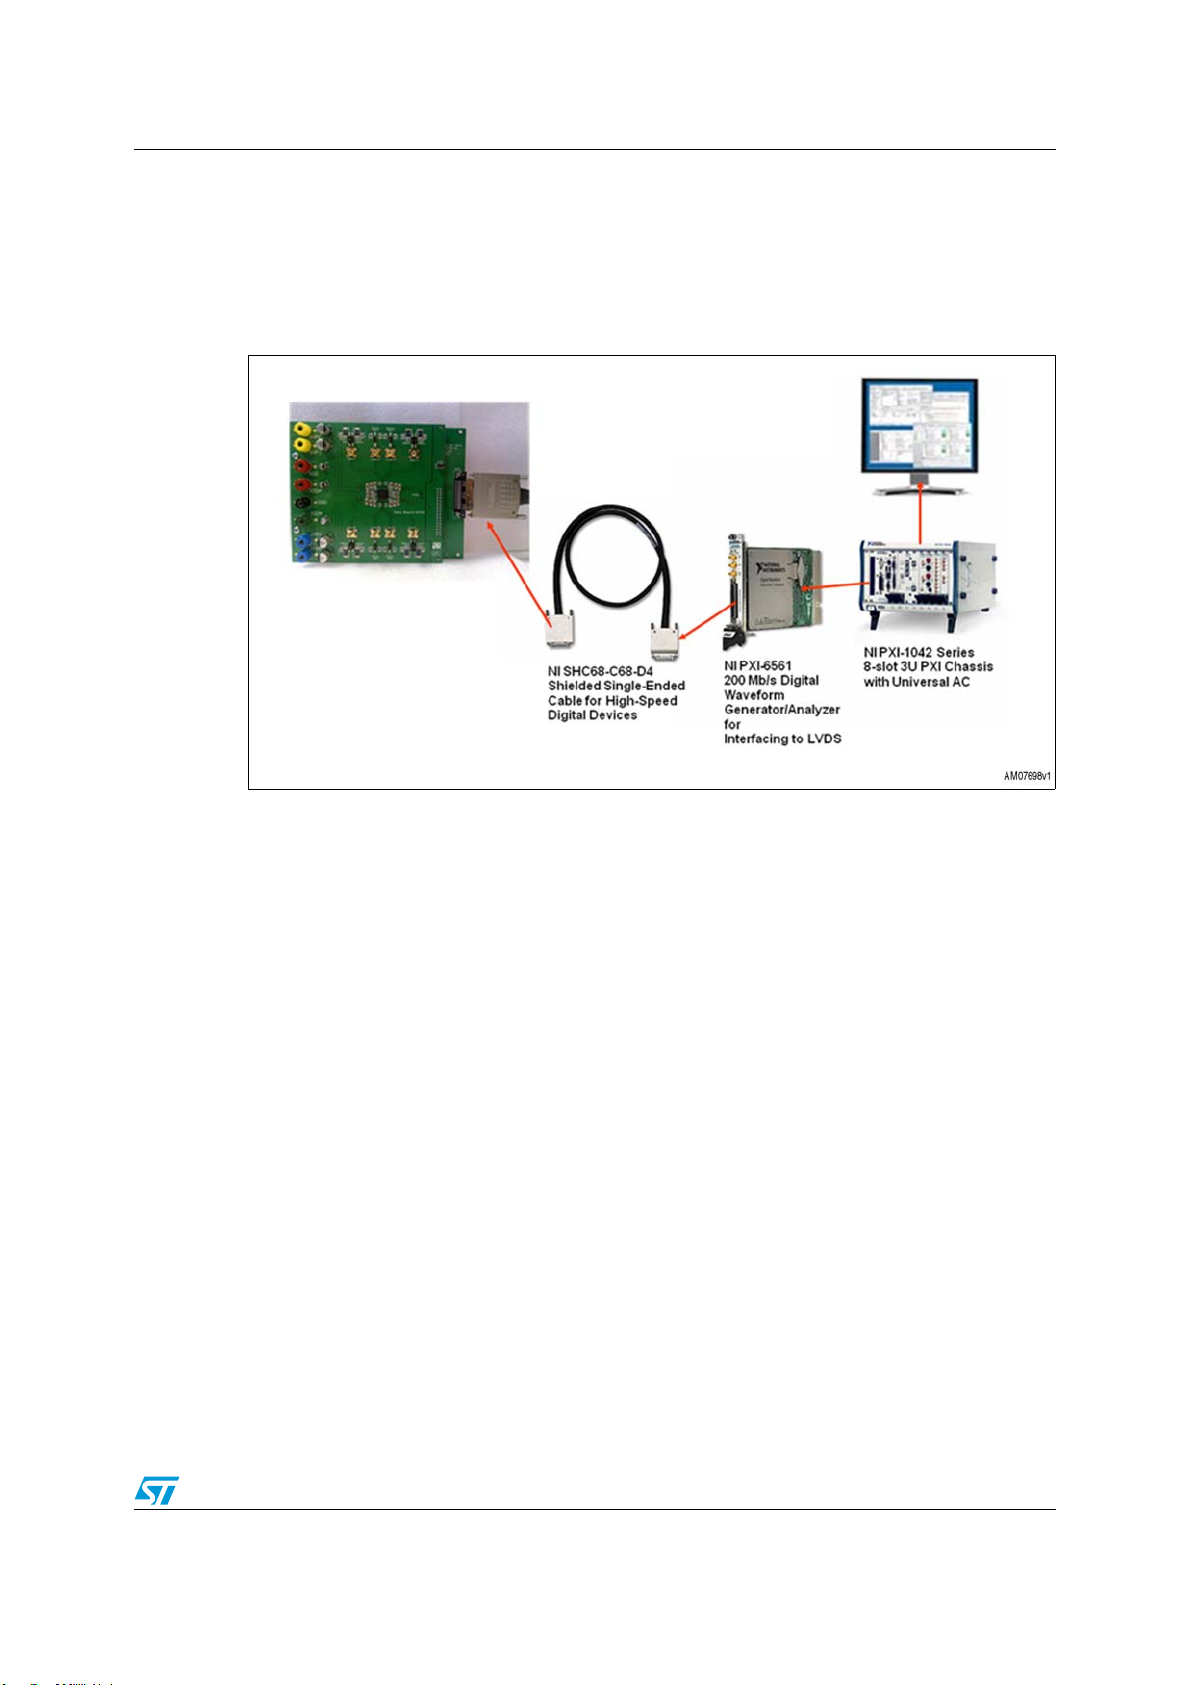
6.3 Method 3 (LabView interface - use of the HSDIO PCB connector)
The user, who has the possibility of using LabView equipment, as shown in Figure 28, can
evaluate the STHV748 detailed functions.
Figure 28. LabView equipment used to develop the STHV749
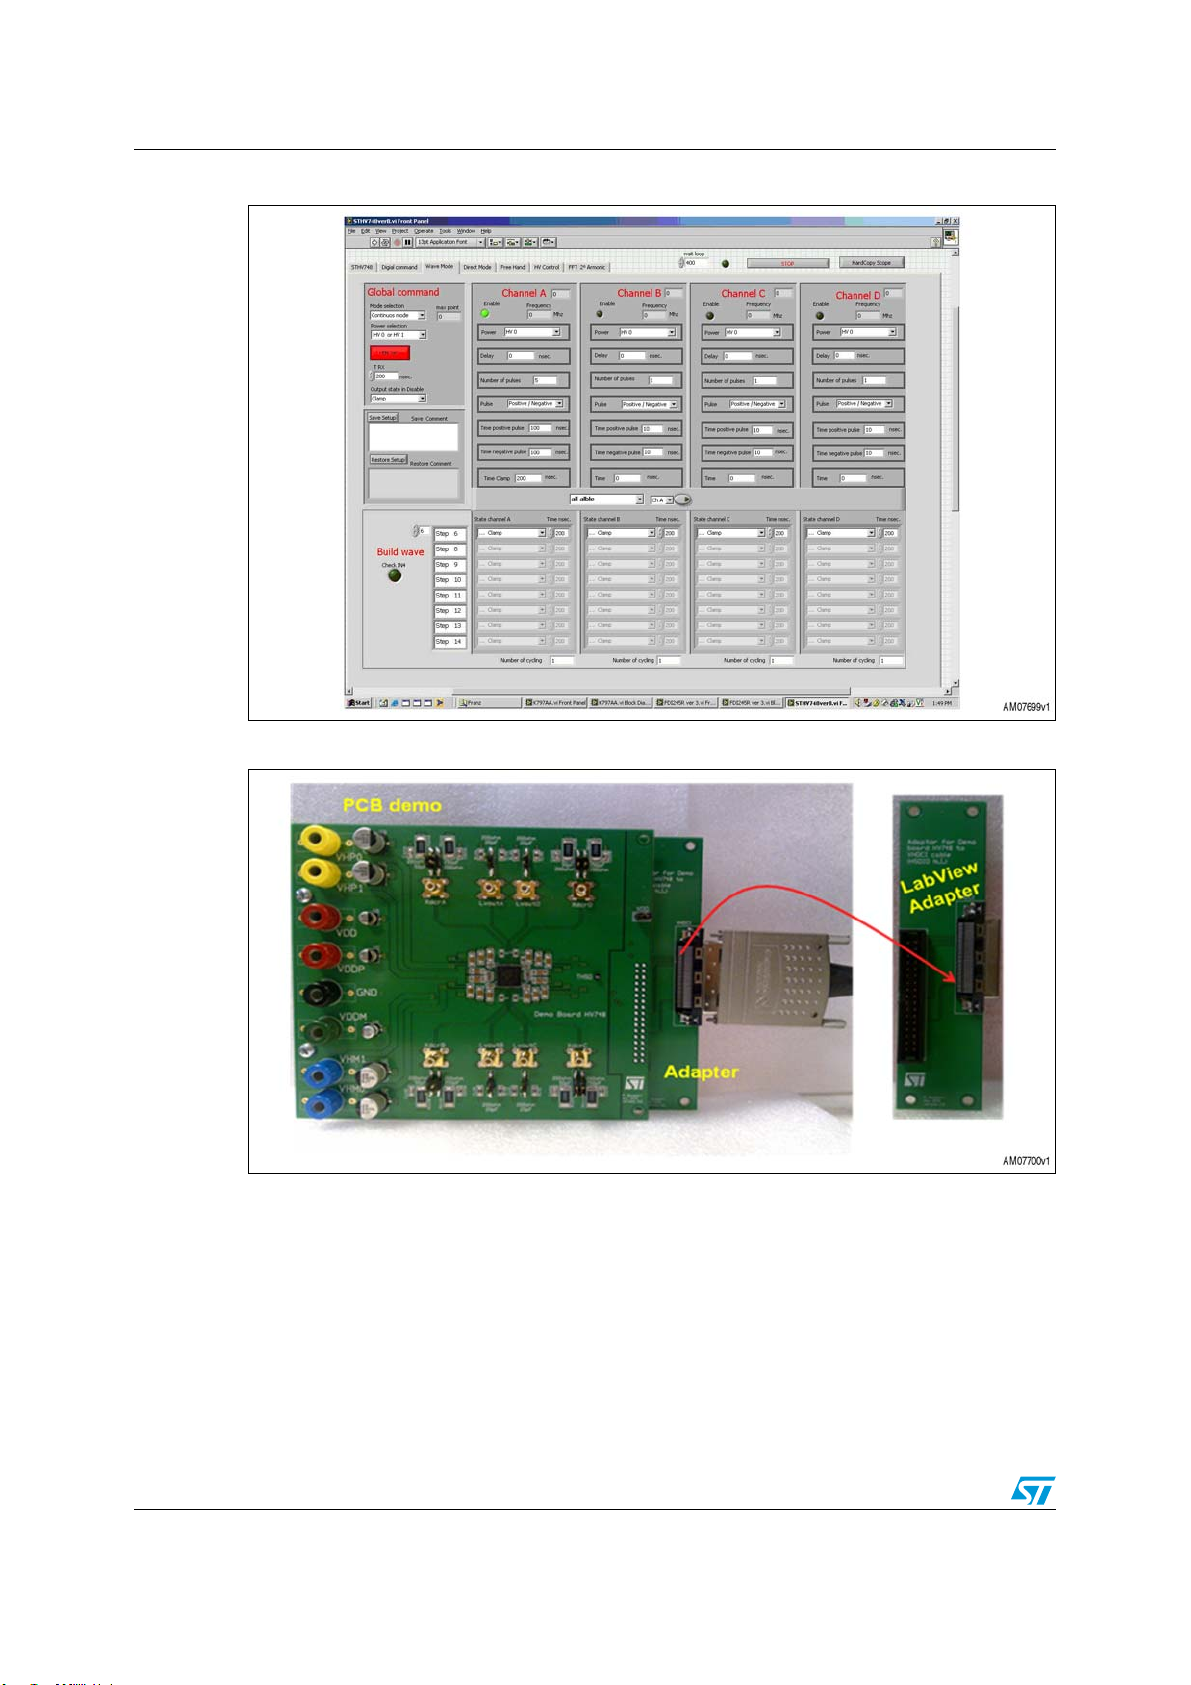
In this case, customized software has been developed (STHV748.vi) to manage all
channels in such a way as to test them in several working conditions (see the PC display -
Figure 29).
In the case of the user having the LabView chain, previously mentioned, it's possible to
connect the PCB demo to the LabView system through a PCB connector shown in
Figure 30.
Doc ID 17689 Rev 1 29/32
Page 30
Demonstration kit composition AN3240
Figure 29. STHV748 LabView PC control panel
Figure 30. STHV748 demo system for LabView evaluation
30/32 Doc ID 17689 Rev 1
Page 31

AN3240 Revision history
7 Revision history
Table 10. Document revision history
Date Revision Changes
21-Dec-2010 1 Initial release.
Doc ID 17689 Rev 1 31/32
Page 32

AN3240
Please Read Carefully:
Information in this document is provided solely in connection with ST products. STMicroelectronics NV and its subsidiaries (“ST”) reserve the
right to make changes, corrections, modifications or improvements, to this document, and the products and services described herein at any
time, without notice.
All ST products are sold pursuant to ST’s terms and conditions of sale.
Purchasers are solely responsible for the choice, selection and use of the ST products and services described herein, and ST assumes no
liability whatsoever relating to the choice, selection or use of the ST products and services described herein.
No license, express or implied, by estoppel or otherwise, to any intellectual property rights is granted under this document. If any part of this
document refers to any third party products or services it shall not be deemed a license grant by ST for the use of such third party products
or services, or any intellectual property contained therein or considered as a warranty covering the use in any manner whatsoever of such
third party products or services or any intellectual property contained therein.
UNLESS OTHERWISE SET FORTH IN ST’S TERMS AND CONDITIONS OF SALE ST DISCLAIMS ANY EXPRESS OR IMPLIED
WARRANTY WITH RESPECT TO THE USE AND/OR SALE OF ST PRODUCTS INCLUDING WITHOUT LIMITATION IMPLIED
WARRANTIES OF MERCHANTABILITY, FITNESS FOR A PARTICULAR PURPOSE (AND THEIR EQUIVALENTS UNDER THE LAWS
OF ANY JURISDICTION), OR INFRINGEMENT OF ANY PATENT, COPYRIGHT OR OTHER INTELLECTUAL PROPERTY RIGHT.
UNLESS EXPRESSLY APPROVED IN WRITING BY AN AUTHORIZED ST REPRESENTATIVE, ST PRODUCTS ARE NOT
RECOMMENDED, AUTHORIZED OR WARRANTED FOR USE IN MILITARY, AIR CRAFT, SPACE, LIFE SAVING, OR LIFE SUSTAINING
APPLICATIONS, NOR IN PRODUCTS OR SYSTEMS WHERE FAILURE OR MALFUNCTION MAY RESULT IN PERSONAL INJURY,
DEATH, OR SEVERE PROPERTY OR ENVIRONMENTAL DAMAGE. ST PRODUCTS WHICH ARE NOT SPECIFIED AS "AUTOMOTIVE
GRADE" MAY ONLY BE USED IN AUTOMOTIVE APPLICATIONS AT USER’S OWN RISK.
Resale of ST products with provisions different from the statements and/or technical features set forth in this document shall immediately void
any warranty granted by ST for the ST product or service described herein and shall not create or extend in any manner whatsoever, any
liability of ST.
ST and the ST logo are trademarks or registered trademarks of ST in various countries.
Information in this document supersedes and replaces all information previously supplied.
The ST logo is a registered trademark of STMicroelectronics. All other names are the property of their respective owners.
© 2010 STMicroelectronics - All rights reserved
STMicroelectronics group of companies
Australia - Belgium - Brazil - Canada - China - Czech Republic - Finland - France - Germany - Hong Kong - India - Israel - Italy - Japan -
Malaysia - Malta - Morocco - Philippines - Singapore - Spain - Sweden - Switzerland - United Kingdom - United States of America
www.st.com
32/32 Doc ID 17689 Rev 1
 Loading...