

Page 1

AN2868
Application note
STM32F10xxx
internal RC oscillator (HSI) calibration
Introduction
The STM32F10xxx microcontrollers offer the possibility of running from an internal RC
oscillator (HSI: high-speed internal oscillator of 8 MHz, typically). At 25 °C, the HSI has an
accuracy of ±1% typically. In the range of –40 to 105 °C, the accuracy value of the RC
frequency increases to the maximum value of ±3%. Temperature therefore has an impact on
RC accuracy.
To compensate for the influence of temperature in the application, the output frequency of
the STM32F10xxx HSI oscillator can be further trimmed by the user runtime calibration
routine to improve the HSI frequency accuracy. This may prove crucial for communication
peripherals.
This application note gives two methods of calibrating the internal RC oscillator: finding the
frequency with the minimum error or finding the maximum allowed frequency error. Both are
implemented by providing an accurate reference source such as an RTC/64 signal or a
mains source signal.
Both methods are based on the same technique: computing of the RC frequency vs. the
reference frequency, computing of the HSI frequency error and setting of the HSITRIM bits
in the RCC_CR register.
February 2009 Rev 1 1/22
www.st.com
Page 2

Contents AN2868
Contents
1 STM32F10xxx’s internal clock: HSI clock . . . . . . . . . . . . . . . . . . . . . . . . 5
1.1 Calibration . . . . . . . . . . . . . . . . . . . . . . . . . . . . . . . . . . . . . . . . . . . . . . . . . 5
2 RC calibration . . . . . . . . . . . . . . . . . . . . . . . . . . . . . . . . . . . . . . . . . . . . . . 6
2.1 Principle of calibration . . . . . . . . . . . . . . . . . . . . . . . . . . . . . . . . . . . . . . . . 6
2.2 Hardware implementation . . . . . . . . . . . . . . . . . . . . . . . . . . . . . . . . . . . . . 7
2.2.1 Case where RTC/64 is used as the reference frequency: 512 Hz . . . . . . 7
2.2.2 Case where the mains frequency is used as the reference frequency:
50 Hz/60 Hz . . . . . . . . . . . . . . . . . . . . . . . . . . . . . . . . . . . . . . . . . . . . . . . 7
3 Description of the RC calibration library . . . . . . . . . . . . . . . . . . . . . . . . 9
3.1 HSI_FreqMeasure() function . . . . . . . . . . . . . . . . . . . . . . . . . . . . . . . . . 9
3.2 HSI_CalibrateMinError() function . . . . . . . . . . . . . . . . . . . . . . . . . 11
3.3 HSI_CalibrateFixedError() function . . . . . . . . . . . . . . . . . . . . . . . 13
3.4 Calibration demo description . . . . . . . . . . . . . . . . . . . . . . . . . . . . . . . . . . 16
3.5 Recommendations on the use of the HSI calibration library . . . . . . . . . . 17
4 Calibration process performance . . . . . . . . . . . . . . . . . . . . . . . . . . . . . 18
4.1 Accuracy of frequency measurements . . . . . . . . . . . . . . . . . . . . . . . . . . . 18
4.2 Duration of the calibration process . . . . . . . . . . . . . . . . . . . . . . . . . . . . . . 18
5 Conclusion . . . . . . . . . . . . . . . . . . . . . . . . . . . . . . . . . . . . . . . . . . . . . . . . 20
6 Revision history . . . . . . . . . . . . . . . . . . . . . . . . . . . . . . . . . . . . . . . . . . . 21
2/22
Page 3

AN2868 List of tables
List of tables
Table 1. Component values when using the mains frequency as the reference . . . . . . . . . . . . . . . . 8
Table 2. RC frequency accuracy vs. reference frequency accuracy . . . . . . . . . . . . . . . . . . . . . . . . 18
Table 3. Document revision history . . . . . . . . . . . . . . . . . . . . . . . . . . . . . . . . . . . . . . . . . . . . . . . . . 21
3/22
Page 4

List of figures AN2868
List of figures
Figure 1. Quantification of the reference signal period (RTC signal) . . . . . . . . . . . . . . . . . . . . . . . . . . 6
Figure 2. Hardware connection using RTC/64 as a source for calibration. . . . . . . . . . . . . . . . . . . . . . 7
Figure 3. Hardware connection in the AC mains calibration method . . . . . . . . . . . . . . . . . . . . . . . . . . 8
Figure 4. RC frequency measurement flowchart . . . . . . . . . . . . . . . . . . . . . . . . . . . . . . . . . . . . . . . . 10
Figure 5. RC calibration flowchart: finding the minimum frequency error . . . . . . . . . . . . . . . . . . . . . 12
Figure 6. “Spring loop” . . . . . . . . . . . . . . . . . . . . . . . . . . . . . . . . . . . . . . . . . . . . . . . . . . . . . . . . . . . . 13
Figure 7. RC calibration flowchart: calibration with the maximum allowed frequency error. . . . . . . . 15
4/22
Page 5

AN2868 STM32F10xxx’s internal clock: HSI clock
1 STM32F10xxx’s internal clock: HSI clock
The HSI clock signal is generated from an internal 8 MHz RC oscillator and can be used
directly as a system clock or divided by 2 to be used as a PLL input. The HSI RC oscillator
has the advantage of providing a clock source at low cost (no external components). It also
has a faster startup time than the HSE crystal oscillator. However, even with calibration the
frequency is less accurate than an external crystal oscillator or ceramic resonator. The HSI
signal can also be used as a backup source (auxiliary clock) if the HSE crystal oscillator
fails.
1.1 Calibration
RC oscillator frequencies may vary from one chip to another due to manufacturing process
variations. For this reason, each device is factory-calibrated by ST for 1% accuracy at T
25 °C.
After reset, the factory calibration value is loaded into the HSICAL[7:0] bits in the clock
control register RCC_CR.
User calibration is performed by setting the HSITRIM[4:0] bits in the RCC_CR register.
These
bits can be programmed to take into account voltage and temperature variations that
affect the frequency of the internal HSI RC oscillator. The default value is 16, which, when
added to the HSICAL value, should trim the HSI to 8 MHz ±1%. The trimming step (F
is around 40 kHz between two consecutive HSICAL steps.
=
A
hsitrim
)
5/22
Page 6
RC calibration AN2868
TimerPeriodCount N 1–()65535× Capture1+=
Frequency
RC
TimerPeriodCount Frequency
Ref
×=
Error Hz() FrequencyRC8000000–=
2 RC calibration
2.1 Principle of calibration
The principle of calibration consists in first measuring the HSI frequency, then computing the
frequency error, and finally setting the HSITRIM bits in the RCC_CR register.
The HSI frequency is not measured directly, but it is estimated from the number of HSI clock
pulses counted using a timer, and compared to an ideal value: 8 000 000 Hz. To do so, a
very accurate reference frequency must be available such as the RTC/64 signal provided by
the external 32 kHz crystal or the 50 Hz/60 Hz of the mains (refer to Section 2.2.2). In the
case of an RTC clock source, the reference frequency is equal to 512 Hz (32768 Hz/64).
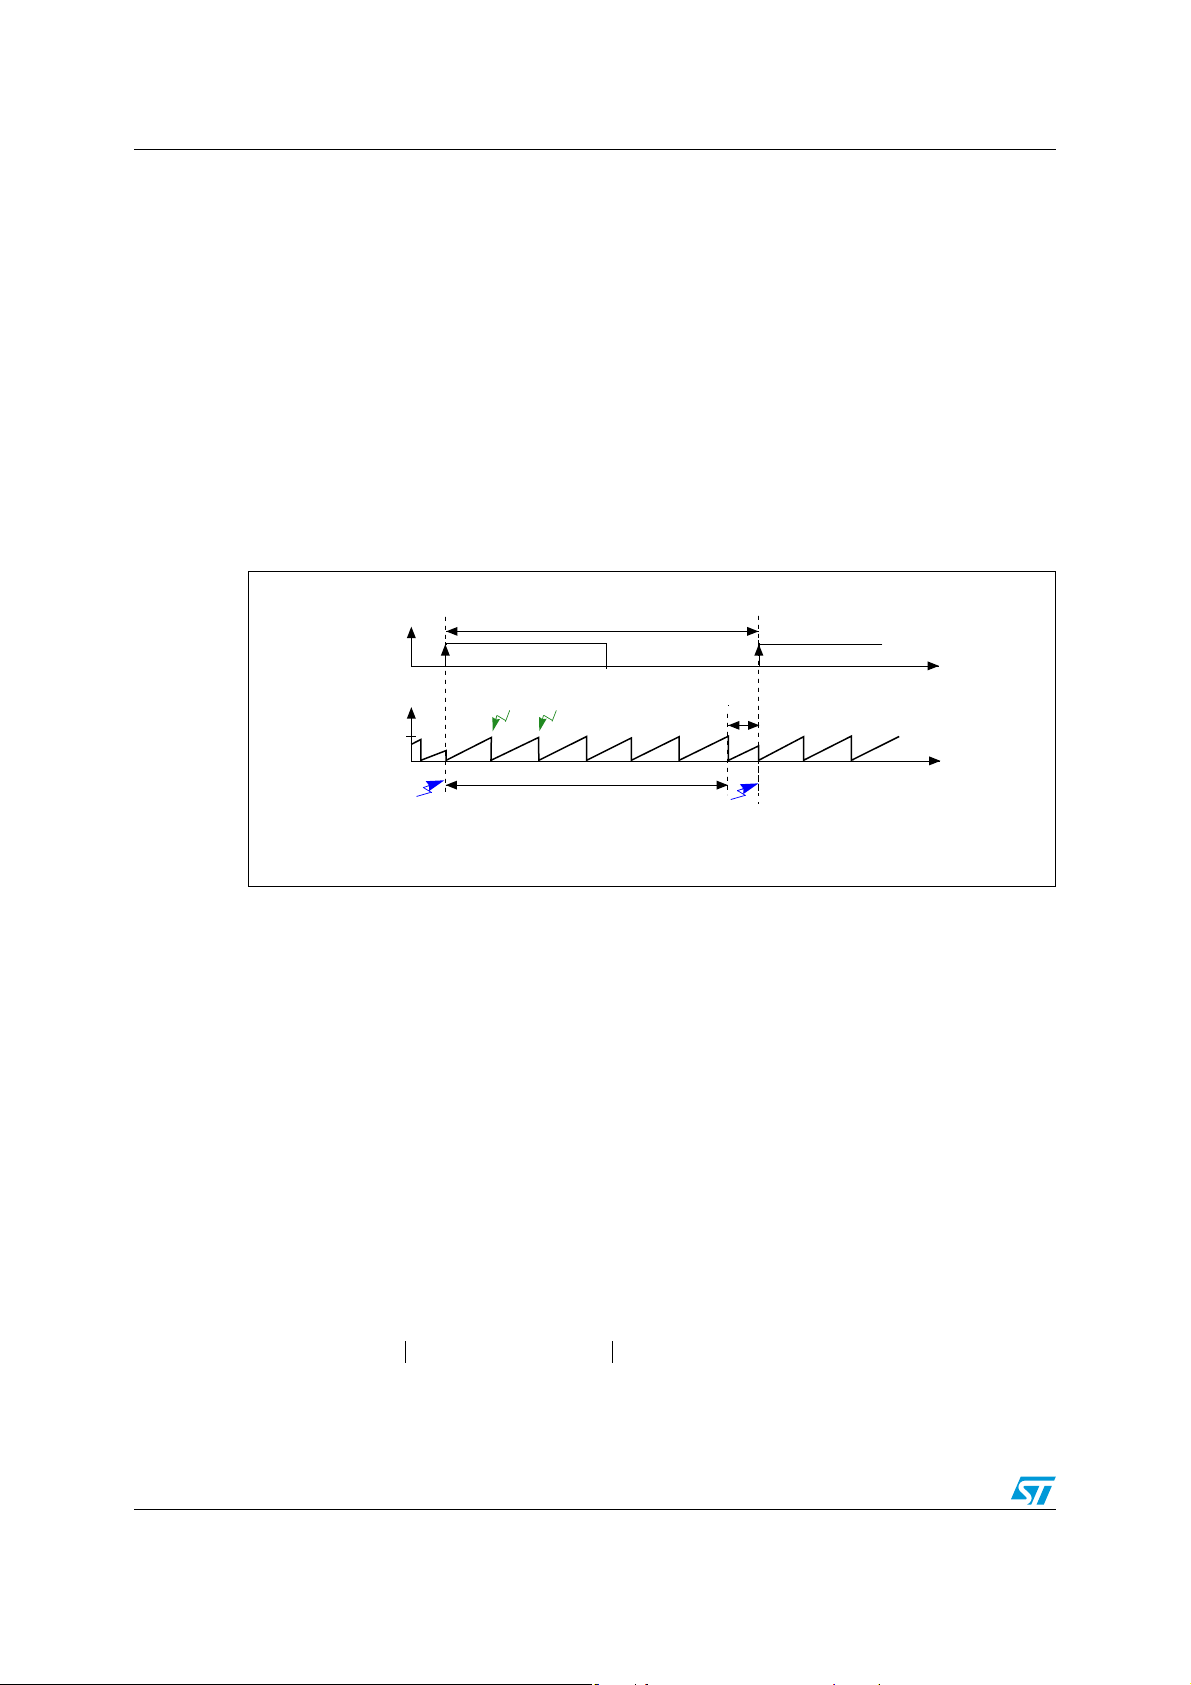
Figure 1 shows how the reference signal period is measured in number of timer counts.
Figure 1. Quantification of the reference signal period (RTC signal)
Reference
signal
TIMx
counter
0xFFFF
0x0
Capture compare 1 interrupt on rising edge
+ update event interrupt
N: number of counter overflows
Only Update event interrupt
1/Frequency
(N –1) × 65535
Ref
Capture 1 value
Capture compare 1 interrupt on rising edge
+ update event interrupt
ai15840
On each rising edge, two interrupts occur: capture compare 1 interrupt and update event
interrupt. The latter is used to count the number of counter overflows over a reference signal
period. Since both interrupts occur at the same time at the beginning of every new period,
an extra overflow occurs. This is the reason why we have to subtract 1 from the number of
counter overflows: N – 1.
Thus the number of counted HSI clock pulses is given as follows:
, where:
– N is the number of timer overflows during one period of the reference frequency
– Capture1 is the value read from the timer CCR1 register.
Since the timer is clocked by the internal RC, the microcontroller can compute the real
frequency generated by the HSI versus the reference frequency.
6/22
The error (in Hz) is computed as the absolute value of the difference between the RC
frequency (Frequency
) and 8 000 000 Hz.
RC
Hence the RC frequency error is expressed as:
.
After calculating the error, the algorithm determines the calibration value that has to be
written to the HSITRIM bits in the RCC_CR register (refer to Section 3 for more details).
Page 7
AN2868 RC calibration
2.2 Hardware implementation
2.2.1 Case where RTC/64 is used as the reference frequency: 512 Hz
The STM32F10xxx can output the RTC signal divided by 64 onto GPIO PC13 (TAMPERRTC pin). The TAMPER-RTC signal can be used as the reference frequency for RC
calibration. For that purpose, this pin must be configured as alternate function push-pull and
be connected to a timer channel input.
Note: In the rest of this application note, the channel used will be timer 3 channel 1 (TIM3_CH1).
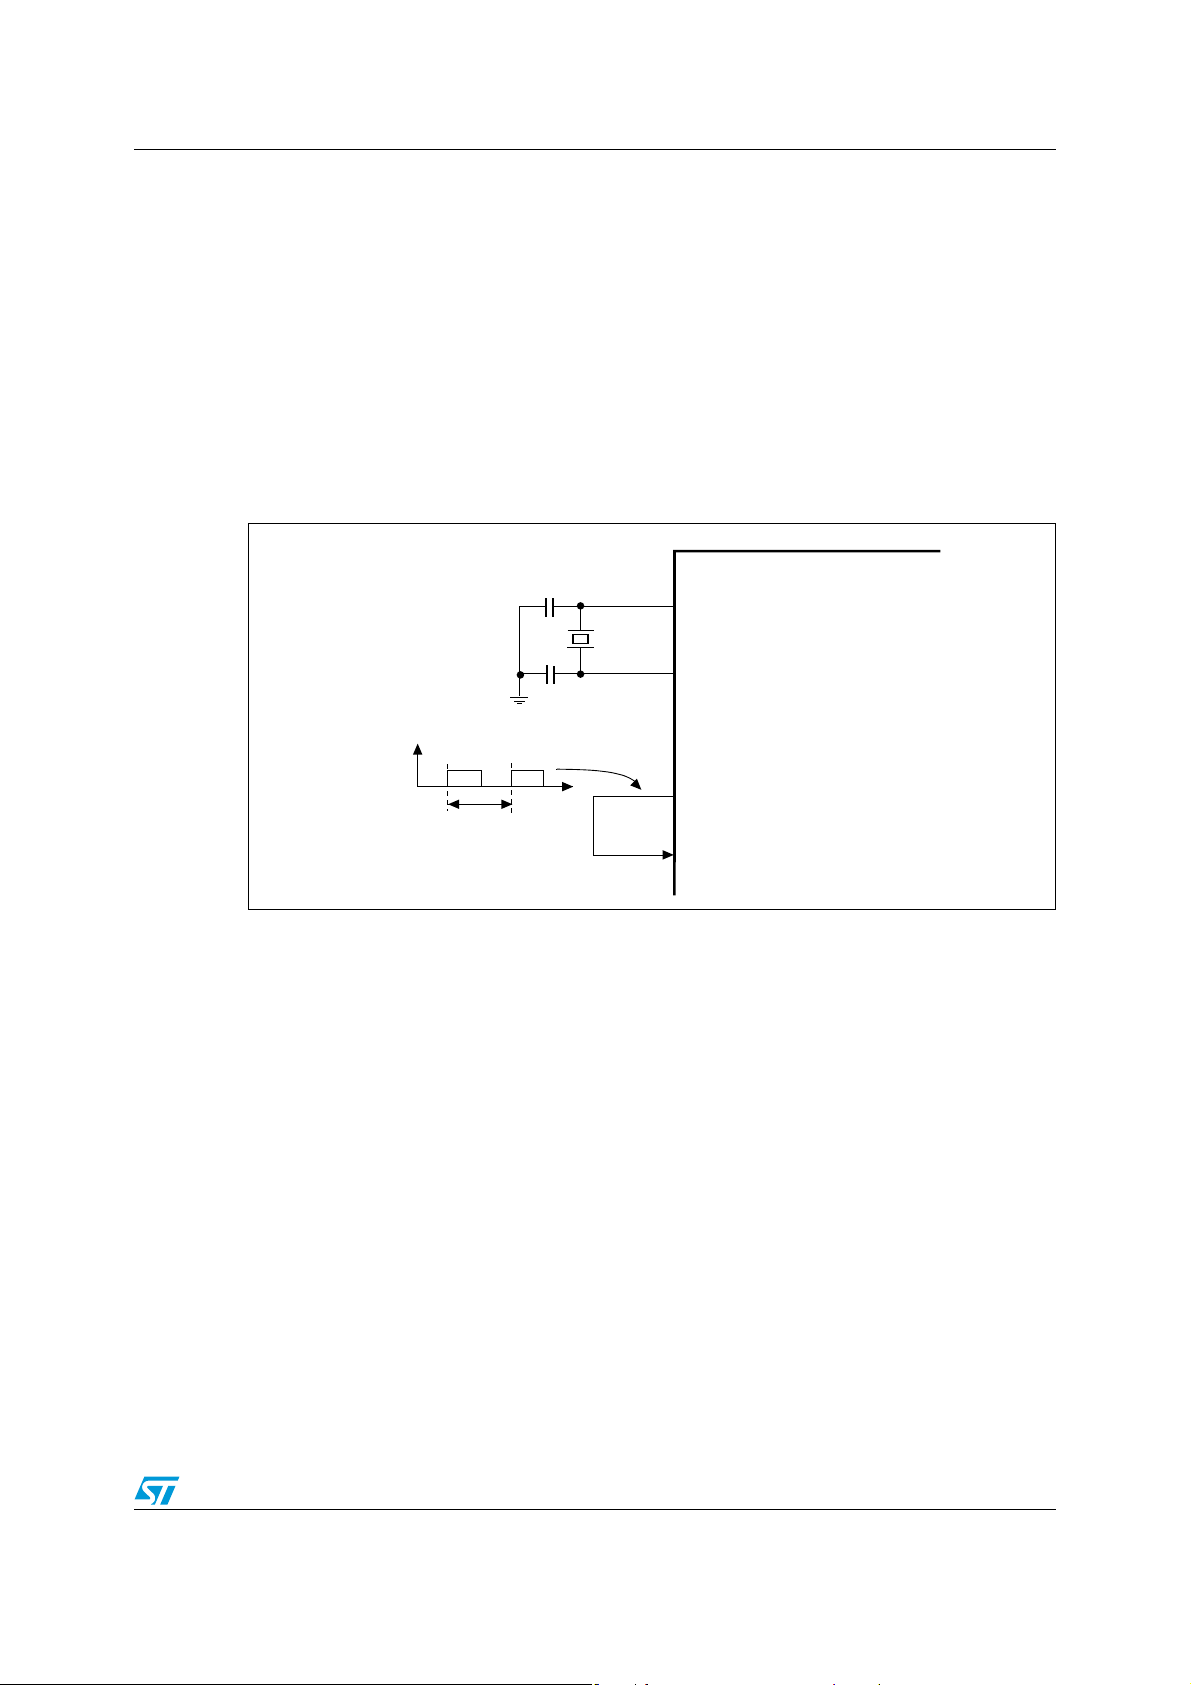
Figure 2 shows the hardware connections needed for RC calibration using RTC/64 as an
accurate frequency source for calibration.
Figure 2. Hardware connection using RTC/64 as a source for calibration
Reference signal
C1
32 .768 kHz
C2
32768 Hz/64
1 /512 Hz
OSC32_IN
OSC32_OUT
STM32F10xxx
TAMPER-RTC/PC13
TIM3_CH1 (PA6)
ai15842
2.2.2 Case where the mains frequency is used as the reference frequency: 50 Hz/60 Hz
This section describes the hardware requirements of the method that uses the AC mains
frequency as a reference. Figure 3 illustrates the circuit implemented to provide the DC
power supply (approximately 3.3 V) to the microcontroller:
The only component required to protect the timer input is a resistor. So if no power supply is
needed, then only a resistor is needed on the TIM3_CH1 input, to protect the timer input
from overcurrents.
This circuit includes a few passive components to convert the 220 V/50 Hz mains of the EU,
or the 110 V/60 Hz mains of the US, to a 3.3 V DC power supply. For applications that have
higher current consumptions, a power converter could be used (refer to the application note
AN1357: VIPower: low cost power supplies using VIPer12A in non isolated applications).
Caution: The reference signal conditioning and power supply circuits cannot be used if there are big
current variations.
In case of noisy mains, it is recommended to use an input power line filter (refer to the
application note AN2326: Calibrating the RC oscillator of the ST7ULTRALITE MCU using
the mains).
7/22
Page 8

RC calibration AN2868
TIM3_CH1
STM32F10xxx
V
DD
V
SS
R3
R4
C1
D2
D1
C2
C3
R2R1
L
N
AC m ains
~
ai15843
Figure 3. Hardware connection in the AC mains calibration method
Table 1. Component values when using the mains frequency as the reference
Component 230 V/50 Hz value 110 V/60 Hz value
R1 220 Ω / 0.5 W 110 Ω / 0.5 W
R2 220 Ω / 0.5 W 110 Ω / 0.5 W
R3 1 MΩ 1 MΩ
R4 5.6 kΩ 5.6 kΩ
D1 BZX85C3V9 BZX85C3V9
D2 1N4148 1N4148
C1 470 nF / ~275 V AC 330 nF / ~275 V AC
C2 100 nF 100 nF
C3 470 µF/16 V 470 µF/16 V
8/22
Page 9

AN2868 Description of the RC calibration library
3 Description of the RC calibration library
The HSI calibration library provided with this application note includes three major functions:
● void HSI_FreqMeasure(void)
● s32 HSI_CalibrateMinError(void)
●
ErrorStatus HSI_CalibrateFixedError(u32 AllowedErrorMax, s32* Freq)
3.1 HSI_FreqMeasure() function
This function is called in the timer 3 interrupt handler (TIM3_IRQHandler()). The
HSI_FreqMeasure() function measures the RC frequency after every input signal period.
The number of measurement periods is configured by the user in the HSI_calibration.h file
as follows:
#define NbOfPeriod 10 /* Number of period to be measured = 10 */
If the number of periods reaches the NbOfPeriod number, the HSI_FreqMeasure()
function computes the average of all measured frequencies (NbOfPeriod measured
frequencies).
The averaging method is used to minimize frequency error measurements.
You can easily configure the frequency of the reference source. It is defined in the file
HSI_calibration.h as follows:
#define Ref_Frequency 512 /* The reference frequency value in hertz */
If the reference frequency is a mains source frequency equal to 50 Hz, then replace 512 by
50 in the previous line as shown below:
#define Ref_Frequency 50 /* The reference frequency value in hertz */
If RTC/64 is used as the reference frequency, uncomment the following line:
#define USE_Reference_RTC
If another reference is used, such as the mains, comment the previous line. In so doing, the
RTC and the PC13 pin will be not configured while the system is configured for calibration.
After the frequency averaging computation, the MeasurementDone software flag is set to ‘1’
to indicate that the frequency measurements are finished and that the process is ready for
the next frequency measurements.
The computation of the frequency measurements does not depend on the duty cycle of the
source reference signal. It depends on its frequency since the capture compare 1 interrupt is
configured to occur on every rising edge of the reference signal (refer to Figure 1).
Figure 4 provides the frequency measurement algorithm.
9/22
Page 10

Description of the RC calibration library AN2868
Figure 4. RC frequency measurement flowchart
Enter TIM capture
compare interrupt
Yes
Measurement done
?
No
Get TIM input capture
Compute current RC
frequency
Add it up to the sum
of frequencies
Counted periods =
Number of periods
defined
Yes
Compute the current
frequency average
Set MeasurementDone
software flag
No
Initialize the number
of overflows
Increment the number
of counted periods
Exit interrupt
Yes
10/22
Enter TIM update
event interrupt
Measurement done
?
No
Increment the number
of overflows
Exit interrupt
ai15845
Page 11

AN2868 Description of the RC calibration library
3.2 HSI_CalibrateMinError() function
This function calibrates the HSI to have the nearest frequency to 8 000 000 Hz. It measures
all 32 frequencies (32 values of the HSITRIM bits) and provides the HSITRIM value that
corresponds to the frequency with the minimum error. The so-obtained HSITRIM value is
the calibration value that is written to the HSITRIM bits in the RCC_CR register.
The frequency measurement starts from HSITRIM = 0 and ends with HSITRIM = 31.
After calibration, the HSI_CalibrateMinError() function returns the RC frequency
value as a signed 32-bit integer (s32). This value can be helpful to reconfigure prescalers,
like the ones used for communication peripherals.
The flowchart in Figure 5 gives the algorithm for this function.
Example
s32 FrequencyValue = 0;
int main()
{
......
/* Calibrate the internal RC with the frequency having the minimum
error found and return the RC frequency in Hz after calibration */
FrequencyValue = HSI_CalibrateMinError();
.........
}
11/22
Page 12

Description of the RC calibration library AN2868
Figure 5. RC calibration flowchart: finding the minimum frequency error
Start of calibration
Save user clock configuration
System configuration for HSI
calibration process
PreviousError = 1000000
HSITRIM = 0
Set HSITRIM bits in RCC_CR
register with the HSITRIM value
Start TIM counter
Enable TIM interrupts
Wait for the current frequency
measurement
(Wait for MeasurementDone = 0)
Stop TIM counter
Disable TIM interrupts
Compute the current frequency
error: CurrentError
CurrentError
< PreviousError
PreviousError = CurrentError
Calibration_value = HSITRIM
FrequencyAfterCalib =
Real_RC_Frequency
Increment HSITRIM
Yes
HSITRIM < 32
Set HSITRIM bits with
Calibration_value
Yes
No
(1)
No
Restore user clock
Return FrequencyAfterCalib
1. Refer to Section 2.1 and Section 3.1.
12/22
configuration
End of calibration
ai15845
Page 13

AN2868 Description of the RC calibration library
16
17
18
1514
19...........31
0 .........13
HSITRIM value
each loop
ai15846
3.3 HSI_CalibrateFixedError() function
This function is provided to calibrate the internal RC with a maximum allowed frequency
error. It is configured by the user as an absolute value given in hertz (the first parameter:
AllowedErrorMax). This function is the same as HSI_CalibrateMinError() (refer to
Section 3.2.), but it searches for the frequency that has an error (in absolute value) less than
or equal to AllowedErrorMax.
● If it finds this frequency, it stops searching and configures the HSTRIM bits according to
this frequency and returns SUCCESS, meaning that the calibration operation has
succeeded.
● If not, it continues searching for it until the HSITRIM bits = 31 (32
sets the HSITRIM bits to 16 (default value) and returns ERROR, meaning that the
calibration has failed and did not find any frequency with an error less than or equal to
AllowedErrorMax.
The frequency measurements start with HSTRIM = 16 (unlike in the
HSI_CalibrateMinError() function where frequency measurements start from 0
to end with 31). The HSITRIM value is computed in loops to find the next value. That is,
the HSITRIM value starts from16 then goes to the next value to the left, then to the next
to the right, then to the second to the left and so on until it reaches 31, forming a “spring
loop” (as shown in Figure 6).
This algorithm is based on the fact that the probability of finding the frequency that has
the minimum error increases when the HSITRIM bit value tends to 16, and decreases
when it tends to 0 or 31. This algorithm is implemented so as to minimize the time
taken by the calibration process.
nd
frequency). It then
Figure 6. “Spring loop”
The second parameter is used to get the frequency (in hertz) after calibration in the form of
a signed 32-bit integer (s32).
The flowchart in Figure 7 gives the algorithm for this function.
Example
#define LED_Green
#define LED_Red
s32 FrequencyValue = 0;
ErrorStatus CalibStatus = ERROR;
int main()
{
......
13/22
Page 14

Description of the RC calibration library AN2868
/* The allowed frequency in absolute value is 14000Hz */
CalibStatus = HSI_CalibrateFixedError(14000, &FrequencyValue);
if(CalibStatus = SUCCESS)
{
GPIO_SetBits(GPIOC, LED_Green);
}
else
{
GPIO_SetBits(GPIOC, LED_Red);
}
......
}
14/22
Page 15

AN2868 Description of the RC calibration library
Figure 7. RC calibration flowchart: calibration with the maximum allowed frequency
error
Start of calibration
Save user clocks configuration
System configuration for HSI
calibration process
HSITRIM = 16
Set HSITRIM bits in RCC_CR
register with the HSITRIM value
Start TIM counter
Enable TIM interrupts
Wait for the current frequency
measurement
(Wait for MeasurementDone = 0)
Stop TIM counter
disable TIM interrupts
Compute the current frequency
Error: CurrentError
CurrentError
< AllowedErrorMax
Calibration successful Calibration failed
Yes
(1)
No
Compute the next HSITRIM
value
HSITRIM < 32
Set HSITRIM bits in RCC_CR
register with default value: 16
(2)
Yes
No
1. Refer to Section 2.1.
2. Refer to Figure 6.
Restore user clocks
configuration
Return the calibration status
End of calibration
ai15847
15/22
Page 16

Description of the RC calibration library AN2868
3.4 Calibration demo description
The demo provided with this application note shows the ability of the firmware to calibrate
the STM32F10xxx HSI.
A green and a red LED have to be connected to GPIO port C pins, the green LED to the
PC5 pin and the red LED to PC6.
Five other LEDs have to be connected from PC0 to PC4 to show the value of the HSITRM
bits in the RCC_CR register.
By default, the demo is configured for calibration of the HSI using the RTC/64 source
frequency. Please, remember to connect PC13 to PA6 (as shown in Section 2.2.1) as the
calibration process will wait until an available source signal is present on the PA6 pin.
By default, the number of measured periods per frequency is set to 10.
#define NbOfPeriod 10
To run the calibration process that provides the frequency with minimum error, you have to
comment the following define in the main.c file. Conversely, to run the calibration process
that finds the frequency with a maximum allowed error, you have to uncomment the same
line:
//#define USE_HSI_Fixed_Error
To show the RC signal, connect an oscilloscope probe to the PA8 pin and uncomment the
following line in the main.c file:
#define OUTPUT_RC_ON_MCO_FOR_DEBUG
When running the demo for calibration with minimum frequency error, you can visualize the
frequency changes on the oscilloscope while the HSI frequency is being measured. You can
also see the frequency stabilize after completion of the calibration process. The LEDs
connected from PC0 to PC4 will light up according to the value of the HSITRIM bits in the
RCC_CR register (binary value). The green LED will also light up.
When running the demo for calibration with maximum allowed error, you can visualize the
frequency changes on the oscilloscope while the HSI frequency is being measured. You can
also see the frequency stabilize after completion of the calibration process. If the calibration
process has succeeded, the green LED lights up, otherwise (if calibration has failed) the red
LED lights up. In both cases, the five LEDs (connected from PC0 to PC4) light up according
to the value of the HSITRIM bits in the RCC_CR register after calibration.
16/22
Page 17

AN2868 Description of the RC calibration library
3.5 Recommendations on the use of the HSI calibration library
1. The NVIC must be configured as described below for all TIM3 interrupts when the HSI
calibration library is being used. This configuration is reserved for TIM3 interrupts:
NVIC_InitStructure_IRQChannel = TIM3_IRQChannel;
NVIC_InitStructure.NVIC_IRQChannelPreemptionPriority = 1;
NVIC_InitStructure.NVIC_IRQChannelSubPriority = 1;
Capture compare 1 and update event interrupts are also reserved for the calibration
process.
2. Frequency measurement accuracy is not guaranteed when using a reference
frequency that exceeds 3 kHz.
3. After calibration, the two calibration functions restore the user clock configuration since
they have their own clock configuration. So, you should call your system clock
configuration function as follows:
In the HSI_calibration.c file
● Declare the user clock configuration as external:
/* Private function prototypes ---------------*/
external void My_RCC_Configuration(void);
● Call the user configuration as follows:
void Restore_RCC_UserConfiguration(void)
{
/* Call your default RCC configuration here */
My_RCC_Configuration(void);
}
4. It is not recommended to call calibration functions in an interrupt routine since, in this
case, the calibration process may be long (refer to the Section 4.2).
5. It is recommended to stop all application activities before the calibration process, and to
restart them after calling the calibration functions. The application therefore has to stop
communications, ADC measurements (see Note: 1) etc. since these processes are
supposed to use clock configurations that are different from those used in the
calibration process. Otherwise, errors might be introduced in the application: errors
while reading/sending frames, ADC reading errors since the sampling time has
changed, etc.
Note: 1 1) Except when using the ADC for the calibration process (refer to 7.).
6. If your application uses the RTC output source on the TAMPER-RTC pin, and selects a
source different from RTC/64 (BKP_RTCOutputSource_CalibClock), its
configuration will be lost and the pin will have to be reconfigured according to your
application requirements.
7. Real-time calibration vs. temperature can be used when the ambient temperature
changes noticeably while the application is running. The internal temperature sensor
can be used with the ADC watchdog with two thresholds. Each time an ADC watchdog
interrupt occurs, a new RC calibration process has to be performed and the two
thresholds are updated according to the current temperature (this feature is not
implemented in this application note):
Threshold_High = CurrentTemperatureValue + TemperatureOffset
Threshold_Low = CurrentTemperatureValue – TemperatureOffset
17/22
Page 18

Calibration process performance AN2868
CalibDuration
NPeriod 1+()NFreq×
F
ref
---------------------------------------------------------------
〈〉ErrorCompDur ConfigRestoreDur++=
4 Calibration process performance
4.1 Accuracy of frequency measurements
The accuracy of HSI frequency measurements depends on the accuracy/stability of the
reference frequency and on its value. Since the measurements also depend on the finite
resolution of the timer, it is recommended to use a reference frequency that does not exceed
3000 Hz. Measurement accuracy is not guaranteed when the used frequency is higher than
3000 Hz.
Ta bl e 2 gives an idea of the efficiency of calibration versus reference frequency accuracy.
Table 2. RC frequency accuracy vs. reference frequency accuracy
Reference frequency accuracy RC frequency accuracy (after calibration)
0% to 0.1% 0% to 0.2%
0.2% to 0.5% 0.3% to 0.6%
0.6% to 1% 0.7% to 1.1%
1.1% to 2% 1.2% to 3%
1. These accuracy values are indicative only and they give a rough idea of the RC frequency error ranges that
can be obtained after calibration. The RC frequency error also depends on the chip.
2. These values remain true even if the HSI frequency is multiplied. This means that the use of a PLL does
not multiply the frequency error of the system clock. The accuracy remains the same.
(1) (2)
4.2 Duration of the calibration process
The duration of the calibration process depends on:
1. The used reference frequency
2. The number of measured periods per frequency (Ref_Frequency value defined in the
HSI_calibration.h file)
3. The number of measured frequencies during the calibration process
The duration of the calibration process is given by:
Where:
– NPeriod is the number of times the frequency is measured in the same HSITRIM
configuration (the same frequency)
– NFreq is the number of measured frequencies (number of HSITRIM values used
for the frequency measurement)
– F
– ErrorCompDur is the time the computation takes to calculate the frequency error.
– ConfigResotreDur is the time the calibration process takes to configure the system
is the used reference frequency in Hz
ref
It takes around 14 µs.
for HSI calibration and restore the user configuration after this process (that is
RCC, TIM, NVIC, etc.). It takes around 280 µs.
18/22
Page 19

AN2868 Calibration process performance
10 1+()32×
512
---------------------------------- -
〈〉300 μs+ 688 m s=
Note: In each measured frequency, the first period captured is not taken into account in order to
measure a stabilized frequency. This is why 1 is added to NPeriod in the CalibDuration
equation above.
In the case of the calibration process with a minimum frequency error
(HSI_CalibrateMinError()) the number of NFreq is equal to 32. If the RTC/64 is used
as the reference frequency (512 Hz) and the selected number of measured periods
configured by the user is 10, the calibration takes around 688 ms.
In the case of the calibration process with a maximum allowed error
(HSI_CalibrateFixedError()), NFreq changes from chip to chip. NFreq also depends
on the maximum allowed error that is selected. The higher the selected allowed error, the
more NFreq will tend to 1. The lower the selected allowed error, the more NFreq will tend to
32.
So, the duration of the calibration process with a maximum allowed error is lower than or
equal to the duration of calibration when using the minimum frequency error process.
19/22
Page 20

Conclusion AN2868
5 Conclusion
Several frequency sources can be used to calibrate the internal RC oscillator: the RTC
crystal, the AC line (to use mains refer to the AN2326 application note), etc. Whatever the
reference frequency source, the RC calibration principle is the same: a reference signal
must be provided for measurement by a timer. The higher the accuracy of the reference
signal frequency, the better the accuracy of the RC frequency measurement. The error is
computed as the absolute value of the ideal RC frequency value and the measured one.
From this, the calibration value is calculated and written to the HSITRIM bits in the RCC_CR
register.
If you choose to use the RTC crystal as the reference frequency source, the maximum RC
frequency error is 0.2%.
20/22
Page 21

AN2868 Revision history
6 Revision history
Table 3. Document revision history
Date Revision Changes
02-Feb-2009 1 Initial release.
21/22
Page 22

AN2868
Please Read Carefully:
Information in this document is provided solely in connection with ST products. STMicroelectronics NV and its subsidiaries (“ST”) reserve the
right to make changes, corrections, modifications or improvements, to this document, and the products and services described herein at any
time, without notice.
All ST products are sold pursuant to ST’s terms and conditions of sale.
Purchasers are solely responsible for the choice, selection and use of the ST products and services described herein, and ST assumes no
liability whatsoever relating to the choice, selection or use of the ST products and services described herein.
No license, express or implied, by estoppel or otherwise, to any intellectual property rights is granted under this document. If any part of this
document refers to any third party products or services it shall not be deemed a license grant by ST for the use of such third party products
or services, or any intellectual property contained therein or considered as a warranty covering the use in any manner whatsoever of such
third party products or services or any intellectual property contained therein.
UNLESS OTHERWISE SET FORTH IN ST’S TERMS AND CONDITIONS OF SALE ST DISCLAIMS ANY EXPRESS OR IMPLIED
WARRANTY WITH RESPECT TO THE USE AND/OR SALE OF ST PRODUCTS INCLUDING WITHOUT LIMITATION IMPLIED
WARRANTIES OF MERCHANTABILITY, FITNESS FOR A PARTICULAR PURPOSE (AND THEIR EQUIVALENTS UNDER THE LAWS
OF ANY JURISDICTION), OR INFRINGEMENT OF ANY PATENT, COPYRIGHT OR OTHER INTELLECTUAL PROPERTY RIGHT.
UNLESS EXPRESSLY APPROVED IN WRITING BY AN AUTHORIZED ST REPRESENTATIVE, ST PRODUCTS ARE NOT
RECOMMENDED, AUTHORIZED OR WARRANTED FOR USE IN MILITARY, AIR CRAFT, SPACE, LIFE SAVING, OR LIFE SUSTAINING
APPLICATIONS, NOR IN PRODUCTS OR SYSTEMS WHERE FAILURE OR MALFUNCTION MAY RESULT IN PERSONAL INJURY,
DEATH, OR SEVERE PROPERTY OR ENVIRONMENTAL DAMAGE. ST PRODUCTS WHICH ARE NOT SPECIFIED AS "AUTOMOTIVE
GRADE" MAY ONLY BE USED IN AUTOMOTIVE APPLICATIONS AT USER’S OWN RISK.
Resale of ST products with provisions different from the statements and/or technical features set forth in this document shall immediately void
any warranty granted by ST for the ST product or service described herein and shall not create or extend in any manner whatsoever, any
liability of ST.
ST and the ST logo are trademarks or registered trademarks of ST in various countries.
Information in this document supersedes and replaces all information previously supplied.
The ST logo is a registered trademark of STMicroelectronics. All other names are the property of their respective owners.
© 2009 STMicroelectronics - All rights reserved
STMicroelectronics group of companies
Australia - Belgium - Brazil - Canada - China - Czech Republic - Finland - France - Germany - Hong Kong - India - Israel - Italy - Japan -
Malaysia - Malta - Morocco - Singapore - Spain - Sweden - Switzerland - United Kingdom - United States of America
www.st.com
22/22
 Loading...