

Page 1

AN2633
Application note
STR91xFA low power management
and power consumption
Introduction
Power consumption is a significant issue for developers of embedded systems today.
Whether the target application is a cellphone, MP3 player, remote control, bio-medical
device or one of a whole new generation of electronic products, it is very likely that efficient
power management and low current consumption are on top of the list of design goals. In
terms of low power design techniques, more and more embedded designers use dynamic
control of clocks and frequencies. For this reason, this application note focuses on this in the
context of the STR91xFA microcontroller family.
This application note is intended for system designers who require a hardware
implementation overview of the STR91xFA low power modes. It includes details on the
power supply circuitry and components, clock systems, register settings and power
management. This guideline document is intended to show how to make the best use of the
extensive low power features of the STR91xFA microcontroller family,
Software source files can be downloaded with this application note for testing the STR91xFA
power modes.
January 2008 Rev 1 1/48
www.st.com
Page 2

Contents AN2633
Contents
1 Power supply and clocks . . . . . . . . . . . . . . . . . . . . . . . . . . . . . . . . . . . . . 4
1.1 Power supply . . . . . . . . . . . . . . . . . . . . . . . . . . . . . . . . . . . . . . . . . . . . . . . 4
1.1.1 Main operating voltages . . . . . . . . . . . . . . . . . . . . . . . . . . . . . . . . . . . . . . 4
1.1.2 Independent A/D converter supply and reference voltage . . . . . . . . . . . . 5
1.1.3 Battery supply . . . . . . . . . . . . . . . . . . . . . . . . . . . . . . . . . . . . . . . . . . . . . 5
1.1.4 Low voltage detector (LVD) . . . . . . . . . . . . . . . . . . . . . . . . . . . . . . . . . . . 5
1.2 Power down mode . . . . . . . . . . . . . . . . . . . . . . . . . . . . . . . . . . . . . . . . . . . 5
1.3 Clocks . . . . . . . . . . . . . . . . . . . . . . . . . . . . . . . . . . . . . . . . . . . . . . . . . . . . . 6
1.3.1 External clock sources: . . . . . . . . . . . . . . . . . . . . . . . . . . . . . . . . . . . . . . 6
1.3.2 Clock control unit (CCU) . . . . . . . . . . . . . . . . . . . . . . . . . . . . . . . . . . . . . 6
1.3.3 Master clock sources . . . . . . . . . . . . . . . . . . . . . . . . . . . . . . . . . . . . . . . . 6
1.3.4 PLL . . . . . . . . . . . . . . . . . . . . . . . . . . . . . . . . . . . . . . . . . . . . . . . . . . . . . 9
1.3.5 Changing the PLL configuration . . . . . . . . . . . . . . . . . . . . . . . . . . . . . . 10
1.3.6 Clock dividers . . . . . . . . . . . . . . . . . . . . . . . . . . . . . . . . . . . . . . . . . . . . 10
1.3.7 Flash memory interface clock . . . . . . . . . . . . . . . . . . . . . . . . . . . . . . . . 10
1.3.8 Baud rate clock (BRCLK) . . . . . . . . . . . . . . . . . . . . . . . . . . . . . . . . . . . . 11
1.3.9 External memory interface (BCLK) . . . . . . . . . . . . . . . . . . . . . . . . . . . . 11
1.3.10 USB clock (USBCLK) . . . . . . . . . . . . . . . . . . . . . . . . . . . . . . . . . . . . . . . 11
1.3.11 Ethernet MAC clock . . . . . . . . . . . . . . . . . . . . . . . . . . . . . . . . . . . . . . . . 11
1.3.12 External RTC calibration clock . . . . . . . . . . . . . . . . . . . . . . . . . . . . . . . . 11
1.3.13 Peripheral clock gating . . . . . . . . . . . . . . . . . . . . . . . . . . . . . . . . . . . . . . 11
1.4 Power modes . . . . . . . . . . . . . . . . . . . . . . . . . . . . . . . . . . . . . . . . . . . . . . 12
1.4.1 Normal Run mode . . . . . . . . . . . . . . . . . . . . . . . . . . . . . . . . . . . . . . . . . 14
1.4.2 Special Interrupt Run mode . . . . . . . . . . . . . . . . . . . . . . . . . . . . . . . . . . 14
1.4.3 Idle mode . . . . . . . . . . . . . . . . . . . . . . . . . . . . . . . . . . . . . . . . . . . . . . . . 14
1.4.4 Sleep mode . . . . . . . . . . . . . . . . . . . . . . . . . . . . . . . . . . . . . . . . . . . . . . 15
1.4.5 Sleep mode and Idle mode configuration considerations . . . . . . . . . . . 15
2 STR91xFA library low power mode functions . . . . . . . . . . . . . . . . . . . 18
2.1 SCU_MCLKSourceConfig . . . . . . . . . . . . . . . . . . . . . . . . . . . . . . . . . . . . 18
2.2 SCU_PLLCmd . . . . . . . . . . . . . . . . . . . . . . . . . . . . . . . . . . . . . . . . . . . . . 19
2.3 SCU_RCLKDivisorConfig . . . . . . . . . . . . . . . . . . . . . . . . . . . . . . . . . . . . . 20
2.4 SCU_HCLKDivisorConfig . . . . . . . . . . . . . . . . . . . . . . . . . . . . . . . . . . . . . 21
2/48
Page 3

AN2633 Contents
2.5 SCU_PCLKDivisorConfig . . . . . . . . . . . . . . . . . . . . . . . . . . . . . . . . . . . . . 22
2.6 SCU_FMICLKDivisorConfig . . . . . . . . . . . . . . . . . . . . . . . . . . . . . . . . . . . 22
2.7 SCU_APBPeriphClockConfig . . . . . . . . . . . . . . . . . . . . . . . . . . . . . . . . . . 23
2.8 SCU_AHBPeriphClockConfig . . . . . . . . . . . . . . . . . . . . . . . . . . . . . . . . . . 24
2.9 SCU_APBPeriphIdleConfig . . . . . . . . . . . . . . . . . . . . . . . . . . . . . . . . . . . 24
2.10 SCU_AHBPeriphIdleConfig . . . . . . . . . . . . . . . . . . . . . . . . . . . . . . . . . . . 25
2.11 SCU_EnterIdleMode . . . . . . . . . . . . . . . . . . . . . . . . . . . . . . . . . . . . . . . . 25
2.12 SCU_EnterSleepMode . . . . . . . . . . . . . . . . . . . . . . . . . . . . . . . . . . . . . . . 25
2.13 SCU_SpecIntRunModeConfig . . . . . . . . . . . . . . . . . . . . . . . . . . . . . . . . . 26
2.14 FMI_Config . . . . . . . . . . . . . . . . . . . . . . . . . . . . . . . . . . . . . . . . . . . . . . . . 27
3 Operating measurements . . . . . . . . . . . . . . . . . . . . . . . . . . . . . . . . . . . . 29
3.1 Board set-up . . . . . . . . . . . . . . . . . . . . . . . . . . . . . . . . . . . . . . . . . . . . . . . 29
3.1.1 Performing measurements with the STR910-EVAL board . . . . . . . . . . . 29
3.1.2 Performing measurements with the Uniboard TQFP128 . . . . . . . . . . . . 29
3.2 Software provided with this application note . . . . . . . . . . . . . . . . . . . . . . 34
3.2.1 Source files . . . . . . . . . . . . . . . . . . . . . . . . . . . . . . . . . . . . . . . . . . . . . . 34
3.2.2 Hardware environment . . . . . . . . . . . . . . . . . . . . . . . . . . . . . . . . . . . . . . 34
3.2.3 How to use the project . . . . . . . . . . . . . . . . . . . . . . . . . . . . . . . . . . . . . . 34
3.2.4 How to test an example of power modes . . . . . . . . . . . . . . . . . . . . . . . . 35
3.2.5 Low power mode routines . . . . . . . . . . . . . . . . . . . . . . . . . . . . . . . . . . . 36
3.2.6 Run mode tests . . . . . . . . . . . . . . . . . . . . . . . . . . . . . . . . . . . . . . . . . . . 37
3.2.7 Sleep mode tests . . . . . . . . . . . . . . . . . . . . . . . . . . . . . . . . . . . . . . . . . . 37
3.2.8 Idle mode tests . . . . . . . . . . . . . . . . . . . . . . . . . . . . . . . . . . . . . . . . . . . 38
3.2.9 Special Interrupt Run mode tests . . . . . . . . . . . . . . . . . . . . . . . . . . . . . 40
3.2.10 Battery supply tests . . . . . . . . . . . . . . . . . . . . . . . . . . . . . . . . . . . . . . . . 41
3.3 Measurements and typical values . . . . . . . . . . . . . . . . . . . . . . . . . . . . . . 41
4 Revision history . . . . . . . . . . . . . . . . . . . . . . . . . . . . . . . . . . . . . . . . . . . 47
3/48
Page 4

Power supply and clocks AN2633
1 Power supply and clocks
1.1 Power supply
1.1.1 Main operating voltages
The STR91xFA requires two separate operating voltage supplies. The CPU and memories
operate from a 1.65 V to 2.0 V on the V
the V
DDQ
pins.
Figure 1. Power supply overview
pins, and the I/O ring operates at 2.7 V to 3.6 V on
DD
AV
(V
)
DDQ
(3V or 3.3V)
(V
)
DDQ
(1.8V)
REF
AV
AV
V
SSQ
V
V
BATT
V
DD
SS
DDQ
DD
128-pin, 144-ball devices
A/D converter
I/O Ring
RTC
SRAM
Core
(V
) AV
DDQ
(3V or 3.3V)
(V
REF
AVSS_V
)
DDQ
(1.8V)
_AV
V
V
DD
SSQ
DDQ
SSQ
V
BATT
V
DD
80-pin-devices
A/D converter
I/O Ring
RTC
SRAM
Core
V
SS
4/48
V
SS
Page 5

AN2633 Power supply and clocks
1.1.2 Independent A/D converter supply and reference voltage
The ADC has an isolated power supply which you can separately filter and shield from noise
in the PCB.
On 128-pin and 144-ball packages, the ADC unit has an independent analog voltage supply
input at pin AVDD (the ADC current consumption is detailed in Section 3.3: Measurements
and typical values on page 41) to accept a very clean voltage source. Additionally, an
independent supply ground connection is provided on pin AV
. You can connect a separate
SS
external reference voltage input for ADC on the AVREF pin for better accuracy on low
voltages inputs. The voltage on AVREF can range from 1.0 V to V
DDQ
.
On 80-pin/ball packages, the ADC voltage supply is tied internally to the ADC reference
voltage pin AV
point, on pin AV
_AV
CC
SS_VSSQ
and the analog ground is shared with the digital ground at a single
REF
.
1.1.3 Battery supply
An optional stand-by voltage from a battery or other source may be connected to pin VBATT
to retain the contents of SRAM in the event of a loss of the main digital supplies (V
V
). The SRAM will automatically switch its supply from the internal V
DDQ
VBATT pin when the V
DD
and V
voltage drops below the LVD threshold (and VBAT
DDQ
source to the
DD
remains above the threshold).
DD
and
Note: In order to use the battery supply, the LVD must be enabled.
The VBATT pin also supplies power to the RTC unit, allowing the RTC to function even when
the main digital supplies (V
DD and VDDQ) are switched off. By programming the device
configuration via JTAG, you can select to power only the RTC (by configuring the RTC) or
both the SRAM (by enabling the PWR bit in the RTC_CR register) and the RTC from VBATT.
1.1.4 Low voltage detector (LVD)
Voltage dropout: The LVD circuit monitors VDD, and V
reset whenever either voltage drops below the configured V
the MCU was reset by the LVD, this is flagged in the System status register
(SCU_SYSSTATUS) and an interrupt request to the VIC is generated if enabled.
Voltage brownout: You can also program the LVD to generate an Early Warning interrupt
when either voltage drops below the V
DD_BRN
and V
DDQ_BRN
event signal is connected to the VIC1.7 interrupt channel. Software can manage the Early
Warning interrupt using the VIC1.7 channel bits in the VIC registers.
Note: When the LVD is turned off, the VBAT feature is not supported.
The LVD logic consists of a lower power voltage band gap that provide an accurate voltage
reference. This voltage reference is used to create the voltage threshold levels that are
compared with the supply voltages.
When either voltage supply falls below the threshold for that supply, the LVD generates a
global reset.
supplies and generates a global
DDQ
DD_LVD
thresholds. The Early Warning
and V
DDQ_LVD
levels. If
1.2 Power down mode
In STR91xFA low power modes, the Flash automatically reduces its power consumption and
can be read immediately after wake-up.
5/48
Page 6

Power supply and clocks AN2633
When the STR91xFA is in low power mode, you can also put the Flash in Power Down mode
for even lower power consumption. You do this by programming the PWD bit in the Flash
Configuration register. The consumption is drastically reduced, but after wake-up from low
power, a delay is inserted automatically to ensure the Flash is operational before the CPU
starts execution.
1.3 Clocks
1.3.1 External clock sources:
f
: A 4 to 25 MHz oscillator provides the main operating clock for all on-chip functional
OSC
blocks.
f
:The RTC has an independent 32.768 kHz crystal. The RTC keeps on running even
RTC
when the CPU is in power down or power off mode. This slow RTC clock can also be used in
power management.
f
: f
USB
when the PLL is configured to generate a clock that cannot be shared by the USB. The PLL
is able to generate a 48 or 96 MHz clock from the input crystal frequency for internal use by
selecting the appropriate multiplier and divider.
input clock is not mandatory to generate the 48 MHz for USB clock. It is needed
USB
f
: The TIM Timer/counters can run on the internal peripheral clock or the external
TIMEXT
TIMEXT input clock. You select this by programming the TIM01SEL and TIM23SEL bits in
the Clock control register (SCU_CLKCNTR). When these pins are not used as clock inputs,
they can be configured as GPIO.
1.3.2 Clock control unit (CCU)
The CCU generates a master clock of frequency f
also generates individually scaled and gated clock sources to each of the following
functional blocks within the STR91xFA.
● CPU, f
●
●
●
●
●
CPUCLK
Advanced High Performance Bus (AHB), f
Advanced Peripheral Bus (APB) f
Flash memory interface (FMI), f
UART Baud Rate Generators, f
USB, f
USB
1.3.3 Master clock sources
The master clock generated by the CCU (Clock Control Unit) has three clock sources that
you select using the MCLKSEL[1:0] bits in the Clock control register (SCU_CLKCNTR).
Under firmware control, the CPU can switch between the three CCU inputs without
introducing any glitches on the master clock output. The clock sources are the PLL output,
the oscillator input pin and the RTC clock:
● The PLL takes the 4 to 25 MHz oscillator clock as input and generates a master clock
output up to 96 MHz. The f
are 48 MHz, 66 MHz or 96 PLL MHz (maximum). By default, at power-up the master
clock is sourced from the main oscillator until the PLL is ready (locked) and then the
CPU may switch to the PLL source under firmware control. The CPU can switch back to
. From this master clock the CCU
MSTR
HCLK
PCLK
FMICLK
BAUD
output frequency is programmable. Typical frequencies
PLL
6/48
Page 7

AN2633 Power supply and clocks
the main oscillator source at any time and turn off the PLL for low-power operation. The
PLL is always turned off in Sleep mode.
● The f
input clock has a frequency of 4 to 25 MHz. This input clock can be sourced
OSC
by an external crystal connected to STR91xFA pins X1_CPU and X2_CPU or an
external oscillator device connected to X1_CPU.
● RTC is a 32.768 kHz external crystal which can be connected to X1_RTC and X2_RTC
or an external oscillator connected to pin X1_RTC to constantly run the real-time clock
unit. You can program the application to run from this slow clock when you want to save
power.
You can choose the source to match the CPU performance and the power management
requirements of your application. Transitions from one clock to another are glitch-free and
do not disrupt any on-going activities
7/48
Page 8
Power supply and clocks AN2633
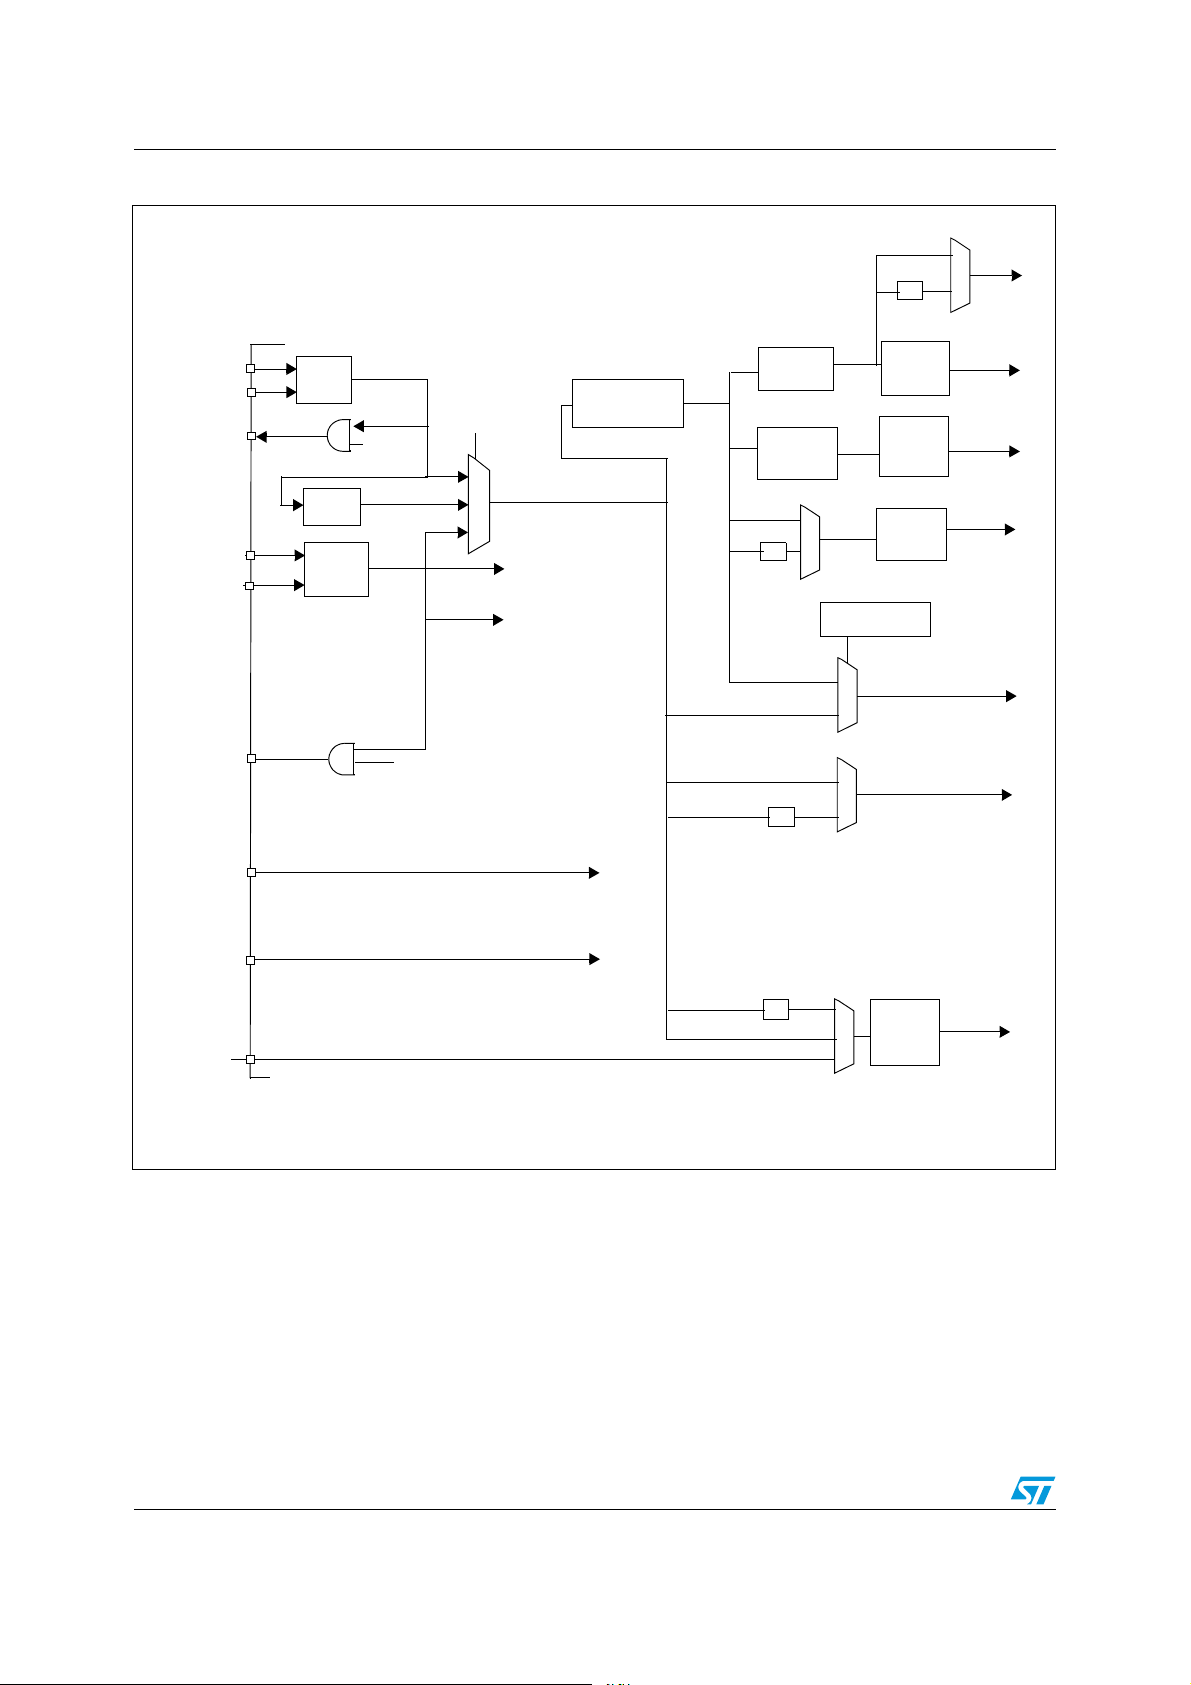
Figure 2. Clock control
EMI_BCLK
to External
memory
interface
HCLK
to AHB
peripherals
PCLK
to APB
peripherals
FMICLK
to Flash Memory
Interface
CPUCLK
to CPU
BRCLK
X1_CPU
X2_CPU
MII_PHYCLK
X1_RTC
X2_RTC
JRTCLK
Main
OSC
PLL
32.768 KHz
RTC
4 to 25 MHz
f
OSC
PHYSEL
32.768
kHz
RTCSEL
MCLKSEL
f
OSC
f
PLL
f
RTC
RCLKDIV
(1,2,4,8,16,1024)
f
MSTR
to RTC
to WDG (software
selectable in WDG
register)
RCLK
AHBDIV
(1,2,4)
APBDIV
(1,2,4,8)
1/2
1/2
1/2
HCLK
Peripheral
Clock
Gating
Peripheral
PCLK
Clock
Gating
Peripheral
FMICLK
Clock
Gating
Special interrupt
mode control
Baud rate clock to UARTs
EXTCLK_T0T1
EXTCLK_T2T3
USB_CLK48M
TIM01CLK
External clock to TIM0 & TIM1
TIM23CLK
External clock to TIM2 & TIM3
1/2
Peripheral
Clock
Gating
48 MHz USBCLK
to USB block
8/48
Page 9

AN2633 Power supply and clocks
2
1.3.4 PLL
As shown in Figure 2, the oscillator input clock (f
PLL frequency multiplier. When the PLL is active, it generates an output frequency (f
) is the input clock to the programmable
OSC
PLL
according to the following equation:
f
PLL
2Nf
××()M2×p()⁄=
OSC
Where the values of M, N and P must satisfy the following constraints:
1 M 255≤≤
1N255≤≤
0P5≤≤
1MHz f
00M Hz 2 N f
4MHz f
OSC
OSC
M2MHz≤⁄≤
××()M⁄ 622M Hz≤≤
OSC
25M Hz≤≤
You program the M, N and P values by writing to the PLL configuration register
(SCU_PLLCONF).
Care is required when programming the PLL multiplier and divider factors, not to exceed the
maximum allowed operation frequency (96 MHz).
At power up, the CPU defaults to run on the oscillator clock, as the PLL is not ready (locked).
The CPU can switch to the PLL clock only after the LOCK bit in the System status register
(SCU_SYSSTATUS) is set. In Sleep mode, the PLL is turned off. When waking up from
sleep mode if the f
is selected to run off the PLL, the CPU waits until the LOCK bit is
MSTR
set before it starts to run.
)
The LOCK bit is set when the PLL clock has stabilized (locked status) and maintains this
value as long as the PLL is locked. You can select the PLL clock as f
clock source only
MSTR
when the LOCK bit is 1. If the LOCK bit goes to 0 if for any reason, the PLL loses the
programmed frequency in which it was locked. In this case, the LOCK_LOST bit is set and
f
automatically switches back to f
MSTR
OSC
. f
is restored as the f
PLL
source when the
MSTR
LOCK bit becomes 1 again.
The LOCK and LOCK_LOST events can be configured to generate interrupt requests to the
VIC.
9/48
Page 10

Power supply and clocks AN2633
1.3.5 Changing the PLL configuration
While the CPU is running on the PLL clock, the PLL clock frequency can be changed by
updating the SCU_PLLCONF register. You need to follow the steps below to change the
clock:
1. Switch the CPU Master Clock source to the OSC by setting bits [1:0] in the
SCU_CLKCNTR register to “10”.
2. Write the new configuration to the SCU_PLLCONF register (write the new P, N and M
values with the PLL_EN enable bit set to “0”).
3. The SCU_PLLCONF register is updated after the clock has been switched to the OSC.
4. If you need the CPU to run at the new PLL clock frequency, write to the
SCU_PLLCONF register again with the new P, N and M values AND the PLL_EN bit set
to “1”.
5. Switch the CPU clock source back to the PLL clock by setting bits [1:0] in the
SCU_CLKCNTR register to “00”.
6. The CPU Master clock switches automatically from the OSC to the PLL once the LOCK
bit is set. Do not initiate another SCU_PLLCONF register change before the LOCK bit
is set.
1.3.6 Clock dividers
The main clock (f
(RCLK) for the ARM core and all the peripherals. The RCLK provide the divided clock for the
ARM core, and feeds the dividers for the AHB, APB, External Memory Interface, and FMI
units.
You program the RCLK divider using the RCLKDIV[2:0] bits in the Clock control register
(SCU_CLKCNTR).
The RCLK can be divided by 1, 2 or 4 to generate the AHB clock. The AHB clock is the bus
clock for the AHB bus and all bus transfers are synchronized to this clock. The maximum
HCLK frequency is 96 MHz.
The RCLK can be divided by 1, 2, 4 or 8 to generate the APB clock. The APB clock is the
bus clock for the APB bus and all bus transfers are synchronized to this clock. Many
peripherals that are connected to the AHB bus also use the PCLK as the source for the
external bus data transfers. The maximum PCLK frequency is 48 MHz.
You program the PCLK and HCLK dividers using the APBDIV[1:0] and AHBDIV[1:0]bits in
the Clock control register (SCU_CLKCNTR).
) can be divided to operate at a slower frequency reference clock
MSTR
1.3.7 Flash memory interface clock
The FMICLK clock is an internal clock derived from RCLK and with the same frequency. You
can optionally divide it by 2 by setting the FMI_SEL bit in the Clock control register
(SCU_CLKCNTR). FMICLK can be gated through the Peripheral Clock Gating Registers
(see Section 1.3.13). The FMICLK determines the bus bandwidth between the ARM core
and the flash memory. Typically, codes in the flash memory can be fetched one word per
FMICLK clock in burst mode. The maximum FMICLK frequency is 96 MHz.
10/48
Page 11

AN2633 Power supply and clocks
1.3.8 Baud rate clock (BRCLK)
The baud rate clock is an internal clock derived from f
UART peripherals for baudrate generation. You can optionally divide the frequency by 2 by
setting the BR_SEL bit in the Clock control register (SCU_CLKCNTR). BRCLK can be gated
through the Peripheral Clock Gating Registers (see Section 1.3.13).
1.3.9 External memory interface (BCLK)
You can select the frequency of the EMI bus clock (BCLK) to be HCLK or HCLK/2 using the
EMIRATIO bit in the Clock control register (SCU_CLKCNTR). By default the frequency is
HCLK/2. The BCLK clock is available on the LFBGA package as an output pin. You can
disable the BCLK output by setting the BCLK_EN bit in the EMI register (SCU_GPIOEMI).
1.3.10 USB clock (USBCLK)
The USB clock can be derived from f
use another f
frequency, the 48 MHz USBCLK must be sourced from the external pin
MSTR
(GPIO pin). You select this using the USB_SEL [1:0] bits in the Clock control register
(SCU_CLKCNTR). USBCLK can be gated through the Peripheral Clock Gating Registers
(see Section 1.3.13).
when the frequency is 48 MHz or 96 MHz. If you
MSTR
1.3.11 Ethernet MAC clock
Special consideration regarding the Ethernet MAC: The external Ethernet PHY interface
device requires it’s own 25 MHz clock source. This clock can come from one of two sources:
● A 25 MHz clock signal coming from a dedicated output pin (P5.2) of the STR91xFA. In
this case, the STR91xFA must use a 25 MHz signal on its main oscillator input in order
to pass this 25 MHz clock back out to the PHY device through pin P5.2. The advantage
here is that an inexpensive 25 MHz crystal may be used to source a clock to both the
STR91xFA and the external PHY device.
● An external 25 MHz oscillator connected directly to the external PHY interface device.
In this case, the f
25 MHz).
input clock doesn't have to be a 25 MHz crystal (from 4 MHz to
OSC
that is used by the three on-chip
MSTR
You enable the output clock using the MAC_SEL bit in the Clock control register
(SCU_CLKCNTR).
1.3.12 External RTC calibration clock
The RTC_CLK can be enabled as an output on the JRTCK pin by setting the Calibration
Clock Output Enable bit in the RTC_CR register. The RTC_CLK is used for RTC oscillator
calibration. The RTC_CLK is active in Sleep mode and can be used as a system wake-up
control clock.
1.3.13 Peripheral clock gating
After reset, only the CPU, the Flash memory, the SRAM and a small subset of Peripheral
clock gating register 0 (SCU_PCGR0) and Peripheral clock gating register 1 (SCU_PCGR1)
registers) of the peripherals start operating. The other parts of the system remain stopped.
because the related PCGR bits are reset. To start them, you have to write 1 to the related
register bit. You can stop the peripheral again, by writing 0 to the related bit.
11/48
Page 12

Power supply and clocks AN2633
This allows you to dynamically control the number of peripherals that are running which
allows you to optimize the power used in a very flexible way.
The Idle mode gating mask register 0 (SCU_MGR0) and the Idle mode gating mask register
1 (SCU_MGR1) allow you to define a set of peripherals that are kept running when the
microcontroller goes into Idle mode. In Sleep mode, all peripherals except the RTC are
turned off.
Clock gating in emulation mode
During emulation mode (debug state of the ARM966E-S processor) the System Controller
allows gating the clock of a peripheral or a group of peripherals. The software application
can choose to stop the desired peripheral when ARM966E-S enters emulation mode. When
you clear the related bit in the Peripheral emulation clock gating register 0 (SCU_PECGR0),
or Peripheral emulation clock gating register 1 (SCU_PECGR1), the peripheral clock is
gated in emulation mode.
1.4 Power modes
The STR91xFA has configurable and flexible power management features that allow you to
choose the best power option to fit your application. You can dynamically manage the power
consumption or hardware to match the system's requirements. Power management is
provided via clock control to the CPU and individual peripherals. The STR91xFA supports
the following 4 global power control modes:
● Normal Run mode
● Special Interrupt Run mode
● Idle mode
● Sleep mode
Note: In the application development environment, a special mode (Debug state) is active during
in circuit emulation (ICE). In this mode, the clocks are never switched off when the ICE is in
use even if the CPU enters Idle or Sleep mode. In Idle mode, the CPU stops fetching
instructions, but the ICE can override this state in order to run the debugger code. Using
Flash_PD_DBG bit in the Power management register (SCU_PWRMNG) you can configure
the Flash to enter power down mode when debug mode is active.
12/48
Page 13

AN2633 Power supply and clocks
Table 1. Comparison of power control modes
Power State Clocks Wake-up event Description
Normal Run mode
Special Interrupt
Run mode
Idle mode
Sleep mode
- All clocks are ON
- CPU is clocked by RCLK
(divided by RCLKDIV)
- CPU is clocked by RCLK
- While executing interrupt
service routines, CPU is
clocked by f
MSTR
(RCLKDIV is bypassed)
in Special Interrupt Run
mode FIQ.
- In Special Interrupt Run
mode using IRQ,CPU
operates at full speed,
when the IRQ service
routine reads the vector
address register in the
VIC.
-ARMCLK = OFF
-FMICLK = OFF
-HCLK = ON
-PCLK = ON
(1)
(1)
-ARMCLK = OFF
-FMICLK = OFF
-HCLK = OFF
-PCLK = OFF
-External reset
-WDG reset
-Interrupts
-RTC Alarm
-External wake-up
-External reset
-External wake-up
-RTC Alarm
- Peripherals active if
enabled by the Peripheral
Clock Gating Registers
- Peripherals active if
enabled by the Peripheral
Clock Gating Registers
- CPU off
- Peripherals active if
enabled by the Peripheral
Clock Gating Registers
AND the corresponding
bit is set in the Idle Mode
Gating Mask Registers
- All clocks off except RTC
- Flash memory in power
down mode
- PLL off
- Oscillator pin (4-25 MHz)
off
(1) The OFF and ON state can be configured in Idle mode gating register 0 (SCU_MGR0)
and the mode gating mask register 1 (SCU_MGR1)
13/48
Page 14
Power supply and clocks AN2633
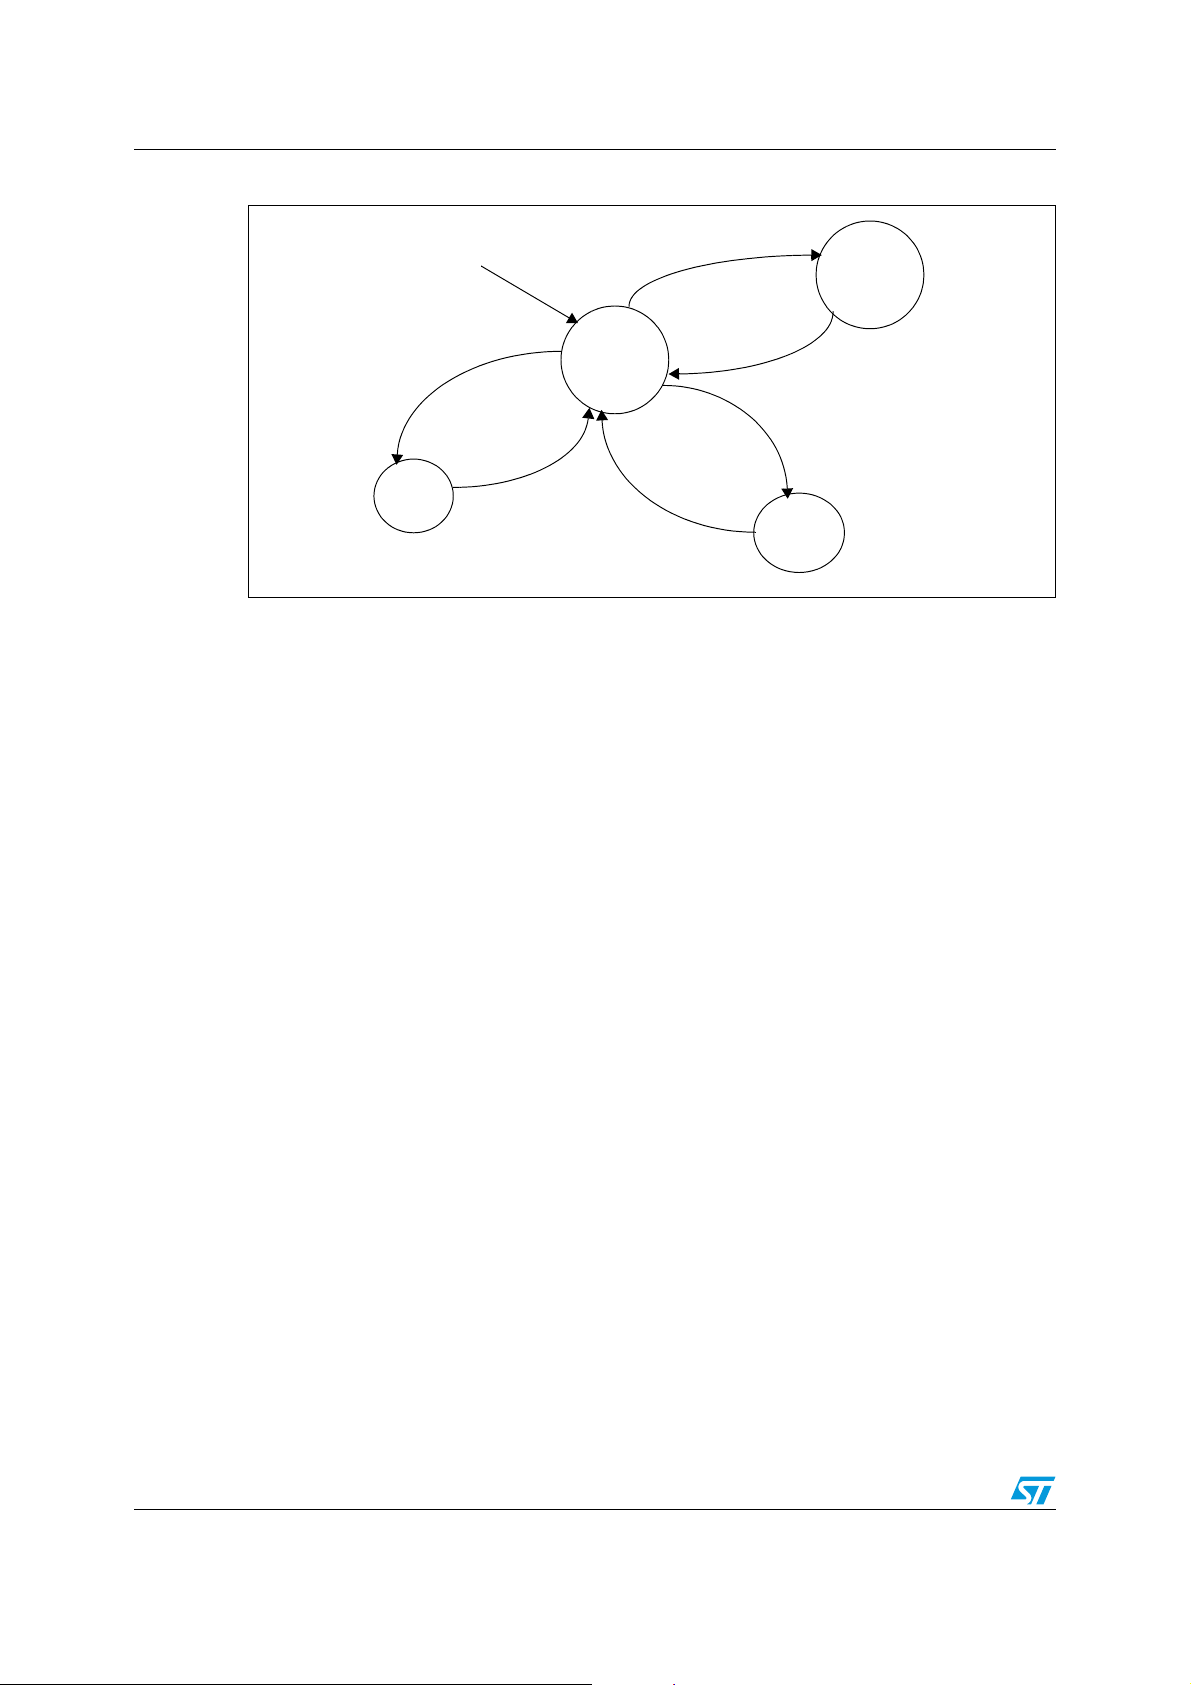
Figure 3. Low power mode state diagram
Power up reset
Set Idle
Mode
Idle
mode
1.4.1 Normal Run mode
This is the default run mode. The CPU executes instructions and any or all of the on-chip
peripherals are in active state. You can turn-on or turn-off the clock of any of the peripherals
writing to Peripheral clock gating register 0 (SCU_PCGR0) or Peripheral clock gating
register 1 (SCU_PCGR1). You can also reduce the frequency (by means of clock dividers)
of the various clocks in order to optimize power usage while operating in normal run mode.
Interrupt
Reset
Wake-up
RTC alarm
Normal
Run
mode
Interrupt
Reset
Wake-up
RTC alarm
Special
Interrupt
Run mode
Return from
Interrupt
Set sleep
mode
Sleep
mode
1.4.2 Special Interrupt Run mode
Special Interrupt mode FIQ
The special interrupt mode using FIQ causes the CPU to temporarily operate at full speed
(f
as clock frequency) while servicing one or more interrupts and return back to normal
MSTR
run mode with the speed selected by the clock RCLKDIV divider (see Figure 2) when the
interrupt routine is complete. You enable/disable this mode using the CPU_INTR bit in the
Power management register (SCU_PWRMNG).
Special Interrupt mode IRQ
The special interrupt mode using IRQ causes the CPU to operate at full speed (f
clock frequency) when the IRQ service routine reads the vector address register in the VIC
and jumps then to the specified interrupt with the speed selected by the RCLKDIV clock
divider. You enable/disable this mode using the CPU_INTR bit in the Power management
register (SCU_PWRMNG).
Workarounds
To operate at full speed when servicing the IRQ interrupts, you have to configure the desired
clock frequency at the beginning of the interrupt routine. Then, you have to switch the
system clock back to the operating frequency after disabling the interrupt.
1.4.3 Idle mode
Idle mode is entered under software control, by writing the value ‘001b’ to the
PWR_MODE[2:0] bits in the Power management register (SCU_PWRMNG). In this mode,
MSTR
as
14/48
Page 15

AN2633 Power supply and clocks
the CPU suspends code execution. The CPU and FMI clocks are turned off. The various
peripherals still continue to operate with their programmed clock rate if they are enabled by
the related bits of the SCU_PCGRx and the SCU_MGRx registers. If the SCU_MGRx
register bit is 0, when the system enters Idle mode, the related clock is gated, otherwise the
peripheral continues to receive the clock if the PCGR bit is set.
To exit from Idle mode, an interrupt must be generated by one of the active peripherals or
from an external source:
● External reset or watchdog reset
● External or internal peripheral interrupt
● RTC alarm interrupt
● Input from EXTINT pins (GPIO pins) via wake-up unit (WIU)
Note: Before entering Idle mode, you should disable the Prefetch Queue/Branch Cache clock
(bit 1 in the SCU_MGR0 register) in order to minimize the current consumption.
1.4.4 Sleep mode
Sleep mode is entered under software control, by writing the value ‘010b’ in the
PWR_MODE[2:0] bits in the Power management register (SCU_PWRMNG). This is the
MCU’s lowest power mode. In this mode, all clock circuits (except RTC) and the oscillator
pin (4-25 MHz) are turned off. In this mode, the CPU does not execute any instructions. All
peripherals except the RTC have their clocks stopped. The ARM Flash Memory is put in
power down mode at the same time as the ARM MCU. The ARM MCU when enters into the
Power Down mode, generates a PD signal to the Flash Memory. The Flash memory take a
recovery time to resume operation on wake-up from sleep mode. The system clock is
switched on only after the recovery time is over.
To exit from Sleep mode, one of the following events must occur:
● External reset via the external reset pin
● External interrupt via wake-up unit (WIU)
● RTC Alarm
Note: In low power modes, the I/O pins keep the same state prior to low power mode entry.
1.4.5 Sleep mode and Idle mode configuration considerations
When enabling Sleep or Idle mode, certain requirements must be met to ensure the proper
operation of the low power modes. The following sections describe these requirements
when entering or exiting Sleep or Idle mode.
Code execution after entering Sleep and Idle mode
Once Idle mode or Sleep mode are entered by writing the PWR_MODE[2:0] bits in the
Power management register (SCU_PWRMNG) it takes about 12 crystal oscillator cycles
(X1_CPU input frequency) for the device before stopping the execution. In order to avoid
executing any valid instructions after the Idle or Sleep bit setting and before entering the
mode, it is mandatory to execute a certain number of dummy instructions after the Power
management register setting.
The number of dummy instructions to be executed depends on the ratio between the CPU
clock frequency and the oscillator input frequency according to the following:
15/48
Page 16

Power supply and clocks AN2633
N_dummy_Instr = (fcpuclk/fosc_x1)*12 if (fcpuclk/fosc_x1)>=1
N_dummy_Instr = 3 if (fcpuclk/fosc_x1)<1
The worst case is represented by the core working out at the PLL maximum frequency (96
MHz) with an 4 MHz crystal or oscillator on the X1 inputs. In this case 288 dummy
instructions would be needed.
Sleep mode with a crystal connected to X1_CPU input
In order to cut the power consumption due to oscillation, the crystal inputs are disabled
during Sleep mode. During recovery from Sleep mode the oscillator takes a start-up time to
re-start the oscillation (Refer to the datasheet for the start-up time). For this reason, when a
crystal is connected to the crystal inputs, the system clock source must be switched
to the RTC clock before entering Sleep mode. After waking up, the CPU runs on the RTC
clock and needs to wait until the crystal start-up time elapses before switching back to the
oscillator or PLL clock (Refer to STR91xFA Reference Manual for more information about
Clock Management during Sleep mode with crystal connected).
Sleep mode with an oscillator connected to X1_CPU input
In this case, the oscillation restarts right away after the X1 inputs are re-enabled and it is not
necessary to switch to RTC clock before entering Sleep mode.
Sleep mode with the PLL used as system clock source
If the oscillation on the X1_CPU inputs is generated by a crystal the software has to
explicitly switch the system clock source to the RTC clock before entering Sleep mode and,
when exiting Sleep mode, switch back to the PLL only after the crystal start-up time.
During Sleep mode, the PLL is automatically turned off and the system clock is
automatically switched to the oscillator input. On exit from Sleep mode, the system clock
goes back to the PLL clock only after the PLL is locked.
If the oscillation on the X1_CPU input is generated by an oscillator no action needs to be
taken since the PLL is automatically turned off, the system clock is automatically connected
to the oscillator clock and changed back to the PLL clock after exiting from Sleep mode once
the PLL is locked (refer to STR91xFA Reference Manual for more information about Clock
Management during Sleep mode
with crystal and PLL).
Sleep mode entry timing
When Sleep mode is selected, all the clock circuits and the oscillator pad (4-25 MHz) are
turned off. This procedure is controlled by a dedicated State Machine inside the Power
Management Unit (PMU), in order to switch off the clocks safely.
During the Sleep mode sequence, there are many interactions between the Power
Management Unit (PMU) and the Clock Control Unit (CCU). In particular, when the low
power mode is set, a signal is asserted to gate the peripheral clocks. As response to this
signal, all the peripherals have to send back to the PMU the acknowledgement that the clock
was shut-off.
The setting or enabling of the peripheral clocks depends on the Clock control register
(SCU_CLKCNTR) configuration and on the EE bit setting in the Watchdog clock control
register (selecting APB or RTC clock as the Watchdog clock source).
16/48
Page 17

AN2633 Power supply and clocks
Table 2. CCU output clocks that determines the entry time (t
SLEEP
)
CCU_OUT Description Control register
BRCLK Baud Rate Clock to the UART SCU_CLKCNTR
TIMO1CLK Timer 0-1 clock SCU_CLKCNTR
TIM23CLK Timer 2-3 clock SCU_CLKCNTR
EMICLK EMI clock SCU_CLKCNTR
FMICLK FMI clock SCU_CLKCNTR
WDG Watchdog clock WDG_CR (EE)
HCLK AHB clock SCU_CLKCNTR
PCLK APB clock SCU_CLKCNTR
CPUCLK ARM core clock SCU_CLKCNTR
USBCLK USB Clock SCU_CLKCNTR
As a result the time required to enter Sleep mode depends both on the oscillator clock, on
the CPUCLK clock and on the slowest clock set for the peripherals coming out of the Clock
Control Unit according to the following equation:
t
SLEEP
= 17 * (t
) + 14 * (t
OSC
SLOWEST_PERIPH_CLK
)+ 6 * (t
CPUCLK
)
Workarounds:
Take account of the maximum time required to enter Sleep mode (T
application.
Caution: During this t
event occurs immediately after setting the power management register and before the mode
becomes internally effective, it could freeze the device.
) in your specific
sleep
time any wake-up input is ignored. In addition, if a Wake-up or interrupt
SLEEP
17/48
Page 18

STR91xFA library low power mode functions AN2633
2 STR91xFA library low power mode functions
2.1 SCU_MCLKSourceConfig
Function name SCU_MCLKSourceConfig
Function prototype ErrorStatus SCU_MCLKSourceConfig(u32 MCLK_Source)
Behavior description Selects the MCLK clock source: OSC, RTC, or PLL
Input parameter
Output parameter None
Return parameter
Required preconditions
Called functions None
Required preconditions
Called functions None
MCLK_Source: specifies the clock source used as system
clock. Refer to Table 3: MCLK source for the allowed values.
ErrorStatus: ERROR or SUCCESS.
Function returns ERROR when selecting the PLL clock as
MCLK source while PLL is either disabled or not locked.
When selecting the PLL as MCLK clock source, make sure that
the PLL is enabled and locked, you can do this using the
SCU_PLLCmd(ENABLE) function.
When selecting the PLL as MCLK clock source, make sure that
the PLL is enabled and locked, you can do this using the
SCU_PLLCmd(ENABLE) function.
When selecting the PLL as MCLK clock source, make sure that
Required preconditions
Called functions None
the PLL is enabled and locked, you can do this using the
SCU_PLLCmd(ENABLE) function.
MCLK_Source
To select the system clock, use one of the following values:
Table 3. MCLK source
MCLK_Source Meaning
SCU_MCLK_PLL MCLK source = PLL clock
SCU_MCLK_RTC MCLK source = RTC clock
SCU_MCLK_OSC MCLK source = Oscillator clock
18/48
Page 19

AN2633 STR91xFA library low power mode functions
2.2 SCU_PLLCmd
Function name SCU_PLLCmd
Function prototype ErrorStatus SCU_PLLConfig(FunctionnalState NewState)
Behavior description Enables or disables the PLL
Input parameter NewState: ENABLE or DISABLE
Output parameter None
ErrorStatus: ERROR or SUCCESS
Return parameter
Required preconditions
Called functions None
After enabling the PLL, the PLL lock bit is polled to ensure that the PLL is locked before
exiting the function.
The function returns ERROR when:
– Disabling the PLL while PLL is selected as MCLK source
– Enabling the PLL while PLL already enabled & locked
– When enabling the PLL, you must have already configured the PLL
factors using the SCU_PLLFactorsConfig function.
– When disabling the PLL, make sure that the PLL is not selected as
MCLK.
Before disabling the PLL a “security” delay is inserted, this to guarantee that the system
clock has already switched to OSC or RTC before disabling the PLL.
19/48
Page 20

STR91xFA library low power mode functions AN2633
2.3 SCU_RCLKDivisorConfig
Function name SCU_RCLKDivisorConfig
Function prototype void SCU_RCLKDivisorConfig(u32 RCLK_Divisor)
Behavior description Selects the RCLK divisor 1, 2, 4, 8, 16 or 1024
Input parameter RCLK_Divisor: Refer to Table 4: RCLK_Divisor for the allowed values.
Output parameter None
Return parameter None
Required preconditions None
Called functions None None
RCLK_Divisor
Table 4. RCLK_Divisor
RCLK_Divisor Meaning
SCU_RCLK_Div1 RCLK Divisor = 1
SCU_RCLK_Div2 RCLK Divisor = 2
SCU_RCLK_Div4 RCLK Divisor = 4
SCU_RCLK_Div8 RCLK Divisor = 8
SCU_RCLK_Div16 RCLK Divisor = 16
SCU_RCLK_Div1024 RCLK Divisor = 1024
20/48
Page 21

AN2633 STR91xFA library low power mode functions
2.4 SCU_HCLKDivisorConfig
Function name SCU_HCLKDivisorConfig
Function prototype void SCU_HCLKDivisorConfig(u32 HCLK_Divisor)
Behavior description Selects the HCLK divisor: 1,2 or 4.
Input parameter
HCLK_Divisor c: Refer to Table 5: HCLK_Divisor for the allowed
values.
Output parameter None
Return parameter None
Required preconditions None
Called functions None
HCLK_Divisor
Table 5. HCLK_Divisor
HCLK_Divisor Meaning
SCU_HCLK_Div1 HCLK Divisor = 1
SCU_HCLK_Div2 HCLK Divisor = 2
SCU_HCLK_Div4 HCLK Divisor = 4
21/48
Page 22

STR91xFA library low power mode functions AN2633
2.5 SCU_PCLKDivisorConfig
Function name SCU_PCLKDivisorConfig
Function prototype void SCU_PCLKDivisorConfig(u32 PCLK_Divisor)
Behavior description Selects the PCLK divisor: 1,2,4 or 8
Input parameter PCLK_Divisor: Refer to Table 6: PCLK_Divisor for the allowed values.
Output parameter None
Return parameter None
Required preconditions None
Called functions None
Function name SCU_PCLKDivisorConfig
Table 6. PCLK_Divisor
PCLK_Divisor Meaning
SCU_PCLK_Div1 PCLK Divisor = 1
SCU_PCLK_Div2 PCLK Divisor = 2
SCU_PCLK_Div4 PCLK Divisor = 4
SCU_PCLK_Div8 PCLK Divisor = 8
2.6 SCU_FMICLKDivisorConfig
Function name SCU_FMICLKDivisorConfig
Function prototype void SCU_FMICLKDivisorConfig(u32 FMICLK_Divisor)
Behavior description Selects the FMI clock Divisor: 1 or 2
Input parameter
Output parameter None
Return parameter None
Required preconditions None
Called functions None
Table 7. FMICLK_Divisor
FMICLK_Divisor Meaning
SCU_FMICLK_Div1 FMICLK Divisor = 1
FMICLK_Divisor: Refer to Table 7: FMICLK_Divisor for the allowed
values.
SCU_FMICLK_Div2 FMICLK Divisor = 2
22/48
Page 23

AN2633 STR91xFA library low power mode functions
2.7 SCU_APBPeriphClockConfig
Function name SCU_APBPeriphClockConfig
Function prototype
void SCU_APBPeriphClockConfig(u32 APBPeriph, FunctionalState
NewState)
Behavior description
Input parameter1
Input parameter2 NewState: ENABLE or DISABLE
Output parameter None
Return parameter None
Required preconditions None
Called functions None
Disables/ enables a clock for a peripheral or combination of
peripherals (uses logical OR) on APB bus
APBPeriph: __PPP, example: __RTC , __GPIO0, Refer to section
APBPeriph for the allowed values.
APBPeriph
The following values are allowed for the APBPeriph parameter:
__TIM01, __TIM23, __MC, __UART0, __UART1, __UART2, __I2C0, __I2C1,
__SSP0, __SSP1, __CAN, __ ADC, __WIU, __GPIO0, __GPIO1,
__GPIO2, __GPIO3, __GPIO4, __GPIO5, __GPIO6, __GPIO7, __GPIO8,
__GPIO9, __RTC.
Note: SCU_PCGR1 Register bit 12 is “don’t care” in the STR91xFA. The system clock to the
Watchdog Block is always running.
23/48
Page 24

STR91xFA library low power mode functions AN2633
2.8 SCU_AHBPeriphClockConfig
Function name SCU_AHBPeriphClockConfig
Function prototype
void SCU_AHBPeriphClockConfig(u32 AHBPeriph, FunctionalState
NewState)
Behavior description
Input parameter1
Input parameter2 NewState: ENABLE or DISABLE
Output parameter None
Return parameter None
Required preconditions None
Called functions None
Disables / enables the clock for a peripheral or combination of
peripherals (use logical OR) on AHB bus
AHBPeriph: __PPP, example: __DMA, __USB, ...
Refer to AHBPeriph for the allowed values.
AHBPeriph
The following values are allowed for the AHBPeriph parameter:
__FMI, __PFQBC, __SRAM, __SRAM_ARBITER, __VIC, __EMI, __EXT_MEM_CLK,
__DMA, __USB, __USB48M, __ENET.
2.9 SCU_APBPeriphIdleConfig
Function name SCU_APBPeriphIdleConfig
Function prototype
void SCU_APBPeriphIdleConfig(u32 APBPeriph, FunctionalState
NewState)
Behavior description Enables/disables the clock for a peripheral during Idle mode
Input parameter1
Input parameter2 NewState: ENABLE or DISABLE
Output parameter None
Return parameter None
Required preconditions None
Called functions None
24/48
APBPeriph
Refer to APBPeriph on page 23 for the allowed values.
Page 25

AN2633 STR91xFA library low power mode functions
2.10 SCU_AHBPeriphIdleConfig
Function Name SCU_AHBPeriphIdleConfig
Function prototype
void SCU_AHBPeriphIdleConfig(u32 AHBPeriph, FunctionalState
NewState)
Behavior description Enables/disables the clock for a peripheral during Idle mode
Input parameter1
AHBPeriph
Refer to AHBPeriph on page 24 for the allowed values.
Input parameter2 NewState: ENABLE or DISABLE
Output parameter None
Return parameter None
Required preconditions None
Called functions None
2.11 SCU_EnterIdleMode
ì
Function name SCU_EnterIdleMode
Function prototype void SCU_EnterIdleMode(void)
Behavior description Puts MCU in Idle mode
Input parameter None
Output parameter None
Return parameter None
Required preconditions None
Called functions None
2.12 SCU_EnterSleepMode
Function name SCU_EnterSleepMode
Function prototype void SCU_EnterSleepMode(void)
Behavior description Puts MCU in Sleep mode
Input parameter None
Output parameter None
Return parameter None
Required preconditions None
Called functions None
25/48
Page 26

STR91xFA library low power mode functions AN2633
2.13 SCU_SpecIntRunModeConfig
Function name SCU_SpecIntRunModeConfig
Function prototype void SCU_SpecIntRunModeConfig(FunctionalStateNewState)
Behavior description Enables or Disables the special interrupt run mode
Input parameter Newstate = ENABLE or DISABLE
Output parameter None
Return parameter None
Required preconditions None
Called functions None
26/48
Page 27

AN2633 STR91xFA library low power mode functions
2.14 FMI_Config
Function name FMI_Config
Function prototype
Behavior description Configures the FMI
Input parameter 1
Input parameter 2
Input parameter 3
Input parameter 4
void FMI_Config(u16 FMI_ReadWaitState, u32 FMI_WriteWaitState, u16
FMI_PWD, u16 FMI_LVDEN, u16 FMI_FreqRange
Fmi_ReadWaitState : Specifies FMI_ReadWaitState: specifies the read
wait state value.
Refer to Table 8: FMI_ReadWaitState for the allowed values.
FMI_WriteWaitState: specifies the read wait state value.
Refer to Table 9: FMI_WriteWaitState for the allowed values.
FMI_PWD: specifies the power down mode stat us.
Refer to Table 10: FMI_PWD for the allowed values.
FMI_LVDEN: specifies the low voltage detector mode status.
Refer to Table 11: FMI_LVDEN for the allowed values.
Input parameter 5
FMI_FreqRange: specifies the working frequency range.
Refer to Table 12: FMI_FreqRange for the allowed values.
Output parameter None
Return parameter None
Required preconditions None
Called functions None
FMI_ReadWaitState
The FMI read wait states that can be selected are listed in the following table. These wait
states are only related to access of non sequential addresses. There are no wait states for
sequential accesses.
Table 8. FMI_ReadWaitState
FMI_ReadWaitState Meaning
FMI_READ_WAIT_STATE_1 1 read wait state
FMI_READ_WAIT_STATE_2 2 read wait states
FMI_READ_WAIT_STATE_3 3 read wait states
FMI_WriteWaitState
The FMI write wait states that can be selected are listed in the following table:
Table 9. FMI_WriteWaitState
FMI_WriteWaitState Meaning
FMI_WRITE_WAIT_STATE_0 0 write wait state
FMI_WRITE_WAIT_STATE_1 1 write wait states
FMI_PWD
FMI power down mode can be selected as listed in the following table:
27/48
Page 28

STR91xFA library low power mode functions AN2633
Table 10. FMI_PWD
FMI_PWD Meaning
FMI_PWD_ENABLE Enable the PWD
FMI_PWD_DISABLE Disable the PWD
FMI_LVDEN
The FMI low voltage detector can be selected as listed in the following table
Table 11. FMI_LVDEN
FMI_LVDEN Meaning
FMI_LVD_ENABLE Enable the LVD
FMI_LVD_DISABLE Disable the LVD
FMI_FreqRange
The FMI frequency ranges that can be selected are listed in the following table:
Table 12. FMI_FreqRange
FMI_FreqRange Meaning
FMI_FREQ_LOW Low working frequency (up to 66 MHz)
FMI_FREQ_HIGH High working frequency (above 66 MHz)
28/48
Page 29

AN2633 Operating measurements
3 Operating measurements
3.1 Board set-up
The STR910 evaluation board (order code STR910-EVAL) and Uniboard (order code
UNIBOARD TQFP 128 14×14) are available for evaluation and testing purposes. Contact
your local ST sales office for further details.
3.1.1 Performing measurements with the STR910-EVAL board
For operating instructions, refer to the STR910_EVAL Board User Manual. With this board,
measurements can be made at V
Consumption measurements
DDQ
, VDD, AV
DD
and V
BATT
.
● Current consumption in V
● Current consumption in V
● Current consumption in V
can be made by replacing JP4 by an amperemeter.
DD
can be made by replacing JP2 by an amperemeter.
DDQ
can be made by replacing JP15 by an amperemeter (to
BATT
measure battery current consumption).
● Current consumption in AV
can be made by replacing JP3 by an amperemeter (to
DD
measure ADC current consumption).
To reduce power consumption, connect a pull-up resistor to USBDP pin and a pull-down
resistor to TAMPER_IN pin.
Wake-up time measurements
Definition:
Three wake-up times are defined:
● Wake-up time from Sleep mode with a crystal connected to X1_CPU and X2_CPU,
● Wake-up time from Sleep mode with an oscillator connected to X1_CPU,
● Wake-up time from Idle mode.
● These wake-up times measure the time between the wake-up trigger event and the first
fetched instruction by the core.
3.1.2 Performing measurements with the Uniboard TQFP128
Environment
The software toolsets used for the connection are: IAR or Signum. It is not possible to
connect with RVDK.
Note: 1 All pins on port 0 - 9 are 5 V tolerant.
2 There are no internal or programmable pull-up resistors on I/O ports 0 to 9. By default they
are in high-impedance input mode.
3 These external components are needed to update Uniboard TQFP128:
29/48
Page 30

Operating measurements AN2633
Table 13. Bill of material
Components Value/Reference Quantity
STR91x Chip STR912FA 1
Capacitor 10 µF 6
Capacitor 100 nF 1
Capacitor 6 pF 2
Resistor 10 K 10
Oscillator 24 MHz-25 MHz 1
Quartz 32 kHz 1
Regulator LD33V 1
Regulator LD25V 1
Regulator LD18V 1
Connector HE-20 1
Battery 3 V 1
Figure 4. Regulator connection
Input
10 µF
Figure 5. JTAG interface
3V3
10k
JTDO
JTCK
JTMS
JTDI
JTRSTn
JRTCK
RESET_IN
10k
STR91xFA
10k
3V3
LDXXV
GND
3V3
10k
10k
3V3
Output
3V3
10k
10 µF
3V3
2
1
4
13
6
9
8
7
10
5
3
12
14
11
15
16
18
20
HE-20 Connector
30/48
Page 31

AN2633 Operating measurements
Pin connection
This table describes how you can connect STR91xFA with clock and reset.
Table 14. Pin connections
Signal name Pin
RESET_IN 89
X1 MCU 104
X1, X2 RTC 41, 42
TA MP ER _ IN 9 1
Figure 6. Reset circuit
3V3
R
2
10K
RESET_IN
Pin 89
100 nF
C1
S4
Figure 7. Oscillator circuit
3V3
Figure 8. Real time clock circuit
Pin 41
C4 C5
6 pF
4
1
Pin 104
3
2
Pin 42
Q2 32 kHz
6 pF
31/48
Page 32

Operating measurements AN2633
Power pin table
This table describes how to connect the STR91xFA power pins.
Table 15. Power pin table
Signal Name VCC(3V) Pin VDD(1V8) Pin RTC (2V4) Pin
AVSS 4
VSSQ 8
VDDQ 9
VSS 16
VDD 17
VDDQ 23
VSSQ 24
VBAT 39
VSSQ 40
VSS 48
VDD 49
VDDQ 43
VSSQ 56
VDDQ 57
VSSQ 72
VDDQ 73
VSS/GND
Pin
VDD 81
VSS 82
VDDQ 86
VSSQ 87
VDDQ 102
VSSQ 105
VDD 112
VSS 113
VDDQ 120
VSSQ 121
AVD D 122
AVR EF 123
32/48
Page 33

AN2633 Operating measurements
JTAG table
This table describes how to connect STR91xFA with a JTAG interface.
Table 16. JTAG connections
Signal Name Pin Connection
JTDO 117 Pull-up to 3V3 via10K resistor and HE-20 pin 13
JTCK 108 Pull-down to 3V3 via 10K resistor and HE-20 pin
JTMS 111 Pull-up to 3V3 via 10K resistor and HE-20 pin 7
JTDI 115 Pull-up to 3V3 via 10K resistor and HE-20 pin 5
JTRSTn 107 Pull-up to 3V3 via 10K resistor and HE-20 pin 3
JRTCK 97 Pull-up to 3V3 via 10K resistor and HE-20 pin 11
VCC 3V
GND GND
33/48
Page 34

Operating measurements AN2633
3.2 Software provided with this application note
3.2.1 Source files
This program provided with this application note for testing the different low power modes
include the following source files:
Table 17. List of source files
Files Description
91x_lpmode.c Routines for entering the different power modes and clock management
main.c Test software for testing power modes
91x_it.c Interrupt service routines
3.2.2 Hardware environment
1. Connect two LEDs to P9.0 and P9.1 pins (LD2 and LD3 respectively on STR91x-EVAL
Board).
2. Connect a push-button to P7.4 pin (Button PB3 on STR91x-EVAL Board).
3. Connect a push-button to P6.0 pin
4. Connect a push-button to P5.0 pin
5. Connect a push-button to P3.2 pin
6. Connect a null-modem female/female RS232 cable between the DB9 connector and
PC serial port.
7. Connect a battery.
3.2.3 How to use the project
In order to make the program work, you must do the following:
1. Create a project and setup all your toolchain start-up files
2. Compile the directory content files and required library files:
91x_lib.c
91x_scu.c
91x_fmi.c
91x_gpio.c
91x_rtc.c
91x_uart.c
91x_vic.c
91x_wdg.c
91x_wiu.c
3. Link all compiled files and load your image into Flash
4. Run the project.
34/48
Page 35

AN2633 Operating measurements
3.2.4 How to test an example of power modes
1. Uncomment the selected clock source and frequency in the two files: main.c and
91x_lpmode.c, if you are going to run a test in Normal Run mode and Idle mode. There
are 5 possibilities:
#define Clock_OSC
The source clock is the oscillator. Therefore, the system clock is set at 25 MHz.
The clock dividers are with their default values.
#define Clock_RTC
The source clock is the RTC. Therefore, the system clock is set at 32.768 KHz.
The clock dividers are with their default values.
#define Clock_PLL48
The source clock is the PLL with a system frequency of 48 MHz. All the clock
dividers are with their default values:
#define Clock_PLL66
The source clock is the PLL with a system frequency of 66 MHz. The clock
dividers are as follows:
APBDIV=2, AHBDIV=RCLKDIV=1 and f
FMICLK=fRCLK=fBRCLK=fEMI_BCLK
#define Clock_PLL96
configure the PLL as clock source. The system frequency is 96 MHz. The clock
dividers are as follows:
APBDIV=2, AHBDIV=RCLKDIV=1 and f
FMICLK=fRCLK=fBRCLK=fEMI_BCLK
.
.
For special interrupt mode tests, select either oscillator or PLL as clock source. For
sleep mode tests, select only oscillator as clock source.
2. Put the test number in the #define test number.
For example, to select LPMode_Idle_RTCAlarm_Periph_ON test you write:
#define Test_Number 18
35/48
Page 36

Operating measurements AN2633
3.2.5 Low power mode routines
Table 18. Test routines
Routines
Tes t
Number
void Run_Mode_Periph_ON(void) Test 0
void Run_Mode_Periph_OFF(void) Test 1
void LPMode_Sleep_RTCAlarm_LVD_ON_PWD_ON(void) Test 2
void LPMode_Sleep_RTCAlarm_LVD_OFF_PWD_OFF(void) Test 3
void LPMode_Sleep_RTCAlarm_LVD_ON_PWD_OFF(void) Test 4
void LPMode_Sleep_RTCAlarm_LVD_OFF_PWD_ON(void) Test 5
void LPMode_Sleep_ExternalWakeUP_LVD_ON_PWD_ON(void) Test 6
void LPMode_Sleep_ExternalWakeUP_LVD_OFF_PWD_OFF(void) Test7
void LPMode_Sleep_ExternalWakeUP_LVD_ON_PWD_OFF(void) Test 8
void LPMode_Sleep_ExternalWakeUP_LVD_OFF_PWD_ON(void) Test 9
void LPMode_Sleep_ExternalWakeUP_Interrupt_LVD_ON_PWD_ON(void) Test 10
void LPMode_Sleep_ExternalWakeUP_Interrupt_LVD_OFF_PWD_OFF(void) Test 11
void LPMode_Sleep_ExternalWakeUP_Interrupt_LVD_ON_PWD_OFF(void) Test 12
void LPMode_Sleep_ExternalWakeUP_Interrupt_LVD_OFF_PWD_ON(void) Test 13
void LPMode_Sleep_ExternalReset_LVD_ON_PWD_ON(void) Test 14
void LPMode_Sleep_ExternalReset_LVD_OFF_PWD_OFF(void) Test 15
void LPMode_Sleep_ExternalReset_LVD_ON_PWD_OFF(void) Test 16
void LPMode_Sleep_ExternalReset_LVD_OFF_PWD_ON(void) Test 17
void LPMode_Idle_RTCAlarm_Periph_ON(void) Test 18
void LPMode_Idle_RTCAlarm_Periph_OFF(void) Test 19
void LPMode_Idle_ExternalWakeUP_Periph_ON(void) Test 20
void LPMode_Idle_ExternalWakeUP_Periph_OFF(void) Test 21
void LPMode_Idle_ExternalWakeUP_Interrupt_Periph_ON(void) Test 22
void LPMode_Idle_ExternalWakeUP_Interrupt_Periph_OFF(void) Test 23
void LPMode_Idle_WDG_Reset_Periph_ON(void) Test 24
void LPMode_Idle_WDG_Reset_Periph_OFF(void) Test 25
void LPMode_Idle_WDG_Timer_Periph_ON(void) Test 26
void LPMode_Idle_WDG_Timer_Periph_OFF(void) Test 27
void LPMode_Idle_UART_Interrupt_Periph_ON(void) Test 28
void LPMode_Idle_UART_Interrupt_Periph_OFF(void) Test 29
void LPMode_Idle_External_Reset_Periph_ON(void) Test 30
void LPMode_Idle_External_Reset_Periph_OFF(void) Test 31
void LPMode_Run_Special_Interrupt_IRQ(void) Test 32
36/48
Page 37

AN2633 Operating measurements
Table 18. Test routines
void LPMode_Run_Special_Interrupt_FIQ(void) Test33
void LPMode_Vbatt_SRAM_ON(void) Test 34
void LPMode_Vbatt_SRAM_OFF(void) Test 35
3.2.6 Run mode tests
There are two tests in Normal Run mode. The first one operates in Normal Run mode with
all peripherals enabled and the other one operates with all peripherals disabled (refer to
Section 2.7: SCU_APBPeriphClockConfig and Section 2.8: SCU_AHBPeriphClockConfig
for information on configuring the peripherals).
Test 0: Run_Mode_Periph_ON:
1. Initially, the system operates in Normal Run mode with the oscillator as clock source
and a LED connected to P9.1 pin is switched on.
2. When you push a button connected to P7.4, the selected (uncommented) clock is
configured and all peripherals are enabled. To indicate that the system operates in
Normal Run mode with all peripherals enabled the LED connected to P9.1 is switched
OFF and a LED connected to P9.0 is toggled.
Routines
Tes t
Number
Test 1: Run_Mode_Periph_OFF:
1. Initially, the system operates in Normal Run mode with the oscillator as clock source
and a LED connected to P9.1 pin is switched on.
2. When you push a button connected to P7.4, the selected (uncommented) clock is
configured and all peripherals are disabled. To indicate that you operate in Normal Run
mode with all peripherals disabled, a LED connected to P9.1 is switched off.
3.2.7 Sleep mode tests
These tests show how to put the system in Sleep mode and then to wake-up from this mode
using either an RTC alarm, an external wake-up via Wake-up Unit (WIU), an external wakeup interrupt via WIU or an external reset.
In Sleep mode, there are 4 possible configurations:
● LVD_ON_PWD_ON: in this case the Low Voltage Detector (LVD) is enabled and the
Power Down mode is disabled.
● LVD_ON_PWD_OFF: the LVD is enabled and the PWD is disabled.
● LVD_OFF_PWD_ON: the LVD is disabled and the PWD is enabled.
● LVD_OFF_PWD_OFF: the LVD is disabled and the PWD is disabled.
Test 2,3,4 and 5: LPMode_Sleep_RTCAlarm:
The system enters this mode as follows:
37/48
Page 38

Operating measurements AN2633
1. After system power on, the system operates in Normal Run mode with the oscillator as
clock source.To indicate this, a LED connected to P9.1 is switched on.
2. When you push a button connected to pin P7.4, the system enters Sleep mode and the
LED connected to P9.1 is switched off.
3. The RTC is programmed to generate an interrupt every 10 seconds. Consequently,
after 10 seconds the RTC alarm wakes up the system causing a LED connected to
P9.0 pin to toggle. This is used to indicate that the MCU is in RUN mode with the
oscillator as clock source.
Test 6,7,8 and 9: LPMode_Sleep_ExternalWakeUP
The system enters this mode as follows:
1. After system power on, the system operates in Normal Run mode with the oscillator as
clock source.To indicate this, a LED connected to P9.1 is switched on.
2. When you push a button connected to pin P7.4, the system enters Sleep mode and the
LED connected to P9.1 is switched off.
3. When a falling edge on EXINT2 line 16 is detected, an external wake-up is generated.
To indicate that the MCU has woken up from Sleep mode, a LED connected to P9.0 is
toggled.
Test 10,11,12 and 13: LPMode_Sleep_ExternalWakeUP_Interrupt
The system enters this mode as follows:
1. After system power on, the system operates in Normal Run mode with the oscillator as
clock source.To indicate this, a LED connected to P9.1 is switched on.
2. When you push a button connected to pin P7.4, the system enters Sleep mode and the
LED connected to P9.1 is switched off.
3. When a falling edge on EXINT2 line 16 is detected, an interrupt is generated. To
indicate that the MCU wakes up from Sleep mode, a LED connected to P9.0 pin is
toggled.
Test 14,15,16 and 17: LPMode_Sleep_ExternalReset
The system enters this mode as follows:
1. After system power on, the system operates in Normal Run mode with the oscillator as
clock source.To indicate this, a LED connected to P9.1 is switched on.
2. When you push a button connected to pin P7.4, the system enters Sleep mode and the
LED connected to P9.1 is switched off.
3. The system waits until you push RESET pin to wake-up from Sleep mode. To indicate
that the power mode is Normal Run mode a LED connected to P9.1 pin is switched on.
Note: All sleep mode tests work only with the oscillator as clock source
3.2.8 Idle mode tests
These tests show how to put the system in Idle mode and then to wake-up from this mode
using either an RTC alarm, an external wake-up, an external wake-up interrupt, a Watchdog
reset, a Watchdog timer interrupt, an UART interrupt or an external reset.
In Idle mode, there are 2 possible configurations:
● Periph_ON: indicates that all peripherals are enabled.
● Periph_OFF: indicates that all peripherals are disabled.
38/48
Page 39

AN2633 Operating measurements
Test 18 and19: LPMode_Idle_RTCAlarm
The system enters this mode as follows:
1. After system power on, the system operates in Normal Run mode with the oscillator as
clock source.To indicate this, a LED connected to P9.1 is switched on.
2. When you push a button connected to pin P7.4, the system enters Idle mode with the
desired frequency and the LED connected to P9.1 pin is switched off.
3. The RTC is programmed to generate an interrupt every 10 seconds. Consequently,
after 10 seconds the RTC alarm wakes up the system causing a LED connected to
P9.0 pin to toggle. This is used to indicate that the MCU is in RUN mode operating with
the selected (uncommented) frequency.
Test 20 and 21: LPMode_Idle_ExternalWakeUP
The system enters this mode as follows:
1. After system power on, the system operates in Normal Run mode with the oscillator as
clock source.To indicate this, a LED connected to P9.1 is switched on.
2. When you push a button connected to pin P7.4, the system configures the selected
(uncommented) clock and then enters Idle mode and the LED connected to P9.1 is
switched off.
3. When a falling edge on EXINT2 line 16 is detected, an external wake-up is generated.
To indicate that the MCU wakes up from Idle mode with the selected (uncommented)
frequency, a LED connected to P9.0 is toggled.
Test 22 and 23: LPMode_Idle_ExternalWakeUP_Interrupt
The system enters this mode as follows:
1. After system power on, the system operates in Normal Run mode with the oscillator as
clock source.To indicate this, a LED connected to P9.1 is switched on.
2. When you push a button connected to pin P7.4, the system enters Idle mode with the
desired frequency and the LED connected to P9.1 is switched off.
3. When a falling edge on EXINT2 line 16 is detected, an interrupt is generated. To
indicate that the MCU wakes up from Idle mode with the selected (uncommented)
frequency, a LED connected to P9.0 pin is toggled.
Test 24 and 25: LPMode_Idle_WDG_Reset
The system enters this mode as follows:
1. After system power on, the system operates in Normal Run mode with the oscillator as
clock source.To indicate this, a LED connected to P9.1 is switched on.
2. When you push a button connected to pin P7.4, the system enters Idle mode with the
desired frequency and the LED connected to P9.1 is switched off.
3. The WDG is programmed to generate a system reset once every 5 seconds.
Consequently, after 5 seconds the WDG Reset wakes up the system with the oscillator
as clock source causing a LED connected to P9.1 to be switched on.
Test 26 and 27: LPMode_Idle_WDG_Timer
The system enters this mode as follows:
39/48
Page 40

Operating measurements AN2633
1. After system power on, the system operates in Normal Run mode with the oscillator as
clock source.To indicate this, a LED connected to P9.1 is switched on.
2. When you push a button connected to pin P7.4, the system enters Idle mode with the
desired frequency and the LED connected to P9.1 is switched off.
3. The WDG is programmed to generate an interrupt every 3 seconds. Consequently,
after 3 seconds the WDG interrupt wakes up the system causing a LED connected to
P9.0 pin to toggle. This is used to indicate that the MCU is in RUN mode operating with
the selected (uncommented) frequency.
Test 28 and 29: LPMode_Idle_UART_Interrupt
1. First of all, you have to configure the Hyperterminal as follows:
Word Length = 7 Bits
Two Stop Bits
No parity
BaudRate = 115200 baud
Flow control: None
2. After system power on, the system operates in Normal Run mode with the oscillator as
clock source.To indicate this, a LED connected to P9.1 is switched on. When you push
a button connected to pin P7.4, the system enters Idle mode and UART0 sends 2
messages to the Hyperterminal ("UART - Hyperterminal communication without
hardware flow control") and ("to exit from low power mode you should send a byte from
Hyperterminal") and the LED connected to P9.1 is switched off.
3. The UART0 waits for a string from the hyperterminal that you must enter to wake-up the
MCU from Idle mode. A LED connected to P9.0 toggles to indicate that the system is in
Run mode and a message "STR91x is in Run mode" is sent to the hyperteminal.
Note: Tests 28 and 29 work with any clock source (Oscillator, PLL: 48 MHz, PLL: 66 MHz and PLL:
96 MHz) except the RTC clock.
Test 30-31: LPMode_Idle_External_Reset
The system enters this mode as follows:
1. After system power on, the system operates in Normal Run mode with the oscillator as
clock source. To indicate this, a LED connected to P9.1 is switched on.
2. When you push a button connected to pin P7.4, the system enters Idle mode with the
desired frequency and the LED connected to P9.1 is switched off.
3. The system waits until you push RESET pin to wake-up from Idle mode. To indicate that
the power mode is Normal Run mode operating with the oscillator as clock source, a
LED connected to P9.1 pin is switched on.
3.2.9 Special Interrupt Run mode tests
Test 32: LPMode_Run_Special_Interrupt_IRQ
1. When you push a button connected to pin P7.4, the system enters Run mode and P9.0
pin toggles with the f
2. When a falling edge on EXINT group 0 line2 is detected, an interrupt is generated.
When entering the interrupt in Special Interrupt Run mode IRQ, a LED connected to
P9.1 pin is toggled. After servicing the interrupt routine, the MCU returns back to Run
mode and P9.0 pin is toggled.
RCLK=fMSTR
/2 as frequency.
40/48
Page 41

AN2633 Operating measurements
Test 33: LPMode_Run_Special_Interrupt_FIQ
1. When you push a button connected to pin P7.4, the system enters Run mode with the
f
RCLK=fMSTR
/2 as frequency and P9.0 pin is toggled.
2. When a falling edge on EXINT group 0 line2 is detected, an interrupt is generated. To
indicate that the system is in Special Interrupt Run mode FIQ operating with f
MSTR
, a
LED connected to P9.1 pin is toggled. After servicing the interrupt routine, the MCU
3.2.10 Battery supply tests
Test 34: LPMode_Vbatt_SRAM_ON
In this test, The SRAM switches its supply from the internal VDD source to the VBATT pin
when the V
SRAM is enabled.
Test 35: LPMode_Vbatt_SRAM_OFF
In this test, The SRAM switches its supply from the internal VDD source to the VBATT pin
when the V
SRAM is disabled.
DD
DD
and V
and V
voltage drops below that of the LVD threshold. In this test, the
DDQ
voltage drops below that of the LVD threshold. In this test, the
DDQ
3.3 Measurements and typical values
For all measurements:
● All peripherals are disabled except if explicitly mentioned.
● For measurements in Ta bl e 2 0:
● All I/O pins are configured in output push-pull 1 (to measure I
● No I/O pads toggling (to measure I
● For all measurements in Tabl e 2 0, Ta bl e 2 1 and Ta bl e 2 2 :
● a crystal is connected to X1_CPU and X2_CPU.
Note: All measurements are done on rev H silicon.
DDQ
).
DDQ
).
41/48
Page 42

Operating measurements AN2633
Table 19. Typical power consumption data on V
Symbol Parameter Conditions
at TA=25°C
BAT
Typical current
measured on
VBAT pin
Unit
I
RTC_STBY
I
SRAM_STBY
RTC Standby Current Measured on VBATT pin 0.58
µA
SRAM Standby Current Measured on VBATT pin 4.27
42/48
Page 43

AN2633 Operating measurements
Table 20. Typical power consumption data on V
DD
and V
Symbol Parameter Conditions
I
DDRUN
I
DDQRUN
Run mode
current from
/
Run mode
current from
RAM
FLASH
All
peripherals
(1)
ON
All
peripherals
(2)
OFF
All
peripherals
(1)
ON
All
peripherals
(2)
OFF
f
MSTR=fOSC
f
FMICLK=fHCLK=fPCLK
f
MSTR=fPLL
f
FMICLK=fHCLK=fPCLK
f
MSTR=fPLL
f
FMICLK=fHCLK
f
MSTR=fPLL
f
FMICLK=fHCLK
f
MSTR=fOSC
f
FMICLK=fHCLK=fPCLK
f
MSTR=fPLL
f
FMICLK=fHCLK=fPCLK
f
MSTR=fPLL
f
FMICLK=fHCLK
f
MSTR=fPLL
f
FMICLK=fHCLK
f
MSTR=fRTC
f
FMICLK=fHCLK=fPCLK
f
MSTR=fOSC
f
FMICLK=fHCLK=fPCLK
f
MSTR=fPLL
f
FMICLK=fHCLK=fPCLK
f
MSTR=fPLL
f
FMICLK=fHCLK
f
MSTR=fPLL
f
FMICLK
f
MSTR=fRTC
f
FMICLK=fHCLK=fPCLK
f
MSTR=fOSC
f
FMICLK=fHCLK=fPCLK
f
MSTR=fPLL
f
FMICLK=fHCLK=fPCLK
f
MSTR=fPLL
f
FMICLK=fHCLK
f
MSTR=fPLL
f
FMICLK=fHCLK
=25 MHz, f
=48 MHz, f
=66 MHz, f
=66 MHz, f
=96 MHz, f
=96 MHz, f
=25 MHz, f
=48 MHz, f
=66 MHz, f
=66MHz, f
=96 MHz, f
=96 MHz, f
=32.768 kHz, f
=25 MHz, f
=48 MHz, f
=66 MHz, f
=66 MHz, f
=96 MHz, f
=HCLK=96 MHz, f
=32.768 kHz, f
=25 MHz, f
=48 MHz, f
=66 MHz, f
=66MHz, f
=96 MHz, f
=96 MHz, f
at TA=25°C
DDQ
=25 MHz,
RCLK
=25 MHz,
=48 MHz,
RCLK
=48 MHz,
=66 MHz,
RCLK
=33 MHz
PCLK
=96 MHz,
RCLK
=48 MHz
PCLK
=25 MHz,
RCLK
=25 MHz,
=48 MHz,
RCLK
=48 MHz,
=66 MHz,
RCLK
=33 MHz
PCLK
=96 MHz,
RCLK
=48 MHz
PCLK
=32.768 kHz,
RCLK
=32.768 kHz,
=25 MHz,
RCLK
=25 MHz,
=48 MHz,
RCLK
=48 MHz,
=66 MHz,
RCLK
=33 MHz
PCLK
=96 MHz,
RCLK
=48 MHz
PCLK
=32.768 kHz,
RCLK
=32.768 kHz,
=25 MHz,
RCLK
=25 MHz,
=48 MHz,
RCLK
=48 MHz,
=66 MHz,
RCLK
=33 MHz
PCLK
=96 MHz,
RCLK
=48 MHz
PCLK
DD
on V
Typical
current
(3.3V)
Typical
current
on V
(1.8V)
52.98 0.8
100.42 5.24
122.86 4.55
173.18 5.24
25.74 0.47
49.92 4.37
65.01 3.96
92.49 4.37
0.9 0.66
54.88 0.75
109.54 5.27
149.27 4.46
191.35 5.27
0.82 0.37
31.53 0.38
59.74 4.5
72.69 3.99
102.56 4.5
DDQ
Unit
mA
43/48
Page 44

Operating measurements AN2633
Table 20. Typical power consumption data on V
DD
and V
Symbol Parameter Conditions
I
DDIDLE
I
DDQIDLE
Idle mode
/
current from
FLASH
All
peripherals
(3)
ON
f
MSTR=fRTC
f
f
FMICLK=fHCLK
f
FMICLK=fHCLK
f
MSTR=fRTC
f
=32.768 kHz, f
f
FMICLK=fHCLK=fPCLK
MSTR=fOSC
f
FMICLK=fHCLK=fPCLK
f
MSTR=fPLL
f
FMICLK=fHCLK=fPCLK
f
MSTR=fPLL
=25 MHz, f
=48 MHz, f
=66 MHz, f
=66 MHz, f
f
MSTR=fPLL
=96 MHz, f
=96 MHz, f
=32.768 kHz, f
f
FMICLK=fHCLK=fPCLK
MSTR=fOSC
=25 MHz, f
FMICLK=HCLK=f
All
peripherals
(4)
OFF
f
MSTR=fPLL
f
f
MSTR=fPLL
f
FMICLK=fHCLK
f
MSTR=fPLL
f
FMICLK=fHCLK
=48 MHz, f
FMICLK=fHCLK=fPCLK
=66 MHz, f
=96 MHz, f
=66 MHz, f
=96 MHz, f
LVD On, PWD On 29.34 10.06
I
DDSLEEP
I
DDQSLEEP
/
Sleep mode current
LVD On, PWD Off 47.08 10.06
LVD Off, PWD On 24.52 6.92
LVD Off, PWD off 41.36 6.92
at TA=25°C (continued)
DDQ
=32.768 kHz,
RCLK
=32.768 kHz,
=25 MHz,
RCLK
=25 MHz,
=48 MHz,
RCLK
=48 MHz,
=66 MHz,
RCLK
=33 MHz
PCLK
=96 MHz,
RCLK
=48 MHz
PCLK
=32.768 kHz,
RCLK
=32.768 kHz,
=25 MHz,
RCLK
=25 MHz,
PCLK
=48 MHz,
RCLK
=48 MHz,
=66 MHz,
RCLK
=33 MHz
PCLK
=96 MHz,
RCLK
=48 MHz
PCLK
DD
on V
Typical
current
(3.3V)
Typical
current
on V
(1.8V)
0.78 0.47
14.65 0.48
28.94 4.46
35.99 4.04
51.35 4.46
0.76 0.47
5.18 0.48
10.99 4.46
12.26 4.06
17.22 4.46
DDQ
Unit
mA
µA
1 ARM core and peripherals active with all clocks on
2 ARM core active and all peripheral clocks stopped
3 ARM core stopped and all peripheral clocks on
4 ARM core stopped and all peripheral clocks stopped
44/48
Page 45

AN2633 Operating measurements
On-chip peripherals
Table 21. Peripherals current consumption at TA=25°C
Typical
Symbol Parameter Conditions
(1)
(1)
(1)
(1)
(1)
(1)
(1)
(1)
(1)
(1)
(1)
(1)
(1)
(1)
f
MSTR=fPLL
f
HCLK=fFMICLK
f
MSTR=fPLL
f
HCLK=fFMICLK
=96 MHz, f
f
=48 MHz
PCLK
=48 MHz, f
=48 MHz
f
PCLK
=96 MHz,
RCLK
=96 MHz,
=48 MHz,
RCLK
=48 MHz,
I
DDTIM
I
DDMC
I
DDUART
I
DDI2C
I
DDSSP
I
DDCAN
I
DDWIU
I
DDGPIO
I
DDRTC
I
DDVIC
I
DDDMA
I
DDENET
I
DDPFQBC
I
DDUSB
1. Data based on a differential IDD (Typical current on VDD=1.8V) measurements between the on-chip peripheral when kept
under reset, not clocked and the on-chip peripheral when clocked and not kept under reset.
TIM Timer supply current
MC supply current
UART supply current
I2C supply current
SSP supply current
CAN supply current
WIU supply current
GPIO supply current
RTC supply current
VIC supply current
DMA supply current
ENET supply current
PFQBC supply current
USB supply current
current on
(1.8V)
V
DD
0.67
1.06
1.59
0.5
1.12
3.79
0.65
0.31
0.07
7.79
21.05
24.1
19.85
2.41
Unit
mA
Table 22. ADC current consumption
Symbol ADC modes Condition
I
ADD
I
DDQ
I
ADD
I
DDQ
I
ADD
I
DDQ
Run mode with conversion
Idle mode
Standby mode
1 Data based on a differential I
conversions.
(1)
f
MSTR=fOSC=fADC
f
FMICLK=fHCLK=fPCLK
measurements between reset configuration and continuous A/D
ADD
=24 MHz, f
45/48
=24 MHz,
RCLK
=24 MHz,
Typical
current
(AV
DD
3.36
4.64
3.36
4.64
1.93
3.21
Unit
=3.3V)
mA
Page 46

Operating measurements AN2633
Table 23. Wake-up times from Sleep and Idle modes
Parameter Conditions
f
MSTR=fOSC
Oscillator connected to
Wake-up time
from Sleep
(1)
mode
Wake-up time
from Idle
(1)
mode
X1_CPU and X2_CPU
X1_CPU
Crystal connected to
Crystal connected to
X1_CPU and X2_CPU
(2)
f
MSTR=fRTC
f
f
MSTR=fRTC
f
f
MSTR=fOSC
f
MSTR=fRTC
f
1. The wake-up times don’t include the interrupt latency.
2 This time includes the crystal start up time.
=25 MHz, f
f
FMICLK=fHCLK=fPCLK
=32.768 kHz, f
FMICLK=fHCLK=fPCLK
=32.768 kHz, f
FMICLK=fHCLK=fPCLK
=25MHz, f
f
FMICLK=fHCLK=fPCLK
=32.768 kHz, f
FMICLK=fHCLK=fPCLK
=25 MHz,
RCLK
=25 MHz,
=32.768 kHz
RCLK
=32.768 kHz,
=32.768 kHz
RCLK
=32.768 kHz,
=25 MHz,
RCLK
=25 MHz,
=32.768 kHz
RCLK
=32.768 kHz,
Wake-up
times
Unit
55.5 µs
1.53 ms
1.72 ms
2µs
1.45 ms
46/48
Page 47

AN2633 Revision history
4 Revision history
Table 24. Document revision history
Date Revision Changes
31-Jan-2008 1 Initial release.
47/48
Page 48

AN2633
Please Read Carefully:
Information in this document is provided solely in connection with ST products. STMicroelectronics NV and its subsidiaries (“ST”) reserve the
right to make changes, corrections, modifications or improvements, to this document, and the products and services described herein at any
time, without notice.
All ST products are sold pursuant to ST’s terms and conditions of sale.
Purchasers are solely responsible for the choice, selection and use of the ST products and services described herein, and ST assumes no
liability whatsoever relating to the choice, selection or use of the ST products and services described herein.
No license, express or implied, by estoppel or otherwise, to any intellectual property rights is granted under this document. If any part of this
document refers to any third party products or services it shall not be deemed a license grant by ST for the use of such third party products
or services, or any intellectual property contained therein or considered as a warranty covering the use in any manner whatsoever of such
third party products or services or any intellectual property contained therein.
UNLESS OTHERWISE SET FORTH IN ST’S TERMS AND CONDITIONS OF SALE ST DISCLAIMS ANY EXPRESS OR IMPLIED
WARRANTY WITH RESPECT TO THE USE AND/OR SALE OF ST PRODUCTS INCLUDING WITHOUT LIMITATION IMPLIED
WARRANTIES OF MERCHANTABILITY, FITNESS FOR A PARTICULAR PURPOSE (AND THEIR EQUIVALENTS UNDER THE LAWS
OF ANY JURISDICTION), OR INFRINGEMENT OF ANY PATENT, COPYRIGHT OR OTHER INTELLECTUAL PROPERTY RIGHT.
UNLESS EXPRESSLY APPROVED IN WRITING BY AN AUTHORIZED ST REPRESENTATIVE, ST PRODUCTS ARE NOT
RECOMMENDED, AUTHORIZED OR WARRANTED FOR USE IN MILITARY, AIR CRAFT, SPACE, LIFE SAVING, OR LIFE SUSTAINING
APPLICATIONS, NOR IN PRODUCTS OR SYSTEMS WHERE FAILURE OR MALFUNCTION MAY RESULT IN PERSONAL INJURY,
DEATH, OR SEVERE PROPERTY OR ENVIRONMENTAL DAMAGE. ST PRODUCTS WHICH ARE NOT SPECIFIED AS "AUTOMOTIVE
GRADE" MAY ONLY BE USED IN AUTOMOTIVE APPLICATIONS AT USER’S OWN RISK.
Resale of ST products with provisions different from the statements and/or technical features set forth in this document shall immediately void
any warranty granted by ST for the ST product or service described herein and shall not create or extend in any manner whatsoever, any
liability of ST.
ST and the ST logo are trademarks or registered trademarks of ST in various countries.
Information in this document supersedes and replaces all information previously supplied.
The ST logo is a registered trademark of STMicroelectronics. All other names are the property of their respective owners.
© 2008 STMicroelectronics - All rights reserved
STMicroelectronics group of companies
Australia - Belgium - Brazil - Canada - China - Czech Republic - Finland - France - Germany - Hong Kong - India - Israel - Italy - Japan -
Malaysia - Malta - Morocco - Singapore - Spain - Sweden - Switzerland - United Kingdom - United States of America
www.st.com
48/48
 Loading...