


AN 2119
®
APPLICATION NOTE
Getting Started with uClinux for STR71x
INTRODUCTION
UClinux is a derivative of the Linux 2.0 kernel intended for use as an operating system in
microcontroller applications.The tools, files and procedures described in this document will help you
get started using uClinux on any of the STR71x, ARM7TDMI core-based microcontrollers.
Necessary software and hardware tools
The uClinux software kit is designed for use with the STR710 Evaluation Board (STR710-EVAL).
Note: Building the uClinux kernel requires a host PC running the Linux OS.
The uClinux software kit includes the uClinux operating system (OS) and the bootloader required
for booting up the board and loading uClinux. The OS is ported from the standard distribution
uClinux-dist-20040408
downloaded at www.uclinux.org, or using the following direct links:
● ARM-ELF toolchain
arm-elf-tools-20030314.sh
● uClinux full distribution
uClinux-dist-20040408.tar.gz
, which implements the Linux kernel
(arm-elf-tools-20030314) – www.uclinux.org/pub/uClinux/arm-elf-tools/
(uClinux-dist-20040408) – www.uclinux.org/pub/uClinux/dist/
2.4.24-uc0
. The software tools can be
To compile an application independently from a uClinux image (
make JFFS2 special utility. You can download it at: sources-redhat.oc1.mirrors.redwire.net/jffs2/
mkfs.jffs2
The STR710 Evaluation Board has been designed by STMicroelectronics for evaluation and
application development for the STR71x ARM7TDMI core-based devices and includes an STR710F
processor. The STR710F device can be programmed using the
device
, or other programming tools for ARM7TDMI core-based microcontrollers.
Note: Programming the STR710F on the evaluation board requires the use of an in-circuit programmer/in-
circuit emulator with JTAG interface and the appropriate programming software. You can find more
information about development tools for STR7 at www.st.com/mcu.
Section 5.2
RealView ICE-ME JTAG run control
) you will also need the
February 2005 Rel. 1.0 1/19

Getting Started with uClinux for STR710
Getting started
To help you get started using uClinux in your STR71x application, this document provides
procedures to help you:
●
Install the tools
●
Build the uClinux kernel
●
Use the bootloader
●
Use uClinux
●
Add your application for debugging
If you want to upload the uClinux image (zimage.bin) provided in the binary files of the uClinux
distribution to an STR71x device, refer to the section
This distribution of uClinux already contains a sample application for read/write of I2C EEPROM for
demonstration purposes. However, if you already have an application that you want to try with
uClinux, refer to the section
Add your application for debugging
Use the bootloader
.
.
For more information, you can refer to
Additional references
.
2/19

1 Install the tools
This section explains how to install the software tools that are required to build the uClinux image on
a host PC running Linux. To correctly install the tools you must
the uClinux distribution
1.1 Install the arm-elf toolchain
To install the arm-elf toolchain,
1 Login as “root.”
2 From the directory that contains the arm-elf toolchain, run:
The rest of the installation is automatic. When this installation is complete, continue by
installing the uClinux distribution.
1.2 Install the uClinux distribution
To install the uClinux distribution on your PC:
1 Login as the user that you are going to use for development.
2 Copy the file uClinux-dist-20040408.tar.gz to the user's home directory, or wherever you want
to work from.
3 Go to the directory that you downloaded the file to, and run:
and
Patch the uClinux distribution for STR710
sh arm-elf-tools-20030314.sh
Getting Started with uClinux for STR710
Install the arm-elf toolchain, Install
.
tar xzvf uClinux-dist-20040408.tar.gz
The uClinux file structure will be extracted to the chosen directory. A sub-directory is created
called uClinux-dist, which contains the whole distribution.
When this is complete, continue by patching the uClinux distribution for use with STR710.
1.3 Patch the uClinux distribution for STR710
1 Copy the uClinux-dist-20040408-str710-patch.tar.gz file from the uClinux package for STR7
to the uClinux-dist directory and then run:
tar xzvf uClinux-dist-20040408-str710-patch.tar.gz
The uClinux-dist-20040408-str710-patch file is output in the chosen directory. This file is the
STR710 porting patch file for uClinux-dist-20040408 distribution, implementing the Linux
kernel 2.4.24-uc0.
2 Now, run:
cd uClinux-dist
patch -p1 < uClinux-dist-20040408-str710-patch
The ST directory and its sub-directory STR710 are added to the "vendors" directory in the
uClinux-dist directory. Once this has been done, you are ready to
Build the uClinux kernel
.
3/19
Getting Started with uClinux for STR710
2 Build the uClinux kernel
Once you have installed the tools, you can configure and build the kernel into a binary file. You don’t
need to be logged on as root from this point on.
2.1 Configure the uClinux kernel
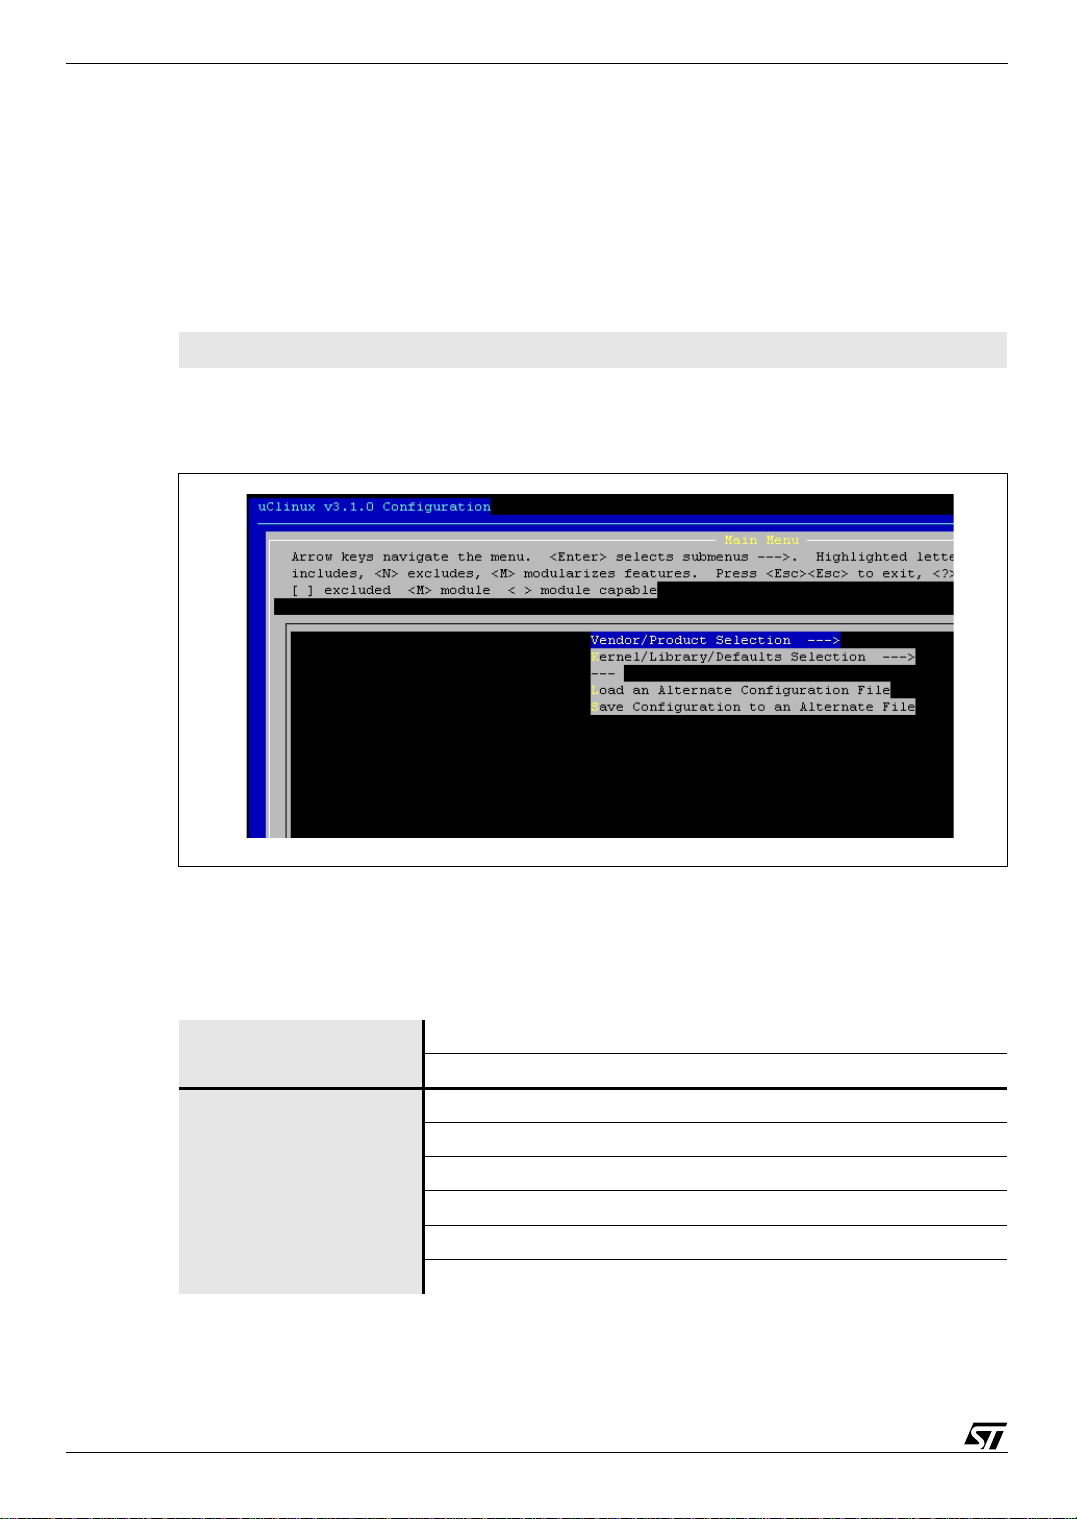
1 To configure the kernel, go to the uClinux-dist directory and run the configuration utility:
make menuconfig
This will run the configuration program that is shown in
Figure 1: uClinux configuration main menu
Figure 1
, below.
2 In the configuration program, select Vendor/Product Selection.
3 Enter your vendor/product combination, the Kernel version and the Libc version according
to the table below:
Table 1: Vendor/product combination
Vendor / product selection Vendor ST
ST products STR710
Kernel / library /defaults
selection
4 Save this configuration by selecting
4/19
Kernel Version Linux-2.4.x
Libc version uClibc
Default all settings (lose changes) -
Customize kernel setting -
Customize vendor/user setting -
Update default vendor setting -
Exit
and choosing
Save
.

Getting Started with uClinux for STR710
Note: Choosing the options: Customize Kernel settings or Customize Vendor/User settings will run
other menus after you exit and save the menuconfig settings. For descriptions of each option, select
help.
When configuring for the first time, set the following to default: Default all settings (lose changes),
Customize kernel setting, Customize vendor/user setting, Update default vendor setting.
You can also use make config or make xconfig to configure the basic kernel.
2.2 Build the uClinux kernel
In order to correctly set up all the dependencies, when the configuration process completes:
1 First, run:
make dep
2 Once this is completed, run the following commands:
make lib_only
make user_only
make romfs
make romfs
make image
Note: You need to run make romfs twice, because the first time romfs.img is generated in the uClinux-
dist/images directory, it is only about 15K. This is not the correct size. After the first make romfs,
the "init" has not been built into romfs.img. After the second make romfs, the size of romfs.img is
larger than 200K. This is the correct size.
After compiling with no errors, there should be a new binary file (
images
Once you have built the uClinux binary file, you need to load this file into the external Flash of the
STR710F device of the STR710-EVAL using the bootloader.
directory. This is the uClinux binary file.
zimage.bin
), in the uClinux-dist/
5/19
Getting Started with uClinux for STR710
3 Use the bootloader
The bootloader allows you to load the uClinux binary file (zimage.bin) to external Flash on the
evaluation board. Loading the bootloader for requires the use of a programmer or in-circuit emulator
with JTAG interface and the software to drive it. For this purpose, we have used the RealView
Developer Kit (RVDK) for ST and the RVICE-ME JTAG run control device that is with this kit.
The following sections provide procedures for using the bootloader including how to:
●
Load the bootloader to the STR710-EVAL board
●
Configure the host computer for serial download
●
Configure and connect the STR710-EVAL board for serial download
●
Serial download an image to external SRAM
●
Program the image to external Flash
●
Boot uClinux
3.1 Load the bootloader to the STR710-EVAL board
The bootloader (71xboot-R10.bin) image has to be programmed in the beginning of the external
Flash memory (0x60000000). It must be executed first after a power up or a reset. It allows the
loading of the uClinux image (zimage.bin) into the external SRAM (0x62000000) via a serial port.
To load it using RVDK:
1 Set SW13, SW14, SW15 on the STR710-EVAL board to RAM boot mode, as shown on page
13 of the
STR710-EVAL Datasheet
.
2 Install and start RVDK.
3 Connect the RVICE-ME JTAG run control device to your PC and the JTAG (CN9) port on your
STR710-EVAL board.
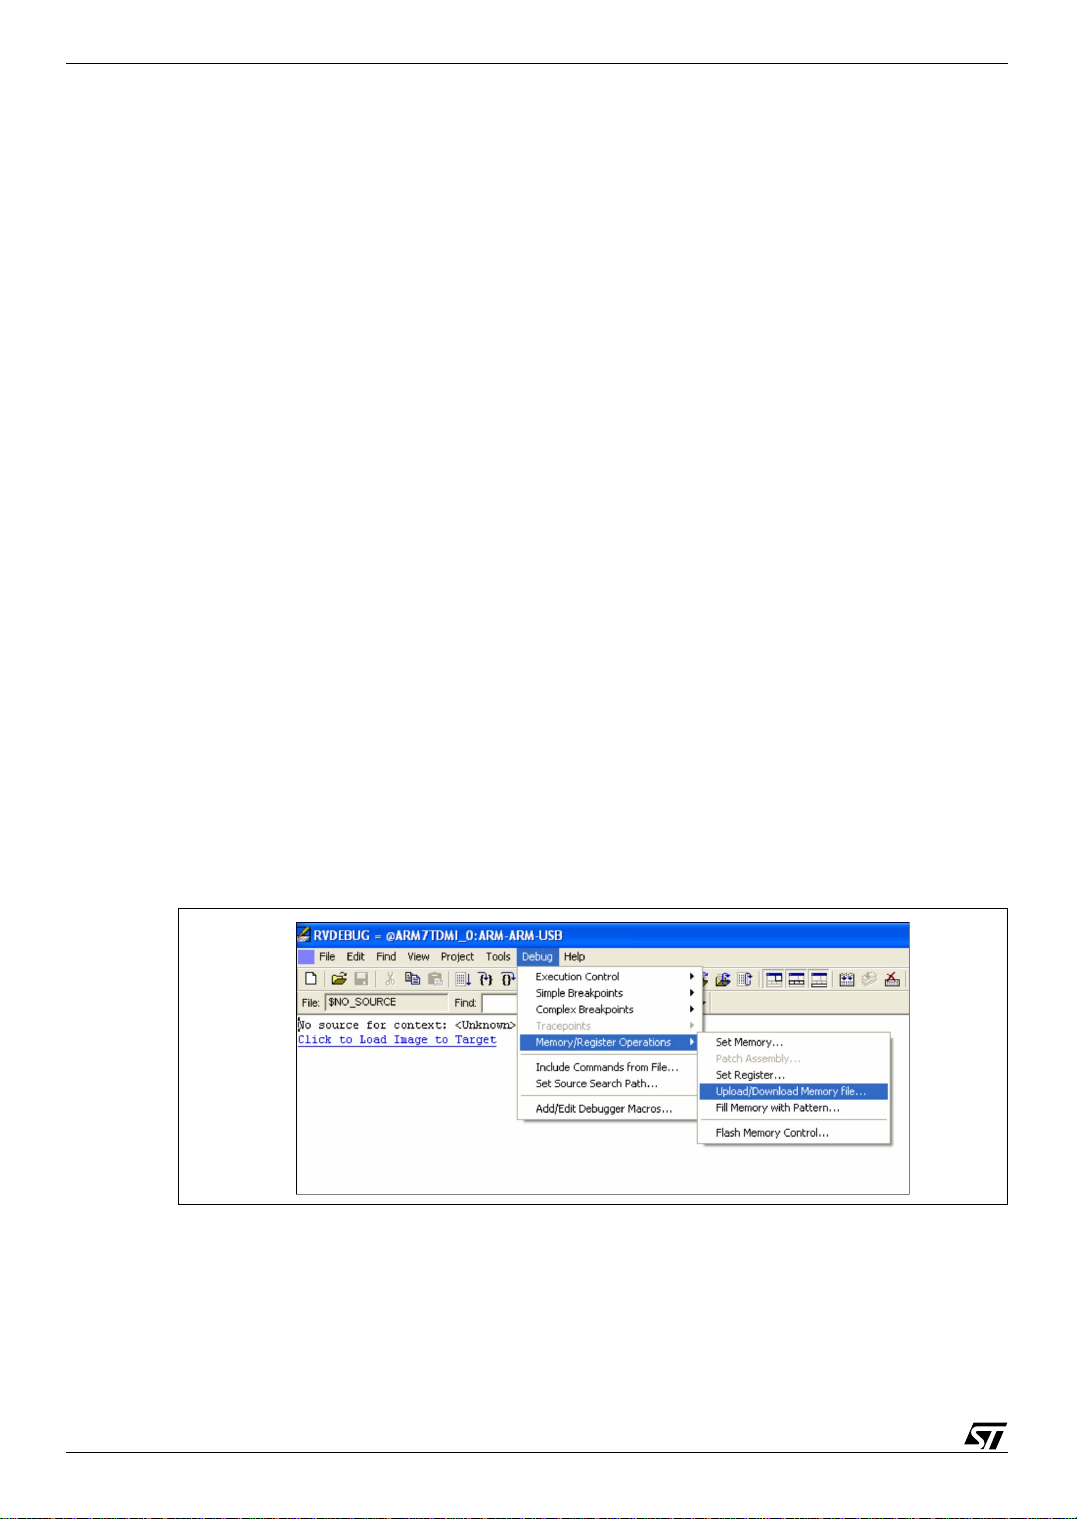
4 In RVDK, select
Debug>Memory/Register Operations>Upload/Download Memory file…
the main menu.
Figure 2: RVDK for ST memory operations menu
in
The Upload/Download file from/to Memory dialog box appears (see
6/19
Figure 3
).

Getting Started with uClinux for STR710
5 Fill in the fields of the prompt window as shown in
enter the full pathname of the bootloader image (71xboot-R10.bin). Once you have configured
all the parameters, click on
After you have loaded the bootloader image to the external flash of the STR710-EVAL board, you
will have to
Configure the host computer for serial download
STR710-EVAL board for serial download
Apply
.
Figure 3: Upload file with RVDK for ST
.
Figure 3
. In the File field, make certain to
and
Configure and connect the
3.2 Configure the host computer for serial download
The host computer must support a fully functional serial terminal, e.g. Microsoft HyperTerminal
running on a Windows PC.
In Windows, launch HyperTerminal. Create a new connection and configure the port settings
according to
Figure 4
:
Figure 4: COM1 properties window
7/19

Getting Started with uClinux for STR710
3.3 Configure and connect the STR710-EVAL board for serial download
3.3.1 Configure the STR710-EVAL board
1 Check that the following option jumpers on the STR710-EVAL board are in there default
positions:
Table 2: STR710-EVAL jumper configuration
Jumper Description Position
• J1 CAN link Fitted
• J3 VBKP supply Fitted
• J4 notJRst/notReset ink Not Fitted
• J5 +1.8V Supply Fitted
2 Check the settings of the following option switches on the STR710-EVAL board:
Table 3: STR710-EVAL switch configuration
Jumper Description Position
• SW6
• SW9 RS232 source: A A
• SW13 Boot mode 1:
• SW14 Boot mode 0: 2-3
• SW15 Boot mode EN: 2-3
2
C EEPROM: write enabled
I
Execute code from external memor y
For more information about jumper and switch settings, refer to the
3.3.2 Connect to the STR710-EVAL board and power up
Connect the RS232-A (CN7) port of the STR710-EVAL and the host computer with a cross-linked
serial cable.
To power up the board, connect the power adapter to the +5V PWR (CN2) port of the STR710EVAL.
Upon power up, the hyperterminal displays the messages shown in
for 5 seconds. Press the ESC button to enter the bootloader’s main menu
Figure 5: Hyper terminal startup messages
STR710-EVAL Datasheet
Figure 5
. These are displayed
(shown in Figure 6)
1-2
2-3
.
.
8/19

Getting Started with uClinux for STR710
Note: If no key is pressed in the HyperTerminal window during the 5 seconds after powering up, the
bootloader waits until the end of the 5 seconds and the automatically downloads uClinux.
If any key other than ESC is pressed during this period, the bootloader will download uClinux
immediately.
Figure 6: Bootloader main menu
You are now connected to the STR710-EVAL board and the bootloader is ready to download an
image using the serial port. To start downloading, go on to the section
external SRAM
.
3.4 Serial download an image to external SRAM
The serial download module allows the programing of binary files to external SRAM through a serial
port. Ymodem protocol is implemented for this purpose.
To download the uClinux binary file to SRAM:
1 Press 1 to select the menu item Serial Download Image. The bootloader waits for a file to be
sent by the host computer. (You can press A to abort this operation.)
2 Select
file to be downloaded and choose Ymodem protocol, then press the Send button (
Transfer>Send File…
from the HyperTerminal menu. In the pop-up dialog, select the
Figure 7: Serial download to SRAM
Serial download an image to
Figure 7
).
9/19
Getting Started with uClinux for STR710
3 Download starts. The messages Transfer Completed, <filename> Received and <number>
Bytes are printed upon completion.
Note: The default external SRAM address used to store the downloaded images is 0x62000000. The
image size is automatically saved as a global variable after image transfer is completed.
The uClinux binary has been downloaded to SRAM. Go on to the next section,
to external Flash
.
3.5 Program the image to external Flash
Now, the Flash programming module is used to program the image that you have downloaded to the
SRAM into the external Flash memory.
To do this:
1 Press 2 to select the menu item Program External Flash. The bootloader will prompt you for
an offset address of the external flash to be programmed to.
2 Enter the number for the offset address (You can type A to cancel this operation). If the number
that you enter is invalid, the bootloader will prompt you for a new entry.
The following data formats are all valid for inputting numbers:
0x0 0 0x312 6543 678K 2M
Note: The bootloader uses 0x62000000 as the source address by default.
3 If the image size hasn’t already been saved, the bootloader will prompt you to enter the size,
otherwise the previously saved value is used (See note in
prompt, enter the number corresponding to the size (You can type A to cancel this operation). If
the number that you enter is invalid, the bootloader will prompt you for a new entry.
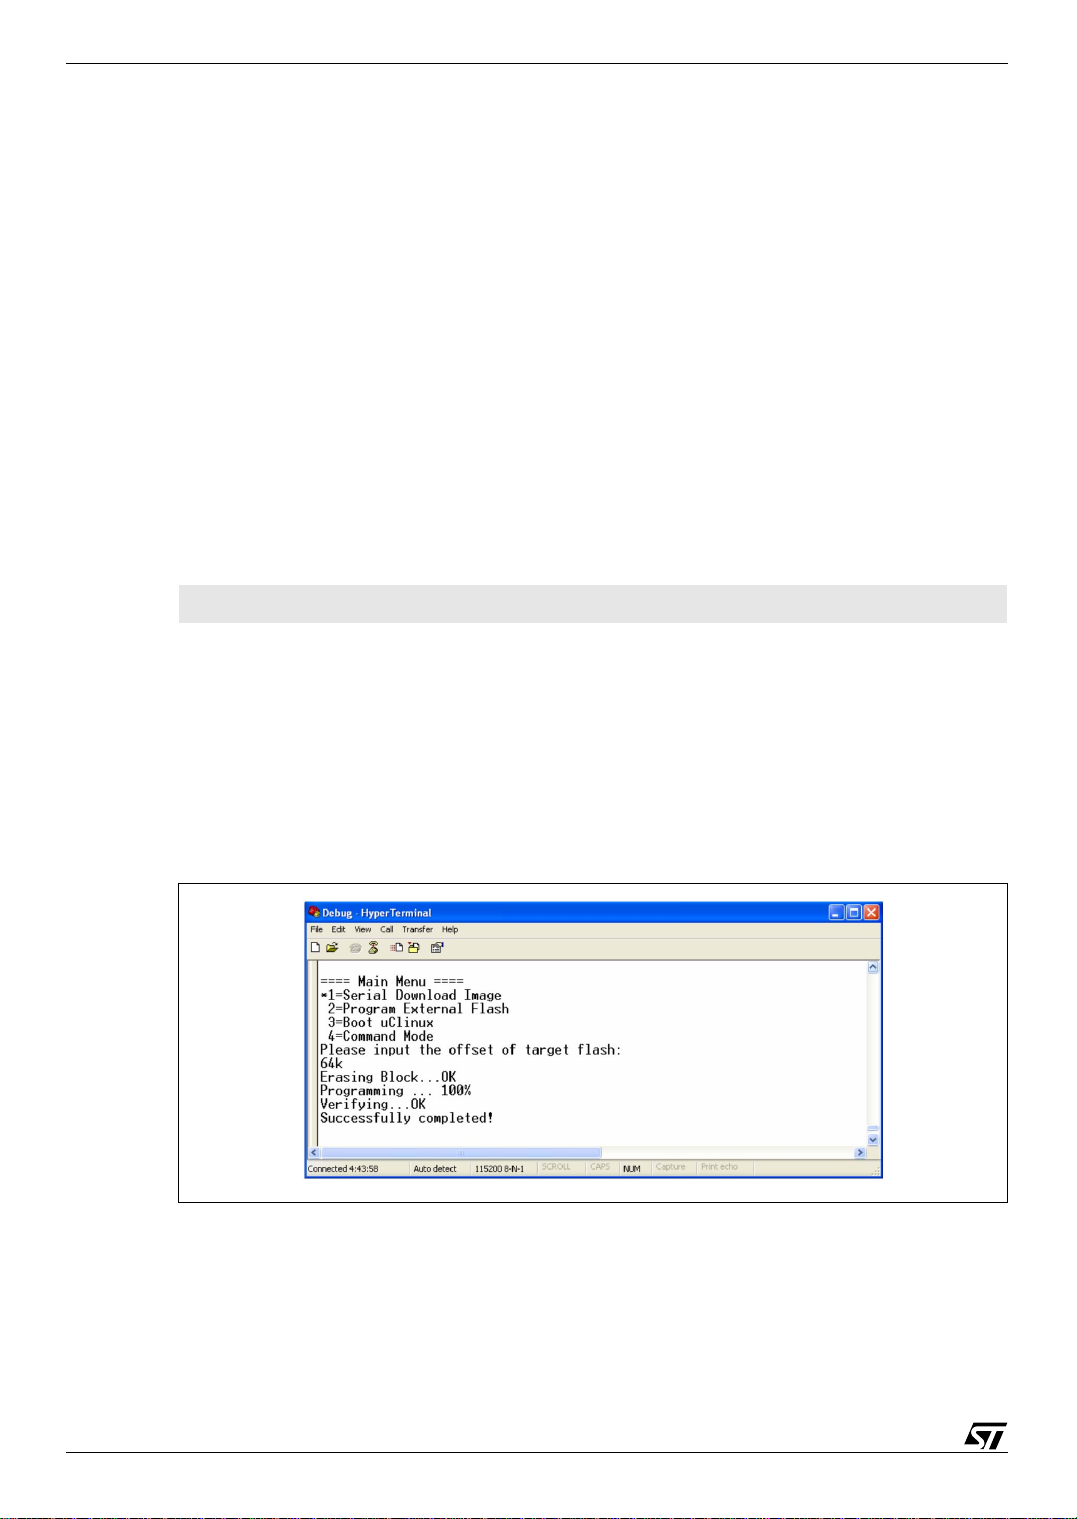
4 The bootloader checks the address range and performs the erase and program operations
automatically (
Figure 8
).
Section 3.4
Program the image
). It you receive this
Figure 8: Program external flash
The uClinux binary has been programmed to external Flash. Go on to the next section,
uClinux
.
Boot
10/19

Getting Started with uClinux for STR710
3.6 Boot uClinux
You can use the bootloader in one of two modes: Menu mode or Command mode. By default, the
bootloader is in
more flexible command input if needed.
3.6.1 Menu mode
In Menu mode, press 3 to select the menu item Boot uClinux. The compressed uClinux image
(zimage.bin) is copied from external Flash to external SRAM. Then, uClinux is uncompressed and
starts to run (
Note: The compressed uClinux zimage is loaded from address 0x60010000 in the external Flash by
default.
Menu mode
Figure 9
when you start. The
).
Figure 9: Boot uClinux
Command mode
, on the other hand, provides
3.6.2 Command mode
To use Command mode, press 4 to select the menu item Command Mode. The command line
prompt (>) is displayed and you can input commands. Type help for all available commands
(
Figure 10
), type exit to quit command mode and return to menu mode.
Figure 10: Command mode
11/19

Getting Started with uClinux for STR710
Frequently used commands are:
serialdown [destramaddr]
Download an image to destramaddr through a serial port. If destramaddr is not specified,
0x62000000 is used by default and it is the same as menu item 1.
progextflash [destflashaddr srcramaddr imagesize]
Program imagesize bytes of data stored at srcramaddr to destflashaddr. If no
arguments are specified, it is the same as menu item 2.
loadlinux [srcaddr]
Load the compressed uClinux binary file, uncompress it and run the uClinux kernel. If no
argument is specified, it is the same as menu item 3. If srcaddr is specified, it is regarded as
the address of zimage stored in the external flash memory.
12/19

4 Use uClinux
UClinux is composed of:
●
Sash command shell
●
Memory Technology Device (MTD) subsystem
memory driver development
Getting Started with uClinux for STR710
– standard command shell supporting Linux commands
– subsystem for data management and
If you have not modified the uClinux distribution, then it also includes a
application
.
4.1 Sash command shell
The Sash command shell is automatically launched after the uClinux kernel is booted (
This is a standard command shell that supports most of the Linux commands. The user can add
other commands when he compiles the uClinux distribution.
Figure 11: Sash command shell
Sample I2C EEPROM
Figure 8
).
4.2 Memory Technology Device (MTD) subsystem
MTD (Memory Technology Device) is a Linux subsystem aimed at simplifying the development of
hardware memory drivers and the management of data stored in memory devices, especially Flash
devices. The highest layer of MTD subsystem is called "MTD user module," which provides a userlevel interface to the application layer. JFFS2 (Journaling Flash File System Version 2) is used to
implement the MTD user module in this project.
The 4 MB external flash memory is divided into 3 MTD partitions. Execute the command cat/
proc/mtd to view the partition information:
mtd0offset 0x0 ~ 0x10000Store the Bootloader
mtd1offset 0x10000 ~ 0x200000Store the uClinux zimage
mtd2offset 0x200000 ~ 0x400000Used as a JFFS2 partition
The third partition is automatically mounted to the directory /mnt/mnt1 as a JFFS2 partition when
uClinux is up. Total size of this partition is 2 MB, and user can perform file operations on this
partition such as, copy (cp), delete (rm), delete directory (rmdir), rename (mv), create directory
(mkdir), open text editor (vi), etc..
13/19

Getting Started with uClinux for STR710
4.3 Sample I2C EEPROM application
The application 24CXX I2C EEPROM has been placed in JFFS2 partition. This is an application that
allows you to copy the contents of the I
contents of a file that you specify to the I
2
C EEPROM memory to a file that you name, or to write the
2
C EEPROM memory.
Note: More information and downloads related to this and other I2C EEPROM applications are available
at http://secure.netroedge.com/~lm78/
24C08 I2C EEPROM has four blocks with a slave address of 0x54-0x57. Each block has a size of
256-bytes.
Program Usage
eeprom [-d dev] [-a adr] [-p pgs] [-w] [-y] [-f file]
dev: device, e.g. /dev/i2c0
adr: the EEPROM base address, e.g. 0x54
pgs: number of pages to read, e.g. 4
-w: writes to EEPROM
-y: suppresses warnings when writing
-f file: copies contents of the specified file to EEPROM when -w is used. Copies EEPROM to
contents to the specified file if -w is not used.
is all zeros).
(default)
(default)
(default)
(Default is read)
(Default is to warn)
(The default for read is “test only.” For write, the default
Examples
The following command line copies the contents of the EEPROM to the specified file. Replace
outfile with the name of the file you want to write the EEPROM contents to, e.g. ./
contents.txt.
./eeprom -d /dev/i2c0 -a 0x54 -p 1 -f ./outfile
The following command line copies the contents of the specified file to EEPROM. Replace infile
with the name of the file you want to write to EEPROM.
./eeprom -d /dev/i2c0 -a 0x54 -p 1 -w -f ./infile
Note: Additional sample applications are provided with this uClinux Package for STR710. These are
described in the readme.txt file in the User Applications directory.
14/19

Getting Started with uClinux for STR710
5 Add your application for debugging
Once you have started developing your own application, there are two ways of using it with uClinux.
You can either
independently of the uClinux image
application independently will save you the time that it would take to rebuild the kernel with your
application. In both cases the compiler used to build your application is arm-elf-gcc.
5.1 Add your application to uClinux image
For this procedure, your application should have a file that contains a main function.
int main(int argc, char *argv[])
{}
To add your application to the uClinux image:
1 Create a new makefile for your application like the one shown below:
Add your application to uClinux image
. If you have already built the uClinux kernel, compiling your
EXEC = myexec
, or you can
Compile your application
OBJS = file1.o, file2.o …
all: $(EXEC)
$(EXEC): $(OBJS)
$(CC) $(LDFLAGS) -o $@ $(OBJS) $(LDLIBS)
romfs:
$(ROMFSINST) /bin/$(EXEC)
clean:
-rm -f $(EXEC) *.elf *.gdb *.o
2 Create a new folder named myprog in uClinux-dist/user/ directory for your application files.
3 Put your source and header files (*.c, *.h) and the makefile in the new directory uClinux-dist/
user/myprog.
4 Now add the following line to the makefile in the directory uClinux-dist/user:
dir_y+= myprog
This line tells the maker to use the directory uClinux-dist/user/myprog.
5 Go to the uClinux-dist directory and run the following commands:
make user_only
make romfs
make romfs
make image
Note: You must run the make romfs command twice as indicated above.
15/19

Getting Started with uClinux for STR710
After you load the resulting uClinux binary file into the STR710-EVAL board (see
Section 3
), you will
find your application in the /bin location and you can execute it by typing its name. You can add
more than one application to your image file by using this same procedure.
To add your application to the uClinux configuration system:
1 Add a line to the user/makefile, which adds myprog to the list of directories to be built:
dir_$(CONFIG_USER_myprog_myprog) += myprog
The directory, myprog contains the files for your application.
2 Add a block to the config/Configure.help like the following:
CONFIG_USER_myprog_myprog
The config/Configure.help file contains the text that is displayed on request during the
distribution configuration. The text must be indented two spaces, and there must not be any
empty lines. Lines should be less than 70 characters long.
3 Add a line to the config/config.in in the appropriate menu section (i.e. in the program group
you want your application to show up in during make menuconfig), like the following:
bool 'myprog' CONFIG_USER_myprog_myprog
The repetition of myprog allows for directories that contain multiple executables. When all this
is set up, run the standard make menuconfig to add your application to the uClinux image
(see
Section 2.1
).
5.2 Compile your application independently of the uClinux image
You can also download your application into the STR710-EVAL board separately from the uClinux
binary. To do this:
1 Add a line to the user/makefile, which adds myprog to the list of directories to be built:
dir_$(CONFIG_USER_myprog_myprog) += myprog
The directory, myprog contains the files for your application.
2 Add a block to the config/Configure.help like the following:
CONFIG_USER_myprog_myprog
The config/Configure.help file contains the text that is displayed on request during the
distribution configuration. The text must be indented two spaces, and there must not be any
empty lines. Lines should be less than 70 characters long.
3 Add a line to the config/config.in in the appropriate menu section (i.e. in the program group
that you want your application to appear in during make menuconfig), like the following:
bool 'myprog' CONFIG_USER_myprog_myprog
16/19

Getting Started with uClinux for STR710
The repetition of myprog allows for directories that contain multiple executables. When all this is
done, run the standard make menuconfig (see
4 Next, to generate your application executable file, go to the uClinux-dist directory and run:
make user_only
Once this is complete, you need to build your executable file into a JFFS2 image. JFFS2 is a
log-structured file system designed for use on Flash devices in embedded systems. There is a
special utility to make a JFFS2 image that you can download at:
http://sources-redhat.oc1.mirrors.redwire.net/jffs2/mkfs.jffs2
5 Copy this utility to the user directory.
6 To make the utility executable, run:
chmod u+x mkfs.jffs2
7 Create a new directory and copy the executable file of your application into this directory.
8 Run:
mkfs.jffs2 -r <directory> -o output-file.jffs2
Section 2.1
).
This will generate output-file.jffs2 in the current directory.
9 Load this file into the STR710-EVAL board (at 0x60200000 address) using the bootloader (see
Section 3.4
and
Section 3.5
). You will find your executable files in the mnt/mnt1 location.
17/19

Getting Started with uClinux for STR710
6 Additional references
At www.st.com/mcu, you will find complete documentation, software downloads and user
discussion groups to help answer questions and stay up to date with our latest product
developments. Here, you can download the latest versions of the following additional documents:
● STR71x Microcontroller Reference Manual
● STR710-EVAL Board Datasheet
Additional information and uClinux downloads are available at www.uclinux.org.
For more details about Journaling Flash File System (JFFS) refer to:
● www.buserror.org/~ebrown/sshf2001/download/utils/mkfs.jffs2.1.html
● www1.idt.com/pcms/tempDocs/79EB438_AN_.pdf
7 Revision History
Table 4: AN2119 revision history
Date Revision Description
Feb 2005 1.0 Initial release
18/19

Getting Started with uClinux for STR710
w
Information furnished is believed to be accurate and reliable. However, STMicroelectronics assumes no responsibility for the
consequences of use of such information nor for any infringement of patents or other rights of third parties which may result from its
use. No license is granted by implication or otherwise under any patent or patent rights of STMicroelectronics. Specifications
mentioned in this publication are subject to change without notice. This publication supersedes and replaces all information
previously supplied. STMicroelectronics products are not authorized for use as critical components in life support devices or systems
ithout express written approval of STMicroelectronics.
The ST logo is a registered trademark of STMicroelectronics.
All other names are the property of their respective owners
Australia – Belgium - Brazil - Canada - China – Czech Republic - Finland - France - Germany - Hong Kong - India - Israel - Italy -
Japan - Malaysia - Malta - Morocco - Singapore - Spain - Sweden - Switzerland - United Kingdom - United States of America
© 2005 STMicroelectronics - All rights reserved
STMicroelectronics group of companies
www.st.com
19/19
 Loading...