

Page 1
AN2050
Obsolete Product(s) - Obsolete Product(s) Obsolete Product(s) - Obsolete Product(s)
APPLICATION NOTE
3-PHASE AUXILIARY POWER SUPPLY DESIGN BASED ON
EMITTER SWITCHED BIPOLAR TRANSISTORS (ESBTS)
1. INTRODUCTION
This document presents the results of a 3-Phase auxiliary power supply designed with the UC3845 PWM
driver and an ESBT, the new STC03DE170, as main switch. This work is supplemented by the release
of a 45W dual output SMPS demo board, widely used as auxiliary power supply in 3-phase motor drive
applications.
Moreover, the ESBT base driving circuit and some guidelines for the optimization of the power
dissipation are given. The influence of parasitic capacitance on ESBTs is also described in detail.
Furthermore, the slope compensation has been added in order to remove the oscillation during max
input voltage and min load. Accordingly, the discussion in theory is presented. Finally, the realization
methods of the output short circuit's protection function are provided.
For a complete design reference of an auxiliary power supply using an ESBT you may refer also to the
application note AN1889.
2. DESIGN SPECIFICATIONS AND SCHEMATIC DIAGRAM
The table below lists the converter specification data and the main parameters fixed for the demo board.
Table 1: Converter Specification Data and Fixed Parameters
Symbol Description
V
Rectified minimum Input voltage 450
inm in
Vin Rectified maximum Input voltage 850
V
Output voltage 1 15V/2A
out1
V
Output voltage 2 15V/1A
out2
P
Maximum Output Power 45W
out
η
F Switching frequency ≅ 100 kHz
Vfl Reflected fly back voltage 400 V
V
Max over voltage limited by clamping circuit 200 V
spike
Converter Efficiency >75%
Values
October 2004
1/20
Page 2

Obsolete Product(s) - Obsolete Product(s) Obsolete Product(s) - Obsolete Product(s)
AN2050 - APPLICATION NOTE
The power supply is based on a standard fly-back schematic including the RCD clamping network and
the TL431 plus opto-coupler for the secondary side regulation. The relevant schematic is reported in
figure 1.
Figure 1: Complete Schematic Diagram
J2
1
2
RF2
10K/0.5W
CF
0.1u/60V
6
RF 3
option
RF 1
2K/0.5W
D
C
B
A
54321
TR1
C3
1.5n/2KV
D7 BA159
D3 BY269
D4 BY269
TOR1
10/3
RG1
10K/0.25W
Lp=2.4uH, Np=160, Ns=5, lg=0.68mm
DDV2
STS20H100CT
DDV1
STS20H100T
R5
D8
12/0.5W
IN4148
1K/0.5W
Q1
ESBT
RS
1.4/1W
CV21
680u/50V
R6
D9 IN4148
C4
47u/50V
CV22
680u/50V
C5
100u/50V
FB
J3
1
2
1000u/50V
R8
10K/0.25W
CV11
RF4
810/0.5W
U2
PIC817
VREF
U3
R7
2.6K/0.25W
TL431
Title
Number RevisionSize
B
Date: 23-Jun-2004 Sheet of
File: C:\Documents and Settings\song liu\My Documents\esbt.ddbDrawn By:
CV12
1000u/50V
61
RF 5
1K/0.25W
8
D
D1
IN400 7
J1
F1
3
2
1
D2
C
B
A
IN400 7
Rb1
56K0.5W
U1 UC 3 8 4 5
7
VREF
CT
1n/60V
VCC
2
FB
1
COMP
8
VREF
4
RT/CT
RT
10K/0.25W
FB
Rco m
10K/0.25W
Cc o m
470p/60V
1 2 3 4 56
C1
150u/450V
R1
220K/0.5W
C2
150u/450V
Dz1
IN414 8
OUT
ISENSE
82K/2W
82K/2W
Dz2
IN4148
6
3
R3
R4
R2
220K/0.5W
Dz3
IN4148
Rb
RG
Rc s
1K/0.25W
CS
471/60V
C4
0.1u/60V
0.56/0.5W
22/0.5W
3. MEASUREMENTS
The board has a voltage doubler in the input stage to allow its testing with a standard main. The two
tables below report the efficiency measurement at full and minimum load.
Table 2: Full Load: 15V@2A, 15V@1A, Vin: 160Vac, 220Vac, 300Vac (with Voltage Doubler)
PARA METER LOW LINE=160Vac NO MLINE=220Vac HILINE =300Vac SPEC.LIMIT
I/P Power (W ) 57.5 57.7 55.3
O/P Power ( W ) 45.5 45.5 45.5
Efficiency ( % ) 79.2% 79% 82.3% 75%
Table 3: Min Load: 15V@0.2A, 15V@0.1A Vin: 160Vac, 220Vac, 300Vac (with Voltage Doubler)
PARAMETER LOWLINE=160Vac NOMLINE=220Vac HILINE=300Vac SPEC.LIMIT
I/P Power (W ) 10.2 9.8 9.7
O/P Power ( W ) 4.6 4.6 4.6
Efficiency ( % ) 45 % 47% 47%
2/20
Page 3
Obsolete Product(s) - Obsolete Product(s) Obsolete Product(s) - Obsolete Product(s)
AN2050 - APPLICATION NOTE
®
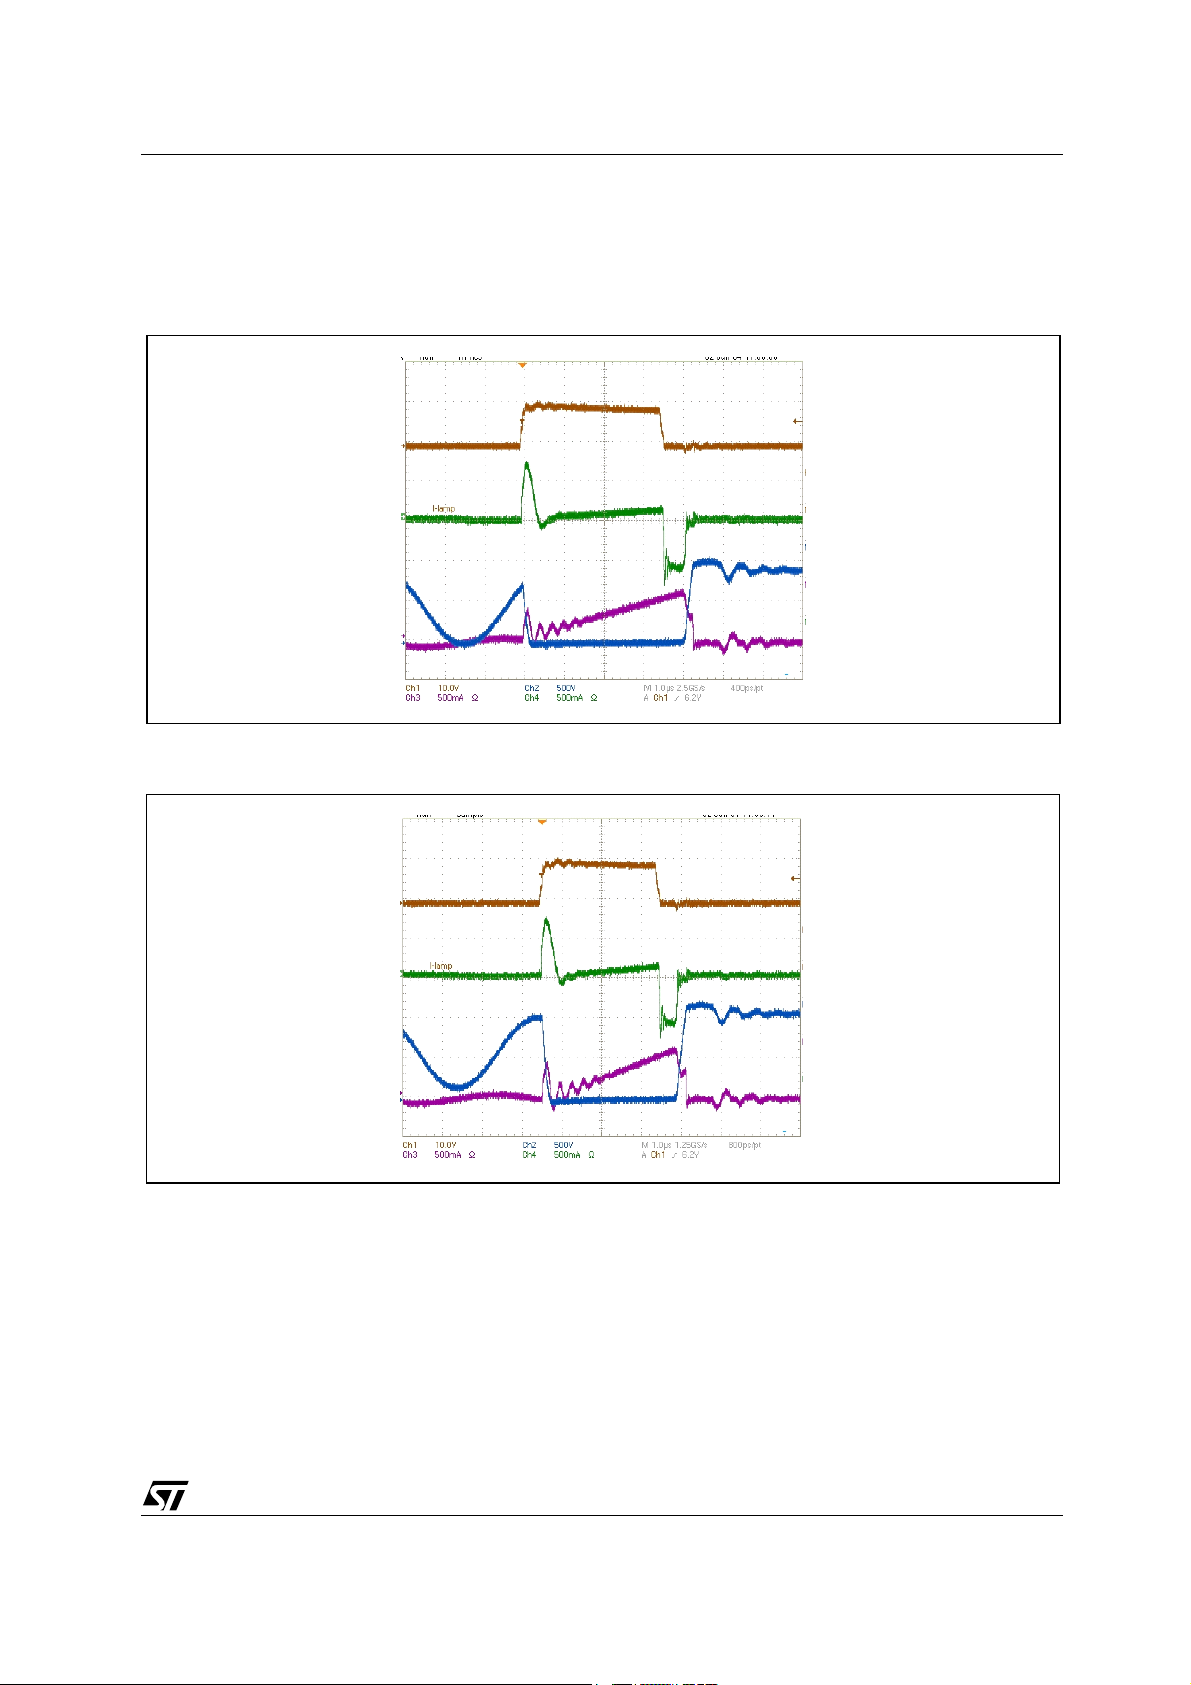
The main waveforms in steady state condition at full load are reported below. It is worth noticing the
behavior of the base current with an initial high peak pulse needed to minimize the effect of the dynamic
saturation voltage.
Figure 2: VinDC = 450V Full Load
Figure 3: VinDC 600V Full Load
3/20
Page 4

Obsolete Product(s) - Obsolete Product(s) Obsolete Product(s) - Obsolete Product(s)
AN2050 - APPLICATION NOTE
Figure 4: : VinDC = 850V Full Load
Table 4: Measurement Results
Power Dissipation
4.37 W
5.39 W
3.71 W
ESBT
Component Measured T emperature
160 Vac
220 Vac
300Vac
68.7
78.9
62.1
Major differences in power dissipation are mainly due to turn-on operation, and are strongly correlated to
the parasitic capacitance of the transformer, and the output capacitance of the ESBT in parallel with the
heat-sink package parasitic capacitance. This issue will be treated deeply in paragraph 5.
4. BASE DRIVING CIRCUIT DESIGN
In practical applications, such as SMPS, where the load is variable, the collector current varies as well.
As a consequence, it is very important to provide a base current to the device that is correlated to the
collector current in order to avoid the over saturation of the device at low load and to optimize its
performance in terms of power dissipation. One common method to do this is the proportional driving
method provided by a current transformer as shown in Figure 1. As already stated in the previous
chapter, it is recommended to provide a short current pulse to the base to make the turn-on as fast as
possible and to reduce the dynamic saturation phenomenon. This pulse is achieved by using the
capacitor and the zener diode in figure 5.
4/20
Page 5
Obsolete Product(s) - Obsolete Product(s) Obsolete Product(s) - Obsolete Product(s)
AN2050 - APPLICATION NOTE
®
⋅
∆
ϕ
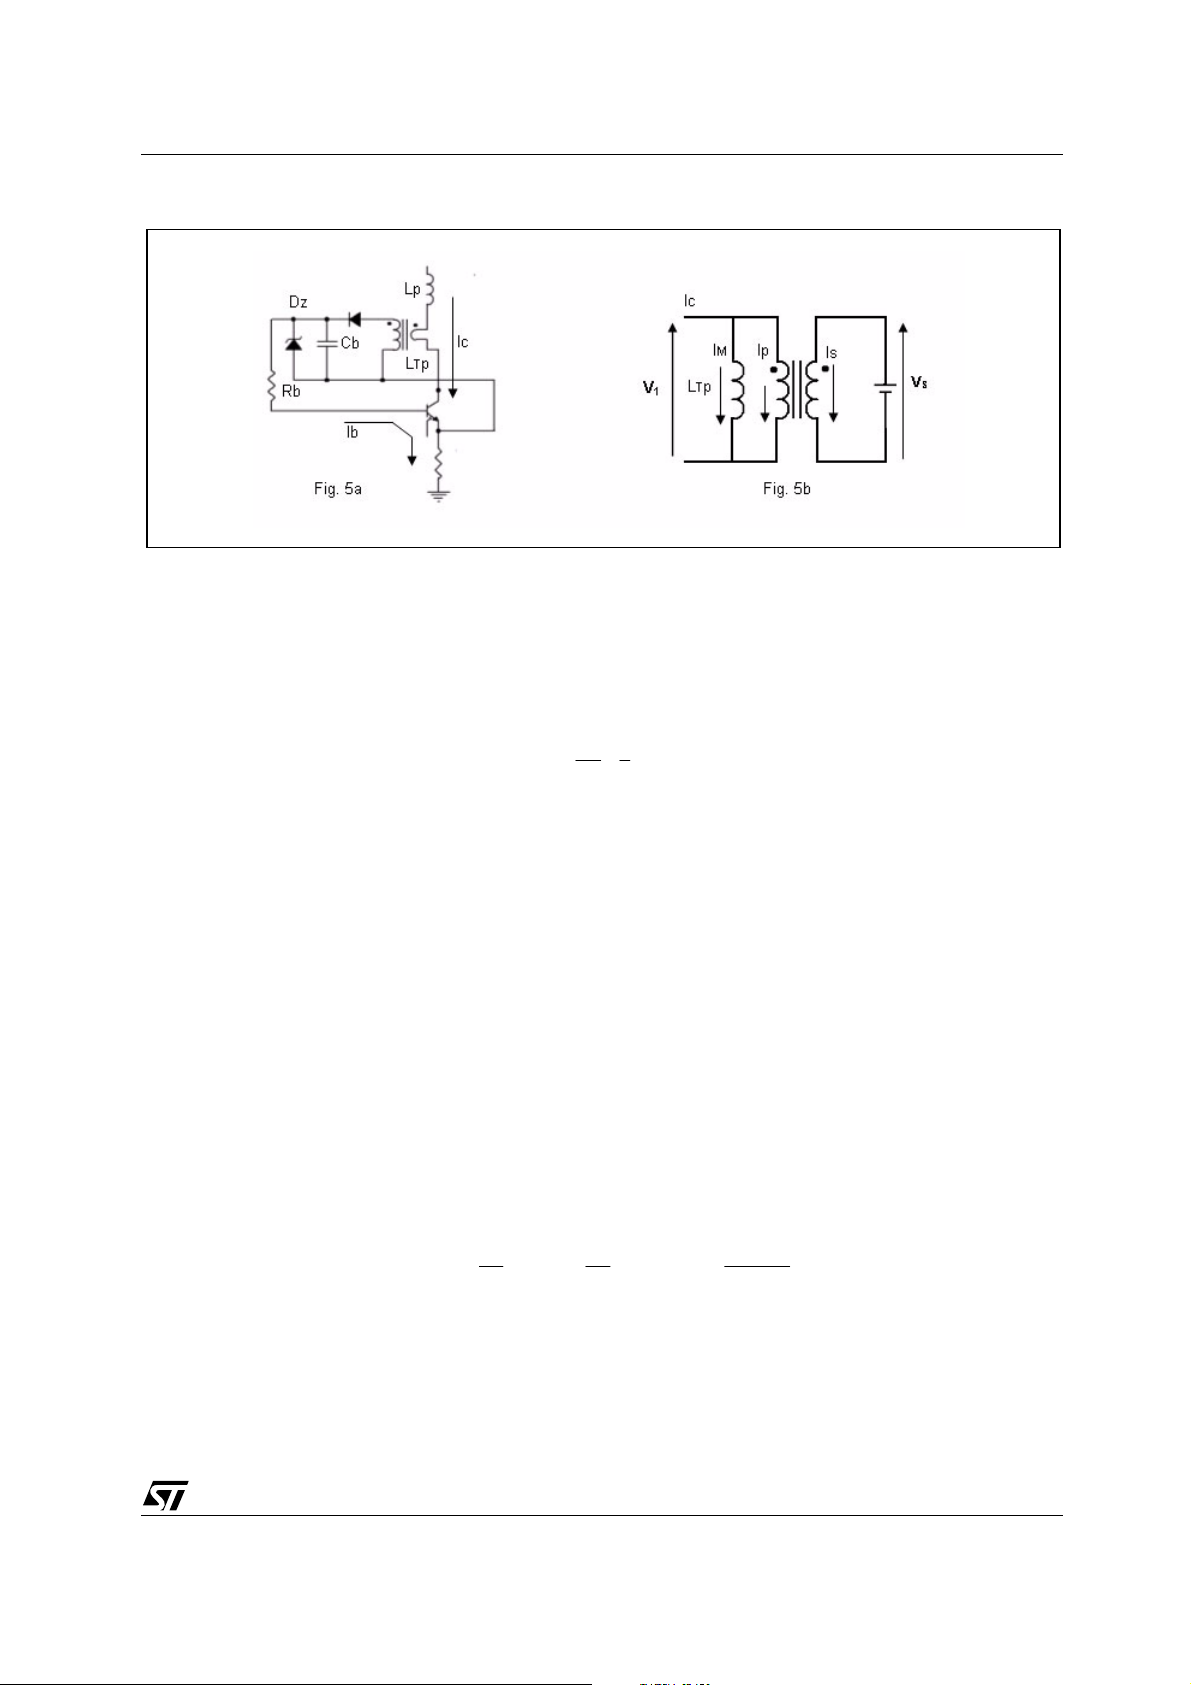
Figure 5: Proportional Driving Schematic and its Equivalent Circuit
The current transformer turn ratio imposes a zone in the current characteristics with fixed IC/IB, its turn
ratio has to be designed according to the characteristics of the chosen transistors and in particular to its
gain. As an example, the STC03DE170 exhibits h
=5 at IC=1.8A, VCE=5V, so that in order to ensure the
fe
right saturation level of the transistor at full load operations we can fix at first a turn ratio:
1
N
P
=
5
N
S
A correct design of the current transformer has to take into consideration some constraints that, being in
contrast each other, lead to a few iterative design steps. The magnetic permeability of the core of the
current transformer has to be as high as possible in order to minimize the magnetization current Im that is
a fraction of the primary current that flows in the core and is not transferred to the secondary side (see
figure 5b). On the other end, too high a permeability core may lead to the saturation even with a very
small magnetization current unless the number of primary turns as well as the size of the core is
increased. On the contrary, by choosing a core with a very small magnetic permeability, it is possible to
reduce the number of primary turns and the core size, but the consequent small permeability would not
ensure the necessary current on the secondary side because almost all of the primary current would be
used as magnetization current. Among some possible choices, a ferrite ring with 12.5mm diameter and
relative permeability in the range of 4500 ÷ 7000 has been selected.
Starting from the preliminarily fixed turn ratio (N=0.2), we must determine the minimum primary turns
needed to avoid the core saturation. By applying the Faraday's law and imposing the maximum flux
Bmax equals to Bsat/2:
d
NV
1
dt
B
AN
⋅⋅≅=
t
∆
N
TPeTPTP
TV
on
=⇒
max1
2
BA
sate
⋅
Where, Bsat is the saturation flux of the core and depends on its magnetic permeability.
Looking at figure 5b the equivalent schematic diagram of the transformer has been modeled with its
secondary closed with a voltage generator, whose value can be calculated doing some consideration on
the circuit in fig. 5a. In fact, during the conduction time, the junction base-emitter of ESBT can be seen as
a forward biased diode, to this we have to add the voltage drop on both diode D and resistor R
in series
B
5/20
Page 6

Obsolete Product(s) - Obsolete Product(s) Obsolete Product(s) - Obsolete Product(s)
AN2050 - APPLICATION NOTE
≅++
=
−
=
with the base of the ESBT (the Vdson of the mosfet can be neglected). In this way the voltage source at
secondary side Vs is given by:
VVVVV
5.2
RBDBEonS
Since the magnetization inductance cannot be neglected, only I
, a fraction of the total collector current,
P
will be transferred to the secondary. As a result, the magnetization current has to be firstly as low as
possible. Meanwhile, the value of the magnetization inductance must be taken into account for the
proper calculation of the transformer primary turns and turns ratio. The magnetization voltage drop, that
is, the voltage at the primary of the current transformer, can be now easily calculated:
N
T
1
VV
S
1
N
T
2
1
5.2
5
[]
V
5.0
=⋅==
The magnetization current will be:
TV
ON
=
max1
L
TP
results relatively high; obviously the core must
Mmax
I
M
max
The number of primary turns should be increased if I
have a window area large enough to hold both primary and secondary windings. Once both core material
and size are fixed, the turn ratio must be adjusted to get the desired I
ratio according to the below
C/IB
equation:
I
P
N
==
eff
I
B
II
maxmaxCMC
I
5
where I
is the max magnetization current.
Mmax
Particular care must be taken in order to ensure the insulation between primary and secondary sides
since the voltage on the primary side during the off time can exceed 1500V.
Next step is to select the zener diode, the capacitor Cb and the resistor Rb. The turn-on performance of
ESBT is related to the initial base peak current and its duration t
CRt 3
bbpeak
that is approximately given by:
peak
A suitable value for Rb that gets rid of the ringing on the base current after the peak, and at the same
time generates negligible power dissipation is 0.56
The t
in mind that in practical applications it should never be lower than 200ns. The value of C
easily calculated since the values of t
The I
6/20
value can be determined once the minimum on time is set upon the operating frequency. Bear
peak
and Rb were chosen.
peak
amplitude must be limited in order to avoid an extra saturation of the device. This action is
peak
Ω.
can be now
b
Page 7

Obsolete Product(s) - Obsolete Product(s) Obsolete Product(s) - Obsolete Product(s)
AN2050 - APPLICATION NOTE
®
(
)
+
(
)
=
made by the zener diode Dz that clamps the voltage across the small capacitor Cb. The zener must be
chosen according to the following empiric formulas and within the range of V
Zmin
and V
Zmax
:
=
max
The base peak current will be higher with higher clamp voltage (Dz) or smaller capacitance (Cb), which in
turn will lead to shorter duration of the peak time.
The higher and longer is the base peak current, the lower is the power dissipation during turn-on, on the
other hand it is necessary to limit the Ib peak both in terms of amplitude and time duration, otherwise at
low load a very high saturation level may occur with consequent long storage time that may lead the
device to an excessive power dissipation during turn-off. Moreover, longer storage times can also lead to
oscillations especially at high input voltage. To overcome these problems it is advisable to fix the peak
duration to 1/3 the minimum duty cycle.
5. PARASITIC CAPACITANCE BETWEEN ESBT COLLECTOR AND GROUND
The parasitic capacitance between the ESBT collector and ground is mainly due to three components as
shown in figure 6: C1 that is the primary inter-winding capacitance, C2 that represents the intrinsic
capacitance of the ESBT between its collector and source, C3 that is the parasitic capacitance between
the collector of the ESBT and the heat-sink. Usually ESBT is assembled on a heat-sink and is insulated
from it by interposing an insulation layer. The heat-sink should be grounded to minimize the RFI and also
for safety reasons. In this way C3 results in parallel with C1 and C2. The resulting total parasitic
capacitance C equal to C1+C2+C3 could result sufficiently large to produce additional not negligible turnon power dissipation and to origin ringing and noise problems. The influence of this parasitic capacitance
will be worst at higher input voltage like those observed in three-phase auxiliary power supply.
12
RIV
bpeakZ
min
RIV 2
bpeakZ
Figure 6: Small Signal Equivalent Circuit
The fly-back converter of the demo is operated in DCM, so, before the end of the off time, the secondary
of the transformer has completely discharged all the energy stored into the primary inductance during the
previous cycle. At that time, the magnetization inductance and the total parasitic capacitance C resonate
as it is evident from figure 7. The power supply has been tested at full load and different input voltages.
The highest temperature on the ESBT has been experienced at about 600V bus voltage when the
7/20
Page 8

Obsolete Product(s) - Obsolete Product(s) Obsolete Product(s) - Obsolete Product(s)
AN2050 - APPLICATION NOTE
heat-sink is grounded and the isolation material is ceramic. Looking at figure 7, it can be noted that ESBT
turns on at maximum voltage (about 1100V) and that the test frequency is about 100kHz. Under the
same conditions, with the heat-sink not grounded, the temperature on the ESBT results considerably
lower. Finally, in figure 8 the current which flows trough the package-heatsink parasitic capacitance is
also showed. The power dissipation caused by the parasitic capacitance between the ESBT collector
and the heat-sink can be calculated by using the formula: P
different values of C
Lower power dissipation can be achieved at a lower value of the capacitance C3 by increasing the
insulation distance between the heat-sink and ESBT collector and using plastic instead of ceramic
material for the insulation pad. However, this will increase the thermal resistance between the package of
the ESBT and the heat-sink, leading the device to operate at a higher working temperature. So the right
value of C3 is a right compromise between the thermal resistance and turn-on losses.
Figure 7: Overall Working Waveforms
are shown in Table 5.
3
= C3V
D
2
f/2. The relevant results at
CS
Figure 8: Discharging and Charging Current of C3
8/20
Page 9

Obsolete Product(s) - Obsolete Product(s) Obsolete Product(s) - Obsolete Product(s)
AN2050 - APPLICATION NOTE
®
The values for the capacitance C3 reported in table 5 are calculated as follows:
1) First the dv/dt of the collector voltage has to be measured with the heat-sink not grounded
2) Knowing that the current available to charge the total parasitic capacitance Cout during turn-off
is the IC peak current, from the formula i=Cdv/dt we can calculate Cout1=C1+C2.
3) Now the heat-sink has to be grounded to redo the measure of the dv/dt
4) Repeat step number 2, where now, Cout2=C1+C2+C3
5) Finally make the difference between Cout2 and Cout1 that is equal to C3
It is strongly recommended using a passive voltage probe whose parasitic capacitance contribution is
negligible.
Table 5: Influence of Parasitic Capacitance
C3 Capacitance (pF) power dissipation(W)
1 insulation plastic pad
2 insulation plastic pads
1 insulation c eramic pad
28 1.4
17 0.85
35 1.75
6. OSCILLATION AT MINIMUM LOAD AND MAXIMUM INPUT VOLTAGE
The fly-back power supply tends to oscillate at minimum load and maximum input voltage. The resistor
Rs in series with the ESBT in Figure 9(a) has the function of a current sense. The current waveform will
often have a large spike at its leading edge as shown in Figure 9(b). This is due to the discharge of the
parasitic capacitance C2 & C3 and the charge of the parasitic capacitance C1 as mentioned in the
previous chapter. A simple RC filter is usually adequate to suppress this transient spike that could cause
a premature end of the output pulse, as shown in Figure 10. The RC time constant should be
approximately equal to the current spike duration usually a few hundred nanoseconds; the values used in
the demo board are Rcs=1K, Cs = 560pF.
Figure 9: Current Sense Circuit (a) and Waveform of Sense Resistor (b)
UC 38 4 5
VCC
FB
COMP
VREF
RT/CT
OUT
ISENSE
6
3
Vc s Vr s
ES BT
Rc s
Spike
Vr s
Cs
Rs
(a) (b)
9/20
Page 10

Obsolete Product(s) - Obsolete Product(s) Obsolete Product(s) - Obsolete Product(s)
AN2050 - APPLICATION NOTE
Figure 10: Normal Operation Waveforms of Output Pulse and Current Spike
In case of maximum input voltage and minimum load, the current spike duration and the pulse width
could stand the same order of magnitudes. In this case the RC filter will not be effective, as shown in
Figure 11. A bigger capacitance could not solve the problem; furthermore, as a consequence, the
increasing of the delay imposed by the current sense may lead the magnetic core of the transformer to
go into saturation since the current continues to rise up during this delay period. This can more easily
happen during start-up and output short circuit.
Figure 11: Output Waveforms and Current Spike at Minimum Load and Maximum Input Voltage
Moreover, if the filter capacitance is too big it is possible that the minimum duty cycle is not reachable
with consequent oscillations and instabilities. On the contrary, if the filter capacitance is too small, some
instability can occur as well. The reason can be explained by the following consideration. The energy
transferred from primary to secondary side results small if the output pulse is prematurely terminated
during the switching cycle. If this happens for several pulses the feedback loop will act increasing the
error signal and producing a higher energy that will be transferred to the secondary side. Accordingly, a
higher output pulse will be generated and again prematurely ended. Another disadvantage of choosing a
too small filter capacitance is that the power supply could not be able to start-up at full load and minimum
input voltage. It is possible to mitigate both of the above mentioned problems just reducing the parasitic
10/20
Page 11

Obsolete Product(s) - Obsolete Product(s) Obsolete Product(s) - Obsolete Product(s)
AN2050 - APPLICATION NOTE
®
capacitance between collector and ground with the effect of smoothing the current spike during turn-on.
Normally, using an ESBT as a main switch, it is not possible to reach a very low minimum duty cycle
because of its storage time; as a consequence, if the minimum load is very low, it is not possible to
completely eliminate the oscillations. In the applications where turn-on can occur at a very high voltage,
like in auxiliary power supplies, the great amount of energy stored in the parasitic capacitances leads to
high peak currents and oscillations. In this situation, small slope compensation can help to completely
remove this problem; note that normally the slope compensation is used to prevent sub harmonic
oscillations when the converter is operated at a duty cycle higher than 50%. The slope compensation can
be implemented by adding a positive going ramp to the signal coming from the sensing resistor (see
figure 12).
Figure 12: Slope Compensation Network and Related Waveforms
Practically, the slope compensation is realized by connecting a resistor between pin 4 and pin 3. In fig.
12b the positive going ramp, added to the voltage on the sense resistor, is shown. The positive effect of
this method is clear if you look at fig 12c where the output signal is correct. If the resistance value to be
inserted is too small (the same order of magnitude of Rt) the switching frequency will be affected by both
Rt and Rslope. To avoid this problem an emitter follower could be interposed between pin 4 and Rslope,
as shown in figure 13.
11/20
Page 12

Obsolete Product(s) - Obsolete Product(s) Obsolete Product(s) - Obsolete Product(s)
AN2050 - APPLICATION NOTE
Figure 13: Modified slope compensation network with emitter follower
The slope compensation can be also achieved by using a small capacitor in place of the resistor as
shown in figure 14. In this case the following relations must be taken into account:
C du
Cs du
Where C = Ct+ Cs Cslope/(Cs + Cslope).
/ dt =( Vref - uCt )/Rt (1)
Ct
/ dt = Cs d(uCt - u
CS
) = Cslope du
Cslope
Cslope
/dt (2)
The capacitive slope compensation does not need the use of a small signal transistor as emitter follower,
but from the equations 1 and 2 above, it is clear that, positive going ramp can be achieved only if the
voltage slope at pin 4 is higher than the voltage slope of the voltage at pin 3 and this could not be verified
in every working condition.
Figure 14: Capacitive Slope Compensation
12/20
Page 13

Obsolete Product(s) - Obsolete Product(s) Obsolete Product(s) - Obsolete Product(s)
AN2050 - APPLICATION NOTE
®
Anyway, in both cases (resistive or capacitive slope compensation), the values have to be chosen in
order to add a voltage ramp that is high enough to solve the oscillation problem. On the other hand the
ramp amplitude cannot be arbitrarily high, otherwise the peak of the ramp will be very high and the
maximum collector current will be reduced accordingly.
Noises can be anyway greatly reduced, paying particular attention to the layout: as an example using
copper ground plane and separate return lines for high and low current paths. The use of 0.1µF
capacitors from Vcc and Vref pins to ground can provide low-impedance paths for high frequency
transients. Some noises are often generated by the output of PWM IC (pin 6) being it pulled down below
the ground at turn-off by the influence of external parasitic inductances. A clamping diode in the pin 6 (to
ground) will prevent such output noise.
Note that there are significant oscillations in figure 15 at min load and max input voltage with the heatsink grounded (high parasitic capacitance). VIS is the waveform of the pin3 of UC3845.
Figure 15: Minimum Load Maximum Input Voltage, Heat-sink Grounded
Note that in Figure 16 the oscillations are slightly decreased at min load and max input voltage when the
heat-sink is not grounded (lower parasitic capacitance).
Figure 16: Minimum Load Maximum Input Voltage, Heat-sink not Grounded
13/20
Page 14

Obsolete Product(s) - Obsolete Product(s) Obsolete Product(s) - Obsolete Product(s)
AN2050 - APPLICATION NOTE
E
Vb
Note that oscillations are completely removed in Figure 17 at min load and max input voltage when the
slope compensation is added and the heat-sink is not grounded.
But it is worth noticing that the working conditions are not particularly stressful during turn-on as it occurs
when the collector voltage is relatively low.
Figure 17: Minimum Load Maximum Input Voltage, Heat-sink not Grounded plus Slope
Compensation
7. THE PROTECTION FOR OUTPUT SHORT CIRCUIT
The self-supply circuit of PWM IC is shown in Figure 18 where the popular 1N4148 or UF4003 can be
used as bias rectifiers. The UC384X family realizes the function of an output short circuit protection by
using the Under-Voltage-Lock-Out function through the Vcc pin (UVLO function). When the output is
short circuited, the auxiliary winding output and consequently the Vcc voltage will drop to zero: once the
Vcc voltage reaches a value lower than the under voltage lockout, the PWM IC stops operating. Then the
power supply will start again and will be stopped by the UVLO function for several cycles till the short
circuit is removed.
Figure 18: Self-Supply Circuit of PWM IC
us
Rs tart
Cv c c
7
2
1
8
4
U1
UC 3 8 4 5
VCC
FB
COMP
VREF
RT/CT
D1
OUT
ISENSE
IN4148
6
3
R1
CS
T
Rb
Rg
Rc s
Rg s
14/20
Page 15

Obsolete Product(s) - Obsolete Product(s) Obsolete Product(s) - Obsolete Product(s)
AN2050 - APPLICATION NOTE
®
The resistor R1 in figure 18 has the function to filter the voltage spikes due to the parasitic inductances,
appearing on the positive edge of the voltage that causes the Vcc voltage to increase at the increasing of
the output load. The optimum value can be found empirically taking into account that its max value has to
ensure the start-up of the power supply at min load and min input voltage, while the min value must
ensure the filtering of the voltage spike at full load and max voltage. It is recommended to design the turn
ratio of the self-supply winding in order to get a voltage approximately in the middle of the two boundary
conditions described before. A small and inexpensive axial inductor in the range of 1 to 10uH may be
used instead of R1, with even better results.
Sometimes, only adjusting the value of the resistance might not be enough to solve the problem. So
other actions, like those listed below, should be taken:
1. Use diode IN4007 instead of 1N4148 or UF4003.
Thanks to the higher recovery time shown by the IN4007, the energy stored in the capacitance of Vcc
can be discharged through the diode and auxiliary winding during the recovery period. This will help
reduce the voltage of Vcc (see figure 19).
Figure 19: Vcc Capacitance Discharging
2.
The auxiliary winding should be twisted tightly on the outermost layer and concentrated on the middle
of the bobbin.
The effect of that is a lost of magnetic coupling between auxiliary winding and primary winding, which, in
turn, helps increase the leakage inductance and the delay making inefficient the transfer of energy from
primary to the auxiliary winding. The auxiliary winding should couple better with the secondary winding.
3. Connect a resistor between PWM IC pin3 and Vbus.
It is very effective when short circuit protection cannot be realized at high input voltage.
4. Remove the bead in series with the secondary diode.
The bead can reduce the current slope rate. Take EMI into account before doing it.
5. Increase current sense resistor.
The current sense resistor connected between the source pin and the ground should be big as soon as
possible on the condition that power supply must start-up normally at full load and min input voltage.
6. Decrease the capacitance of RC filter.
Noise immunity and starting up of power supply at full load and min input voltage must be ensured.
15/20
Page 16

Obsolete Product(s) - Obsolete Product(s) Obsolete Product(s) - Obsolete Product(s)
AN2050 - APPLICATION NOTE
Table 6: Bill of Material
Part Type Designator
1 C1 150u/450V
2 C2 150u/450V
3 C3 1.5n/2KV
4 C4 0.1u/60V
5 C5 100u/50V
6 Ccom 470p/60V
7 CS 471/60V
8 CF 0.1u/60V
9 CT 1n/60V
10 CV11 1000u/50V
11 CV12 1000u/50V
12 CV21 680u/50V
13 CV22 680u/50V
14 R1 220K/0.5W
15 R2 220K/0.5W
16 R3 82K/2W
17 R4 82K/2W
18 R5 12/0.5W
19 R6 1K/0.5W
20 R7 2.6K/0.25W
21 R8 10K/0.25W
22 RG 22/0.5W
23 RG1 10K/0.25W
24 Rb 0.56/0.5W
25 Rb1 56K/0.5W
26 RS 1.4/1W
27 Rcs 1K/0.25W
28 RT 10K/0.25W
29 Rcom 10K/0.25W
30 RF1 2K/0.25W
31 RF2 10K/0.25W
32 RF3 Option
33 RF4 810/0.5W
34 RF5 1K/0.25W
35 D1 IN4007
36 D2 IN4007
37 D3 BY269
38 D4 BY269
39 D5 IN4148
40 D6 IN4148
41 Dz IN4148*3
42 Db BA159
43 DDV1 STS20H100CT
44 DDV2 STS20H100CT
45 F1 FUSE1
46 U1 UC3845
47 U2 PIC817
48 U3 TL431
49 TR1 Lp = 2.4uH, Np = 160, Ns = 5
50 TOR1 Turn Ratio:12/3
16/20
Page 17

Obsolete Product(s) - Obsolete Product(s) Obsolete Product(s) - Obsolete Product(s)
®
Figure 20: Picture of Demo board
AN2050 - APPLICATION NOTE
ESBT:
STC03DE17
Figure 21: PCB Picture Bottom View
17/20
Page 18

Obsolete Product(s) - Obsolete Product(s) Obsolete Product(s) - Obsolete Product(s)
AN2050 - APPLICATION NOTE
Figure 22: PCB Picture Top View
18/20
Page 19

Obsolete Product(s) - Obsolete Product(s) Obsolete Product(s) - Obsolete Product(s)
®
8. REVISION HISTORY
Table 7: Revision History
Date Revision Description of Changes
15-Oct-2004 1 First Release
AN2050 - APPLICATION NOTE
19/20
Page 20

Obsolete Product(s) - Obsolete Product(s) Obsolete Product(s) - Obsolete Product(s)
AN2050 - APPLICATION NOTE
Information furnished is believed to be accurate and reliable. However, STMicroelectronics assumes no responsibility for the consequences
of use of such information nor for any infringement of patents or other rights of third parties which may result from its use. No license is granted
by implication or otherwise under any patent or patent rights of STMicroelectronics. Specifications mentioned in this publication are subject
to change without notice. This publication supersedes and replaces all information previously supplied. STMicroelectronics products are not
authorized for use as critical components in life support devices or systems without express written approval of STMicroelectronics.
The ST logo is a registered trademark of STMicroelectronics.
All other names are the property of their respective owners
Australia - Belgium - Brazil - Canada - China - Czech Republic - Finland - France - Germany - Hong Kong - India - Israel - Italy - Japan -
20/20
Malaysia - Malta - Morocco - Singapore - Spain - Sweden - Switzerland - United Kingdom - United States of America
© 2004 STMicroelectronics - All rights reserved
STMicroelectronics group of companies
www.st.com
 Loading...