

S
f
A
A
A
AN1978
APPLICATION NOTE
ST8004: SMART CARD INTERFACE
1. INTRODUCTION
The ST8004 is a smart card interface designed to minimize the microprocessor hardware and software
complexity in all the applications that need a smart card, such as Set-Top-Boxes, electronic payments,
pay TV and identification.
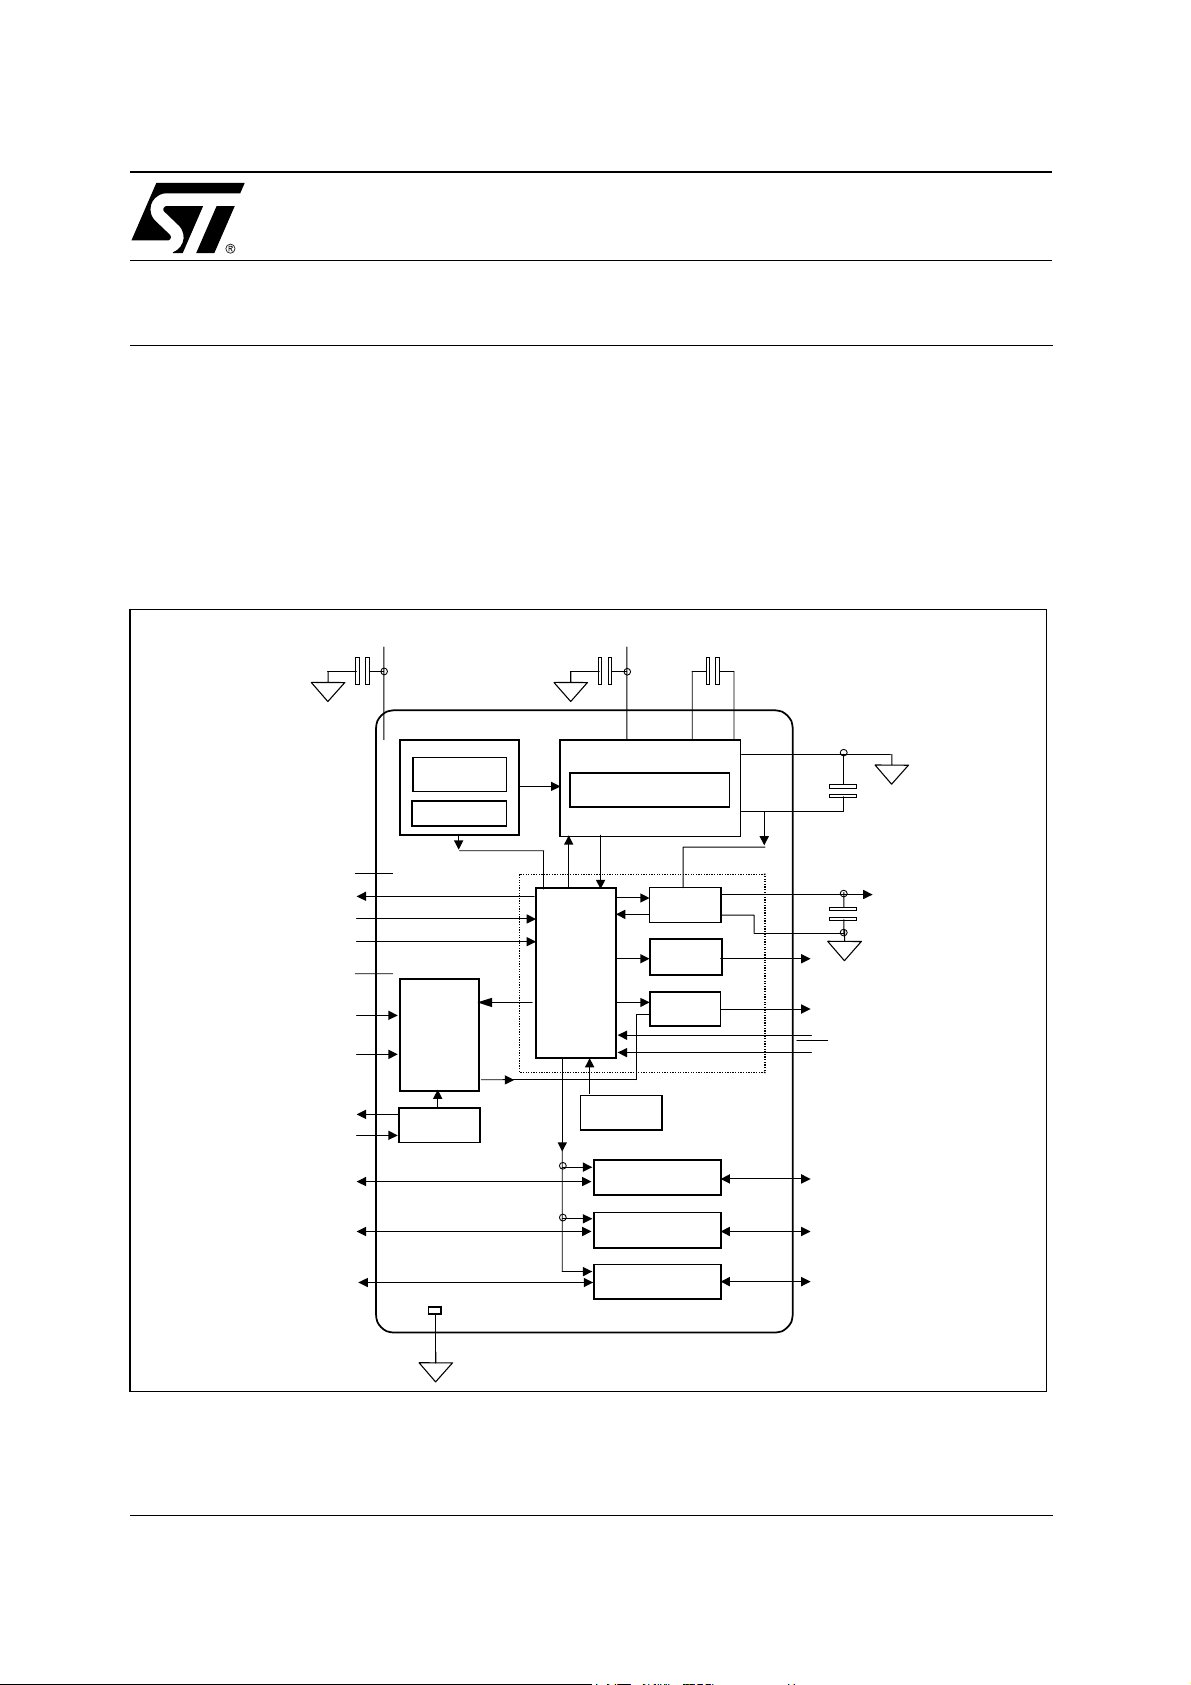
The ST8004 is compliant with the NDS requirements. It implements all the blocks and procedures for the
card activation/deactivation as shown in the block diagram of figure 1.
Figure 1: ST8004 internal block diagram
V
DDP
6
STEP-UP CONVERTER
INTERNAL OSCILLATOR
2.5MHz
En1 CLKUP
En2
GENERATOR
PV
CC
En5
RST BUFFER
En4
CLOCK
BUFFER
THERMAL
PROTECTIO
S1
VCC
7 5
2
P
4
GND
100nF
UP
CC
100nF
17
14
16
15
10
8
9
V
V
CGND
RST
CLK
PRES
PRES
VTHSEL
OFF
RSTIN
CMDVCC
5/3V
CLKDIV1
CLKDIV2
XTAL1
XTAL2
VDD
21
18
23
20
19
3
1
2
24
25
SUPPLY
INTERNAL
REFERENCE
VOLTAGE
SUPERVISOR
CLOCK
CIRCUITRY
LARM
CLK
Vre
En4
En3
100nF 100nF100nF
ST8004
SEQUENCER
UX1
27
I/OUC
28
26
22
GND
I/O TRANSCEIVER
I/O TRANSCEIVER
I/O TRANSCEIVER
AUX1UC
AUX2UC
June 2004
13
UX2
12
I/O
11
1/14
AN1978 - APPLICATION NOTE
2. SEQUENCER
Core of the ST8004 is the sequencer (shown in figure 1) that must coordinate the enable signals for the
activation and deactivation sequence and check for possible fault conditions. This because the smart
card is basically a microcontroller and needs to be activated/deactivated by a correct sequence as
required by the ISO/IEC7816 standard.
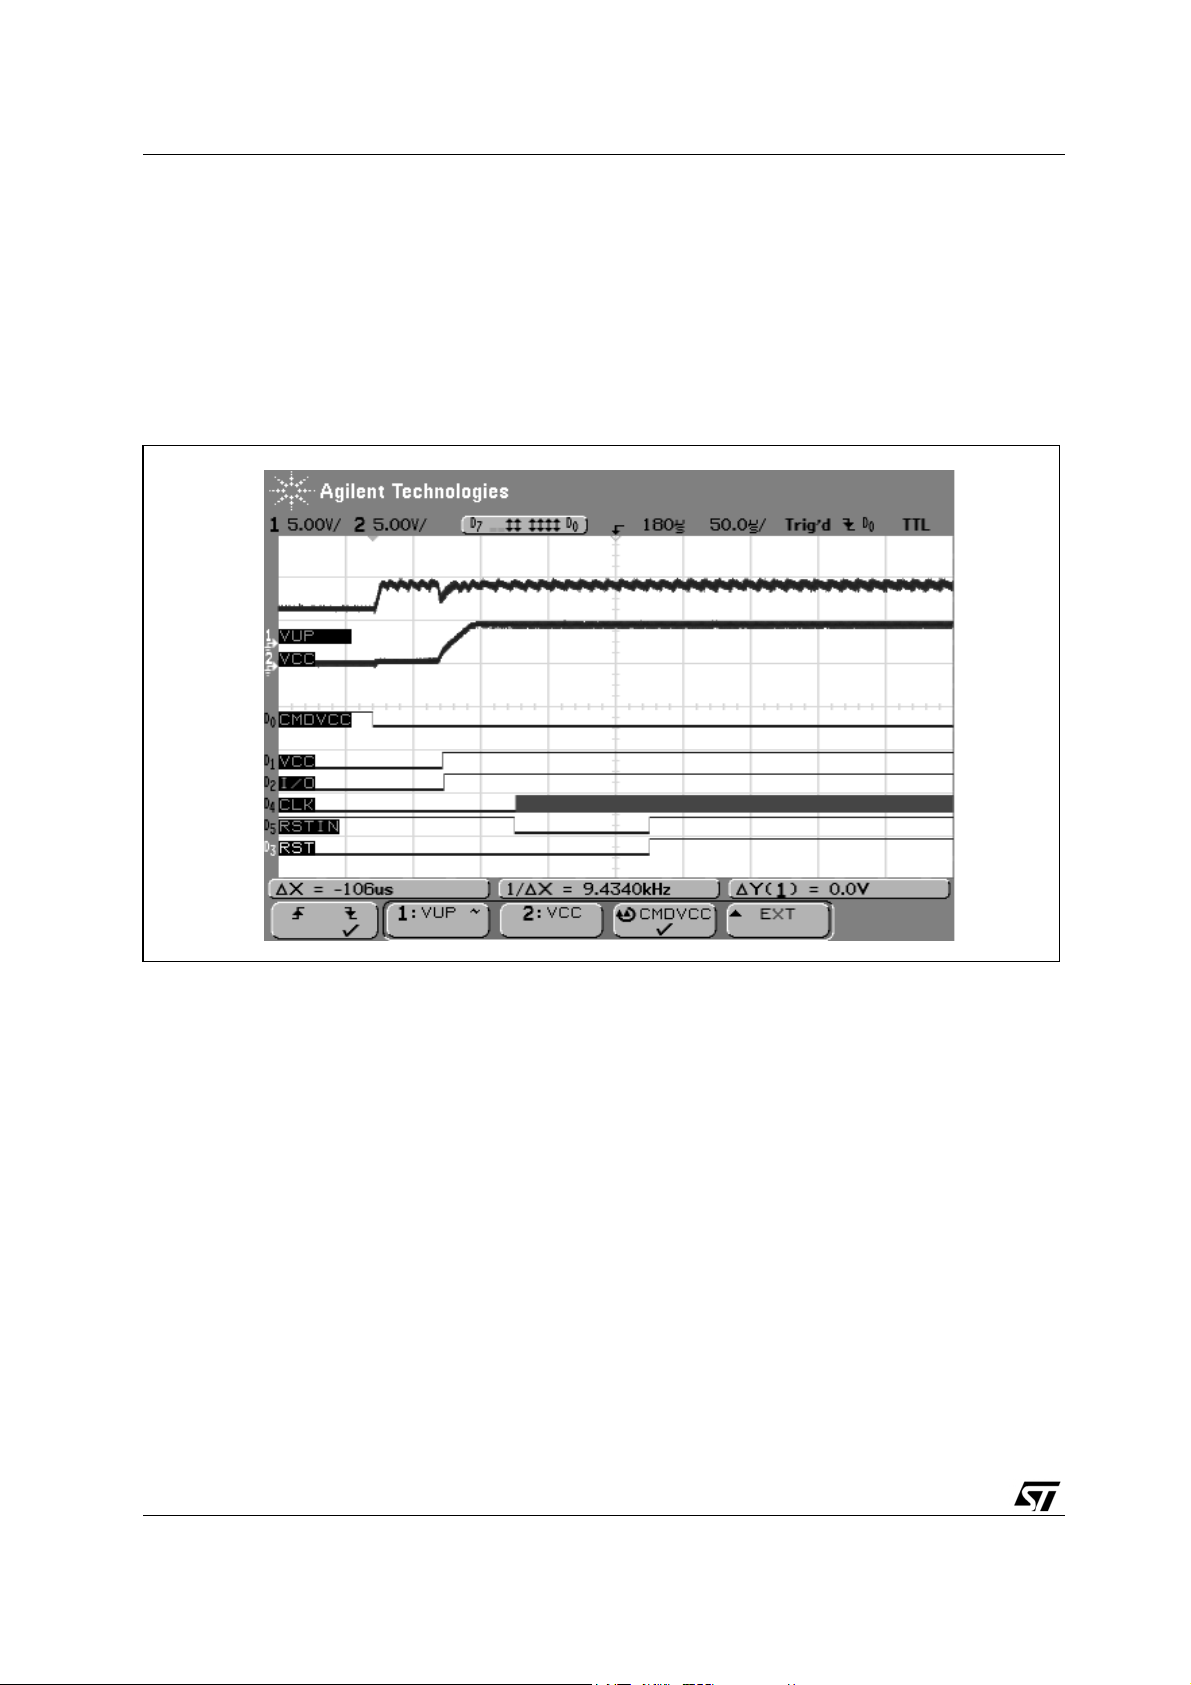
Figure 2 and figure 3 show respectively the ST8004 activation and deactivation sequences.
Figure 2: Activation sequence
As shown in figure 2, when the PRES condition is true (PRES = low or PRES = high) and CMDVCC goes
low, the activation sequence starts; the first block to be enabled is the step-up converter (V
), while the
UP
last enabled signal is the RST that allows the start of the card software.
Figure 3 shows the deactivation sequence when the CMDVCC goes high. During the deactivation the I/O
outputs are deactivated at the time t13 being forced into a three-state condition, following the Vcc slope
(see CH 1 in figure 3).
2/14

Figure 3: Deactivation sequence
AN1978 - APPLICATION NOTE
3. CLOCK TO THE CARD
The clock signal to the card is present on the CLK pin when the ST8004 is activated; ; its frequency can
be of the same value as one of its ratios compared to the input one (crystal or signal) as shown in the
following table (Table 1: CLK division).
Table 1: CLK Division
CLKDIV 1 CLKDIV 2 CLK
0 0 1/8 f
01¼ f
11½ f
10 f
XTAL
XTAL
XTAL
XTAL
According to the EIA/ISO7816 specifications, the CLK duty cycle must be enclosed between 45% and
55% even if the clock division changes. In this case, at CLKDIV change, the ST8004 waits for the first
falling edge to ensure the duty cycle accuracy, as shown in Figure 4.
3/14
AN1978 - APPLICATION NOTE
Figure 4: Clock duty cycle on CLKDIV change
CH1: output CLK waveform.
CH1: output CLK waveform.
CH2: CLKDIV1 pin.
CH2: CLKDIV1 pin.
Conditions:
Conditions:
VDD=3.3V;
VDD=3.3V;
VDDP=5V;
VDDP=5V;
5/3V=H;
5/3V=H;
CMDVCC=L.
CMDVCC=L.
F
F
=10MHz;
=10MHz;
XTAL1
XTAL1
CLKDIV2=0V;
CLKDIV2=0V;
The output Duty Cycle is 50%±5%
The output Duty Cycle is 50%±5%
even if the Clock Division changes.
even if the Clock Division changes.
The clock signal can be obtained by a crystal connected between the XTAL1 and XTAL2 pins or by an
external signal applied to the XTAL1 pin; in this case the XTAL2 pin must be left floating. The external
signal voltage value must be enclosed between GND and VDD.
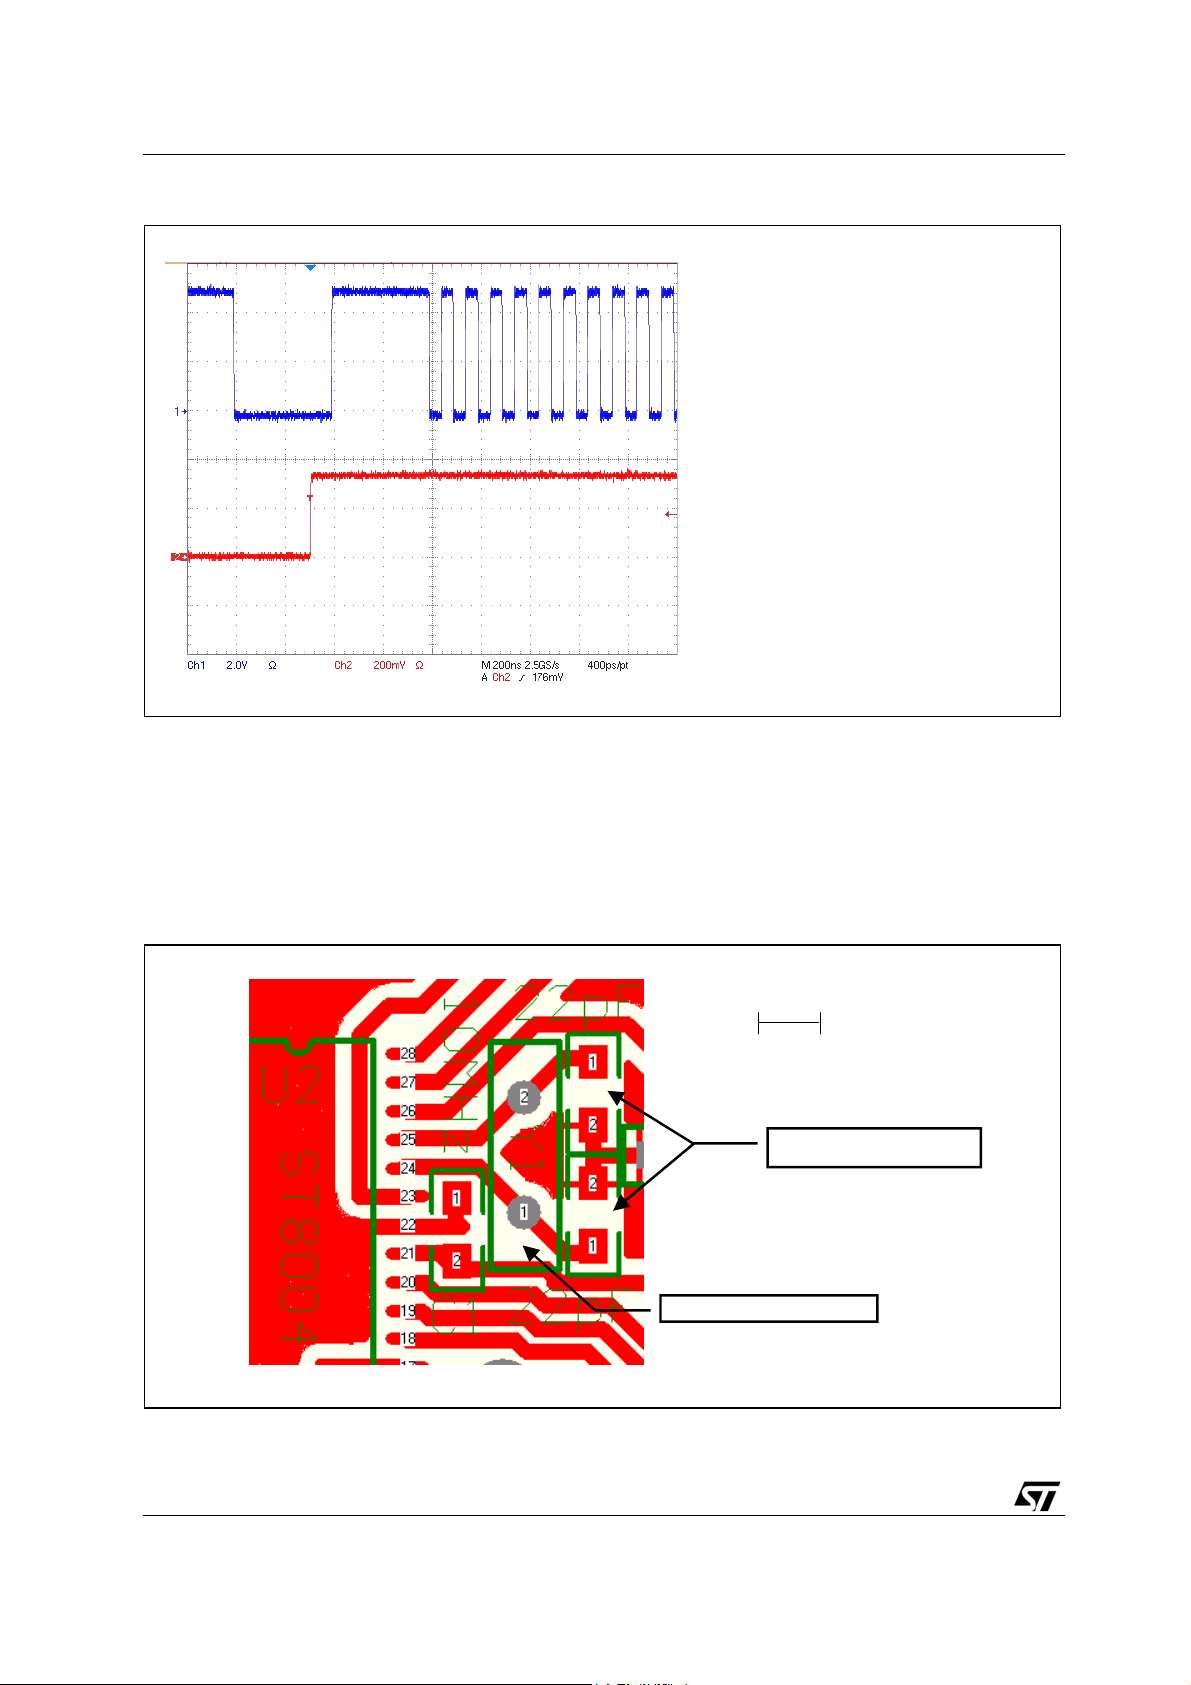
In the PCB design, in order to reduce the reflections especially for the high frequency, the Xtal should be
connected as close as possible to the XTAL pins, as shown in figure 5.
Figure 5: XTAL connection
100 mils
XTAL2
XTAL1
GND
VDD
2MHz to 26MHz XTAL (Y1)
Compensation capacitors
Two compensation capacitors, lower than 22pF, can be used to improve the oscillator performance even
if the characterization tests remarked that the CLK Duty Cycle is enclosed between 45% and 55%,
4/14

AN1978 - APPLICATION NOTE
V
without additional capacitors, even for a frequency higher than 26MHz.
Another recommendation about the CLK output is to keep the CLK wire far from the other signals
because inductive or capacitive effects could produce cross conduction on the transceiver lines.
Moreover it is better to shield the clock wire with a ground plain or track on the PCB.
4. STEP-UP CONVERTER AND POWER SUPPLY REGULATOR
The ST8004 can drive both 3V and 5V cards through the supply voltage selector 5/3V pin (pin 3) as
shown in Figure 6. If the 5/3V pin is to GND, the Vcc voltage is 3V and the internal Vcc regulator is
connected directly to the VDDP pin.
If the 5/3V pin is connected to VDD, the Vcc regulator is connected to the internal step-up converter, as
shown in Figure 6, in order to provide the high Vcc supply voltage (5V) even when the VDDP voltage is
lower than 5V.
Figure 6: Step-up converter block diagram.
3
DDP
100nF
S1
S2
6
ON/OFF
OUTPUT
H
L
7 5
STEP-UP
CONVERTER
P
GND
100nF
V
UP
100nF
5/3V
ST8004
EN2
P
VCC
VCC
REGULATOR
The step-up converter is supplied by the VDDP pin; S1 and S2 pins are used to duplicate the supply
voltage through the 100nF pumping capacitor, while the charge pump output is connected to the VUP pin
that requires a 100nF storage capacitor to stabilize the voltage.
Due to the switching circuitry, a little noise is introduced so, in order to reduce it and improve the
efficiency of the step-up converter, the capacitors must be connected as close as possible to the pins as
shown in Figure 9 and are recommended with ESR lower than 50mΩ @ 100kHz such as MURATA
GRM31M7U1H104JA01B. Anyway, also capacitor with ESR up to 100mΩ @ 100kHz are enough to work
in specifications.
17
V
CC
5/14

AN1978 - APPLICATION NOTE
A better noise performance could be achieved connecting the VUP (100nF) capacitor between VUP and
V
instead of GND. Moreover, a 200nF capacitor should be connected to V
DDP
into GND in order to
DDP
obtain a higher current from the charge pump when pulsed load is applied on Vcc.
In the typical applications a 100nF filter capacitor is connected to the Vcc output, near the ST8004 pins
and another 100nF is connected, between C1 and C5, near the card slot as shown in Figure 7 and
Figure 9. In order to reduce the noise presence and avoid cross conduction effects the wire length
between ST8004 and the card should be as short as possible (a wire less than 5cm-long is suggested).
In this way the Vcc spikes are much lower than 350mVpp, even when an impulsive load up to 65mA is
applied, as specified in the NDS requirements.
Figure 7: Smart Card connection.
CGND connections
between ST8004 and
Card should be short
and straight.
To V
R1
100K
Ω
DD
PRES
I/O
AUX2
AUX1
CGND
10
11
ST8004
12
13
14
100nF
C5
C6
C7
C8
CARD SLOT
C9
100nF
C10
C1
C2
C3
C4
CMDVCC
19
V
THSEL
18
Vcc
17
RST
16
CLK
15
K1
K2
J1
C3 (CLK) wire
should be routed far
from the other card
contacts.
A typical Vcc output waveform, with an impulsive 65mA load applied (worst condition at f=55KHz;
D.C.=50%) is shown in Figure 8 where the measured ripple is lower than 240mVpp; the Vcc pin will be
able to handle fast current transient generated by the smart card and remain between 4.60V and 5.30V
for Class-A and between 2.7V and 3.3V for Class-B (including ripple).
6/14

Figure 8: Vcc loaded with a 65mA pulsed current.
AN1978 - APPLICATION NOTE
CH1: Vcc voltage; offset=5V;
BandWidth=250MHz.
CH4: Vcc output current into
GND.
Conditions:
VDD=3.3V;
VDDP=4.75V;
5/3V=H.
The Vcc voltage is between
4.6V and 5.3V even if a 65mA
sink pulsed current is forced.
Figure 9: Step-up and Vcc capacitors placement.
V
wire
V
wire
V
wire
DDP
DDP
DDP
PGND
PGND
PGND
S2
S2
VUP wire
VUP wire
VUP wire
C8 (AUX2)
C8 (AUX2)
C8 (AUX2)
Card
Card
Card
connector
connector
connector
C7 (I/O)
C7 (I/O)
C7 (I/O)
C6 (N.C.)
C6 (N.C.)
C6 (N.C.)
C5(GND)
C5(GND)
C5(GND)
S2
V
V
V
DDP
DDP
DDP
S1
S1
S1
V
V
V
UP
UP
UP
Vcc
Vcc
Vcc
PRES and PRES
PRES and PRES
PRES and PRES
Vcc
Vcc
Vcc
C4 (AUX1)
C4 (AUX1)
C4 (AUX1)
C3 (CLK)
C3 (CLK)
C3 (CLK)
C2 (RST)
C2 (RST)
C2 (RST)
C1 (Vcc)
C1 (Vcc)
C1 (Vcc)
C1 (Vcc)
C1 (Vcc)
C1 (Vcc)
Card
Card
Card
connector
connector
connector
C11:
C11:
C11:
100nF filter
100nF filter
100nF filter
capacitor
capacitor
capacitor
7/14

AN1978 - APPLICATION NOTE
5. FAULT DETECTION
ST8004 provides a fault detection circuitry as shown in Figure 1 monitoring the following conditions:
- Over-temperature detection
- Fault on card removing
- VDD under-voltage
- Vcc Short circuit protection
5.1. VDD under-voltage
The ST8004 logic circuitry is supplied by VDD; in order to avoid voltage spikes causing bad behaviors of
device and card, a voltage supervisor block is embedded as shown in Figure 1.
This check block allows the deactivation of the card when the VDD voltage falls below the VTH2 or VTH3
threshold, depending on the VTHSEL selection.
The VTH3 threshold can be used when the microcontroller I/Os continue to work down to 2.85V. In order
to provide the correct CLK signal to the card until time t12, the application circuitry should ensure,
through filter capacitors, that the VDD voltage falls more slowly than 1.6V/ms. The VDD capacitors used
in the evaluation board are 10µF and 100nF.
When the VTHSEL is high or floating and the VDD voltage falls below VTH2, the supervisor starts the
deactivation sequence immediately as shown in Figure 13 and the OFF pin goes low (Figure 11).
When the VTHSEL is tied low and the VDD voltage falls below VTH3 for more than about 20µs, the
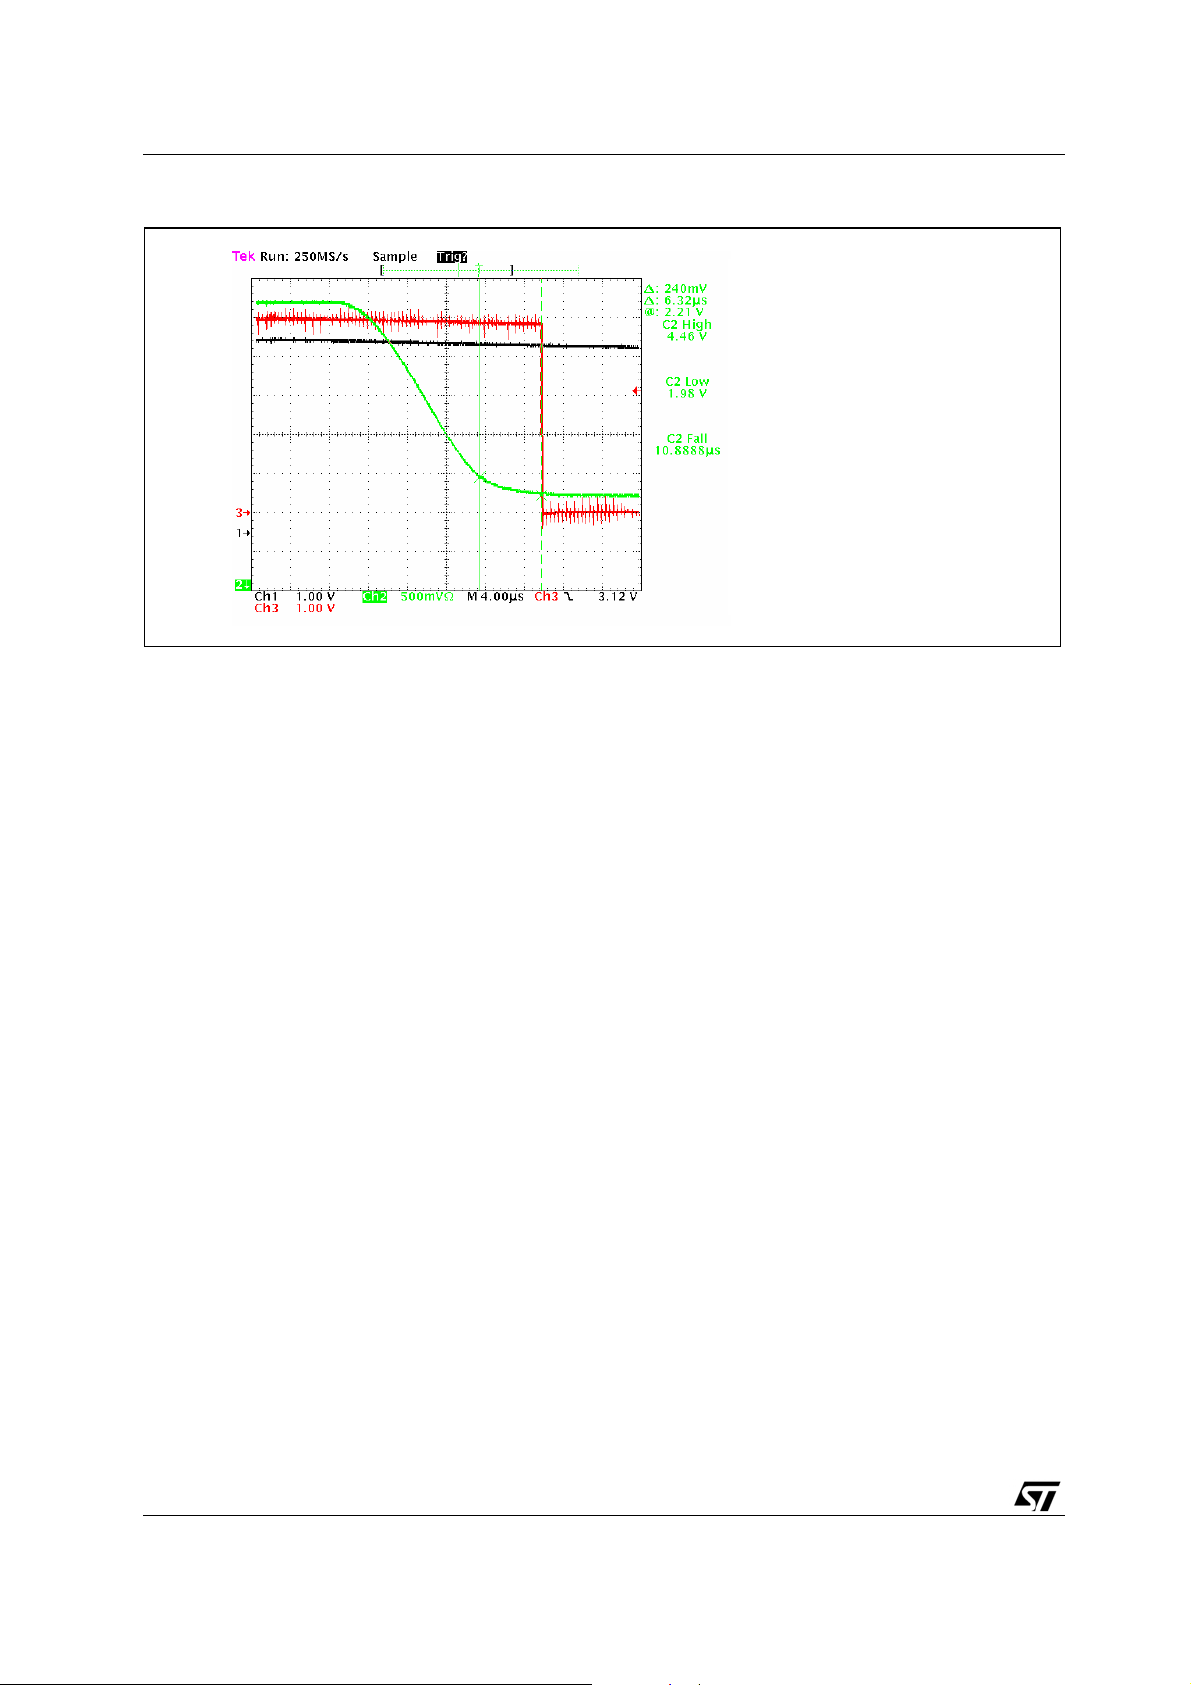
supervisor starts the deactivation sequence as shown in Figure 10.
Figure 10: Deactivation sequence when V
falls down the V
DD
voltage
TH3
Conditions:
V
= GND;
THSEL
V
=4V to 0V;
DD
V
S.R.=0.015V/µs
DD
V
=5V;
DDP
5/3V=L.
When the V
the Vth3 value (about 3.0V in this
case) a deactivation sequence
starts; after 20µs the RST pin
goes low and then the other
signals follow the deactivation
sequence.
voltage falls below
DD
8/14
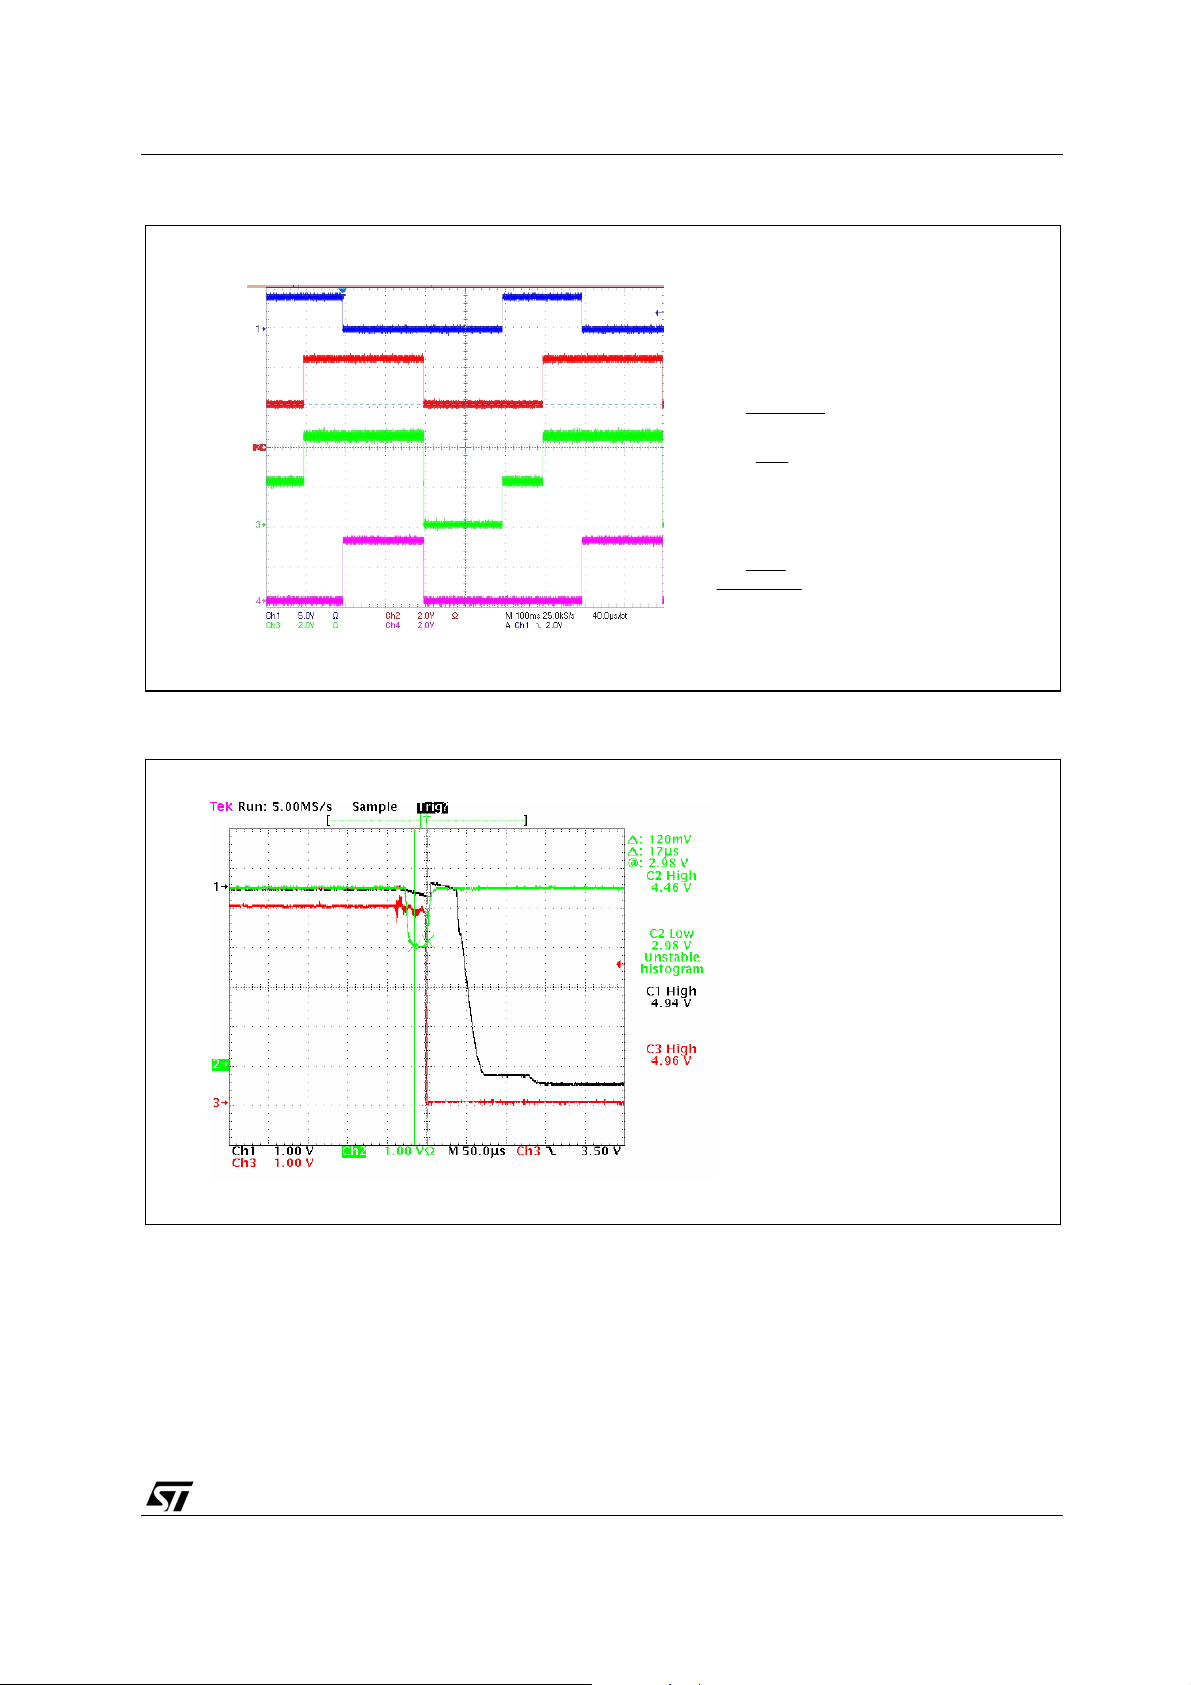
Figure 11: OFF behaviour on VDD drop.
AN1978 - APPLICATION NOTE
Conditions:
V
= Floating;
THSEL
V
=4V to 2V;
DD
V
=5V;
DDP
5/3V=L.
CH1:CMDVCC
CH2: VDD
CH3: OFF
CH4: Vcc
When the V
the Vth2 value (about 2.1V) a
deactivation sequence starts and
the OFF pin goes low until
CMDVCC rising edge happens.
voltage falls below
DD
Figure 12: Deactivation sequence automatically when spikes on VDD are present.
Conditions:
Conditions:
= GND;
= GND;
V
V
THSEL
THSEL
=4.5V to 3V;
=4.5V to 3V;
V
V
DD
DD
=5V;
=5V;
V
V
DDP
DDP
5/3V=H.
5/3V=H.
CH1: Vcc
CH1: Vcc
.
CH2: V
CH2: V
CH3: RST pin.
CH3: RST pin.
When the V
When the V
down the Vth3 value (about
down the Vth3 value (about
3.0V) for more than 20µs. a
3.0V) for more than 20µs. a
deactivation sequence
deactivation sequence
starts; the RST pin (CH3) is
starts; the RST pin (CH3) is
the first that goes low.
the first that goes low.
DD
DD
.
DD
DD
voltage falls
voltage falls
9/14
AN1978 - APPLICATION NOTE
Figure 13: Vth2 threshold.
5.2. Vcc short-circuit protection
Conditions:
Conditions:
V
V
= VDDor floating;
= VDDor floating;
THSEL
THSEL
= 4.5V to 2V;
= 4.5V to 2V;
V
V
DD
DD
V
V
=5V;
=5V;
DDP
DDP
5/3V=H.
5/3V=H.
CH1: Vcc
CH1: Vcc
CH2: V
CH2: V
CH3: RST pin.
CH3: RST pin.
When the V
When the V
below the Vth2 value
below the Vth2 value
(about 2.1V) a deactivation
(about 2.1V) a deactivation
sequence starts; the RST
sequence starts; the RST
pin (CH3) is the first to go
pin (CH3) is the first to go
low after about 6µs.
low after about 6µs.
DD
DD
.
.
DD
DD
voltage falls
voltage falls
An important feature of the voltage regulator is the short-circuit protection that warns the sequencer
block (see Figure 1) if the output current grows more than the short circuit current limit (about 90mA). In
this case a deactivation sequence starts to protect the card and the OFF pin falls down warning the
occurred fault as shown in Figure18. The following figures (Figure 14 and Figure 15) show the load curve
of the ST8004 Step-up converter and regulator.
As specified in the NDS electrical requirements the ST8004 is able to maintain the Vcc voltage included
in the range 4.75V÷5.25V for the Class-A and 2.80V÷3.20V for the Class-B with current load from 0 to
the short-circuit current.
An example of short circuit protection intervention is shown in Figure 16, in which the activation
sequence starts in presence of a Vcc short circuit and the protection acts at the end of the activation
sequence.
If the short circuit condition happens when the device is already activated, the protection acts
immediately as shown in Figure 17.
10/14

Figure 14: Vup load curve
V
Vup voltage VS Iup
8
7
6
5
4
Vup (V)
3
2
1
0
0 20 40 60 80 100 120
Iup (mA)
AN1978 - APPLICATION NOTE
5/3V=H
5/3V=L
Figure 15: Vcc load curve
cc voltage V S Icc
6
5
4
3
Vup (V)
2
1
0
0 20406080100
Iup (mA)
5/3V=H
5/3V=L
11/14
AN1978 - APPLICATION NOTE
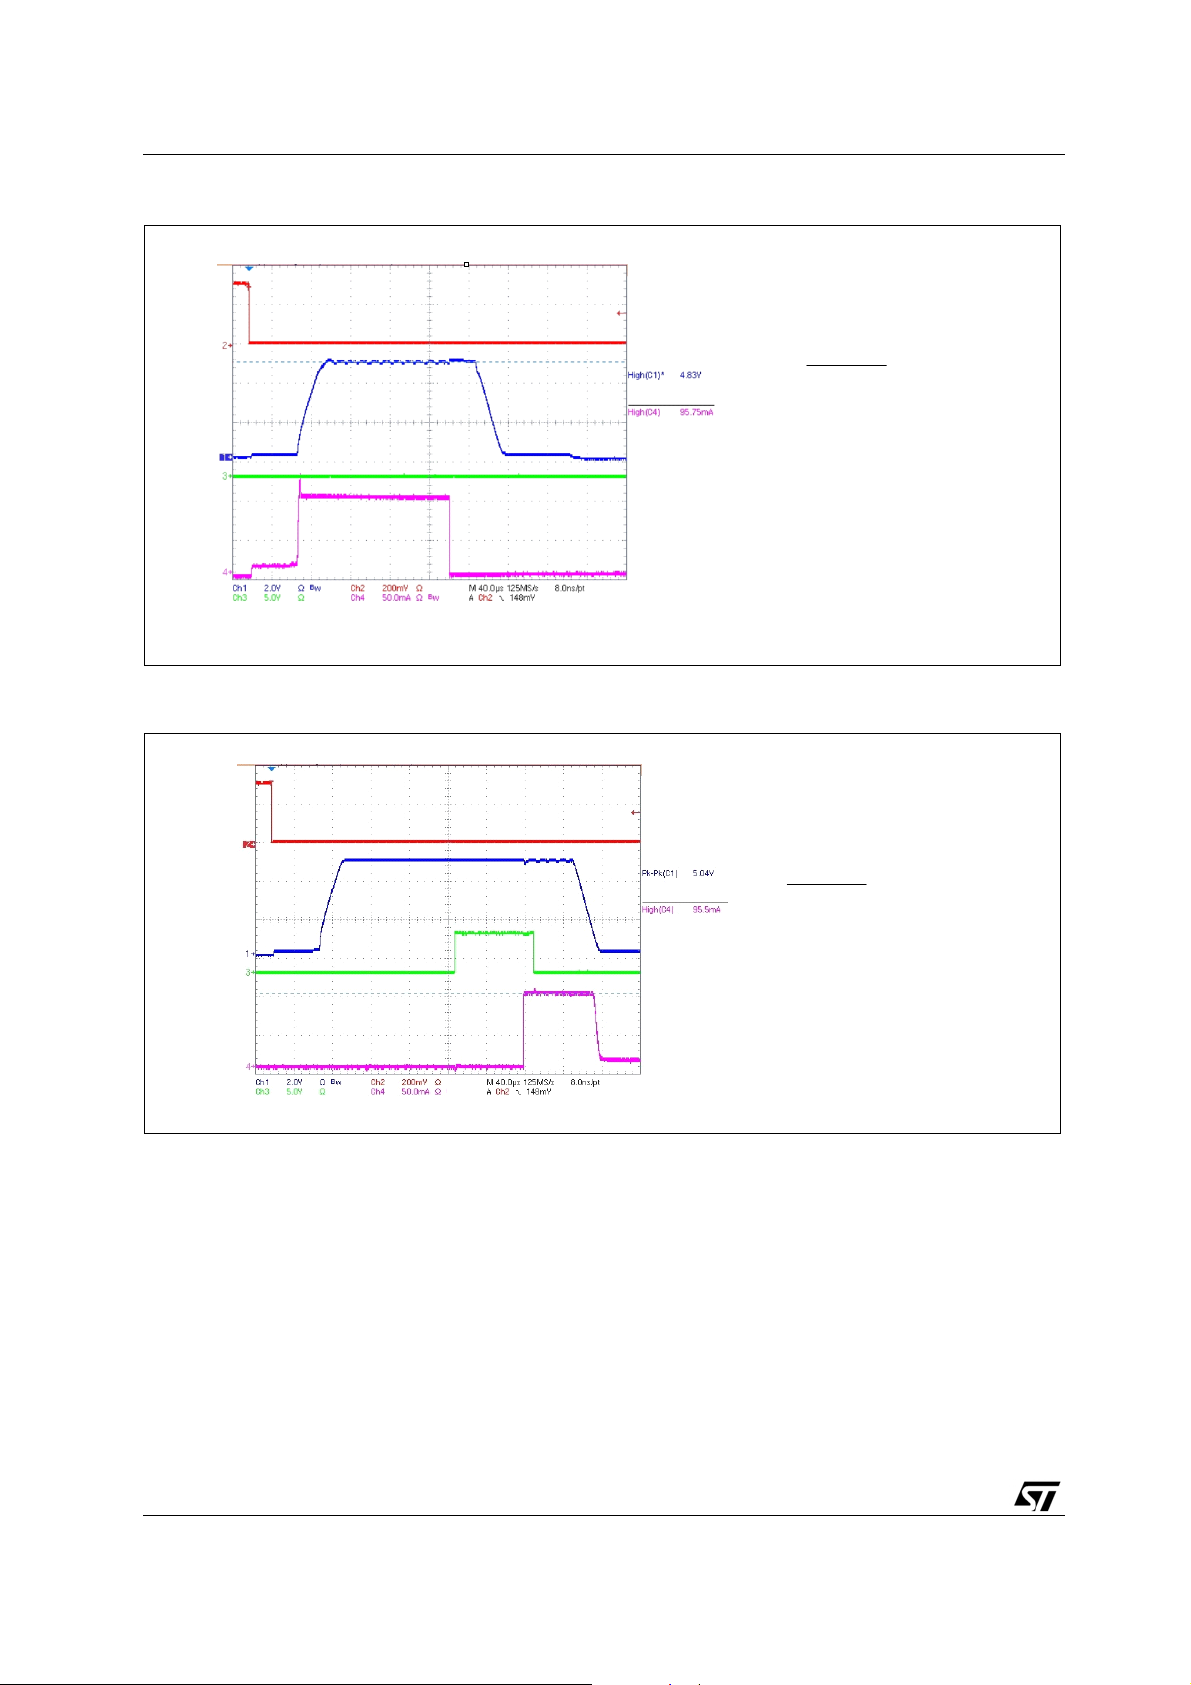
Figure 16: Short-circuit on Vcc during the activation.
Figure 17: Short-circuit on Vcc after the activation.
Conditions:
Conditions:
Conditions:
VDD= 3V
VDD= 3V
VDD= 3V
V
=4.75V;
V
=4.75V;
V
=4.75V;
DDP
DDP
DDP
5/3V=H.
5/3V=H.
5/3V=H.
CH1: Vcc
CH1: Vcc
CH1: Vcc
CH2: CMDVCC.
CH2: CMDVCC.
CH2: CMDVCC.
CH3: RST .
CH3: RST .
CH3: RST .
CH4 : Vcc output current
CH4 : Vcc output current
CH4 : Vcc output current
In this case the short circuit
In this case the short circuit
In this case the short circuit
is present before and
is present before and
is present before and
during the activation
during the activation
during the activation
sequence, then the
sequence, then the
sequence, then the
automatic deactivation
automatic deactivation
automatic deactivation
starts as soon as the fault
starts as soon as the fault
starts as soon as the fault
is acknowledged.
is acknowledged.
is acknowledged.
Conditions:
Conditions:
Conditions:
V
V
V
= 3V
= 3V
= 3V
DD
DD
DD
V
V
V
=4.75V;
=4.75V;
=4.75V;
DDP
DDP
DDP
5/3V=H
5/3V=H
5/3V=H
CH1: Vcc
CH1: Vcc
CH1: Vcc
CH2: CMDVCC.
CH2: CMDVCC.
CH2: CMDVCC.
CH3: RST .
CH3: RST .
CH3: RST .
CH4 : Vcc output current
CH4 : Vcc output current
CH4 : Vcc output current
In this case the short
In this case the short
In this case the short
circuit acts after the
circuit acts after the
circuit acts after the
activation sequence then
activation sequence then
activation sequence then
the automatic deactivation
the automatic deactivation
the automatic deactivation
starts after about 8µs.
starts after about 8µs.
starts after about 8µs.
12/14

Figure 18: OFF behavior on Vcc short-circuit.
6. REVISION HISTORY
AN1978 - APPLICATION NOTE
Conditions:
Conditions:
= 3V
= 3V
V
V
DD
DD
V
V
=5V;
=5V;
DDP
DDP
5/3V=L
5/3V=L
CH1: CMDVCC.
CH1: CMDVCC.
CH2: Vcc
CH2: Vcc
CH3: OFF .
CH3: OFF .
CH4 : Vcc output current
CH4 : Vcc output current
When the short circuit
When the short circuit
occurs the OFF pin goes
occurs the OFF pin goes
low indicating a fault.
low indicating a fault.
Table 2: Revision History
Date Revision Description of Changes
10-June-2004 1 First Release
13/14

AN1978 - APPLICATION NOTE
Information furnished is believed to be accurate and reliable. However, STMicroelectronics assumes no responsibility for the consequences
of use of such information nor for any infringement of patents or other rights of third parties which may result from its use. No license is granted
by implication or otherwise under any patent or patent rights of STMicroelectronics. Specifications mentioned in this publication are subject
to change without notice. This publication supersedes and replaces all information previously supplied. STMicroelectronics products are not
authorized for use as critical components in life support devices or systems without express written approval of STMicroelectronics.
The ST logo is a registered trademark of STMicroelectronics.
All other names are the property of their respective owners
© 2004 STMicroelectronics - All rights reserved
Australia - Belgium - Brazil - Canada - China - Czech Republic - Finland - France - Germany - Hong Kong - India - Israel - Italy - Japan -
Malaysia - Malta - Morocco - Singapore - Spain - Sweden - Switzerland - United Kingdom - United States
STMicroelectronics GROUP OF COMPANIES
www.st.com
14/14
 Loading...