

WP-ID5BTD
Weatherproof Audio System
with Bluetooth Audio
User Guide
TRACK
MODE
VOL
© Copyright 2013 SSV Works
WP-ID5BTD-UG Rev. A 12-23-13
CORPORATE: SSV WORKS, 201 N. Rice Ave Unit A, Oxnard, CA 93030
WEB: www.SSVworks.com Phone: 818-991-1778 FAX: 866-293-6751
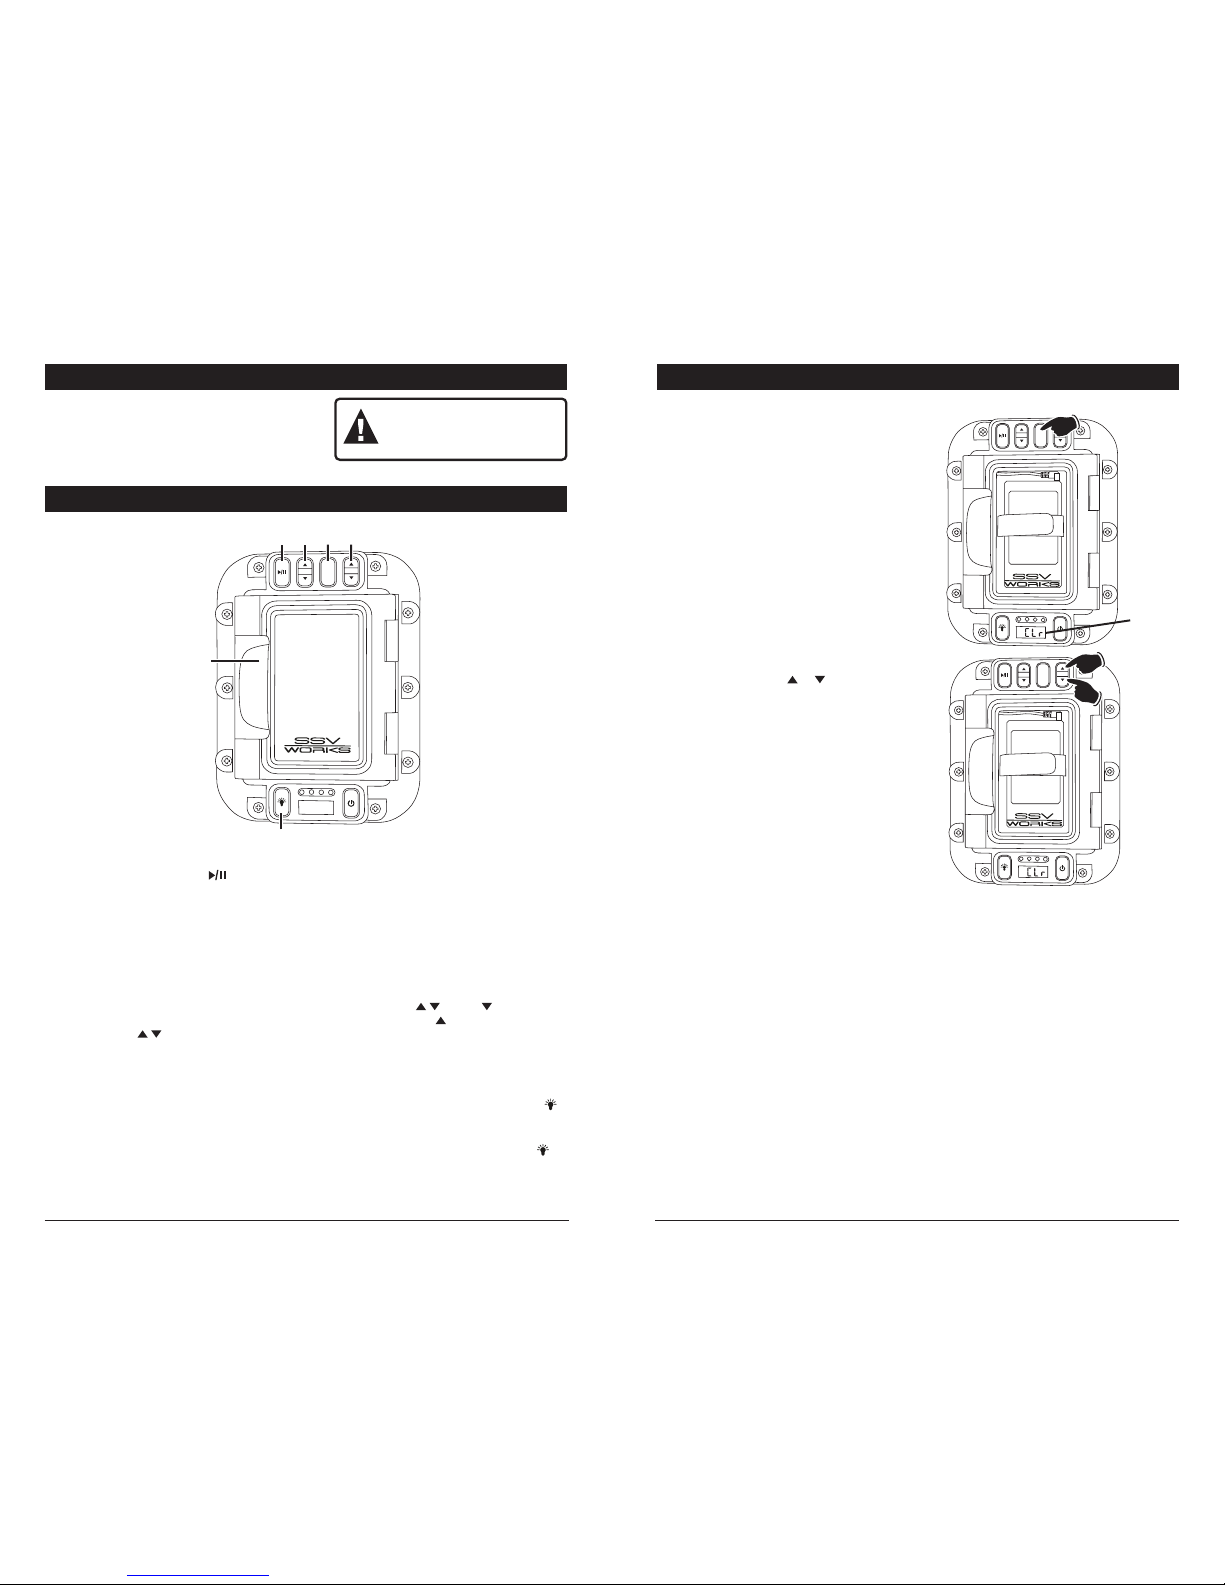
Button Locations and Functions
1. Mute or Play/Pause Button ( ):
-
Radio Mode (rAd)
: Press to mute the audio,
press again to restore the audio.
-
Auxiliary Input Mode (AU In)
: Press to mute
the audio, press again to restore the audio.
-
Bluetooth Mode (bt)
: Press to pause the track,
press again to resume playing the track.
-
iPod Mode (IPOd)
: Press to pause the track,
press again to resume playing the track.
2. Track Button ( ):
-
Radio Mode (rAd)
:
Scan Tuning: Press and release, the tuner
will scan to the next strong station and stop.
Manual Tuning: Press and hold until the
desired radio station is tuned-in.
-
Auxiliary Input Mode (AU In)
: No function.
-
Bluetooth Mode (bt)
: Press to select a higher
or lower track.
-
iPod Mode (IPOd)
: Press to select a higher or
lower track.
Safety Information
Do not attempt to disassemble or repair the WP-ID5BTD
yourself.
Please call SSV Works for technical assistance
or repair information. Changes or modifications to the
WP-ID5BTD not authorized by SSV Works will void the
warranty.
2 11
WARNING:
Remove fuse from SSV Works fuse holder
located at the battery before charging the
battery or jump starting the vehicle.
3.
Mode Button (Mode): Press and release the button
to
switch between the available sources: radio
(rAd), auxiliary input (AU In), Bluetooth audio
input (bt) and iPod (IPOd).
-
Mode Button (Audio Adjustment): Press and
hold for 3 seconds to enter the audio adjustment
modes: bass, treble, balance and fader. (See
Sound Control section for more infor
mation).
4. Volume Button ( ): Press to decrease
the volume or press to increase the volume.
5. Door Release Handle: Lift up on door handle
to open the door.
6. Dome Light Button :
-
Built-in Dome Light
: Press and release the
button to turn on the built-in dome light, press
again to turn off.
-
External Dome Light
: Press and hold the
button to turn on an external dome light, press
and hold again to turn off.
Reset
Resetting the WR-ID5BTD:
To reset the microprocessor to the original
factory settings:
1. Press and hold the MODE button until “bA 0”
appears in the display.
2. Press the MODE button four more times and
“CLr” will appear in the display.
3. Press either the VOL or button and the
system will reset the microprocessor to the
original factory settings.
TRACK
MODE
VOL
or
TRACK
MODE
VOL
Reset
Indicator
Hold
TRACK
MODE
VOL
1
5
2
3
4
6

10 3
Button Locations and Functions
7. Display Area: This area displays mode infor-
mation. In the radio mode the radio frequency
is displayed.
8. Built-in LED Dome Light
9. Power Button ( ): Press to turn the unit on
and off.
10.
3.5mm Jack: Plug the 3.5mm jack into a device
(MP3 or phone) with a 3.5mm socket. The
WP-ID5BTD will not control the device, it
simply
allows the audio to be played through the
system.
11. 30-pin Connector for Apple Products: Plug
the 30-pin connector in an iPod, iTouch or
iPhone. Use the track button to select the
desired song.
Note 1: Will work with Apple approved 30-pin
to lightning adapter.
Note 2: The WP-ID5BTD can not select menu
items.
12. Mounting Straps: Straps your device securely
Built-in and External Dome Light Operations
Memory
Retaining the Memory:
In order for the WP-ID5BTD to remember the
current radio station and audio settings the unit
must be turned off first before turning the vehicle
off. To turn the audio system off press the
button and the display will become blank.
TRACK
MODE
VOL
Dome Light Button :
Built-in LED Dome Lights
: Press and release
the button to turn on the built-in dome light,
press again to turn off.
External Dome Light
: Press and hold the
button to turn on an external dome light, press
and hold again to turn off.
TRACK
MODE
VOL
Built-in Dome Lights
TRACK
MODE
VOL
10
11
12
7
8
9

4 9
Sound Controls
Bass Control:
1. Press and hold the MODE button until “bA 0”
appears in the display.
2. Press the VOL buttons to increase or
decrease the level of bass. The bass level will
appear in the display.
bA 7 = Maximum bass
bA 0 = Neutral bass
bA-7 = Minimum bass
After 5 seconds control reverts back to
volume control.
Volume Control:
Increase the volume by pressing VOL button
press the VOL button to decrease the volume
level. The volume level will appear in the display.
TRACK
MODE
VOL
Increase
Decrease
Volume
Level
TRACK
MODE
VOL
Increase
Decrease
TRACK
MODE
VOL
Bass
Level
Hold
FM Radio Operations
Selecting the Play Source:
Press the MODE button until “rAd” appears in
the display.
Scan Tuning: Press and release or TRACK
button and the tuner will scan to the next strong
station and stop. The frequency will appear in
the display area.
Manual Tuning: Press and hold or TRACK
button until the desired radio station is appears
in the display.
Switching from US to OCEANIA Radio Tuning
Note: Do not change if using in North America.
1. Press the MODE button until “rAd” appears in
the display.
2. Press and hold the VOLUME button first
then at the same time press and hold the
MODE button for approximately 5 seconds
until “SEt” appears in the display.
3. Press the button on the front panel to
enter setting menu.
4. Press TRACK button to change the display
from “US” to “OCEA”.
5. Press the button on the front panel to
confirm the change.
TRACK
MODE
VOL
TRACK
MODE
VOL
Display
Display
Display
TRACK
MODE
VOL
1st
2nd
Hold

8 5
Sound Controls (continued)
Treble Control:
1. Press and hold the MODE button until “bA 0”
appears in the display.
2. Press the MODE button one more time and
“tr 0” will appear in the display.
3. Press the VOL buttons to increase or
decrease the level of treble. The treble level
will appear in the display.
tr 7 = Maximum treble
tr 0 = Neutral treble
tr-7 = Minimum treble
After 5 seconds control reverts back to
volume control.
TRACK
MODE
VOL
Increase
Decrease
TRACK
MODE
VOL
Treble
Level
Hold
Balance Control:
1. Press and hold the MODE button until “bA 0”
appears in the display.
2. Press the MODE button two more times and
“L= r” will appear in the display.
TRACK
MODE
VOL
Balance
Level
Hold
Bluetooth Operations
Pairing Bluetooth Devices:
1. Open the Bluetooth setup program on the mobile
device and activate the Bluetooth feature.
2.
Press the button to turn on the WP-ID5BTD.
3.
Press the
MODE
button
until “bt” appears in the
WP-ID5BTD’s
display
.
4. Once the Bluetooth mode is selected
“PAIr” will
appear in the display.
5.
From your mobile device scan for available devices.
Select ”SSV ID5BT” to connect to the unit.
6.
When the mobile device has been paired “PLAY”
will
appear in the
WP-ID5BTD’s
display and audio can be
heard through the speakers
.
Note 1: A previously paired Bluetooth mobile device
will automatically connect to the
WP-ID5BTD
when
“bt” is selected using the
MODE button
(if it is within
range).
Note 2: If the Bluetooth mobile device is already
paired with the
WP-ID5BTD
, select “SSV-ID5BT” on
your phone and touch “Connect”.
Bluetooth Operation:
Mode Selection:
Press the
MODE button until “bt”
appears in the display.
Play/Pause Button:
Press the button to pause the
Bluetooth playback, “PAUS” will appear in the display.
Press the button again to resume playback and
“PLAY” will appear in the display.
Changing the Track:
Press the
TRACK button to select a higher track.
Press the
TRACK button to select a lower track.
Sound Controls: Use the sound controls on the
WP-ID5BTD
unit to adjust the volume and sound
quality.
Note: For optimum sound quality make sure the media
volume on the device is set at 75% or greater.
TRACK
MODE
VOL
TRACK
MODE
VOL

6 7
Sound Controls (continued)
Balance Control: (continued)
3. Press the VOL buttons to adjust the
output of the left and right speakers. The
balance setting will appear in the display.
L
-
-
r = Equal sound left and right
r 7 = Right speakers only
L 7 = Left speakers only
After 5 seconds control reverts back to
volume control.
TRACK
MODE
VOL
Left
Speaker
Right
Speaker
Fader Control:
1. Press and hold the MODE button until “bA 0”
appears in the display.
2. Press the MODE button three more times and
“F=r” will appear in the display.
3. Press the VOL buttons to adjust the
output of the front and rear speakers. The
fader setting will appear in the display.
F
-
-
r = Equal sound front and rear
r 7 = Rear speakers only
F 7 = Front speakers only
After 5 seconds control reverts back to volume control.
TRACK
MODE
VOL
Fader
Level
Hold
TRACK
MODE
VOL
Front
Speakers
Rear
Speaker
iPod, iTouch or iPhone Operations
iPod, iTouch or iPhone Operation:
1. Plug your iPod, iTouch or iPhone into the
30-pin connector.
Warning: DO NOT plug in the 3.5mm jack
when the 30-pin connector is plugged in.
2. Secure the iPod with the mounting straps.
3. Close the weatherproof door.
4.
Turn on the WP-ID5 by pressing the button.
5. Press the MODE button until “IPOd” appears
in the display. The iPod will automatically
start playing.
6. Press the TRACK buttons to select the
desired track.
Note 1: Press to pause the track, press
again to resume playing the track.
Note 2: If using a newer iPod or iPhone with
“Shake to Shuffle” you will need to go into settings and turn this function “Off”.
Note 3: You may receive the “this accessory
is not made to work with iPhone” message
just press “NO” and the device will function
normally.
Auxiliary Input Operations
3.5mm Audio Input Operation:
1. Plug the 3.5mm jack into your phone or MP3
player.
2. On your device select the desired track, press
play and set the volume between 80-90%.
3. Secure the device with the mounting straps.
4. Close the weatherproof door.
5. Turn on the WP-ID5BTD by pressing the
button.
6. Press the MODE button until “AU In” appears
in the display. The audio from your device
can now be heard thru the speakers.
Note: The WP-ID5BTD does not control the
device, it simply allows the audio to be played
through the system.
TRACK
MODE
VOL
30-Pin
Connector
TRACK
MODE
VOL
3.5mm
Jack
 Loading...