

Page 1

LTE Router
IGW/9
36-
L
with
eSOM/3517
First Steps
SSV Embedded Systems
Dünenweg 5
D-30419 Hannover
Phone: +49 (0)511/40 000-0
Fax: +49 (0)511/40 000-40
Email: sales@ssv-embedded.de
Document Revision: 1.4
Date: 2018-08-29
Page 2

LTE Router IGW/936-L – First Steps
2
D ocu m e nt R e v is i o n 1 . 4
CONTENT
1 INTRODUCTION ............................................................................................................... 3
1.1 Checklist ................................................................................................................................. 3
1.2 Conventions ........................................................................................................................... 3
2 SAFETY GUIDELINES ..................................................................................................... 4
3 REQUIRED EQUIPMENT ................................................................................................. 5
4 SIM CARD ......................................................................................................................... 6
5 CONNECTIONS ................................................................................................................ 7
5.1 LTE Antenna ........................................................................................................................... 7
5.2 Ethernet Link .......................................................................................................................... 8
5.3 Serial Ports COM2 and COM3 ................................................................................................ 9
5.4 Power Supply ....................................................................................................................... 10
6 OPERATION ................................................................................................................... 11
6.1 Booting the IGW/936-L ........................................................................................................ 11
6.2 Accessing the SSV/WebUI .................................................................................................... 11
6.3 Accessing the SSV/WebUI with DHCP enabled ................................................................... 12
6.4 LTE Modem Configuration ................................................................................................... 14
6.5 WAN Configuration .............................................................................................................. 15
6.6 Firewall Configuration ......................................................................................................... 16
6.7 LAN1 Configuration .............................................................................................................. 17
6.8 LAN2 Configuration .............................................................................................................. 18
6.9 Access via Telnet .................................................................................................................. 19
6.10 Access via FTP ...................................................................................................................... 20
7 TECHNICAL DATA ......................................................................................................... 22
8 PINOUT SCREW TERMINALS ....................................................................................... 22
9 LED FUNCTIONS ........................................................................................................... 23
10 TROUBLE SHOOTING IP ADDRESS PROBLEMS ....................................................... 24
11 HELPFUL LITERATURE ................................................................................................ 25
CONTACT ............................................................................................................................. 25
DOCUMENT HISTORY ......................................................................................................... 25
Page 3
LTE Router IGW/936-L – First Steps
D ocu m e nt R e v is i o n 1 . 4
3
1 INTRODUCTION
This documentation gives you an overview about the initial operation and the first steps of
use with the LTE Router IGW/936-L.
1.1 Checklist
Compare the content of your IGW/936-L start-up package with the checklist below.
If any item is missing or appears to be damaged, please contact SSV!
LTE Router IGW/936-L
1x LTE antenna
Adapter cable with power and RS232 connector
Plug-in power supply
Screwdriver
Documentation
CD-ROM for eSOM/3517
IMPORTANT!
You will need further equipment to operate the IGW/936-L! Please refer to chap-
ter 3.
1.2 Conventions
Convention
Usage
bold Important
terms
monospace
Filenames,
Pathnames, program code, command lines
Table 1: Conventions used in this document
Page 4

LTE Router IGW/936-L – First Steps
4
D ocu m e nt R e v is i o n 1 . 4
2 SAFETY GUIDELINES
Please read the following safety guidelines carefully! In case of property or personal
damage by not paying attention to this manual and/or by incorrect handling, we do not
assume liability. In such cases any warranty claim expires.
• The power supply should be in immediate proximity to the device.
• The power supply must provide a stable output voltage between 11 – 28 VDC. The out-
put power should be at least 2.5 W.
• Please pay attention that the power cord or other cables are not squeezed or damaged
in any way when you set up the device.
• Do NOT turn on the power supply while connecting any cables, especially the power
cables. This could cause damaged device components! First connect the cables and
THEN turn the power supply on.
• The installation of the device should be done only by qualified personnel.
• Discharge yourself electrostatic before you work with the device, e.g. by touching a
heater of metal, to avoid damages.
• Stay grounded while working with the device to avoid damage through electrostatic
discharge.
• The case of the device should be opened only by qualified personnel.
Page 5

LTE Router IGW/936-L – First Steps
D ocu m e nt R e v is i o n 1 . 4
5
3 REQUIRED EQUIPMENT
To operate the IGW/936-L the following hardware is required:
• a valid SIM card with an appropriate mobile tariff. Please refer to chapter 4 to see how
the SIM card is inserted.
• one Ethernet cross-over cable or two Ethernet patch cables and a switch.
To configure the IGW/936-L a PC with the following features is required:
• Windows 7 or higher
• Web browser (e.g. Firefox, Chrome)
• Telnet/SSH client (e.g. TeraTerm)
• FTP client (e.g. FileZilla)
• 10/100 Mbps Ethernet network controller and TCP/IP configuration
• CD-ROM drive
Page 6
LTE Router IGW/936-L – First Steps
6
D ocu m e nt R e v is i o n 1 . 4
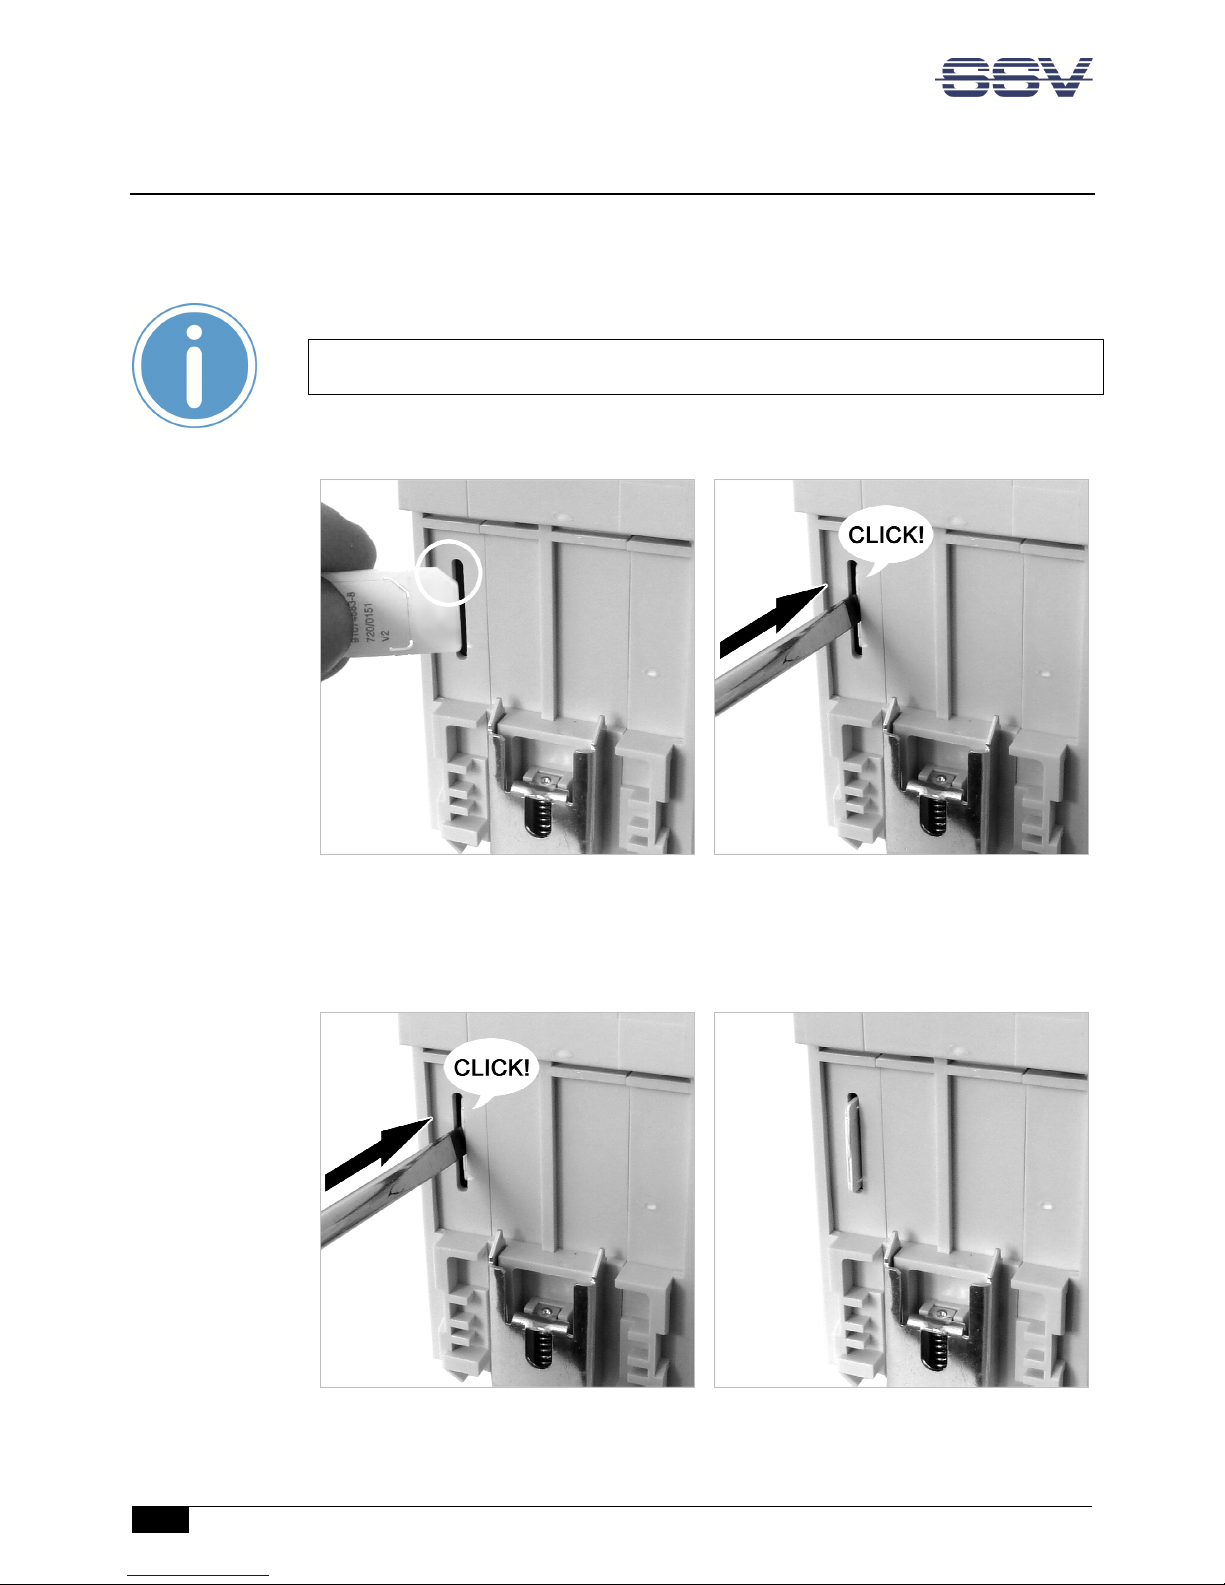
4 SIM CARD
The internal SIM card of the IGW/936-L can be changed through the slot on the backside.
To insert the SIM card just push it by hand as deep as possible into the slot.
Please note:
Pay attention to the correct orientation of the SIM card like shown in fig. 1!
Then use a screw driver to push it gently further into the slot until you here a soft "click".
Figure 1: Inserting the SIM card
To remove the SIM card just push it gently with a screw driver until you hear a soft "click"
(see fig. 2). The SIM card is ejected a few millimeters and can be pulled out easily by hand.
Figure 2: Removing the SIM card
Page 7
LTE Router IGW/936-L – First Steps
D ocu m e nt R e v is i o n 1 . 4
7
5 CONNECTIONS
For a quick and easy start with the IGW/936-L there are a few cable connections necessary.
The following chapters describe how these connections have to be made.
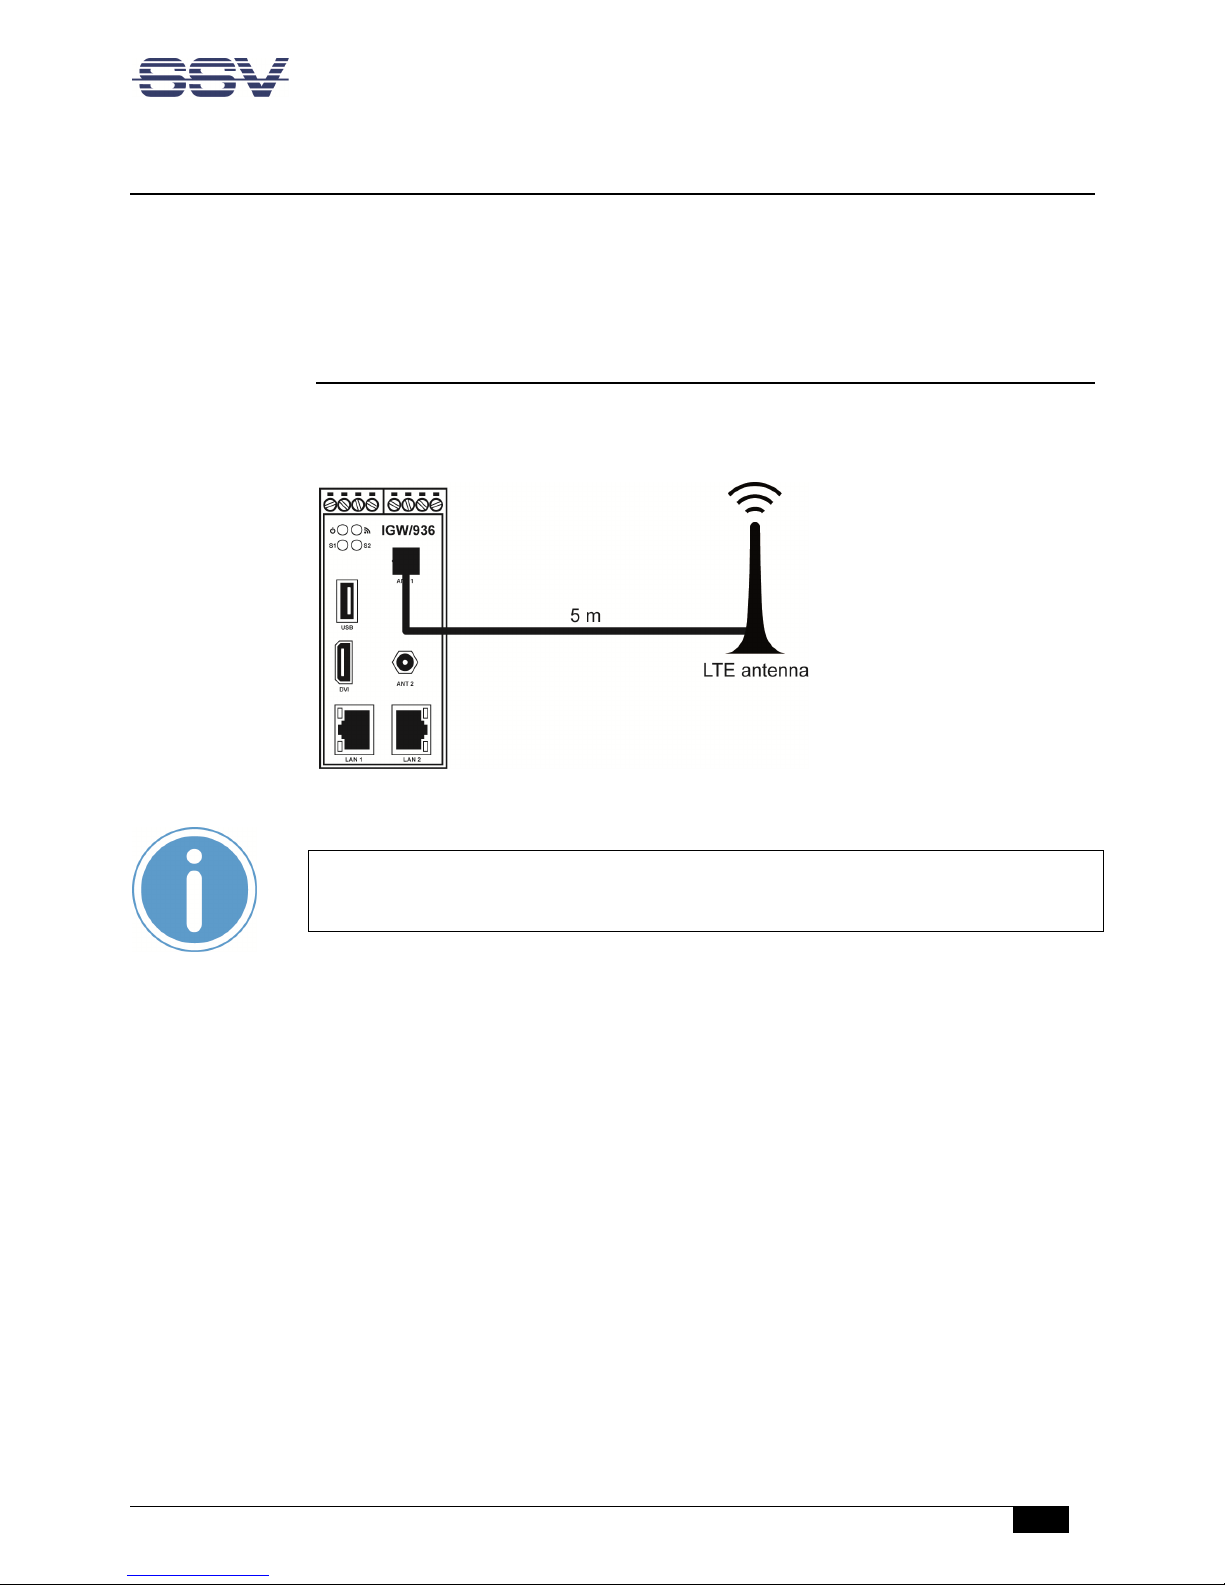
5.1 LTE Antenna
Connect the LTE antenna with the IGW/936-L like shown in fig. 3 and place it where the LTE
signal strength is high.
Figure 3: Connecting the LTE antenna
Please note:
The best LTE signal strength is achieved by using two antennas. Please contact SSV if
you want to order a second LTE antenna.
Page 8

LTE Router IGW/936-L – First Steps
8
D ocu m e nt R e v is i o n 1 . 4
5.2 Ethernet Link
The Ethernet link between the PC and LAN1 of the IGW/936-L can be made on two ways:
• Direct with an Ethernet cross-over cable like shown in fig. 4.
• With two standard Ethernet patch cables over a hub or switch like shown in fig. 5.
Figure 4: Ethernet link with cross-over cable
Please note:
For the Ethernet connection in fig. 4 it is absolutely required to use a cross-over cable. Do not use an ordinary patch cable. Ethernet patch and cross-over cables are in
most cases visual indistinguishable. But the internal wiring is fully different. Mixing
up these types of cables leads to LAN errors. Hence pay attention to the label of the
cable or packing.
Figure 5: Ethernet link with hub or switch
The IP address of the LAN1 interface is ex-factory set to 192.168.0.126.
Page 9

LTE Router IGW/936-L – First Steps
D ocu m e nt R e v is i o n 1 . 4
9
5.3 Serial Ports COM2 and COM3
You can create an RS485 serial link on port COM2 and COM3 of the IGW/936-L.
An RS232 serial link is only possible on port COM3.
Figure 6: Serial links on COM2 and COM3
Terminal
Signal
A1 COM
2 RS485 Serial Port RX /TX+
A2 COM2
RS485 Serial Port RX /TX
-
B4
Signal
Ground
Table 2: Screw terminals COM2
Terminal
Signal
B2
COM3
Serial Port: TXD (RS232), RX/TX
- (RS485)
B3 COM3
Serial Port: RXD (RS232), RX/TX+ (RS485)
B4 Signal Ground
Table 3: Screw terminals COM3
Please note:
The RS485 (officially called TIA/EIA-485-A) connection between your IGW/936-L and
the field devices needs termination resistors on both ends for proper operation. The
IGW/936-L does not offer internal termination resistors. Please make sure, that the
RS485 cable connection is equipped with external terminatio n resistors.
Page 10

LTE Router IGW/936-L – First Steps
10
D ocu m e nt R e v is i o n 1 . 4
5.4 Power Supply
The IGW/936-L needs a supply voltage of 11 – 28 VDC to work.
Connect the cables of an appropriate power supply to provide the system with the necessary power like shown in fig. 7.
Figure 7: Power supply for the IGW/936-L
Terminal
Signal
A3 Vin (11 .. 28 VDC)
A4 GNDin
Table 4: Screw terminal power
CAUTION!
Providing the IGW/936-L with a higher voltage than the regular 11 – 28 VDC could cause
damaged device components!
Do NOT turn on the power supply while connecting it with the IGW/936-L. This could cause
damaged device components! First connect the power supply and THEN turn it on.
Page 11

LTE Router IGW/936-L – First Steps
D ocu m e nt R e v is i o n 1 . 4
11
6 OPERATION
6.1 Booting the IGW/936-L
Just power up the IGW/936-L and the boot process starts immediately. The IGW/936-L
boots thereby an embedded Linux out of its Flash memory. This may take up to one minute.
6.2 Accessing the SSV/WebUI
To open the login page of the SSV/WebUI enter the ex-factory IP address and port number
of LAN1 of the IGW/936-L manually in a web browser:
http://192.168.0.126:7777
Enter the username admin and the password ssvadmin and click on [Login].
Figure 8: Login page of the SSV Web WebConfig
Page 12

LTE Router IGW/936-L – First Steps
12
D ocu m e nt R e v is i o n 1 . 4
6.3 Accessing the SSV/WebUI with DHCP enabled
If the automatic IP address configuration of LAN1 via DHCP is enabled, you have to check
the assigned IP address, which is necessary to access the IGW/936-L via a Telnet client or a
web browser.
Therefore open in Windows Control Panel > Network and Internet > View network com-
puters and devices. The IGW/936-L should show up in this list.
Figure 9: Selecting the IGW/936-L
Just right-click on the IGW/936-L to open the properties dialog, where you can see the current IP address of the IGW/936-L like shown in fig. 10.
A double-click on the IGW/936-L opens the SSV/WebUI in a web browser.
Please note:
To access the SSV/WebUI, it is important to add the port number 7777 to the current IP address of the IGW/936-L, e.g.: http://192.168.0.126:7777!
Page 13

LTE Router IGW/936-L – First Steps
D ocu m e nt R e v is i o n 1 . 4
13
Figure 10: The properties dialog shows the current IP address
Now you are able to access the IGW/936-L via a Telnet client or a web browser.
Page 14

LTE Router IGW/936-L – First Steps
14
D ocu m e nt R e v is i o n 1 . 4
6.4 LTE Modem Configuration
To configure the modem settings choose from the menu Network > Mobile.
Figure 11: Mobile network settings
1. In the section Modem configuration enable the checkbox.
2. In the section ISP settings choose your provider.
3. Enter the PIN of the SIM card.
4. In the section Connection settings choose On System start.
5. Click on [Apply].
In the section DNS configuration you can enter a DNS server if needed.
Page 15

LTE Router IGW/936-L – First Steps
D ocu m e nt R e v is i o n 1 . 4
15
6.5 WAN Configuration
To use the IGW/936-L as an LTE router the WAN (Wide Area Network) settings need to be
configured.
Choose from the menu Network > WAN.
Figure 12: WAN settings
1. In the section WAN configuration choose Mobile.
2. In the section Internet click on [Check] to test the Internet connection.
3. Click on [Apply].
Page 16

LTE Router IGW/936-L – First Steps
16
D ocu m e nt R e v is i o n 1 . 4
6.6 Firewall Configuration
Choose from the menu Services > Firewall and NAT.
Figure 13: Firewall and NAT settings
1. In the section Firewall configuration enable the checkbox.
2. In the section Forwarding with IP-Masquerading and NAT enable the checkbox.
3. Click on [Apply].
Page 17

LTE Router IGW/936-L – First Steps
D ocu m e nt R e v is i o n 1 . 4
17
6.7 LAN1 Configuration
The IP address of the LAN1 interface is ex-factory set to 192.168.0.126.
To configure the LAN1settings choose from the menu Network > LAN1.
Figure 14: LAN1 settings
To enable the automatic IP address assignment via DHCP follow these steps:
1. In the section IP address configuration enable the radio button automatically.
2. Click on [Apply].
Please note:
After DHCP was enabled, it is necessary to re-log into the SSV/WebUI with the new
assigned IP address of LAN1. Please refer to chapter 6.3 to find out the current IP
address.
Page 18

LTE Router IGW/936-L – First Steps
18
D ocu m e nt R e v is i o n 1 . 4
6.8 LAN2 Configuration
The LAN2 interface is ex-factory disabled.
To enable LAN2 choose from the menu Network > LAN2.
Figure 15: LAN2 settings
1. In the section Network configuration for LAN2 enable the checkbox. The IP address is
preset to 192.168.10.126.
2. Click on [Apply].
Page 19

LTE Router IGW/936-L – First Steps
D ocu m e nt R e v is i o n 1 . 4
19
6.9 Access via Telnet
To access the IGW/936-L via Telnet please open a Telnet client program (like TeraTerm) on
your host PC and enter the current IP address* of the IGW/936-L to activate a Telnet session.
In the upcoming Telnet window you can login with the username root and the password
root.
Now you can enter any Linux commands, which will be executed by the IGW/936-L operating system.
Figure 16: Access via Telnet client
*Please note:
The ex-factory IP address of the LAN1 interface is 192.168.0.126. If DHCP is enabled, please refer to chapter 6.3 to find out the current IP address.
Page 20

LTE Router IGW/936-L – First Steps
20
D ocu m e nt R e v is i o n 1 . 4
6.10 Access via FTP
The IGW/936-L comes with a pre-installed FTP server, which allows the file transfer via
Ethernet between a PC and the IGW/936-L. To access the IGW/936-L via FTP use an FTP client like e.g. FileZilla.
Figure 17: FileZilla as FTP client to access the FTP server
Use for the FTP login the current IP address* of the IGW/936-L, the username root and the
password root. With this login you have FTP read/write permission in the file system.
The default setting of the root file system after the boot process is read-only. There are only three exceptions, which are shown in table 5:
Directory
Remark
/flash
R/W directory, non
-
volatile memory within Flash
/home/root
R/W directory, RAM disk, volatile memory
/var/volatile
R/W directory,
RAM disk, volatile memory
Table 5: R/W directories in the file system
The read-only restriction protects all files of the file system. Under ordinary operating conditions it is not possible to overwrite or delete a file which is necessary for the eSOM/3517
within the IGW/936-L.
Page 21

LTE Router IGW/936-L – First Steps
D ocu m e nt R e v is i o n 1 . 4
21
To disable the write protection just login with the username root and the password root
and enter the following command:
mount / -o remount,rw
This command „mounts„ the file system as read/write. All files are now writable and
deletable. Please pay attention not to damage important system files! With the command
mount / -o remount,ro
the system is set back to the read-only initial condition after the boot process.
*Please note:
The ex-factory IP address of the LAN1 interface is 192.168.0.126. If DHCP is enabled, please refer to chapter 6.3 to find out the current IP address.
Page 22

LTE Router IGW/936-L – First Steps
22
D ocu m e nt R e v is i o n 1 . 4
7 TECHNICAL DATA
Supply voltage ................................................................................. 11 – 28 VDC
Weight .................................................................................................... < 0,5 kg
Mechanical Dimensions (LxWxH) ............................. 112 mm x 46 mm x 100 mm
Temperature range ........................................................................... 0° C – 70° C
Rel. air himudity .................................................................................. max. 85%
8 PINOUT SCREW TERMINALS
The table 6 shows the pinout of the screw terminals of the IGW/936-L.
Terminal
Signal
A1 COM
2 Serial Port: RS485 RX/TX+
A2 COM2
Serial Port: RS485 RX/TX
-
A3 Vin (11 .. 28 VDC)
A4 Power Ground
B1 ---
B2 COM3
Serial Port: TXD (RS232), RX/TX
- (RS485)
B3 COM3
Serial Port: RXD (RS232), RX/TX+ (RS485)
B4 Signal Ground
Table 6: Pinout of the screw terminals
Please note:
The RS485 (officially called TIA/EIA-485-A) connection between your IGW/936-L and
the field devices needs termination resistors on both ends for proper operation. The
IGW/936-L does not offer internal termination resistors. Please make sure, that the
RS485 cable connection is equipped with external terminatio n resistors.
Page 23

LTE Router IGW/936-L – First Steps
D ocu m e nt R e v is i o n 1 . 4
23
9 LED FUNCTIONS
LED Description
Off Flash
On
Power
No Power
--- Power
On
Wireless
Always Off
--- ---
S1 System
Not ready
Booting
Ready
S2 Modem/
VPN Off Connecting
Ready
Table 1: LED functions
The LED S2 shows the modem state by different flashing provided the modem is used.
After the modem connection is established and VPN is enabled, the LED S2 shows the state
of the VPN connection.
The following table describes the functions of the particular LED signals.
On Time
Off Time
Description
Permanent
--- Modem connected or/and VPN connected
0.9 s 0.1 s Good mobile signal (20 ASU
- 31 ASU)
0.3 s 0.3 s Normal mobile signal quality (13 ASU
- 19 ASU)
0.1 s 0.9 s Bad mobile signal quality (0 ASU
- 12 ASU)
1 s 1 s VPN-client tries connecting the VPN
-
server
2 s 2 s
Modem in init sequence, missin
g antena, unknown sig-
nal
--- Permanent
Unknown state, modem disabled, wrong PIN, VPN dis-
connected
Table 1: LED S2 functions
Page 24

LTE Router IGW/936-L – First Steps
24
D ocu m e nt R e v is i o n 1 . 4
10 TROUBLE SHOOTING IP ADDRESS PROBLEMS
If the IP addresses of LAN1 and LAN2 are not configured properly it is possible, that the
SSV/WebUI (the configuration user interface) of the IGW/936-L cannot be accessed anymore.
In that case it is necessary to restore the factory settings of the IGW/936-L. To do so please
follow these steps:
1. Connect the LAN1 interface of the IGW/936-L via a cross-over-cable with the LAN inter-
face of a Windows PC. Disconnect (if present) the cable from the LAN2 interface of the
IGW/936-L. If not already running turn on the IGW/936-L.
2. Make sure that DHCP (IP address is obtained automatically) is enabled within the net-
work settings of the Windows PC for the LAN interface.
3. Take a USB memory stick and format it under Windows with FAT16 or FAT32.
4. Create a new simple text file on the memory stick, name it factoryreset and re-
move the file extension.
Please note:
Keep in mind that Windows hides file extensions by default!
5. At first unmount the memory stick over the USB symbol in the Windows system tray
before removing it from the PC.
6. Now plug the memory stick into the USB port of the (running) IGW/936-L.
7. The IGW/936-L makes a reboot and the LED S1 turns off after 15 to 30 seconds.
8. Remove the memory stick (at the latest when the LED S1 begins to blink).
9. The Windows PC shows the message Network restricted after 30 to 60 seconds.
10. The IGW/936-L answers via UPnP with its new IP address within the AutoIP range of
169.254.x.x. It can now be found as an icon within the Windows network environment. A double click on this icon opens the IGW/936-L’s login page in a browser. The
URL of the login page looks like this: http://169.256.x.x:7777.
Page 25

LTE Router IGW/936-L – First Steps
D ocu m e nt R e v is i o n 1 . 4
25
11 HELPFUL LITERATURE
• IGW/936 hardware reference manual
• eSOM/3517 hardware reference manual
CONTACT
SSV Embedded Systems
Dünenweg 5
D-30419 Hannover
Phone: +49 (0)511/40 000-0
Fax: +49 (0)511/40 000-40
Email: info@ssv-embedded.de
Internet: www.ssv-embedded.de
Forum: www.ssv-comm.de/forum
DOCUMENT HISTORY
Revision
Date Remarks
Name
Review
1.0 2014-05-07 First version WBU ENE
1.1 2015-08-26 Edited chapter 1.1 WBU ENE
1.2 2016-02-03 Edited chapter 6.1 and 6.2, added chapter 6.3 and 6.7 WBU KDW
1.3 2016-06-15 Edited chapter 5.3, added chapter 9 WBU HNE
1.4 2018-08-29 Added chapter 10 WBU HNE
The content of this document can change any time without announcement. There is tak
en over no guaran-
tee for the accuracy of the statements. The user assumes the en
tire risk as to the accuracy and the use of
this document. Information in this docu
ment is provided ‘as is’ without warranty of any kind. Some names
within this document can be trademarks of their respective holders.
© 2018 SSV EMBEDDED SYSTEMS. All rights reserved.
 Loading...