

Page 1
AVP 870-0
Operating Instructions
for end users
Access video panel
Page 2

2
Contents
These operating instructions supplement/are supplemented by:
• Access video panel product information
• Access system manual
The relevant current edition is
located in the download area on
www.siedle.com
Subject to printing errors.
We reserve modications depending
on technical improvements.
Safety remarks
Electrical voltage 3
Electrostatic charging 3
Commissioning requirements 3
Application 3
Intended application 3
Operating remarks 3
Care instructions 3
Legal notice 3
General information
Functional scope 4
Scope of supply 4
Video memory 4
SD card 4
Servicing 4
Product overview 5
Speech button – Functions 6
Door release button – Function 6
Touchscreen – Operation
Accessing menus 7
Accessing functions 7
Moving tiles 7
Changing pages – Start screen 8
Overview of menus and symbols
Menu structure User interface 9
Explanation of symbols 10
Status displays 11
Display symbols – Status
change 11
Display navigation
Navigation bar 12
Start – Drop-down menu 13
Cameras 13
Switching –
Drop-down menu 14
Door call images 14
Calls list 14
Settings 15
ECO mode 15
Operation
Door call 16
Call/Internal call 17
Calling a contact 18
Dialling a contact using
the start screen 18
Dialling a contact using
the Contacts menu 18
Missed calls – Callback 18
Selecting a door station 18
Changing the display mode 18
Accessing building automation 18
Dening the image view 19
Cleaning the display 19
Reset to as-delivered status 19
General information
Disposal 20
Index 21
Page 3
3
Safety remarks
Electrical voltage
Mounting, installation and servicing
work on electrical devices may only
be performed by a suitably qualied
electrician.
Mounting
During installation, where applicable
ensure that the surface is protected
from damage.
Electrostatic charging
As a result of electrostatic charging,
direct contact with the circuit board
can result in destruction of the
device. Direct contact with the circuit
board must therefore be avoided.
Commissioning requirements
• The device must be powered
via PoE (Power over Ethernet;
IEEE802.3af or 802.3at).
• To operate an Access video panel,
an Access server release from version 2.1 is required. Access servers
with a lower release status must be
updated with an upgrade. This can
give rise to additional costs.
The Access commissioning instructions and the Access planning and
system manual can be found in the
download area.
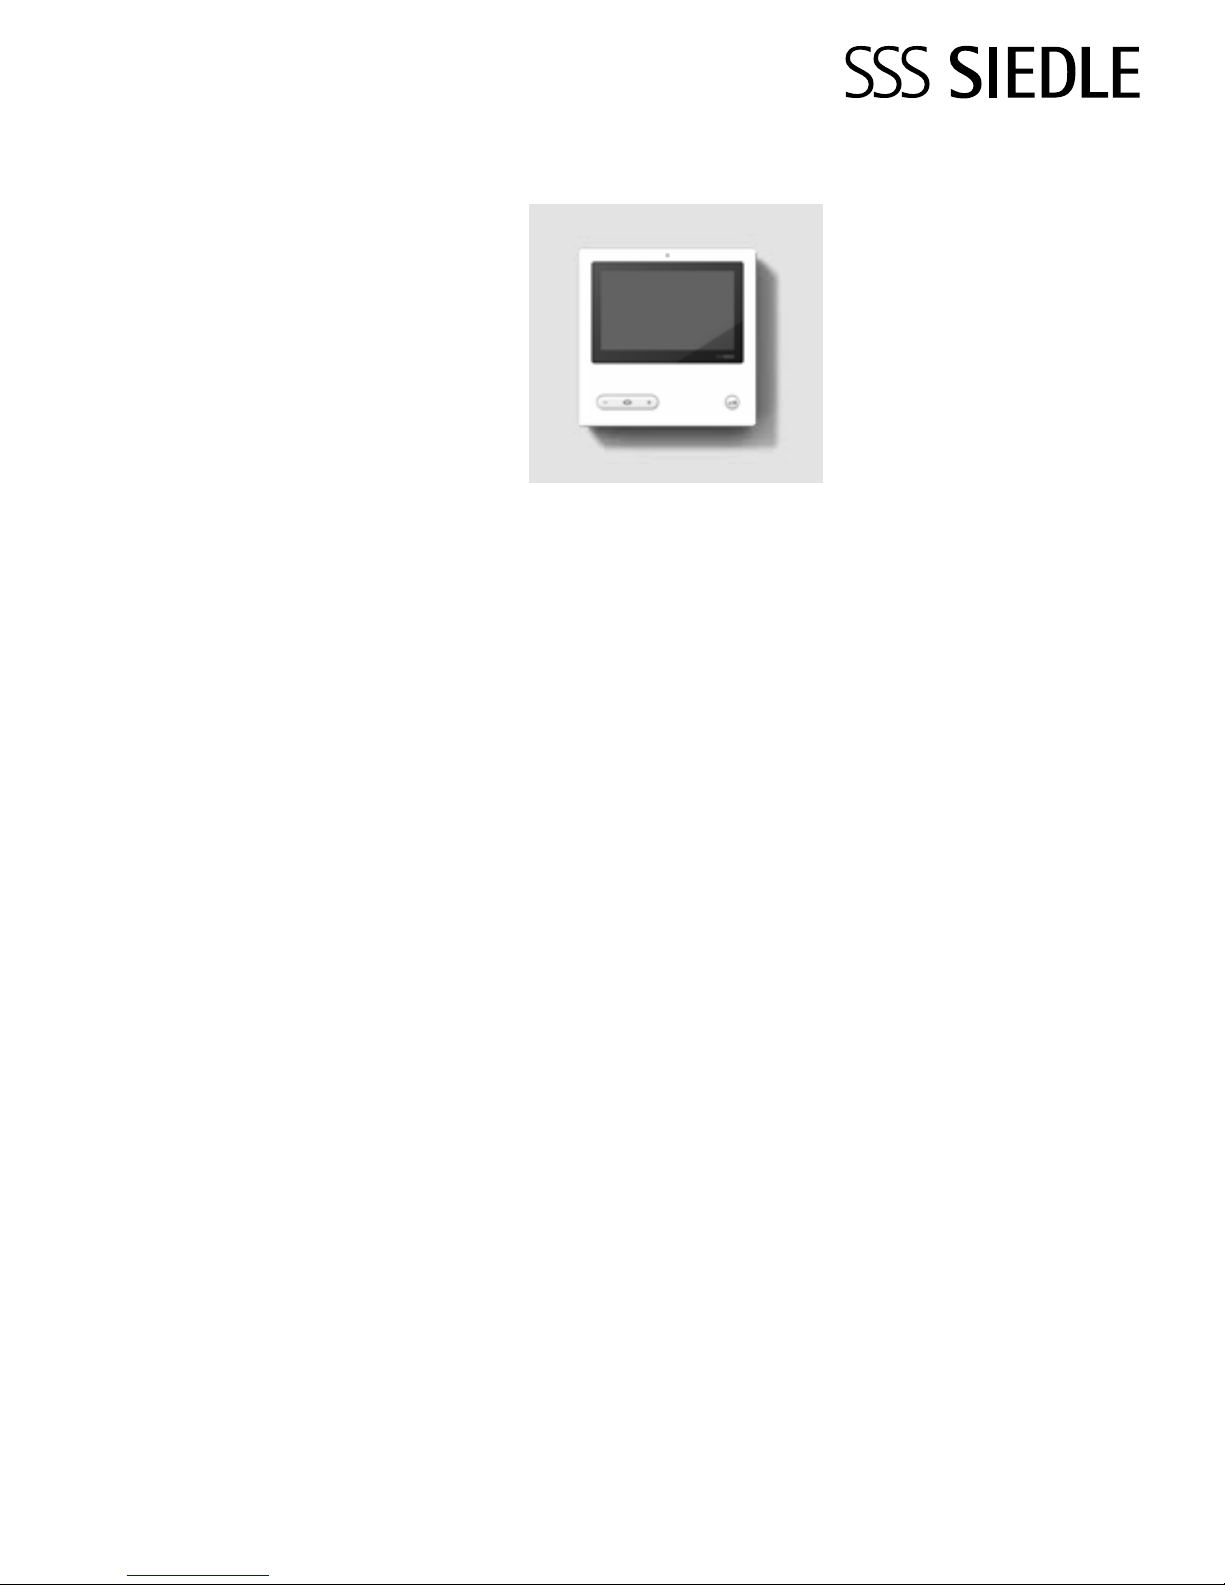
Application
Access video panel with touchscreen
17.8 cm for the Access system,
made of high-grade plastic. The
panel is a system product with a
low-prole surface-mount housing
for wall and table-top mounting.
It provides ergonomically designed
intuitive user prompting with gesture
control.
Intended application
The panel is part of a door communication system and may only be
used exclusively within this system.
Siedle does not accept any liability
for damage caused as a result of
using the equipment for any other
than its intended purpose.
Operating remarks
In order to avoid damage to the
panel, please note the following:
The touchscreen and the buttons
can be damaged by using sharpedged or pointed objects such as
ballpoint pens or keys.
Only ever use your nger to operate
the panel.
When restarting the Access video
panel or the Access server, the
Access video panel is restarted step
by step. Depending on the system
size, a complete restart can take several minutes. During this period, the
Access video panel shows various
statuses in English. The Access video
panel is not ready for operation
until the start screen is continuously
displayed.
Care instructions
Dry, aggressive cleaning agents and
abrasive detergents can damage the
surface!
Only ever clean your indoor device
using a soft damp cloth.
Please ensure that no moisture ever
penetrates the housing.
Legal notice
Photographs of individuals taken
without their knowledge may not be
published or stored in publicly
accessible video memory facilities.
Individuals who have been
photographed without their
knowledge are entitled to request
that pictures be deleted based on
the right of persons to their own
likeness. Never store pictures of
persons you do not know in social
networks or send them by email
to others/public groups. This will
infringe their personal rights.
If stored images are used as part of
private / criminal law proceedings or
in a police investigation, this requires
prior clarication with a lawyer or
the responsible police authority.
Page 4

4
Scope of supply
• AVP870-… (Base plate and
housing with circuit board)
• RJ45 plug 2 x
• Dummy card for SD card insert
• Operating instructions for the
end user
• This product information
Video memory
Pictures are stored centrally on the
server. There are currently no plans
to allow pictures to be stored on
SD card.
Similar to photographs, saved
images are subject to copyright.
SD card
There is a dummy card inserted in an
SD card slot at the top of the device
which is used as a dust protector.
When upgrading with new functions, this slot can be used to install
a memory card.
General information
Functional scope
With the functions calling, speech,
vision, door release, light, remote
switching and call silencing.
Performance features:
• Individual crafted design concept
offering a wide choice of varied fea-
tures and nishes
• Display offers graphic scope for
individual operation
• 17.8cm (7") touchscreen, resolution 800x480 Pixel
• Brilliant image reproduction
• Excellent audio quality (dual loud-
speaker technology)
• Input for storey call
• Output freely programmable
• Additional inputs and outputs
with Access input/output accessory
AZIO870-…
• Call differentiation between door
calls, storey calls, and internal calls
• Switching functions
• Video memory function
• Can be used with table-top acces-
sory AZTVP 870-… as a table-top
device
• Update capability using the Access
server
• from Access-ServerV 3.1…:
AVP with KNX link to the JUNG
FacilityPilotServer
Servicing
Statutory warranty conditions apply.
If the device requires servicing,
contact your specialist dealer or electrical installer.
Access Service Center in the
Furtwangen factory
Tel. +49 7723 63-540
access@siedle.de
Page 5

5
1 Display with touch function
(touchscreen)
2 Speech button with LED display
and rocker switch for setting the
speech volume
3 Loudspeaker
4 Door release button
5 Microphone
6 Status displays
7 Display of the start menu, time
and date (standard conguration)
8 Content area
9 Navigation bar
10 Card slot for SD card
11 Number of pages and displayed
page
The Access video panel is characterized by its generously dimensioned touchscreen. Two buttons
are assigned to the basic functions
Speech/Regulate volume and
Door release. Other functions are
actuated at the display.
10:10
12 1
20.05.2013
1
4
3
2
8
9
5
3
10
11
Entrance
Ringtone Study Study
Front door Entrance Kitchen Study
Kitchen Study Hallway
Start
08:00 | 16.12.2014
Entrance Basement
Living room
Hallway
Clear symbols, intuitive operation:
The most important button is also
the biggest. The unmistakable
mouth symbol clearly indicates what
the button is for: to accept calls.
The call tone is accompanied by par-
allel ashing of the mouth symbol,
guiding the hand of the operator to
the correct place. Once the call has
been accepted, the mouth symbol
lights up continuously. The door
release button clearly stands out –
this enhances security as it cannot
be confused or actuated by mistake.
Product overview
Page 6

6
Product overview
Speech button – Functions
Accepting a call In the case of a door call, you can pick up the call within 60 seconds of the
last ring tone. If an internal call is in progress, you can accept the call within
120 seconds after the last ring.
During an active call, the speech button lights up.
Press the speech button in order to accept the call.
The panel only transmits speech in one direction and automatically switches
over.
Setting the call volume The call volume can be set in ve steps – both during a call and also without
an active call.
If you have set the minimum volume, only the + on the call button will
respond. If you have already set the maximum volume, only the – on the
call button will respond. The set volume will be adopted for future calls.
During an existing call:
• Increasing the volume: Press + on the call button, until the graphic
control for the call volume appears, and hold down + until the call volume
has reached the required value.
• Reducing the volume: Press – on the call button, until the graphic control for the call volume appears, and hold down – until the call volume has
reached the required value.
If there is no active call:
1. Open the menu settings> Audio> Call volume
2. Using the controller, adjust the call volume.
3. The set volume will be adopted for future calls.
Ending a call During an active call, the speech button lights up.
Press the speech button in order to terminate the call.
Missed calls In the event of missed door calls/telephone calls, the mouth symbol on the
call button ashes, provided this function has been set up.
This signalling function is set using the menu Settings > ECO mode >
Call display > Speech button ashes to indicate a missed call.
Door release button – Function
Press the door release button.
The door release is actuated for 3 seconds.
Using the door release button, you can also always actuate the door release
from the door from which the last door call came without the need for a
preceding call.
Note: In the as-delivered status, the initiation period for the door release is
pre-set to 3 seconds. This can be changed in the Access server.
Page 7
7
Touchscreen – Operation
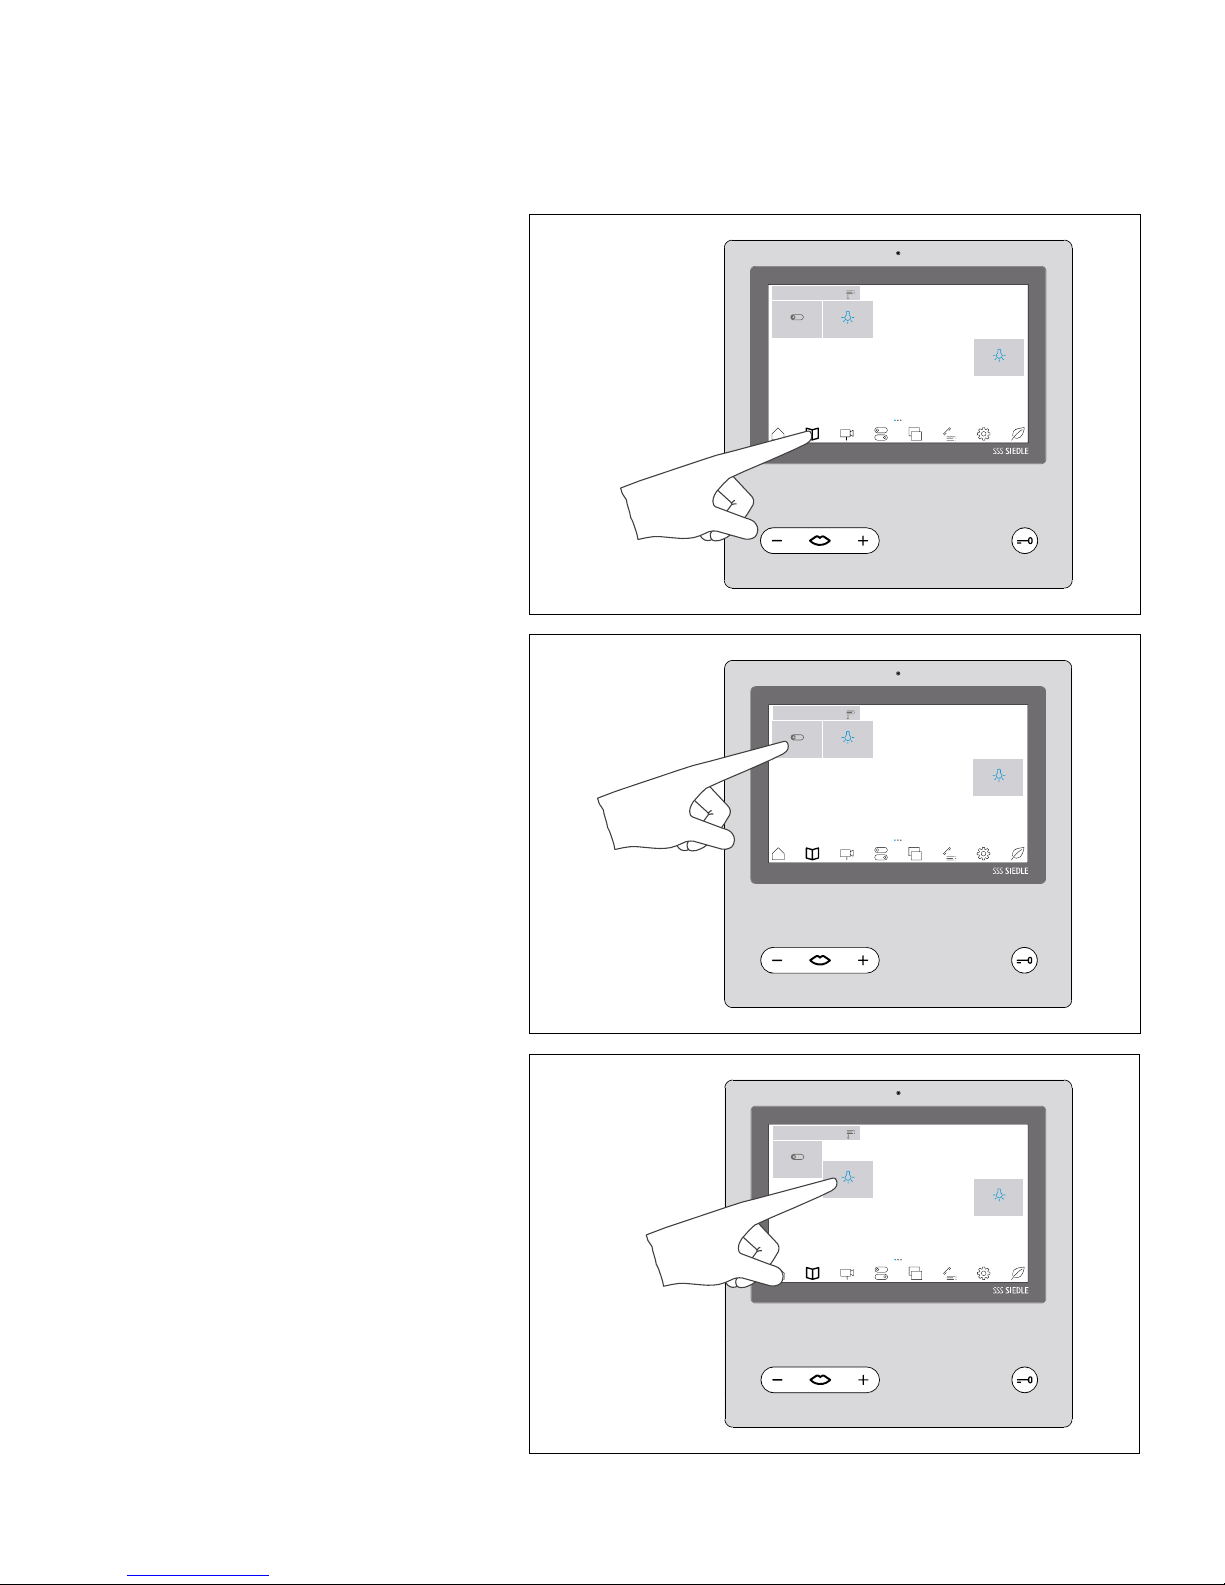
Accessing menus
1 Tap on the required symbol.
10:10
12 1
20.05.2013
Start
08:00 | 16.12.2014
TimPaul
Lili
Accessing functions
1 Tap on the required tile.
10:10
12 1
20.05.2013
Start
08:00 | 16.12.2014
TimPaul
Lili
Moving tiles
1 Using any nger, touch the tile
you wish to move on the start
screen. The tile briey changes
colour.
2 Drag the tile using your nger to
a free space on the start screen.
10:10
12 1
20.05.2013
Start
08:00 | 16.12.2014
Paul
Lili
Tim
Page 8
8
Touchscreen – Operation
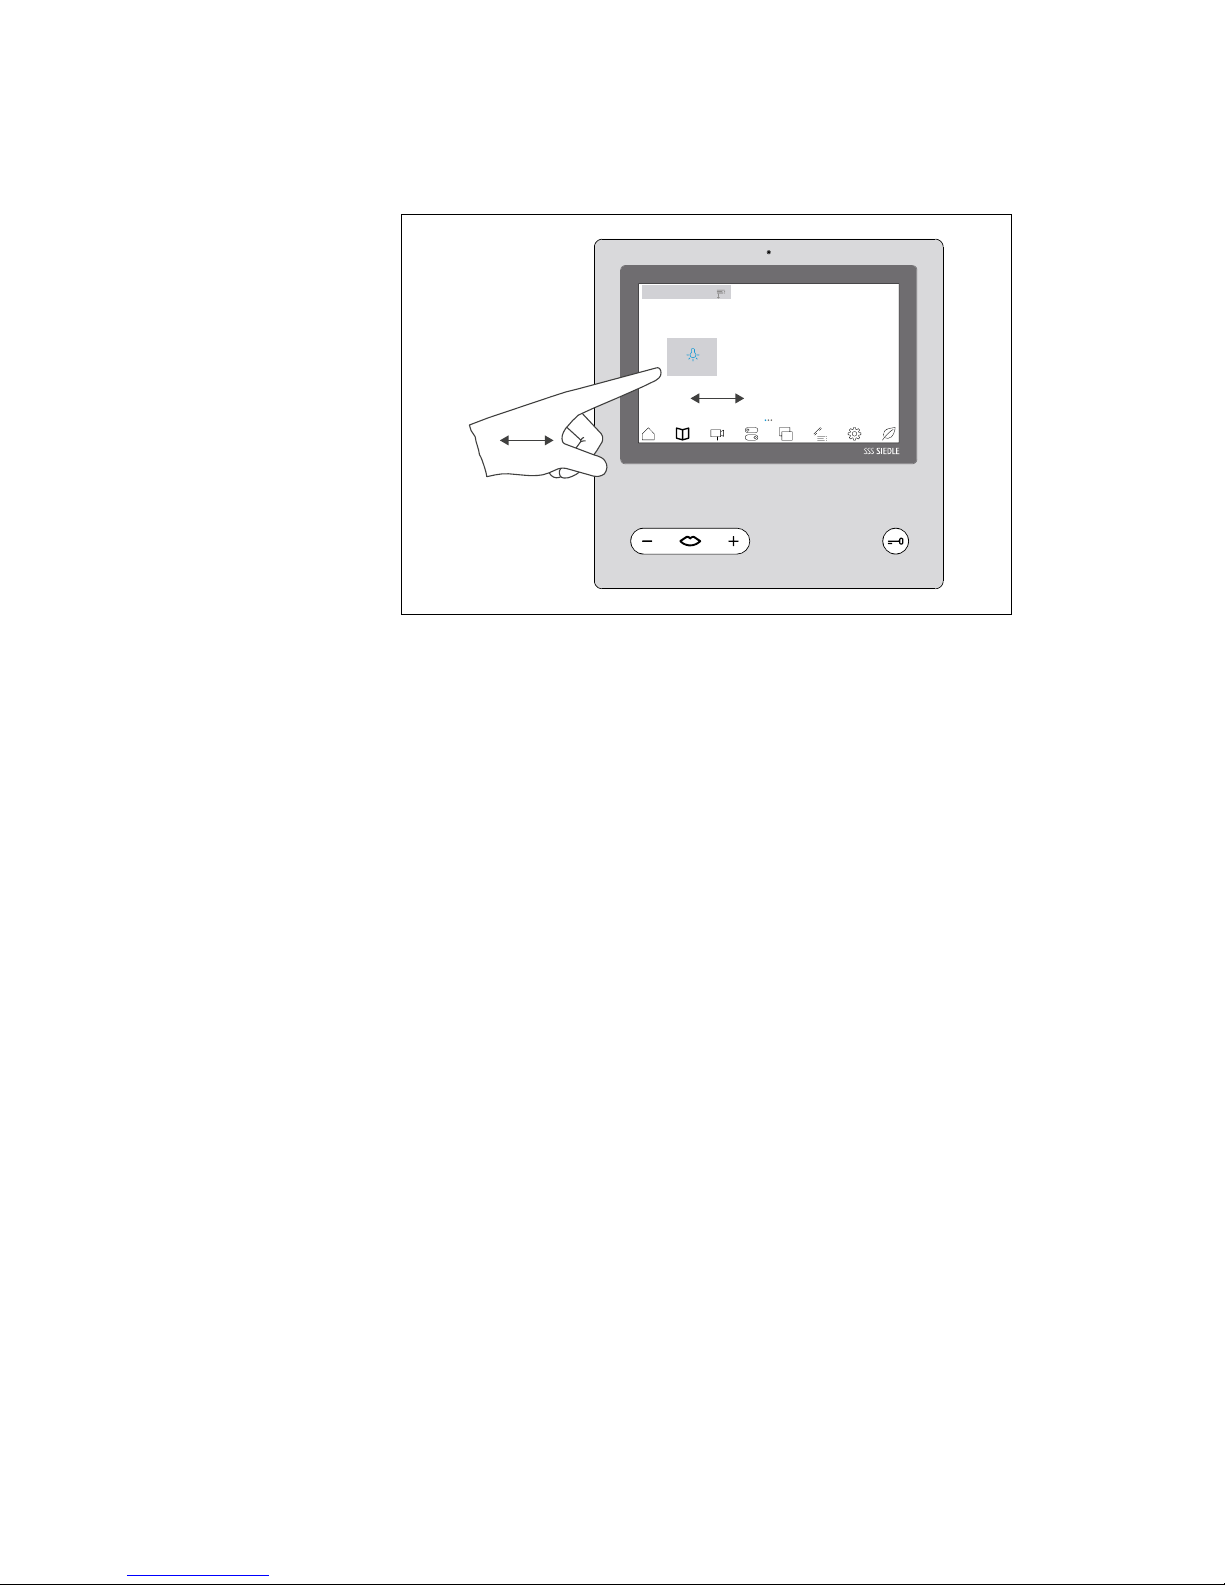
Changing pages – Start screen
1 Use any optional nger to swipe
the start screen horizontally using
the touchscreen to change pages.
If you are on the rst or last page,
the swipe movement will only work
back in the opposite direction.
The number of existing pages is
indicated by dot for each. The
dots are located in the centre at
the lower part of the screen. The
current page is highlighted from the
others in colour. The start screen
comprises several pages which can
be changed by swiping.
10:10
12 1
20.05.2013
Start
08:00 | 16.12.2014
Lili
Page 9

9
Overview of menus and symbols
Menu structure User interface
Start Call forwarding
Ringtone
Doormatic
Contacts All
Concierge
Internal
External
Groups
Doors
Cameras Standard screen mode
Full screen mode
Switching All switching functions
Doors
General
Light
Status display
Mail notication system
Building automation * (Accessing building automation)
Door call images Standard screen mode
Full screen mode
Delete all images
Calls list Delete all entries
Settings Audio Phone volume
Ringtone volume
Display Brightness
Language Language selection
Image view Standard screen mode
Full screen mode
Design Design Light/Dark
Position of menu prompting and
navigation bar Left/Right
ECO mode Call display
Idle status
Cleaning the display
System User information
Device information
Licence information
Reset Factory setting
ECO mode *
* A maximum of 8symbols can be
displayed in the navigation bar of
the AVP. If the Building automation
symbol is displayed, the ECO mode
symbol is omitted.
The ECO mode can be used over the
Settings menu.
The Building automation symbol
is only displayed on your AVP if the
connection to the
JUNG FacilityPilotServer has been
congured in the Access server.
Page 10

10
Overview of menus and symbols
Explanation of symbols
Start/Start screen Building automation * Full screen mode
Drop-down menu – Open Door call images Standard screen mode
Drop-down menu – Close Delete all images Accepting a call
Call forwarding On Delete image Microphone off
Ringtone Off Settings Reject call/Ending a call
Doormatic On Audio Storey call
Contacts Volume – Missed calls/Calls list
Call silencing Volume +
Contact – Concierge Display
Contact – Internal Brightness –
All contacts/Contact –
External
Brightness +
Contact – Groups Language
Doors Image view
Cameras / Door station Design
List ECO mode
Standard screen mode Cleaning the display
Full screen mode System information
Charging… Reset
All switching functions/
Switching
ECO mode *
Switching Internal call / Audio door
stations / External call
Light switching Save picture
* A maximum of 8symbols can be
displayed in the navigation bar of
the AVP. If the Building automation
symbol is displayed, the ECO mode
symbol is omitted.
Mail notication system Light switching
Status display Door release
Page 11

11
Status displays
Ringtone Off The symbol indicates that the acoustic signalling of door calls and telephone
calls has been silenced.
Missed calls The symbol indicates that at least one call has been missed. The call log
opens when you tap on this symbol. The missed calls remain highlighted in
a different colour until the call log is opened.
Call forwarding On The symbol indicates that the Call forwarding function has been switched
on. All user calls are forwarded to the dialled destination directly or after a
set time (forwarding after X seconds).
It is only possible to accept a user call once the call forwarding function has
been deactivated.
Doormatic On The symbol indicates that the Doormatic function has been switched on.
The function must have been congured in the Access server.
The door release is automatically actuated after pressing the call button,
either for one specic door or all doors depending on the programming.
Status display Contacts The symbol is a dot located next to each contact/door in the Contacts and
Cameras menus.
The symbol indicates whether a contact/door is free (green), unattainable
(grey) or engaged (red).
Display symbols –
Status change
Status display – Off Change of status by
• change of the symbol colour
• change of the symbol
Status display – On
Switch – Off
Switch – On
Switch – Off Change of status by changing the
colour of the symbol
Switch – On
Status display Contacts
– green
Status display Contacts
– grey
Status display Contacts – red
Drop-down menu – Open Change of status by changing the
symbol
Drop-down menu – Close
Page 12
12
Display navigation
Navigation bar
Start The Start menu is also the start page of the Access video panel with indi-
vidual functions created individually using tiles and a drop-down menu with
the functions: Call forwarding, ring tone and Doormatic.
Using the start page, you can access the different tiles with control functions
and intercom functions which have been set up using the Access server.
Remark: Only those tiles are displayed which have actually been programmed for your Access video panel. If no functions have been programmed, you only have access to the drop-down menu on the start page.
Contacts The Contacts menu contains all the set up/enabled contacts.
Here, you can
• show contacts sorted according to existing categories/lters
• dial contacts direct
Cameras The Cameras menu contains all the set up/enabled video door stations.
Audio door stations are located in the Contacts menu.
Here, you can
• access the life camera image of a door station
• dial the video door station direct
• change the video icon view (standard icon view/large icon view)
Switching In the Switching menu, you have access to all set-up/enabled switching
functions and signalling functions, provided these have been congured in
the Access server.
Here, the switching functions, status displays and signalling functions:
• Can be shown sorted according to the existing categories/lters.
• Can be executed or displayed directly.
Building automation * Tapping on the Building automation symbol will open the building auto-
mation server start page.
Door call images In the Door call images menu, you will nd door call images taken by all set
up/enabled door call stations, which you can view.
Here, you can
• view and evaluate the images according to date and time
• delete individual images
• delete all images
• change the depiction of entries in the Door call images menu (list view
without preview, large icon view, standard icon view)
Calls list In the call log menu, you will nd all missed and rejected calls as a log entry.
Here, you can
• evaluate all missed calls according to date and time
• delete all entries
• return a missed call directly by tapping the call log entry.
Settings In the Settings menu
• carry out basic settings (language, tone and display settings, ECO mode),
• obtain information about your device,
• activate the cleaning mode and
• reset the device to the as-delivered status
ECO mode * By tapping the ECO symbol, you send the display to the idle status.
To reactivate the display, tap anywhere on the touchscreen.
Page 13

13
Start – Drop-down menu
Call forwarding Switching call forwarding on and off
Incoming calls are forwarded to a different indoor device.
As long as call forwarding is active, the relevant symbol appears in the
status display.
In case of call forwarding with time delay (forwarding after X seconds),
incoming calls can still be accepted using your panel within the programmed time. In case of immediate call forwarding, it is not possible to
pick up calls at your panel.
Ringtone Ring tone on and off
Here, it is possible to
• mute the ring tone
• switch the ring tone back on
The symbol indicates whether acoustic signalling of door calls and telephone
calls is active or has been muted.
Doormatic Switching Doormatic on and off
The door release is automatically actuated after pressing the call button,
either for one specic door or all doors depending on the programming.
Remarks:
• The Doormatic function must have been congured in the Access server
for it to be capable of being used.
• The Doormatic function must be manually activated and deactivated.
• As long as the Doormatic is active, the relevant symbol appears in the
status display.
Cameras
Door station Here, all the set-up/enabled door stations are visible and can be called
directly. These can be assigned names during programming (e.g. entrance
door, main entrance, etc.).
Standard screen mode Standard icon view for images and video.
Full screen mode Large icon view for images and video.
* Reference to the displayed symbols
in the navigation bar:
A maximum of 8symbols can be
displayed in the navigation bar of
the AVP. If the Building automation
symbol is displayed, the ECO mode
symbol is omitted.
Page 14

14
Switching –
Drop-down menu
All switching functions All available switching functions are displayed.
Doors For switching functions, status displays and signalling functions to
be displayed in the categories/lters, the Access server must have
been programmed/congured.
General
Light
Status display
Mail notication system
Door call images
Standard screen mode The door call images are displayed in the standard icon view.
Full screen mode The door call images are displayed in the large icon view.
List The door call images are displayed as a log entry.
Delete all images All existing door call images of the user are deleted.
Delete image The selected door call image is deleted.
Calls list
Delete all entries All existing entries in the call log are deleted.
Display navigation
Page 15

15
Settings
Audio Phone volume Call volume
(adjustable in 5stages)
Ringtone volume Ring tone volume
(adjustable in 5stages)
Display Brightness Brightness
(adjustable in 5 stages)
Language Language selection Deutsch
English
Français
Italiano
Nederlands
Español
Dansk
Svenska
Polski
русский
Image view Standard screen mode Standard icon view for images and
video.
Full screen mode Large icon view for images and
video.
Design Light Light user interface
Dark Dark user interface
Position of menu prompting and
navigation bar – Left
Menu prompting and navigation bar
are located on the left-hand side.
Position of menu prompting and
navigation bar – Right
Menu prompting and navigation bar
are located on the right-hand side.
ECO mode Call display Speech button ashes to indicate
missed calls.
Idle status The display changes to the idle
status after an adjustable period of
inactivity or remains continuously
active.
Cleaning the display The touch function is temporarily
deactivated for display cleaning.
System User information User information
(name, call number)
Device information Information on the device
(name, call number, version, net-
work adapter, server IP address)
Licence information Detailed licence information on the
product.
Reset Factory setting Resetting to default settings
ECO mode By tapping the ECO symbol, you send the display to the idle status.
To reactivate the display, tap anywhere on the touchscreen.
Page 16

16
Door call
Save picture Taking a picture manually
Light switching Triggering the light relay
Door release Triggering the door release
Full screen mode Large icon view for images and video.
Reject call If you do not wish to accept an incoming call, tap the red receiver symbol.
If the device belongs to a group, the call is retained at the other devices.
Accepting a call Tap on the pick-up symbol (green receiver symbol) to accept an incoming
call. In the case of a door call, you can pick up the call within 60 seconds of
the last ring tone. After accepting the call, the speech connection is established. During an active call, the speech button lights up.
If you do not manually end the door call, automatic disconnection of the
door call takes place after a system timeout of 10 minutes to ensure that
noises generated inside the home are not mistakenly relayed outside.
Microphone off Using the microphone silencing function, you can mute the microphone in
the panel during an active call in order to talk privately to a person in the
room. Your call partner at the door or the internal user cannot hear your
conversation. This is indicated by microphone symbol highlighted in a different colour with the line through.
Ending a call Tap on the red receiver symbol to end the existing call.
If you do not manually end the door call, automatic disconnection of the
door call takes place after a system timeout of 10 minutes to ensure that
noises generated inside the home are not mistakenly relayed outside.
Accepting a call/Ending a call Using the speech button, you can accept an incoming call or terminate an
existing call.
Operation
Page 17

17
Call/Internal call
Full screen mode Large icon view for images and video.
Reject call If you do not wish to accept an incoming call, tap the red receiver symbol.
If the device belongs to a group, the call is retained at the other devices.
Accepting a call Tap on the pick-up symbol (green receiver symbol) to accept an incoming
call. If an internal call is in progress, you can accept the call within 120 seconds after the last ring. After accepting the call, the speech connection is
established. During an active call, the speech button lights up.
Microphone off Using the microphone silencing function, you can mute the microphone in
the panel during an active call in order to talk privately to a person in the
room. Your call partner at the door or the internal user cannot hear your
conversation. This is indicated by microphone symbol highlighted in a different colour with the line through.
Ending a call Tap on the red receiver symbol to end the existing call.
Accepting a call/Ending a call Using the speech button, you can accept an incoming call or terminate an
existing call.
Page 18

18
Accessing building automation
From Access serverV3.1…, the
integration and operation of a
building automation server (JUNG
FacilityPilotServer) is possible using
the Access Video Panel. Please note
that the building automation server
(JUNGFacilityPilotServer) is not a
constituent part of the Siedle Access
system. Advisory services and the
sale of hardware and licences take
place exclusively through
ALBRECHTJUNGGmbH&Co.KG.
Remarks:
• The Building automation
symbol is only displayed on your
AVP if the connection to the JUNG
FacilityPilotServer has been congured in the Access server.
• Accessing the Building automation
is used to visualize KNX control/
switching functions (e.g. KNX dim-
ming actuator) of the JUNG Facility
Pilot Server at the AVP in the Access
system.
• Integration / display of the user
interface takes place using the
embedded HTML frame. The functional scope and the design can
only be congured on the JUNG
FacilityPilotServer. For commis-
sioning and operation, please use
the relevant manufacturer documentation.
Condition:
The JUNGFacilityPilotServer is ready
for operation and the connection to
the JUNGFacilityPilotServer is congured in the Access server.
Procedure:
1 In the navigation bar, tap the
Building automation symbol.
2 The Building automation start
page is displayed.
Operation
5 If the contact accepts the call, the
display changes to the call mode.
Door calls are connected immediately.
6 In the call mode, all operable functions are displayed.
Missed calls – Callback
Procedure:
To return a missed call, change to
the call log menu and type in the
relevant log entry. The call log menu
is reached using the navigation bar
or the missed calls symbol in the
status display.
Selecting a door station
A selective call to a specic door call
station is possible if this has been
programmed/set up for your Access
video panel. Direct dialling of door
call stations is then possible either
using a tile set up on the start screen
or using the Contacts menu.
Changing the display mode
There are 2 ways in which you can
change the video image view:
• Tap twice on the displayed camera
image in order to change between
the display modes (standard icon
view and large icon view).
• Tap on the large icon view symbol
or on the standard icon view symbol
to change between the display
modes (standard icon view and large
icon view).
Calling a contact
There are 2 ways of calling a contact:
• Dialling a contact using the start
screen
• Dialling a contact using the
Contacts menu
Dialling a contact using the start
screen
It is only possible to dial a contact
using the start screen if you have
created tiles with contacts on the
start screen.
Procedure:
1 On the start screen, tap on the
contact to which you wish to make
a call.
2 The call set-up process begins.
A message appears in the display.
3 If the contact accepts the call, the
display changes to the call mode.
Door calls are connected immediately.
4 In the call mode, all operable functions are displayed.
Dialling a contact using the
Contacts menu
All the contacts enabled for you are
located in the Contacts menu. The
Contact list can contain internal and
external users, groups, terminals and
any doors which can be dialled.
Procedure:
1 Tap on the Contacts symbol in the
navigation bar in order to open the
Contacts menu.
2 To allow the required contact list
to be displayed, tap on the relevant
symbol (All, Concierge, Internal,
External, Groups, Doors).
3 Tap on the contact to which you
wish to make a call.
4 The call set-up process begins.
A message appears in the display.
Page 19

19
Reset to as-delivered status
Resetting the panel to the as-delivered status will only affect settings
which you can change at the panel,
such as the ring tone volume or display settings.
Programming by the electrical
installer will not be lost.
Procedure:
1 In the navigation bar, tap the
Settings symbol.
2 Tap on the reset symbol.
3 Tap on OK in order to reset the
device to the as-delivered status.
4 As soon as the process is concluded,
the menu Settings> Language
appears.
5 Please select your language in order
to activate the operating mode.
Care instructions
Dry, aggressive cleaning agents and
abrasive detergents can damage the
surface!
Only ever clean your indoor device
using a soft damp cloth.
Please ensure that no moisture ever
penetrates the housing.
Cleaning the display
To ensure that you do not initiate a
function by mistake or change settings when cleaning the panel, you
can disable the touch function for a
short period (10seconds).
Procedure:
1 In the navigation bar, tap the
Settings symbol.
2 Tap the Clean display symbol.
3 Clean the device display.
4 If cleaning takes longer than the
set period, tap the Clean display
symbol again.
Dening the image view
The required icon view for pictures
and videos can be dened in the
Settings menu for all door calls/telephone calls as standard.
Procedure:
1 In the navigation bar, tap the
Settings symbol.
2 Tap the icon view symbol.
3 Tap standard icon view or large
icon view in order to dene the
required icon size for images and
videos.
4 Tap OK to conrm your selection.
5 All door calls/telephone calls will
be displayed in future with the
selected icon size.
Page 20

20
General information
Disposal
All electrical and electronic devices
must be disposed of separately from
the general house waste at the
specially provided municipal waste
facility.
Responsible disposal and separate
collection of end-of-life devices help
to prevent potential environmental
and health hazards, and form the
basis for the recycling of used electrical and electronic devices.
If a product bears the symbol of a
waste bin with a line through it,
then it falls under the regulations of
European Directive 2002/96/EC.
Remarks
When disposing of your end-of-life
devices and batteries, please observe
the local waste disposal regulations.
Details can be obtained from your
local authority, waste disposal service
or the specialist dealer from which
you purchased the product.
Page 21

21
Index
Accepting a call 6, 16, 17
Accepting/ending a call 16, 17
Accessing building automation 18
Accessing functions 8
Accessing menus 8
All switching functions 14
Application 3
Audio 15
Brightness 15
Call forwarding 11, 13
Call log 9, 12
Call volume 6, 15
Callback 18
Calling a contact 9, 12, 18
Calls/Internal calls 17
Cameras 9, 12, 13
Care instructions 19
Changing pages – start screen 8
Changing the display mode 18
Cleaning the display 15, 19
Commissioning requirements 3
Default setting 15
Deleting all entries 12, 14
Deleting an image 14
Design 15
Device information 15
Dialling a contact 18
Dialling the door station 13, 18
Display navigation 12
Display symbols – status
change 11
Disposal 20
Door call 16
Door call images 9, 12, 14
Door release button – functions 6
Doormatic 11, 13
ECO mode 9, 12, 15
Electrical voltage 3
Electrostatic charging 3
Ending a call 6, 16, 17
Evaluating all missed calls
according to date and time 12
Explanation of symbols 10
Functional scope 5
Idle status 15
Image view 15, 19
Intended application 3
Language selection 15
Large icon view 13–17
Legal remarks 3
Licence information 15
Light switching 14, 16
Menu structure user interface 10
Microphone off 16, 17
Missed calls 6, 11
Moving tiles 7
Navigation bar 12
Operating remarks 3
Operation 16
Overview of menus
and symbols 10
Performance features 4
Position – prompting /
navigation bar 15
Product overview 5
Rejecting a call 17
Remark 3
Reset to as-delivered status 19
Ring tone 11, 13
Safety remarks 3
Saving an image 16
Scope of supply 5
SD card 4
Servicing 4
Settings 9, 12, 15
Speech button – functions 6
Standard icon view 13–15
Start –
drop-down menu 9, 12, 13
Switching –
drop-down menu 9, 12, 14
System 15
Touchscreen – Operation 7
User information 15
Video memory 4
Page 22

22
Page 23

23
Page 24

S. Siedle & Söhne
Telefon- und Telegrafenwerke OHG
Postfach 1155
78113 Furtwangen
Bregstraße 1
78120 Furtwangen
Telefon +49 7723 63-0
Telefax +49 7723 63-300
www.siedle.de
info@siedle.de
© 2015/07.16
Printed in Germany
Best. Nr. 200049155-00 EN
 Loading...