

SSS Siedle ASH 670-04 S, ASH 670-04 M Commissioning Instructions
Commissioning instruction
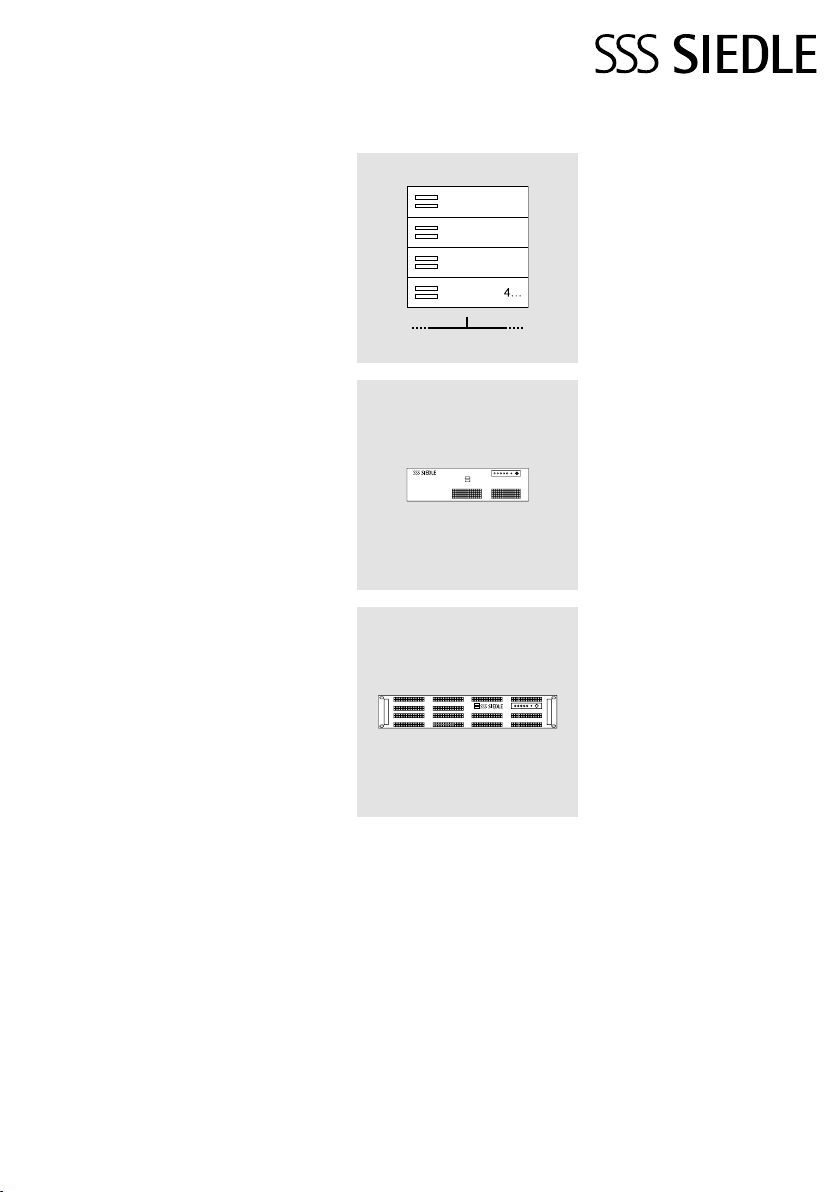
Access Professional V 4…
ASH 670-04 S
ASH 670-04 M

Contents
Direct entry point for advanced
users
1 Access Professional – New
Installation on customer hardware:
from page 15
2 System update to
AccessProfessionalV4.0.0…:
from page 73
3 System upgrade to
AccessProfessionalV4.0.0…:
from page 79
4 Setting up Access Professional:
from page 79
We accept no liability for mod-
ications, mistakes or printing
errors.
Modications / additions, mistakes
or printing errors do not form
grounds for any claim to compensation for damages.
This document is used as a
guideline for commissioning of
AccessProfessional in an independent network and is designed to
provide a brief overview of the most
important points to be observed
during initial commissioning.
Please note that this document
cannot cover all possible questions
arising from the commissioning of
your Access system.
This document cannot replace an
intensive advanced training course.
This document supplements and is
supplemented by the Planning and
System Manual AccessProfessional.
In addition to this document, you
will nd the current valid issue of the
entire documentation in the download area under www.siedle.com
Access Service Center in the
Furtwangen factory
Tel. +49 7723 63-540
access@siedle.de
2
Safety remarks 4
System overview
Access system version –
Important changes 7
Minimum requirements –
Server hardware / Virtual
machine 8
System conditions
Access Professional 9
Virtualization 9
Additional requirements
imposed on virtualization 9
Commissioning
Commissioning requirements 10
Connecting and switching
on the server hardware 10
Recommended commissioning
sequence 11
Device commissioning 11
Using the MAC address label 11
Commissioning possibilities 12
Device-specic settings 12
Use latest system version 14
Changing/adapting the
network conguration 14
Setting up the
server operating system
Installation and operating
conditions 15
Installing the
server operating system 15
Log in 16
Conguring the
static IP address 17
Conguring the default
gateway and DNS-Server 18
Starting the server manager 19
Add DHCP server service 22
Conguring necessary
services and options 35
Scope Wizard –
starting the conguration 36
Enter the name of the server
service 37
Dening the IP address range 38
Dening exclusions in the
IP address range and
server time delay 39
Dening the lease duration of
assigned IP congurations 40
Conguring the DHCP options 41
Specifying IP address for
routers/gateways 42
Dening the domain name
and DNS server 43
Dening the WINS server 44
Activating the IP address range 45
Conguring the DHCP options 47
Activating and conguring
the time server 48
Activating and conguring
the Log servers function 49
Activating and conguring
the NTP server 50
Activating and conguring
the boot server host name 51
Activating and conguring
the Bootle name 52
Activating a remote connection 53
Modifying the NTP server
services conguration 55
Subsequent installation of the
missing software platform
(Microsoft .NETFramework3.5)
with command line 59
Installing the missing software platform (Microsoft
.NETFramework4.6.1) 60
Changing the
server conguration 61
Installing the Accesssystem
Downloading and installing
the Accesssystem 63
Installation Wizard –
Language selection 64
Starting the installation 65
Checking the
safety warning message 66
Selecting installation paths 67
Determining the
start menu folder 68

Starting the installation 69
Completing the installation 70
Restart the system 71
Optionally: Updating the
Accesssystem
System updating procedure 73
Checking the safety warning
message 74
Maintenance contract 74
Performing a system update 75
Optionally: Uninstalling the
Accesssystem
Access the uninstall Wizard 76
Starting the uninstall process 77
Completing the uninstall
process 78
Status of the Access server 78
Setting up the Accesssystem
Getting started 79
Installing the Firefox browser 79
Important information on the
Access user rights system 79
Firewall – Necessary ports 80
Firewall –
Video multicast IP addresses 81
Accessing the Access system 82
Logging in without security
code 83
Additional functions at the
login window 83
Accept licensing agreements 83
User interface language 84
Changing the password 84
Activating the security code
request 85
Logging in with security code 85
Start page (dashboard) 86
New in this version 86
Administration graphic user
interfaces 86
Menu structure
AccessProfessional 88
Conguring the
basic parameters 89
Basic parameter 89
Server 89
Location parameters 90
Date and time 91
Data management 92
Telephony 93
Conguring the
server functions 94
Start page (dashboard) 94
Ordering Access licences 95
Importing Access users/
Application licence 96
Additional scripts 97
KNX addresses 98
Acoustic button
acknowledgements 100
Telephony link 101
Congure SIP gateways 102
Conguring SIP provider
accounts 105
Telephone directories 108
Creating contacts 109
Creating a project 110
Differentiation between
users and call groups 111
Creating and conguring
new folders 112
Preparing door stations (ATLC) 114
Creating and conguring users 115
Differentiation between
users and call groups 115
Editing already dened
call groups 119
Creating and editing individually dened call groups and
folders 120
Differentiation between
users and call groups 122
Congure devices
Virtual device 123
Device types 123
Virtual device 123
Conguring the door station
(ATLC) 124
Conguring the Access video
panel (AVP with KNX) 130
Button conguration 130
Accesssoftwareconcierge
(ASC) 134
Access in-house telephone
software (ASHT) 135
Access software module (ASM) 136
SiedleAppiPad 137
Siedle app iPhone 138
SIP video telephone 140
SIP audio telephone 141
External telephone 142
Creating virtual devices –
Binary switching device 143
Incoming calls – Telephony
routes
Conguring telephony routes 144
Roles and user accounts
Roles 145
Accounts 147
Creating a user account 148
Editing administrators 150
Final assignments
Carry out a function check 151
Handing over the Access
system to the customer 151
Optional administration
functions
Reboot / shut down 152
Version 154
Creating a system backup 155
Exporting a system backup 156
Importing a system backup 157
Saving the protocol 158
View user status 159
System characteristics 160
Connecting to external
networks – Access gateway 161
Index 164
3
Safety remarks
Observe the safety instructions!
Read and observe the safety instructions and content of the following
supplied documents before using
the Access server hardware for the
rst time:
• Product information
AccessServerhardware
• Planning and System Manual
AccessProfessional
• These commissioning instructions
Explain the content of the safety
instructions and dangers inherent in
using technically complex products
to children and those requiring
assistance in a way that is easily
understandable.
Electrical voltage
Mounting, installation and servicing
work on electrical devices may only
be performed by a suitably qualied
electrician.
Devices with 230V connection
In accordance with DIN VDE0100
part410, section 411.1.3 attention
must be paid to ensuring a safe separation between system lines and the
mains voltage; i.e. system and mains
cores must not be permitted to touch!
The system line cable (extra-low safety
voltage) must be stripped back by the
minimum possible.
System update
During the update process, the
power supply to the devices must
not be interrupted, as this can result
in damage. In this case, a repeat
update is no longer possible, and the
devices will have to be sent in for
repair.
User access and passwords for
the Access system
SiedleAccess and the server operating system are delivered with
standard passwords. Issue new and
secure passwords and keep these in
a safe location. Forgotten passwords
of the Access server and the server
operating system cannot be restored
and the server operating system
would have to be reinstalled and
commissioned.
All user access codes and passwords are within the sphere of
responsibility of the installer/
operator/customer.
Protect your property!
The SiedleApp can be used from
any location as a door release! Keep
smartphones/tablets on which the
SiedleApp is activated safe from
theft. Protect these devices against
unauthorized usage with a code/
password/ngerprint. Always use the
latest protection mechanisms available for your smartphone/tablet.
Protect your network!
Only use up-to-date components
and terminals in the network in
line with the latest state of the art.
Regularly update the operating systems of all components and terminals. Exchange obsolete components
and terminals for up-to-date models.
Use professional protective software
(antivirus, rewall, …) in all terminals. Issue secure passwords. Secure
your network with the highest security standards available in the network. Protect your network against
unauthorized attack from inside and
outside.
Legal notice
Photographs of individuals taken
without their knowledge may not be
published or stored in publicly accessible video memory facilities.
Individuals who have been photographed without their knowledge
are entitled to request that pictures
be deleted based on the right of
persons to their own likeness. Never
store pictures of persons you do
not know in social networks or
send them by email to others/public
groups. This will infringe their personal rights.
If stored images are used as part of
private / criminal law proceedings or
in a police investigation, this requires
prior clarication with a lawyer or
the responsible police authority.
The legally admissible operation and
installation of this device and all its
system components (hardware and
software) are the responsibility of
the user and not of the device manufacturer.
Servicing
Statutory warranty conditions apply.
If the device requires servicing,
contact your specialist dealer or electrical installer.
4

System overview
WLAN
ASHT
Switch
iPhone
iPad
Customer server
(e.g. mail server)
Public WLAN
WLAN
Internet
iPhone
iPad
ASC
Access gateway
Local network
SIP telephone
Start
08:00 | 16.12.2014
10:10
20.05.2013
12 1
AVP
AHTV AHF AHFV
Switch
Switch
ATLC/NG 670
Access server
Router
Internet
ASHT
3G / 4G
iPhone
Internet
iPad
Public mobil network
SIP telephone SIP telephone SIP telephone SIP telephone
SIP telephone
system
Router
Door station
Door release
Internet
Local telephone networkLocal Access network
5

System overview
Access server variant Access Professional ASH 670-04 M ASH 670-04 S
Finish Software without server oper-
Access system version Access Professional V4… Access Professional V4… Access Professional V4…
Possible number of users
(User licences)
Possible number of communication connections
(simultaneously)
Conditions • Hardware server
As-delivered status • The Access server must be
Maintenance contract Maintenance contracts for the Siedle Access system can be purchased both through
6
ating system/virtualization
10–320 10–320 10–50
25 25 10
• Server operating system
(MS Server 2012R2 Standard)
• Microsoft
.NETFramework4.6.1 for
WindowsServer2012R2
(ofine installer or web
installer if internet connection
exists).
• Network/VLAN as required
• Indoor stations with POE
supply
• Software clients/apps on
terminals with network connection
installed and commissioned.
• For regular operation of the
Access system, an Access user
licence for up to 320users/
devices must be purchased
for a fee. The trial period for
an Access system without a
valid Access user licence ends
after 30days.
• The server hardware/virtualization and server operating
system must be provided by
the customer and must be
available.
• Microsoft licences: Please
check whether any Microsoft
server access licences (Client
Access License – CAL) are
required by the customer for
operation of the Access users,
or whether these already
exist. (For detailed information, see Planning and System
Manual AccessProfessional)
the Siedle Project Sales and through an AccessCertiedPartner(ACP).
(For detailed information, see page74)
Hardware server + pre-installed AccessProfessional
• Network/VLAN as
required
• Indoor stations with POE
supply
• Software clients/apps on
terminals with network
connection
• The Access server is installed ready for operation and
prepared for commissioning by the customer.
• An Access user licence is required for the regular use
of AccessProfessional. The Access user licence allows
Siedle Access Professional to be enabled and used
in Version V4.0.0 for up to 320users/terminals per
system (optionally inclusive of licensed hardware indoor
stations/door stations and/or optional hardware and
software terminals to be licensed). Access user licences
can be purchased for 10, 20, 40, 80, 160 or 320users/
terminals and combined as required. The trial period for
an Access system without a valid Access user licence
ends after 30days.
• Optional application licences enable the use of additional performance features.
Remark
The standard password for the server operating system
of a AccessServerHardware (from ASH670-04…) is:
SiedleAccessMain2015
Please change the password on initial commissioning, taking note of the security instructions.
Hardware server + pre-installed AccessProfessional
• Network/VLAN as
required
• Indoor stations with POE
supply
• Software clients/apps on
terminals with network
connection

Access system version – Important changes
V3.0.0 From AccessV3.0.0 onwards, the Access server is available in the following
V3.1.0 From Access V3.1.0, the integration and operation of a building automation
V3.2.0 From Access V 3.2.0, the administration user Interface has been revised:
V4.0.0 From Access V4.0.0, the system is called AccessProfessional and includes
variants:
Hardware variant (HW) and Software variant (SW)
The Access System Version3… (hardware variant) is operated on
the server operating system Microsoft Windows Server2012R2for
Telecommunication. No other Microsoft licences are required.
The Access System Version3… (software variant) requires the server operating system MicrosoftServer2012R2Standard. Please check whether any
Microsoft server access licences (Client Access License – CAL) are required
by the customer for operation of the Access users, or whether these already
exist. Microsoft Client Licences (CAL) are not included in the scope of supply
of the Access server.
server (JUNG FacilityPilotServer) is possible using the Access Video Panel.
Please note that the building automation server (JUNGFacilityPilotServer)
is not a constituent part of the Siedle Access system. Advisory services
and the sale of hardware and licences take place exclusively through
ALBRECHTJUNGGmbH&Co.KG.
• Call groups are located in the Users menu.
• The Groups menu has been omitted.
• Account and role management have been moved together into the
Administrators folder.
• In the System maintenance menu, different sub-menu points have been
renamed and resorted.
• To order licences, in the Licences menu, the hardware ID can be exported
as an XML le.
• In the submenu Create gateway and Create provider, devices linked to
the gateway are now also shown in the content area, and can be deleted
directly and completely from the system from this menu.
the following new features:
• AccessProfessional as a pure software solution can now be optionally
operated on a server made available by the customer or in a virtual machine
(from VMwarevSphere6) in any IT environment which fulls the Access
system specication.
• An Access user licence is required for the regular use of
AccessProfessional.
• The Access user licence enables Siedle Access Professional to be enabled
and used from V4.0.0 for up to 320users or 320 terminals (optionally
inclusive of licensed hardware indoor stations/door stations and/or optionally
licenced hardware and software terminals).
• Access user licences can be purchased for 10, 20, 40, 80, 160 or 320
users/terminals and combined as required.
• A ash is no longer required for correct display of the dashboard (start
page) of AccessProfessional.
• Dedicated symbols have been assigned to the sub-menu points of the
administration user interface in order to enhance operating convenience.
• The switching inputs of the door controller ATLC can now be congured
using the storey call button function.
• The number of users and devices which are being utilized and the maximum number of users and devices are indicated on the dashboard.
7

System overview
Minimum requirements – Server hardware / Virtual machine *
Possible number of users (User
licences)
Processor output min. Intel Xeon Quad Core Processor
Random access memory (RAM) at least4GB at least2GB
Storage location (HD) at least256GB
Network connection (LAN) at least1x1000Mbit/s
Server operating system/software
Operating system Microsoft Server2012R2 Standard or Datacenter (installation: Standard full
Role of the server operating system optionally: DHCP server service, if no DHCP server is operated in the existing
Other server services optionally: NTP server
Necessary DHCP options Time Server, Log Servers, NTP Servers, Boot Server Host Name,
Access system version Access Professional – from Version4.0.0
Access licences For regular operation of AccessProfessional, an Access user licence must be
320 50
64Bit (from launch year 2014 or more
recent)
installation -> Server with graphic user interface)
network.
BootleName
Optionally: Router (Default Gateway), Domain Name and DNS-Server
purchased against a fee.
Optional application licences enable the use of additional performance
features.
min. Intel Atom D510; 1.6 GHz
dual-core *
Network connection
Network Own physical network from CAT-5 and optionally with modied VLAN with
Transmission speed 100MBit/sec (End devices)
Internet protocol IPv4
Multicast capability
(only if you wish the video signal to
be transferred in the network as a
multicast stream. As an alternative,
the unicast operation mode can
be used. With unicast, every video
stream is separately generated
and can cause very high network
capacity utilization where there
are high number of users with
approx.1MBit per user.)
Distribution list The use of switches is a requirement.
Power over Ethernet (PoE) Access indoor stations require PoE-capable switches or PoE injectors in com-
8
Quality of Service (IEEE802.1p)
1000 MBit/sec (Server hardware)
Throughout the entire network
pliance with IEEE802.3af

Virtualization
* For Access systems with up to
50 users, server hardware can be
used which corresponds to the
performance data of Access server
hardware S:
- Processor output: At least Intel
Atom D510; 1.6 GHz dual-core
- Random access memory (RAM): at
least 2GB
Important: Please note that in this
conguration, no virtualization and
no additional system expansion are
possible.
System conditions
Access Professional
In order to operate Access
Professional correctly as a software variant, the provided server
hardware/virtual machine and the
network infrastructure must meet
the minimum requirements of the
Access system
Remarks
• In order to work with Access
Server Administration, you need an
PC with the latest version of the web
browser Mozilla Firefox.
If you use a different web browser
to the MozillaFirefox, display errors
can occur.
• Two network sockets are afxed to
the back of the Accessserver hardware (Service and Access).
For linking the Access devices to the
Access network, the Access socket
must be used.
Notice on the scope of supply
The Accessserverhardware is
delivered as standard with the following additional software tools and
releases:
• 7-Zip(x64)
• Firefox
• Notepad++
• Putty
• Wireshark
• WinPcap
• Remote desktop release
The listed les and programs are
required for conguration and
servicing purposes and should only
be used by specialist and servicing
personnel.
The Accesssystem (software variant)
is delivered without these additional
software tools and releases.
Additional requirements imposed
on virtualization
• For virtualization, from
VMwarevSphere6 upwards a
virtualization solution congured
for server systems must be used.
• The minimum requirements
imposed on the virtual machine
are the same on principle as server
hardware provided by the customer
for up to 320 users. With the virtual
machine, remember that at least 2
virtual and separate processor units
(CPUs) must be made available.
• If virtualization is used, the host
(physically present server on which
the virtual machine is operated)
must have sufcient performance to
make available the output needed
for the virtual machine.
Remarks
The size of the hard disk storage
capacity which should be selected
depends on various factors when
using a virtualization solution:
• Number of users, groups and
terminals
• Utilization scenario and incidence
of communication
• Activated video memory function: If no video memory function
is used, we recommend a hard
disk storage capacity of at least
30Gigabytes. When using the video
memory function, please contact the
AccessServiceCenter to be advised
on the minimum capacity required
for the hard disk memory.
• For Access systems with up to
50 users, server hardware can be
used which corresponds to the
performance data of Access server
hardware S:
- Processor output: At least Intel
Atom D510; 1.6 GHz dual-core
- Random access memory (RAM): at
least 2GB
Important: Please note that in this
conguration, no virtualization and
no additional system expansion are
possible.
9

Commissioning
Commissioning requirements
In order to commission and set up
the Access server, you must ensure
that the following commissioning
requirements are fullled:
• The Access system is documented
(structures, administration of user
rights, devices, correlations, directories, length of telephone numbers
(2-5 digits), information on call
number plans etc.)
• For regular operation of the Access
system, an Access user licence for up
to 320users/devices must be purchased for a fee.
• Additional user licences are
required for software clients, thirdparty devices and non-standard
functions.
• If the customer performs their
own Access installation, Access
licences can only be ordered from
Siedle at the start of commissioning
via Access Certied Partners, as
the hardware ID generated by the
Access server is required for this.
• The passive network infrastructure
has been completely installed and is
fully functional. All RJ45 connections
are located in the required positions.
• All switches required in the network and for the Access network are
ready for operation.
• All door stations are correctly
connected to the ATLC and ready for
operation, but not yet linked to the
network.
• All hardware indoor stations are
prepared for installation or installed,
but not yet linked to the network.
• POE (Power over Ethernet) is
available at all network connections
for hardware indoor stations (POE
switch or POE injector).
• The Firefox browser in the latest
version is required for commissioning
and is installed in the commissioning
computer, or is ready for subsequent
installation on the server.
10
Note!
• In the as-delivered status of the
Siedle Access server as a hardware
variant, the DHCP and NTP server of
the Siedle Access server is active.
• If the IP address of the Access
Server has to be changed, rst adjust
the IP address and then connect the
terminals to the server. Otherwise,
the terminals will be assigned the
wrong IP address and will have to be
restarted.
• In large systems, it is advisable
following the basic conguration
to link the terminals block by block
in logically cohesive groups to the
server, in order to allow them to
be congured in the Access server
administration.
Connecting and switching on the
server hardware
Irrespective of whether the server
hardware was supplied by Siedle,
or whether the customer's own
hardware is being used, this must be
connected to the power supply and
the network.
Remark: Operate the Access server
hardware exclusively within the
admissible ambient temperature of
10°Cto+50°C.
Procedure with Siedle server
hardware:
1 Set up the server hardware or
mount the server hardware in the
required position in the server cabinet.
2 Connect the server hardware to
the power supply.
3 Connect the server hardware to
the Access network.
4 Switch on the server hardware.
5 Make available a computer for
conguration/set-up of the Access
server and connect this to the Access
network, or provide a possibility of
operating the Access server directly
using a monitor, keyboard and
mouse.
Remark
• The Siedle Access servers (hardware variant) are already pre-installed and ready for conguration/
set-up. The following steps for
installation of the server operating
system and the Access server software are omitted. The Access server
(hardware variant) can be reached
as standard over the IP address
192.168.1.1.
Procedure with customer's own
server hardware:
1 Set up the server hardware or
mount it in the required position in
the server cabinet.
2 Connect the server hardware to
the power supply.
3 Connect the server hardware to
the Access network.
4 Make available a computer for
conguration/set-up of the Access
server and connect this to the Access
network, or provide a possibility of
operating the Access server directly
using a monitor, keyboard and
mouse.
5 Switch on the server hardware.
6 Start the installation of the server
operating system and the Access
server software as instructed over
the following pages.

Recommended commissioning sequence
Device commissioning
Depending on the size (number of
devices) of the Access system and
the situation on site (e.g. building
size on the customer's premises),
select the best procedure to use for
device commissioning at your own
discretion. Possible procedures:
Procedure Description Commentary
Prepared conguration Local provisional set-up (workshop)
Complete conguration Link all devices to the already set
Block-by-block conguration Systematically connect the devices
Serial conguration Systematically connect the devices
Using the MAC address label
With all indoor stations and door
controllers, an additional MAC
address label for the respective
device is included in the scope of
supply.
for commissioning and conguration of the Access server and the
Access devices prior to actual installation on the customer's premises.
up Access server and congure the
devices.
one block at a time to the already
set up Access server in order to congure them in blocks.
in series to the already set up Access
server in order to congure them
individually.
This label should be used for documentation purposes and for commissioning support in the Siedle Access
device protocol (e.g. handover protocol for the customer).
The Siedle Access device protocol is
located in the Siedle download area
at www.siedle.de
Suitable for all sizes of Access
system in buildings in which the
nal installation is only possible
shortly before closure, buildings
with a large number of security
areas and access restrictions or
where communication possibilities
are restricted. The preparatory conguration calls for a fully completed
detailed plan and a highly neat,
structured and documented work
method. In addition, all pre-congured devices must have been logically and traceably inscribed.
Suitable for small Access systems
with a simple structure and few or
only few identical Access devices,
and buildings with no or minimal
internal access restrictions.
Suitable for medium and very
large Access systems with complex
structures which have few or few
identical Access devices within one
or more users or groups, as well as
buildings with no or only minimal
internal access restrictions.
Suitable for medium and very
large Access systems with complex
structures which have few or few
identical Access devices within one
or more users or groups, as well as
buildings with no or only minimal
internal access restrictions.
11

Commissioning
Recommended commissioning sequence
Recommendation
• Only ever commission several
devices simultaneously if these can
be clearly differentiated by their
device type and if assignment to the
user is clear.
• Commission devices individually in
series if you are dealing with a large
quantity of identical device types
which need to be commissioned.
Commissioning possibilities Distribution of tasks Remarks
Commissioning on site
with 2 persons
Commissioning on site
with 1person
Commissioning with 1person
and prepared Access system
Background
All newly detected devices are
located in the Users menu in the
Unassigned devices folder. If there
are a large number of identical
devices, the identication work
increases, as does the effort involved
in user-specic conguration and
assignment of the individual devices.
• Person 1 carries out the nal
installation, commissioning and
function test of the device at the
relevant device location.
• Person 2 carries out the relevant
device conguration at the Access
server.
• Person 1 prepares the Access
server for device commissioning.
• The next step is nal assembly,
commissioning of the device, conguration at the Access server using
a mobile computer at the relevant
device. Then the device is function
tested on site.
• Person 1 commissions the Access
server and starts the network infrastructure.
• In the next step, nal assembly,
commissioning and function testing
of the precongured device take
place on site.
Device-specic settings
In the system, it is possible to select
a language for all Access terminals
at the Access server.
The system language and setting
of the bell and voice volume can be
centrally congured at the Access
server. These settings can be locally
individually changed at the terminals.
Suitable for large Access systems in
large buildings or buildings without
functioning WIFI.
Mobile wireless phones or wireless
devices are necessary for communication between the two people.
Suitable for small to medium Access
systems or Access systems in small
to medium buildings.
WIFI or LTE/UMTS access to the
Access server is necessary in order
to allow device conguration for the
respective devices to be carried out
at the Access server.
Suitable for small to medium Access
systems or Access systems in small
to medium buildings.
Requirement: Completed and
released detail planning of the
Access system, as well as unambiguous marking and documentation
of the pre-congured devices.
12
Plan and document the Access system in detail. see Planning and System Manual
Install and set up the server operating system
(only with AccessProfessional as software variant). Page 15
Install and set up the AccessProfessional
(only software variant). Page 63
Congure and store basic parameters. Page 82
Import the Access user licence and
optional Access application licences Page 96
Import additional scripts. Page 97
Import and manage KNX addresses. Page 98
Set up individual acoustic button acknowledgements. Page 100
Setting up a telephony connection. Page 101
Set up individual directories/contacts. Page 108
AccessProfessional
Create and congure folder structure. Page 110
Set up and congure users. Page 115
Congure virtual devices, link devices to the
Access server and congure. Page 123
Incoming calls – congure telephony routes. Page 144
Congure roles and create other
administrator access rights. Page 145
Carry out nal tasks Page 151
13

Commissioning
System version and network conguration
Use latest system version
The Access server hardware /
AccessProfessional as a hardware/
software variant are always delivered
in the latest Access system version.
By the time commissioning takes
place on the customer's premises,
it is possible that a newer system
version exists.
Remarks
• From Access server 3.0.0 onwards,
the updating process of the Access
server has been revised. The system
updating process will not be
launched in future via the Access
server, but carried out by the Access
server installer (see chapter System
update). External access to the new
system version is reserved to Access
Certied Partners "ACP". More
recent system versions can incur a
charge.
• Updating AccessProfessional is
optionally possible by an ACP. Using
the services of an ACP can also incur
a charge.
• If possible, always use the latest
system version of the Access server
and always keep this version up to
date.
Procedure
1 Have an ACP check whether there
is a more recent AccessProfessional
system version available.
2 If a newer system version exists,
where applicable have this delivered,
installed or updated by the ACP
against a charge.
In the case of a system version
•
change (upgrade) to AccessProfessional from V4.0.0, the hardware ID
changes. In addition, the optimum
licence package and the right maintenance contract for the customer/
operator/end user can be selected
from the new user licence model.
Before carrying out an upgrade, contact the AccessServiceCenter.
• A system update from
AccessV3… to AccessProfessionalV4… is possible.
• A system update from
AccessProfessional V4.0.0
upwards is only possible if a valid
maintenance contract exists. This
can be concluded against a fee.
Changing/adapting the network
conguration
Siedle Access server Hardwares are
delivered with a standard network
conguration. The Siedle Access
server hardwares are precongured
as DHCP and NTP servers.
Depending on the customer network infrastructure and the already
available/set up network services, it
can happen that the standard conguration of the Siedle Access server
hardware has to be changed.
14

Setting up the server operating system
Microsoft Server 2012R2 Standard
Installation and operating conditions
In order to allow the Siedle Access
server to be correctly operated, you
must full the following installation
requirements:
1 The server hardware or virtual
machine (from VMwarevSphere6)
you have provided complies at least
with the technically specied system
requirements for the Access server.
2 As a server operating system,
you must install Microsoft
Server2012R2Standard or
Datacenter as a standard pre-installation (Server with graphic user
interface).
3 Assign a static IP address for the
server operating system.
4 Optionally: Assign the server
operating system the role of the
DHCP server and where applicable
the NTP server, if there is no DHCP
and NTP server operating in your
network.
5 Only activate the services necessary for operating the Access server,
and where applicable activate the
NTP server.
6 In the congured server operating
system, install only the Siedle Access
system. In addition, no other server
services may be installed, as this
can result in impaired performance
of the Siedle Access server. (Rule:
1server service per server operating
system installation.)
7 The network infrastructure corresponds to the prescribed specication for Siedle Access.
8 All network users of the Access
server are operated using this network infrastructure.
Installing the server operating
system
You must install the Microsoft
server operating system in the full
installation variant – server with
graphic user interface on the
server hardware.
Procedure
1 Start the installation of the server
operating system.
2 As an installation option for the
server operating system, select the
full installation –Server with
graphic user interface (server
graphic shell) variant.
3 Execute the installation of the
server operating system.
Remark
• The values for IP addresses and
network entries used in these commissioning instructions are intended
as examples only and can deviate
from your network environment.
15

Setting up the server operating system
Assigning the static IP address
Log in Procedure
1 Log into the Windows server with
the administrator access data issued
by you during installation.
2 The desktop of the Windows
server is displayed.
Remark
• The standard password for
the server operating system
of a AccessServerHardware
(from ASH670-04…) is:
SiedleAccessMain2015
Please change the password on
initial commissioning, taking
note of the security instructions.
16
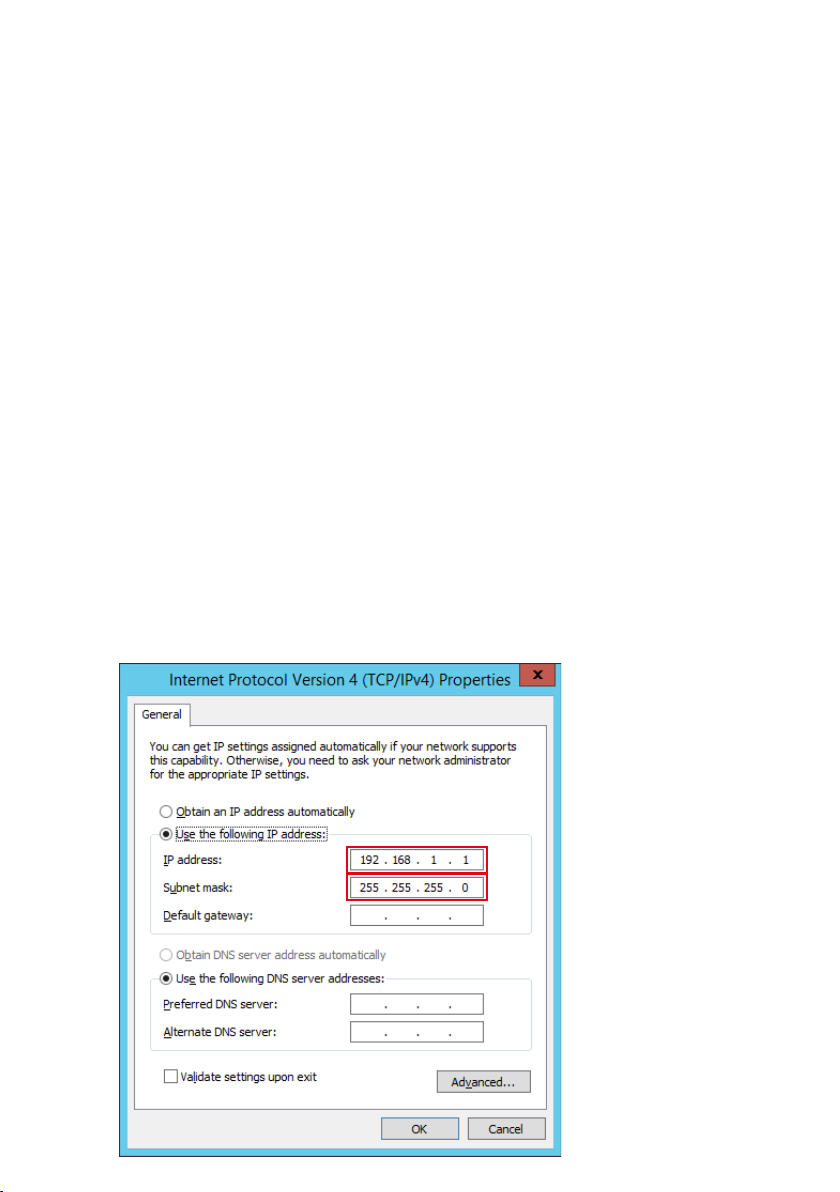
Conguring the static IP address
In order to operate the Access server
correctly, you must assign the Server
operating system a static IP address.
This means that the Access server
can always be reached under the
same IP address.
A missing static IP address in regular
operation results in faults or possible
prevention of the Access server
being reached.
Remark
Alternatively, you can also reach the
settings using the start menu:
Start -> Control Panel -> View
network status and tasks ->
Change adapter settings ->
Double click on the used network
adapter -> Properties -> Double
click on Internet Protocol Version
4 (TCP/IPv4).
Procedure
1 With the right-hand mouse
button, click on the network icon in
order to open the context menu.
2 Click on Open Network and
Sharing Center.
3 Click on Change adapter settings.
4 Double click on the network
adapter you wish to use in order to
open the properties of the network
adapter.
5 Click on Properties in order to
display the properties of the network
adapter.
6 Double click on Internet Protocol
Version 4 (TCP/IPv4) in order to
change the settings.
7 Click on Use the following IP
address: in order to assign a static
IP address to the server operating
system.
8 In the input eld IP address, indicate an IP address under which you
wish the server operating system to
be reachable (e.g. 192.168.1.1).
9 In the input eld Subnet mask,
enter the subnet mask (e.g.
255.255.255.0).
Continued overleaf…
8.
9.
17
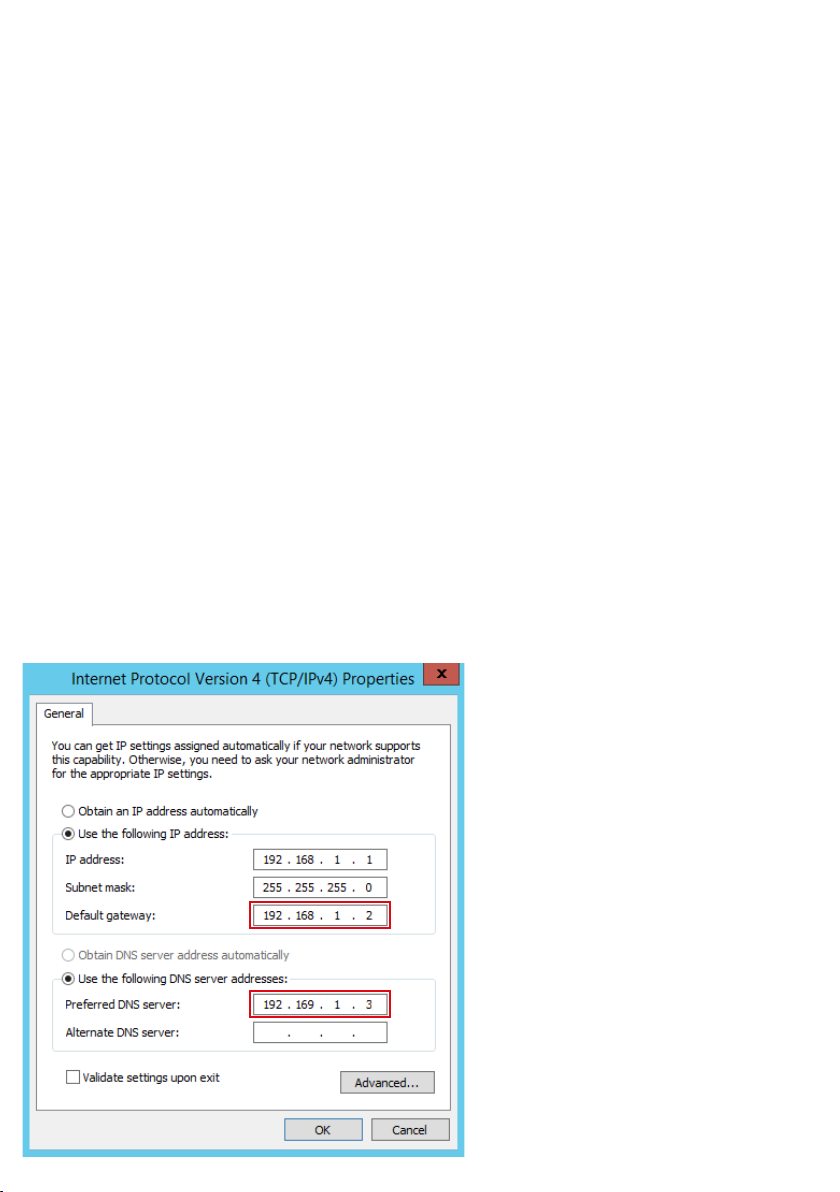
Setting up the server operating system
Assigning the static IP address
Conguring the default gateway
and DNS-Server
If you do not use the Access server
exclusively in the stand-alone mode,
but link it to your existing network
(e.g. domain, Access gateway) or
if you wish the Access server to be
reachable over the internet (e.g.
Siedle App for Access), you must
enter the correct IP addresses for
the default gateway and the pre-
ferred DNS server.
Procedure
10 Enter the IP address in the eld
Default gateway.
11 Enter the IP address in the eld
Preferred DNS server.
12 Optionally: If known, enter the
IP address in the eld Alternate
DNS server.
13 Optionally: Activate the option
Validate settings upon exit in
order to have the entered network
settings checked by the Windows
server.
14 Conrm your entries with OK.
15 Close any remaining open win-
dows which you had opened for this
conguration.
16 You have congured the network
settings of the server operating
system and are now back on the
desktop of the server operating
system.
Remark
• The correct IP addresses are available from your responsible network
administrator.
10.
11.
18

Setting up and conguring the DHCP server service
Starting the server manager
Using the server manager you can
add the DHCP server service at the
server operating system.
Procedure
1 Click on the Windows start
button (bottom left-hand corner) in
order to open the start screen of the
Window server.
1.
19

Setting up the server operating system
Setting up and conguring the DHCP server service
Starting the server manager
(continued)
Procedure
2 Click on the Server Manager tile
in order to start the server manager.
3 The Dashboard (start page) of the
server manager opens up.
2.
20

Starting the server manager
(continued)
Procedure
4 Click on 2 Add roles and features.
5 The page Before you begin
opens up.
Remarks
• With the Server Manager, you can
manage not only your own server
but also others.
• In the lower part of the Dashboard
under Roles and Server Groups,
the available servers and the created
server services are displayed. After
setting up the DHCP server service,
this is also shown there.
4.
21

Setting up the server operating system
Setting up and conguring the DHCP server service
Add DHCP server service Procedure
1 If required, read the instructions
on the Add Roles and Features
Wizard.
2 Optionally: If you do not want
these instructions to appear in
future, click on Skip this page by
default.
3 Click on Next.
4 The page Select Installation
Type opens.
1.
22

Add DHCP server service
(continued)
Procedure
5 If nothing is already preselected,
select the option Role-based or
feature-based installation.
6 Click on Next.
7 The page Select destination
server opens up.
5.
23

Setting up the server operating system
Setting up and conguring the DHCP server service
Add DHCP server service
(continued)
Procedure
8 If not already preselected, select
the option Select a server from
the server pool.
9 If not already preselected, select
your server.
10 Check whether the displayed IP
address agrees with the IP address of
your server.
11 Click on Next.
12 The page Select server roles
opens up.
Remark
• In the area Server Pool, all servers
which can be reached by the Server
Manager are displayed. You can
identify your server on the basis of
the assigned IP address. If you are
not able to nd out your IP address,
check the network settings of your
server.
8.
24

Add DHCP server service
(continued)
Procedure
13 If not already preselected, select
the option DHCP server.
14 Click on the checkbox next to the
DHCP server in order to activate the
role DHCP server.
15 The sub-page Add features that
are required for DHCP Server?
opens up.
13.+14.
25

Setting up the server operating system
Setting up and conguring the DHCP server service
Add DHCP server service
(continued)
Procedure
16 If not already activated, click
on the checkbox next to Include
management tools (if applicable),
in order to also activate the management tools for the DHCP server
service.
17 Click on Add Features.
18 You are then back on the page
Select server roles.
19 Click on Next.
20 The page Select features opens
up.
Remark
• All previous steps can be repeated
as often as required, for example to
extend the existing function scope of
the DHCP server service.
16.
26

Add DHCP server service
(continued)
Procedure
21 Do not open any other functions/
tools.
22 Click on Next.
23 The page DHCP Server opens
up.
Remark
• No supplementary functions/tools
are required to operate the Access
server.
22.
27

Setting up the server operating system
Setting up and conguring the DHCP server service
Add DHCP server service
(continued)
Procedure
24 If required, read the instructions
on the DHCP server.
25 Click on Next.
26 The page Conrm installation
selections opens up.
24.
28

Add DHCP server service
(continued)
Procedure
27 Do not select any additional
options.
28 Click on install.
29 The page Installation progress
opens up.
28.
29

Setting up the server operating system
Setting up and conguring the DHCP server service
Add DHCP server service
(continued)
Procedure
30 Click on Close to complete the
process.
31 You are back on the page
Dashboard (start page) of the server
manager.
Remark
• You have not yet completed the
set-up of the DHCP server service.
In the Notications area on the
Dashboard (start page) of the server
manager, a yellow warning triangle
is displayed.
30.
30
 Loading...