

Page 1
Operating Instructions
for end users
Siedle Axiom
A 180-10
A 180-11
A 180-20
A 180-21
A 180-30
A 180-31
Page 2

2
Contents
These operating instructions supplement/are supplemented by:
• Siedle Axiom product information.
The relevant current edition is
located in the download area on
www.siedle.com
Subject to printing errors.
We reserve modications depending
on technical improvements.
Safety remarks 3
Application
Intended application 4
Operating remarks 4
Care instructions 4
Legal notice 4
General information
Functional scope 5
Commissioning requirements 5
Video memory 5
Update 5
Servicing 5
Touchscreen
Product overview 6
Touchscreen – Operation
Accessing menus 7
Accessing functions 7
Moving tiles 7
Deleting tiles 8
Changing pages – Start screen 8
Magnifying glass 9
Buttons / Sensors
Speech button 10
Door release button 10
Sensors 10
Earpiece volume 11
Overview of symbols 12
Status displays
Status bar 13
Login and basic settings
Showing apps 14
Showing functions 14
Showing favourites 14
Creating contacts 14
Edit contacts 14
Storing contacts as favourites 14
Important functions 15
Telephone 15
Contacts 15
Threshold 15
Video memory 15
IP cameras 15
KNX 15
Telephony
Call with number entry 16
Calling a call number from
the contact list 16
Calling a call number from
the call list 16
Calling a call number from
the favourites list 16
Rejecting a call 16
Putting a call on hold 16
Microphone muting during
the call 16
Settings 17
General information
Disposal 18
Page 3
3
Safety remarks
Electrical voltage
Mounting, installation and servicing
work on electrical devices may only
be performed by a suitably qualied
electrician.
Mounting
During installation, where applicable
ensure that the surface is protected
from damage.
Electrostatic charging
As a result of electrostatic charging,
direct contact with the circuit board
can result in destruction of the
device. Direct contact with the circuit
board must therefore be avoided.
Static magnetic eld
Magnetic elds can pose a hazard
for pacemakers, magnetic data
storage media and electronic
devices. A safe distance must be
maintained.
Battery safety
The DECT™ receiver contains a
non-removable battery, therefore
the general battery safety instructions apply.
• Keep the battery away from
sources of heat and naked ames.
• Never immerse the battery in
liquids.
• Never attempt to dissemble or
modify the battery, or to expose it to
the effects of heat.
• Avoid dropping the battery and
protect it from jolting and impacts
which could damage the housing.
• Otherwise there is a risk of explosion or battery leakage, which could
result in re, injury or damage to the
surroundings.
• If a battery leaks and the emerging
substances come into contact with
the eyes, mouth, skin or clothing,
rinse the affected area immediately
using water and consult a doctor.
• Only use the holder provided to
charge the battery in the receiver.
• The holder was developed exclusively for use with the receiver. Do
not use with other products or
storage batteries.
• A risk of overheating and deformation exists which could cause res
or initiate electric shocks.
• For technical reasons, rechargeable
batteries lose their charging capacity
as they age, and the risk of a malfunction or even device failure also
increases.
It is therefore advisable to replace
rechargeable batteries with new
ones after many years of use, when
their performance – such as the
maximum duration of a call – has
noticeably dropped.
•
Modern furniture is coated with an
enormous variety of different lacquer
and plastic nishes. Constituents of
these materials can result in softening of the plastic feet in table-top
devices and so impair the surface of
the furniture. Please appreciate that
the manufacturer is unable to accept
any liability.
• Avoid sources of interference such
as microwave devices or electrical
devices with large metal housings in
the vicinity of the base station.
• For any servicing requirements,
please contact your specialist dealer
or electrical installer.
• When using in conjunction with a
hearing aid, it is possible for humming or feedback noises to occur.
• The cordless handset and the base
station should be positioned at least
1 metre distant from other electrical
devices.
• When used close to medical
devices, functional disturbances can
occur. In such cases, please contact
the manufacturer.
Page 4

4
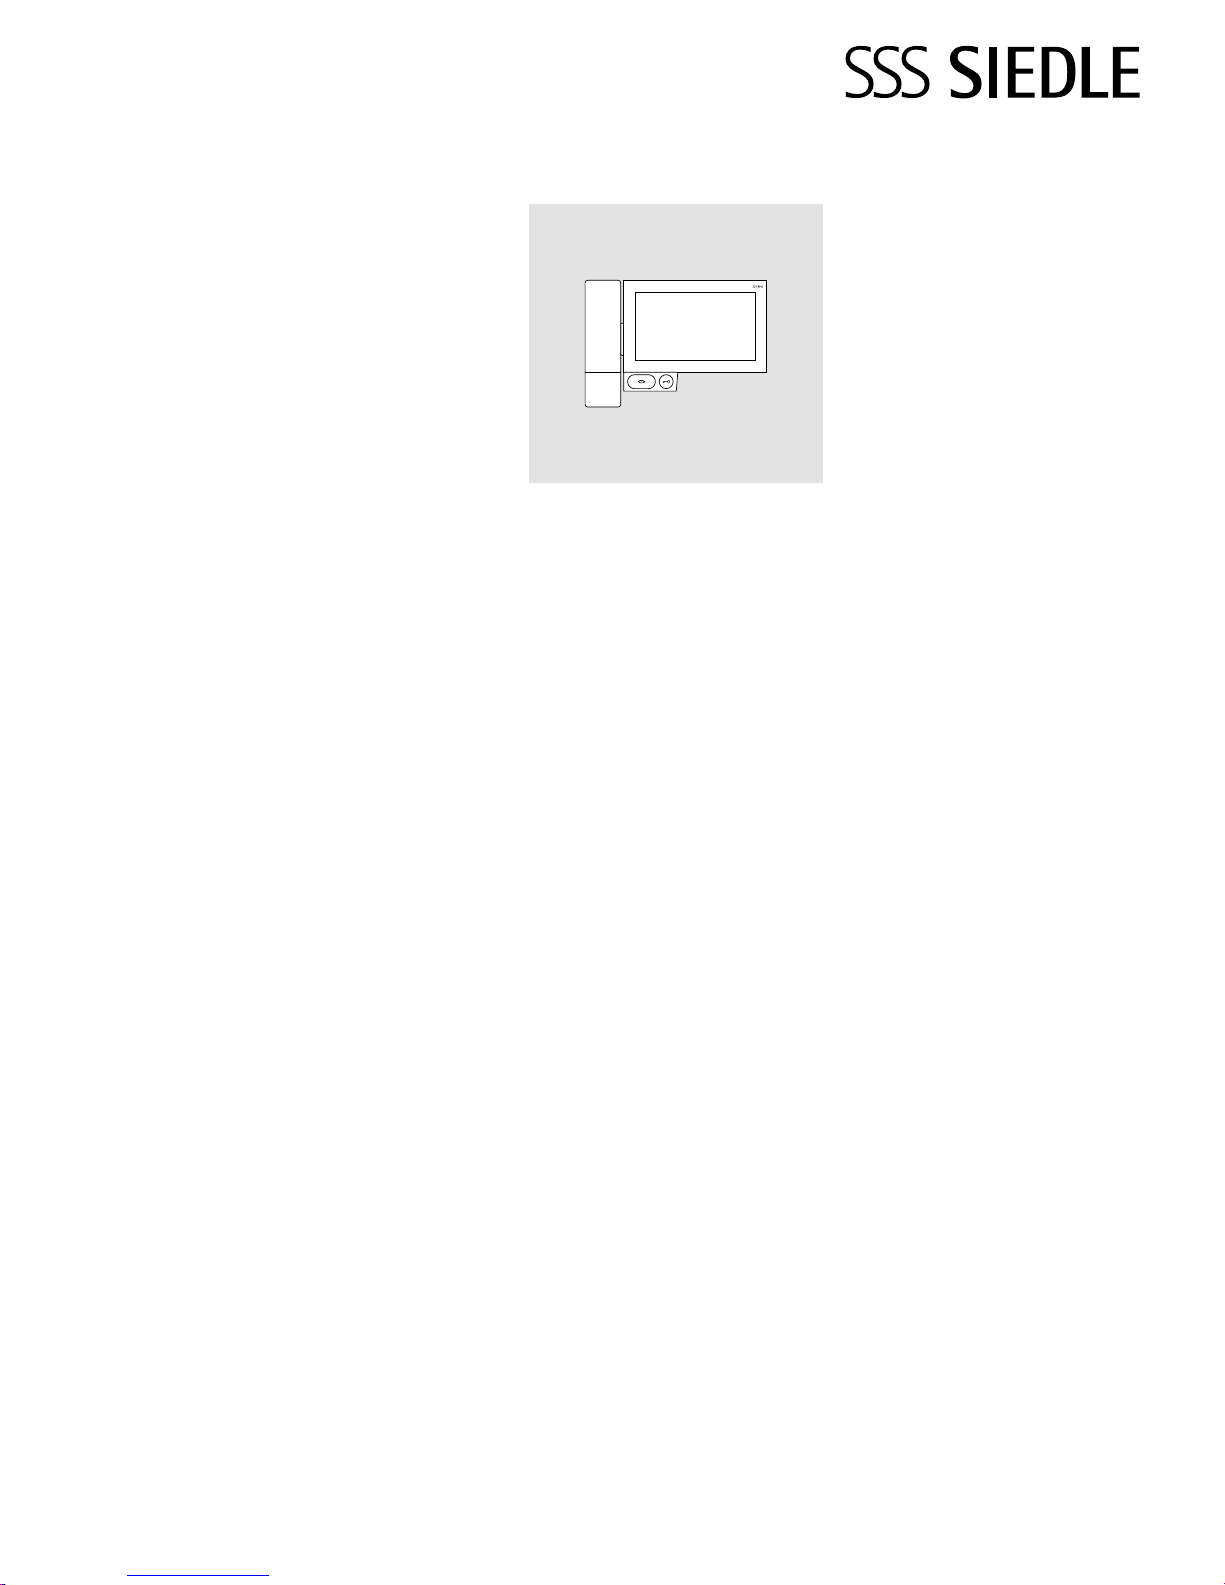
Siedle Axiom with 17.8cm touchscreen made of high-quality plastic.
The panel is a system product with
low-prole housing for wall and
table-top mounting. It provides
ergonomically designed intuitive
user prompting. Siedle Axiom can
be used in the In-Home bus system
(together with a Smart Gateway).
Intended application
The panel is part of a door communication system and may only be
used exclusively within this system.
Siedle does not accept any liability
for damage caused as a result of
using the equipment for any other
than its intended purpose.
Operating remarks
In order to avoid damage to the
panel, please note the following:
The touchscreen and the buttons
can be damaged by using sharpedged or pointed objects such as
ballpoint pens or keys.
Only ever use your nger to operate
the panel.
When restarting the panel or the
server, the panel is restarted step by
step. Depending on the system size,
a complete restart can take several
minutes. The panel is not ready for
operation until the start screen is
continuously displayed.
Care instructions
Dry, aggressive cleaning agents and
abrasive detergents can damage the
surface!
Only ever clean your indoor device
using a soft damp cloth.
Please ensure that no moisture ever
penetrates the housing.
Legal notice
Photographs of individuals taken
without their knowledge may not be
published or stored in publicly accessible video memory facilities.
Individuals who have been photographed without their knowledge
are entitled to request that pictures
be deleted based on the right of
persons to their own likeness. Never
store pictures of persons you do
not know in social networks or
send them by email to others/public
groups. This will infringe their personal rights.
If stored images are used as part of
private / criminal law proceedings or
in a police investigation, this requires
prior clarication with a lawyer or
the responsible police authority.
Application
Page 5

5
Scope of supply A 180-21
(Table-top version with receiver)
• Siedle Axiom
• DECT™ receiver
• Tray with connector
• 8-pole connecting cables, 3m long
with RJ45 plug
• Operating instructions for the end
customer
• Product information
Scope of supply A 180-30
(Furniture version without receiver)
• Siedle Axiom
• Furniture adapter
• 8-pole connecting cables, 3m long
with RJ45 plug
• Operating instructions for the end
customer
• Product information
Scope of supply A 180-31
(Furniture version with receiver)
• Siedle Axiom
• DECT™ receiver
• Furniture adapter
• 8-pole connecting cables, 3m long
with RJ45 plug
• Operating instructions for the end
customer
• Product information
Video memory
Pictures are stored centrally on the
Smart Gateway. There are currently
no plans to allow pictures to be
stored on SD card.
Similar to photographs, saved
images are subject to copyright.
Update
The Siedle Axiom software is automatically updated during the Smart
Gateway update.
Servicing
Statutory warranty conditions apply.
If the device requires servicing,
contact your specialist dealer or electrical installer.
General information
Functional scope
With the functions calling, speech,
vision, door release, telephone, light.
Performance features:
• Adjustment of the graphics on the
display for individual operation
• 17.8cm (7") touchscreen, resolution 1024x600 Pixel
• Brilliant image reproduction
• Excellent audio quality
• Call differentiation between door
calls, storey calls, and other calls
• Switching functions
• Video memory function
• Can be updated via Smart
Gateway
Commissioning requirements
• The device must be powered
via PoE (Power over Ethernet;
IEEE802.3af or 802.3at).
Scope of supply A 180-10
(Wall version without receiver)
• Siedle Axiom
• Wall mounting plate
• RJ45 socket
• Operating instructions for the end
customer
• Product information
Scope of supply A 180-11
(Wall version with receiver)
• Siedle Axiom
• DECT™ receiver
• Wall mounting plate
• RJ45 socket
• Operating instructions for the end
customer
• Product information
Scope of supply A 180-20
(Table-top version without receiver)
• Siedle Axiom
• Tray with connector
• 8-pole connecting cables, 3m long
with RJ45 plug
• Operating instructions for the end
customer
• Product information
Page 6
6
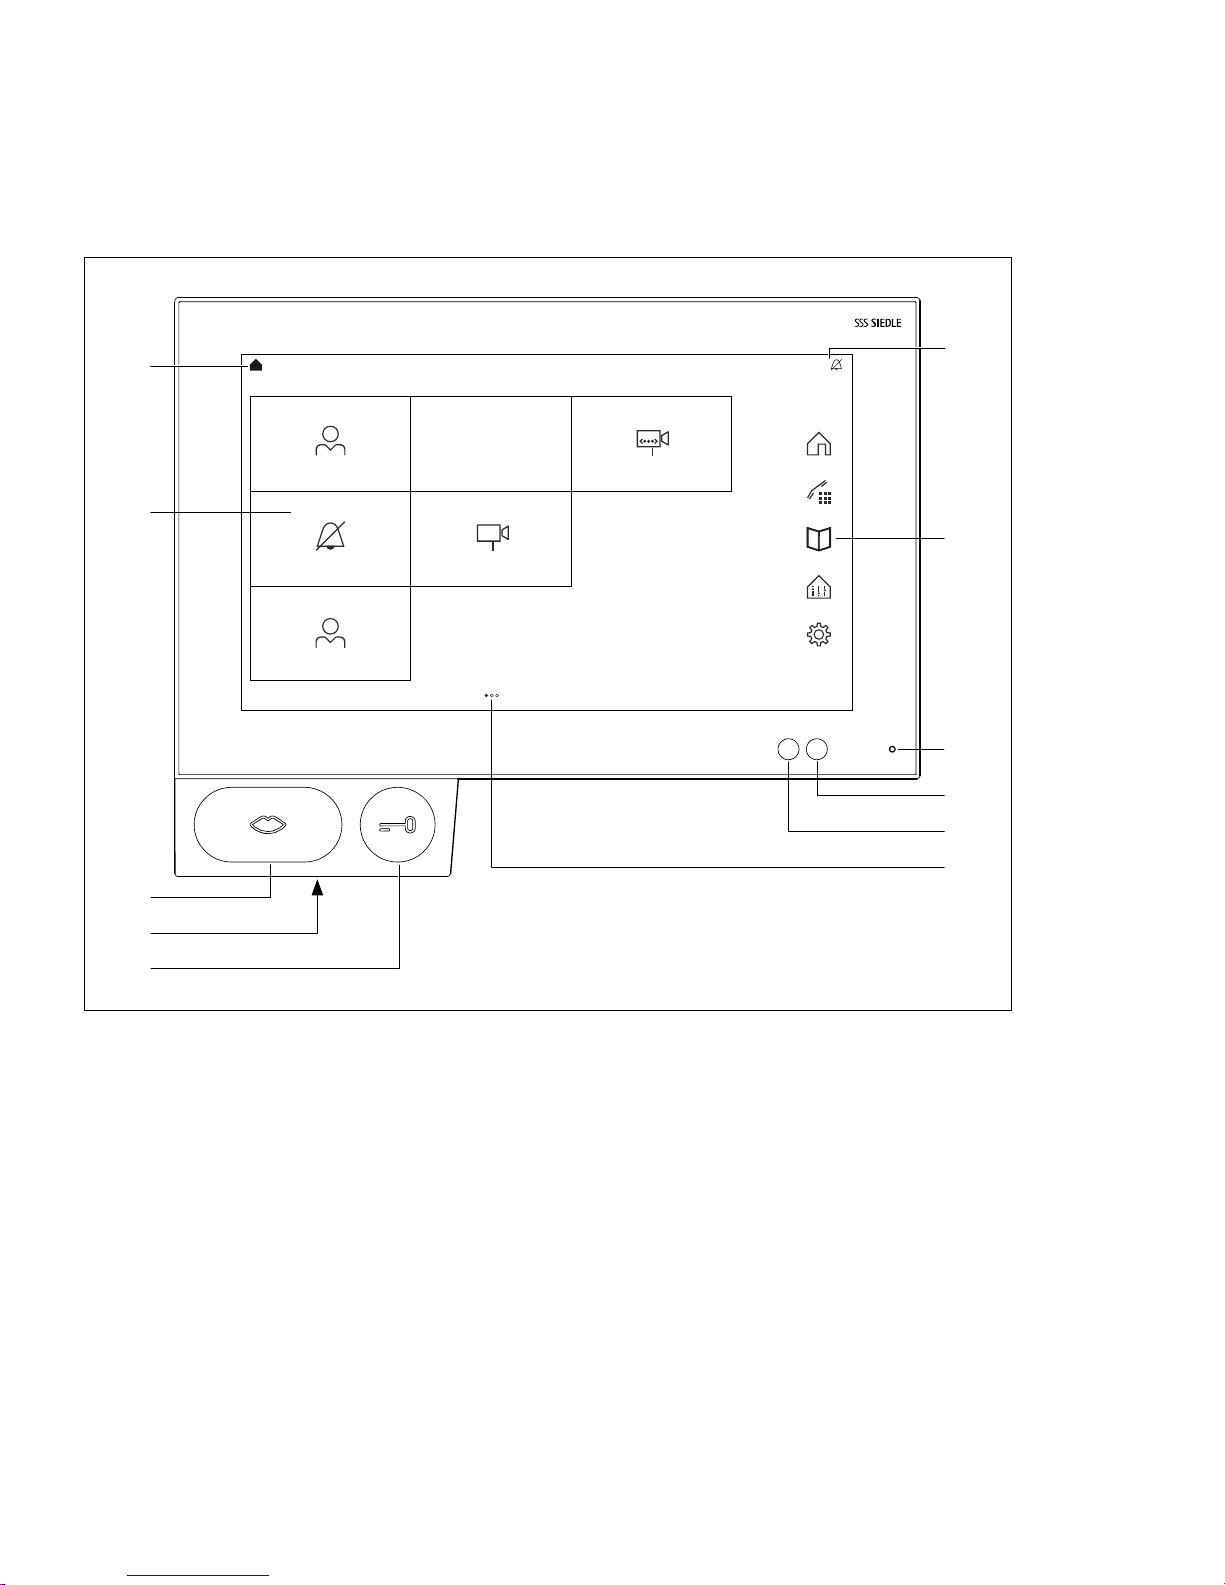
1 Display of the start menu, time
and date (standard conguration)
2 Display with touch function
(touchscreen)
3 Speech button with LED display
4 Loudspeaker
5 Door release button
6 Number of pages and displayed
page
7 Brightness sensor
8 Proximity sensor
9 Microphone
10 Navigation bar
11 Status bar
Siedle Axiom is characterised by
its generously dimensioned touchscreen. Two buttons are assigned to
the basic functions speech and door
release. Other functions are actuated
at the display.
Clear symbols, intuitive operation:
The most important button is also
the biggest. The unmistakable
mouth symbol clearly indicates what
the button is for: accepting calls.
The ring tone is accompanied by a
ashing mouth which guides the
hand of the operator. If the call is
accepted, the mouth lights up continuously.
Product overview
Touchscreen
Max Maier
Ring tone on/off
Eva Köhler
Door light Driveway
Private
Work
12:17 | Wednesday, February 7, 2018
Front door
2
3
4
7
6
8
9
10
11
1
5
U
\
Page 7

7
Max Maier
Touchscreen – Operation
Accessing menus
Tap on the required symbol.
Accessing functions
Tap on the required tile.
Moving tiles
1 Using any nger, touch the tile you
wish to move on the start screen.
After two seconds the tile will begin
to wobble and the delete symbol
appears in the top left corner of
the tile.
2 Drag the tile using your nger to a
free space on the start screen.
12:17 | Wednesday, February 7, 2018
12:17 | Wednesday, February 7, 2018
Private
Door light Driveway
12:17 | Wednesday, February 7, 2018
Private
Paul
Dr. Christine Förster
Work
Done More
Dr. Silke Köster
Arbeit
Dr. Silke Köster
Arbeit
U
w
w
Page 8

8
Changing pages – Start screen
The screen display comprises several
pages which can be changed by
swiping.
1 Use any optional nger to swipe
the start screen horizontally using
the touchscreen to change pages. If
you are on the rst or last page, the
swipe movement will only work back
in the opposite direction.
The number of existing pages is indicated by dot for each. The dots are
located in the centre of the lower
part of the touchscreen. The dot for
the current page is highlighted from
the others in colour.
Deleting tiles
1 Touch any tile. After two seconds
all the tiles will begin to wobble. The
delete symbol appears in the top left
corner of the tile.
2 Ta p the delete symbol on the tile
that you want to delete.
The following apps cannot be
deleted: Telephone, Contacts,
Threshold and Settings.
Touchscreen – Operation
Paul
Private
12:17 | Wednesday, February 7, 2018
Dr. Christine Förster
Work
Alwin Lehmann Car park
Private
Ulrike Meier
Arbeit
Esther Schubert
Arbeit
12:17 | Wednesday, February 7, 2018
Done More
Dr. Silke Köster
Arbeit
Dr. Silke Köster
Arbeit
w
w
U
Page 9

9
Magnifying glass
The magnifying glass allows you to
enlarge any area of the screen.
1 Briey double-tap a blank area of
the display.
2 A frame appears above a circle.
Text and icons within the frame are
enlarged.
3 Touch and move the circle to move
the frame over the area that you
want to enlarge.
4 Double-tap again on a blank area
of the display to deactivate the magnifying glass.
Important
The magnifying glass function must
rst be activated under Settings:
Settings > Display > Magnifying
glass > Magnifying glass function on
12:17 | Wednesday, February 7, 2018
Door light
U
Page 10

10
Speech button
Accepting a call Press the speech button in order to accept the call.
Status displays Optical ringtone signal
If there is an incoming call, the mouth symbol on the speech button ashes
yellow. During an active call, the speech button lights up steady yellow.
Muting: During muting, the mouth symbol on the speech button lights up steady
red.
Ending a call During an active call, the speech button lights up.
Press the speech button in order to terminate the call.
Door release button Press the door release button.
The door release is actuated for 3 seconds.
Using the door release button, you can also always actuate the door release
from the door from which the last door call came without the need for a
preceding call. (However, this only applies if the last call was a door call.)
Sensors The proximity sensor activates the display automatically when you approach
the panel.
Control the sensitivity of the proximity sensor: Settings > Display > Proximity
sensor
The brightness sensor adjusts the brightness of the display to the ambient
light.
The brightness can also be set manually. To do so, you need to switch the
brightness sensor off:
Settings > Display > Brightness > Brightness sensor
The brightness sensor is switched off in the standard settings.
Buttons / Sensors
Page 11

11
Earpiece volume
The receiver connection is wireless
and takes place via DECT™.
Earpiece volume
1 Loudspeaker 1
2 Positioning pins
3 Charging contacts
4 Speech button
5 Door release button
6 Microphone
7 Button for on/off and reset
8 Loudspeaker sound exit 2
9 Battery status indicator
10 Range status indicator
Status displays
There are several status indicators on
the receiver. They are integrated in
the speech button and on the side
of the receiver. When the receiver
is on the receiver cradle, all status
indicators are disabled.
Call status
If there is an incoming call, the
mouth symbol on the speech button
ashes yellow. During an active call,
the speech button lights up steady
yellow.
Muting status
During muting, the mouth symbol
on the speech button lights up
steady red.
Battery status
The status indicator for the battery
(9) ashes red if the charging state
of the battery falls below 20%.
Range status
In the case of a weak signal or no
signal, the status indicator for the
range lights up red.
Button for on/off and reset
The receiver switches off or on if the
button (7) is held down for approx.
ve seconds.
Once it has been switched on, the
two status indicators (9, 10) ash
briey.
While it is switched off, the two
status indicators light up.
To start a reset for the receiver, the
button must be held down for more
than 10seconds when switching
it on.
Receiver base
The receiver is secured to the
receiver base by means of magnets.
The receiver cradle serves as the
charging station for the receiver. It is
a DECT™ base station and the interface between the panel and receiver.
Charging the battery
The receiver battery charges automatically when the receiver is placed
in the cradle.
Log the receiver in to the panel
(pairing)
1 When switching it on, hold the
button (7) down for approx. 10seconds until the lower status display
(10) starts to ash.
2 Tap the Settings symbol
3 Tap Receiver > Login > Log in.
Logging the receiver out of the
panel
1 Tap the Settings symbol
2 Tap Receiver > Login > Log out.
3
4
5
6
7
8
9
1
2
10
Page 12

12
Overview of symbols
A
Start / Home
B
Threshold
l
Door
O
Contacts
P
New contact
J
Contact
E
Internal contact
H
Group
T
Favourite(s)
W
Cameras / Door station
X
IP camera
U
Light
s
Video memory
V
Snapshot
y
App
Q
Settings
b
Ring tone off
+
Back
%
Next
]
Audio
)
Volume –
]
Volume +
—
Volume control
[
Brightness –
}
Brightness +
{
Brightness ++
h
Search
\
The receiver battery is being
charged
C
KNX
6
Telephone
8
Quit
.
Hold
,
Calls list
Call received
Call made
;
Audio privacy
z
Handsfree
c
Microphone off
_
Numeric eld
∑
Delete image
|
Deleting an entry
Calling/Speech
End call
,
,
Page 13

13
Status displays
Status bar
Ringtone Off The symbol indicates that the acoustic signalling of door calls and telephone
calls has been silenced.
The receiver battery is
being charged
The symbol shows that the receiver has been correctly placed on the cradle
and its battery is being charged.
b
\
Page 14

14
Login and basic settings
When the panel is switched on for
the rst time, the basic settings for
the login must be entered.:
• Language
• Server address
• User name
• Password
Language
Select the language for the display
screens by tapping the relevant
radio button behind the required
language.
After selecting the language, the
view automatically switches to further basic settings.
Server
Enter the server address that is to
be used for panel operation in the
logon screen.
The address can be entered directly
or determined via the server nder.
1 The server nder is automatically
activated after tapping the arrow
behind the address eld.
2 All the available servers in the network are shown in the server nder.
3 Select the server and tap Save.
Log in
1 Enter the username and password
that were previously created on the
server.
2 Tap logon.
Log out
When logging out, you can either
delete the entered access data from
the logon screen or keep it for when
you log on again.
1 Tap the Settings symbol.
2 Tap on the Logout option.
3 Ta p on the Logout button.
4 Tap delete or save, as you wish.
5 The panel is now logged out of
the server.
Showing apps
Apps can be optionally shown as
tiles or as symbols in the navigation
bar.
1 Touch any tile. After two seconds
all the tiles will begin to wobble.
2 Tap on the More button.
3 Tap on the tab with the symbol for
the apps.
4 In the list of apps, select whether
the relevant app should be shown as
a tile or in the navigation bar.
Showing functions
Functions can be shown as tiles.
1 Touch any tile. After two seconds
all the tiles will begin to wobble.
2 Tap on the More button.
3 Tap on the tab with the symbol for
the functions.
4 In the list of functions, select
whether the relevant function should
be shown as a tile.
Showing favourites
Favourites can be shown as tiles.
1 Touch any tile. After two seconds
all the tiles will begin to wobble.
2 Tap on the More button.
3 Tap on the tab with the symbol for
the favourites.
4 In the list of favourites, select
whether the relevant favourite
should be shown as a tile.
Creating contacts
1 Tap the Contacts symbol.
2 Tap the New contact symbol.
3 Enter the relevant data.
4 Ta p Save.
Edit contacts
1 Tap the Contacts symbol.
2 Select the contact that you want
to edit from the list of contacts.
3 Tap Edit contact.
Now you can adjust, change or
delete the entered data as you
desire.
Internal contacts can only be processed via the administration interface of the Smart Gateway.
Storing contacts as favourites
1 Tap the Contacts symbol.
2 Select the contact that you want
to edit from the list of contacts.
3 Select the required number as
a favourite by tapping the symbol
behind it.
Page 15

15
Important functions
Telephone The Telephone symbol takes you directly to the dial buttons.
Here you have direct access to the call list and favourites.
Contacts Under Contacts you will nd the phone book with all stored contacts. Here
you can search for, call up and edit contacts.
Threshold The Threshold symbol gives you access to the cameras in the entrance area.
Call up camera image You can call up the camera image for a camera by tapping the relevant
camera.
Snapshot Tap the Snapshot symbol to store a snapshot in the video memory.
Video memory The Video memory symbol takes you to the folder with all stored snapshots
and the recordings of the received door calls.
6
O
B
s
Supplementary functions
IP cameras You can add up to 20IP cameras and edit their conguration data under
Settings > IP cameras. The available live stream from the IP cameras is shown
on the display.
KNX The KNX icon takes you to the KNX visualisation. The connection to a KNX
visualisation server is congured via the administration interface of the
Smart Gateway. The KNX icon only appears on the display if a connection
has already been established with a KNX visualisation server in the Smart
Gateway.
X
C
V
W
Page 16

16
Telephony
Call with number entry
1 Tap the Telephone symbol.
2 The numeric eld is displayed.
3 Enter the relevant number.
4 Press the mouth symbol.
5 The call is initiated.
Calling a call number from the
contact list
1 Tap the Contacts symbol.
2 Select the relevant contact.
3 Tap on the relevant number or
press the speech button.
4 The call is initiated.
Calling a call number from the
call list
The call list shows all dialled and
received calls.
Missed calls are shown in red.
1 Tap the Call list symbol.
2 Select the relevant contact.
3 Tap on the relevant number or
press the speech button.
4 The call is initiated.
5 If the receiver setting “Automatic
call acceptance” is activated, the call
is also activated when the receiver is
picked up.
Calling a call number from the
favourites list
1 Tap the Favourite(s) symbol.
2 Select the relevant contact.
3 Tap on the relevant number or
press the speech button.
4 The call is initiated.
5 If the receiver setting “Automatic
call acceptance” is activated, the call
is also activated when the receiver is
picked up.
Rejecting a call
A call can be rejected by tapping the
red mouth symbol.
Putting a call on hold
Hold is required for consultation
hold and brokering. One of the users
is placed on hold. In the meantime,
the other user can speak to a third
party. As soon as they have ended
this call, they return to the previous
call.
1 Tap the Hold symbol during an
active call.
2 To resume the call, tap the symbol
again.
Microphone muting during the
call
1 Tap the Microphone off symbol.
2 If you want the call partner to
be able to hear you again, tap the
symbol once more.
6
O
,
T
Telephone
Contacts
Calls list
Favourite(s)
Page 17

17
Settings
Settings
Audio
Tones/signals Selection of ring tones
Panel volume • Ringtone volume
• Phone volume
Earpiece volume • Ringtone volume
• Phone volume
Ring tone on/off Ring tone on/off
Device acoustics • Table-top device
• Wall mounting
Display
User interface Bright or dark design
Tile design With or without background
Text size • Standard
• Big
Magnifying glass Activate magnifying glass function
Display
Brightness • Switch the brightness sensor on
or off
• Set the brightness manually
Proximity sensor • Switch the proximity sensor on
or off
• Set the sensitivity
Idle status Display switches to energy-saving
mode after the set time
Cleaning the display Temporarily deactivate the touch
function
Earpiece volume
Register receiver Register and deregister receiver
Automatic call pick-up Switch call acceptance when picking
up the receiver on and off
Paging call Initiate paging call to determine the
current position of the receiver
IP camera
Edit IP camera Edit conguration data
Add IP camera Enter conguration data
Log out
Log out Log out with or without saving the
access data for login
Language
Select display language
System
Reset Reset to default settings
Restarting Restart the device
Device information Device and system information
Licence information Detailed licence information on the
product.
Q
Page 18

18
General information
Disposal
All electrical and electronic devices
must be disposed of separately from
the general house waste at the
specially provided municipal waste
facility.
Responsible disposal and separate
collection of end-of-life devices help
to prevent potential environmental
and health hazards, and form the
basis for the recycling of used electrical and electronic devices.
If a product bears the symbol of a
waste bin with a line through it,
then it falls under the regulations of
European Directive 2012/19/EU.
Remarks
Before disposing of the cordless
handset, remove the battery.
Direct contact of the battery with
other metal objects can result in re
and explosions. Cover over contacts
using adhesive strips or other insulating material before disposal.
When disposing of your end-of-life
devices and batteries, please observe
the local waste disposal regulations.
Details can be obtained from your
local authority, waste disposal service or the specialist dealer from
which you purchased the product.
Page 19

19
Page 20

S. Siedle & Söhne
Telefon- und Telegrafenwerke OHG
Postfach 1155
78113 Furtwangen
Bregstraße 1
78120 Furtwangen
Telefon +49 7723 63-0
Telefax +49 7723 63-300
www.siedle.de
info@siedle.de
© 2018/03.18
Printed in Germany
Best. Nr. 210008054-00 EN
 Loading...