

SSSI Black4Neo, Black800Neo, Black1600Neo, DVR-Black4Neo, DVR-Black800Neo User Manual
...
0
Standalone DVR
USER’S MANUAL
DVR-Black4Neo
DVR-Black800Neo
DVR-Black1600Neo
Revision date : Oct 2006

1
•Contents
• Chapter 1. Specification & System organization
1. Product Contents List -------------------------------------------------------- 3
2. System Organization --------------------------------------------------------- 4
• Chapter 2. Product Description
1. DVR-1600Neo / 800Neo Front Panel--------------------------------------------- 5
2.
DVR-1600Neo / 800Neo Rear Panel ----------------------------------------------- 7
3. DVR-Black4Neo Front Panel-----------------------------------------------------8
4.
DVR-Black4Neo Rear Panel ---------------------------------------------------- 9
5. Remote Controller -------------------------------------------------------- 10
•Chapter 3. Display
1. System Power ON ---------------------------------------------------------- 11
2. Screen View Selection ------------------------------------------------------ 12
3.Display Mode ---
--------------------------------------------- 12
4. PTZ/FOCUS Control -------------------------------------------------------- 13
5. System Power OFF --------------------------------------------------------- 13
•Charpter4. Search
⊙ Go to Search Mode --------------------------------------------------------- 14
1. Search by Date/Time ------------------------------------------------------- 14
2. Search by Event ----------------------------------------------------------- 15

2
• INDEX
•Chapter 5. SETUP
⊙ Go to Menu -------------------------------------------------------------- 16
⊙ Go to System Setup -------------------------------------------------------- 16
1. Display ------------------------------------------------------------------ 17
2. Camera ----------------------------------------------------------------- 21
3. Sound ------------------------------------------------------------------ 22
4. System ------------------------------------------------------------------ 25
5. Event/Sensor ------------------------------------------------------------- 30
6. Disk Management ---------------------------------------------------------- 31
⊙ Go to Record Menu -------------------------------------------------------- 34
1. Recording Operation -------------------------------------------------------- 34
2.Timer/motion setup ---------------------------------------------- 35
3. Alarm Record Schedule ----------------------------------------------------- 34
4. Panic setup ------------------------------------------------------- 37
⊙ Go to Archiving ----------------------------------------------------------- 38
1. CD-RW and USB Back up --------------------------------------------------- 38
3
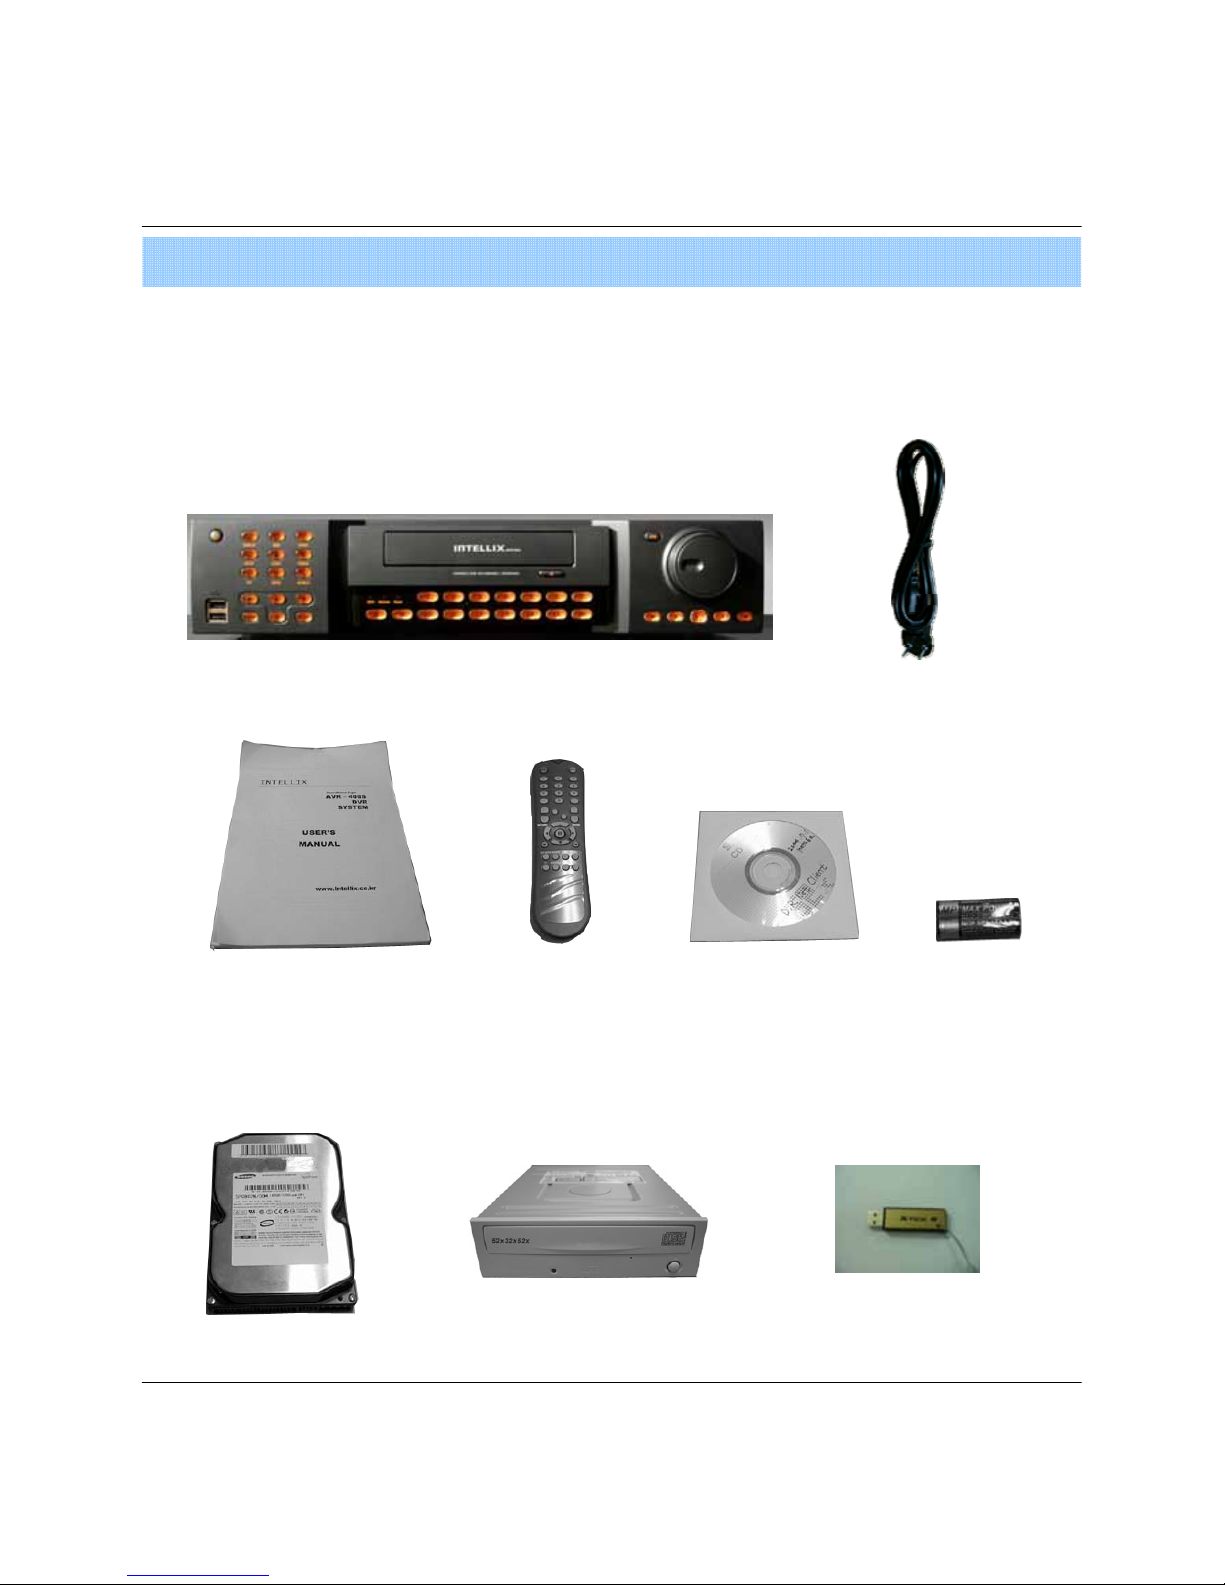
1. Product contents List
Please Confirm the Contents When open Package.
①Basic Contents
Remote Controller
User’s Manual
Remote Client
Program Install CD
AAA Battery X 2
Power Cable
② Option Contents
HDD
CD-RW USB Memory
1. Specification & Organization
4
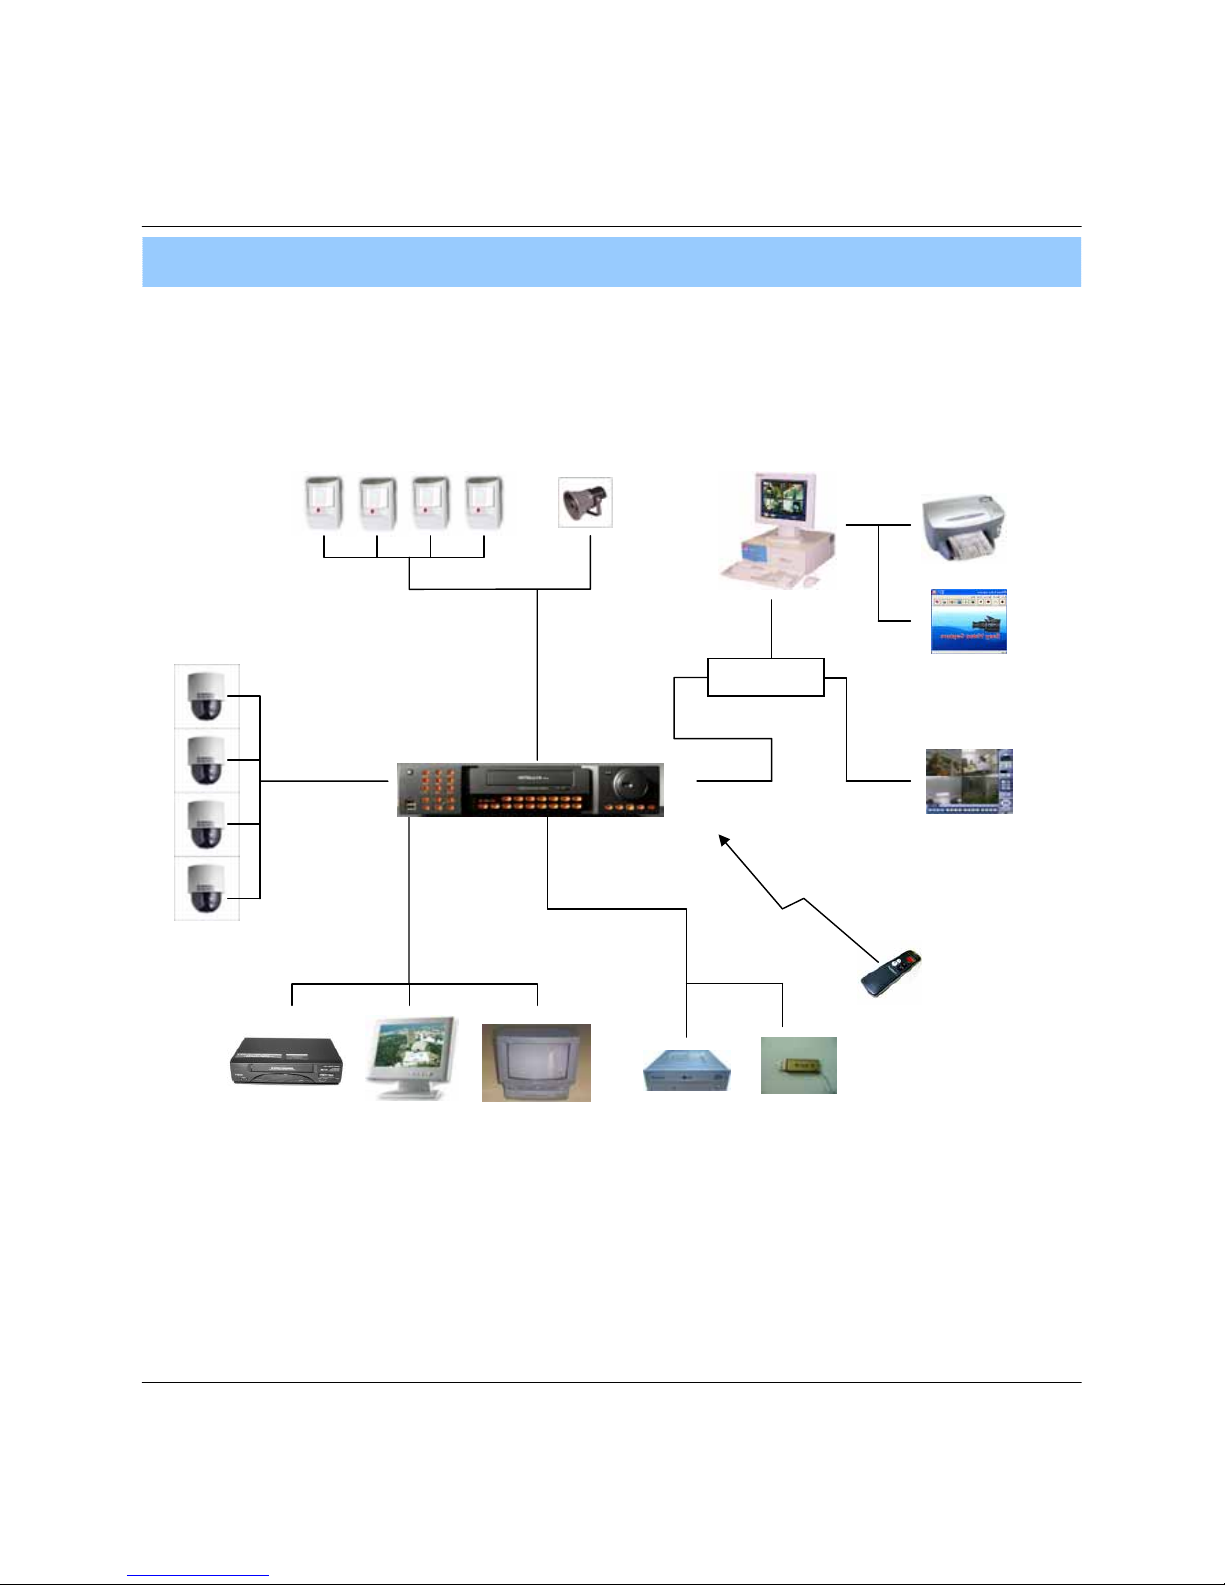
2. System Organization
NETWORK
Camera #1-8(16)
Alarm Sensor #1-8(16) Relay Out
VCR
VGA
Monitor
AV Monitor
Remote Client PC Image Printer
Video In
Video Out
TCP/IP
Alarm Input/Out
Remote
Controller
CD-RW
(It is not supported on DVR-Black4Neo)
Backup
AVI Backup
WEB Client
USB
1. Specification & Organization

5
2. Description (DVR-Black800Neo/1600Neo)
• Channel Selection Button is Prior to DISPLAY.
• When Remote Controller Sensor Input is Blocked by Something, it Cause 1
Remote Controller do NOT Work Properly.
• When Press any Button, it Operate with Beep Sound.
Tip
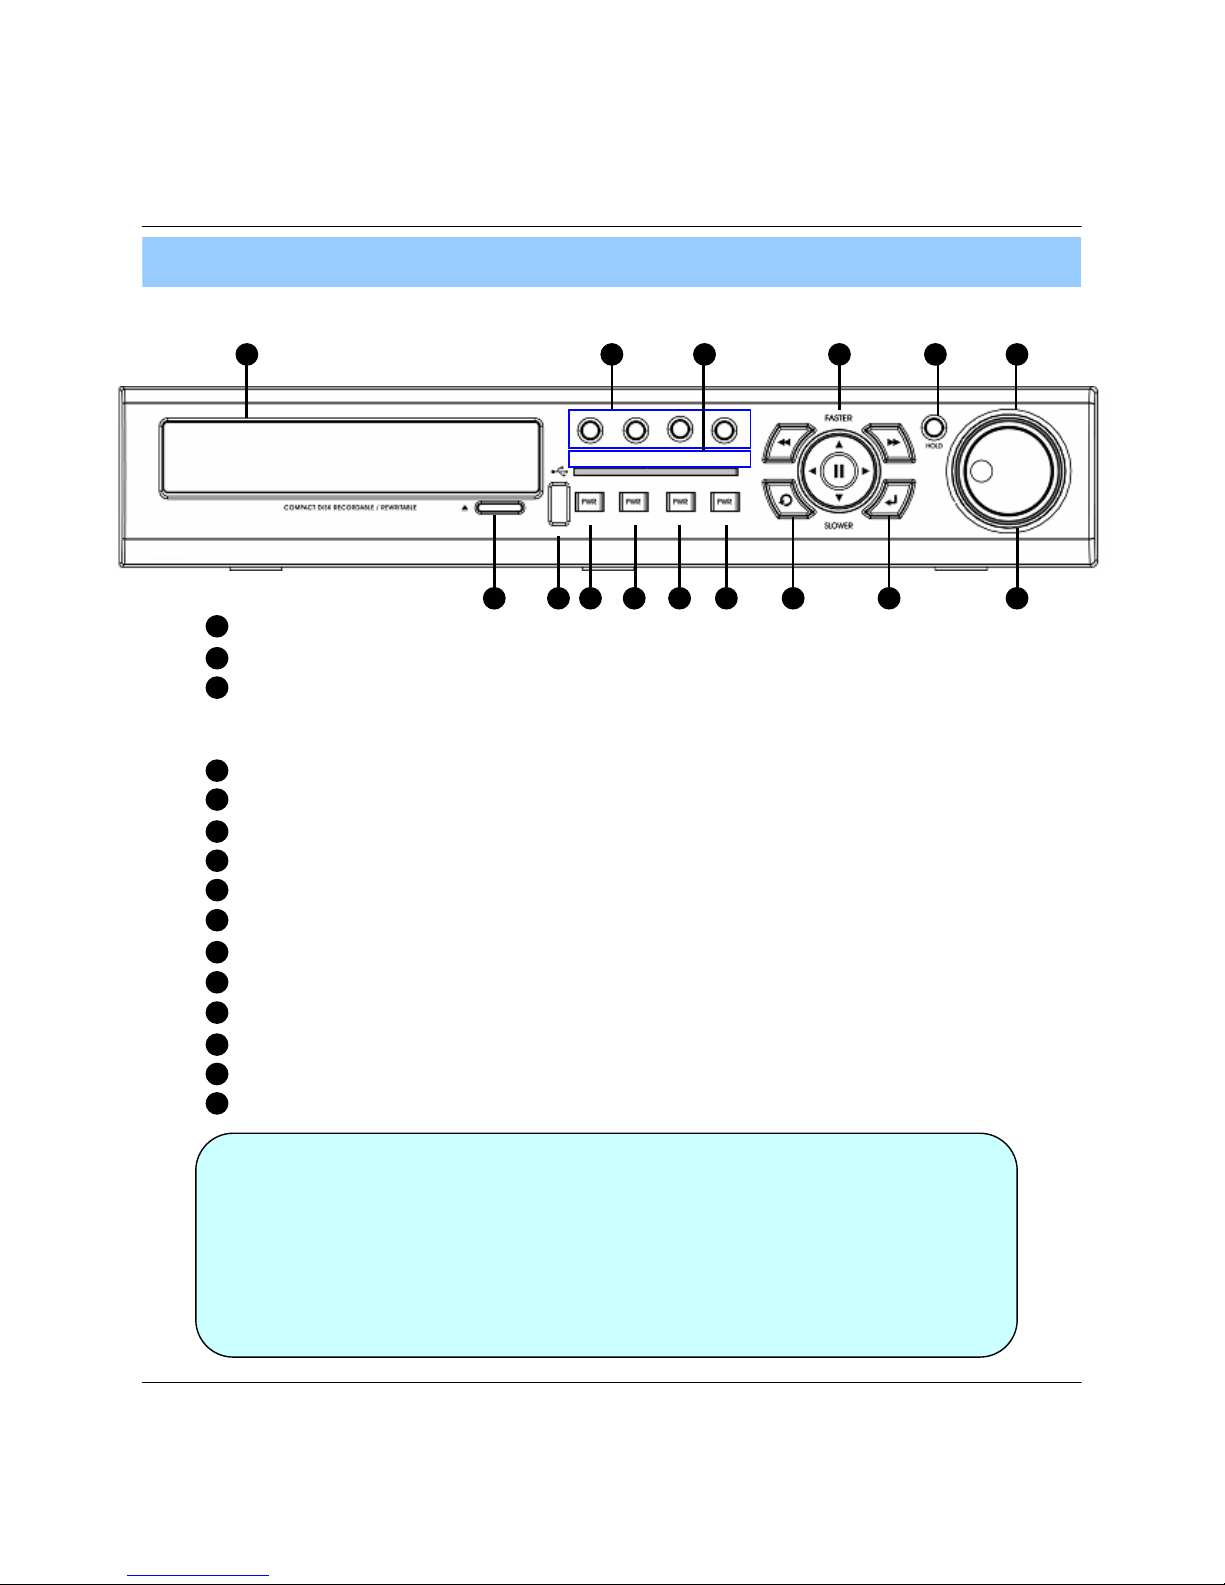
1. Front Panel
1
2
3
4
11
12
9
8
765
10
POWER : System Power On/Off
SHORTCUT : Shortcut button for convenience.
CD/DVD RW : Back up image to CD/DVD RW
HOLD : Hold Current Jog/Shuttle position
RETURN : Cancel/Deselect/Return to previous screen
Direction / Navigation Button : UP/DOWN/LEFT/RIGHT
ENTER : Confirm/ Select next screen
CHANNEL Select button : Select Channel or Input Password.
FOCUS : Adjust Focus (Near/ Far) or Reverse Play /Rewind
PAUSE : Pause playback
IRIS : Adjust Iris (Open/Close) or Forward Play / Fast forward
Jog shuttle : Outer wheel – variable REW or FF : Inner wheel – scroll frame – by frame while paused
1
2
3
4
10
11
9
8
7
6
5
12
6
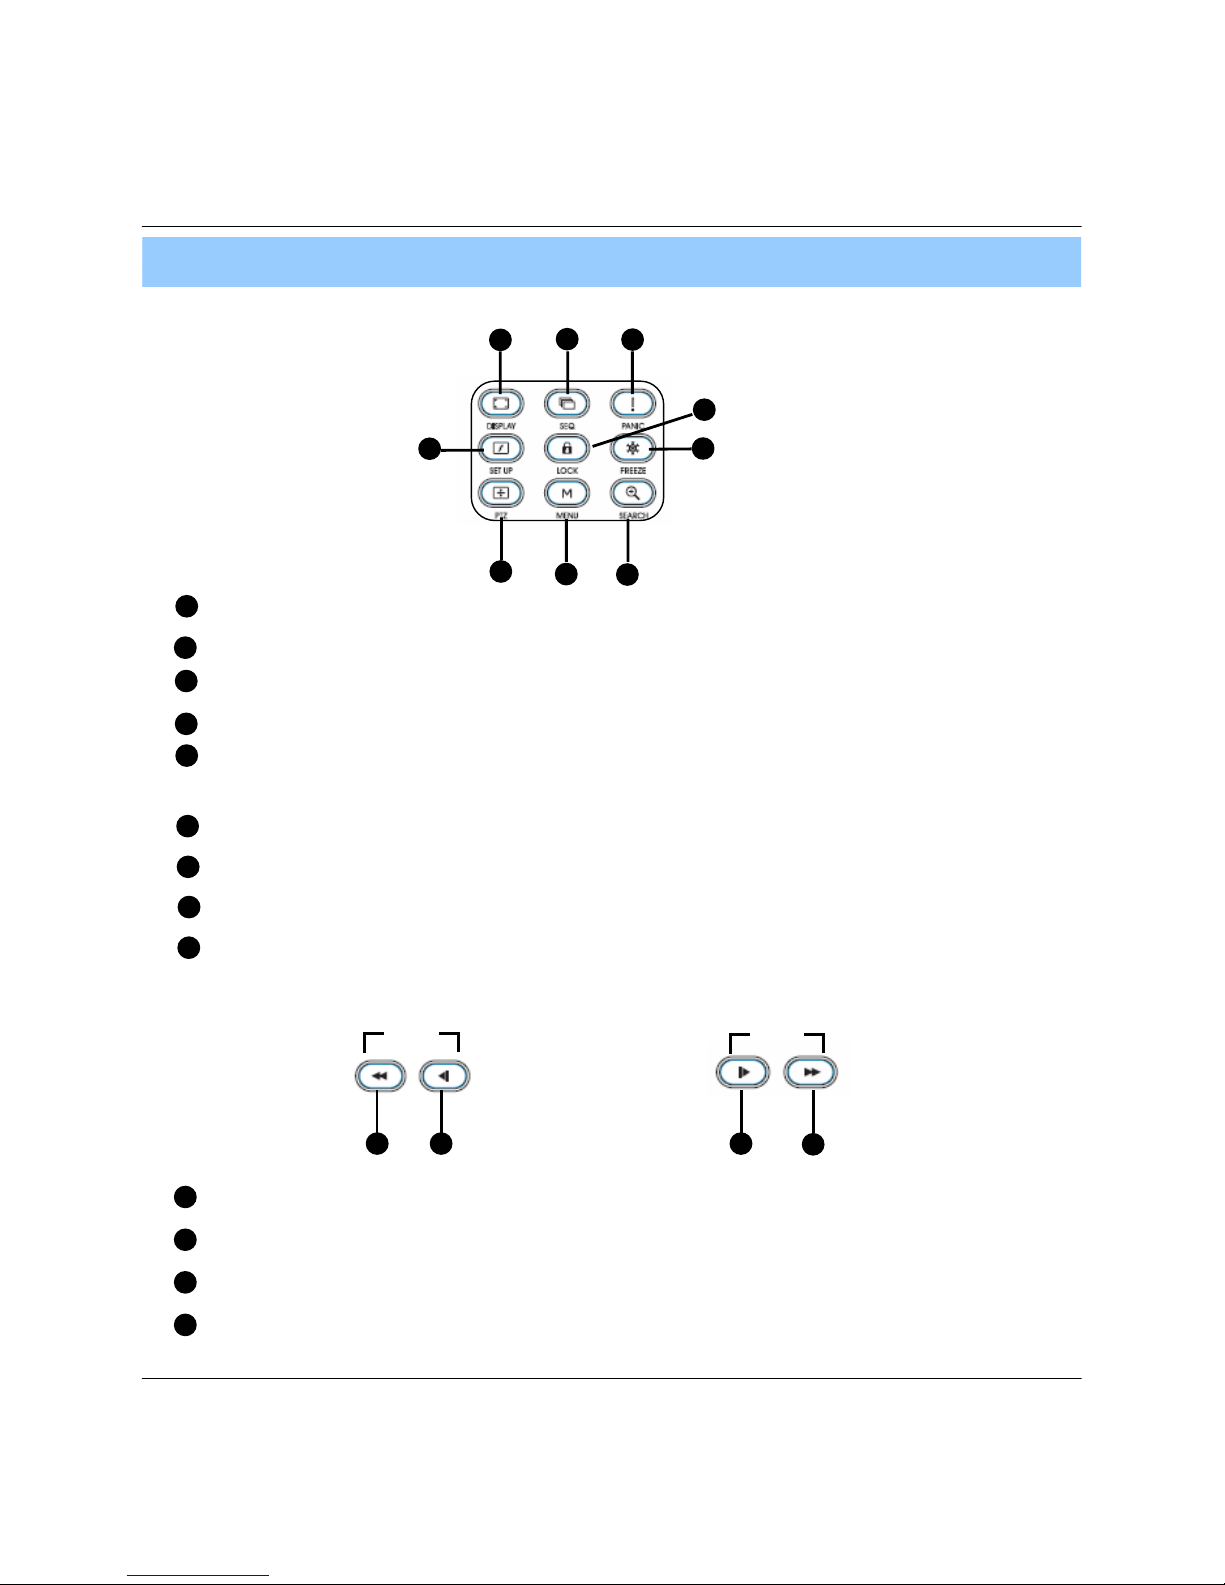
2. Description
* Shortcut button
1
2
3
4
9
8
7
6
5
DISPLAY : Select Screen Division Mode or Rotation Mode.
SEQ : Select sequence screen mode.
PANIC : Urgent Recording as setup.
ZOOM : Digital zoom on Live or Playback image
LOCK : Front Panel Lock Button (Default password: 1234)
When locked, “LOCK” is displayed on screen. Press lock button to unlock.
ARCHIVE : Go to archiving setup menu. (Default password : 1234)
PTZ : Go to Camera PTZ Control.
SETUP : Go to System Setup.
SEARCH : Go to Search Mode.
1
2
3
4
9
8
7
6
5
* FOCUS / IRIS button
FOCUS
IRIS
1 2 3
4
1
2
3
4
NEAR : Set camera focus (Near & Far) or Reverse Play/Rewind.
FAR : Set camera focus far.
CLOSE : Close camera iris.
OPEN : Open camera iris.
7
• Do not power on the unit all cable connections have been made.
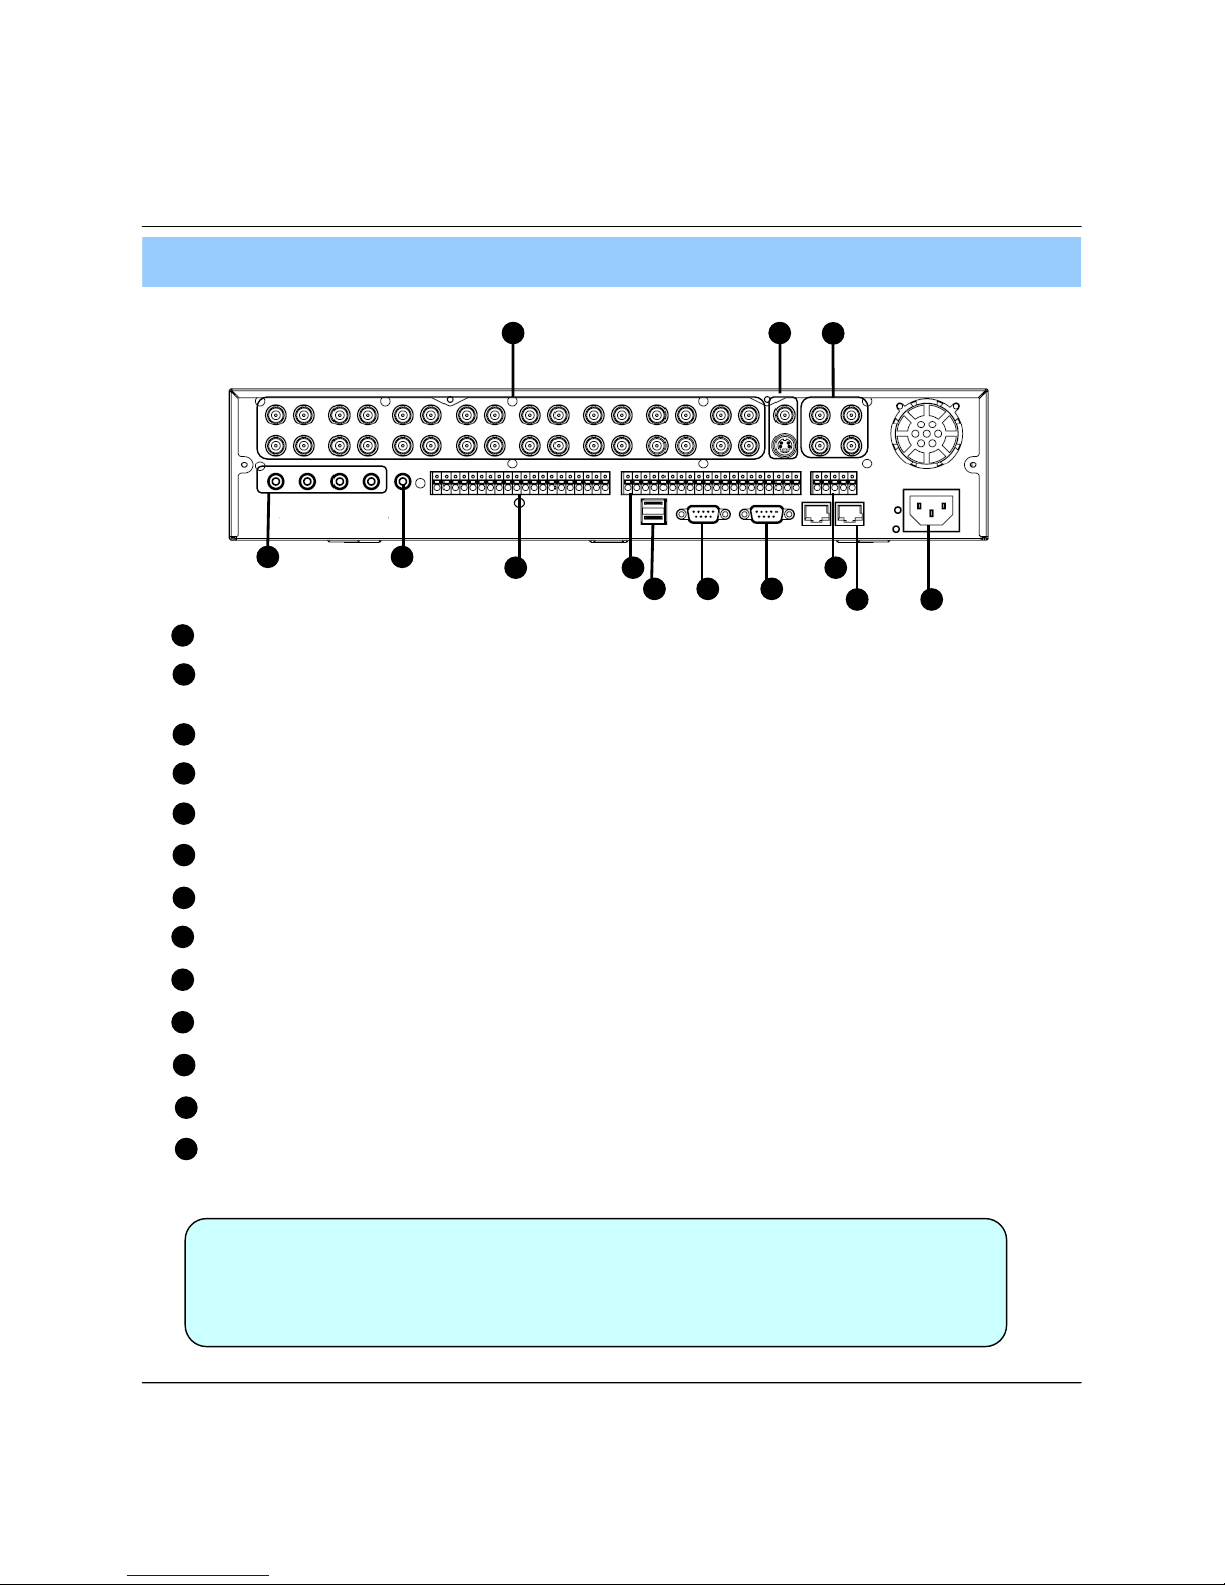
2. Rear Panel
2. Description
Tip
1
2
3
4
7
6
5
Video IN / Loop : BNC Video Input Port/ Loop Output (1-8/16)
11
12
9
8
10
13
Monitor out : BNC Main Monitor Output.
SVHS : S-Video Main Monitor Output.
Spot #1 ~ #4 : 4x BNC Output to individually – Sequenced Spot Monitors
Audio In : 4 x RCA Audio Line Input Terminal
Audio Out : RCA Audio Line Out Terminal
Alarm : 8/16 x Input TTL Alarm/Sensor Input Terminal
USB : USB port for use the USB memory stick and USB HDD Backup.
VGA OUT : VGA Main Monitor Output (to a computer Monitor)
RS-232C : Serial Configuration Port for Program Debugging.
RS-485 : Serial Interface for PTZ device connection and control
Ethernet (TCP/IP) : 10/ 100 Ethernet LAN/WAN connection (for Remote Access and configuration)
POWER : Power Cable connection.
Relay : 8/16 x Relay Output Terminal
12
98 10
13
1 2
3
4
76
5
11
8
1. Front Panel
• Power Button is Soft Style to Prevent System Failure by Wrong Operation.
• Channel Selection Button is Prior to SCR Mode.
• When Remote Controller Sensor Input is Blocked by Something, it Cause
1 Remote Controller do NOT Work Properly.
• When Press any Button, it Operate with Beep Sound.
• In Case of CD-RW, the Real Appearance will be Differ from the above Picture
1 Depends on its Model.
2. Description (DVR-Black4Neo)
Tip
1 2 3 4
7
65
11 1298 10 13 1415
CD-RW : CD-RW Device for Backup.
Channel Selection Button : Select Channel or Input Password.
Led Indicator : Indicate Present System Status Information.
( PWR: System On/Off, REC: Record On/Off,
ALARM: Alarm Sensor Detection Status, NET: Client Network Connection Status, )
Search Controller : Searching Recorded Data or Control Menu & PTZ/FOCUS.
HOLD : Hold Jog dial.
JOG dial
Eject : Eject CD
MENU : Go to System Menu.
SEARCH : Go to Search Mode for Searching Data.
SCR MODE : Select Screen Division Mode or Rotation Mode.
PTZ/FOCUS : Go to Camera PTZ/FOCUS Control.
RETURN : Cancel Setup or Return to Previous Mode.
ENTER : Apply Changing Setup.
Remote Controller Sensor Input.
USB Port: USB port for use the USB memory stick and USB HDD Backup
1
2
3
4
7
6
5
11
12
9
8
10
13
14
15
9
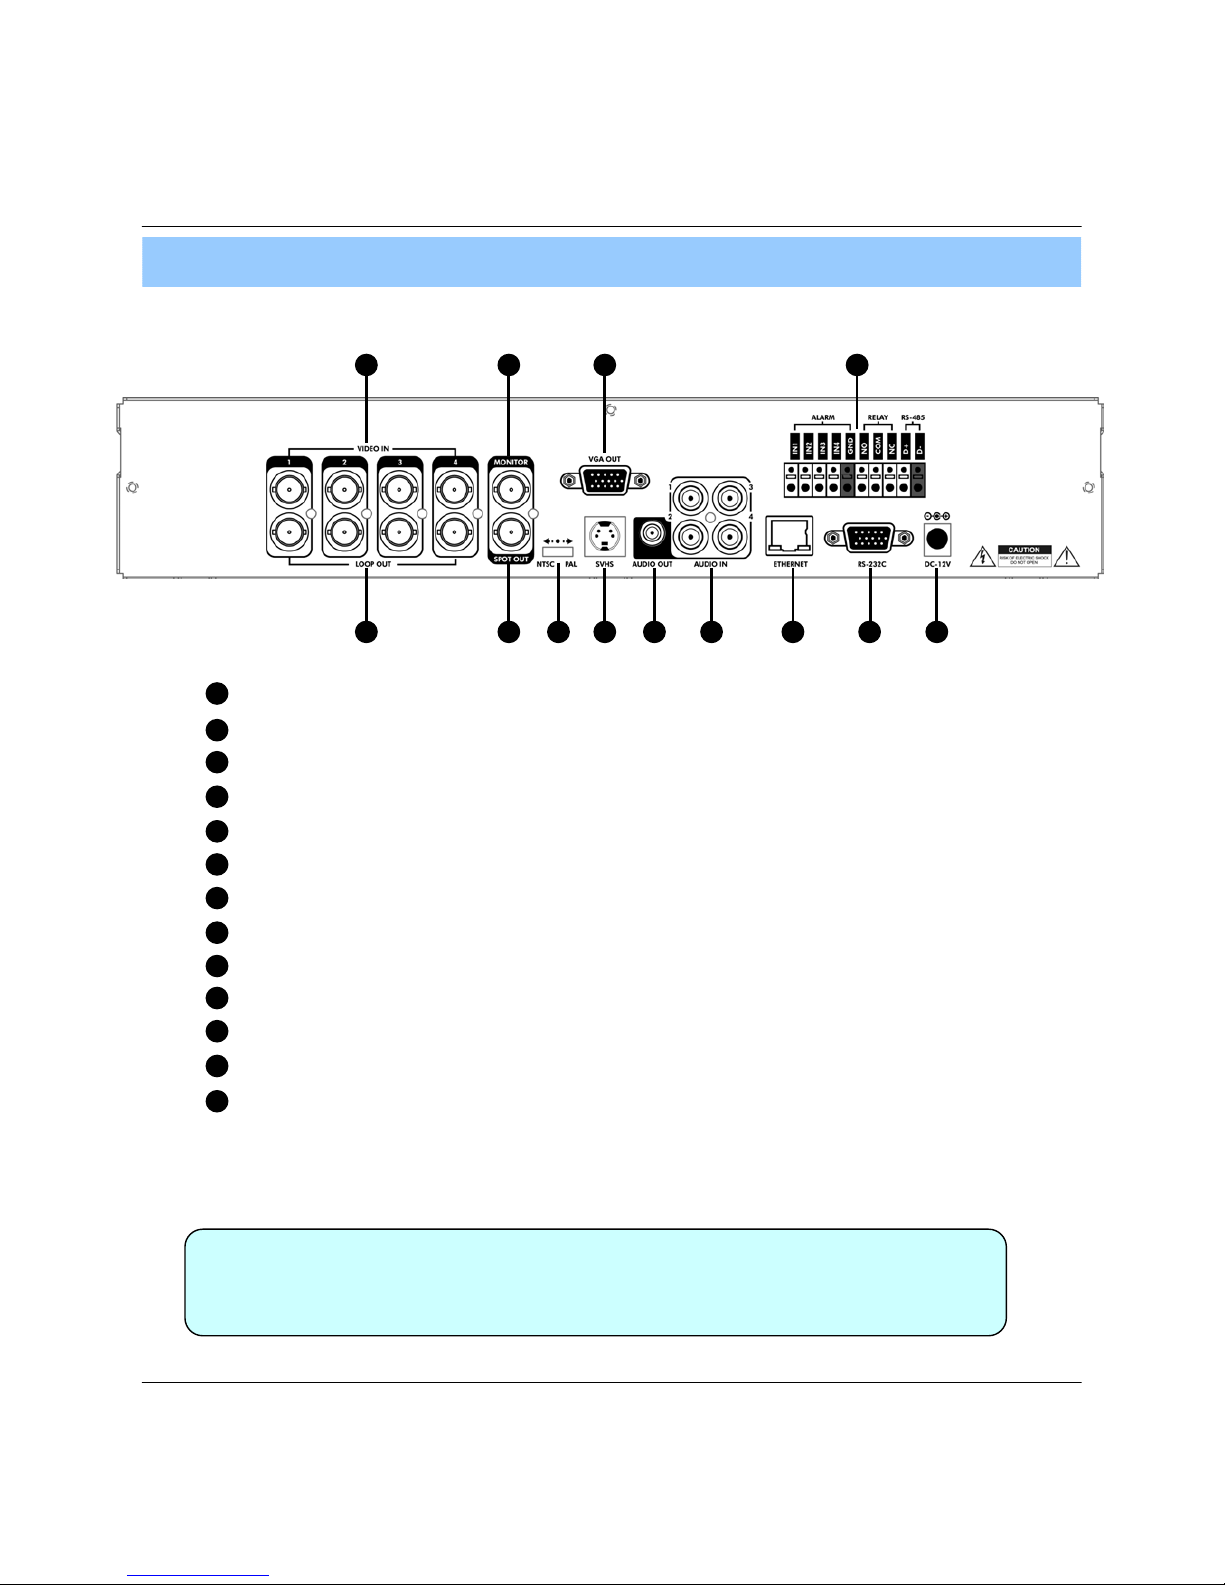
2. Rear Panel
2. Description
• When System Installation, Please Install under System Power OffStatus.
• Please Use Specific Adaptor when Power Supply.
Tip
2 4 75 1298 10 13
1 3 6 11
Video In : BNC Port for Connection of DVR & Camera. (4 Camera Connectable)
Loop Back : Output DVR Camera Video to Loop Back Port. (4 BNC Port)
Monitor Out : Output DVR Video to AV Monitor.
Spot Out : Output Spot-out Video to AV Monitor.
NTSC/PAL : Select NTSC or PAL Type.
VGA OUT : Output Video to a Computer Monitor by Connected VGA (Option)
SVHS : Output Video by Connected SVHS.
Audio Out : Output Audio Data.
Audio In : Audio Input Terminal Related with #1~4 Camera.
Ethernet (TCP/IP) : Port for Cross cable. (Possible to Remote Surveillance.)
Alarm/Relay/RS-485 : Connect Port for Sensor, Relay, & PTZ.
RS-232C : Connect Port for Program Debug.
DC Power Input : Power Supply by DC 12V Adaptor.
1
2
3
4
7
6
5
11
12
9
8
10
13
10
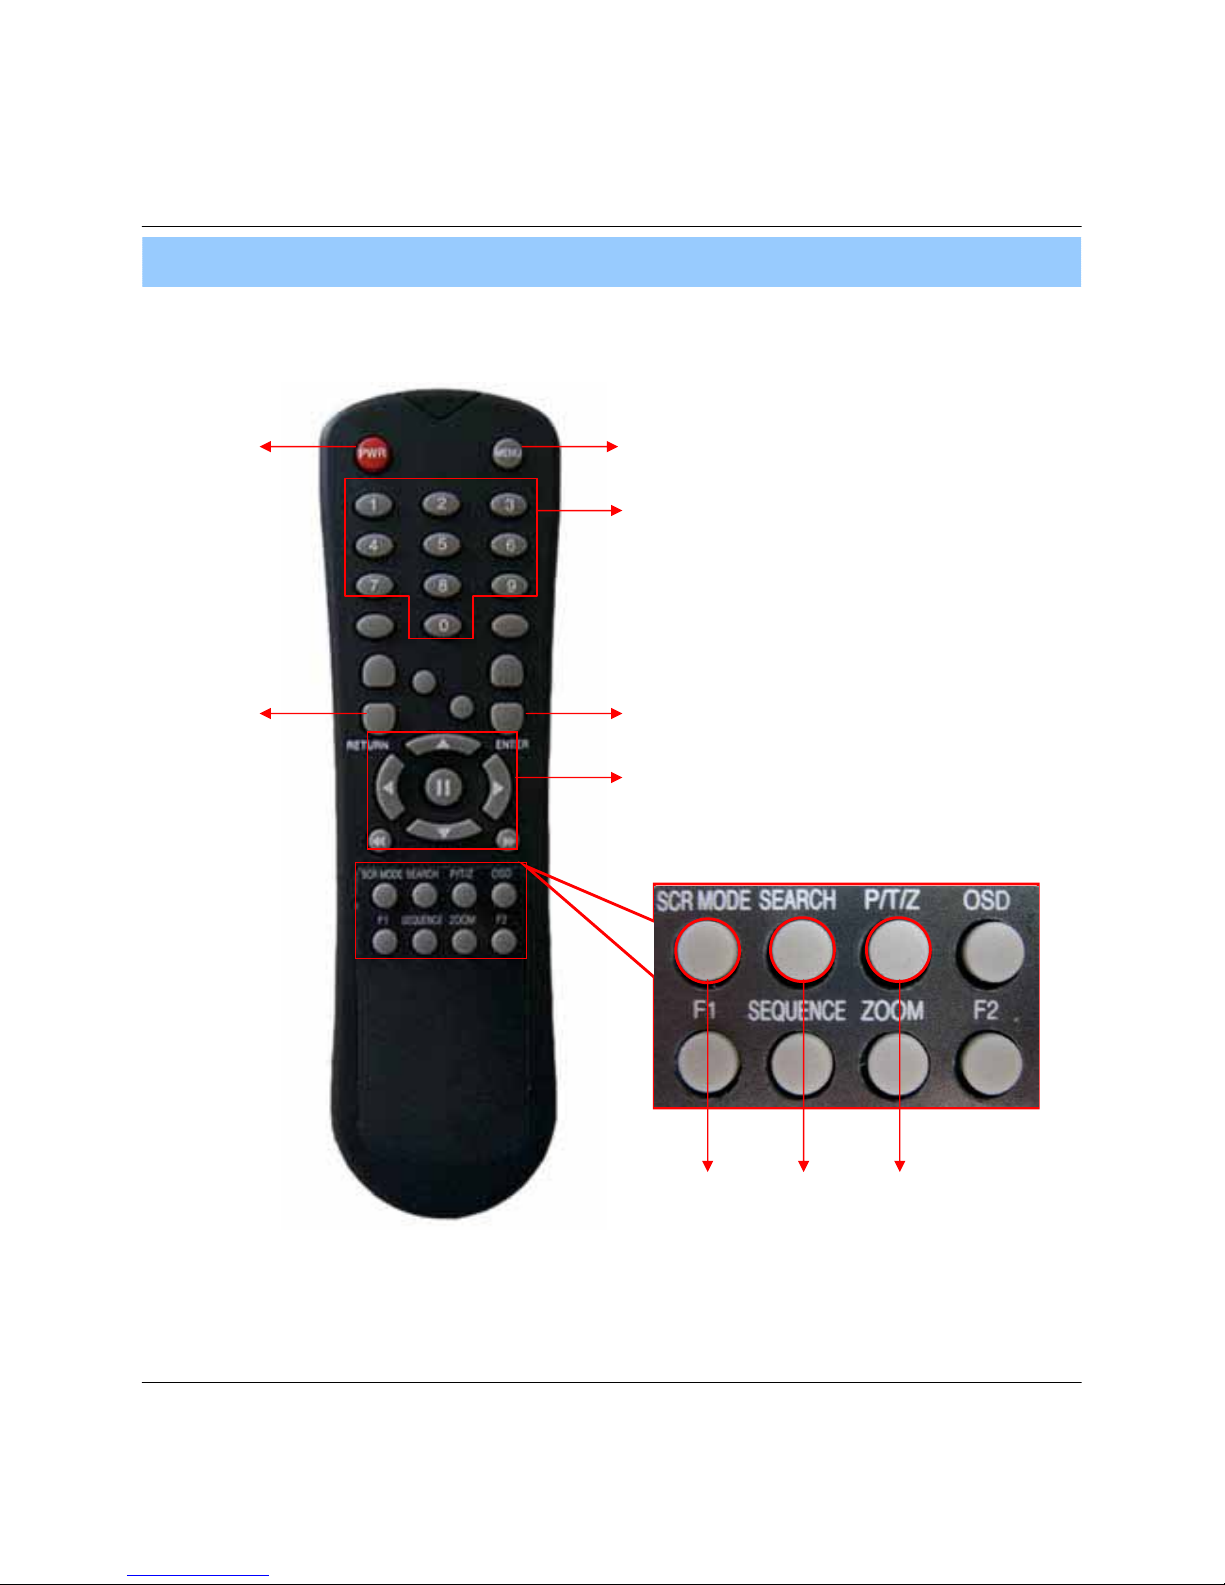
POWER
System
ON/OFF
MENU : Open System Setup Menu
RETURN
Cancel /
Deselect
Previous Screen
ENTER : Apply / Select /Go to Next Sereen
Channel Selection Buttons
Change Display
Mode
Search Menu
PTZ/IRIS Mode
• There are buttons on the controller that are unused, and their descriptions have been omitted.
• Every Button on the controller will function the same as its corresponding button on the Front Panel
• Remote Controller will only work when used within line-of-sight of the IR remote sensor on the DVR.
※ If there are many DVRs within line-of-sight of the controller, they will all respond to the controller.
Navigation Buttons : Used for Playback
Control, Menu Navigation, and PTZ/Focus
Control
3. Remote Controller
2. Description
11
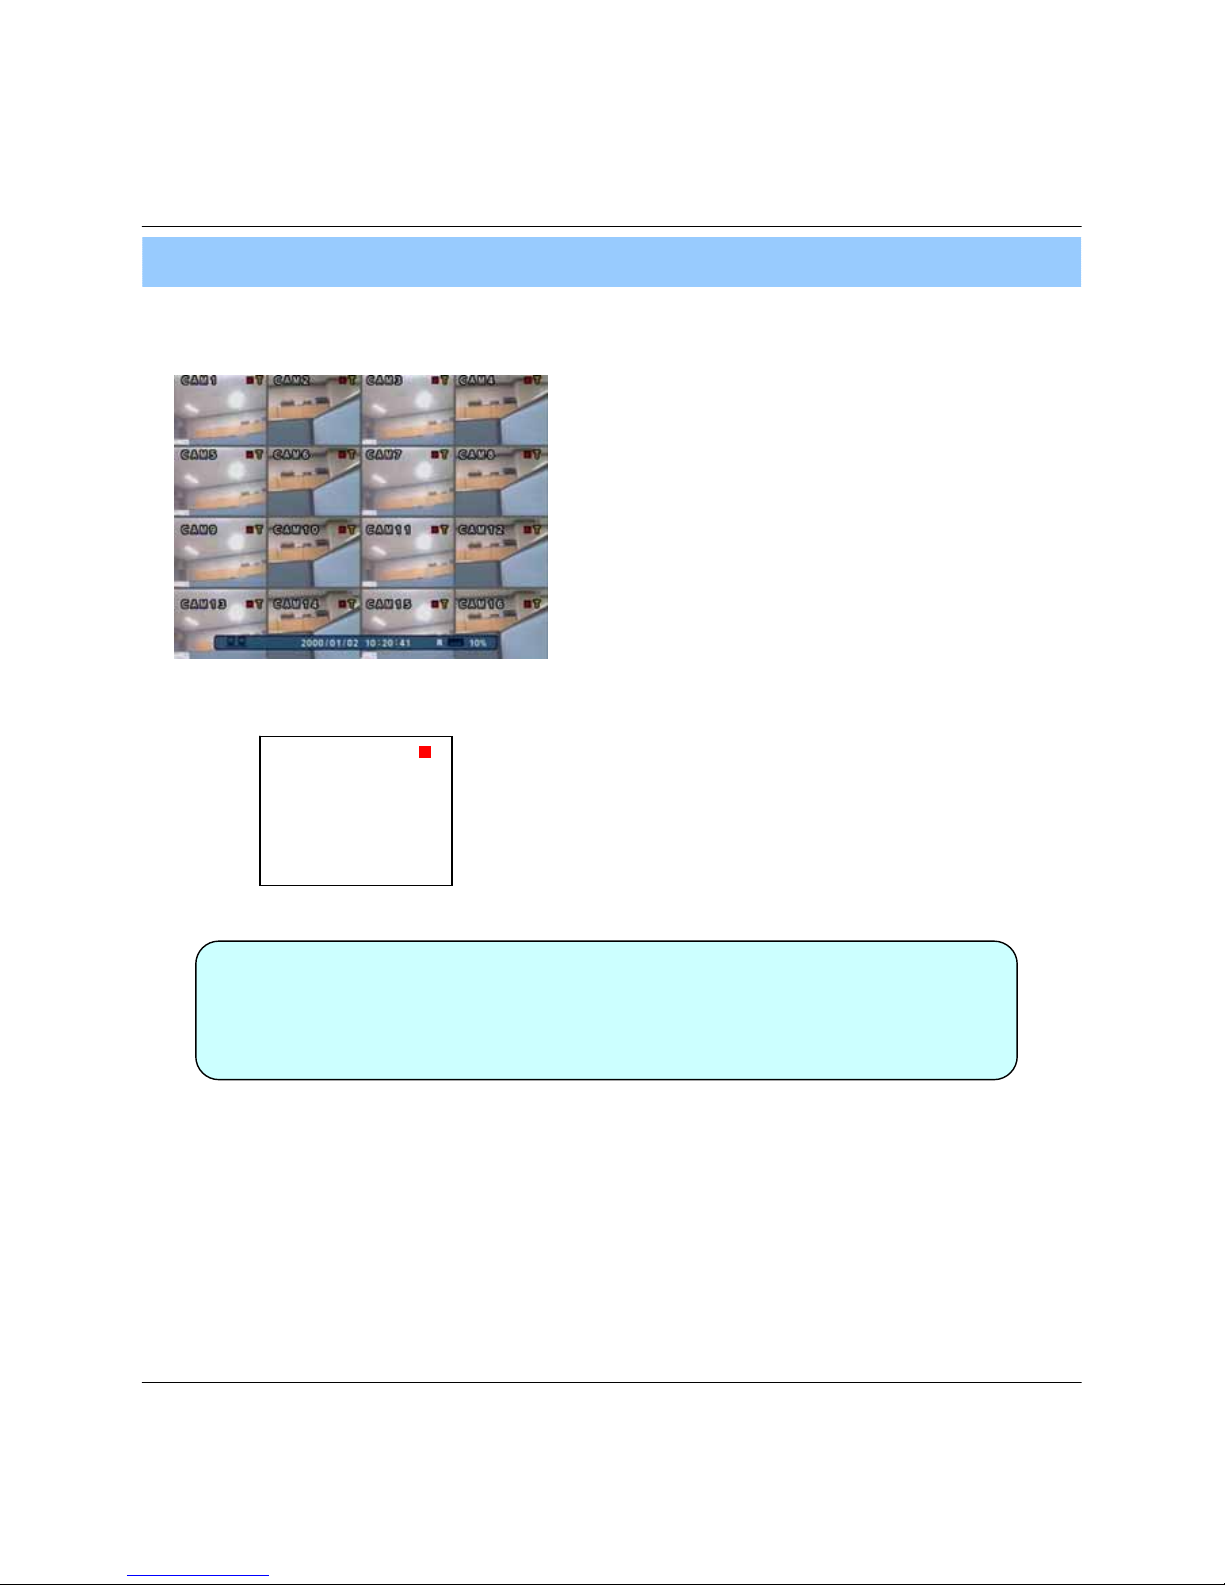
1. System Power ON
• Press power button to start system.
• After Checking Hard Disk, display mode is shown.1
• Initial Screen View Mode is Quad Division Mode and
Recording Mode.
<Picture of Power On after Finishing Installation>
3. Display
• Check System status LEDs
Power : Indicates System (On/Off)
Record : Indicates Recording (On/Off)
Network : Indicates Network/LAN Client connection Status
Tip
CAMERA
2005/01/01
00:00:00
• Each Channel Indicates Camera Name & Recording Status.
• Present Time & Date shown on Status Bar at a bottom of screen.
 Loading...