

Page 1
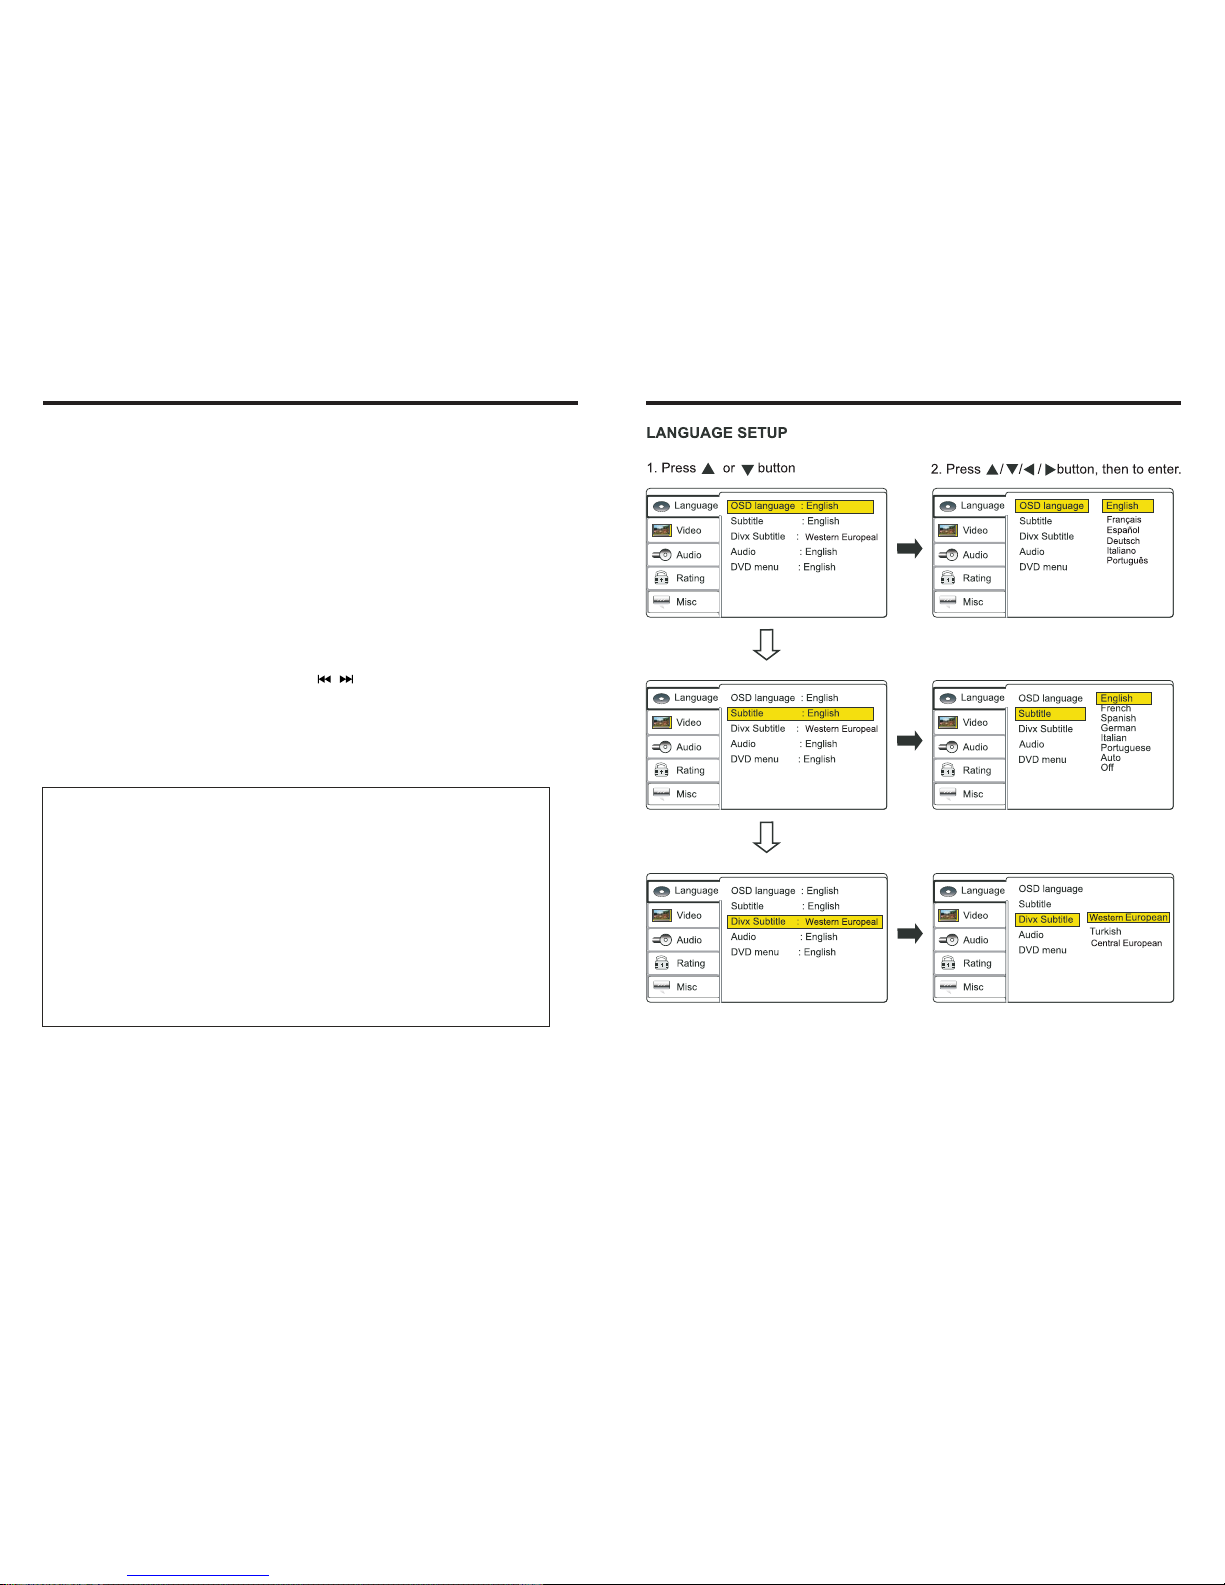
Page 2
SD704M
2
1. WELCOME
2. WARNING
6. Panel Arrangement
7. Panel Button Control Instruction
8. Main Menu Touch Operation
9. OSD Setup
10. Adjust Mode
11. Remote Control Function
12. Disc Play Touch Operation
13. CD/MP3 Operation Interface
14. RDS User Operation
15. Radio Operation
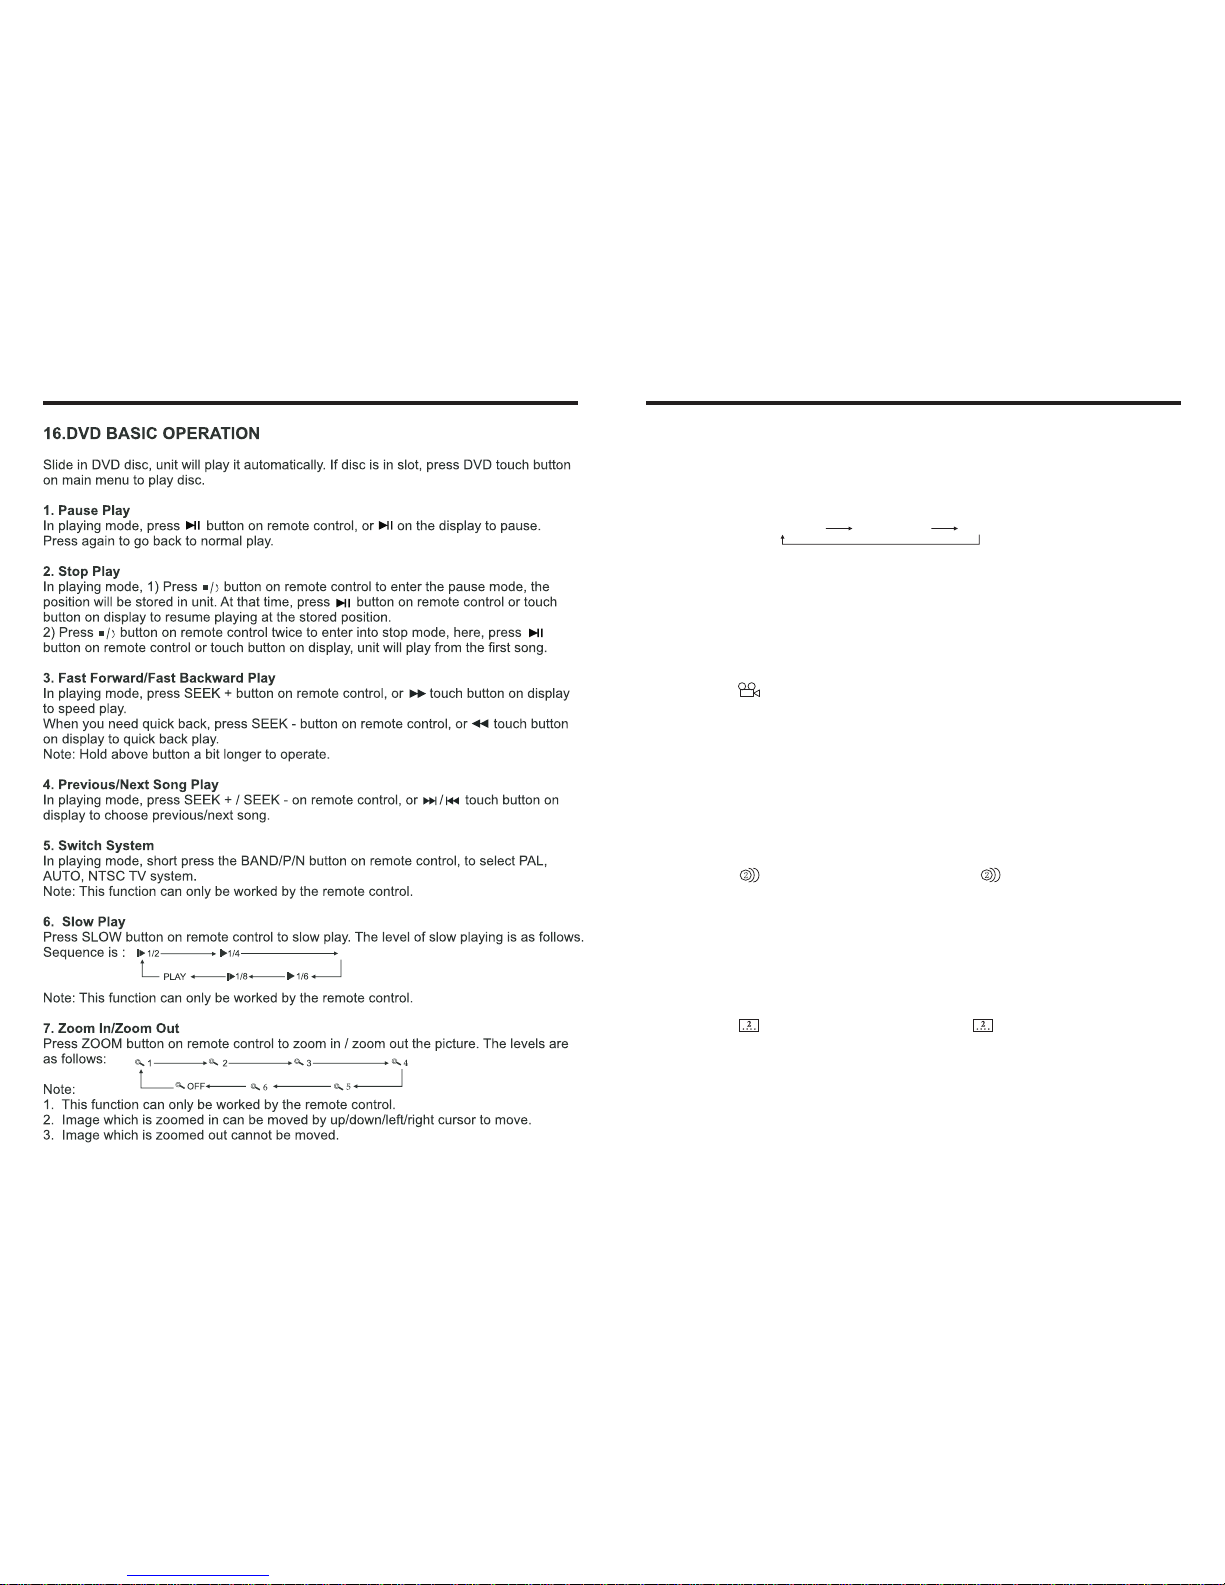
16. DVD Basic Operation
17. VCD Basic Operation
18. CD/MP3 Basic Operation
19.Other Play Mode
20.
Accessory
3. NOTE
4. Features
5. Basic Operation
Trouble Shooting
21.Wiring Diagram
22.Specifications
23.
3
3
4
5
6
7
8
12
13
14
15
17
18
19
21
22
32
35
37
38
39
40
41
Page 3

INSTRUCTIONS
1.WELCOME
2.WARNING
1. Please keep the disc slot clean, wipe it off when there is some dirt on it. You should
wipe off any dirt on the disc before you place it into the unit. If the disc is dirty and you
place it inside the unit, it will cause the unit to go into an error and will not play the
disc. Please ask professional to clean the laser.
2. Playing the radio at higher volumes for a long period of time may cause hearing
issues. You should play this unit at a moderate listen level.
3. This unit is set up by precision parts. If you open up this unit, you will void any and
all of your warranty.
4. Please do not touch LCD display with any hard object so that you prevent it from
getting scratched or damaged.
5. To avoid an accident caused by watching the LCD screen. This unit has a vehicle
lock out wire so that you will not be allowed to watch a video while driving down the
road.
6. This unit is meant for a 12V power and negative ground system from a vehicle.
NOTE:
We keep improving this product all the time. There may be some changes in it that are
not in this manual.
Thank you for enjoying series of digital car A/V product.
To properly use this product, please go through this instruction manual for installation
and operation, put it in a safe place for future use!
3
Page 4
INSTRUCTIONS INSTRUCTIONS
4
41
3.NOTE
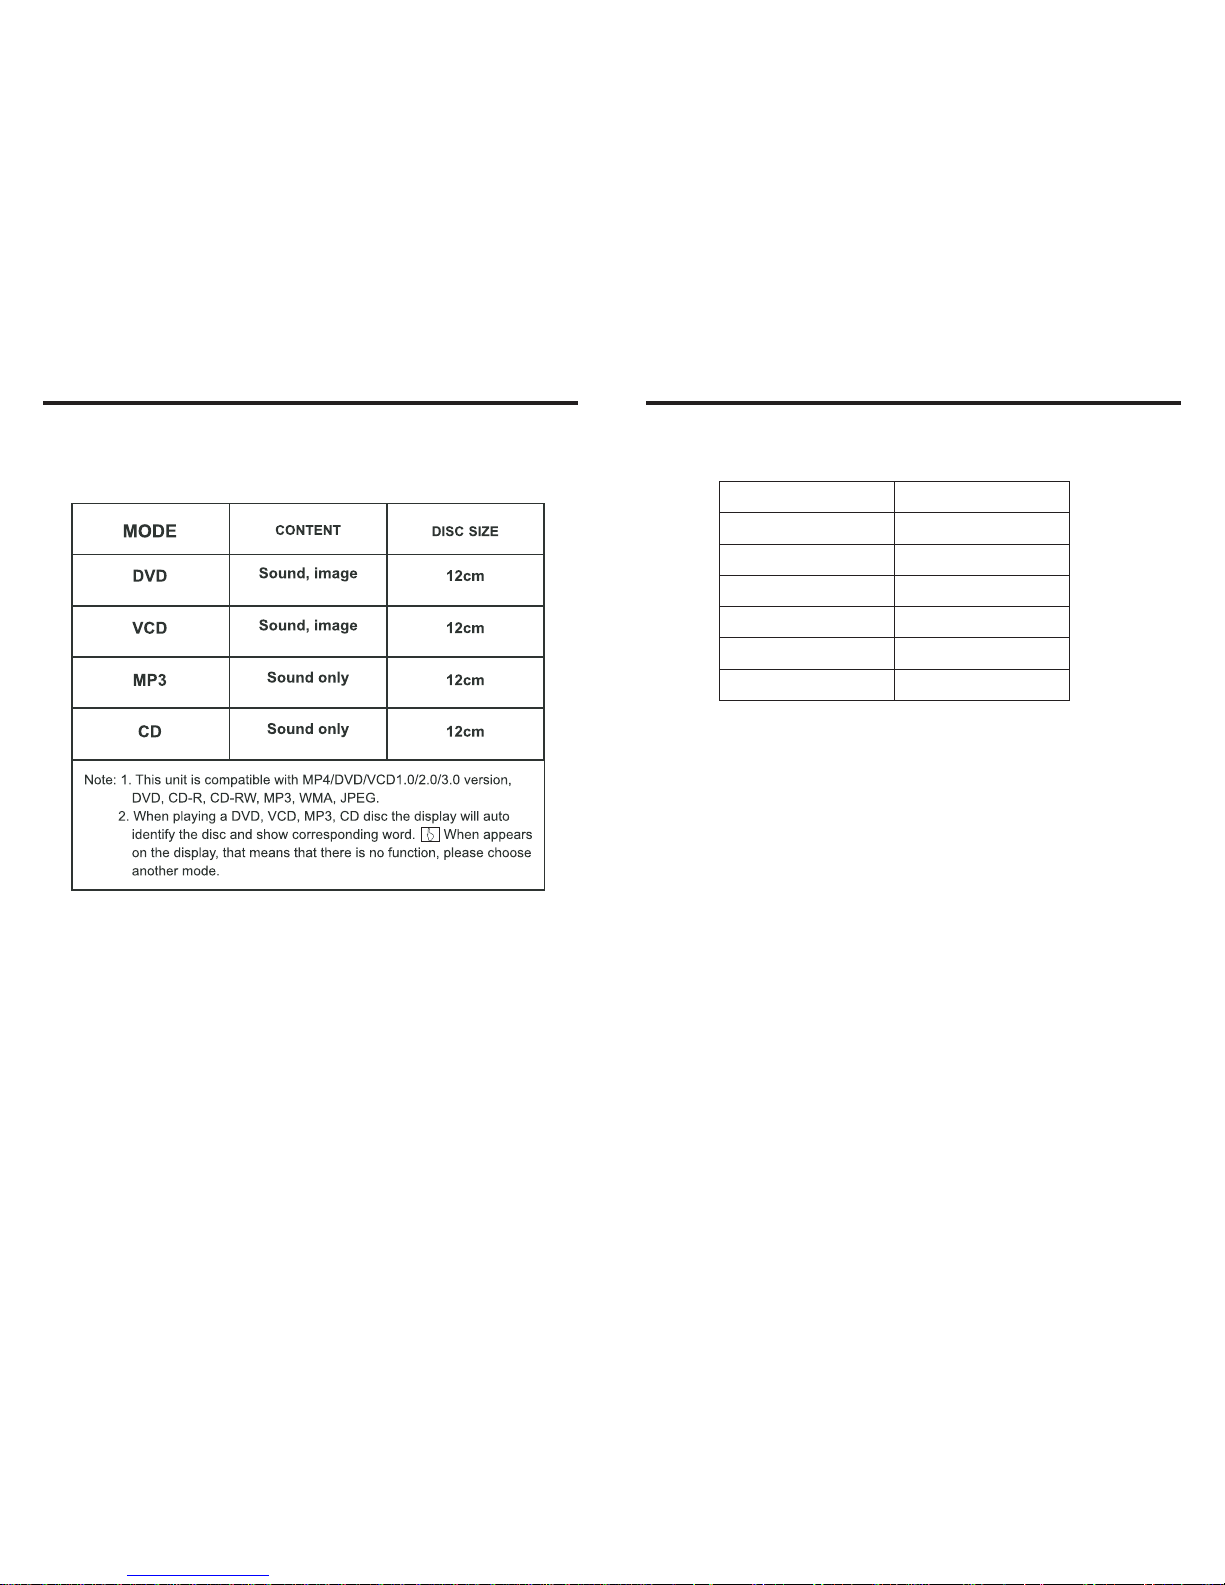
● This unit can play the following disc
23.ACCESSORY
Accessory
Quantity
User Manual
1PC
Wire
USB Cable
Keys
Remote controller
Warranty card
2PCS
1PC
1PC
1PC
2PCS
Page 5
4.FEATURES
INSTRUCTIONS INSTRUCTIONS
DVD PLAYER
1. MPEG-4 Decoder Technology
2. Compatible with MP4 (AVI/5.X), DVD (DVD-R/DVD-RW), VCD,
SVCD, CD-RW, WMA, MP3, JPG
3. Supporting Multiple Subtitles, Angles, Languages
4. Child lock function
5. 4-Channel Audio Output
6. Pause, Play, Up/Down, Stop, Zoom, PBC Function
RADIO
1. AM/FM Radio Tuner
2. 30 Radio Preset Stations (18FM, 12AM)
LCD DISPLAY
1. 7” - 16:9 TFT LCD Display
2. Touchscreen
5
40
Power supply
Power range
Max operate current
Dimensions
Ground system
FM tuner
European requency range f
Signal/Noise ratio
Stereo separation
Search station volt
Distortion rate
AM tuner
Limit noise sensitivity
DVD PLAYER
Signal/Noise ratio
Frequency response
DC 12V
10.8-16.0V DC
10A
155X182X53MM
Negative ground
87.5-108MHz
55dB
30dB
20-30dBuv
1.5%
522-1620KHz
32dB
70dB
20Hz-20KHz
22.SPECIFICATIONS:
USA frequency range
87.5-107.9MHz
European requency range f
USA frequency range
530-1710KHz
Amp Rating
85 Watts x 4 Channels
Page 6
5.BASIC OPERATION
1. SOURCE ON/OFF
Press SRC button on panel or SOURCE button on remote control quickly to power on.
Press SRC button on panel or SOURCE button on remote control longer to power off.
2. PLAYING SOURCE CHOOSE
Press SOURCE button on remote control, unit will switch sources in the following
sequence: RADIO → DVD → AUX
3. MUTE CONTROL
Press MUTE button on panel or MUTE button on remote control shortly to turn off
sound output, press again to back to sound output.
4. VOLUME ADJUSTMENT
1) Press VOL+/VOL- button on panel, VOL+/VOL- button on remote control or touch
button on display to adjust volume level.
2) The volume setting on this unit is 0 - 39.
BASS, TREBLE, BALANCE & FADER ADJUSTING (SELECT)
Press SEL button on remote control to choose your desired Bass, Treble, Balance &
Fader level:
NOTE:
1) DVD playing mode, MBP & User will be automatically activated.
2) After 5 seconds you choose desired mode, do not adjust volume button. The mode will
automatically take you back to status before adjustment.
5. RESET
1) If unit is not working correctly, you should press the RES button. This will reset the
radio and should start working correctly afterwards.
2) After reset, all settings will resume back to the factory default settings.
VOL
BAS TRE L/R
F/R
INSTRUCTIONS INSTRUCTIONS
6
39
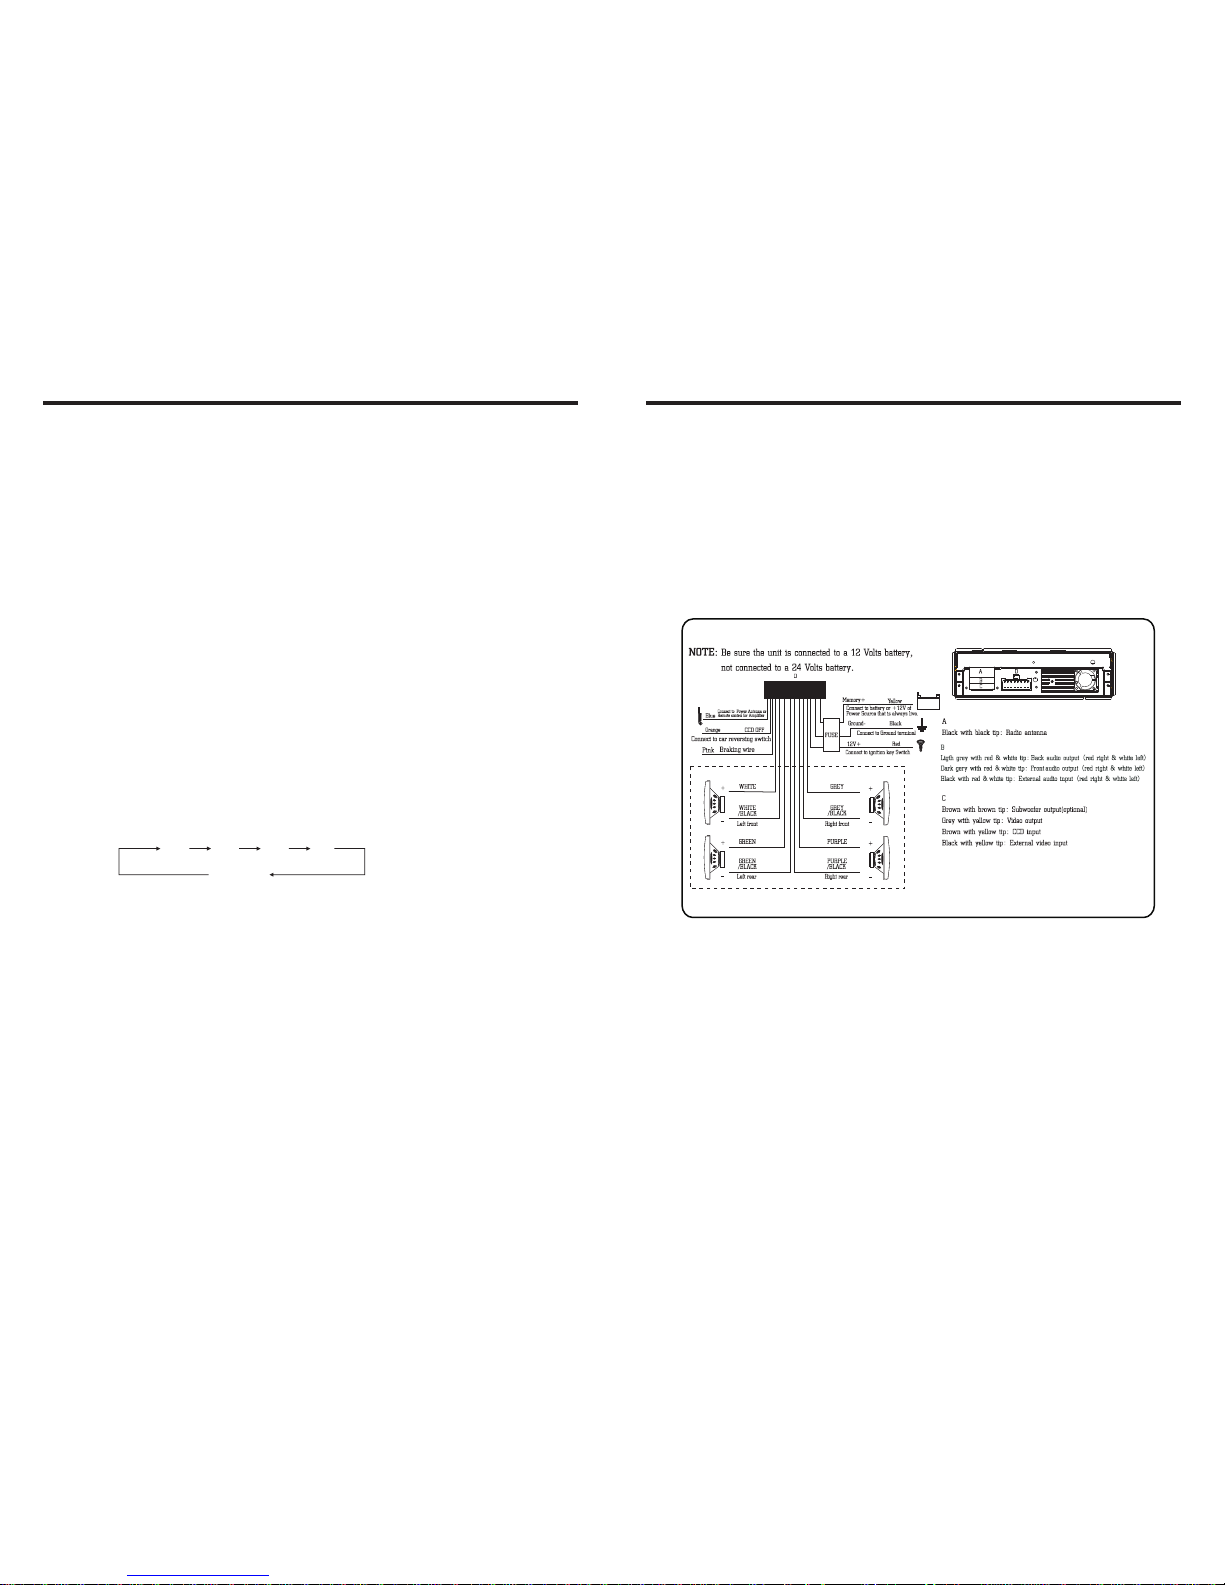
21.WIRING DIAGRAM
This player is equipped with ISO standard connector, please follow below instruction:
● Yellow – 12 V Constant
● Black – Ground wire
● Blue - Power Antenna / Remote Amp Turn On
● Orange – Back-Up Camera Trigger (+)
● Pink – Parking Brake (-)
● White/White black - Left front speaker (+-)
● Purple/Purple black - Right rear speaker (+/-)
● Green/Green black - Left rear speaker (+/-)
● Red - ACC ON (+12V)
● Grey/Grey black - Right front speaker (+/-)
Note:
The “PARKING BRAKE” wire must be connected to the parking brake system
of your car. When the parking brake is engages, the LCD will be allowed to view
your video. If not, the screen will produce an image saying, “PARKING BRAKE”.
This is a safety feature designed for the driver not to watch a video while driving.
The video output on this unit will not be affected by this.
Page 7
INSTRUCTIONS INSTRUCTIONS
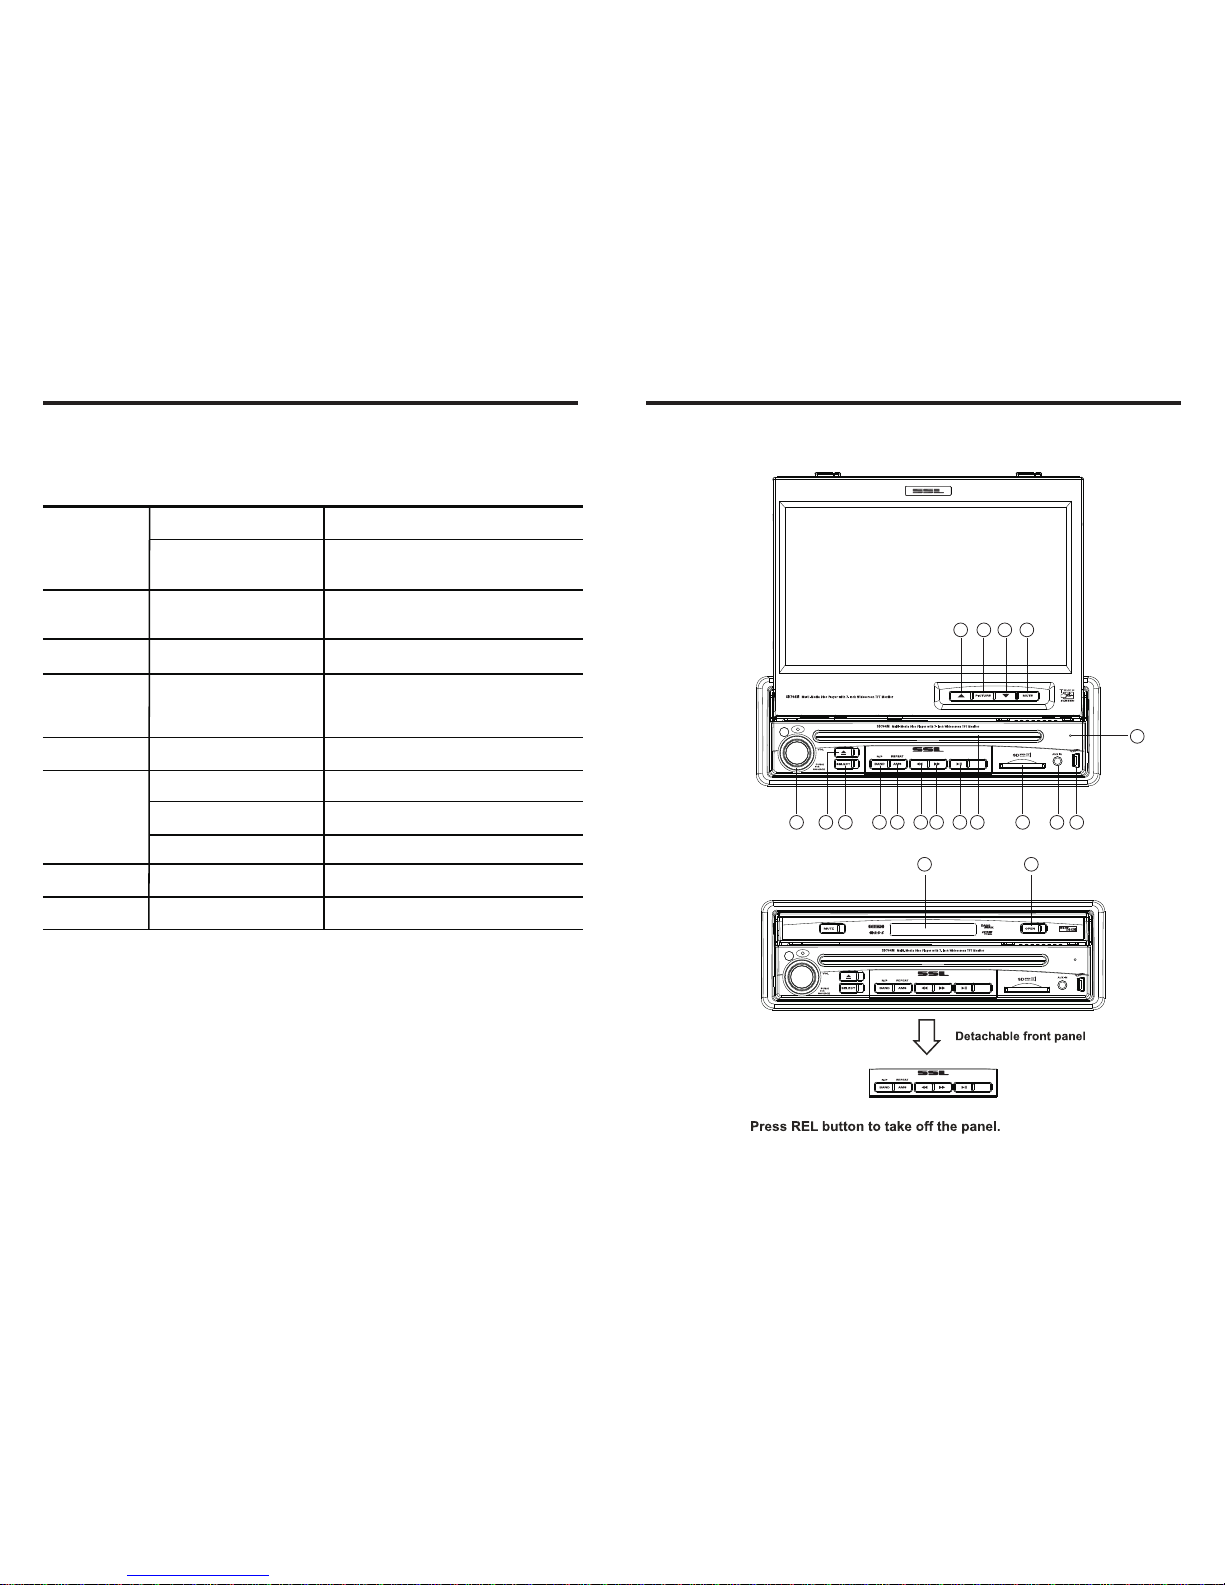
6.PANEL ARRANGEMENT
7
38
1 2
3
4
5
6 7 8 9 10
11 12
17
18
19
13
14
15 16
20.TROUBLE SHOOTING
After ignition
switch off, setting
information all lose
Remote control no
function
Poor performance
of radio station
Can not load disc
Can not play disc
Can not switch
language/subtitle
No image
PROBLEM
Can not power on
CAUSE
Check whether power fuse
blew or not
Some factor cause MPU wrong
operation
No enough power supply
from battery
Disc is scratched
Put wrong side of disc into unit
Lens has dirty
There is only one language/
subtitle in disc
Video line between unit and
TV is not properly connected
SOLUTION
Change fuse same as the old one
Press RESET button on the panel by pen
point, then, power on
Check whether antenna is connected or not,
or poor connection
Change new disc
Slot in the disc with sign side up
Clean lens by lens clean disc
If disc is not with multi-language/subtitle, it
cannot switch language/subtitle
Reconnect lines
Improper length of antenna,
poor connection of antenna
grounding
The disc will not go in all
the way
Change the wiring around
Change battery in remote control
Remove the 2 screws on top of the radio
Wrong connection between
ignition line ACC and
Constant 12 Volt wire
Page 8
INSTRUCTIONS INSTRUCTIONS
8
37
19.OTHER PLAY MODE
AUX IN:
AUX IN OPERATION
1) Press “Source” button on remote control or touch “AUX” on the touch screen, to
switch to AUX mode.
2) This will allow you to listen and or watch any source that you have plugged into this
section of the radio.
3) This unit has 1 - Video RCA input & 1 pair of Audio RCA’s for this feature.
CCD (Back-Up Camera)
1) If there is a back-up camera installed onto your car, you will need to connect it to
the CCD video input.
2) When you are backing up the car there you will see this image on your screen.
3) You can set CCD image according to your car's own position in general setting mode.
7.PANEL BUTTON CONTROL INSTRUCTION
1.Power On/Off/Function MODE button
2.Disc Out button
3.SELECT Button
4.BAND/SYS /P.N button
5.AMS Program Preset/Play Repeat button
8.Pause button
9.Disc load slot
10.SD socket
11.Aux In
12.USB socket
13.UP Adjustment(TFT Screen)
14.DN Adjustment(TFT Screen)
15.PIC Color Selection button
16.MUTE / TFT on/off button
17.
18.TFT Display Screen Extend/Retreat
19.Reset button
Page 9
INSTRUCTIONS INSTRUCTIONS
10. CD Program Play
In CD mode, you can set the sequence of playing by the program function, the operation
is as follows:
When CD is playing, press ST/PROG button, then the display shows:
Input the number of the song you want to program by the remote control, program the
first song, input your desired song, for example, the sixth song, and press number button
6 on the remote control. Program the second song, press button move the cursor to
2 . Input your desired song, for example, the ninth song, press number button 9 on
the remote control. Press button to program play.
Back to the normal mode, press the ST/PROG button, then press button.
Note: This function can only be worked by the remote control.
11. MP3 Program Play
In MP3 mode, you can set the sequence of playing by the program function, the
operation is as follows:
When MP3 is playing, press ST/PROG button, then the display shows:
Then, input desired song by remote control.
For example: Program the first song, input 01, press button move the cursor to the
second lattice, input desired song, for example the third song. Program the second song,
press button, work with button, move the cursor to 2 . Input 01, press button
move the cursor to the second lattice, input desired song, for example, the sixth song
(press 6). Press button to program play.
Back to the normal mode, press the ST/PROG button and then press button.
Note: This function can only be worked by the remote control.
PROG
TC
3 _ _ : _ _
4 _ _ : _ _
TC
7 _ _ : _ _
8 _ _ : _ _
5 _ _ : _ _
6 _ _ : _ _
TC
11 _ _ : _ _
12 _ _ : _ _
9 _ _ : _ _
10 _ _ : _ _
TC
15 _ _ : _ _
16 _ _ : _ _
13 _ _ : _ _
14 _ _ : _ _
PLAY
DELETE
1 _ _ : _ _
2 _ _ : _ _
PROG
TC
3 _ _ : _ _
4 _ _ : _ _
TC
7 _ _ : _ _
8 _ _ : _ _
5 _ _ : _ _
6 _ _ : _ _
TC
11 _ _ : _ _
12 _ _ : _ _
9 _ _ : _ _
10 _ _ : _ _
TC
15 _ _ : _ _
16 _ _ : _ _
13 _ _ : _ _
14 _ _ : _ _
PLAY
DELETE
1 _ _ : _ _
2 _ _ : _ _
9
36
1. Power On/Off/Function MODE button
Press this button for short moment to turn on power,and long press it to turn off power.
Every button-press to switch audio source mode.
Rotate this button clock wisely to increase the volume lever,rotate it anti-clock wisely to
decrease the volume lever.
2. Disc Out button
Press this button can eject the disc.
3. SELECT Button
Press this button to adjust each function setting according to everyone's favorite.
After you choose one function setting mode,you can use voice adjust button for adjustment.
4. BAND/SYS /P.N button
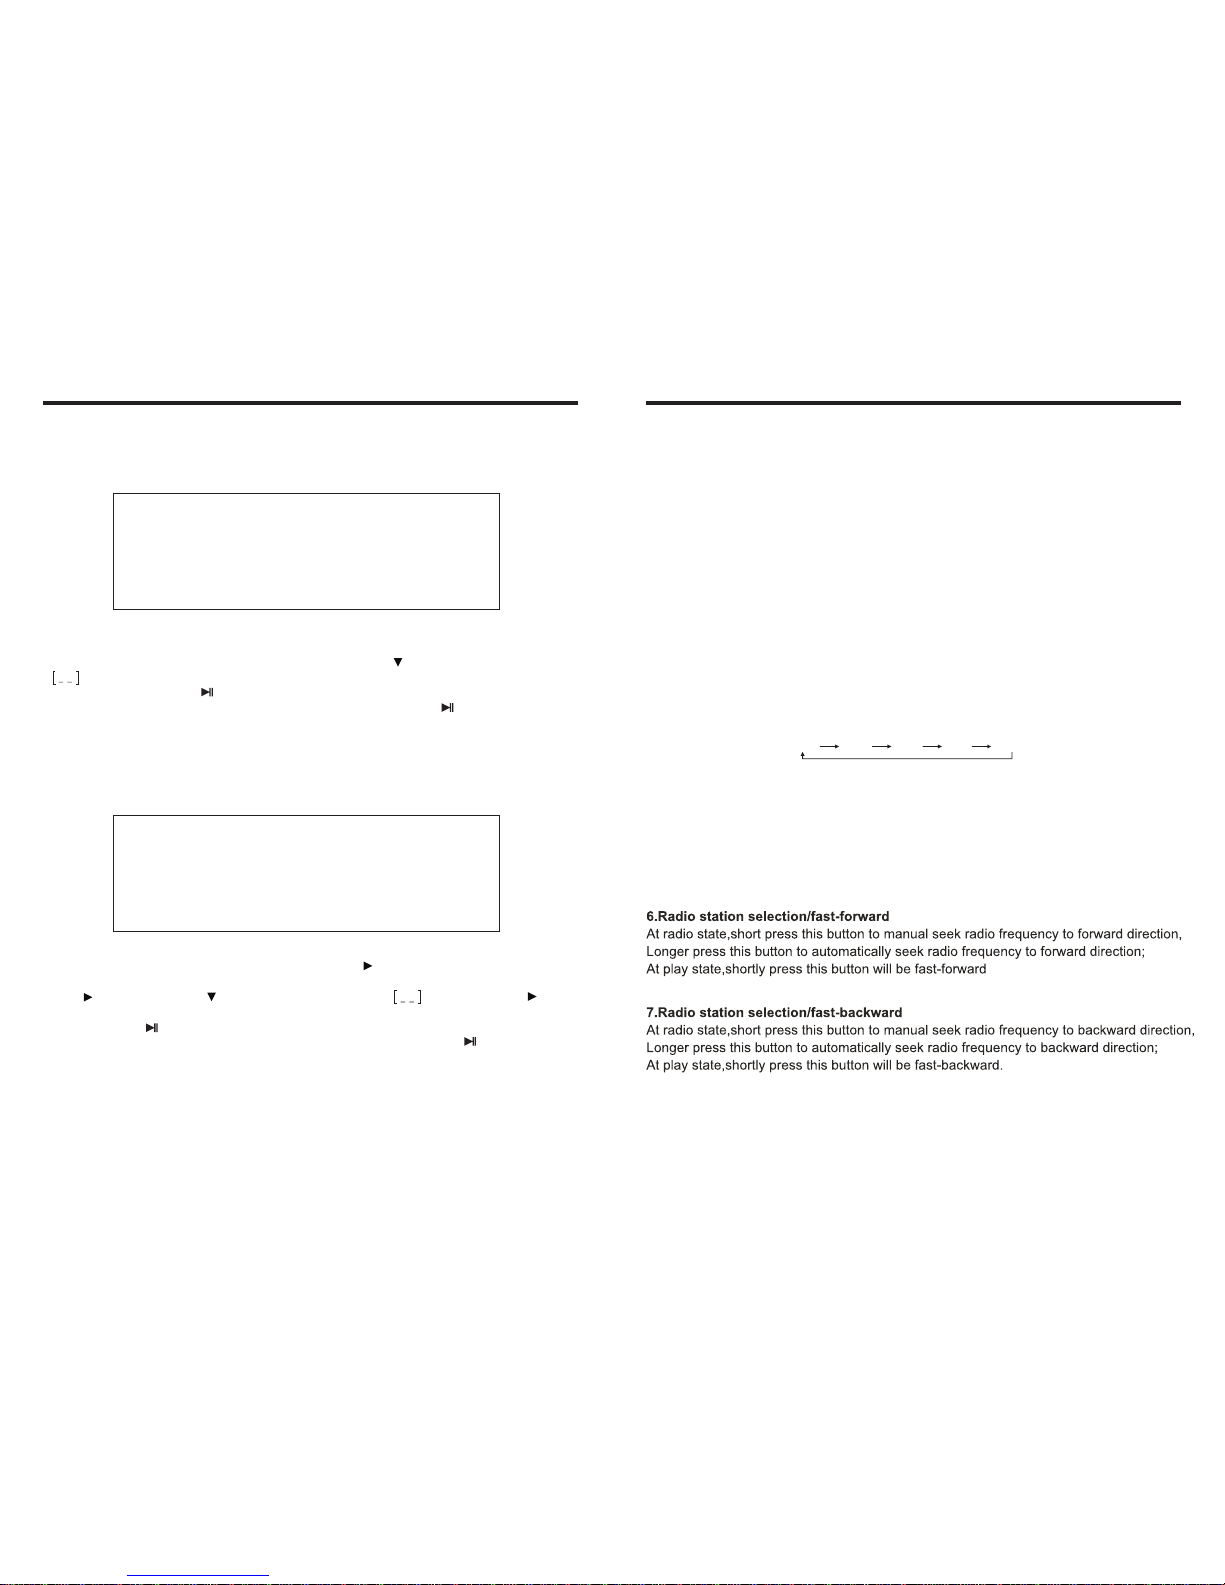
In radio mode, press this button to switch band, every time to choose band, the
sequence is as follows: FM1 FM2 FM3 AM1 AM2
In playing state, press this button to switch video system, AUTO, NTSC, PAL.
5. AMS Program Preset/Play Repeat button
Under radio mode, press this button for a short moment to start scanning preset programs.
Under PLAY mode, press it to repeat playing a single song, and press it again to turn
off this function.
8. Pause button
In playing state,press this button to execute play/pause.
OUTLOOK AND BASIC FUNCTION
Page 10
INSTRUCTIONS INSTRUCTIONS
Slide in CD/MP3 disc, unit will play it automatically. If disc is in slot, press DVD touch
button on main menu can to play.
1. Repeat Play
In CD/MP3 mode, press AMS/RPT button on remote control, to startup following, repeat
CD disc: Single song repeat→ Repeat play off.
MP3 disc: Single song repeat→Directory repeat→ Repeat play off.
2. Fast Forward/Fast Rewind
Press SEEK + / SEEK - button on remote control, or / touch button on display to
speed forward or backward playing.
Note: Hold above button a bit longer to operate.
3. Previous/Next Song Play
In playing mode, press SEEK + / SEEK - on remote control, or / touch button on
display to choose previous/next song.
4. Pause Play
In play mode, press button on remote control, or button on display to pause.
Press again to go back to normal play.
5. Stop Play
In play mode:
1) Press button on remote control to enter the pause mode, the position will be stored
in unit. At that time, press button on remote control or touch button on display to
resume playing at the stored position.
2) Press button on remote control twice to enter into stop mode, here, press
button on remote control or touch button on display, unit will play from the first song.
6. OSD
In playing mode, short press OSD on remote control to show all information of present
disc.
7. Randomly Play
In CD mode, press LOC/RDM button on remote control, to instantly play each song.
Press again to back to the normal play.
8. EQ Mode
1) This function can only be worked by remote control.
2) When playing CD/MP3, press the “EQ” button on the remote control, you can
choose the sound mode.
9. OPEN
Press button on pedestal to eject disc.
18.CD/MP3 BASIC OPERATION
10
35
9. Disc load slot
Opening for disc to enter or retreat.
10. SD socket
This is a high-spees transmission interface, which can read high-capacity
date in MP3 or MP4 format.
11.Aux In
External connected audio input.
12. USB socket
Connect the USB memory to this socket, and the unit can play music format files
supported by this unit in the USB memory
13. UP Adjustment(TFT Screen)
After the display screen is extended, press this button to adjust the upward
view angle of the screen in 5 setps of adjusting angle.
14. DN Adjustment(TFT Screen)
After the display screen is extended, press this button to adjust the downward
view angle of the screen in 5 setps of adjusting angle.
15. PIC Color Selection button
Short press this button to chroma setup in the following level:
16. MUTE / TFT on/off button
Press this button to shut off the sound output, re-press this button can resume
the sound output, long press this button can turn off the TFT LCD display.
Bright Soft Sharp Standard Self Set
Page 11
INSTRUCTIONS INSTRUCTIONS
PROG
TC
3 _ _ : _ _
4 _ _ : _ _
TC
7 _ _ : _ _
8 _ _ : _ _
5 _ _ : _ _
6 _ _ : _ _
TC
11 _ _ : _ _
12 _ _ : _ _
9 _ _ : _ _
10 _ _ : _ _
TC
15 _ _ : _ _
16 _ _ : _ _
13 _ _ : _ _
14 _ _ : _ _
PLAY
DELETE
1 _ _ : _ _
2 _ _ : _ _
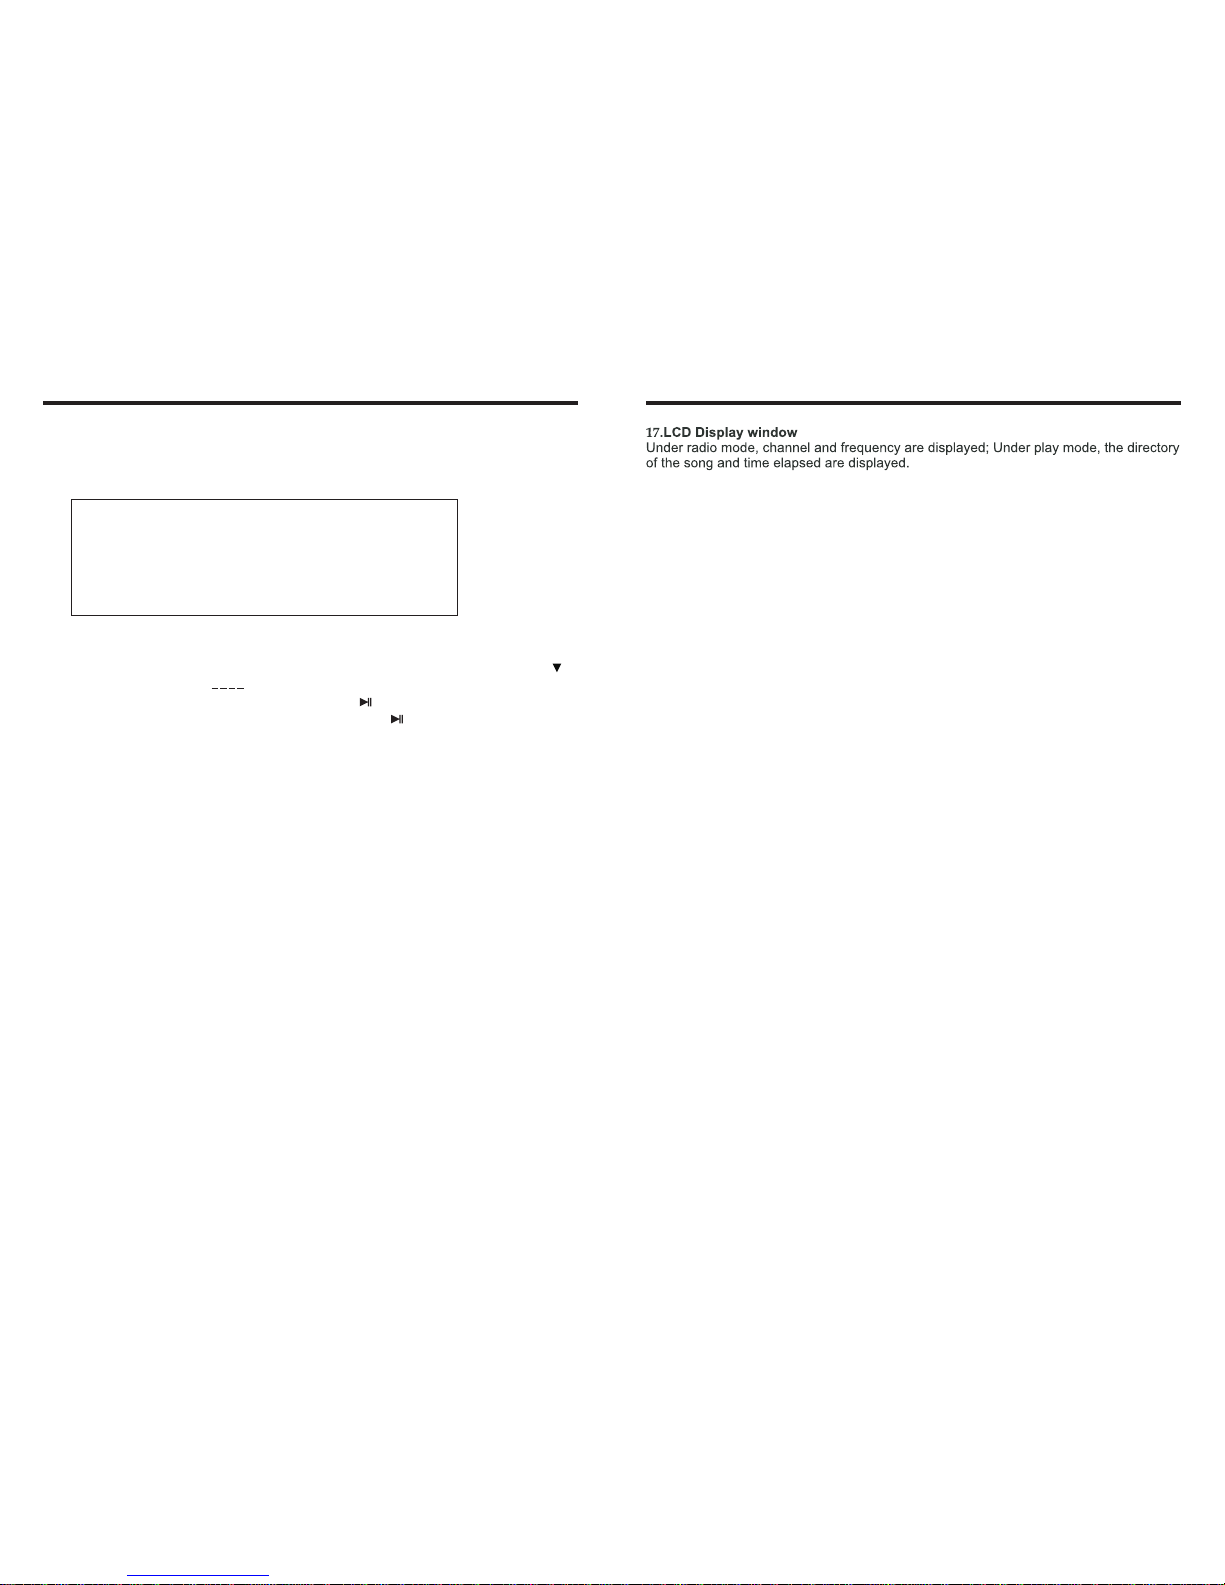
15. VCD Program Playing
In VCD mode, you can set playing sequence of songs by program play function.
The program playing operation steps are as follows:
In VCD mode, press ST/PTOG button, display will show:
Input the songs which you want to programmed by the number buttons on remote control.
For example: Program the first song, input your desires song, for example, the fourth song,
and press number button 4 on the remote control. Program the second song, press
button move the cursor to 2 . Input your desired song, for example, the eighth song,
press number button 8 on the remote control. Press button to program play. Back to
the normal mode, press the ST/PROG button, then press button.
Note: This function can only be worked by the remote control.
11
34
18. TFT Display Screen Extend/Retreat
Press this button to extend the TFT screen from the device or retreat it back. The
maximum angle of extension is 104 degree.
Attention: Under the disc playing mode, there is no image display at the moment of screen
extension after the button is pushed. It will become normal in 3 seconds.
19. Reset button
Press this button can back to defauil mode.
Page 12
INSTRUCTIONS INSTRUCTIONS
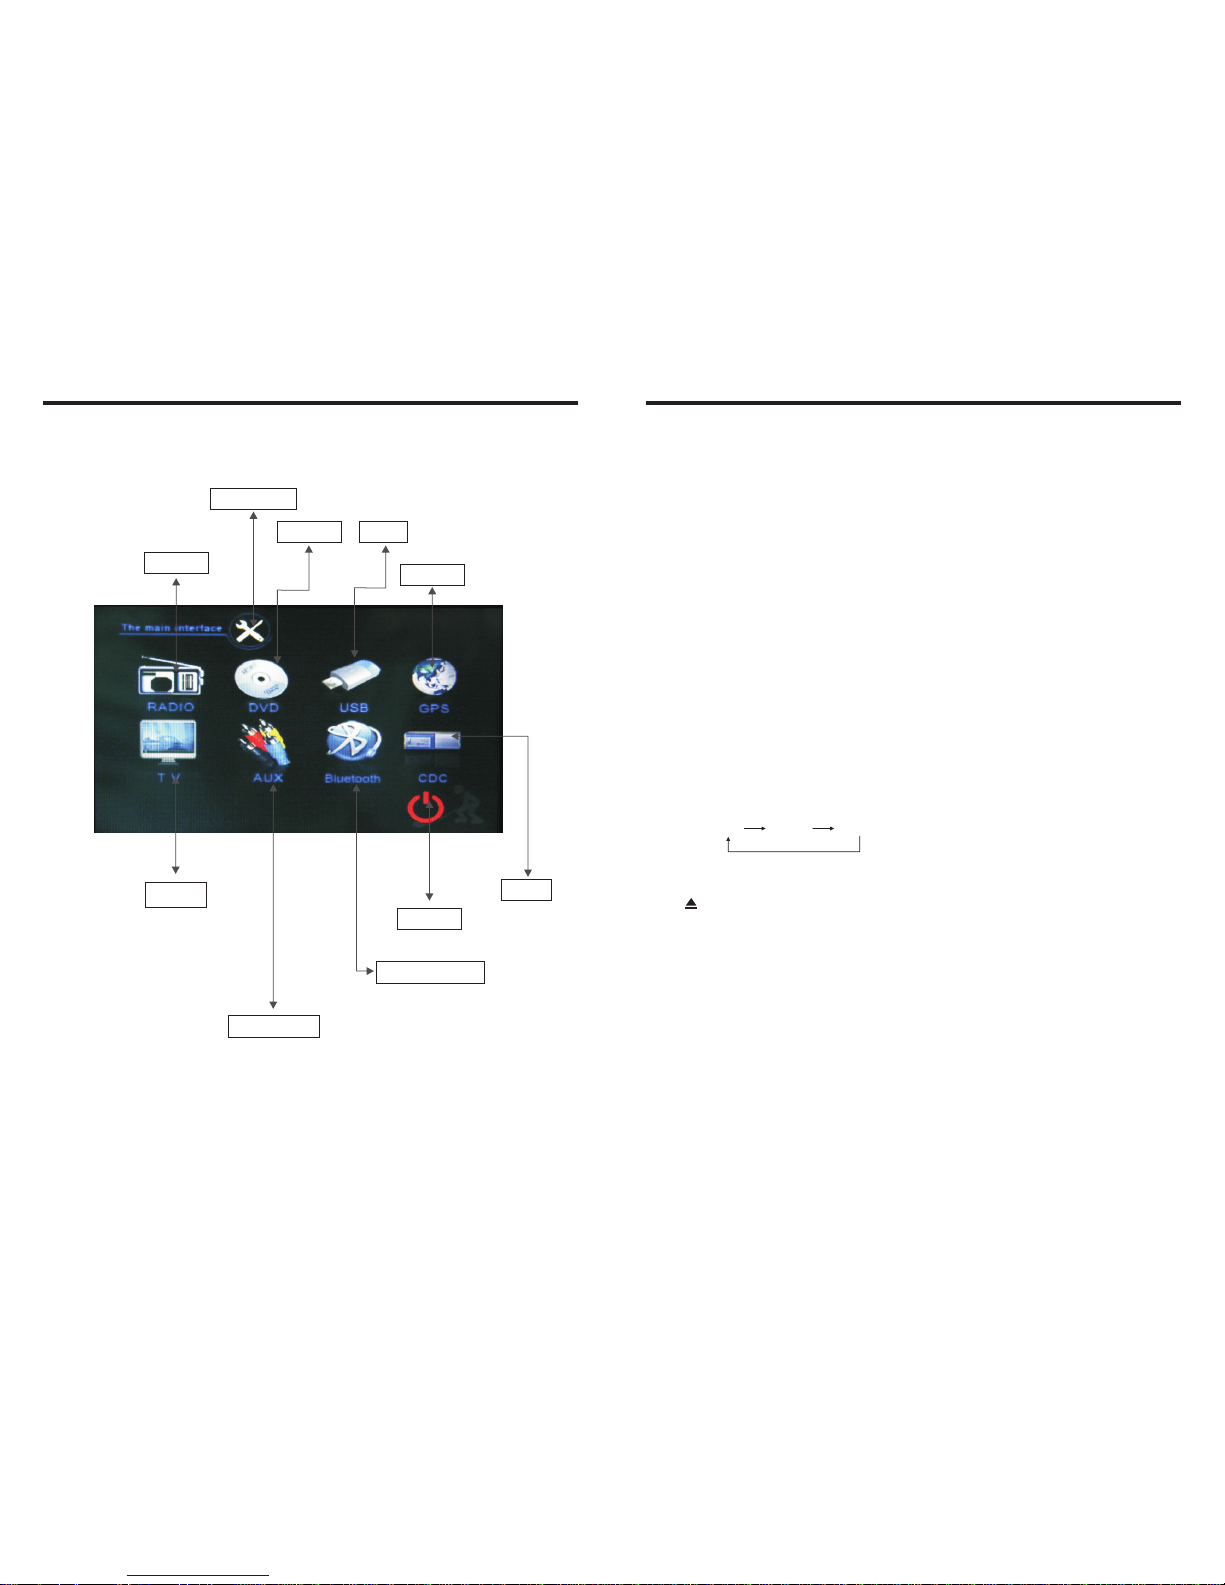
8.MAIN MENU TOUCH OPERATION
RADIO
AUX INPUT
DVD
BLUETOOTH
USB
GPS
POWER
OSD SET
TV
CDC
Stereo
Left
Right
8. OSD
In playing mode, short press OSD on remote control to show all information of present
disc.
9. Number Buttons
In VCD mode, press 0-9 number button to input song. For example, you want to choose
13th song, press 10+ button, and then press 3 button once to play 13th song.
Note: This function can only be worked by the remote control.
10. Repeat Play
In playing mode, press AMS/RPT button on remote control, to startup following, repeat
function. Single song repeat→ Repeat play off.
Note:
1) When playing VCD disc, if PBC is on, no repeat function.
2) After unit is power off or mode is switched to other playing mode except VCD mode.
if you switch back to VCD mode, repeat playing will be cancelled.
11. Randomly Play
In VCD mode, press LOC/RDM button on remote control, to instantly play each song.
Press again to back to the normal play.
Note: When VCD disc, if PBC is on, RDM will not work.
.
12. Switch Track
In VCD mode, press AUDIO button on remote control to switch track as following
sequence:
13. OPEN
Press button on pedestal to eject disc.
14. PBC (MENU) Play
In VCD mode, press this button then play the PBC and display will show whole menu
in disc, work with number button to choose song. When you are playing either song
of the PBC, and you want to stop to select another song, press the button to turn off.
Note:
1) This function can be worked by the control.
2) PBC is suitable for the SVCD and VCD 2.0 disc.
3) In PBC mode, you can not press number button only to choose song.
12
33
This un it wi thout C DC/ TV/GP S/B LUETOOTH fun ction .
*
Page 13
INSTRUCTIONS INSTRUCTIONS
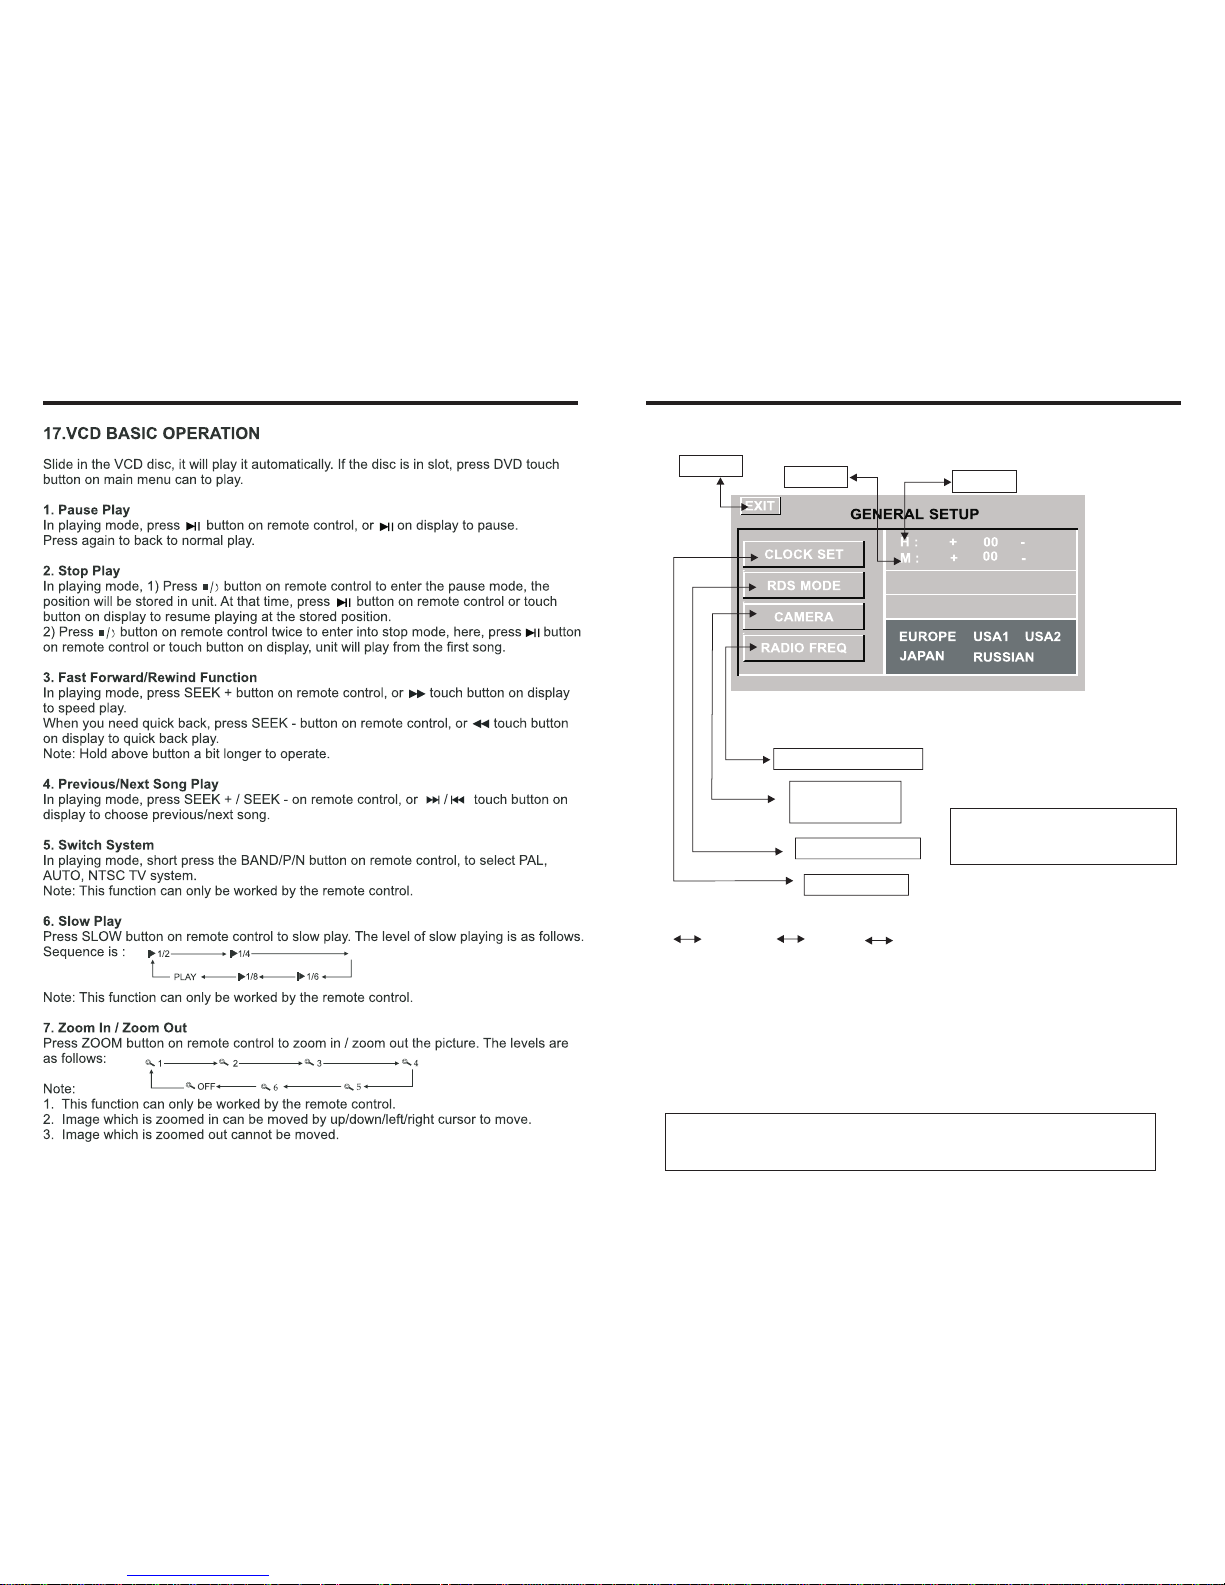
Time display: Touch main menu into adjust mode, press time setup button, the
corresponding function will be display in yellow words.
(1)Press “+” on hour to add hour, press “-” to reduce hour;
(2)Press “+” on minute to add minute, press “-” to reduce minute.
NOTE: Touch the correspondence function, will be display in green background.
The unit include two times system: Europe time (24 hour setup), America time (12
hour setup), when show the AM mark it indicate morning time, when appear the PM
mark, it show the time of afternoon.
9.OSD SETUP
Exit
Minute
Hour
Radio frequency setting
RDS on/off optional
Time setting
Note: Touch corresponding function,
it will display in yellow words reminding,
and blue back ground reminding.
Remark: This unit is with RDS function, it will automatically adjust the time when you
activate RDS function or have received RDS radio channels. At no received RDS radio
channels or AM state, you should adjust the time.
Note: There are 3 buttons automatically changed according to your setting change in
radio state when you activate or exit RDS; Changes are as following:
PTY LOUD; TA EQ;
AF ST
TIME DISPLAY AND ADJUST
Back-up Camera
left/right selection
RDS: ON OFF
LEFT RIGHT
13 32
Page 14
INSTRUCTIONS INSTRUCTIONS
14
31
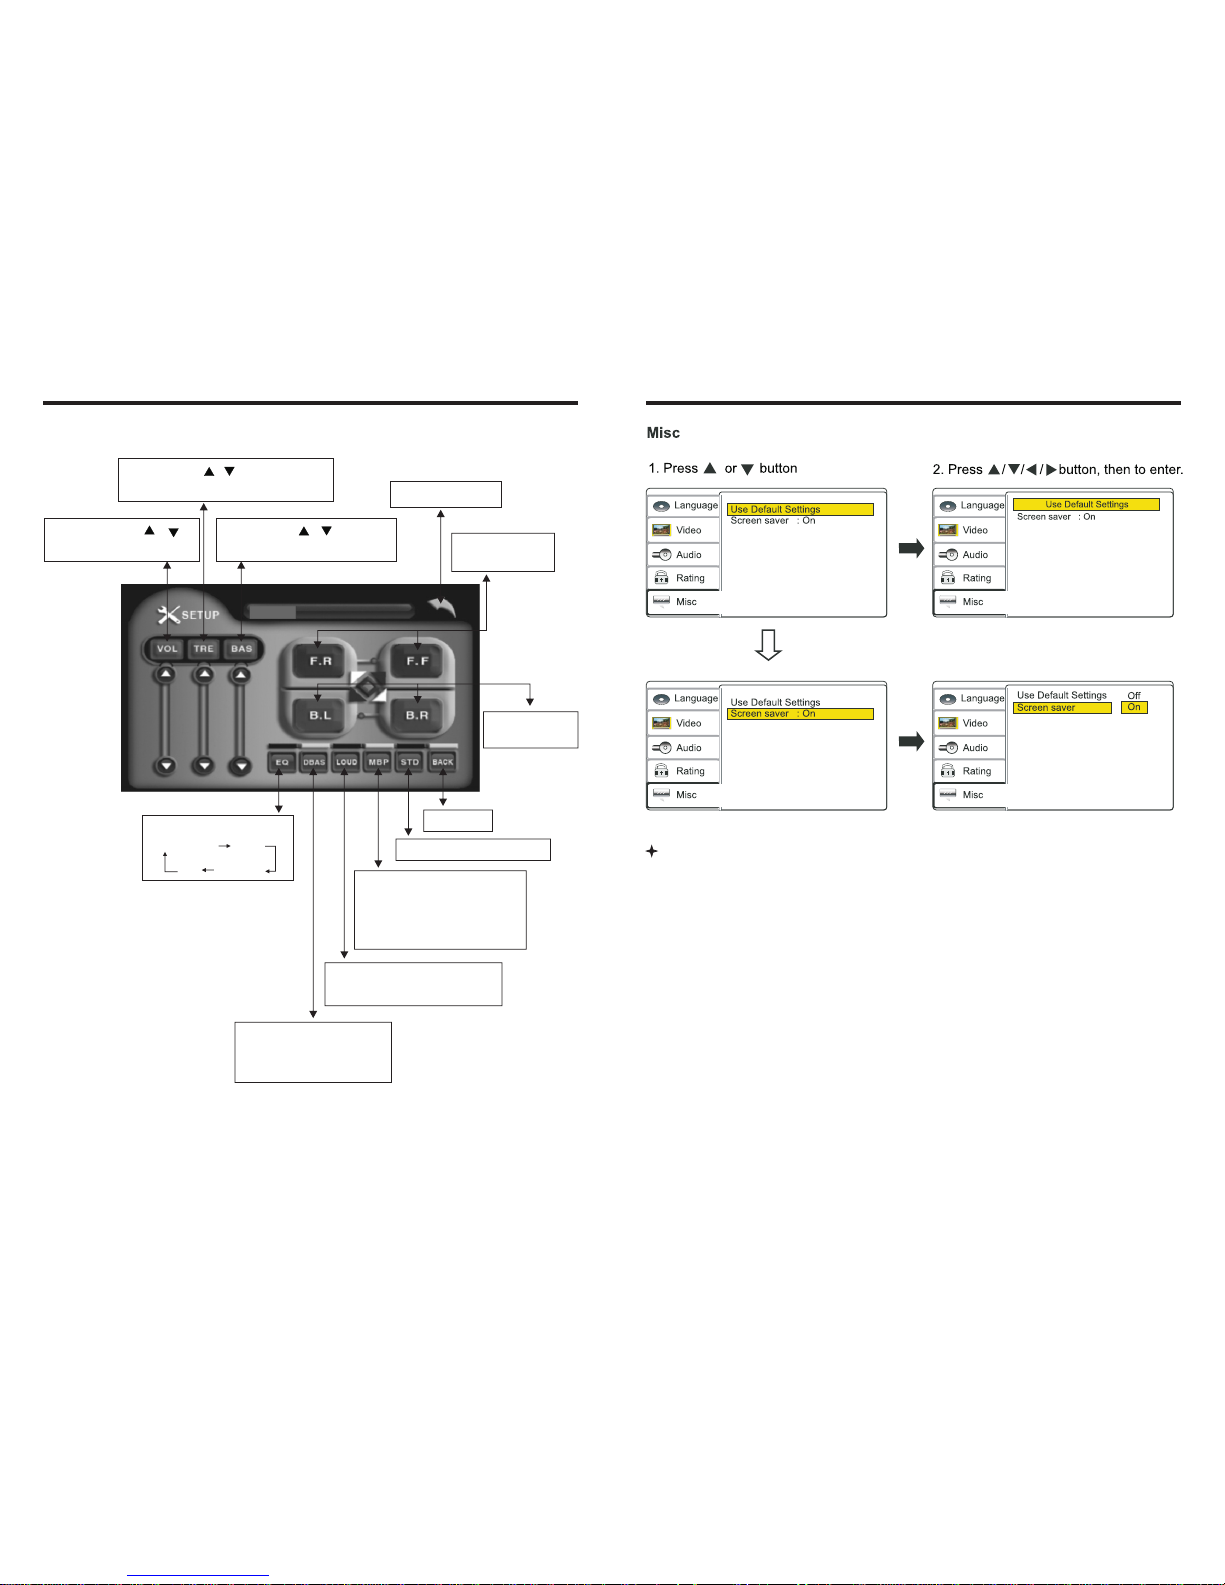
10.ADJUST MODE(pic A)
Volume: press /
button to adjust volume
Sharp: press button to adjust
sharp sound high and low
/
Bass: press button to
adjust bass level
/
Back main menu
Adjust front and
rear speaker
Adjust left and
right speaker
EQ mode
From
POP
Classic
Off
DBAS on/off: press
once to DBAS on, press
again to DBAS off
Loud: press once off LOUD
on, press again to turn off
Choose the best listening
place; this function will
make you enjoy the best
comfortable sound effects
Resume standard video
Exit setup
Rock
Note: No screen saver function.
Page 15
INSTRUCTIONS INSTRUCTIONS
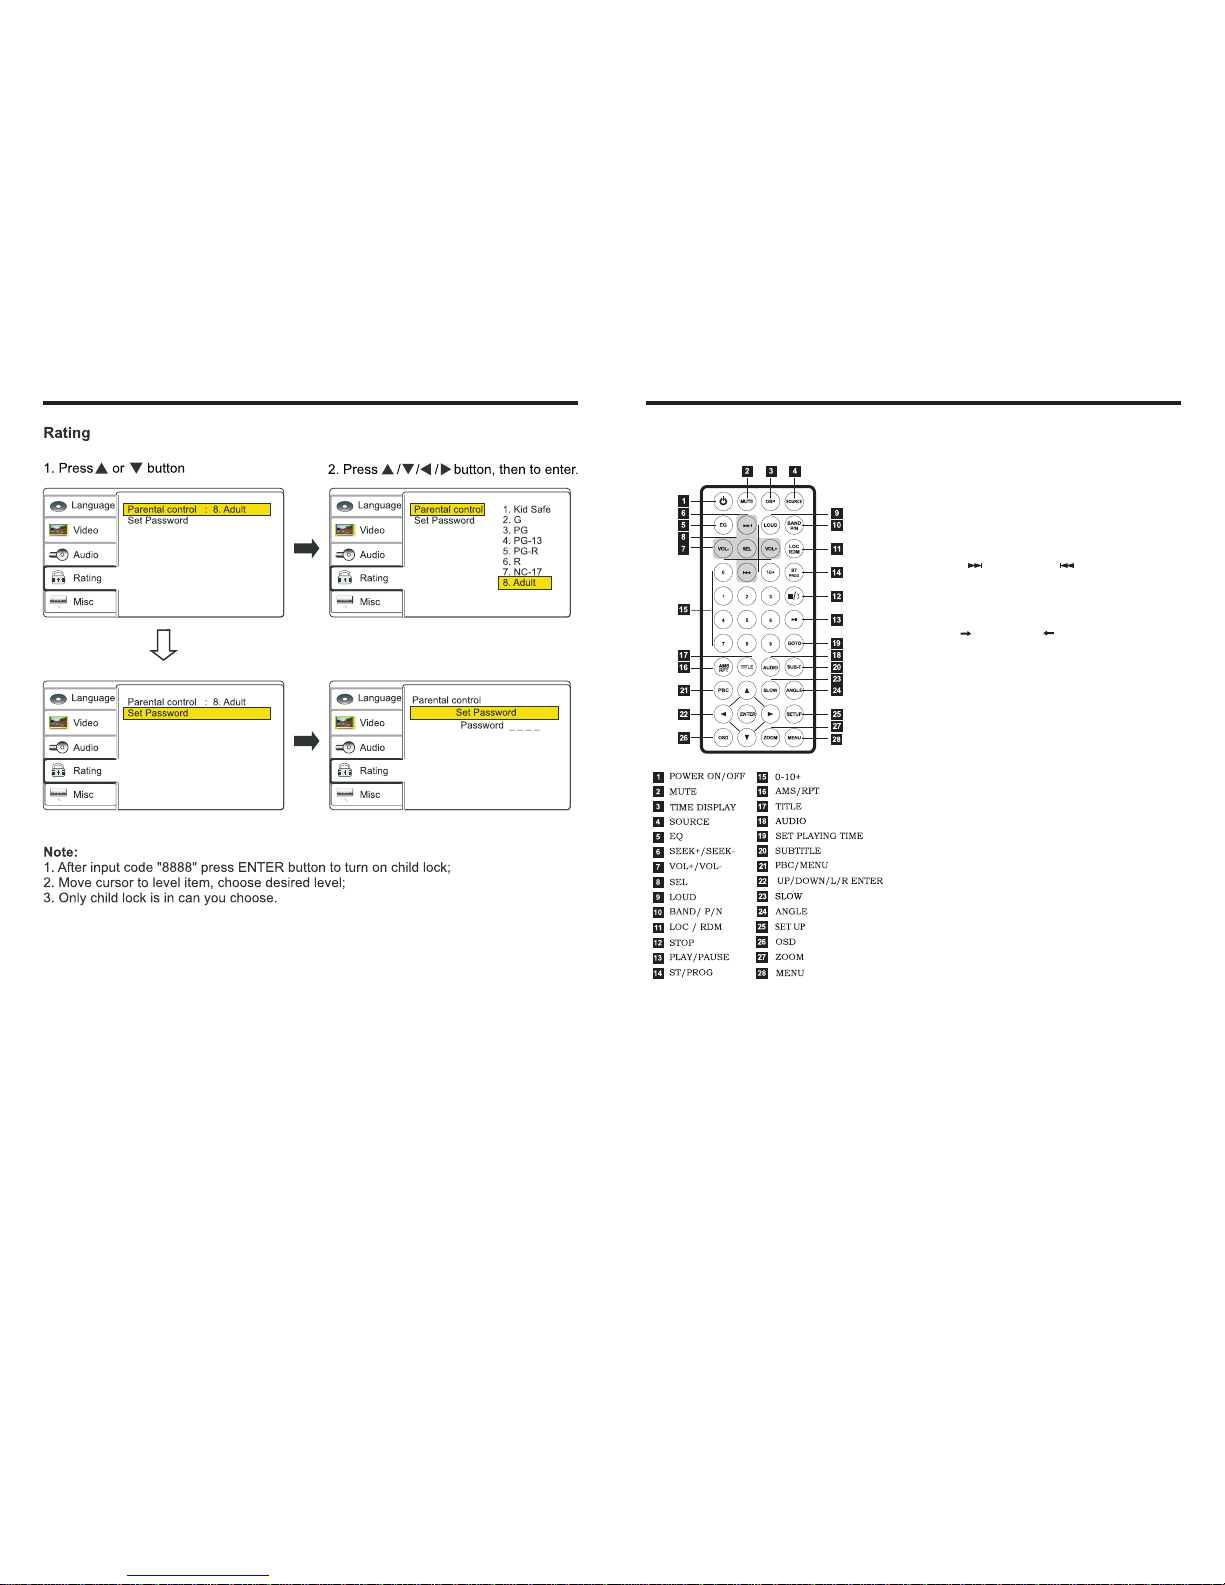
11.REMOTE CONTROL FUNCTION
4. SOURCE Button
Press this button to choose audio sources.
5. EQ Button
Press this button to choose POP, ROCK, CLASS, off.
6. SEEK + ( ) / SEEK - ( ) Button
Press this button to manual turning, speed
or quick back, previous song and next song.
7. VOL + ( ) / VOL - ( )
Press this button to increase or decrease
volume level.
8. SEL Button
Press this button to choose sound feature.
9. LOUD Button
Press this button to startup LOUD function.
10. BAND - P/N Button
In radio mode, press this button to choose band.
In VCD, DVD mode, press this button to choose
AUTO, PAL or NTSC system.
11. LOC/RDM Button
In radio mode, press this button to switch
between local and direction. In VCD, CD mode,
press this key to randomly play.
12. STOP Button
Press this button to stop playing.
13. PLAY/PAUSE Button
Press this button to switch between play and
pause. In stop mode, press this button to play.
14. ST/ PROG Button
In radio mode, press this button to choose
stereo or mono station. In audio mode, it
can help STOP button to programmed play.
1. POWER
Press once to switch on, press again to
switch off.
2. MUTE Button
Press once to turn off audio output,
press again to resume volume level.
3. DSP
Press this button to show the time.
15
30
Page 16
INSTRUCTIONS INSTRUCTIONS
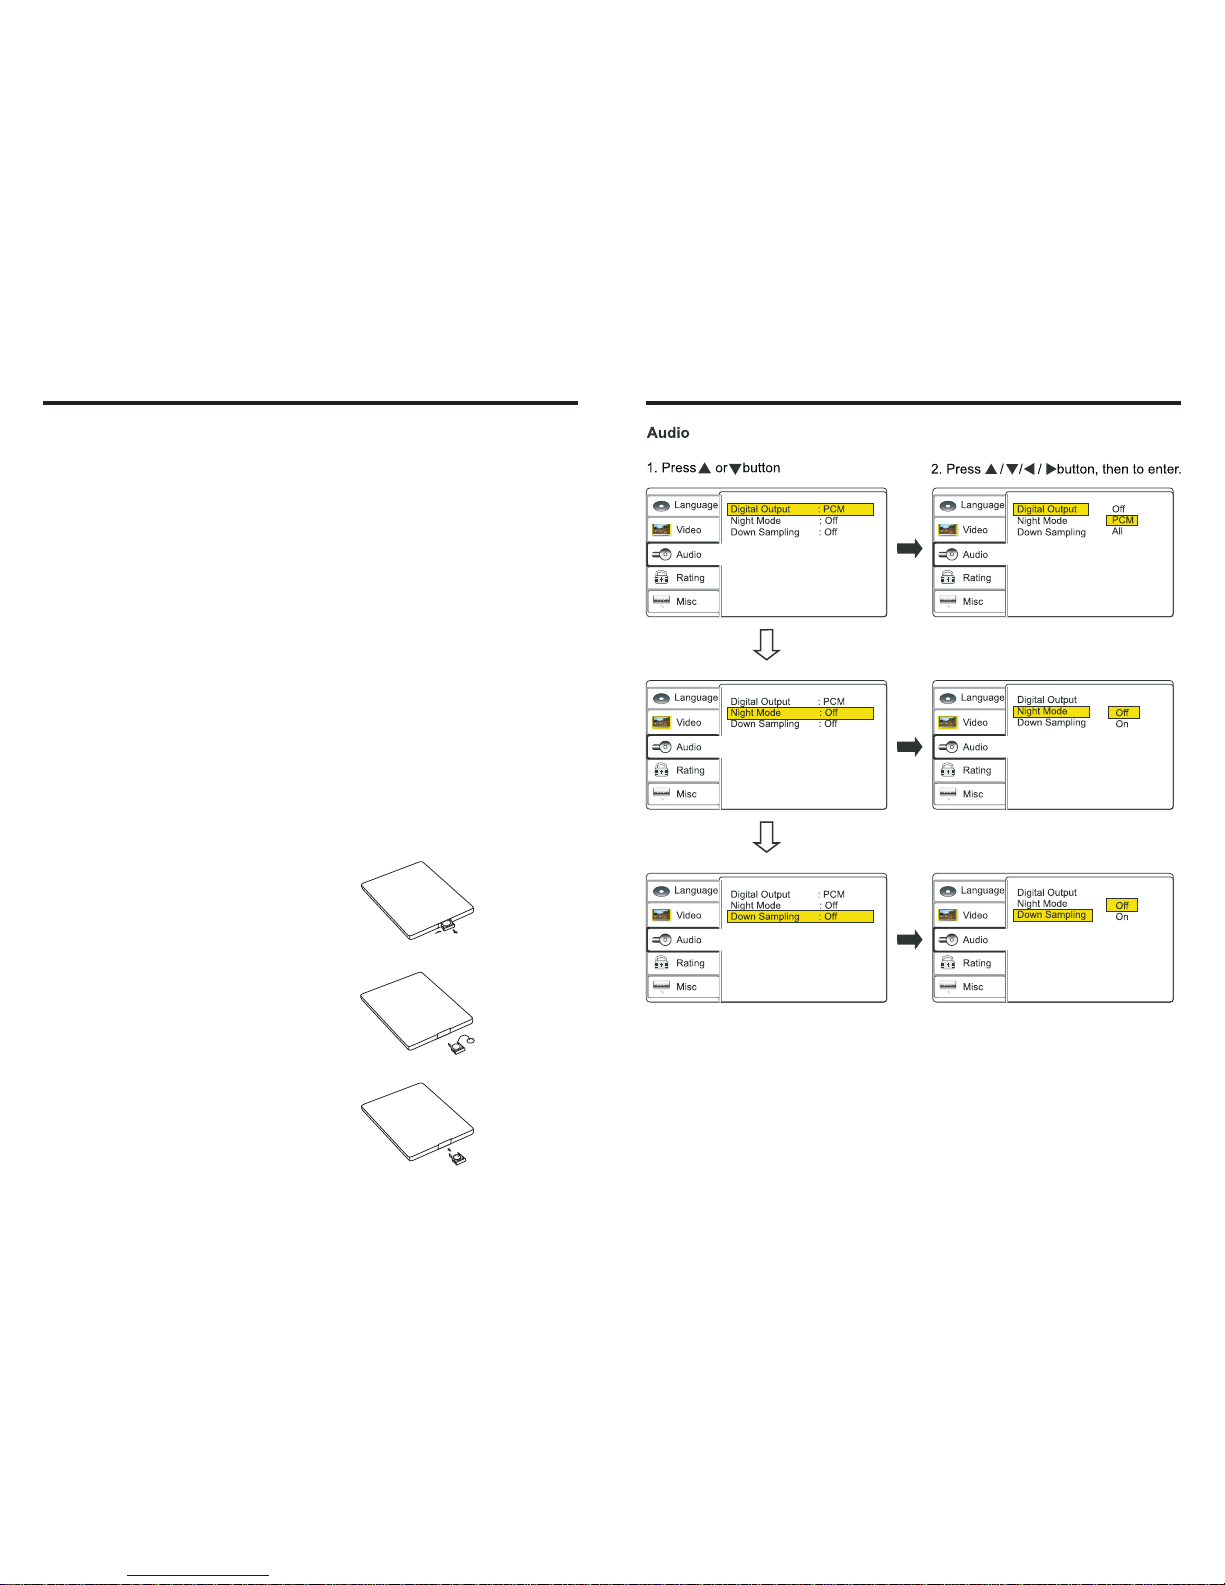
15. 0 - 10 + Button
Press this button to choose desired song,
section, preset stations.
* Decimal numbers, for example the 19th
song, press 1,9 button;
* Centesimal numbers, for example, the
120th song, press 1,2,0 button.
16. AMS / RPT Button
In radio mode, press this button to browse
stored stations. In audio mode, press this
button to play repeatedly.
17. TITLE Button
In DVD mode, press this button to play
back to the top menu of disc.
18. AUDIO Button
In DVD mode, press this button to switch
language of dialogue. In VCD mode, press
this button to choose left track, right track,
and stereo.
19. SET Playing Time
In DVD mode, press this button, you can
define playing time.
20. SUBTITLE Button
In DVD mode, press this button to switch
language of subtitle.
21. PBC Button
In VCD mode, press this button to display
all song menus, work with number button
to choose songs.
22. UP, DOWN, LEFT, RIGHT, ENTER
Button
In DVD mode, press this button to move
cursor up, down, left, right to choose item
in menu. Press the enter button to confirm
choice.
23. SLOW Button
In audio mode, press this button to slow
backward and slow forward.
24. ANGLE Button
In DVD mode, press this button to change
play angle.
25. SETUP Button
In audio mode, press this button to choose
different set items.
26. OSD Display
Press this button to display the title chapter
and the left time.
27. ZOOM Button
In DVD/VCD mode, press this button to
ZOOM in.
28. MENU Button
Press button to back to the main menu.
BATTERY CHANGE
When control distance of remote control
becomes shorter or no function, please
change battery. Please confirm polarity
before change.
One hand press stopper, then pull out battery.
Put battery into controller.
Insert battery holder into controller.
16 29
Page 17
INSTRUCTIONS INSTRUCTIONS
17
28
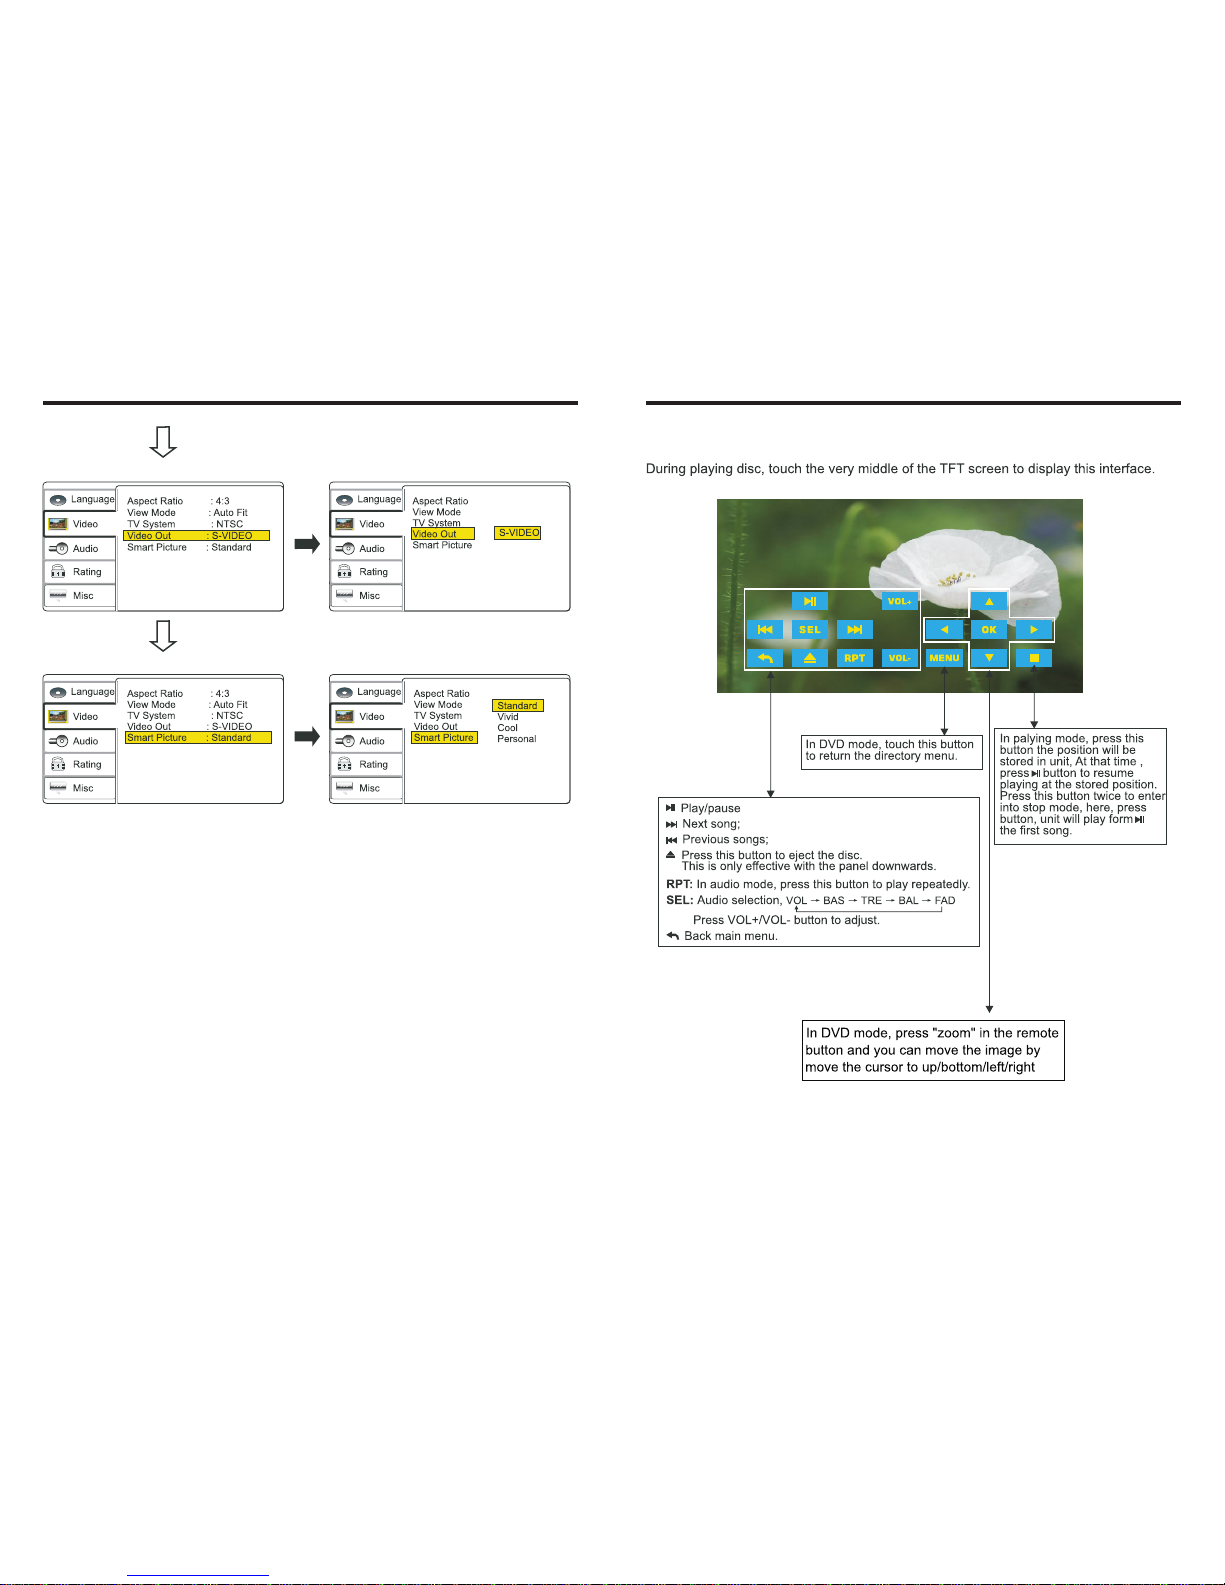
12.DISC PLAY TOUCH OPERATION
Page 18
INSTRUCTIONS INSTRUCTIONS
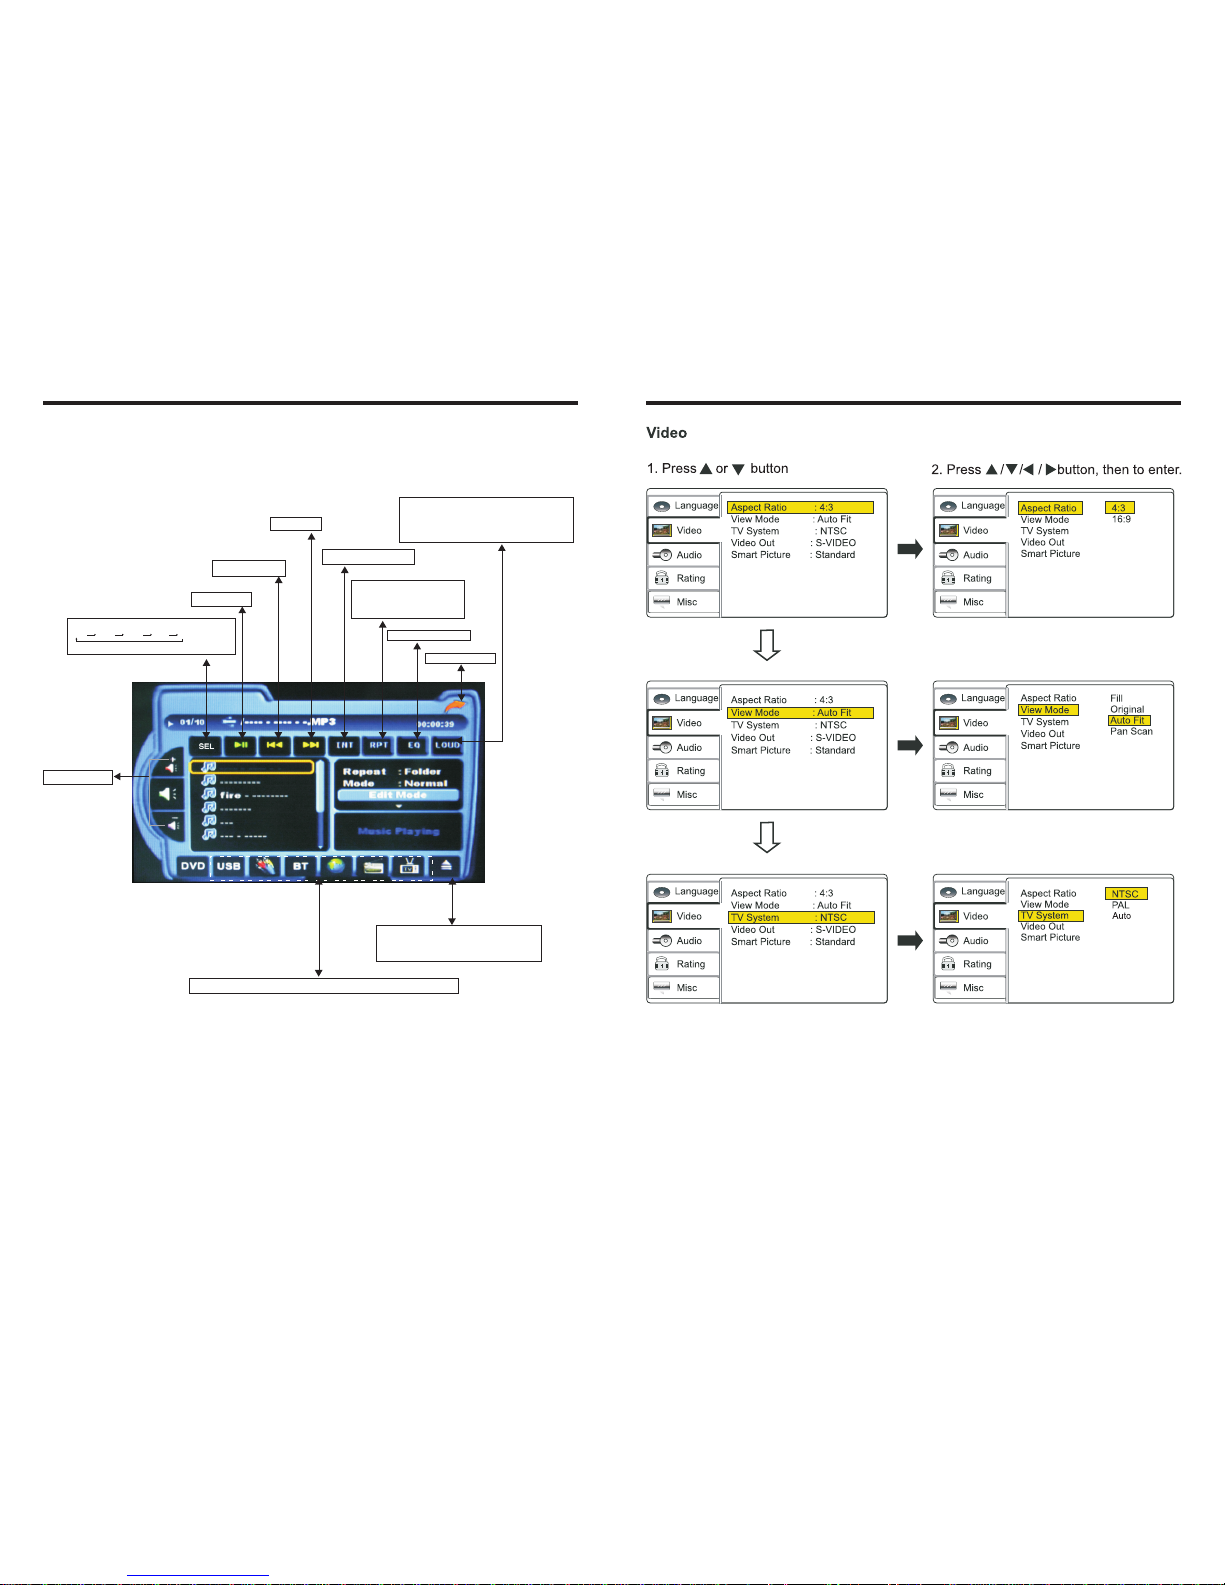
Press VOL+/VOL- button to adjust.
Audio selection,
VOL BAS TRE BAL FAD
Play/Pause
Previous song
Next song
Browse/Broadcast
Repeat select,includes
single song repeat and
directory repeat
sound effect choice
Back main menu
Press this button to exit balance left
&right speaker,re-press this
to resume balance left & right
speaker function.
button
Volume adjust
Touch these icons,can enter your desired pattern directly
Press this button to eject the disc
this is only effective with the panel
downwards.
13.CD/MP3 OPERATION INTERFACE
18
27
Page 19
INSTRUCTIONS INSTRUCTIONS
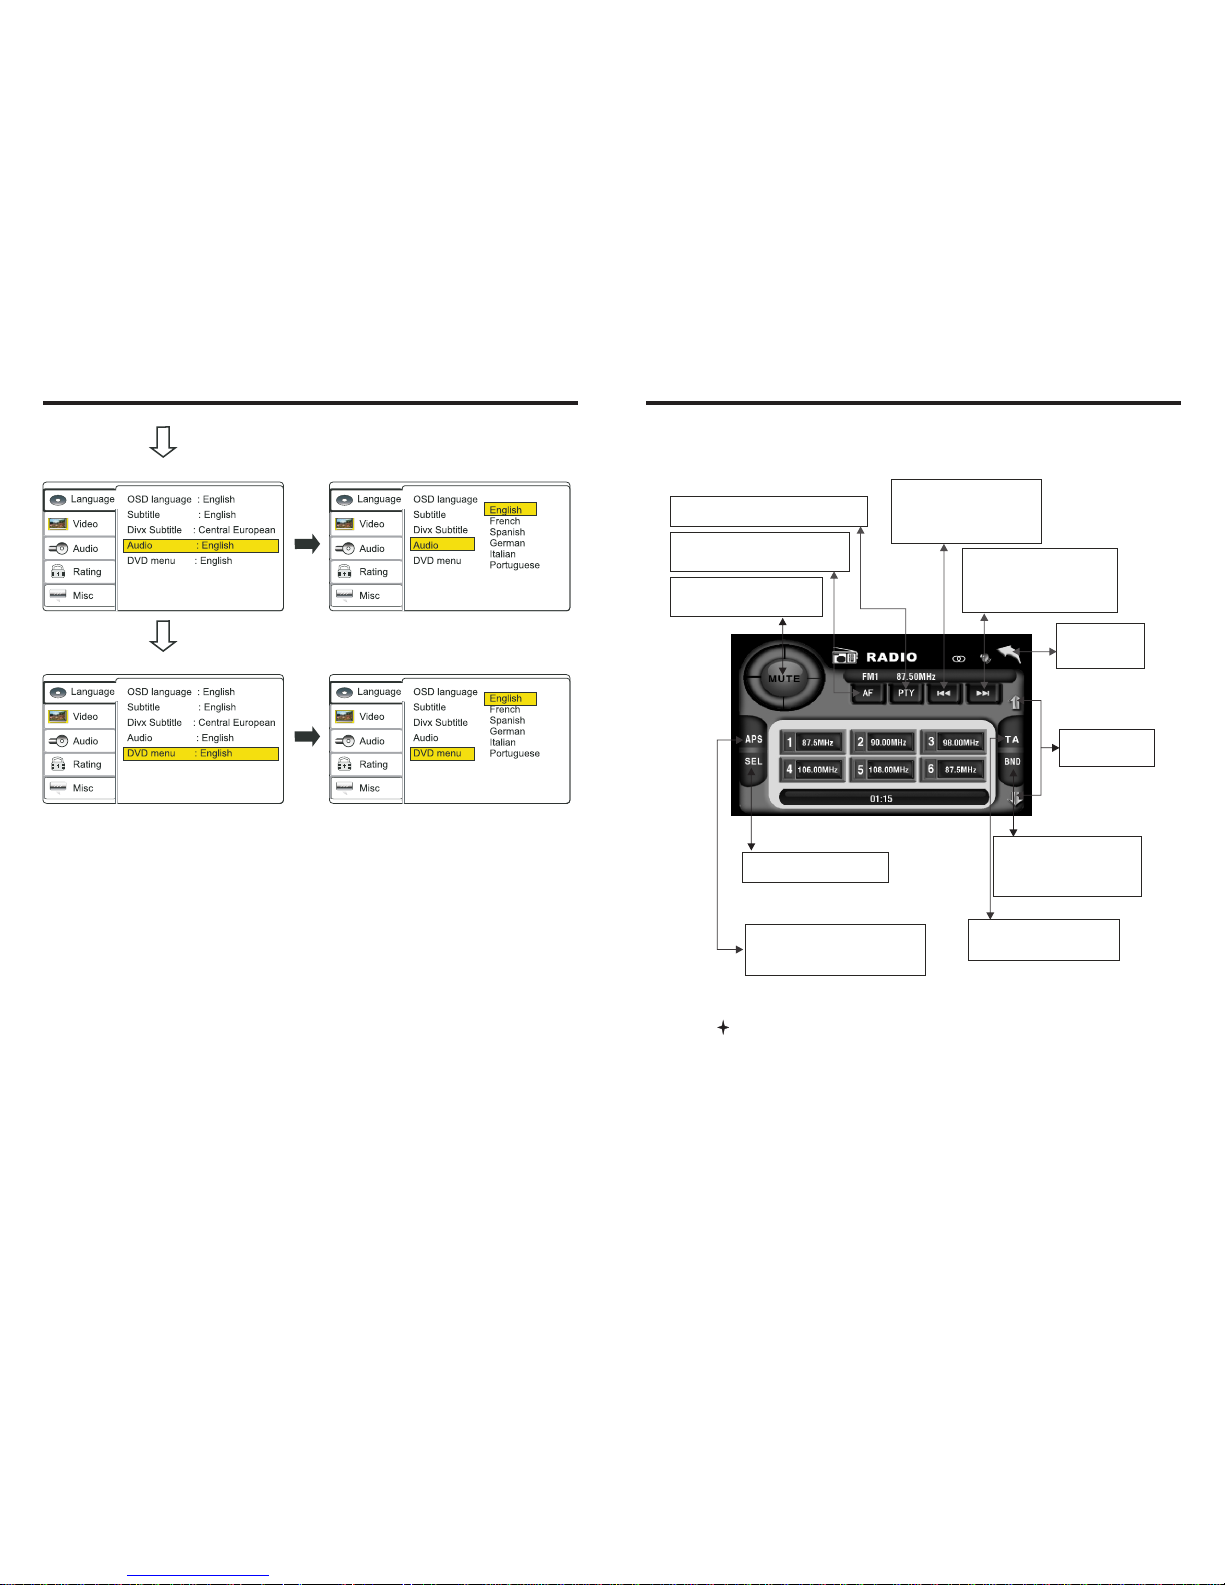
14.RDS USER OPERATION
19 26
Press this button to close sound
output, re-press this button to
resume sound.
Press this button to choose radio
channels' name, please refer to details
user manual.
Press PTY, when PTY is on, it means there
is strong RDS signals output.
Short press on this button to
decrease radio frequency;
longer press on this button to
seek radio channels frequency
decreased direction.
Short press on this button to
increase radio frequency;
longer press on this button to
seek radio channels frequency
increased direction.
Touch this area to
enter & exit main
menu.
Press this button each time, it
will automatically execute the
following operation in an
order of FM1 → FM2 → FM3 →
AM1 → AM2
Press TA, when TA is on, it
means the unit is automatically
track RDS radio channels.
Press “SEL” to adjust other
functions, please refer to pic A.
In the radio state, press APS” button,
it will automatically seek radio
channels in the whole band and preset
the strongest radio channels.
“
Press this button to
adjust angles of the
monitor.
For details of RDS operation, please refer to other instruction
Page 20
INSTRUCTIONS INSTRUCTIONS
RDS
1. EON (RDS Mark)
Indicate main unit is on auto tracking RDS mode.
2. AF (RDS Auto Tracking Mark)
Indicate radio is auto tracking RDS channel.
3. TA (RDS Signal Increasing Output)
Indicate RDS channel have signal increasing output.
4. TP (RDS Channel Stereo Mark)
Indicate RDS channel is on stereo playing mode.
5. POP.M (RDS Channel Mark)
Indicate RDS channel name.
1. RDS Tracking System
Press AF button in FM mode, and then press / last 2 Seconds, RDS will auto search
channel up and down, it will stop searching when RDS channel be founded, but “AF”
will keep remaining on the screen and waits for the next traffic emergency report.
2. RDS Tracking on Playing Mode
In playing mode, “AF” tracking system keeps on opening and waits for traffic emergency
report.
Note: RDS channel in broken line is available.
AF: RDS auto search button, in radio mode also can press this button shortly auto
tracking RDS channel, press this button shortly can cancel RDS function.
TA: In RDS mode, press this button can output TA signal, and check RDS channel is
exist or not, if no RDS signal TFT will show “NO.TA.TP”.
1) PTY: RDS button, press once will show music mode POP, press 1-6 function
memory button, every group have 2 channel.
2) Press PTY button twice and then press 1-6 function memory button, every
button have 3 channel.
NEWS
AFFAIRS
INFORMATION
SPORT
EDUCATION
DRAMA
CULTURE
SCIENCE
CHILDREN
SOCIETT
RELIGION PHONING
TRAVEL
POP M
ROCK M
LIGHT M
CLASSICS M
OTHER M
JAZZ
COUNTRY
NATION
EASY M
20 25
Page 21
INSTRUCTIONS INSTRUCTIONS
14. MENU Select
In playing mode, press PBC button on remote control to back to the menu, display will
show chapter and section in disc. Work with / button on remote control or touch
button on display to choose your desired song. Press button / ENTER button to play.
Note: This function can only be worked by the remote control.
OPEN: Press button on pedestal to eject disc.
15. Program Play
In DVD mode, you can set the sequence of playing by the program function, the operation
is as follow:
When DVD is playing, press ST / PROG button, then display shows:
For example, program the first song, input 01, press button move the cursor to the
second lattice, input desired song, for example, the third song. Program the second song,
press button, move the cursor to 2 . input 01, press button move the cursor to
th
the second lattice, input desired song, for example, the 6 song (press 6). Press button
to program play. Back to the normal mode, press the ST/PROG button, then press
button.
Note: This function can only be worked by the remote control.
16. Digital Album
Play the disc contains JPEG pictures, read the picture menu first.
1. Press button on remote control, the pictures will be browsed automatically.
2. Press ENTER button on the remote control, it can be manual browsed by SEEK + and
SEEK -.
3. ZOOM in picture function: During auto browsing, press pause button stop the screen,
press ZOOM button to zoom in or zoom out the picture. During manual browsing, you
can press ZOOM button to zoom in or zoom out picture directly.
4.Under zoom in picture, you can move the picture by .
Note: You can not move picture in normal mode and zoom out mode.
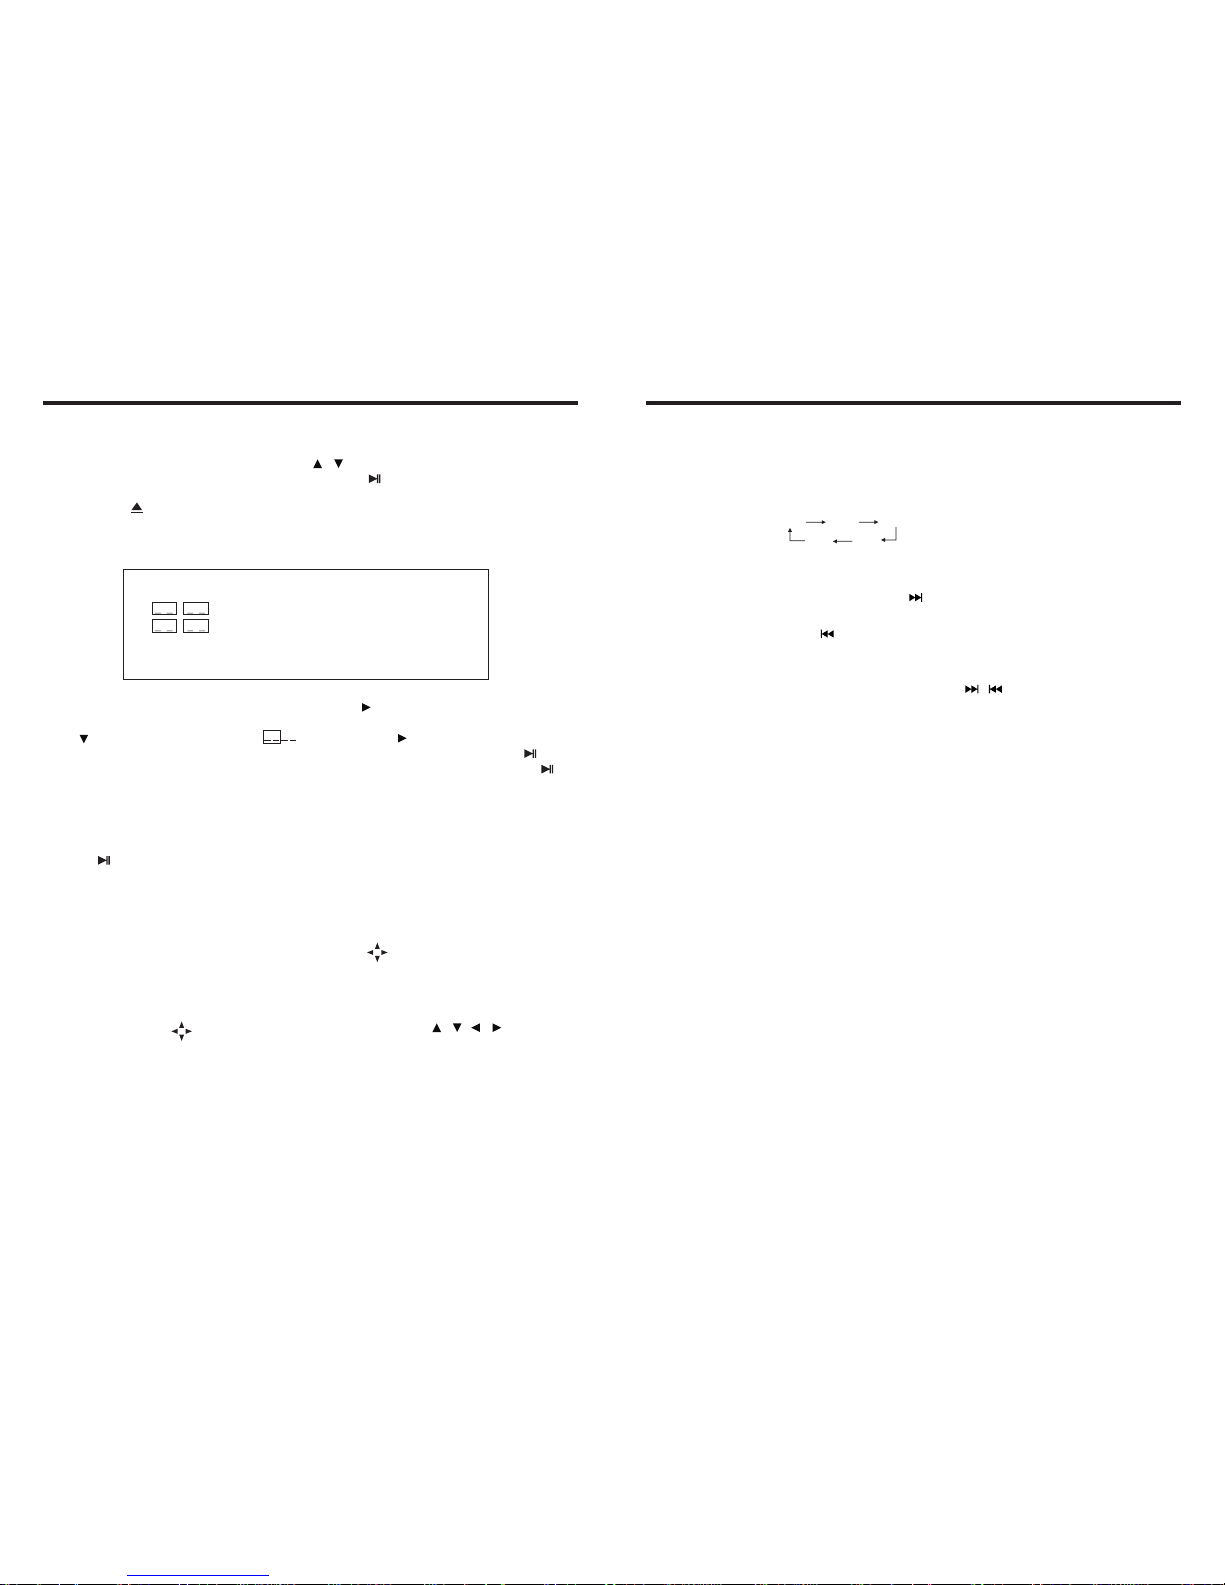
17. Setup
Press SETUP button, display will show the system set up menu and the submenu, select
the item you want by , after selecting the proper item, press / / / to press
ENTER to confirm.
Note:
1. It just can be worked by the remote control.
2. Some function setting maybe different because of the different model or disc.
3. If the selected language is not recorded in the disc, then unit will show the appointed
language,
4. About the “SETUP”, please read the follow.
Press “SETUP” on the remote control, it will appear the following touch menu:
PROG
TC
1 0 1 : 0 3
2 0 1 : 0 6
3 _ _ : _ _
4 _ _ : _ _
TC
7 _ _ : _ _
8 _ _ : _ _
5 _ _ : _ _
6 _ _ : _ _
TC
11 _ _ : _ _
12 _ _ : _ _
9 _ _ : _ _
10 _ _ : _ _
TC
15 _ _ : _ _
16 _ _ : _ _
13 _ _ : _ _
14 _ _ : _ _
PLAY
DELETE
FM1
FM2
FM3
AM1AM2
1. Band Selection
In radio mode, press BAND button, BAND/P/N button on remote control, or touch position
on screen every time to choose band, the sequence is as follows:
2. Adjust Frequency
Manually Adjust Frequency:
Press SEEK + button on remote control, or touch button on display shortly every time,
frequency will increase one step by one step till you get desired frequency. Press SEEK button on remote control, or touch button on display shortly every time, frequency will
ecrease on step by step till you get desired frequency.
Search Station:
Press SEEK + / SEEK - button on remote control, or / touch button on display
shortly every time to search station in up/down direction. When get one station, it will
auto stop searching.
3. Browse / Auto Search and Store Station
1) In radio mode, press AMS/RPT button on remote control, or APS button on display
shortly to browse preset station on 1-6;
2) In radio mode, press AMS/RPT button on remote control, or APS button on display
longer to auto search in whole band from present frequency and store 6 most strong
frequency on 1-6;
3) This unit has FM1, FM2, FM3, AM1, AM2 Bands. Each band can store 6 stations,
so a total 30 preset stations.
Note: After preset station, unit will cancel the former preset stations.
4. Mono/Stereo Selection
In radio mode, press ST/PTOG button on remote control or ST touch position on display
to choose mono/stereo program.
Note: In radio mode, start up the stereo function automatic, touch the ST button again on
the display, the TFT display will show the ST OFF & MOMO mark, that is to turn off the
stereo. When the right under foot appear the MONO mark, it show the MONO on.
5. Manual Preset and Store Station
In radio mode, press 1-6 button on remote control, or 1-6 position on display longer to
store preset frequency into preset channel. For example, the present frequency is
89.8MHz, press 2 button longer, then 89.8MHz frequency is stored in 2 channel.
15.RADIO OPERATION
21 24
Page 22
INSTRUCTIONS INSTRUCTIONS
8. OSD
In playing mode, short press OSD on remote control to show all information of present
disc.
9. Repeatedly Play
In play mode, press AMS/RPT button on remote control to start up follow repeat function.
10. Angle Switch
If the DVD disc is recorded with multi-angles, you can press the ANGLE button to switch
the angle during playing.
The sequence is as follow:
ANGLE 1 → ANGLE 2 → ANGLE 3
Note:
1. It just can be worked by the remote control.
2. It is only for the DVD disc which has multi-angle.
3. If there is a sign on the cover of the DVD disc. The number in the sign means
how many angles the disc has.
4. You can not switch the angle when slow playing.
11.Multi-Audio
There are different languages of dialogue and audio systems in DVD disc.
If the DVD disc is recorded with multi-audio, you can switch the language of dialogue and
the audio systems when playing.
Press the AUDIO button repeatedly to change the language of dialogue.
Note
1. It just can be worked by the remote control.
2. It is only for the DVD disc which has multi-language.
3. If there is a sign on the cover of the DVD disc, means that it was recorded
by multi-language/audio system.
4. In VCD mode, press the AUDIO button to select the L/R or STEREO track.
12.Multi-Subtitle
If the DVD disc is recorded with multi-subtitle, you can switch the languages of subtitle.
Press the sub-t button repeatedly to change the language.
Note:
1. It just can be worked by the remote control.
2. It only for the DVD disc which is recorded with multi-Subtitle.
3. If there is a sign on the cover of the DVD disc means that it has several
subtitle.
13. Title Select
In DVD mode, press TITLE button to back to the title menu. Display shows all the titles of
the disc. You can select the chapter you want by the cursor, press play button to play the
chapter.
Note: It just can be worked by the remote control.
Repeat (chapter)
Repeat (section)
Repeat (off)
22
23
 Loading...