

Page 1
PDF created with FinePrint pdfFactory trial version http://www.pdffactory.com
Page 2
Page2
Thankyouforpurchasingthiscaraudioproduct.
Pleasereadthismanualcarefullybeforeoperatingthiscaraudioproduct.
Pleasekeepthismanualforfutureuse.Itwillbehelpfultoyouifyouareencounterany
operationalproblem.
Toreducetheriskoffireorelectricshock,donotusetheunitintherainormoisture
environment.
Topreventdirectexposuretolaserbeam,donottryopentheenclosure.
Visibleandinvisiblelaserradiationwhenopenandinterlocksdefeated.
Toprotectourenvironment,donotdisposeofelectricalequipmentinthedomesticwaste.
Pleasereturnanyelectricalequipmentthatyouwillnolongerusetothecollectionpoints
providedfortheirdisposal.
Thishelpsavoidthepotentialeffectsofincorrectdisposalontheenvironmentandhuman
health.Thiswillcontributetotherecyclingandotherformsofreutilizationofelectricaland
electronicequipment.Informationconcerningwheretheequipmentcanbedisposedofcan
beobtainedfromyourlocalauthority.
WARNING!
Selectingfineaudioequipmentisonlythestartofyourmusicalenjoyment.
Nowitistimetoconsiderhowtomaximizetheenjoymentyouwillgetfrom
knowinghowtoworkyournewcarstereoreceiver.
Wehopeyouenjoyusingthisproductandencourageyoutoalwayslistenat
amoderate,safesoundleveltoavoidanypossiblehearingdamageorloss.
Ifyoulistentoexcessivelyloudsoundovertime,yourhearingcanadaptto
highervolumesandwhatsounds"normal"toyoumaybequiteharmfuland
cancauseyoutohavepermanenthearingloss.Sopleasepractice"safesound"
andalwayslistenatmoderate soundlevelsonly.
Startwithyourvolumecontrolatthelowestsetting,andslowlyincreasethelevel
untilyoucanhearitcomfortablyandclearly,freefromdistortion.
Onceyouhaveestablishedthiscomfortablesoundlevel,leaveitthere.
Preface
Page9
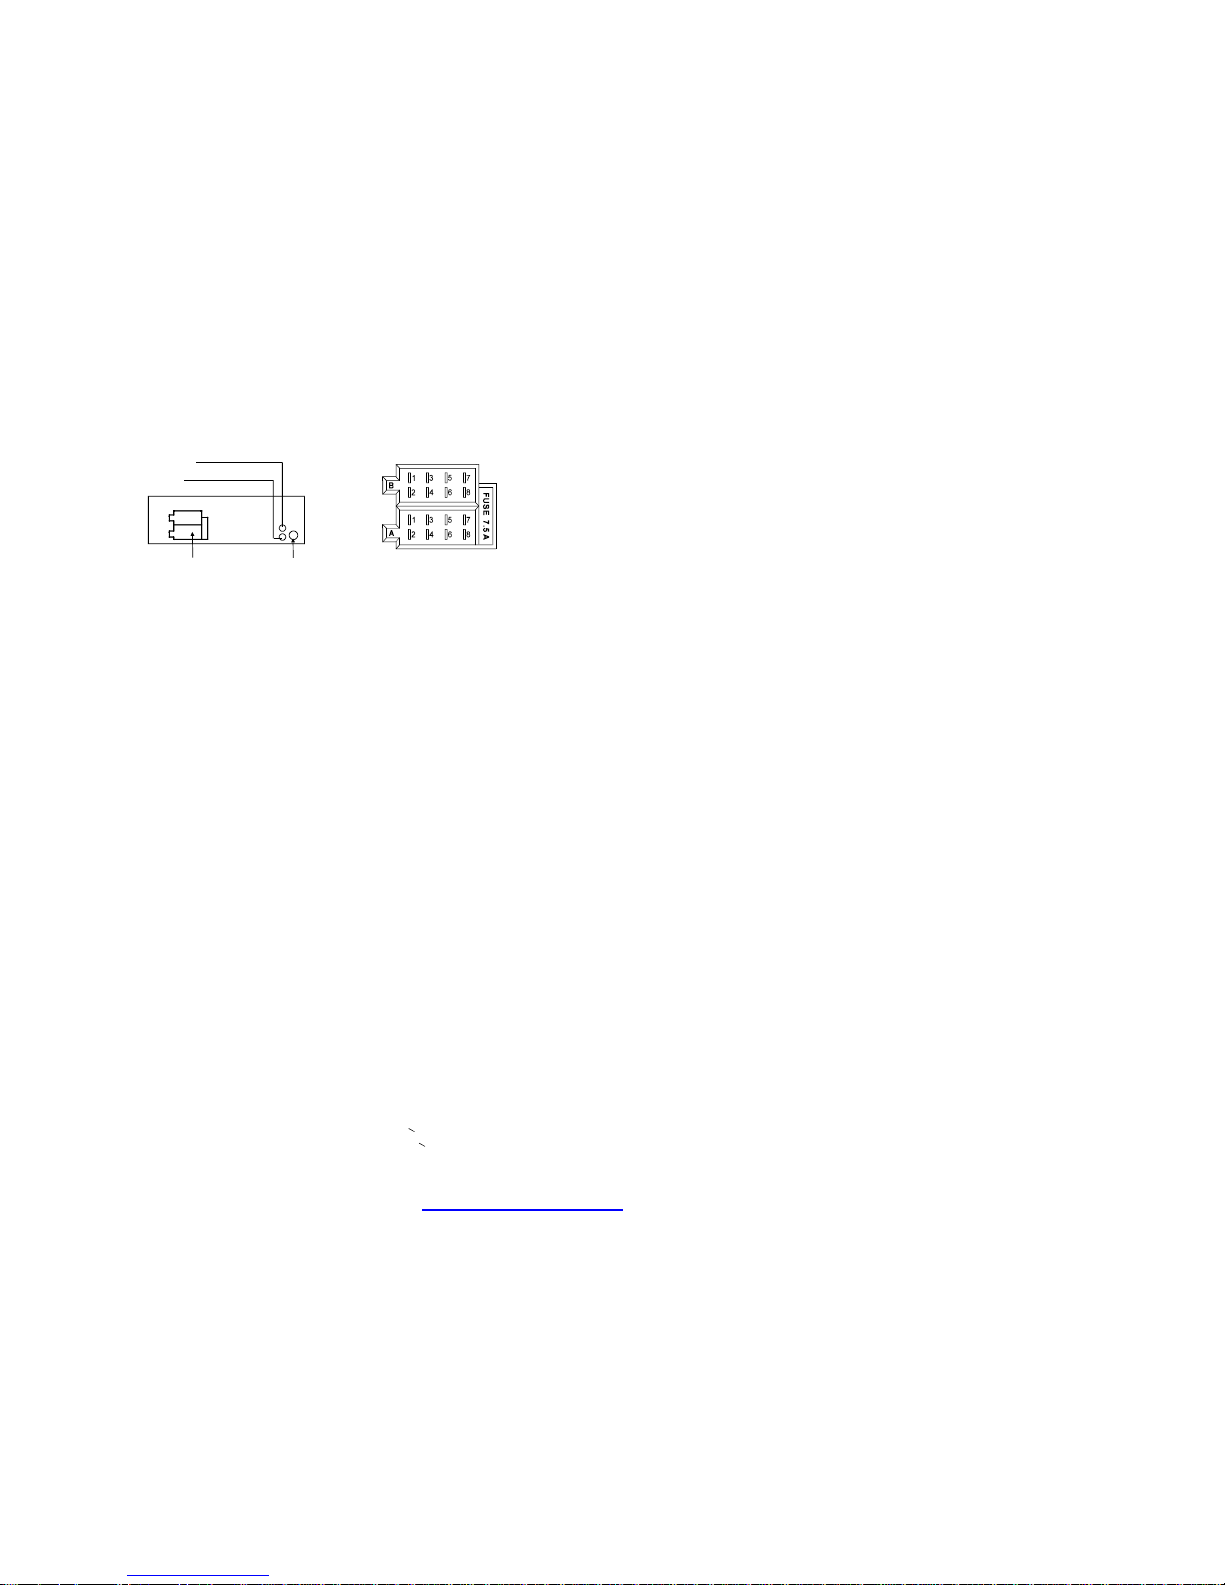
FIXEDISOCONNECTORA
1.
2.
3.
4.CONSTANT+12VDC
5.AUTOANTENNAB+
6.
7.ACC+12VDC
8.GROUND
FIXEDISOCONNECTORB
1.REARRIGHTSPEAKER(+)
2.REARRIGHTSPEAKER(-)
3.FRONTRIGHTSPEAKER(+)
4.FRONTRIGHTSPEAKER(-)
5
7.REARLEFTSPEAKER(+)
8.REARLEFTSPEAKER(-)
.FRONTLEFTSPEAKER(+)
6.FRONTLEFTSPEAKER(-)
WIRESCONNECTION
SPECIFICATION
GENERAL
SupplyVoltageDC12V.NegativeGround
CurrentConsumptionMax.7.5A
PowerOutput4x60W
Numberofchannels2STEREOchannels.
UnitDimensions(LxWxH):7
178x165x50(mm)
FMSECTION
Frequencyrange87.5MHz-107.9MHz
Effectivesensitivity3uV.
I.FFrequency10.7MHz.
AMSECTION
Frequencyrange530KHz-1710KHz
Effectivesensitivity40dB.
I.FFrequency450KHz
PreampOutput:1VMax
CDPLAYER
SystemMP3AudioSystem.
SuitableCDsMP3,CD,CD-R,CD-RWDisc
Frequencycharacteristics20Hz-100Hz<5dB
10KHz-20KHz<5dB.
S/NRatiotoCD50dB[1KHz]
” x6.5” x1.97”
FIXEDISOSOCKETSKETCH
ISOSOCKET ANTENNAJACK
FRONTLEFTRCAOUTPUT
FRONTRIGHTRCAOUTPUT
RED
WHITE
PDF created with FinePrint pdfFactory trial version http://www.pdffactory.com
Page 3
Page3
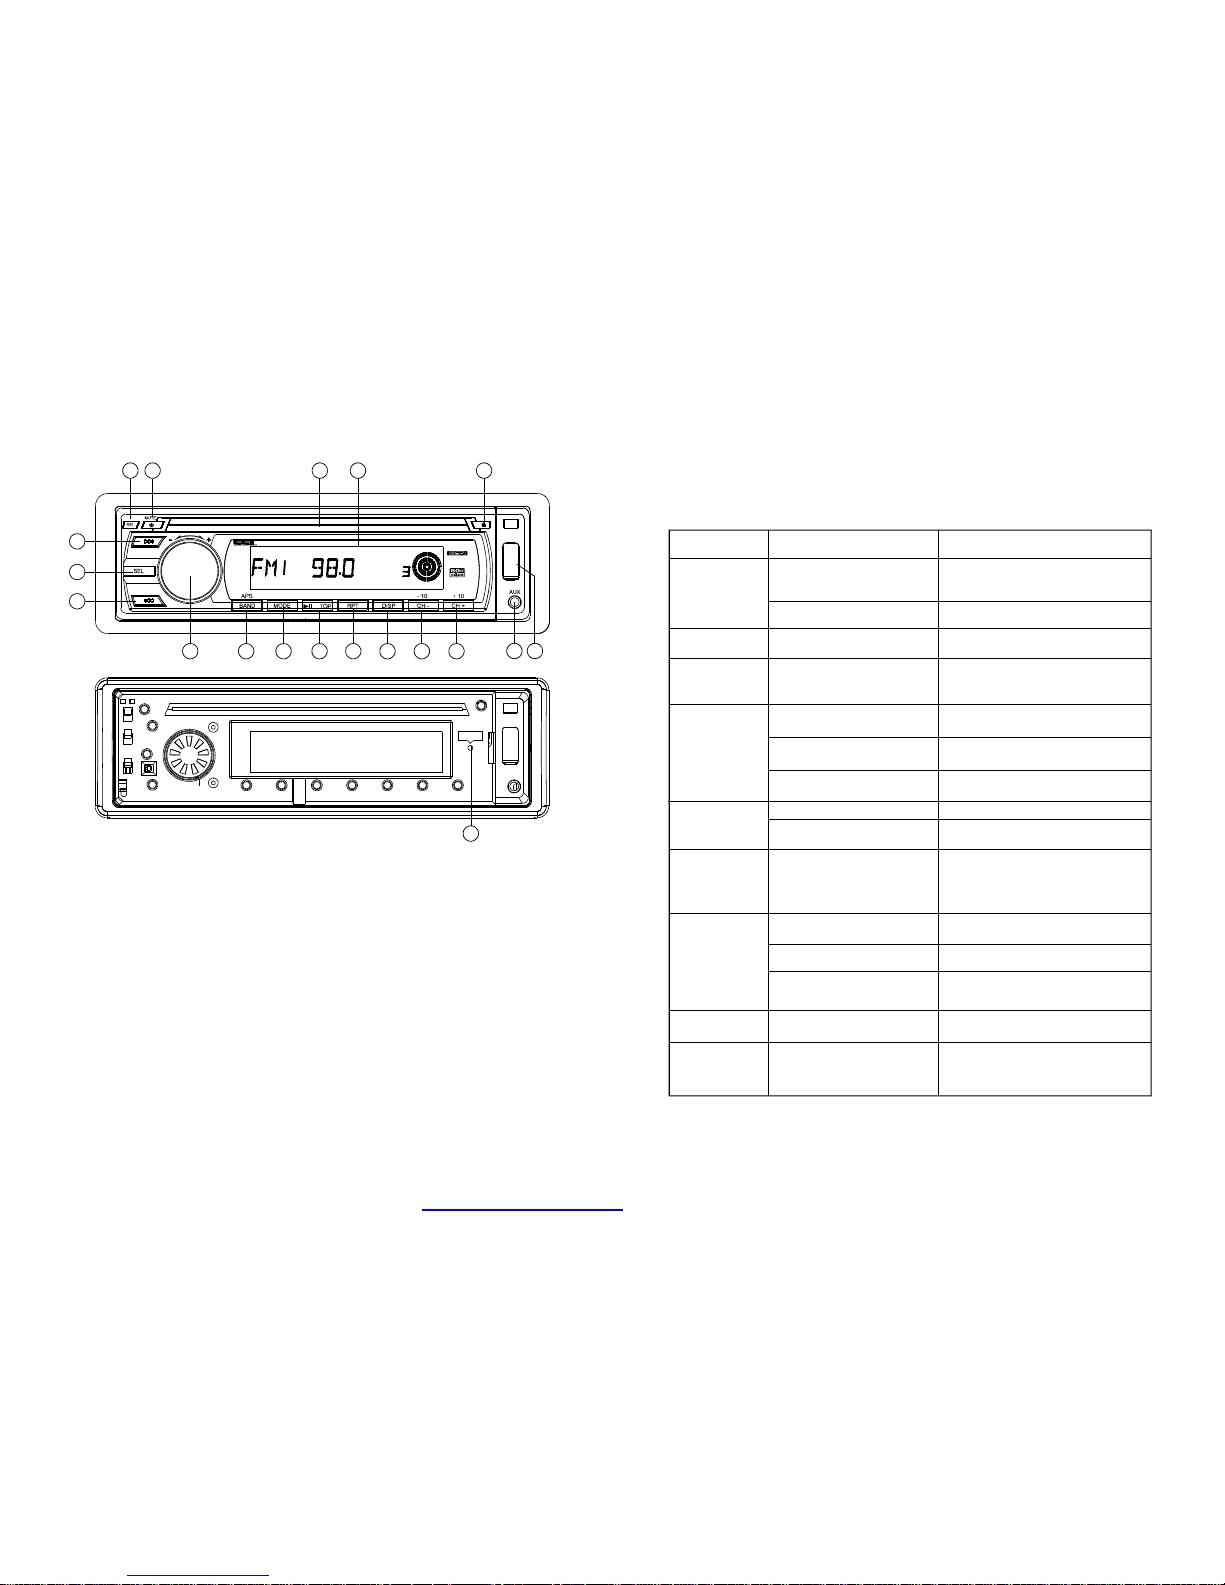
LOCATIONANDFUNCTIONOFCONTROLS
1.RELEASEBUTTON
2.POWERON/OFF&MUTE
3.CDSLOT
4.LCDDisplay
5.EJECTKEY
PresstheRELbuttontoreleasethefrontcontrolpanelfromtheunitchassis,
thenpullitupalittletoremovefromtheunitchassis.
Whentheunitispoweroff,theunitcomestoonbypressinganybuttonexcept
theRELEASEbutton.
Whentheunitispoweron,pressandholdthepowerbuttonformorethan0.5
seconds,theunitgoesintopoweroffmode.
Whentheunitispoweron,pressthepowertoswitchtheMUTEstateon/off.
Inthepoweronstate,theloadeddisccanbeejectedbypressingtheEJkey.
19
9
17 18
10 11 12 13 151416
4
5321
6
8
7
RESET
VOLUME
USB
M335USA
Page8
TROUBLESHOOTING
Beforeusingthechecklistpleasemakealltheconnectionsfirst.
Ifyoustillhavequestionsaftergoingthroughthechecklist,pleaseconsult
yourlocalcustomerservicerepresentative.
CommonSymptoms
Thereisnopower.
TheCDscannot
beloaded.
Cause
Thefusehasblown.
PresenceofCDdiscinsidetheplayer
Insertingthediscinupsidedown
ThesurfaceofCDisextremelydirty
oritisdamaged.
Temperatureinsidethecaristoo
high.
Thevolumecontrolissettoolow.
Thereisnosound.
Theoperationkeys
donotwork
Thesoundofthe
CDplayerskips
Theantennacableisnotconnected. Inserttheantennacablefirmlyintothe
antennasocketofthedevice.
Noradioreception.
1.Thebuilt-inmicrocomputerisnot
operatingproperlyduetonoise
2.Frontpanelisnotproperlyfixinto
itsplace
1.Switchthedeviceoffandonagain.Orpress
theRESETbuttontoresumetheprogram.
2.Reinstallthefrontpanel
Thedevicehasnotbeencorrectly
connected.
Theinstallationangleismorethan
30degrees
Waituntiltheroadbecomessmootherbefore
playingtheCD.
Adjusttheinstallationangletolessthan30
degrees
Turnupthevolumeproperly.
Checkthepowerandearthconnection
accordingtothewiringdiagram.
Cooloffuntiltheambienttemperaturereturns
tonormal
CleantheCDortryanotherCD,ifthisworks
correctly,thefirstCDisproperlydamaged.
Insertthecompactdiscwiththelabelfacing
upward
Removethediscintheplayerthenputanew
upward
Replaceanotherfuseaccordingtothewiring
diagram.
Thecarignitionisswitchedoff.
Ifthepowersupplyisproperlyconnectedto
thecaraccessory,switchtheignitionkeyto
ONor"ACC""".
Solution
Thedevicedoes
notworkcorrectly
(EJECT,LOAD,
PLAY)
Inautomaticsearch
modetheradiodoes
notstopatatransmittingstation.
Tuneintoaradiostationmanually.Thetransmissionsignalsaretoo
weak.
TheCDsareloaded
onlyhalfwayinto
theCDtray.
Thetransportscrewshavenotbeen
removed.
Removethetransportscrewsbeforeusing.
Thesurfaceoftheroadisuneven.
ThesurfaceofCDisextremelydirty
oritisdamaged.
CleantheCDortryanotherCD,ifthisworks
correctly,thefirstCDisproperlydamaged.
PDF created with FinePrint pdfFactory trial version http://www.pdffactory.com
Page 4
Page4
a)DuringRADIOmode:
Pressthe>>|or|<<buttonbrieflytomanualtuneup/downforthedesired
radiostationfrequencystepbystep.
Pressandholdthe>>|or|<<buttonforlonger0.5seconds,toautomatically
tuneup/downfortheradiostationfrequencyofstrongsignal.
Aftersearchradiofrequency,pressRPTbuttonwillshowMEMx,thenpress
RPTtostorethechannel,orpresstheCH-/CH+toselectyourfavorchannel
andthenpressRPTtostoreit.
b)Duringdisc,USBplaybackmode:
Pressthe>>|buttonbrieflytoplaynexttrack.
Pressthe|<<buttonbrieflytoplaythecurrenttrackfromthebeginningofit
iftheplayingtimeismorethan2seconds.
Pressthe|<<buttonbrieflytoplaytheprevioustrackiftheplayingtimeis
lessthan2seconds.
Pressthe>>|or|<<buttonandholdtoskipforwardsorbackwards,release
toresumenormalplayback.
a)PresstheSELbuttonbriefly,itisactivatedasselectingeachmodeofE.VOL.
->VOLUME->BASS->TREBLE->BALANCE->FADER->
Whenselectingadesiredaudiomode,rotatetheVOLknobtoadjustthe
audioeffect.
Ineachmode,thewaitingtimeisabout5seconds,andthetimewaitingtime
isover,itreturnstothelastdisplaymodeoftunerorCDmode.
ThecontrolmodeofE.VOLisoperatedwithfollowingnumericdisplay.
-VOL:(MIN)00,01,......46,47(MAX).
-BASS/TRE:-07,-06,...,00,...+06,+07
-TRE:-07,-06,...,00,...+06,+07
-BAL:0LR9,1LR9,...,9LR9,...,9LR1,9LR0
-FAD:0FR9,1FR9,...,9FR9,...,9FR1,9FR0
b)Whenpressedandholdfor2seconds,itisactivatedascyclicalmodeof
followingfunctionsforusersselection.
->BEEP(ON/OFF)->USERSET(FLAT/CLASSIC/ROCK/POP)
->VOL(LAST/DEFA)->AVOL->STEREO/MONO(inFMmode)
->LOUD(ON/OFF)(inFMmode)->CLK(ON/OFF)->CLK(12/24)mode.
Whenselectingadesiredaudiomode,presstheVOL+orVOL-buttonto
adjusttheaudioeffect.
BEEPONmode:Thebeepisgeneratedwhenanykeyispressed.
BEEPOFFmode:Thebeepsoundisdisabled.
VOLLAST:Theradioswitchesonattheactualvolumeithadwhenitwaslast
switchedoff.
VOLDEFA:AfterpressingSELbutton,AVOLwillbedisplayed.Thenyoucan
pre-selectaconstantswitch-onvolumebyusingtheVOLknob.
CLKON:Clockwillalwaysshowonthedisplaywhenpoweroff.
CLKOFF:Clockwilldisappearonthedisplaywhenpoweroff.
6&7.TUNE,SEEK,TRACK,SKIPUP/DOWNBUTTONS
8&9.SEL(MENU)BUTTONANDVOLUMEUP(+)/DN(-)KNOB
BEEPON/BEEPOFF
VOLLAST/VOLDEFA
CLKON/OFF
’
Page7
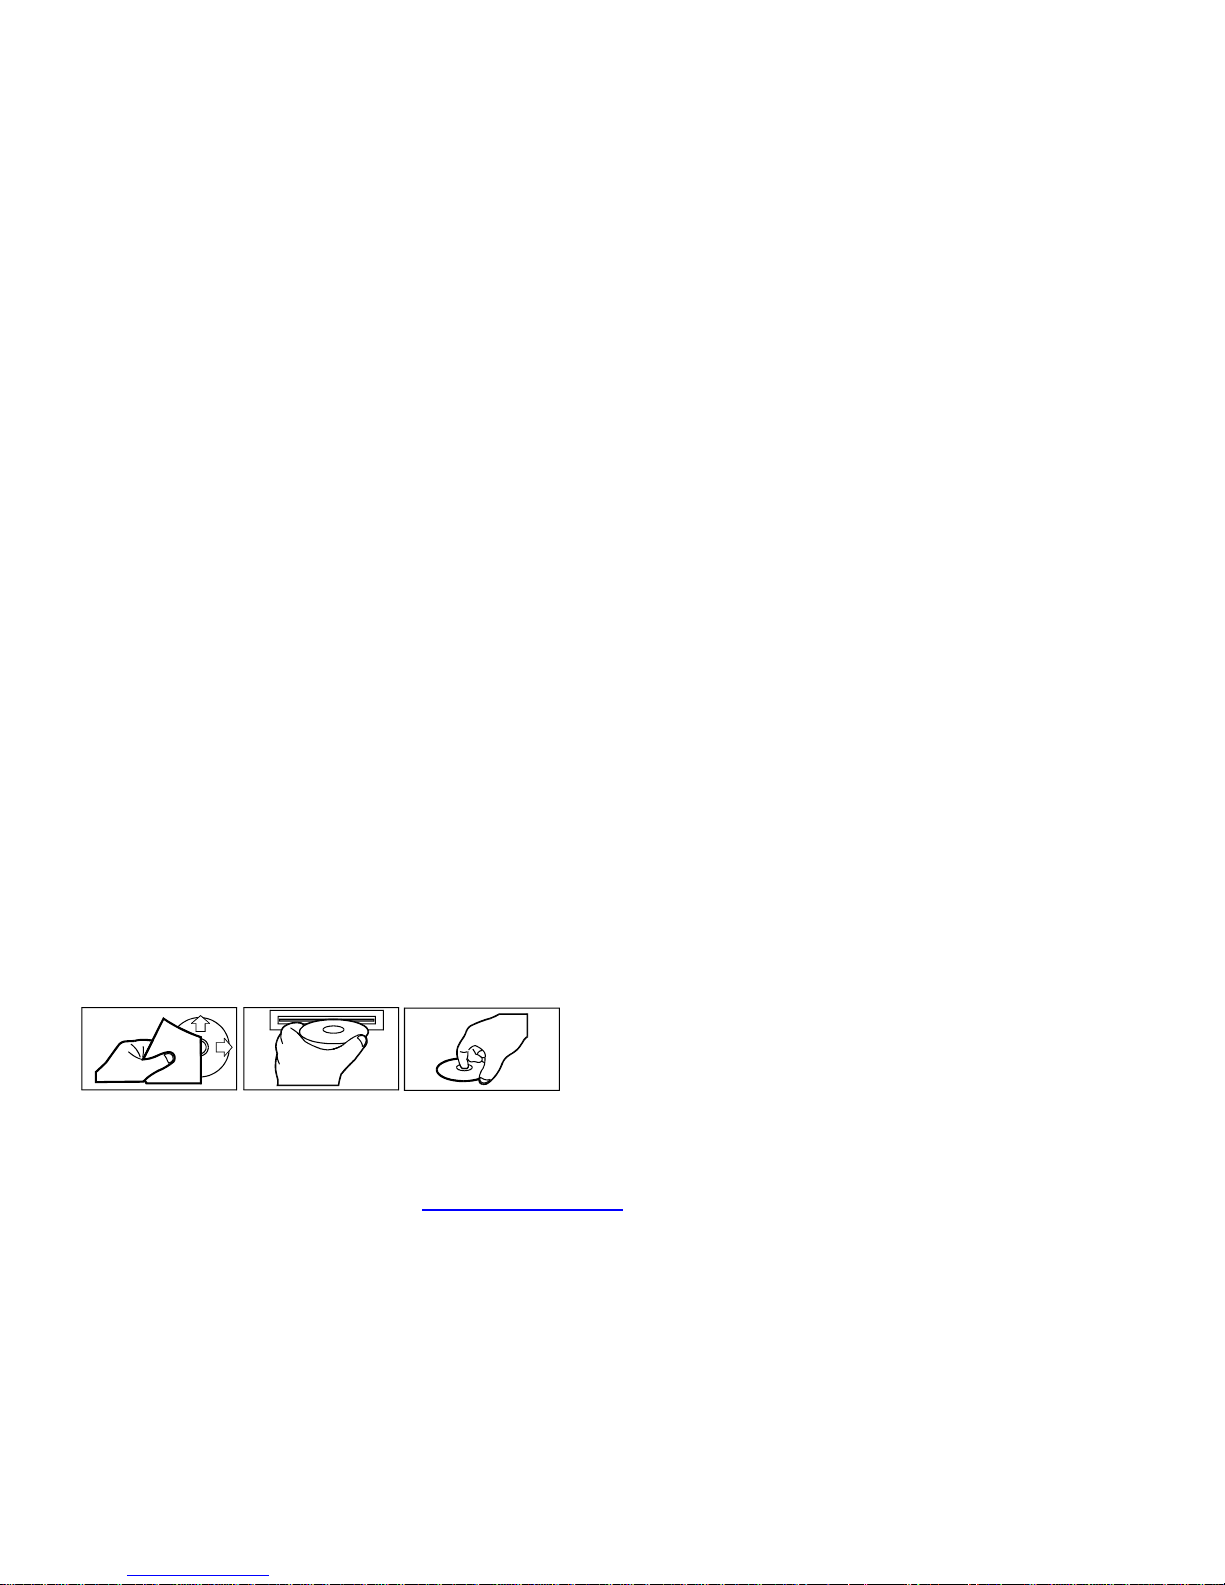
CAREFORUSINGCD'S:
1.Tokeepthediscclean:
Beforeplayingadisc,wipeitoffwithaclean,dust-freecleaningcloth.
Wipethediscoutwardsfromthedisccenter.
2.Whenonehasalreadybeeninserted.Doingsomaydamagetheunit
Donotattachanystickeroradhesivetapeonthedisc.
Handlethediscbyitsedgetokeepthedisccleananddonottouchthesurface.
.Insertadisc
withlabeledsurfaceup,oritwilldamagetheunit.
3.Donotexposethedisctodirectsunlightornearbyheatsourcessuchasheating
vents,caliductwhichcancausethedisctowarp.
Donotleavediscinacarifitisparkedindirectsunlightasthatwillleadtoa
considerableriseinthetemperatureinsidethecar.
4.Donotuseanysecondhandorrenteddisc,usually,thereisglueonthesurfaceof
thosediscs,itwillstoptheunitworkinganddamageit.
5.Alwaysstorethediscinitscaseforprotection.Scratchedupdiscswillproducepoor
soundperformanceandcauseCDplayertoskip.
6.Inrainingdayorwetarea,themoisturemayformonthediscortheopticalparts,
theplaybackmaynotbepossible.Ifmoistureformsonthedisc,wipeitoffwitha
softcloth.
Ifmoistureformsontheopticalpartsoftheunit,allowtheunittositforaboutone
hourwithpoweron.
7.Donotusesolventssuchasbenzineorthinners.Commerciallyavailablecleaners
oranti-staticspraywilldamagetheunit.
AboutCD-R/CD-R/Wdiscs:
Inadditiontocommercially-recordedaudioCD's,thisunitcanplayCD-Rand
CD-R/Wdiscs.Insomecases,particularlywhenrecordedonolderCDburners,
someCD-RandCD-R/Wdiscsmaynotplay.Also,wheneveryouarerecording
aCDforplaybackinthisreceiver,itisrecommendedthatyourecordat24xor
slowerspeedforCD-Rand4xorslowerforCD-R/Wtoachievehighersignal
qualityandbetterplaybackperformance.
PDF created with FinePrint pdfFactory trial version http://www.pdffactory.com
Page 5
Page5
Duringradiomode:
1)PresstheBANDbuttonbrieflytoselecttheradiobroadcastingbandyouwould
liketohear.TheAM/FMbandistoggledcyclicallythroughthetuningbands:
->FM1->FM2->FM3->MW1->MW2->.
2)Pressandholdformorethan1second,theradiosearchesfromthecurrent
frequencyandchecksthesignalstrengthleveluntil6stationarefound.
Andthenthe6stationsfrequencyarepresettothecorrespondingpreset
memorynumberedbank.Theauto-storageoperationisimplementedinthe
eachselectedband.Whentheauto-storageoperationisfinished,theradio
executethePresetScan.
PresstheCH-/CH+toselectthestorageradio.
DuringMP3fileindisc,orUSBmode:
PressBANDtoturntoTRACKSEARCHmode,theLCDwilldisplayTRKT000
andflashthebiggestdigit0thattheUSBFlashDrivecontain.(ifthenumberof
tracksislessthan100andmorethan9,itwillbeTRK00)
ThenrotatetheVOLknobtoselectthenumberoftheflashingdigitfrom0~9.
ThenpressSELbuttontoconfirmthenumberandflashnextsmallerdigit0.
Withthesamemeans,selectthenumberoftheflashingdigit.Afterfinishing
selectingthenumberofallflashingdigit,pressSELbuttontoplaythetrack of
theselectedserialnumber.
PresstheMODEbuttontochangeamongtuner(radio),disc(whenadiscis
loaded),USB(whenanUSBFlashDriveisinserted)andAUXmode.
Duringdisc,USBmode:
1)PresstheTOP/>||buttonbrieflytointerrupttheplaybackofthedisc,USB.
Pressagaintoresumenormalplayback.
PresstheTOP/>||buttonandholdforapproximately0.5secondstoplaythe
firsttrackofthedisc,USB.
2)PresstheRPTbuttononcetoplaythecurrenttrackrepeatedly,presstwice
toplaythecurrentfolderrepeatedly,pressthricetoplayinrandomorder,
pressfourthtoplayeachtrackforfirst10secondspart,pressagaintoturn
offabovefunction.
3)Pressthe-10and+10buttontomoveupanddown10tracksatatime.
Whentheremainedtotaltracksislackof10,thebothbuttonsareinactively.
PresstheDISPbuttonbrieflytodisplaytimefor5secondsonthedisplay,and
thenreturnstoitspreviousdisplayunlessthebuttonispressedagain.
ThenpresstheDISPbuttonandholdformorethan1seconduntiltherealtime
flashesonthedisplay.ThenyoucanadjustHOURorMINUTEbyrotatethe
VOLknob.
Pressthemodebuttontoselectauxiliaryinputplayingmode.Thenyoucan
connect anymatchedexternalaudiodevicetothissocket.Usethevolume
knobtoadjustvolume.
10.BANDBUTTON
11.MODEBUTTON
12-15.TOP/>||,INT,RPT,RDMBUTTONS
16.DISPBUTTON
17.AUXINPUTJACK
Page6
18.USBPORT
19.RESETBUTTON
InordertoplaythefileintheUSBFlashDrive,turnovertheplasticcovercapthen
inserttheUSBFlashDriveintotheUSBPort.Thesystemwillchangeintothe
USBmodeautomatically,andthenplaythefirstfileintheUSB.
Beforeoperatingtheunitforthefirsttime,orafterreplacingthecarbatteryor
changingtheconnections.Youmustresettheunit.
Pressthisbuttonwithacuspidalobject.Thisoperationwillerasetheclock
settingandsomestoredcontents.
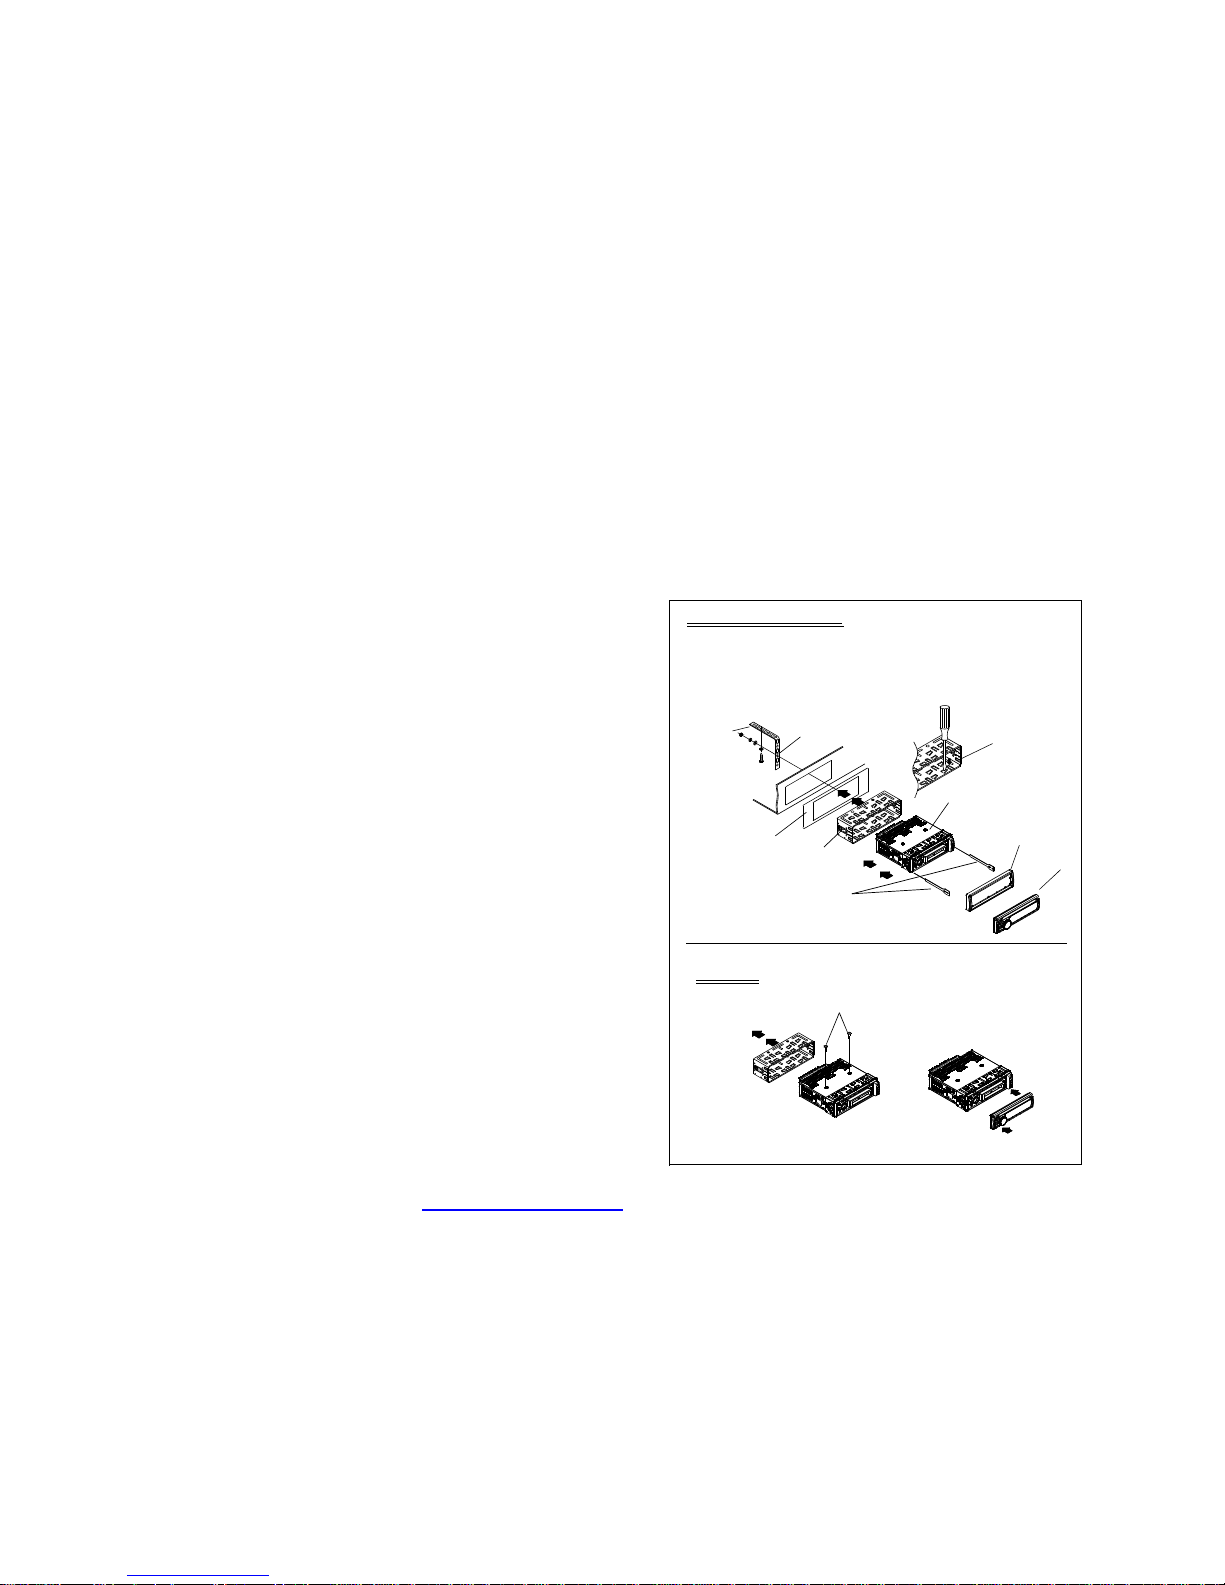
INSTALLATIONMETHOD
Thisisananti-theftinstallationmethod.
ThemainunitwearsaMETALMOUNTINGSLEEVE.
Pleaseconnectthewiring,eg,thePowersupply,theSpeakersandtheAntenna
accordingtotherequirementsofthisInstructionManual,theninstallthemetalmounting
sleeveintothecarasperthediagramillustratedbelow.
METAL
SUPPORTSTRAP
Toraisetheanti-skipcapabilityoftheunit,
pleaseensurethemetalsupportstrapis
connectedfirmlytothecarchassis.
Toproperlyfixthemetalmounting
sleeve,bendthetabsofthesleeve
againsttheDASHBOARDwitha
screwdriver.
DASHBOARD
METALMOUNTINGSLEEVE
UNITCHASSIS
PLASTICTRIMRING
FRONTPANEL
ToremovetheCDplayeroutofthemountingsleeve,
insertthetwosuppliedkeysintotheleftandrightside
slotsofthechassisatthesametime.
NOTE
Beforeinstallingandoperating
theCDplayer,removethemetal
mountingsleeveillustratedby
thearrows.
Removethetwoscrewsthatprotect
theCDplayerduringtransportation
beforeoperatingtheplayer.
Toattachtheremovablefaceplate,insertthe
rightsideofthefaceplateintotherightofthe
CDplayerchassisfirst.Thenpushtheleftside
ofthefaceplateintothechassisuntilyouhear
itclick.“”
PDF created with FinePrint pdfFactory trial version http://www.pdffactory.com
 Loading...