

Page 1

Page 2
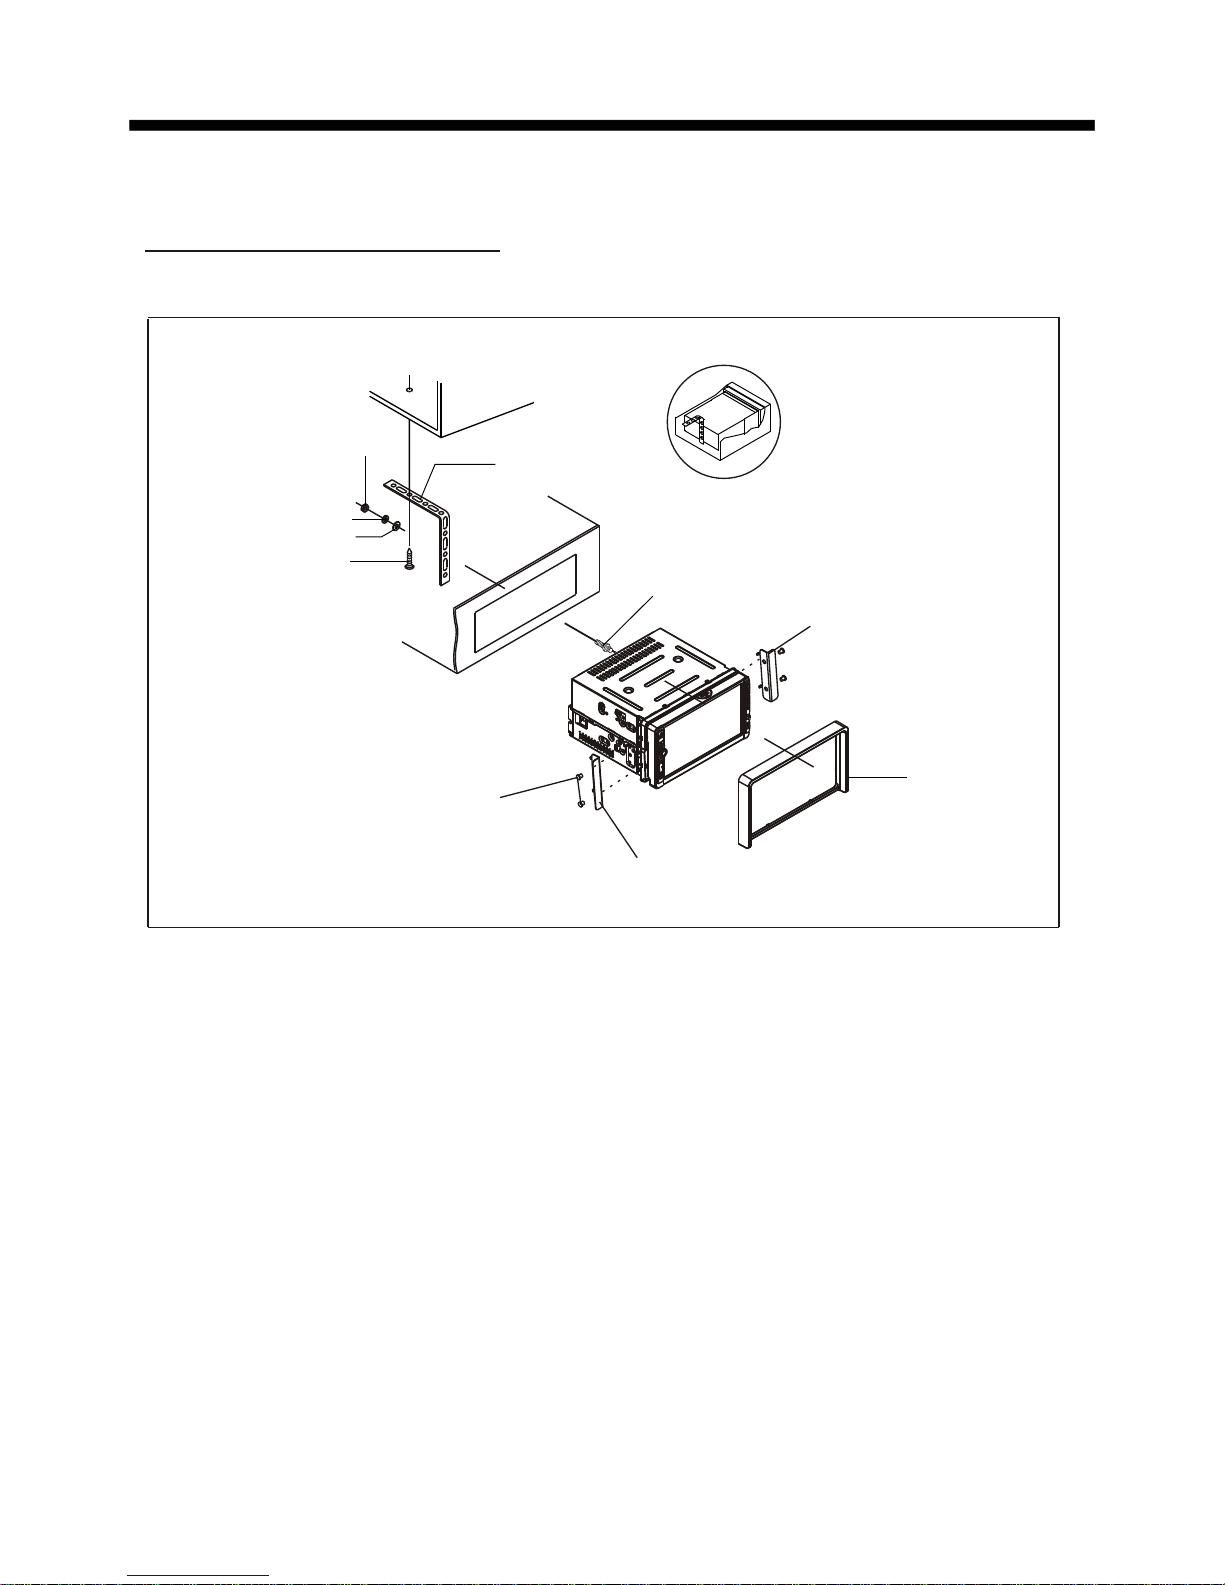
Installation diagram
MOUNTING BRACKET
MOUNTING BRACKET
MOUNTING BOLTS
Installation diagram
HEX NUT
SPRING WASHER
PLAIN WASHER
TAP PIN G SCREW
DASH BOARD
METAL MOUNTING
STRAP
CONSOLE
HEX BOLT
PLASTIC FRAME
Page 3

Wiring diagram
NOTE:
1. Must use 4 ohms impedance of speakers.
2. After connecting parking Line, video on screen of control panel
will be displayed only after
3. Before finishing wiring, do not attach control panel onto chassis.
applying parking brake.
IGNITION SWITCH
RED
WHITE
WHITE/BLACK
GREY
GREY/BLACK
GREEN
GREEN/BLACK
VIOLET
VIOLET/BLACK
YELLOW
CONSTANT 12 VOLTS
BLACK
GROUND(B-)
BLUE
AUTO ANTENNA
FRONT
Lch SPK.
REAR
Lch SPK.
FRONT
Rch SPK.
REAR
Rch SPK.
BROWN
(B-) PAR KIN G BRAKE
PINK
RADIO ANTENNA JACK
(B+) 12V
REAR CAMERA SWITCH
REAR CAMERA INPUT
YELLOW
GREY
SUB WOOFER
AUDIO R OUT (red)
AUDIO L OUT (white)
VIDEO OUTPUT (brown)
FUSE
Wiring diagram
ISO CONNECTOR
Page 4
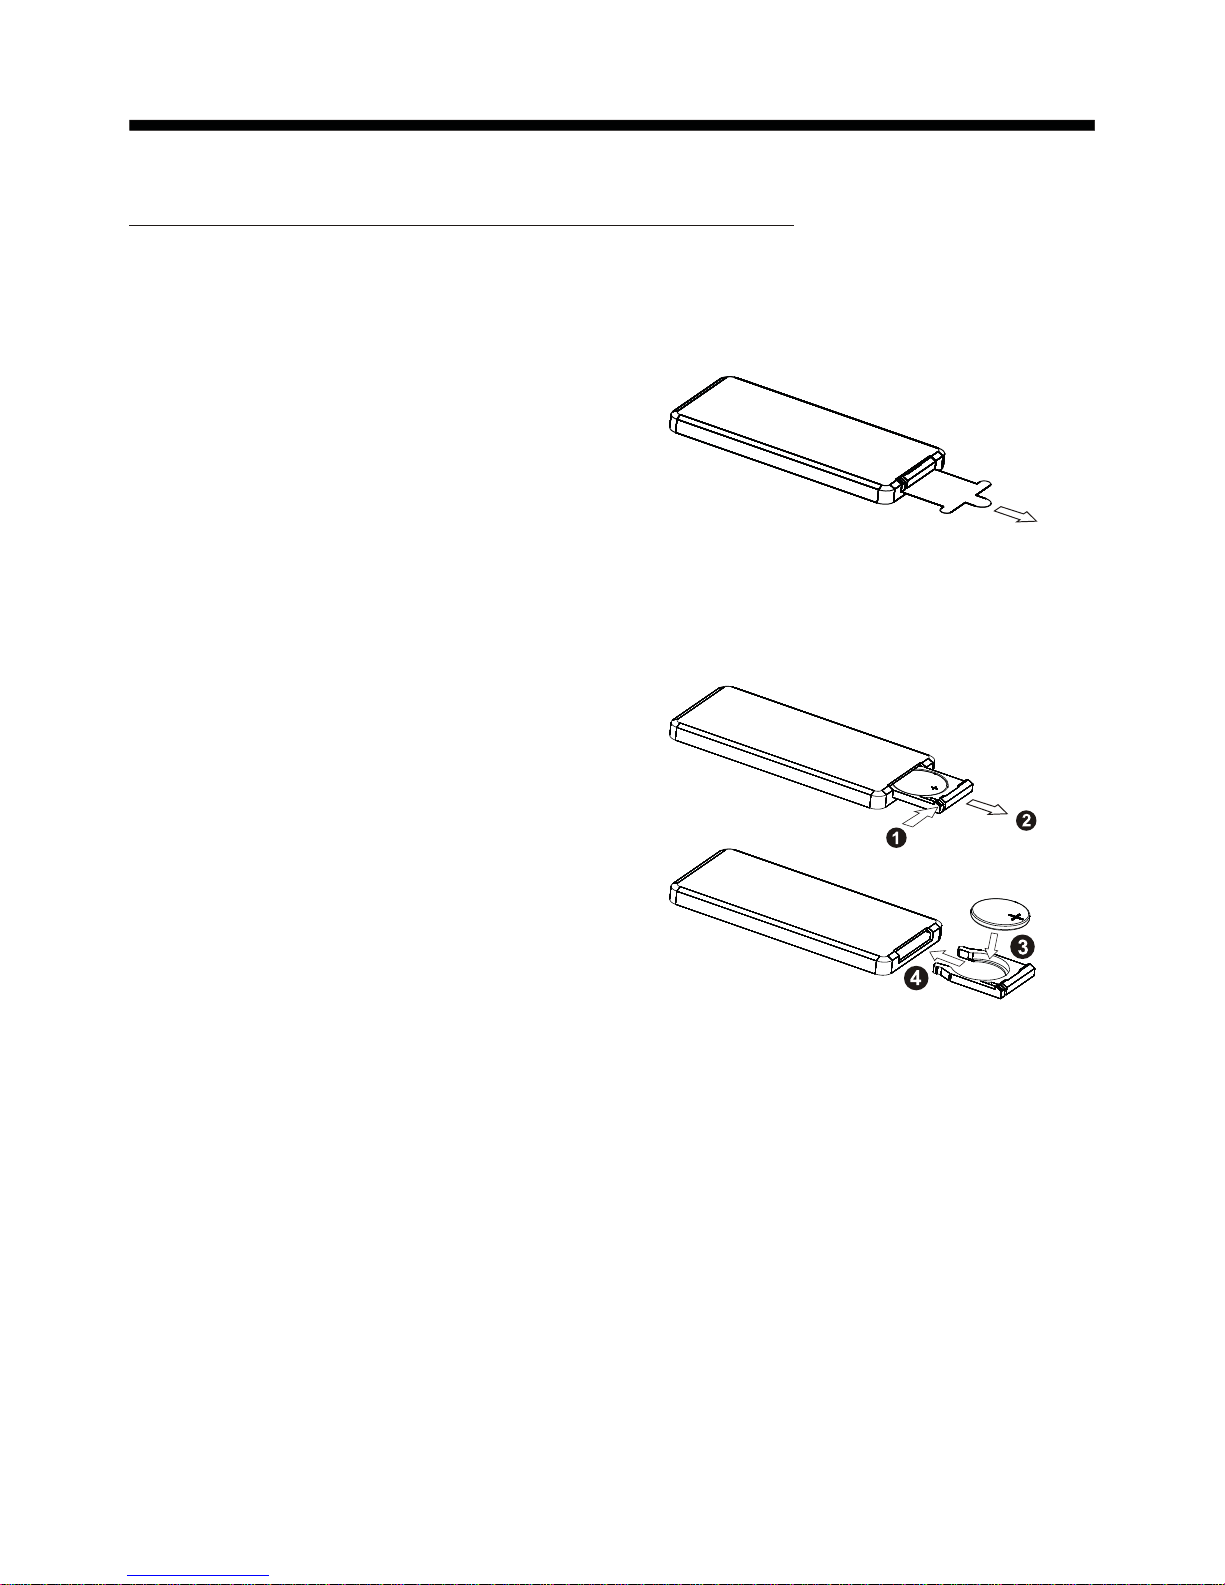
1. Removing insulating sheet
If
)
)
)
.
)
)
)
.
)
)
using remote control for the first time, you
can see an insulating sheet at the bottom
side of remote control as right.
you must remove the insulating sheet as right.
Otherwise, the remote control is disabled.
2. Replace lithium cell
If the electric energy of lithium cell is weak,
replace it.
1 Press and hold the movable block as direction
indicated by arrow 1 as right, at one time pull
cell holder out of remote control as direction
indicated by arrow 2 as right.
2 Replace the old cell by a new one with (+)
polarity side upward as right.
3 Insert the cell holder into remote control again
as right.
3 Note about using remote control
1 Yo
u should face the emitting window of remote control towards the sensor
window of the unit.
2 Operation angle for front panel: About 30 degree
3 The distance between the emitting window of remote control and the sensor
window of the unit : < 5M .
4 Warning for lithium cells of remote control
leakage may cause damage to remote control.1
Cell
2Do not throw cells into fire, it may cause explosion.
.
3.To avoid risk of accident, keep cells out of reach of children.
GENERAL KNOWLEDGE ABOUT REMOTE CONTROL
General knowledge about remote control
Page 5
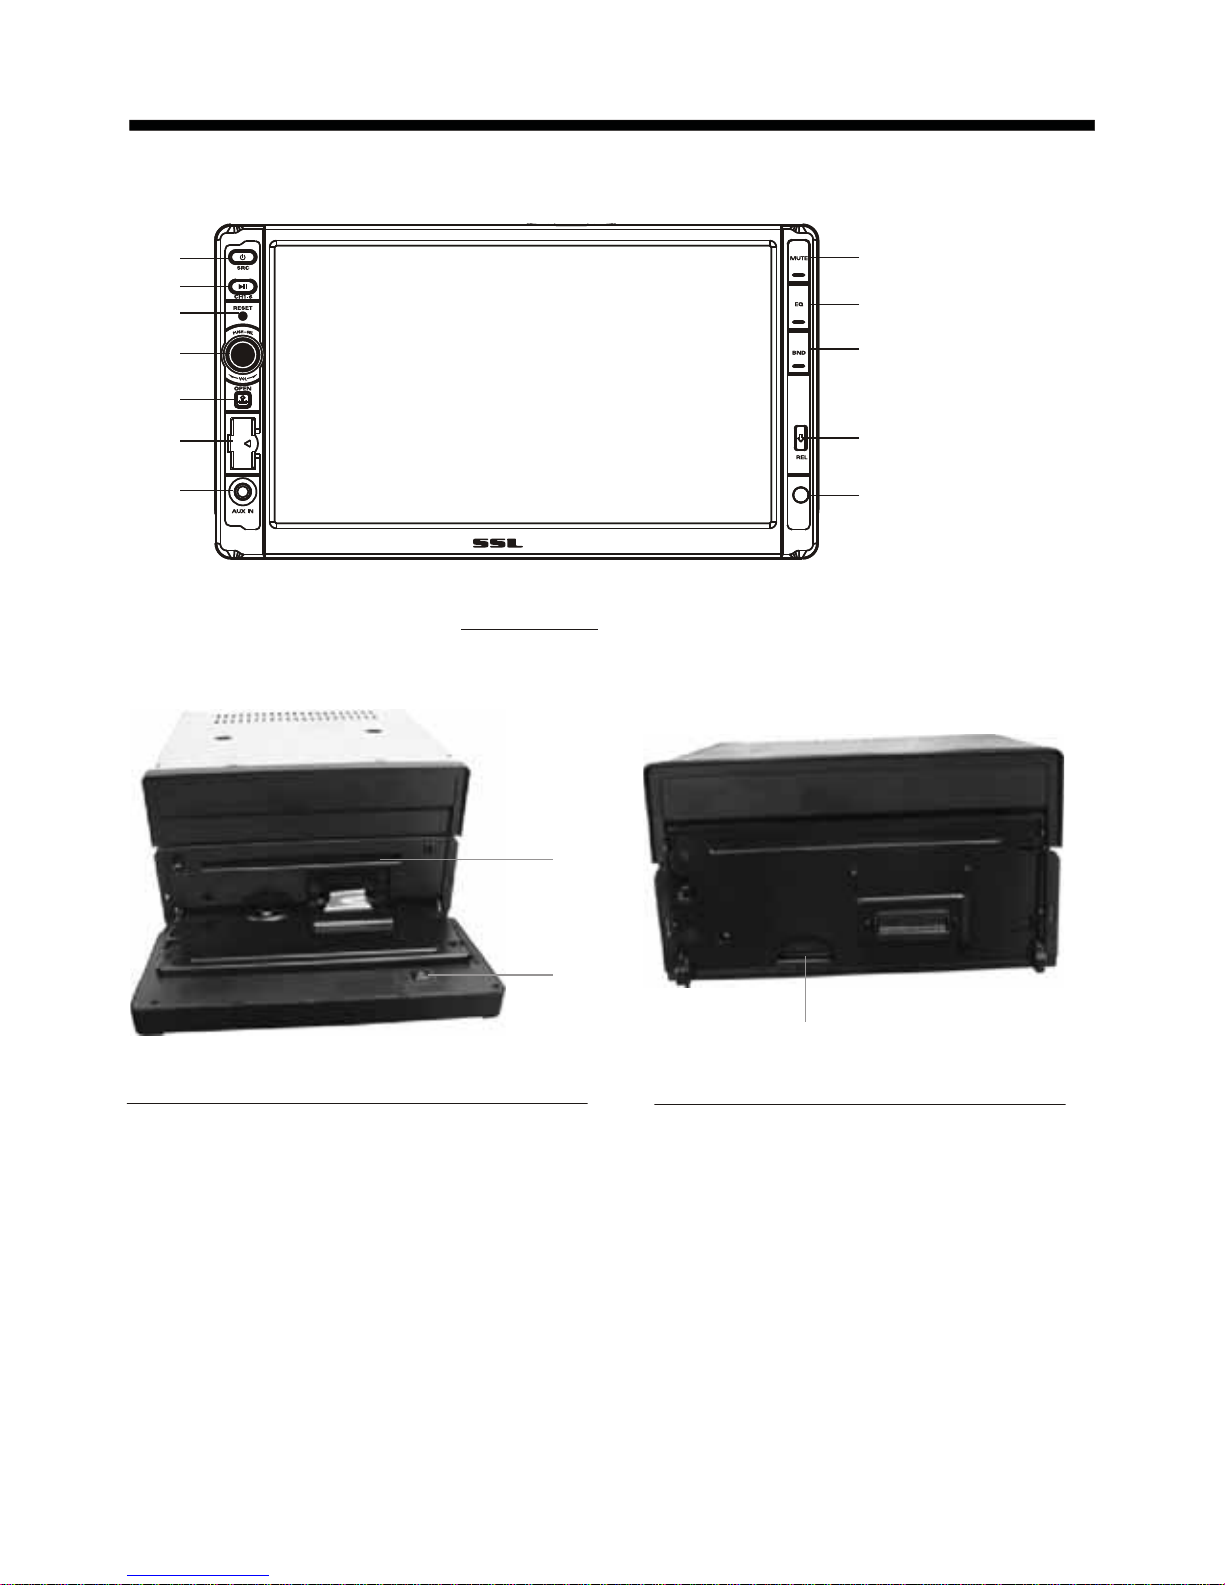
Locations and names of controls on main unit
Control Panel
Top Front Vi ew Drawi ng after Flipping down Control Panel
1. POWER or SOURCE BUTTON
2.
4.
MUTE BUTTON
>|| or CH1~6 BUTTON
3. RESET BUTTON
SEL BUTTON and VOL KNOB
5. OPEN BUTTON
6. USB PORT and COVER
7. AUX IN JACK
8.
9. EQ BUTTON
10. BAND BUTT
ON
11. REL BUTT
ON
12. IR SENSOR WINDOW
13. DISC SLOT
14. EJECT BUTTON
15. CARD SLOT
Front View Dra wi ng after Remo ving Control Panel
14
13
15
1
7
2
3
4
6
9
8
10
11
12
5
Page 6

Locations and Names of Controls on Remote Control
16. VOL- BUTTON
17. SEL BUTTON
18. SETUP BUTTON
19. GOTO BUTTON
20. >|| BUTTON
21. STOP BUTTON
22. AUDIO or MO/ST BUTTON
23. ANGLE BUTTON
24. EQ BUTTON
25. CLK BUTTON
26. ^ BUTTON
27. >>| BUTTON
29. > BUTTON
30. V BUTTON
31. |<< BUTTON
32. INT or 3 BUTTON
33. 6 BUTTON
34. +10 BUTT
ON
35. AF or 9 BUTT
ON
36. TA or 0 BUTTON
37. 2 BUTTON
38. 5 BUTTON
39. 7 and 8 BUTTON
28. ENTER BUTTON
1. POWER BUTTON
2. MUTE BUTTON
3. REPEAT BUTTON
4. ZOOM BUTTON
5. SOURCE BUTTON
6. MENU or SW BUTTON
7. >> BUTTON
8. SUBTITLE or LO/DX BUTTON
9. < BUTT
ON
BAND or OSD
<< BUTT
ON
12. A/PS or TITLE/PBC BUTTON
13. TOP or 1 BUTTON
14. VOL+ BUTTON
15. RDM or 4 BUTTON
10. BUTTON
11.
1
2
6
10
11
3
20
21
33
9
12
17
34
23
4
5
7
8
13
14
15
16
18
19
22
24
25
26
27
28
29
30
31
32
35
36
37
38
39
SRC
Page 7

Same functions in any work source
Same functions in any work source
1. POWER button and icon
In power off mode, pressing POWER button on remote control or pressing POWER button on
control panel powers on main unit.
In power on mode, pressing POWER button on remote control or long pressing POWER button
on control panel or touching icon on source menu(see Source menu fig.on next page)
powers of
f main unit.
2.
VOL knob & VOL+/VOL- buttons
To adjust volume level, rotate VOL knob on control panel or press or hold VOL+ or VOL- button
on remote control.
3. SEL button
To switch between BASS,TREBLE,BALANCE, F
ADE,COLOR,BRIGHTNESS,CONTRAST
, TINT
and VOLUME, briefly and repeatedly press SEL button.
After switching on the desired mode above, rotate VOL knob or press VOL+/VOL- buttons to set it.
To switch between REG, PI, TA, AF, LOUD, SWF, EQ, DX/LOCAL(in radio mode), STEREO/
MONO(in radio mode), TIME 12H/24H, CLOCK, BUZZ,EUR/USA FREQ,ANIMATION and BG,
long press SEL button to switch on REG, then briefly and repeatedly press SEL button.
After switching on the desired mode above, rotate VOL knob or press VOL+/VOL- buttons to set it.
4. MUTE button
To switch MUTE mode on or off, press MUTE button on remote control or on control panel.
5. EQ button
To select a desired preset EQ mode from JAZZ, CLASSIC, POP , ROCK and USER, press EQ
button on remote control or on control panel continuously
.
6. To switch LOUD mode
To switch on or off LOUD mode, long press EQ button on remote control .
7. SW button
To switch on or off SUBWOOFER mode, long press SW button on remote control.
8. CLK button
Press CLK button on remote control to display clock time .
9. SOURCE button and source menu
To switch work source between RADIO, DISC(after inserting a disc), USB(after inserting a USB
storage), CARD(after inserting a card) and AUX IN , press SOURCE button on remote control or
on control panel continuously
.
During disc(non-CD)/USB/card playback, touch screen to pop up Function Icons-board and then
touch the icon in the Function Icons-board to enter the source menu(refer to Disc/USB/Card
Operation) .
During AUX IN playback, touch screen to pop up AUX interface and then touch icon to enter
the source menu(refer to AUX Operation).
In radio or CD mode, touch icon to enter the source menu(refer to Radio Operation and Disc/
USB/Card Operation).
Page 8

Same functions in any work source
The source menu displays as follows:
In source menu, touch one icon of AUX, RADIO, DISC, SD CARD and USB to enter one
work source of AUX IN, RADIO, DISC, SD CARD and USB.
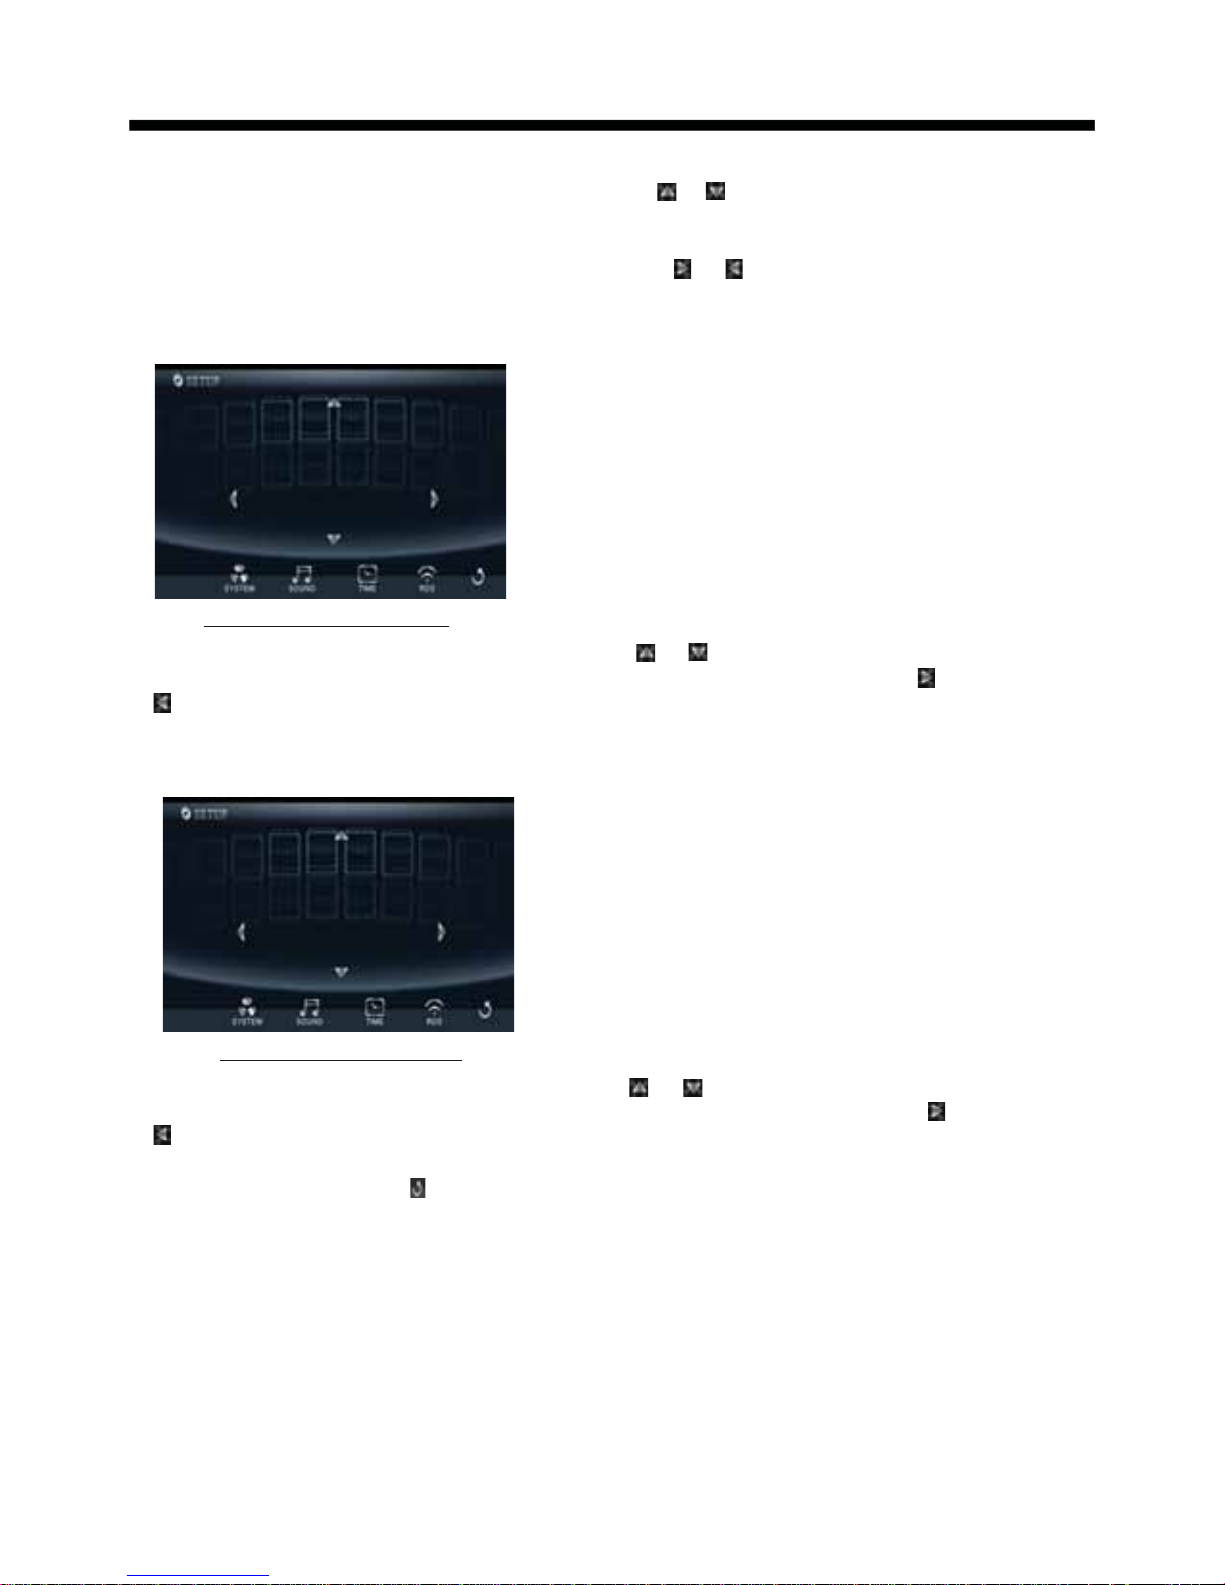
10. SETUP icon
1) SETTING SYSTEM
In source menu, touch SETUP icon to display SYSTEM page of SETUP menu as follows:
In the SYSTEM page of SETUP menu, repeatedly touch the or icon to highlight one setting
item of BRIGHTNESS, CONTRAST
, COLOR, TINT
, ANIMATION and WALLPAPER. After highlighting a
desired setting item, touch the or icon to set it.
2) SETTING SOUND
In SETUP menu, touch SOUND icon to display SOUND page of SETUP menu as follows:
Source Menu
System page of SETTING menu
Sound page of SETTING menu
COLOR
TINT
CONTRA S T
16
BASS
TREBLE
+03
BALANCE
Page 9
Same functions in any work source
In the SOUND page of SETUP menu, repeatedly touch the or icon to highlight one setting
item of TREBLE, BASS, BALANCE, FADE, SUBWOOFER, LOUDNESS, RADIO LOC/DX(entering
Source Menu in radio mode), RADIO STEREO(entering Source Menu in radio mode) and BUZZER
ON/OFF. After highlighting a desired setting item, touch the or icon to set it.
3) SETTING TIME
In SETUP menu, touch TIME icon to display TIME page of SETUP menu as follows:
In the TIME page of SETUP menu, repeatedly touch the or icon to highlight one setting
item of HOUR, MINUTE and 24H/12H. After highlighting a desired setting item, touch the or
icon to set it.
4) SETTING RDS
In SETUP menu, touch RDS icon to display RDS page of SETUP menu as follows:
In the RDS page of SETUP menu, repeatedly touch the or icon to highlight one setting
item of REGION and PI SOUND/MUTE. After highlighting a desired setting item, touch the or
icon to set it.
After finishing setting, touch icon to return back to normal playback.
11.OPEN button
press OPEN button on control panel to flip down the control panel.
12.REL button
Press REL button on control panel to detach the control panel, then hold the right part of the
control panel to lift up a little and pull it rightwards to remove it.
13.RESET button
When LCD displays wrongly or some buttons are not available or sound is distorted, use the
sharp end of a pointed object to press RESET button to reset the program to zero.
Time page of SETTING menu
MINUTE
HOUR
11:36AM
24H/12H
PI SOUND/MUTE
REGION
PI SOUND
RDS page of SETTING menu
Page 10

Radio operation
Radio Operation
1. To enter RADIO mode(MODE or SOURCE button or RADIO icon)
When you use MODE or SOURCE button or source menu (tapping RADIO icon) to enter RADIO
mode, it will display radio interface as follows:
* Some icons on radio interface correspond with the buttons on remote control or control
panel as follows:
MUTE icon = MUTE button
and icons = VOL- and VOL+ buttons = VOL knob
EQ icon = EQ button
: To enter source menu.
2. To switch between bands (BAND)
The BAND icon or button can switch between bands of FM1, FM2, FM3, AM1(MW1) and AM2
(MW2), and the word FM1,FM2,FM3,AM1(MW1) or AM2(MW2) will be displayed on screen.
3. To search for a station ( < and > icons or v and ^ buttons)
1) Long touching < or > icon or long pressing v or ^ button on remote control can automatically
search down or up for an available station beginning from the current frequency
.
2) Briefly touching < or > icon or briefly pressing v or ^ button on remote control can manually
search down or up for a your desired station beginning from the current frequency.
4. To preset and scan all memory stations (APS icon or A/PS button)
1) When long touching APS icon or long pressing A/PS button on remote control , the radio
searches from the lowest frequency and checks the signal strength level until 1 cycle
search is finished, and the 6 strongest stations are preset to corresponding preset
number memory bank for the current band.
The presetting function can be implemented in selected FM or AM(MW) band. (It can presets
3x6 stations for FM and 2x6 stations for AM(MW) in all)
2) When briefly touching APS icon or briefly pressing A/PS button, the radio scans
for each preset station in FM or AM(MW) band from NO.1 bank, each preset station broad casts for 5 seconds. After finishing a circle of scanning, it will resume broadcasting the
station in NO.1 bank.
NOTE: In FM band, FM1,FM2 and FM3 are preset and scaned as one band at a time;
In AM(MW) band, AM1(MW1) and AM2(MW2) are preset and scaned as one band at a time.
DXDX
ST
USERUSER
1
2
3
6
5
4
87.50
90.00
98.00
89.5089.50
107.00107.00
106.00106.00
FM1
107.00107.00
MHZ
Page 11

Radio operation
5. To preset and listen to a memory station(1~6 icons or 1~6 buttons or CH1-6 button )
1) Long touching one of 6 number(1~6) icons or long pressing one of 6 number(1~6)
buttons can preset the current broadcasting station of the current band in the number
memory bank; .
2) Briefly touching one of 6 number(1~6) icons or briefly pressing one of 6 number(1~6)
buttons can listen to the memory station in the current band preset in the number
memory bank.
* CH1-6 button:
1)T
o preset a station in a memory bank with CH1-6 button, first select a desired
band; then press CH1-6 button to select a desired memory bank; and then search
for a desired station; finally long press CH1-6 button to store the station in the
memory bank.
2)To listen to a preset station with CH1-6 button, first switch on a desired band, then
continuously press CH1-6 button highlight and listen to it.
6. To switch on between stereo and mono mode (MO/ST button)
Press MO/ST button on remote control to select STEREO or MONO mode for FM band.
When the STEREO mode is activated, it can get better audio ef
fect; when the
MONO mode is activated, it can get clearer audio signal.
7. To switch on between local and distance mode (LO/DX button)
Press LO/DX button to turn LOC on to tune for local stations with weak interference;
Press LO/DX button to turn DX on to tune for distance stations with stronger signal.
8. To search for a RDS station that is broadcasting a typed program (PTY)
Continuously touching PTY icon on touch screen switches between the program types
such as: NEWS ...and so on.
After selecting a desired program type, no operation for a while, it displays PTY
SEEK and automatically searches for a station that is broadcasting the selected
type of program.
If the station that is broadcasting the selected type of program does not exist, it will
display NO PTY and return back to the previous normal station.
9. To automatically alternate a stronger signal of frequency for the current RDS station(AF)
During broadcasting a typed program of a RDS station, use the AF icon in the RADIO
interface or SEL and VOL buttons to set AF mode on or AF button on remote control to
switch on AF mode, then AF icon flashes on screen.
After switching on AF mode, the radio checks the signal strength of AF(alternate
frequency) all the time. Whenever a new AF is stronger than the current frequency
,
Page 12

It switches over to the AF for a short time, and the AF icon is light on screen(not
flash).
* In FM mode, when switching on AF mode, the radio auto searches for or preset
only those RDS stations.
* In FM mode, when switching on AF and TA modes, the radio auto searches for
only those RDS stations broadcasting traf
fic announcement.
10. REGION mode
use the RDS page of the SETUP MENU or the SEL and VOL buttons to set
REGION mode on or off.
In REGION on mode, when switching on AF mode, the radio can’t switch over to
those AF stations which have a dif
ferent regional program content.
In REGION off mode, when switching on AF mode, the radio can switch over to
those AF stations which have a dif
ferent regional program content.
11
. PI mode
use the RDS page of the SETUP MENU or the SEL and VOL buttons to set PI
SOUND or PI MUTE mode.
In PI SOUND mode, when switching on AF mode, if a car cruises that critical area
back and forth, an oscillation phenomenon can be occurred, because the dif
ferent
PI code can be receive from a same AF. when the different PI sound (DIP) is heard
once in a while, the different PI sound will be heard for less than 1 second.
In PI MUTE mode, when switching on AF mode and under above same situation,
a mute sound will be heard for less than 1 second.
12.
To automatically
search for traffic announcements (TA)
In any mode, use the TA icon or SEL and VOL buttons to set TA mode on or long press
TA button on remote control to switch on TA mode, then TA: ON will display on screen
for a while and begin to search for those RDS radio stations transmitting traffic
announcement.
When an RDS radio station transmits traffic announcement and is received by the
radio, temporarily switch the current work source to an RDS radio station broad casting traffic announcement, and TRAFFIC will be displayed on screen.
When the traffic announcement is over, it will return back to previous work source.
Radio operation
Page 13

Disc/USB/Card Operation
1. Loading or unloading a disc, USB or card
1.1 Loading a disc, USB or card
To play files in a disc, press OPEN button on control panel to flip down the control
panel, then insert a disc with label surface up into disc slot, then flip up the control
panel and attach onto chassis till hear a click sound, finally it will automatically play
.
*
CAUTION OF USING DISC
1) Handle a disc by its edge, do not touch the surface of play side.
2) Before inserting disc, wipe the disc outwards from the disc
center with a clean, soft, dry
, lint-free cloth. Do not use solvents
/thinner such as petrol/benzine, cleaner.
3) After taking a disc out of disc slot, put the disc inside disc case to
keep it clean.
4) Do not stick paper or tape on the disc surface of play side. If
there is glue (or analog) on the disc surface, must wipe it up
before using.
To play files in a USB, firstly open USB port cover
, then insert USB
storage into USB port, and then it will play files in the USB automatically.
To play files in a card, firstly press REL button to detach control panel, then hold
the right part of the control panel to lift up a little and pull it rightwards to remove
it, and then insert the card into card slot till hear a click sound, and then attach
the control panel onto chassis again, by now it will play files in the card automatically .
Label
surface up
Disc/USB/card operation
Page 14

1.2 Unloading a disc, USB or card
To unload the disc in disc slot, use STOP button to stop playback and then press
OPEN button to flip down the control panel, then press EJECT button to eject disc,
then remove it.
right
* During MP3/WMA playback
, the information of file
, folder, title, artist and album
will be scrolling on LCD display. As long as the current playing MP3/WMA music
contains relevant ID3 tag information in version 1.0/2.0 format, the 3 items
underlined above will be scrolling on LCD display; other
wise
, they will not.
* There is ESP function for all formats of discs.
2. Popping up Function Icons-board
2.1 Function Icons-board of Digital Video/VCD/MPEG4/Image/MP3/WMA
During Digital Video/VCD/MPEG4/Image playback, tapping any place on touch
screen can pop up Function Icons-board 1 as next page
, then tap
icon to pop
up Function Icons-board 2 as next page.
During MP3/WMA playback, tapping any place except folder area, track area and
MP3/WMA&Image&MPEG4 icons can pop up Function Icons-board 1 same as one
of Digital Video/VCD/MPEG4/Image, then tap
icon to pop up Function Icons-
board 2 same as one of Digital Video/VCD/MPEG4/Image.
To pull away the USB storage, use STOP button to stop playback, then you can
remove the USB storage
.
To unload the card in card slot, use STOP button to stop playback, then press
REL button to detach the control panel and then hold the right part of it to lift up a
little and pull it wards to remove it, and then you can push the card for release
it and then pull it out of the card slot.
WMA
Mp3
[MP3]
ITLE / SONG: TRACK 03 / ITLE / SONG: TRACK 03 /
001001
002002
003003
004
005005
006
007007
008008
007007
001
002
003
Folde r area Track area
MP3/WMA icon Image icon MPEG4 icon
Disc/USB/card operation
Page 15

Function Icons-board 1 Function Icons-board 2
The Function Icons-boards display as follows:
* Some icons on the Function Icons-boards descript as follows:
: Same as MUTE button.
: Same as VOL- button or rotating
VOL knob with anti-clock wise.
: Same as VOL+ button or rotating
VOL knob with clock wise.
: Poping up source Menu.
: Poping up Function Icons-board 2.
2.2 CD interface
During CD playback, the CD interface displays as follows:
* Some icons on the CD interface descript as follows:
: Poping up source Menu.
: Same as VOL+ button or rotating
VOL knob with clock wise.
: Same as VOL- button or rotating
VOL knob with anti-clock wise.
MUTE : Same as MUTE button.
: Same as EQ button.
: Same as CLK button.
: Same as long pressing EQ button.
: Same as SW button.
: Poping up Function Icons-board 1.
:To switch AF mode on or of
f.
: To switch TA mode on or off.
EQ : Same as EQ button.
AF icon : To switch AF mode on or off.
TA icon : To switch TA mode on or off.
Disc/USB/card operation
Page 16

3. Function of controls on the touch screen/main unit/remote control
1. icon or button
During playback, use it to pause playback; in pause mode, use it to resume play back.
In CD inter face, the icon displays as .
2. icon or button
During Digital Video/VCD/CD/MP3/WMA playback, tapping or pressing it pre-stop
or pause playback; in pre-stop or pause mode, use icon or button to resume
playback.
During playback, tapping or pressing it twice to fully stop playback; in fully stop
mode
, use
icon or button to start playback from the beginning of the media.
During MPEG4/image playback, use icon or button to display root menu as
follows:
During MP3/WMA playback
, the root menu above displays all the time
.
/chapter
* Tapping folder icon, track icon or kind icon can execute the operation above.
3. / icons or buttons
During playback, continuously tapping or icon or continuously pressing
or button can fast backwards or for wards at the following multiple of normal
When displaying root menu
, use < or > button to highlight the current chapter/
track, the current folder or the kind icons.
* If there are no track for a kind icon
, you can’t highlight the kind icon
.
When highlighting a kind icon, press ENTER button to enter it.
When highlighting the current folder, use v or ^ button to highlight other folders
and then press ENTER button to enter it
.
When highlighting the current track, use v or ^button to highlight other tracks and
then press ENTER button to play it.
* For image, after highlighting a track, press ENTER button to display only the high lighted track; press >|| button to display all tracks step by step from the highlighted
track.
WMAWMA
Mp3
[MP3]
ITLE / SONG: TRACK 03 / ITLE / SONG: TRACK 03 /
001
002
003
004004
005
006006
007
008
007007
001001
002002
003003
Folder area Track area
MP3/WMA icon Image icon MPEG4 icon
Disc/USB/card operation
Page 17

MENU
PBC
MENU
PBC
MENUMENU
PBC
MENU
PBCPBC
MENU
PBC
speed: x2, x4, x8, x20, x1.
During fast playback, use icon or button to resume normal playback.
For image files, no this function.
4. / icons or buttons
During playback, use one of them to play previous or next chapter/track.
In CD inter face, the icons displays as / .
5. Number buttons
During Digital Video/VCD(PBC OFF)/MPEG4/Image/CD/MP3/WMA playback,
use number buttons to input chapter/track SN. , then it will play or display it.
digit in s place digit
in
6. icon and MENU button
During Digital Video playback
, use MENU icon or button to display the current
chapter list, then use direction buttons to select your desired chapter and then
press ENTER button to play it.
For VCD, MENU button is disabled, track list is displayed on the monitor screen
by pressing TITLE/PBC button or tapping icon.
7. icon and TITLE/PBC button
During Digital Video playback
, use TITLE/PBC button to display title list; then use
direction buttons to select your desired title and then press ENTER button to open
the chapter list of the title; then use direction buttons to select your desired chapter
and then press ENTER button to play
.
*
You can also tap a desired title and then chapter to play.
During VCD playback
, use
icon or TITLE/PBC button to switch PBC mode on
or off. When PBC mode is switched on, it will play from the beginning of media till
it displays a track list. When a track list is displayed, use the number buttons to
select your desired track to play
.
For CD, the TITLE/PBC button is disabled.
To input a chapter/track with an SN that is equal to or bigger than 10, use the +10
button to input the ten and then use 0-9 button to input the
units order.
I.
e. +10 ~ 1 = 11 (number 11 chapter/track will be displayed/played.)
During VCD playback, when it is in PBC ON mode, the number buttons are disabled.
For MPEG4/image, MENU button and icon are disabled, root menu is displayed
on the monitor screen by pressing button or tapping icon.
Fo
r MP3/WMA, MENU button and icon are disabled, root menu displays on
the monitor screen all the time. Root menu of MP3/WMA is same as the one of
MPEG4/image
.
Fo r CD, MENU button is disabled.
For MP3/WMA/MPEG4/image, icon and TITLE/PBC button are disabled.
MENU
PBC
MENUMENU
PBC
Disc/USB/card operation
Page 18

8. icon and GOTO button
For Digital Video/MPEG4/VCD/image/MP3/WMA, you can use , , ,number
and ENTER icons or G OTO, <, >, number and ENTER buttons to select a chapter
/track or from a playback time point to play
.
During playback, tap icon or press GOTO button to display changeable
playback information bar as follows:
Digital Video:
MPEG4:
VCD:
Image:
MP3/WMA:
* During playback, tapping icon can also display the Goto F
unction icons-board
as follows:
When displaying the changeable playback information bar, use / icon or
< or > button to highlight title SN.(only for Digital Video) , chapter/track SN. or
elapsed time of current chapter/track(disabled for image).
When highlighting title SN
. or chapter/track SN
. , use number icons or buttons to
input desired SN. of title or chapter/track, then use ENTER icon or button to play
the selected chapter/track.
When highlighting elapsed time of current chapter/track(disabled for image), use
number icons or buttons to input desired playback time point for the playback time
of the whole media
for Digital Video/VCD and of the current chapter/track for
MPEG4/MP3/WMA, then use ENTER icon or button to play from the playback time
point.
9. icon or ZOOM button
During Digital Video/VCD/MPEG4/image playback, use icon or ZOOM button
to switch zoom mode between ZOOM 2, ZOOM 3, ZOOM 4, ZOOM ½, ZOOM 1/3,
ZOOM 1/4 and ZOOM OFF
.
When zooming in video/image, use direction buttons to move video/image
upwards, downwards, rightwards or leftwards.
v=
For CD, G
OTO button is disabled
.
When not zooming in image, direction buttons can switch on 4 fixed rotated
angles between >=90 deg cw, <=90 deg ccw, ^=UP-DOWN and LEFT-RIGHT.
Disc/USB/card operation
Page 19

icon and are
Fo r CD, the ZOOM button is disabled.
10. OSD icon or button
During Digital Video /MPEG4/Image/MP3/WMA playback, use OSD icon or
button to display playback information bar as bellows:
Digital Video
:
MPEG4:
VCD:
Image:
MP3/WMA:
11. icon or RPT button
During Digital Video playback, touch icon or long press RPT button to switch repeat
mode between REP CHAPTER, REP TITLE, REP ALL and REP OFF.
touch icon or long press to
E1
Fo
r MP3/WMA
, ZOOM button disabled.
/VCD
For CD , OSD button is disabled.
During VCD(PBC OFF)/CD playback, RPT button switch
repeat mode between RP , REP ALL or REP OFF.
Disc/USB/card operation
Page 20

During MP3/WMA/MPEG4/image playback, touch icon or long press RPT button
to switch repeat mode between REP1,REP FOLDER(or DIR),REP ALL or REP OFF.
During VCD(PBC ON) playback, the icon and RPT button are disabled.
2
For MPEG4/image/VCD(PBC ON) playback
, RDM button disabled.
14
During VCD playback, use button to switch audio channels between
MONO L, MONO R, MIX MONO and STEREO.
For MPEG4/MP3/WMA image, button disabled.
For VCD/MP3/WMA/MPEG4/image, button disabled.
1. icon or RDM button
During Digital Video/VCD(PBC OFF)/CD/MP3/WMA playback, tapping icon or
long pressing RDM button switches random mode on or off
.
icon and are
13. icon or INT button
During VCD/CD playback, tapping icon or long pressing INT button switches
intro mode on or off
.
Fo r Digital Video/MP3/WMA/MPEG4/image, icon and INT button are disabled.
. icon or button
During Digital Video playback, use icon or button to switch between audio
tracks (depending on the current playing media).
/CD icon or
/ icon and are
15.
icon or button
During Digital Video playback, use icon or button to switch subtitle languages
on or off(depending on the current playing media).
icon and are
Fo r CD, the button is disabled.
16. ANGLE icon or button
During Digital Video playback, use ANGLE icon or press ANGLE button to
play in different angles (depending on the current playing media).
Fo r VCD/MP3/WMA/MPEG4/image, the ANGLE icon and button are disabled.
Fo r CD, the ANGLE button is disabled.
Disc/USB/card operation
Page 21

11. icon or SETUP button
Use icon or SETUP button to enter Media Setup Menu for setting up all media
parameter values.
Use icon or SETUP button to display Media Setup Menu(the default page is
SYSTEM SETUP);
Media Setup Menu has 4 pages in all. When highlighting a page, tap the aim page
icon or press > or < button to highlight another page;
After selecting a page, tapping the aim item icon or press ^ or v button to highlight
a setup item in the selected page;
After selecting a setup item, tapping the aim value; or press > button to enter the
setup item, then press v or ^ button to select a desired value, finally press ENTER
button to confirm it.
After finishing setting, tapping EXIT icon or press SETUP button to exit Media
Setup Menu to resume normal playback.
1) SYSTEM SETUP
TV SYSTEM
This setup item is for setting up video system in NTSC, PA
L or AUT
O .
If you set a non-matched video system for playing a video, the playing video will
display white-black or flash.
SCREEN SAVER
This setup item is for switching screen saver on or off.
TV TYPE
This setup item is for setting up video display size.
Description of the 4 pages:
TV SYSTEM
SCREEN SAVER
TV TYPE
PASSWORD
RATING
DEFAULT
SYSTEM SETUP
EXIT
USB/card operation
Page 22

(1) 4:3 PS: Choose this item when connecting a monitor with 4:3 screen. When
playing video with 16:9 size, the left and right part of video will be cut out, and
video will display in full screen.
(2) 4:3 LB: Choose this item when connecting a monitor with 4:3 screen. When
playing video with 16:9 size, the top and bottom part of the monitor screen will
be turned into a black square .
(3) 16:9: Choose this item when connecting a monitor with 16:9 wide screen.
P
ASSWORD
This setup item is for locking or unlocking parental control. The default mode
is locked. The default unlocking password is 0000.
To lock or unlock parental control:
(1) Highlight PASSWORD item and then press > or ENTER button to enter it;
(2) Input password 0000;
(3) Press ENTER button to confirm, then it will unlock or lock parental control.
*
eof the PASSWORD
RA
TING
This setup item is for setting a new rating level of parental control.
(1) First highlight PASSWORD item to see whether parental control is locked or not.
If it is in locked mode, unlock parental control referring to PASSWORD above.
(2) Highlight RA
TING item and press > or ENTER button to enter it, then use ^ or v
button to select your desired rating level, and then press ENTER button to
confirm.
(3) Highlight PASSWORD item again and then press > or ENTER button to enter it,
then input password 0000, and press ENTER button to lock parental control
again.
DEF
AUL
T
This setup item is to change all parameter back to the default factory values.
2) LANGUAGE SETUP
Remove th section of the User Manual to keep this sensitive
information confidential.
OSD LANGUAGE
AUDI O LANG
SUBTITLE LANG
MENU LANG
LANGUAGE SETUP
EXIT
USB/card operation
Page 23

OSD LANGUAGE
This item is for selecting the type of language displayed on the screen except for
subtitle language and menu language(depending on current playing media).
AUDIO LANG
This item is for selecting the type of audio language(depending on current playing
media).
SUBTITLE LANG
This item is for selecting the type of subtitle language(depending on current
playing media).
MENU LANG
This item is for selecting the type of menu language(depending on current playing
media).
3) VIDEO SETUP
BRIGHTNESS
For adjusting brightness of video output.
CONTRAST
For adjusting contrast of video output.
HUE
For adjusting hue of video output.
SA
TURA
TION
For adjusting saturation of video output.
SHARPNESS
For adjusting sharpness of video output.
BRIGHTNESS
CONTRAST
HUE
SATURATION
SHARPNESS
VIDEO SETUP
EXIT
USB/card operation
Page 24

4 ) DIGITAL SETUP
DYNAMIC RANGE
This item is for adjusting linear compression ratio. If you set it to FULL,
Peak-to-Peak value of audio signal is minimum; if you set it to OFF, Peak-to
-Peak value is maximum.
DYNAMIC RANGE
DIGITAL SETUP
EXIT
USB/card operation
Page 25

AUX IN operation
AUX IN operation
An external AV system can use the car AV system as monitor and amplifier.
1. Use an AV cable to make the car AV system and the external AV system connected
through the AUX IN jack on control panel of the car AV system and the AV Out jacks
of the external AV system.
2. Play the external AV system, then use MODE or SOURCE button or Source Menu to
enter AUX IN mode for the car AV system. By now
, the program played by the external
AV system can be output through the monitor of the car AV system and the speakers
connected to the car AV system.
* The icons on the AUX interface descript as follows:
: Popping up Source Menu.
: Same as VOL+ button or rotating
VOL knob with clock wise.
: Same as VOL- button or rotating
VOL knob with anti-clock wise.
3. In AUX IN mode, you can use SEL, +, -, VOL, MUTE, EQ , SW and LOUD buttons
or icons to adjust audio and video.
MUTE: Same as MUTE button.
EQ : Same as EQ button.
AF : Entering AF mode.
TA : Entering TA mode.
MOD
VIDEO IN (yellow)
RCH IN (red)
LCH IN (white)
Page 26

Rear View Camera operation
REAR VIEW CAMERA
The car AV system can make you look at the actual status behind your car when
you change the gear level to the back position.
1. Use an video cable to make the car AV system and the rear view camera con nected through the REAR CAMERA INPUT jack in the rear cabinet of the car AV
system and the VIDEO OUTPUT jack of the rear view camera.
Make the REAR CAMERA SWITCH line in the rear cabinet of the car AV system
connected to (B+)12V power supply
.
2.
When you change the gear level to the back position, the screen of the car AV
system will display the actual status behind your car.
* Note : the external monitor can not display the actual status behind your car
.
Page 27

Troubleshooting
Please read the user manual carefully before using the car A/V system. If you have any
difficulty using this car A/V system, . If you still
after using all the suggestions, please contact
NO PICTURE
, SOUND
*
Ensure that the power switch is on.
* Ensure that the power cord is not damaged or the fuse is not blown.
NO SOUND BUT HAVE PICTURE
* Ensure that the player’s audio output speak
er
’s audio
input.
* Check whether the audio connector is damaged.
* Check whether you have turned down the volume.
* Ensure that the audio is not in MUTE mode.
BLACK AND WHITE PICTURE OR SCREEN ROLLING
* Ensure that you have set right mode of video system (e
.g
. PAL, NTSC).
FLAWS OF PICTURE OR SOUND
* Check whether disc is scratched or stained.
* Check whether AV connector and output terminal is stained.
* Check whether there is condensation inside the lens
. If so
, power on the player and do
not work for an hour or so, then try again.
DISPLAYS: NO DISC OR BAD DISC
* Ensure that you have inserted a disc into the disc slot
.
*
Check whether disc is inserted with label side upwards.
* Check whether disc is bent.
* Check whether disc is stained or scratched badly.
* Ensure that disc format is compatible to the player.
* Ensure that temperature inside the car is not too high
. If so
, cool off until the ambient
temperature returns to normal.
* Insert another disc into the disc slot.
REMOTE CONTROL IS INSENSITIVE OR DOES NOT WORK
* Check whether the lithium cell of the remote control is power
ful and working properly
.
* Direct the IR emitting window of the remote control to the IR sensor of main unit.
* Check whether there are some obstacles between remote control and main unit.
SOME FUNCTION BUTT
ONS DO NO
T WORK
* Turn off ACC power, then turn on again.
* Reset unit to zero, then turn on again.
* Remove control panel from chassis, reattach it onto the chassis and then turn it on again
.
RADIO DOES NOT WORK
* Check whether antenna cable is connected firmly.
* Manually tune for a station.
refer to the troubleshooting guide are
unable to resolve the problem your dealer
or an authorised service centre .
is properly connected to the
Troubleshooting
Page 28

Specification
General
Power Supply Requirement..................................................DC 12V
Current consumption........................................................10A MAX.
Audio
Signal Output.........................................................2ch&4ch line out
Frequency Response.................................................20 Hz - 20 KHz
S/N Ratio.......................................................................90 dB (JIS)
Wow and Flutter..........................................Below measurable limits
TFT Monitor
Monitor Screen Size.......................................................7 Inch Wide
Disc/USB/Card
Compatible Format..Digital Video/MPEG4/VCD/IMAGE/MP3/WMA/CD
Color System..................................................................NTSC/PAL
Radio
FM
Frequency range..................................87.5MHz - 107.9MHz(U.S.A.)
87.5 MHz - 108 MHz
(Europe
)
Usable sensitivity..................................................................15dBu
I.F Frequency...................................................................10.7MHz
AM(MW)
Frequency..............................................530KHz - 1710KHz(U.S.A.)
522KHz - 1620KHz(
Europe)
Usable sensitivity..................................................................40dBu
I.F Frequency.....................................................................450KHz
NOTE:
Specification and design are subject to modification, without notice,
due to improvements in technology.
CAR AUDIO ACCESSORIES
SOUND STORM LAB AUDIO ACCESSORIES
 Loading...