

Ss Brewtech FTSs2, FTSs Product Manual
ENGINEERING BETTER BEER
FTSs2 Product Guide

IN THE BOX
STANDARD KIT
FTSs2 Controller
Silicone Stopper
Hose Clamps
*(x2 Half bbl Chronical)
O-Rings
Pump Inlet Cover
Pro Grade Submersible Pump
Lock Nuts
Power Supply
Chronical
Neoprene Insulation Jacket
(Included with the Chronical Kit only)
Immersion Coil
*(x2 Half bbl Chronical)
Chronical
Cone Heating Pad
Vinyl
Tubing
Thermowell
Brew Bucket
Neoprene Insulation Jacket
(Included with the Brew Bucket Kit only)
Brew Bucket
Cone Heating Pad
FTSs Lid
Page 2
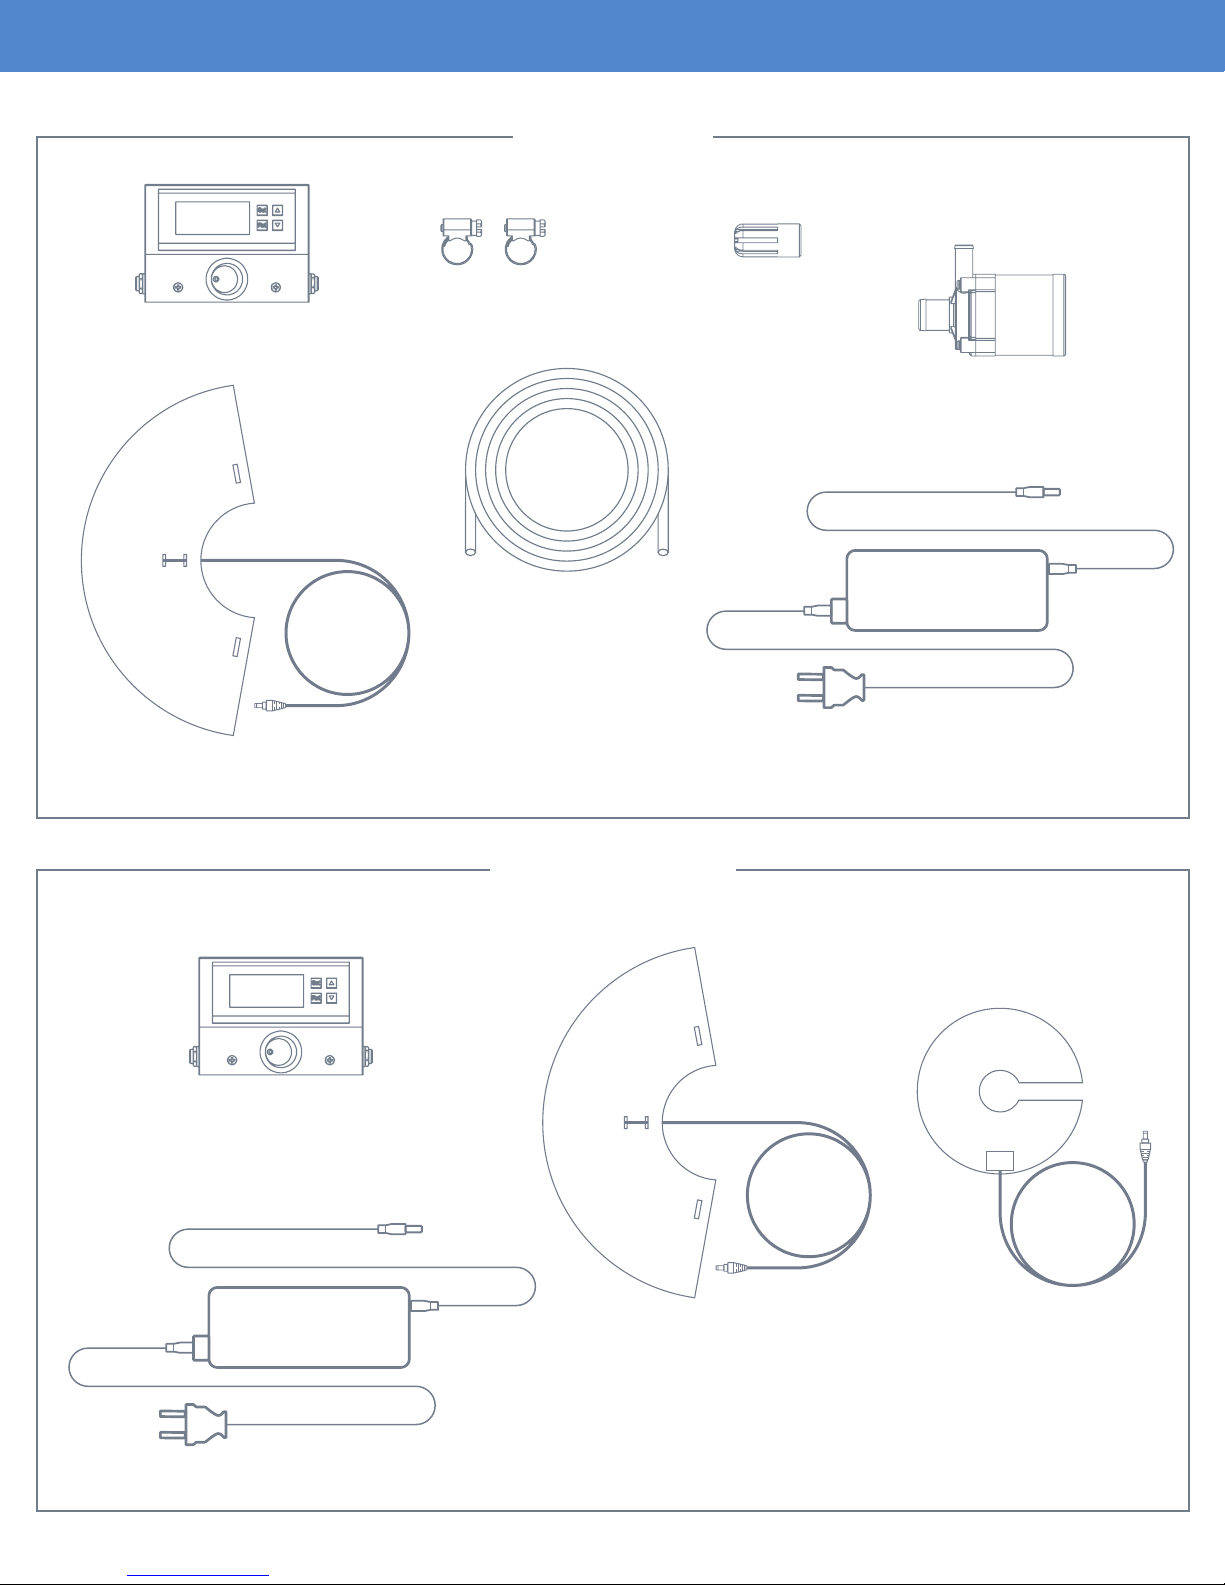
IN THE BOX (CONTINUED)
BME KIT
FTSs2 Controller
Cone Heating Pad
Hose Clamps
Vinyl
Pump Inlet Cover
Pro Grade Submersible Pump
Tubing
Power Supply
FTSs
2
Controller
UPGRADE KIT
Cone Heating Pad
(Included with the
Chronical Kit only)
Chronical
Brew Bucket
Cone Heating Pad
(Included with the
Brew Bucket Kit only)
Power Supply
Page 3
INTRODUCTION
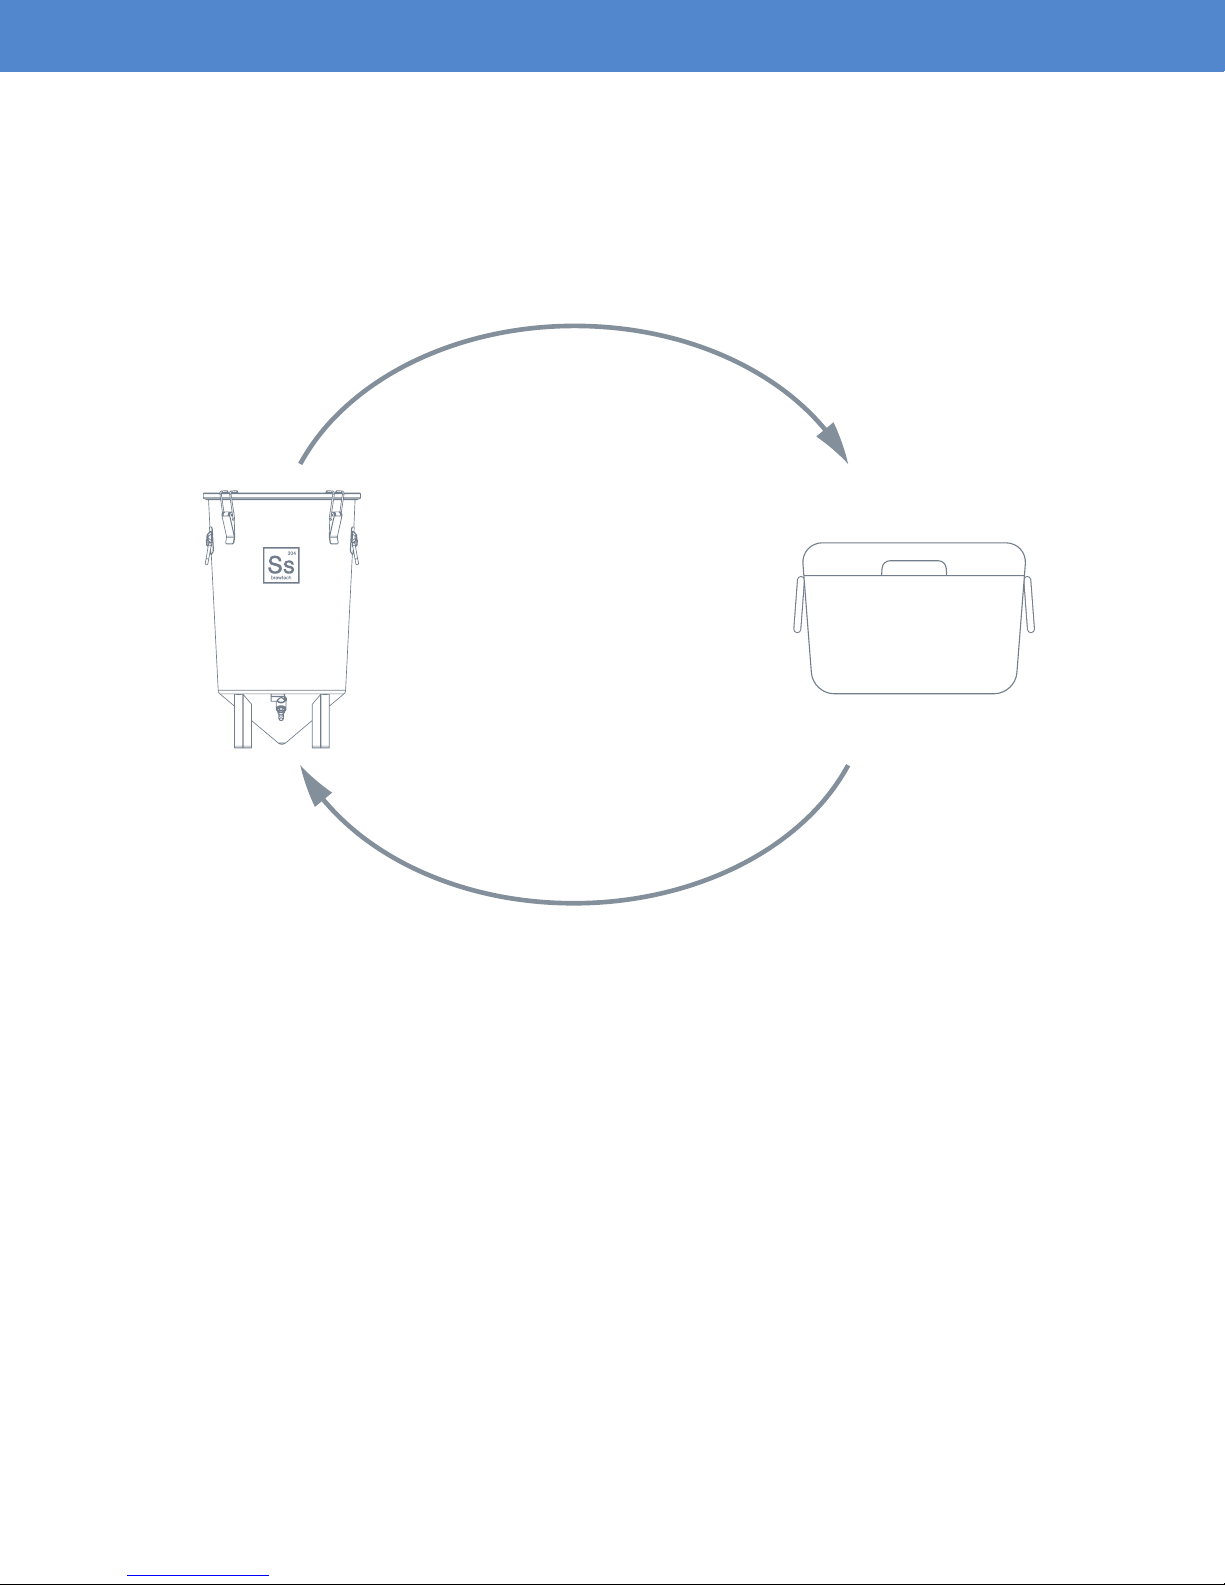
SYSTEM OVERVIEW
The basic principle of the Fermentation Temperature Stabilization System (FTSs2) is to pump chilled
water or glycol through the immersion coil when the temperature of your wort is greater than the controller
set-point. The system is designed to use chilled ice water from a common cooler or glycol chiller. In this
conguration, the submersible pump will be placed in the bottom of the cooler.
Warm Water or Glycol
Low Pressure
Closed Loop System
Cold Water or Glycol
The FTSs
to the fermenter is then returned to the cooler to be used again.
If your setup requires more distance from the fermenter to the cooler, you can purchase common vinyl
tubing at most hardware stores. The pump is capable lifting the water up to 10 feet. Pumping beyond
10 feet will negatively affect efciency.
In a heating mode, the controller will activate the low wattage heater, which will in-turn begin to slowly
raise the temperature of the liquid volume starting at the fermenter’s cone. From there, convection will
foster the newly introduced heat to radiate up to the remaining liquid volume not in direct contact with
the cone. This key characteristic insures that hot-spots don’t form within the fermenter.
2
is intended to be a low pressure closed loop system. Water or glycol pumped from the cooler
Page 4

INTRODUCTION (CONTINUED)
NOTES ON EFFICIENCY
Efciency of your system depends on many variables. Ideally, you would have the fermenter in an area
where the temperatures are relatively moderate.
Since the system contains both heating and cooling, the controller will need to be properly setup to
avoid over cycling. Cycling is where the system runs the cooling or heating cycle long enough to overshoot the set point and past the threshold where it causes the opposite function to activate too quickly.
To avoid over cycling, we recommend you set the “delay” on your controller to at least 5 minutes. This
will allow sufcient time for the fermenter’s liquid temperature to stabilize and ultimately avoid over
cycling.
This will extend the life of the ice in your cooler. We recommend using ONLY block ice, frozen plastic
water jugs or similar. Cubed ice melts much faster than block ice thus requiring more frequent additions
of ice to ensure you maintain cold water. You should avoid using your FTSs
temperature to a pitching temperature. In addition to leaving all of the cold break* in your fermenter, it
will consume much of your cooling capacity and require you to replenish the ice early in the process.
2
to bring the wort from a high
*Cold break- A term that describes the precipitation or occulation of proteins, tannins, and hop matter
that occurs when wort is rapidly chilled.
PRE-ASSEMBLY INSTRUCTIONS
FIRST TIME CLEANING
Before you use your system, you will need to clean all manufacturing residues with either TSP (highly
recommended and can be found at any hardware store) or warm soapy water, followed by a good hot
water rinse. Please see the FAQ section on our website (www.ssbrewtech.com) regarding proper care
and cleaning of stainless steel.
SANITATION
Sanitize the immersion coil, thermowell, lid and gasket.
Page 5
ASSEMBLY INSTRUCTIONS
BEFORE YOU BREW - SYSTEM ASSEMBLY
1. Think about where you want to locate your Brew Bucket or Chronical series fermenter, where you will
place the controller, and where you will place your chilled water source (whether that is an ice chest,
chilled corny keg in a cooler, glycol chiller, etc.).
2. Start by removing your fermenter’s ttings, lid, and neoprene jacket if it is already installed, and then
place the fermenter upside down on a surface that won’t mar the upper rim of the body. This will make
it easier to insure the heater is orientated correctly on the cone while you reinstall the neoprene jacket.
3. Place the low-wattage heater onto the cone so that it doesn’t interfere with the welded ttings, and
maximizes surface area contact with the fermenter body. Use a zip-tie to hold the heater’s shape until
the neoprene insulating jacket is reinstalled over the fermenter. The neoprene jacket will insure that the
heater is held tightly to the cone to maximize efciency.
3. Extend the wire from the low-wattage cone heater out of the bottom of the neoprene jacket.
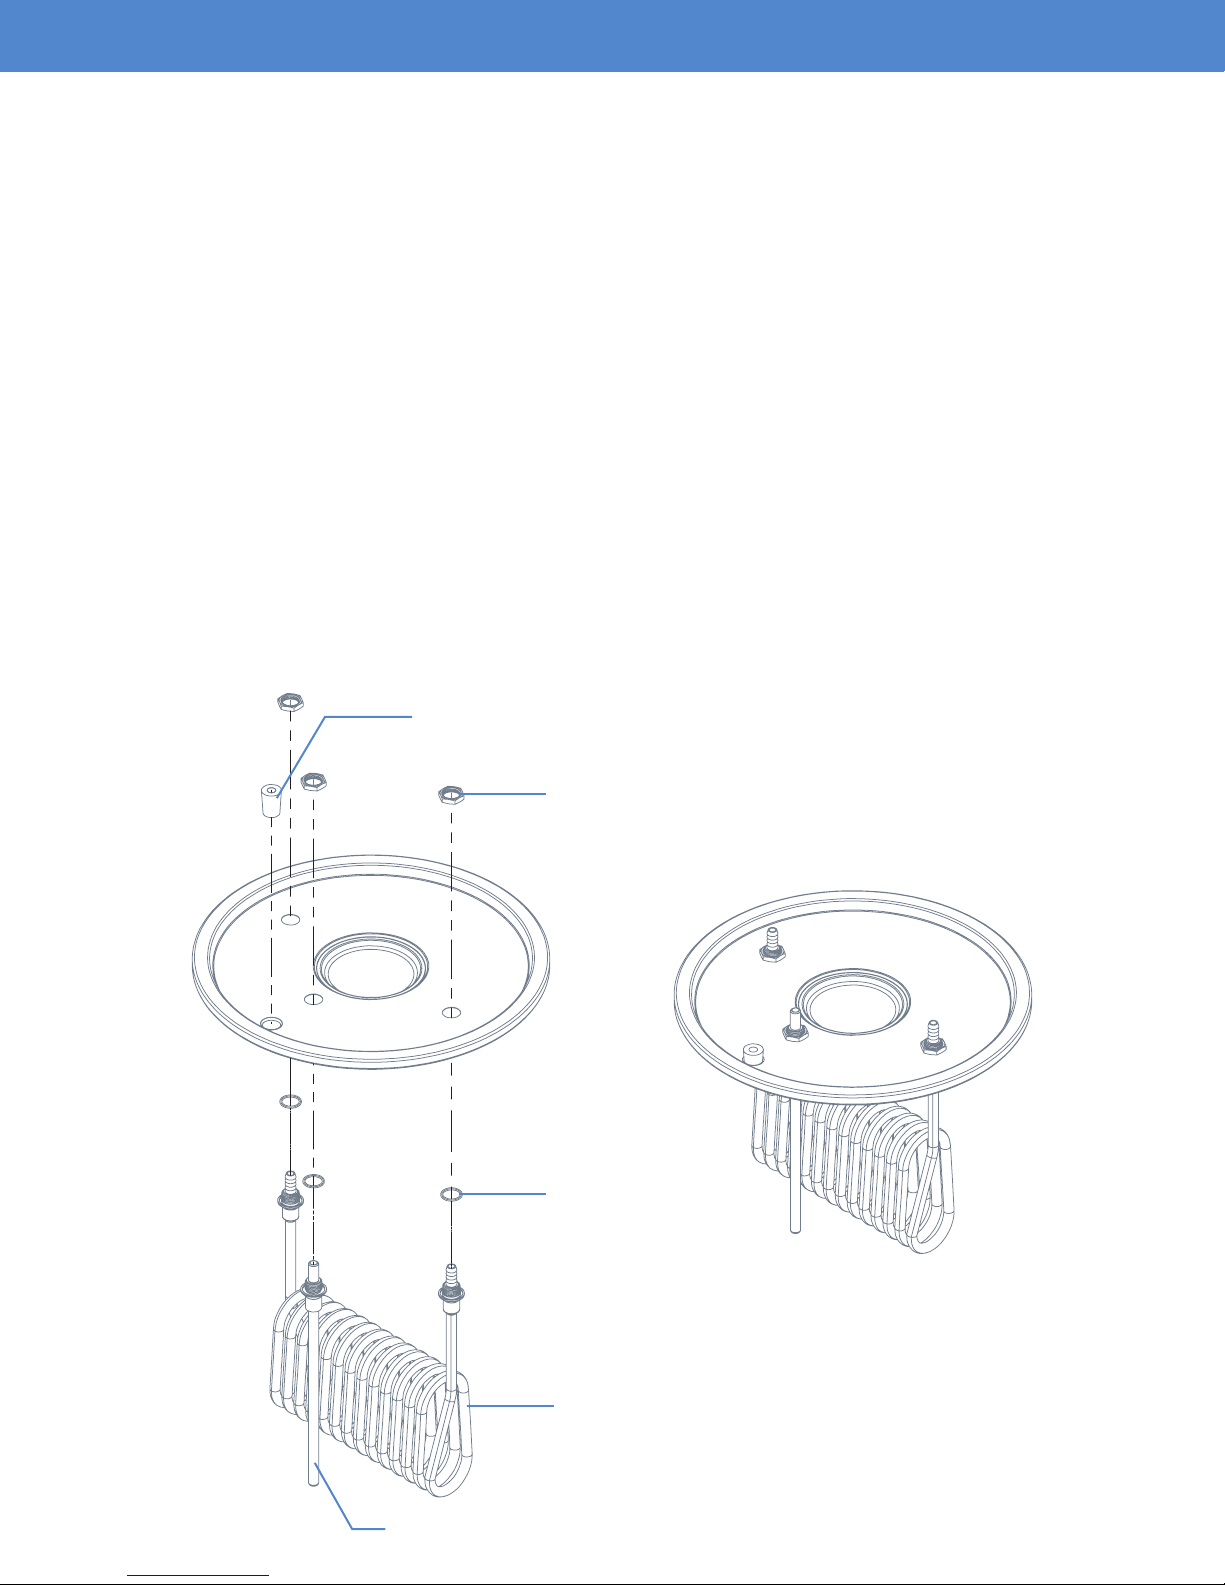
4. Next, install the immersion coil and thermowell into the lid as shown (Note: there are extra o-rings
supplied; you only need to use the o-rings on the wort side of the lid).
Silicone Stopper
Lock Nut
O-Ring
Thermowell
Immersion Coil
Page 6
 Loading...