


ENGINEERING BETTER BEER
eKettle Product Guide

INTRODUCTION
Ss eKETTLE
The Ss eKettle was purpose-built for electric brewing and features 100% welded TC ttings, etched
volume markings, and a new version of our popular trub dam, 1.5” TC service ports for the ball valve
and accessories, along with a 2” TC dedicated element port with proprietary element locknut system.
Aesthetically, the eKettle features front to back silicone overmolded handle orientation for a more
compact brewhouse layout.
FEATURES
- All 304 Stainless eKettle with Fully welded TC Fittings
- 1.5” TC ball valve port with trub dam
- 1.5” TC accessory port
- 2” TC element port with proprietary element locknut system
- 5500 Watt Incoloy 800 alloy Halo heating element
- Integrated PT100 temperature probe
- L6-30 connector molded into element base
HALO ELEMENT
A halo element design is better suited to distributing heat evenly throughout the kettle, in addition to
fostering an effective whirlpool and trub cone formation. Our engineers incorporated a lengthened “Cold
Pin” that extends the resistive portion of the element away from the element base, where heat emitting
from the element will not interfere with the temperature readings from the integrated PT100 probe.
Page 2

IN THE BOX
(1) Lid
(1) 5500 Watt Incoloy 800 Alloy
Halo Heating Element
Ss eKETTLE
(1) Blue Silicone Kettle Inset Gasket
(1) eKettle
(1) 1.5” TC Blank
(2) 1.5” TC Gaskets
(2) 1.5” TC Clamps
(1) Dip Tube w/ Trub Dam
(1) 3-Piece 1.5” TC to ½” FTP Ball Valve
(1) Brass Locknut Washer
(1) Knurled Lock Nut
Page 3
PREASSEMBLY
WARNING
Heat that comes into the contact with the ball valve or thermometer can cause damage to the
thermometer’s and/or ball valve’s interior seals. Always brew on a at, nonammable surface.
Never attempt to lift a kettle that contains hot liquid due to the risk of injury or scalding to yourself
or others. As a solution, utilize a wort pump to transfer hot liquids and avoid injury.
Before activating the heater element, always verify the element is fully submerged in water.
Dry ring the element will cause irreversible damage to the element coil and void the element’s
warranty. Prolonged dry ring can cause damage to the vessel and other components and can
result in personal injury or property damage.
Make sure that the unit is connected to a dedicated GFCI circuit.
Wear proper PPE (Personal Protective Equipment) when using the equipment. This would
include protective eyewear, gloves and apparel that would aid in prevention of scalding from
boiling water.
Before plugging in the kettle element to the controller, ensure that both the heater activation
button as well as the side mounted on/off switch are not currently engaged. This will prevent
accidental dry ring.
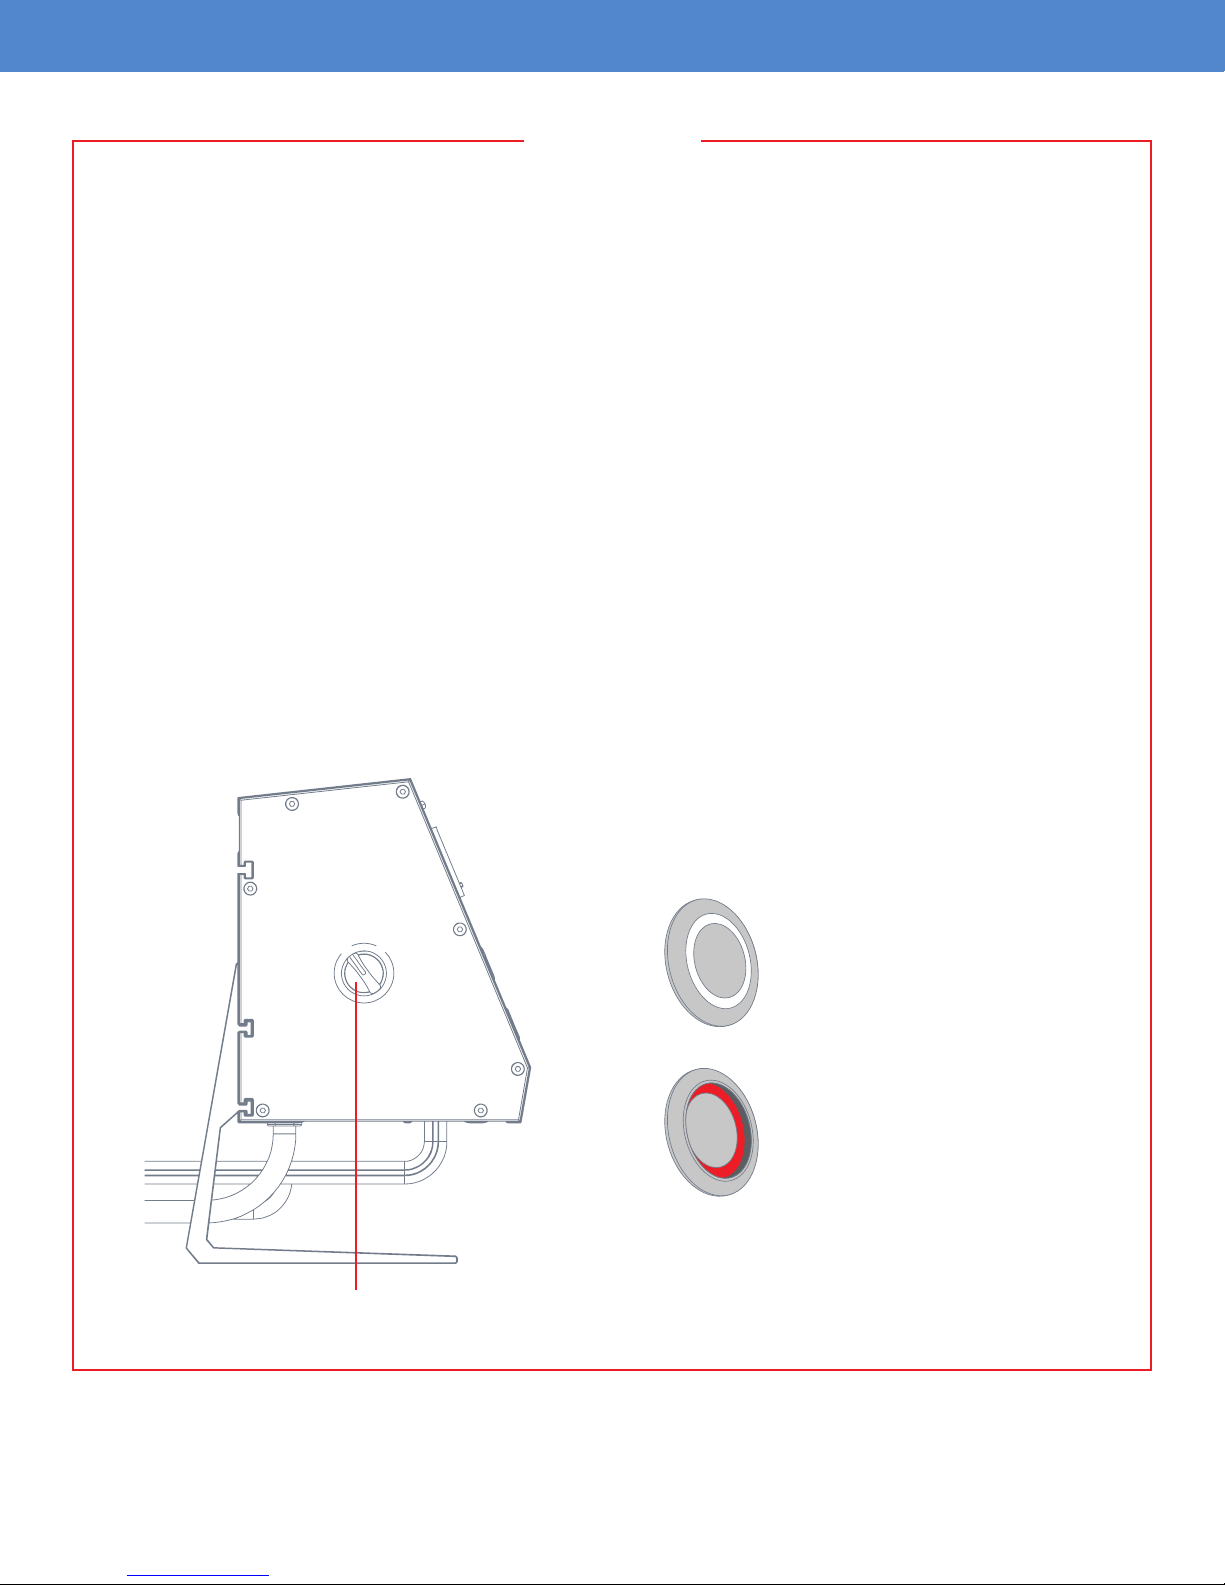
ACTIVATION BUTTON
O
O
F
N
F
N
F
F
O
O
Off Position
- Button is not recessed
- No indicator light
On Position
- Button is recessed
- Red indicator light
Side Mounted “ON/OFF” Switch in “OFF” Position
Page 4

STAINLESS STEEL PREP
PRE-CLEAN
Prior to rst time use, thoroughly wash all surfaces of the Ss Brew Kettle, including all valves and
ttings, with Tri-Sodium Phosphate (TSP) in hot water, mixed to the manufacturer’s recommendations.
Scrub with a soft terry cloth, and after the initial TSP wash, rinse thoroughly and dry all surfaces.
PASSIVATION
It’s good practice to periodically passivate all stainless steel equipment with an acid based solution to
establish a uniform passive oxide layer that will maximize corrosion resistance. Following the pre-clean
step, ll the Ss Brew Kettle BME with Star San at a concentration of 1 ounce per gallon at 70- 80°F for
30 minutes. Moving forward, for best stainless performance, passivation should be performed at least
once a year or anytime you believe you may have inadvertently scratched the surface. ***Save this Star
San solution to perform the pressure testing step covered later in this guide.
CLEANING AND SANITIZING
As part of a regular cleaning regimen, both pre and post-fermentation, wash the interior surfaces of your
Ss Brew Kettle with an alkali cleaner such as PBW at a ratio of 0.75 ounce per gallon. Then sanitize
with Star San or another acid based sanitizer per the manufacturer’s recommendations.
Page 2

ASSEMBLY
BALL VALVE INSTALLATION
Once the initial pre-clean steps have been completed, begin by locating the 3-Piece 1.5”TC to ½” FTP
Ball Valve, 1.5” TC gasket and 1.5” TC Clamp.
Place a 1.5” TC gasket between the 3-piece valve TC face and bottom 1.5” TC kettle attachment point.
1.
Finally attach the 1.5” TC clamp to this union and hand tighten down to provide a sanitary leak free seal.
Repeat this same process with the 1.5” TC blank, 1.5” TC gasket and 1.5” TC clamp to then be assembled
on the above accessory port.
2.
3.
4.
Page 6

ASSEMBLY (CONTINUED)
HEATER ELEMENT INSTALLATION
First, Locate the following items
- 5500 Watt Incoloy 800 alloy halo heating element
- Blue silicone kettle inset gasket
- Brass locknut washer
- Knurled lock nut
Begin by installing the blue silicone kettle inset gasket on the elements male threads.
Blue Silicone Kettle Inset Gasket
5500 Watt Incoloy 800 Alloy Halo Heating Element
Next feed the electrical connection and PT 100 3.5mm connection through the 2” TC element connection
point through the inside of the kettle out.
Page 7

ASSEMBLY (CONTINUED)
Place the brass lock washer washing onto the male threads of the element to then tighten with the
provided knurled lock nut.
Note: Each plug must be feed through the brass lock washer and knurled lock nut one at a time. They
will not both t through the openings at the same time. The threading on the knurled lock nut is directly,
so be sure to test and orient correctly for proper installation.
Brass locknut washer
Knurled Lock Nut
Page 8

OPERATION
Once cleaned and assembled, your kettle is now ready for use. Please refer to our eController quick
start guide for operation.
Our kettles were designed with advanced brewing practices in mind and suit a wide variety of needs
including a boil kettle or as a hot liquor tank.
Depending on the intended use, you can individually congure your kettle with optional accessories
to ll a specic role within your brew house. If you intend to use the vessel primarily as a boil kettle.
The trub dam is a key feature that will inhibit the transfer of break material and hop residue into the
fermenter. For best results, immediately following the boil, create a whirlpool by vigorously stirring or
using a wort pump along with our optional whirlpool tting. (Use caution around the submerged heating
element). The effectiveness of the trub dam is dependent on creating a trub cone in the center of the
vessel. Furthermore, ning agents such as Whirloc or Irish moss can also be used to assist in the
process of creating a uniform trub cone. This process is especially important for brewers that typically
utilize whole or leaf hops, since they can easily clog the dip tube.
If you intend to use the vessel as an HLT, similar operation would occur. Again, keep in mind that any
heat that is dispersed through the unit that encounters the kettles surface or accessories will be hot, so
handle with PPE equipment. Always brew on a at, nonammable surface. Never attempt to lift a kettle
that contains hot liquid due to the risk of injury or scalding to yourself or others. As a solution, utilize a
wort pump to transfer hot liquids to avoid injury.
Page 9

WARRANTY
WARRANTY
Ss Brewtech provides a one year limited warranty to the original purchaser that our product(s) will be
free from manufacturing defects in material and workmanship. The limited warranty covers only those
defects and/or product failures that arise as a result of normal use, and does not cover any problems
that originate from:
- Improper cleaning, care and maintenance
- Modications made to a product
- Operation outside the product’s published specications
- Damage caused by incorrect assembly
- Exceeding recommended operational limits
Ss Brewtech reserves the right to request the original purchaser to return the defective item, at the
purchaser’s expense, before processing the warranty claim and issuing a replacement. If a direct
replacement is no longer available, a product that serves the same purpose with equal or greater value
shall be awarded. Ss Brewtech, at its discretion may also opt to simply refund the full purchase price in
lieu of replacing the product.
Ss Brewtech limited warranty is only applicable to customer-direct sales of home brewing.
LIMITATIONS
Ss Brewtech makes no warranty of any nature beyond what is contained in this limited warranty.
Ss Brewtech is not responsible for representations made about a product by another retailer.
Page 10

SsBrewtech.com
REV 12102018
 Loading...