

Page 1

0
1
2
3
4
5
6
7
8
9
10
11
12
13
14
15
16
0
Page 2

Quality class: Ssangyong genuine engine oil
(Approved by MB Sheet 229.1 or 229.3 or 229.31 for DSL/GSL
ENG without CDPF)
(Approved by MB Sheet 229.31 for DSL ENG with CDPF)
Viscosity: MB sheet No. 224.1
Ssangyong genuine coolant
Anti-Freeze SYC-1025, Anti-Freeze:W ater = 50:50
ORGANIC ACID TYPE
COLOR:BLUE
Ssangyong genuine oil
(Shell ATF 134 or Fuchs ATF 134)
Ssangyong genuine oil (FUCHS TITAN ATF 3292)
Ssangyong genuine oil (ATF DEXRON II)
Ssangyong genuine oil (ATF DEXRON II or III)
7.5
8.5
7.5
9.0
8.0
9.5
1.4
1.1
Page 3
0-3
0
1
2
3
4
5
6
7
8
9
10
11
12
13
14
15
16
Ssangyong genuine oil (SAE 80W/90, API GL-5)
Ssangyong genuine oil
(Shell synthetic fuel efficient GL75W/90)
Ssangyong genuine oil (SAE 80W/90, API GL-5)
Ssangyong genuine oil
(Shell synthetic fuel efficient GL75W/90)
Ssangyong genuine oil (DOT4)
Ssangyong genuine oil (ATF DEXRON II or III)
* TOTAL FLUIDE DA(Extreme cold condition only)
2.0
Page 4

Front View
Rear View
Unit: mm
Page 5

0-5
0
1
2
3
4
5
6
7
8
9
10
11
12
13
14
15
16
* ( ) Optional, < > DPF
←
←
←
←
←
2,071 (AWD: 2,053)
2030
←
←
5 / 18:1
(EURO IV:17.5:1)
2,696
←
165 PS / 4,000 rpm
<161 PS / 4,000 rpm>
340 Nm /
1,800 ~ 3,250 rpm
750 ± 20 rpm
←
11.0 ~ 11.5
9.2
D27DTD20DT
←
←
←
←
2,530
2WD: 1,885, 4WD: 1,994
2WD: 1,862, 4WD: 1,971
Gasoline
←
4 / 10.4 : 1
2,295
←
150 PS /5,500 rpm
214 Nm /
3,500 ~ 4,000 rpm
750 ± 50 rpm
←
10.5 ~ 11.0
7.9
G23D
←
←
←
←
–
2,046
–
←
←
6 / 10 : 1
3,199
←
220 PS / 6,100 rpm
312 Nm / 4,600 rpm
700 ± 50 rpm
←
11.5 ~ 12.0
9.8
G32D
Page 6

←
←
←
←
←
←
←
←
←
Electronic, 5-speed
←
3.595
2.186
1.405
1.000
0.831
3.167
1.926
←
–
–
–
–
–
–
–
–
Electronic, 5-speed
←
3.951
2.423
1.486
1.000
0.833
3.147
1.930
4.315
2.475
1.536
1.000
0.807
3.919
3.536
2.143
1.478
1.156
0.866
0.677
3.094
D27DT
G32D
D20DT
* ( ) Optional
←
–
←
←
←
←
←
←
←
Electronic, 6-speed
←
3.536
2.143
1.478
1.156
0.866
0.677
3.094
G23D
Page 7

0-7
0
1
2
3
4
5
6
7
8
9
10
11
12
13
14
15
16
* ( ) Optional
Part-time (AWD)
←
←
← (AWD: –)
←
←
←
←
←
←
Build-up type
(IOP type )
Semi-floating type
(Ball joint type)
Build-up type
(IRS type)
←
←
←
←
Cable type:
internal expansion
(EPB type)
AWD
←
←
–
–
–
←
←
←
←
IOP type
Ball joint type
IRS type
←
←
←
Disc type
Cable type:
internal expansion
(EPB type)
D27DT
G32D
Part-time
←
←
2.483 : 1
←
←
←
←
←
←
Build-up type
Semi-floating type
Build-up type
←
←
←
←
Cable type:
internal expansion
G23D
Page 8

* ( ) Optional
12 - 2.2
D20DT
←
5-link + coil spring
(Multi link + coil spring)
(EAS)
←
←
←
←
←
Multi link + coil
spring (EAS)
←
←
12 - 1.8
←
D27DT
G32D
←
5-link + coil spring
←
←
12 - 1.2
12 - 115
G23D
Page 9

0-9
0
1
2
3
4
5
6
7
8
9
10
11
12
13
14
15
16
2. Chassis Number
The chassis number is stamped
on the frame behind the front
right tire.
3. Certification Label
The certification label is located
on the driver’s door sill.
4. Vin Label
Page 10
0
1
2
3
4
5
6
7
8
9
10
11
12
13
14
15
16
1
Page 11

CHECK THE VEHICLE INSIDE
1. Make sure that all doors including the tailgate are properly closed.
2. Adjust the driver’s seat for comfortable driving.
3. Adjust the outside and inside rear view mirrors.
4. Fasten the seat belts and be sure that all other occupants have fastened theirs properly.
5. Check operation of the parking brake.
6. Check that all appropriate warning lights are operating when turning the ignition key to the “ON” position.
7. Check the operations of the clutch pedal, accelerator
pedal, and brake pedal.
8. Make sure that there are no obstacles in the danger
area around the vehicle.
Page 12

SAFETY PRECAUTIONS
1-3
0
1
2
3
4
5
6
7
8
9
10
11
12
13
14
15
16
Do not Use Methanol
Fuels containing methanol (wood alcohol) should not be
used in your Kyron. This type of fuel can reduce vehicle performance and damage components of the fuel system.
The warranty policy will not cover damage of the fuel system and any performance problems that are caused by the
use of methanol or fuel containing methanol.
NOTE
Operation in Foreign Countries
If you are going to drive your Kyron in another country, be
sure to:
• Observe all regulations regarding registration and insurance.
• Check that a suitable fuel is available.
Vehicle Fueling from Drums or Storage Containers
For safety reasons (particularly when using noncommercial
fueling systems) fuel containers, pumps and hoses must
be properly earthed.
Static electricity build up can occur under certain atmospheric
and fuel flow conditions if unearthed hoses, particularly
plastic, are fitted to the fuel dispensing pump.
It is therefore recommended that earthed pumps with integrally earthed hoses be used, and that storage containers
be properly earthed during all noncommercial fueling
operations.
Page 13

4. • Diesel engine equipped vehicle:
Insert the ignition key into the key cylinder and turn it to
the
“ON” position without depressing the accelerator
pedal. As soon as the glow indicator (
) goes out, turn
the key to the
“START” position to start the engine.
• Gasoline engine equipped vehicle:
Turn the ignition key to “ON” position and check the appropriate warning lights are operating.
5. Release the key when the engine starts. If your vehicle is
equipped with a manual transmission and is engaged
at neutral (N), it is ok to release the clutch pedal when
the engine runs.
6. Warm up the engine properly according to the ambient
temperature.
7. Make sure that there are no persons or obstacles in the
danger area around the vehicle.
8. Release the parking brake.
9. • Automatic transmission equipped vehicle
Keep the brake pedal depressed and shift into the
“D”
position. Make sure that the position indicator of “D”
comes on. Slowly release the brake pedal to begin
moving.
• Manual transmission equipped vehicle
Keep the brake pedal and clutch pedal depressed and
shift into the
“1” position. Release the brake pedal and
gradually depress the accelerator while slowly releasing
the clutch to begin moving.
Page 14

SAFETY PRECAUTIONS
1-5
0
1
2
3
4
5
6
7
8
9
10
11
12
13
14
15
16
Air Bag
1. Never impact the air bag installations by hands or tools.
2. The air bag system serves as a supplement to the
seat belt. Make sure that you and your passengers
always fasten the seat belts properly even if the air
bags are installed in the vehicle.
3. Do not place any objects on the air bag inflation location.
You may be injured by those objects during deployment.
4. The air bag system should be inspected 10 years after installation regardless of its appearance and other
conditions.
5. Repairs to the air bag system should be done only
by a Ssangyong Dealer or Ssangyong Authorized Service Center.
6. Do not diagnose the circuit with a circuit tester. Do not
attempt to modify any air bag components including the
steering wheel, air bag mounting area, and harness.
7. Never install a child restraint in the front seat. The children on the restraint could be seriously injured by the
air bag in a collision.
8. The deployed air bag unit should be removed from
the vehicle and replaced with a new one.
9. When the air bag is deployed, the relevant components will be very hot, so do not touch them until they
have cooled down.
10. A person who is smaller than 140 cm should sit in
the rear.
Page 15

Power Window
1. When you operate the rear windows from the driver’s
seat while a child sits in the rear, make sure that no
body part of the child is between the window and the
window frame.
2. When carrying children in the rear seat, press the rear
door window lock switch to make the rear door
switches inoperative.
3. Make sure that all passengers have their body parts
such as hands inside the vehicle.
4. When closing the windows, be aware of safety conditions before operation.
Glass Care
1. Be careful not to damage the rear heated wire when
cleaning the rear glass.
2. Do not install any sunshield on the windshield glass
and rear glass. It may adversely affect the rear heated
wire.
3. The rain and automatic light sensors are installed on
the upper middle front of the windshield (if equipped).
If these sensors are contaminated or covered with various coating sprays, the automatic rain sensing wipers
and lights may not work properly.
Page 16

SAFETY PRECAUTIONS
1-7
0
1
2
3
4
5
6
7
8
9
10
11
12
13
14
15
16
• Do not hold a child while riding in a vehicle.
• Never let a child stand or kneel on any seat.
• Do not allow a child in the cargo areas while the vehicle is
moving.
• Children who have outgrown child restraint systems should
sit in the rear seat and be restrained with the seat belt. If child’s
seating position has a shoulder belt which is on or very close
to the face or neck, move the child close to the center of the
vehicle, slightly inboard of the shoulder belt, or move the child
to a position without a shoulder belt if possible.
• Please note that the three point seat belt is designed for a
person who is taller than 140 cm.
WARNING
Page 17

Warming Up the Engine
1. It is recommended to drive off after warming up the engine.
Driving immediately after starting the engine may decrease the
engine’s life expectancy. Warm up the engine properly according to the ambient temperature.
2. Excessive engine warming increases the fuel consumption
and air pollution. An optimized warming up time is approx. 2
minutes.
Do not accelerate the engine during the warming up period.
Driving the Automatic Transmission Equipped
Vehicle
1. Keep the brake pedal depressed and shift the gear selection
lever into the “D” position. Make sure that the “D” light is on
the instrument cluster.
Drive off the vehicle by releasing the brake pedal slowly.
2. To avoid any possible damage to the automatic transmission,
do not abruptly drive off or accelerate the vehicle after shifting
the gear selection lever into the
“D” position. Especially on a
hill, move the lever to the
“D” position with the brake pedal
depressed and wait for a couple of seconds until the position
indicator of
“D” is on the instrument cluster.
3. Your vehicle may move backward on a steep hill even if the shift
lever is engaged into the
“D” position. Therefore, always de-
press the brake pedal when you need to stop on such a hill.
Page 18

SAFETY PRECAUTIONS
1-9
0
1
2
3
4
5
6
7
8
9
10
11
12
13
14
15
16
Vapor Lock
When the brake is excessively applied on a downhill, some
bubbles can be formed in the brake cylinder or in brake lines.
Because of these bubbles, hydraulic braking pressure cannot
be transferred to breaking units of the vehicle despite the fully
depressed brake pedal.
Engine Brake
When driving down a long slope, use the engine brake
effect by downshifting the transmission in steps according to the driving conditions while using the service brake.
An excessive operation of the service brake could result
in a “Fade” or “Vapor Lock” effect.
Stopping and Parking the Vehicle
1. Never leave infants and children unattended in the vehicle with the doors locked. They can move the vehicle
unexpectedly. They can be suffocated in especially hot
weather.
2. When parking the vehicle on a hilly road, apply the parking brake and chock the blocks under the wheels.
Place the gear selector lever to the “P” position (automatic
transmission equipped vehicle).
3. If possible, do not stop and park the vehicle on the steep road.
Extinguisher
Keep it ready for use at any time. Be familiar with how to
use it. For more information, read the label on the surface of the fire extinguisher.
Page 19

Supplementary Heating Device
- FFH (Fuel Fired Heater)
This supplementary heater is a fuel burning type and improves the heating effect by increasing the engine coolant temperature.
- PTC (Positive Temperature Coefficient) Heater
This supplementary heater is an electrical air heating type
and installed on the heater outlet port. This device improves the heating effect by increasing the temperature of
flowing air into the passenger room.
FFH Operation
The FFH system operates up to more than 2 minutes to
burn the residual fuel inside the system when stopping
the engine during its operation.
Therefore, a certain period of FFH operation after stopping
the engine is not a malfunction.
In an initial operating stage, the fuel pump generates the
operating sound and the FFH heater produces white
smoke. These are normal states to fill the fuel into the
FFH fuel line.
Page 20
SAFETY PRECAUTIONS
1-11
0
1
2
3
4
5
6
7
8
9
10
11
12
13
14
15
16
If the engine CHECK indicator flashes,
drive the vehicle at over 50 km/h for 15
~ 20 minutes to regenerate the CDPF.
When the amount of particulates is
lowered down to a certain limit, the engine CHECK indicator goes off.
Catalyst diesel particulate filter
(CDPF)
The CDPF is a compound word for
Diesel Oxidation Catalyst (DOC) and
Diesel Particulate Filter (DPF), which
are exhaust gas after-treatment
devices.
Page 21

Priming Pump
Page 22

SAFETY PRECAUTIONS
1-13
0
1
2
3
4
5
6
7
8
9
10
11
12
13
14
15
16
In particular, modifying your vehicle into the LPG vehicle
might bring serious damage to the vehicle's performance and durability. Not only the engine but also the
transmission and wheel alignment are excluded from
the warranty.
If you install a wheel dust cover on the tires to enhance
the beauty of tire parts, the heat caused by friction in braking might bring serious problems in performance, causing Vapor Lock and Fade phenomena.
Do not modify the car’s audio system and install other
additional electronic devices such as wireless communication equipment, rear view camera, LCD TV, and remote starting device.
This vehicle’s electronic system contains electronic circuits and fuses for the installation of standard electric and
electronic devices. If you add new devices or circuits using the several existing devices and circuits at a time, electric and electronic devices can be damaged from overloading and may ignite. In addition, when you do drilling work
in installing devices such as an antenna may expose the
vehicle to rusting.
Page 23

Do not equip the vehicle with bumper guards sold in the
market.
Installing bumper guard or other guard bars that are being sold in the market may cause problems in parking and
stopping due to the extended length of vehicle, and increase in fuel cost due to additional vehicle weight, and
rusting may occur in the holes for equipping the guards.
And because of the absence of shock absorber in the
bumper guard, even accidents during low-speed driving
will be much serious compared with the damage that unmodified cars might sustain.
Do not modify or replace the vehicle flooring or the seats
at your discretion.
• When replacing the interior flooring of vehicle with laminated paper
To improve the comfort of cushion and to facilitate the
cleaning of the vehicle, some drivers replace the flooring
with laminated paper after removing the seats. However,
this may cause damage to the various electronic system
control units and wiring. This also may hinder the function of the seat rail that enables for the seat to move forward and backward. In this case, the locking system to fix
the location of seats may malfunction, which might lead
to a serious accident if the loose seats tilt forward or backward during an uphill climb or downhill descent.
Page 24

SAFETY PRECAUTIONS
1-15
0
1
2
3
4
5
6
7
8
9
10
11
12
13
14
15
16
Do not install products that may decrease the driving
resistance such as sticker, molding, air dam, or windproofing products.
The sticker’s adhesives may damage the coated surface
of the vehicle. If parts of the car are drilled to attach molding and other functional parts, the area near the holes will
rust and other unfamiliar sound may occur while driving.
Especially if the attached parts are not fixed well, it may
damage the vehicle or even cause a fatal accident.
In using audio in the vehicle, do not use illegally copied
CD and DVD, which violates relevant laws. Such discs
can also cause malfunction of the audio head unit and
changer. In addition, such discs may also not play
properly.
When installing the vehicle with unauthorized parts or
modifying it in ways including the cases mentioned
previously, please keep in mind that the changed parts
and related problems with changed auto parts shall not
be covered by warranty.
Page 25

0
1
2
3
4
5
6
7
8
9
10
11
12
13
14
15
16
2
Page 26

PANIC BUTTON
(operative only when the ignition key is
inserted)
Page 27
IGNITION KEY, REMOTE CONTROL KEY
2-3
0
1
2
3
4
5
6
7
8
9
10
11
12
13
14
15
16
SIMULTANEOUS OPERATIONS OF
ROOM LAMPS
The front and center room lamps come on for 30 seconds
when the unlock button on the remote control is pressed
and hold. The lamps immediately go off when the remote
lock button is pressed.
AUTOMATIC DOOR LOCKING
If a door is not opened within 30 seconds after unlocking
the door with the remote control key, all the doors will be
locked automatically.
• Standard key does not have the remote control function.
• In case of the remote control key, some keys come with the
immobilizer and battery as an optional package
NOTE
Page 28

DOOR LOCK/UNLOCK BUTTON
1. Lock (Briefly Press)
• If you press this button, all doors are locked and the
theft deterrent mode is activated.
• When the theft deterrent mode is activated, the emergency hazard lights blink twice.
2. Unlock (Press and Hold)
• If you press and hold this button for about 2 seconds,
it unlocks all doors and releases the theft deterrent
mode.
• When the deterrent mode is deactivated, the emergency
hazard lights blink once.
• The front and center room lamps come on for 30 seconds when the doors are unlocked with the remote control key.
Page 29
IGNITION KEY, REMOTE CONTROL KEY
2-5
0
1
2
3
4
5
6
7
8
9
10
11
12
13
14
15
16
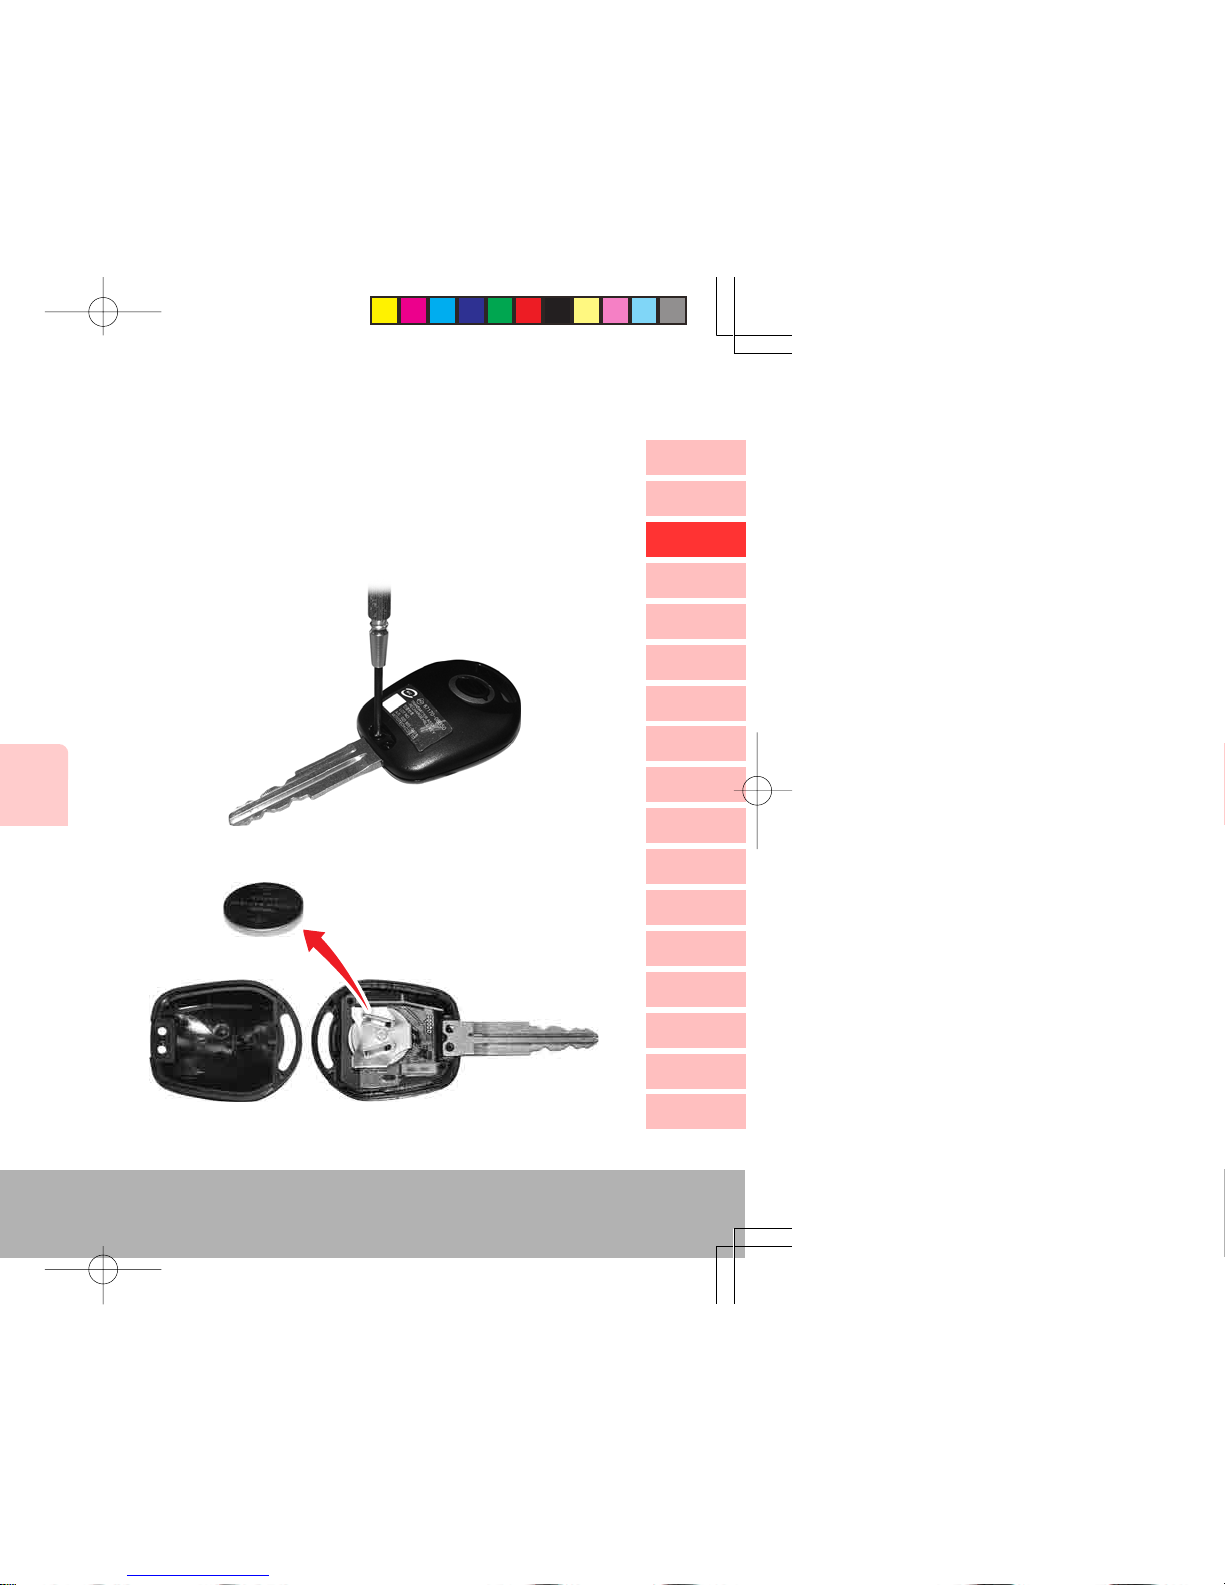
Battery Replacement
1. Remove the rubber cover from back of the ignition key.
2. Unscrew two screws from the rear cover.
3. Pry off the cover by using a small flat screwdriver.
Model: CR2032
4. Remove the battery and insert a new one.
Page 30
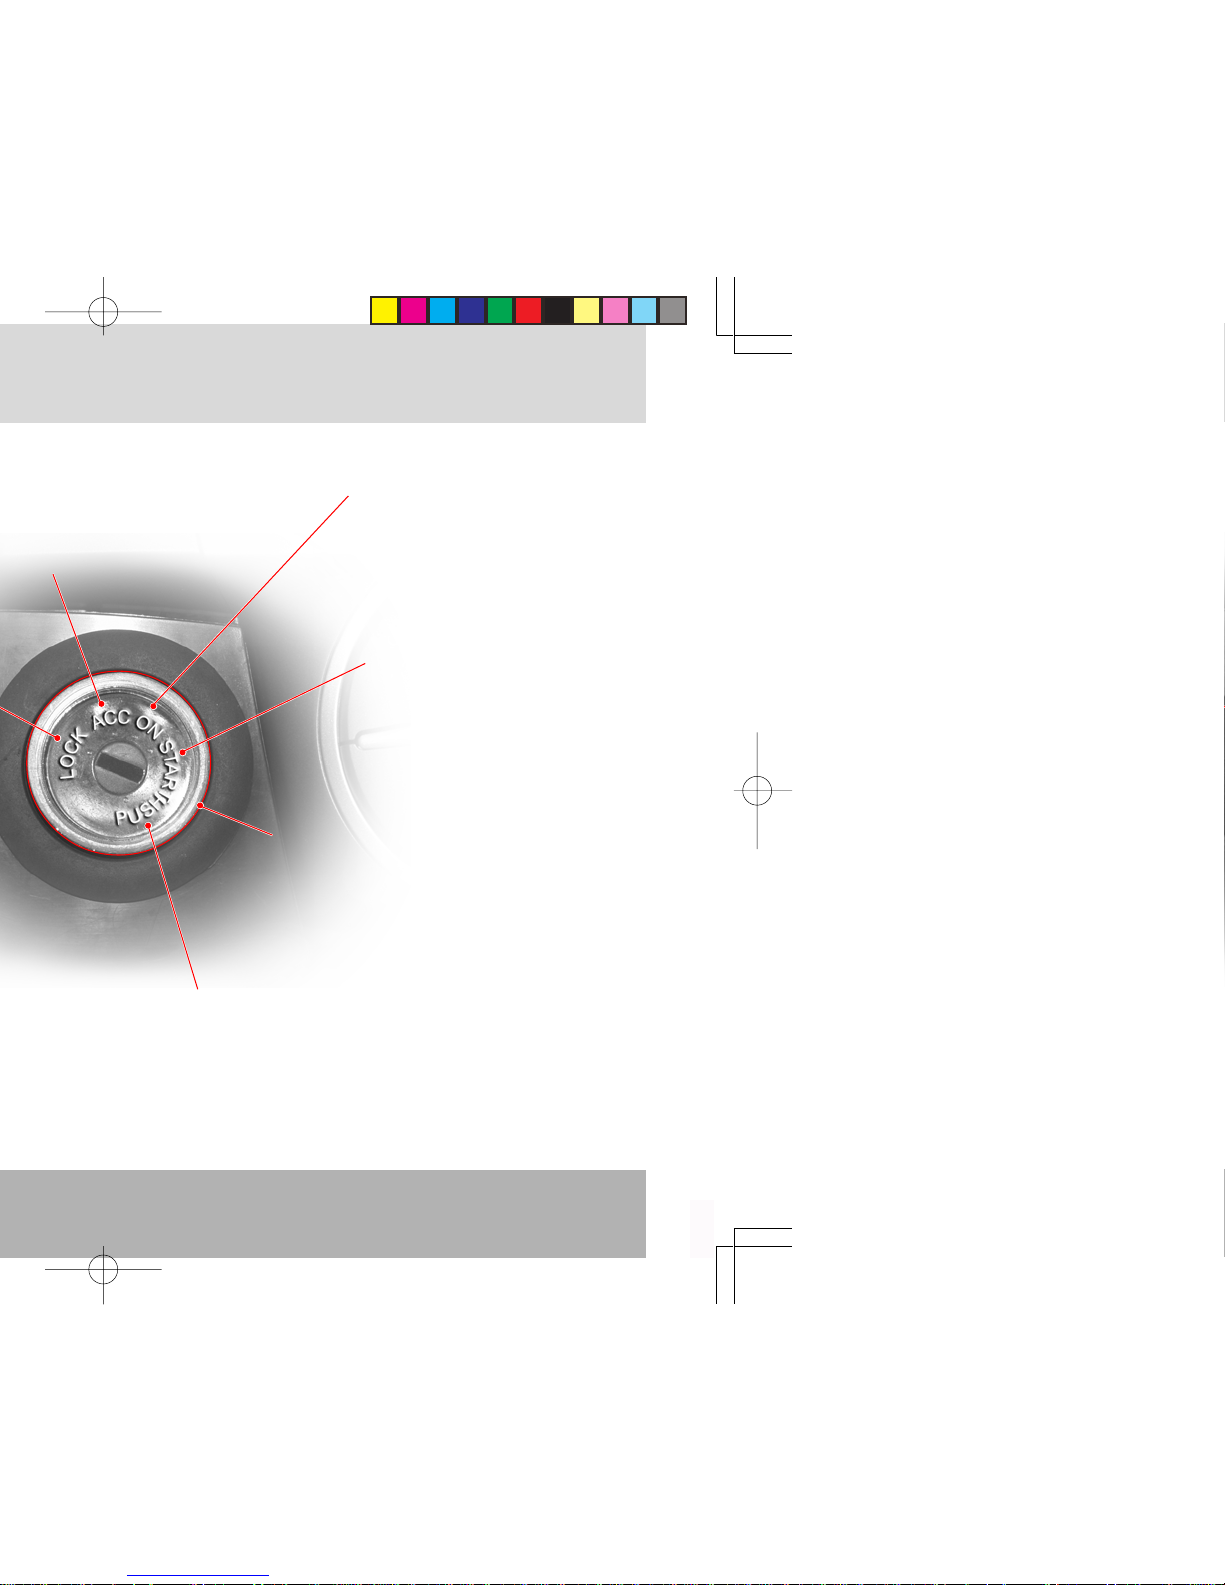
START Position
• Engages the starter. After the
engine starts, release the key
and it will automatically return
to the “ON” position.
ON Position
• The engine runs and all electrical accessories can be used.
• The steering wheel is unlocked.
From ACC to LOCK Position:
Turn the key to LOCK position from
ACC position while pressing the key.
Key Hole Illumination
Page 31

IGNITION KEY, REMOTE CONTROL KEY
2-7
0
1
2
3
4
5
6
7
8
9
10
11
12
13
14
15
16
• A warning buzzer sounds when opening the driver’s door
with the key positioned at the
“ACC” or “LOCK”
position.
• Do not leave the key at the
“ACC” or “ON” position
when engine is not running. Otherwise, the battery could
run down.
• Never press down the accelerator pedal while starting.
• Do not operate the starter for more than 10 seconds at
a time. (The starter motor may be damaged.)
• To prevent any damage to the starter, restart the engine from the
“LOCK” position after waiting at least
10 seconds.
• Never turn the key to the
“LOCK” position or with-
draw the ignition key from the ignition switch while
driving. The steering wheel will be locked and you may
end up with serious injuries.
• Never use any duplicated key not provided from
Ssangyong.
The duplicated key might not turn back to the
“ON”
position. It may cause a fire due to an overload in the
electric circuit. In addition, the engine with the immobilizer system cannot be started with the duplicated key.
Page 32

Battery
Transponder
Immobilizer Indicator
This indicator comes on when the ignition key is communicating with the
engine control unit (during engine
starting) and goes out after starting the
engine. If this indicator blinks, it may
indicate that there is something wrong
in the immobilizer system. Have the
system checked by a Ssangyong
Dealer or Ssangyong Authorized Service Center.
Key plate
The time needed for communication between the immobilizer
key and ECU can vary. When the time is very short, the immobilizer indicator does not come on.
NOTE
Page 33

IGNITION KEY, REMOTE CONTROL KEY
2-9
0
1
2
3
4
5
6
7
8
9
10
11
12
13
14
15
16
In the following cases, you may be unable to start the
vehicle with the immobilizer.
X When two or more immobilizer keys come into con-
tact with (each) other(s).
X When the key is close to any device sending or re-
ceiving electromagnetic fields or waves.
X When the key is close to any electronic or electric
devices such as lighting equipment, security keys
or security cards.
X When the key is close to a magnetic or metal ob-
ject or a battery.
• If the indicator remains blinking, have the immobilizer system
checked by a Ssangyong Dealer or Ssangyong Authorized Service Center.
• Avoid impact to the transponder inside of the key. The transponder can be damaged.
• With a damaged transponder, the engine cannot be started.
• The immobilizer system should be inspected, replaced,
serviced, or coded by only qualified service personnel in a
Ssangyong Dealer or Ssangyong Authorized Service Center.
• When an old code should be replaced or another key is added,
please observe the process personally.
CAUTION
Page 34

When you unlock the door with the ignition key after the door is
locked with the remote control (the theft deterrent mode), a warning buzzer sounds. Stop the buzzer by pressing any button on
the remote control.
CAUTION
Page 35

IGNITION KEY, REMOTE CONTROL KEY
0
1
2
3
4
5
6
7
8
9
10
11
12
13
14
15
16
2-11
Page 36
0
1
2
3
4
5
6
7
8
9
10
11
12
13
14
15
16
3
Page 37
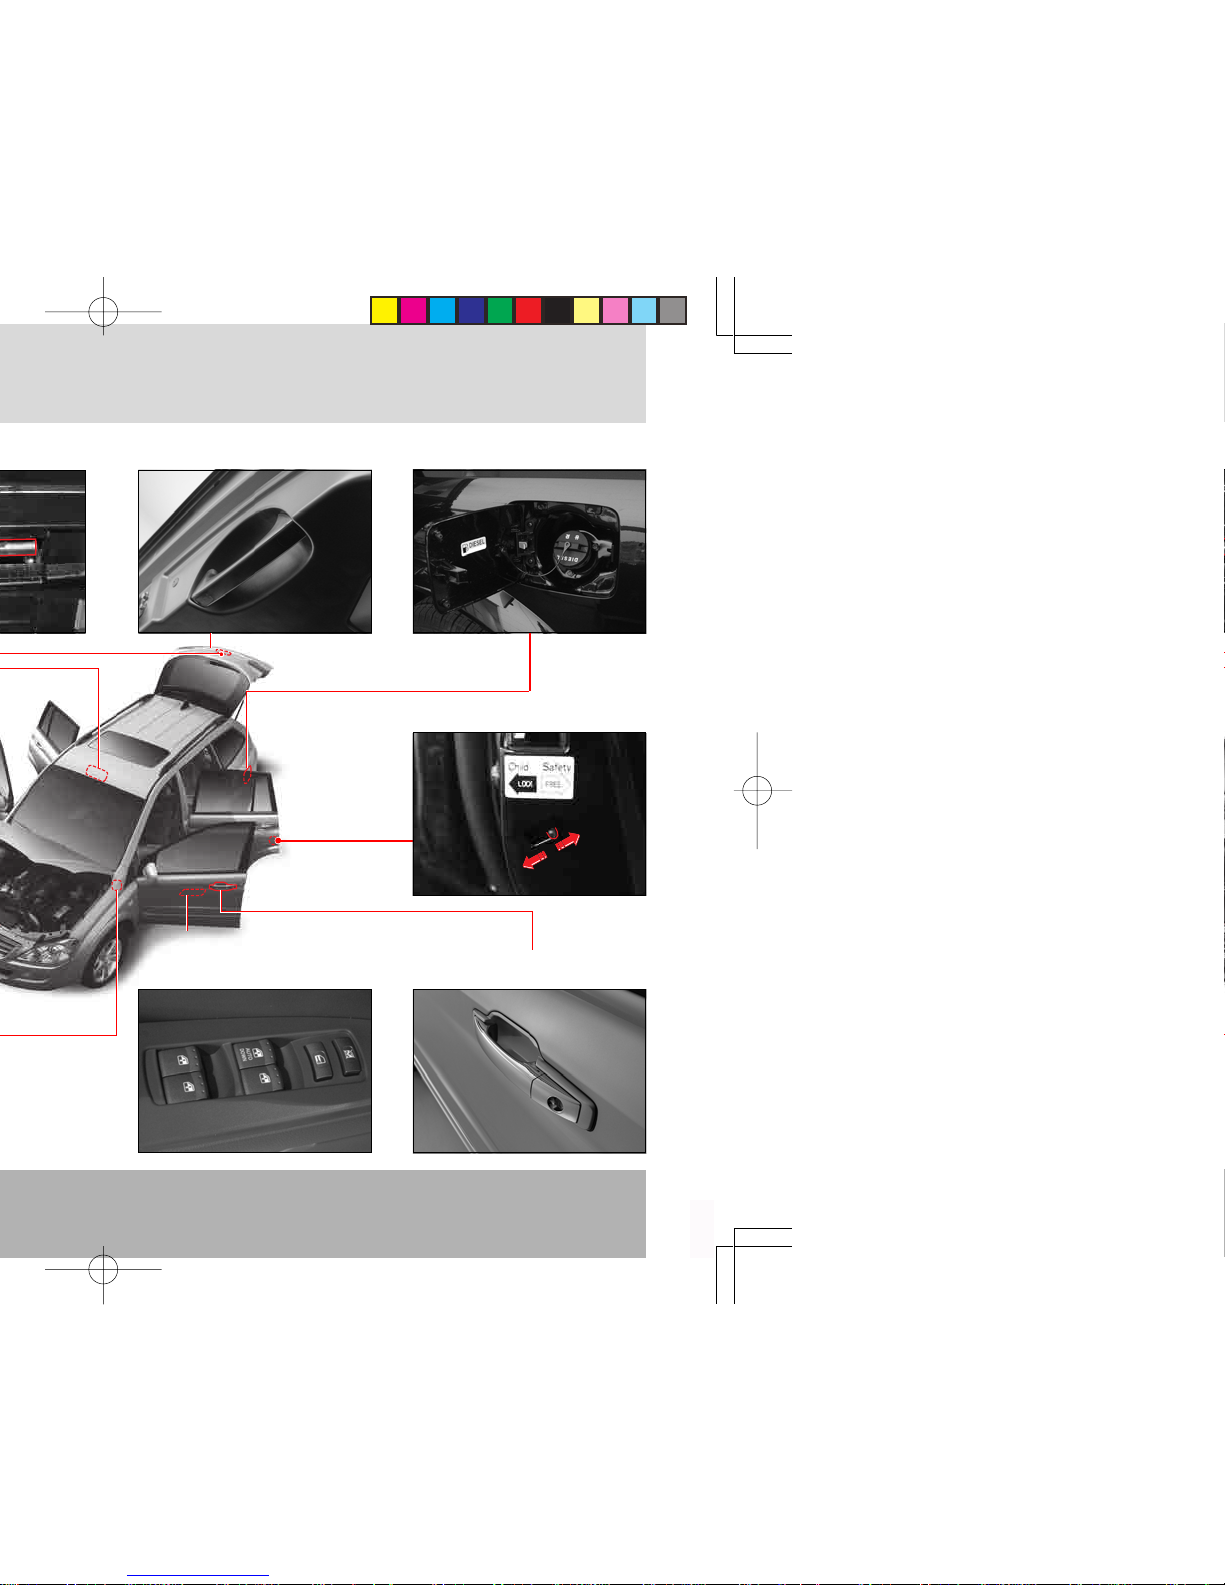
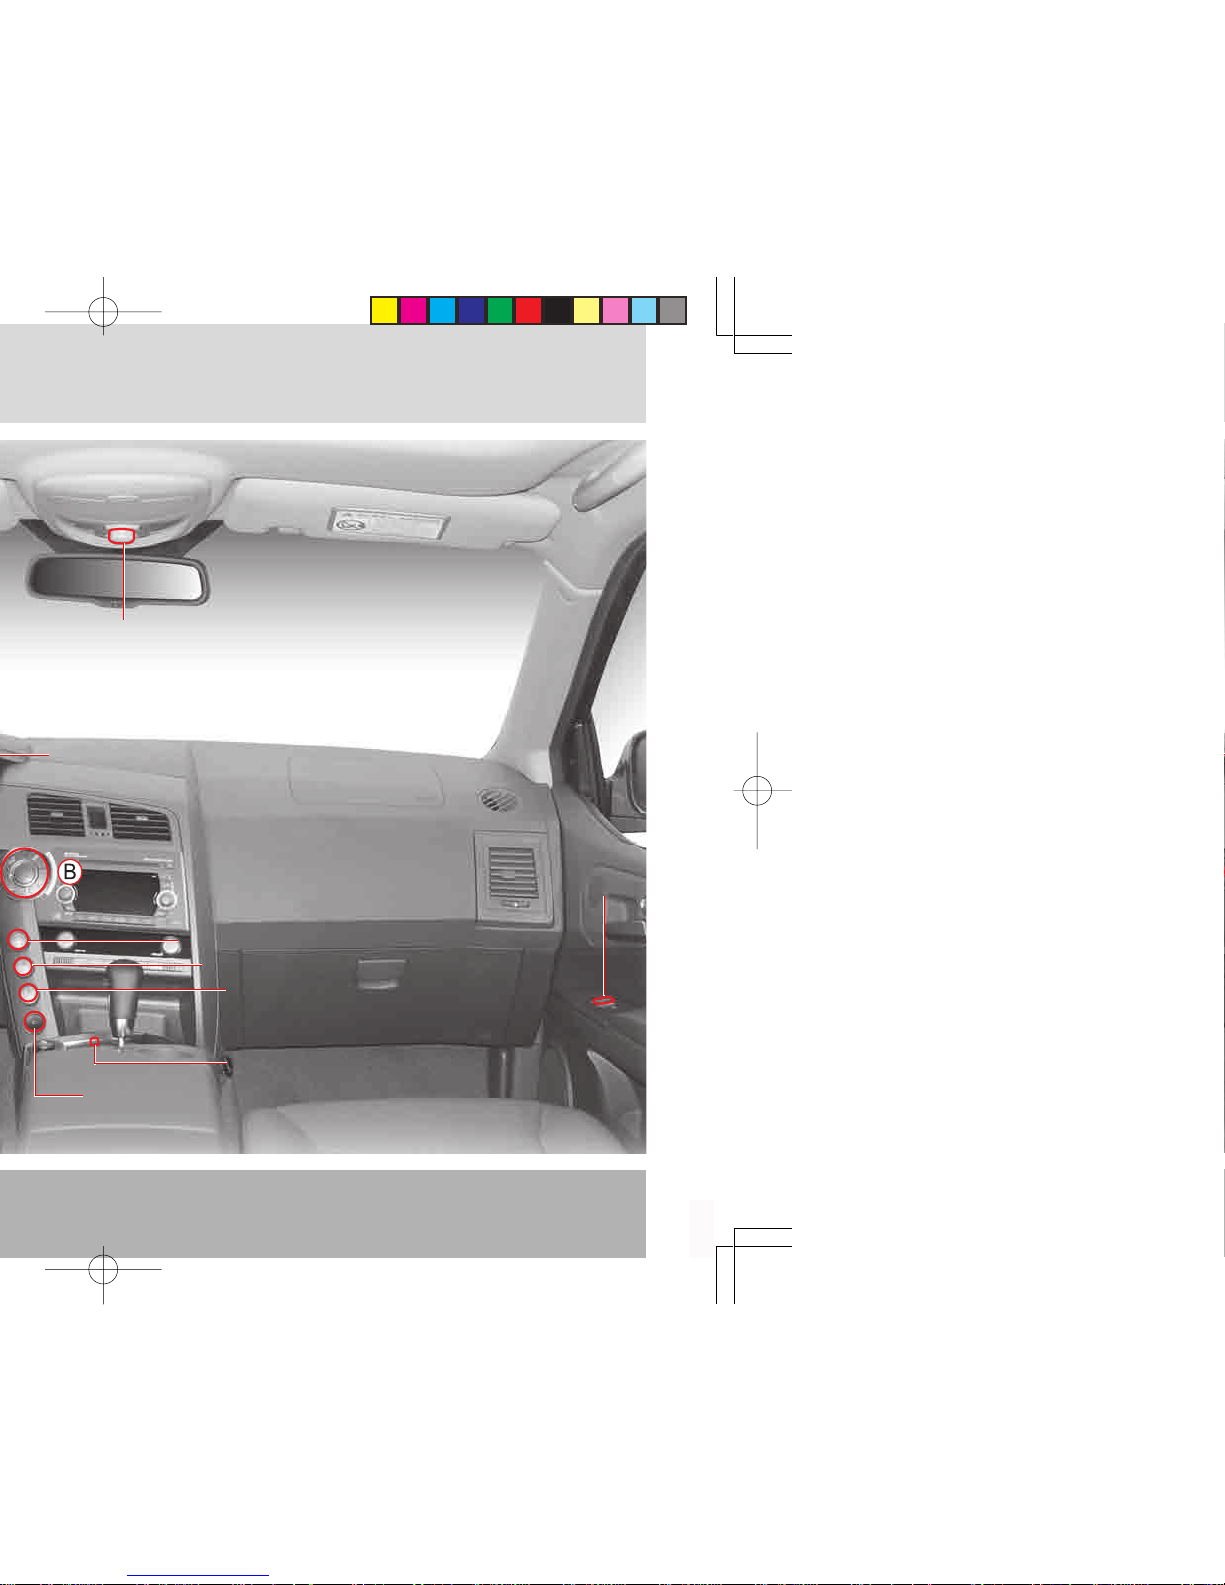
Child Safety Door Lock
Driver’s Door
Windows Switch
Door Opening Lever
Tailgate handle
Lock
Unlock
Rear Door
Page 38
OPENING AND CLOSING
3-3
0
1
2
3
4
5
6
7
8
9
10
11
12
13
14
15
16
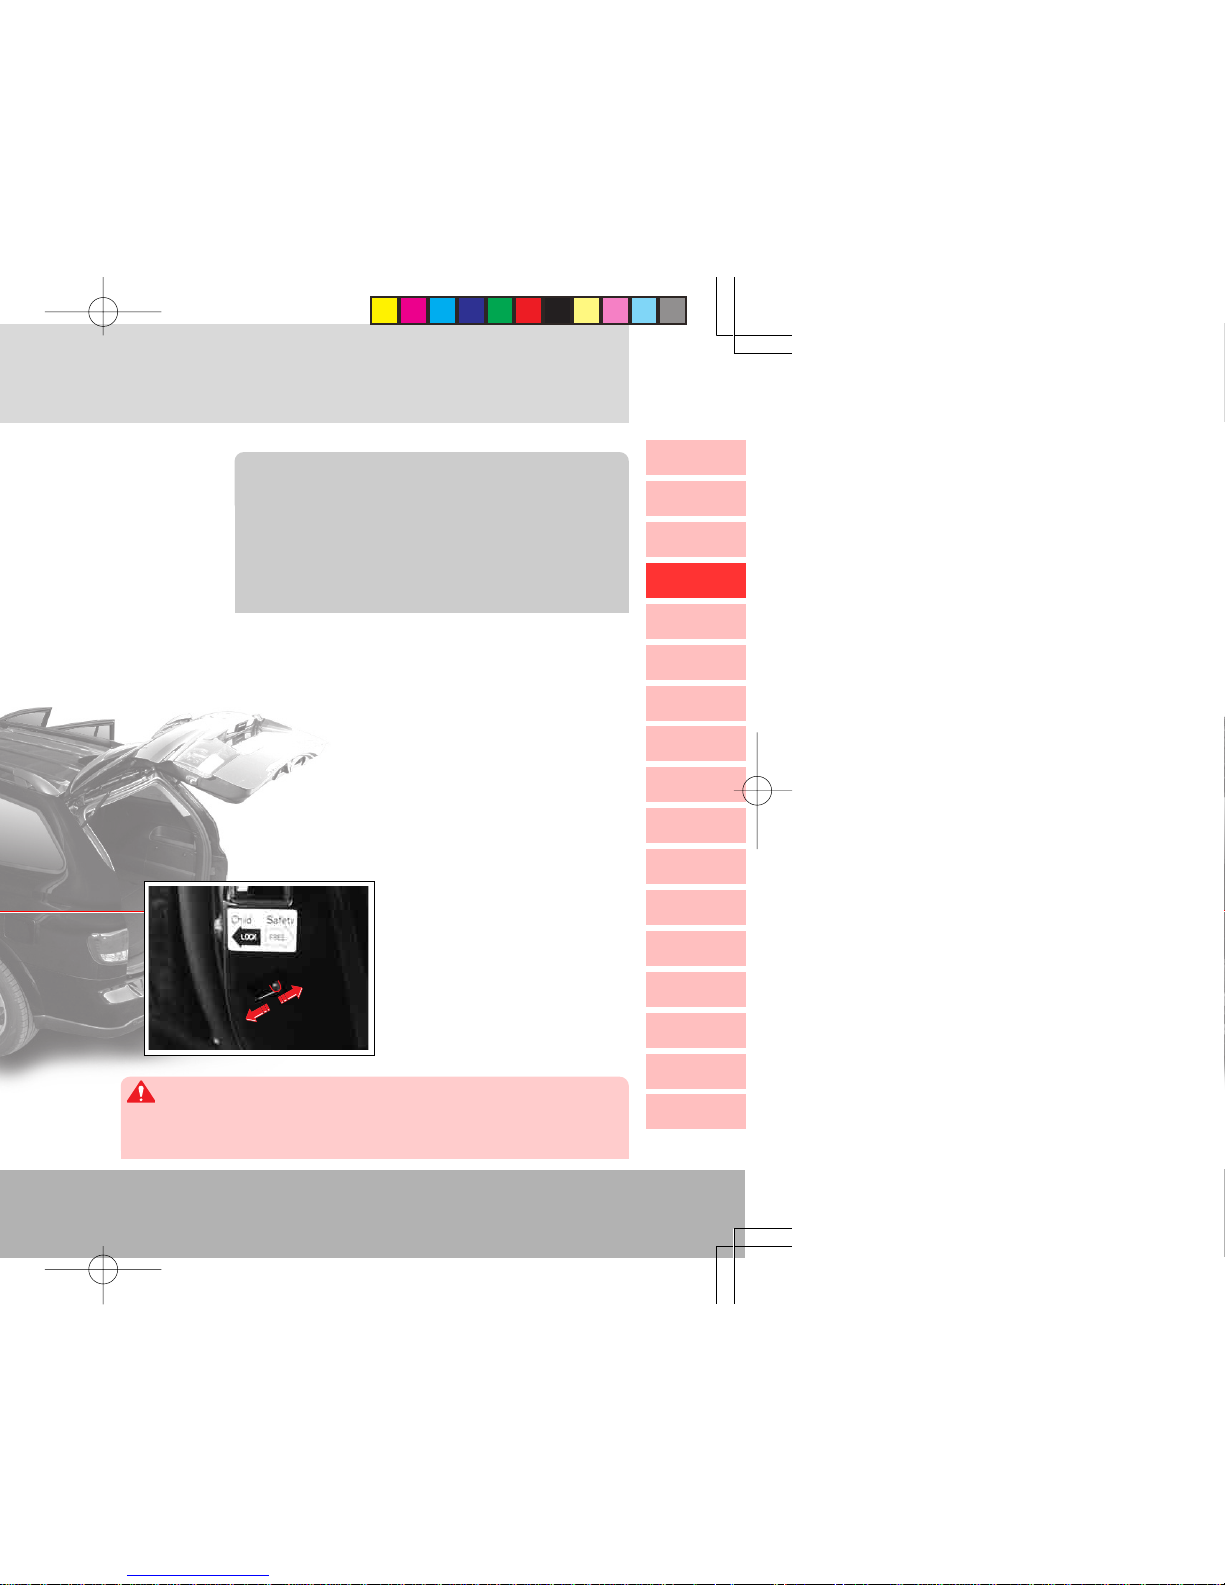
Child Safety Door Lock
Child safety door lock helps
prevent from an accidental
door open, especially when
children are in the vehicle.
When the child-safe lever is
in the
“LOCK” position,
the rear door can be opened
only from the outside.
Children in rear seats can open rear doors. Move the child-safe lever
to the
“LOCK” position.
WARNING
• The passenger’s door lock/unlock knob and lever
have the same functions with those of the driver’s
door.
• The door lock/unlock knob on the rear right or rear
left door can only lock or unlock its respective
door.
NOTE
Lock
Unlock
Page 39

Automatic Door Locking
All doors will be automatically locked when you drive over
30 km/h while the doors are unlocked.
When the door lock/unlock switch is
pressed while all doors including the tailgate are locked, all doors will be
unlocked. When the switch is pressed
again, all doors will be locked.
This switch is not available when any of
doors are not fully closed and the vehicle
is in theft deterrent mode.
Room Lamp Coupled Operation
The center room lamp is on or off depending on opening/
closing of doors. When any door is open, the front and center room lamps come on. (However, the main switch of the
front room lamp should be pressed.) When any door is
closed, the lamp will dim down and go out.
When you drive at 30 km/h or a higher speed and try to unlock all
doors with the door lock/unlock knob or switch, all doors are automatically locked again.
CAUTION
Page 40

OPENING AND CLOSING
3-5
0
1
2
3
4
5
6
7
8
9
10
11
12
13
14
15
16
Time Lag of Window Operation
The power window can be operated for 30
seconds even after the ignition key is turned
to another position from the “ON” position.
However, the function immediately stops
when one of the front doors is opened.
Passenger’s Door
Window Switch
Central Door Lock/
Unlock Switch
Window Lock Switch
If the window lock switch is pressed down,
only driver’s window is operative. Passenger’s
and rear windows cannot be operated by their
switches.
When closing the passenger’s and rear windows
from driver’s seat, be aware of safety conditions
before operation. Parts of the body can be trapped
by the window.
CAUTION
When carrying children in the rear seat, press the
window lock switch to make the rear window
switches inoperative. Do not allow children to play
with the power window switch and rear door
window switches.
WARNING
Page 41

Passenger’s and Rear Window Switch
To move windows up or
down, pull up or press the
corresponding switch for the
window.
• Before operating the power windows, make sure that nothing
can be trapped (such as heads, hands, or fingers) in the window.
• Make sure that passengers do not stick out their hands or heads
from the vehicle while driving.
• Do not allow children to play with any switch, door lever or the
gear shift lever.
WARNING
Rear seat
Door Lock/Unlock Switch
Window switch
Passenger’s seat
Page 42

OPENING AND CLOSING
3-7
0
1
2
3
4
5
6
7
8
9
10
11
12
13
14
15
16
Anti-Pinch Function
To prevent any body parts from being trapped by the sliding
sunroof, an Anti-Pinch Function automatically opens the
sunroof when an object is trapped.
• When operating the sunroof, be aware of safety conditions before
operation. Parts of the body can be trapped.
WARNING
• This safety function is available for the sliding sunroof close.
• The anti-Pinch function is deactivated just before the sunroof closes.
• If the anti-pinch is operated 3 times in series, the system is
changed to manual mode.
CAUTION
SUNROOF OPEN WARNING BUZZER
If the driver’s door is opened after the ignition key is removed with the sunroof opened, the buzzer will sound to alert
you that the sunroof is opened. The buzzer will automatically turn off when the door is closed. After this, the buzzer
will not sound even though the door is opened again.
Page 43

Battery Discharge or Power Failure while
Operating Sunroof
If the sunroof is stopped midway due to a discharged battery or
power failure, you need to re-calibrate the starting point of the
sunroof. In addition, the following cases need the re-calibration.
• The sunroof does not completely close or open by operating the switch once.
• The sunroof slides back to close. But the operation does
not stop even after a complete close and tilts up the sunroof.
• The opening gap remarkably decreases for the sliding open
or tilt up.
• Operation of the sunroof switch does not do anything or
work properly.
Re-calibrating the Sunroof Starting Point
• Turn the sunroof switch to the “CLOSE” direction to completely close the sunroof (sliding close).
• When the sunroof stops while the rear of the sunroof is
a little open, turn the sunroof switch to the “CLOSE” direction to tilt it completely.
When the sunroof is completely opened with the sunroof switch
and the switch is turned to the “OPEN” direction for more than 5
seconds, the sunroof cannot completely be either closed or opened
by operating the switch once. The sunroof will be moving only
when the switch is being turned. When this happens, re-calibrate
the beginning point of the sunroof to reactivate the one touch button.
NOTE
Page 44

OPENING AND CLOSING
3-9
0
1
2
3
4
5
6
7
8
9
10
11
12
13
14
15
16
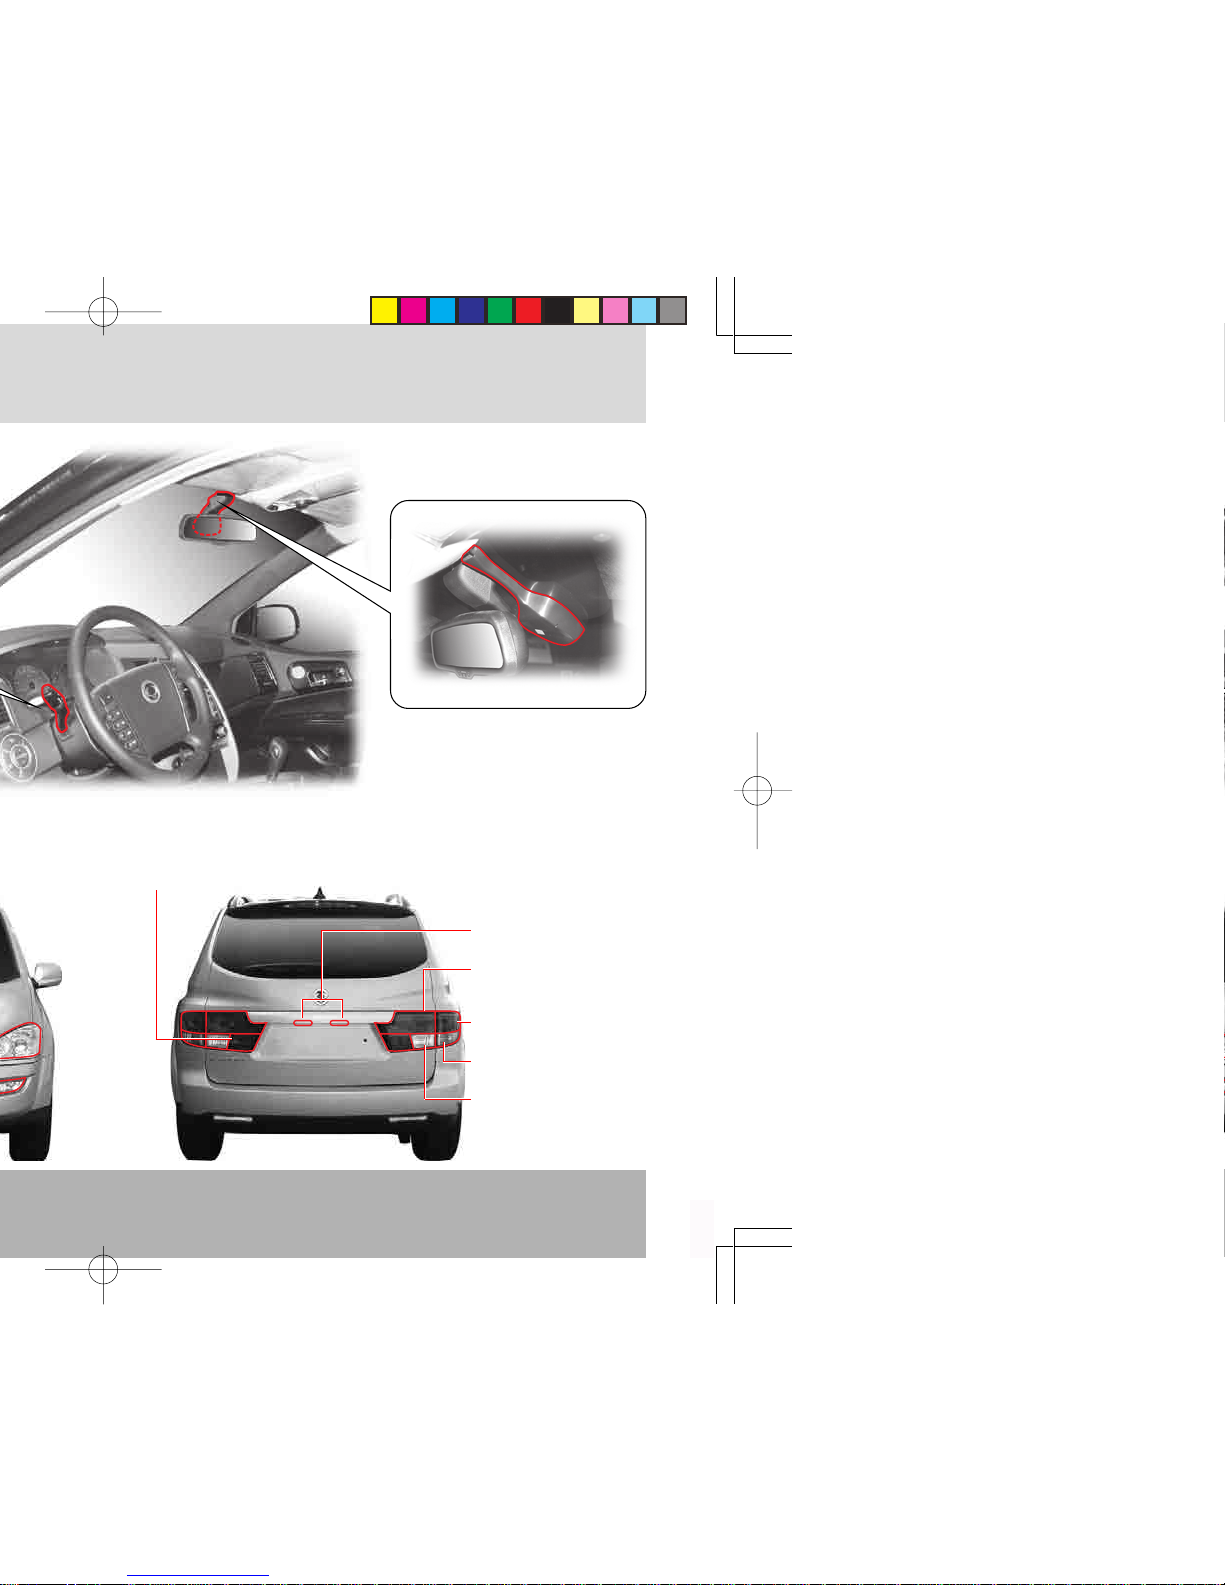
To open the tailgate, unlock the
tailgate and pull the tailgate
opening lever up.
Tailgate Opening Lever
(Outside)
Tailgate Handle
To close the tailgate, pull down
the tailgate handle to lower the
gate. Then, push the tailgate to
close it completely.
Exhaust gases are poisonous. Do
not run the engine with the tailgate
open to avoid exhaust gas in the
cabin.
Cargo can fall out of an open tailgate while the vehicle is in motion,
resulting in an unexpected accident.
Do not travel with the tailgate open.
WARNING
Before closing the tailgate, ensure that
none of your body parts are trapped. Also,
because the tailgate is heavy, it might unexpectedly fall down and close. To prevent any injury, close the tailgate with
caution.
WARNING
Page 45

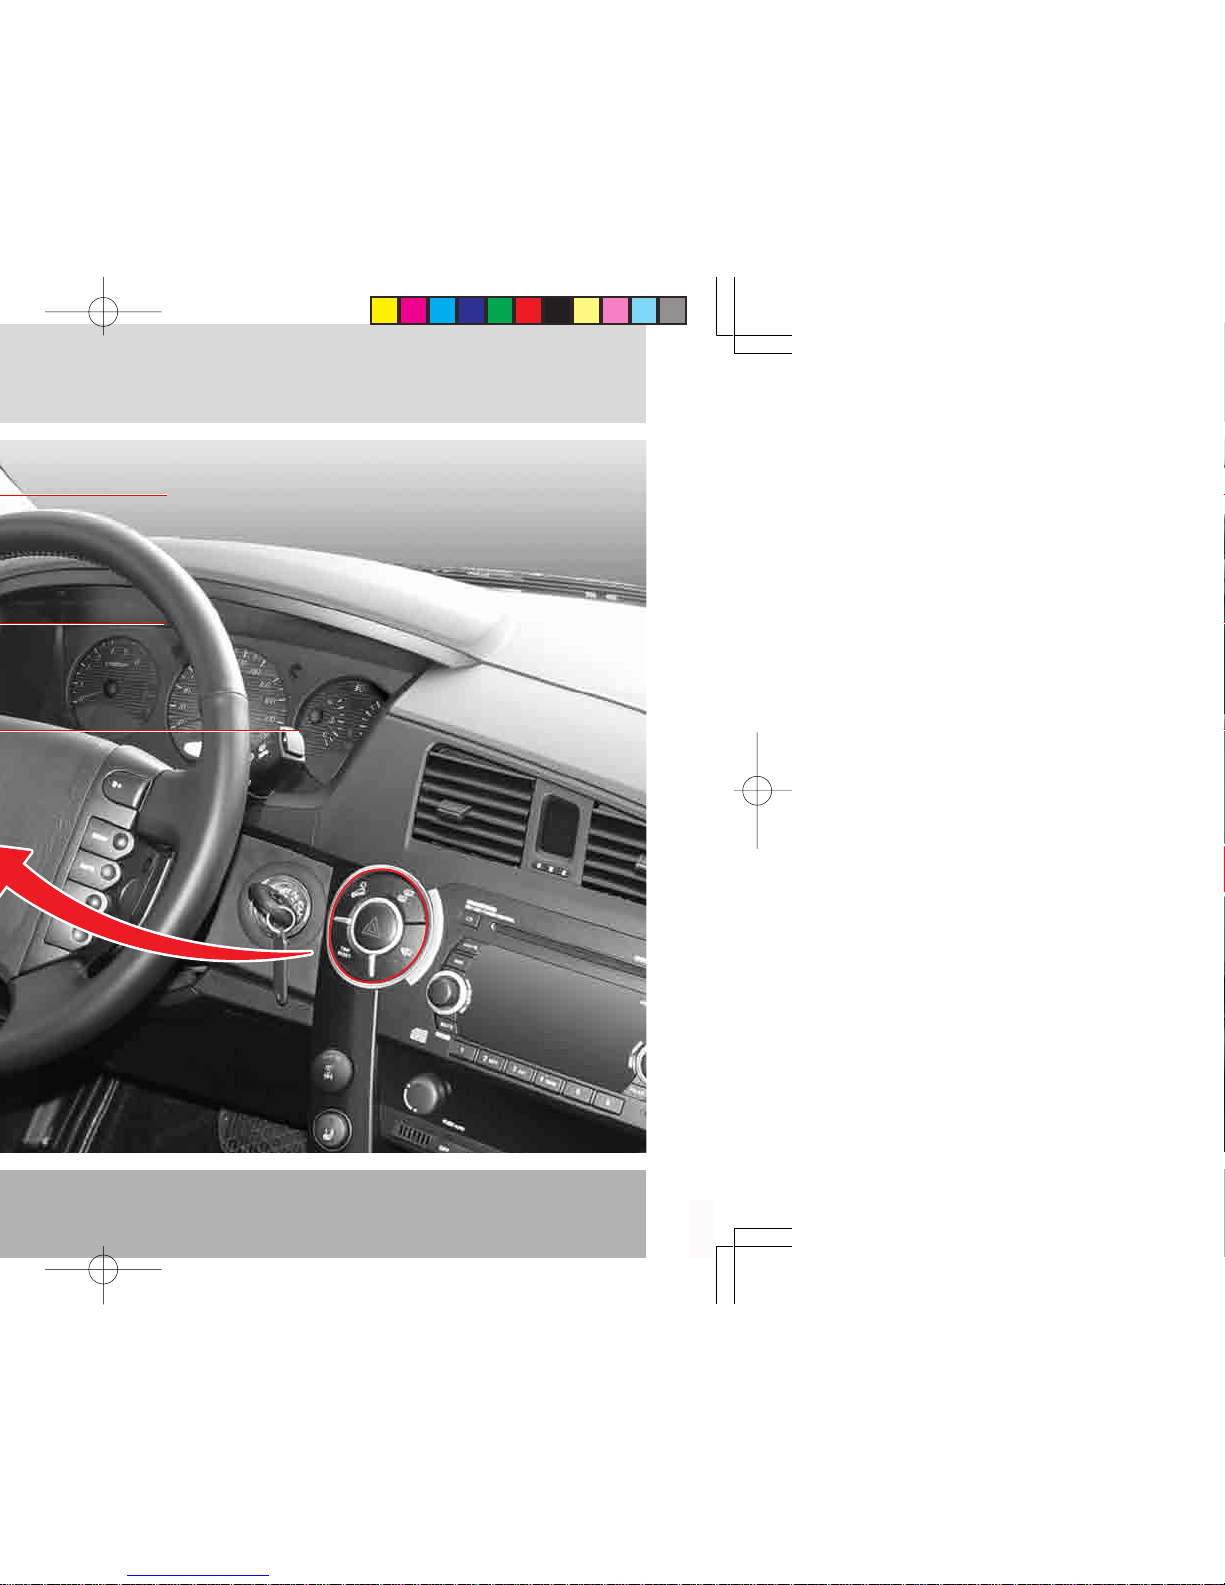
1. To open the engine hood, pull the
release knob located on the lower
left side of the steering wheel to
unlatch the engine hood.
2. Slightly lift up the engine
hood and raise up the safety
latch lever with your fingers.
Then, completely lift up the
engine hood.
Page 46

OPENING AND CLOSING
3-11
0
1
2
3
4
5
6
7
8
9
10
11
12
13
14
15
16
1. Open the fuel filler door ( ) by pulling the
release lever located on the lower left side
of the steering wheel.
OPEN
CLOSE
2. Open the fuel filler cap ( ) by
turning it counterclockwise.
3. After refueling, tighten the fuel
filler cap by turning it clockwise
until you hear clicking sounds.
Then close the fuel filler lid (
)
properly until it latches.
Page 47

For correct octane rating setting and other use of gasoline (ex.
Leaded), consult your Ssangyong Dealer.
CAUTION
Gasoline damages paintwork.
If gasoline spills onto paintwork, wash with cold water immediately.
CAUTION
Engine and exhaust system will be damaged.
• Do not use leaded fuel to the vehicle for unleaded fuel.
• Use the fuel with specified or higher Research Octane Number
recommended for your country by Ssangyong. Otherwise, it is
not covered by warranty.
CAUTION
Page 48

4
5
6
7
8
9
10
11
12
13
14
15
16
Heated Glass Switch ................................. 4-22
Audio Remote Control Switches on Steering
Wheel ......................................................... 4-23
4-wheel Drive System* .............................. 4-24
Switches in Overhead Console ................ 4-27
Limited Slip Differential (LSD)* ................ 4-28
Locking differential (LD)* .......................... 4-29
0
1
2
3
4
Page 49
Sunroof switch
4-wheel drive switch
Driver seat heating switch
Winter mode switch
Passenger seat heating switch
Door lock/
unlock switch
Wiper and
washer switch
Headlight leveling switch
Page 50

INTERIOR SWITCHES
4-3
0
1
2
3
4
5
6
7
8
9
10
11
12
13
14
15
16
HDC switch*
Tailgate and outside rearview
mirror heated glass switch
Windshield heated glass switch
TRIP/RESET switch
Outside rearview mirror
folding switch
Outside rearview mirror
control switch
Outside rearview mirror
selection switch
Rear fog light switch*
Page 51
Automatic Light & Rain
Sensor*
This senses the ambient illumination intensity to determine the
timing for turning the headlamps
and tail lamps on or off automatically when the light switch
is set to “AUTO”.
Back-up lamp
Tail lamp
License plate lamp
Tail lamp/Stop lamp
Rear fog light*
Turn signal lamp
Page 52

INTERIOR SWITCHES
4-5
0
1
2
3
4
5
6
7
8
9
10
11
12
13
14
15
16
Automatic Light & Rain Sensor*
This senses the amount of rain to operate the windshield
wiper automatically (For detailed information of wiper
operation, refer to wiper and washer switch section).
Do not shake and impact the sensor. It may not work properly.
CAUTION
Page 53
(Automatic light ON)
(Lights OFF)
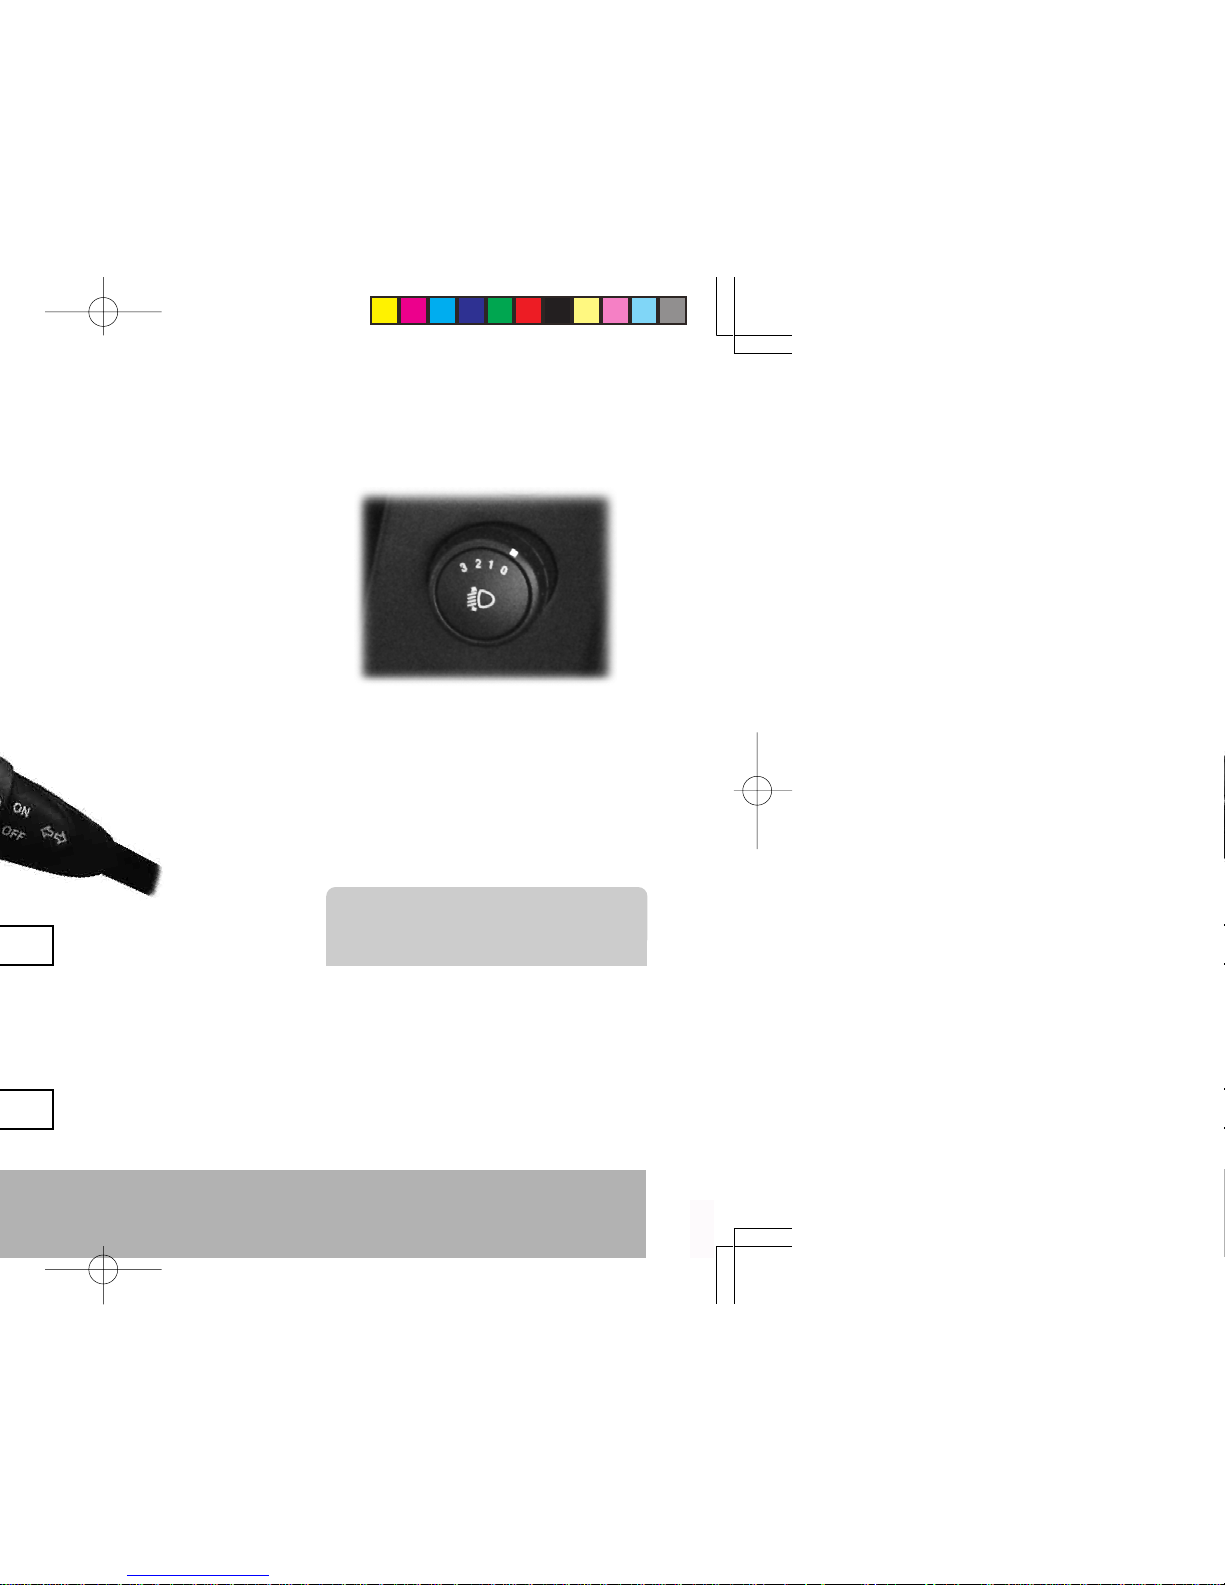
With the low beam switched on, adjust the aiming angle of headlights to
suit the vehicle load.
• To lower the aiming angle, rotate the
switch counter-clockwise.
• To raise the aiming angle, rotate the
switch clockwise.
HEADLIGHT LEVELING
SWITCH*
According to load condition, adjust the
aiming angle of headlights.
NOTE
Page 54

INTERIOR SWITCHES
4-7
0
1
2
3
4
5
6
7
8
9
10
11
12
13
14
15
16
Right Turn Signal Switch
FRONT FOG LIGHT SWITCH
To turn on the fog lights, turn this switch while the tail
lamps or headlamps are turned on.
While the turn signal lamp is turned on, the turn signal
indicator in the instrument cluster blinks.
NOTE
To turn on the rear fog light, push the rear fog light switch while
the front fog light switch is turned on. To turn it off, push the
switch again. The rear fog lights are automatically turned off when
turning off the light switch or the front fog light switch. Therefore,
to turn on the rear fog lights, push the rear fog light switch again
after turning on the light switch and the front fog light switch.
DAYTIME RUNNING LIGHT (DRL):
DRL Regulation Region Only
For vehicles equipped with the DRL, the tail
lights automatically turn on when turning the
starter key from ACC to ON.
The headlights turn on as the engine starts.
With the headlights automatically ON, turn-
ing the light switch from off to on turns off the
headlights but keeps the tail lights on.
(Turning the light switch immediately deactivates the DRL function.)
Page 55

FRONT AUTOMATIC WIPING
SPEED CONTROL SWITCH
The interval of wiper swings can be adjusted by twisting the control knob upward or downward when the
windshield wiper switch is in the AUTO position.
Fast: Fast interval
Slow: Slow interval
Page 56

INTERIOR SWITCHES
4-9
0
1
2
3
4
5
6
7
8
9
10
11
12
13
14
15
16
Wiper and Washer Coupled Operation
Pull the lever briefly (for less than 0.6 seconds):
One wiping cycle with washer spray
Pull and hold the lever for more than 0.6 seconds:
Three wiping cycles with washer spray
While being held down, the wiper and washer will
keep working.
FRONT AUTO WASHER SWITCH
When the front wiper switch is off and this switch
is pressed, washer fluid will be sprayed and the
wiper will automatically operate 4 times. Then, the
fluid will be sprayed again and the wiper will automatically operate 3 times.
Page 57
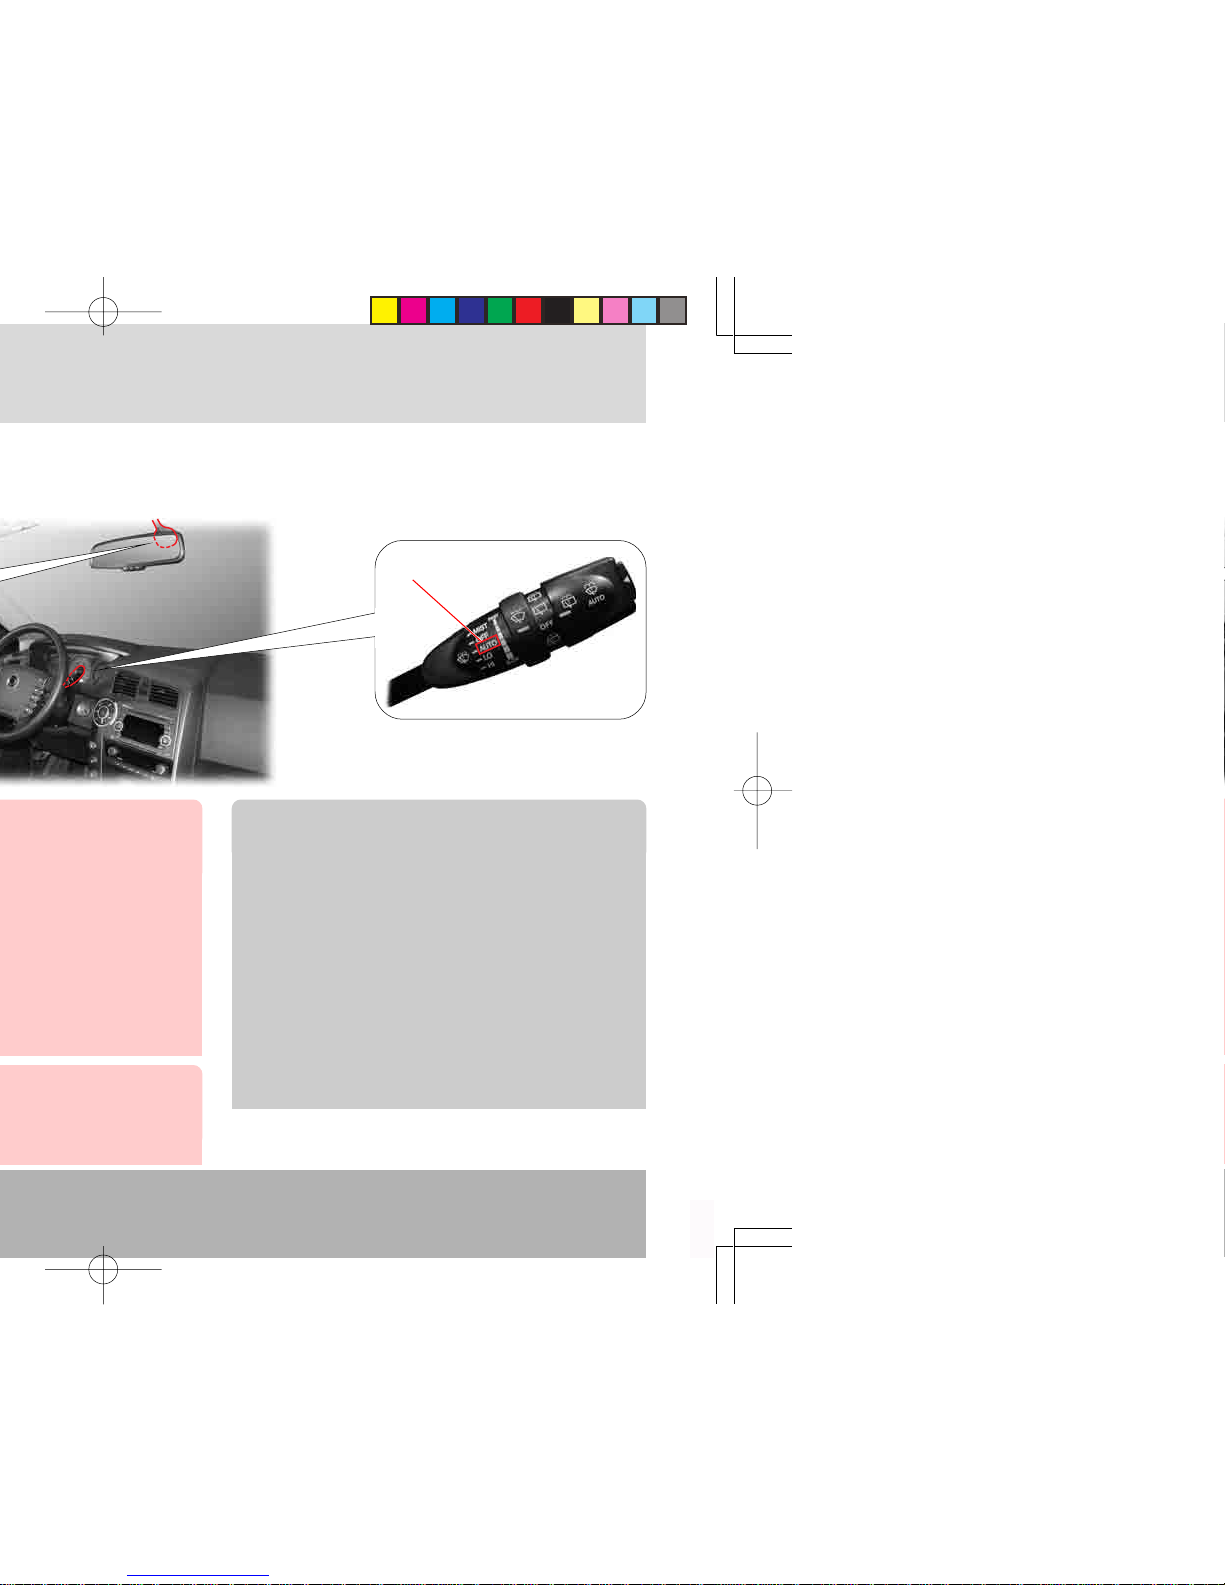
Wiper AUTO Position
AUTO
• When the light and wiper switches are in the “AUTO”
position, head lights come on if the rain sensor detects any rain. The head lights stay on for 3 minutes after the rain stops.
• The speed of the wipers becomes a little faster
when it is dark enough to turn on the automatic lights.
• When the ignition key is in the “ON” position, the wiper
will automatically operate once if the wiper switch
is turned from the “OFF” to the “AUTO” position. But
the wiper will not operate again to prevent any damage to the window even though the wiper switch
is turned from the “OFF” position to the “AUTO”
position.
NOTE
Page 58

INTERIOR SWITCHES
4-11
0
1
2
3
4
5
6
7
8
9
10
11
12
13
14
15
16
Setting a Desired Speed
1. To operate the cruise control, accelerate to the desired speed, which must be more than 36 km/h
(23 MPH) and less than 150 km/h (90 MPH).
2. When the desired speed is reached, push up the
ACCEL switch of the cruise control lever or push
down the DECEL switch for 1 second per one
switching and then release the accelerator pedal
slowly.
3. Now, the vehicle is cruised by this system with the
set speed.
4. And you can set to other vehicle speeds again with
above steps after an accelerator pedal intervention
during the cruise control running.
TYPE A
TYPE B
Page 59

Decelerating with the Cruise Control System
• While the cruise control system is running
1. Push down the DECEL switch of the cruise control lever
and hold it until the desired speed is reached without a
brake pedal intervention. But the cruise control system
cannot maintain the cruise function at less than 34 km/h.
2. When the desired speed is reached, release the lever.
• When the cruise control system is not running
1. Push down the DECEL switch of the cruise control lever
and hold it.
2. And then release the accelerator pedal slowly.
3. When the desired speed is reached, release the lever.
But the cruise control system cannot maintain the cruise
function at less than 34 km/h.
• Tap-down while the cruise control system is running
1. Push down the DECEL switch of the cruise control lever
less than 0.5 second per one switching while the cruise
control system is running. This is a tap-down switching.
2. When you operate a tap-down switching, the vehicle is
decelerated for 1 km/h below the previous set speed.
3. If you want to decelerate for 10 km/h, operate the tap-down
switching ten times without the brake pedal intervention.
Page 60

INTERIOR SWITCHES
4-13
0
1
2
3
4
5
6
7
8
9
10
11
12
13
14
15
16
TYPE A
TYPE B
The cruise control system will be canceled when one or
more items of the following conditions are applied;
1. When the brake pedal is depressed.
2. When the cruising speed is downed less than 34 km/h.
3. When the OFF switch is operated by pulling the cruise
control lever (Type A) or by pushing the ON-OFF switch of
the cruise control lever (Type B).
4. When ESP is activated.
5. When applying the parking brake when driving.
6. When using the clutch in order to shift (M/T only).
And the cruise control system can be operated again in driving state.
Normal Cancellation of the Cruise Control
Keep the main cruise control switch in the neutral position when
not using the cruise control.
CAUTION
Page 61

Using the Cruise Control on Hills
How well the cruise control works on hills depends on the
speed, load, and the steepness of the hill.
When going up steep hills, you may have to depress the
accelerator pedal to maintain your speed. When going
downhill, you may have to brake or shift to a lower gear to
keep your speed down.
Applying the brake takes you out of the cruise control.
Page 62

INTERIOR SWITCHES
4-15
0
1
2
3
4
5
6
7
8
9
10
11
12
13
14
15
16
Outside Rearview Mirror
Control*
1. Select the driver side mirror
(L) or the passenger side mirror (R) with the mirror selection switch.
2. Adjust the outside rearview
mirror by pushing the appropriate edge of the switch.
Aiming Switch
Adjust the selected mirror up, down, left,
or right by pressing the corresponding
edges of the switch to get a desired view.
• You can fold and unfold the mirrors within 30 seconds after the
ignition is turned to OFF. However, this function is overridden when
the driver’s door is opened with the ignition switch OFF.
• Do not fold or unfold the outside rearview mirrors manually. It may
cause a malfunction of the mirror folding system.
• If you directly spray high-pressured water to the electric remotecontrolled outside mirrors, this may cause some malfunctions in the
mirror system.
CAUTION
Page 63

Blinking: When ESP is activated.
On: When ESP is deactivated (by pressing the ESP
OFF
switch).
When ESP system is defective.
When ESP is activated, the indicator light is blinking and
a warning buzzer sounds. If this indicator illuminates in
spite of an activated ESP, this means a malfunction of
the ESP system.
Stopping ESP Function With ESP
OFF
Switch
If the driving wheels are slipping on snowy or icy roads,
the engine rpm may not increase even when you depress
the accelerator pedal, and accordingly, you may not be
able to move your vehicle. In this case, stop the ESP
function by pressing the ESP
OFF
switch. When the ESP
OFF
switch is pressed, the ESP function stops and the vehicle
is driven independently from the sensor outputs.
Resuming ESP Function With ESP
OFF
Switch
If you push the ESP
OFF
switch again when the ESP function
is deactivated (the ESP warning lamp is turned on), the system will be resumed and the ESP warning lamp on the instrument cluster goes out by resuming the ESP system.
ESP Warning Lamp
OFF
switch,
Page 64

INTERIOR SWITCHES
4-17
0
1
2
3
4
5
6
7
8
9
10
11
12
13
14
15
16
Driving Impression when ESP is Working
When ESP is applied in a certain situation (the indicator
blinks and a warning buzzer sounds), such as during a sharp
turn, you may feel that ESP controls each wheel and different levels of needed braking force are applied to wheels.
You may hear some noise or feel some vibrations from the
brake pedal or other systems. They are caused by pressure
changes in relevant system. You may also notice the engine
output decreases even when the accelerator pedal is being
depressed.
• If the ESP warning light comes on, the ESP related system is
defective. Make sure to check the vehicle at the nearest
Ssangyong Dealer or Ssangyong Authorized Service Center.
• The ESP system does not operate during reverse driving.
• The ESP system activates when the vehicle is unstable to correct
the vehicle stability. When the ESP warning lamp and the warning
alarm turn on, reduce the speed and pay extra attention to the
road.
• The ESP system is only a supplementary device for the vehicle.
When the vehicle exceeds its physical limits, it cannot be controlled.
Do not rely on the system. Keep driving safely.
• When ESP is applied, you may feel some noise or vibration from
the brake pedal or other relevant systems. They are caused by
pressure changes in the relevant systems.
CAUTION
Page 65
HDC (Hill Descent Control) Switch*
The green HDC indicator in the instrument
cluster comes on when pressing this
switch.
Tailgate and Outside Rearview Mirror
Heated Glass Switch
Press this switch to turn on the tailgate and
outside rearview mirror heated glasses. The
heated glass indicator in the switch comes on.
Windshield Heated Glass Switch
Press this switch to turn on the windshield heated glass. The heated glass
indicator in the switch comes on.
Page 66

INTERIOR SWITCHES
4-19
0
1
2
3
4
5
6
7
8
9
10
11
12
13
14
15
16
TRIP/RESET Switch
TRIP/RESET switch is used for different displays: TRIP A, TRIP B and
ODO (the total driving distance)
Unit: 0.0~999.9 km
Unit: 0.0~999.9 km
Trip A
Trip B
Total driving
distance
Unit: 0~999999 km
* If the meter cluster with “mile” unit is
installed, trip/odo distance is displayed
in “mile”.
Page 67

Depressing the Accelerator or Brake Pedal
while HDC is being applied
If you depress the accelerator or brake pedal, the HDC function immediately stops and there will be more driving or braking force accordingly.
• When driving down an extremely dangerous steep grade, HDC will
still work even if the brake or accelerator pedal is depressed.
WARNING
Page 68
INTERIOR SWITCHES
4-21
0
1
2
3
4
5
6
7
8
9
10
11
12
13
14
15
16
Operation of HDC
When all operational conditions are met, HDC is applied
and the green HDC indicator blinks. HDC automatically decreases the vehicle speed to 7 km/h in the 2 wheel (2H) or
4 wheel high speed mode (4H) position. HDC automatically
stops at speeds less than 7 km/h or when the slope descends slowly. It is normal to have strong vibrations and
noise from the brake system when HDC is applied.
• HDC is designed for driving on off-road steep grades.
• Unnecessary usage of HDC can cause malfunctions in the brake
system or ESP. Do not use HDC when driving on normal roads.
• If driving on a level road with HDC on and ready for use, HDC
may be applied during sharp cornering or passing over a speed
bump. Therefore, do not activate HDC while driving on normal
roads.
• If the red HDC indicator illuminates, HDC is overheated or
malfunctioning. If the indicator is on even after the system has
cooled down enough, have the nearest authorized dealer or service center check the system.
• It is normal to have strong vibrations and noise from the brake
system when HDC is applied.
• In case of a manual transmission vehicle, the gear shift is in the
forwarding “1” or “Reverse” position. If HDC is attempted in the
“2” position, the engine may turn off.
WARNING
Page 69

Windshield
heated glass
Windshield heated glass switch
• Press this switch to turn on the windshield
heated glass. It will operate for about 12
minutes.
• Press the switch again to stop the
operation.
• Use this to prevent the windshield wiper
blades from being frozen.
• The indicator in the switch comes on when
in use.
Page 70

INTERIOR SWITCHES
4-23
0
1
2
3
4
5
6
7
8
9
10
11
12
13
14
15
16
Audio mode changes when
the button is pressed.
MODE
Stops audio output from the
audio system. To resume
the audio output, press the
button again.
MUTE
Gear shift button
(Up-shift)
Page 71

4L : 4-Wheel Drive, Low
Use this position for maximum traction.
4H : 4-Wheel Drive, High
Use this position on wet or
slippery roads such as sandy,
muddy or snow covered
roads.
2H : 2-Wheel Drive
This is rear wheel drive with
high speed. Use this position
for normal driving. This position gives greater fuel
economy, quieter ride and
least drive train wear.
DRIVING MODE
Page 72

INTERIOR SWITCHES
4-25
0
1
2
3
4
5
6
7
8
9
10
11
12
13
14
15
16
• Automatic Transmission Equipped Vehicle
Stop the vehicle on a level ground and place the gear selector lever into the “N” position. Turn the switch to the desired position while depressing the brake pedal.
• Manual Transmission Equipped Vehicle
Stop the vehicle on a level ground and place the shift lever into the “Neutral” position. Turn the switch to the desired position while depressing the clutch pedal.
2H, 4H ⇔ 4L
• When shifting the driving mode to “4L”, this
indicator blinks until the shifting operation is
completed. After completion of the mode
change to 4L, the indicator comes on.
Page 73

CAUTIONS WHEN USING 4-WHEEL
DRIVE MODE
• There could be mechanical noises and shocks during mode
changes. However, these are normal conditions due to the mode
changing operations.
• Use only the 2H mode on a normal paved surface. Do not drive
your vehicle in the “4H” or “4L” position on paved road surfaces.
Doing so will result in damages to the drive train.
• Driving in a 4 wheel mode on a normal paved surface will cause
unwanted noises, premature wear of tires, or increased fuel
consumption.
• To shift from “4L” into another mode or vice versa, stop the vehicle and depress the brake pedal before any shift.
• If the “4WD CHECK” warning light stays on, have the 4WD system checked by the nearest Ssangyong Dealer or Ssangyong
Authorized Service Center.
• When cornering a curved road in a 4-wheel drive mode (4L or
4H), there could be some mechanical shocks and resistances in
vehicle’s drive train. These are normal conditions due to internal
resistance in the drive train when the 4-wheel drive mode is
properly working. To avoid damages to the drive train, do not
drive your vehicle at an excessively high speed on a sharply
curved road.
• When shifting from “4L” to “4H” in an vehicle equipped with automatic transmission, move the gear selector lever from “N” to
“R” position after pushing the 4WD switch, and then move it to
the “N” position again. This helps to make the mode changes
easily.
Page 74

INTERIOR SWITCHES
4-27
0
1
2
3
4
5
6
7
8
9
10
11
12
13
14
15
16
Main Room Lamp Switch
When this switch is pressed, the front and center room lamps are coupled with doors. (The
center room lamp is coupled only if the center
room lamp switch is in the door coupled
operation.) When pressed again, the lamps go
out. If switches of the spots and center room
lamps are turned on, the lamps do not go out in
spite of repressing the switch. To turn them off,
check the switches.
* When a door is opened, the front and center
room lamps are turned on. In this case, you
cannot turn off the lamps with the main room
lamp switch. However, if the door is closed,
the lamp will go out.
Spot Lamp Switch
(Passenger’s)
The front room lamp (passenger’s)
turns on when pressing in this switch.
Page 75

If you run the wheels with high speed while escaping mud or
puddle, the limited slip differential (LSD) may badly be affected.
Use other devices such as wood block while escaping depending
on the situations.
CAUTION
Limited slip differential (LSD) is integrated in the rear axle and operates when there are slippage differences between the left wheel
and right wheel. So, in any cases, never start the engine if any
wheel is jacked up.
Particularly, if you start the engine while one of rear wheels is
jacked up, the wheel on the ground will run due to operation of the
LSD, due to operation of the LSD, and make the vehicle move
abruptly, so that you can be seriously injured. You can be seriously injured.
WARNING
Page 76

INTERIOR SWITCHES
4-29
0
1
2
3
4
5
6
7
8
9
10
11
12
13
14
15
16
• Because of different friction levels from individual wheels,
the vehicle may be distorted when you abruptly accelerate to escape from the spot.
• The Locking Differential becomes activated when the left
and right wheels have different rotation speeds.
Do not start the engine when one of the front wheels is being supported by a jack.
If the drive gear becomes engaged while the engine is
running, the wheel contacting the ground will be rotating. It
can be very dangerous since your vehicle will suddenly
move.
If your vehicle is equipped with the Locking Differential, never let
the wheels rotate when one of the wheels is being supported by
a jack. Otherwise, it can cause injury.
WARNING
• Do not abruptly increase the wheel rotation speed or rotate the
wheels at a high speed for an extended period of time when
one of the wheels is stuck in a puddle.
When the wheels spin for an extended period of time or the
puddle becomes too deep to escape, tow the vehicle. Otherwise,
you will damage the clutch friction plate.
CAUTION
Page 77

How to Drain the Water from the Fuel Filter
(With Additional Water Separator) .......... 5-12
4WD Indicators (Part Time T/C Only) ....... 5-14
Engine Overheat Warning Light, Front Fog
Light Indicator, High Beam Indicator, Door
Ajar Warning Light .................................... 5-15
Engine Hood Open Warning Light, Engine Oil
Pressure Warning Light, Engine Check Warn-
ing Light, Cruise Control Indicator* ........... 5-16
Glow Indicator (Diesel Only), EBD Warning
Light, ABS Warning Light ......................... 5-17
Brake Warning Light, Winter Mode Indicator,
Low Fuel Level Warning Light................. 5-18
0
1
2
3
4
5
6
7
8
9
10
11
12
13
14
15
16
5
Page 78

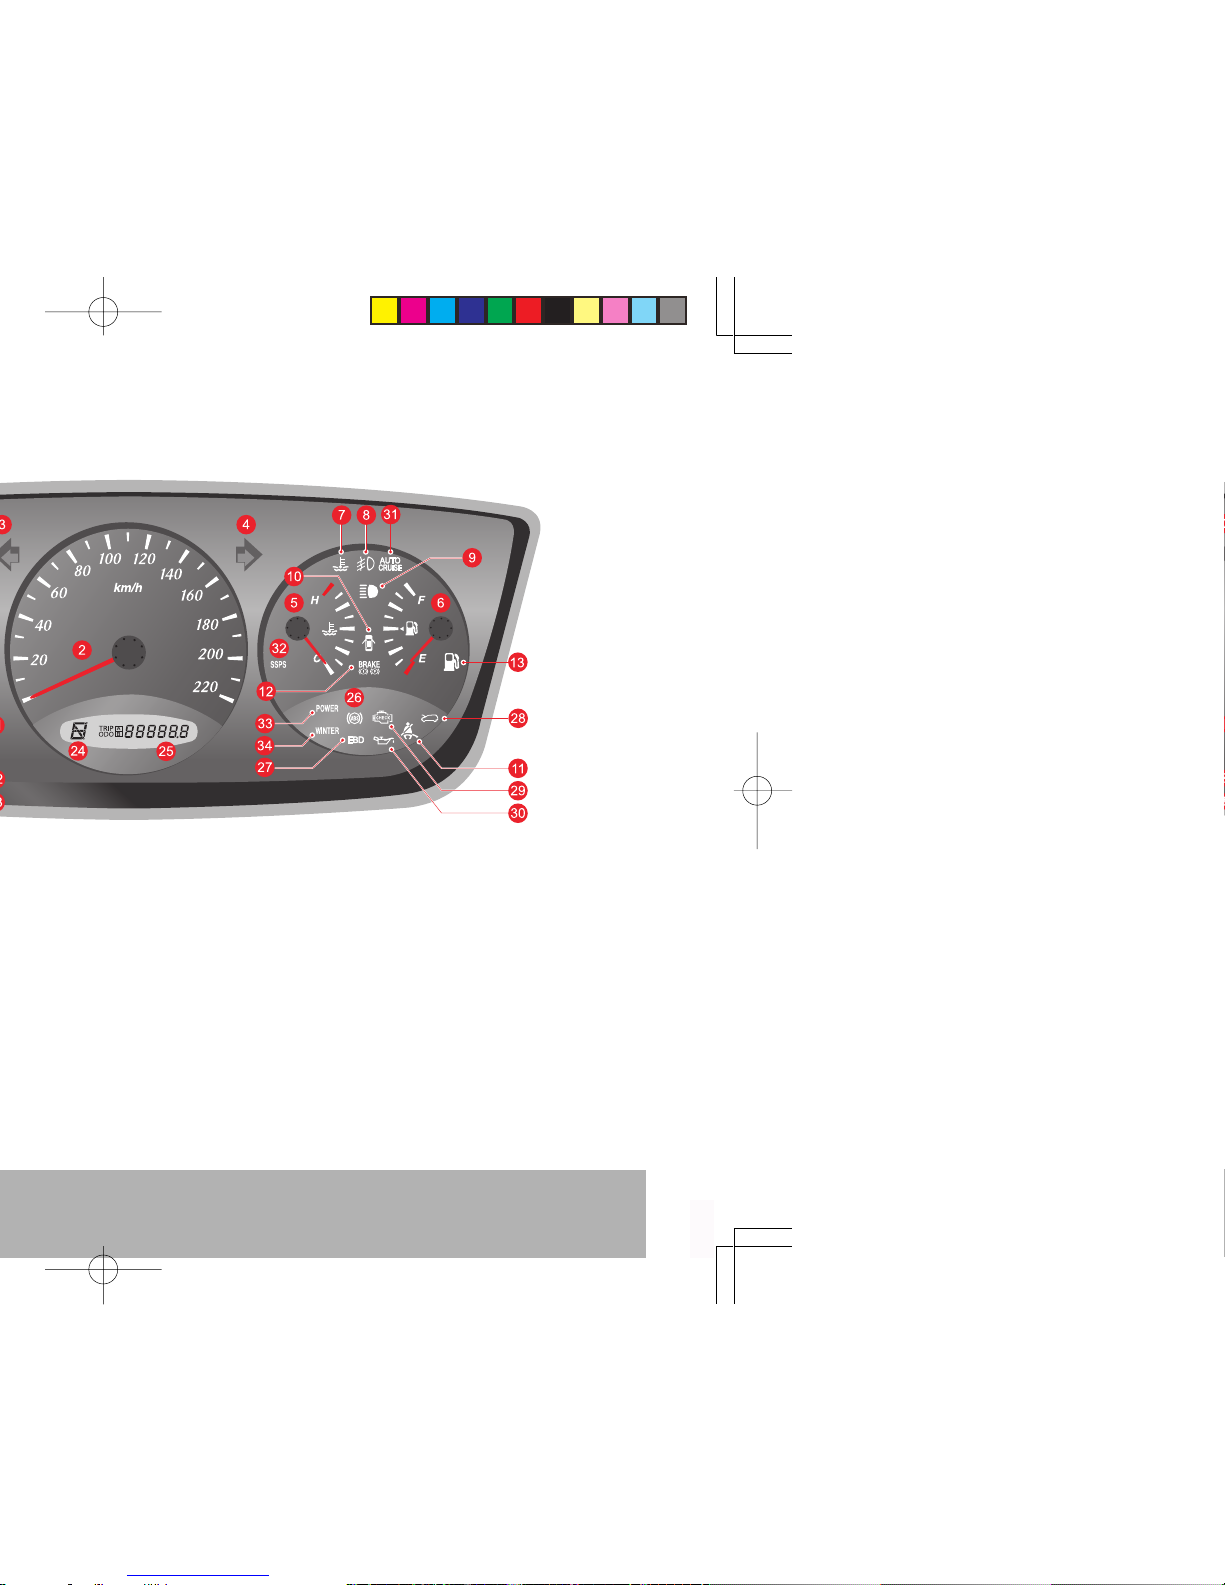
40
60
80
20
km/h
0
220
200
HF
CE
25. Auto shift indicator (for automatic
transmission)
26. ODOmeter/ Trip odometer
27. ABS warning light
28. EBD warning light
29. Engine hood open warning light
30. Glow indicator
31. Engine check warning light
32. Engine oil pressure warning light
33. Auto cruise indicator
34. SSPS warning light
35. Hazard warning light (Eastern
Europe only)
Page 79

INSTRUMENT CLUSTER
5-3
0
1
2
3
4
5
6
7
8
9
10
11
12
13
14
15
16
40
60
80
20
km/h
0
220
200
HF
CE
24. Auto shift indicator (for automatic
transmission)
25. ODOmeter/ Trip odometer
26. ABS warning light
27. EBD warning light
28. Engine hood open warning light
29. Engine check warning light
30. Engine oil pressure warning light
31. Auto cruise indicator
32. SSPS warning light
33. Hazard warning light (Eastern
Europe only)
Page 80
0
24. Auto shift indicator (for automatic
transmission)
25. ODOmeter/ Trip odometer
26. ABS warning light
27. EBD warning light
28. Engine hood open warning light
29. Engine check warning light
30. Engine oil pressure warning light
31. Auto cruise indicator
32. SSPS warning light
33. Power mode indicator
34. Winter mode indicator
Page 81

INSTRUMENT CLUSTER
5-5
0
1
2
3
4
5
6
7
8
9
10
11
12
13
14
15
16
40
60
80
20
40
60
80
20
km/h
MPH
0
0
220
200
40
60
80
20
40
60
80
20
km/h
mph
0
0
220
200
NOTE
SPEEDOMETERTACHOMETER
The speedometer indicates the vehicle speed in kilometers
per hour (km/h) or mile per hour (km/h).
40
60
80
20
km/h
0
220
200
80
RED ZONE
(GCC ONLY)
Speedometer-KPH (MPH) Speedometer-MPH (KPH)
Page 82
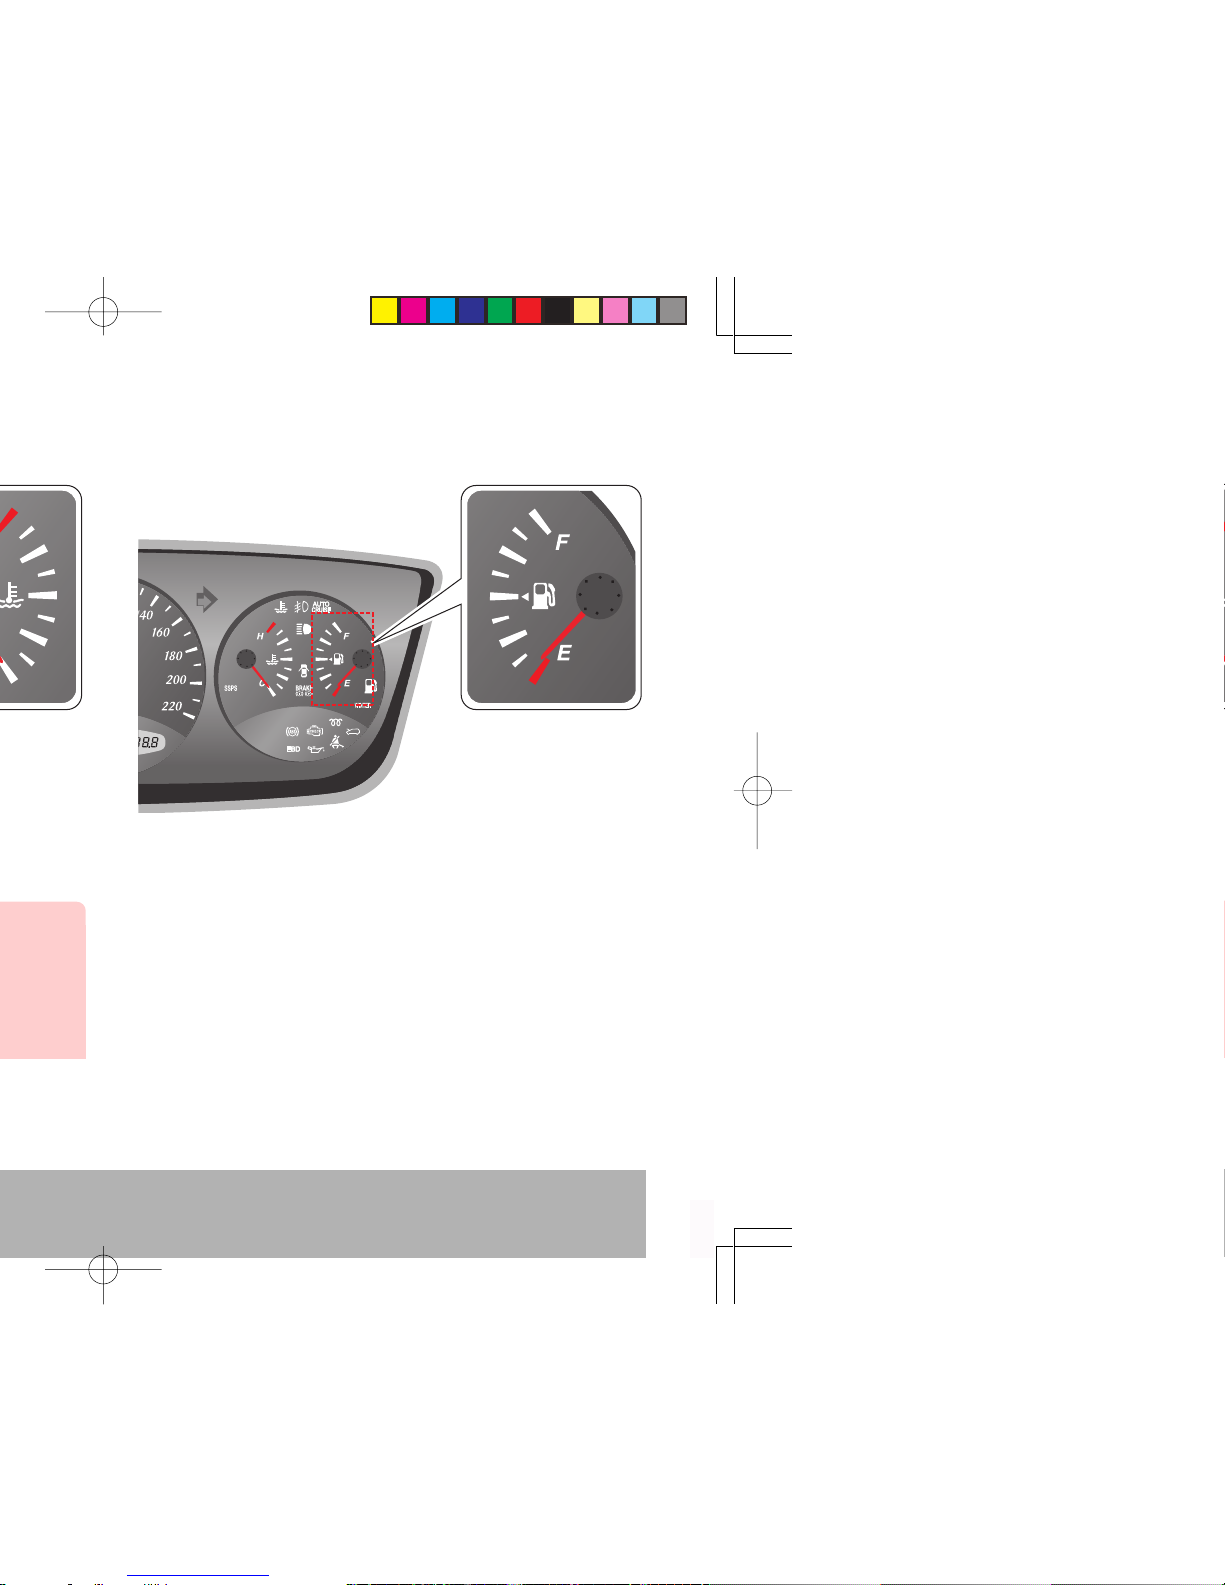
FUEL GAUGE
This gauge indicates the level of fuel remaining in the fuel
tank. Fill up the fuel tank before the needle reaches
“E”.
Page 83
INSTRUMENT CLUSTER
5-7
0
1
2
3
4
5
6
7
8
9
10
11
12
13
14
15
16
HF
CE
Trip A
Trip B
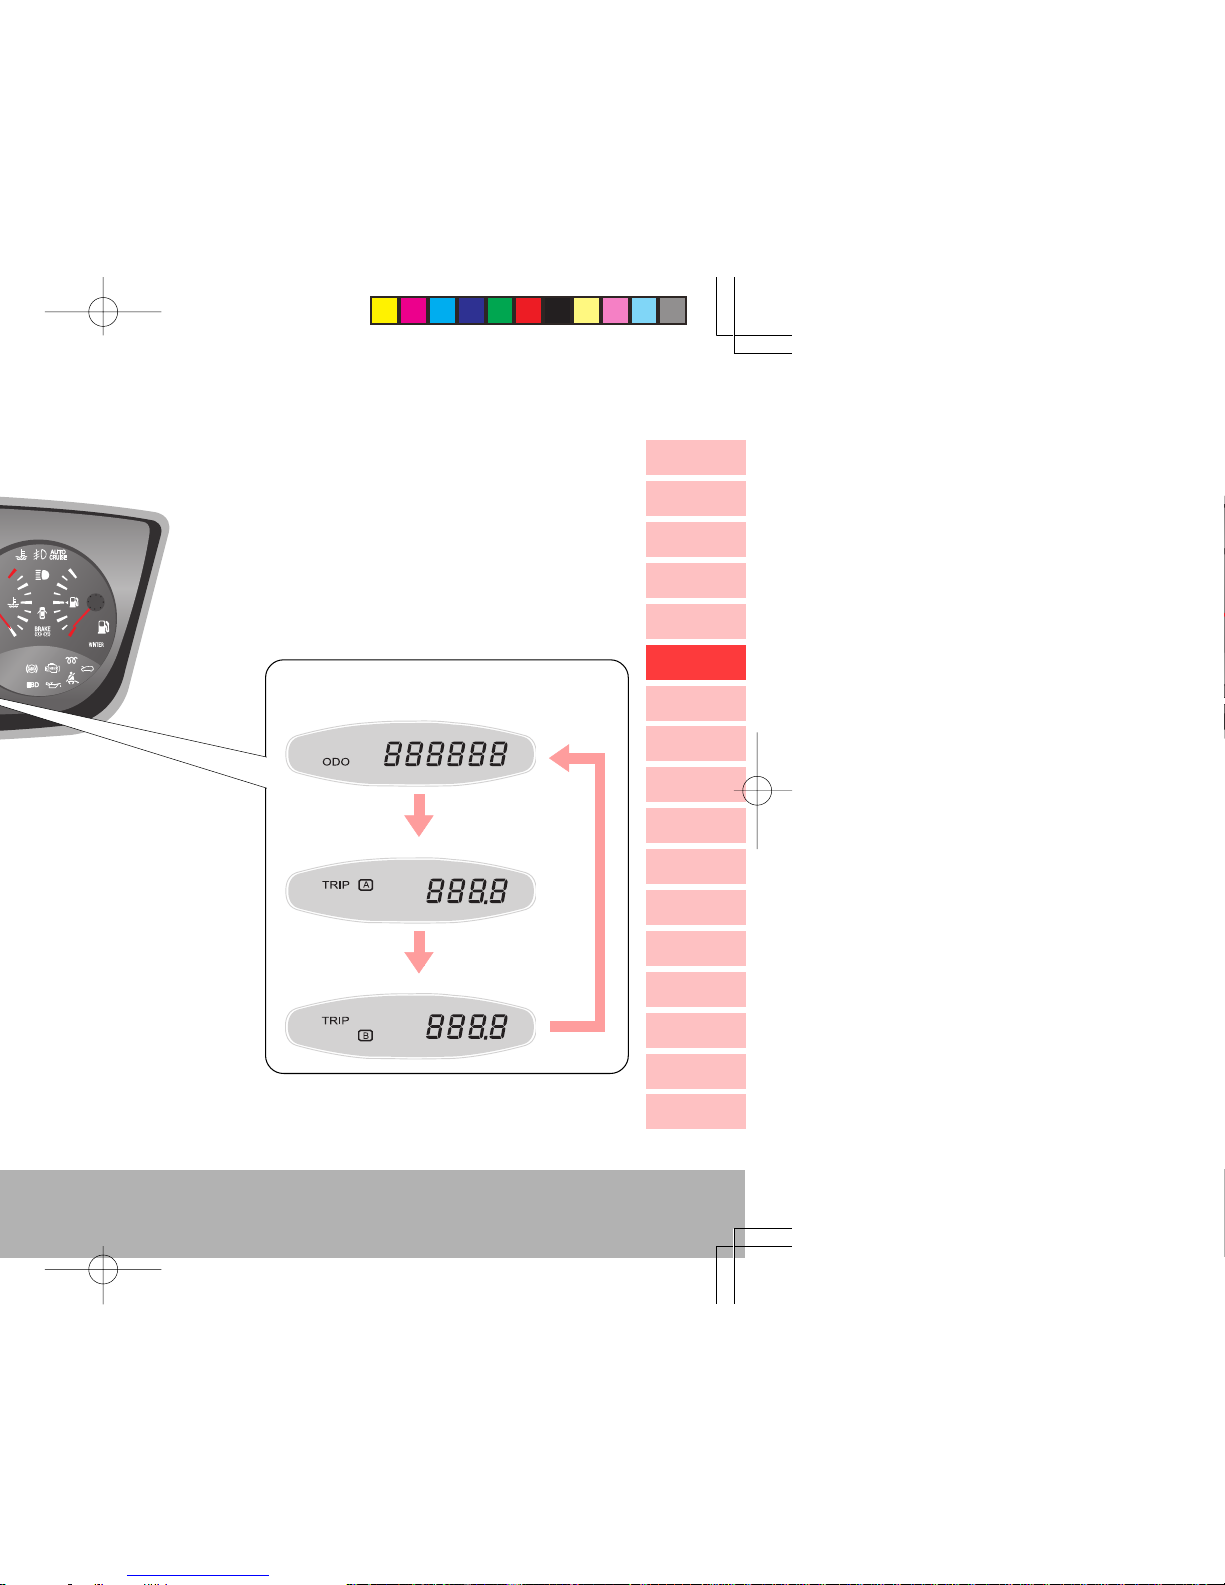
Odometer and Trip Odometer
Display
Each time the TRIP/RESET switch on the
center panel is pressed lightly, the indicators are changed. To reset the trip meter,
press and hold the switch.
Total driving
distance
Unit: 0.0~999.9 km
Unit: 0.0~999.9 km
Unit: 0~999999 km
* If the meter cluster with “mile” unit is
installed, trip/odo distance is displayed
in “mile”.
Page 84
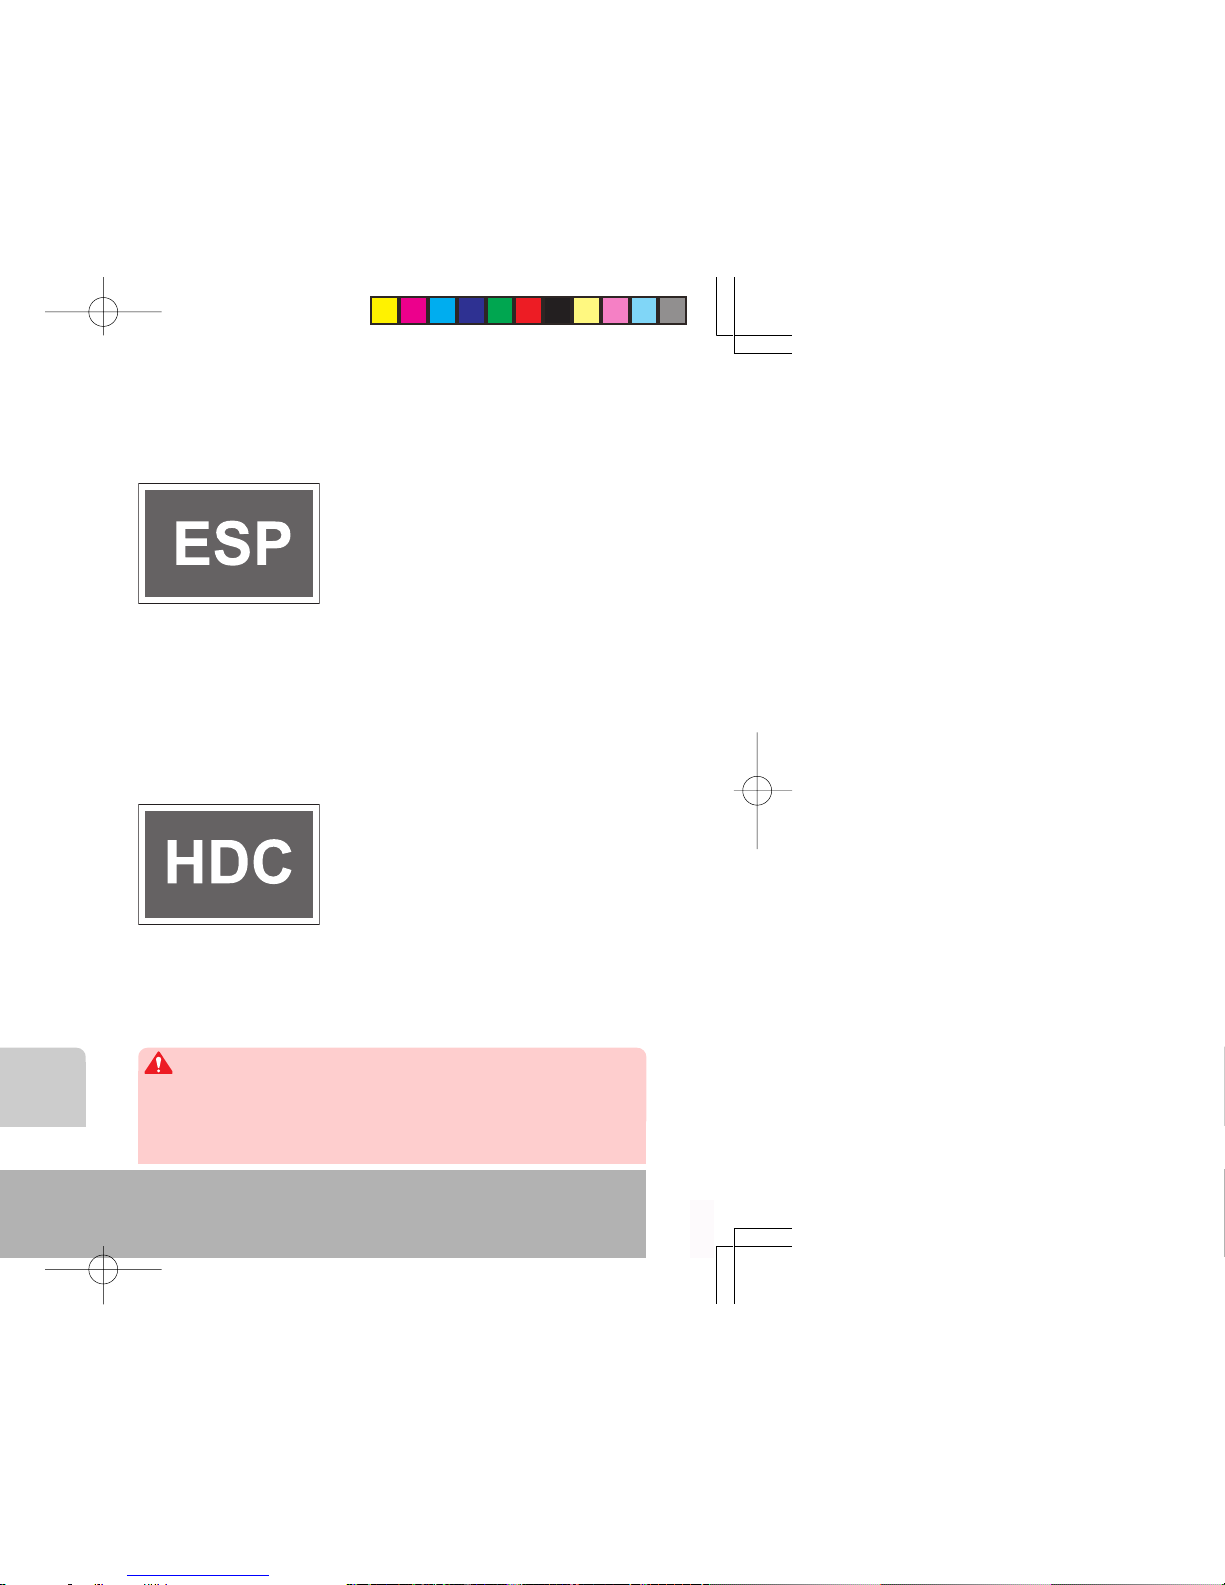
ESP WARNING LIGHT
If you press the ESP
OFF
switch, the
ESP function stops and the indicator
lamp in the instrument cluster comes
on. If the ESP function operates, the
indicator lamp flickers.
If the ESP warning light is on without
any deactivation of the system, there are some malfunctions
in the system. Take the vehicle to an authorized dealer or
service operation.
For more information about ESP (Electronic Stability
Program), refer to Chapter 4.
HDC INDICATOR
When the HDC switch is pressed
once, HDC is ready for use. The
green HDC indicator in the instrument cluster comes on. When the
button is pressed again, HDC is deactivated and the indicator goes off.
When HDC is applied, the green HDC indicator blinks.
When the red HDC indicator is on, the HDC system is over-
heated or malfunctioning. For more information, refer to
Chapter 4, HDC Switch.
If the red HDC indicator illuminates, HDC is overheated or
malfunctioning. If the indicator is on even after the system has
cooled down enough, have the nearest authorized dealer or service center check the system.
CAUTION
Page 85
INSTRUMENT CLUSTER
5-9
0
1
2
3
4
5
6
7
8
9
10
11
12
13
14
15
16
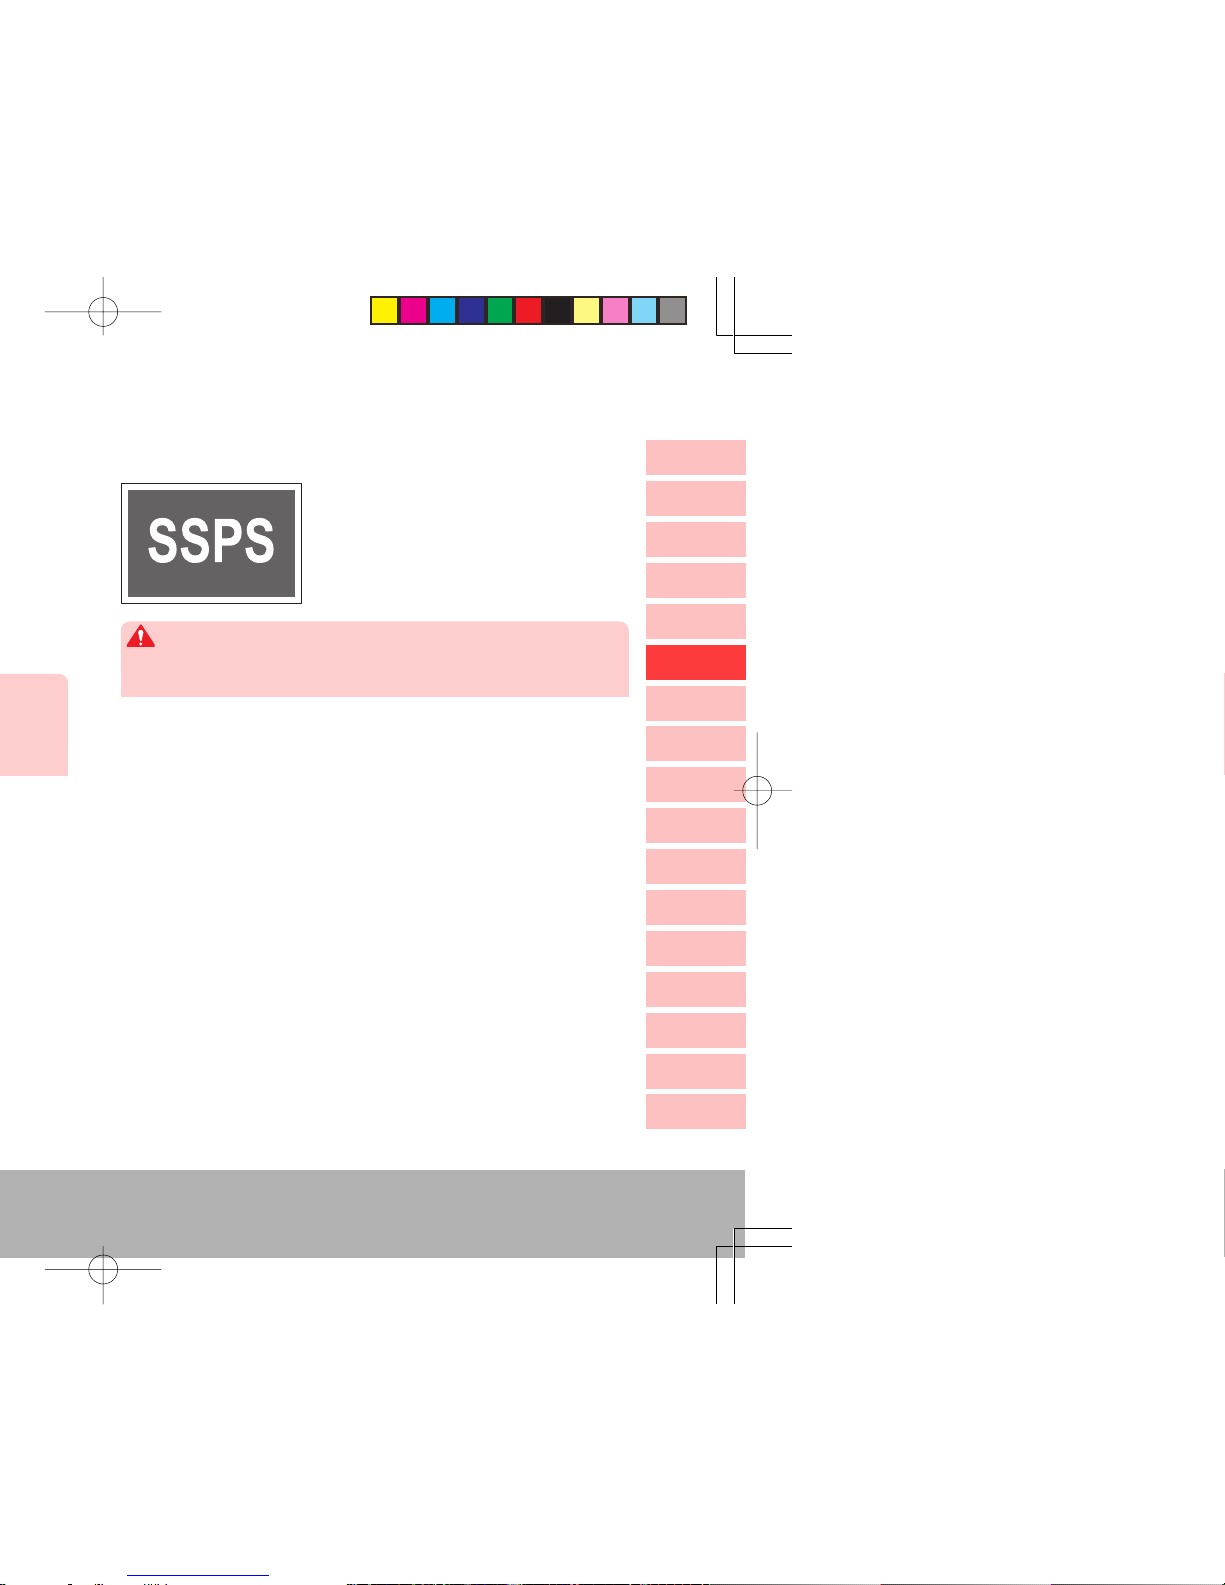
This warning light comes on when
the SSPS system is defective. When
this warning light comes on, the
steering effort becomes heavy.
SSPS WARNING LIGHT
If this light comes on, have the SSPS system checked by Ssangyong
Dealer or Ssangyong Authorized Service Operation.
CAUTION
SSPS?*
In traditional constant power assist steering system, the
steerability gets lighter as vehicle speed rises, and this may
cause dangerous situation.
SSPS, by providing appropriate steerability to driver according to the changes of vehicle speed, gives steering stability.
In other words, the steering wheel gets lighter by adjusting
steerability in stop or low speed and provides steering stability by adjusting steering wheel to become heavier in high
speed.
Page 86

• The fuel system in the engine may get serious damage if you keep driving while the warning light is on.
Prompt correction should be necessary.
• Using low quality fuel could result in serious damage
to the engine due to the water or impurities in fuel.
Never use low quality fuel.
• Before starting the engine, pump fuel until the priming pump is fully filled after draining the water.
• When the water level inside the water separator in
the fuel filter exceeds a certain level, this warning
light comes on and a buzzer sounds. Also, the driving force of the vehicle decreases. If these conditions
occur, immediately drain the water from fuel filter. If
the above conditions still exist after draining the
water, have the system checked by a Ssangyong
Dealer or Ssangyong Authorized Service Center.
DIESEL ENGINE
CAUTIONS
Page 87

INSTRUMENT CLUSTER
5-11
0
1
2
3
4
5
6
7
8
9
10
11
12
13
14
15
16
4. Wait until a certain amount of fuel gets out from the port,
then turn the drain plug to the closing direction to tighten it.
5. Engage the connector under the drain plug and press the
priming pump until it becomes rigid.
6. Close the engine hood and start the engine.
Be careful not to be injured by surrounding equipment during the
working procedures.
CAUTION
If the priming pump is not properly operated, air may get into the
fuel line. It may cause a starting problem or fuel system problem.
Make sure to perform the job in step 5.
WARNING
DIESEL ENGINE
Page 88
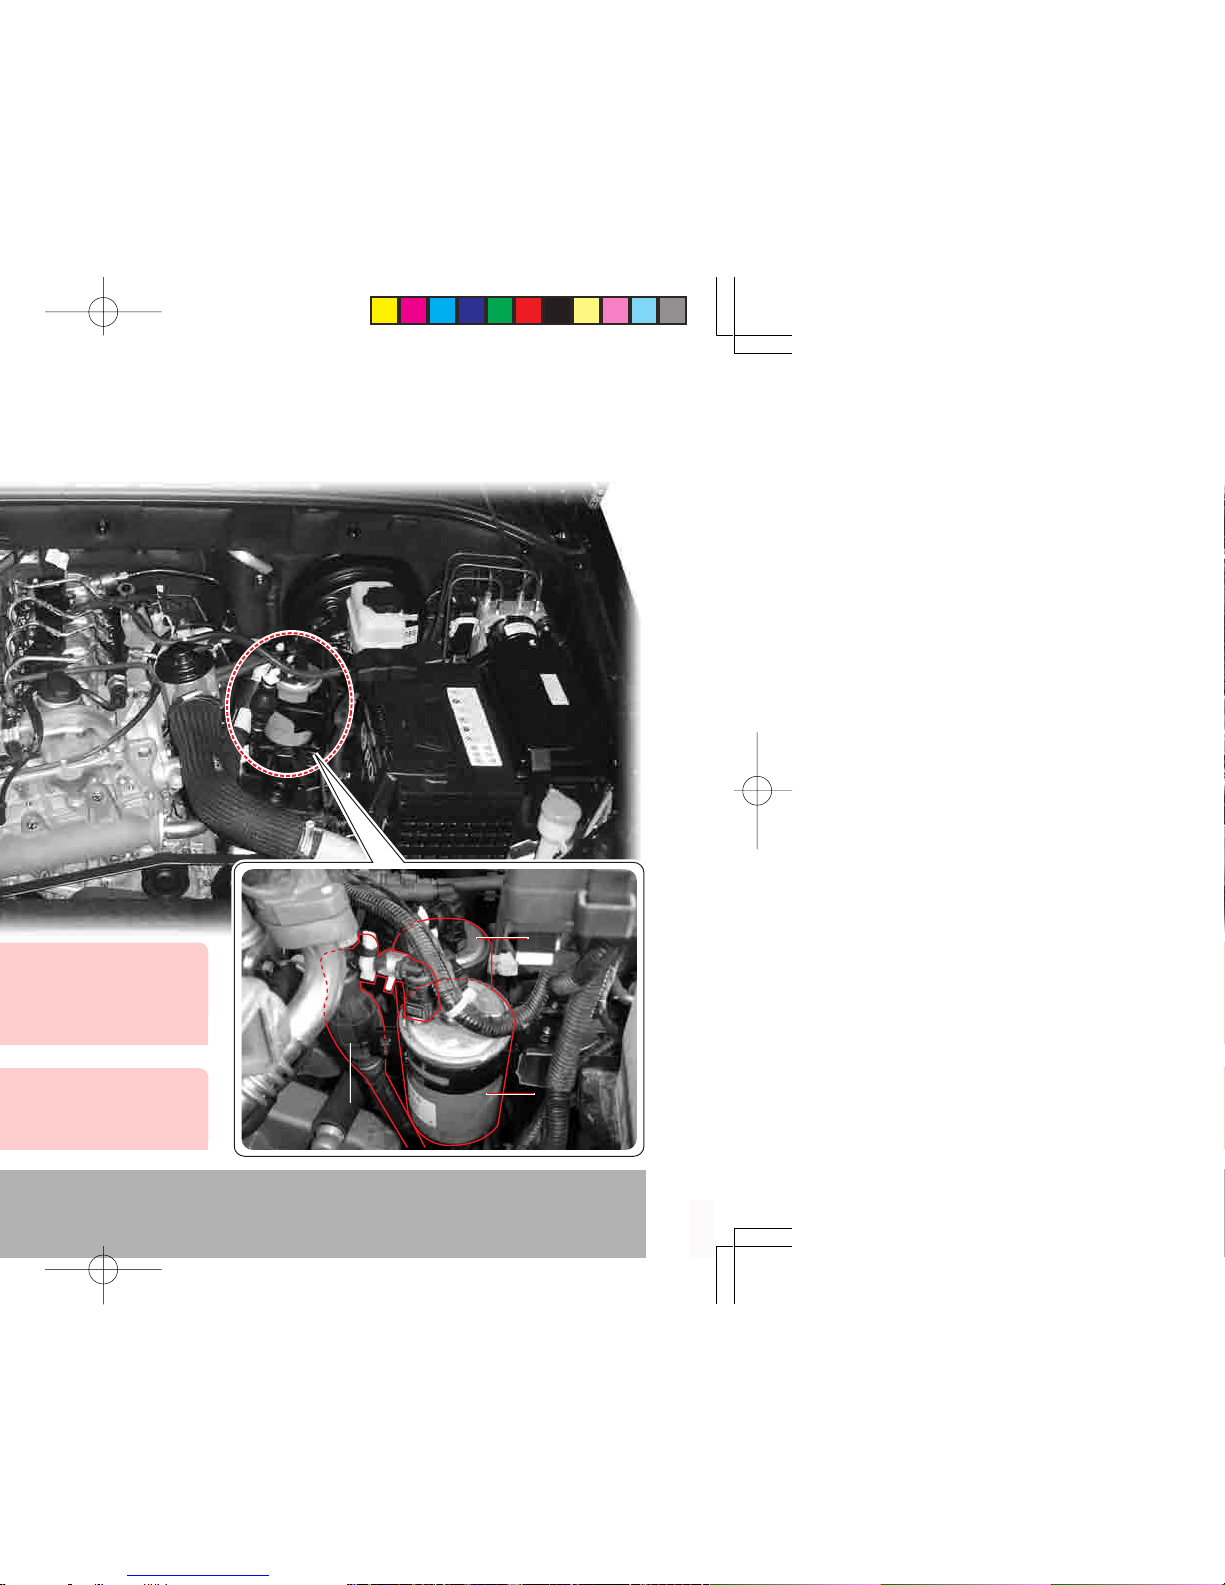
Fuel filter
Water
separator
Priming pump
DIESEL ENGINE
Page 89

INSTRUMENT CLUSTER
5-13
0
1
2
3
4
5
6
7
8
9
10
11
12
13
14
15
16
1. Locate the fuel filter ( ) & water separator ( ) in the engine compartment.
2. Place the water container under the fuel filter & water
separator.
3. Disconnect the connector under the drain plug (
) of the
water separator.
4. Turn two drain plugs to the “
” direction to drain the water.
5. Press the priming pump until all water is drained. After
draining, turn the drain plug until the gasket contact to
the threaded plug hole, then tighten (“ ” direction) it 1/2
turns by hand.
6. Engage the connector under the drain plug and press the
priming pump (
) until it becomes rigid.
7. Close the engine hood and start the engine.
If the priming pump is not properly operated, air may get into the fuel
line. It may cause a starting problem or a fuel system problem. Make
sure to perform the job in step 6.
WARNING
Be careful not to be injured by surrounding equipment during the
working procedures.
CAUTION
Page 90

4WD Check Warning Light*
This warning light comes on when
the ignition switch is turned to “ON”
and should go out if the system is
normal. If the “4WD CHECK” warning
light stays on, have the 4WD system
checked by a Ssangyong Dealer or
Ssangyong Authorized Service Center.
• If the “4WD CHECK” warning light stays on, have the 4WD system checked.
• Do not drive your vehicle over 80 km/h in 4H mode.
CAUTION
Page 91

INSTRUMENT CLUSTER
5-15
0
1
2
3
4
5
6
7
8
9
10
11
12
13
14
15
16
DOOR AJAR WARNING LIGHT
This light comes on when a door or
the tailgate is either opened or not
closed completely.
This indicator illuminates when the
high beam headlamp is switched on.
HIGH BEAM INDICATOR
Driving with high beam headlamp disturbs the approaching vehicle’s
visibility. For safe driving, use the high beam headlamp only when
it is very hard to see the road.
WARNING
Driving with the door open can cause injury to people inside and
outside the vehicle.
• Before driving off, close all doors.
• Check whether or not the light is off.
WARNING
Page 92

This indicator comes on when the
cruise control is switched on.
CRUISE CONTROL INDICATOR*
If the light stays on or comes on while
driving, some of the engine control
components including sensors and
devices are defective.
ENGINE CHECK WARNING LIGHT
If the engine halts due to a completely empty fuel tank and the
engine check light comes on even after refueling, the engine’s
power output may decrease within a certain driving distance
(about 30 km).
WARNING
When this warning light comes on, the vehicle operates in safety
mode to maintain minimum driving conditions and to prevent the system from being damaged. In this mode, the engine driving force
may be decreased or the engine may stall. When this happens,
have the system checked at the nearest Ssangyong Dealer or
Ssangyong Authorized Service Center.
CAUTION
Page 93

INSTRUMENT CLUSTER
5-17
0
1
2
3
4
5
6
7
8
9
10
11
12
13
14
15
16
ABS WARNING LIGHT
When the ignition switch is turned
“ON”, this warning light comes on and
goes out if the system is normal.
• If this light doesn’t come on when the ignition is switched to
“ON” or if this light doesn’t go out, contact your nearest
Ssangyong Dealer or Ssangyong Authorized Service Center. If
this light illuminates while driving, a malfunction of ABS is indicated.
In this case the brake system performs its regular function but
without the anti-locking capability. Have the system checked by
a Ssangyong Dealer or Ssangyong Authorized Service Center
as soon as possible if this condition occurs.
• ABS is a device that prevents wheels from locking during braking to allow steering. However, the ABS system does not shorten
the stopping distance.
WARNING
When the engine starts and the vehicle starts to move, ABS performs self diagnosis by transferring hydraulic pressure to the braking units. This may cause some noise and vibrations. This means
ABS is properly functioning.
CAUTION
Page 94

LOW FUEL LEVEL WARNING LIGHT
This warning light indicates that the
fuel will soon be exhausted. The time
it takes to turn on, however, varies according to the vehicle operation or
road conditions. Do not wait until this
light is on to refuel the vehicle. It is recommended that fuel should be added as soon as this light
comes on.
While driving on steep hills or rough roads, this warning light may
come on if the remaining fuel level is low.
CAUTION
Page 95

0
1
2
3
4
5
6
7
8
9
10
11
12
13
14
15
16
6
Winter (W) / Standard (S) Mode ............... 6-22
Safety Mode (Automatic Transmission).... 6-23
Parking Aid System ................................... 6-24
Brake System ............................................. 6-26
Parking Brake Operation
(Foot Operated Type) ................................ 6-31
Parking Brake Operation
(Hand Operated Type) ............................... 6-32
Page 96
Reverse
5th
4th
2nd
4th Gear
Position for normal
and high speed
driving
• You should stop your vehicle and fully depress the
clutch pedal before you shift into the reverse position.
• If the clutch pedal is frequently half-depressed, the clutch
disk will be easily worn out. Use only as needed.
• Do not put your foot on the clutch pedal if not shifting
gears.
• When shifting from a high gear into a lower gear, ensure that the RPM gauge pointer does not go into the
red zone on the gauge. Especially, when shifting from
the 5th to the 4th gear, moving the gear shift lever to
the left too much may result in shifting into the 2nd
gear. This will cause a sudden increase of the engine speed and may damage the engine and the
transmission.
• When the temperature of the transmission oil is very
low on a cold day, you may have some difficulty for
shifting gears. This is a normal phenomenon.
• When you have difficulty for shifting into the 1st or
reserve gear, put the gear shift lever into the neural
position and release the clutch pedal. Then, depress
the pedal again and shift into the intended gear.
• While your vehicle is moving, do not put your hand
on the shift lever except to shift gears. Otherwise,
the gear may be disengaged from the transmission
and the internal transmission components may be
damaged.
• Do not shift into the second next higher gear from a
lower gear. Also, while the engine is rotating fast, do
not shift into a lower gear.
CAUTION
Page 97
TRANSMISSION AND BRAKE SYSTEM
6-3
0
1
2
3
4
5
6
7
8
9
10
11
12
13
14
15
16
3. The vehicle starts to move smoothly if you depress the
accelerator pedal while releasing the brake pedal after
checking that the engine rpm is raising.
4. Release the clutch pedal completely after the vehicle
starts off
Parking Brake Operation When Driving
Uphill
When driving on a steep uphill, it is safer to use the
parking brake as follows: Apply the parking brake, follow steps (Vehicle with M/T: steps 1 - 3, and release
the parking brake when the vehicle starts to move.
Caution in using half clutch mode
When using the half clutch mode, there is no need to
abruptly depress the accelerator pedal because the
engine power increases. When the accelerator pedal
is continuously depressed in half clutch mode, the internal components can be worn or damaged. Frequent
use of half clutch mode is not recommended.
Page 98
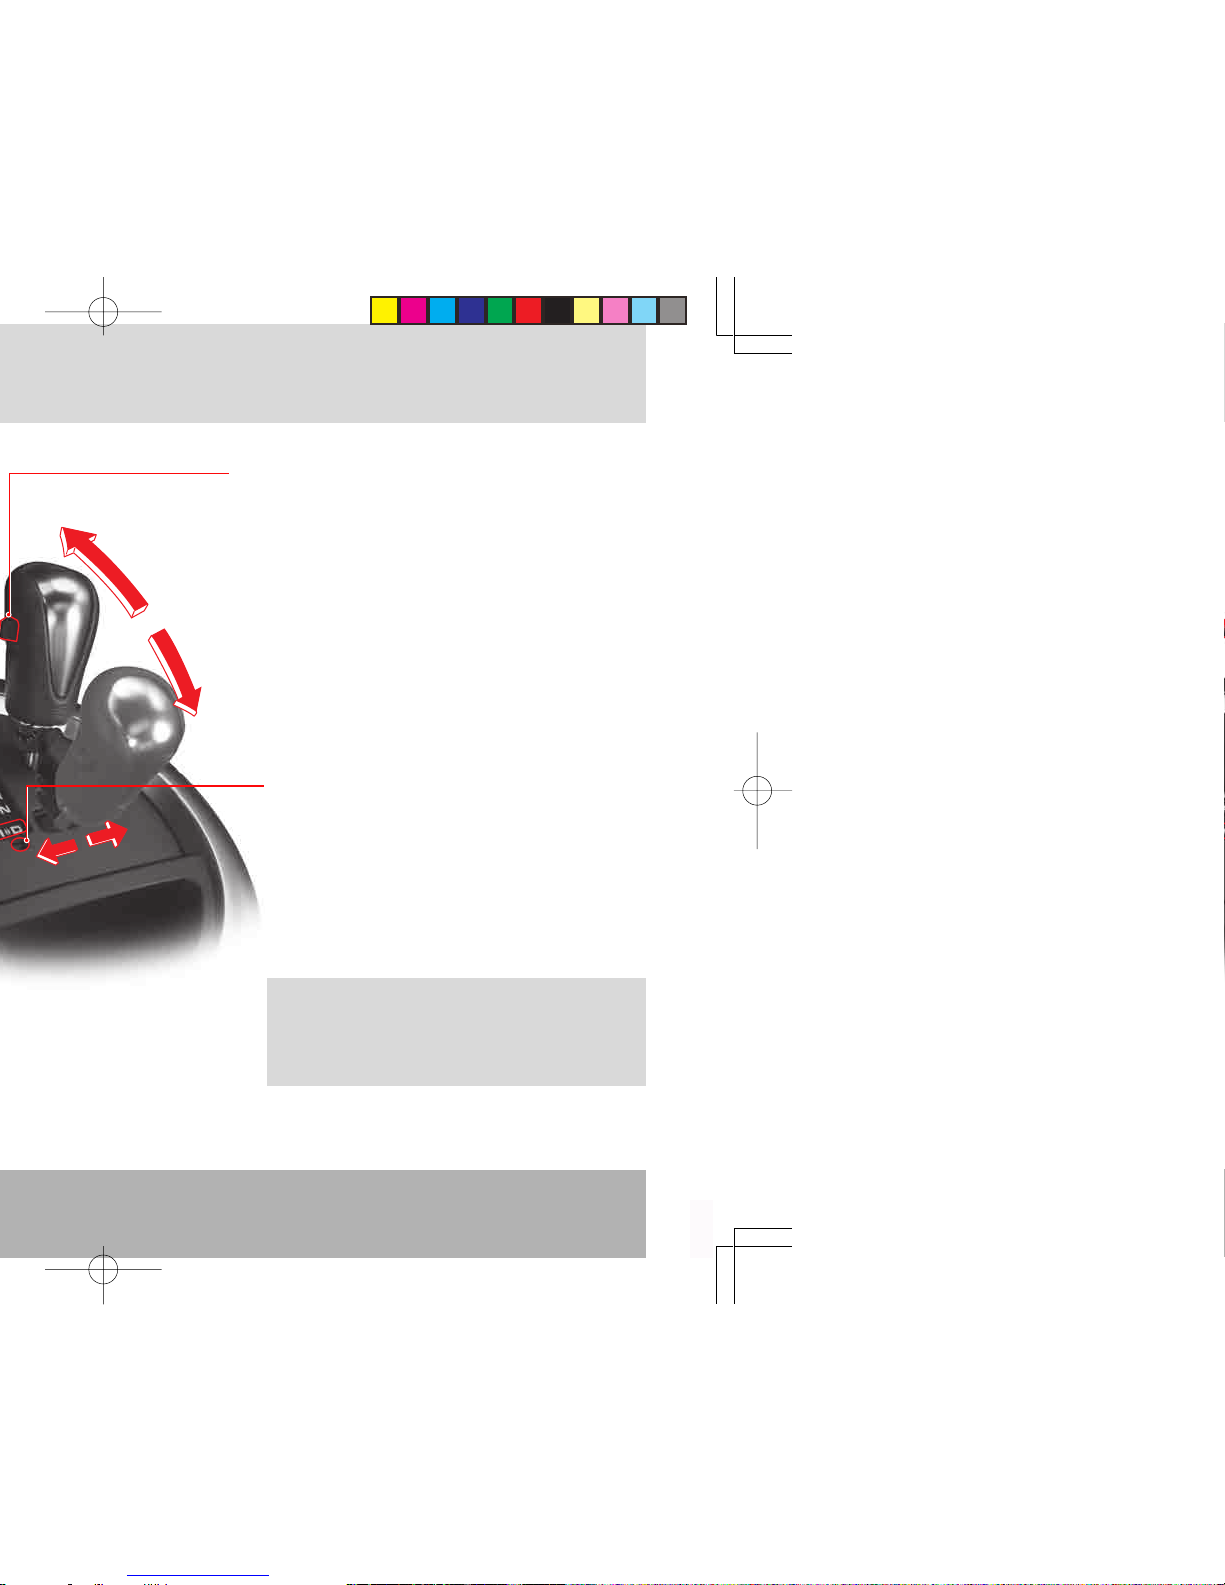
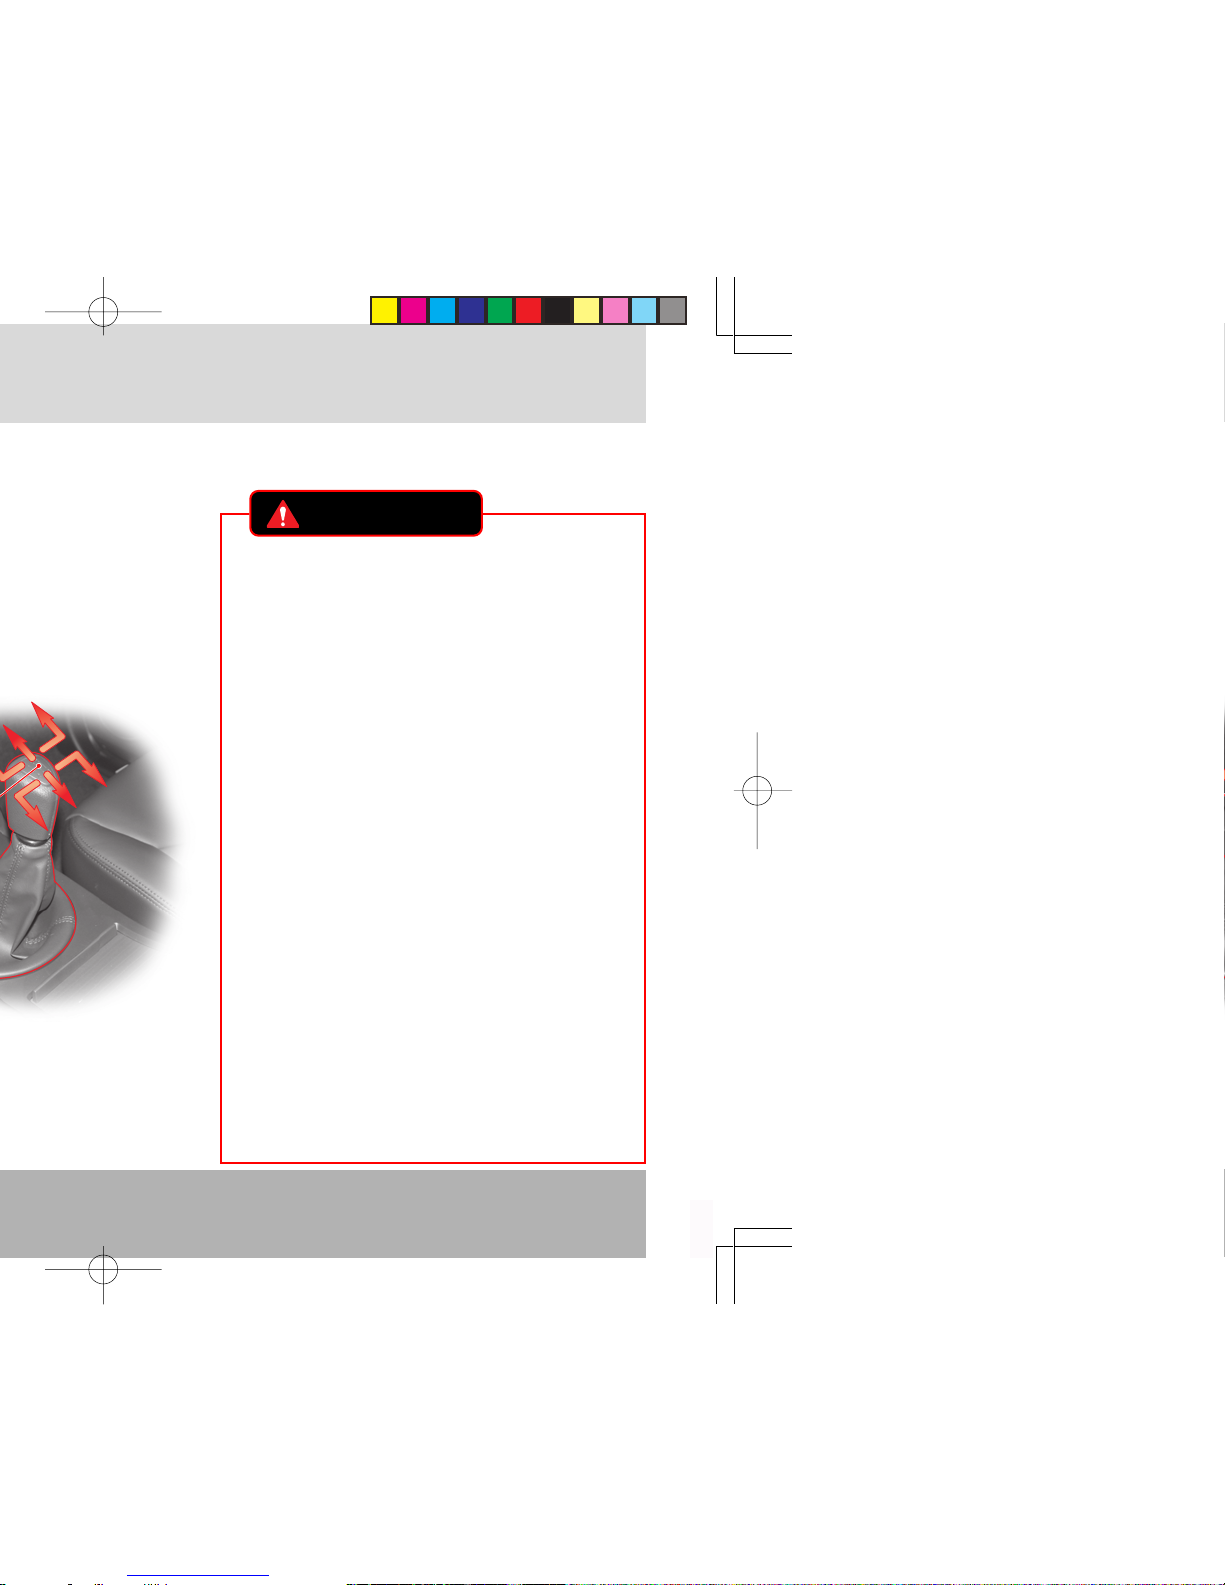
Shift Lock Release Button when
Locked in the “P” Position
If you cannot move the selector lever from the
“P” or “N” position, try to move the lever while
pushing down here with a sharp object such
as a ballpoint pen. For your safety, turn off
the engine and depress the brake pedal before the attempt.
Tip Switch in “M” Position
(Manual Gear Shift)
The shiftable gear can be adjusted by moving
this switch to forward and rearward when the
gear selector lever is in “M” position.
To shift into any other positions from the
“P” or “N” position after stopping the
vehicle, you have to depress the brake
pedal with the ignition switch “ON”
Page 99
TRANSMISSION AND BRAKE SYSTEM
6-5
0
1
2
3
4
5
6
7
8
9
10
11
12
13
14
15
16
• Do not abruptly drive off or sharply accelerate the vehicle after
shifting into “D”. Otherwise the transmission will be damaged.
Especially, when you start off after stopping, wait for a while
until the “D” shift indicator comes on for several seconds with
the brake pedal depressed.
• When driving on a down hill, never shift the selector lever to
“N”. If you try to shift the lever to “D” from “N”, a sudden gear
engagement can damage the driving train.
• HDC is designed for driving down a steep hill. When HDC is
applied, do not shift to “N”. Otherwise, HDC will be deactivated.
• Even though you can start the engine with the selector lever in
both “P” or “N”, for your safety, always start the engine with
the selector lever in “P”.
• As a safety function, the gear selector lever cannot be moved
into the “P” or “R” position when the vehicle speed about 8 km/h.
• Never shift into “R” when the vehicle is moving.
CAUTION
Page 100

• Do not excessively apply the brake pedal while going down a
long hill. The brake system will overheat, experience vapor lock
or the fade phenomenon, and lose the braking force.
• Be aware that the engine brake does not work when the gear
selector lever is in the “N” position.
• Avoid any abrupt engine braking on slippery roads, or the tires
may slip.
CAUTION
Engine Brake
When the accelerator pedal is released while the vehicle
is in motion, the engine speed decreases. This decreased engine speed creates an extra braking force. On
a down hill, engaging a lower gear can generate a slower
engine speed and eventually slow down the vehicle
speed. By using this engine brake, you can decrease your
vehicle speed without excessively using the brake
system. The lower gear, the more braking force.
 Loading...