

SRS TruSurround HD CineLED TV User Manual

User Manual
41
ENGLISH
INTRODUCTION
Thank you for having acquired this Multimedia TV Energy CineLED. Welcome to the Energy TV
Multimedia World. The following sections will give you an overview of your new device and its basic
features.
Please read this manual carefully before you begin using the product.
SAFETY INSTRUCTIONS
To ensure your safety and that of others, please read this information carefully before using this
product. Save this information for future reference.
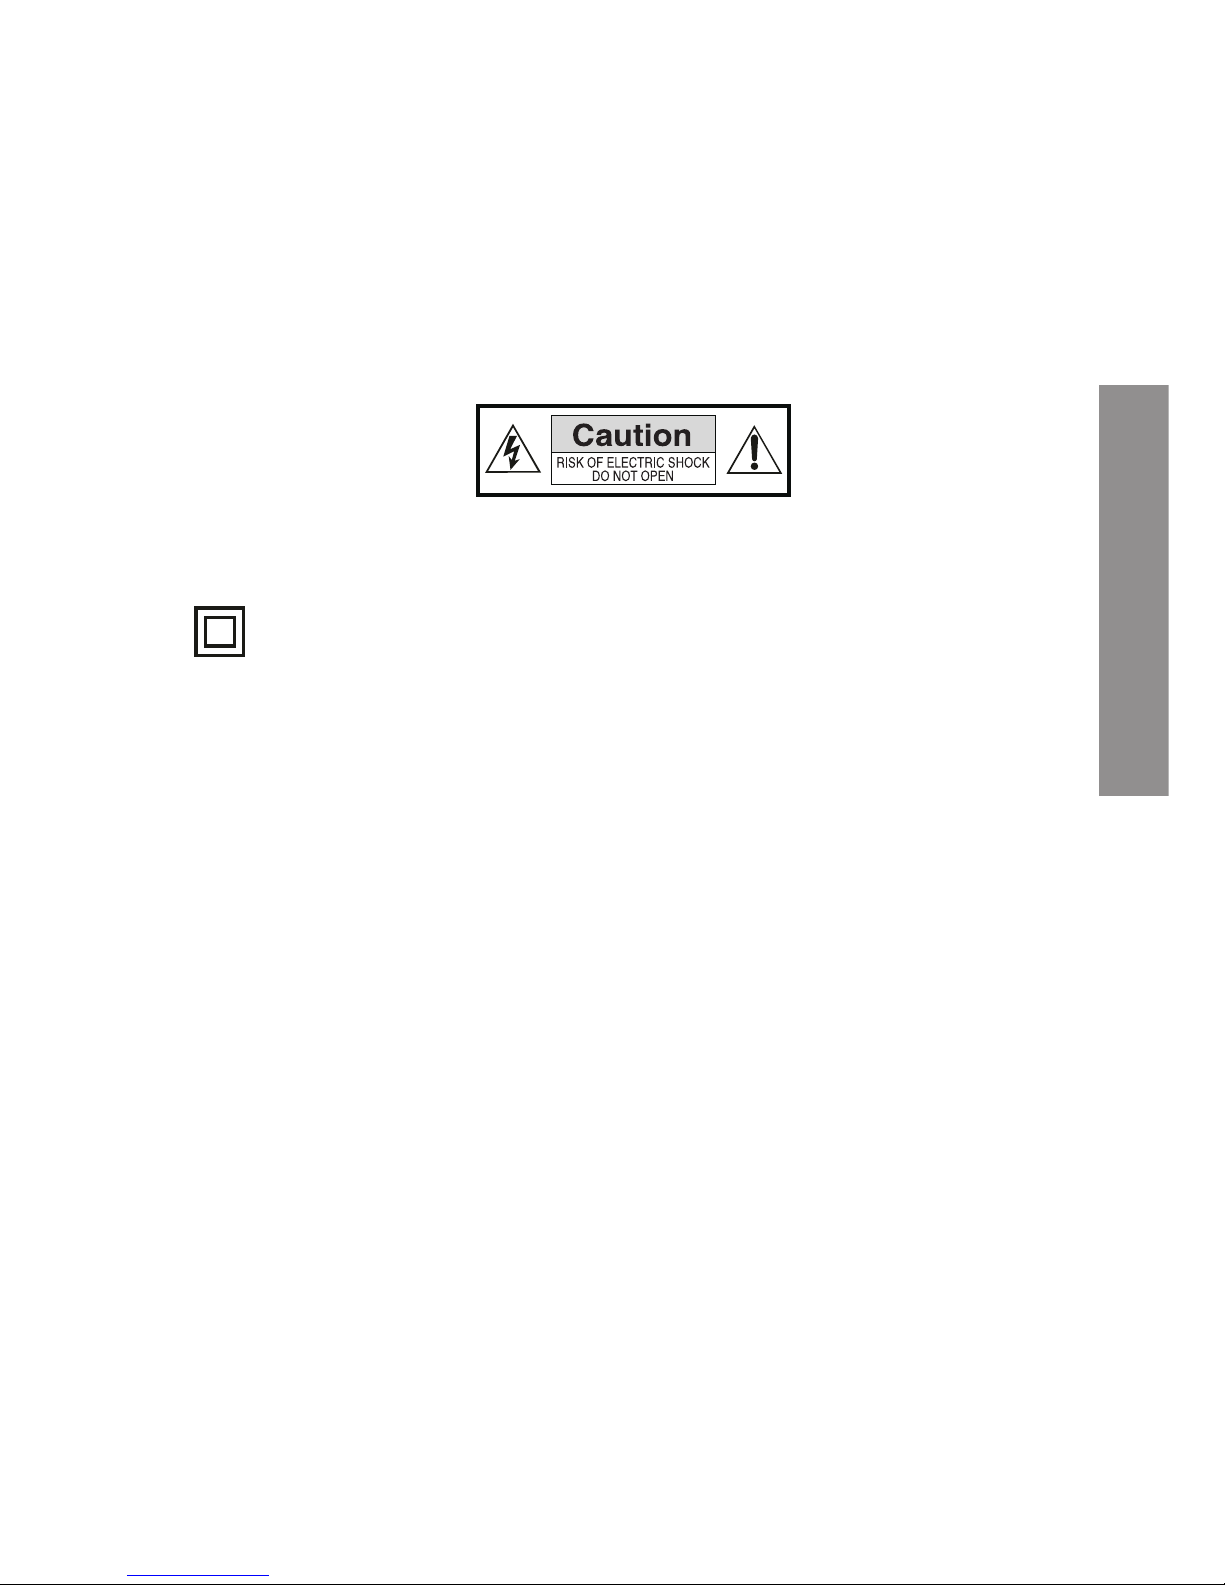
This symbol indicates that this product incorporates double insulation between the supply
and the elements accessible to the user.
Caution
: To reduce the risk of fire or electric shock, do not expose your CineLED TV to rain or
moisture.
SECURITY CONSIDERATIONS
≥ Do not disassemble or modify the device.
≥ Do not expose your CineLED TV to dripping, splashing or wet conditions.
≥ Don’t let the device get wet.
≥ Don’t place objects with liquid on top of the device.
≥ Keep the product away from direct sunlight and heat sources such as radiators or
heaters.
≥ Don’t place sources of naked flame, such as candles, near the device, cables, etc.
≥ Don’t place the product on a stand or table unstable. The unit may fall, causing
damage or injury.
≥ Don’t let the device suffer blows or falls.
The CineLED TV 16 SRS HD+ incorporates an external AC power adapter. Only use the AC adapter
included with the product. The use of any other adapter will void warranty. We recommend that
you unplug the adaptor from current when the unit will not be in use for a long period.
Caution
: Make sure that the current voltage is the same as that of the receiver. To avoid the risk of
electric shock, do not open the lid or the back of the television.

42
VENTILATION
Slots and openings in the device are for ventilation. Do not cover unit, as it may cause overheating.
NEVER let children introduce anything in the device holes or slots.
MANTENIMIENTO
The CineLED TV does not require maintenance.
BATTERY DISPOSAL
Please ensure that batteries are disposed safely. Never throw batteries in a fire or with other
household waste. Ask the local authority about how to dispose batteries.
CLEANING
ALWAYS turn off your CineLED TV for cleaning.
Do not use liquid or aerosol cleaners.
Clean your CineLED TV with a soft cloth, you can use a mild soap dissolution and a damp (not
wet) cloth.
43
ENGLISH
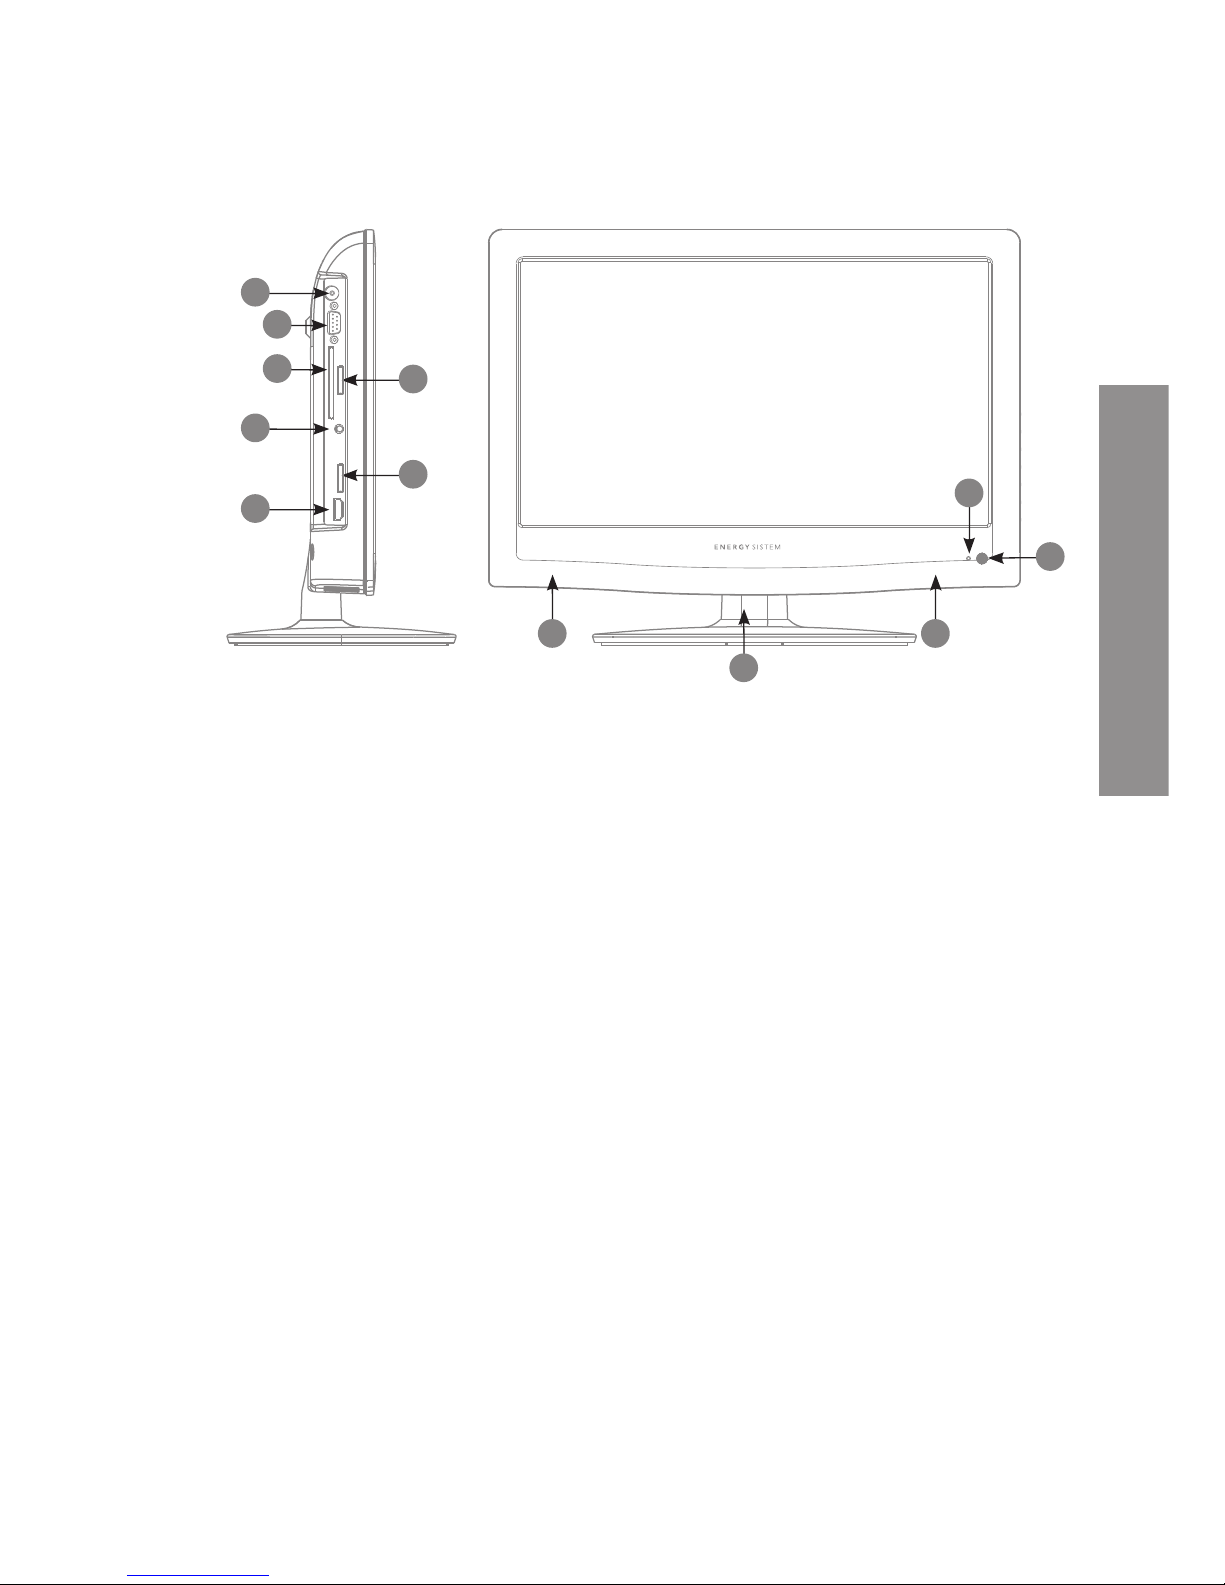
GENERAL VIEW
SCREEN CINELED 16“.
FRONT
3
4
3
9
10
5
11
7
6
8
1
2
1. OPERATION LED INDICATOR. Shows operation status. red indicates standby mode,
blue indicates in operation.
2. REMOTE SENSOR (IR): receives the signal from the remote control.
3. SPEAKERS.
4. TV STAND.
LEFT SIDE PANEL
5. Antenna RF IN. Plug here the antenna cable to watch TV Broadcast.
6. PC VGA input. It is used to connect devices such as personal computers, to use
your CineLED TV as a PC monitor.
7. AUDIO IN. Used in conjunction with the VGA PC input, to enjoy the sound of your
computer through your CineLED TV.
8. COMMON INTERFACE / CAM (Conditional Access Module) OR PCMCIA. It is used
to add “Pay per view” modules.
9. MINI SCART. It is used to connect devices such as DVB-T, DVD, Video… with
standard definition. Use the SCART cable adapter included.
10. USB connector. It is used to connect to an external USB device and play
multimedia files or DTV recordings.
44
11. HDMI 1. It is used to connect to a device with HDMI output.
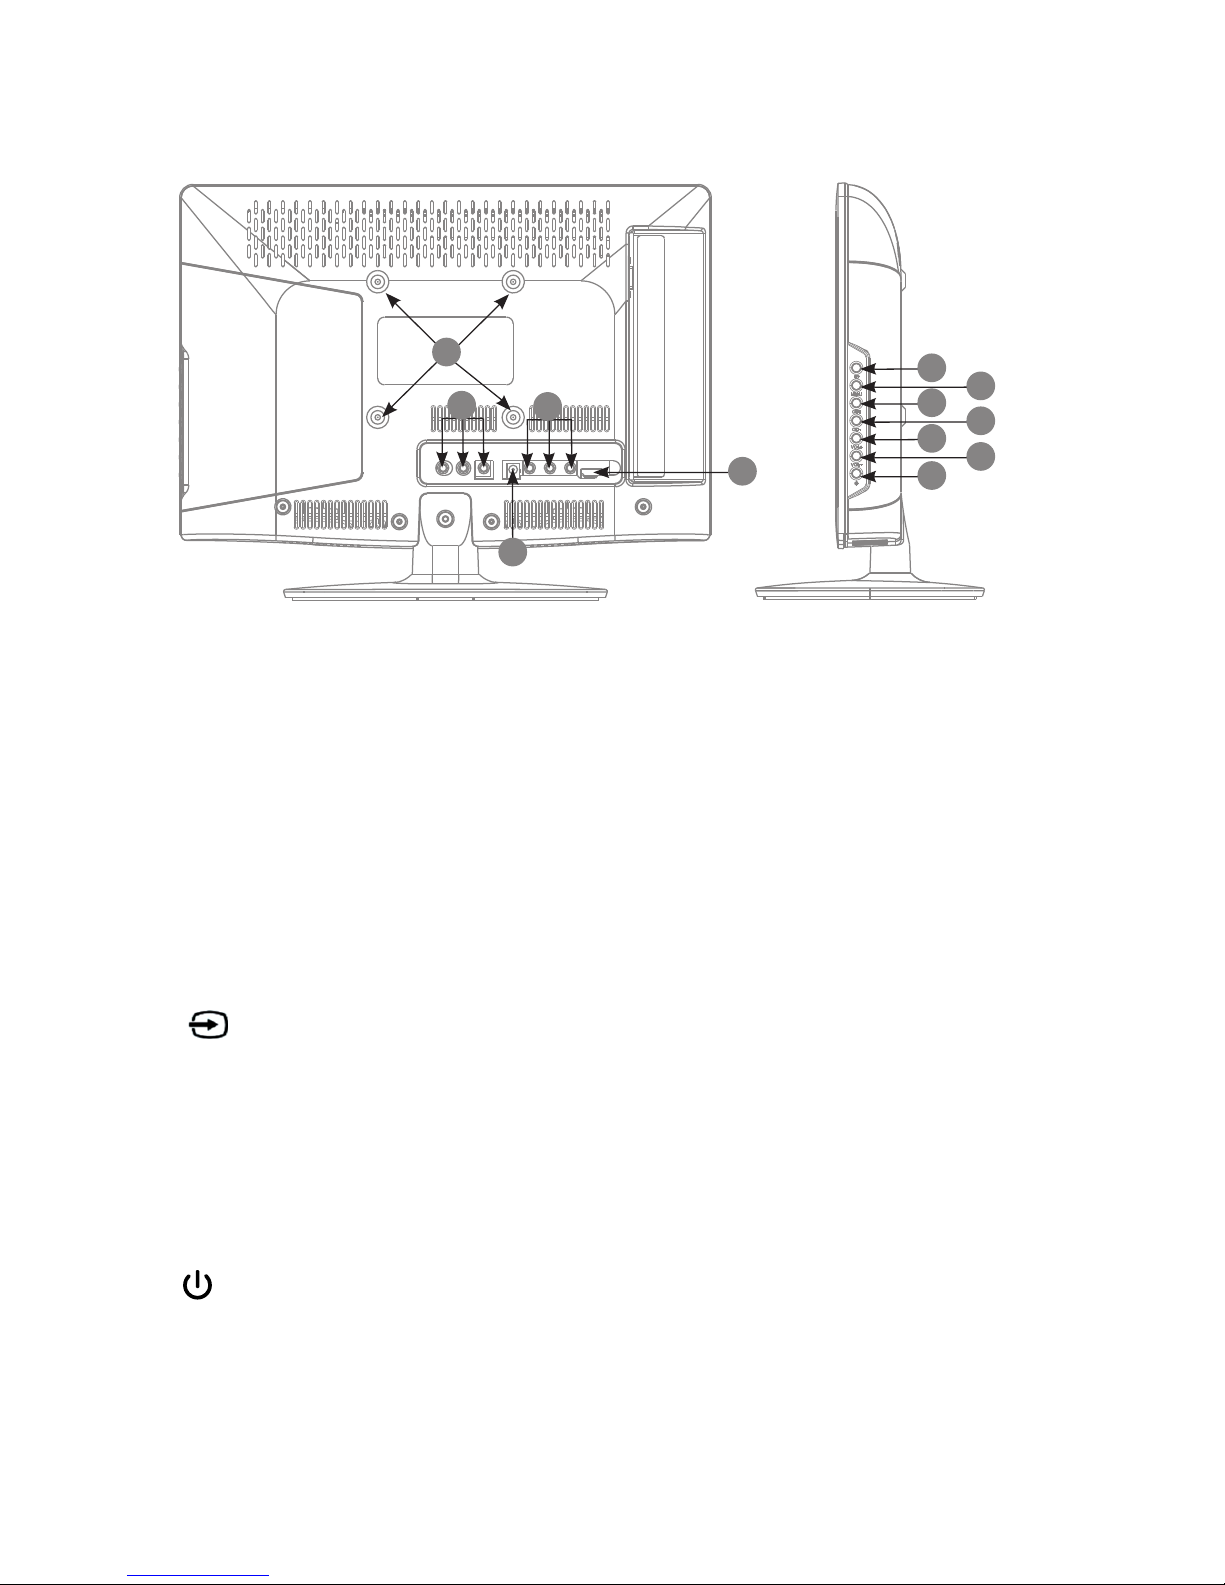
REAR PANEL
3
4
3
17
9
10
5
11
7
6
8
18
19
20
21
23
22
15
16
1
2
12
13
14
12. AV input. Composite video and stereo analogue audio input.
13. DC IN 12V. It is used to plug the 12V DC adapter.
14. COMPONENT VIDEO INPUT. Here you can connect devices with YPbPr component video
output.
NOTE: This input shares the L+R audio stereo AV input.
15. HDMI 2. It is used to connect to a device with HDMI output.
16. ANCHORS FOR WALL MOUNTING. Use the VESA standard 100 x 100 mm.
RIGHT SIDE PANEL
17.
:Press this button to select input source. It is also used to confirm the selection when you use
the menu.
18.
MENU: Press to open the menus / exit the current menu and return to the previous menu.
19.
CH+: Scroll upwards the menu. In TV mode, is used to switch to the next channel.
20.
CH-: Scroll down the menu. In TV mode, is used to switch to the previous channel.
21.
VOL+: increase the volume. Move to the right / change the configuration menu.
22.
VOL-: lower the volume. Move to the left / change the configuration menu.
23.
: On / off button.
45
ENGLISH
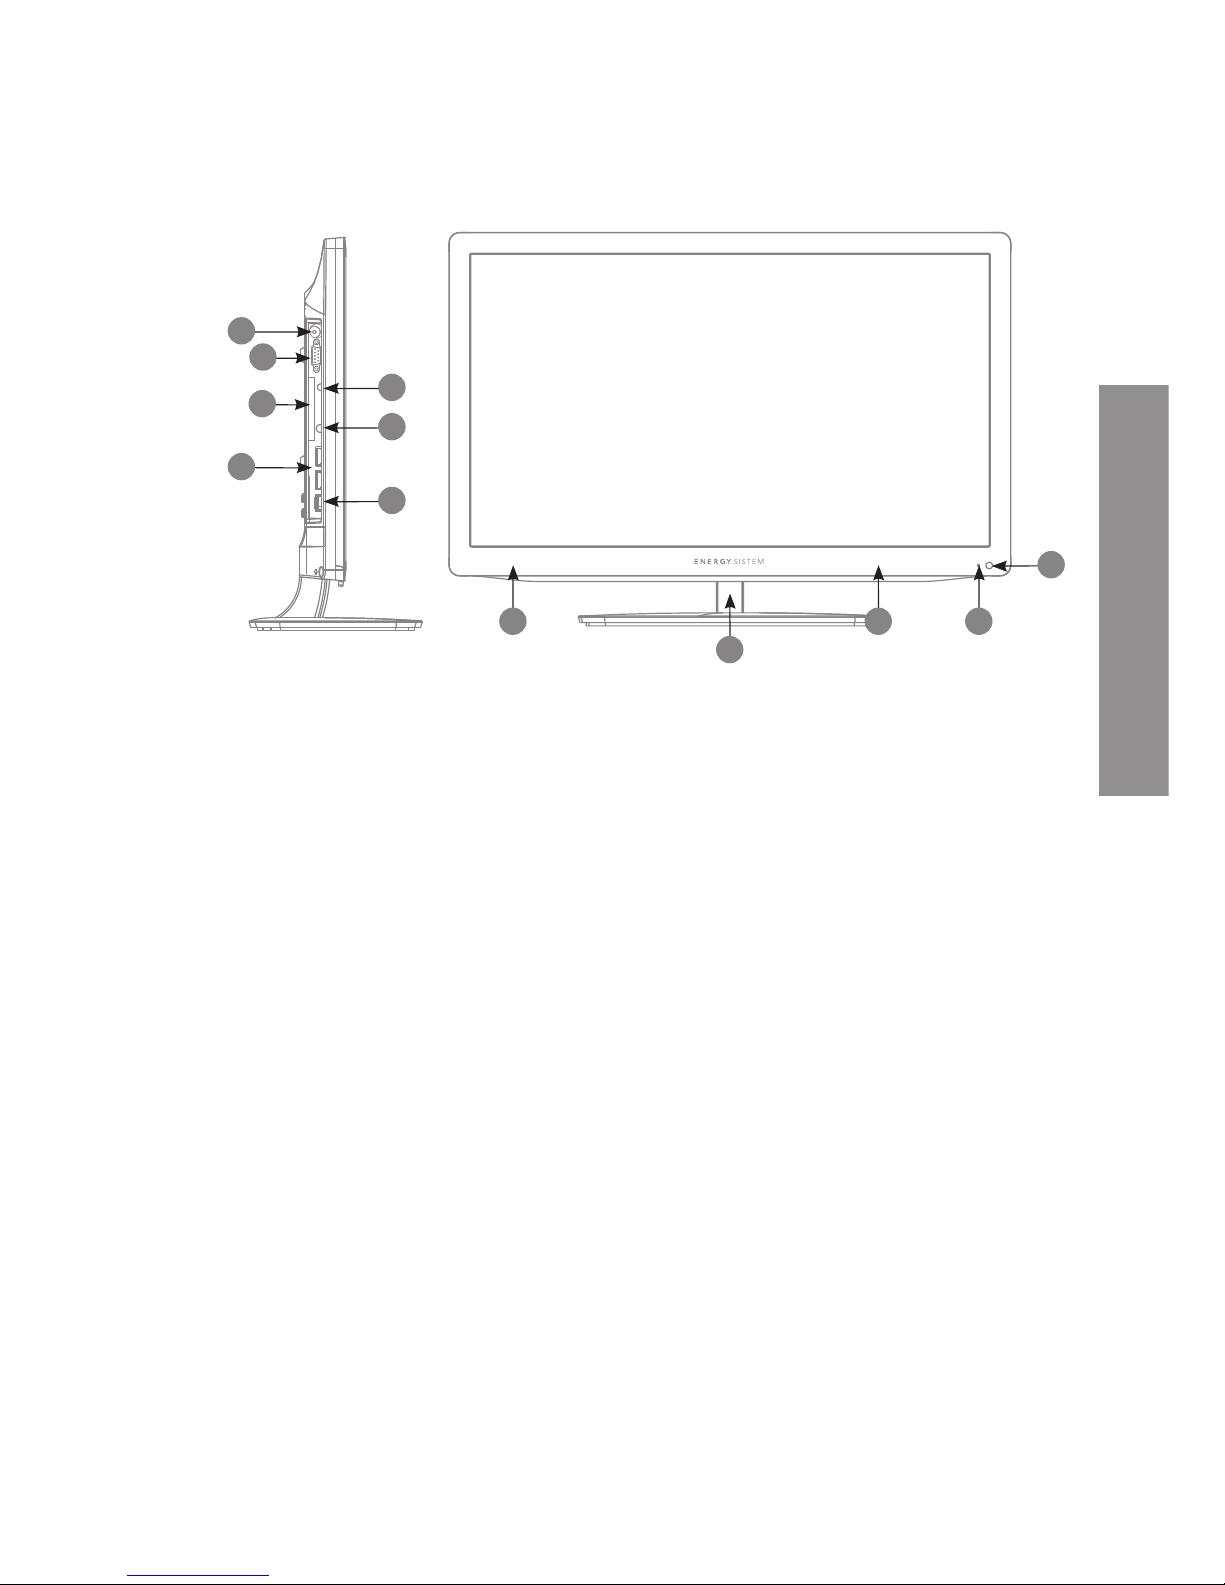
GENERAL VIEW
SCREEN CINELED 19” / 22”
FRONT
3 1
4
3
7
9
11
5
10
6
8
2
1.
OPER ATION LED INDICATOR. Shows operation status. RED indicates standby mode, BLUE indicates
in operation.
2.
REMOTE SENSOR (IR): receives the signal from the remote control.
3.
SPEAKERS.
4.
TV stand.
LEFT SIDE PANEL
5.
IN RF antenna. Plug here the antenna cable to watch TV Broadcast.
6.
PC VGA input. It is used to connect devices such as personal computers, to use your CineLED TV as
a PC monitor.
7.
AUDIO IN. It is used in conjunction with the VGA PC input, to enjoy the sound of your computer
through your CineLED TV.
8.
HEADPHONE. You can plug your headphones here, or use it to connect your TV to external sound
equipment.
9.
COMMON INTERFACE / CAM (Conditional Access Module) OR PCMCIA. It is used to add “Pay per
view” modules.
10.
HDMI 1 and 2. It is used to connect to a device with HDMI output.
11.
USB connector. It is used to connect to an external USB device and play multimedia files or DTV
recordings.

46
REAR PANEL
3 1
4
3
16
7
9
11
5
10
6
8
17
18
19
20
22
21
15
2
12
14
13
12.
AV input. Composite video input and analogue stereo audio.
13.
COMPONENT VIDEO INPUT. Here you can connect devices with component video output YPbPr.
NOTE: This input shares the L+R audio stereo AV input.
14.
SCART. It is used to connect devices such as DVB-T, DVD, Video… with standard definition.
15.
ANCHORS FOR WALL MOUNTING. Use the VESA standard 100 x 100 mm.
RIGHT SIDE PANEL
16.
: Press this button to select input source. It is also used to confirm the selection when you
use the menu.
17.
MENU: Press to open the menus / exit the current menu and return to the previous menu.
18.
CH+: Scroll upwards the menu. In TV mode, is used to switch to the next channel.
19.
CH-: Scroll down the menu. In TV mode, is used to switch to the previous channel.
20.
VOL+: increase the volume. Move to the right / change the configuration menu.
21.
VOL-: lower the volume. Move to the left / change the configuration menu.
22.
: On / off button.
47
ENGLISH
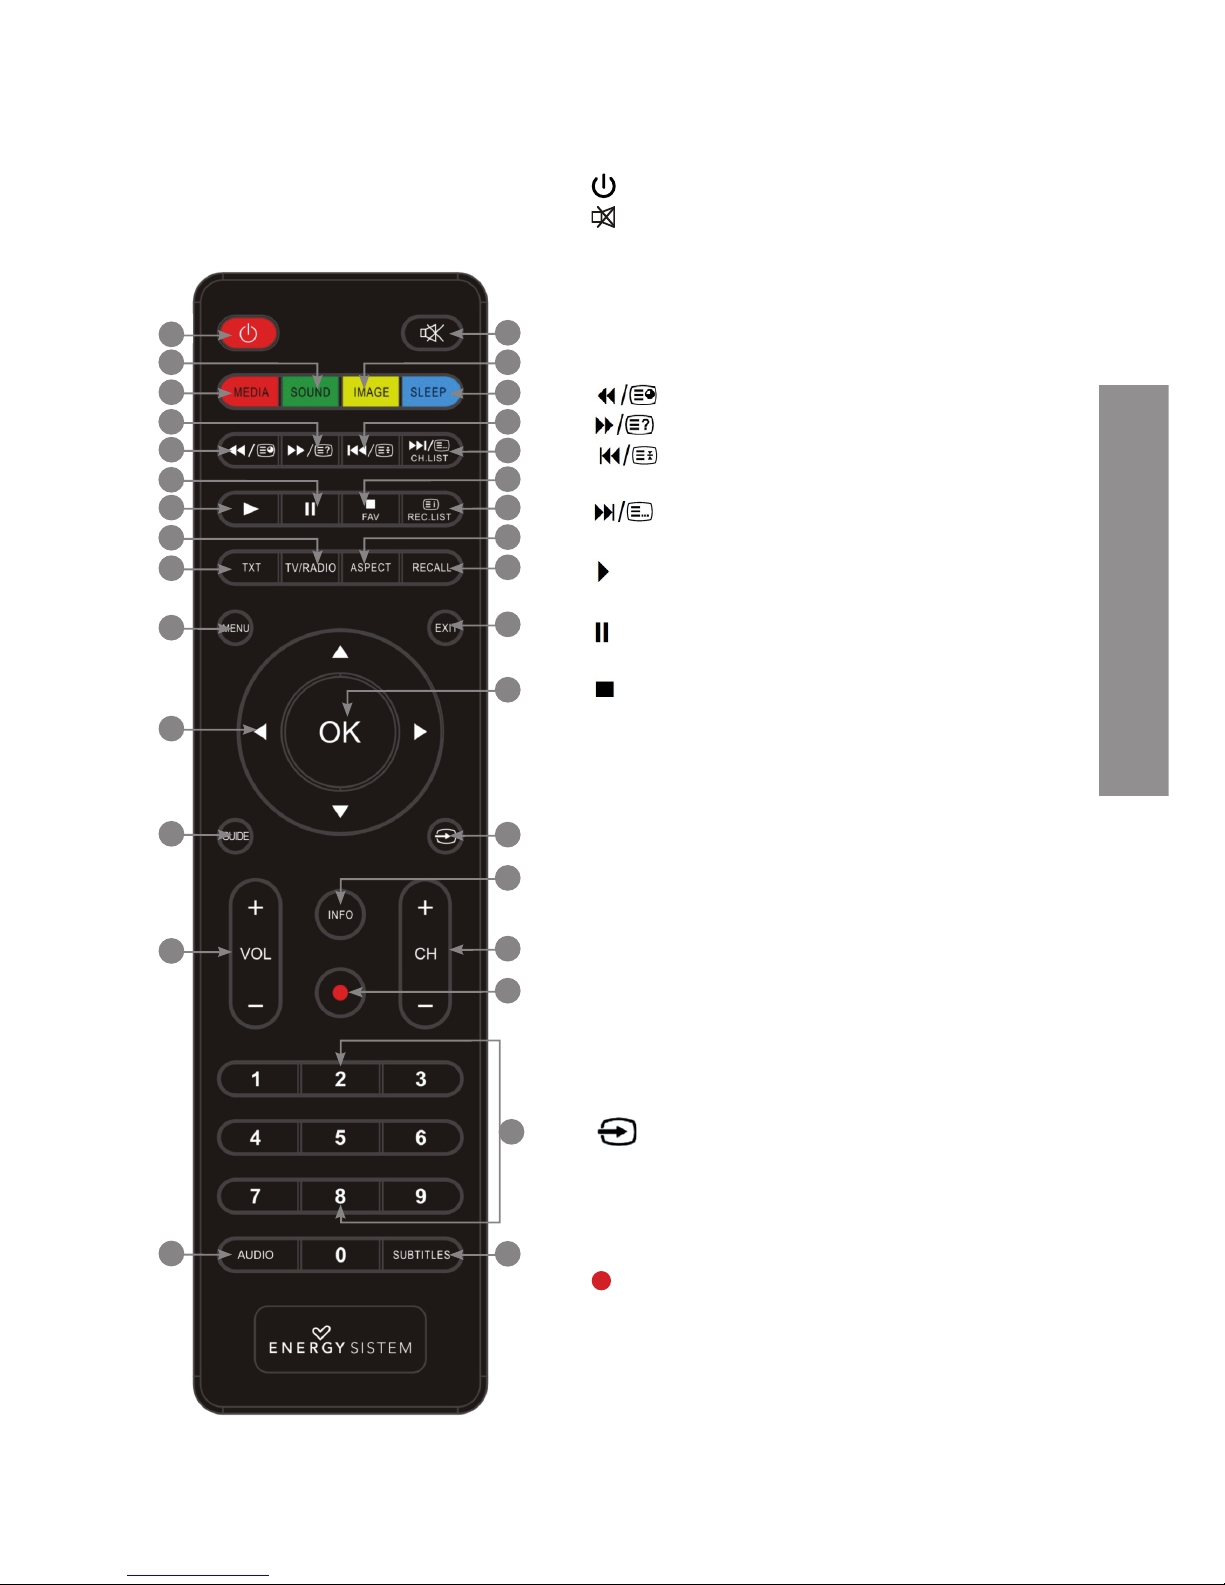
REMOTE CONTROL
BUTTON DESCRIPTION
1. : Press to toggle Power On/Standby Mode.
2. : Press to mute TV, press again to restore the volume to the
previous level.
3. MEDIA / Selects RED in Teletex t and menus.
4. SOUND / Selects YELLOW in Teletext and menus.
5. IMAGE / Selects GREEN in Teletext and menus.
6. SLEEP / Selects BLUE in Teletext and menus.
7. : In PVR mode / Time Shift / Multimedia: Fast reverse.
8. : In PVR mode / Time Shift / Multimedia: Fast forward.
9. :In PVR mode / Time Shift / Multimedia: Back to top /
Previous.
10. CH LIST: In PVR mode / Time Shift / Multimedia: Next. In TV
mode: Displays the list of channels.
11. : Play button. Press in Multimedia mode to begin playback of the
selected files.
12. : PAUSE button. Press to pause playback, press again to resume
playback.
13. / FAV: STOP button. In PVR mode / Time Shifting / Multimedia
stops the playback / recording.
14. INDEX / REC LIST: In TV mode: Displays the list of PVR recordings. In
some menus adopts special functions.
15. TEXT: Press to toggle between TV and Teletext.
16. TV/RADIO: Press to toggle between TV and Radio.
17. ASPECT: Press to toggle between the various formats of image size.
18. RECALL: Click to switch to the previously selected channel, press
again to return.
19. MENU: Access the menus on your TV.
20. EXIT: To exit / go back on the menus of your TV.
21. CURSOR ARROWS: Use these arrows to scroll through the menus.
22. OK: To confirm the selection. In Multimedia mode add files to the
playlist.
23. GUIDE: Access the programming guide.
24.
: cycles the different input sources, HDMI, Scart, AV…
25. VOL + / - : Set the T V volume.
26. CH + / - : Switch to next / previous channel.
27. INFO: Press to view on screen information about the DTV program
you’re watching.
28. : REC button. Press for record the DTV program you’re watching.
29. NUMERIC KEYS: direct access to programs and select menu options.
30. AUDIO BUTTON: Use this button to select between the different audio
languages available.
31. SUBTITLE button: Use this button to select between the different
subtitles languages available.
1
3
7
11
15
19
21
23
25
30
2
6
10
14
18
20
22
13
98
54
12
17
16
28
27
29
24
26
31
48
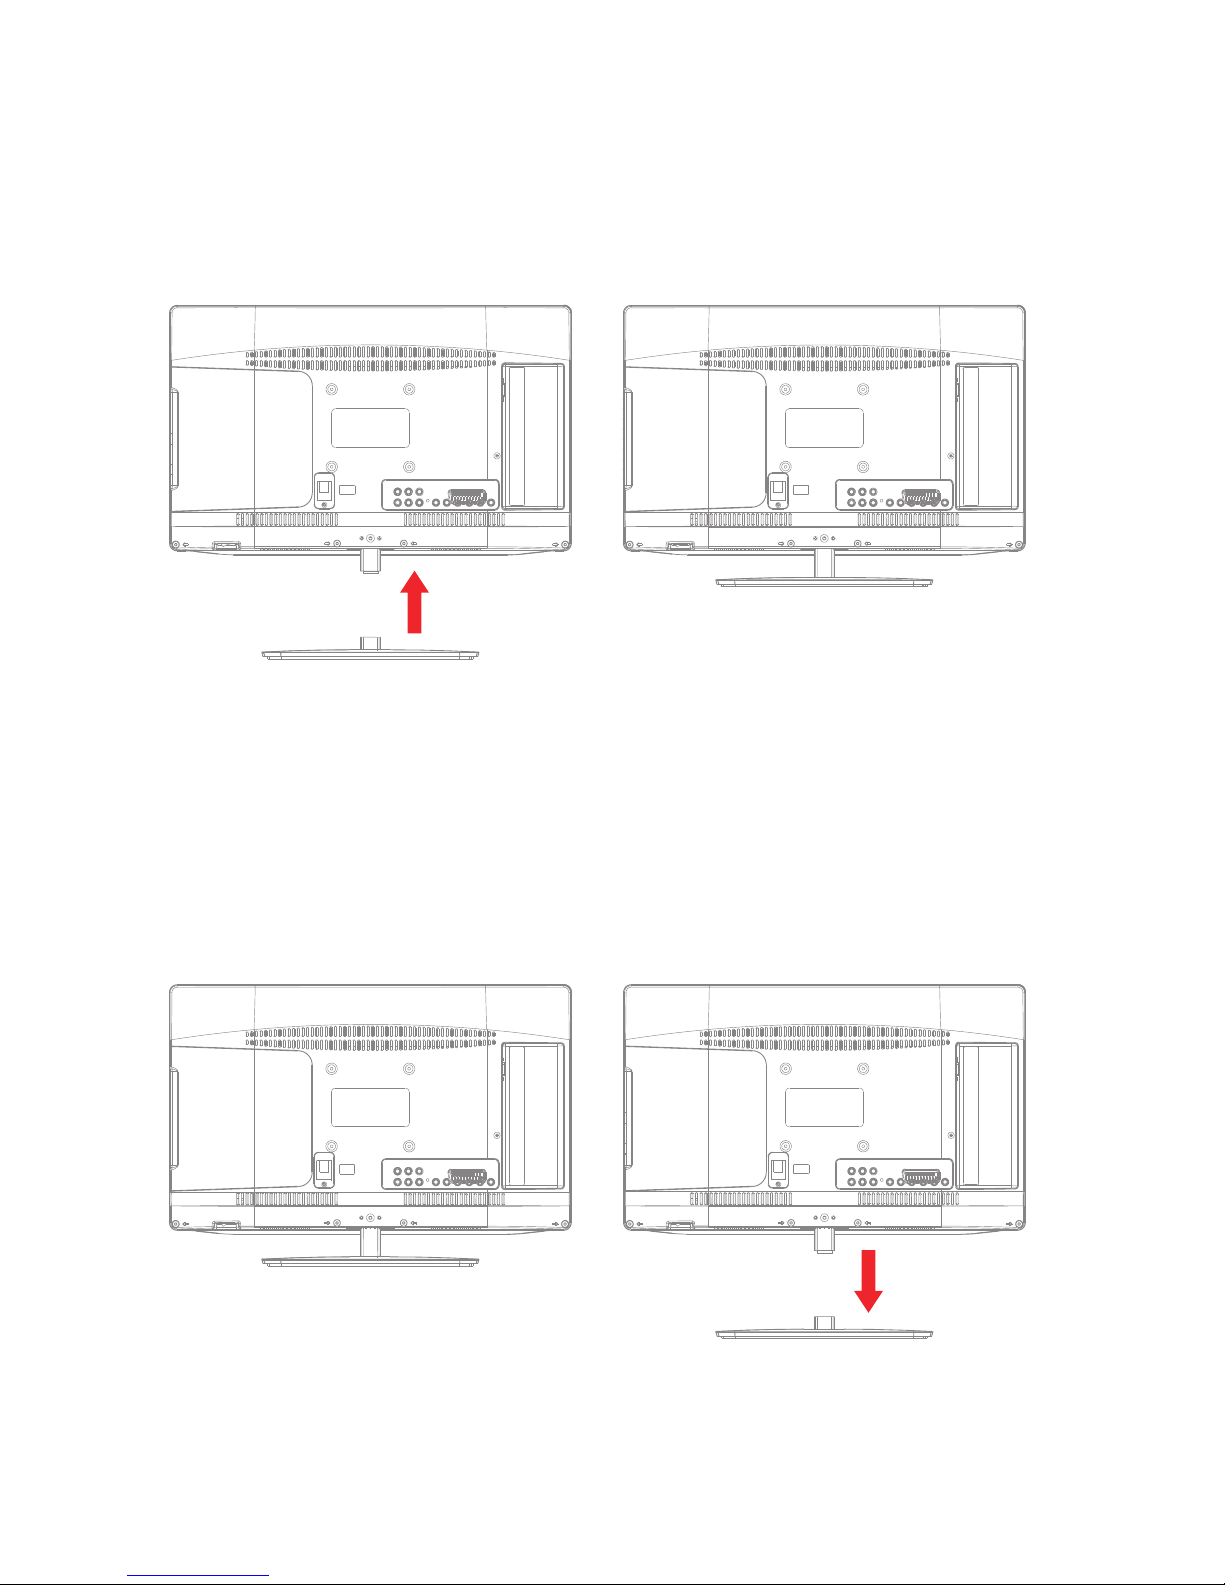
TV STAND INSTALLATION
Place your TV on a flat surface with the front down. Use a soft cloth to avoid damaging the panel or
the surfaces. Locate the TV bracket and the screws between the accessories that you will find in
the box. Screw onto your TV Cineled stand.
WALL MOUNTING
Place your TV on a flat surface with the front down. Use a soft cloth to avoid damaging the panel
or the surfaces. Remove the bolt in the stand. Subsequently, remove the screws that attach the
mast to your TV.
Save all attachments for future needs.
49
ENGLISH
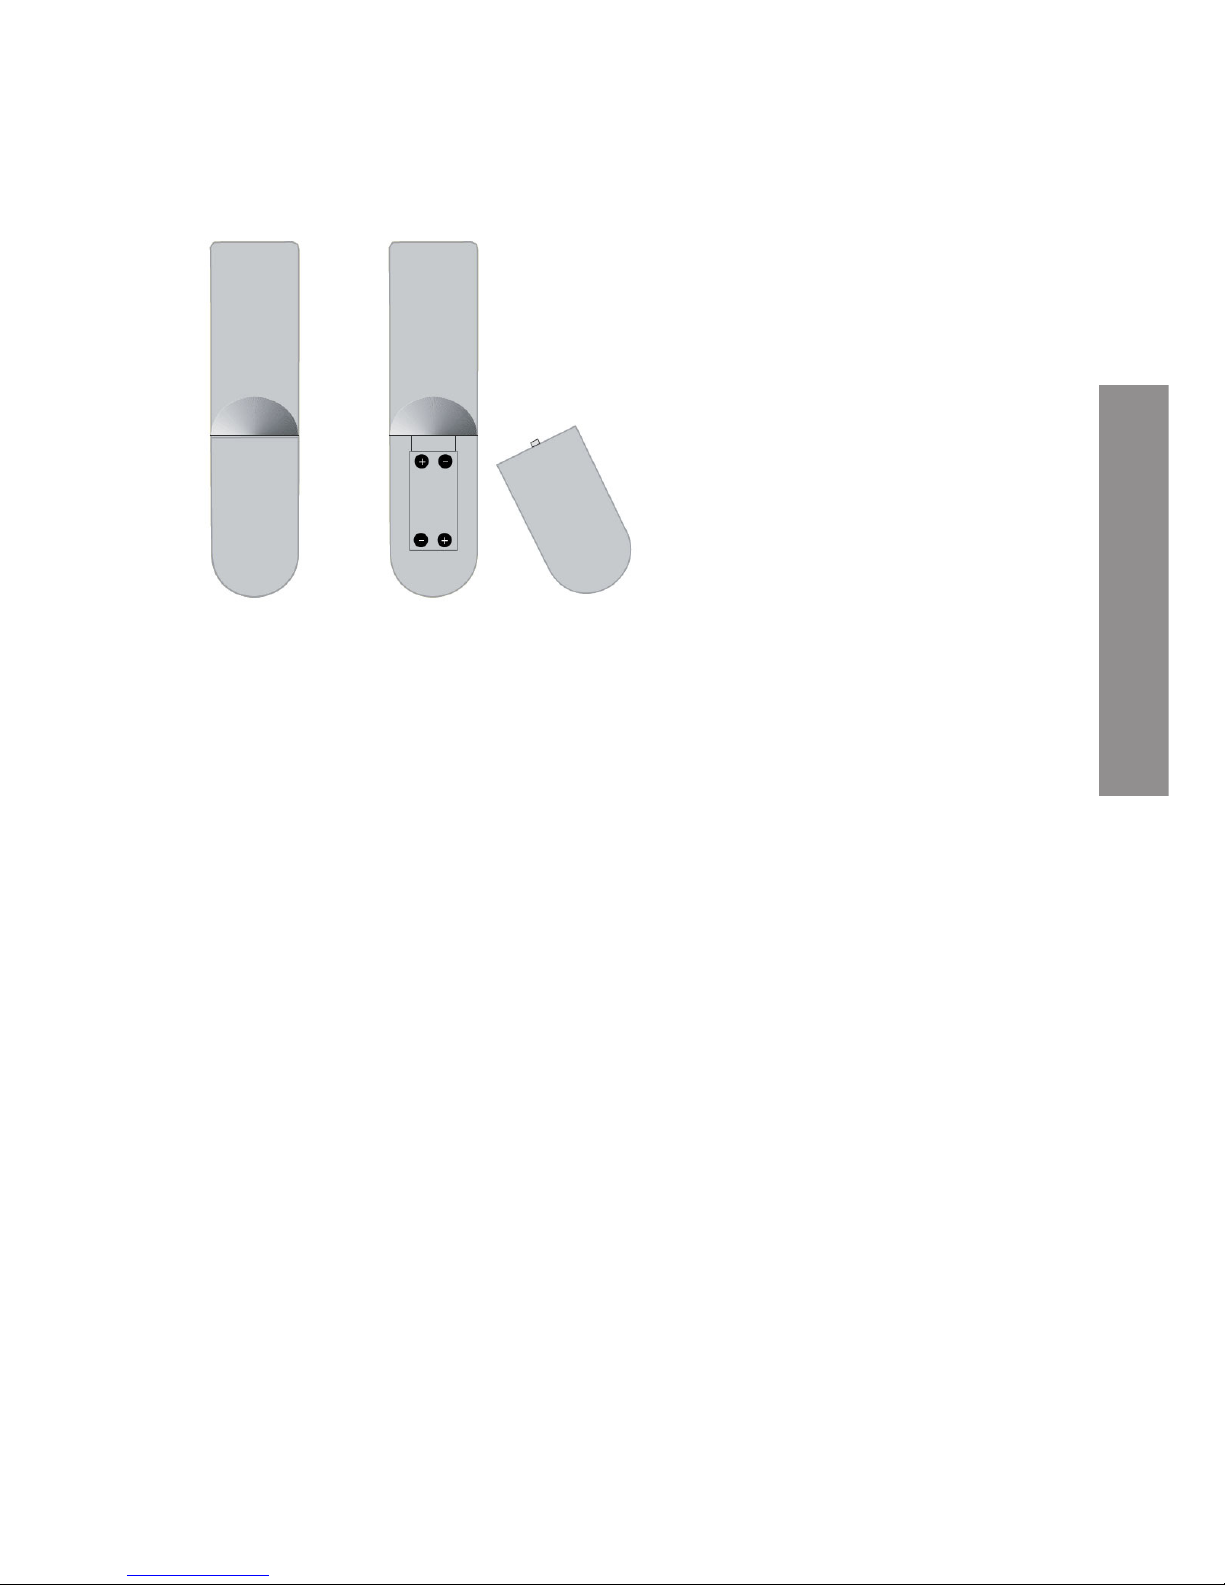
PLACING THE BATTERIES
Remove the remote control battery cover and place two AAA batteries.
Put the battery cover back on.
Be sure to replace the batteries in correct direction.
If remote control range decreases replaces the batteries. Do not recharge, neither disarm nor
heat batteries.
The misuse of batteries can cause leaks that may damage remote control.
Save the batteries out of the reach of children. If a person swallows a battery must receive
medical help immediately.
Do not try to recharge batteries.
Don’t throw batteries in fire, disassemble or short circuit them. Change the batteries at least once
a year to avoid spilling them. Changes the two batteries at the same time and replace them by
others of the same type.
When the remote control will not be used for a long time, please remove batteries.
Do not expose the remote command unit to splashing of liquids, sources of heat or direct sunlight.
USING THE REMOTE CONTROL
To use the remote control point it to the IR receiver.
The remote control has a maximum range of 6 mt. from the receiver in an angle of up to ± 30°.
If batteries are low, the command may not work correctly, so it is recommended to replace the
batteries immediately.
The remote will not work if the path to the receiver is blocked.
Direct sunlight or very intense light can reduce the remote control sensitivity.
 Loading...