

Page 1

operating instructions
betriebsanleitung
notice d’utilisation
handleiding
brugsanvisning
bruksanvisning
Page 2

DualDrive · December 2002
2
Precautionary measures,
which protect from possible
accident, injury or danger to
life, or which prevent possible
damage to the bicycle.
These instructions contain important
information on your DualDrive
system.
Cycling with DualDrive is easy. It’s
true. It may surprise you just how
many features your DualDrive
system has.
To make the best possible use of
your DualDrive please take the time
to read these operating instructions
carefully.
Your DualDrive system is almost
maintenance-free. Should you have
any queries that are not answered in
these operating instructions, your
qualified bicycle specialist will be
pleased to help you.
Have a nice time and enjoy
”dualdriving”.
Special advice to assist in
the better handling of the
operation, control and adjustment procedures.
Please take particular note of the
following:
© Copyright SRAM Corporation 2002
Publ. No. 5000 E/D/F/Nl/Dk/Sv
Information may be enhanced
without prior notice.
Released December 2002
SRAM Technical Documentation,
Schweinfurt/Germany
Shimano is a trademark of Shimano Inc., Japan.
Page 3

DualDrive · December 2002
3
E
CONTENTS
THE DUALDRIVE SYSTEM 4
OPERATION 7
MAINTENANCE AND CARE
» Gear adjustment 8
» Remove and fit rear wheel 10
» Cleaning and Lubrication 11
» Cable change 12
ASSEMBLY OF COMPONENTS 14
TECHNICAL DATA 18
ADDRESSES 110
Page 4

DualDrive · December 2002
4
THE DUALDRIVE SYSTEM
WHAT IS DUALDRIVE
The general perception is that shifting
requires a Zen-like touch from years
of trial and error . . . mostly error.
Many riders wanted something
easier. We really love this kind of
challenge. And DualDrive exceeds
all the expectations.
DualDrive is a drive train consisting
of a self-energized internal hub and
rear derailleur for smooth adjustment.
It’s the market’s most revolutionary
transmission.
OPERATING PRINCIPLE
Single-side shifting allows the rider to
use one-hand to easily click through
a 27-, 24- or 21 gear option. And
DualDrive’s superior gear indication,
featuring three intuitive riding modes,
creates a smooth, comfortable ride
for novice and masters alike. Easy
shifting.
Advanced performance. Mission
accomplished.
RIDING MODES
DualDrive has 3 intuitive shifting
modes. Hill mode, standard mode, and
fast mode. Each mode is designed to
allow the rider to be in the proper
mode wherever you go.
H
i
l
l
S
t
a
n
d
a
r
d
F
a
s
t
Page 5

DualDrive · December 2002
5
E
THE DUALDRIVE SYSTEM
DualDrive hub and cassette
Super light shifting forces,
load shiftable. Stand-still shifting
(mode selector): easy re-start at
a traffic light
DualDrive single-sided shifter
Simple gear indication:
one view for all information.
Intuitive logical shifting.
DualDrive rear derailleur
Light, precise shifting.
Larger pivots, links and cages:
increased rigidity and durability.
DualDrive Clickbox
Easy wheel removal:
pre-adjusted gears for simplicity.
Page 6

DualDrive · December 2002
6
THE DUALDRIVE SYSTEM
HOW LONG DID IT
TAKE TO FINISH
DUALDRIVE?
A big team of 25 engineers from all
around the world worked for two
years on this project.
HOW DID WE TEST
DUALDRIVE?
Enthusiastic trekking riders did test
the system under all weather circumstance for more than a year.
Within these tests we finetuned the
function of the system to perform to
100% of the comfort trekking riders
expectations.
WHAT PARTS DO I NEED
TO COMPLETE A DUALDRIVE TRAIN?
A DualDrive train contains the
following products:
» DualDrive hub: in either without
brake and disc brake version.
» Cassette: 11-34 teeth, 9 speed for
DualDrive 27 or 11-32 teeth, 8
speed for DualDrive 24 or 12-32
teeth, 7 speed for DualDrive 21.
» Derailleur: DualDrive 9 speed for
DualDrive 27, DualDrive 8 speed
for DualDrive 24 or DualDrive 7
speed for DualDrive 21.
» Shifter with Clickbox: 27 speed
with gear indication window or
24 and 21 speed without gear
indication window.
» Spoke protector: There are two
versions available: in versions for
36 or 32 spoke hole hubs.
» Crank: DualDrive cranks offer the
best performance with the DualDrive system.
I BELIEVE A DUALDRIVE SYSTEM HAS
TO BE HEAVIER THAN
A NORMAL EXTERNAL
DRIVE SYSTEM!
In fact the DualDrive system weighs
around 250 gr less than a standard
derailleur drive train system.
WHAT IS THE BENEFIT
OF THE SINGLE SIDED
SHIFTER?
It is more intuitive due to the riding
modes which explain the driver
directly what mode to use in which
terrain.
Page 7

DualDrive · December 2002
7
E
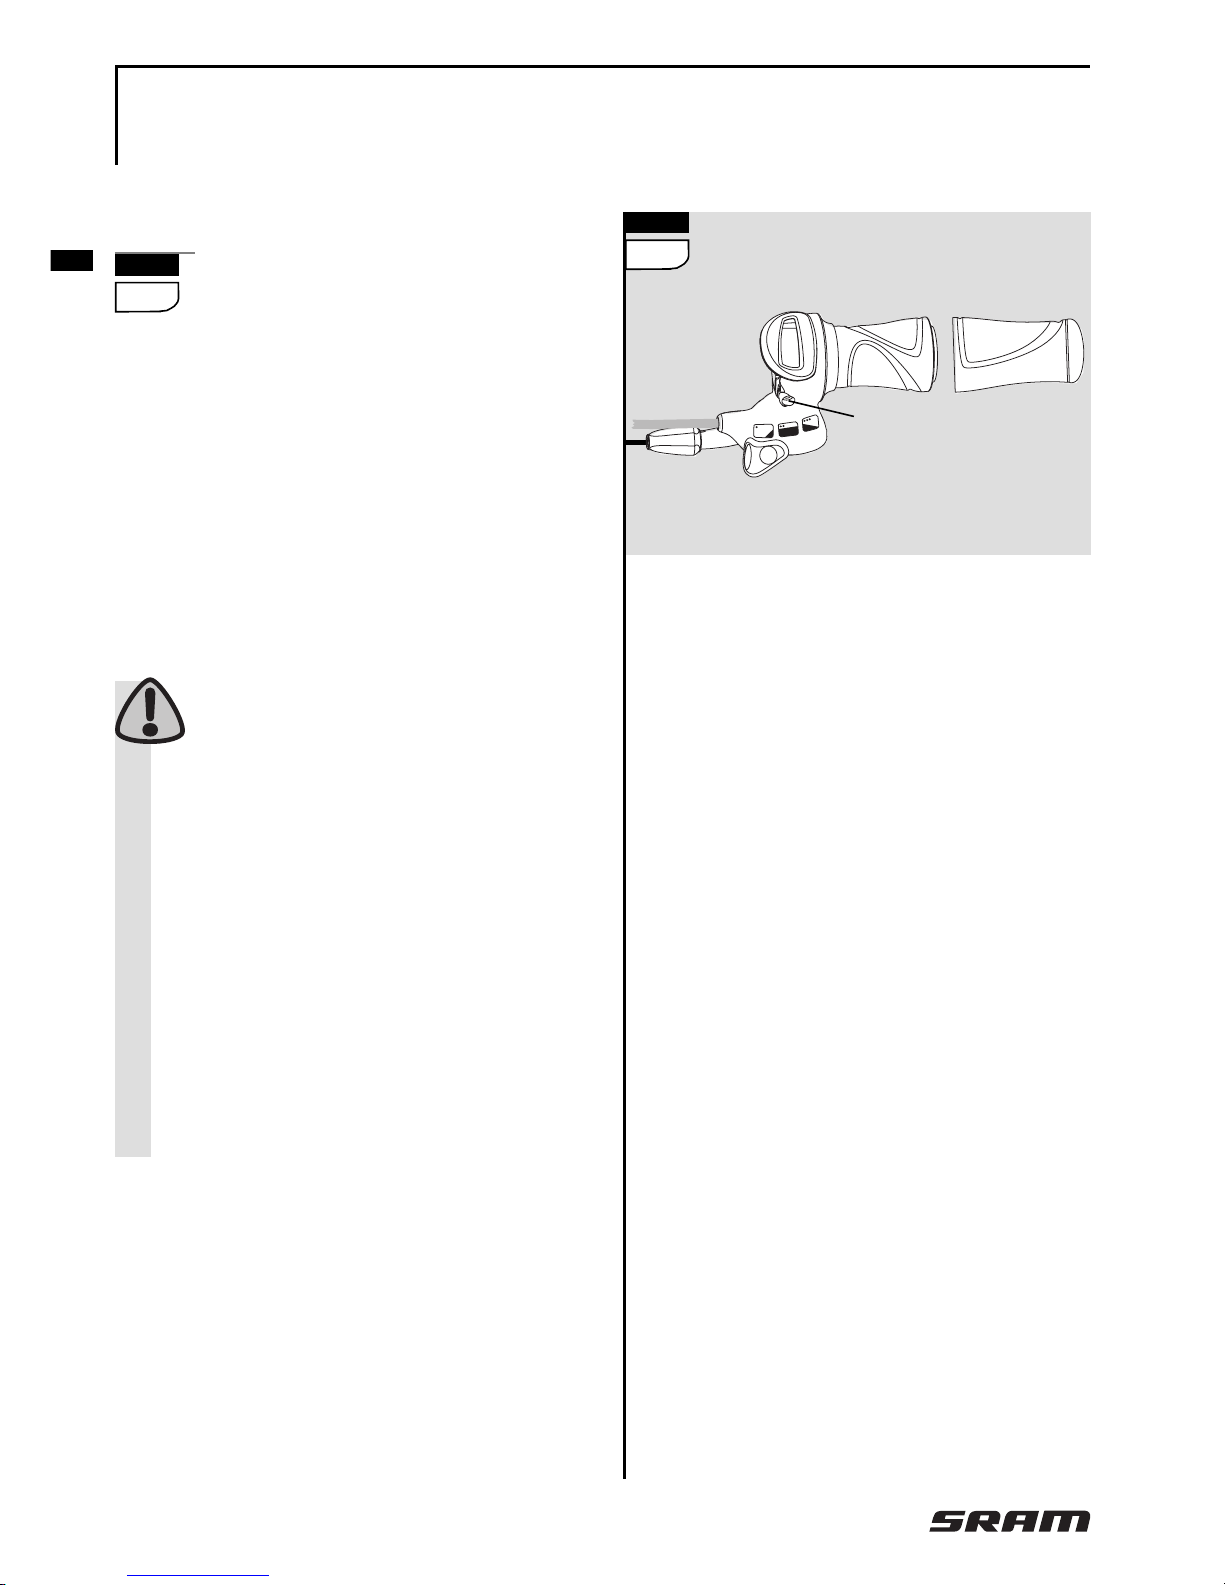
OPERATION
RIDING MODES
Use the thumb shifter to
choose the gear ratio. You can
operate it in stand still or while
riding. The smoothest and fastest
gear change happens when
changing gears while pedaling.
DERAILLEUR
Use the rotating grip (to the
right) to change gear of the
derailleur system. The smoothest
and fastest gear change happens
when changing gears while
pedaling with low force.
1
2
1
2
Page 8

DualDrive · December 2002
8
4
5
MAINTENANCE AND CARE
GEAR ADJUSTMENT
GEAR HUB
Place thumb shift lever
in standard mode.
Match up the yellow marks in
the Clickbox viewing window
by twisting the barrel adjuster.
DERAILLEUR
Limit screw adjustment:
View the rear derailleur and
pulleys from behind the rear of
the bicycle.
» Turn the limit screw marked ’H’ on
the outer link of the derailleur to
align the upper guide pulley center with the outboard edge of the
smallest cog – clockwise moves
the guide pulley inboard towards
the wheel.
» While turning the crank, push the
rear derailleur towards the larger
cogs by hand.
» Align the upper guide pulley under
the largest cog, by turning the
limit screw marked ’L’ on the outer
link – clockwise moves the guide
pulley outboard away from the
spokes.
3
5
3
4
Page 9

DualDrive · December 2002
9
E
MAINTENANCE AND CARE
GEAR ADJUSTMENT
Chain gap adjustment:
Chain gap is the distance between the
upper guide pulley and the cog the
chain is riding on. Optimal chain gap
allows quick, efficient shifts.
» While turning the crank, push the
rear derailleur inboard by hand to
the largest cog.
» Hold the derailleur in this position
while making the following adjustment.
Use a 3 mm hex wrench, turn
the b-adjust screw until the
chain gap equals approximately
6 mm (
1
/4”).
– Turn the b-adjust screw clock-
wise to increase the chain gap.
– Turn the b-adjust screw
counterclockwise to decrease
the chain gap.
Do not use the b-adjust screw
to adjust the rear derailleur
to act as a chain-tensioning device
or to prevent chain suck. This
increases the chain gap causing
poor shifting performance.
Index shifting adjustment:
» Make sure the chain is located on
the smallest sprocket.
» Shift the chain to the second cog.
– If the chain hesitates or does not
shift, increase the cable tension
by turning the shifter barrel
adjuster counterclockwise.
–
If the chain shifts beyond the
second cog,
decrease the cable
tension by turning the shifter
barrel adjuster clockwise.
» Repeat the two former steps until
shifting and cable tension is
accurate.
» While turning the crank, shift the
chain up and down the cassette
several times to ensure that your
derailleur is indexing smoothly.
3 mm
6 mm
(
1
/
4
")
6
6
Page 10

DualDrive · December 2002
10
MAINTENANCE AND CARE
REMOVE AND FIT REAR WHEEL
REMOVE REAR WHEEL
» Rotate the twist shifter to the hig-
hest gear position (speed „7/8/9“).
Place thumb shift lever
in hill riding mode.
Push Clickbox button down.
» Pull Clickbox off the axle.
» Dismantle wheel.
Unscrew shifting rod (1)
FIT REAR WHEEL
» Fit wheel in frame dropouts.
Place retaining washers (2) on
both sides of the axle – the
serrations must bear against the
dropout (washers with lugs: these
must engage in the dropout slots).
» Tighten up axle nuts. Tightening
torque 30 – 40 Nm (266 – 350 in. lbs.).
» Screw shifting rod (1) into the hub
axle and thigthen it with 0.2 Nm
(1.8 in. lbs.).
» Push on Clickbox to the stop on
the hub axle. The thumb shift lever
must be positioned in the hill riding
mode and Clickbox button must be
pushed down.
» Bring Clickbox button back to initial
setting by pushing it up from underneath.
» Check the gear settings.
7
8
9
7
8
9
9
1
0,2 Nm
2
Page 11

DualDrive · December 2002
11
E
MAINTENANCE AND CARE
CLEANING AND LUBRICATION
CLEANING
Your DualDrive components
are well protected against
adverse environmental influences.
In order to avoid malfunction due
to water penetration, pressurized
jets (high pressure cleaners etc.)
should not be used when cleaning
the bicycle.
» When using the bike during the
winter more frequent cleaning is
necessary to prevent damage
caused by de-icing salt.
» Do not use solvants or corrosive
materials to clean the components.
» Clean dirty chains before oiling.
Do not use any grease-dissolving
or acidic agents. Cleaning agent
must be rinsed off after a few
minutes with water. Apply oil after
chain is completely dried.
LUBRICATION
» DualDrive hubs are provided with
permanent lubrication and
maintenance-free under normal
conditions.
Lubricate the shifting joints
regularly. Grease any cable
guides (e.g. beneath the bottom
bracket).
» Regular lubrication will extend the
chain’s service life.
10
11
11
10
Lubricate the
shifting joints
regularly
Page 12

DualDrive · December 2002
12
13
14
12
MAINTENANCE AND CARE
CABLE CHANGE
CABLE CHANGE
Leave the shifter on the
handlebar.
» No need to move other components.
The shifter does not need to be
opened.
» Use only new high quality cable
(stainless) and compressionless
cable housing with end caps.
Twist shifter (rear derailleur):
» Detach the cable from the
derailleur.
» Cut cable off 15 cm (6") from
shifter barrel adjuster. Discard old
cable and cable housing.
Remove screw (1) and pull open
the cable change sleeve (2).
Rotate the shifter fully in the
cable release direction (gear
position “7/8/9“). Look for cable
head entry (3).
» Push cable up/out of the shifter
and discard.
» Feed the new cable through the
cable entry.
Pull cable snug.
Install cable change sleeve (2)
and fit screw (1).
2
1
3
4
5
12
13
12
Page 13

» Install Clickbox (see Page 10).
» Adjust gearshift.
15
» Feed the cable through the new
cable housing and frame stops.
» Attach cable to the derailleur and
adjust indexing.
Thumb shifter (gear hub):
Place thumb shift lever
in hill riding mode.
» Remove Clickbox from the axle
(see Page 10).
Snap open Clickbox-cover (6)
as shown.
» Unscrew clamping bolt (7), hex
wrench 4 mm.
Remove the shifter escape
hatch (4).
» Remove and discard the old cable.
» Feed the new cable through the
cable entry (5), the new cable
housing and pull the cable snug.
» Attach the escape hatch.
Pull the cable tight and
position it under the cable
anchor washer (8).
» Tighten the 4 mm hex cable anchor
bolt to 2.5 – 4 Nm (22 – 35 in.lbs.).
» Cut off cable end to 1 – 2 mm.
» Snap in Clickbox-cover.
15
7
15
14
MAINTENANCE AND CARE
CABLE CHANGE
DualDrive · December 2002
13
E
REPAIR WORK
Arrange for any work, which
may become necessary on
the DualDrive gear hub and shifter
to be carried out by your qualified
specialist dealer.
» Non-authorized work on your
DualDrive system could put you in
danger and also lead to the loss of
your guaranteed rights.
» If you have questions or problems
please contact your qualified
specialist dealer.
6
7
8
4 mm
2.5 – 4 Nm
22 – 35 in.lbs.
Page 14

1
0,2 Nm
2
3
17
ASSEMBLY
OF COMPONENTS
DualDrive · December 2002
14
ASSEMBLY HUB
»
Spoke the hub as normal.
Place spoke protector disc (1)
on shoulder of hub, fit
cassette (2) onto driver profile.
Screw lock nut (3) with cassette
tool (Park Tool FR-5 or SRAM Part
No. 4624 411 010), tightening
torque: 40 Nm (350 in.lbs.).
Screw shifting rod (1) into the
hub axle and tighten it with
0.2 Nm (1.8 in.lbs.).
» Fit wheel in frame dropouts.
Place retaining washers (2) on
both sides of the axle – the
serrations must bear against the
dropout.
– Version for horizontal dropouts (2):
the lug must engage in the
dropout slot.
– Version for vertical dropouts (3):
without lug.
» Tighten up axle nuts. Tightening
torque 30 – 40 Nm (266 – 350 in. lbs.).
16
3
2
1
16
17
17
Page 15

18
5 mm
8 – 10 Nm
70 – 85
in.lbs.
(4 links)
ASSEMBLY
OF COMPONENTS
DualDrive · December 2002
15
E
ASSEMBLY DERAILLEUR
Check the rear derailleur
hanger alignment. A bent rear
derailleur hanger will result in
inaccurate index shifting.
Attach the rear derailleur to
the frame’s rear derailleur
hanger.
Check that the b-adjust
washer tab (b-adjust screw at
DualDrive 24 and 21) is clear of the
rear derailleur dropout tab.
» Tighten the 5 mm hex hanger bolt
to 8 – 10 Nm (70–85 in.lbs.).
CHAIN LENGTH
Bypassing the rear derailleur,
run the chain around the
largest cog chainring combination. Add 4 LINKS or 3 links +
connecting link to this length for
proper chain length.
» For rear suspension frames,
position the rear suspension for
the greatest chain length
required.
18
19
DualDrive 24 / 21
DualDrive 27
19
20
20
Page 16
ASSEMBLY
OF COMPONENTS
DualDrive · December 2002
16
ASSEMBLY SHIFTER
Slide the shifter (5) onto the
handlebar.
» Rotate the shifter until the barrel
adjuster (6) is beneath (but out of
the way of) the brake lever.
» Tighten the 3 mm hex clamp bolt (7)
to 1.9 – 2.5 Nm (17 – 22 in.lbs.).
» Slide the handlebar grip (8) onto
the handlebar.
Never use lubricants or
solvents to install handlebar
grips. Handlebar grips provide an
axial safety function. For this
reason, they should be mounted in
such a way as to make sure they
do not slip off handlebar.
» Check that the shifter and brake
lever function properly and are
unobstructed.
» Never ride without the handlebar
grips, this can result in severe
injury or death.
21
21
5
6
7
8
Page 17

ASSEMBLY
OF COMPONENTS
DualDrive · December 2002
17
E
INSTALLING CLICKBOX
» Fit the cable and avoid small
radius.
» Cable housing must be movable
inside attachment.
Place thumb shift lever
in hill riding mode.
Push Clickbox
button down.
» Push on Clickbox to the stop on
the hub axle.
» Bring Clickbox button back to initial
setting by pushing it up from
underneath.
GEAR ADJUSTMENT
See MAINTENANCE AND CARE
22
23
22
23
Page 18

DualDrive · December 2002
18
TECHNICAL DATA
DualDrive 27 DualDrive 24 DualDrive 21
Over Locknut Dim. 135 mm
Length 182.6 mm
Ends Diameter FG 10.5
Holes 36 or 32
Hole Diameter 2.6 mm
Hole Ref. ø 67 mm
Flange Dist. to 1/2OLD
33 mm / 18 mm
Totally 576% 542 % 509 %
Totally hub 186 %
Speed 1
73
%
Speed 2
100
%
Speed 3
136
%
Chainline 45 mm 45 mm 42 mm
Crankset 33 / 38 Teeth
Cogset 9 / 8 / 7 speed, 11-34 / 11-32 / 12-32 Teeth
Cogset Compatib. DualDrive 27 DualDrive 24 DualDrive 21
Shifter Compatib. DualDrive 27 DualDrive 24 DualDrive 21
Tandem compatib.
Not suitable for tandems and delivery bicycles
Axle
Spoke
Ratio
67
18
Chain line
67,5
135
182,6
4,6 / 4,6 / 9,5
33
GEAR HUB
Page 19

DualDrive · December 2002
19
E
TECHNICAL DATA
DualDrive 27 DualDrive 24 DualDrive 21
Speeds 98 7
Shifter Compatibility DualDrive 27 DualDrive 24 DualDrive 21
Cage Length Short, 75 mm Short, 75 mm Short, 75 mm
Sprocket, max. 34 Teeth 32 Teeth 32 Teeth
Sprocket, min. 11 Teeth 11 Teeth 11 Teeth
Pulleys Exchangea. / Bushing
Direct Mount ●● ●
➔
DualDrive 27 DualDrive 24 DualDrive 21
Shifter Type SRS Twistring-Thumbshifter-Combo (2in1)
Gear Hub DualDrive
Derailleur DualDrive 27 DualDrive 24 DualDrive 21
Gear Indication Der. Window Printed Printed
Riding Mode Indic. Printed Printed Printed
Barrel Adj. Derailleur Index
Clamping Diameter 22,3 mm
Handlebar, Straight Area
Minimum length = 150mm
Cable Routing, Gear Hub
Continuous housing (preassembled)
Cable Routing, Der. Open or continuous
Com-
pat.
DualDrive 27 DualDrive 24 DualDrive 21
Largest Cog 34 Teeth 32 Teeth 32 Teeth
Speeds 98 7
Cogs 11/34 11/32 12/32
Spacers Blue Black Grey
Chain compatib.
9spd, SRAM/Shim. 8spd, SRAM/Shim.
7spd, SRAM/Shim.
CASSETTE
DERAILLEUR
SHIFTER
Page 20

ADDRESSES
DualDrive · December 2002
110
DANMARK
Dan Agentur
Stationsvej 77
5792 Årslev
Tel.: +45 65 99 24 11
Fax: +45 65 99 28 42
DEUTSCHLAND
Epple Zweirad GmbH
Mittereschweg 1
87700 Memmingen
Tel.: +49 (0) 83 31 7 51 411
Fax: +49 (0) 83 31 7 51 450
Hermann Hartje KG
Deichstraße 120-122
27318 Hoya/Weser
Tel.: +49 (0) 42 51 81 12 40
Fax: +49 (0) 42 51 81 12 49
ESPAÑA
Casa Masferrer, s.a.
Pol. Ind. Congost.Avda.
San Julian, s/n
E-08400 Granollers (Barcelona)
Tel.: +34 9 38 46 60 51
Fax: +34 9 38 46 53 56
FRANCE
Savoye, S.A.
Rue de l’industrie
01470 Serrières de Briord
Tel.: +33 4 74 36 13 77
Fax: +33 4 74 36 15 14
ITALIA
A.M.G. s.r.l.
Via Piave 10
23871 Lomagna (Como)
Tel.: +39 039 5 30 11 67
Fax: +39 039 9 22 02 70
NEDERLAND
Koch Kleeberg B.V.
Dukdalfweg 25
1332 BJ Almere
Tel.: +31 36 532 05 04
Fax: +31 36 532 25 48
Vertex Cycle Systems BV
Delfweg 12
2211 VM Noordwijkerhout
Tel.: +31 252 340611
Fax: +31 252 345030
EUROPE
Page 21

ADDRESSES
DualDrive · December 2002
111
UNITED KINGDOM
Fisher Outdoor Leisure Plc
Unit 8/9 Brick Knoll Park
Ashley Road Industrial Estate
Ashley Road
St. Albans, Hertfordshire
AL1 5UG
Tel.: +44 1727 798345
Fax: +44 8009 807129
World Headquarters
Chicago, Illinois U.S.A.
SRAM Corporation
1333 North Kingsbury, 4th floor
Chicago, Illinois 60622
Tel.: +1-312-664-8800
Fax: +1-312-664-8826
UNITED STATES
ÖSTERREICH
KTM Fahrrad GmbH
Harlochnerstrasse 13
5230 Mattighofen
Tel.: +43 7742 409 10
Fax: +43 7742 409 172
SCHWEIZ
Amsler & CO AG
Lindenstraße 16
8245 Feuerthalen
Tel.: +41 5 26 47 36 36
Fax: +41 5 26 47 36 66
SUOMI
J. Syväranta Oy
Nervanderinkatu 5E 47/PL 64
F-00101 Helsinki
Tel.: +358 9 434 2030
Fax: +358 9 493 890
SVERIGE
Vartex AB
Batterivägen 14
43232 Varberg
Tel.: +46 340 64 60 00
Fax: +46 340 61 11 90
Page 22

WORLD HEADQUARTERS
Chicago, Illinois U.S.A.
SRAM Corporation
1333 North Kingsbury, 4th floor
Chicago, Illinois 60622
phone: +1-312-664-8800
fax: +1-312-664-8826
EUROPEAN HEADQUARTERS
Amersfoort, The Netherlands
SRAM Europe
Basicweg 12-D
3821 BR Amersfoort
The Netherlands
phone: +31-33+-450-6060
fax: +31-33-457-0200
ASIAN HEADQUARTERS
Taichung, Taiwan
SRAM Taiwan
No. 1598-8 Chung Shan Road
Shen Kang Hsiang, Taichung
County 429
Taiwan R.O.C.
phone: +886-4-2561-3678
fax: +886-4-2561-3686
www.sram.com
 Loading...