

Page 1
Page 2

DOWNLOAD THE SQUATZ APP TO FOLLOW YOUR CUSTOM SQUATZ WORKOUT!
ALL SQUATZ PRODUCTS COME WITH AN ADVANCED WORKOUT PROGRAM!
Before you start training on your Stationary Cycling Bike Exerciser, please
read the instructions carefully. Be sure to keep the instructions for information,
in case of repair and for spare pare delivery.
SAFETY INSTRUCTION
• This Stationary Cycling Bike Exerciser is made for home use only and tested
up to a maximum body weight of 275 lbs.
• Follow the steps of the assembly instructions carefully.
• For assembly use only suitable tools and asks for assistance with assembly if
necessary.
• Check before the rst training and every 1-2 months, that all connecting
elements are tight tting and are in the correct condition. Replace defective
components immediately and/ or keep the equipment out of use until repair.
For repairs, use only original parts.
• In case of repair, please ask your dealer for advice.
• Avoid the use of aggressive detergents when cleaning the home exerciser.
• Ensure that training starts only after correct assembly and inspection of the
item.
• For all adjustable parts be aware of the maximum positions to which they can
be adjusted/tightened to.
• The Stationary Cycling Bike is designed for adults.
Please ensure that children use it only under the supervision of an adult.
• Ensure that those present are aware of possible hazards, e.g. movable parts
during training.
• Consult your physician before staring with any exercise program.
He or she can advise on the kind of training and which impact is suitable.
WARNING!
INCORRECT/EXCESSIVE TRAINING CAN CAUSE HEALTH INJURIES.
• Follow the advice for correct training as detailed in training instructions.
• The load/work level can be adjusted by turning the adjustment knob on the
handle bar stem.
www.squatz.com
2
Page 3
• The safety level of this equipment can be maintained only if it is check regularly
for all assembly procedure mentioned in the assembly instruction sheet.
• Please check regularly for the tightening knobs to notice any irregular wear.
1
2
11
12
13
14
3
4
5
6
15
7
16
8
9
10
17
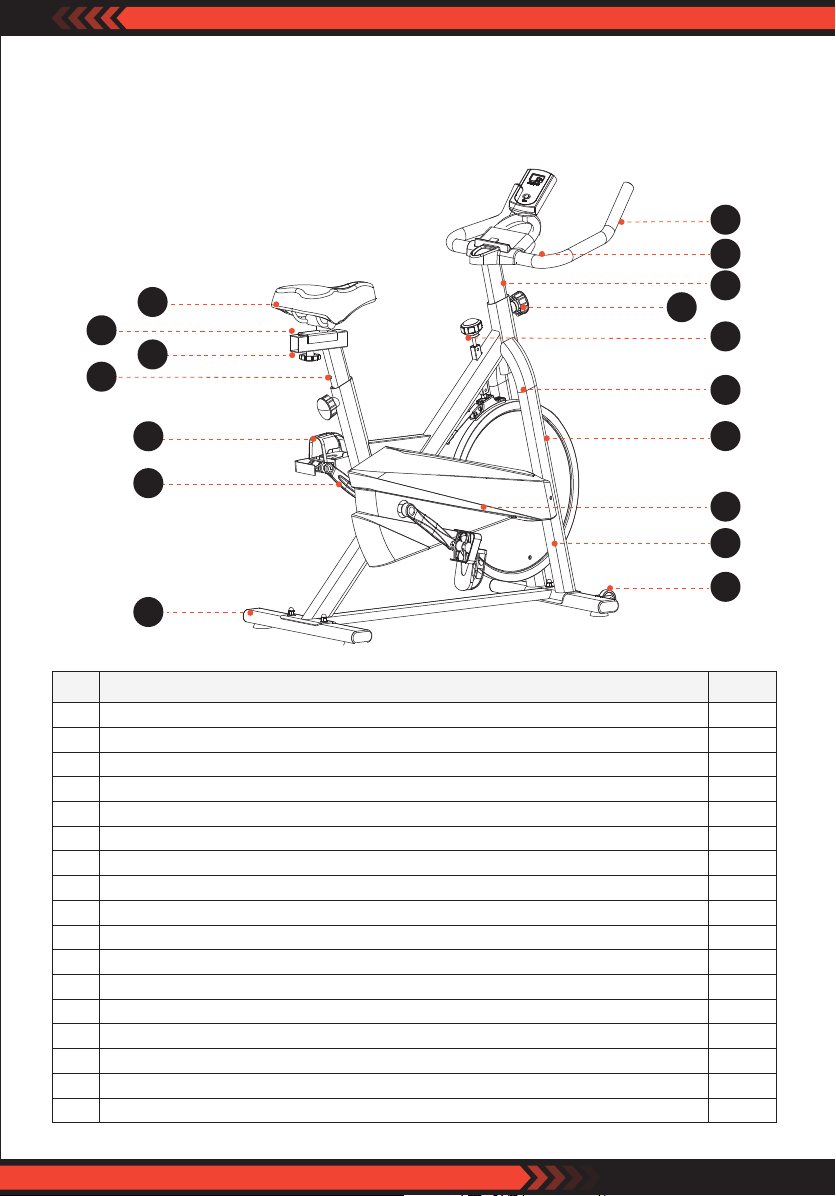
NO. DESCRIPTION Q’TY
1
Handle Bar
2
PAD Holder
3
Handle Bar Post
4
Adjusting Knob for Handle Bar Post
5
Brake Knob
6
Bottle Holder
Flyw
7
8
Crank (L+R)
9
Main Frame
10
Front Stabilizer
11
Saddle
Horizontal Seat Post
12
Adjusting Knob for Horizontal Seat Post
13
Seat Post
14
Pedal (L+R)
15
Chain Cover (L+R)
16
Rear Stab
17
1 PC
1 PC
1 PC
1 PC
1 PC
1 PC
heel Cover
1 PC
2 PC
1 PC
1 PC
ilizer
1 PC
1 PC
1 PC
1 PC
2 PC
2 PC
1 PC
www.squatz.com
3
Page 4
ASSEMBLY INSTRUCTION
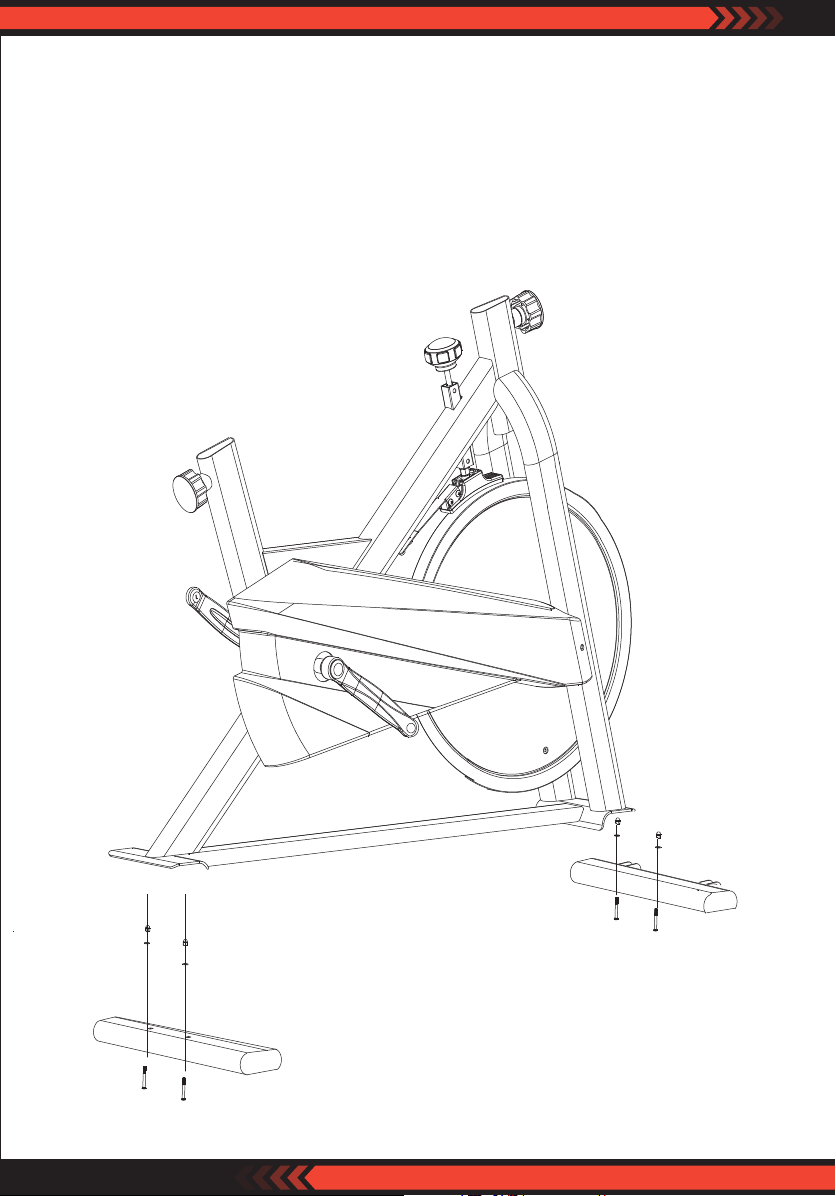
Step 1:
Fasten the front stabilizer (10) on the, main frame (9) with the carriage bolts
(M8x55, 2pcs), washers (8x16, 2pcs) and cap nut (M8, 2pcs); then fasten the rear
stabilizer (17) on the main frame (9) with the carriage bolts (M8x55, 2pcs),
washers (8x16, 2pcs) and cap nut (M8, 2pcs).
www.squatz.com
4
Page 5
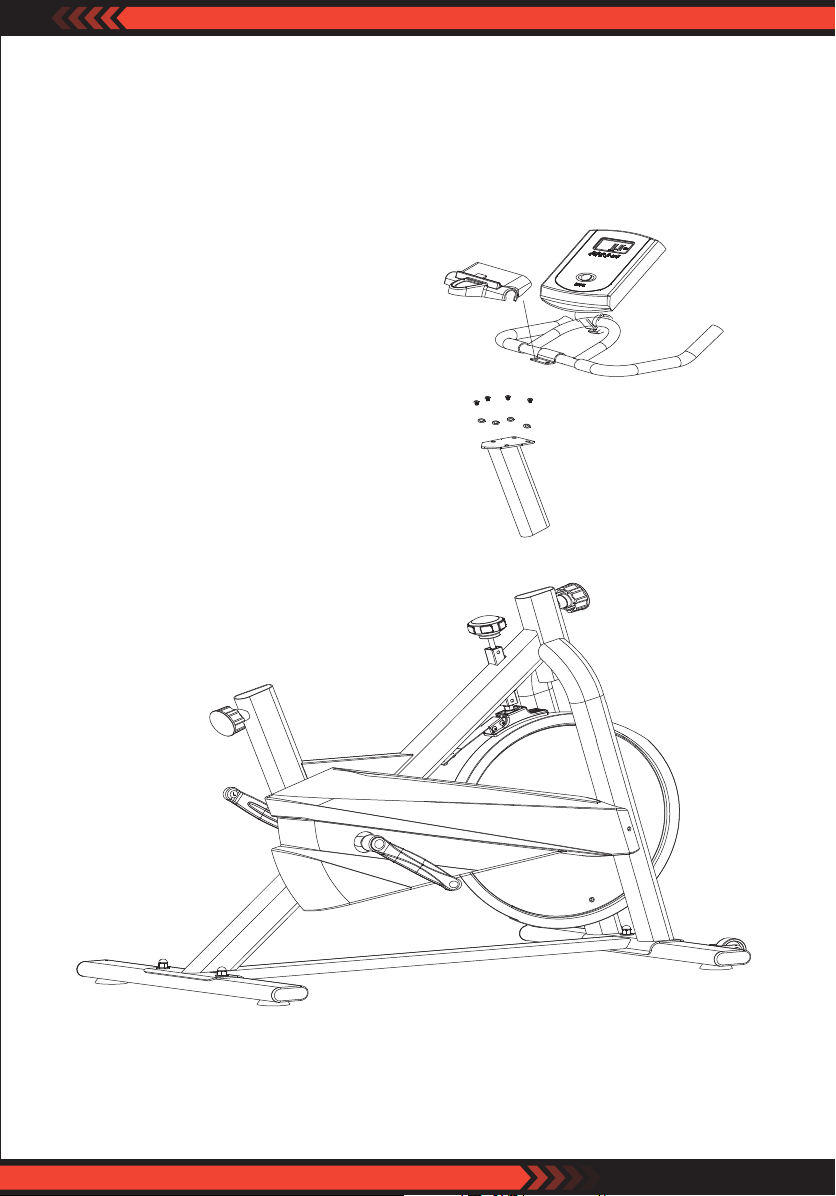
Step 2:
Attach the handlebar post (3) with the handlebar (1) using hex socket bolt
(M8x15, 4pcs), spring washer (M8, 4pcs). Then set the PAD holder in the correct
position and secure.
www.squatz.com
5
Page 6
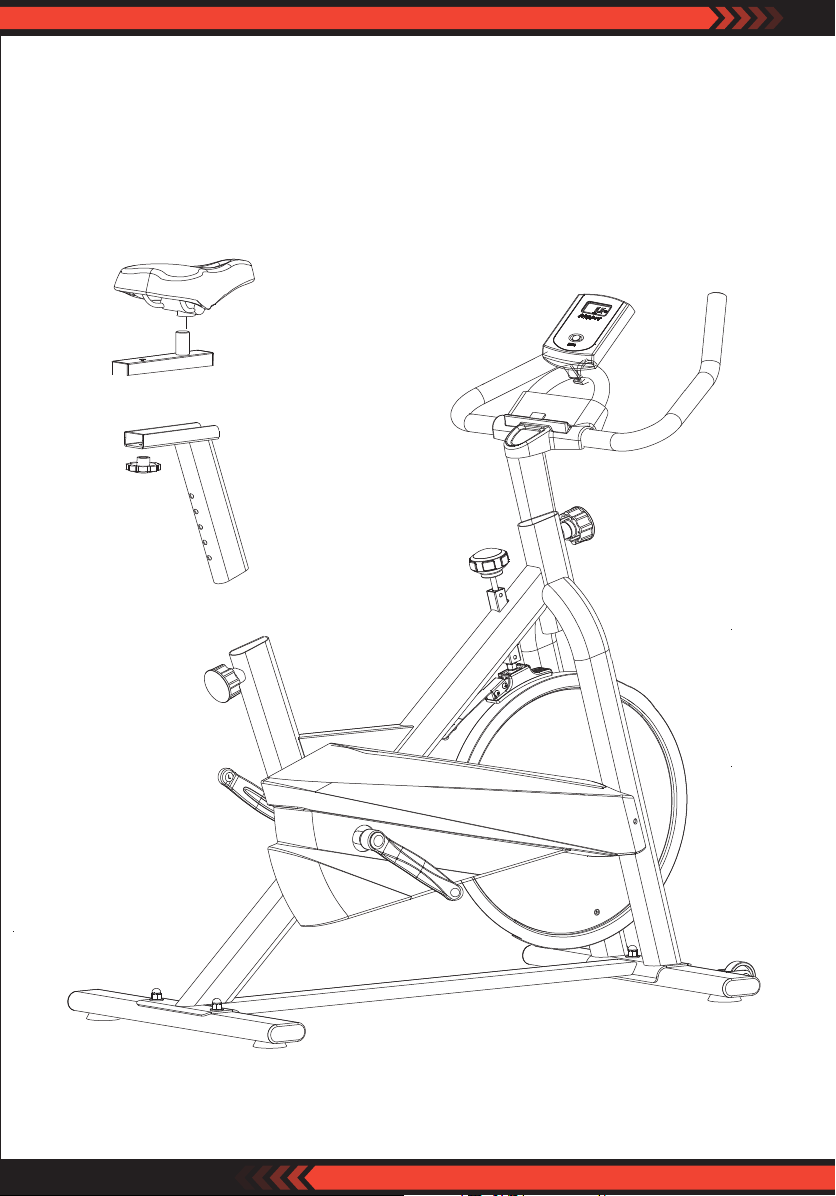
Step 3:
Fasten the seat post (14) on the main frame (9), adjust it to a suitable height
and lock. Install the saddle (11) to the horizontal seat post 12).
Slide the horizontal seat post (12) into the seat post (14) and x it using adjusting
knob (13).
www.squatz.com
6
Page 7
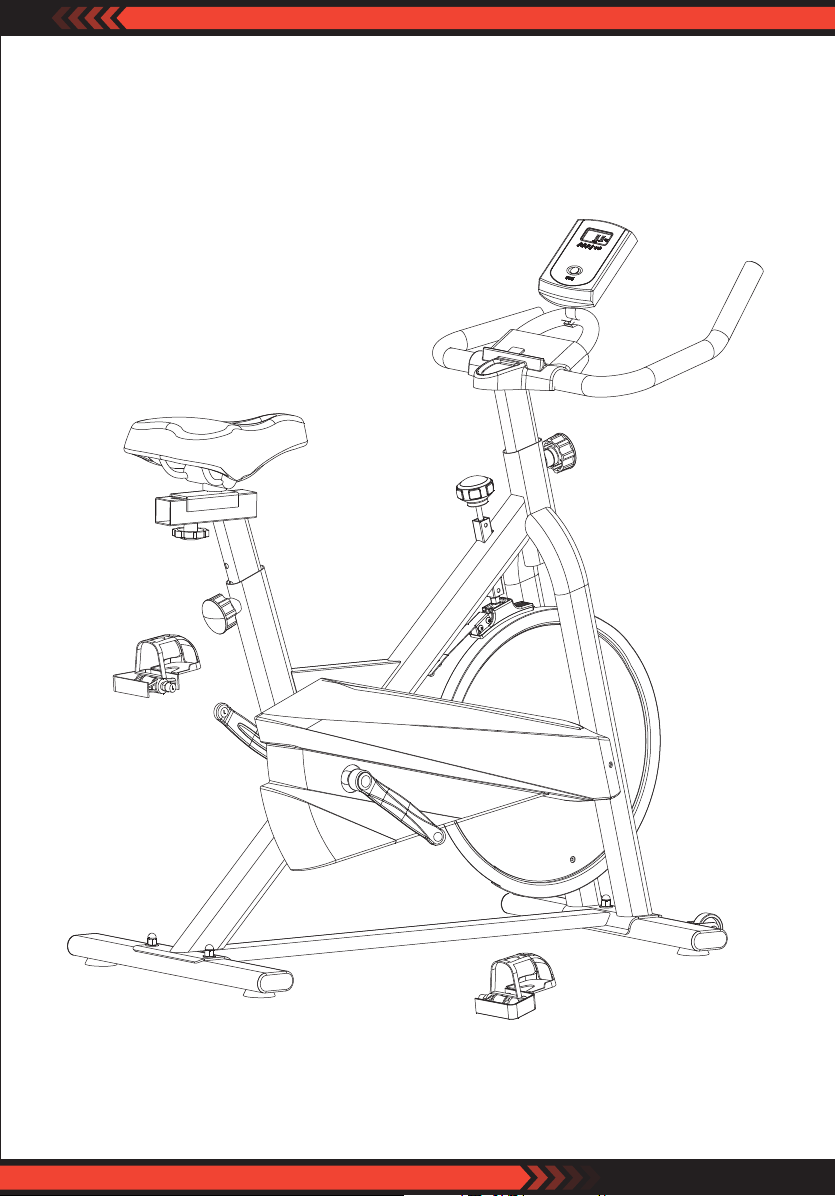
Step 4:
Attach the pedal (15) to the crank (8). Note that the Right pedal should be
threaded on clockwise and the left pedal anti-clockwise.
www.squatz.com
7
Page 8

Assembly accomplished
The most important: Make sure all the bolts and parts are securely xed
before you ride on the bike.
COMPUTER FUNCTION
A. BATTERY INSTALLATION
Load two 1.5V AA battery in the battery box on the back.
(after each battery replacement, all values will be "0")
B. FUNCTIONAL DESCRIPTION
1. Automatic Scanning (SCAN): Open the screen or press the button to enter
SCAN state, all the functions of the TIME--SPD--DIST--CAL--ODO will be
automatically displayed on the main screen.
2. Movement time (TIME): Cumulative calculation of movement time from
00:00--99:59, the user can press the button to select the time value display
state.
3. Movement Distance (DIST): Cumulative calculation movement from
0.0--999.9, the user can press the button to select the value of the distance
display.
4. Calories (CAL): Shows that the cumulative consumption of calories from
0.0--9999, the user can press the button to select the value of the state of the
display value.
www.squatz.com
8
Page 9

Note: This data is only a rough description and cannot be used for medical
treatment.
5. The speed of movement (SPEED): Shows the current speed of the athlete,
the value of 0.0--999.9 km / mile / hour.
6. Odometer (ODO): Shows total distance travelled by the rider.
The distance between motion and time is 0-9999 km.
7. Reset: Press and hold down the button for about 3 seconds, all the values
will return to "0", the function can be reset.
C. ATTENTION
1. Such as electronic display is not normal, the need to re install the battery to
try again, pay attention to the battery + and – ends before installing.
2. Battery Specication: 1 AA 5 1.5V battery
3. When the battery is scrapped, it must be removed from the electronic watch
and handled safely.
OPERATION
Adjust the seat. When the pedal is at the lowest position, your leg should be
almost, but not quite, straight. You shouldn’t have to strain or rock your hips to
pedal. Your knees shouldn’t feel crunched when they’re at the top of the pedal
stroke. With a recumbent bike, you adjust the seat forward and back, rather
than up and down, but the principles are the same.
Get to know the display panel. For instance, notice how many levels the bike
has. Also, pay attention to your cadence - that is, how many revolutions per
minute (rpm) you’re cycling.
Adjust the pedal straps so that your feet feel snug - but don’t let the straps
cut o your circulation. Riding a bike with the foot straps is much more
comfortable and ecient than pedalling without them.
Don’t pedal with just your toes. Otherwise you may bring on foot and calf
cramps. Instead, press from the ball of your foot and through your heel as you
pump downward on the pedal, and pull up with the top of your foot on the
upstroke.
www.squatz.com
9
Page 10

Don’t hunch over. Rounding your back is the way to develop back and neck
pain. Don’t get your upper body into the eort, either. Instead, keep your chest
up, shoulders back and down, ears in line with your shoulders.
Pedal slowly for the rst 5 to 10 minutes of your workout.
This is called a warm up and allows your body time to adapt to being in a state
of motion, decreasing your chance of injury.
Grasp the silver heart rate monitors to allow the machine to monitor your
heart rate. Most beginners will want to begin working at about 70 percent of
their maximum heart rate. As your tness improves, you will be able to work
out at a higher percentage of your maximum heart rate.
www.squatz.com
10
Page 11

Features:
• Handle Bar with Thick Foam Coat
• High Rebound and Air Permeable Cushion
• Integrate Magnet and Wool Pad for Quiet Riding
• Heavy-Duty Steel Frame and 30 lbs. Flywheel
• Four-way Adjustable Seat and Handlebar
• Holds up to 275 lbs. Weight and Provide Stability while Cycling
• Bluetooth Enabled Spin Bike makes Indoor Cycling Fun
• Equipped with Belt Drive
• Auto Shut-O after 50 Seconds of Use
• Smooth & Quiet Operation and Less Maintenance
• Adjust Lever Switch to Get 8-level Resistance
• Exercise Console Indicates the Marked Levels of Resistance
• The LCD Monitor Tracks Time, Speed, Distance and Calories Burned.
• Phone/Tablet Holder Allows Entertainments During Workouts
What's in the Box:
• (1) Handle Bar
• (1) PAD Holder
• (1) Handle Bar Post
• (1) Adjusting Knob
for Handle Bar Post
• (1) Brake Knob
• (1) Bottle Holder
• (1) Flywheel Cover
• (2) Crank (L+R)
• (1) Main Frame
• (1) Front Stabilizer
• (1) Saddle
• (1) Adjusting Knob
for Horizontal Seat Post
• (1) Seat Post
• (2) Pedal (L+R)
• (2) Chain Cover (L+R)
• (1) Rear Stabilizer
• (2) Carriage Bolts, M8x55
• (2) Washers, 8x16
• (2) Cap Nut, M8
• (4) Hex Socket Bolt, M8x15
• (4) Spring Washer, M8
• (1) Wrench
• (1) Horizontal Seat Post
Technical Specs:
• Construction Material: Steel
• Weight Capacity: 330 lbs.
• Expand Size: 4.33", 1.89", 4.25" -inches
• Steel tube thickness: 0.047" - inches(1.2mm)
• Fly Wheel Capacity: 13.2 lbs.
• Packing Size: 3.78", 3.07", 0.83" -inches
• Product Dimensions (L x W x H): 4.33" x 1.89" x 4.25" -inches
www.squatz.com
11
Page 12

 Loading...