

Page 1

Page 2
2
Features:
• Automated Screen System
• 661 Lbs. Max Testable Punching Strength
• Works when Unit is Punch
• Perpendicular Angle Punching Unit
• Unit Contain Lithium Battery
• Comes with other Devices
• 0.79’’ Thickness Built-in Foam
• Oers Better Protection to the Hands while Punching
• Suitable to use on smooth and secured surfaces
What's in the Box:
• Boxing Mat
• (2) Adhesive Straps
• (6) Plastic Nails
• Power Cord
Technical Specs:
• Construction Material: Pearl Cotton, Vegan Leather, Composite Structural Board
• Charge Capacity: 5V 1A
• Weight Capacity: 661 Lbs.
• Product Dimensions (L x W x H): 15.75" x 15.75" x 2.56" -inches
This product comes with a complete
Digital Training Program!
Download the SQUATZ APP to start
Training!
www.SQUATZ.com
Page 3

3
Instructions
1. Portable design boxing Mat with accurate Digital Counter.
2. Max Testable Punching strength is 661LBS. 0nIy works when you punch the unit.
3. Please punch and use the device employing proper form.
Improper or unintended use of this product may result in damaging or
breaking this device.
4. This device contains a lithium Battery. For your safety, use the device and the
battery as intended and instructed by the factory.
5. lt is recommended that this product be used with appropriate gear and
boxing gloves.
6. InstaII the device on a secure, stable, and smooth surface or wall.
You can secure the mat utilizing the provided 6 plastic fasteners.
7. Store in a cool and dry place.
8. Clean unit by wiping surface with a damp cloth.
This product is not waterproof or machine washable.
9. Aim and punch the padded surface of the mat - do not punch the screen to
avoid product damage or injury.
10. Press the power button to turn the screen/device ON
OR punch the device with a force equal to 2 Ibs of force.
11. The screen light will deactivate after one minute of idleness.
The Mat will turn o after 3 minutes of inactivity.
www.SQUATZ.com
Page 4
4
ASSEMBLY INSTRUCTIONS
The Boxing Mat must be assembled by adults to make sure it's assembled in the
correct manner before using.
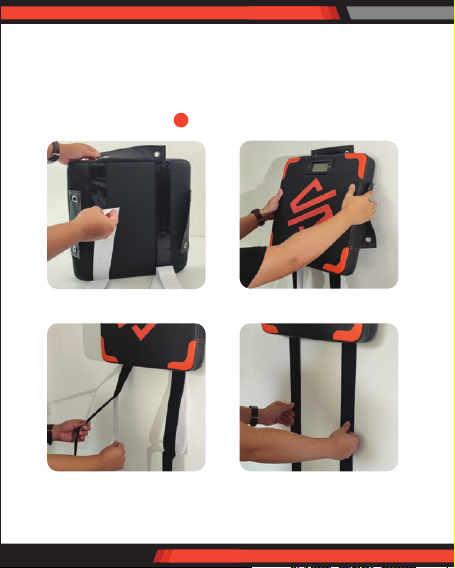
INSTALLATION METHOD
1. Tear o the upper adhesive 2. Secure the Boxing mat in place
3. Tear o the bottom adhesive 4. Smooth down the adhesive
Note: The height of the screen from the ground shouId be at your eye-level.
www.SQUATZ.com
1
Page 5
5
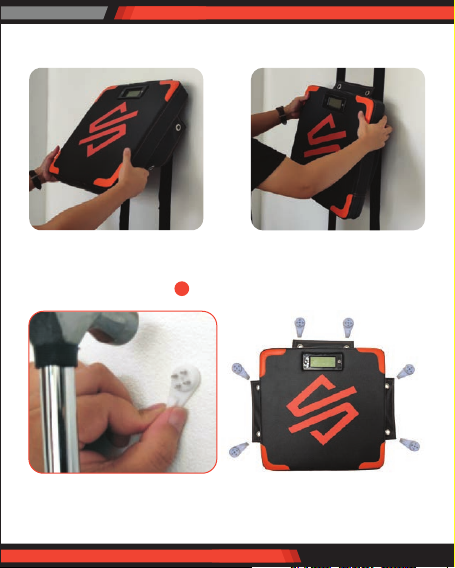
How to adjust the height
1. Tear o the Boxing mat 2. Paste it to a suitable height
INSTALLATION METHOD
1. Fasten the plastic nails to the wall 2. Refer to the picture above and
2
x all nails
www.SQUATZ.com
Page 6
6
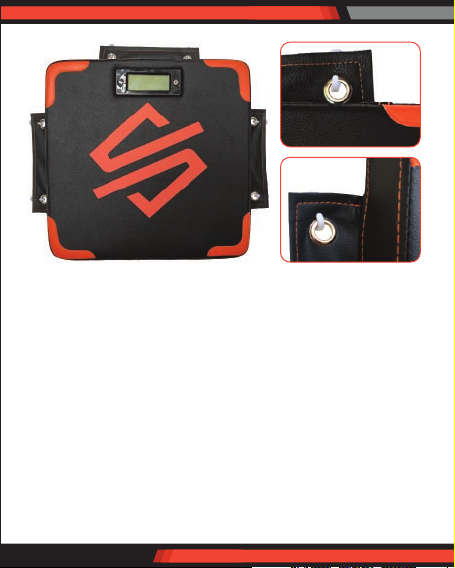
3. Hang the Boxing mat on the nails
LCD SCREEN FUNCTIONS INSTRUNCTIONS
Press the One time SET button:
When the unit is 0, press the SET BUTTON one time to turn ON the screen.
When the unit turns 0n, press the SET BUTTON one time to switch units from KG
to LB.
Press the SET BUTTON twice to set unit.
Press the SET BUTTON twice to turn on or o the screen’s background light.
Press the SET BUTTON three times to change training modes.
Hold down the SET BUTTON for three seconds or longer to:
Reset the counter to ZERO.
Turn O the unit - total power down.
www.SQUATZ.com
Page 7
7
Mode Instructions
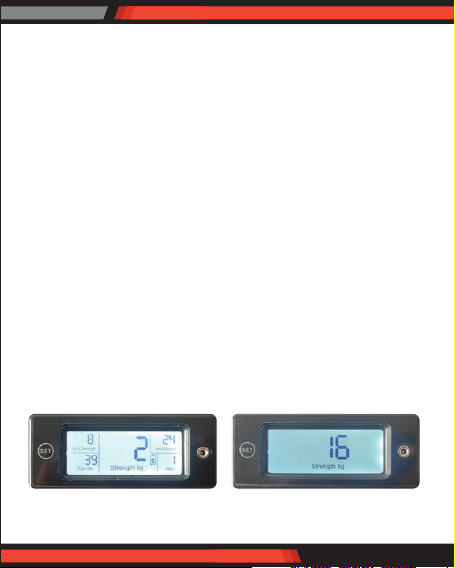
Unit have two Modes:
Training Mode and Strike Mode
Training Mode:
Training Mode is intended for daily practice use.
Strike Mode:
Strike Mode is for Game and Competitions use.
Mode Switch:
Press Three times SET button to switch Training Mode and Strike Mode.
Notes:
In Strike Mode, unit will only record and display the max punching strength after
you punch. It will display 1 second later after you punch. Wait for the screen to
display and log your punch before using the MAT again.
Training Mode Strike Mode
www.SQUATZ.com
Page 8
8
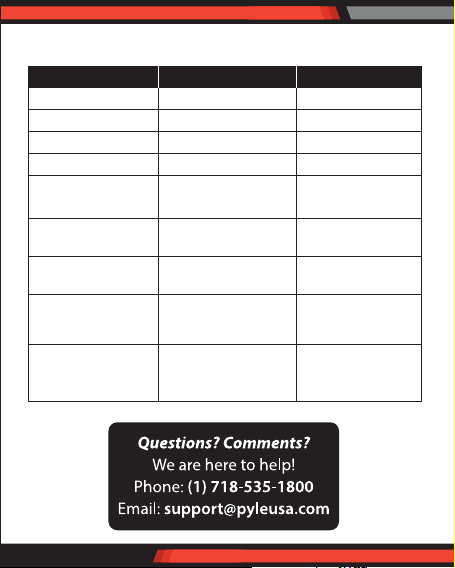
TROUBLESHOOTING
PROBLEMS REAS0NS SOLUTIONS
1. Screen not ON Unit not turned ON
2. Screen shows LO Lack of power
3. Screen ashing Lack of power
4. No data after punch Punch strength not enough
5. “ mark shows on screen
6. Inner punch sound
from the unit
7. Wrong data when you
test on oor
8. Data no changes Need to restart
9. Wrong data after your
get the product
www.SQUATZ.com
Punching strength
beyond limitation
Inner tester works Normal
Wrong operations Fix the unit on the wall
Wrong data caused
during transportation
Turn ON the unit
Charge the unit
Charge the unit
Punch harder
Redo the test
Turn o the unit and
wait for 3 mins.
then restart
Press and hold SET
button to clear the
wrong data
 Loading...