


Pyramid Sequencer
User Guide
Squarp Instruments

Manual based on PyraOS version V 1.0
Transcribed from Squarp Instrument’s original HTML to LATEX by Juan Pumarino.
Edited and revised by Ryan Gallagher (ryanpg).
This document was generated on November 29, 2016.

Contents
1 Quickstart 1
Pyramid Workflow . . . . . . . . . . . . . . . . 1
Wire Up . . . . . . . . . . . . . . . . . . . 1
Sequencer workflow . . . . . . . . . . . . 1
Tracks vs Sequences . . . . . . . . . . . . 1
Quick tour of the four Pyramid modes . . . 2
Screen . . . . . . . . . . . . . . . . . . . . 2
Basics . . . . . . . . . . . . . . . . . . . . . . . 4
Selecting the current track . . . . . . . . . 4
Capturing a performance . . . . . . . . . . 4
Using the step sequencer . . . . . . . . . 4
Muting and unmuting tracks . . . . . . . . 5
Selecting the current sequence . . . . . . 5
Creating and editing sequences . . . . . . 5
Performing sequences . . . . . . . . . . . 5
Tempo . . . . . . . . . . . . . . . . . . . . 6
Undo . . . . . . . . . . . . . . . . . . . . . 6
Saving and loading a project . . . . . . . . 6
Effect manager . . . . . . . . . . . . . . . 6
Assign a control . . . . . . . . . . . . . . . 7
Display features . . . . . . . . . . . . . . . 7
Quick track settings . . . . . . . . . . . . . 7
Play/Pause/Stop . . . . . . . . . . . . . . 8
Metronome . . . . . . . . . . . . . . . . . 8
Settings menu . . . . . . . . . . . . . . . . 8
Inputs/Outputs . . . . . . . . . . . . . . . . . . 8
MIDI connectivity . . . . . . . . . . . . . . 8
USB connectivity . . . . . . . . . . . . . . 9
CV/Gate connectivity . . . . . . . . . . . . 9
DIN Sync connectivity . . . . . . . . . . . 10
Pedal foot-switch . . . . . . . . . . . . . . 10
Connectivity examples . . . . . . . . . . . . . . 10
Pyramid on stage . . . . . . . . . . . . . . 10
Pyramid sequencing virtual instruments . 10
Pyramid on the studio table . . . . . . . . 11
2 Live Mode 13
Screen . . . . . . . . . . . . . . . . . . . . . . . 13
Pads . . . . . . . . . . . . . . . . . . . . . . . . 13
Play with the keypad . . . . . . . . . . . . . . . 13
Record your performance . . . . . . . . . . . . 13
Countdown . . . . . . . . . . . . . . . . . 13
Hard record . . . . . . . . . . . . . . . . . 13
Live looper . . . . . . . . . . . . . . . . . 14
Change smartpad type . . . . . . . . . . . . . . 14
Chord smartpads . . . . . . . . . . . . . . . . . 14
Scale smartpads . . . . . . . . . . . . . . . . . 14
Repeat smartpads . . . . . . . . . . . . . . . . 15
Hold . . . . . . . . . . . . . . . . . . . . . . . . 15
Relatch . . . . . . . . . . . . . . . . . . . . . . 15
Copy/Paste/Delete . . . . . . . . . . . . . . . . 15
3 Step Mode 17
Screen . . . . . . . . . . . . . . . . . . . . . . . 17
Pads . . . . . . . . . . . . . . . . . . . . . . . . 17
Change Stepmode . . . . . . . . . . . . . . . . 17
Note Stepmode . . . . . . . . . . . . . . . . . . 17
Add notes . . . . . . . . . . . . . . . . . . 17
Poly / Mono editing . . . . . . . . . . . . . 18
Note parameters: velocity, width, offset . . 18
Quick step edits: velocity, width, offset,
transpose, move horizontally . . . 19
Note learn with a keyboard . . . . . . . . 19
Piano roll . . . . . . . . . . . . . . . . . . 19
Chord Stepmode . . . . . . . . . . . . . . . . . 20
Add chords . . . . . . . . . . . . . . . . . 20
Quick step edits: velocity, width, offset,
transpose, move horizontally . . . 20
Piano roll . . . . . . . . . . . . . . . . . . 20
Euclid Stepmode . . . . . . . . . . . . . . . . . 21
CC messages Stepmode . . . . . . . . . . . . 21
Create step automation . . . . . . . . . . 21
Draw automation . . . . . . . . . . . . . . 22
Step-lock automation . . . . . . . . . . . . 22
Effects Stepmode . . . . . . . . . . . . . . . . . 23
Create step automation . . . . . . . . . . 23
Draw an automation . . . . . . . . . . . . 23
Step-lock automation . . . . . . . . . . . . 23
Track player: pages, zoom and length . . . . . 24
Rotate . . . . . . . . . . . . . . . . . . . . . . . 24
Copy/Paste . . . . . . . . . . . . . . . . . . . . 24
i

Delete . . . . . . . . . . . . . . . . . . . . . . . 24
Encoder step edit . . . . . . . . . . . . . . . . . 24
Filter . . . . . . . . . . . . . . . . . . . . . . . . 25
Player tracking . . . . . . . . . . . . . . . . . . 25
4 Track Mode 27
Screen . . . . . . . . . . . . . . . . . . . . . . . 27
Pads . . . . . . . . . . . . . . . . . . . . . . . . 27
Mute/unmute tracks on the fly . . . . . . . . . . 27
Mute/unmute in sync . . . . . . . . . . . . 28
Mute/unmute tracks to create sequences . . . . 28
Save mute states OFF . . . . . . . . . . . 28
Solo a track . . . . . . . . . . . . . . . . . . . . 28
MIDI Channel . . . . . . . . . . . . . . . . . . . 28
Zoom . . . . . . . . . . . . . . . . . . . . . . . 29
Length . . . . . . . . . . . . . . . . . . . . . . . 29
Copy/Paste/Delete a track . . . . . . . . . . . . 29
Time signature and polyrhythm . . . . . . . . . 29
Polyrhythms signature (x:4) (default) . . . 30
Polymeters signature (x/4) . . . . . . . . . 30
Track length fraction and polymetry . . . . . . . 31
Irrational rhythms (advanced users) . . . . . . . 31
DISP track view . . . . . . . . . . . . . . . . . . 31
Microstep track . . . . . . . . . . . . . . . . . . 32
5 Seq Mode 33
Screen . . . . . . . . . . . . . . . . . . . . . . . 33
Pads . . . . . . . . . . . . . . . . . . . . . . . . 33
Create and edit sequences . . . . . . . . . . . 33
“PERFORM” project . . . . . . . . . . . . . . . 34
PERFORM delay selection . . . . . . . . 34
“PLAY” project . . . . . . . . . . . . . . . . . . 34
“LOOP” project . . . . . . . . . . . . . . . . . . 35
Note about track lengths concurrence & se-
quences . . . . . . . . . . . . . . . . . . . 35
Track run modes: FREE, RELATCH & TRIG . . 35
RELATCH run mode . . . . . . . . . . . . 35
TRIG run mode . . . . . . . . . . . . . . . 36
FREE, RELATCH & TRIG mixed . . . . . 36
Copy/Paste/Delete a sequence . . . . . . . . . 36
6 Effect Manager 37
Effect manager principles . . . . . . . . . . . . 37
Adding effects to a track . . . . . . . . . . . . . 37
Other tools . . . . . . . . . . . . . . . . . . . . 38
Effect list . . . . . . . . . . . . . . . . . . . . . . 39
Quantizer / humanizer . . . . . . . . . . . 39
Arpeggiator . . . . . . . . . . . . . . . . . 39
Harmonizer . . . . . . . . . . . . . . . . . 39
Swing . . . . . . . . . . . . . . . . . . . . 40
Randomizer . . . . . . . . . . . . . . . . . 40
Delay . . . . . . . . . . . . . . . . . . . . 40
Equalizer . . . . . . . . . . . . . . . . . . 41
Scale . . . . . . . . . . . . . . . . . . . . 41
Note to CC . . . . . . . . . . . . . . . . . 41
BPM . . . . . . . . . . . . . . . . . . . . . 42
Chance . . . . . . . . . . . . . . . . . . . 42
LFO . . . . . . . . . . . . . . . . . . . . . 42
7 Assign 45
Assign principles . . . . . . . . . . . . . . . . . 45
Assign a CC message . . . . . . . . . . . . . . 45
How to assign an effect parameter . . . . . . . 46
Automation recording and overdub . . . . . . . 47
Assign touchpad to smartpads . . . . . . . . . 48
Note about analog input voltage assignment . . 49
8 Save/Load 51
Save/load principles . . . . . . . . . . . . . . . 51
Save . . . . . . . . . . . . . . . . . . . . . . . . 51
Save As . . . . . . . . . . . . . . . . . . . . . . 51
Load . . . . . . . . . . . . . . . . . . . . . . . . 51
New . . . . . . . . . . . . . . . . . . . . . . . . 51
Project files . . . . . . . . . . . . . . . . . . . . 51
Import and export files . . . . . . . . . . . . . . 52
9 Settings 53
Settings menu . . . . . . . . . . . . . . . . . . 53
MIDI in . . . . . . . . . . . . . . . . . . . . . . . 53
MIDI out . . . . . . . . . . . . . . . . . . . . . . 53
CV/pedal . . . . . . . . . . . . . . . . . . . . . 54
Misc . . . . . . . . . . . . . . . . . . . . . . . . 54
10 Shortcuts 57
In any mode . . . . . . . . . . . . . . . . . . . . 57
Live mode . . . . . . . . . . . . . . . . . . . . . 57
ii | Contents

Step mode . . . . . . . . . . . . . . . . . . . . 57
Track mode . . . . . . . . . . . . . . . . . . . . 57
FX manager mode . . . . . . . . . . . . . . . . 58
Assign mode . . . . . . . . . . . . . . . . . . . 58
Save/load mode . . . . . . . . . . . . . . . . . 58
Contents | iii


1 Quickstart
Pyramid is an instant source of inspiration to start and finish your song. You will never run out of ideas!
TRACKS VS SEQUENCES
Pyramid Workflow
WIRE UP
Connect the Pyramid to the supplied mini USB power
supply, or connect the Pyramid to a computer with a standard mini USB cable, and press the on/off button.
SEQUENCER WORKFLOW
Pyramid provides 64 sequencer tracks. A track is a
loop that contains polyphonic or monophonic notes, automation and effects; plays repeatedly, and controls instruments connected to MIDI A, MIDI B, USB MIDI, or CV
outputs. The Pyramid workflow is designed around muting and unmuting tracks to build sequences and songs.
A Pyramid project can include up to 64 tracks. Tracks are
organized into 4 banks: A, B, C, D. Each bank contains
a group of 16 tracks. Thus all 64 tracks and four banks
are organized from TR01A to TR16A (track 1 through 16,
bank A) up to TR01D to TR16D (track 1 through 16, bank
D).
Each track can be configured according to your needs.
A track can be:
• a standard pattern (e.g. a 4 bar track)
• a linear clip (e.g. a 384 bar track)
• an euclidean pattern
• a polymetric pattern (e.g. a 1+1/4 bar track)
• a polyrhythmic pattern (e.g. a 8 bar track with 7/8 time
signature)
• a micro track with a high zoom resolution (e.g. a 1/4
bar track with 1600% zoom)
A Pyramid project can be composed of up to 32 sequences. A sequence defines the mute states of each
of the 64 available tracks. In each sequence, you choose
which track is unmmuted (active) or muted (inactive) in
order to build your song or arrange your set:
Pyramid also provides powerful creative tools:
• smart chord harmonizer
• scale generator
• beat repeat
• hold and relatch
• groundbreaking step sequencer (unlimited number of
notes and CC messages per step, per-step FX parameter locks)
• euclidean sequence generator
• polyrhythmic & polymetric sequences
• real-time MIDI effects
You can choose to play 64 tracks at the same time in
a single sequence, or mute/unmute any of the 64 tracks
across 16 sequences: it’s a great and versatile way to
create songs very quickly.
1

In the example below SE01, (sequence 01) has only
TR02 (track 02) unmuted. In SE02 (sequence 02),
TR02A and TR11A (tracks 02 and 11) are unmuted. In
SE03 (sequence 03), tracks 01, 06, and 14 are unmuted:
or scaled piano), an attached MIDI controller, a Control
Voltage instrument, or your computer.
Individual tracks are shared between sequences.
Changes to TR02A will apply to all sequences where
TR02A is active (SE01 and SE02 in the example above).
When the sequence changes, if a previously active track
is still active in the next sequence, it will not restart from
the beginning like a classic sequencer. It will continue
to play & loop and therefore keep its shift with the other
tracks, to keep the polymetry running (see ”Note about
track lengths concurrence & sequences” section). If you
want to restart your track from the beggining like a classic
sequencer, configure your track in ”relatch mode”.
Moreover, if you want to add some MIDI effects on
TR02A, you can assign a control (e.g. an encoder) for
this effect, and affect the sound of the TR02A in real-time,
no matter which sequence you are in.
Press
notes and chords using the 16 pads of the
&
CHORD
offset of a single note or a group of notes. Edit your
live recording with surgical precision. Switch to
stepmode to auto-fill steps. Switch to
stepmode to create or edit MIDI CC automation. Switch
to
EFFECTS
ter locks. Each step (and even microstep) can contain an
unlimited number of notes, CC and FX automation!
Press
two rows of 16 pads . Change the current BANK
(A/B/C/D) with<and>. Set up the length, time signature, zoom, and MIDI channel of the current track. Build
a sequence.
Press
of all 64 tracks) on the fly, or program a chain of sequences to create a complete structured song.
: fill steps of the currently selected track with
STEP
stepmodes. Configure velocity, width, and
CC MESSAGES
stepmode to create or edit effect parame-
TRACK
SEQ
: mute/unmute the tracks using the bottom
: launch your sequences (stored mute states
NOTE
EUCLID
QUICK TOUR OF THE FOUR PYRAMID MODES
Pyramid is a dynamic sequencer that allows you to interact intuitively with tracks and sequences. All modes are
always accessible. Launch sequences in
mute/unmute tracks in
and even add notes and CC messages in
STEP
functional rotary encoders to control MIDI effect parameters in real-time. Encoder assignments are independent
of the sequence you are viewing or the mode you are
working in.
Press
rent track using the built-in keypads, smartpads (8 pads
that can be configured as chord generator, note repeat
2 | Quickstart
modes. You can assign one of the 5 multi-
: record notes and CC automation to the cur-
LIVE
TRACK
mode; play with effects,
SEQ
LIVE
mode;
and
SCREEN
In each of the four modes, the following data is displayed:

stead continue to play & loop thus preserving polymetry
(see “Note about track lengths concurrence & sequences”
section, p. 35). If you want your track to restart from
the beginning as with a classic sequencer, configure your
track to play in “relatch mode.”
Mode:
STEP TRACK
LIVE
SEQ
Project name: name of your saved song.
MIDI in flashes if a MIDI message is received; MIDI out
A, MIDI out B and USB out flash when a MIDI message
is sent.
Tempo: BPM of your project.
Current track: track number and bank (A, B, C, D) in Live
and Step Modes.
Track out indicates which output is transmitting sequence
information (MIDI A, MIDI B, USB, CV), and which MIDI
channel is configured. Multiple outputs can be selected.
Current sequence: sequence number and the tracks you
are editing in TRACK mode. Can also display the next
sequence to be played in the chain.
Mode zone: highlights the main parameters of each
mode, which generally can be edited via the clickable
data encoder .
Player zone: track player (a representation of the current
track, the level of zoom, the track length), the player position, and the page you are viewing in Live, Step and Track
modes:
The example above shows a 12 and 1/4 bar long track (12 bars
+ 1 beat). The four outlined squares represent the first page of
the track. The arrow icon indicates the player is currently at the
twelfth bar.
In Seq Mode the Player zone displays the sequence
chain:
In the example above, 6 sequences are chained and SE06
(highlighted) will play 2 bars.
When chaining sequences, any active (unmuted) track
that is active in the following sequence will not restart
from the beginning like a classic sequencer but will in-
Quickstart | 3

Basics
CAPTURING A PERFORMANCE
SELECTING THE CURRENT TRACK
As described in ”TRACKS VS SEQUENCES” a Pyramid
project can include up to 64 tracks:
• 16 tracks in bank A
• 16 tracks in bank B
• 16 tracks in bank C
• 16 tracks in bank D
In any mode hold
pads to select the track of the current BANK you
want to work with (for example TR03A).
To change the current track BANK (A/B/C/D), hold
TRACK
and press<or>.
TRACK
while pressing one of the 16
When in
rently playing track by pressing press rec . If the track
is paused, press rec to ”arm” the track, then press
to begin a count-off before recording begins.
You can play and record notes with the built-in keyboard
and smartpads . Use the 5 assignable encoders and the assignable touchpad to record
CC and FX automation.
You can also use an external MIDI controller to record
notes and automation. It’s even possible to record CV
events thanks to the CV/gate input!
Pyramid allows unlimited polyphony and CC automation
data per track. Quantize is not active by default, so you
will capture the “human feel” of your performance.
Enter
STEP
roll and recorded notes:
mode, capture a performance on a cur-
LIVE
mode then press
to view the piano
DISP
The current track number and its output channel are displayed on the screen:
Change the MIDI output channel of the selected track by
pressing
transmit on the same MIDI channel.
Note: A track is created as soon as you edit a note or a
CC message in
TRACK
+
MIDI channel
or
LIVE
STEP
. Multiple tracks can
mode.
Of course, it’s possible to add, remove, edit notes in a
flash in STEP mode with the step-by-step sequencer.
USING THE STEP SEQUENCER
Add, remove, and edit notes in the current track in
mode with the step sequencer.
Enter
STEP
• to select the note (e.g. C4), rotate
• to add a note, press one of the 16 steps
• to remove the note, press this step again
• you can also hold one of the 16 steps and rotate to
set the note.
Pyramid is fully polyphonic, so you can add as many
notes as you want on each step. You can set the
velocity
zoom
= a quarter note, but you can zoom in so that 1 step =
a 1/64 note). Finally, you can set the
time signature
short or very long patterns!
mode:
, the
to set the resolution of steps (by default 1 step
, and the
width
of the track, so you can work on very
offset
of a note. You can
length
STEP
and the
4 | Quickstart

Press
the notes entered in
to view the piano roll of the current track and
DISP
LIVE
and
STEP
mode.
Cycle through stepmodes by holding
. There are 5 stepmodes:
• NOTE (add, delete, edit notes)
• CHORD (add, delete, edit chords)
• EUCLID (generate algorithmic patterns)
• CC MESSAGES (add, delete, edit CC automation)
• EFFECTS (add, delete, edit FX automation)
Multiple stepmodes can be used on a single track (except
EUCLID) to add notes, chords, CC automation, and FX
automation. Of course, you can also create tracks that
only contain note or CC information.
STEP
and rotating
MUTING AND UNMUTING TRACKS
In any mode, hold
SE01 to SE16) by pressing the corresponding pad
. If you select an empty sequence a new sequence
will be created and the track mute states of the last sequence will be applied. To display sequences from SE17
to SE32, hold
To launch a new sequence after the end of the currently
playing sequence, enter
16 pads . The newly selected sequence will begin
when the current one ends. Holding
one of the 16 pads will start the newly selected sequence without waiting for the end of the currently playing
sequence (instant jump).
SEQ
SEQ
and press>.
and select a sequence (from
SEQ
mode and press one of the
SEQ
while pressing
CREATING AND EDITING SEQUENCES
In
TRACK
you want to create or edit by pressing one of the 16 pads
and press>. The current sequence number is displayed
on the screen:
mode, hold
. To display sequences 17 through 32, hold
SEQ
and select the sequence
SEQ
Enter
TRACK
Use the 16 pads to mute/unmute any tracks you
have created, from TR01A to TR16D.
You can play up to 64 tracks simultaneously! Muting and
unmuting tracks is a great and intuitive way to perform
your project spontaneously.
Press
sion:
Note: Changes in mute/unmute states sync differently depending on the PERFORM type selected in
DISPinTRACK
mode. Press
mode to display track progres-
to select a track bank.
< >
SEQ
mode.
SELECTING THE CURRENT SEQUENCE
The current sequence number is displayed on the screen:
Then mute/unmute your active tracks to build the sequence. A sequence is automatically created as soon
as you change the mute state of a track.
PERFORMING SEQUENCES
Once you have created several sequences, enter
mode to play them. Make sure PERFORM is selected in
order to perform sequences on the fly. Sequences will
always remain in sync:
You can select how Pyramid transitions between sequences: instant, 1 beat, 1 bar, 2 bars, which gives you
deep control over performing with sequences.
Press any sequence number to launch it. Pyramid
waits until the current sequence ends (the end of the bar,
if “1 BAR” selected) before launching the next sequence.
SEQ
Quickstart | 5

The current sequence will play in a loop until you press
another sequence number.
TEMPO
EFFECT MANAGER
Press
Chain up to 4 real time MIDI MIDI effects per track:
to access the EFFECT MANAGER screen.
FX
Tap
to set the tempo, or hold
BPM
BPM
while turning the data encoder . To fine tune BPM to decimal
values, press while rotating. Tempo resolution ranges
from 10.0 BPM to 999.9 BPM.
TIP
Hold
2ND+BPM
and turn the data knob . The
tempo change will be applied only when you release
.
2ND
TIP
Hold
2ND+BPM
and slide the touchpad X axis to
temporarily shift the tempo up or down. Very handy for
manually syncing Pyramid to an external sound source
(for example a turntable).
TIP
Hold
and press<or>to double or divide the
2ND
BPM in a flash.
By default Pyramid automatically synchronizes BPM to any instrument providing a sync signal at the MIDI input.
UNDO
In any mode, press
for example notes or automation recorded in Live mode.
Another press of
undo
Undo will work on the following actions:
• REC ON in Live mode,
• PLAY ON,
• stepmode change,
• new track selection,
• step copy,
• track delete.
2ND
+
to cancel the last edit,
undo
will redo the last edit.
SAVING AND LOADING A PROJECT
In any mode, press
load, or create a new project.
An SD card must be inserted or you will be unable to enter the
save/load menu.
6 | Quickstart
2ND
+
save/load
to save, save as,
There are eleven effects to choose from:
• Quantizer
• Arpeggiator
• Harmonizer
• Swing
• Randomization
• Delay
• Equalizer
• Scale
• Note to CC converter
• BPM
• Chance
Effect parameters can be edited using the 5 encoders
. Experiment to find your favorite settings:

TIP
You can still play or add notes in
mode, mute/unmute tracks in
launch sequences in
SEQ
mode with the effect manager
TRACK
and
LIVE
STEP
mode, and even
activated.
Change an effect’s position in the chain by holding
2ND
and rotating . Different arrangements may produce very
different results. Experiment!
Quantize can only occupy the first effect position.
TIP
The effect manager is also a great tool if you are a
keyboardist and you want to revive your old synths. Give
them new features like arps and effects and they’ll sound
like they never did. You can also use Pyramid to control
your modular system using CV in & out to create a truly
unique instrument.
The effect engine also works when the player is stopped, as
Pyramid clock always runs.
ASSIGN A CONTROL
Once a controller has been assigned use it to make realtime changes in any mode.
Press rec in
mode to record automation on a
LIVE
currently playing track:
• If the encoder is assigned to a CC message, automation will be recorded to the track only if the MIDI out and
the MIDI channel of the CC is the same as the current
track out settings (for example MIDI A channel 04).
• If the encoder is assigned to an effect parameter, automation will be recorded to the track only if this effect
is active on the current track.
Controller assignments are saved with the project and are independent of track and sequence. Selecting a new track or a new
sequence will not unlink or change controller assignments.
DISPLAY FEATURES
You can access extra information in some modes by
pressing
will show the piano roll editor:
DISP
. For example, in
DISP
STEP
mode, pressing
Pyramid provides 5 clickable encoders and a touchpad.
You can assign values by holding
ASSIGN
and turning
an encoder or sliding the touchpad.
For each controller you can:
• send a CC MIDI message to the current track’s MIDI
channel (for example pitch or a CC message)
• link to a track’s effect effect parameter (for example
the quantization grid, the swing % or the arpeggiator
rate of the track 02)
TIP
Press an encoder to display its assignment and its
value (for example TR02A Swing Grid = 1/16).
The above is an example of a track programmed with notes of
different lengths. You are viewing the page 1 of 4. The current
note is C4, the current velocity is 127, the current note length
is 4 steps and the current note offset is 0%. If you add a step
by pressing a pad you will add another note with these
parameters.
QUICK TRACK SETTINGS
This is one of Pyramid’s most useful features, we strongly
advise you try it!
To change the current track settings, in any mode, hold
TRACK
to use the shortcuts:
Quickstart | 7

•
solo
•
MIDI channel
•
zoom
length
•
time signature
•
For example, when in
zoom
25% to 1600%) in a flash.
and rotate to change the zoom resolution (from
STEP
PLAY/PAUSE/STOP
mode, hold
TRACK
SETTINGS MENU
Press
2ND+FX
+
Select a category to configure your project:
• MIDI IN (MIDI input configuration)
• MIDI OUT (MIDI output configuration)
• MISC (other project and core options)
• CV/PEDAL (CV/Gate inputs+outputs analog configura-
tion, pedal control assignment)
• DISK (save/restore all settings, save/restore all track
channels)
to enter General Settings.
Press to play/pause the sequencer. flashes (depending on the BPM and the current track time signature)
if the project is playing, and is softly backlit if the project
is paused.
Press to stop the sequencer. If you are working with
multiple pages (see Step Mode section), pressing once
stops the player at the current track page, while pressing
twice rewinds to the beginning of the track.
Two presses on STOP will send an All Note Off MIDI message
to your instruments, a third press will send an All Sound Off MIDI
message to silence the synth’s note release instantly. In addition, the third STOP press also sends Program Change messages of active tracks, if set.
By default MIDI clock is sent to MIDI A out, MIDI B out and USB
out. Play/stop/continue messages are disabled by default. You
can activate them separately in the SETTINGS menu.
METRONOME
Hold
2ND
and press
to activate the metronome:
LIVE
Inputs/Outputs
MIDI CONNECTIVITY
MIDI input
Connect one or more MIDI controllers (e.g. keyboard,
drumpad, fader surface) to Pyramid’s MIDI in, and transmit MIDI notes and MIDI CC messages to Pyramid. In
SETTINGS you can choose between OMNI-mode (con-
trol the selected track, regardless of controller output
channel) and MULTI-mode (control TR01A if a con-
troller’s channel = 01, control TR14A with a controller
set to channel 14, etc.). This option allows you to record
multi-channel events as a MIDI looper.
Synchronize Pyramid’s clock (tempo) with an external
machine and even control play, pause, and start remotely.
The metronome will send a specified MIDI note on the selected
output channel and will follow the tempo. You can configure it
in SETTINGS > MISC.
8 | Quickstart

MIDI outputs
Pyramid provides two MIDI outputs (A and B) to control a
large range of electronic instruments such as synthesizers, drum machines, and MIDI enabled effects. Because
both MIDI outputs provide 16 MIDI channels Pyramid can
control up to 32 instruments.
USB CONNECTIVITY
USB MIDI input
Connect Pyramid to your computer with a standard mini
USB cable and Pyramid will receive MIDI notes, CC messages, pitch, aftertouch, transport messages and MIDI
clock. USB works exactly like a MIDI DIN input.
CV/GATE CONNECTIVITY
CV/Gate inputs
There is one CV and one Gate input on the Pyramid.
You can use them to convert CV/Gate notes to MIDI
notes, then add real-time MIDI effects to your CV/Gate
performance, and finally send these notes to MIDI OUT,
CV/Gate OUT, or USB OUT.
To use these inputs, plug a CV pitch output from your
instrument to the Pyramid’s 3.5mm CV input jack, and
plug the gate output of your instrument to the 3.5mm CV
Gate input jack. Your external instrument will control MIDI
notes on the currently selected Pyramid track.
You can also use the CV inputs as a voltage controlled
MIDI CC MESSAGES. For example, a CV voltage of +5V
can be converted to a CC MESSAGE value of 127. Pyramid will then send the CC Message via MIDI OUT, or you
can choose to control an internal MIDI effect (e.g. control
TRACK04 arpeggiator rate with CV input #1, and control
the TRACK11 quantize grid with the CV input #2).
We added these 2 CV/Gate inputs to Pyramid for those
who like to experiment.
CV/Gate outputs
USB MIDI output
Pyramid can also control and sequence up to 16 virtual
instruments (VST) on your computer, and sync your DAW
via MIDI clock.
Pyramid has only one CV output and one Gate output because we wanted to keep the machine compact. “ENV”
is another control voltage output that is very useful for
sequencing filters or any voltage-controlled input on your
modular or CV synth.
Quickstart | 9

DIN SYNC CONNECTIVITY
Pyramid provides an optional DIN sync output (configurable to Sync48, Sync24, Sync12, …in menu SETTINGS) that lets you synchronise your vintage instruments with tempo clock and a run/stop message.
The DIN sync output is available on MIDI out B, routed as
following:
Connectivity examples
PYRAMID ON STAGE
In SETTINGS, you can also configure the 3.5mm CV ENV
jack as a DIN Sync output to provide analog clock to your
modular.
PEDAL FOOT-SWITCH
You can plug a foot-switch type pedal and assign it to an
internal control (REC, play/pause or play/stop). You can
also use a double pedal (stereo jack) to control 2 actions
in Pyramid.
PYRAMID SEQUENCING VIRTUAL INSTRUMENTS
10 | Quickstart

PYRAMID ON THE STUDIO TABLE
Quickstart | 11


Play with the keypad
2 Live Mode
Live Mode is the quickest way to create tracks from
scratch.
In your studio, use Live mode to experiment and record
your music using the built-in keypad, knobs, touchpad
and smartpads (that can be configured as chords harmonizer, advanced beat repeat or a scaled piano).
On stage, play with Pyramid and make your performance
lively and creative. Real-time effects allow you to easily
generate complex music, always in sync.
Screen
Use the keypads to play your performance live.
Press<or>to shift down and up octaves.
You can also use external MIDI controllers (keyboards,
drumpads, fader surfaces) connected to the Pyramid’s
MIDI input to control the current track (control notes with
velocity + aftertouch + pitch, or control CC messages).
With OMNI-mode disabled, a controller transmitting MIDI on
channel 01 will control track 01A, a controller transmitting MIDI
on channel 12 will control track 12A,…
TIP
MIDI effects on the current track will be applied to your
live performance, even when using an external controller.
Record your performance
Press rec (or rec + if the track is paused or
stopped) to record your live performance on the current
track using the keypads, smartpads, or an external MIDI
controller.
Record FX and MIDI automation using the assignable encoders , the touchpad , and the analog inputs.
(See the Assign section to learn how to assign a control.)
Note: the track player zone is described in the Step Mode section.
Pads
Pads in Live Mode are divided into two parts: a oneoctave keyboard and 8 smartpads .
Note: Processed & recorded notes are displayed on the 13
black & white keypads with low luminosity. This feature is very
fun and useful when using the arpeggiator & chord smartpads
for example.
COUNTDOWN
When the player is stopped , ”arm” the track for recording by pressing rec . When you press , Pyramid sends
a MIDI metronome countdown before recording starts pressing
tinue playing and remains until the end of the track loop.
Define the countdown duration in SETTINGS > MISC >
REC COUNTDOWN.
2ND
and
causes the metronome to con-
LIVE
HARD RECORD
Press
Previously recorded notes are overwritten in this mode
of recording.
2ND
+
RECORD
to activate ”hard recording.”
13

LIVE LOOPER
Pyramid provides you a new way to capture your performance in the style of looper pedals! In this mode,
the length of a track grows to fit your initial performance.
Press rec to start recording a loop. Press rec a second time to stop recording. Track length is now fixed. Perform freely without worrying about pre-determining track
length.
To activate Live looper, enter SETTINGS > MISC > LIVE
LOOPER and select the looper time quantization (beat
= the track length is set to the nearest beat, 1bar = the
track length is set to the nearest bar, ...) To activate a
Live Looper recording, first stop Pyramid, press rec ,
then press .
Change smartpad type
Hold
tion of the 8 smartpads :
• CHORD (default)
• SCALE
• REPEAT
and rotate the data knob to change the func-
LIVE
Pyramid’s original harmonizer algorithm allows you to
quickly select a relative tone by rotating . Unleash your
creativity by building complex harmonies.
Holding
jor/minor tonality. Add complexity by pressing and rotating :
Press<or>to shift the chord down or up by octaves.
TIP
Increasing complexity will add «alterations» and even-
tually bring you to complex jazzy chords.
TIP
Set a low complexity value to perform simple chords
and then add additional tones with the keypads.
Press
smartpads and the currently recorded notes:
DISP
+ rotating will jump to the next ma-
2ND
to display the generated chords for the 8
Chord smartpads
The Chord Smartpads represent the 7 degrees of the harmonized scale. These harmonized scales are the basis
on which almost every song you know is built.
In Pyramid, we use two parameters to build chords:
”tonality” is the first note of your harmonized scale and
”complexity” represents the number of notes in each
chord and chord inversion.
If we choose a CMaj tonality and 4 notes of complexity,
we can obtain the following chords by pressing one (or
more) of the smartpads:
Scale smartpads
A scale is an ordered set of musical notes based on a root
note. Predifined scales help you easily compose melodic
patterns.
Pyramid includes a varied set of scales: Minor scale, Harmonic minor, Minor blues, Major blues, Romanian minor,
Tunis scale, Dominant 7th, Spanish scale, Gipsy scale,
Arabian scale, Egyptian scale, Hawaiian scale, Japanese
scale, Minor third, Fourth scale, Fifth scale, Octave scale,
Ionian scale, Dorian scale, Phrygian mode, Lydian mode,
Mixolydian mode, Aeolian mode, Locrian mode.
Rotate to select a scale from the list:
14 | Live Mode

Hold
scale.
With the Romanian Minor scale and a root note of C, you
can perform the following notes using the smartpads:
and rotate to select the root note of the
2ND
Hold
Hold
Hold allows you to sustain notes played with the keypad,
smartpads, or an external MIDI device. Held notes are
highlighted on the keypad.
TIP
Hold is very useful when designing drones/synth
pads or experimenting with an effect like the arpeggiator.
When HOLD is enabled, is displayed on the screen.
and press to activate the HOLD function.
2ND
Relatch
Press<or>to shift the scale’s octave down or up.
Repeat smartpads
Hold a smartpad to choose a repeat speed (for example 1/8 = 8 notes per bar) and use the keypad
to play a note repeatedly.
Rotate to select the gate of repeated notes (from 0% to
100%):
Hold
tion, allowing you to hold the last keys or chords played
until you play something else.
When RELATCH is enabled, the icon is displayed on
the screen.
Hold
LIVE
and press to activate the RELATCH func-
2ND
and press a third time to go back to regular
2ND
Mode.
Copy/Paste/Delete
Press
2ND
notes + FX + FX automation + CC automation).
+
copy
to copy the selected track (copy all
Press
DISP
smartpads:
to display the repeat speed of each of the 8
Press
2ND
lected track.
All notes, CC automation, FX, FX automation are copied, however track parameters like track length are not.
Press
2ND
tion + FX automation of the current track.
+
+
paste
to paste the copied track to the se-
delete
to delete only notes + CC automa-
Live Mode | 15

16 | Live Mode

Change Stepmode
3 Step Mode
Step Mode is another way to create rhythms and
melodies. Unlike Live Mode–where you perform in realtime using the keypad and the smartpads–Step Mode allows you to “program” sequencer information directly into
the current track. Step Mode is a great way to get the
best from your synthesizers and drum machines.
Pyramid includes 16-step pads , but you are free
to extend the length of the track up to 384 bars and zoom
up to 1600%: the number of steps is almost infinite! The
ability to add multiple notes on a single step, modify the
velocity, note width, and offset for each step makes Pyramid one of the most advanced sequencers on the market.
Step Mode also allows you to edit a previously recorded
live performance using the piano roll view.
Screen
Stepmode defines how steps are filled. Hold
turn the data knob to select Stepmode from the following modes:
• NOTE (default)
• CHORD
• EUCLID
• EFFECTS
• CC MESSAGES
All stepmodes (except EUCLID) can be used together to
create a track. For example, you can add chords with the
CHORD stepmode, then edit these chords with the NOTE
stepmode, create step-lock automation with CC MES-
SAGES and EFFECTS stepmodes, and finally go back
to NOTE stepmode to add extra notes.
EUCLID stepmode can’t be used with NOTE or CHORD
stepmodes because the euclidean algorithm takes exclusive control of the track player.
STEP
and
Pads
Note Stepmode
This mode allows you to program notes by filling steps.
ADD NOTES
Select a note on the screen with .
Press a step pad to fill it with the current note.
Press the pad again to remove the note. You can
add multiple notes on a single step. The pad corresponding to the step filled with the selected note will be softly
backlit.
TIP
Hold
faster.
TIP
Preview the selected note by pressing . Pressing
<or>
while pressing allows you to jump octaves and
and rotate to scroll the current note list
2ND
17

navigate notes more quickly. You can also press a key
while holding to directly enter a desired note (or
press multiple keys to enter a chord).
At any time, you can
zoom
to increase the step resolu-
tion and navigate the pages with<and>.
POLY / MONO EDITING
Switch to MONO/POLY EDITING by pressing rec
POLY EDITING is enabled by default. Poly mode is
useful when editing tracks controlling polyphonic instruments. This mode allows you to add multiple notes to a
single step. In POLY EDITING mode, pads will be softly
backlit only if they are filled with the current note, displayed on the screen. When copying steps,
only copy the current notes. The same behavior is true for
paste
, transpose, move horizontally, and for
width,offset
quick edits.
To switch to MONO EDITING, press rec (rec led will
lit). It’s useful to edit tracks controlling monophonic instruments, like a classic step sequencer. Whatever the
current note is, steps softly backlit if they are filled. You
can’t add multiple notes on a single step: all notes of the
track are stacked. If you
copy
some steps, the copy
will be effective for all the notes in selection. Same behavior for
velocity
TIP
paste
, transpose, move horizontally, and for
,
width,offset
quick edits.
Switch to MONO EDITING to have a global view of
which of the 16 steps are filled with notes. If you press
a filled step, it will remove all notes in this step, whatever
the current note is.
TIP
A long press on a step (if MONO EDITING enable)
auto-select the nearest note of the step. For example if
a step contains a C2♯ and a E2 note, and if the selected
note of the piano roll is C4, a long press will select the
note E3. Very handy to quickly view or edit a note in a
step.
copy
velocity
will
Default velocity is 100, default note width is 1 step, and
default offset is 0%.
This means that by default notes will fill a step from its
start to its end. Note duration depends on zoom and
time signature. If
zoom
= 100% and
note width
= 1,
an added note will be a quarter note (because the 16
steps represent 16 quarter notes). If
note width
= 1, the added note will be an eighth note
zoom
= 200% and
(because the 16 steps now represent 16 eighth notes).
You can play with the
zoom
shortcut to edit your track
with a high degree of resolution!
● SET NOTE VELOCITY
To change the defalult note velocity, hold
velocity
and
rotate (from 0 to 127):
TIP
Double tap a step pad to add a low velocity
note in order to create accents quickly.
● SET NOTE WIDTH
,
By default notes are played the entire width of a step. To
change the default note width, hold
note width
and ro-
tate (from 1/32 of a step to 16 steps):
NOTE PARAMETERS: VELOCITY, WIDTH, OFFSET
When you add a note on a step, the step is filled with its 3
current parameters:
18 | Step Mode
velocity
,
note width
and
offset
TIP
Using a
note width
longer than 1 step is an easy
way to create slides on monophonic instruments.
● SET NOTE OFFSET
Each note starts at the beginning of a step. To change
.
the default offset, hold
offset
and rotate (from 0% to
99% of a step):

QUICK STEP EDITS: VELOCITY, WIDTH,
OFFSET, TRANSPOSE, MOVE
HORIZONTALLY
When you hold a step (or when you hold two steps to
select a row of steps), the screen displays the note parameters of the selection:
TIP
You can also press a keypad while holding
to directly select a note. Select multiple notes to quickly
create a custom chord. Pressing<or>while holding
allows you to jump octaves.
PIANO ROLL
Note velocities ranges from 60 to 120, note width ranges from
1 step to 4 steps, note offsets ranges from 0% to 45%.
Now you can edit in a flash selected note parameters:
● Rotate encoder1to transpose notes
● Rotate encoder2to transpose notes, by octaves
● Rotate encoder3to increase/decrease note velocity
● Rotate encoder4to increase/decrease note width
● Rotate encoder5to increase/decrease note offset
● Press<or>to move horizontally the selection
TIP
In POLY EDITING mode, you will edit only the current
note of the selection. In MONO EDITING mode, you will
edit all notes of the selection.
TIP
Hold rec to select the entire track, instead of pressing the first and the last step. For example, hold rec
and rotate1to transpose all notes.
Press
An example of a track, programmed with notes of different
lengths. You are viewing the page 1 of 1 page. The current
note is C4, the current velocity is 127, the current note length is
2 steps and the current offset is 0%. If you press a step to add
a note, the note will be added with these parameters.
to view the piano roll sequencer:
DISP
It’s a great way to see the notes you are editing, for example:
● In POLY EDITING, hold rec and rotate to transpose
the current notes of the track (e.g. all C4 notes).
NOTE LEARN WITH A KEYBOARD
Use your external keyboard to set the current note, or
even a chord, in a flash!
The current step can be filled with a note received on the
MIDI input, (for example C3#). You can also perform a
chord with your external keyboard (for example C2+2) instead of a note. So you can fill your step sequence with
custom chords:
● In POLY EDITING, hold a step and rotate to
transpose only the current note of the step.
Step Mode | 19

● In MONO EDITING, hold rec and rotate to trans-
pose all notes of the track.
● In MONO EDITING, hold a step and rotate to
transpose all notes of the step.
TIP
Hold
Press a step pad to fill it with a chord. A step filled
with a chord is semi-highlighted.
TIP
Preview the selected chord by pressing .
You can only add one chord per step. If you add a chord
to a step that has already been filled, the previous chord
will be replaced with the new one.
There are 7 chord degrees across the 10 octaves:
I II III IV V VI VII
These are the same chords you will find on the Live
Mode’s chord smartpads (chord degree I is smartpad 1,
chord degree III is smartpad 3, etc.)
The chord tonality (by default CMAJ) and the chord complexity (by default 3) can be set in the Live Mode using
the chord smartpads.
Note: Read the Live Mode section for further details about
chord generation.
and rotate to change the chord tonality.
2ND
QUICK STEP EDITS: VELOCITY, WIDTH,
OFFSET, TRANSPOSE, MOVE
HORIZONTALLY
TIP
Press
STEP
again to go to the next nearest note.
to go to the nearest note. Press
STEP
Chord Stepmode
This mode is similar to Note Stepmode except the steps
are filled with chords.
ADD CHORDS
Select a chord degree on the screen with :
As in Note Stepmode, you can edit the
note width
and
offset
of a chord.
velocity
PIANO ROLL
Press
An example of a track, programmed with chords of different
lengths. You are viewing the page 1 of 1 page. The selected
chord root note is E4, the current velocity is 100, the current
note length is 1 step and the current offset is 0%.
to view the piano roll sequencer:
DISP
,
20 | Step Mode

Euclid Stepmode
The Euclidean sequencer provides one of the most intuitive ways to create uncommon and rich rhythmic patterns.
Originally derived from nuclear physics, and then applied
to music theory, an Euclidean algorithm evenly generates
distributed notes (fills) among a defined number of available slots (steps).
This leads to a great number of well-known rhythm patterns, as well as many odd-sounding ones. Almost all
traditional rhythms from across the world can be generated with this tool, which is why we decided to implement
on the Pyramid.
The EUCLID stepmode takes exclusive control of the track
player. You can’t use it together with NOTE and CHORD stepmodes. When you change stepmodes, EUCLID is activated at
the STEP pad release, and NOTE + CHORD stepmodes are
disabled. As soon as you switch to NOTE, CHORD, CC MESSAGES or EFFECTS stepmodes, EUCLID is disable again.
Hold
euclid fills
notes in your EUCLID pattern. Hold
tate to select the number of steps in your pattern. Press
+<or
2ND
to change the triggered note (for example C3♯) and use
note width
and rotate to select the number of
euclid step
+>to rotate the pattern. Turn
2ND
to change the gate.
and ro-
TIP
Steps that are filled with notes are displayed on the
pads. You can press a pad to add or remove steps
and thus create your own pattern.
You can create multiple euclidean tracks to generate
complex rhythmic patterns. Each pattern will be 1 bar or
shorter in length, but if each bar is a different length, they
will shift against each other creating a constantly changing loop.
TIP
Decrease the time signature lower number to multiply
the euclidean pattern length. By default the time signature of a euclidean track is 4/16 (1 bar long) but you can
set a 4/8 time signature (2 bars long), a 4/4 time signature
(4 bars long)…
CC messages Stepmode
This stepmode allows you to create CC automation.
CREATE STEP AUTOMATION
Using select a CC message (0 to 119), PITCH BEND,
PRESSURE or PROGRAM CHANGE message you want
to automate. Hold
faster:
and rotate to scroll the CC list
2ND
By default, there are 16 euclid steps (1 bar) and 4 euclid fills.
Press
to view the Euclidean circle:
DISP
PITCH BEND message is selected, the current value is 63
Now you can fill steps with the selected CC message.
velocity
Hold
the touchpad from left to right) to select a CC value,
from 0 to 127:
and rotate (or hold
velocity
Step Mode | 21
and slide

PITCH BEND automation is selected, the current value is 127
(if you press a step, a pitch=127 message will be added)
Continue to hold
velocity
while activating step pads
to create steps with different CC values.
At any moment, press
A 16-step automation of the PITCH BEND message. The dotted line represents the current CC value.
TIP
Press
ASSIGN
to activate ENCODER STEP EDIT.
to display the automation:
DISP
This allows you to select the current CC value directly
with the touchpad X axis or with encoder3.
This stepmode can also be used to display and edit automation recorded in live mode, for example CC10 value
performed with the touchpad:
A live recorded automation of the CC10 (PAN), zoomed.
You can create an infinite number of automation on the
same track. Rotate to select another CC message and
program another automation!
TIP
Press the menu encoder to preview the current (dot-
ted line) CC value.
TIP
Press
Press
STEP
STEP
to go to the nearest CC automation.
again to go to the next nearest CC automa-
tion.
DRAW AUTOMATION
Hold rec while sliding the touchpad to draw a CC automation. Very useful for experimenting with complex automation in a flash!
A live recorded automation of the CC10 (PAN) message.
As in other stepmodes, you can
zoom
to increase the
step resolution and navigate the automation pages with
and>:
<
22 | Step Mode
Each new automation drawn will delete existing automation.
STEP-LOCK AUTOMATION
Hold a step and rotate the encoder3to increase
or decrease the step’s automation. Very useful for quickly
creating step-lock automation.
You can also increase or decrease a row of steps ,
by pressing the first and last step, and rotating the encoder3.
TIP
Hold rec and rotate3to equally increase or de-
crease all the values of an existing CC automation.

Effects Stepmode
This stepmode allows you to create FX parameter automation. First, you need to add at least one effect with
the FX manager on the current track, for example an
arpeggiator.
CREATE STEP AUTOMATION
In EFFECTS stepmode, select the effect parameter you
want to automate by rotating :
ARPEGGIATOR effect: RATE parameter is selected, the current parameter value is 1/4.
Now you can fill steps with FX parameters. To choose
the parameter value, hold
velocity
and slide the touchpad from left to right):
velocity
and rotate (or hold
As in other stepmodes, you can
step resolution and navigate the automation pages with
and>to create complex automation:
<
A 64-step automation of the QUANTIZER effect: GRID parameter
This stepmode can also be used to display and edit automation recorded in live mode, for example a swing automation performed with an encoder:
zoom
to increase the
ARPEGGIATOR effect: RATE parameter is selected, the current parameter value is 1/32 (if you press a step, a rate=1/32
message will be added).
Fill some steps with different parameters values. Press
to display the automation:
DISP
A 16-step automation of the ARPEGGIATOR effect: RATE parameter.
TIP
Press
Then you can select the current FX value directly with the
touchpad X axis or with the encoder3.
ASSIGN
to activate
ENCODER STEP EDIT
You can create an infinite number of automation on the
same track. Rotate to select another effect parameter
and program another automation!
DRAW AN AUTOMATION
Hold rec while moving your finger across the touchpad to draw FX automation. Very useful for experimenting with complex automation!
Newly drawn automation replaces all prior automation on
that track.
STEP-LOCK AUTOMATION
Hold a step and rotate3to increase or decrease
that step’s automation value. Very useful for quickly creating step-lock automation.
You can also edit FX parameters on a sequential range
of steps . Select a range of steps by holding the
first and last step and rotate the encoder3.
.
TIP
Hold rec and rotate3to increase or decrease the
whole existing FX automation.
Step Mode | 23

Track player: pages, zoom and length
The track player zone displays data on of the current
track:
• Track length (number of bars )
• Page position (viewed bars on the 16 pads)
• Player position (sequencer track progression)
A default track is 4-bars long. Therefore, the track player
zone displays 4 white bars: they are the 4 bars you can
see on the 16 pads (currently viewed page) in Step Mode.
These 16 pads represent 16 steps = 16 quarter notes.
If you want to program a longer or shorter track, hold
length
TRACK
ber of the track to 16 bars for example:
+
and rotate to change the bar num-
Zooming in changes the track resolution (step length) and
allows you to rotate your track with increasing precision..
TIP
Press
track.
and hold<or>to quickly rotate your
2ND
Copy/Paste
Press
notes and/or automation contained in a step.
You can copy multiple steps by pressing
+ the first and the last steps of your selection.
You can paste notes and automation in the current track
or in another track by pressing
Note: copy/paste is not available in EUCLID stepmode.
2ND
you wish to paste into.
+
copy
+ any step to copy all the
paste
+
2ND
2ND
copy
+
+ the step
Delete
Press<or>to navigate through the pages:
TIP
Hold<or>to quickly navigate.
To change the pad resolution, hold
and rotate . For example, 2 bars are displayed in 200%
zoom on a row of 16 pads, also called a page. In 400%
zoom, only 1 bar is displayed.
TIP
Microscope mode: 1600% zoom provides you with
the highest degree of precision to edit your track step by
step.
Note: All examples given reference a standard 4/4 time signature. Pages always represent a 4/4 bar. This convention is
used because all 16 physical pads can be divided into four 4/4
bars. For all other time signatures, represents all pages, and
represents the currently active group of 16 pads.
TRACK
+
zoom
Rotate
In stepmodes NOTE, CHORD and EUCLID, press
+<or
+>to shift the track one step left or right.
2ND
2ND
Press
notes contained in the step.
Note: delete is not available in EUCLID stepmode.
2ND
+
delete
+ any step to delete all the
Encoder step edit
At startup, the 5 encoders can be used to assign
a CC or FX parameter, in every mode. But they can do
more. In
the 5 encoders and the touchpad to step shortcuts.
Simply press
feature:
It’s a great way to quickly edit your notes and automation,
you no longer have to rotate while pressing a green
shortcut.
In stepmode NOTE, encoders & touchpad will control:
•
•
•
•
•
•
In stepmode CHORD, encoders & touchpad will control:
•
•
•
STEP
note
1
note octave
2
note velocity
3
note width
4
5 note offset
touchpad X
chord degree
1
chord tonality
2
chord velocity
3
mode, you can decide to assign directly
ASSIGN
note velocity
to enable the “encoder step edit”
24 | Step Mode

•
chord width
4
•
5 chord offset
touchpad X
•
In stepmode EUCLID, encoders & touchpad will control:
euclid steps
•
1
•
euclid fills
2
euclid velocity
•
3
euclid gate length
•
4
•
5 rotate
touchpad X
•
In stepmode CC, encoders & touchpad will control:
•
3
CC value
touchpad X
•
In stepmode EFFECTS, encoders & touchpad will control:
•
3 FX value
touchpad X
•
TIP
In
LIVE
the velocity of the keyboard and the smartpads.
Press
ASSIGN
chord velocity
euclid velocity
CC value
FX value
mode, you can also use the touchpad to set
again to disable these shortcuts.
Press
2ND
+
STEP
to exit the filter mode.
Player tracking
The viewed page (viewed bars on the 16 pads) can autofollow the player position if you press
ful if you are working on multiple pages.
2ND
+
DISP
. Use-
Filter
In stepmode NOTE and stepmode CC MESSAGES, press
+
2ND
through programmed notes or CC messages. A popup is
displayed for a few time:
For example, in NOTE stepmode, rotating will jump
to the next programmed note (e.g. D4), useful if use a
wide range of notes. In CC MESSAGES stepmode, rotating will jump to the next CC automation (e.g. Program
Change).
When the filter is activated, a circle pictogram is displayed
next to the stepmode name:
to activate the filter, in order to scroll only
STEP
Step Mode | 25


4 Track Mode
Track Mode has three purposes:
1. to configure the current track (MIDI channel, zoom,
length, time signature) using the shortcuts before
playing in Live Mode or programming in Step Mode
2. to mute/unmute the 64 tracks using the 16 pads and
. This tactile, intuitive method allows you to
< >
perform your song on the fly
3. to build your current sequence (a set of the 64
muted/unmuted tracks)
Screen
Pads
Mute/unmute tracks on the
fly
Press one of the 16 pads to mute or unmute a
track in the current BANK. Change the current BANK
(A/B/C/D) with<and>.
An empty track (without notes, effects, or automation)
can’t be muted.
When the sequencer is playing, tracks evolve in parallel
even if they are muted: this enhances your ability to perform with tracks.
In the example below, 3 tracks are unmuted, 2 tracks are
muted and all tracks are the same length:
This display shows that TR01A is selected (current track)
and contains notes, effects, CC automation and FX automation, with a 200% zoom and a 4/4 time signature.
Sequence SE01 groups 6 unmuted tracks of bank A:
TR01A, TR02A, TR05A, TR08A, TR12A and TR15A.
The other tracks are muted or empty.
Tracks of different lengths are played simultaneously;
shorter tracks will repeat before the others:
TIP
Use different track lengths (for example 2 bars, 4 bars
and 6 bars) to create a non-repetitive, evolving sequence.
27

MUTE/UNMUTE IN SYNC
SAVE MUTE STATES OFF
Mute/unmute changes are in sync, depending on the
PERFORM type selected in
For example, if you unmute track 01, this track will be activated at the beginning of the next bar (if PERFORM =
1BAR in
changing mute states in perfect sync.
To mute/unmute tracks instantly, select PERFORM =
INST in
TIP
to specify that tracks mute/unmute in sync by selecting
”SEQ PERFORM,” or mute/unmute instantly by selecting
”INST.”
TIP
pressing
SEQ
mode). This allows you to play tracks by
SEQ
mode.
SETTINGS > MISC > TRACKS MUTE allows you
You can always mute/unmute a track instantly by
+ its corresponding pad .
2ND
SEQ
mode:
Mute/unmute tracks to create sequences
By default, track mute states changes are saved in the
current sequence (rec is lit). If you mute or unmute a
track, the sequence will save the mute states.
Press rec to disable saving sequence mute states (REC
led will be OFF). If you mute or unmute a track, the sequence will not save the mute states. This allows you to
mute and unmute tracks in
ing your sequence’s track states. Switching a sequence
restores it to its “default” state.
TRACK
mode, without los-
Solo a track
Hold
a track.
To cancel solo, press any track .
and select a track with the pads to solo
solo
A sequence is a set of 64 tracks, muted or unmuted. To
build a sequence, mute and unmute tracks using the 16
smartpads and
For example in SE01, only TR02A is unmuted. In SE02,
TR02A and TR11A are unmuted. In SE03, TR01A,
TR06A and TR15A are unmuted:
< >
.
MIDI Channel
Pyramid includes two MIDI outputs, one USB MIDI output, and one CV/Gate (analog) output.
Each MIDI output provides 16 channels, which means
that you can control up to 16 electronic musical instruments per MIDI output.
Hold
MIDI channel
nel of the current track.
TIP
Hold
MIDI channel
the MIDI output of the track. A message pops up, displaying the selected output type (MIDI A, MIDI B, USB,
CV) and channel number:
and rotate to select the MIDI chan-
and press and rotate to select
Once you have created your sequences, jump to Seq
Mode to launch them, or program a chain of sequences
to create a complete structured song.
28 | Track Mode
TIP
You can link the track to two different outputs, for ex-
ample both MIDI A and MIDI B or CV/Gate and USB.

The output channel is always displayed under the track
number:
MIDI B CHANNEL 01 + USB OUT CHANNEL 01 is set
Note: DIN sync output (also called SYNC24) is available on
MIDI port B. You can enable and configure it using the Settings
menu.
Zoom
Hold
zoom
to 1600%:
and rotate to set the resolution, from 25%
A length of 4 bars, a length of 64 bars.
length
Hold
with step precision:
A length of 2 bars + 1 quarter note, a length of 0 bar + 1 quarter
note (1/4 bar = 1 quarter note).
TIP
Remember, in every mode, hold
the following shortcuts:
•
solo
•
MIDI channel
•
zoom
length
•
time signature
•
and press + rotate to set the track’s length
TRACK
to activate
A 100% zoom means that 1 step = 1 quarter note.
A 200% zoom doubles the resolution: a quarter note is
divided into 2 steps. With a 1600% zoom, a quarter note
is divided into 16 steps. Edit your track with surgical precision.
A 50% zoom decreases the resolution. This is useful if
you want to have a global view of your track: two quarter
notes become one step.
Note: please read the Step Mode section “Track player: pages,
zoom and length” for further details about the zoom feature.
Length
length
Hold
track’s length in bars:
and rotate to increase or decrease a
Copy/Paste/Delete a track
Press
2ND
Press
2ND
TIP
Copy/paste is very useful to create a new pattern from
an existing track. Copy saves track settings + notes + automation + effects.
Press
2ND
+
+
+
copy
+ a track to copy it.
paste
delete
+ a track to paste it.
+ a track to delete it.
Time signature and polyrhythm
Create cross-rhythms and pattern variations! The 4/4
standard time signature often sounds good, but sequencing with other time signatures is an easy way to add complexity and originality to your songs.
In
SETTINGS>MISC>SIGNATURE
how your track time signature will be interpreted by Pyramid: either
● If
polyrhythms when different time signatures are used. If
you select a 3:4 time signature you will have bars of 3
Polyrhythms
Polyrhythms
(default) or
is selected, Pyramid apply true
, you can choose
Polymeters
.
Track Mode | 29

quarter notes, but the bar will have the same duration as
a 3/4 bar. The bar size is the same, but the beat differs.
Polymeters
● If
same. If you select a 3/4 time signature you will have
bars of 3 quarter notes, and each quarter note will have
the same length than the 4/4 ones. The length of the bar
differ, but the beat unit remains the same. The polymetric
mode is easier to understand than the Polyrhythmic one
because it doesn’t mix several speeds.
is selected, all quarter notes remain the
The difference is the length of each quarternote. If you increase the time signature’s upper number, it will increase
the number of quarternotes in one bar: 4/4 means 4 quarternotes in a bar, 15/4 means 15 quarternotes in a bar.
time signature
Hold
signature’s upper number on the current track:
and rotate to change the time
The lower number works the same in
Polymeters
ber is set on 4, which means ”quarter note”. It can also
be set on 2 ”half note”, 8 ”eighth note” or 16 ”sixteenth
note” by holding
:
Each increment multiplies or divides the basic /4 bar
length by 2:
. By default the time signature’s lower num-
time signature
and pressing + rotating
Polyrhythms
or
You can adjust the track’s length to 4 bars to work achieve a 7:4
time signature (28 quarter notes) or any other track length you
choose (for example 2 bars + 2/7ths quarter notes).
POLYMETERS SIGNATURE (X/4)
With this setting, all quarter notes will remain the same
as a 4/4 beat, but the length of your loop will be different.
Your loops will shift against each other as they play: this
is polymetry!
In other words, the length of the bar differ, but the beat
unit remains the same.
POLYRHYTHMS SIGNATURE (X:4) (DEFAULT)
With Pyramid you can mix a 4/4 track with a 5:4 track, a
9:4 and a 15:4 track: true polyrhythms! Tracks with dif-
ferent time signatures are synchronized and will loop at
the same time, but steps follow their own path. The bar
size is the same, but the beat differs. Of course you may
still use all functionalities such as track length, zoom, offset and effects, as the PyraOs core system is based on
Polyrhythm.
The length of a bar is the same whether you set a common 4/4 signature or you choose an odd one such as
15:4. For example, at 120 bpm, a bar in 4/4, 3:4 or 15:4
will last 2 seconds, and will loop at the same time:
30 | Track Mode
• The 1st track is a standard 4/4 bar
• The 2nd track is a 3/4 bar (3 quarter notes)
• The 3rd track is a 5/4 bar (5 quarter notes)
time signature
Hold
signature’s upper number on the current track:
and rotate to change the time

Track length fraction and
Irrational rhythms
polymetry
Changing the length of a track is an other way to create
polymeters.
Let’s say we are working with a 1 bar track and a 4/4 time
signature. Each step represents a quarternote.
length
Hold
quarternote (one step) to the length of the selected Track.
This leads to the following possibilities:
and press + rotate to add or remove one
(advanced users)
An irrational rhythm uses step durations that lie outside
the scope of the 4/4 system and loop on a different bar
length.
Create a polyrhythmic (tracks with different time signatures) and polymetric (tracks with different bar lengths)
sequence to experiment irrational rhythms! Both the measure size and the beat differ.
In the example below you get a simple overview of all
these concepts for 3 simple tracks:
• The 1st track is a standard 4/4 bar
• The 2nd track is a 4/4 bar with 1 removed quarternote
• The 3rd track is a 4/4 bar with 1 added quarternote
The length of your loops are different, so they shift against
each other as they play. The length of the bar differ, but
the beat unit remains the same.
Using polymetric patterns is a good trick to create lively,
ever-changing and lengthy sequences. In the following
example, the sequence composed of 3 short tracks will
get back to its starting point after 15 loops of the standard 4/4 track:
TIP
Link these 3 tracks to the same MIDI channel (ie to
a unique musical instrument) to create a progressive pattern.
This sequence will get back to its starting point after 6
loops of the 4/4 track. Within the sequence, track quarternotes are never on time because of the beat phase
shift.
DISP track view
Press
ily understand your track polymeters:
This screen displays:
• Track number: from 1 to 16
• Track progression: percentage of the loop being
played
• Track bar length
• Track time signature
• Run modes: RELATCH , TRIG or FREE (nothing
displayed)
to display your tracks progressions and eas-
DISP
Track Mode | 31

• Output: flashes if the track is sending events via MIDI,
USB or CV/GATE.
Muted tracks are shaded:
The
the selected bank. If you press
play TR09 to TR16 tracks. You can also use the menu
encoder to select the displayed tracks.
With
send MIDI events (notes and CC messages).
view displays tracks from TR01 to TR08 of
DISP
again, it will dis-
DISP
activated, the 16 pads flashes when tracks
DISP
Microstep track
To create a Microstep track, set the track length on 0+1/4
bar, the zoom on 1600% and increase the time signature
lower number to 4/16. The step-by-step player will run at
high speed, which is very useful to create drones, black
midi and glitch sounds, and to expand the boundaries of
your instruments.
32 | Track Mode

5 Seq Mode
After creating your tracks in
assembling them into several sequences in
you are now able to play with the sequences.
Seq Mode is the second way to perform your song. Instead of muting/unmuting tracks like you do in Track
Mode, Pyramid offers an advanced system of playing sequences:
PERFORM: launch your sequences on the fly. You can
select the delay Pyramid will wait until playing the next
sequence (Instant, 1 Beat, 1 Bar, 2 Bars, …8 Bars). It’s a
great creative tool to improvise with total freedom, while
always remaining in sync!
PLAY: play straight through a sequence arrangement
(chain) programmed using the project song zone.
LOOP: loop a sequence arrangement (chain) programmed with the project song zone.
When your sequences are playing, remember that you can still
TRACK
enter
playing sequence; enter
rec or program notes and automation on the current track.
mode to change mute states of the currently
LIVE
Live
mode or
and
Step
STEP
mode, and
mode,
Track
mode to play,
Below, the full length progression of a sequence is displayed. For example, if the current sequence contains a
3 bar track and a 4 bar track, the sequence will be 12 bars
long (number of bars after which all tracks restart at the
same time again). This progression zone will be 100%
filled after 12 bars.
Note: On all 4 modes, Pyramid displays the current sequence
and the next sequence to be played if there is one:
Pads
Screen
Seq
the
sync with the BPM (4 beats = 1 bar):
mode screen displays a 4/4 beat progression in
Create and edit sequences
In
TRACK
you want to create or edit with one of the 16 pads .
To display sequences from SE17 to SE32, hold
press
The current sequence number is displayed on the screen:
Then mute/unmute your active tracks to build the sequence. As soon as you made a mute state change, the
sequence is created.
When selecting an empty sequence, Pyramid will copy
the previous mute states, so you can perform your live
set without blanks!
mode, hold
>
SEQ
and select the sequence
SEQ
and
33

Selecting a sequence can only be done with SEQ PERFORM
enable. This action is non available with SEQ PLAY or SEQ
LOOP enable, because the sequencer will play the defined
sequence chain (and therefore the selected sequence = the
played sequence).
“PERFORM” project
This mode allows you to build a song from sequences in
a free and creative way, while always remaining in sync.
At startup, PERFORM is activated and the sequence
SE01 plays in a loop.
Press any sequence number to launch it on the fly.
Pyramid waits until the current sequence ends (the end
of the bar, if “1 BAR” selected) and then it launches the
new sequence right away. The new sequence will then
play in a loop until you press another sequence number.
BEAT: The next sequence will be launched at the next
beat of the current sequence.
1 BAR: The next sequence will be launched at the next
bar of the current sequence.
2 BAR …8 BAR: The next sequence will be launched at
the modulo (2, 3, 4, 5, 6, 7 or 8 bar) of the current sequence.
“PLAY” project
This mode allows you to program a set of sequences to
compose a complete song ready to play.
Before enabling PLAY PROJECT, you need to design
your chain of sequences.
Rotate clockwise to highlight the first sequence slot:
Press to make your selection and rotate to choose
the first sequence in the chain, for example SE03:
In the example above, Pyramid plays SE01, where only
the TR01 is unmuted. The user then presses SE03
which starts as soon as the SE01 ends. Tracks:
TR02, TR03, TR04 and TR05 play together in a loop until
the user presses another sequence.
PERFORM DELAY SELECTION
You can select the delay Pyramid waits before switching
to the next sequence.
Press to confirm and rotate to choose the number of
bars this sequence will play. A sequence can be between
1 bar and 64 bars length, or can be shorter that on bar
(1/4 bar, 2/4 bar, 3/4 bar...)
For your information, the screen indicates the full length of the
sequence. This is the number of bars after which all tracks are
perfectly sync again, if using different track length. For example
a sequence with a 3 bar long track and a 4 bar long track has a
total length of 12 bars.
Press to confirm:
Repeat this one-handed operation to create a sequence
chain as long as you choose, there is no limit to the number of sequences you can chain:
INST: The next sequence will be launched instantly, without delay.
34 | Seq Mode
Select the PLAY PROJECT Submode:

TR01 is unmuted in all sequences: it plays fully.
TR02 is muted in SE02: it replays from the start in SE03.
TR03 is 6-bars long: it replays from the start in the middle
of SE03.
TR04 is only 1-bar long: it loops in SE04.
The player stops and stands ready to play the programmed sequence chain. Press play to launch your
project. Once the song is finished, the player stops and
waits for another press of .
Once the chain is programmed, you can change the number
and the length of a sequence, and even move it and delete it.
“LOOP” project
It’s exactly the same mode as the “PLAY” project, except the sequence arrangement loops creating an infinite
song.
Track run modes: FREE, RELATCH & TRIG
By default tracks play concurrently in FREE run mode.
Each track can also be configured in RELATCH or TRIG
run modes:
RELATCH ( icon displayed under TR): when a new sequence starts, the track always restarts at its beginning.
It’s an easy way to sync tracks.
TRIG ( icon displayed under TR): the track plays once
at the beginning of the sequence and does not loop. The
track is simply triggered and stops when it reaches its end.
To change the track run mode, enter
TRACK
and rotate :
TRACK
mode, hold
Note about track lengths concurrence & sequences
One of Pyramid’s great features is when switching from
one sequence to another a track active in the prior sequence keeps playing from its last position. We call it
FREE run mode (enabled by default).
In the example below, you see 4 tracks:
If you play these tracks organized in sequences:
TR01A configured as a RELATCH track, and as a TRIG track.
RELATCH RUN MODE
Each of these 4 tracks are configured in RELATCH run
mode:
If you play these tracks organized in sequences:
If an active track in the sequence is set to RELATCH, it
will always start from the beginning of each sequence,
Seq Mode | 35

even if the track is not finished yet. In other words, each
track restarts at the beginning of each sequence.
TRIG RUN MODE
Each of these 4 tracks are configured in TRIG run mode:
If you play these tracks organized in sequences:
If an active track in the sequence is set to TRIG, it will play
once without looping. If the track is active in the next sequence, it will continue to play just as in FREE run mode.
FREE, RELATCH & TRIG MIXED
A great way to add complexity to your song is to use different run modes for different tracks. Performing sequences
just goes one step beyond!
Copy/Paste/Delete a sequence
Press
Press
Press
2ND
2ND
2ND
+
+
+
copy
+ a sequence to copy it.
paste
delete
+ a sequence to paste it.
+ a sequence to delete it.
36 | Seq Mode

6 Effect Manager
Effect manager principles
You can add up to 4 real-time MIDI effects per track, from
TR01A to TR16D. Notes (played or recorded in
mode, or programmed in
and sent to the outputs in real-time by the effect engines.
All the effects are non-destructive.
The position of an effect in the chain is very important: an
Harmonizer placed after an Arpeggiator will not sound like
an Arpeggiator placed after an Harmonizer. Experiment
with the order of effects to generate eccentric melodies.
It’s also possible to add multiple effects of the same engine on the same track (e.g. chaining two arpeggiators).
STEP
mode) are processed
LIVE
With the effect manager activated, you can still play
notes and smartpads in
stopped or paused, very handy to experiment with effect
parameters. You can also add notes in
mute/unmute tracks in
SEQ
in
Effects compute notes according to the track time signature, so if you change the time signature from 4/4 to 4/8,
effects will operate twice as fast.
Finally, all the effect parameters can be edited in realtime using the programmable controllers, even if you are
not in the FX manager. You can even automate parameters in REC mode or even step (parameter locks).
Some examples of MIDI FX chaining:
mode.
TRACK
mode even if Pyramid is
LIVE
mode, launch sequences
STEP
mode,
Adding effects to a track
Press
track:
To place an effect in the chain, select one of the 4 racks
and press :
to display the Effect manager of the current
FX
37
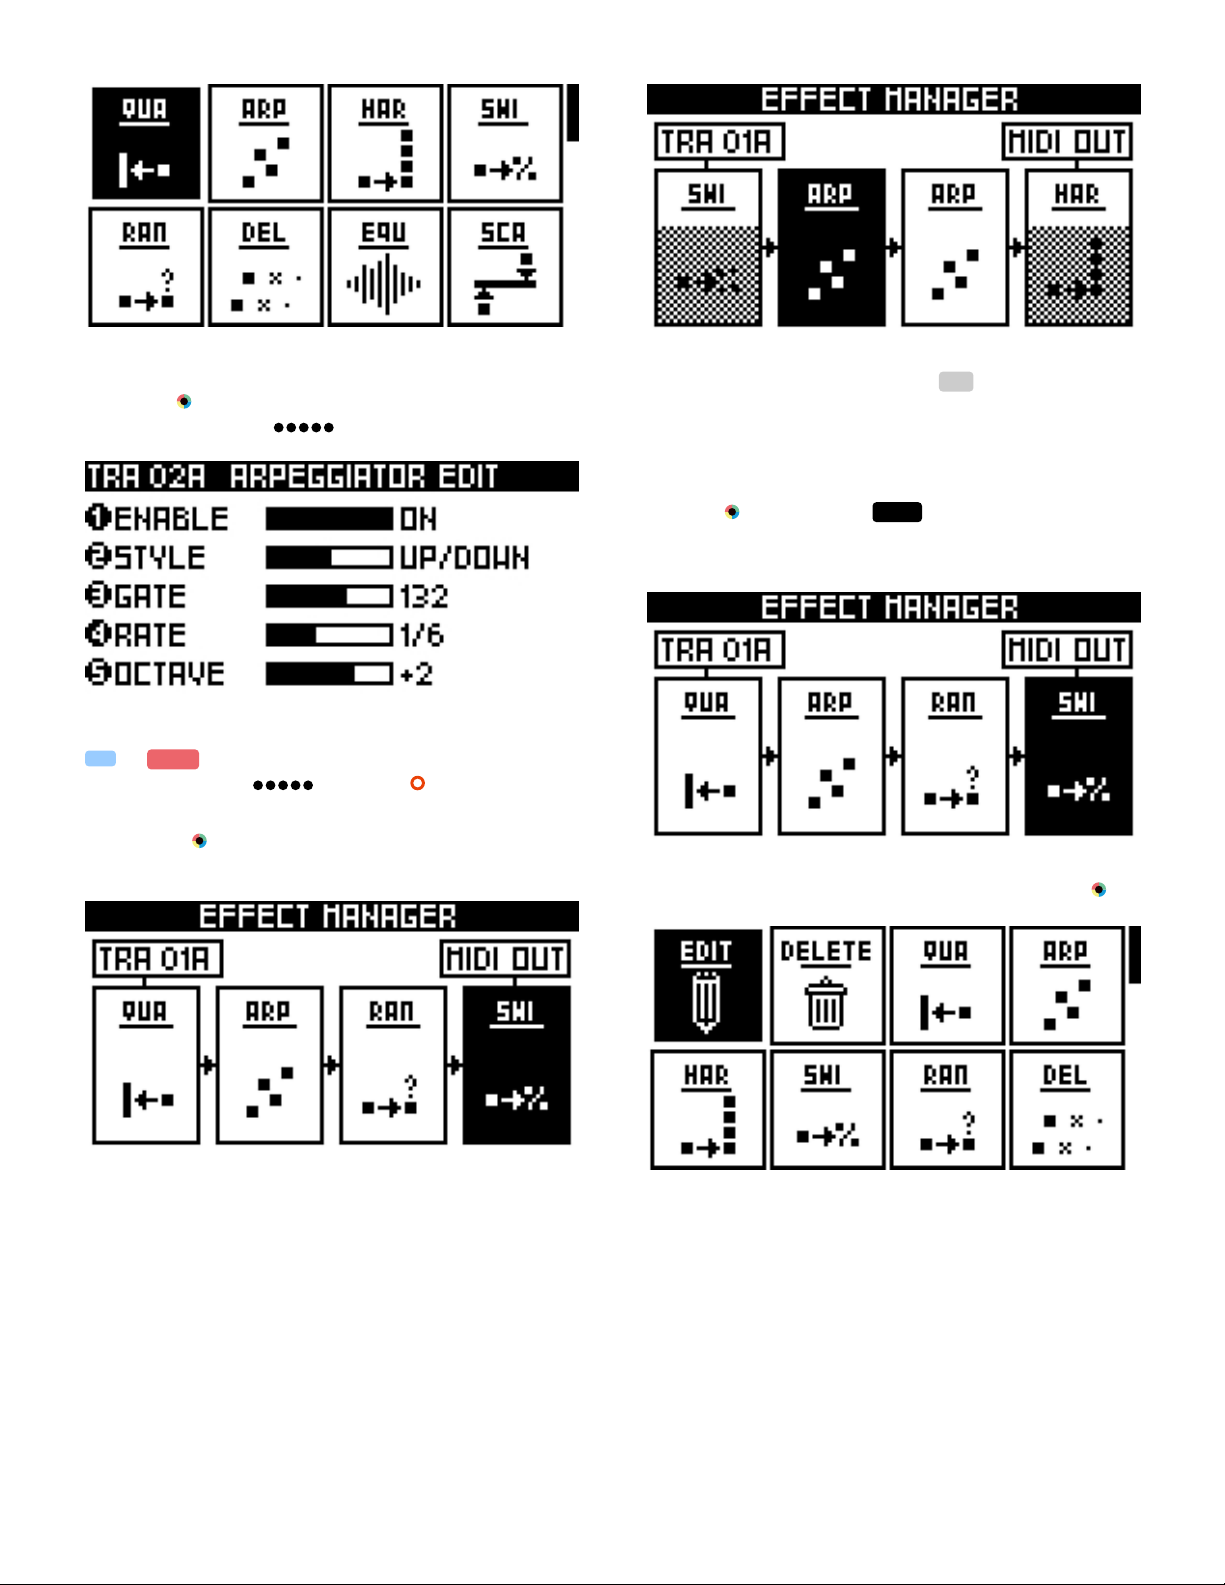
Select an effect from the list, for example an arpeggiator,
and press to add it. It is now possible to edit the effect
using the 5 encoders to find a preferred setting:
To exit the effect manager, press
Other tools
FX
.
TIP
In
ing the 5 encoders , press rec to directly record
effect parameter automation.
Press again to go back to the FX manager. Repeat this
operation to fill up to 4 racks:
mode, when you are editing an effect us-
LIVE
Rotating while pressing
position of the selected effect. The Quantizer can’t be
moved.
Edit, delete or replace an effect by selecting it with :
allows you to change the
2ND
The Quantizer can only occupy the first position. If you attempt
to add the Quantizer on another rack, the effect manager will
automatically move it to the first position.
A disabled effect is greyed (in the screen below, the
SWING and the HARMONIZER are disable):
38 | Effect Manager
Quick FX selection:
• Press encoder 1 to enter the configuration page of an
effect in slot 1.
• Press encoder 2 to enter the configuration page of an
effect in slot 2.
• Press encoder 3 to enter the configuration page of an
effect in slot 3.
• Press encoder 4 to enter the configuration page of an
effect in slot 4.
Quick FX enable/disable:

• Press encoder 2ND + 1 to turn on/off the effect in slot
1.
• Press encoder 2ND + 2 to turn on/off the effect in slot
2.
• Press encoder 2ND + 3 to turn on/off the effect in slot
3.
• Press encoder 2ND + 4 to turn on/off the effect in slot
4.
TIP
Selecting another track with
not exit the FX manager, useful to check if effects are
added in the other tracks.
TRACK
+ does
Effect list
ENABLE
ON OFF
Activate/disable the arpeggiator engine.
QUANTIZER / HUMANIZER
Eliminates or adds imprecision to your performance or
step note edits.
ENABLE
ON OFF
Activate/disable the quantizer / humanizer engine.
GRID
1/6 1/8
1/4
Amount of quantization. A grid of 1/4 bar will move notes
(forward or backwards) to the nearest beat.
HUMAN-
0
Amount of humanization advance. Moves notes backwards (millisecond level) randomly, to mimic the “organic”
human playing.
HUMAN+
0
Amount of humanization delay. Moves notes forward
(millisecond level) randomly, to mimic the “organic” human playing.
…
…
10
10
1/12
1/16
1/24
1/32
STYLE
UP
DOWN UP/DOWN RANDOM ASSIGN
Direction of the arpeggiated pattern. UP plays the pattern
from the lowest note to highest. RANDOM will play notes
in a random order. ASSIGN will play notes in the order
they were played.
GATE
…
…
…
200%
1/64
+5
1%
Pattern note lengths, depends on the rate.
RATE
1/4
Speed of the pattern. A rate of 1/4 will play a note of the
arppegio every beat.
OCTAVE
-5
To create octave shifted progression. If OCTAVE=1 the
arpeggiator will play the original pattern, followed by the
same pattern one octave higher. If OCTAVE=-2 the
arpeggiator will play the original pattern, followed by the
same pattern one octave lower, followed by the same pattern two octaves lower.
HARMONIZER
Turns notes into chords.
ARPEGGIATOR
Turns notes and chords into running patterns.
ENABLE
ON OFF
Effect Manager | 39

Activate/disable the harmonizer engine.
RANDOMIZER
HARMO1
-24 …
Add an extra note simultaneously with the sequenced
note according to the selected interval (harmonic). If
HARMO1=12, a note will be generated one octave
higher. If HARMO1=NO, no note will be added.
HARMO2
-24 …
Add a second extra note.
HARMO3
-24 …
Add a third extra note.
HARMO4
-24 …
Add a fourth extra note.
+24
+24
+24
+24
SWING
Swing notes to create groove rhythms and easily go “off
the grid”.
Randomly changes notes parameters (velocity, pitch or
length).
ENABLE
ON OFF
Activate/disable the randomizer engine.
PARAM
VELOCITY PITCH NOTE LENGTH
Note parameter to be randomized.
RANDOM-
0
… 127
Negative amount of randomization. 0% (default) has no
effect on notes. 100% set the maximum range of negative randomization.
ENABLE
ON OFF
Activate/disable the swing engine.
PERCENT
50%
Percentage of swing (delay the position of every second
point in the quantization grid). 50% (default) has no effect
on note position.
GRID
1/1
Swing quantization grid, to define positions of second
points. Most common grids are 1/8 and 1/16.
VELOCITY
0%
Amount of swing accent. 50% (default) has no effect on
note volume. Decrease this parameter to accentuate the
first note. Increase it to accentuate the second note.
…
…
…
99%
1/64
100%
RANDOM+
0
… 127
Positive amount of randomization. 0% (default) has no
effect on notes. 100% set the maximum range of positive
randomization.
All random-based FX (Humanizer, Randomizer, Chance,
Arpeggiator) utilize a True Random Number generator algorithm!
DELAY
MIDI delay creates a copy of entered notes, simulating a
standard delay effect, but using velocity MIDI data.
ENABLE
ON OFF
Activate/disable the delay engine.
40 | Effect Manager

TIME
1/8
1/4
is the amount of time between the original notes and the
delay notes.
REPEAT
0
FEEDBACK
-100%
Change the MIDI velocity of each delay note. The velocity of the delay notes will be gradually decreased (positive
feedback) or increased (negative feedback). If the feedback is set to 0% velocity will not change.
DRY/WET
0%
Change the MIDI velocity of all notes:
• if 0%, you will only hear the original notes,
• if 50%, you will hear both the original notes and the
• if 100%, you will only hear the delay notes.
TIP
synth you are using, as the velocity MIDI data can be interpreted in many ways.
128
…
…
…
delay notes,
Delay can work very differently depending on the
1/16
1/12
Number of delay notes.
0%
50%
…
…
1/24
100%
100%
1/32 1/48 1/64
Delay time
EQUALIZER
MIDI equalizer changes the velocity of the original notes,
simulating a standard EQ effect, but using the velocity
MIDI data. It increases or decreases note velocities, according to the note pitch. The EQ slope is linear. You
can, for example, increase the velocity of all lowest and
highest notes, increase only medium notes, decrease the
velocity of highest notes, ...
MID GAIN
0%
cording to the BASENOTE parameter).
HI GAIN
0%
(F9#).
…
…
100%
Select the gain of the central notes (ac-
100%
Select the gain of the highest notes
SCALE
This effect quantizes all note pitches to a defined scale in
real time, to refine your melody.
ENABLE
ON OFF
SCALE
MAJOR MINOR
CHROMATIC
KEY
C
… B
STICK
UP
scaled notes, select if the effect have choose the note
below or above.
Activate/disable the scale engine.
…
Select the scale.
Select the scale root note.
DOWN
If a non-scaled note is exactly between two
AEOLIAN LOCRIAN
ENABLE
ON OFF
BASENOTE
C-1#
note pitch of the equalizer.
LOW GAIN
0%
1#).
Activate/disable the equalizer engine.
Select the ”mid gain note” = the central
F9#
…
…
100%
Select the gain of the lowest notes (C-
TRANSPOSE
Transpose all scaled notes
-12 …
+12
NOTE TO CC
This effect converts a note parameter value (note pitch or
note velocity) to a selected CC message (or to the MIDI
”pitch bend”, ”aftertouch” or ” program change”). For example, you can change a synth parameter (like the filter)
according to the velocity of a note. It’s also very handy
to fully control the Korg Volca Sample parameters (pitch,
velocity, ...) with a keyboard.
Effect Manager | 41

ENABLE
ON OFF
PARAM
NT ON VELOCITY NT ON/OFF
rameter value to convert (pitch of the note ON, velocity of
the note, pitch of the note ON and note OFF).
TO CC
CC0
Select the MIDI CC message to be created.
PLAY NOTE
OFF ON
tered. If ON, the original entered note will be played.
Activate/disable the Note 2 CC engine.
Select the note pa-
CC119 PITCH PRESSURE PR. CHANGE
...
If OFF, the original entered note will be fil-
BPM
This effect enables you to create global tempo automation! Very useful for creating BPM changes between two
tracks during your live set, automating small BPM variations, creating ”bouncing ball” effects in sync, ...
ENABLE
ON OFF
CHANCE
0%
be played. If ”50%”, the note has a fifty-fifty chance to be
played. If ”99%”, the note will almost always be played.
If ”VELOCITY,” the note will have the same probability of
being played as its velocity. Very handy for programming
different per note probability.
SYNC
OFF
chance” parameter). If sync = ”1/4”, all beat notes will
have a different probability of being played. If sync =
”1/16”, all sixteenth notes will have a different chance to
be played...
SYNC CHANCE
0%
played. For example, if sync = ”1/4” and sync chance =
”100%”, all beat notes will be played.
APPLY
PER PPQN
the probability affects a group of notes contained in the
same PPQN (if a chord is played, all notes of the chord
will be played or not). If ”PER NOTE” selected, the probability affects each note (if a chord is played, only some
notes of the chord will be played).
Activate/disable the Chance engine.
...
...
100%
1/4
1/8 1/16
100%
PER NOTES
VELOCITY
The probability of a synced note to be
If ”0%”, the note will never
Add a synced probability (”sync
If ”PER PPQN” is selected,
ENABLE
ON OFF
BPM
10
Activate/disable the BPM engine.
The new global BPM (substitutes tap BPM).
250
...
CHANCE
This effect plays or does not play a note based on probability. It’s a great way to add variations to drums or
melodies.
42 | Effect Manager
LFO
Generate high resolution CC waveforms in a flash, based
on wavetables!

WAVEFORM
OFF SINE TRIANGLE
Set the LFO waveform.
SQUARE
S AND H
RAMP
S AND H
means ”sample and
hold”, generating a random value at each synchronized
step.
PHASE
0°
...
Set the phase of the waveform.
180°
RANGE
-127 ...
0
...
Set the amplitude of the wave-
+127
form. If 0, no LFO will be generated. If +63, the LFO will
be generated with the maximum range value (0 to 127).
If -63, the LFO will be generated with the maximum range
value, but the waveform will be inverted (127 to 0). If the
value is upper 63, the LFO will ”saturate”.
RATE
1/16
...
Set the rate of the waveform (from 1/16 bar
64
to 64 bars).
TO CC
CC0
CC119 PITCH PRESSURE PR. CHANGE
...
Set the CC message destination.
TIP
The central value of the LFO is 63. To set an other
central value (0 to 127), add a CC automation in stepmode CC.
TIP
Press
to display the LFO in real-time:
DISP
SINE
TIP
It’s possible to chain multiple LFOs (with the same
CC number, on the same track), in order to create original
waveforms:
TRIANGLE+TRIANGLE
RAMP
SINE
+
RAMP
S AND H
Effect Manager | 43


7 Assign
Assign principles
The 5 encoders , the analog inputs, as well as the
touchpad X+Y axis, are able to control CC messages
and effect parameters in real-time.
Once they are assigned, you can perform with them in all
Pyramid’s modes and submodes.
To record CC messages automation or effect parameters,
you must be in
Assignments are saved with the project and are independent of the current track and sequence. Selecting a new
track or a new sequence will not unlink or change the assignment. That means that you can work on track TR05D
and slide the touchpad to control a CC message or an effect parameter of TR01A, perfect for live performance.
The controllers are always ready for use, very handy for
simultaneous multi-track control.
We tried to make the controller assignment process as
easy as possible. If you love to play the touchpad for
creating automation, it’s fast and simple to reassign the
control to another CC message or effect parameter and
record your performance.
TIP
Once an encoder is assigned, press it to display its
set value. In
played on the 16 leds when rotated.
You can record automation on a track filled with notes, or on a
blank track. This allows one to create tracks filled only with automation, and thus mute/unmute, and sequence CC messages
and effect parameter automation.
LIVE
mode, with
LIVE
mode, the encoder value will be dis-
REC
enabled.
Now you have two options:
Assign the CC message to the MIDI channel and out-
1
put of the selected track. The CC will be always sent to
the same channel & output, whatever the current track.
Assign the CC message to ”GLOBAL”: the CC mes-
2
sage will be sent on the channel of the current track. For
example if you assign the CC7 (VOLUME) on the encoder
1, this CC will control the VOLUME of the current track instrument.
Assign a CC message
Hold
ASSIGN
• turn an encoder , or
• slide the touchpad X or Y axis, or
• plug a jack into the CV or the GATE input.
The display “ASSIGN ENCODER TO…” will appear on
the screen. Select MIDI CC by rotating then press to
confirm:
and …
Now select the CC message number, from CC0 to
CC119. Scroll the list and press to assign the CC message. Holding
and rotate allows fast scrolling.
2ND
45

How to assign an effect
parameter
At the end of the CC list, you can find the PITCH
BEND, the PRESSURE (aftertouch) and the PROGRAM
CHANGE MIDI messages:
You can record automation on the current track only if:
• the CC channel (e.g. CH14) is the same as the track
channel
• the output of the CC is the same as the track
Note: as soon as you assign a CC control and move it to set
the value, an automation message is created to store this value
(you can display it or remove it in stepmode CC MESSAGES).
This message will be sent at the start of the track, so your synthesizer will always have the right set value. You can disable
this feature in SETTINGS > MISC > CC ASSIGN > AUTOREC
OFF.
When an assigned encoder is moved or pressed, a popup
is displayed, with the CC number (68), the CC value (111)
and the CC MIDI channel (CH09A):
Hold
ASSIGN
• turn an encoder , or
• slide the touchpad X or Y axis, or
• plug a jack into the CV or the GATE input.
The display “assign control to…” must popup. Select and
press EFFECT PARAM with :
Using , select the track containing the effect you want
to assign:
Select the effect you want to assign with :
and …
46 | Assign
Using , select the parameter you want to assign:

You can record the effect parameter automation on the current
track only if the effect belongs to the current track.
When an assigned encoder is moved or pressed, a popup
is displayed displaying the effect (ARP), the effect parameter (STYLE), the effect value (DOWN), and the effect
track (01A):
Automation recording and overdub
Unlike notes, automation is not recorded with overdub.
That means that the player will erase existing automation
step.
For example, if you activate rec in
gressively change an assigned value (e.g. CC10) during
the first loop, an automation is created:
mode and pro-
LIVE
If you don’t disable rec during the second loop, and
even if you don’t change the assigned value, the automation will be erased step:
Assign | 47

You can of course record another automation if rec is
still enabled:
Assign touchpad to smartpads
When assigning the touchpad, another option appears:
SMARTPADS
Select the octave range of the touchpad X axis:
Disable rec to preserve automation:
This operation applies to all CC messages, pitch bend,
pressure, program change and effects parameters.
Assign the touchpad Y axis to a note parameter:
Now you can slide the touchpad X axis to:
• play with chords (if
• play with repeats (if the
• play with scales (if the
For example, if
OCTAVES and Y axis = VELOCITY, slide the touchpad
X to play notes (in the selected scale) and the touchpad
Y to change note velocity.
You can play smartpads with the touchpad in every mode,
and record your performance. Notes are always sent on
the current track so you can use MIDI effects if you want.
LIVE
smartpads = CHORD)
LIVE
smartpads = REPEAT)
LIVE
smartpads = SCALE)
LIVE
smartpads = SCALE, X axis = 2
48 | Assign

Note about analog input voltage assignment
You can assign the two analog jack inputs (CV input and
GATE input) to control in real-time CC messages and effect parameters. It’s a great way to control Pyramid with
your CV modules, or to create your own DIY analog controller.
The voltage (0V to 5V) will be converted to a CC MIDI
value (0 to 127) or to an effect parameter value (for example the arpeggiator STYLE).
Hold
ASSIGN
want to assign (CV input or GATE input), the assign manager display will appear. Then select the CC message or
the FX you want to assign. Moreover, the option “CV IN
MODE” in
stead of CV/GATE.
and plug a mini jack on the input you
SETTINGS
will be autoset to CC MESSG, in-
Assign | 49


8 Save/Load
Save/load principles
To save or load a project, make sure a SD card is inserted, hold
menu:
A project is a whole set of 64 tracks (notes + effects racks
+ CC messages automation + effect parameters automation), 16 sequences, sequences chain, assignments and
settings. Saving or loading a new project will stop playback.
Please do not remove the SD card while save/load menu is activated. To exit the save/load menu, press
To exit the Save/load menu, press
2ND
and press
save/load
2ND
save/load
to enter the
save/load
+
2ND
or
.
Select “<” to delete the last character. Select “SAVE” to
confirm.
TIP
Hold
in the edit display.
and rotate to move the cursor vertically
2ND
Load
Select LOAD with to load a new project on the SD card.
This action will delete the current project: you must save
your project before loading an other one.
Select the project to load in the dropdown list with :
.
Save
Select SAVE with to save the project on the SD card
with the current project name. If no project name was defined (NEW PROJECT), SAVE will redirect you to SAVE
AS.
Saving an existing project creates a backup file on the SD card,
for example “BACKUP_PROJECT1”, to always keep an old version of your project. This backup is not displayed on the LOAD
project list. If you want to load it, rename the file, for example
“PYRA_PROJECT1”.
Save As
Select SAVE AS with to save the project with a new
name. Then edit the project name with this edit display:
Press to load selected project.
TIP
Press 2ND + delete to remove the selected project
permanently from the SD card (note: the backup project
is not removed).
New
NEW
Select
from scratch.
to delete everything in the project and restart
Project files
Project directories are always saved on the SD card with
the prefix “PYRA_”, in the SD root directory.
You can read the project files on your computer:
51

The core.pyr file contains the project settings, the sequences data, assignments and effects racks.
The other files can be deleted:
The track 01A contains MIDI notes (track01.mid), MIDI
CC automation (CC_track01.mid) and effects parame-
ters automation (FX_track01.pyr).
The track 09A contains only MIDI CC automation
(CC_track09.mid).
The track 10A contains only effects parameters automation (FX_track10.pyr).
The track 01B contains only MIDI notes (track17.mid).
The track 16D contains only MIDI notes (track64.mid).
You can also create a MIDI track from scratch on your
DAW and export it to an existing SD card project directory, with a valid name. If you want to export the *.mid file
(filled with notes) to the Pyramid TR08A, name the file
track08.mid. For TR01B, name the file track17.mid. For
TR16D, name the file track64.mid...
Pyramid will play this .mid note pattern in a loop, depending on the track length.
Import and export files
It’s easy to import and export MIDI files (notes and CC
automation) because Pyramid store these files as standard *.mid data (type 0 MIDI file: single track). All popular
DAWs can play and edit MIDI files.
You can import or export from short patterns up to long linear tracks. For example, you can drag-and-drop a *.mid
file from the SD card project directory to your favorite software sequencer (e.g. Ableton) and play and edit this pattern on the DAW:
52 | Save/Load

9 Settings
Settings menu
Press
2ND+FX
Then select the settings folder. You can also select the
disk icon to:
• ● Save settings currently stored in flash memory. Settings options will be auto-loaded at Pyramid startup.
• ● Save current track channel mapping in flash memory. The 64 track channels will be auto-loaded at Pyramid startup.
• ● Restore default settings.
• ● Restore default track channels.
To exit the settings menu, press
TIP
You can also restore default settings at startup: hold
the encoder5while powering ON Pyramid.
MIDI in
PYRAMIDI
CHANNEL 1
Select the input channel to control Pyramid with PYRAMiDi
messages (see the MIDI implementation chart). For example,
if CH13 is selected, you can send channel 13 MIDI CC messages (with an external controller) to Pyramid, to mute/unmute
the 64 tracks on the fly, select a track, activate REC, launch a
sequence…
to enter General Settings.
FXor2ND
CHANNEL 16 OFF
...
.
MULTITRACK OFF will play notes and CC on the current track,
regardless of the controller channel. MULTITRACK ON will play
CH01 notes and CC on TR01A, CH02 notes and CC on TR02A,
…CH16 notes and CC on TR16A.
IGNORE SYNC
OFF ON
Enables or disables BPM auto-sync, if your MIDI IN controller
is sending a timing clock.
IGNORE CC MESSAGES
OFF ON
Filters out all CC messages from your MIDI IN controller.
IGNORE START STOP
OFF ON
Filters out all START, STOP and CONTINUE messages from
your MIDI IN controller.
IGNORE PITCH
OFF ON
Filters out all PITCH BEND messages from your MIDI IN controller.
IGNORE AFTERTOUCH
OFF ON
Filters out all AFTERTOUCH (channel pressure) messages
from your MIDI IN controller.
IGNORE PR CHG
OFF ON
Filters all PROGRAM CHANGE messages of your MIDI IN controller.
TRANSMIT SYSEX
NO
MIDI A MIDI B MIDI AB
If OFF, received sysex messages are ignored. If Midi A (or Midi
B, or Midi A+B), received sysex messages transmitted to MidiA
(or Midi B, or Midi A+B).
ANTI ECHO
OFF ON
If ON, received notes (midi in) are not transmitted to midi out,
but they still can be recorded. Handy if your synth (connected
to Pyramid via midi in and midi out) does not include the setting
”Local Control = Off/On”
MIDI out
ASSIGN NOTE TO
KEYPAD
OFF
Specifies if received notes are performed as notes, smartpads
(e.g. CHORDS) or ignored. If SMARTPADS ONLY WHITE is
selected, only the white keys will trig the smartpads.
OMNI MODE
MULTITRACK ON MULTITRACK OFF
SMARTPADS SMARTPADS ONLY WHITE
MIDI A MODE
MIDI OUT
TURBO MIDI X2 TURBO MIDI X4 TURBO MIDI X5
TURBO MIDI X6.7
Configures Pyramid MIDI out A as a MIDI out (default), as a
MIDI thru (all messages received on the MIDI input will be sent
directly on the MIDI out A), as a MIDI out + thru (all messages
received on the MIDI input will be sent directly on the MIDI out
A, together with Pyramid MIDI messages).
MIDI THRU
MIDI OUT + THRU MIDI OFF
53

It’s possible to speed up the midi A communication up to 6,7
times and avoid latency problem, when sequencing an Elektron
machine (Analog Four, Analog Keys, Analog Rytm, Octatrack),
by using the TURBO MIDI protocol.
SYNC MIDI A
OFF SEND
Sends BPM MIDI clock to MIDI out A.
START/STOP MIDI A
OFF SEND
Sends START, STOP and CONTINUE messages to MIDI out
A.
MIDI B MODE
MIDI OUT
Configures Pyramid MIDI out B as a MIDI out (default), as a
MIDI thru (all messages received on the MIDI input will be sent
directly on the MIDI out B), as a MIDI out + thru (all messages
received on the MIDI input will be sent directly on the MIDI out
B, together with Pyramid MIDI messages).
MIDI THRU
MIDI OUT + THRU MIDI OFF
SYNC MIDI B
OFF SEND
Sends BPM MIDI clock to MIDI out B.
START/STOP MIDI B
OFF SEND
Sends START, STOP and CONTINUE messages on MIDI out
B.
SYNC USB
OFF SEND
Sends BPM MIDI clock to MIDI out USB.
START/STOP USB
OFF SEND
Sends START, STOP and CONTINUE messages to MIDI USB.
SYNC STOP
NO CLOCK SEND CLOCK
If NO CLOCK selected, the sync (timing clock) will never be
sent when the player is stopped or paused.
CV/pedal
CV IN MODE
OFF CV/GATE CC MESSAGES
Selects if the CV inputs control notes of the current track
(CV/GATE) or CC messages (see Note about analog input voltage assignation).
CV IN 2V NOTE
...
F4#
C1#
Selects the CV INPUT TO MIDI root note. By default, a CV
voltage of 2V plays a C2 MIDI note on the current track.
Selects if your analog controller generates CV V/oct or CV Hz/V.
CV OUT 2V NOTE
...
F4#
C1#
Selects the MIDI TO CV OUTPUT root note. By default, a C2
MIDI note plays a CV voltage of 2V.
CV OUT TYPE
VOLT/OCTAVE HERTZ/VOLT 1.2 VOLT/OCTAVE
Selects if your analog synthesizer is controlled by CV V/oct or
CV Hz/V.
GATE POLARITY
ACTIVE 5V ACTIVE 0V
Selects the active polarity gate of your analog synthesizer.
ASSIGN ENV OUT TO
VELOCITY PITCH AFTERTOUCH MODULATION
DIN SYNC METRONOME
Selects if the CV ENV outputs the note velocity, the pitch, the
aftertouch (channel pressure) or the modulation of the CV track.
You can also assign the CV ENV output to the din sync clock,
to easily sync your modular system with a mini jack.
DIN SYNC
OFF SYNC1 SYNC2 SYNC4 SYNC8 SYNC12
SYNC16 SYNC24 SYNC48 SYNC96
Selects the DIN SYNC clock speed.
SEND DIN SYNC
PLAY ONLY ALWAYS
The DIN SYNC clock can be sent only when the player is playing, or always (when player is stopped or played).
PEDAL HOT
REC HARD REC PLAY/PAUSE PLAY/STOP
PREVIOUS TRACK NEXT TRACK
NEXT SEQ
Sets the action triggered by the footswitch pedal.
TAP TEMPO
PREVIOUS SEQ
PEDAL COLD
REC HARD REC PLAY/PAUSE PLAY/STOP
PREVIOUS TRACK NEXT TRACK
NEXT SEQ
Sets the second action that will be triggered by the footswitch
pedal (if double pedal used).
TAP TEMPO
PREVIOUS SEQ
ANALOG IN
(display only)
Display the 4 input voltages (0 to 5V).
ANALOG OUT
(display only)
Display the 3 output voltages (0 to 5V).
Misc
CV IN TYPE
VOLT/OCTAVE HERTZ/VOLT
54 | Settings
LIVE LOOPER
OFF
BEAT 1 BAR 2 BAR ...
8 BAR

Enable LIVE looper recording and select looper time quantization (see Record your performance).
SIGNATURE
POLYRHYTHMS POLYMETERS
- If POLYRHYTHMIC is selected, Pyramid apply true
Polyrhythms when different time signatures are used. If you select a 3:4 time signature you will have bars of 3 quarter notes,
but the bar will have the same duration as a 3/4 bar.
- If POLYMETRIC is selected, all quarter notes remain the
same. If you select a 3/4 time signature you will have bars of 3
quarter notes, and each quarter note will have the same length
than the 4/4 ones. The polymetric mode is easier to understand than the Polyrhythmic one because it doesn’t mix several
speeds.
DOUBLE TAP MODE
VELOCITY GLIDE
In NOTE and CHORD stepmodes, double tap a pad to enter
velocity accents or gliding notes. Glides only works with compatible synths: if two notes follow, the first one must be double
tapped to create a glide (= an overlapping) between these two
notes.
REC COUNTDOWN
OFF
1 BAR 2 BAR
Activates a countdown before a recording in live mode (When
the player is stopped and you press REC then PLAY). You can
select the duration of the countdown. The countdown will be
sent on the metronome output channel and note.
3 BAR
4 BAR
METRONOME CH
CURRENT TRACK MIDI CH01A
Select the metronome output channel (made with midi notes).
If the metronome is activated (2ND+LIVE), the metronome will
be send on this selected track, and will follow the beat.
USB CH16
…
METRONOME NOTE
C-1 G9
Select the metronome output note. If the metronome is acti-
2ND+LIVE
vated (
note.
), the metronome will click on the selected
STEP LEARN
OFF LEARN NOTES
If OFF, step note learn with an external keyboard is disable (see
Note Stepmode).
CC ASSIGN
AUTOREC OFF AUTOREC ON
With autorec on, as soon as you assign a CC control and move
it to set the value, an automation message is created to store
this value (you can display it or remove it in stepmode CC MESSAGES). This message will be sent at the start of the track, so
your synthesizer will always have the right set value.
PLAY PAD
PLAY/PAUSE PLAY/RESTART
If ”play/pause” selected, a press on the PLAY pad will alternately play and pause the playback. If ”play/restart” selected, a
PLAY/MUTE
press on the PLAY pad will always restart the current sequence
playback from the beginning. If ”mute” selected, Pyramid continue to play but send no midi data if the player is paused.
MUTE DELAY
SAME AS SEQ PERFORM
Select if tracks mute/unmute are in sync with SEQ PERFORM
or always instant (see Mute/unmute tracks on the fly).
INSTANT
DEFAULT TRACK
MODE FREE MODE RELATCH MODE TRIG
Set the default run mode of new tracks.
DEFAULT ZOOM
25% 50% 100% 200% 400%
Define the default zoom of all tracks at startup.
DEFAULT LENGTH
1 BAR …
Define the default length of all tracks at startup.
64 BAR
DEFAULT TS L
1/
Define the default time signature top number of all tracks at
startup.
…
24/
DEFAULT TS R
…
/16
/1
Define the default time signature bottom number of all tracks at
startup.
DEFAULT PERFORM
INST
Set the default run mode for new tracks.
BEAT 1 BAR …
8 BAR
POPUP ASSIGN
ON CLICK ON ROTATE AND CLICK
Displays a popup with encoder assignment information on click
or on rotation.
TOUCHPAD
ON OFF
Enables or disables the touchpad.
TOUCHPAD RELATCH
NO RELATCH
If no relatch is selected, the touchpad (assigned X or Y position)
will keep it’s last set value. If a value is selected (for example
0), the touchpad will send back this value when the touchpad
is released.
0
… 127
ENABLE USB
ON OFF
Enables or disables the USB output.
AUTOLOAD
OFF LAST SAVED PROJECT LAST LOADED PROJECT
After startup, Pyramid can load an empty project, load the last
saved project or load the last loaded project.
Settings | 55

STOP/PAUSE LED
OFF ON
When Pyramid is stopped or paused, the led displaying the
player position on the 16 pads will blink.
56 | Settings

Step mode
10 Shortcuts
In any mode
Hold
TRACK
•
solo
•
MIDI channel
•
zoom
length
•
time signature
•
To change BPM in decimal increments, turn while
pressing it.
Hold
2ND+BPM
the tempo, which will apply only when you release
Hold
2ND
BPM in a flash.
Once an encoder is assigned, press it to display its set
value.
FX manager,Assign
In
to exit and return to the current mode.
BPM
Hold
2ND
Live mode
Hold
LIVE
smartpads.
Hold
STEP
and smartpad velocity. You can also press
enable the ENCODER STEP EDIT feature, in order to set
velocity
the
Hold
2ND
When the player is stopped and you press rec , Pyramid waits for play to be pressed. Once you press
a countdown begins. After a specified number of countdown bars, recording starts and continues until the end of
the track loop at which point recording stops and the loop
continues to play as normal.
When smartpads = CHORD,
to the very next major/minor tonality. Add complexity by
pressing and rotating .
When smartpads = SCALE,
the root note of the scale.
+ play activate the HOLD/RELATCH mode.
2ND
Press
2ND
tion + FX automation of the current track.
to activate the following shortcuts:
and turn the data knob to change
2ND
and press<or>to double or divide the
,
DISP
and press
and rotate to change the function of the 8
velocity
+
using the touchpad X axis.
and press rec to activate a hard recording.
+
delete
to activate the metronome.
LIVE
and rotate to change keypad
2ND
2ND
to delete only notes + CC automa-
Settings
or
+ rotating will jump
+ rotating will select
, press
ASSIGN
to
Hold
STEP
Hold
list faster.
Preview the selected note by pressing . Pressing
or>while holding allows you to jump octaves for a
quicker note navigation. You can also press a key
while holding to directly select the note number.
In stepmode
a step. Hold
(and even edit) the step velocity. Same functionality is
true for
edit several steps: hold
and press the first step together with the last step of the
row .
.
Double tap a step pad to add a low velocity note
in order to create accents quickly.
velocity
Hold
quickly set the velocity, the CC value or the FX value.
Hold<or>to quickly navigate pages.
Press
(shift all notes one step left or right).
Press rec to switch to MONO EDITING, to have a global
view of which of the 16 steps are filled with notes. Pressing a filled step will remove all notes in this step, whatever
the selected note is.
In stepmode
a row of steps) and rotate to transpose it. Hold rec
and rotate to transpose the track notes.
In stepmode
step (or a row of steps) and rotate to increase/decrease its value. Hold rec and rotate to
transpose the whole automation.
In stepmode
rec and slide the touchpad to draw an automation.
Press
feature, in order to assign directly the 5 encoders and the
touchpad to shortcuts.
In stepmode
STEP
programmed notes or CC messages. Press
STEP
and turn to change Stepmode.
and rotate to scroll the note list or the CC
2ND
, you can display the parameters of
NOTE
velocity
length
2ND
ASSIGN
to activate the filter, in order to scroll only through
again to quit the filter.
and
and slide the touchpad from left to right to
and hold<or>to quickly rotate the track
NOTE
CC MESSAGES
CC MESSAGES
NOTE
and press a filled step to display
. You can also display and
width
velocity
and
CHORD
to enable the ENCODER STEP EDIT
and
CC MESSAGES
length
(or
, hold a step (or
and
EFFECTS
and
EFFECTS
or
, pres
width
, hold a
, hold
2ND
2ND
<
)
+
+
Track mode
Hold
instantly.
Hold
lect the MIDI output of the track.
and select a track to mute/unmute it
2ND
MIDI channel
and press + rotate to quickly se-
57

length
Hold
step precision.
time signature
Hold
signature’s upper number on the current track.
Pess rec in order to disable saving sequence mute
states (rec led will be OFF). If you mute or unmute a track,
the sequence will not save mute states.
In
DISP
> TR07A, TR08A > TR16A, TR01B > TR07B, …)
and press + rotate to set the bar level with
and rotate to change the time
view, rotate to scroll the track banks (TR01A
FX manager mode
With the effect manager activated, you can still play
or add notes in
tracks in
SEQ
Rotating while pressing
position of the selected effect.
In
encoders , press rec to record directly the effect
parameters automation.
In the main EFFECT MANAGER window:
• Press encoder 1 to enter the parameter screen of the
effect in slot 1.
• Press encoder 2 to enter the parameter screen of the
effect in slot 2.
• Press encoder 3 to enter the parameter screen of the
effect in slot 3.
• Press encoder 4 to enter the parameter screen of the
effect in slot 4.
• Press encoder 2ND + 1 to turn the effect in slot 1 on or
off.
• Press encoder 2ND + 2 to turn the effect in slot 2 on or
off.
• Press encoder 2ND + 3 to turn the effect in slot 3 on or
off.
• Press encoder 2ND + 4 to turn the effect in slot 4 on or
off.
TRACK
mode.
mode, when you are editing an effect with the 5
LIVE
and
LIVE
mode, and even launch sequences in
STEP
2ND
mode, mute/unmute
allows you change the
Assign mode
Hold
and rotate to scroll through the CC list faster.
2ND
Save/load mode
Hold
the SAVE AS…edit display.
In the LOAD project list, press
a project definitively from the SD card (note: the backup
project is not removed).
58 | Shortcuts
and rotate to move the cursor vertically in
2ND
+
2ND
delete
to remove
 Loading...