

Page 1

SquareLED - Othello
Page 2

Manual | Othello
1. Safety Warning
Squareled products are designed and manufactured to meet the requirements of People’s Republic of China
and international safety regulations. Modications to the product could aect safety and render the product
non-compliant to relevant safety standards. Instructions pertaining to continued protection against re, electric
shock, and injury to persons are found throughout this manual. Please read all instructions prior to assembling,
mounting, and operating this equipment.
IMPORTANT
ALWAYS READ THE USER MANUAL BEFORE OPERATION. PLEASE CONFIRM THAT THE POWER SUPPLY STATED
ON THE PRODUCT IS THE SAME AS THE MAINS POWER SUPPLY IN YOUR AREA.
• This product must be installed by a qualied professional.
• Always operate the equipment as described in the user manual.
• A minimum distance of 0.5m must be maintained between the equipment and combustible surface.
• The product must always be placed in a well ventilated area.
• Always make sure that the equipment is installed securely.
• DO NOT stand close to the equipment and stare directly into the LED light source.
• Always disconnect the power supply before attempting and maintenance.
• Always make sure that the supporting structure is solid and can support the combined weight of the
products.
ATTENTION
This product left the place of manufacturer in perfect condition. In order to maintain this condition and for safe
operation, the user must always follow the instructions and safety warnings described in this user manual.
• Avoid shaking or strong impacts to any part of the equipment.
• Make sure that all parts of the equipment are kept clean and free of dust.
• Always make sure that the power connections are connected correct and secure.
• If there is any malfunction of the equipment, contact us immediately.
• When transferring the product, it is advisable to use the original packaging in which the product left the
factory.
• Shields, lenses or ultraviolet screens shall be changed if they have become damaged to
• such an extent that their eectiveness is not conformable.
Page 3
Manual | Othello
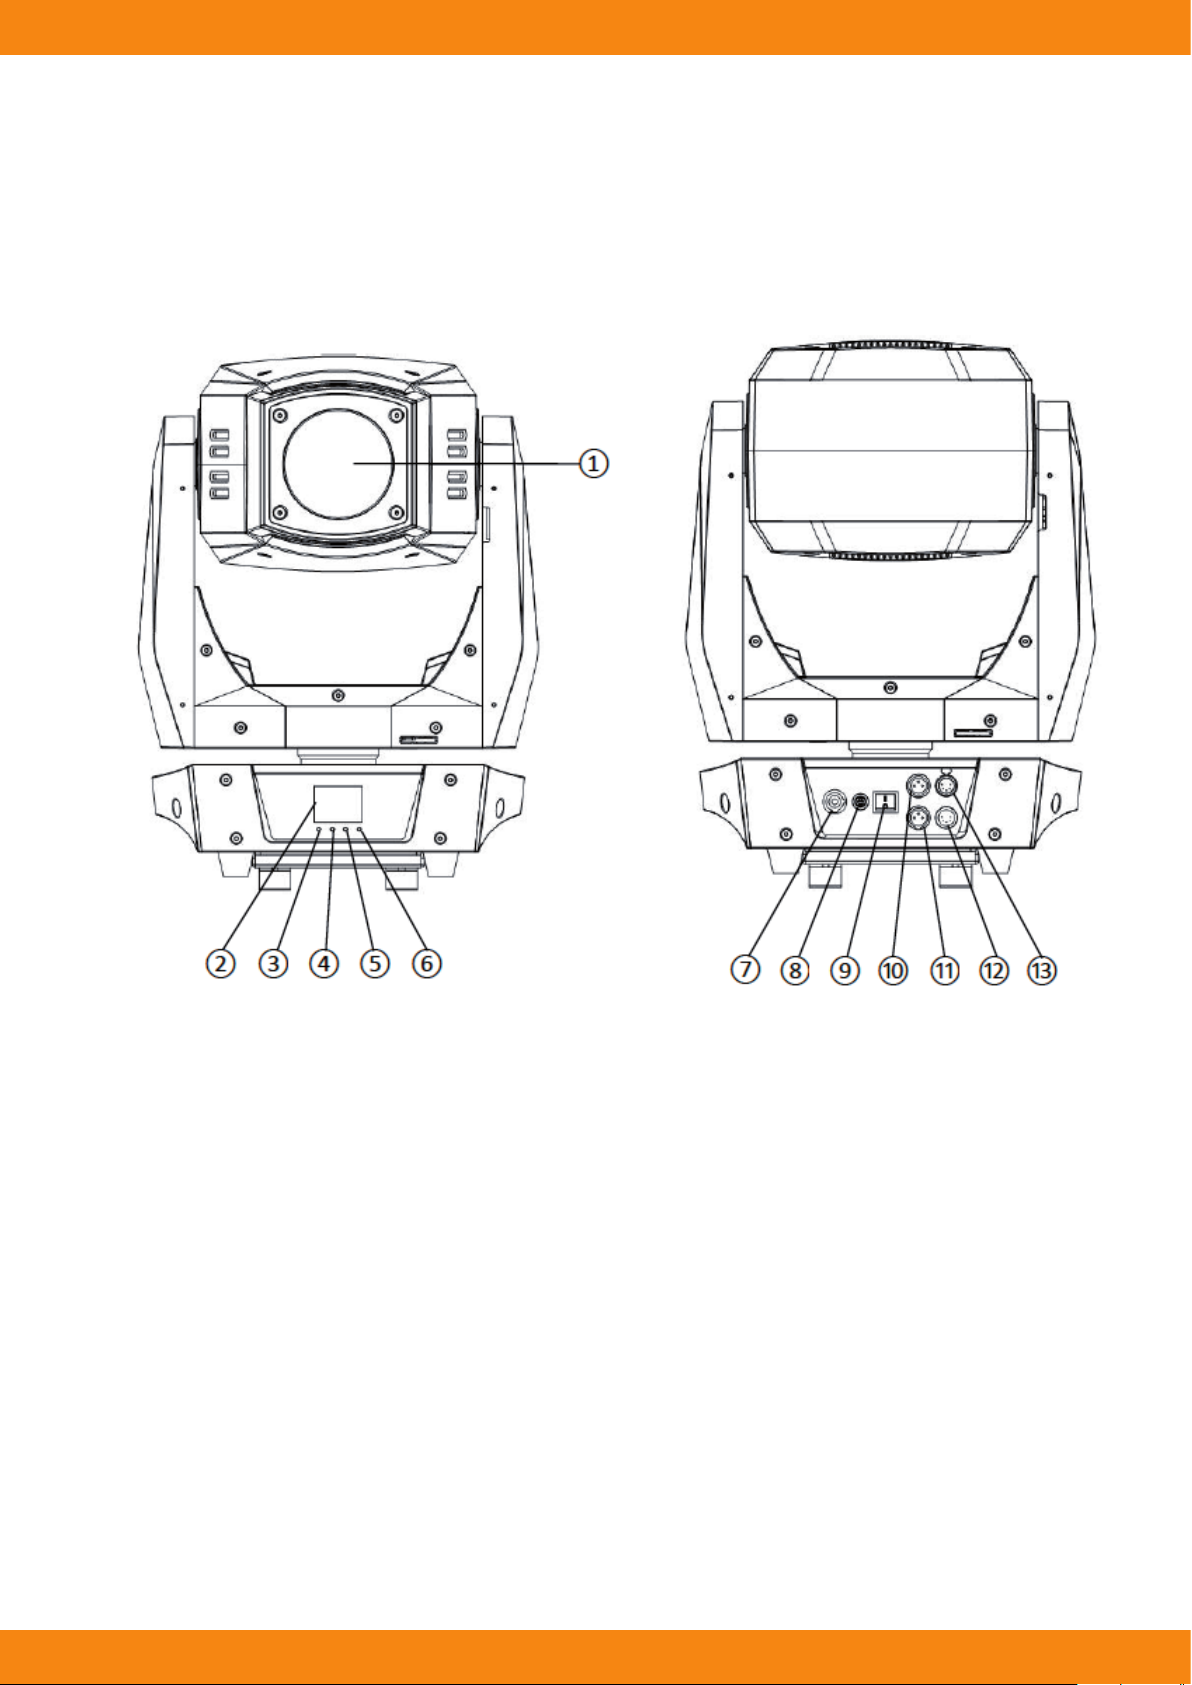
2. Fixture Overview
1) Lens
2) LCD display
3) Menu-button
4) Down-button
5) Up-button
6) Enter-button
7) PowerCon in
8) Fuse
9) Switch
10) DMX 3-pin out
11) DMX 3-pin in
12) DMX 5-pin in
13) DMX 5-pin out
Page 4

Manual | Othello
3. Features
Othello is a low power high output LED moving head. An incredibly ecient 480W white LED engine, provides
output comparable with traditional 1200W discharge lamp xtures.
• Source: 480W White LED
• CT: 6500K
• Life: >20,000 hrs
• Power supply: AC 100-240V, 50/60Hz
• Power consumption: 650W
• Color: 1 Color Wheel with 7 dichroic lters plus open, full and split gels function,two directional rainbow
eects. CMY variable color mixing for innite color possibilities. CTO color temperature linear change.
• Gobo: 2 rotating Gobo Wheels, each one has 6 interchangeable glass gobos plus open. Index,shake and
bi-directional rotation at variable speed.
• Zoom: 13-37° linear zoom
• Focus: Motorized, auto focus function
• Iris: Step-less, 5-100% linear change iris with pulse eects
• Prism: 3-facet circular rotating prism
• Frost: 1 frost lter
• Dimmer: 0-100% smoothly adjustable
• Strobe: 0-20 Hz variable speed, pulse and random strobe
• Pan/Tilt: 540°/270°, 16 bit resolution, position memory, auto correction after unexpected movement.
• Control mode: DMX512, Manual
• DMX channel: 26/33
• Net weight: 32 Kgs
• Dimension: 708x410x308 mm
4. Installation Instructions
• The installation must always be secured with a secondary safety attachment, e.g. an appropriate safety
cable.
• Never stand directly below the device when mounting, removing or servicing the xture.
• The operator has to make sure the safety and technical installations are approved by an expert before
taking using this xture in the eld for the rst time.
• Fixed installations must be inspected by a skilled person on a regular basis.
• Overhead mounting requires extensive experience, including amongst others calculating working load
limits, installation material being used, and periodic safety inspection of all installation material and the
device. If you lack these qualications, do not attempt the installation yourself. Improper installation can
result in serious bodily injury.
Page 5

Manual | Othello
Attachment Instructions
• Attach the Omega clamp on the bracket by tighten the M12 bolt on the bracket to the hole in the middle
of the bracket.
• Insert the quick-lock fasteners of the bracket into the respective holes on the bottom of the xture.
• Tighten the quick-lock fasteners fully clockwise.
• Install the second Omega clamp.
• Attach the safety-cable through the holes on the bottom of the base. Attach to the trussing system or
other safe xation point.
• Be sure the safety is fully looped, the quick-link is attached and fully tighten.
• Inspect for complete attachment before lifting over-head.
Page 6

Manual | Othello
5. Dimensional Drawings
Page 7

Manual | Othello
6. Mounting Orientations
Be sure this xture is kept at least 0.5m (1.6ft) away from any ammable materials (decoration etc.). Always use
and install the supplied safety cable as a safety measure to prevent accidental damage and/or injury in the event
the clamp is improperly installed or fails.
Overhead mounting requires extensive experience, including amongst others calculating working load limits, a
detailed knowledge of the installation materials being used, and periodic safety inspection. This safety inspection must cover all installation material, trussing, hardware and the xture. If you lack these qualications, do
not attempt the installation yourself. Improper installation can result in sever injury and possible death if struck
by a falling xture.
Page 8

Manual | Othello
7. Linking Fixtures
The Othello xture operates on standard DMX512 link controlled by a DMX console. The number of xtures on
a link will be determined by the combined number of channels required by all the xtures. An Othello xture
requires a 26/33 channel footprint on a standard DMX512 link. Attach the xture to the link using data-grade
cable and 5-pin or 3-pin XLR cable connectors.
Cable Connectors
The Othello xture accepts both 3-pin and 5-pin XLR cable connectors. Cabling must have a male XLR connector
on one end of the cable and a female XLR connector on the other end.
To link one or more xtures to a DMX controller:
• Connect the male XLR connector of a DMX Data cable to the controller’s DMX Data Outconnector.
• Connect the Data cable’s female XLR connector to the Data In connector of the rst (or next) xture on the
DMX link.
• Continue linking the remaining xtures connecting a cable from the Data Out connector of each xture to
the Data In connector of the next xture on the link.
Page 9

Manual | Othello
DMX Terminator
For installations where the DMX cable has to run a long distance or is in an
electrically noisy environment, a DMX terminator on the last xture of the
link prevents data reection, which can corrupt the data communication on
the link.
Terminate the link by installing a 120 ohm, 1/4 watt (minimum) terminator
in the xture’s Data Out (female) cable connector in the last xture on each
DMX link.
8. Fixture Control Board
Using the Control Board to set the starting DMX address or make other settings. The functions provided are
described in the following sections.
(MENU) Scroll through the main menu or exit from the current sub-menu.
(DOWN) Scroll ‚DOWN‘ through the menu list or decrease the value of the current function.
(UP) Scroll ‚UP‘ through the menu list or increase the value of the current function.
(ENTER) Enter the currently selected menu or conrm the current function value.
Address 001-512 DMX address setting
Standard 33Chs
Channel Mode
Reduced 26Chs
Invert Pan O/On
Pan/Tilt
Fixture
Invert Tilt O/On
Swap Pan-Tilt O/On
Curve
Curve 1
Optional dimmer
Curve 2
curves
Curve 3
Page 10

Manual | Othello
Head Reset Reset except P/T
Reset
Manual
Channel For manual control of the attribute channels
Stop
Auto program 1
Auto Test
Auto program 2
Auto program 3
Language Chinese/English
Backlight Setting Auto/Keep On
System
Display Normal/Invert
Factory Reset OK/Cancel
Information Device/Lamp Usage information of the xture
Pan/Tilt Reset Reset only P/T
All Reset Reset whole light
Auto test programs ,
in order to test the functional components of the xture,
the default status is “Stop”.
9. Channel Assignments
This product have two DMX512 channel conguration: (Standard) and (Reduced).
Mode/Channel
Value Function
Reduced Standard
1 1
0-255 0-100%
2 2
0-255 0-100%
3 3
0-255 0-100%
4 4
0-255 0-100%
Pan/Tilt Speed
5 5
0-255 Fast -> Slow
Pan
Tilt
Pan ne
Tilt ne
6 6
Dimmer
0-255 0-100%
Page 11

Manual | Othello
7
7 8
Dimmer ne
0-255 0-100%
Strobe/Shutter
0-3 Close
4-103 Strobe,Slow -> Fast
104-107 Open
108-207 Pulse: Slow -> Fast
208-212 Open
213-251 Random
252-255 Open
Color
0-7 Blank
8-15 Color 1
8 9
16-23 Color 2
24-31 Color 3
32-39 Color 4
40-47 Color 5
48-55 Color 6
56-63 Color 7
64-71 Blank + Color 1
72-79 Color 1 + Color 2
80-87 Color 2 + Color 3
88-95 Color 3 + Color 4
96-103 Color 4 + Color 5
104-111 Color 5 + Color 6
112-119 Color 6 + Color 7
120-127 Color 7 + Blank
128-189 Rotation(CW): Fast -> Slow
190-193 Stop
194-255 Rotation(CCW): Slow -> Fast
9 10 Gobo 1
9 10 0-9 Blank
9 10 10-19 Gobo 1
Page 12

Manual | Othello
9 10
20-29 Gobo 2
30-39 Gobo 3
40-49 Gobo 4
50-59 Gobo 5
60-69 Gobo 6
70-79 Gobo 1 Shake: Slow -> Fast
80-89 Gobo 2 Shake: Slow -> Fast
90-99 Gobo 3 Shake: Slow -> Fast
100-109 Gobo 4 Shake: Slow -> Fast
110-119 Gobo 5 Shake: Slow -> Fast
120-129 Gobo 6 Shake: Slow -> Fast
130-190 Rotation(CW): Fast -> Slow
10 11
11 12
191-194 Stop
195-255 Rotation(CCW): Slow -> Fast
Gobo1 Rotating
0-127 Gobo1 Position
128-191 Gobo1 Rotation(CW): Fast->Slow
192-255 Gobo1 Rotation(CCW): Slow-> Fast
Gobo 2
0-9 Blank
10-19 Gobo 1
20-29 Gobo 2
30-39 Gobo 3
40-49 Gobo 4
50-59 Gobo 5
60-69 Gobo 6
70-79 Gobo 1 Shake: Slow -> Fast
80-89 Gobo 2 Shake: Slow -> Fast
90-99 Gobo 3 Shake: Slow -> Fast
100-109 Gobo 4 Shake: Slow -> Fast
110-119 Gobo 5 Shake: Slow -> Fast
120-129 Gobo 6 Shake: Slow -> Fast
130-190 Rotation(CW): Fast -> Slow
Page 13

Manual | Othello
11 12
12 13
13 14
15
191-194 Stop
195-255 Rotation(CCW): Slow -> Fast
Gobo2 Rotating
0-127 Gobo2 Position
128-191 Gobo2 Rotation(CW): Fast->Slow
192-255 Gobo2 Rotation(CCW): Slow-> Fast
Focus
0-255 0-100%
Focus ne
0-255 0-100%
Auto focus
0-31 Auto Focus Disable
14 16
15 17
18
16 19
32-59 Auto Focus 5m
60-87 Auto Focus 6m
88-115 Auto Focus 7m
116-143 Auto Focus 8m
144-171 Auto Focus 10m
172-199 Auto Focus 12m
200-227 Auto Focus 14m
228-255 Auto Focus 17m
Zoom
0-255 0-100%
Zoom ne
0-255 0-100%
Prism
0-127 Prism out
128-255 Prism in to the light beam
17 20
18 21
Prism Rotate
0-127 Prism Position
128-191 Rotation(CW): Fast -> Slow
192-255 Rotation(CCW): Slow -> Fast
Iris
0-255 0-100%
Page 14

Manual | Othello
19 22
Frost
0-255 0-100%
CMY Function
20 23
21 24
22 25
26
23 27
28
24 29
30
0-127 Unused
128-255 CMY Fade
CMY Speed
0-255 0-100%
Cyan
0-255 0-100%
Cyan ne
0-255 0-100%
Magenta
0-255 0-100%
Magenta ne
0-255 0-100%
Yellow
0-255 0-100%
Yellow ne
0-255 0-100%
25 31
32
26 33
CTO
0-255 0-100%
CTO ne
0-255 0-100%
Reset
0-99 Unused
100-150 Pan/Tilt Reset
151-200 Head Reset
201-255 Complete Reset
Page 15

Manual | Othello
Das Lichttechnikhaus Vertriebs GmbH
Rudolf-Diesel-Str. 3, D-89312 Günzburg
Telefon +49 (0) 82 21 207 98-0
Fax +49 (0) 82 21 207 98-69
E-Mail info@lth-gmbh.de
Web www.lth-gmbh.de
 Loading...