


User Manual: Squareled Fidelio 600W
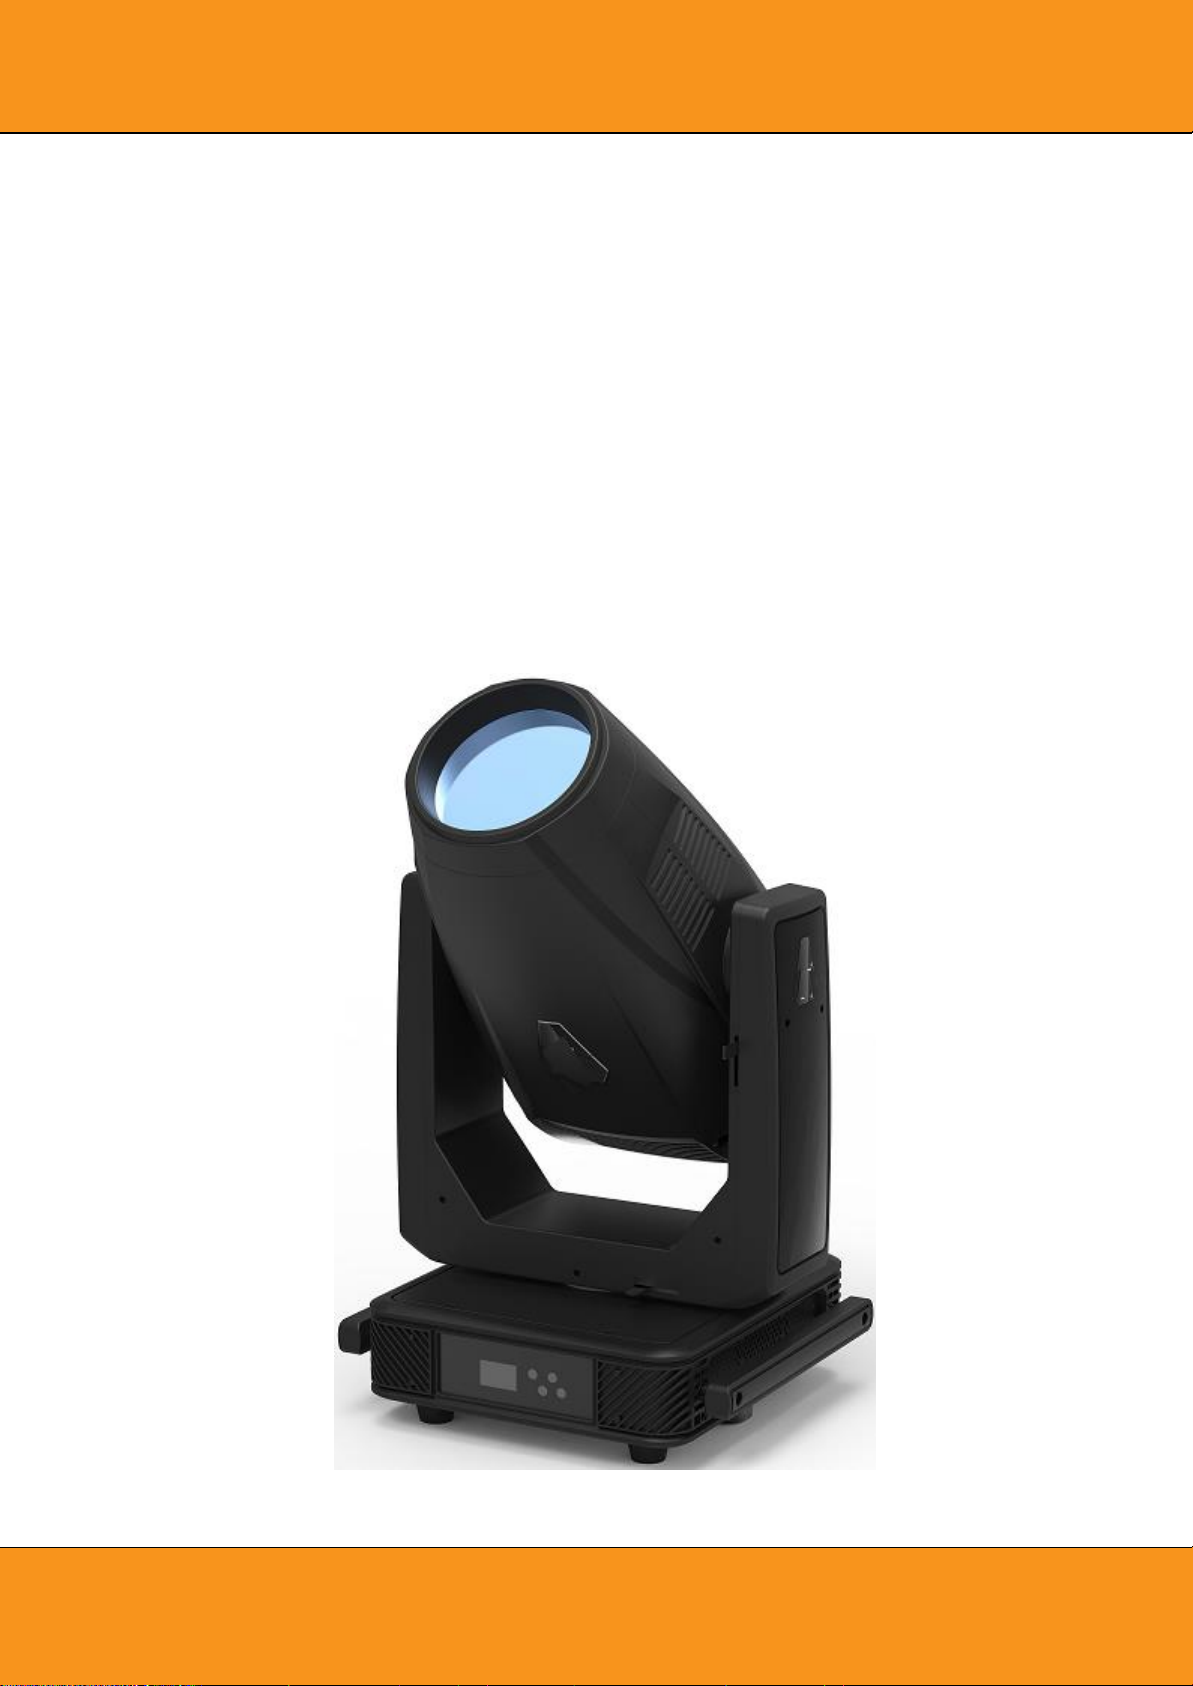
SQUARELED FIDELIO
Manual

Catalogue
1.SAFETY GUIDE ................................................................................................................................................... 3
2.TECHNICAL SPECIFICATION .......................................................................................................................... 4
3.HOW TO SET UP THE MACHINE ................................................................................................................... 6
3.1 control panel ..................................................................................................................................... 6
3.2 MAIN FUNCTIONS ........................................................................................................................................... 6
4. UNIVERSAL DMX CONTROLLER CONTROL................................................................................................. 2
4.1 DMX Connect .................................................................................................................................... 2
4.2 Address ID setting ........................................................................................................................... 2
4.3 DMX 512 Channel ............................................................................................................................ 3
5. TROUBLE SHOOTING ........................................................................................................................................ 7

1.Safety Guide
Please read this manual carefully
Warning
Note:
The equipment is packaged at the factory, please follow the user manual. None machine
failure is not covered by the warranty.
● Please open it carefully to ensure that the lamp is not damaged by transportation.
●The fixture is only suitable for indoor dry places.
● The installation and operation should be by professionals.
● Do not let children operate the machine.
● Use a secure cord when securing the fixture. Hold the bottom when moving the fixture.
● The device must be installed in a well-ventilated area, at least 50 cm from the adjacent
plane. .
● Ensure that the vents are unobstructed to prevent overheating.
● Make sure that the power supply voltage matches the requirement before running.
● Ground the conductor to prevent electric shock.
● Do not operate the fixture in an environment above 40 °C.
● Do not connect the fixture directly to the dimming device.
● A small amount of smoke or odor may appear during the operation of the new fixture,
and it will disappear after 15 minutes of operation.
● Do not place flammable materials next to the fixture during operation to prevent fire.
● Please check the power cord for damage before turning on the lamp.
● When the lamp is running, the surface temperature can reach 85 °C. Do not touch it by
hand.
● Avoid flammable liquids, water or metal conductors entering the interior of the lamp to
avoid electric shock or fire. If something enters the fixture, please cut off the power
immediately.
● Avoid operating in dirty and dusty environments, and regularly clean and maintain the
lamps.
● Do not touch the wires while the lamps are running to prevent electric shock.
● Avoid tying the power cord to other wires.
● The distance between the fixture and the illuminated surface should be greater than 5M.
● Disconnect the power before replacing the fuse or the lamp.
● Use the same model when replacing the fuse or the lamp.
● If there is a serious operation failure, please stop using it immediately.
● Do not turn fixture on and off frequently, and turn on the fixture at least 30 seconds later.
● Replace the lamp housing, lens or UV filter when it is obviously damaged.
●There are no available parts inside the lamp. Do not open the lamp cover without
authorization.
● Do not operate the machine by yourself. Non-professional personnel may cause damage
or malfunction to the equipment. For repairs, please contact the nearest authorized service
center.
● Turn off the power when the lamp is not used or repaired for a long time.
● When you need to transport again, please use the original packaging materials.
● To avoid fire hazard or electric shock, do not expose the fixture to rain or wet areas.
● Do not look directly at the lamp when it is running.

2.Technical Specification
Light Source
LED Type: High power 600W White LED
CCT: 8000K / 6500K
LED life: 20,000H
CRI: ≥90
Pan&Tilt
Pan: 540° (16 bit)
Tilt: 270° (16 bit)
Advanced scanning system is faster, more stable, quieter, with automatic error correction
reset function.
Color Plate
Uniform and smooth CMY+CTO (2700K-6500K)
1x Color disk: 6 color plates + white,Half-color effect, can be positioned at will, with a
rainbow effect of bi-direction
Gobo
1x Rotation Gobo: 7 Plug-in rotation plate + white circle; patterned dithering and pattern
arbitrary positioning.
1x Fixed Gobo: 7 Plug-in fixed plate + white circle; patterned dithering.
Both discs are plug gable, which is good for customers to change the pattern.
Spec.
3 channel mode: DMX512, 27/29/34 channels
Prism: Rotation 4 prisms,bi-direction prism with positioning function.
Aperture: 5%~ 100% linear adjustments.
Strobe:Electronic strobe, frequency up to 25Hz,and optional random strobe and pulse
strobe.
Dimmer:0~100% linear, have 4 dimmer curve.
Atomization: two atomization, three atomization effects, 0~100% linear atomization.
Zoom: Electric zoom function,6° ~ 50° linear.
Cutting module: A set of controllable spot chamfering system consists of 4 chamfered
corners. The whole chamfering system can be rotated by 90°. Through precise control of the
cut sheet, triangles, diamonds, rectangles, etc. can be created in any direction.
Dynamic effect disk: super cool simulation dynamic vibration, turbulent water and other
dynamic effects.
Display
Touch LCD display: With rechargeable battery, you can enter the menu address code and
other settings without powering up; when power off, press the “BAT SW” for 3 seconds to
enter the setting DMX address and Other menu functions, automatically cut off in 5 seconds
when not in operation. Automatically charge the battery when power is on;
Software
The DMX address code, machine reset, voice mode conversion and other functions can be
changed from the console; so that the customer can know the fixture usage in time.
Other function
Input signal isolation protection function ensures signal transmission is stable and
undisturbed.
RDM function
DMX signal input/output: 3-Pin or 5-Pin XLR, RJ45 and USB interface
Wireless function (optional)
Radiating
Dissipates heat by fan. After the temperature of the light source is higher than 40 degrees,
the light source fan starts to work, and according to the temperature, the fan speed is
adjusted accordingly.
Power supply
AC100~240v, 50/60Hz
Size
Fixture size:473*432*855 mm
N.W.:44.5kg(including the hook)
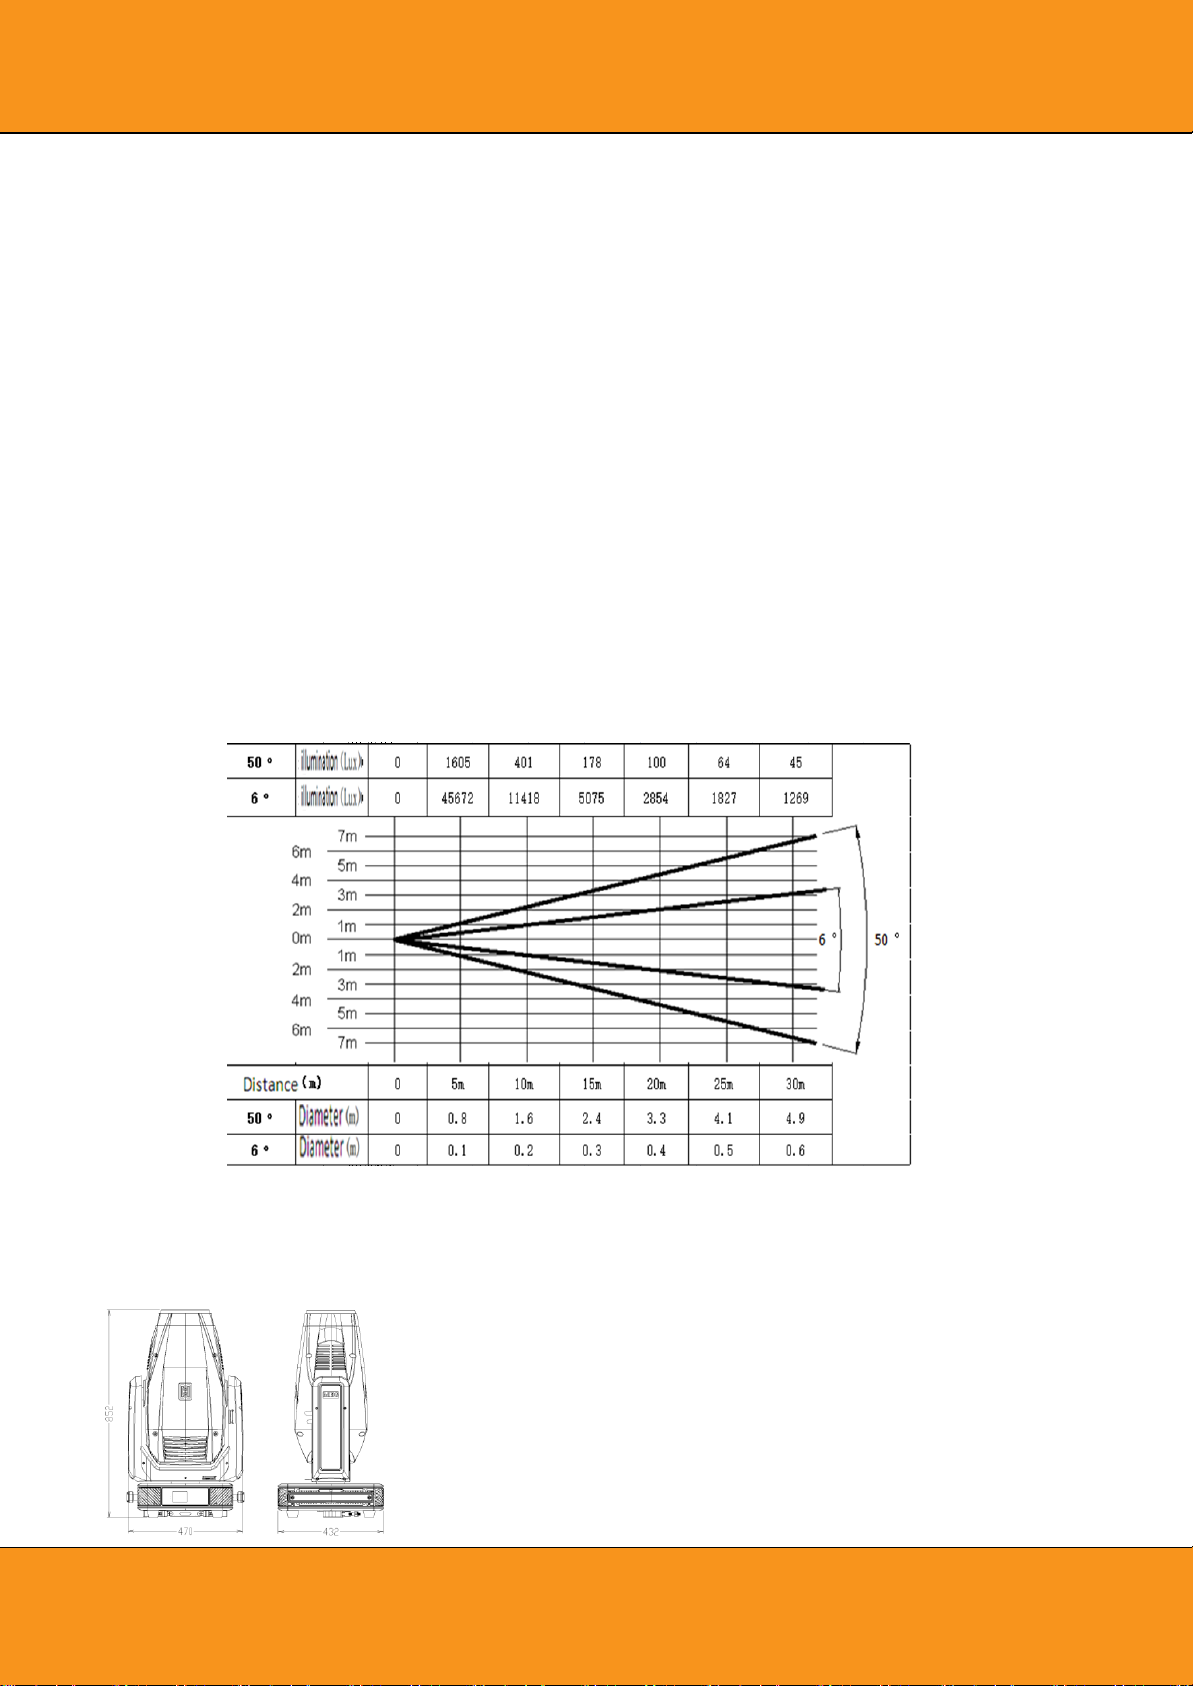
Illumination Chart
Fixture size
DMX
DMX Address
1-512
DMX Channel Mode
Mode1(29)
Mode2(34)
Mode3(37)
DMX State
Blackout
Hold
View DMX Value
---
SET
Pan Inverse
Yes/No
Tilt Inverse
Yes/No
1 2 4
5
6
LCD Display:Display function menu and
selected functions
Rear side covers card board
3
3.How to set up the machine
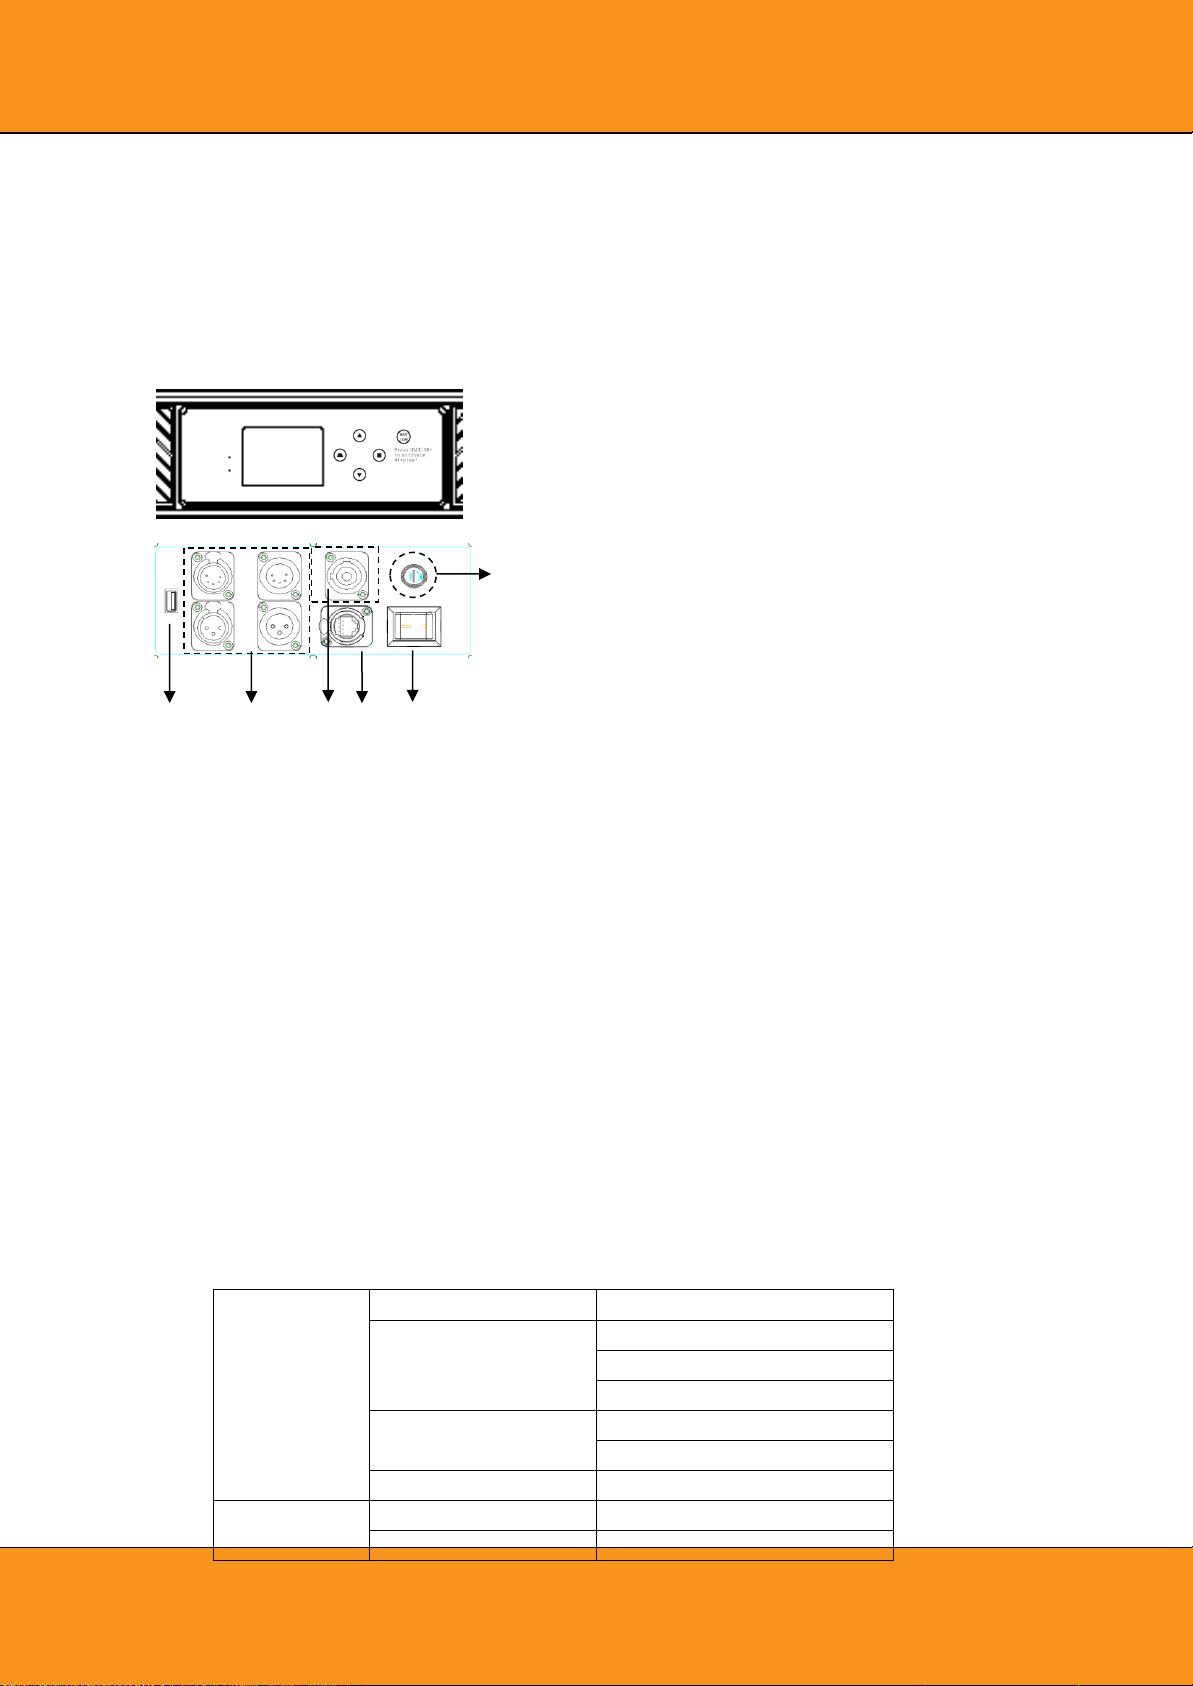
3.1 control panel
1. DMX signal input/output: DMX512 connection, connect DMX console and fixtures with
XLR signal line, and input /output DMX signal;
2. Power input: Connect to the main power supply;
3. Fuse (T 15A): Protects the fixture from damage caused by excessive current or short
circuit;
4. Power switch: Power on/off;
5. RJ45 Internet access;
6. USB socket
3.2 Main functions
Press MENU for about 3s to enter the menu mode and use MENU to select the menu option
that you want. Press the ENTER button to enter the selected function, the display will flash,
then use UP/DOWN to select the desired function and press ENTER to confirm. Press MENU
to return, or wait 1 minute to return to the main menu. The main functions are as follows:

P/T Feedback
Yes/No
Dimmer Curve
Liner
Square law
Inv SQ law
S Curve
Dimmer Speed
Fast
Smooth
Focus Compensate
Disable
Near
Medium
Far
Display
Setting
Display Inverse
Yes/No
Backlight Switch
On/Off
Backlight Intensity
1-10
Temperature Unit
℃/℉
Language
English/Chinese
Test
Auto Test
-
Manual Test
-
Fixture
Information
Fixture use time
-
Temperature
-
Firmware Version
-
Reset
Pan/Tilt
Yes/No
Effect Motor
Yes/No
All Motor
Yes/No
Special
Function
Factory Setting
Yes/No
DMX Functions
Enter MENU mode, select DMX Functions, press ENTER to confirm, use UP/DOWN to select:
DMX Address, DMX Channel Mode, DMX State and View DMX Value.
DMX Address
Select DMX Address and press ENTER to confirm that the current DMX Address will be
shown on the display. Use UP/DOWN to select 001~512 address and press ENTER to save.
Press MENU to return to the previous menu or wait for 1min to automatically exit the menu
mode.
MXD Channel Mode
Select the DMX Channel Mode, press ENTER to confirm, the current channel mode will be
displayed on the display, use UP / DOWN to select: 29 CH, 34 CH or 37 CH, press ENTER to
save. Press MENU to return to the previous menu or wait for 1 minute to automatically exit
the menu mode.
DMX State
Select the DMX State, press ENTER to confirm, the current DMX State will be shown on the
display, and press the MENU return to the previous menu or wait for 1 minute to
automatically exit the menu mode.
View DMX Value

Select the View DMX Value and press ENTER to confirm, the current DMX value will be
displayed on the display. Use UP/DOWN to select the value and press ENTER to save. Press
MENU to return to the previous menu or wait 1min is automatically exit the menu mode.
Fixture Setting
Enter MENU mode, select Fixture Setting, press ENTER to confirm, use UP/DOWN to select:
Pan Inverse, Tilt Inverse, P/T Feedback, Backlight Switch, Backlight Intensity, Dimmer Speed,
Dimmer Curve, and Focus Compensate.
Pan Inverse
Select Pan Inverse, press ENTER to confirm, the current mode will be displayed on the
display, through UP/DOWN to select: NO (Normal Operation) or YES (Pan Inverse), then
press ENTER to save. Press MENU to return to the previous menu or wait 1 minute to
automatically exit menu mode.
Tilt Inverse
Select Tilt Inverse, press ENTER to confirm, the current mode will be displayed on the
display, through UP/DOWN to select: No (Normal Operation) or Yes (Tilt Inverse), press
ENTER to save. Press MENU to return to the previous menu or wait one minute to
automatically exit menu mode.
P/T Feedback
Select P/T Feedback, press ENTER to confirm, the current mode will be displayed on the
display, press UP/DOWN to select: No (P/T will remain the statue of out-of-step) or Yes (P/T
will automatically correct out-of-step), press ENTER button to save. Press the MENU button
to return to the previous menu or wait for 1 minute to automatically exit the menu mode.
Dimmer Speed
Select the Dimmer Speed, press ENTER to confirm, the current mode will be displayed on
the display, through UP/DOWN to select: FAST or SMOOTH, press ENTER to save. Press
MENU to return to the previous menu or wait 1 minute to exit the menu mode
automatically.
Dimmer Curve
Select the Dimmer Curve and press ENTER to confirm. Use UP/DOWN to select Linear,
Square, Inverse Square or S Line, after selecting the desired mode, press ENTER to set and
save. Press MENU to return, or wait 1 minute, later return to the main menu.
Focus Compensate
Select Focus Compensate, press ENTER to confirm, the current mode will be displayed on
the display, through UP/DOWN to select: Disable, Near, Medium or Far, press ENTER to save.
Press MENU to return to the previous menu or wait 1 minute to automatically exit the menu
mode.

Mode1(Optical linearity):As the DMX value increases, the increase in light intensity
tends to be linear;
Mode2(Square rate):The light intensity is controlled to be fine at low values and thicker
at high values;
Mode3(Reverse squared rate):The light intensity is controlled to be thicker at low
values and thinner at high values;
Mode4(S-Linear):The light intensity is controlled to be finer at low values and high
values, and thicker at intermediate values.
Display setting
Enter MENU mode, select Display Settings, press ENTER button to confirm, select by
UP/DOWN: display reverse, backlight brightness, temperature unit or language.
Display Inverse
Select Display Inverse, press ENTER button to confirm, the current mode will be displayed
on the screen, through the UP/DOWN button to select: No (normal) or Yes (display reverse),
press the ENTER button to save. Press the MENU button to return to the previous menu or
wait 1 minute to automatically exit the menu mode.
Backlight Intensity
Select the backlight brightness, press the ENTER button to confirm, the current mode will be
displayed on the screen, press UP/DOWN to adjust the Backlight Brightness from 1 (black)
to 10 (bright) and press the ENTER button to save. Press the ENTER button to save. Press
MENU to return to the previous menu or wait for 1 minute to automatically exit the menu
mode.
Temperature unit
Select the temperature unit, press the ENTER button to confirm, the current mode will be
displayed on the display, through the UP/DOWN button to select: °C or °F, press the ENTER
button to save. Press MENU to return to the previous menu or wait for 1 minute
automatically exits the menu mode.
Language
Select the language, press the ENTER button to confirm, the current mode will be displayed
on the display, use the UP / DOWN button to select: Chinese or English, press the ENTER
button to save. Press MENU to return to the previous menu or wait for one minute
automatically exits the menu mode.
Fixture Test
Enter the menu mode, select the Fixture test, press the ENTER button to confirm, select
through the UP/DOWN button: automatic test, manual test.
Auto Test
Select the Auto Test, press ENTER to confirm, the machine will run the built-in program test
level, vertical, color, pattern Disc, pattern disc rotation, stroboscopic, dimming, prism disc,
prism disc rotation, atomization, focusing, etc. Press the MENU button to exit go back to
the previous menu or return to the menu mode after the test ends.
Manual Test

Select manual test, press the ENTER button to confirm, the current channel will be displayed
on the screen. Use UP/DOWN to select a channel: press ENTER to confirm, then use
UP/DOWN to adjust the channel value and press ENTER to save, the machine will run at the
value of the channel. Press MENU to return to the previous menu or wait for 1 minute to
automatically retreat out menu mode.
(All channel values will become zero after exiting the manual test menu)
Fixture Information
Enter menu mode, select Fixture information, press ENTER button to confirm, use
UP/DOWN button to select: device hours, temperature, fan status and CPU version.
Fixture use time
Select the fixture use time, press the ENTER button to confirm, the display will show the
time the lamp is running, press the MENU button to exit.
Temperature
Select the Temperature, press the ENTER button to confirm, the temperature of the device
will be displayed on the screen, press the MENU button to exit.
CPU Version
Select CPU Version, Press ENTER to confirm, the firmware version of the device will be
displayed on the screen, press the MENU button to exit.
Reset Function
Enter menu mode, choose the Reset, press Enter Button , Press Up/Down to choose:
Horizontal and Vertical, The head motor or all motor.
Pan/Tilt
Choose Pan/Tilt, Press Enter to confirm, Press Up/Down to choose: No or Yes(The Fixture
run the build-in program to recover the initial position of the Pan/Tilt ), Press Enter to save
it, Press Menu exit.
Effect
Select Effect, Press Enter to confirm, Press Up/Down to select, No Or Yes (The Fixture runs
the build-in program to recover the initial position of Effect). Press Enter to save. Press
Menu to exit.
All
Select All, press the ENTER button to confirm, use the UP/DOWN button to select: No or
Yes (The machine will run the built-in program to restore All initial positions). Press the
ENTER button to save. Press the MENU button to exit.

Special function
Enter the menu mode, select the special function, press the ENTER button to confirm, select:
Restore Factory Settings.
Factory setting
Select to restore Factory setting, press the ENTER button to confirm, use the UP/DOWN
button to select No (keep the current setting) or (Restore Factory setting), once selected,
press the ENTER button to save. Press the MENU button to exit.
3.3 Initial position adjustment
Press the MENU button to enter the menu mode, then press the ENTER button for about 3
seconds to enter the initial setup menu to adjust the initial position of each motor. Press the
ENTER button to confirm. Use the UP/DOWN button to select a submenu, press the ENTER
button to save and automatically return to the previous menu. Press the MENU button to
exit


4. Universal DMX Controller Control
4.1 DMX Connect
1. In order to reduce signal errors and avoid signal attenuation and interference
during transmission, a 120OHM 1/4W resistor can be added between the 2 and 3
cores of the DMX output of the last machine.
2. Connect the luminaire with the XLR signal cable, one end to the output of the
luminaire and the other end to the input of the next luminaire. XLR signal lines can
only be used in series and cannot be connected in parallel. The DMX512 signal
transmission speed is very fast. Damage to the signal line, weak soldering, poor
contact, etc., all will affect the signal transmission, and cause the system to shut
down.
3. When the power of a unit's machine is disconnected, the connection between the
DMX output and the input is bypassed to maintain the DMX line connectivity.
4. Each light must have an address code that can receive information the console,
ranging from 0-511(usually 0 &1 and 1 are the same)
5. The terminal of the DMX512 system needs to be equipped with a terminator to
reduce errors in signal transmission.
6. The 4.3-core XLR connector is more common than the 5-pin XLR:
3-pin XLR: PIN 1: GND, PIN 2: Negative signal, PIN 3: Positive signal.
5 pin XLR :PIN 1:GND,PIN 2:Negative signal,PIN 3:Positive signal,
PIN4/PIN5:No use;
4.2 Address ID setting
When using a general purpose DMX controller to control the fixture, you need to set
the starting address (1-512) for the fixture so that the machine can accept the DMX
signal.
Press the MENU button to enter the menu mode, select the DMX function, press the
ENTER button to confirm, the current address will flash on the display, then use the
2

Channel
Mode
Fixture 1
Fixture 2
Fixture 3
Fixture 4
Address ID
Address ID
Address ID
Address ID
29 CH
1
30
59
88
34 CH
1
35
69
103
37CH
1
38 75
112
MH-L600 DMX PROTOCOL
29ch
34ch
37ch
value
Function
27
29 1 (0-255)
Pan
30 2 (0-255)
Pan Fine
28
31 3 (0-255)
Tilt 32 4 (0-255)
Tilt Fine
33 5 (0-255)
Pan/Tilt Speed
Fast - Slow
29
34 6
(0-29)
(30-39)
(40-49)
(50-59)
(60-69)
(70-79)
(80-89)
(90-99)
(100-109)
(110-119)
(120-129)
(130-139)
(140-149)
(150-159)
(160-169)
Special Function
Null
Dimmer Curve SQUARE_LAW
Dimmer Curve INVERSE_SQUARE_LAE
Dimmer Curve LINE
Dimmer Curve S
Black Out When XY Move Enable
Black Out When XY Move Disable
Black Out When Color Change Enable
Black Out When Color Change Disable
Black Out When Gobo Change Enable
Black Out When Gobo Change Disable
Focus Compensate Off
Focus Compensate Near
Focus Compensate Medium
Focus Compensate Far
UP/DOWN button to select the address code (1-512) and press the ENTER button to
save. Press the MENU button to return to the previous menu or wait for one minute
to automatically exit the menu mode.
Please refer to the chart below to set the address codes of the first 4 fixtures.
4.3 DMX 512 Channel
3

(170-179)
(180-189)
(190-199)
(200-209)
(210-219)
(220-229)
(230-255)
Dimmer Speed Default
Dimmer Speed Fast
Dimmer Speed Smooth
Reset All
Reset Effect
Reset XY
Null
1 6 7
(0-15)
(16-30)
(31-135)
(136-145)
(146-175)
(176-185)
(186-215)
(216-225)
(226-245)
(246-255)
Strobe
Shutter closed
Shutter open
Strobe (slow to fast)
Shutter open
Fast Close Slow Open(slow to fast)
Shutter open
Fast Open Slow Close(slow to fast)
Shutter open
Random strobe (slow to fast)
Shutter open
2 7 8 (0-255)
Dimmer
8 9
(0-255)
Dimmer Fine
3 1 10
(0-255)
Cyan
4 2 11
(0-255)
Magenta
5 3 12
(0-255)
Yellow
6 4 13
(0-255)
CTO
7 5 14
(0-131)
(132-141)
(142-151)
(152-161)
(162-171)
(172-181)
(182-191)
(192-222)
(223-224)
(225-255)
Color
Open-Color6 Index
Color-1
Color-2
Color-3
Color-4
Color-5
Color-6
Rotation CW(fast to slow)
Stop
Rotation CCW(slow to fast)
8 9 15
(0-7)
Gobo1
Open
4

(8-15)
(16-23)
(24-31)
(32-39)
(40-47)
(48-55)
(56-95)
(96-97)
(98-129)
(130-147)
(148-165)
(166-183)
(184-201)
(202-219)
(220-237)
(238-255)
R-Gobo1-1 index
R-Gobo1-2 index
R-Gobo1-3 index
R-Gobo1-4 index
R-Gobo1-5 index
R-Gobo1-6 index
Gobo1 CW(fast to slow)
Gobo1 Stop
Gobo1 CCW(slow to fast)
R-Gobo1-1 Shaking(Slow to Fast)
R-Gobo1-2 Shaking(Slow to Fast)
R-Gobo1-3 Shaking(Slow to Fast)
R-Gobo1-4 Shaking(Slow to Fast)
R-Gobo1-5 Shaking(Slow to Fast)
R-Gobo1-5 Shaking(Slow to Fast)
R-Gobo1-6 Shaking(Slow to Fast)
9
10
16
(0-127)
(128-191)
(192-255)
R-Gobo1
R-Gobo1-6 index
Rotation CW(fast to slow)
Rotation CCW(slow to fast)
11
17
(0-255)
R-Gobo1 Fine
R-Gobo1-6 (0-65535) index
10
12
18
(0-7)
(8-15)
(16-23)
(24-31)
(32-39)
(40-47)
(48-55)
(56-63)
(64-95)
(96-97)
(98-129)
(130-147)
(148-165)
(166-183)
Gobo2
Open
Gobo2-1 index
Gobo2-2 index
Gobo2-3 index
Gobo2-4 index
Gobo2-5 index
Gobo2-6 index
Gobo2-6 index
Gobo2 CW(fast to slow)
Gobo2 Stop
Gobo2 CCW(slow to fast)
Gobo2-1 Shaking(Slow to Fast)
Gobo2-2 Shaking(Slow to Fast)
Gobo2-3 Shaking(Slow to Fast)
5

(184-201)
(202-219)
(220-237)
(238-255)
Gobo2-4 Shaking(Slow to Fast)
Gobo2-5 Shaking(Slow to Fast)
Gobo2-5 Shaking(Slow to Fast)
Gobo2-6 Shaking(Slow to Fast)
21
19
19
(0-255)
Iris
Big to Small
11
13
20
(0-15)
(16-125)
(126-145)
(146-255)
Fire Wheel
Close
Rotation CW(fast to slow)
Stop
Rotation CCW(slow to fast)
22
14
21
(0-15)
(16-255)
Prism
Prism off
Prism On
23
15
22
(0-127)
(128-191)
(192-255)
R-Prism
Index 0°-360° Index
Rotation CW(fast to slow)
Rotation CCW(slow to fast)
23
(0-255)
R-Prism Fine
(0-65535) Index
24
16
24
(0-99)
(100-199)
(200-214)
(215-229)
(230-255)
Frost
Frost1 Open to full frost
Frost2 Open to full frost
Frost1 Open
Frost2 Open
Frost1 & Frost2 Open
25
17
25
(0-255)
Zoom
26
(0-255)
Zoom Fine
26
18
27
(0-255)
Focus
28
(0-255)
Focus Fine
12
20
29
(0-255)
Blade Ring
Index 0°-90°
13
21
30
(0-255)
BladeA1
Index 0% -100%
14
22
31 BladeA1
6

(0-255)
Index 0% -100%
15
23
32
(0-255)
BladeA1
Index 0% -100%
16
24
33
(0-255)
BladeA1
Index 0% -100%
17
25
34
(0-255)
BladeA1
Index 0% -100%
18
26
35
(0-255)
BladeA1
Index 0% -100%
19
27
36
(0-255)
BladeA1
Index 0% -100%
20
28
37
(0-255)
BladeA1
Index 0% -100%
5. Trouble shooting
The following are some of the problems that often occur during operation. It is
accompanied by some suggestions for troubleshooting.
A. The Fixture cannot operate, there is no light, and the fan is damaged.
1. Check the power connection and the fuse is intact.
2. Check the voltage.
3. Check the indicator light of the switching power supply.
B. Out of control by Console
1. The indicator light must be red. If it is not lit, check the DMX signal connector and
signal cable to see if it is connected correctly.
2. If the DMX indicator is red, but does not respond to the control channel, check
that the address code setting is correct.
3. If the DMX signal transmission is intermittent, check that the Aviation connector is
connected to the signal line.
4. Try using another controller.
5. Check to see if the DMX signal line and the high voltage line are too close
together to damage or interfere with the signal circuit.
C. Some channel fails
1. The stepper motor may be damaged and the motor leads may be broken.
2. The drive circuit of the motor may be faulty.
7

6. Fixture cleaning
The inside and outside of the lens and the mirror must be wiped frequently to make
the lighting better. The frequency of wiping depends on the environment. Moist,
smoky, and particularly dirty environments can cause dust to accumulate in the lens.
--- Use soft linen and a special glass cleaner.
--- Carefully dry the parts.
--- Wipe the outside of the lens at least every 30 days.
7. Accessories
1pcs Power Cable
1pcs Signal Cable
1pcs Safety Rope
1pcs User Manual
8

9

Das Lichttechnikhaus Vertriebs GmbH
Rudolf-Diesel-Str. 3, D-89312 Günzburg
Telefon +49 (0) 82 21 207 98-0
Fax +49 (0) 82 21 207 98-69
E-Mail info@lth-gmbh.de
Web www.lth-gmbh.de
 Loading...