


LR32 audio recorder
User manual
Version 1.01

This recorder let‘s you to record any audio or human conversation in high quality and store all
on micro SDHC card. The state of art technology with very low power consumption allows
you to record very long records when the battery is powering the module. This recorder is
equipped with very high sensitive microphone and wide dynamic range and is able to record
conversation from distance over 30 feet (10 meters). All stored recordings are accessible on
micro SDHC card by using included recording manager developed for Windows operating
system. This software includes fast overview of each record and simple editing functions,
including serach for active sound in long records. For protection of stored data it is possible to
set password access for all stored recordings. Integrated real time clock should start recording
in any specific period of each day or at any specific date. All recorded data are stored with
time marks, which gives you very good overview in case of long time recording.
Technical data:
Dimension: 17,5x27x3mm
Power supply voltage: 2,8-6,0V
Maximum recording time: over 70days (with 16GB card)
Card type: Micro SDHC card
Signal-to-noise ratio: 65dB
Storage format: 16bit uncompressed, logaritmic, 4bit ADPCM or
2bit ADPCM
Sample rate: 44kHz, 22kHz, 16kHz, 11kHz, 8kHz, 5.5kHz
Bit width: 16bit
Built-in microphone sensitivity: 8-10m
Power consumption in stand-by mode: <50uA
Power consumption in VAS mode: 1,6mA at 3,0V
Voice activated recording yes
AGC function user selectable automatic gain control or fixed
microphone gain
Exporting format: by using included software, WAV format
Scheduled recording: selectable daily period, week period or calendar
Operating mode select: slide switch
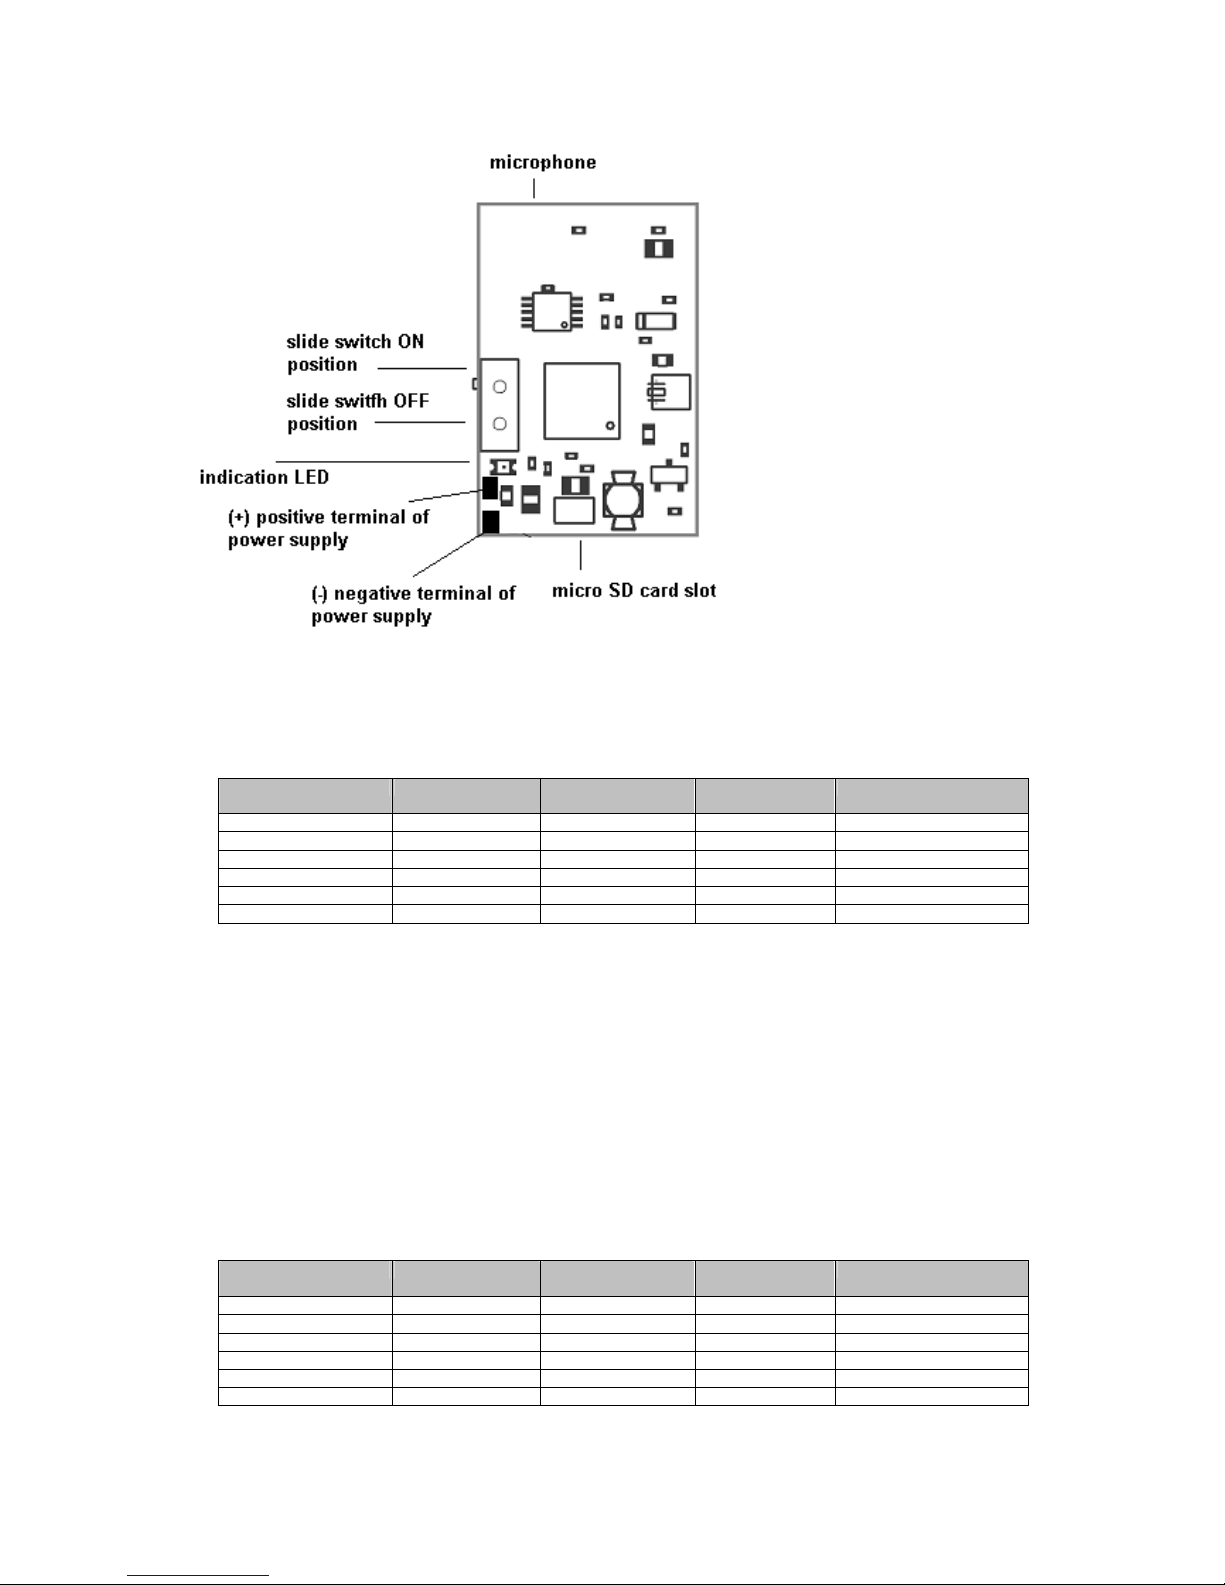
Module description
Power consumption in different recording modes based on 3.0V voltage supply in [mA]:
Sample rate none Ulaw 4bit
ADPCM
5,5kHz 3mA 1,85mA 1,6mA 1,6mA
8kHz 4,2mA 2,5m A 2,2mA 1,7mA
11kHz 5,2mA 2,9mA 2,6mA 2mA
16kHz 7,3mA 3,3mA 3,1mA 2,2mA
22kHz 9,4mA 4,8mA
44kHz 17,8mA 9,6mA
2bit ADPCM
The current is calculated when the 3,0V voltage is used. When you have a higher voltage or
for example 6,0V batteries, the consumption is decreased with the increasing voltage in
proportional way.
B attery life for different operating modes in continuous recording mode with CR-123 type
battery [in days]:
Sample rate none uLaw 4bit
ADPCM
5,5kHz 18days 29days 33days 33days
8kHz 12days 21days 24days 32days
11kHz 10days 18days 20days 27days
16kHz 7days 16days 17days 24days
22kHz 5days 11days
44kHz 3days 5days
2bit ADPCM

For extending battery life should be used voice acitivated recording mode. This option may
extend this time significantly.
Operating instructions
For controlling all functions is used one slide switch and multifunctional LED.
Before inserting batteries you must have ready formatted SDHC card, which must be
formatted by included recording manager. Card must be formatted with FAT32 filesystem
only and can’t contain any other files or folders, than image files, created by recording
manager and can’t be used by other equipement, like PDA, digital camera, etc... After
insertion of card to PC, you need to start formating by selection in menu „Memory -> Create
new image“. You should select option to create smaller image file, than the size of the card,
however, the total recording time will be shorter. Creating of image file should take several
minutes. After the creating of image files is complete, you will find one file with name
„rcimage.raw“ which is used for storing all records. If you want to make a backup of all
stored records, you should copy this file to your local hard drive. In case of selecting larger
used space for image file, there will be more than one file created and the others will be
named „rcimage.ra1“, „rcimage.ra2“, etc… Once you have created image file, you can insert
the card into the recorder and start using it. Do not remove or insert the card, when the
recording is in progress.
Start and stop the recording
This action is operated by using a slide switch. The slide switch works in parallel with the
internal timers for scheduled recording. For example, when the slide switch is in ON position,
the recording is not interrupted regardless the settings of scheduled recording. When the timer
activates the recording, it still continues until the scheduler reaches the scheduled stop time
regardless the position of slide switch.
Before the recording starts, the LED flashing sequence will follow. When the LED flashes 5
times, it means some failure and the recording didn’t start. When it flashes only ones, the card
is full and recording can’t be started. Flashing 2 to 4 times indicates available memory space.
(4 flashes – more than 75% space available, 3 flashes – more than 50% space available, 2
flashes – less than 25% space available). The recorder should store up to 255 records. If this
count has exceeded, the card is considered as full. When the recording is in progress, the LED
makes short flashes each 2 seconds. This function should be disabled for discrete recording.
When the voice activated recording is enabled, the LED flashes only, when the sound level is
above selected threshold and recording is in progress. The recording is stopped when the card
is full or by moving the slide switch to OFF position. Stop sequence is indicated by 3 LED
flashes.
Power supply for recorder
The recorder should be powered with any power source giving the voltage in a range of 2,86,0V. Do not exceed the 6,0V limit, this may significantly damage the recorder. The
recorder should be powered by small coin cell batteries with any chemistry (Zinc-Air batteries
gives the longest recording time in comparing the smallest size).

Types of supported SDHC cards
The recorder supports a wide range of micro SDHC cards, however we recommend you to use
our included card for best performance. The cards from the other brands should consume
more power and this should affect the power consumption significantly in recording mode.
Recorder manager – software description
This software is used for overview, export and replay of all stored data. When you start this
application you must open the image file, which is stored on microSD card, containing file
„rcimage.raw“. When this action is complete, all records will be visible in recordings list. To
load each record, double click on selected record you whish to load. For using the detailed
view you should select only specific area by using mouse left and right button and clicking on
full record’s overview window. When the mouse is moved over this area, the time is visible in

bottom status bar. This time scale should be non-linear, when the voice activated recording
was used.
Recorder’s settings
All configuration is stored in image file on microSD card. The configuration should be
changed in main menu by selecting „Options -> Recorder settings“. This windows is divided
into 4 following sections:
The first general part is used to select recording sample rate and compression method. To
achieve the best quality you should use 16kHz or 22kHz without compression, but this mode
takes the most power from the battery and will use most of the space for storing the data. For
best performance check table showing battery life and memory capacity for each specific
mode. Using ADPCM 2bit compression results in worst audio quality.
Next page is used for voice activated recording. When this option is enabled, recorder is
recording only when it detects sound above selected threshold level. Minimum level means
the highest sensitivity. Delay is specifying the time, for how long recording continues after
this sound level is not detected anymore. Recommended value is 5 seconds or more. When
LED is enabled to flash during recording, it is flashing only when recording is in progress and
not when the recorder is in idle mode waiting for exceeding the selected threshold level. This
mode saves significantly the battery energy resulting much longer time of operation. For

microphone volume control is implemented AGC function. The recorder should be used in
noisy environment or to monitor large rooms, where all silent sounds are required to be
recorded. When AGC checkbox is checked, this function is enabled and recorder
automatically adjust microphone volume according detected sound level. Maximum
microphone volume indicates the maximum volume used by AGC function. When AGC
function is disabled, this selected volume is fixed for all the time.
Recorder is equipped with internal real time clock and recording scheduler. If you want to use
time activated recording, you can choose from 3 options. Daily timer enables recording
scheduler to start and stop recording at the specified time period, which repeats every day.
Single timer is used to start and stop only once at given time and date. The last is weekly
timer, where you can specify a different time periods for each day of a week. Every time set
to 00:00 is ignored, which enables to schedule recording for example over the midnight.

The last part of a configuration contains various options. LED should be disabled in this
window to allow discrete mode of operation. Only flashes during recording are disabled.
Indication of power up, start and stop sequence is not affected by this option. The real time
clock is synchronized according the preset time stored on microSD card. When you select in
this window power-up date and time, this date and time is synchronized inside the recorder
when the card is inserted into a recorder and the recorder is powered up by inserting the
batteries. All recordings should be password protected by using password protection.
Password protection and audio files encryption
For LR-32 PRO version is a different password protection method. All records are encrypted
by using the password in the recorder settings. When the password protection is enabled and
the password is entered, all new recorded audio will be encrypted by using this password.
When you open the image file, all encrypted records will be displayed in a red color in the
list. Please note, when you’ll change the password again, all previously stored records are still
encrypted with the previous password. When you want to replay the record or export it, you’ll
be asked to type the password, which has been used at the time, when this audio record has
been made.
Export of records
Each record should be exported and stored to your local hard drive in WAV format. To do
this, select from one exporting options in main menu „Records“. All records are stored to
selected directory, which you can change by menu item „Select directory for export“. Long
records should be split into more files. Use option in menu “Records->Maximum size of
exported file” to specify maximum size of each exported WAV file.
FAQ:
Q: Can’t start recording – LED flashes only once and the card is not full.
A: The card contains 255 records. For next recording you must delete at least last record from
the list or format the card.
Q: Card can’t be initialized, LED always flashes 5 times.

A: Card is not micro SDHC type or is not properly inserted or the power supply can’t give
sufficient current to initialize the card.
Q: The beginning time of recording is incorrect.
A: This time is always equivalent to the real time clock, which are synchronized from the
card. This problem should happen, when the batteries were removed or the card was removed
and clocks are resynchronized again with wrong time.
Q: Recorder was operating and the power source has been suddenly interrupted.
A: For this case the last record will be stored properly without any problems.
Q: The image file is missing on the card, or the card is unreadable in PC computer or the
image file was deleted.
A: In this case never try to recover the date by using any data recovery software and consult
this problem with your distributor of recorder. All the data should be recovered, but recorder
is using specific way to store the data and special procedure must be used for this case.
Q: The program shows much shorter available space for recording, then is the expected size
of used card.
A: The card was formatted to smaller image size. You must create new image file with using
maximum space of card.
Q: Recorded sound is distorted in very loud sequences.
A: Enable AGC function in recorder’s settings to prevent microphone overloading by loud
sounds. Avoid using ADPCM2 compression, if you require good quality of audio.
 Loading...