

Page 1

Symptom Possible Reason Solution
Fail to start Low Power Recharge Battery
System Halted Reset, then start
again
Auto shut o Low Power Recharge battery
Green LED flash
Device can not
be recognized by
computer
USB Cable failure Replace new cable
PC Bios disabled Set USB enabled
Main board does not support USB port
Update mainboard
driver
Data not Saving Memory is full Remove video files
Power o automatically after starting
Low Power Recharge
Memory is full Remove Video files
Product size 6 x 1.5 x 2in. (folded)
USB 2.0(HS)
Physical Weight 2oz
Resolution 1920x1080P@30fps 1280x720P @60fps
Power Supply Embedded 550mAH Li-polymer Battery
Video Format Mov/H.264
Pixels 5 mega
Power Duration about 1 hour
Memory Support Max High Speed 32gb TF card
Power Consumption <1.5W
Audio Stereo
Working Temp 23 °F to 104 °F
Storage Temp 4 °F to 158 °F
Fov 135 degree
Menu Language English
Player VLC, Media player, Real Player, Quicktime
Operating System win7, WinXP, Windows Vista, Mac Os 10.7
A. The Inventio-HD Pro supports up to 32GB
microSD cards. MicroSD cards with a speed
of Class 6 or higher are strongly recommended for optimal video quality.
B. When your microSD card is full, the Inven-
tio-HD Pro blue LED light will light up for
1-2 seconds. At this point, the Inventio-HD
Pro will automatically save all data and
power o.
A. To charge the Inventio-HD Pro battery,
connect the Inventio-HD Pro to a computer
or AC adaptor using the enclosed cables.
B. A red LED light will appear, indicating that
the battery is successfully charging. It
should require approximately 3-4 hours to
fully charge your Inventio-HD Pro.
C. A green LED light will appear when the
battery is fully charged.
Troubleshootings
Specifications
Storage
Battery
* If the Inventio-HD Pro is unresponsive or the blue LED light
blinks rapidly, this is often an indication that the battery needs
to be charged
USER MANUAL
www.spytecinc.com
Page 2
A. Insert a microSD Card
Insert a microSD card into the microSD card
slot. (MicroSD cards with a speed of Class 6
or above are recommended for optimal video
quality.)
B. Switch On/Start Recording
To turn on the Inventio-HD Pro and begin
recording, press the ON/OFF/RECORD button.
The blue LED light will flash. If the audio alerts
are enabled, the Inventio-HD Pro will emit
4 short beeps. The Inventio-HD Pro is now
recording.
C. Switch O /Stop Recording
To turn o the Inventio-HD Pro and stop
recording, press the ON/OFF/RECORD button.
The Inventio-HD Pro will automatically save all
data and power o.
Date/Time Stamping on Videos (RTCDisplay)
Range: 0 – 1
Default Setting: 1
1–Enables date/time stamp display, 0–Disables date/time stamp display
Enabling Audio Alerts (AudioEnable)
Range: 0 – 1
Default Setting: 1
0–O, 1–On
Audio Volume (AudioVol)
Range: 0 – 3
Default Setting: 1
0–High, 1–Medium, 2–Low, 3–O
VideoSwitch
Range: 0 – 1
Default Setting: 0
Resolution:0–1080P, 1–720P
Time Lapse Recording (TimeLapse)
Range: 0 – 1
Default Setting: 0
0–O, 1–On
BuzzerAlert
Range: 0 – 3
Default Setting: 2
0–O, 1–High, 2–Middle, 3–Low
A. Connect to a Computer
Connect the Inventio-HD Pro to the computer and open the Inventio-HD
Pro drive. Locate and open the setting.txt file on the Inventio-HD Pro drive.
This file will allow you to personalize various settings which are explained
in detail below. Be sure to change update to Y (yes) and save the file in
order to preserve your settings.
B. Settings Guide
Exposure (EV)
Range: 1 – 12
Default Setting: 6
Adjusting the exposure to “–EV” increases exposure levels, ideal for use in
strong sunlight. Using “+EV” will increase the brightness in dark or cloudy
conditions.
White Balance (AWB)
Range: 0 – 4,
Default Setting: 0
0–Auto, 1–Daylight, 2–Cloudy, 3–Tungsten Filament, 4–Incandescent
White balance changes the overall balance of colors in an image. This setting may be used for color correction.
Contrast (CTST)
Range: 1 – 200
Default Setting: 100
A higher contrast ratio results in an image with higher resolution and
brighter colors. A lower contrast ratio produces an image that will appear
dimmer.
Saturation (SAT)
Range: 1 – 200
Default Setting: 100
Saturation is the colorfulness of an image relative to its own brightness.
Adjusting the saturation setting will aect the apparent intensity of color.
Sharpness
Range: 1 – 200
Default Setting: 100
Adjusting the sharpness enhances the edge contrast of the video in order
to improve its acutance (apparent sharpness).
Quality
Range: 0 – 2
Default Setting: 0
0–High, 1–Middle, 2–Low
Adjusting the video quality determines the Bit Rate for recording.
Light Frequency (LIGHTFREQ)
Range: 0 – 1
Default Setting: 1
0–60Hz, 1–50Hz
Adjust the light frequency setting to avoid power interference stripes,
which may occur indoors with certain lighting.
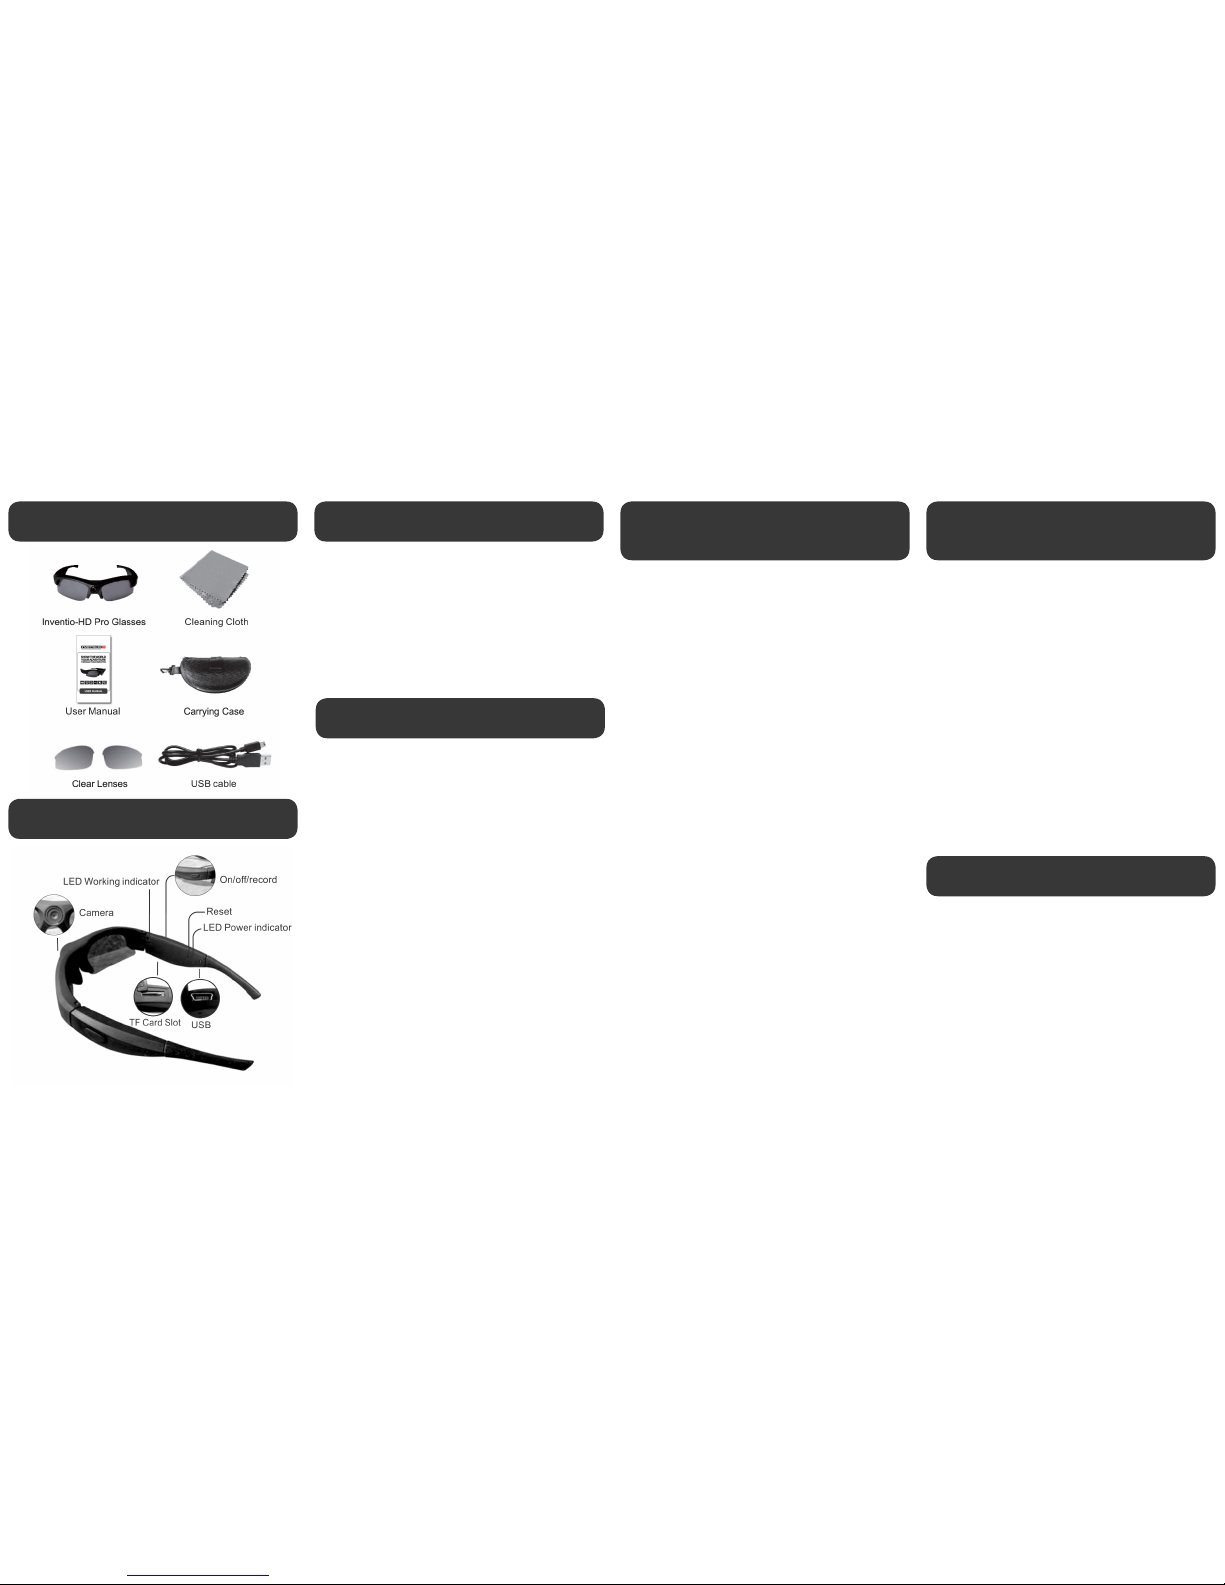
Inventio-HD Pro Features
• ON/OFF/RECORD Button
• LED Indicator Light
• MicroSD Card Slot
• RESET Button
• Mini USB Port
• 6 Audio Alerts
Inventio-HD Basic Operation
Changing the Inventio-HD
Pro’s Settings
Changing the Inventio-HD
Pro’s Settings
Viewing Videos on a PC or Mac
A. On a PC
1. Connect the Inventio-HD Pro to the PC using the
enclosed USB cable.
2. D ouble-click on “My Computer” and locate “Removable Disk”.
3. Double-click on “Removable Disk”
4. Double-click on “DCIM”
5. You may now copy, move, or play your video files.
B. On a Mac
1. Connect the Inventio-HD Pro to the Mac using the
enclosed USB cable.
2. The Inventio -HD Pro will be recognized as an External
Hard Drive.
3. Double-click on the External Hard Drive
4. You may now copy, move, or play your video fi
les.
Inventio-HD Pro Features
Inventio-HD Pro Features
 Loading...