

Page 1
GL-300 GPS TRACKER
User Manual
Spy Tec www.spytecinc.com
Page 2

GETTING STARTED
3
Components
Features
Activating the Device
Charging the Device
Powering the Device
Placing the Device
Accessing the Spy Tec GPS Portal/Interface
Using the Spy Tec GPS Interface
ACCOUNT INFORMATION
CHANGE SETTINGS
Set Home Address
Change Password
Change Driver Icon
Add New Driver/Vehicle
Remove Driver
Change Alert Settings
Add Email for Alerts
3
3
4
5
5
5
6
8
9
9
10
10
10
11
12
12
13
Add SMS for Alerts
Remove Email/SMS for Alerts
Change Time Zone
TRACK HISTORY
GEOFENCING
Create Geofencing Area
View/Delete Geofences
REPORT GENERATION
Travel Log Report
Mileage Report
Fuel Report
DTC Report
Bottom Buttons
REAL TIME
Precautions
Frequently Asked Questions (FAQs)
How do I unfreeze the device?
13
14
14
15
18
18
19
20
20
22
24
25
26
27
28
28
28
Why is there unexpected interference?
What is the battery life?
Spy Tec www.spytecinc.comSpy Tec www.spytecinc.com
28
28
Page 3

GETTING STARTED
Components
• GPS Tracker
• Charger
Features
• Real-Time Tracker
• Track a Child, Adult, Vehicle or Asset
• 2” x 1” x .8”
• Access Remotely via Computer, Tablet or Phone
• Receive Location and Speed Alerts by E-mail & Text Message
• Rechargeable Battery Life up to 2 Weeks
• Geo-Fence
• Monthly Subscription Applies
• View Route on Google Maps or Google Earth
• One Year Warranty
Spy Tec www.spytecinc.comSpy Tec www.spytecinc.com 3
Page 4
Activating the Device
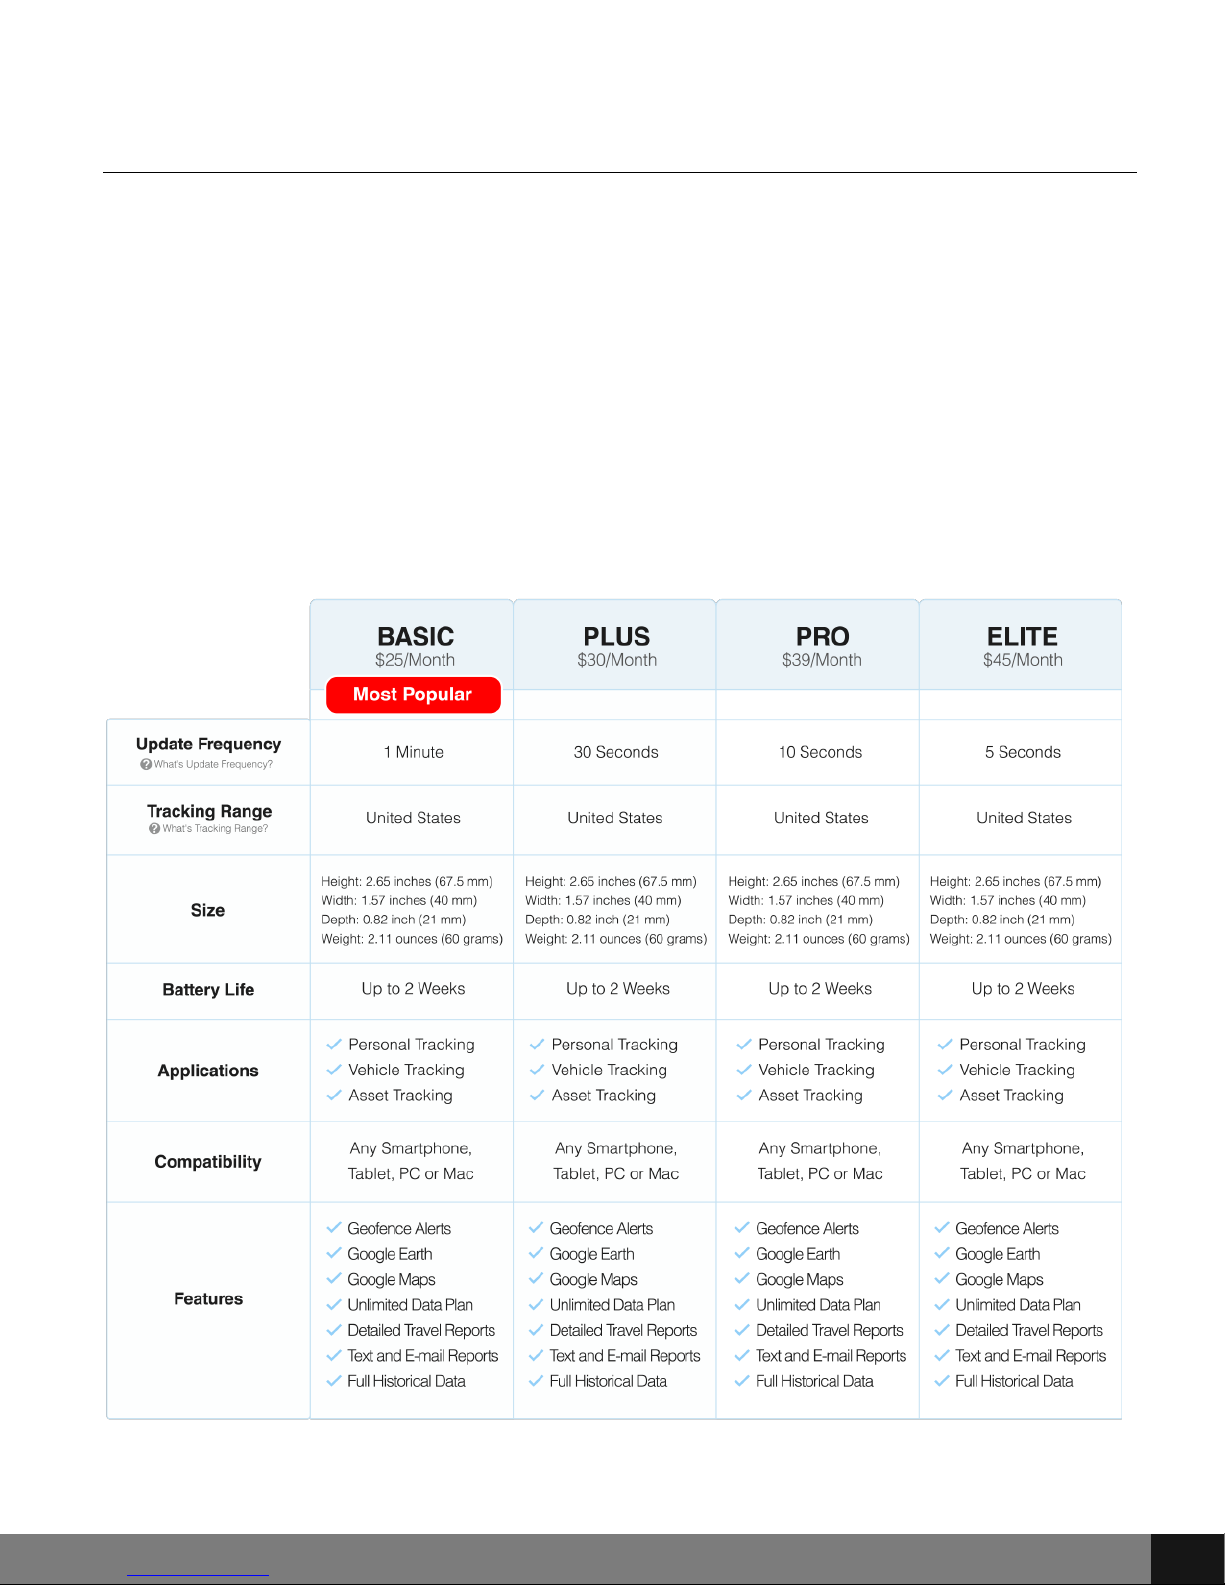
After the device is purchased, a monthly service plan must be activated so that
the device is able to send data to your Spy Tec account. There is a basic option
for $25 per month that allows 1 minute updates. Updates are then 30, 10 and
5 seconds for the more expensive plans, as shown in the chart below.
Activate your GPS device(s) by filling out the activation form at
http://www.spytecinc.com/gpstracking. Tracking plans and payment can be
setup there using major bank cards, credit cards or gift cards. An e-mail will be
sent within 24 hours of activating your device. This email will contain a link to
the GPS site (www.spytecgps.com), as well a user name and password.
Spy Tec www.spytecinc.comSpy Tec www.spytecinc.com 4
Page 5
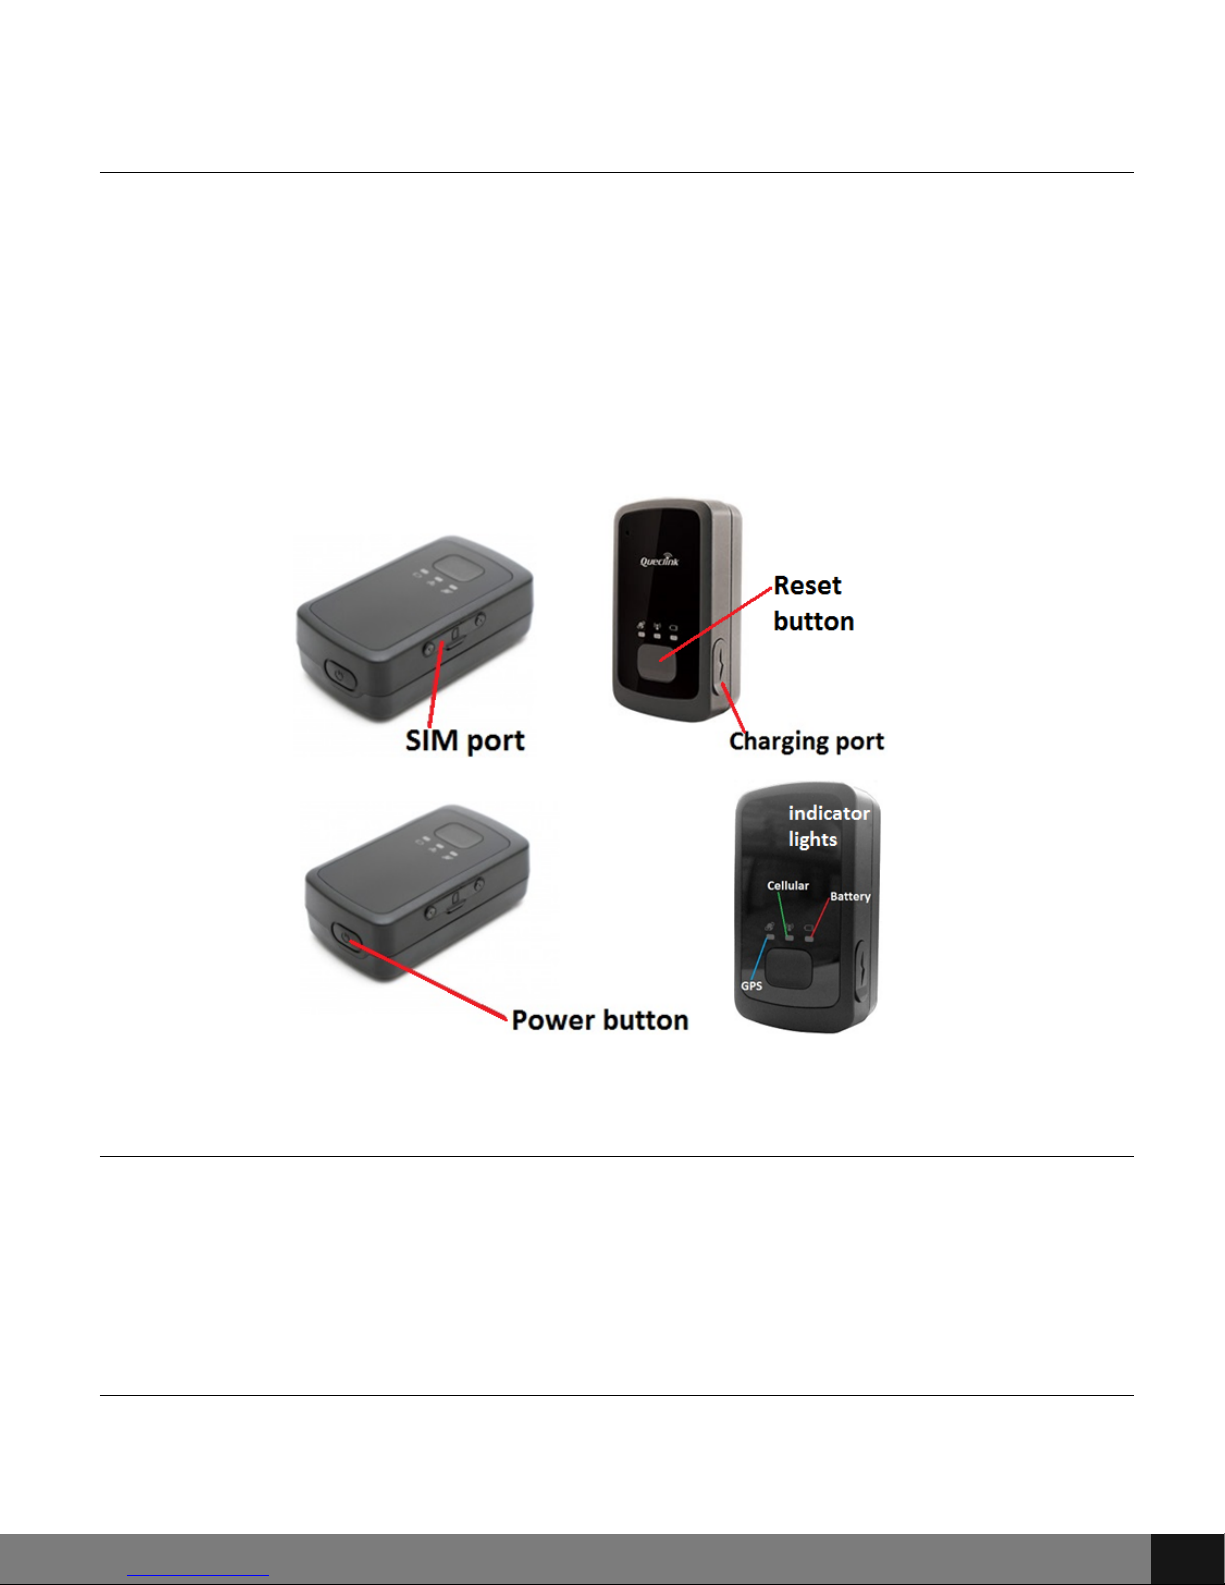
Charging the Device
Lift the flap covering the charging port and plug the charger into the unit via
USB port, then into an electrical outlet. When fully charged as indicated by the
battery icon to the bottom right on the device, remove the device from the
charger.
The battery icon will have a diminishing fill eventually resulting in a red
portion with empty outline indicating a low battery. Recharge the device as
needed.
*The SIM card is already installed in the device. Do not remove or replace it.
Powering the Device
To turn the device on, press the Power button once. As the device reaches the
satellite(s), the middle light will begin blinking and any movement will be
reported in time increments according to the GPS plan. To turn the device off,
press the Power button again
Placing the Device
Make sure that the device is placed near a window or on a surface that does
not obstruct the signal reception. It is best not to be placed in a trunk. Watch
the signal lights to ensure that the best reading is made.
Spy Tec www.spytecinc.comSpy Tec www.spytecinc.com 5
Page 6
Accessing the Spy Tec GPS Portal/Interface
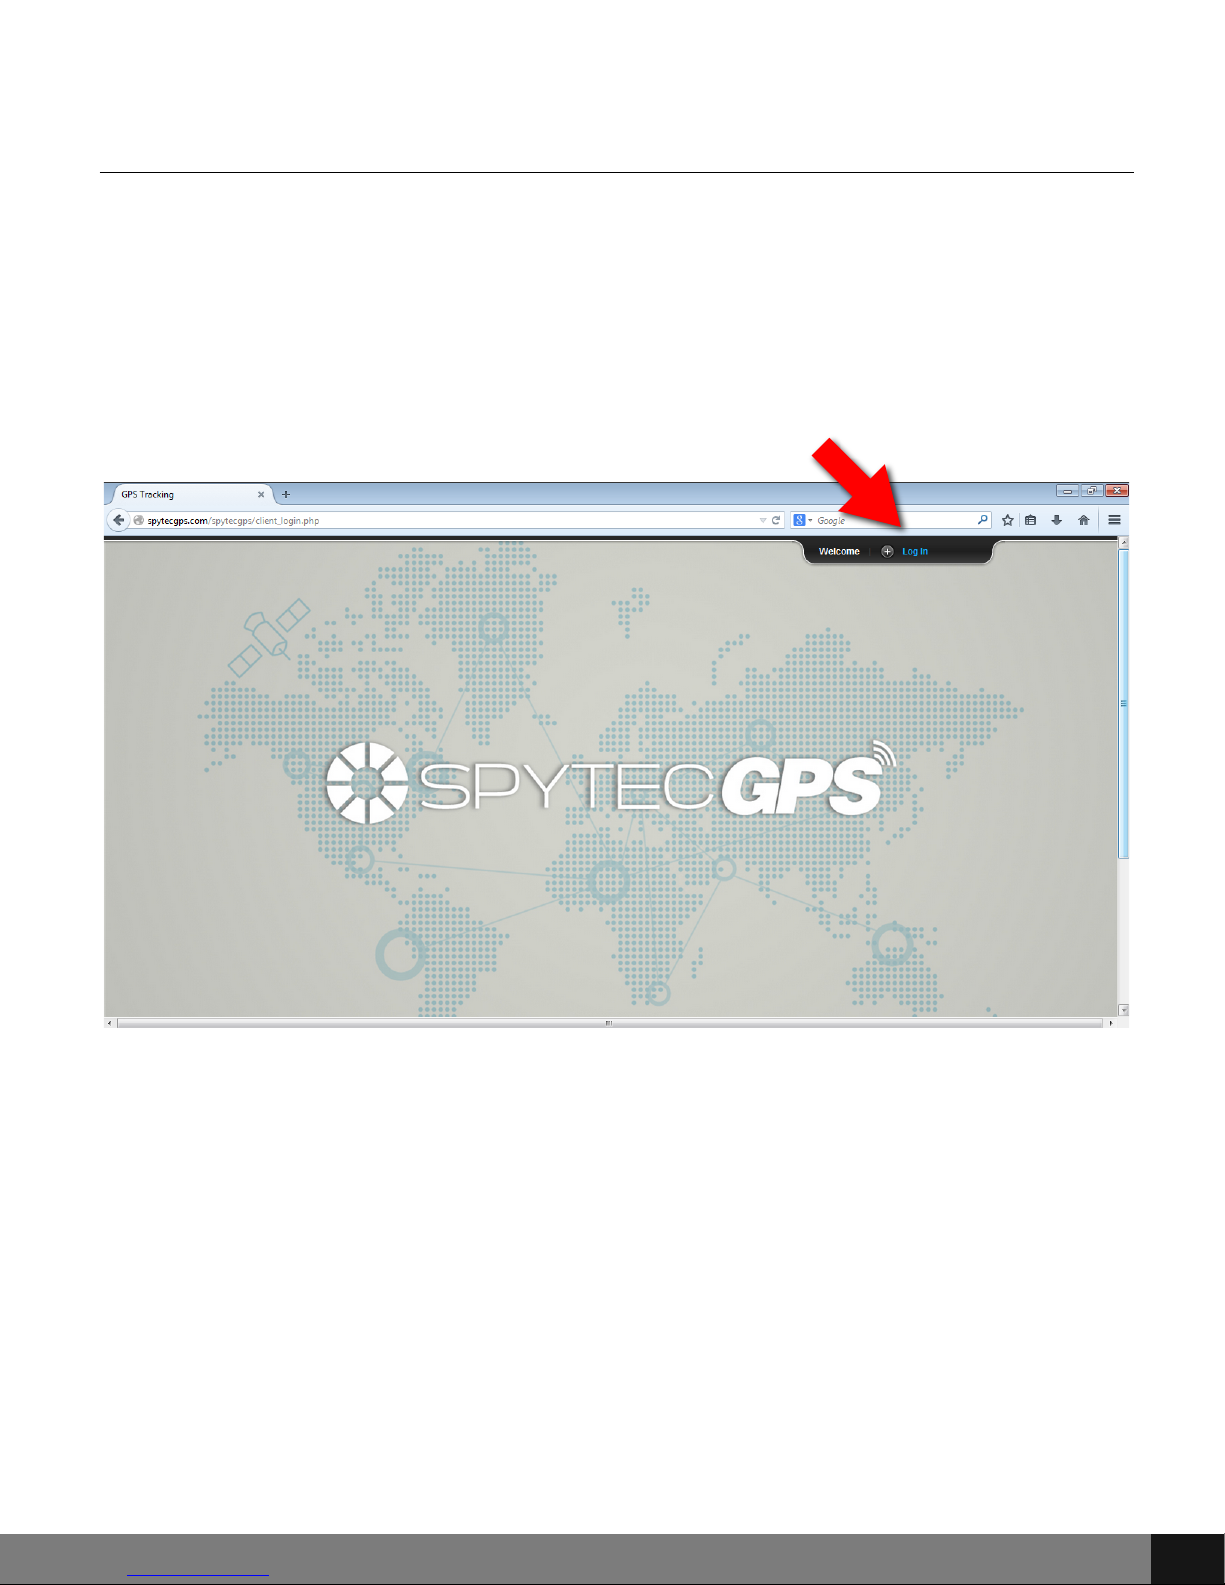
Before logging into a Spy Tec GPS Portal account, make sure that browser
software is up to date.
Go to http://spytecgps.com (http://spytecgps.com/spytecgps/client_login.php)
and click the Login In link at the upper right of the page. A login tab will open.
Spy Tec www.spytecinc.comSpy Tec www.spytecinc.com 6
Page 7
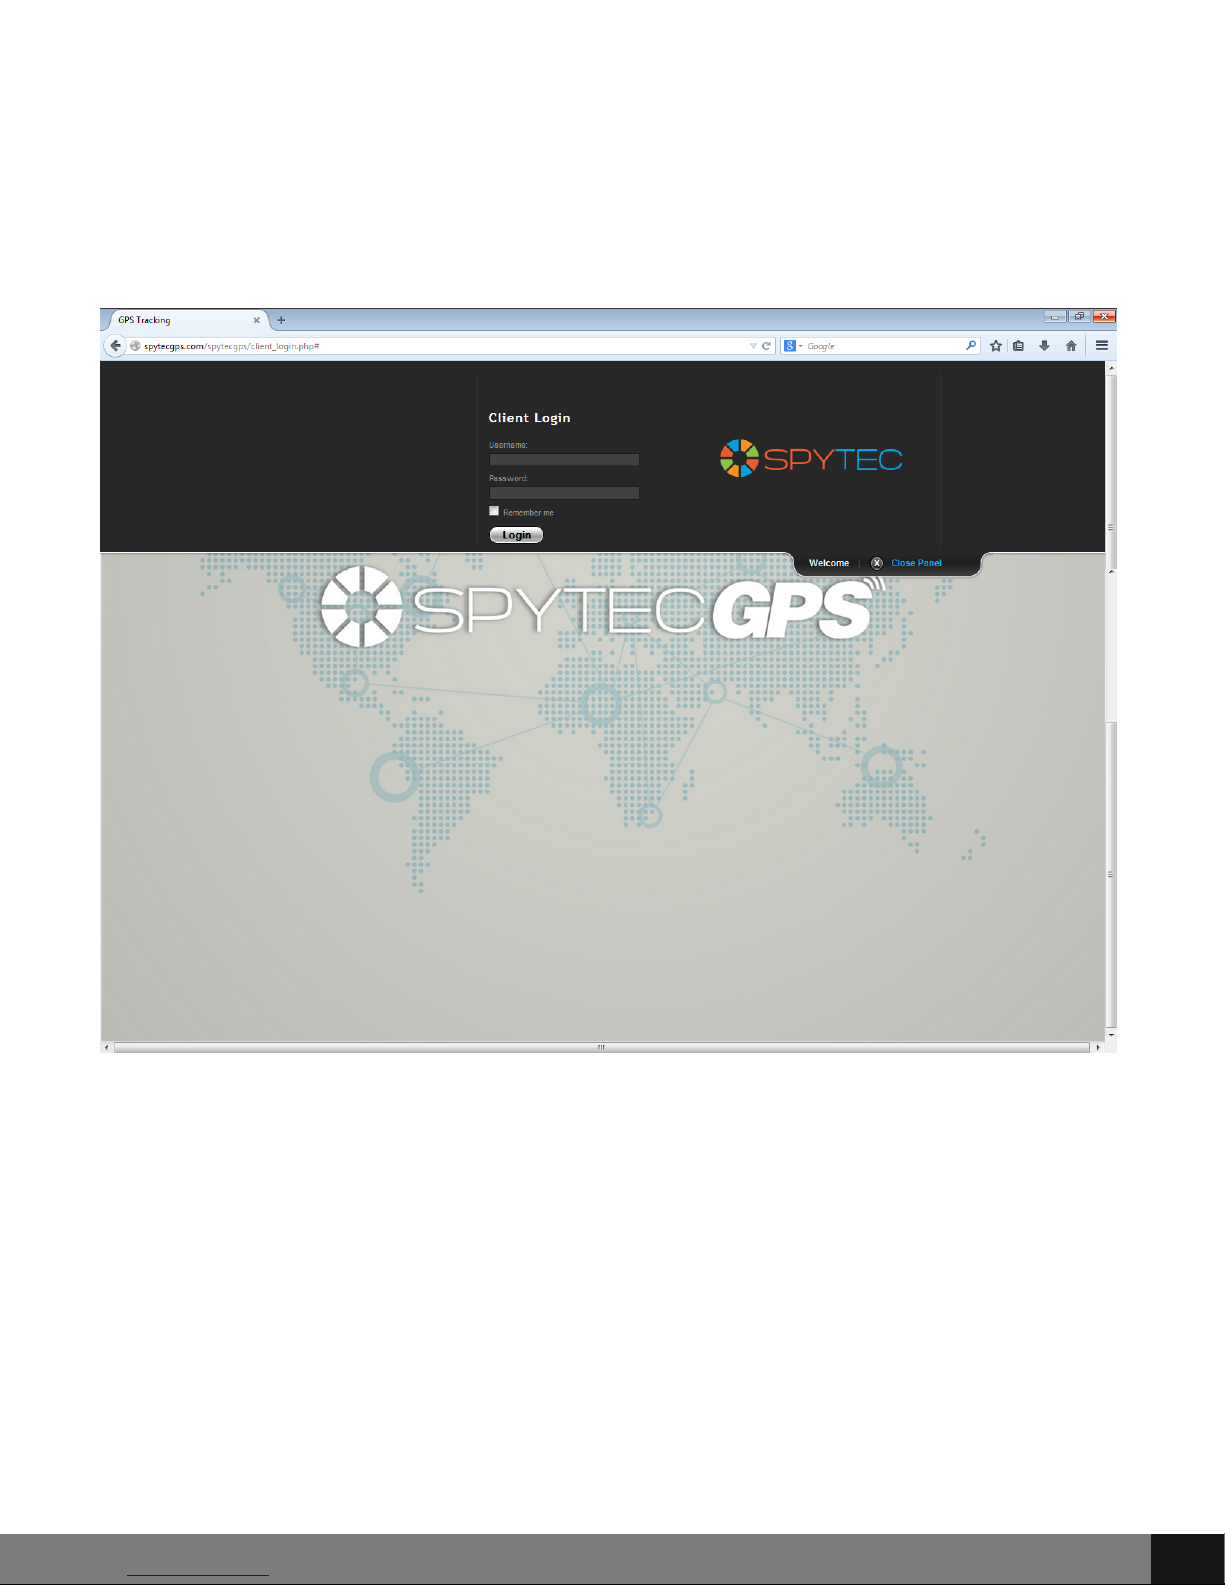
In the open tab, enter username and password and then press the Login
button. Once logged in, the interface will open with a menu to the top left. The
map will appear with the GPS locator position to the device’s location coordinates.
Spy Tec www.spytecinc.comSpy Tec www.spytecinc.com 7
Page 8

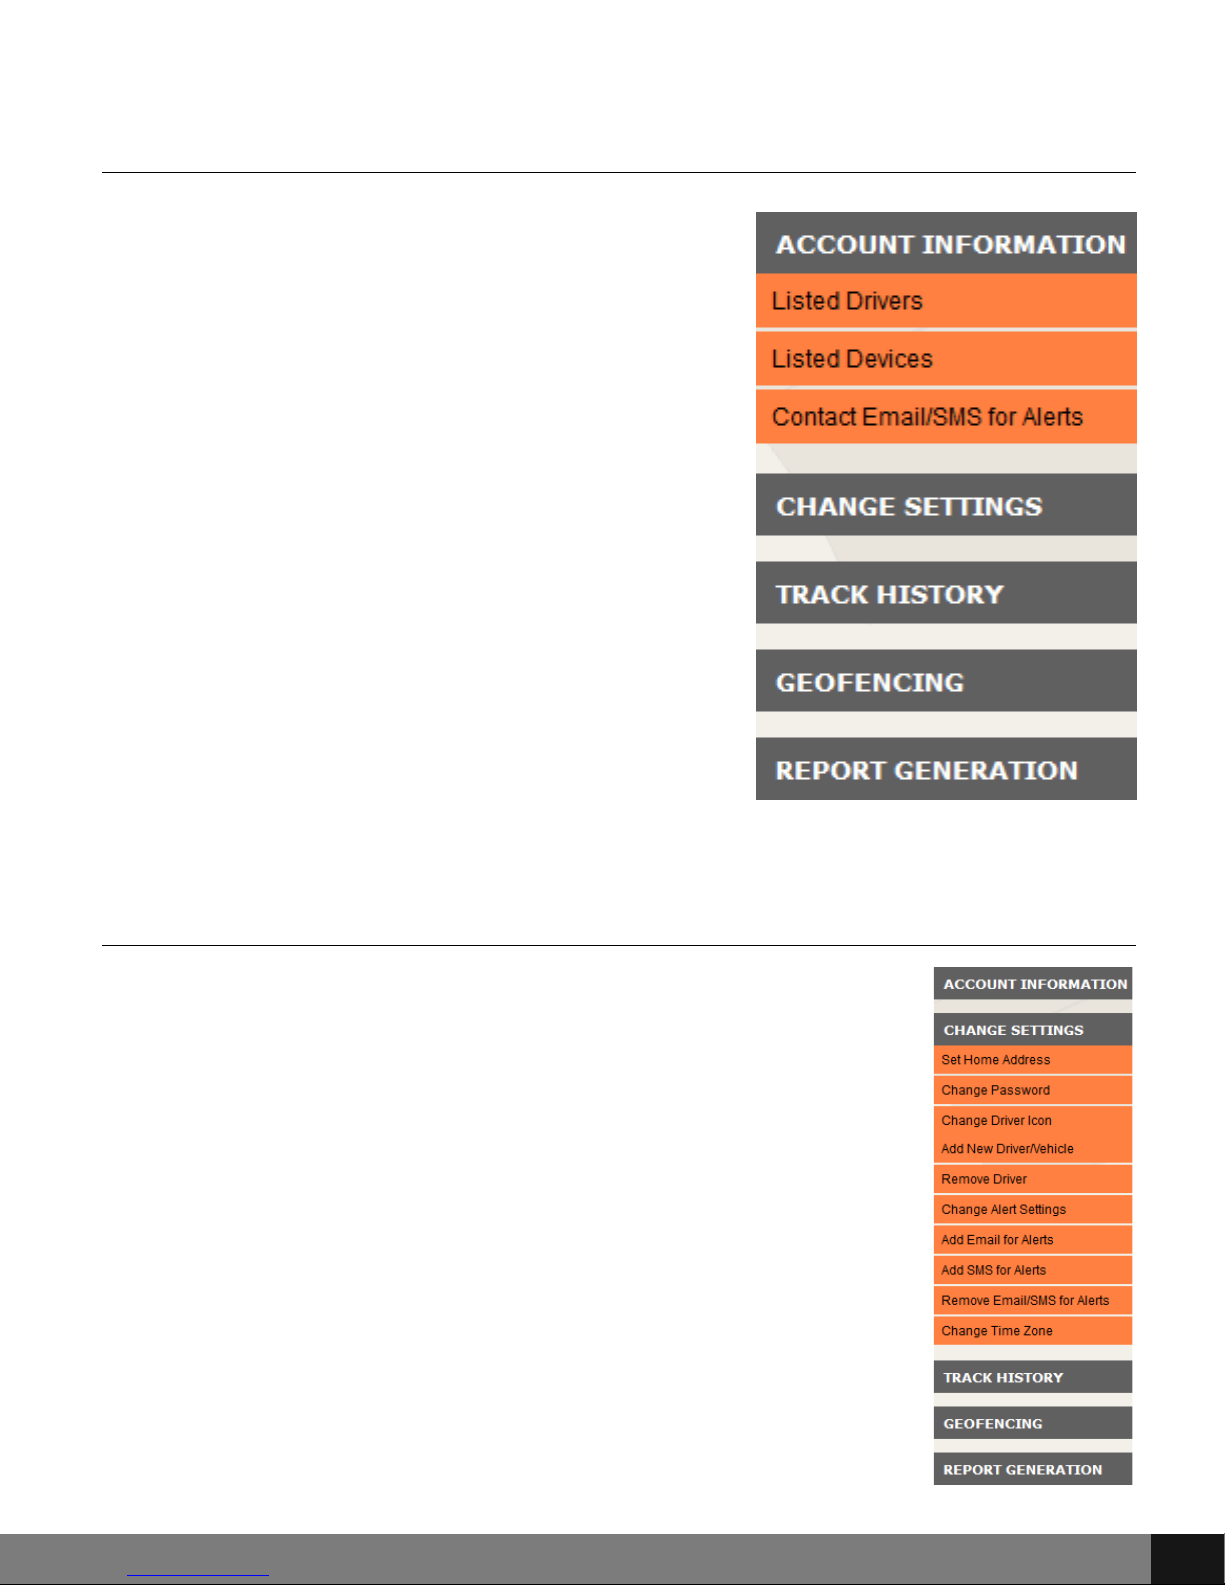
Using the Spy Tec GPS Interface
At the top left of the screen, there is a user menu with drop down buttons:
ACCOUNT INFORMATION, CHANGE SETTINGS, TRACK HISTORY, GEOFENCING
and REPORT GENERATION.
Spy Tec www.spytecinc.comSpy Tec www.spytecinc.com 8
Page 9
ACCOUNT INFORMATION
ACCOUNT INFORMATION
Click the ACCOUNT INFORMATION button
Click the ACCOUNT INFORMATION button
to open a drop-down menu with Listed
to open a drop-down menu with Listed
Drivers, Listed Devices and Contact
Drivers, Listed Devices and Contact
Email/SMS for Alerts buttons. By clicking
Email/SMS for Alerts buttons. By clicking
the Listed Drivers option, a pop up will
the Listed Drivers option, a pop up will
appear with listed drivers as assigned to
appear with listed drivers as assigned to
the active device. By clicking the Listed
the active device. By clicking the Listed
Devices option, a pop up will appear with
Devices option, a pop up will appear with
listed devices (in this case the GL300), the
listed devices (in this case the GL300), the
date of activation and device description.
date of activation and device description.
The Contact Email/SMS for Alerts button
The Contact Email/SMS for Alerts button
will show contact information for active
will show contact information for active
alerts as selected in the CHANGE
alerts as selected in the CHANGE
SETTINGS > Add Email for Alerts or > Add
SETTINGS > Add Email for Alerts or > Add
SMS for Alerts button drop-down menu.
SMS for Alerts button drop-down menu.
CHANGE SETTINGS
The CHANGE SETTINGS button enables a drop down menu
with the following options: Set Home Address, Change
Password, Change Driver Icon, Add New Driver/Vehicle,
Remove Driver, Change Alert Settings, Add Email for Alerts,
Add SMS for Alerts, Remove Email/SMS for Alerts and
Change Time Zone. Click any option to access a pop up
screen that allows for preference changes.
Spy Tec www.spytecinc.comSpy Tec www.spytecinc.com 9
Page 10

Set Home Address
This feature has been disabled.
Change Password
By choosing the Change Password option, a pop up window appears as seen
below. Enter the old password in the Old Password field and then a new
password in the New Password field. Confirm by re-entering the new
password in the Confirm New Password field. Click the SUBMIT button. Use
the new password for the next login.
Change Driver Icon
Click on the Change Driver Icon menu option to change the appearance of the
vehicle that appears on the GPS interface. A pop up will appear that allows the
user to choose a Driver as assigned to the device.
Spy Tec www.spytecinc.comSpy Tec www.spytecinc.com 10
Page 11

Remove Driver
To Remove a Driver from the GPS device, click the Remove Driver menu option
and check the box corresponding to the driver that is to be removed. Click the
SUBMIT button.
Change Alert Settings
Select the Change Alert Settings item from the drop-down menu to set alert
options for Geofencing (set parameters/boundaries), Speed, Ignition Off,
Ignition On, Tow Alert, Function Key Alert and Low Battery Alert. Check the
box(es) that corresponds to the desired alert(s.) Enter a Speed Limit and/or
Low Battery Alert option in the field below. For example, if an alert is to be
sent when the car reaches 75 mph, enter 75 in the Speed Limit field and make
sure that the box next to Speed is checked. Click the SUBMIT button.
Spy Tec www.spytecinc.comSpy Tec www.spytecinc.com 11
Page 12

Choose the radio button that corresponds to the Driver for which you would
like to add a new icon and click the SUBMIT button. A new pop up will appear
with a radio button for each corresponding driver icon option. Choose an
option, scroll down and click the SUBMIT button.
Add New Driver/Vehicle
Choose the Add New Driver/Vehicle
option from the drop-down menu. An
Add New Driver pop up will appear.
Enter the new driver’s first and last
name in the Driver First Name and
Driver Last Name fields. Click the
SUBMIT button. Another pop up will
appear. Select the radio button
corresponding to the device that will
receive the new driver and click the
SUBMIT button.
Spy Tec www.spytecinc.comSpy Tec www.spytecinc.com 12
Page 13

Now that updates have been made, the settings will have appropriate [ON] or
[OFF] shown beside each option.
Add Email for Alerts
After clicking the Add Email for Alerts option, a pop up with an Email Address
field will show. Type the email address that alerts will be sent to and click the
SUBMIT button.
Add SMS for Alerts
Choose the Add SMS for Alerts option from the menu and enter a phone
number in the field provided on the Add New SMS Number and Select Carrier
pop up. Choose the radio button that corresponds with the service provider
(ATT, T-Mobile, Verizon or Sprint) and then click the SUBMIT button.
Spy Tec www.spytecinc.comSpy Tec www.spytecinc.com 13
Page 14

Remove Email/SMS for Alerts
Choosing the Remove Email/SMS for Alerts option will open a pop-up showing
a checkbox with corresponding options as set in Email/SMS alerts settings.
Check the email or SMS account that needs removal and click the SUBMIT
button.
Change Time Zone
Choose the Select/Change Timezone option to update timezone preferences.
A pop-up will appear with radio buttons for each timezone (GMT). Select the
radio button for any given timezone and then click SUBMIT.
Spy Tec www.spytecinc.comSpy Tec www.spytecinc.com 14
Page 15

TRACK HISTORY
The TRACK HISTORY button allows you to View Track History by clicking the
View Track History link in a drop-down menu.
Clicking the View Track History option will open a pop up that asks for dates of
travel for which a detailed report will be generated according to Stops, Ignition
On/Off, Movements or All of these maneuvers. Begin by entering a Start and
End Date for the report.
Spy Tec www.spytecinc.comSpy Tec www.spytecinc.com 15
Page 16

The TRACK HISTORY button allows you to View Track History by clicking the
View Track History link in a drop-down menu.
Choose the corresponding radio button for All, Stops Only, Ignition On/Off or
Movements only and click SUBMIT.
Spy Tec www.spytecinc.comSpy Tec www.spytecinc.com 16
Page 17

Select the Driver/Vehicle for which the report is to be generated and click
SUBMIT.
A map view will appear as indicated with given preferences in previous
selections, showing the trip’s path.
Spy Tec www.spytecinc.comSpy Tec www.spytecinc.com 17
Page 18

GEOFENCING
The Geofencing button opens a drop-down menu that
includes the following options: Create Geofencing Area
and View/Delete Geofences. The Geofences define
parameters to which the assigned Driver/Vehicle is
permitted to drive. If the Driver/Vehicle exits the
parameters, an alert will be sent as specified in the
CHANGE SETTINGS options. When using the drop down
menus, click the option to access a pop up screen that
allows for preference changes.
Create Geofencing Area
To create a Geofencing area, click on the Geofencing menu option and then
click Create Geofencing Area from the drop-down menu. A pop-up with Real
Time map will appear with instructions to the bottom right of the screen:
1. Enter Address (or latitude/longitude in search box) to map location
for geofencing.
2. Draw geofencing circle by moving markers so that circle covers the
area to be geofenced.
3. Press submit button to enter data.
Spy Tec www.spytecinc.comSpy Tec www.spytecinc.com 18
Page 19

View / Delete Geofences
To view current Geofences, click on the Geofencing menu option and then
click View/Delete Geofences from the drop-down menu. A pop-up will appear
with the first Geofencing area. Use the PREV and NEXT buttons to navigate
through Geofencing areas.
To delete a Geofence, click the red box to the right of the SUBMIT button.
After clicking DELETE, click the SUBMIT button. The selected Geofence will be
deleted and the Geofencing window will close.
Spy Tec www.spytecinc.comSpy Tec www.spytecinc.com 19
Page 20

REPORT GENERATION
The REPORT GENERATION button enables a drop-down menu with the
following options: Travel Log Report, Mileage Report, Fuel Report and DTC
Report. Click the option to access a pop up screen that allows for preference
changes.
Travel Log Report
Clicking the Travel Log Report option will open a pop up that asks for dates of
travel for which a detailed report will be generated according to Stops, Ignition
On/Off, Movements or All of these maneuvers. Begin by entering a Start and
End Date for the report.
Spy Tec www.spytecinc.comSpy Tec www.spytecinc.com 20
Page 21

When selecting Date Ranges, a pop up calendar will appear. Click on the start
and end date for each field.
Choose the corresponding radio button for All, Stops Only, Ignition On/Off or
Movements only and click SUBMIT.
Spy Tec www.spytecinc.comSpy Tec www.spytecinc.com 21
Page 22

Select the Driver/Vehicle for which the report is to be generated and click
SUBMIT.
A pop up will appear with the Travel Log Report as indicated with given
preferences in previous selections. Use the Print this page button in the top
right of the window to print a report according to printer preferences in My
Computer.
Mileage Report
Clicking the Mileage Report option will open a pop up that asks for dates of
travel for which a mileage report will be generated.
Spy Tec www.spytecinc.comSpy Tec www.spytecinc.com 22
Page 23

When clicking in the Start and End Date fields, a pop up calendar will appear
for selection of dates. Click the date for each field.
Once the dates are selected, click the SUBMIT button.
Select the Driver/Vehicle by clicking the corresponding radio button and then
the SUBMIT button.
Spy Tec www.spytecinc.comSpy Tec www.spytecinc.com 23
Page 24

A pop up will appear with MILEAGE REPORT SUMMARY for indicated dates and
driver/vehicle. A Print this page button is at the top left. Click the Print this
page to print the report according to print preferences in My Computer.
Fuel Report
The Fuel Report option will open a pop up with fields for start and end dates.
Click in each field and a pop up calendar will appear. Click the date for start
and end fields and then SUBMIT. Another pop up will then appear asking for
Driver/Vehicle. Choose the radio button that corresponds to the driver/vehicle
for which the report is to be generated.
Spy Tec www.spytecinc.comSpy Tec www.spytecinc.com 24
Page 25

A report will pop up giving fuel usage values for the times indicated as per the
preferences given. Click the Print this page button to print the report
according to printer preferences in My Computer.
DTC Report
The DTC Report option will open a pop up with fields for start and end dates.
Click in each field and a pop up calendar will appear. Click the date for start
and end fields and then SUBMIT. Another pop up will then appear asking for
Driver/Vehicle. Choose the radio button that corresponds to the driver/vehicle
for which the report is to be generated.
Spy Tec www.spytecinc.comSpy Tec www.spytecinc.com 25
Page 26

A report will pop up giving DTC values for the times indicated as per the
preferences given. Click the Print this page button to print the report
according to printer preferences in My Computer.
BOTTOM BUTTONS
The buttons on the bottom of the screen enable many functions. The first (left)
button is the REAL TIME button. The next is the TOGGLE MENU button, which
hides or shows the toggle menu to the upper left of the screen. The SUPPORT
button opens a Send a Message window that enables the user to send a
message to the Tech Support staff at Spy Tec Inc. The LOG OFF button
immediately allows the user to logoff and closes the map/real time view. The
ONLINE MANUAL button links to the Online Manual
(http://www.spytecgps.com/help/help.htm) and opens a new window with
given GL300 device instructions.
Spy Tec www.spytecinc.comSpy Tec www.spytecinc.com 26
Page 27

Real Time
The first (left to right) button enables a Real Time view of the locator on
Google Earth. By pressing the Real Time button, a new tab or window will
appear in your browser with a locator by GPS device location coordinates and
Real Time view.
In the Real Time screen, there are two buttons at the bottom right of the
screen for CURRENT LOCATION and LAST 24 HOURS CHART. The CURRENT
LOCATION is a default setting when using the REAL TIME screen, whereas the
LAST 24 HOURS CHART button will create a chart of GPS tracker whereabouts
for the last 24 hours. Hover over the LAST 24 HOURS CHART button and then
click on the Driver to receive a chart of whereabouts for the last 24 hours.
Spy Tec www.spytecinc.comSpy Tec www.spytecinc.com 27
Page 28

PRECAUTIONS
• Strictly observe relevant laws as this product cannot be used for any
illegal purpose. The user is responsible for any legal matters.
• The maximum life of the battery will diminish if not used for a long time
so recharge it before use or storage.
• Do not adjust settings or placement while driving.
FREQUENTLY ASKED QUESTIONS (FAQs)
How do I unfreeze the device?
Turn the power off and restart the device.
Why is there unexpected interference?
During a time of interference, the left light (blue) will begin blinking. This
means that no wireless signal is available and the device is searching for a
new signal.
What is the battery life?
The battery lasts up to 14 days, but with greater activity the battery life will be
less.
Spy Tec www.spytecinc.comSpy Tec www.spytecinc.com 28
 Loading...