

Page 1
G1W-H Dash Camera
User Manual
Spy Tec www.spytecinc.com
Page 2

GETTING STARTED
Components
Features
Powering Up the Device
MicroSD Memory Card for Data Storage
Attaching the Device to Tilting Suction Mount
Menu Options
Accessing Menu Items
Video Menu
Resolution
Loop Recording
Wide Dynamic Range (WDR)
Exposure
Motion Detection
Record Audio
G-Sensor
Date Stamp
Video Settings Menu
Set the Time and Date
Auto Power Off
Beep Sound
Language
TV Mode
Frequency
Screen Protection
IR LED
Format
Default Setting
Version
Still Capture Menu
Capture Mode
Resolution
Sequence
Quality
Sharpness
White Balance
Color
ISO
Exposure
Anti-Shaking
HDR
Date Stamp
Still Capture Settings Menu
Set the Time and Date
Adding License Number Set to Timestamp
Auto Power Off
Video Recording
Taking Pictures
Accessing, Adding and Deleting Files
Specifications
Precautions
Frequently Asked Questions (FAQs)
How do I unfreeze the device?
Why is there unexpected interference?
Why is the file length inconsistent?
Why won’t the camera auto-start?
What is the battery life?
3
3
3
4
5
6
7
7
8
8
8
8
8
8
9
9
9
9
9
9
9
10
10
10
10
10
10
10
10
11
11
11
11
11
11
12
12
12
12
12
12
12
13
13
13
13
13
13
13
15
16
17
17
17
17
17
17
Spy Tec www.spytecinc.comSpy Tec www.spytecinc.com
Page 3

GETTING STARTED
Components
• Camera with rechargeable battery
• USB cable
• Car charging unit
• Suction holder
• User Manual
Features
• 1080P HD Video & Audio Recording
• Up to 64 GB microSD
• Novatek NT96650 & Aptina AR0330
• G-Sensor (allows camera to stabilize if jarred and prevents loop recording
over footage taken during an accident)
• 2.7" screen
• Lightweight
• 140 degree wide angle
• Tilting suction mount
• Loop Recording
• Functions as a regular camera or dash camera
Spy Tec www.spytecinc.comSpy Tec www.spytecinc.com 3
Page 4
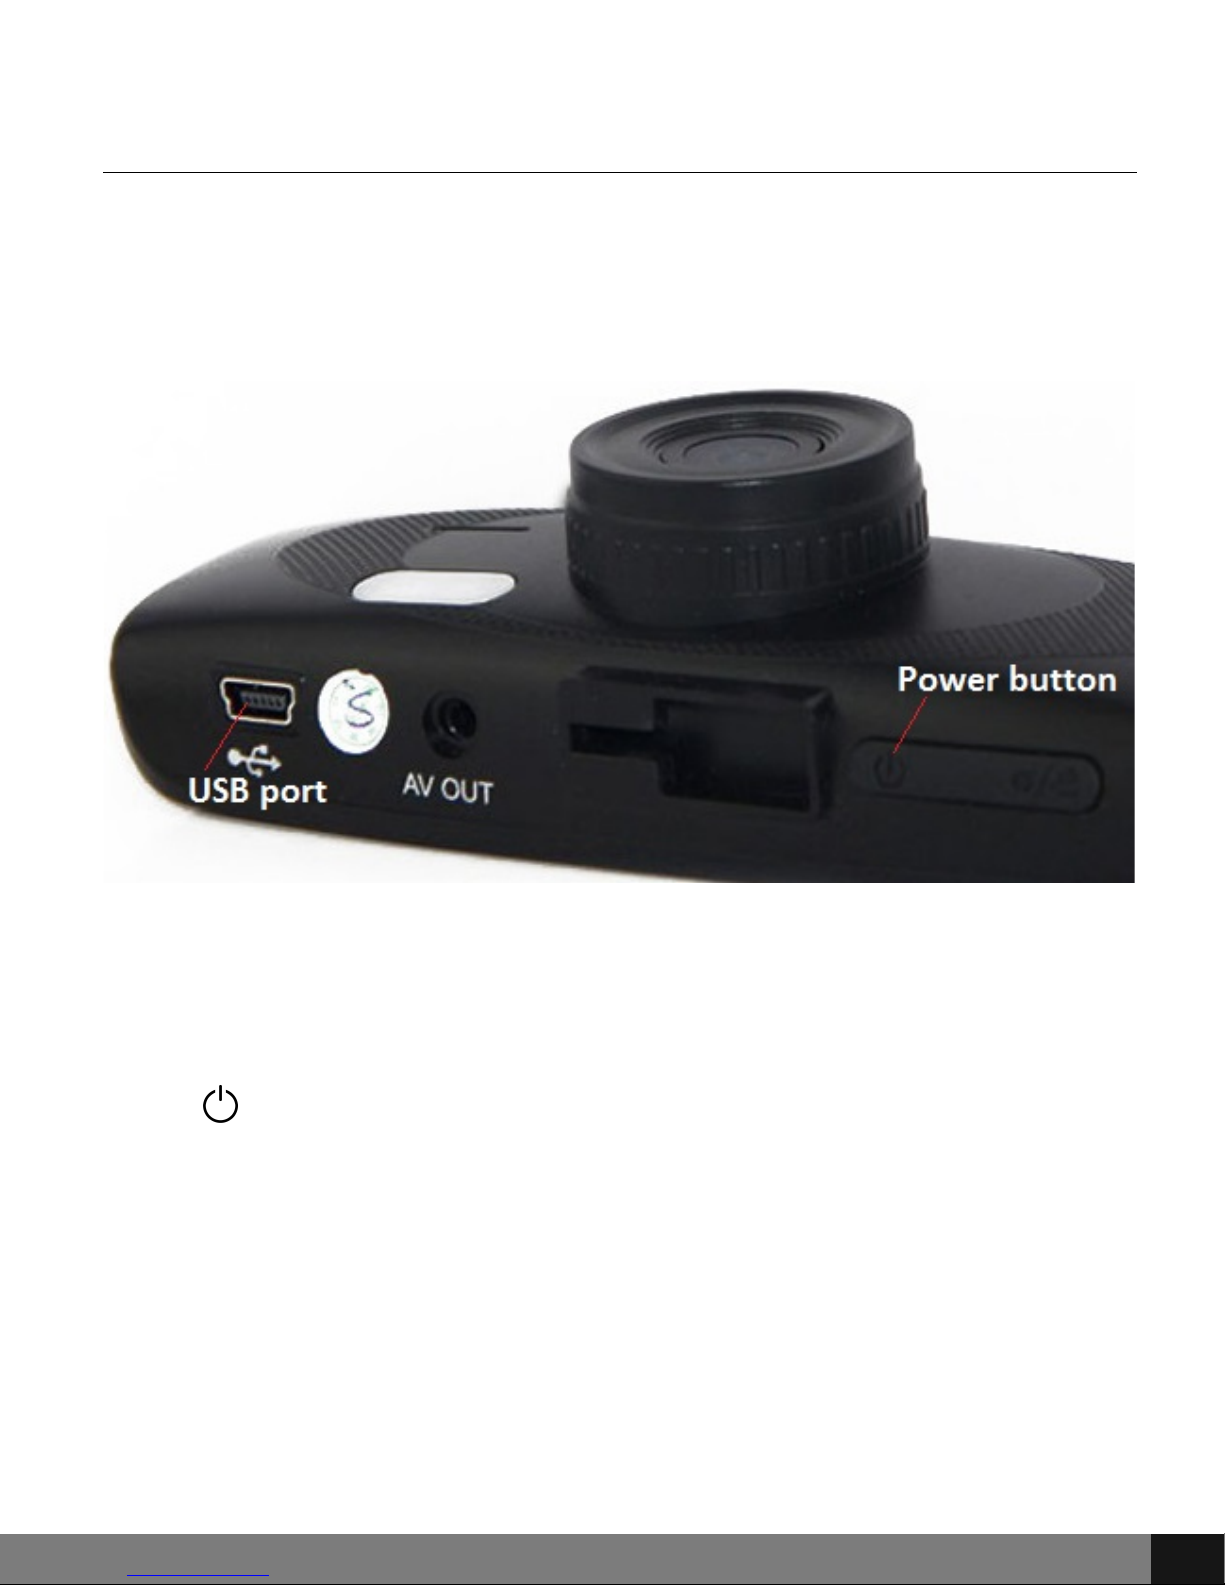
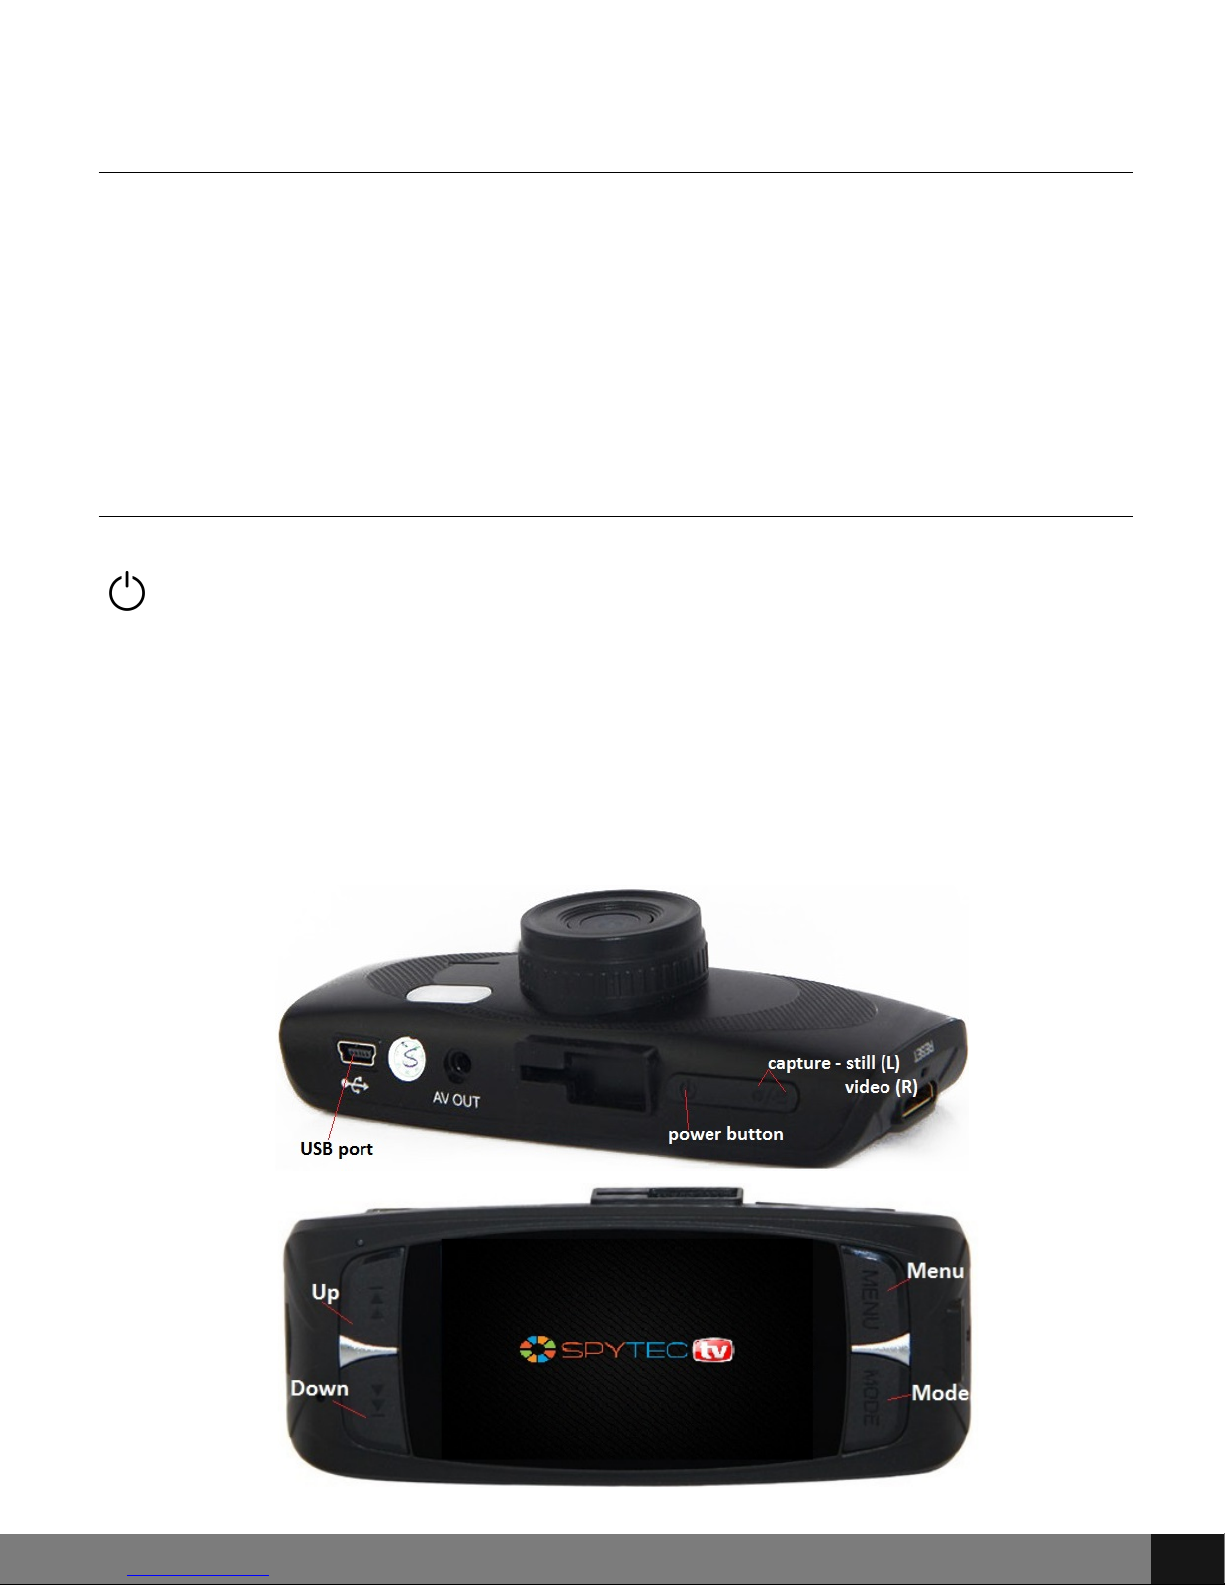
Powering Up the Device
Plug the USB cable into the dash cam device via the small USB port and attach
the cord to the external power supply via the larger USB port (computer or
adapter) or use the car charger.
You may allow the device to charge until fully charged and begin
programming when finished –or– as the device charges, press the power
button and wait for the screen to appear.
When fully charged as indicated by the battery icon to the bottom right on the
dash cam device screen, you may remove the device from the charger and/or
continue using the direct power source. If using battery power alone, the
battery icon will have a diminishing fill eventually resulting in an empty outline
indicating a low battery.
Spy Tec www.spytecinc.comSpy Tec www.spytecinc.com 4
Page 5
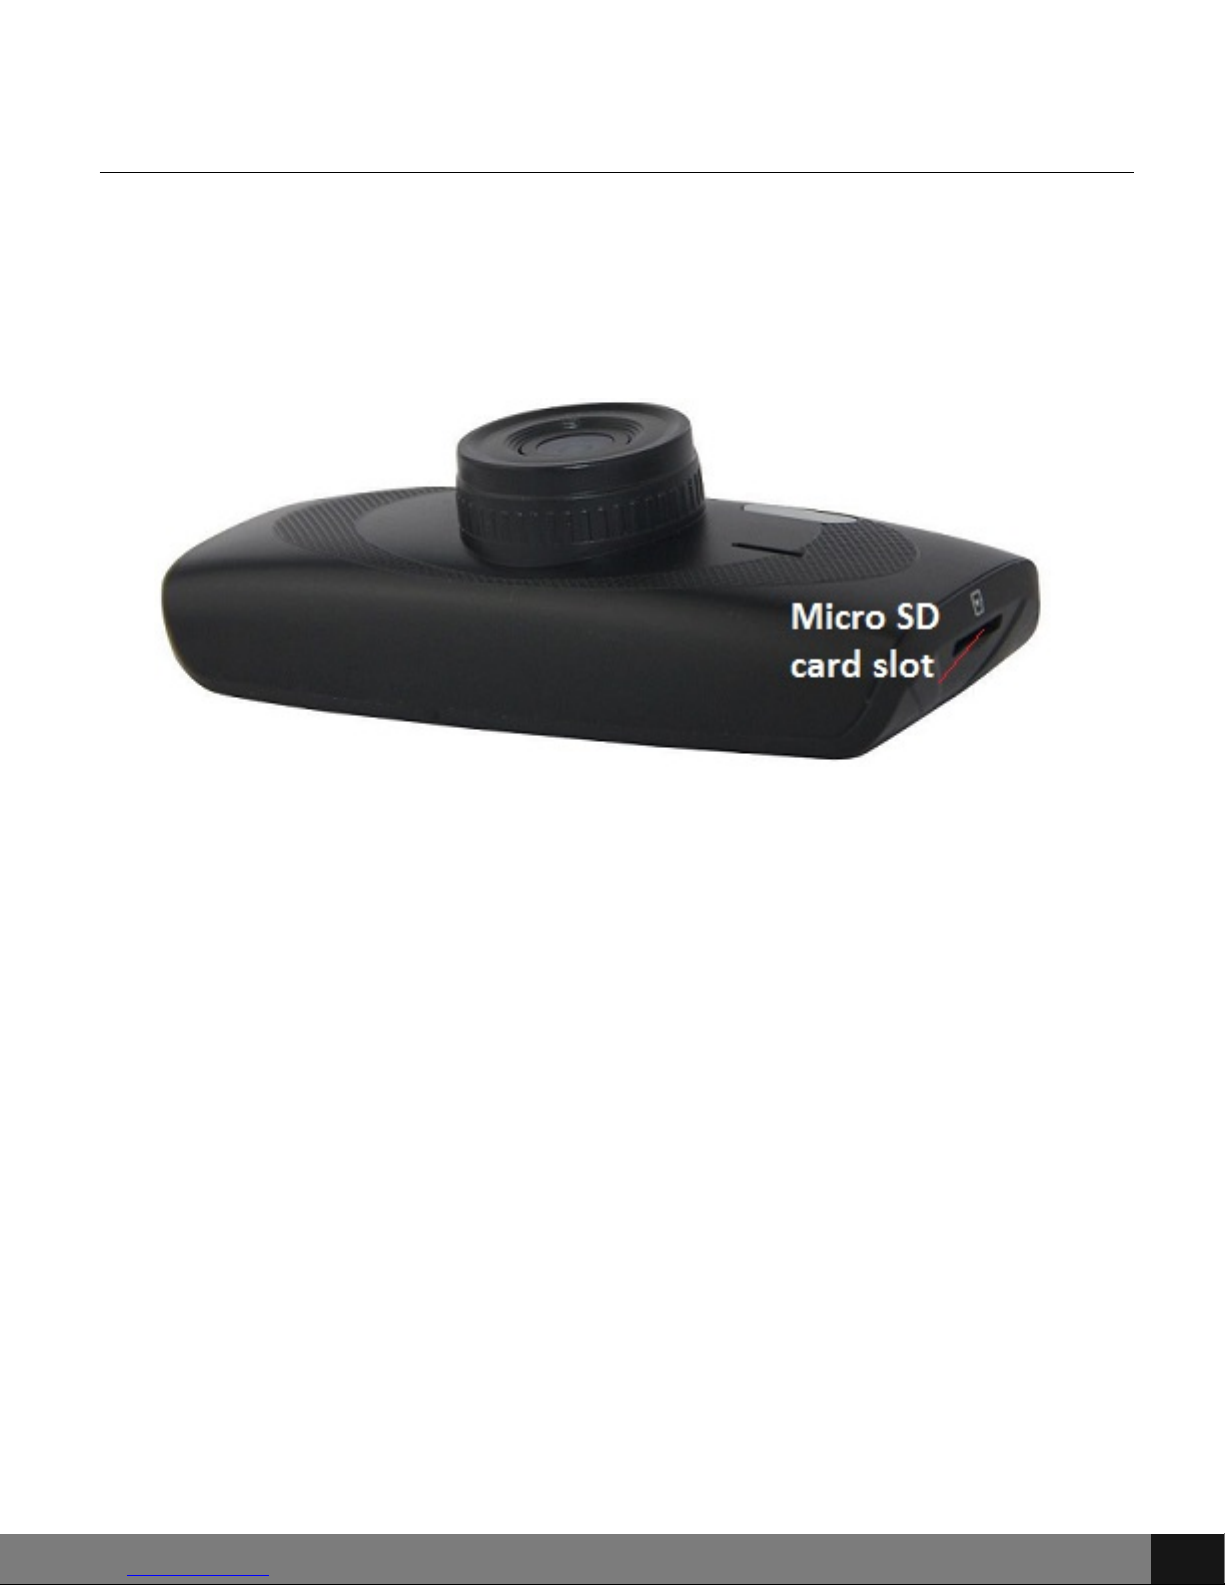
Micro SD Memory Card for Data Storage
On the right-facing side of the G1W-H device, you will see a slot for the Micro
SD card (not included). Place the microSD memory card (up to 64GB), text
facing upwards, into the slot and push in until it clicks into place. To remove or
replace the microSD memory card, simply push in until it clicks in/out of
place.
If the microSD card is unrecognized, a blue screen will appear with the
message “PLEASE INSERT SD CARD.” Plug the microSD into an adapter and
into your computer via USB. Now a pop-up window will appear and ask you to
reformat your card. Please note that any data stored on the microSD card will
be deleted during the reformatting process. Click Yes and allow the
reformatting to begin. Once the reformatting is complete, detach card from
adapter and put back into the camera device. If no pop-up appears, as the
microSD is attached via USB, go to the Windows menu and select Computer.
Right-click the removable drive and select Format.
Place the microSD card back into the camera after reformatting and press the
power button.
Spy Tec www.spytecinc.comSpy Tec www.spytecinc.com 5
Page 6

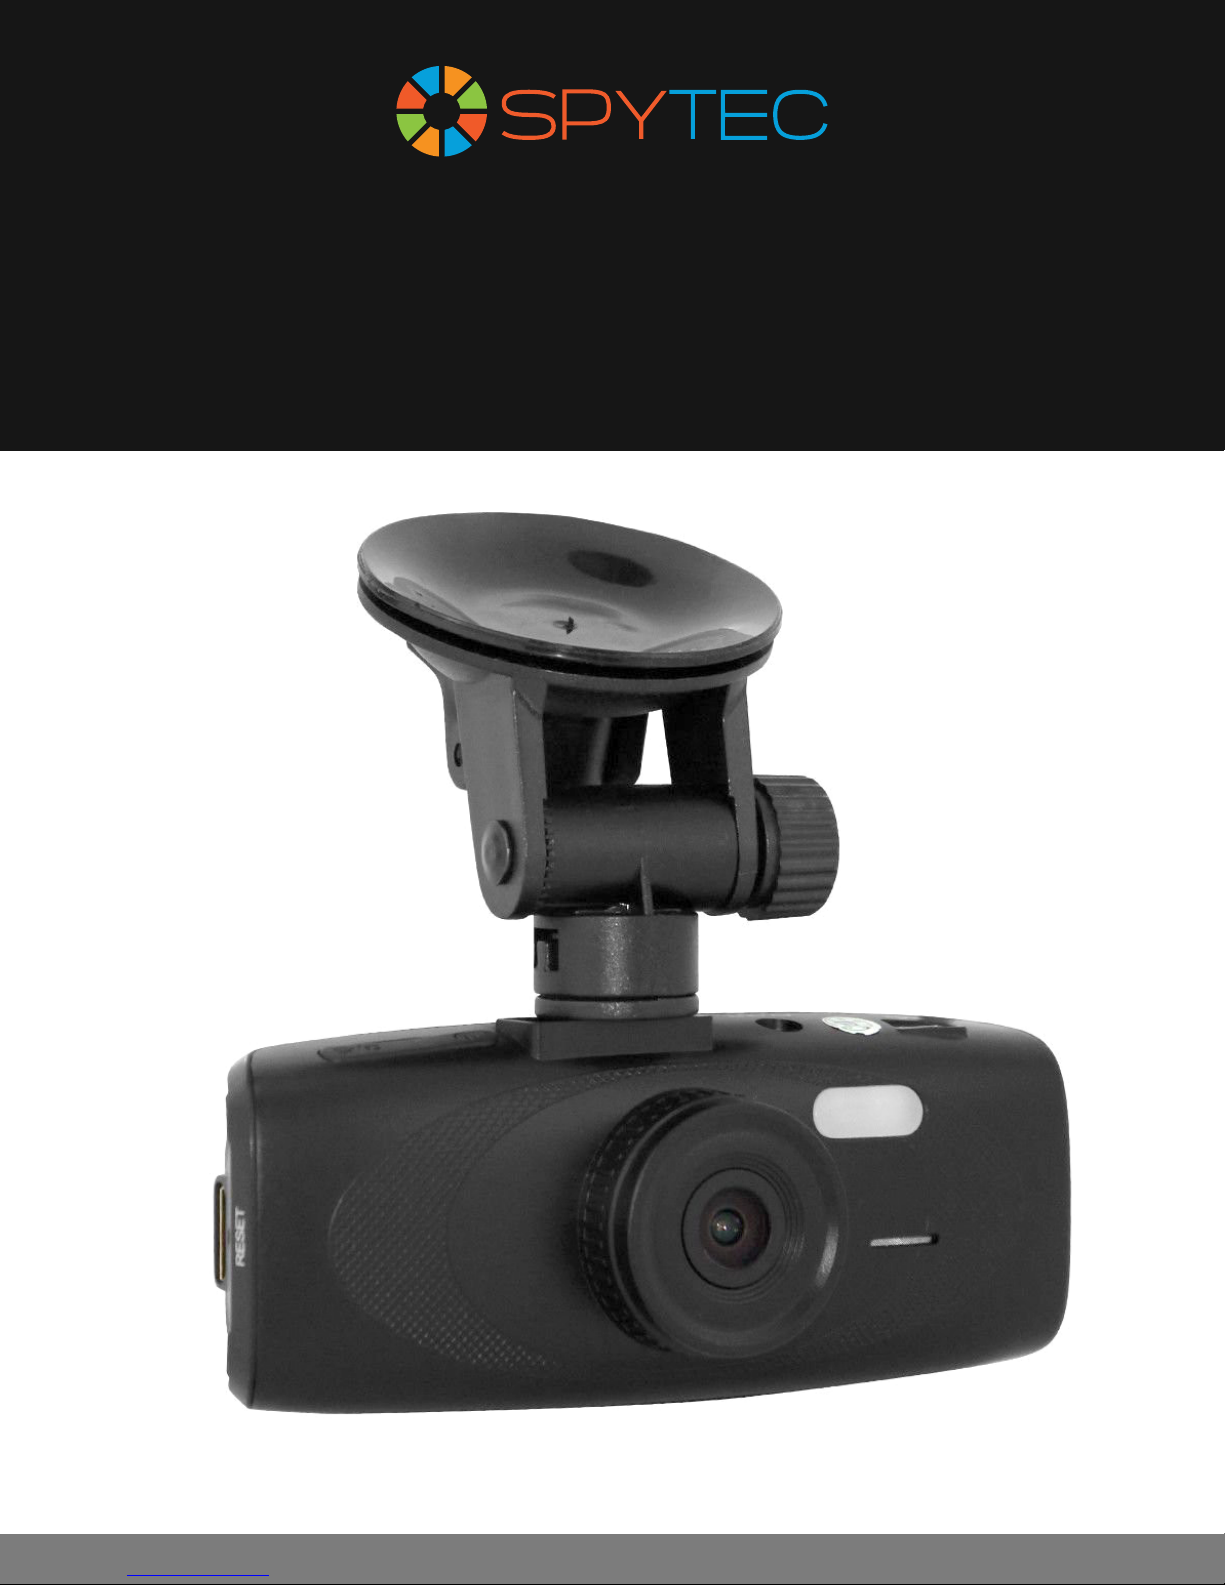
Attaching the Device to Tilting Suction Mount
On the top of the camera, you will see an open slot for the tilting suction
mount at center. Align the mount’s arm with the camera device’s open slot,
pressing down and forward to secure with mount.
Now you may remove the clear film on the suction and attach to the glass
surface. To remove the suction mount, pull the tag on the right-facing side of
the suction and gently pull off the glass surface to detach.
G1W-H with mount
Spy Tec www.spytecinc.comSpy Tec www.spytecinc.com 6
Page 7
Menu Options
Press the Menu button on the right side of the screen to access the Video
menu and press the Menu button again to access the Settings menu. Use the
Up and Down arrow buttons to the left of the screen for navigation of menu
selections. Once you have found the desired menu option, press the Capture
button to make a selection. The capture button features a still and video icon
but is still only one button for both features. To escape the menu screen,
press the Mode button.
Accessing Menu Items
Buttons are located on top of the MVS device:
Power on/off
M
Buttons are also located on each side of the viewing screen:
Up Arrows Navigates the selection options upward
Down Arrows Navigates the selection options downward
REC Enters Menu according to mode
MODE Changes mode from Video, Still Camera or Viewer
Menu
Spy Tec www.spytecinc.comSpy Tec www.spytecinc.com 7
Page 8

Video Menu
To access the Video menus, if the device powers on and is not automatically in
Video mode, press the Mode button to the right of the screen until you are in
Video mode (shows a film strip icon to the top left of the screen) and then the
Menu button. Press the Menu button twice for Setup.
Resolution
After selecting the Resolution option, navigate using the Up and Down buttons to
the left of the screen. Select the desired resolution: 1080FHD, 720P 60FPS, 720P
30FPS, WVGA or VGA and press the Capture button for changes to take place.
Loop Recording
Loop recording will allow continual recording, as the camera records continually
over the previous footage. To disable loop recording, select the Loop Recording
option from the Menu and navigate using the Up and Down buttons to the left of
the screen to select Off and press the Capture button. You may also set Loop
recording to 3 Minutes, 5 Minutes or 10 Minutes.
Wide Dynamic Range (WDR)
Allowing the camera to use WDR technology automatically adjusts lighting features
to enhance clarity and reduce glare. To access WDR settings, select the WDR option
from the Menu and navigate using the Up and Down buttons to the left of the
screen to select On or Off and press the Capture button.
Exposure
The exposure settings allow you to adjust the picture quality by enabling a certain
amount of light to pass through a unit area of the lens. By adding more value, the
greater the amount of light to pass through the camera as it is filming or taking still
photos and likewise, the lesser the value will give lesser light to the capture. Settings
may be set higher for nighttime to reduce glare and lower for daytime to get similar
results. Settings for exposure are as follows: -2.0, -1.0, -1/3, -2/3, -4/3, -5/3, +0.0,
+5/3, +4/3, +2/3, +1/3, +1.0 and +2.0. To adjust exposure, select the Exposure option
from the Menu and navigate using the Up and Down buttons to the left of the
screen to select On or Off and press the Capture button.
Motion Detection
By enabling motion detection, the camera will record as motion is sensed by the
lens. Using this feature will not permit continual recording unless motion is
continuous. To enable or disable motion detection, select the Motion Detection
option from the Menu and navigate using the Up and Down buttons to the left of
the screen to select On or Off and follow by pressing the Capture button.
Spy Tec www.spytecinc.comSpy Tec www.spytecinc.com 8
Page 9

Record Audio
There are settings to enable or disable audio recording available from the menu by
selecting the Record Audio option and navigating using the Up and Down buttons to
choose either On or Off. In Off mode, only video is recorded and in On mode, both
audio and video are recorded. Once the On or Off option is highlighted, press the
Capture button to save the selection.
G-Sensor
The G-Sensor stabilizes the image in the event that a wreck or other physical
disturbance occurs. The G-Sensor prevents any recorded footage during a physical
disturbance from being lost by not allowing Loop mode to have effect, thus not
allowing the device to record over the footage by proceeding with regular, continual
recording. To access G-Sensor settings, select G-Sensor from the Menu and use the
Up and Down buttons to navigate settings: On, Off, High, Medium or Low. The High
settings will detect slight physical disturbance whereas Low will detect only major
physical disturbance. Press the Capture button.
Date Stamp
The date stamp may be enabled or disabled by selecting Date Stamp from the
menu. Select either On or Off and press the Capture button to save changes.
Video Settings Menu
Set the Time and Date
To set the time and date, use the Up and Down buttons to select the System Setup
icon (last on the right) of the settings menu and press the Capture button. Here
Time and Date are listed with an arrow pointing to changeable values. Use the Up
and Down buttons to adjust the values. After you have found the correct value for
the year, press the Capture button. Now, you can adjust the Date Format by
pressing the Up and Down buttons. Press the Capture button after selecting the
desired format.
Auto Power Off
By selecting Auto Power Off in the menu, the camera is able to set off automatically
after 3 Minutes, 5 Minutes or 10 Minutes. This may be disabled by selecting Off in
the menu. After highlighting the selection, press the Capture button to update
settings.
Beep Sound
By selecting Beep Sound in the menu, the beep sound may be disabled or enabled
by selecting either On or Off and pressing the Capture button to save settings.
Spy Tec www.spytecinc.comSpy Tec www.spytecinc.com 9
Page 10

Language
Select the Language icon from the menu to choose English, French, Spanish,
Portuguese, German, Italian, Simplified Chinese, Traditional Chinese, Russian, or
Japanese and pressing the Capture button to save settings.
TV Mode
Use the AV Out port to connect an HDMI cable to the camera for viewing images on
a television monitor. Select the TV Mode icon from the settings menu and choose
either NTSC (National Television System Committee) or PAL (Phase Alternate Line)
depending on user preferences. Press the Capture button to save changes.
Frequency
Select the Frequency icon from the menu to choose either 50 Hz or 60 Hz and press
the Capture button to save settings. When adjusting frequency settings, consider the
computer or other monitoring tool that will be used for retrieval of files to avoid
flicker. In the United States, 60 Hz is commonly used. Otherwise, the 50 Hz setting
would need to be selected.
Screen Protection
Select the Screen Protection icon from the menu to enable or disable screen
protection by choosing 3 minutes, 5 minutes, 10 minutes or Off in the menu. Press
the Capture button to save changes. If you choose to use Screen Protection, the
screen will shut off but the camera will keep recording as settings prescribe.
IR LED
Select the IR LED icon from the menu to enable or disable Infrared LED by choosing
either Off or On in the menu. Press the Capture button to save changes.
Format
Select the Format option from the menu to delete contents from the SD Card. This
option reformats the microSD memory card after selecting the SD Card option (only
option). Confirm that all data will be deleted by choosing OK or Cancel.
Default Setting
By choosing to return to Default Settings, the menus will automatically convert to
Russian. Be prepared to change your language settings before setting back to
default. Otherwise, this setting allows all other previous changes to default back to
factory settings. To go back to default settings, choose Default Settings from the
menu and press the Capture button. A prompt will ask you to confirm your
selection.
Version
Select Version from the menu and press the Capture button to view the installed
application information.
Spy Tec www.spytecinc.comSpy Tec www.spytecinc.com 10
Page 11

Still Capture Menu
To access the Still Capture menus, press the Mode button to the right of the
screen until you are in Camera mode (shows a camera icon to the top left of
the screen) and then the Menu button on top of the camera and press the
Menu button twice for Setup.
Capture Mode
After selecting the Capture Mode option, press the Capture button. Navigate using
the Up and Down arrow buttons to the left of the screen to select the desired
Capture Mode: Single, 2S Timer, 5S Timer and 10S Timer and press the Capture
button for changes to take place. This setting allows the user to have extra time for
capturing an image after the Capture button is pressed.
Resolution
Resolution settings will allow for picture quality to be adapted according to the
user’s specifications. Select the Resolution option from the Menu and navigate using
the Up and Down buttons to the left of the screen to select an option and press the
Capture button. Options for this feature are 3M, 2MHD, VGA, 1.3M, 12M, 10M, 8M
and 5M.
Sequence
Enabling the sequence feature allows the camera to take 3 images within 1 second.
Select the Sequence option from the Menu and navigate using the Up and Down
buttons to the left of the screen to select On or Off and press the Capture button.
Quality
The quality settings allow you to adjust the picture quality by enabling a certain
amount of light to pass through a unit area of the lens. By adding more resolution,
the greater the file size written to the microSD card. Settings may be set to Fine,
Normal or Economy. Select the Quality option from the Menu by navigation using
the Up and Down buttons to the left of the screen and press the Capture button.
Sharpness
This feature enables the camera to take pictures with greater or lesser sharpness to
increase or decrease pixel proximity (compressing the image for clarity). Select the
Sharpness option from the Menu and navigate using the Up and Down buttons to
the left of the screen to select Strong, Normal or Soft and press the Capture button.
Spy Tec www.spytecinc.comSpy Tec www.spytecinc.com 11
Page 12

White Balance
There are settings to enhance white balance available from the menu by selecting
the White Balance option and navigating using the Up and Down buttons to choose
either Auto, Daylight, Cloudy, Tungsten or Flourescent. In Auto mode, settings will
adjust themselves to changes in lighting. In Daylight mode, settings will allow greater
clarity for footage taken in daylight as with Cloudy settings for cloudy conditions.
The Tungsten mode is best for basic indoor use, whereas the Flourescent setting
adds brightness and warmth to the indoor image. Once the desired option is
highlighted, press the Capture button to save the selection.
Color
To change the color of images, select the Color option and use the Up and Down
arrow buttons to the left of the screen to choose Normal, Black and White, or Sepia
(reddish brown effect). Press the Capture button to finalize the selection.
ISO
The ISO settings allow for greater or lesser allowance of incoming light and may be
accessed by selecting ISO from the menu. In certain lighting conditions, a higher ISO
setting may create undesirable noise. Select either Auto, 100, 200 or 400 and press
the Capture button to save changes.
Exposure
The exposure settings allow you to adjust the picture quality by enabling a certain
amount of light to pass through a unit area of the lens. By adding more value, the
greater the amount of light to pass through the camera as it is filming or taking still
photos and likewise, the lesser the value will give lesser light to the capture. Settings
may be set higher for nighttime to reduce glare and lower for daytime to get similar
results. Settings for exposure are as follows: -2.0, -1.0, -1/3, -2/3, -4/3, -5/3, +0.0,
+5/3, +4/3, +2/3, +1/3, +1.0 and +2.0. To adjust exposure, select the Exposure option
from the Menu and navigate using the Up and Down buttons to the left of the
screen to select On or Off and press the Capture button.
Anti-Shaking
The Anti-Shaking settings allow for image stabilization when physical interference
occurs. Select either On or Off and press the Capture button to save changes.
HDR
This setting is not accessible.
Date Stamp
The date stamp may be enabled or disabled by selecting Date Stamp from the
menu. Select either On or Off and press the Capture button to save changes.
Spy Tec www.spytecinc.comSpy Tec www.spytecinc.com 12
Page 13

Still Capture Settings Menu
Set the Time and Date
To set the time and date, use the Up and Down buttons to select the System Setup
icon (last on the right) of the menu and press the Capture button. Here Time and
Date are listed with an arrow pointing to changeable values. Use the Up and Down
buttons to adjust the values. After you have found the correct value for the year,
press the Capture button. Now, you can adjust the Date Format by pressing the Up
and Down buttons. Press the Capture button after selecting the desired format.
Adding License Number Set to Timestamp
To add a license number to the timestamp, use the Up and Down buttons to select
the System Setup icon of the main menu and press the Capture button. There is a
character for each row in this setting. Use the Up and Down buttons on the left of
the screen to find the appropriate character and press the Capture button to adjust
the next character. Press the Capture button after selecting the desired format.
Auto Power Off
By selecting Auto Power Off in the Menu, the camera is able to power down
automatically after 3 Minutes, 5 Minutes or 10 Minutes. This may be disabled by
selecting Off in the menu. After highlighting the selection, press the Capture button
to update settings.
Video Recording
When the G1W-H is powered on, it automatically goes to the Video screen. To
start recording, press the Capture button. To end recording, press the Capture
button again. To have automatic recording take place upon powering the
device, adjust settings as explained in the previous section (Video Settings, 11).
Taking Pictures
To take still pictures with the G1W-H, press the MODE button once. The screen
will give a smaller view and a camera icon will appear to the top left of the
screen. To capture an image as seen in the screen, press the Capture button.
Accessing, Adding and Deleting Files
To view files from the microSD card in the screen, press the MODE button
twice to enter the Playback menu. Use the Up and Down arrow buttons to the
left of the screen to navigate videos and pictures.
Spy Tec www.spytecinc.comSpy Tec www.spytecinc.com 13
Page 14

Press the Menu button to either Delete or Protect the files. Protecting the files
allows the current image to be set as Locked or Unlocked. By choosing the
Lock All or Unlock All option, the entirety of microSD files will be selected.
When files are locked, a key icon will appear at the top center of the screen
disabling any changes to the file.
It is also possible to view a Slide Show from the Playback menu by selecting
the last menu option. Always use the Capture button to make menu selections
after desired menu navigation. To escape the menu, press the MODE button.
In the Playback screen, press the Menu button twice to access the Setup
menu. Here, settings may be changed for Date/Time values, License Number,
Auto Power, Beep Sound, Language, TV Mode, Frequency, Screen Protection,
IR LED, Format, Default Setting and Version just as explained in Video Settings
(11).
To access files on the Dash Camera device through a computer, connect the
Dash Camera device by USB to a computer and go to MY DOCUMENTS. The
device will show up as a Removable Disk with Music, Picture and Video
folders. Each folder contains files as stored on the device’s Micro SD card.
These files may be moved, deleted, dragged/dropped or copied/pasted as
needed.
Spy Tec www.spytecinc.comSpy Tec www.spytecinc.com 14
Page 15

Specifications
Sensor 3M CMOS Sensor
Solution Novatek 96650
Lens fixed focus lens
Zoom 4 x digital zoom
LCD Display 2.7 inch 16:9 TFT LCD
Lens Angle 120 degree ultra wide angle lens
Night Video Enhanced led lights
Video Output AV (SVBS): composite TV signal output NTSC/PAL
High definition TV terminal interface: HDMI output
Picture JPG file format Maximum output pixel: 5.0 Mega Pixels
Video Resolution 1920x1080, 30 fps
1280x720, 60 fps; 848 x 480, 30fps; 640x480p, 30fps
Audio Built-in Microphone/Speaker (AAC)
Codec MPEG4
G-Sensor Support
Memory External media: SDHC
(supports 64GB Max, microSD card, NOT Included)
Interface USB / HDMI / AV / microSD card slot
Motion Detection Support
Shutter Electronic shutter
Battery 3.7V 300mAh Poly
Spy Tec www.spytecinc.comSpy Tec www.spytecinc.com 15
Page 16

Precautions
• Strictly observe relevant laws as this product cannot be used for any illegal
purpose. The user is responsible for any legal matters.
• The maximum life of the battery will diminish if not used for a long time so
recharge it before use or storage.
• MicroSD card real capacity may be slightly less than the nominal value. If
the capacity of the card is abnormal, reformat the card. Any previously
stored data will be lost after reformatting the card.
• The security and integrity of the internal files on the G1W-H are not
covered under warranty.
• Do not adjust settings or placement while driving.
Spy Tec www.spytecinc.comSpy Tec www.spytecinc.com 16
Page 17

Frequently Asked Questions (FAQs)
How do I unfreeze the device?
Press the Menu button. Wait a few seconds to see if the device unfreezes. Try
this again. If the Menu button does not return to the menu, so that you may
resume activity, turn the power to Off and restart the device.
Why is there unexpected interference?
If attached to a continual power supply, make sure that the USB is securely
plugged into the electrical source with cable completely connected to device.
Press the cable in if any loosening has occurred.
Why is the file length inconsistent?
Go to the Loop recording settings and select a set time frame for recording.
Why won’t the camera auto-start?
The camera may be set to motion detection.
What is the battery life?
The battery is a very small capacity Li-ion intended for use in emergencies. It
only has a battery life of around 10 minutes.
Spy Tec www.spytecinc.comSpy Tec www.spytecinc.com 17
 Loading...