

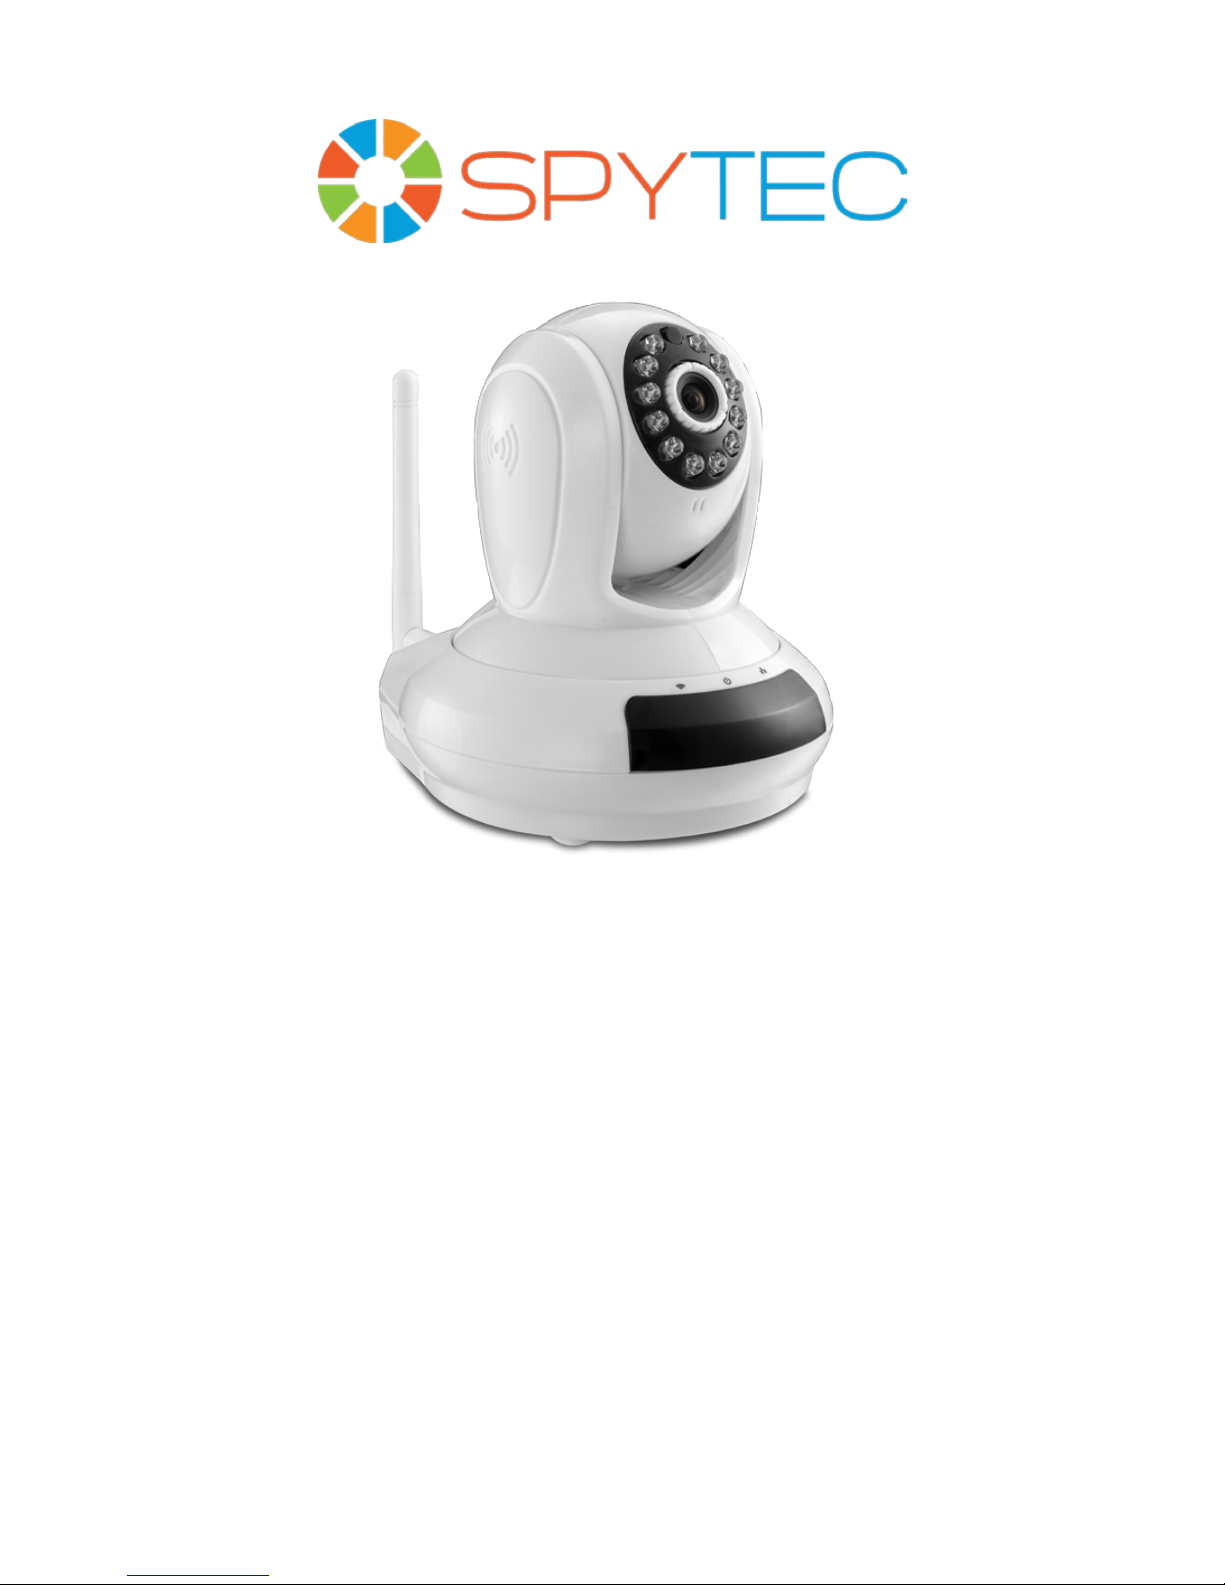
SPYTEC CIRRUS i6 INDOOR PTZ HD
CLOUD SECURITY CAMERA USER GUIDE
Thank you for purchasing the SpyT
ec Cirrus i6 Indoor Pan/Tilt/Zoom HD Cloud
Security Camera. You’ll be able to control the motorized camera remotely to pan
and tilt and stream live video to a mobile device or computer or to several devices
at once. You’ll be able to zoom in for close-up views by spreading your ngers on
a phone or tablet. The camera’s 12 infrared LEDs enable the i6 to see in the dark.
Video is saved on a microSD card and to an optional home-cloud storage device.
You’ll be able to access live and recorded video over your wired or wireless network
or remotely through the Internet. With built-in motion detection, the i6 will begin
recording automatically and send you real-time alerts. You can also set it to record on
a customized schedule.
The camera captures high-def (720p) video with sound and you can talk back from
wherever you are thanks to the camera’s built-in speaker. The i6 is Ethernet- and
Wi-Fi-compatible and easily mounted.

In the Box
Power adapter
Ethernet cable
Adjustable stand
2 screws and stents
Requirements
Available Ethernet port on router or hub
Wi-Fi (for wireless connection)
microSD card up to 32GB
SPYTEC CIRRUS i6 INDOOR PTZ HD CLOUD SECURITY CAMERA USER GUIDE 2

SPYTEC CIRRUS i6 INDOOR PTZ HD CLOUD SECURITY CAMERA USER GUIDE 3
Installing the Stand
If you’d prefer to elevate the camera on a tabletop or mount it securely to a horizontal
or vertical surface, use the included adjustable stand. Insert the knob on screw
through the stand’s center hole and into the threaded socket at the bottom of the
camera. Position the camera with its input/output panel on the same side as the
stand’s dual knobs and tighten the knob beneath the platform. Use the dual knobs
to adjust the angle of the platform based on whether the camera will be mounted
horizontally or vertically. Once you’re happy with the orientation, temporarily remove
the camera so you have clear access for attaching the platform to a shelf or wall.
Two screws and stents are included for mounting. You may need to drill holes in the
intended mounting surface.
Installing the Camera
Insert a microSD card with a storage capacity of up to 32GB into the slot on the rear
panel. Be aware that the attached antenna may block the line-of-sight of the pivoting
lens. You can avoid blockage by pointing the antenna down or to the side. Attach the
camera to an electrical outlet using the included AC adapter. Connect the Ethernet
cable to an RJ-45 port on your router or hub. On rst setup you’ll need to use the
wired connection. Afterwards, you’ll be able to switch to Wi-Fi. Press the FN button for
connecting to the Wi-Fi network.
SPYTEC CIRRUS i6 INDOOR PTZ HD CLOUD SECURITY CAMERA USER GUIDE 4
The camera essentially sets itself up. Wait about a minute and you’ll see the camera
rotate and ash a green LED three times every 3 seconds. State 1 indicates a wired
connection. State 2 will indicate a wireless connection.
Before switching the camera to Wi-Fi, use a computer or mobile device on the same
local network to log onto the camera. If you’re using a browser, go to: https:// www.
mipcm.com/. If you’re on the same local area network as the camera, browser
access should work ne. If you’re connecting to the camera remotely over the
Internet, you may experience better performance by downloading the client software
for accessing the camera rather than using a browser.
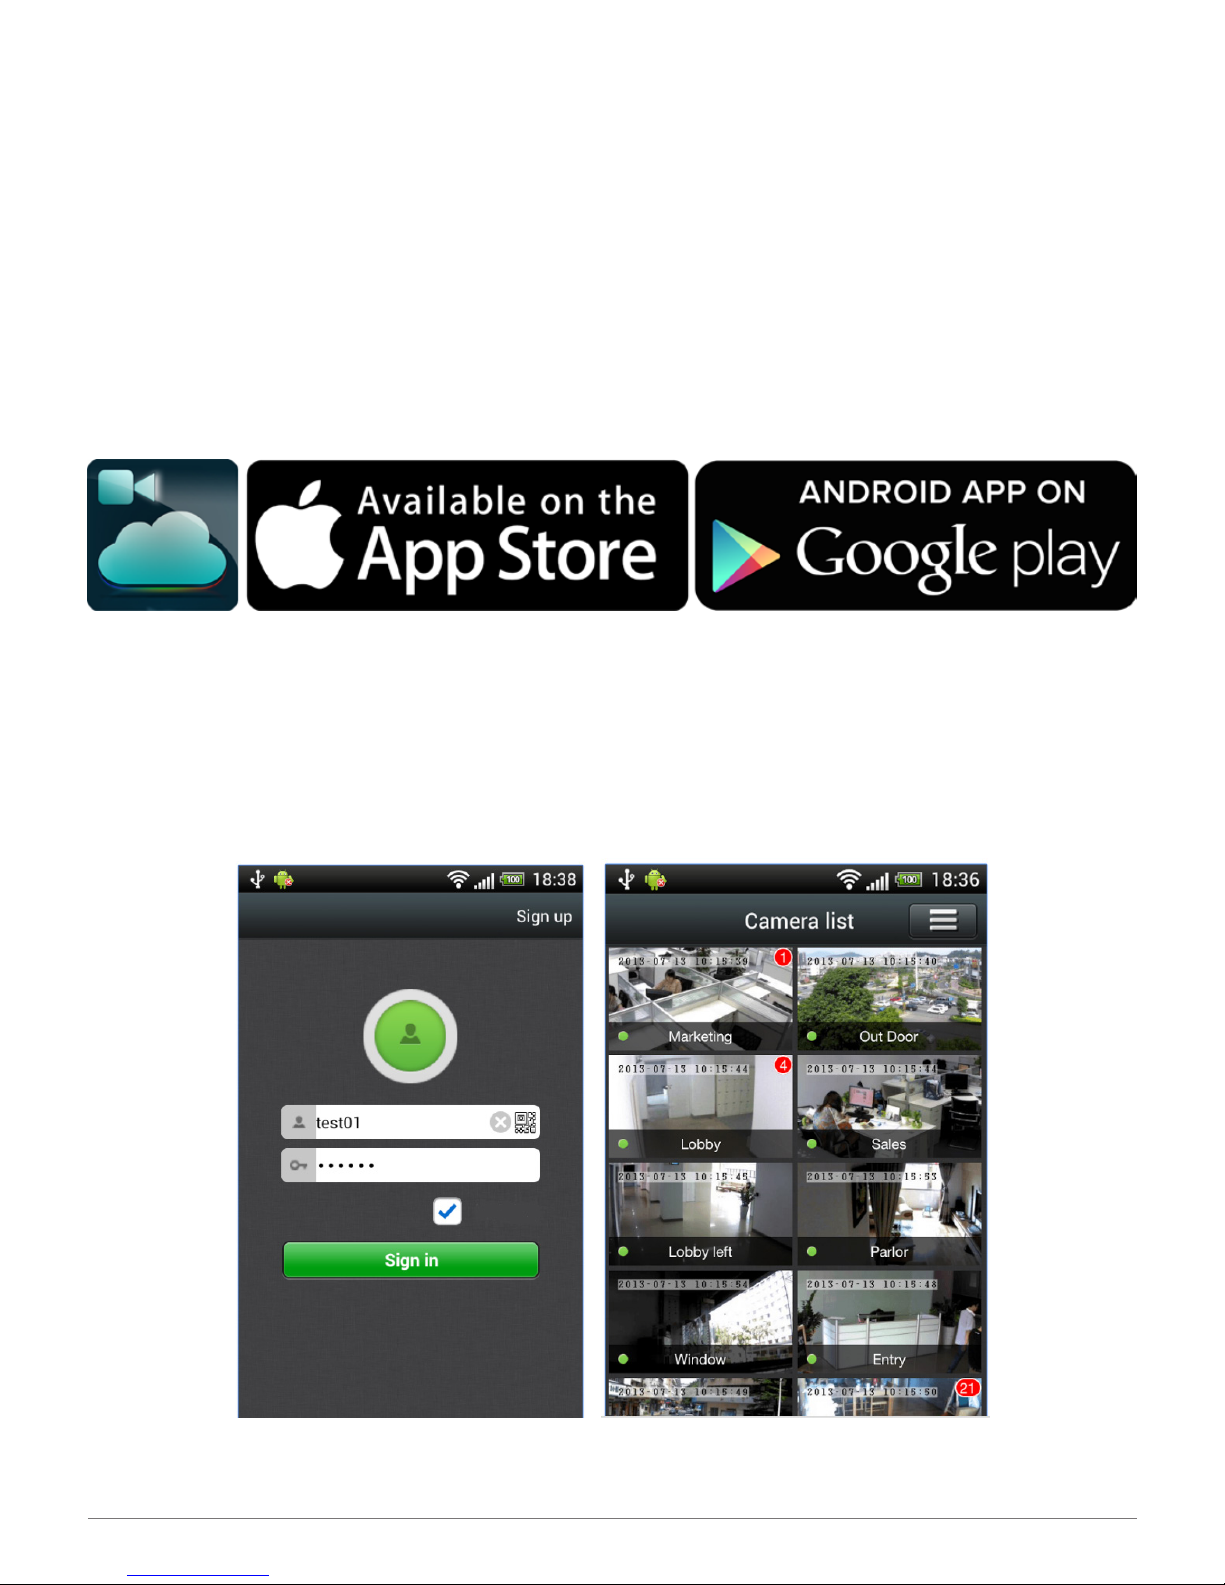
If you plan to run the camera from an Android or iOS device, go to Google Play or the
Apple App Store to download the MIPC app. iPhone and iPad users must have iOS
system 5.0 or above installed.
Using the Camera from your App or Computer
SPYTEC CIRRUS i6 INDOOR PTZ HD CLOUD SECURITY CAMERA USER GUIDE 5
From your mobile device you can optionally scan the QR code found on the back
of the camera or on the box to add the camera. Sign in with your username and
password. If you're adding the camera to ones already installed in different rooms or
at different angles, choose the one you want to use from the pictured list.
You’ll see a still image of the view from the selected camera. Touching the play arrow
superimposed on the screen on a mobile device or clicking the play arrow below the
frame using a computer launches the live view. Sliding your nger on the screen of a
mobile device will engage the camera’s motor to pan and tilt in the direction indicated
by your gesture. Clicking the navigational diamond with your mouse on a computer
enables you to pan and tilt the frame of view. Spreading your ngers using the mobile
app on a touchscreen enables you to digitally zoom for close-up viewing.
Operational icons appear alongside the view that enable you to start video
recording, take a snapshot (even while recording), mute the sound or empower you
to speak into the mic on your device so that your voice is heard from the camera’s
built-in speaker. Depending on what you’re seeing, you could shout: “Stop, thief!”
or “Welcome home, honey.” Since the camera has a microphone, a two-way
conversation could ensue.

SPYTEC CIRRUS i6 INDOOR PTZ HD CLOUD SECURITY CAMERA USER GUIDE 6
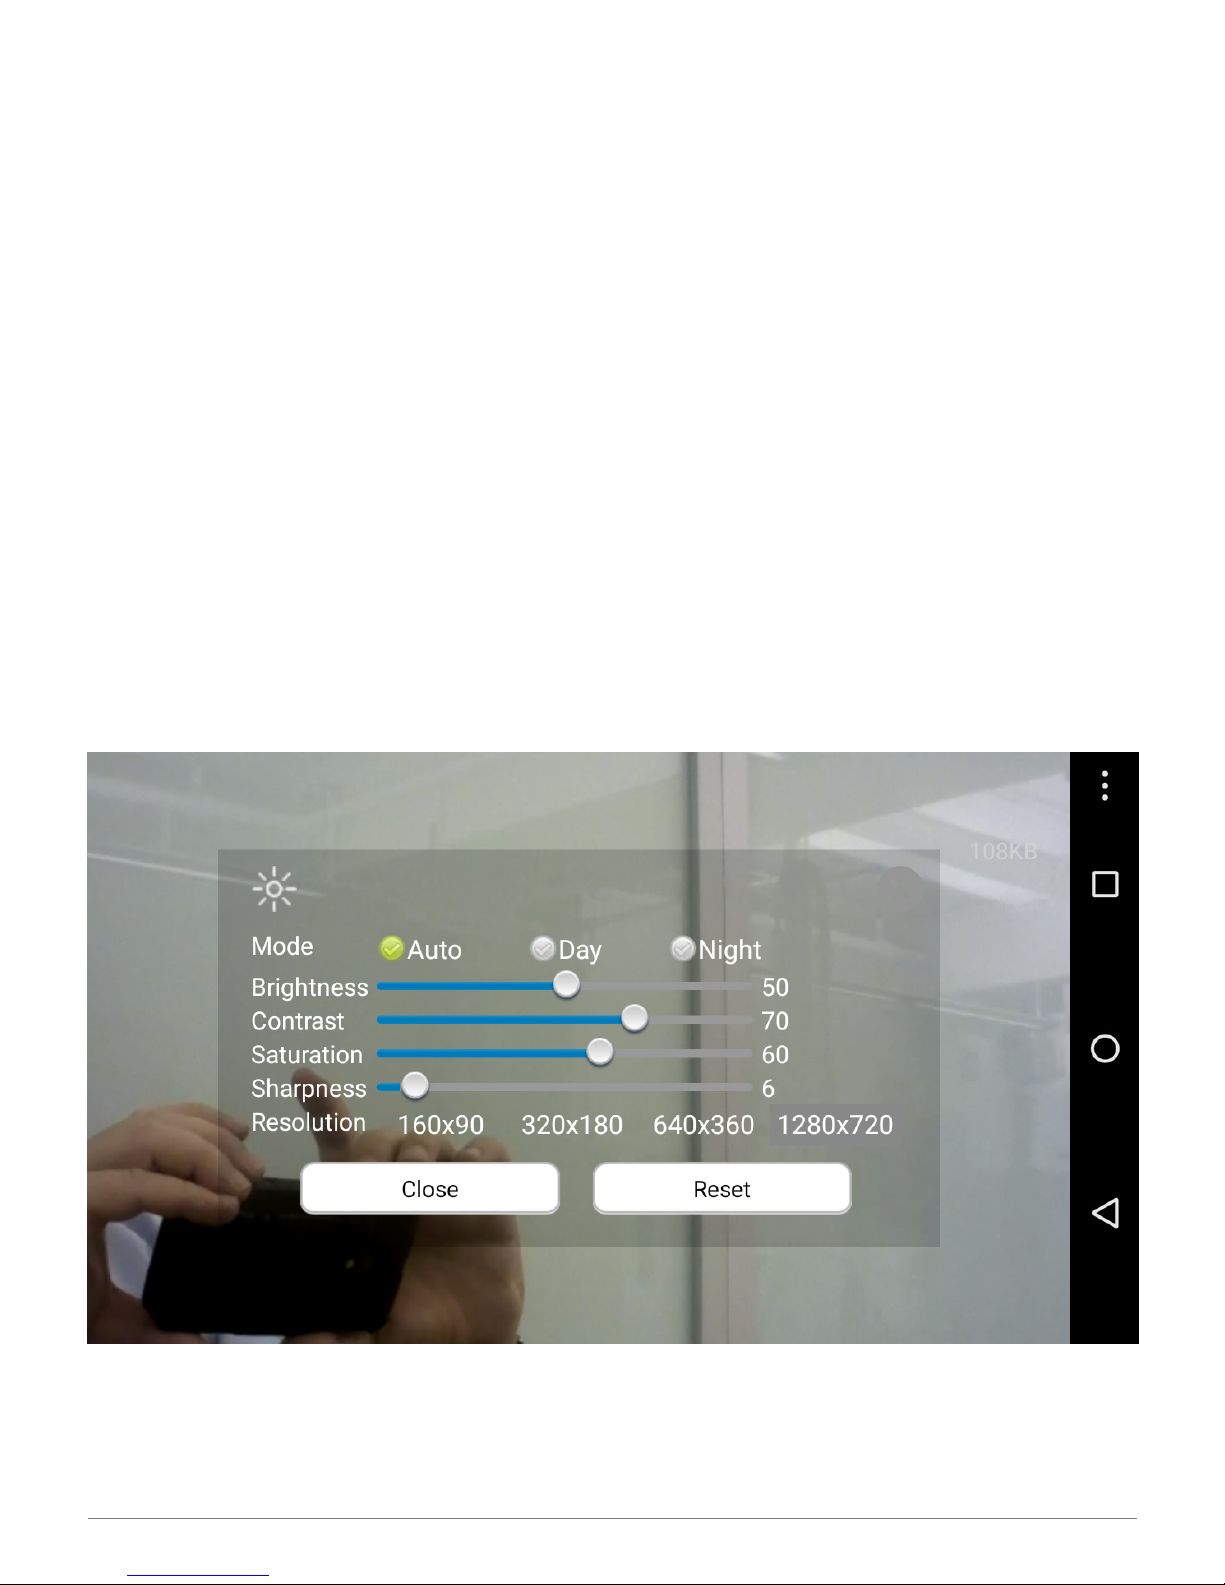
Other controls set the picture brightness, contrast, saturation, and sharpness. A
mode control for how the picture is lit can be set to auto, day or night. The rst setting
automatically turns on the camera’s infrared LEDs for capturing the view, albeit in
black in white, in the absence of ambient lighting. It’s the default setting. The day view
(in color) allows only the natural or exterior lighting to light up the view. The night view
means that the infrared LEDs are kept on all the time.
Note: the night vision function can illuminate subjects up to approximately 32-feet
away from the camera.
The Flip control, normally off, ips the image 180-degrees when set to on. It’s meant
for use when you’ve installed the camera upside down mounted from the ceiling, for
example.
The power frequency should be set to 60 Hz in North America and 50 Hz in many
other parts of the world.
Browser or PC Client?
There are two ways to access the camera from a Windows computer: using
your browser or launching the client software (also called the plug-in version).
Both provide the same functionality, but the client software may provide better
performance and less confusion. The rst time you use a computer to access the
camera, you’ll need to point your browser to MIPCM.com. You can either sign in with
your user name and password and be taken to the MIPCM site, which serves as a
portal to your camera(s) or click the down arrow to download the PC client. In the
latter case, you’ll be prompted for your user name and password once you install and
load the software. If you don’t expect to use a particular computer to come back to
the camera much in the future, using the browser is good enough. However, if you
plan to regularly access the camera or cameras from a particular computer, you’re
likely to experience smoother performance via the dedicated software.
Note: Macintosh users must use a browser to access the camera.
Tip: When you’re logged into mipcm.com using your browser to review content and
you want to go back to a previous screen or menu, click on < Back below the play
window, not the browser’s Back arrow at the top of the screen. The browser’s back
button will exit the site. The client software has only one back control, so there’s no
confusion. It keeps you within the client program until you decide to click on Exit.

SPYTEC CIRRUS i6 INDOOR PTZ HD CLOUD SECURITY CAMERA USER GUIDE 7
Playback
Videos and photos on the microSD card in the camera can be streamed to your
computer when logged onto your account at mipcm.com or on your mobile device
using the Android or iOS app. Click the Playback tab from your browser or touch the
record button on your mobile screen.
Assuming you’ve recorded video or taken snapshots on a selected date, a contact
sheet containing still frames will appear. The current date is the default. If nothing
appears, try a different date.
Each video is distinguished by a movie camera icon followed by the duration of
the clip and the date and time it was recorded. Photos are simply captioned by the
date and time they were taken. If you play a video or photo on your computer and
on some mobile devices, the day-, date- and time-creation information overlays the
upper left corner of the picture in the format: SATURDAY 2016-06-18 08:17:59.

SPYTEC CIRRUS i6 INDOOR PTZ HD CLOUD SECURITY CAMERA USER GUIDE 8
File Transfer
Y
ou can transfer les in the camera to your computer or mobile device. Touch the
Down arrow on your Android device or the Up arrow on your iOS device. Click
the Down arrow on your PC. The progress of the transfer is shown as a running
percentage. Further options in the iOS app, for instance, include emailing the
content, sharing it to social media or printing a photo.
Playback
The Records tab shows videos and photos stored on the memory card in the
selected camera. Drag the screen up on your mobile device to see all the thumbnails.
Touch one to load a file. The Local tab shows videos and photos (transferred to the
phone's own memory. By
tou
ching
the Calendar icon in the upper right corner of the
iOS or Android app, you can skip to a speci
c date and time.
Settings
There are slight variations between the PC client/browser versions, the iOS app and
the Android app. Generally, the following menu items will appear.
About
Lists the model number, software version and device ID.
Name or Nickname
Allows you to rename the camera based on its room location or the subject being
watched. Nicknames are especially useful if you’re managing more than one camera.
Device admin password
Provides elds for inputting an old password, a new password and conrmation of the
new password.
Device guest password
Provides elds for inputting an old password, a new password and conrmation of
the new password. This is useful for providing temporary access to the camera for
someone without giving out your permanent password.
Network
Affords access to Ethernet and Wi-Fi settings.

SPYTEC CIRRUS i6 INDOOR PTZ HD CLOUD SECURITY CAMERA USER GUIDE 9
OSD
Customizes the onscreen display on whether to show text, the date, the time and the
day. The date can be shown in the following formats: MM-DD-YYYY, YYYY-MM-DD or
DD-MM-YYYY where MM represents the month, DD the day and YYYY the year. The
time can be displayed according to a 12- or 24-hour clock.
SD card
Provides the memory card status in the camera: whether a card is mounted, the
card’s capacity, how much memory (listed in gigabytes) is used and how much is
valid (available). You may also be able to format, unmount and repair the card from
here. In the latter case, if you can’t see the video le in playback or can’t view the
alarm information, you can try to repair the microSD card.
Note: choosing repair may result in part of the data on the card being lost.

SPYTEC CIRRUS i6 INDOOR PTZ HD CLOUD SECURITY CAMERA USER GUIDE 10
Storage Device
If you’re connecting a cloud-box storage device on the same network as the camera,
the box has a device ID and password (just like the camera) that need to be entered
here. (See image on previous page.)
Motion and Notication
You’ll nd multiple settings under this heading meant to auto trigger recordings and
send you alerts based on someone or something moving in front of the camera. If
Motion Detection is enabled, you’ll see two sliders to set detection sensitivity: one for
day; the other for night.

Sliding the button to the right increases sensitivity up to a 100 percent response;
sliding the left decreases sensitivity down to zero response. If people normally are
moving about during the day but no one is likely to be present at night, you may
want to set the day and night sensitivities to low and high respectively. Generally, you
should start out above the midpoint for an active sensitivity setting. If you nd that
you’re getting too many false alerts, decrease the sensitivity.
Make sure to apply (save) changes before leaving the Motion and Notication
settings. A “Set Successfully” message should appear.
SPYTEC CIRRUS i6 INDOOR PTZ HD CLOUD SECURITY CAMERA USER GUIDE 11
With motion detection enabled, you can also choose from several alert types:
Snapshots to take still pictures and Record to start video recording. Depending on
how you’ve adjusted your mobile device, the camera’s motion alert appears as a text
message accompanied by a three-note chime.
Note: The I/O alarm and I/O output settings visible in the screen images are relevant
for the i8 model but not the i6. The i6 does not contain ports for attaching devices.
Masking
Using the i6's Android app, you can mask parts of the frame so that motion in those
portions of the picture won’t trigger alerts. (Masking was not available to iOS and
computer users when this manual went to press.) Under the Motion Detection setting,
touch Mask settings. A live view of the area in front of the camera will appear overlaid
by a grid pattern. Touching particular squares in the grid or running your nger across
contiguous squares will turn them gray. Once you click OK, grayed-out portions of the
picture are masked so that motion in those areas won’t trigger a recording or an alert.
Partial masking of the frame is useful where, for example, a ceiling fan is active or a
pet paces the oor.
Note: Make sure the camera’s live view is suitably framed before you use the
masking feature since swiping the image in a particular direction won’t move the
camera when the app is in masking mode.

SPYTEC CIRRUS i6 INDOOR PTZ HD CLOUD SECURITY CAMERA USER GUIDE 12
Schedule alerting
If enabled, you can schedule up to four time periods for video recording. Enter a
begin and end time as well as day. For the latter, you can check off up to seven days.
Schedule recording
If enabled, you can schedule up to four time periods for video recording. Enter a
begin and end time as well as day. For the latter, you can check off up to seven days.
Day/Time
Sets the camera system’s date and time. You can auto synch the settings to the date
and time on your mobile device or computer. There also is a setting for your time
zone.
System settings
From here you can do an online upgrade if an update is available, restore the camera
to its factory settings or restart the device.
Others
The slider bars enable you to adjust the volume of the in-camera speaker and the
sensitivity of the in-camera mic. You can also ip the picture if the camera is installed
upside down. And you can change the power frequency: 60 Hz for North America; 50
Hz for many overseas countries.
Delete device
You can delete a particular camera from use with the app. You’ll be prompted to conrm.

SPYTEC CIRRUS i6 INDOOR PTZ HD CLOUD SECURITY CAMERA USER GUIDE 13
Image sensor 1/4" CMOS
Resolution 1280 x 720 (720p)
Lens f: 3.6mm, F:2.4
Pan and tilt 350° (H) and 100° (V)
Minimum illumination 0.5Lux
Audio Two-way audio (built-in microphone and speaker)
Audio compression AAC(Advanced Audio Coding)
Video compression H.264
Lighting frequency 50 Hz, 60 Hz
Image frame rate 25 fps
Image resolution 1280 x 720, 640 x 360, 320 x 180, 160 x 90
Image adjustment Brightness, contrast, saturation, sharpness, white
balance
Night vision 12 infrared LEDs,
IR distance 32.8' (10 m)
Wi-Fi 802.11b/g/n (detachable antenna)
Ethernet 10/100 Mbps RJ-45
Motion detection Ye s
Alarm notication Real-time app push notications
Working temperature 32°F ~ 131°F (0° ~ 55°C)
Working humidity 10% ~ 80% (no condensation)
Storage temperature 14°F ~ 140°F (-10°C ~ 60°)
Storage humidity 0% ~ 90% (no condensation)
Power 1DC 5V / 2.0 A, power consumption < 8W
Size (H x W xD) 5" x 4.4" x 4.5" (12.7 x 11.2 x 11.4 cm)
Weight (without stand) 11.2 oz. (318 g)
SPECIFICATIONS

Warranty
This Limited Warranty applies to physical goods sold by STI and lasts for a period of
one year from the date of sale of the device.
This Limited Warranty covers any manufacturing defects to the device or accessories
encountered by normal use. This warranty does NOT cover damages resulting
from improper use of the device (including the use of incompatible accessories
such as chargers, storage devices, etc.), unauthorized modications to the device,
negligence, or from any environmental or natural disasters, or from loss or theft. This
warranty requires proof of sale of the device from STI or from approved resellers only.
Devices that are covered will be repaired or replaced at STI’s discretion. Devices
requiring replacement will be fullled with a new or refurbished unit, or a similar unit if
the original unit is no longer available.
To take advantage of our warranty, please go to http://www.spytecinc.com/returnpolicy/ and review our returns policy. If your device meets the above guidelines
as well as the guidelines on our website, please click the button to proceed to the
Return Authorization Form. In the event our online guidelines change, this warranty
will supersede any newer changes. Once you have lled out the Return Merchant
Authorization form, please wait for instructions. The date the form is lled out must
not exceed one year from the date of sale.
Thanks again for purchasing a SpyTec product! We appreciate your business and
strive to make your experience the best possible. If you have any issues with your
product, please contact us at support@spytecinc.com so that we can help you get
things started.
Help
An occasional upgrade may be available for the i6. Visit: http://support.spytecinc.com/
Firmware Upgrades
SPYTEC CIRRUS i6 INDOOR PTZ HD CLOUD SECURITY CAMERA USER GUIDE 14
 Loading...