

Page 1

SPYTEC A118C 1080P HD
DASH CAMERA WITH CAPACITOR
USER GUIDE
Thank you for purchasing the SpyTec A118C 1080p HD Dash Camera with Capacitor,
an easily-concealed, wedge-shaped camcorder that mounts right up against the
windshield for capturing the driver’s view. The pocket-size dash cam features a wideangle lens, full high-def resolution and color view screen. Equipped with a G-sensor,
the camera detects when your vehicle is bumped and automatically write-protects
video made during an incident.
Page 2

What’s in The Box
A118C camera
In-car charging cable
USB data cable
Mounting plate
Cable-cover mount extension
Five cable mount hooks
Extra mounting plate adhesive pad
String and screw
User manual
Requirements
MicroSD card (up to 64GB)
Vehicle with an available cigarette lighter to power the camera
Installation
Make sure the car engine is shut off before installing the A118C. With the camera
off and its darkened display screen facing up, insert a microSD card, gold contacts
pointed up, into the memory card slot. For a quick start, use a memory card with a
capacity of 32GB or less. If you go with a 64GB card, it must be properly formatted.
See “64GB microSD Card Support” on pg. 15 for formatting instructions.
Note: Insert and remove the memory card only while the camera is powered off.
Since 1080p is the default video recording resolution, large les are created. Use a
brand-name, high-speed memory card (Class 6 or higher) with a minimum capacity
of 4GB.
SPYTEC A118C 1080P HD DASH CAMERA WITH CAPACITOR USER GUIDE 2
Page 3

Slide the rectangular window mount plate horizontally into the recessed par t of the
camera until it snaps into place, leaving the adhesive cover undisturbed for now.
Installing the cable-cover mount extension (the hollow plastic triangle) is optional.
Some people choose to use it to hide the cable leading away from the camera. It has
its own adhesive mounting strip and its mouth is meant to be pressed up against the
port side of the camera.
Remove the transparent shielding covering the lens and screen. Before mounting the
camera, you may want to test it by connecting the power cable to the USB port and
the vehicle’s cigarette lighter. A welcome screen should appear. It there’s a formatted
card present, the camera should begin recording. Otherwise it will indicate that
there’s no memor y card.
Take a front seat in the vehicle. Peel off the adhesive cover and press the camera to
the windshield in the vicinity of the rear-view mirror. Properly placed, the camera will
be centrally located to take in the road ahead while the mirror helps hide the camera.
The camera’s LCD will face you. If the lens is pointed down, turn the left or right dial
on either side of the camera so that it rotates outward. You can fur ther adjust lens
direction once the camera is turned on and the live view is displayed on the LCD.
Tip: Keeping the lens close to the glass reduces reections.
Attach the power cable using the cable slot and cable clip, placing the cable along
edges and being careful not to obstruct the driver’s view or camera’s line-ofsight. Guide and tuck the cable along the top edge of the windshield, pressing it
into indentations where possible, then tting it along the side of the windshield.
(Depending on the location of the cigarette lighter and other accoutrements, scope
out whether it makes more sense to channel the cable along the passenger’s or
driver’s side.) Where nooks are missing to tuck in the cable, use the adhesive hook
mounts to channel the cable. When you’re satised that the cable is sag-free, tightly
mounted and won’t snag on someone entering or exiting the vehicle, plug it into the
cigarette lighter. (Use a twisty tie to loop any cable overrun.)
Insert the in-vehicle charger into the cigarette lighter of the car or truck. Insert the
other end into the USB port on the camera.
Start the engine. A welcome screen should appear, and the camera should begin
recording. Check the camera’s LCD to make sure the view being recorded is suitable.
Note: the included string is meant for removing a mount by ossing through the
adhesive.
SPYTEC A118C 1080P HD DASH CAMERA WITH CAPACITOR USER GUIDE 3
Page 4
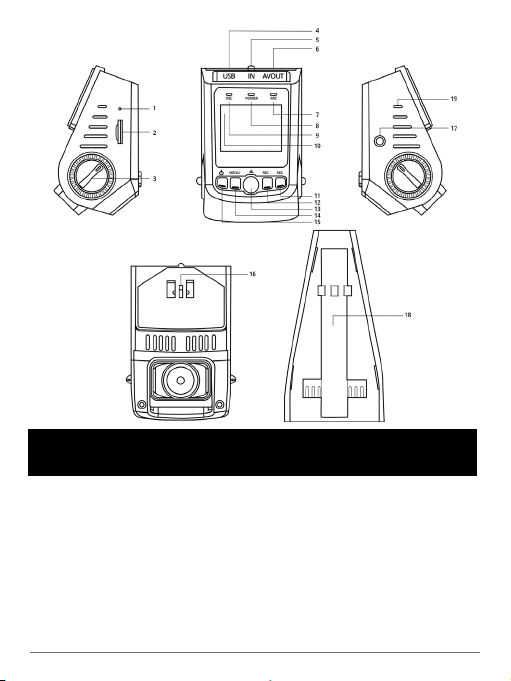
OVERVIEW
1. Microphone
2. MicroSD card slot
3. Lens rotation knob (both sides)
4. USB port
5. GPS port (for optional receiver)
6. Audio/video output
7. Mic indicator
8. Power indicator
9. Record indicator
10. Display
SPYTEC A118C 1080P HD DASH CAMERA WITH CAPACITOR USER GUIDE 4
11. Mic button
12. Record button
13. OK button
14. Menu button
15. Power button
16. Pedestal
1 7. Reset button
18. Cable slot
19. Vents (both sides)
Page 5

Button Functions
The buttons have multiple uses. The result of deploying one depends on the state
of the camera at the time pressed and whether you short-press or long-press the
button.
Power or Backlight
When the camera is powered off, pressing the Power button turns it on and video
recording automatically starts.
When the camera is already powered on, pressing the Power button for 5 seconds
will save the video le currently being recorded and shut off the camera.
When the camera is on, pressing the Power button quickly disables the display. The
camera will continue to record. Another short press of the Power button will make the
picture on the screen visible.
Menu for Video and Setup Options
When the camera is in standby state (recording is paused by hitting the Rec button),
pressing the Menu button will bring up a directory of video options (indicated by a
movie scene clapperboard). Press Menu again, and a directory of setup features
(indicated by a wrench and screwdriver) will appear. Press Menu again to return to
the standby view.
When the Video or Set Up Menus are displayed, navigate vertically through options
by pressing the Mic button to move the highlight bar down or the Rec button to go up.
Press the OK button to select the highlighted option
SPYTEC A118C 1080P HD DASH CAMERA WITH CAPACITOR USER GUIDE 5
Page 6

Video Menu
If the camera is recording, press the Rec button, then the Menu button. The tools
icon atop the directory will be highlighted. Use the Mic button to navigate down the
list or the Rec button to go up the list. Press the OK button to make a selection. When
you’re ready to exit the Video Menu, press the Menu button t wice.
Resolution
Before recording a video, you can set the resolution. The best quality and the default
is 1080p (1920 x 1080 pixels), but you can adjust the resolution to 720p 60 (1280
x 720 at 60 frames per second); 720p (1280 x 720 at 30 fps); WVGA (848 x 480);
or VGA (640 x 480). Press OK to make your selection and return to the options
directory. All videos from that point on will be recorded at the selected resolution until
you choose to change it.
Loop Recording
Video les are normally saved ever y 3 minutes, but you can change the time interval
to 1- or 5 minutes or turn off loop recording entirely. If off, recording ceases once the
memory card lls up.
WDR
Wide dynamic range capability helps reveal details when the scene contains
extremely bright and dark areas. If WDR is turned off while driving toward a rising or
setting sun, for instance, objects that come between you and the horizon may appear
very dark. WDR is turned on by default.
SPYTEC A118C 1080P HD DASH CAMERA WITH CAPACITOR USER GUIDE 6
Page 7

EV
You can increase or decrease the exposure value in videos and photographs as
they’re being captured by the camera to compensate for poorly-lit or overly-bright
scenes. The default is set at a neutral +0.0 but you can adjust the value to -1/3, -2/3,
-1.0, -4/3, -5/3 or -2.0 as well as +1/3, +2/3, +1.0, +4/3, +5/3 and +2.0.
Motion Detection
Since a dash cam is mainly used when your car or vehicles in view are moving, the
camera’s motion detection capability is set to off by default. However, you can turn it
on so that the camera starts recording only when it detects motion.
Record Audio
Video is normally recorded with audio, but you can tur n off the microphone. When the
mic is off, the LED labeled mic, which normally glows red, will not be lit and a slash
will appear over a mic icon on the screen.
SPYTEC A118C 1080P HD DASH CAMERA WITH CAPACITOR USER GUIDE 7
Page 8

Date Stamp
The data stamp is normally superimposed on a corner of the picture, but you can
disable it on recordings going forward.
GPS
The camera using an optional accessory can access the Global Positioning System
for embedding location information in videos and photographs.The tiny receiver plugs
into a dedicated port on the camera. GPS access is turned off by default.
G-Sensor
The camera has a built-in shock detector called the G-sensor. In the case of a severe
collision, the camera locks the video recorded at the time and displays a lock icon on
the screen. The le is saved to the RO (“Read Only”) directory so that is won’t later
be overwritten by loop recording.
G-sensor sensitivity can be adjusted. The default is middle sensitivity, but you can set
it to high- or low-sensitivity or turn it off entirely.
Tip: Bumped or not, if you see a noteworthy incident while the camera is recording
that’s a keeper, meaning the video is wor th protecting from being erased later during
loop recording, hold down the center button until a yellow triangle appears on screen
indicating that the video currently being recorded will be protected. Upon playing
back the video, a key icon will appear in the upper left corner indicating that the le is
protected and will not be erased automatically like unprotected les.
SPYTEC A118C 1080P HD DASH CAMERA WITH CAPACITOR USER GUIDE 8
Page 9

Set Up Menu
If the camera is recording, press the Rec button, then the Menu button twice. The
tools icon atop the directory will be highlighted. Use the Mic button to navigate down
the list or the Rec button to go up the list. Press the OK button to make a selection.
When you’re ready to exit the Set Up Menu, press the Menu button.
Date/Time
To highlight Date/Time on the rst row, press the Mic button.To select this option,
press the OK button.
Use the Rec button to increase each digit or the Mic button to decrease it. Press the
Menu button to go to the next eld. Press the OK button to accept the Date/Time
settings and return to the previous menu.
Time Zone
Click on Time Zone. Use the Mic or Rec button to cycle through the zones until you
nd yours.Press the OK button.
SPYTEC A118C 1080P HD DASH CAMERA WITH CAPACITOR USER GUIDE 9
Page 10

Auto Power Off
The camera can be set to stay on indenitely or automatically turn off after not being
used for 1-, 3- or 5 minutes. (See image on previous page.) If the camera has shut
down, press the power button to restart it.
Beep Sound
By default, the camera emits a beep whenever you press a button. If you prefer, you
can turn it off.
Language
You can set the language used in menus to: English, Spanish, Portuguese, German,
Italian, Simplied Chinese, Traditional Chinese, Russian or Japanese.
TV Mode
Set the TV Mode to NTSC (North America) or PAL.
Frequency
Though the default is 50 HZ, change it to 60 Hz if you live in North America. While
the setting doesn’t impact natural lighting, man-made lighting may appear to icker if
incorrectly set.
Screen Saver
The default setting is off, meaning the screen will remain illuminated indenitely
until the camera is powered off. You can change the setting so that the backlight
automatically turns off 1- or 3-minutes from the last time a button was pressed.
SPYTEC A118C 1080P HD DASH CAMERA WITH CAPACITOR USER GUIDE 10
Page 11

Format
Choosing this option will reformat the memory card. If the card contains data, it will
be deleted.
Default Setting
The option returns all adjustable options to the factory settings.
Car No.
Enter your license plate number or vehicle eet number if desired. The default is
blank.
Version
The rmware version number is provided by the manufacturer.
Operation
When the A118C powers up, it will automatically enter record mode and start
recording. The charge indicator will be lit on the pistol-like piece that plugs into the
cigarette lighter, and a blueish LED labeled Power will light up above the camera’s
display. Two recording indicators will be ashing—the LED labeled Rec above the
screen and a red dot on the LCD. A red LED labeled Mic above the screen will be
steadily lit indicating that audio is being recorded along with the video.
When you turn off the engine, the camera will automatically save the last le and shut
off. Recordings are saved on the memory card. When the recording goes more than a
few minutes, les are split up. Consecutive les are automatically created at a timed
interval. The default is 3 minutes, but you can choose 1- or 5-minute intervals instead.
As the memory card becomes full, the oldest le will be automatically overwritten.
While each video records, its running time appears just above the live picture in the
upper-right corner of the screen. The video resolution is also shown. The year/month/
day and running time since the engine was turned on appears below the live picture.
SPYTEC A118C 1080P HD DASH CAMERA WITH CAPACITOR USER GUIDE 11
Page 12

Manual Recording
The camera can be triggered manually. To start a camera that has been powered off,
press the Power button for 1 second. A Welcome screen will briey appear and the
camera will start recording.
Tur n off the camera by holding down the Power button for 1 second. A goodbye
screen will briey appear before the screen and all indicators on the camera go dark.
Note: If holding the camera by hand, make sure the display is pointed down toward
the ground. If it’s pointed up, resulting videos will play upside down on your computer
or TV.
Taking Photographs
If you haven’t already stopped recording video, press the Rec button. With the
blinking red dot on the screen gone and the red LED above the screen steady, press
the Mic button twice. Press the center button to save the image in live view on the
screen. You’ll hear the sound of a camera shutter. The date and time will be briey
superimposed at the bottom of the screen.
On-Screen Feedback (Photos)
As you take photos, a variety of icons and readouts are super imposed on the live
view. Here’s what you’re seeing on the screen:
Photo mode
Anti-shaking, also called image
stabilization, is on; if off, an X will
overlay hand icon
Image counter
Image size
3 stars, ne; 2 stars,
normal; 1 star, economy
SPYTEC A118C 1080P HD DASH CAMERA WITH CAPACITOR USER GUIDE 12
Memory card present or not
Camera has power
ISO (image sensor setting)
Automatic white balance
Exposure setting
Page 13

On-Screen Feedback (Video)
As you record video, you’ll notice a variety of icons and readouts superimposed on
the live view. Here’s what you’re seeing on the screen:
Video mode
“High dynamic range” for better
performance in some situations
Timer counts length of the le
Resolution setting
If GPS is turned on,
a dish icon appears; if not,
it will say No GPS
Protected File
Time and date stamp
Microphone On/OFF
If motion detection is
active, icon appears
Playing Videos and Photos on the Camera
SPYTEC A118C 1080P HD DASH CAMERA WITH CAPACITOR USER GUIDE 13
Page 14

If you haven’t already stopped recording, press the Rec button. With the blinking red
dot on the screen gone and the red LED above the screen steady, press the Mic
button twice. Four control icons will appear at the bottom of the screen: OK/right
arrow, right arrow/stop, a pair of double arrows pointing left and a pair of double
arrows pointing right. (See image on previous page.)
To play the most recent video, press the center button below the screen. The elapsed
time will appear near the upper right of the screen. Press the center button to pause
the video; press it again to play the video. To fast forward through the video, hold
down the Mic button. To fast reverse through the video, hold down the Rec button.
To go to the previous video or photo, short press the Rec button. To go to the next
video or photo, short press the Mic button. The rst frame and date of each recorded
video will appear as you cycle through them with the four control icons near the
bottom of the screen. As you cycle through content, the control icons disappear when
photographs appear.
To exit playback and return to standby mode, press the Mic button t wice. You can
start recording by pressing the Rec button.
Note:You can simultaneously play videos and photos on an external screen by
connecting an optional cable to the camera’s AV output.
SPYTEC A118C 1080P HD DASH CAMERA WITH CAPACITOR USER GUIDE 14
Page 15

Slide Show
To view photos on the camera’s LCD from standby mode, press the Mic button twice
to bring up the Playback menu. Use the Rec button to navigate to the Images icon.
You can manually proceed through the images by pressing the Rec button or launch
an auto-changing slide show. The slide show interval default is 2 seconds, but you
can change it to 5- or 8 seconds.
Attaching the Camera to a PC
When you connect the camera to your computer using the included USB cable, the
camera’s display will offer you the choice of PC Camera or Mass Storage. Navigate
the highlight bar using the Rec or Mic button and press OK. If PC Camera, you’ll
need to use a program like Skype. If Mass Storage, you’ll be able to view a directory
of all video and photo les on the camera’s memory card. You can play les directly
from the camera, transfer them to your computer or delete them.
When you explore the les on the camera’s memory card, you’ll nd content in the
CARDV folder with t wo subdirectories, movie and photo. Movie will list videos, but
you’ll also see a folder called RO (“read only”) that contains protected videos you
can’t readily delete.
64GB microSD Card Support
If a 64GB card is not recognized by the A118C, you’ll need to properly format it. If the
card has not been used before, for matting it won’t wipe out any data. But if the card
has been in use, keep in mind that any data stored on the card will be lost during
formatting.
Fully insert the 64GB microSD card into the camera’s memory slot until a click is
heard and connect the camera to your PC using the included USB cable.
Windows Users
Download the formatting utility from http://support.spytecinc.com/help/article/link/
gui-format-program to format the card as FAT32. Quit all other programs including the
anti-virus, rewall, browser and le manager. Otherwise, it will fail to start formatting.
Disable the computer sleep mode. There are two removable drives added. Choose
the drive for the microSD card with capacity 59-/63-/128GB listed. The allocation
unit is 32768. Choose “quick format” and press start. Once nished, if the memory
card still cannot record, please do it again but uncheck the “quick format”. It will take
around between 2- and 9-hours to nish. Do not touch anything during this time and
make sure the power supply and cable connection are stable.
SPYTEC A118C 1080P HD DASH CAMERA WITH CAPACITOR USER GUIDE 15
Page 16

Macintosh Users
Format the card as “MS-DOS FAT” by using spotlight to search for “disk utility”.
There are two removable drives added. Choose the drive for the microSD card
with capacity 59-/63-/128GB listed. Choose Erase. Choose “MS-DOS FAT” under
the Format. Press “Erase” at the lower right corner. Then press “Erase” in the new
pop-up windows. Wait for a while, making sure and that the power supply and cable
connection are stable. Formatting should be complete.
For more help formatting memory cards greater than 32GB, see:
http://support.spytecinc.com/help/article/link/64gb-sd-card-formatting-guide
http://support.spytecinc.com/help/article/link/how-to-video-formatting-a-64gb-sd-card
GPS Module (Optional)
The GPS Module for the A118 Dash Cam enables GPS logging for video recordings
and photographs. Besides latitude and longitude coordinates, the module enables a
speed stamp on video footage.
SPYTEC A118C 1080P HD DASH CAMERA WITH CAPACITOR USER GUIDE 16
Page 17

Specifications
Imaging sensor
Angle of view
Lens rotation (Vertical)
LCD size
Video resolution
Frame rate
Video format
Photo format
Ports
Internal memory
Memory card slot
Maximum capacity
External power supply
Battery
Operating current
Quiescent current
Storage temperature
Operating temperature
Operating humidity
Operating system support
In-car charging cable length
USB cable length
Size
Weight
3 MP
170°
85°
1.5"
1080p, 720p, 480p
30 fps (1080p), 30- or 60 fps (720p), 30 fps (480p)
H.264, MOV
JPG
Mini USB, AV out, GPS
None usable
MicroSD
64GB
Mini USB 5-pin interface and USB5V
None; capacitor IC
400 MA
20 mA
-4 to 158°F (-20 to 70°C)
14 to 140°F (-10 to 60°C)
15% to 65% (RH)
Windows
13" (4 m)
30" (76 cm)
2.8" x 2" x 1.7" (7.2 x 5.2 x 4.3 cm) excluding bracket
2.3 oz. (66 g)
Help
Thanks again for purchasing a SpyTec Inc. product! We appreciate your business
and strive to make your experience the best possible. If you have any issues with
your product, please contact us at support@spytecinc.com so that we can help you
get things started.
SPYTEC A118C 1080P HD DASH CAMERA WITH CAPACITOR USER GUIDE 17
Page 18

Warranty
This Limited Warranty applies to physical goods sold by STI and lasts for a period
of one year from the date of sale of the device. This Limited Warranty covers
any manufacturing defects to the device or accessories encountered by normal
use. This warranty does NOT cover damages resulting from improper use of the
device (including the use of incompatible accessories such as chargers, storage
devices, etc.), unauthorized modications to the device, negligence, or from any
environmental or natural disasters, or from loss or theft. This warranty requires
proof of sale of the device from STI or from approved resellers only.
Devices that are covered will be repaired or replaced at STI’s discretion. Devices
requiring replacement will be fullled with a new or refurbished unit, or a similar
unit if the original unit is no longer available.
To take advantage of our warranty, go to http://www.spytecinc.com/return-policy/
and review our returns policy. If your device meets the above guidelines as well
as the guidelines on our website, please click the button to proceed to the Return
Authorization Form. In the event our online guidelines change, this warranty will
supersede any newer changes. Once you have lled out the Return Merchant
Authorization form, please wait for instructions. The date the form is lled out
must not exceed one year from the date of sale.
SPYTEC A118C 1080P HD DASH CAMERA WITH CAPACITOR USER GUIDE 18
 Loading...