

Page 1
user manual
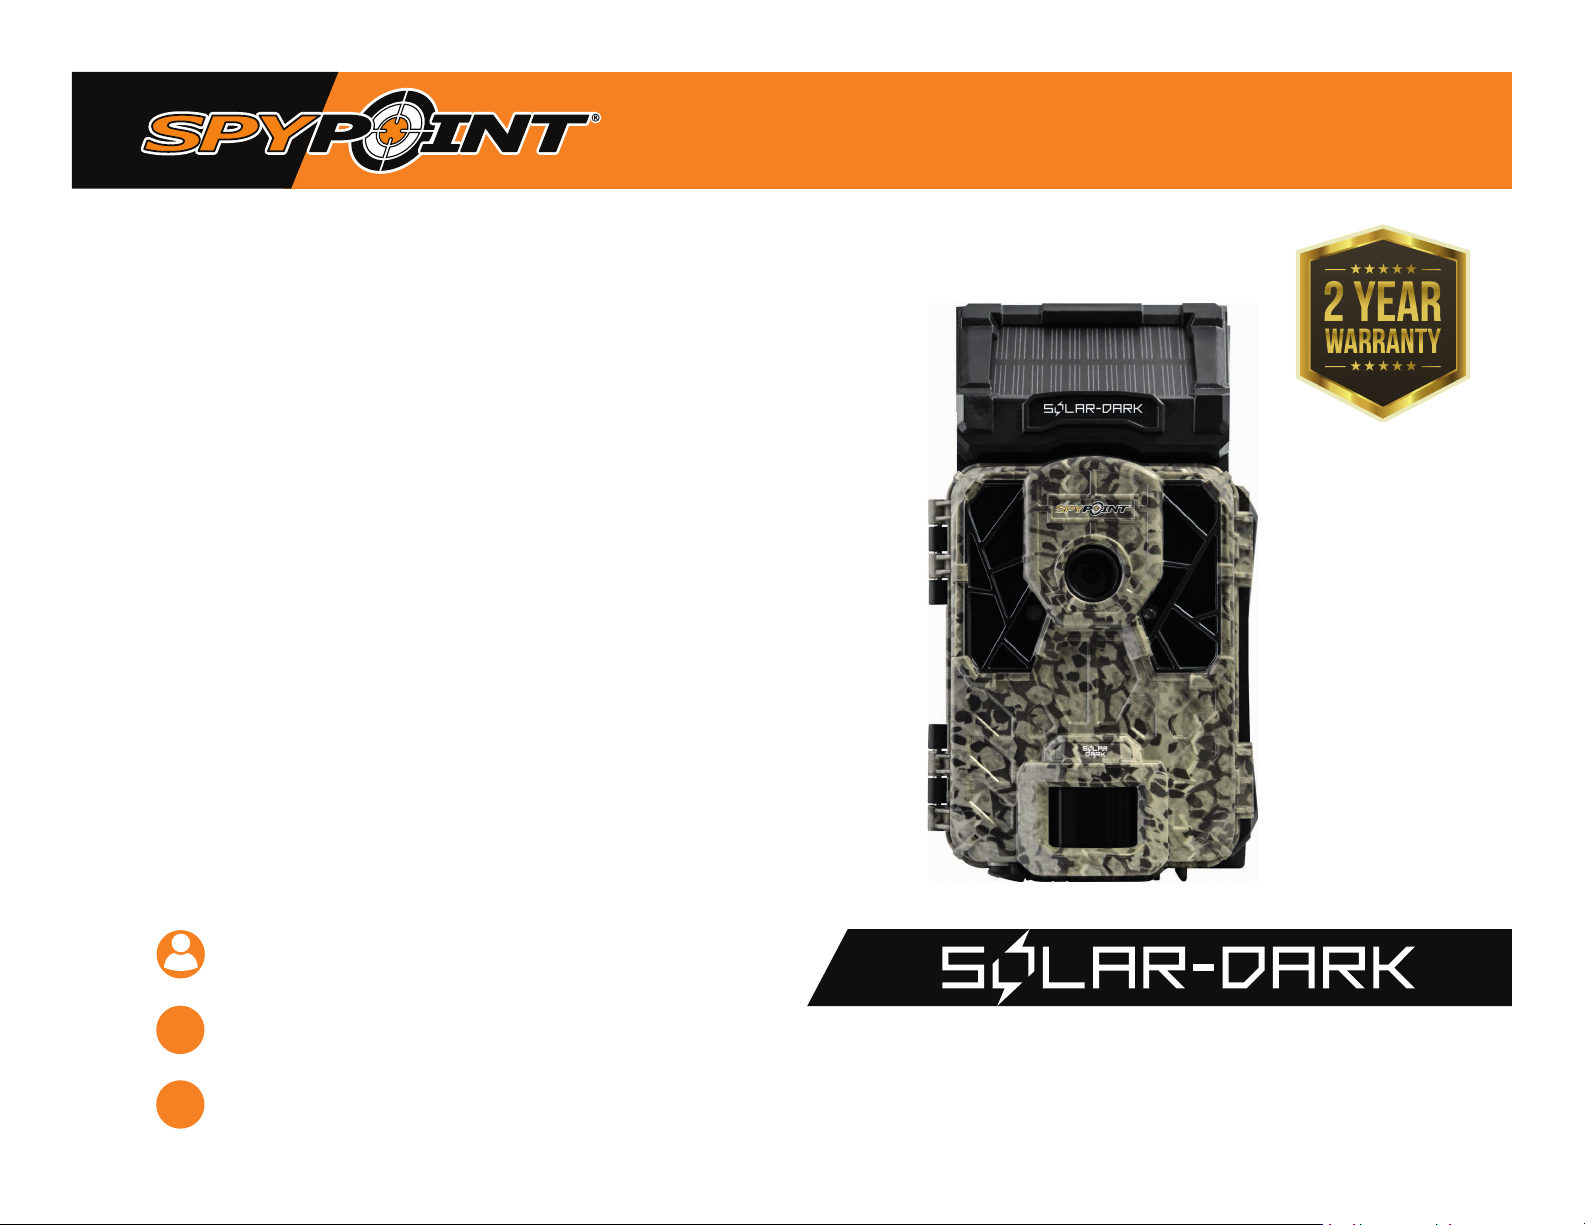
solar trail camera
models :
solar-dark and similar models*
www.spypoint.com
* Specications and features may vary according to model.
Refer to our website or package for details.
support.spypoint.com
Version 7.0
Page 2
THANK YOU FOR CHOOSING A SPYPOINT PRODUCT.
ABOUT US
This manual is designed to guide you through all the great features of
your SPYPOINT device so you can optimize its use, all while making the
most of your time in the eld.
We strive to provide our customers with a positive experience and an
outstanding service. If you require product support, here’s how to contact us:
Through the web chat service oered on our website, from
Monday to Friday, between 8:30 a.m. and 4:30 p.m.
(Simply click on the orange ''Need help?'' button found on the bottom right corner of your screen.)
www.spypoint.com
By e-mail at:
On our website at support.spypoint.com for more information
on your cameras, or by phone at 1-888-779-7646, for customer
service assistance.
ONLINE CAMERA AND PHOTO MANAGER
Create your account for FREE!
Available for all SPYPOINT trail camera models, this incredible tool allows you to
manage all your cameras and photos with ease.
GG Telecom is dedicated to providing you with products that are
easy-to-use, innovative, aordable, and of exceptional quality.
SPYPOINT products are mainly used for hunting or residential and
commercial security. Our products are distributed and sought-after
on all continents, and their popularity continues to grow. As a successful
and respected company, GG Telecom is constantly on the look-out for new
technologies while being attentive to our customers and their needs. This
allows us to provide cutting-edge products and practical solutions that
enhance our customers' hunting and outdoor activities.
JOIN THE SPYPOINT COMMUNITY
facebook.com/SPYPOINT
twitter.com/SPYPOINTcamera
youtube.com/SPYPOINTtrailcam
AUTOMATICALLY SORT ALL OF YOUR PHOTOS
Drag and drop your photos to sort them by date.
ACCESS YOUR PHOTOS
From anywhere, and never worry about backups or storage space.
SHARE YOUR PHOTOS
With your hunting partners, friends, and family.
GEOLOCATE YOUR TRAIL CAMERAS
Find your cameras faster and never lose them in the woods again.
TAKE CONTROL OF YOUR CELLULAR CAMERAS
Change settings and get status updates, notications, and GPS location.
(compatible models only)
BUCK TRACKER
Image recognition technology, analyzes your photos and sorts them according to their
content so you don't have to.
(May vary depending on service plans and models.)
Page 3
table of contents / 1
Components
specifications
power
memory card
main menu
configuration menu
general settings
installation, mounting bracket and updates
transferring files to a computer
available accessories
troubleshooting
warranty and repairs
2-3
4
5-6
7
8
9-10
10-11
12
13
14
15
16
Page 4
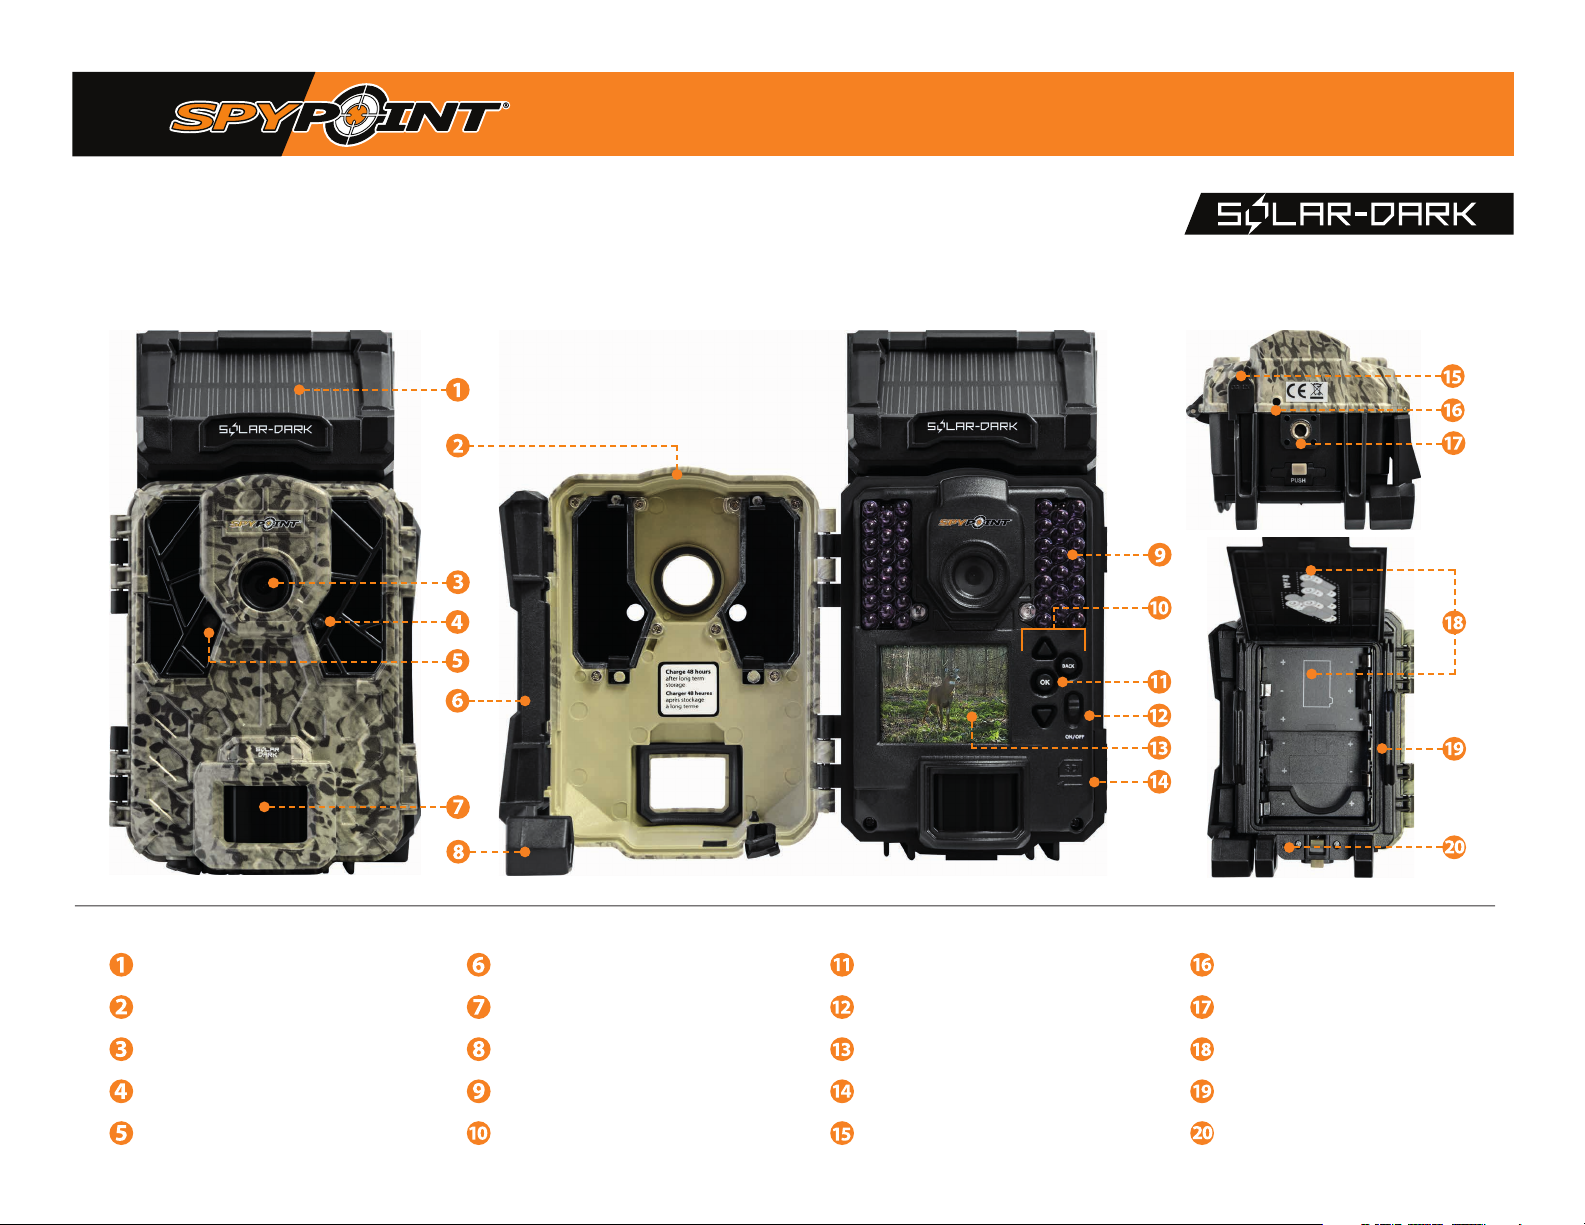
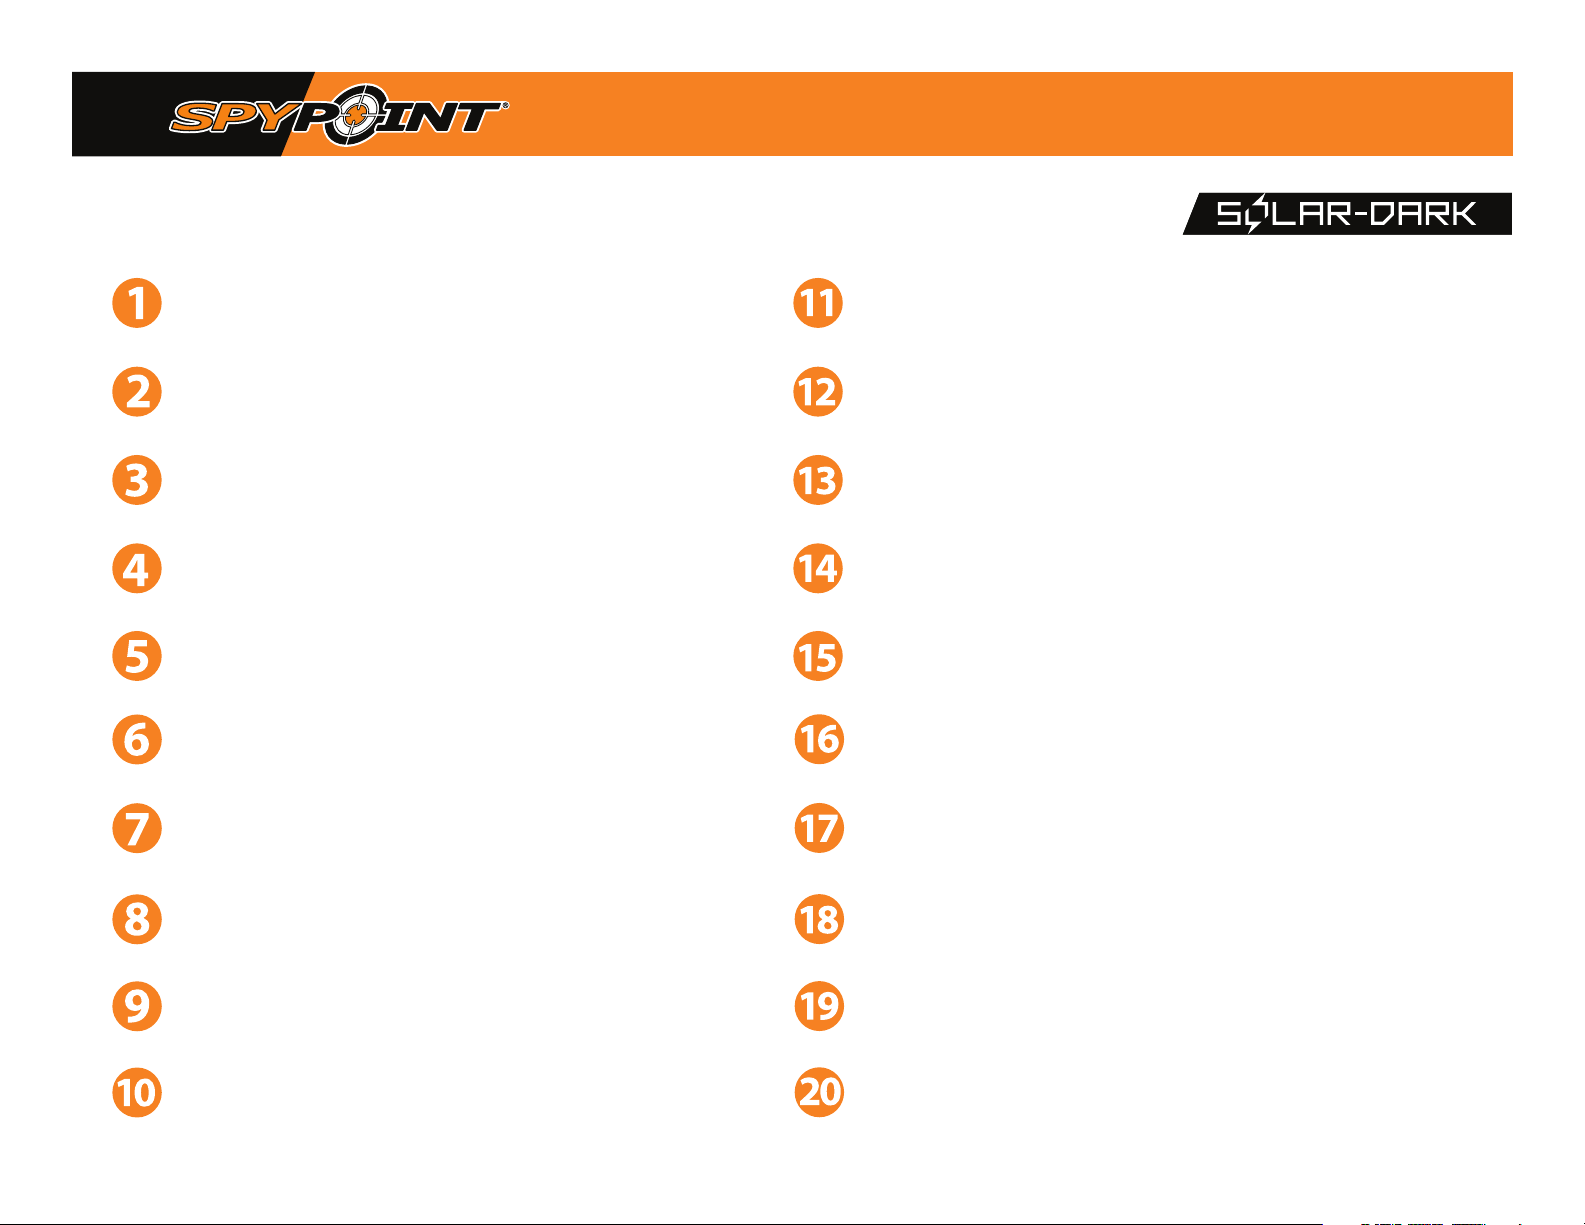
components / 2
Solar panel
Front door
Photo lens
Test light
Light sensor
Lockable door latch
Detection lens
Cable lock hole
LEDs
Navigation buttons
OK button
OFF/ON button
Viewing screen
SD card slot
12 V jack
Microphone
Tripod mount
Battery compartment/Back door
Slot for the mounting strap
“BUSY” light
Page 5
components / 3
SOLAR PANEL
Absorbs solar energy to charge the internal battery.
FRONT DOOR
Provides access to the OFF/ON button, the navigation buttons, the viewing screen,
and the SD card slot.
PHOTO LENS
Captures the image.
TEST LIGHT
Once the camera is installed and a signal is found, the DETECTION TEST light will ash
for 30 seconds, allowing you to leave the site without being lmed or photographed.
LIGHT SENSOR
Detects ambient lighting conditions for taking photographs. Photos will be shot in
color during the day and black and white during the night.
LOCKABLE DOOR LATCH
Locks or opens the door to access the navigation buttons.
DETECTION LENS
Expands the detection area of the camera’s motion sensor.
OK BUTTON
Allows the user to make a selection.
OK ON / OFF BUTTON
Allows the user to conrm a selection and turn the camera on and o.
VIEWING SCREEN
Allows you to access the main menu and view photos/videos.
SD CARD SLOT
Narrow opening in which to insert the SD card required to store photos/videos.
12 V JACK
This camera can be powered from an external 12-volt DC input such as a 12 V battery.
MICROPHONE
Records sound in video mode.
TRIPOD MOUNT
Standard ¼''-20" tripod mount.
CABLE LOCK HOLE
Allows the user to install a CLM-6FT cable lock, sold separately.
LED'S
Night lighting to obtain black-and-white photos and videos.
NAVIGATION BUTTONS
Buttons to navigate the camera’s menus and set the camera.
BATTERY COMPARTMENT / BACK DOOR
Opens with the “PUSH” button found underneath the camera and gives access to the AAbattery compartment or lithium battery pack.
SLOT FOR MOUNTING STRAP
Allows for installation of the camera using the included mounting strap.
BUSY LIGHT
Lights up when the camera saves a le or when the camera detects movement when TEST
mode is activated.
Page 6
specifications / 4
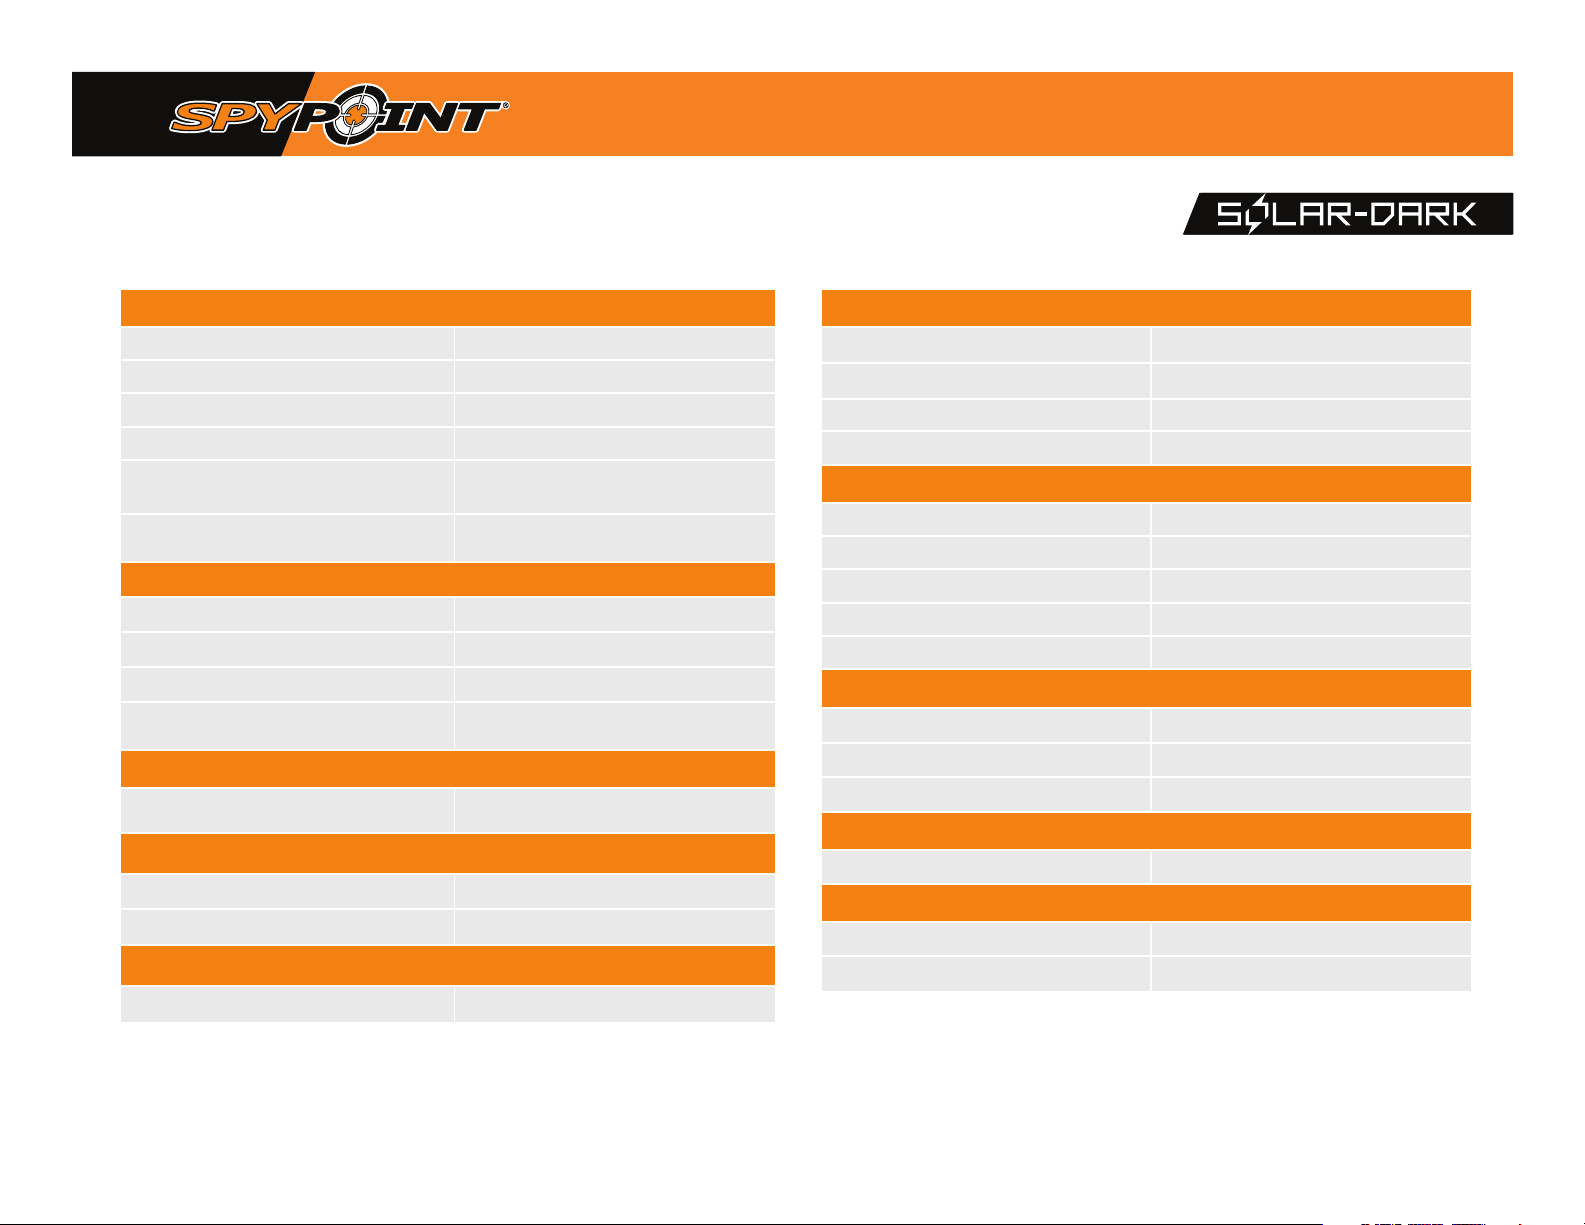
photo
Photo resolution 12 MP
Photo le format JPG
Time lapse mode 1 min to 24 hour intervals
Multishot mode Up to 6 photos per detection
Information appearing on photos only
Capture mode
Date, time, temperature (°C/°F), moonphase,
SPYPOINT logo, and camera model
Color during daytime, black and white
during nighttime
video
Video resolution 1280 x 720 (HD 1080p)
Video le format AVI
Sequence length Adjustable from 10 s to 90 s
Capture mode
Color during daytime, black and white
during nighttime
Audio
Audio recording
(automatically recorded in video mode)
Mono
memory
Internal memory None
External memory SD/SDHC card (up to 32 GB)
Display
Built-in 2" ACL screen
2.0” LCD screen for conguration only
power sources
Internal rechargeable battery Included and non-accessible
Alkaline or lithium batteries 8 x AA (not included)
Lithium battery pack Regargeable battery pack (LIT-09/LIT-C-8)
External battery (12 V jack) 12V battery (KIT6V-12V, KIT-12V, BATT-12V)
detection system
Motion sensor Infrared sensor
Detection angle 40°
Detection distance Up to 110' (33 m)
Trigger speed 0,07 sec
Delay between each detection Adjustable from instant to 30 min
nighttime illumination system
LEDs 42 LEDs
Illumination range Up to 80' (24 m)
Exposure Automatic infrared level adjustment
camera's physical dimensions
18 cm H x 9.6 cm L x 8 cm P 7.3'' H x 3.8'' L x 3.2'' P
recommendations
Operating temperature (-30 °C à + 50 °C) (-22 °F à +122 °F)
Storage temperature (-40 °C à + 60 °C) (-40 °F à +140 °F)
Page 7
power sources / 5
recharging the internal battery
This camera is designed with a non-accessible internal battery. This battery is charged by
the solar panel and generates adequate power for general usage.
It is recommended to recharge this internal battery over a period of 24 to 48 hours before
initial use. A USB charging cable designed for this purpose is included in the package.
When charging the camera via the USB cable, make sure your device is turned o and
that the solar panel is either covered or facing downward to avoid any interference with
the USB charging process. To recharge the internal battery, plug the USB cable provided
by SPYPOINT into the camera’s 12 V jack under the device and connect it to one of your
computer’s USB ports. Your computer must remain running and awake for the entire
charging period. You can also connect the USB cable to a wall outlet USB adapter.
While in use, the camera will turn o if the power level of its internal rechargeable battery
gets too low. Once the solar panel has recharged the internal battery, the camera will
start up again in the same mode as it was before shutdown. Ensure that the panel is clear
of obstructions for maximum performance.
battery level icons
optional power sources
If the user congures the camera in a way that requires a lot of battery power or installs it
in an area with poor ambient lighting, it is recommended to use a backup power supply.
When the internal battery has insucient energy to power the camera, it will
automatically connect the next available power source and go into charging mode.
If no additional power source is available, the camera will go to sleep mode. During
this time, the camera will recharge itself. Once the internal battery will be suciently
charged, the camera will automatically wake and return to its previous setting.
Three alternate power sources are available to the user.
• 8 AA batteries, to be inserted into the camera`s battery compartment;
• A lithium rechargeable battery pack #LIT-09 (sold separately) to be inserted into
the camera's battery compartment;
• An external 12 V battery (#BATT-12V, sold separately) plugged into the 12 V jack
The camera is designed to draw its power from the alternate power sources in
this order of priority :
12 V battery plugged into the camera`s 12 V jack;
Internal battery;
AA batteries or lithium battery pack.
When the camera is on, an icon showing the approximate battery level appears in the lower right corner of the screen. The battery level icon switches between the various power source
modes (12V-AA-LIT and INT for internal). If an X shows up over the AA battery icon, it means this power source isn’t available within the camera.
Select the power source mode you wish to have displayed on the camera’s screen by navigating to the Battery Type tab in the general settings menu. Choosing the right type of power
source directly impacts the precision of the battery level displayed.
When the camera is in Detection test mode, the battery charge level is shown in percentage in the lower left corner of the screen (12V-AA-LIT and INT for internal).
An icon resembling a sun with a percentage level is also visible and represents the level of external light detected. The higher the percentage, the faster the internal battery will be
recharged.
When a single line remains on the battery icon, the camera will continue to take photos, but we strongly recommend changing the AA batteries or recharging the lithium battery pack
before it gets drained of power. If a video is being recorded and the battery level reaches 0%, the camera simply saves the le before shutting down.
Page 8
power sources
power sources / 6
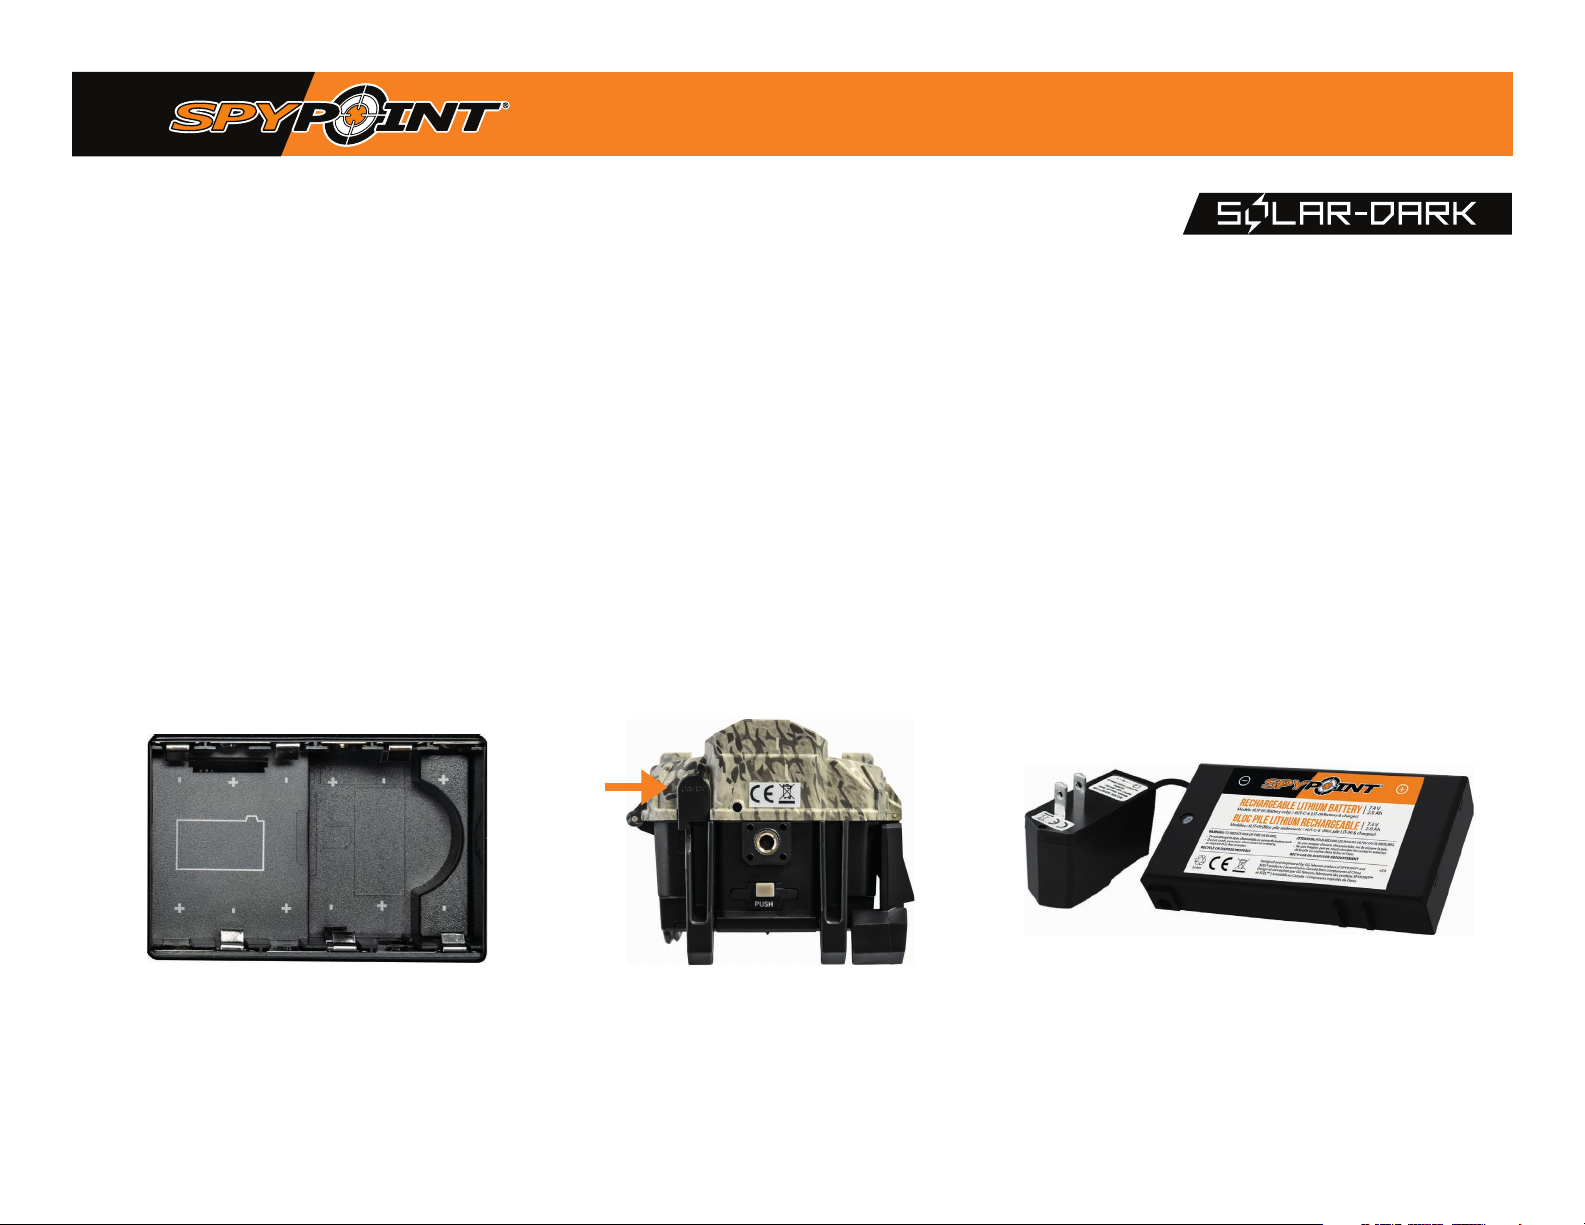
AA BATTERIES
The camera can be powered by 8 AA batteries (1.5 V). The use of
alkaline or lithium batteries is strongly recommended. Be sure to
respect the polarity indications (+) and (-) when inserting the
batteries.
To ensure maximum performance of your camera and prevent
battery leakage, we recommend using new batteries. Be sure
to respect the polarity indications (+) and (-) when inserting the
batteries. Do not use a variety of battery types. This means only
alkaline or only lithium batteries must be used.
Rechargeable AA batteries are not recommended as the
lower voltage they generate can cause operational issues.
12V EXTERNAL BATTERY
The 12 V battery (#BATT-12V) plugged into the camera
oers the benet of lasting a very long time. For the best
possible results and maximum battery life, we recommend
using an external 12 V power source such as an external 12 V
battery (KIT-12V, BATT-12V, or KIT6V/12V, sold separately).
Plug the cable into the 12 V jack under the device.
LITHIUM BATTERY PACK
The SPYPOINT camera can be powered by a LIT-09/LIT-C-8
rechargeable lithium battery pack, sold separately.
The rechargeable lithium battery pack includes a CA
charger with an integrated luminous recharge indicator. It
is perfectly designed for the camera and ensures an
exceptional energy length.
This battery type is less impacted by cold temperatures and
provides a performance of up to three times greater than
alkaline batteries.
Be sure to respect the polarity indications (+) and (-)
when inserting the batteries.
Page 9
memory card
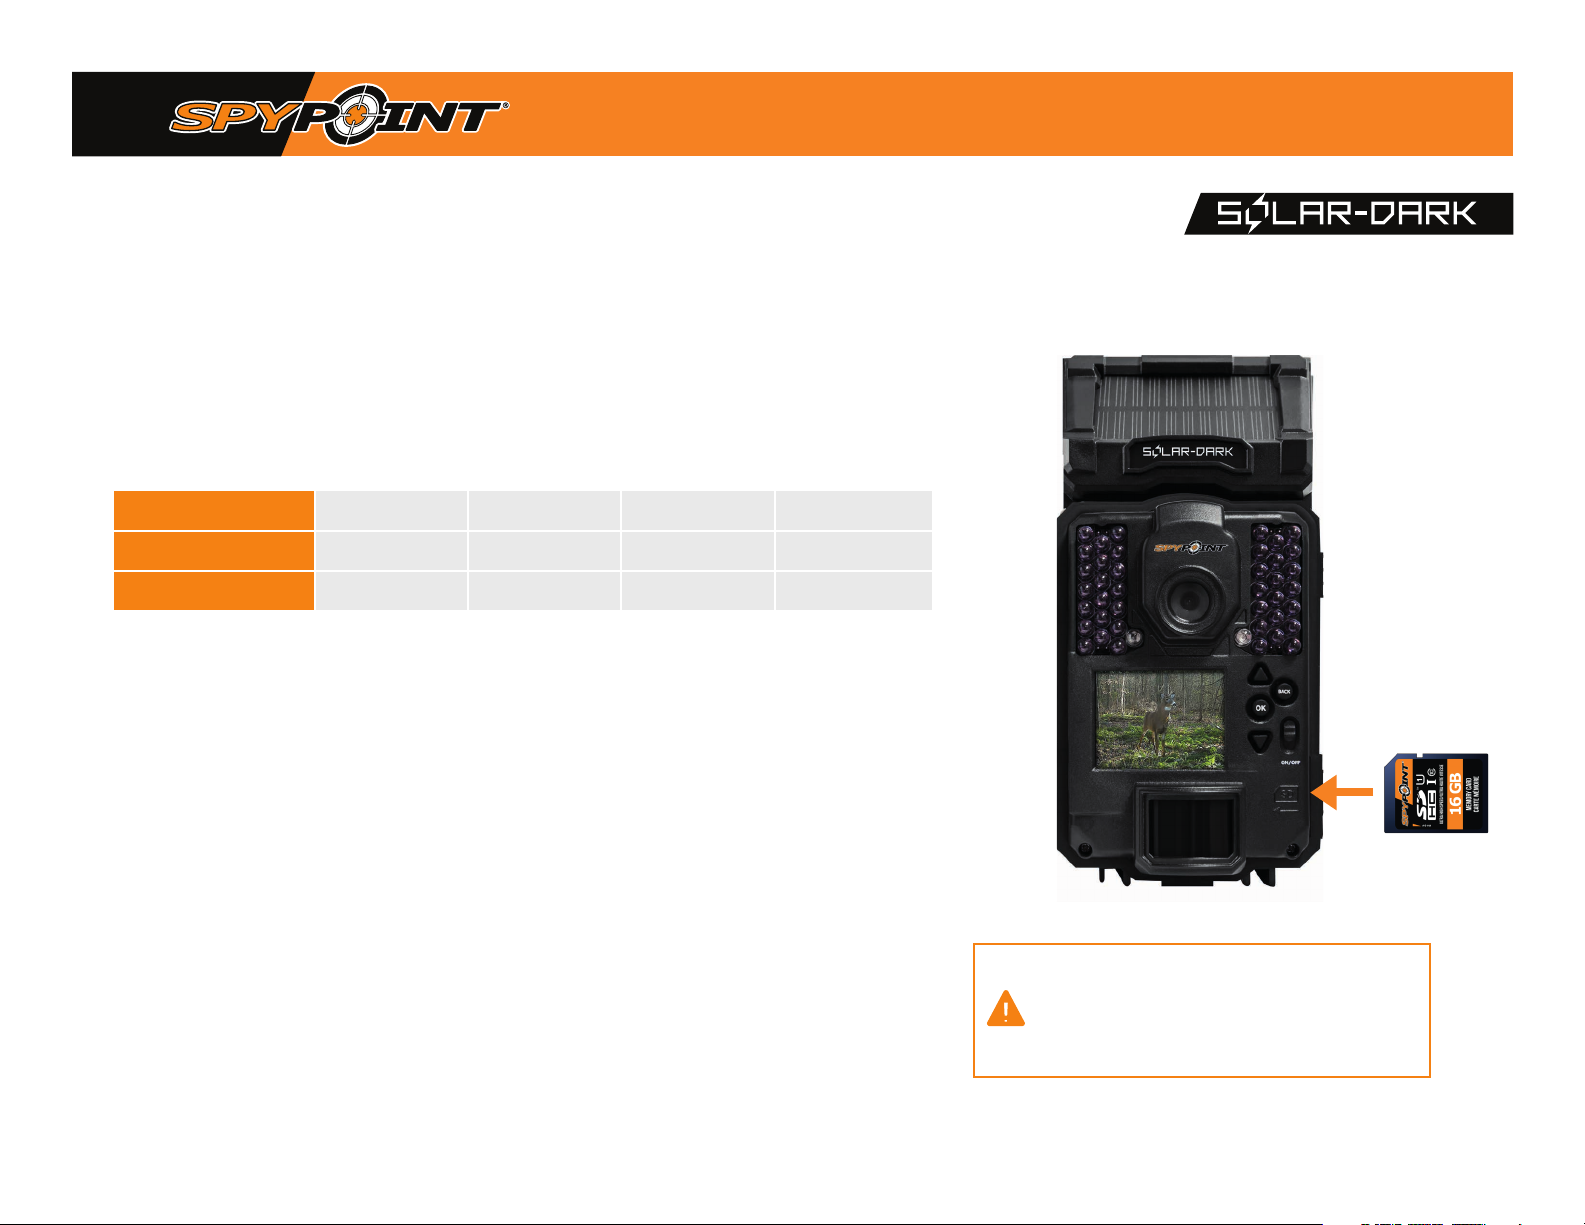
A memory card is required to record photos and videos. The camera is compatible with SD/SDHC memory
cards, up to 32 GB capacity (sold separately).
When the camera is turned on and no memory card is used, the camera displays "Insert memory card."
Here is a table of the approximate number of pictures and videos in terms of duration that can be recorded
with dierent memory card capacities.
memory card and busy light / 7
Memory
12 MP photos
1280 x 720 videos
Note : This SPYPOINT camera is equipped with continuous le recording. When the memory card capacity is
full, the camera will continue to record photos or videos by deleting the oldest recorded les.
4 GB 8 GB 16 GB 32 GB
1,600 3,200 6,300 12,600
40 m 1h20 2h40 5h20
Inserting the memory card
Before inserting or removing a memory card, always turn the camera o to prevent any loss or damage to
photos already saved on the memory card. Also, make sure the switch on the side of the SD card is not set on
LOCK.
Insert a standard full-size SD/SDHC memory card (up to a 32 GB capacity) in the SD card slot with the label
facing up. The card is inserted correctly when a click is heard.
Removing the memory card
Gently press down on the exposed edge of the memory card once to eject and remove the card from the slot.
busy light
The busy light is found on the back of the camera. This light is used as a diagnostics tool. It will turn on upon
camera start-up and when the camera saves a le. When the camera is in DETECTION TEST mode, both the
BUSY and TEST lights will be on simultaneously.
We recommend formatting your SD card whether
it was used in another device before or not. Thus
ensuring that you benet from its full memory
capacity. Quick formatting is NOT recommended
for this task
Page 10
main menu
main menu
Use the
and
buttons to navigate the interface and modify the selection, the OK button to conrm your selection and the BACK button to return to the previous menu
starting the camera
To turn the camera on and o, press and hold down the OK button.
Allows the user to start the camera in PHOTO, VIDEO or TIME LAPSE modes.
mode is selected, the test light in front of the camera will ash for 30 seconds and a
countdown will appear on the screen, allowing the user adequate time to leave the area
without being photographed or video recorded.
When a
detection test
Allows to test the detection system of the camera at the desired location. No photo or
video is recorded during the test. Walk past the camera, ensuring that you enter the
camera’s frame. The busy light will blink when movement is detected, indicating that a
picture would have normally been taken
increase the detection distance using the Sensitivity option from the general settings
menu. Realigning the camera angle may also be necessary. It’s possible to take a picture
while in DETECTION TEST mode by pressing the OK button. The picture will be saved
and can be displayed using the View mode.
.
If the system does not detect any movement,
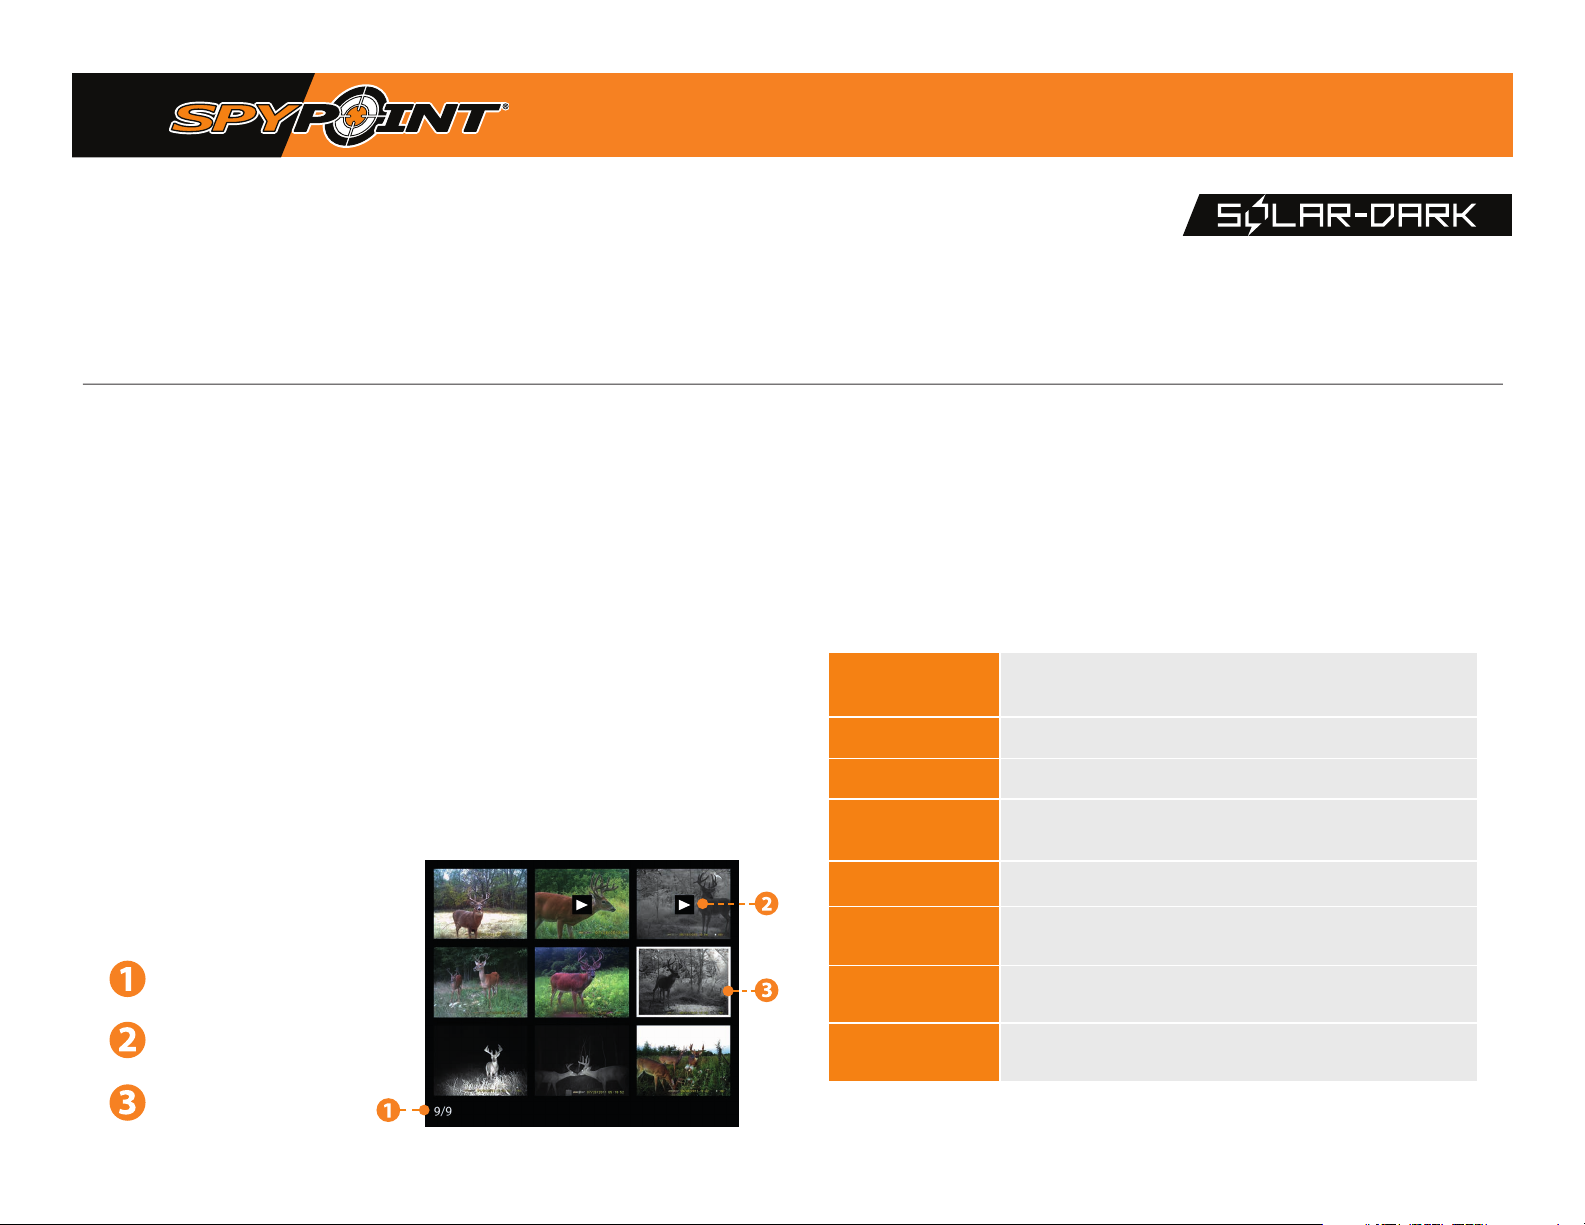
Viewing
Allows to view and manage photos and
videos using the camera's viewing screen.
Selected photo /
Total number of photos
The play icon indicates that this
element is a video.
.
In VIEW mode the last pictures and videos taken will appear as thumbnails on the camera
screen. Use the
a larger format. To cycle from one photo to the next, use the
the BACK button to return to thumbnail view.
When a large-format video is open, press OK to view the available options:
play
zoom
date and time
protect
erase
erase all
format
exit
and
buttons to navigate this page and press OK to view a photo in
and
Allows you to play or pause the video on the screen (this option is
available only for videos).
Allows you to zoom in.
Allows the user to view the date and time displayed on the photo.
Allows you to protect individual photo's or video's, preventing them
from being deleted when using the "Erase All" option.
Allows you to erase the currently viewed photo or video.
Allows you to erase all photos and videos stored on the memory
card (with the exception of protected les.)
Allows to deletion of all content from the memory card, including
protected les.
Allows to exit the menu and return to viewing mode.
buttons. Press on
The white outline indicates
which photo is selected.
Page 11
configuration menu
Allows the user to congure the PHOTO, VIDEO, TIMELAPSE and GENERAL SETTINGS.
-
photo settings
Sets the options for PHOTO mode.
configuration menu / 9
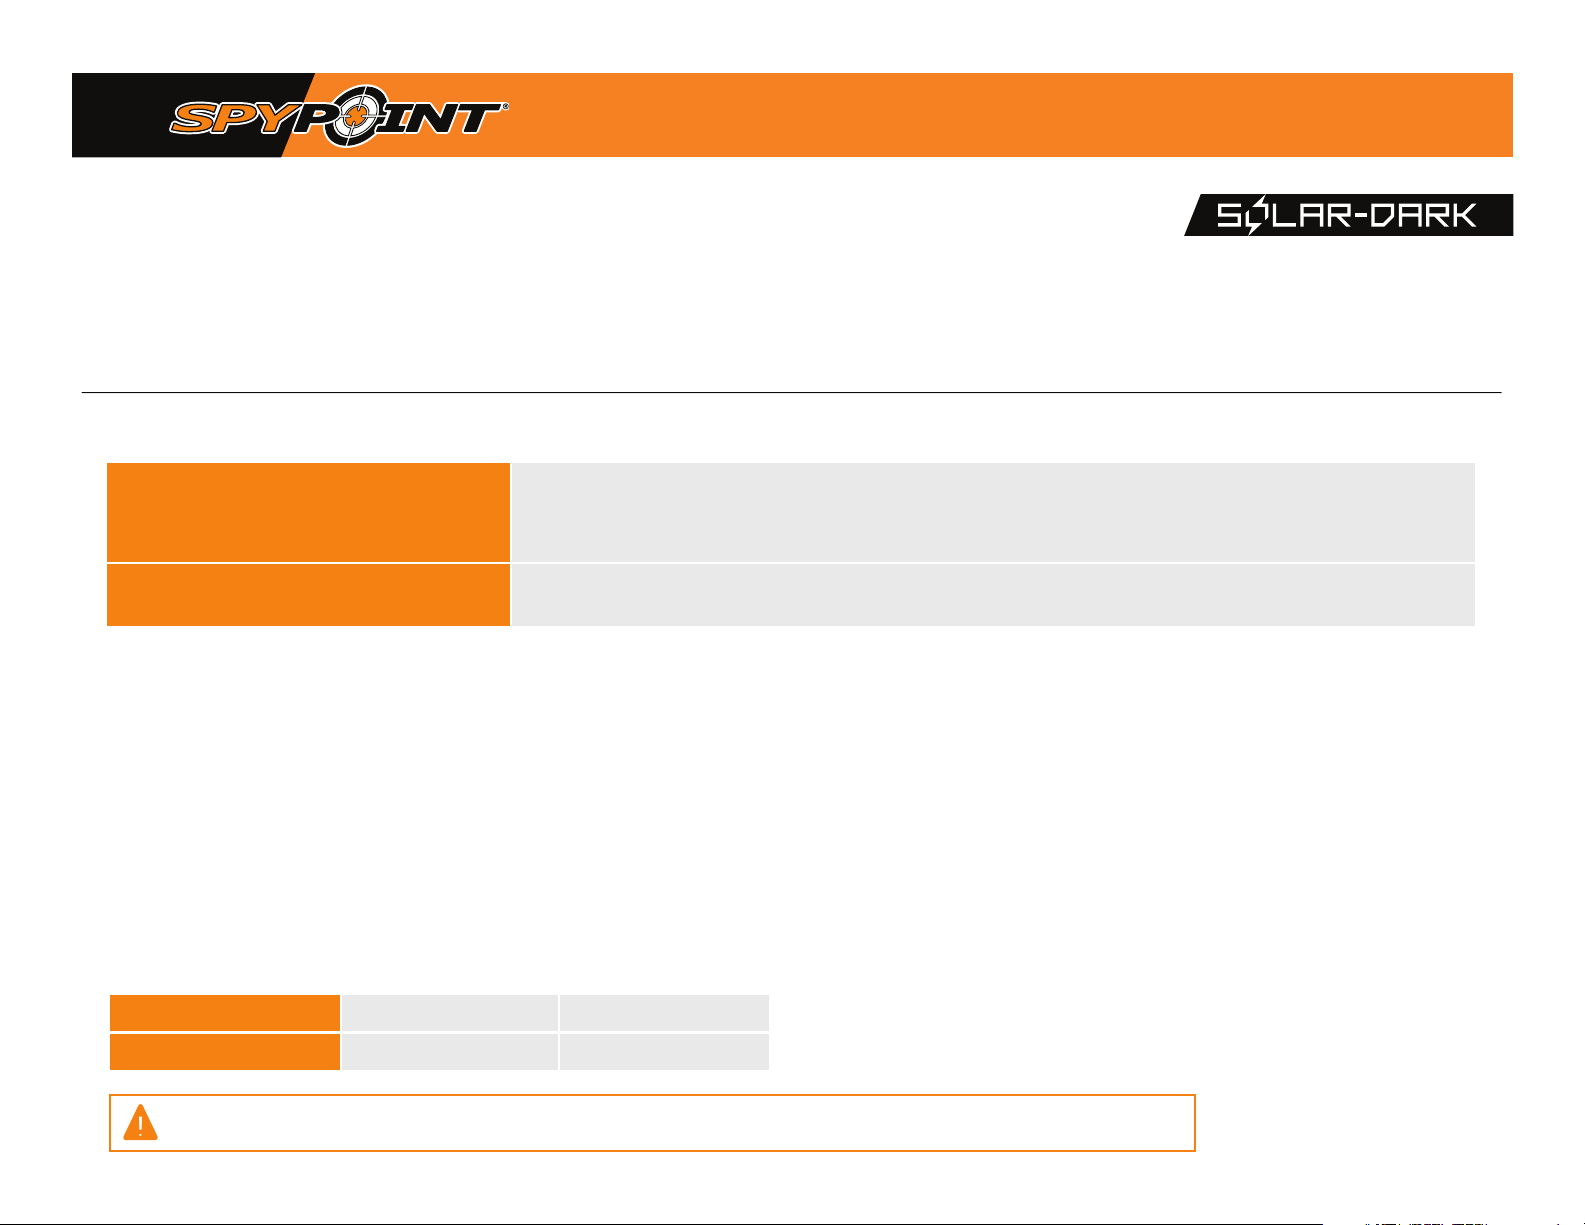
Delay
(Instant/10s/1m/3m/5m/10m/15m/30m)
MULTIshot
(1/2/3/4/5/6 photos consécutives)
Allows the user to choose the delay between each detection before the camera records the next video. A longer delay
minimizes the number of videos taken and maximizes battery life. A shorter delay maximizes the number of videos taken
but requires more battery power. Shorter delays are recommended when the camera is used for security purposes.
Allows you to take up to 6 consecutive photos for each detection with a 5-second delay between each photo.
recommended settings
The camera can be congured for usage in trails. This conguration will typically result in lower activity levels, fast moving subjects and fewer
photos. These settings increase the chances of capturing animals following one another.
The camera can also be congured for usage at a feeding site. This conguration will typically result in higher activity levels, slow moving subjects
and more photos. This conguration makes it possible to reduce the number of photos taken while capturing all the activities on the feeding site.
The below table shows the suggested settings for both congurations:
trail feeder
Delay
multishot
Instant 5 min
1 1-6
Battery life can be compromised if the settings of your camera are not adapted to the actual situation.
Page 12
configuration menu and general settings / 10
timelapse settings
- Allows to set the options for TIME LAPSE mode.
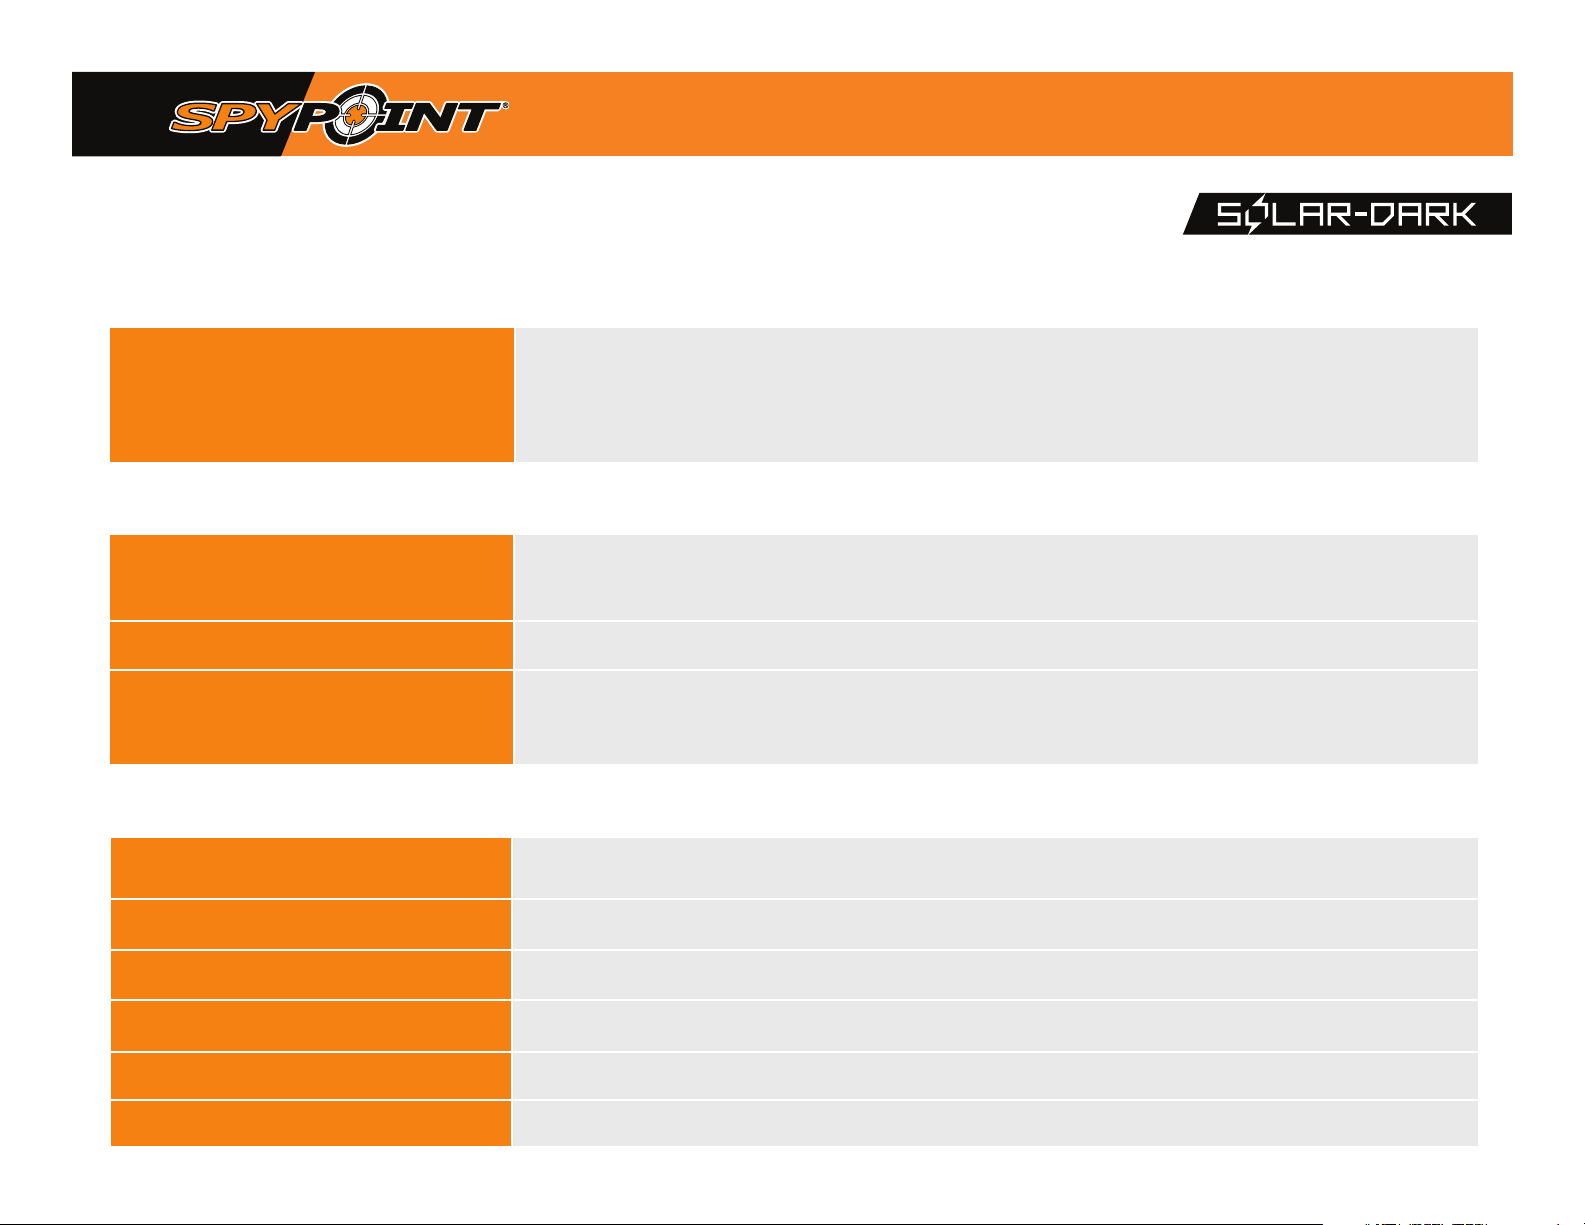
delay
(From 1 min to 24 h)
-
video settings
Allows to set the options for VIDEO mode.
delay
(Instant/10s/1m/3m/5m/10m/15m/30m)
video length
photo first
general settings
(10s/30s/60s/90s)
(Yes/No)
-
Allows to set the camera's general options.
device name
Allows the camera to take photos at regular preset intervals. For example, if "5 m" is selected in the TIME LAPSE mode, the
camera takes a photo every 5 minutes even if there is no detection. This option allows the user, among other things, to obtain
photos of game outside the detection range of the camera.
Note: The Time lapse mode only applies for photos, not videos. When the Time lapse mode is selected, the Delay option and the
Multishot mode are disabled.
Allows the user to choose the time interval between each detection before the camera records the next video. A longer delay
minimizes the number of videos taken and maximizes the battery life. A shorter delay maximizes the number of videos taken
but requires more battery power. Shorter time intervals are recommended when the camera is used for security purposes.
Allows to congure the recording length of video sequences when the camera is set in Video mode.
When this option is enabled, a photo is taken immediately before each video.
Note: The number in the le name of the photo will precede the number in the le name of the corresponding video.
For example, if the name of the photo is PICT001.JPG, the name of the corresponding video will be VID002.AVI
Allows the camera to be named via the electronic keyboard. This option is particularly useful for users with more
than one camera.
Language
(English / Français / Deutsh)
date format
time format
Date
time
(MM/DD/YYYY or DD/MM/YYYY)
(12 H or 24 H)
Sets the displayed language on your camera.
Congures the date format (month, day, year, or day, month, year)
Allows to select between a12 hour or 24 hour time format.
Sets the date.
Sets the time.
Page 13
general settings
general settings / 11
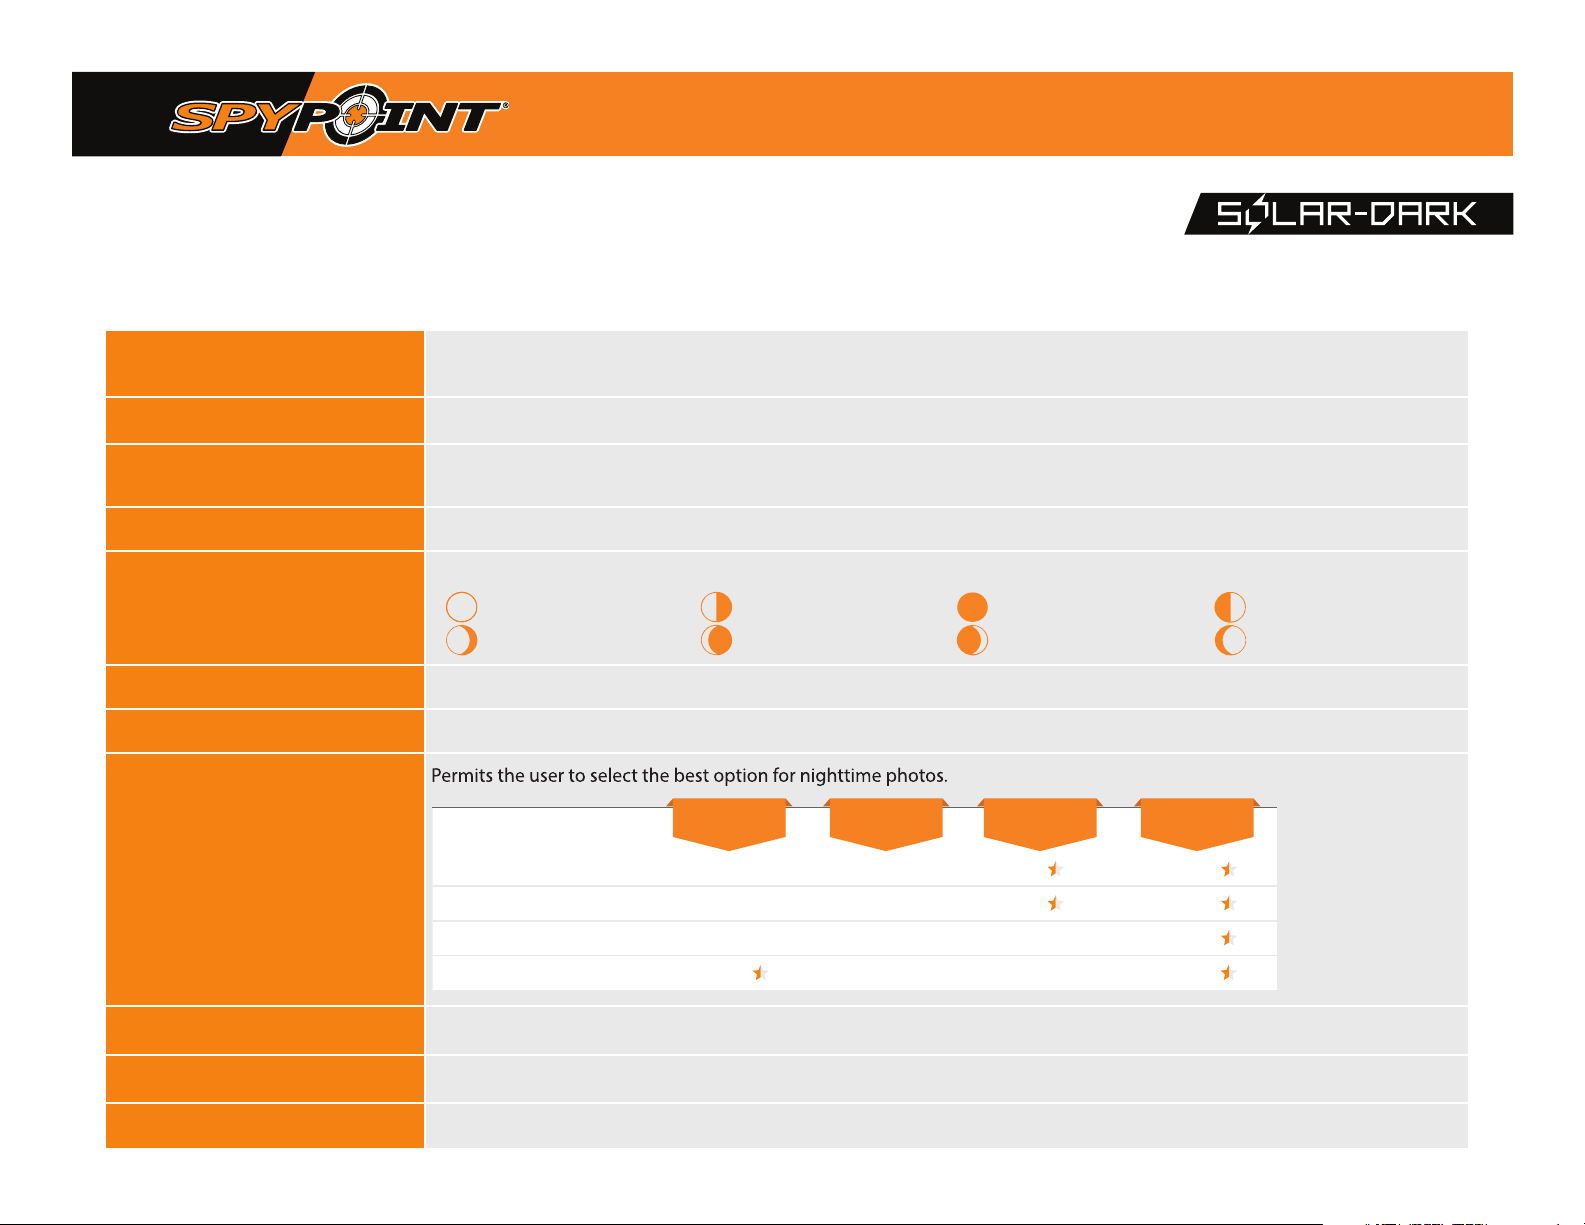
sensitivity
resolution
(Low / Medium / High)
(Normal / High)
trigger speed
(Optimal / Fast)
battery type
(AA / LIT-09 / 12V)
information appearing
on the photos
start time
end time
night mode
Allows to choose the sensitivity of the motion sensor. A greater sensitivity will give a greater number of photos. Make sure
the front of the camera is free of any obstructions. The area of installation should be cleared from branches or bushes.
Sets photo quality.
Optimal : Takes higher quality images.
Fast : Takes photos more quickly.
Allows the user to select the battery type in use to get a more precise battery level reading.
Displays the date, time, temperature, moon phase, SPYPOINT logo, and camera model on each photo.
New moon First quarter Full moon Last quarter
Waxing crescent Waxing gibbous Waning gibbous Waning crescent
Sets the time at which the camera begins detecting movement.
Sets the time at which the camera stops detecting movement.
blur reduction
mode
LED's visibility
battery life
invisible
mode
optimal
mode
renforced
mode
temperature format
about the device
default settings
(°C / °F)
flash range
blur reduction
Sets the the displayed temperature format.
Displays system information. (Software/hardware version number / Model number / Device name.)
Restores the camera to its default settings
Page 14
installation, mounting bracket and updates / 12
Camera software updates
Go to https://support.spypoint.com/EN for instructions on how to perform
camera software updates.
installation
Recommended installation height
The camera should be installed at the same height as the animal's mid-body.
Ideal installation for quality images and videos
The targeted animal should be 7.5 m (25 ft.) away from the camera for a better
eld of view.
To achieve brighter pictures at night, there should be elements in the background that can reect the camera's infrared light. Take note that the camera
should not be facing directly toward the sun as this may create backlighting and
trigger false detections.
Make sure the front of the camera is free of any obstruction. The installation area
must be clear of branches or bushes as they could trigger false detections when
combined with heat, reections, and/or wind. If the camera's sensitivity is set to
High, this could also trigger false detections.
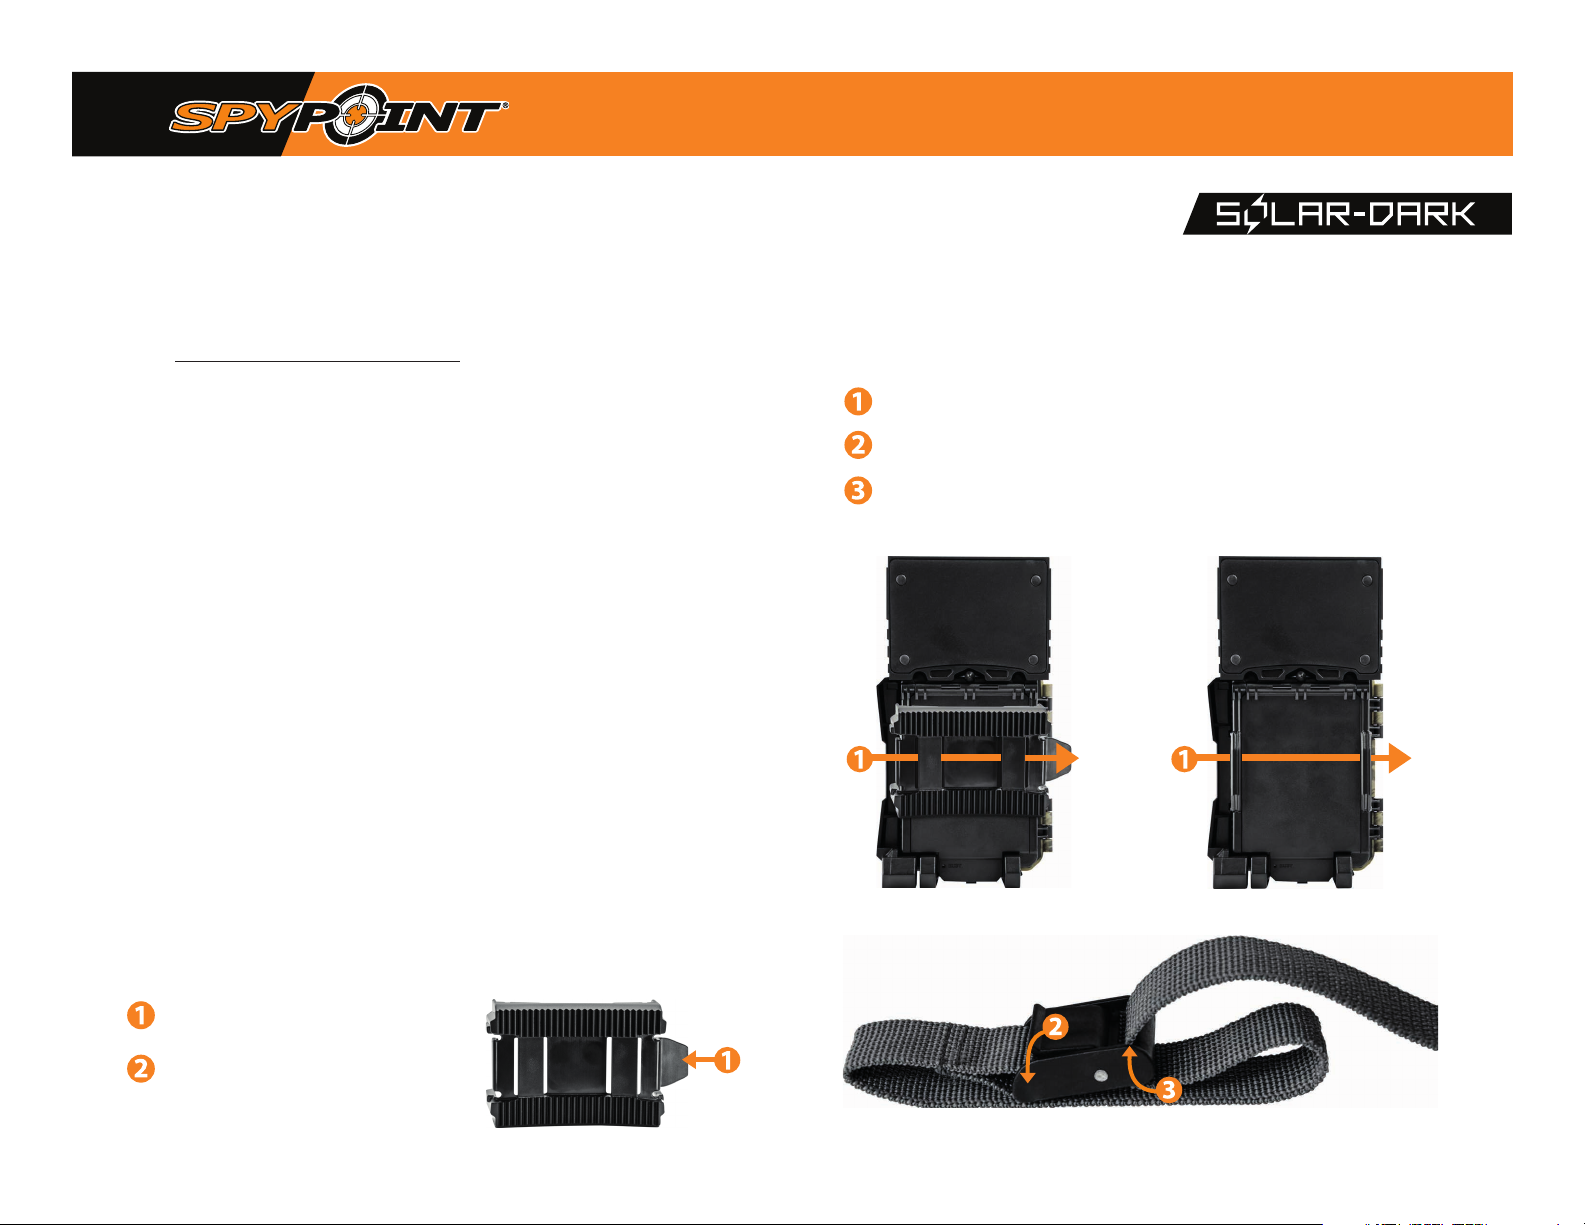
Installation with the supplied strap
The dimensions of the included strap are 2.5 cm (1’’) X 152 cm (60’’).
Thread the strap through the strap slot found on the back of the camera.
Wrap the strap around the tree then press and hold down the latch.
Thread the strap through the latch from behind, as shown below.
or
mounting bracket
To remove the camera from the mounting bracket:
Push the tab to release the
camera from the mounting bracket.
Remove the camera.
Page 15
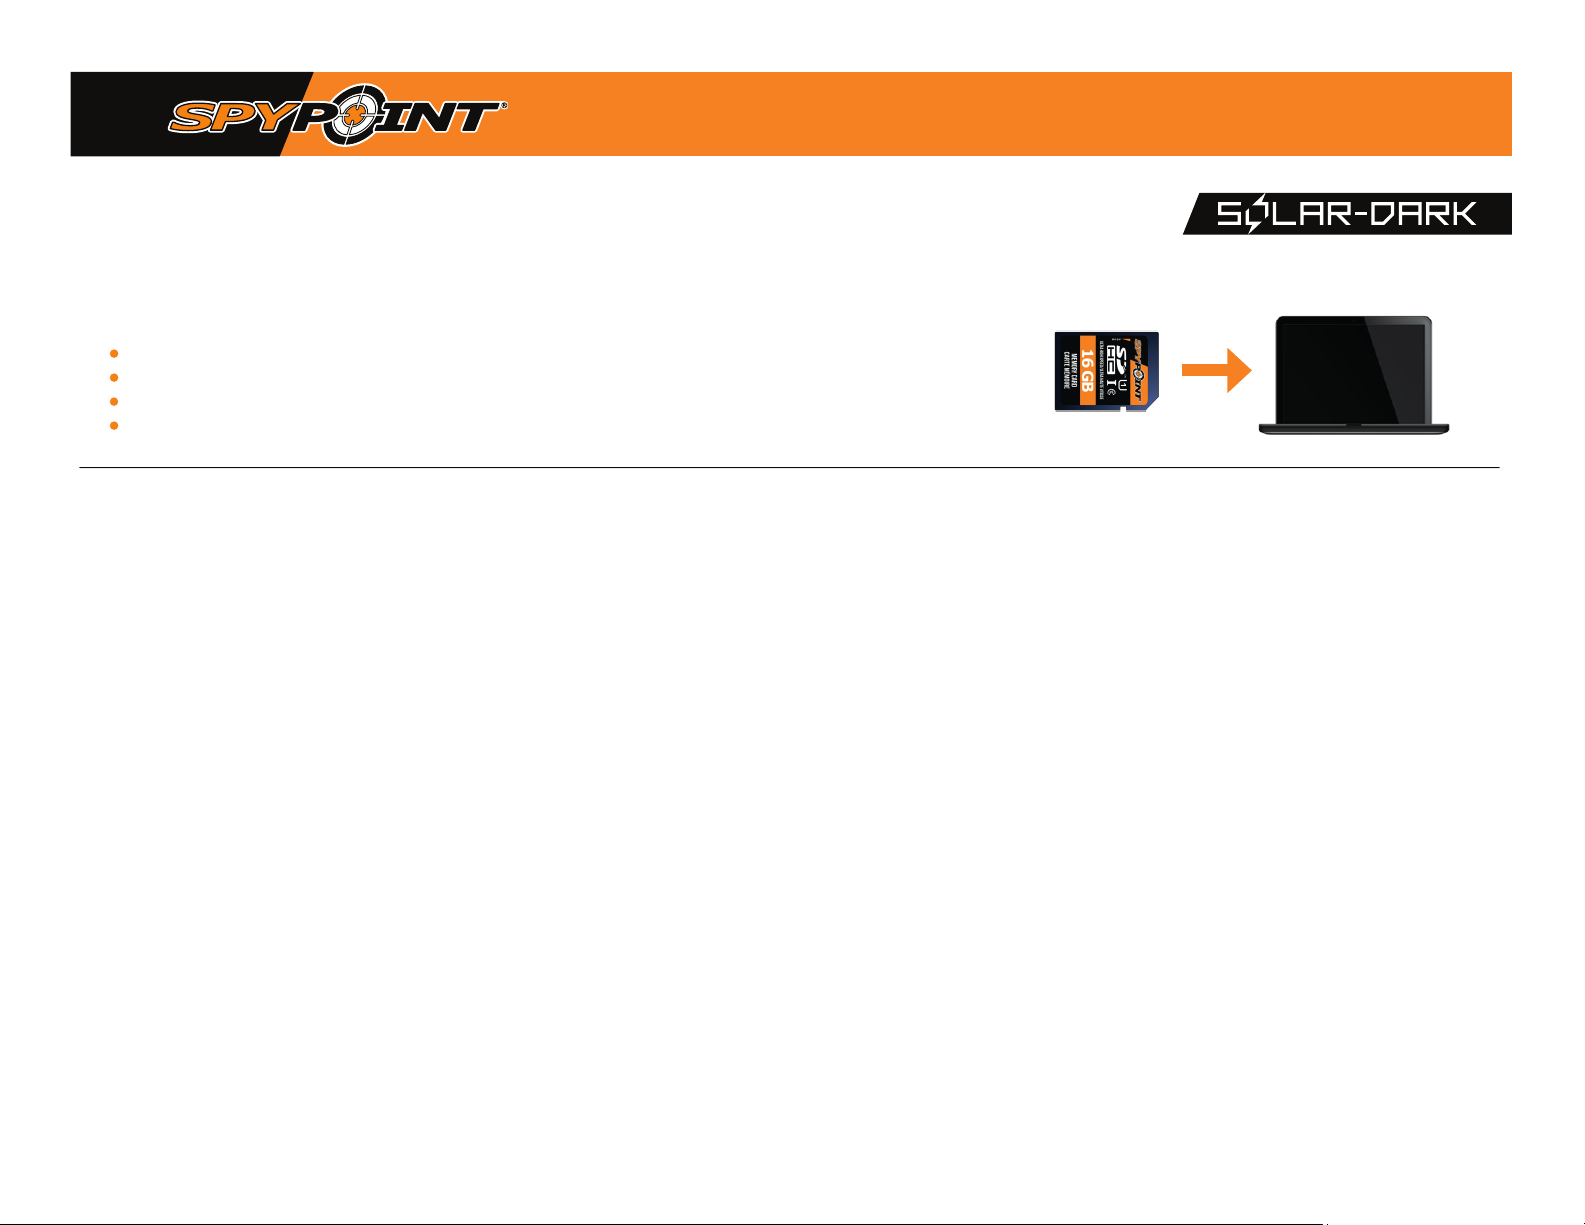
TRANSFERRING FILES TO A COMPUTER
• Turn OFF the camera.
• Remove the SD card from the camera.
• Insert the SD card into the alotted slot on your computer, or use a SD card USB adapter.
• The computer will dectect the SD card.
transferring files to a computer / 13
on a pc
Click “My Computer” or “This PC” on your desktop.
Locate your device under “Removable Disk" then click to access it. Next, click on the
“DCIM” folder, then on “100DSCIM” to nd all saved photos.
Select the photos you want to copy. The easiest way to select them all is by clicking on
the “Home” tab found in the menu bar (situated at the top of the window), then “Select
All” on the right-hand side of the toolbar. Alternatively, you can also use the “Ctrl+A”
command on your keyboard, or click the “Edit” tab (found in the menu bar) and choose
“Select All” in some versions of Windows.
Click the “C op y” icon on the left-hand side of the menu bar or use the “Ctrl+C”
command to copy the les.
NOTE: If you do not want to select all photos, press and hold down the “Ctrl” key and
click on the photos you wish to select before clicking the “Copy ” icon.
Navigate to the folder where you would like to store your images, or create a new folder
by clicking the “New Folder” button in the menu bar. Alternatively, you can also use the
“Ctrl+Shift+N” command to create a new folder, or right-click on an empty space in the
“Images” folder and choose “N ew ,” then “Folder" in the shortcut menu that appears.
Type in a name for your new folder, press “Enter,” then double-click on the folder to open it.
In the “Home” tab, select “Paste” or use the “Ctrl+V” command. The photos will be
copied to the new folder.
on a mac
Click the "Finder" icon in the "Dock".
Locate your device under the Devices tab, then click to access it. Next, click on the
"DCIM" folder, then on "100DSCIM" to nd all the saved photos.
Click "Edit" in the menu bar (situated at the top of the window), then press "Select All"
to select all the images on the card. You can also "Select All" by pressing the ⌘ and A
keys simultaneously on your keyboard.
Alternatively, if you do not wish to import all the les, you can individually select the
images you would like to transfer by holding ⌘ and clicking the lename of each image.
Click "Edit" once again, then "Copy" or use the ⌘ and C command to copy the
selected images.
Navigate to the folder in which you would like to store your images, or create a new
folder by simultaneously right-clicking and pressing Ctrl, then select New Folder from
the shortcut menu that appears.
Click Edit then Paste or use the ⌘ and V command to copy your chosen images from
your device to the selected folder.
Images may take several minutes to transfer depending on the le size and the
number of images you are importing.
Once your images have been transferred, click the Eject icon found beside the name
of your device, then unplug the device from your Mac.
Page 16
accessories available / 14
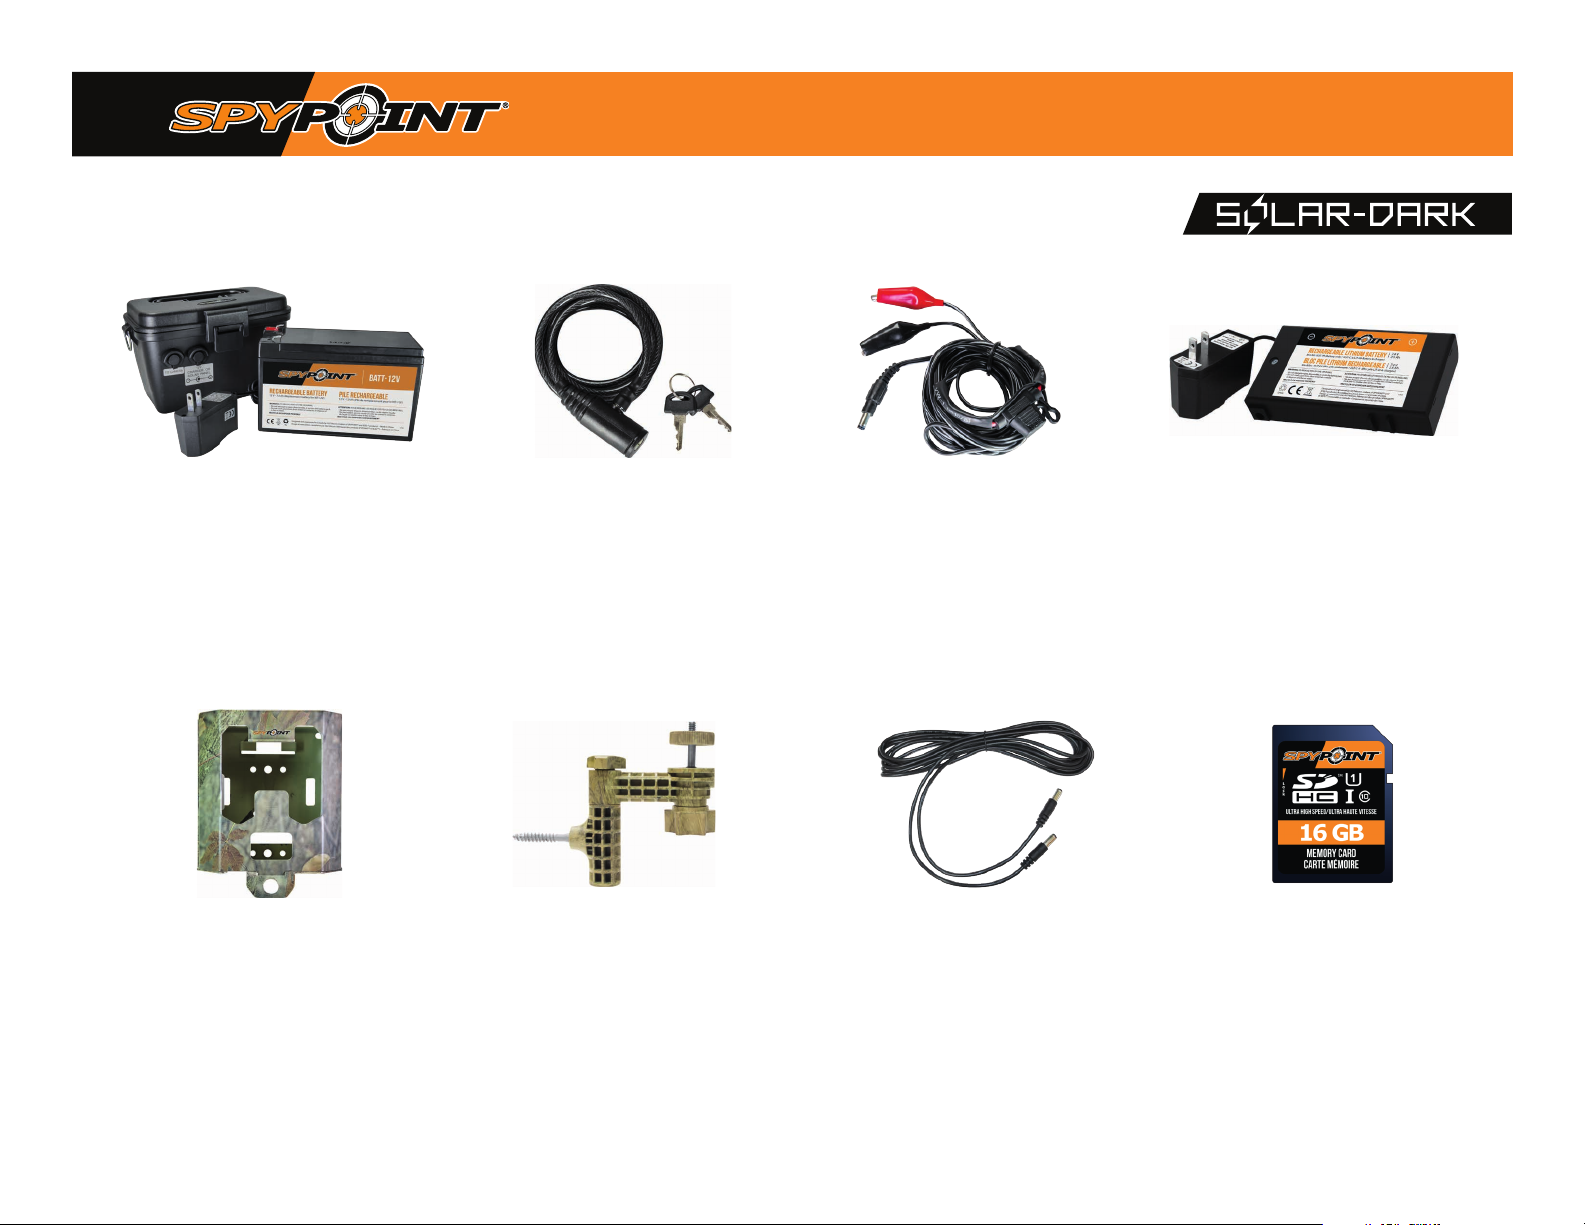
12V rechargeable Battery,
Charer and housing kit
#KIT-12V - 12-volt 7.0 Ah rechargeable
battery with a water-resistant ABS plastic
case, AC charger, 3.6 m (12 ft.) power
cable (#PW- 12 ft) and strap included.
Compatible with all SPYPOINT products
that have a 12 V outlet.
42 led steel security box
#SB-200,
against theft. It also protects it from breakage
caused by bears or other animals. Fits all 42
LED SPYPOINT cameras
Steel box to secure the camera
Cable lock
#CLM-6FT - 1.85 m (6 ft.) lock cable ts all
SPYPOINT cameras and security boxes.
adjustable mounting arm
#MA-360 - Adjustable mounting arm,
ts all cameras that have a standard
¼''-20 tripod mount. Pivots 360° and
tilts +/- 90°.
12V power cable
#CB-12FT - 3.6 m (12 ft.) power cable
with alligator clips to connect a 12V
battery to a camera.
spare power cable
#PW-12FT - 3.6 m (12 ft.) spare power
cable to connect the camera to KIT-12V.
lithium battery pack and charger
#LIT-C-8, Rechargeable lithium battery
pack and AC charger with charge
indicator light. Fits all SPYPOINT cameras.
sd 16 gb memory card
#SD-16GB - Includes a high-speed Class
10 SD 16 GB card.
For more information on other available products and accessories, go to www.spypoint.com
Page 17
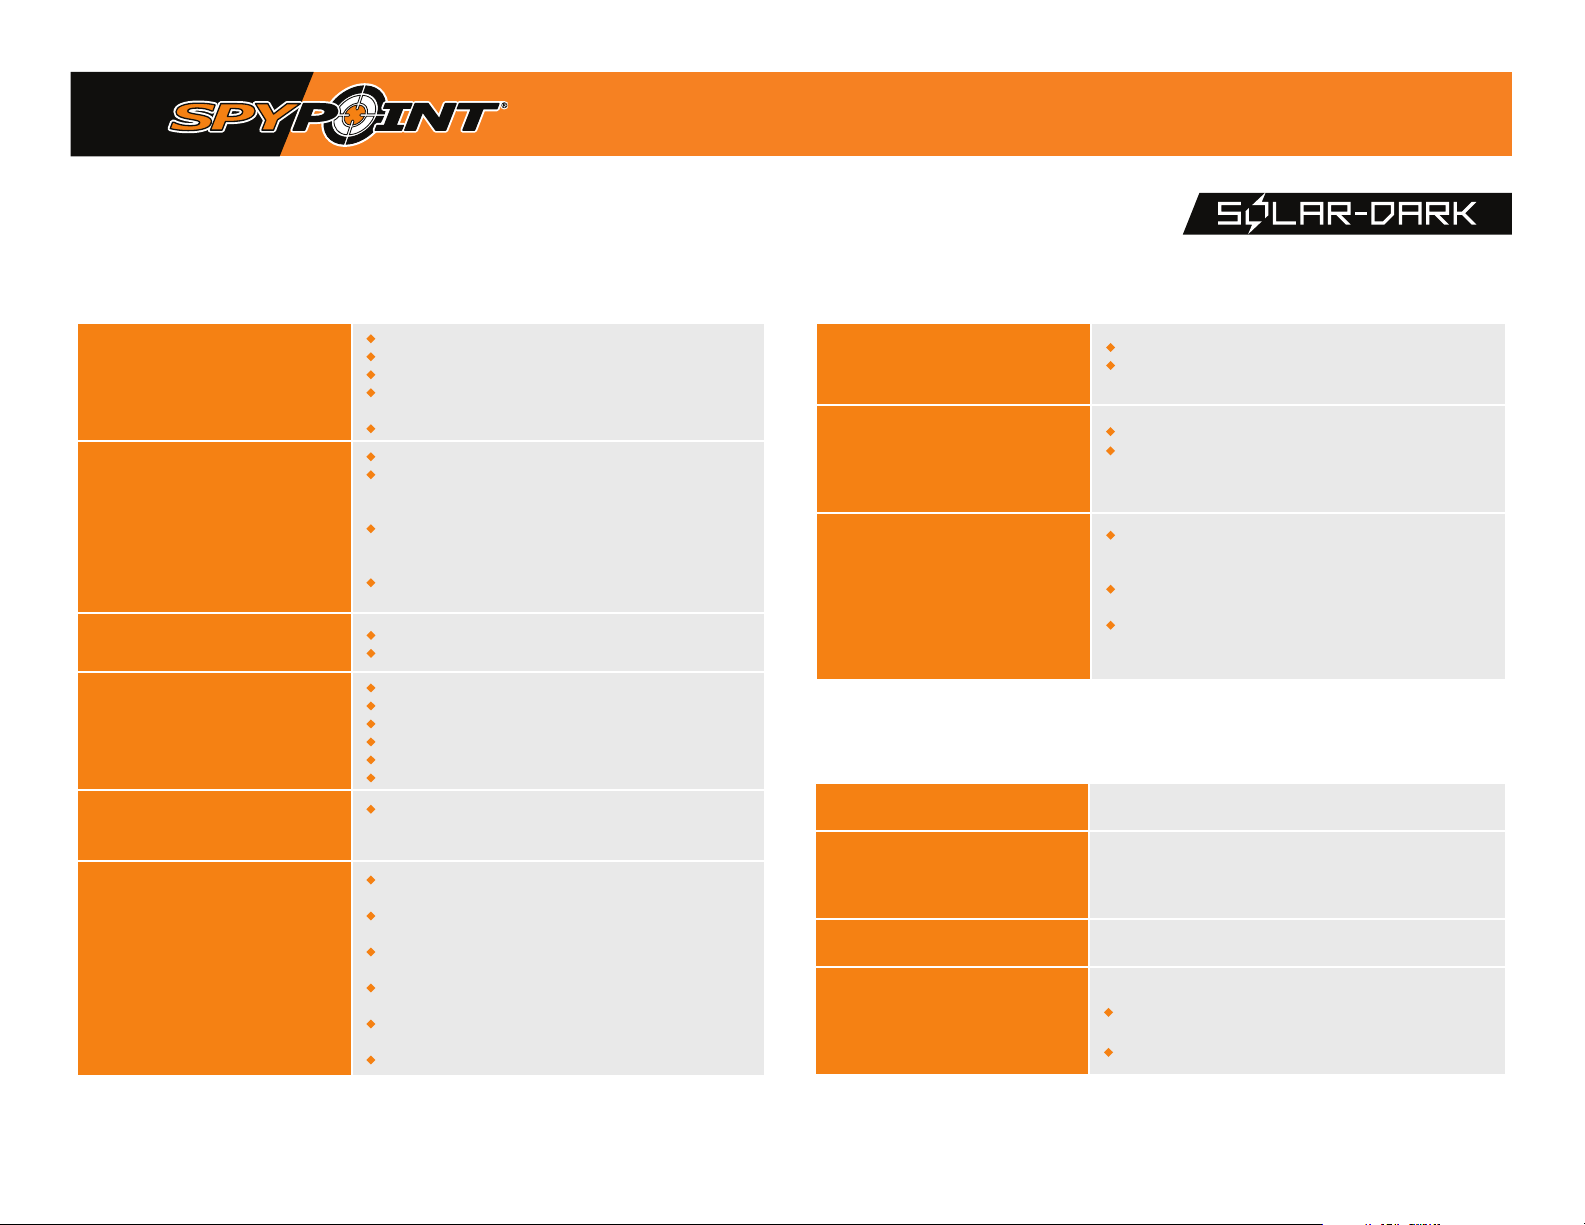
troubleshooting / 15
Problem Problem
impossible to turn
on the camera
the screen of the
camera turns off
La camera does not respond
Impossible to take
photos / videos
blurry Photos
no person or animal appearing
in the photos
possible solutions possible solutions
• Recharge the internal battery for 24-48 hours.
• Check if there are batteries in the camera.
• Check if the batteries are correctly installed.
• Install the latest update (available on
www.spypoint.com under the SUPPORT section).
• Replace the batteries or recharge the lithium battery pack.
• Recharge the internal battery for 24-48 hours.
•
The camera may be set to Photo or Video mode and
the screen turns o after a period of 30 seconds in order
to preserve battery life.
• The camera will initialize PHOTO or VIDEO mode
(according to the last selected or used mode) after 2
minutes of inactivity on the main menu.
• To return to the screen, turn o the camera and turn it
on again.
• Remove the batteries and reinsert them.
• Replace the batteries.
• Recharge the internal battery for 24-48 hours.
•
Check if there are batteries in the camera.
•
Replace batteries or recharge the lithium battery pack.
•
Format the SD card.
•
Check if the camera is turned on.
•
Remove the protective sticker from the detection lens.
• Low-lighting conditions and fast-moving subjects
may produce streaks on the photo; try setting the
"Night mode" to "Optimal."
• Check if the camera is pointing towards the direction
of sunrise or sunset, as this can trigger the device.
•
At night, the motion sensor may detect beyond the range
of the ash. Reduce the detection sensitivity of the camera.
• Small animals may trigger the device. Reduce the
sensitivity and/or increase the height of the camera.
• The motion sensor may detect animals through
the foliage.
• Make sure the mounting post or tree is stable and
does not move.
• Recharge the internal battery for 24-48 hours.
.
Photos / vidEos dark
during nighttime
red light on the front of the
camera is flashing
photos / videos are dark
error messages
insert memory card
low battery
no image
protected file
•
Make sure the subject is within nighttime ash range.
•
Check that there are elements in the background to reect
the camera's infrared light.
• The camera is in Test mode and detects motion.
•
The camera is in Photo or Video mode. The test light
will ash for 30 seconds to allow the user to leave the
site without being photographed.
• Check the battery level to see if battery power is full as
the ash will stop operating near the end of the battery
life, especially if recording a video.
• Check that there are elements in the background to
reect the camera's infrared light.
• Test the camera’s nighttime illumination mode in a dark
room to see if the camera takes black-and-white photos
or videos.
solutions
The use of a memory card is required to save photos and videos.
Appears on the screen just before the camera turns o.
Recharge the batteries or replace them with new ones.
Always check the battery level before using the camera.
There is no le to display.
Check if the memory card contains photos/videos.
The le you want to delete is protected.
• Remove the protect option from the photo using the View
mode, then you will be able to delete this le.
• Format the memory card to delete the les.
Page 18
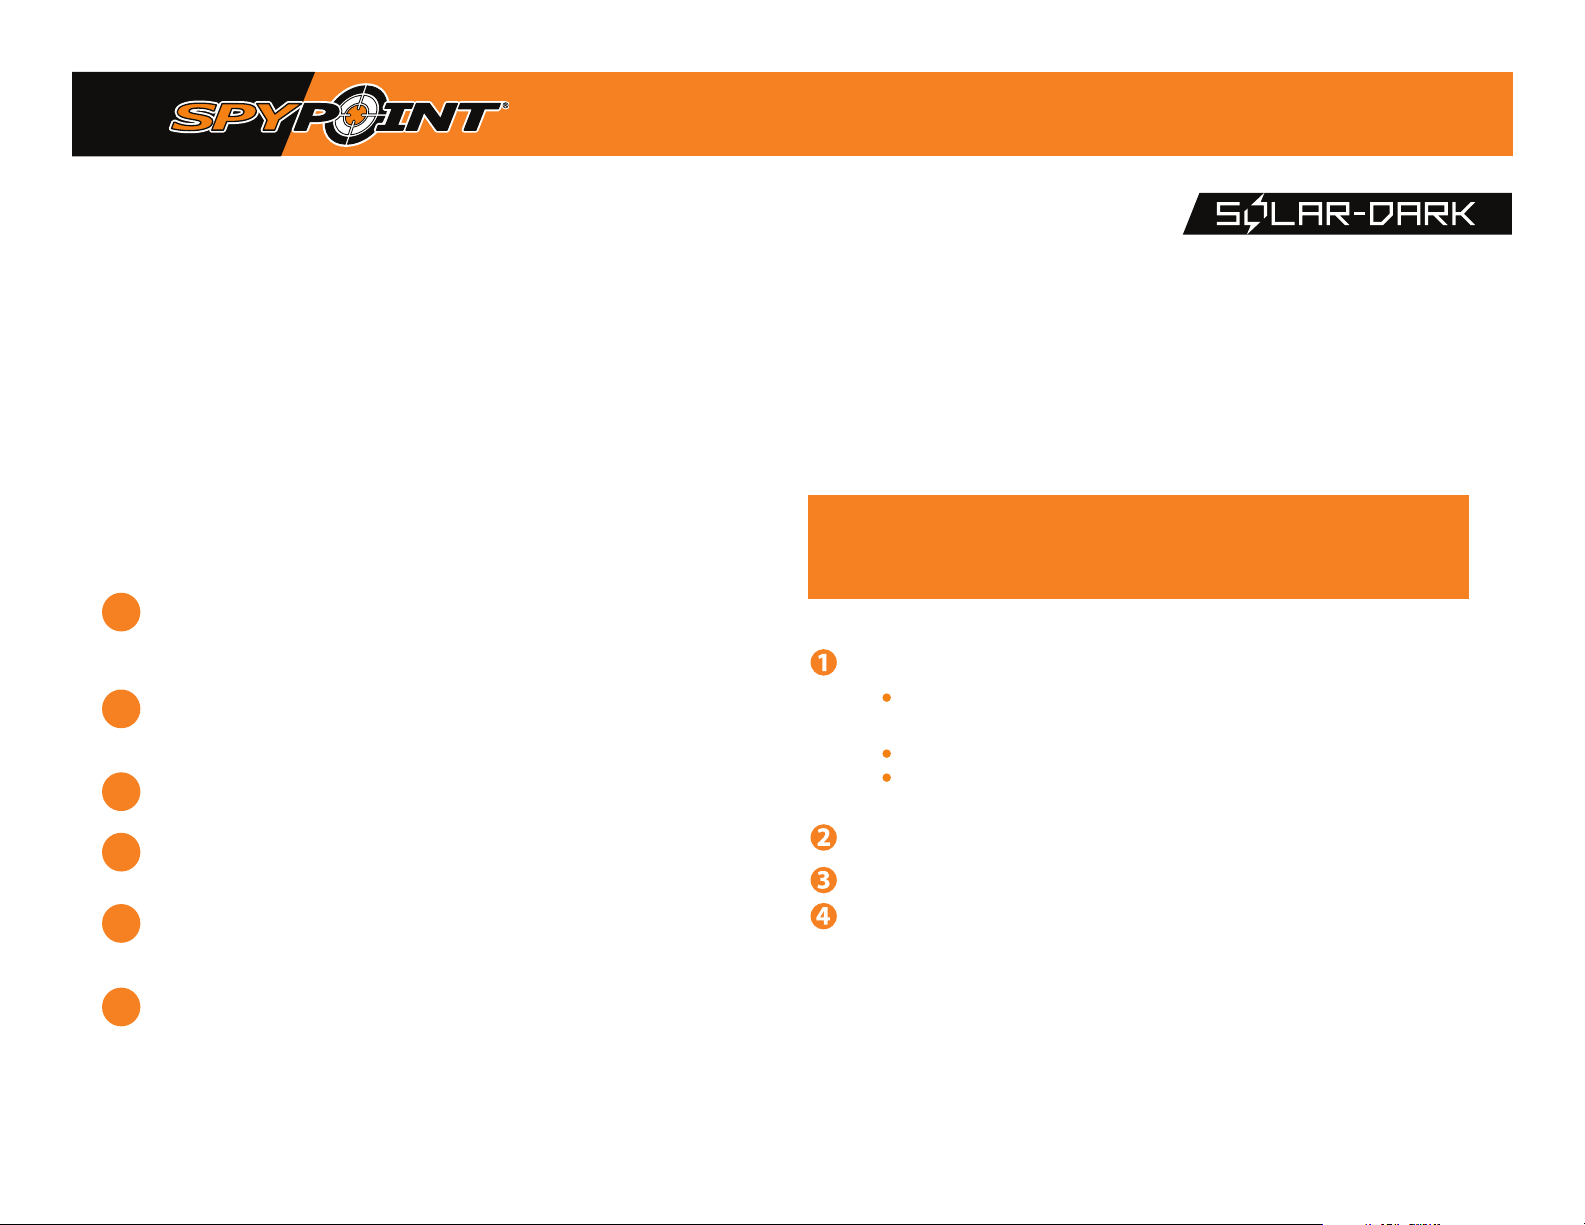
warranty and repairs / 16
limited warranty
This SPYPOINT product, designed by GG Telecom, is covered by a two (2) year
limited warranty on material and workmanship starting from the original date of
purchase. The electronic receipt is the client’s proof of purchase and must be
presented to conrm that the warranty is applicable if service is needed.
This warranty will be honored in the country of purchase only.
This GG Telecom warranty does not apply to the following:
Consumable parts, including but not limited to the batteries; of which
A
performance is designed to decrease over the course of time;
Damage caused by misuse, use with another product, neglect, accidents,
liquid contact, re, earthquakes, or any other external causes;
b
GG Telecom products that have been purchased online from an
c
unauthorized dealer;
Products that have been modied or tampered with;
d
repair service instructions
GG Telecom will repair the product or replace it at its discretion with an equivalent product without charge
if covered by the warranty described previously. The shipping fees for a sent item will be assumed by the
customer. GG Telecom will then pay for the return of the product covered by the warranty.
For a product not covered by the warranty, the repair will be subject to a reasonable charge and the
customer will also assume all shipping costs.
IMPORTANT
Under no circumstances will GG Telecom accept returned products without
an RMA (Return Material Authorization) number. It is essential to contact
GG Telecom before making a return.
Before sending us a product for repair, you can get help in several dierent ways. Most issues
can be resolved over the phone or online:
•
Contact our
Friday, between 8:30 a.m. and 4:30 p.m. (simply click on the orange ''Need help?''
button found on the bottom right corner of your screen);
•
Contact us by e-mail at [email protected];
•
Go to support.spypoint.com for more information on your cameras or contact our
SPYPOINT customer service assistance by calling 1-888-779-7646.
If a product needs to be returned, an RMA number will be issued to authorize the return of
the product and be used for future reference. Please keep this number.
The original receipt or copy must be included with the package sent to GG Telecom.
web chat service oered directly on our website, from Monday to
Cosmetic damage, including but not limited to scratches and broken plastic;
e
Damage caused by use of the product outside of GG Telecom's recommendations.
f
The RMA number must be written on the outside of the package sent to:
Canada
GG Telecom
330 de la Jacques-Cartier
Victoriaville, QC
G6T 1Y3
The customer is liable for any losses of damages to the product during transportation to GG Telecom.
We recommend using a mailing service which requires a tracking number to ensure the product's protection.
UNited states
GG Telecom
3000 Gannett Avenue
Des Moines, Iowa
50321
 Loading...