

Page 1
FORCE-20
& COMPARABLES*
QUICK START GUIDE
v.1.4
Page 2

In the Box
1x Camera
1x Strap
ENGLISH
1x SD card 16Gb
1x SD card reader
1x Quick Start Guide
Note: Batteries sold separately.
User manuals, software updates & FAQs available at:
support.spypoint.com
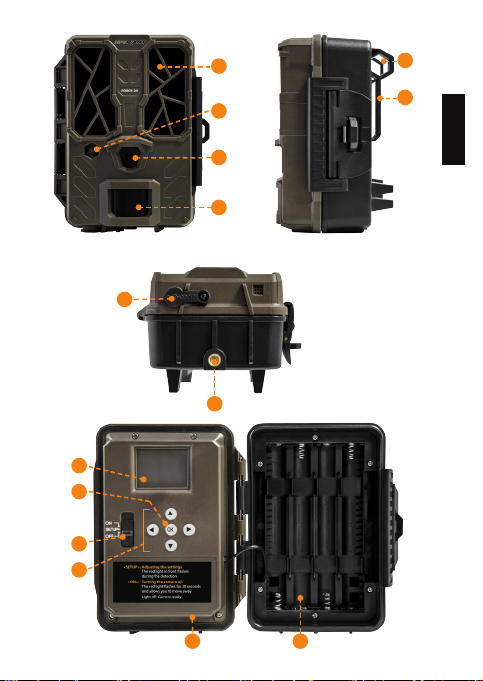
Components
1 8
LED
Pilot Light
2
Photo Lens
3
Detection Lens
4
Opening for Lock Cable
5
Slot for Strap
6
Plug 12V
7
Tripod Bracket
9
Screen LCD
10
OK Button
11
Navigation Buttons
12
ON/OFF/SETUP Button
13
Card Slot SD
14
Battery Compartment
*The specications and characteristics of similar models may vary. Refer to
the website or packaging for details.
2
Page 3
1
2
5
6
3
4
7
8
9
10
11
12
13 14
ENGLISH
3
Page 4
Preparation
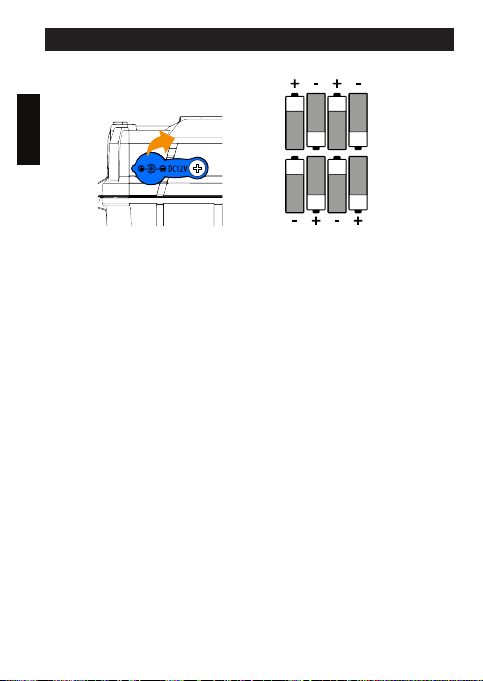
SELECT A POWER SOURCE
ENGLISH
12V
Power Source
Be sure to insert AA batteries in keeping with the (+) and
(-) signs.
To ensure that the device operates at maximum performance and
to avoid battery leakage, we recommend using new batteries. Use
ONLY lithium or alkaline batteries, NOT a combination of the two.
Rechargeable AA batteries are not recommended because they
produce lower voltage and may function poorly as a result.
4
8 AA alkaline or lithium
batteries
Page 5
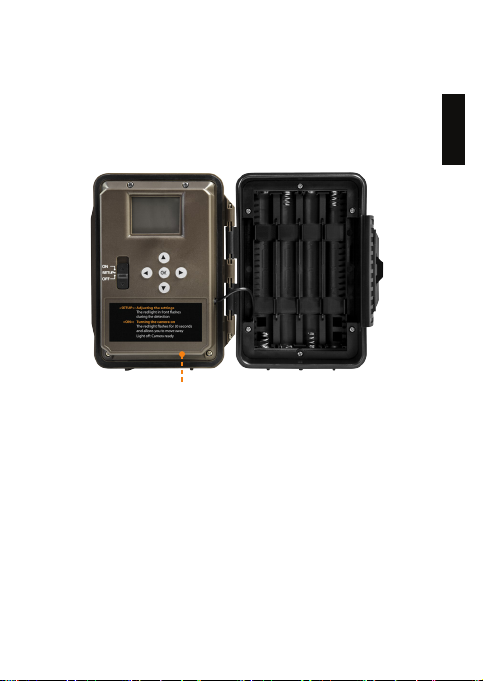
INSERT A MEMORY CARD
Insert a SD/SDHC memory card (up to 32 GB capacity) into the
SD card slot with the label side up. If the card is correctly inserted,
you will hear a click. Always ensure that the camera is turned off
before inserting a memory card.
We recommend reformatting your SD card if it was
previously used in another electronic device.
ENGLISH
5
Page 6
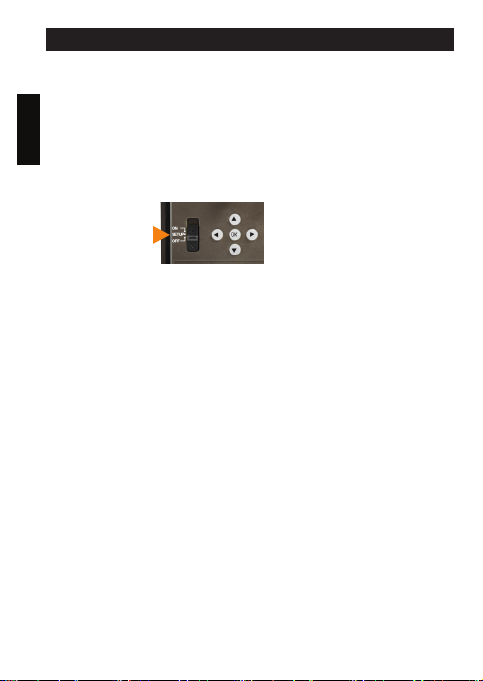
Setup
Use the buttons to switch to the LCD display or to
change options and press OK to select. Several setup pages will be
ENGLISH
displayed.
GENERAL SETTINGS SETUP
A. To turn the camera on or off, use the ON/OFF/SETUP button;
B. The button must be on SETUP to make your initial changes;
C. When the button is on SETUP, press OK to open the MENU;
1. Set the Language (French, English, German)
2. Set the date (MM/DD/YY or DD/MM/YY)
3. Set the time (12-hour or 24-hour clock)
4. Set the temperature (◦F or ◦C)
6
Page 7

ADJUST THE SETTINGS FOR THE 3 MODES OF
OPERATION
Picture Mode
DELAY
Allows you to select the time elapsed before the camera can detect
again and take the next picture.
If you want to capture multiple images, use a shorter delay.
Once you have selected the delay, press OK.
QUALITY
Allows you to select a resolution of 20 MP or 3 MP. Once you have
made your selection, press OK.
MULTI
Allows you to select the number of photos to be taken per shot
(from 1 to 5 photos). Once you have made your selection, press OK.
DETECT
Allows you to set motion-detector sensitivity (LOW, NORMAL,
HIGH, AUTO). Once you have made your selection, press OK.
Video Mode
DELAY
Allows you to select the time elapsed before the camera can detect
again and take the next video.
QUALITY
Allows you to choose between HD and VGA. Once you have made
your selection, press OK.
LENGTH
Allows the user to choose the video length (10 to 60 secs). Once
you have made your selection, press OK.
ENGLISH
7
Page 8
DETECTION
Allows you to set motion-detector sensitivity (LOW, NORMAL,
HIGH, AUTO). Once you have made your selection, press OK.
Mode Time lapse
ENGLISH
TIME LAPSE : Allows you to take pictures at regular predened
intervals without necessarily detecting a movement.
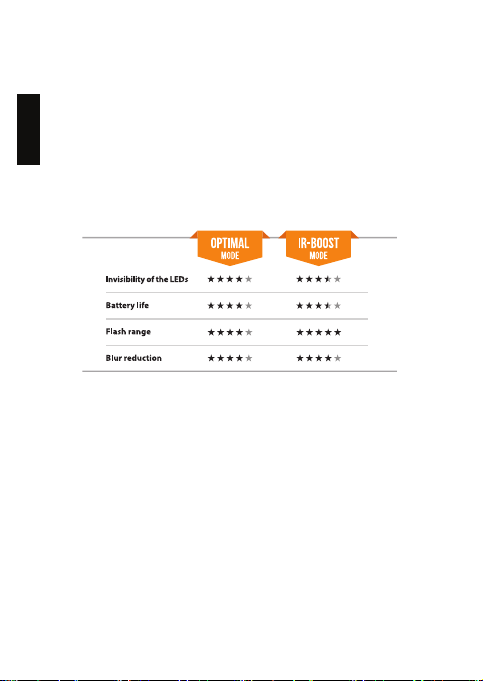
NIGHT
Choose the BOOST option for maximum brightness for night vision.
Select OPTIMAL to reduce fuzziness at night. Once you have made
your selection, press OK.
Other Options
Name: Allows to give a name to your camera.
About: Indicates software version.
Default: Resets all default settings.
Format: Allows the camera to format the SD card the next time
it is used. (Reformatting the SD card will delete all the images
and videos on the card. Only format the card if you are sure you
want to delete everything on it. Transfer all data to your computer
beforehand).
8
Page 9

Operation
Once the setup is complete, turn the button from SETUP to ON.
You may also switch from SETUP to OFF and turn the camera to
ON later.
RED LIGHT ON THE FRONT OF THE CAMERA
When the button is in the SETUP position the red light will ash to
conrm a motion detection once you have adjusted your settings.
When you move to the ON position, the red light at the front of the
camera will ash for 30 seconds to allow you to move out of the
camera eld of view.
When the light turns off, the camera is ready for use.
ENGLISH
9
Page 10

Installation
Recommended height of installation:
The camera must be installed at the height of the centre line of the
ENGLISH
animal’s body.
Ideal setup for high-quality images and videos:
The target animal should be 7.5 m from the camera to get a better
line of sight.
To produce brighter pictures at night, there should be items in the
background to reect the camera’s ash.
Please note that the camera should never be directly pointed at
the sun to avoid back lighting and faulty detection.
This device complies with Part 15 of the FCC Rules.
Operation is subject to the following two conditions: (1) this
device may not cause harmful interference, (2) this device
must accept any interference received, including interference
that may cause undesired operation.
10
Page 11

THANK YOU
for choosing
Sit back & relax as this camera is covered by the “Know you’re
covered” 2-year warranty.
We strive to provide our customers with a positive experience and
an outstanding service.
User manual, latest rmware & FAQ available at
support.spypoint.com
Online support at SPYPOINT.COM
Join the community
Facebook: www.facebook.com/spypoint/
Youtube: www.youtube.com/user/SpypointTrailCam
Instagram: @spypointcamera
Flickr: www.ickr.com/photos/spypoint/
ENGLISH
11
 Loading...