

Page 1
SUR
VEILLANCE SYSTEMS by ETHEREAL
The functions described below must be done locally at the NVR.
SPY-NVR4720W & SPY-NVR8720W
Quick Setup Guide
Before You Start:
• You must have a PC monitor or TV that supports 1024x768, 1280x1024, 1366x768,
1440x900 or 1080p resolution connected to the NVR via a HDMI cable or VGA
cable.
• The NVR MUST be hardwired to your network with an Ethernet cable coming
from your router/switch to the WAN input on the back of the NVR as it will NOT
connect wirelessly to a WIFI network.
• All cameras and NVR must have power connected to them using the included
power supplies.
Once the NVR and cameras are all powered on and connected please follow the
steps on the following pages for a fast and easy setup.
460 Walker St., Holly Hill, FL 32117 MetraHomeTheater.com
© COPYRIGHT 2017 METRA ELECTRONICS CORPORATION
Page 2

SUR
VEILLANCE SYSTEMS by ETHEREAL
The functions described below must be done locally at the NVR.
Step 1. Set Date/Time
Check to see if your date and time is correct. If the Date and Time are not correct
please follow the following:
1. Right click
2. (Left Click) on System Setup
3. (Left Click) on Time Setup located on the left
4. Change time and/or date to match the installed location and then (Left Click)
on Apply located to the right of the System time
5. Go to the bottom and (Left Click) Apply, then (Left Click) OK.
460 Walker St., Holly Hill, FL 32117 MetraHomeTheater.com
© COPYRIGHT 2017 METRA ELECTRONICS CORPORATION
Page 3

SUR
VEILLANCE SYSTEMS by ETHEREAL
The functions described below must be done locally at the NVR.
Step 2. Recording Setup
Let’s setup the recording of the NVR. In this section, Time = 24/7 and Motion = NVR
will only record when cameras see motion. (00:00 – 23:59 represents 24 hour recording from midnight to 11:59:59pm) If you would like to have a mix of motion or
time scheduled recording, you can adjust the time for each schedule with up to 4
schedules.
1. Right click
2. (Left Click) on System Setup
3. (Left Click) on Record setup
4. (Left Click) on drop down box located to the right of Weekday
5. (Left Click) on the word ‘Everyday’ (If you would like your schedule to vary
from day to day, only select the days you want to change)
6. (Left Click) “Schedule 1” Motion box or Time box.
7. (Left Click) on ‘ALL’ Box (If you would like your schedule to vary from
day to day, only select the days you want to change)
8. (Left Click) on ‘Copy to’ located at bottom left.
9. Go to the bottom and (Left Click) Apply, then (Left Click) OK.
460 Walker St., Holly Hill, FL 32117 MetraHomeTheater.com
© COPYRIGHT 2017 METRA ELECTRONICS CORPORATION
Page 4

SUR
VEILLANCE SYSTEMS by ETHEREAL
The functions described below must be done locally at the NVR.
Step 3. Create Administrator Password
Let’s have a password assigned to the NVR if you’re going to have it connected to
the internet to keep it secure.
1. Right click
2. (Left Click) on System Setup
3. (Left Click) on System Admin
4. (Left Click) on User
5. (Left Click) on Set password
6. Old password will be left blank
7. New password will be whatever you would like (Minimum 4 Characters, Maximum
10 Characters)
8. Repeated Re-enter the password you entered for New password
9. (Left Click) OK
10. (Left Click) OK at bottom of page
460 Walker St., Holly Hill, FL 32117 MetraHomeTheater.com
© COPYRIGHT 2017 METRA ELECTRONICS CORPORATION
Page 5

SUR
VEILLANCE SYSTEMS by ETHEREAL
The functions described below must be done locally at the NVR.
Step 4. Network Setup
Let’s connect the NVR to the network for remote access
1. Right click
2. (Left Click) on System Setup
3. (Left Click) on Network Setup
4. (Left Click) on the DHCP & SPYCLOPS ID/P2P ID
5. Go to the bottom and (Left Click) Apply, then (Left Click) OK.
6. Right click
7. (Left Click) on Exit System
8. (Left Click) on Reboot (Rebooting the NVR will allow it to initiate a UPNP request
for network access)
Once NVR reboots, at the bottom right corner of your monitor should say (ONLINE) within a few minutes.
460 Walker St., Holly Hill, FL 32117 MetraHomeTheater.com
© COPYRIGHT 2017 METRA ELECTRONICS CORPORATION
Page 6
SUR
VEILLANCE SYSTEMS by ETHEREAL
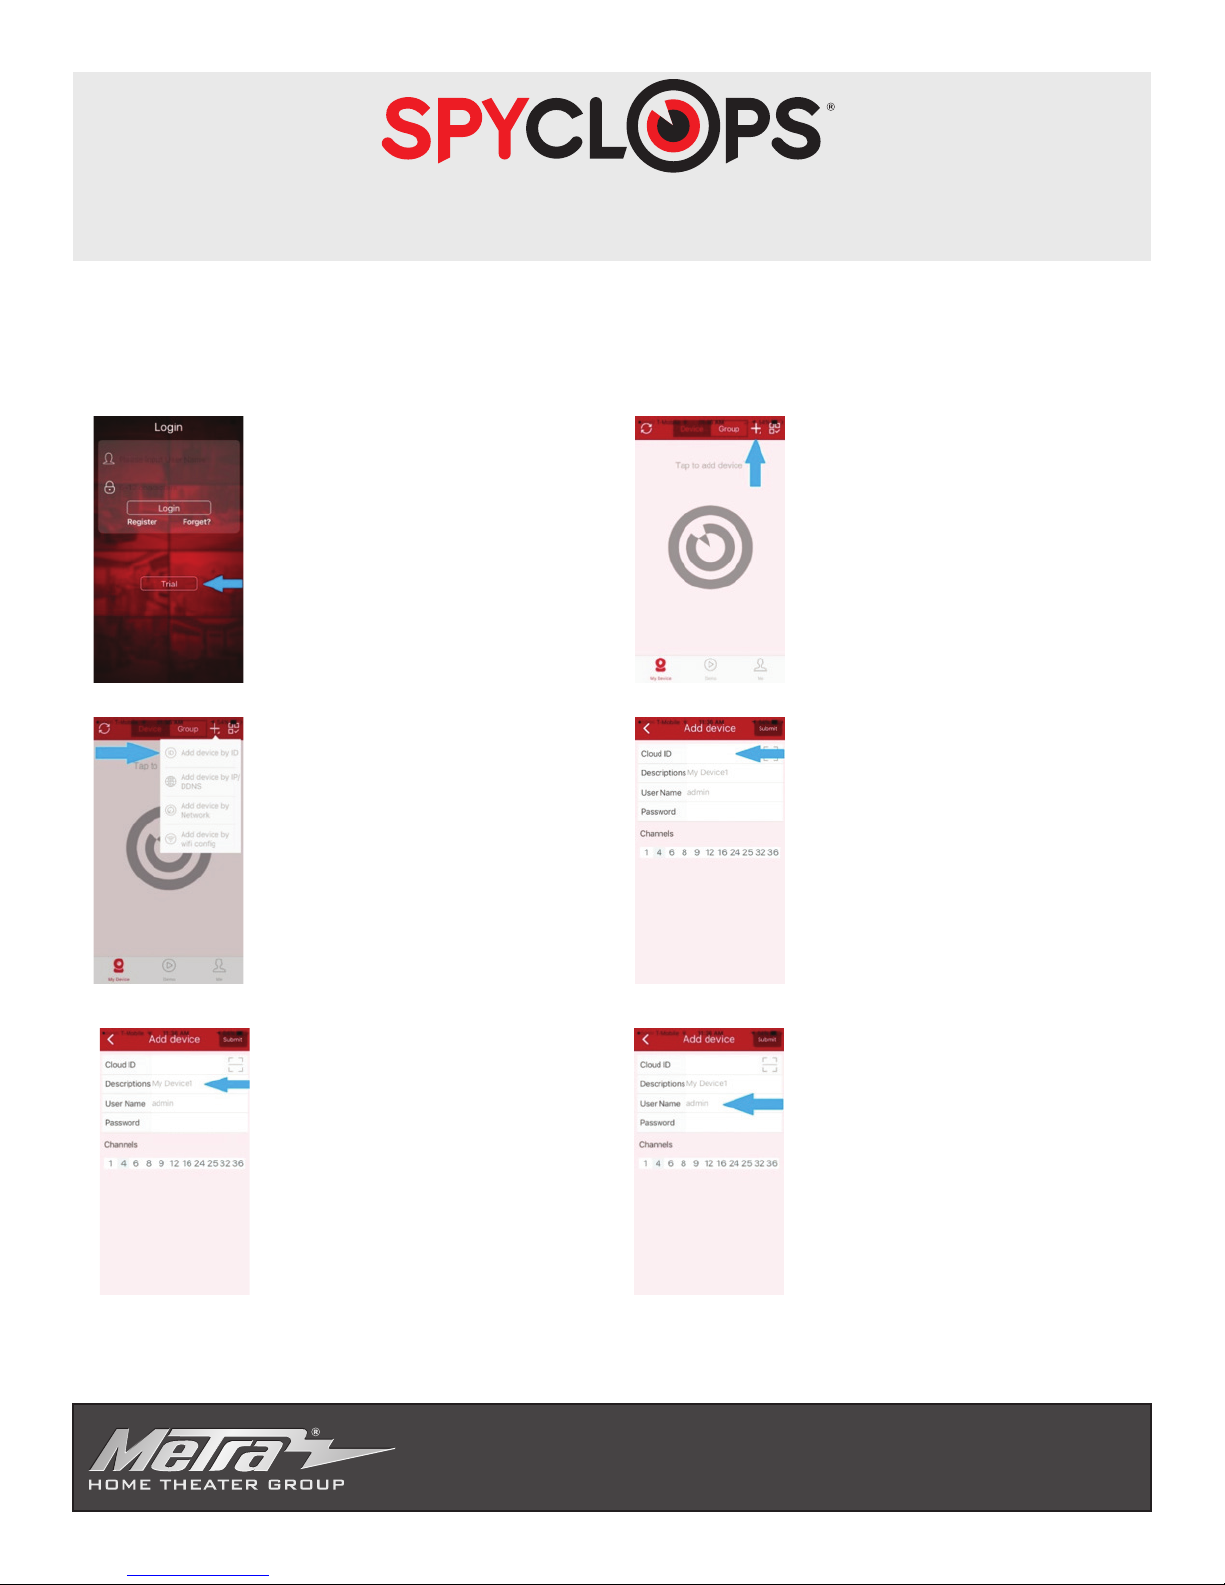
Step 5. Connecting to Android or iOS devices
Download SPYCLOPS app from your app store and open the app.
1. Select ‘Trial’ or register
with the app. *Note – The
username and password for
the app are not the same as
you set for the NVR during
password setup.
3.Select the 1st option in
the drop down menu ‘Add
Device by ID’
2.Touch the ‘+’ located at
the top right corner of your
cell phone or tablet
4. Cloud ID: Enter the 9 digit
number. This can be located
at the bottom right corner of
the monitor that your NVR is
connected to or in Network
Setup.
5. Descriptions: Enter a
name for your NVR. You
may name this NVR whatever you would like.
6. User Name: Enter in your
User Name (That was created on the NVR). If you
didn’t create a user name
during password setup, use
the default ‘admin’.
460 Walker St., Holly Hill, FL 32117 MetraHomeTheater.com
© COPYRIGHT 2017 METRA ELECTRONICS CORPORATION
© COPYRIGHT 2017 METRA ELECTRONICS CORPORATION
Page 7
SUR
VEILLANCE SYSTEMS by ETHEREAL
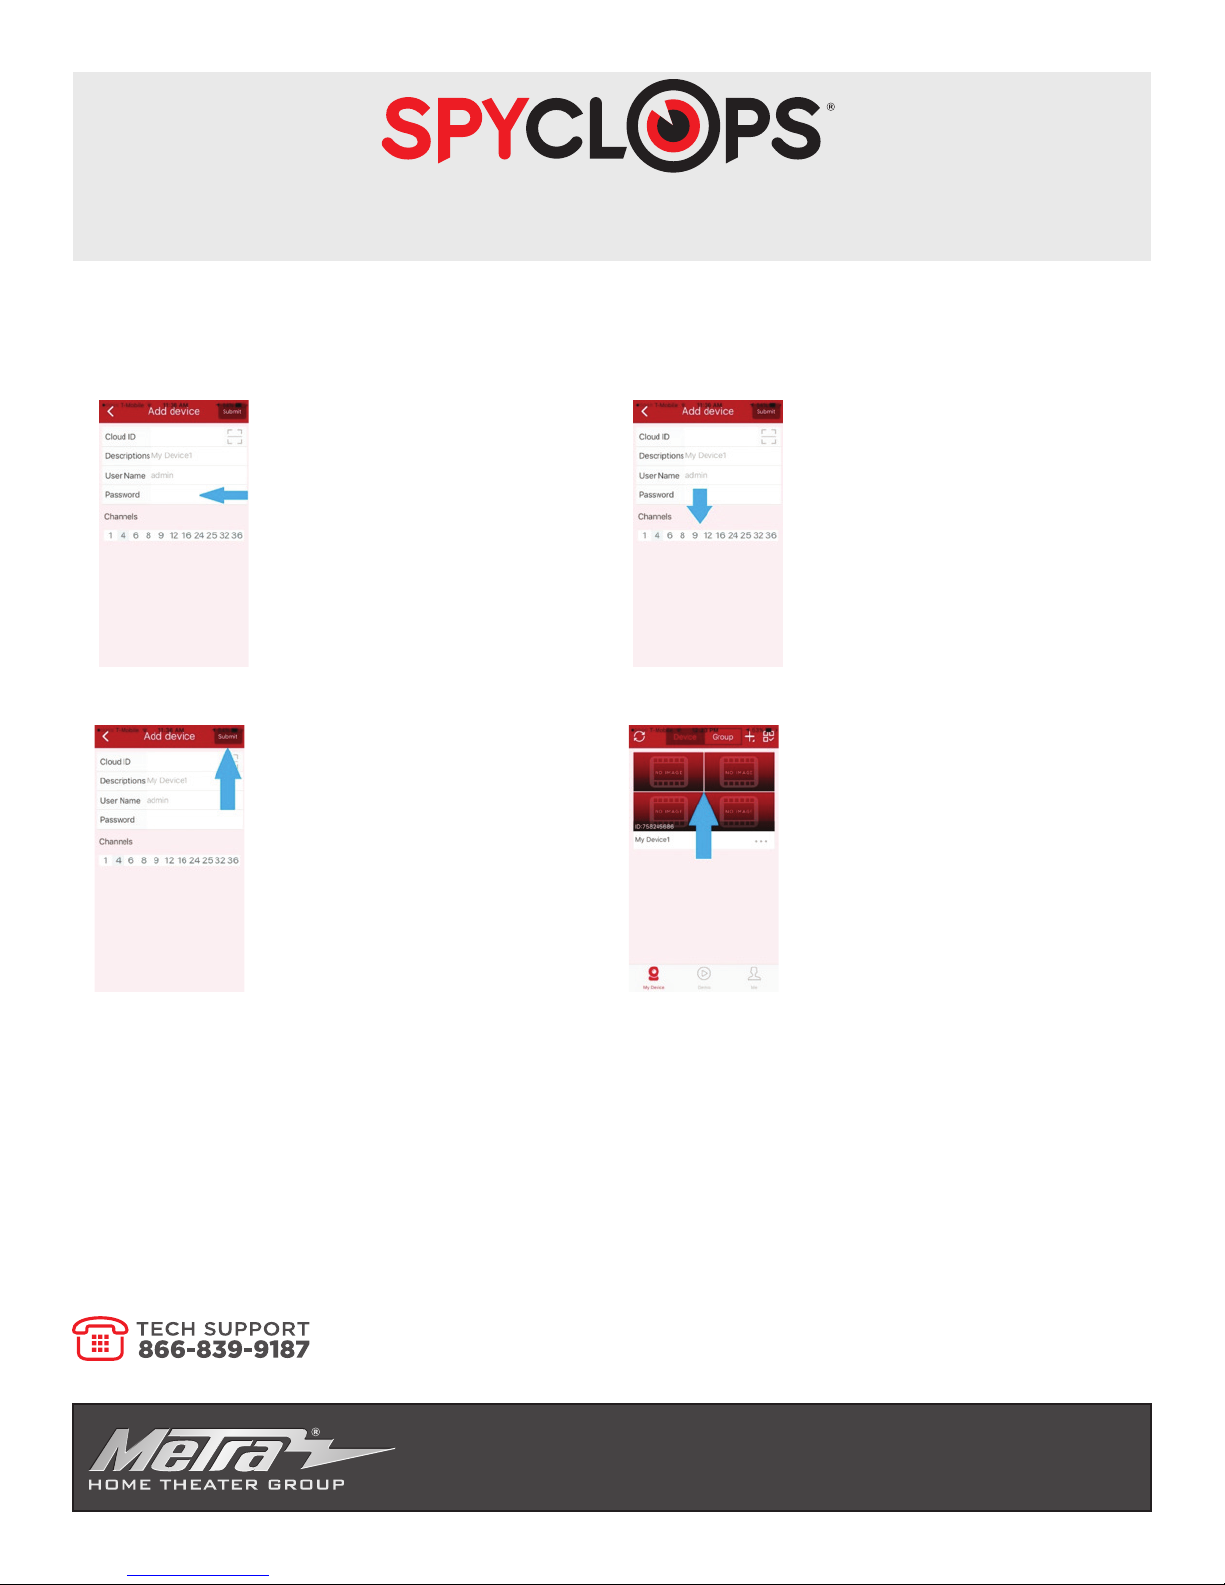
7. Password: Enter in your
Password (That was created on the NVR).
8.Select the number of
channels your NVR has. (4
or 8 channels)
9.Click ‘Submit’ 10.Once you have followed
the steps above, your mobile device is ready to remotely view your cameras.
Click anywhere within the
preview grid. This will open
your live streaming experience with your new Spy-
clops Surveillance System.
460 Walker St., Holly Hill, FL 32117 MetraHomeTheater.com
© COPYRIGHT 2017 METRA ELECTRONICS CORPORATION
 Loading...