

Spyard 960 Operating Instructions Manual
SPYARD® Spy Pen Camera Operating Instructions & Tips
Revision 5
For more information visit our online store at www.spypenyard.com or www.spyard.com
Customer Support: support@spypenyard.com or support@spyard.com
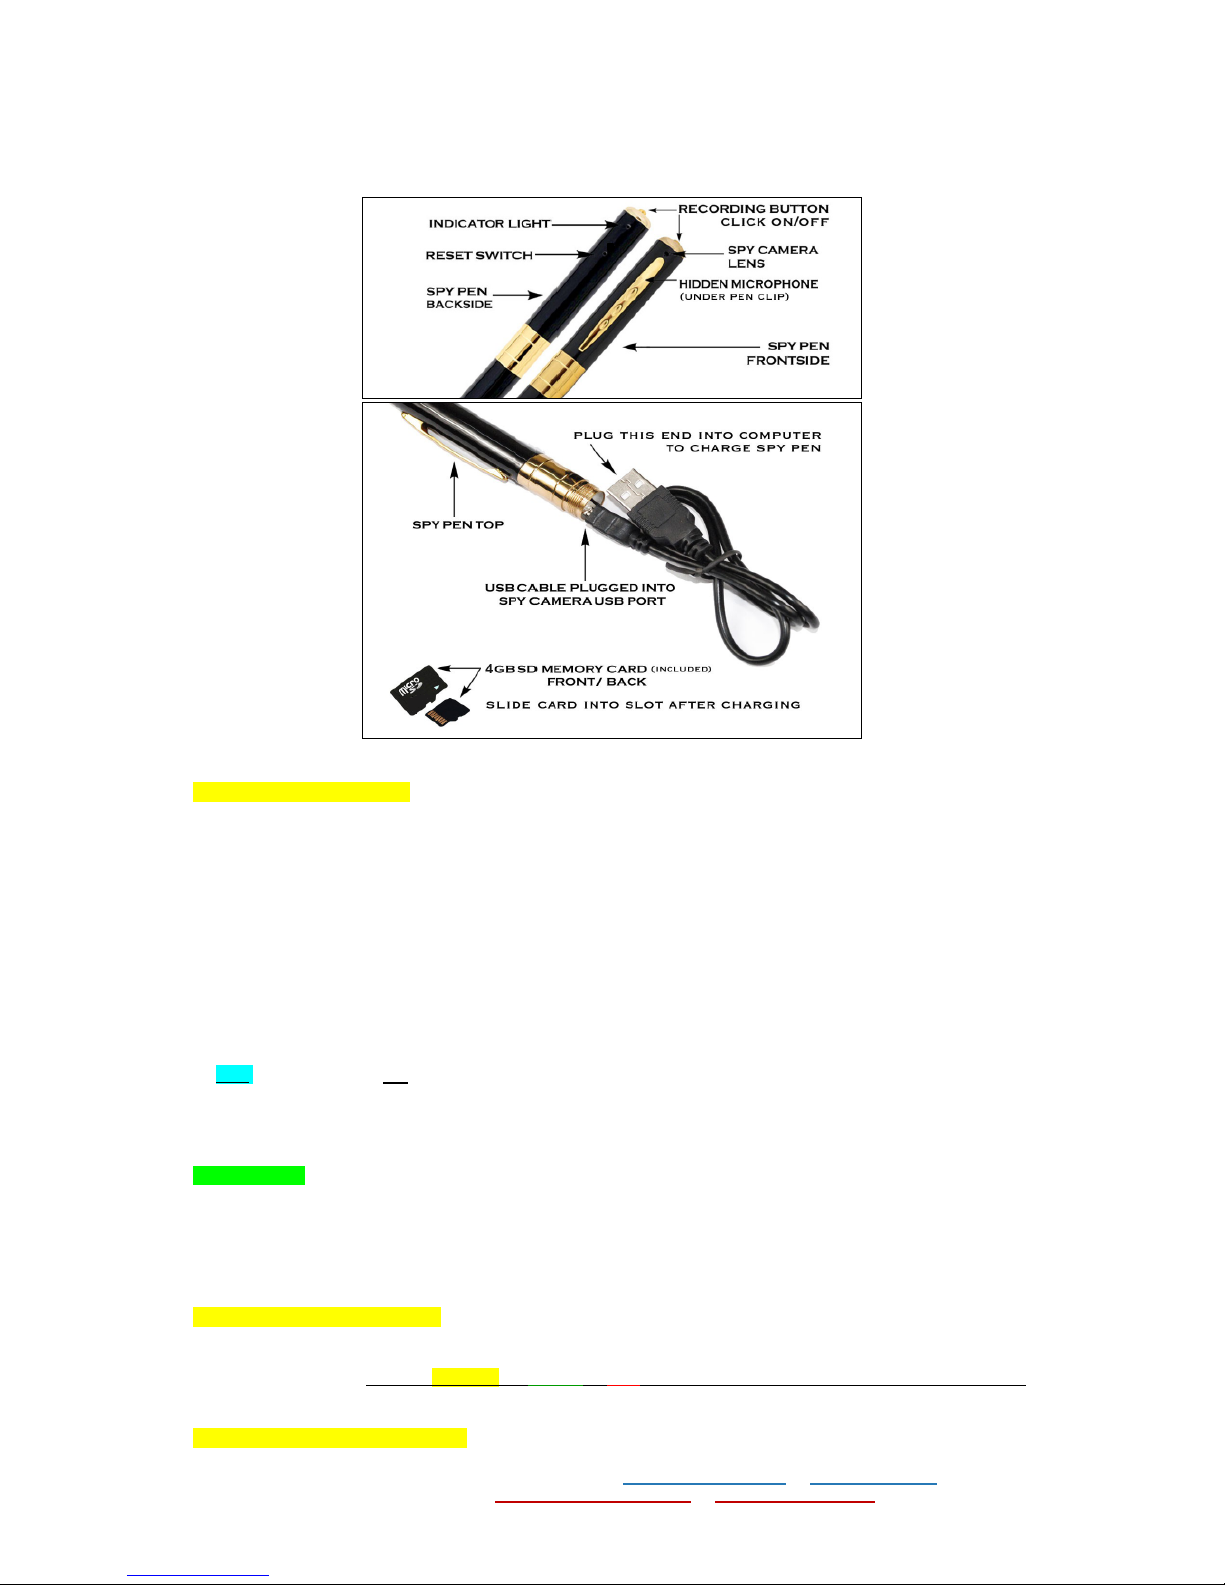
Get to Know Your SPYARD® Pen Components
STEP 1 – GETTING STARTED
Charging Your Cam Pen (First time only, charge for 1 – 2 hours, thereafter, it’s usually a 15‐minute recharge)
Plug the USB cable into the pen’s camera USB port and plug the other end into your computer USB port (see
illustration). During charge the red indicator light will flash slowly. First‐Time Charge 1-2 Hours!
Disconnect the pen from your USB cable/port once the charge is complete (SOLID RED indicator light).
A fully charged pen will have about 1.5 hours of recording time.
Recharging Your Cam Pen
Recharge your pen as needed — usually approximately 15 minutes.
Your pen’s indicator LED will blink slowly while recharging. Once indicator light turns SOLID RED, pen is fully charged.
Insert the Micro SD Memory Card
Gently, but firmly, slide the micro SD card into the slot adjacent to the USB cable slot (see illustration). You should feel
solid resistance when the SD card is fully inserted. About 1/8” of the SD card will show when inserted correctly. You are
now ready to use your pen.
Note: The Cam Pen will not work without the micro SD memory card. All recordings/photos are stored on the SD card.
In the case the pen does NOT display a solid LED during charge (i.e. continues to flash), remove the top cap part where
the On/Off button is and inspect the button. Likely the On/Off button keeps pressuring onto the On/Off switch beneath it.
Try charging then pen without the On/Off button cap back in place.
TIPS & TRICKS
Ensure the micro SD card is pushed in completely or it will not collect data during the recording session.
The indicator light will blink red to indicate an SD card error. (This typically means the SD card is inserted incorrectly).
Your SD card's memory capacity (4GB - 8GB ‐ 16GB - 32GB) will determine how much data can be recorded.
Your pen has a rechargeable lithium battery - can record up to 2 hours of recording time for videos, sound and photos.
Recharge your pen as needed (See “Recharging Your Cam Pen” instructions above).
STEP 2 – TURN ON THE SPY PEN
Power up your pen by pressing the On/Off Button (see illustration) for 3 seconds
To power off, press On/Off Button for 6 seconds.
Check indicator LED. A SOLID YELLOW (or GREEN or RED) LED means your pen is in READY STANDBY MODE.
READY STANDBY MODE means you can start taking videos/photos.
STEP 3 – START RECORDING VIDEO

SPYARD® Spy Pen Camera Operating Instructions & Tips
Revision 5
For more information visit our online store at www.spypenyard.com or www.spyard.com
Customer Support: support@spypenyard.com or support@spyard.com
From READY STANDBY MODE start recording by pressing the On/Off Button for 3 seconds.
The LED will slowly blink 3 times to indicate recording is about to begin then goes off when recording.
Note: The Cam Pen will automatically save files every 50 minutes till recording stops or battery runs out.
TIPS & TRICKS
Be sure that the camera lens (see illustration) remains unobstructed during the recording session.
To produce clean, clear recordings, hold the pen as steady as possible during recording sessions.
STEP 4 – ENDING A RECORDING SESSION
To stop recording, click the Off/On button once again. The file of the recording will be saved in the memory card before
the pen reverts back on READY STANDBY MODE.
TIPS & TRICKS
For multiple recordings, simply toggle between “record” and “stop” by clicking the On/Off button sequentially.
Once finished recording, remember to power OFF your pen by pressing the On/Off button for 6 seconds.
STEP 5 – TAKING A PHOTO
Take photos with one quick click to the On/Off button.
The LED will blink once to indicate it has captured a photo then pen returns to READY STANDBY MODE.
STEP 6 – TAKING AUDIO ONLY RECORDINGS
In READY STANDBY MODE, start audio recordings by clicking and hold the On/Off Button down for about 5 seconds.
The LED will change to solid RED to indicate it is now in voice (audio) only recording mode.
To stop, simply click the On/Off button and pen will go back to READY STANDBY mode.
NOTE: This feature is temporarily not available with your SPYARD pen.
STEP 7 – VIEWING YOUR RECORDINGS AND PHOTOS
Unscrew the top of the pen to expose the USB port (see illustration).
Connect the USB cable to the pen and connect the other end to your computer.
Wait for the pen’s SD memory card device icon to appear on your computer desktop.
Double click the removable drive icon to open and download video footage/photos files to your computer hard drive.
NOTE: It's best to view the photos and videos directly on your computer, not directly from the pen. Just copy the cam
pen’s files (photos, audio & videos) onto your computer before viewing.
STEP 8 – SETTING UP YOUR PEN CAMERA AS PC WEBCAM
With the pen turned on and in READY STANDBY MODE, connect your pen to your PC with USB cable.
Activate Web Cam mode. In this mode your camera can be used as a PC Web Cam. You can video chat with your
friend’s online, take photos, etc.
NOTE: Depending on your computer systems configuration, it may not detect the device as a camera but as a
removable disk drive. You will need to install the device drivers from the supplied mini compact disk or online.
STEP 9 – ERASING FILES FROM YOUR MICRO SD CARD
You can erase all videos and photos from your pen’s SD card by clicking on each video/photo and pressing the delete
key on your computer’s keyboard. Once all videos/photos are removed, your SD card is ready to record and take more
videos and photos.
Be sure you are looking at the files on your SD card (removable disc folder) and not those stored on your computer.
Use the same method to erase your computer files (video/audio/photo) or save them to review over and over.
STEP 10 – CHANGING THE DATE ON YOUR “CAM PEN”
Connect the USB cable to the USB port of the computer.
Open the removable disc folder and you will find the “time.txt” file.
Change the time and date in this “time.txt” file and save it quickly.
TIPS & TRICKS
If your pen is unresponsive and you have not charged it for a while, recharging your pen should remedy the problem. It
needs a charged‐up battery to handle recording videos easily.
Download your recordings and images onto your computer before viewing them. The data transfer speed from your pen
simply isn't fast enough to accommodate real time viewing; it will cause the footage to appear choppy.
Some computers may not have software programs that will easily play your recordings.
 Loading...