

Page 1

- 1/12 -
INSTRUCTION MANUAL
Model #: V-8506
CAUTION :
Read and follow all safety and operating instruction before first use of this product.
Before Using Your New Vacuum cleaner -----------------------------
1
Parts and Features ------------------------------------------------------- 2-3
Assembly Instruction ---------------------------------------------------- 4-6
Operation Instruction ----------------------------------------------------
7
Carpet Height Adjustment & Suction --------------------------------- 8-9
Attachments -------------------------------------------------------------- 10-11
Vacuum Cleaner Care --------------------------------------------------- 12-13
Filter change & Clean --------------------------------------------------- 14-15
Belt change & Agitator Clean ------------------------------------------ 16-18
Trouble Shooting ---------------------------------------------------------
19
Guarantee & & Important Safety Instruction ------------------------ 20
Important Safety Instruction ------------------------------------------- 21-22
Specification & Order Parts -------------------------------------------- 23
Please read this guide. It will help you assemble and operate your new vacuum
cleaner in safest and most effective way.
We suggest you record the model, serial numbers and purchase date below. The
serial numbers and model number are located on the silver rating plate on your
cleaner. For prompt and complete service information, always refer to these
numbers when inquiring about service.
Model No: ___________________________________
Serial No: ____________________________________
Date of Purchase: ______________________________
TABLE OF CONTENTS
BEFORE USING YOUR NEW CLEANER
Page 2
- 2/12 -
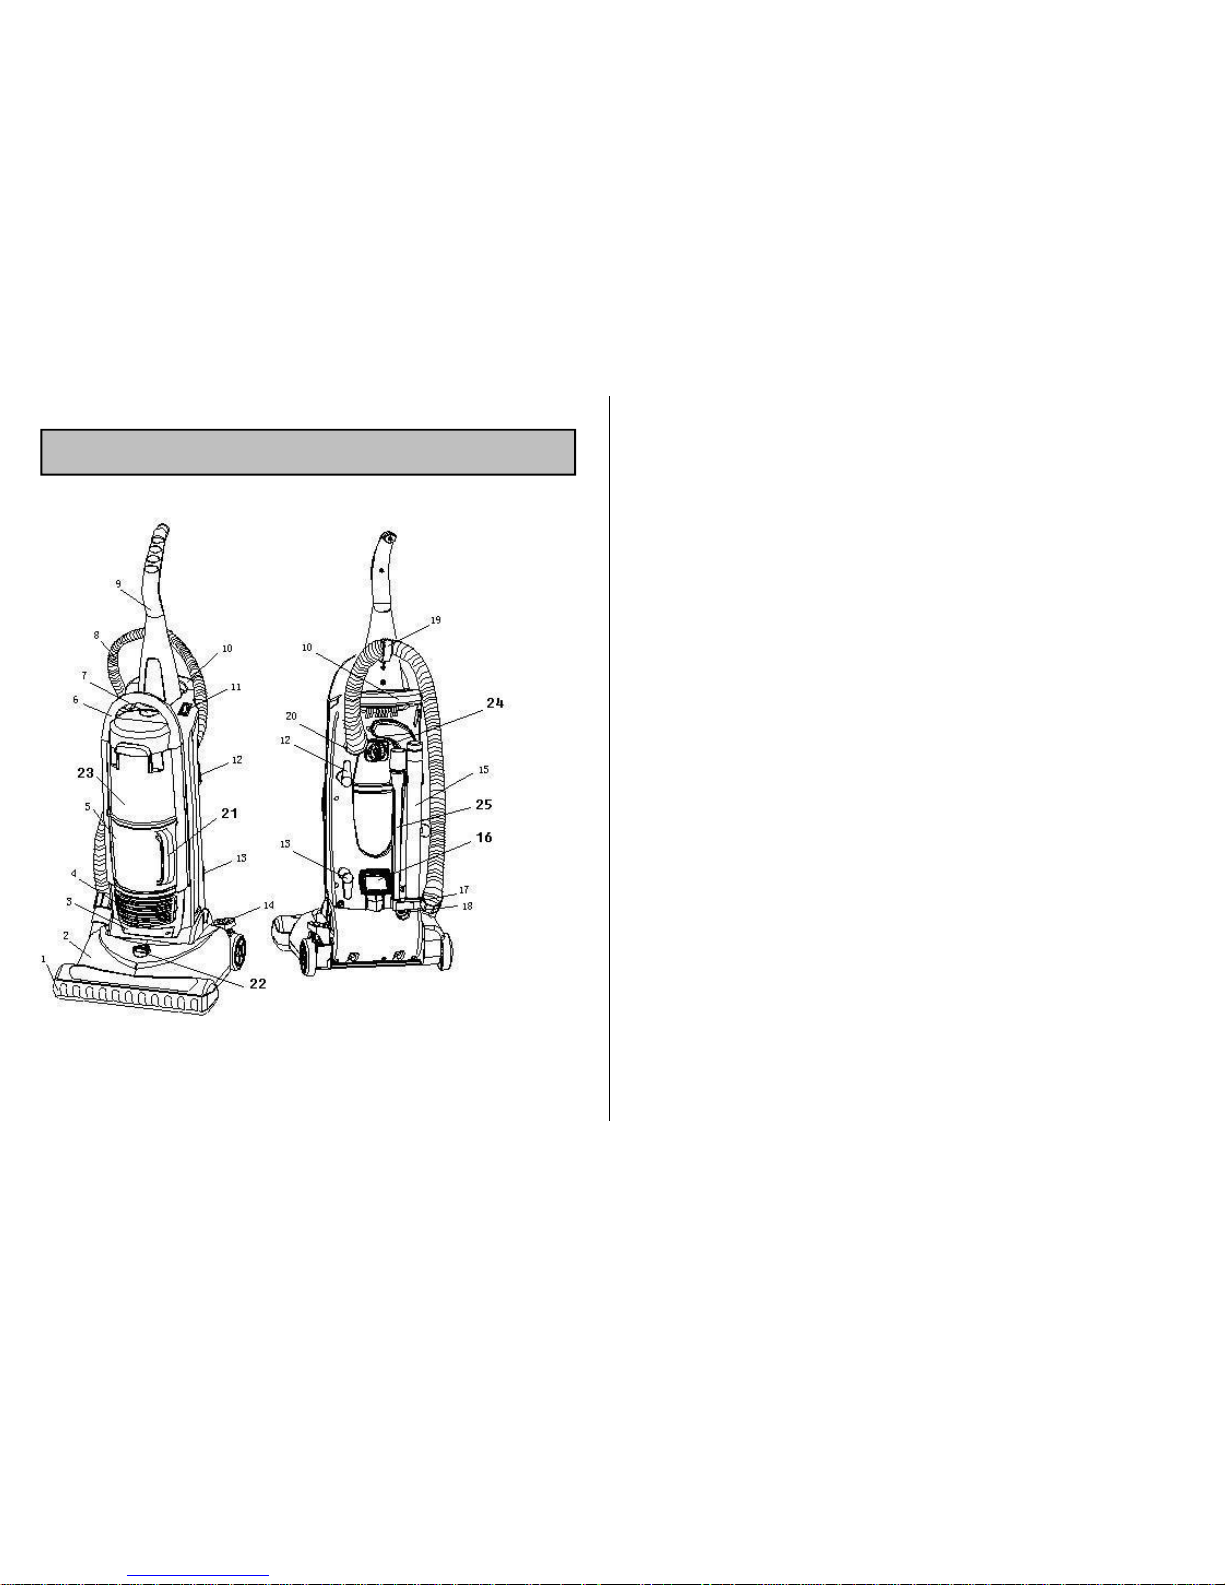
1 Furniture Guard
2 Nozzle Cover
3 Light Lens
4 Exhaust Filter
5 Dust Bin
6 Dust Bin Release Handle
7 Dust Bin Release button
8 Hose
9 Handle
10 Carry handle
11 On/Off Switch
12 Quick Release Cord Hook
13 Lower Cord Retainer
14 Handle Release Pedal
15 Wand
16 Dusting Brush
17 Tool Holder
18 Motor Protector
19 Hose Holder
20 Suction Inlet
21 Lower dust bin handle
22 Carpet Height Setting
23 Upper dust bin
24 Lock of upper dust bin
25 Crevice tool
ACCESSOIRES:
1.Wand 2. Crevice tool 3. Dusting brush
PARTS AND FEATURES
Page 3

- 3/12 -
Before assembling vacuum, use parts list to verify that you have received all the components of your new cleaner.
HANDLE ASSEMBLY
Handle screw holes
Handle
Insert the screw so it passes through the handle into the vacuum.
Begin to tighten the screw with your fingers.
It may be necessary to adjust the handle slightly.
Using a screwdriver tighten the screw.
CAUTION
Do not over tighten.
Over tightening could strip the screw holes.
Do not operate the cleaner without the screw in place.
CORD ASSEMBLY
Make sure the quick release cord hook is in the upright position.
Remove the wire tie from the power cord.
Lock the cord into place by forcing it into the locking notch on the body of the
quick release cord hook as shown.
This helps to keep the power cord away from under the vacuum cleaner agitator.
Wrap the power cord around the quick release cord hook and lower cord retainer.
Lock the power cord plug onto the power cord.
TRANSPORTING AND CARRYING CLEANER
To move cleaner from room to room, put handle in upright position, tilt cleaner
back on rear wheels and push forward. Cleaner can also be moved by using the
carrying handle located on the top of the dust bin.
ASSEMBLY INSTRUCTION
1 2 3
Page 4

- 4/12 -
Quick Release hook
Power cord
Lower Cord Retainer
ATTACHMENT ASSEMBLY
After the handle has been assembled to the body and the power cord has been
wrapped around the cord hooks, the attachment can be assembled.
1. Place the wand in the right slot of the tool holder.
2. Place the crevice tool in the left slot of the tool holder.
3. Place the dusting brush into the brush clip.
HOW TO START
1. Turn the quick release cord hook to either side and down to release the power
cord.
Quick release cord hook
2.
Release the power cord plug from the power cord and pull the cord off the
quick release cord hook. Check to be sure the power cord is still locked into
the locking notch in the quick release cord hook.
WARNING
Do not plug in if switch is in the ON position. Personal injury or damage
could result.
OPERATION INSTRUCTION
Page 5

- 5/12 -
To select a carpet height setting:
For maximum cleaning performance, the following carpet height settings are
recommended:
Lowest setting: for all types of carpet and hard surface flooring.
Note: If the cleaner is difficult to push, turn knob to the next higher setting.
Higher settings: for very deep pile carpet, where easier pushing effort is
desired, while maintaining good cleaning performance.
ATTENTION: Special care is required when vacuuming certain types of carpet
of floor covering. Always check the recommended cleaning instructions of the
carpet or floor covering before vacuuming.
To Select Suction Control:
Turn the Suction Control Knob to desire setting from MIN to MAX.
Release the handle by placing your foot on the pedal and pull back on the handle
until it releases from its upright position.
Pedal
To start the vacuum cleaner, step on the ON/OFF switch located on the back of
the vacuum. To stop the vacuum cleaner, step on the switch a second time.
CARPET
HEIGHT SETTING
AND SUCTION
RELEASING THE HANDLE
Page 6

- 6/12 -
WARNING
Do not place hands or feet underneath the brush unit at any time. When
using attachments, the agitator continues rotating.
Do not allow the cleaner to remain in just one place for a period as the
agitator may damage the floor surface.
Avoid placing the cleaner on furniture, the fringed area of rugs, deep pile
carpeting, or carpeted stairs. The ideal position for the cleaner when using
attachments is for the unit to be on a level area with the handle in the full
upright position.
TO USE ATTACHMENTS
Tools allow for cleaning surfaces above the floor and for reaching hard to clean
areas. The cleaner is ready for attachment use when handle is in upright position.
Use the hose and attachments for stair cleaning. Clean from bottom to top.
When using cleaning tools, the agitator will continue to rotate.
When using attachments, be careful not to overextend the hose length when
reaching. Trying to reach beyond the hose reach could cause the cleaner to tip
over.
If the dusting brush is being used and more distance is needed, the crevice tool
can be added to the wand, then the dusting brush can be added to the wand.
crevice tool
Dust brush
wand
TO STORE ATTACHMENTS
Return the hose to its position and the attachments to their holders.
CLEANING AREA
ATTACHMENT Furniture
Between
cushions
Drapes Stairs Walls
DUSTING
BRUSH
* * * *
CREVICE
TOOL
* * *
ATTACHMENTS
ATTACHMENT US
E CHART
Page 7

- 7/12 -
Always follow all safety precautions when cleaning and servicing the vacuum
cleaner.
Gather the power cord and wrap it loosely around the quick release cord hook
and lower cord retainer.
Store the cleaner in a dry, indoor area, on the floor with handle locked in the
upright position.
WARNING
Electrical shock and personal injury hazard
Wrapping the power cord too tightly puts stress on the cord and can cause
cord damage. A damaged cord is an
electrical shock hazard and could cause
personal injury or damage.
Unplug cord from wall outlet. Do not drip water on cleaner.
Clean exterior: using a clean, soft cloth that has been dipped in a solution of mild
liquid detergent and water, then wrung dry. Wipe dry after cleaning.
To reduce static electricity and dust build up, wipe outer surface of cleaner and
attachments.
Wash attachments in warm soapy water, rinse and air-dry. Do not clean in
dishwasher.
Do not use attachments if they are wet.
It is recommended that the dust bin be emptied before the dirt reaches the upper
dust bin or after every use if preferred.
CAUTION: Very fine materials, such as face powder or cornstarch, may seal the
filter and cause loss of suction. When using the cleaner for this type of dust,
empty the cup and clean the dust bin and clean the filters often.
How to empty:
Disconnect cleaner from electrical outlet. Press dust bin release button on the top
of the dust bin and pivot cup out.
Turn the lower dust bin counterclockwise to open for emptying.
To empty lower dust bin:
Empty the lower dust bin contents into a waste container.
To replace the lower dust bin
Place lower dust bin back into vacuum cleaner by inserting the bottom first and
tilt back with the lower dust bin handle. Then rotating lower dust bin handle
clockwise to align as shown open (for emptying) on the wall of the dust bin.
Open (for emptying)
Close(for usage)
VACUUM CLEANER CARE
VACUUM STORAGE
CLEANING EXTERIOR AND ATTACHMENT
DUST BIN CLEANING
Page 8

- 8/12 -
HEPA FILTER
The filter cannot be washed, or it will lose its dust trapping ability.
Check HEPA filter frequently and clean when dirty.
1. Release the lower dust bin before clean the HEPA filter.
2. Twist the filter counterclockwise to release it (see photo below).
3. Clean HEPA filter by using a soft brush and gently tapping over a
trash container.
4. Replace the filter assembly in the dust bin lid, twisting clockwise to
lock into position.
5. Replace the lower dust bin.
HEPA filter can be cycle used, but it should be replaced if necessary.
To remove the upper dust bin for cleaning, unlock the switch from the back
of the dust bin and pull the dust bin forward.
EXHAUST FILTER
The filter cannot be washed, or it will lose its dust trapping ability.
Check exhaust filter frequently and clean when dirty.
Press inward on each side of exhaust filter cover and pull out to remove from
vacuum cleaner (see photo below).
Remove the exhaust filter.
Clean exhaust filter by gently tapping over a trash container.
Replace the exhaust filter, carefully positioning it so that it fits into the motor
cover. The grey edge of the filter should be facing away from the operator.
Push only on filter frame, not on filter itself.
Replace the exhaust filter cover by placing tabs in slots and pushing in until
cover snaps into place.
To remove the upper dust bin for cleaning, unlock the switch from the back of
the dust bin.
FILTER CHANGING /CLEANING
Page 9

- 9/12 -
The belt on your vacuum cleaner causes the agitator to rotate and is important
for the effective operation of the cleaner. The belt is located under the bottom
plate of the cleaner and should be checked from time to time to be sure it is in
good condition.
To remove nozzle cover:
Disconnect cleaner from electrical outlet.
Release the handle by placing your foot on the pedal and pull back on the handle
until it releases from its upright position, then turn over the cleaner and place on
the floor.
Remove the 6 screws located at the nozzle base by using Phillips screwdriver.
Pull and release the nozzle cover from the vacuum cleaner.
To protect the nozzle cover, always place paper under the floor surface any time
the nozzle base is removed.
Carefully remove any residue the may exist in the belt area.
Always unplug the cleaner before cleaning the brush area as agitator may
suddenly restart.
Failure to do so could result in electrical shock or personal injury.
To remove belt/clean agitator:
Position hands on the agitator. If the belt is still attached to the agitator, there will
be tension on it.
Carefully lift the left end of the agitator and then lift the right end.
Remove the worn or broken belt from the motor driver shaft and discard used
belt.
Be careful when removing the agitator as the belt tension maybe high.
Failure to do so could result in personal injury from the agitator releasing
quickly and snapping away.
Remove the agitator to check for string and hair build-up.
NOTE: in order to keep cleaning efficiency high and to prevent damage to your
vacuum, the agitator must be cleaned every time the belt is changed.
Cut off any carpet pile, hair or lint entangled around the agitator and remove any
string or debris located near the end caps.
When agitator brushes are worn, the agitator should be replaced.
BELT CHANGING AND AGITATOR CLEANING
Page 10

- 10/12 -
Agitator
Nozzle base
Belt
Installing new belt:
Loop the new belt on the motor shaft; loop the other end of the belt on the belt
pulley on the agitator.
Insert agitator through belt and place belt in belt guide on agitator.
Should the agitator shield become dislodged while replacing the belt or the
agitator, reposition it noting the placement of its belt guide.
Securing agitator:
Grasp agitator firmly and fit it into position by first sliding end opposite the belt
into the rectangular slot on side of cleaner.
Pull other side of agitator into place. Turn agitator making sure the belt turns
freely and is not pinched between agitator and bottom of cleaner.
Replacing nozzle cover:
Turn over the cleaner and reposition cover. Turn to the bottom of the cleaner and
tighten screws securely.
PROBLEM POSSIBLE CAUSE POSSIBLE
Cleaner won’t run
1. Unplugged at wall outlet.
2. Tripped circuit breaker/blown fuse
at household service panel.
3. On/off switch not turned on.
4. Thermal protector tripped.
1. Plug in firmly, push on/off switch
to on.
2. Reset circuit breaker or replace
fuse.
3. Push on. off switch to on.
4. Reset thermal protector.
Poor job of dirt
pick-up
1. Full or clogged dust bin.
2. Wrong pile height setting.
3. Clogged nozzle or dust bin port.
4. Clogged hose.
5. Hole in hose.
6. Broken/misplaced belt.
7. Hose not inserted fully.
8. Motor protection system activated.
9. Dirty filters.
10. Sliders not rotating.
1. Clean dust bin.
2. Adjust setting.
3. Check clog and remove large
debris that has become lodged in
the airway.
4. Check for clogs.
5. Replace hose.
6. Replace/fix belt.
7. Insert hose fully.
8. Check for clogs.
9. Clean/change filters.
10. Remove obstructions.
Cleaner picks up
moveable rugs or
pushes too hard
1. Wrong pile height setting. 1. Adjust setting.
Agitator does not turn
1. Broken belt.
2. Belt installed incorrectly.
1. Replace belt.
2. Check belt changing and agitator
cleaning.
Air flow restricted and
it’s making wired
noise
1. Attachment used restricts airflow.
2. New carpet fuzz clogged air path.
1. Check attachment.
2. Remove clog in the base and clean
the hose.
TROUBLESHOOTING
Page 11

- 11/12 -
Your Guarantee
If this product is found to be faulty as a result of faulty materials or workmanship within one year
from date of purchase, it will be repaired free of charge.
This guarantee is subject to the following terms:
Sunpentown must be notified of the fault.
Proof of purchase must be presented to Sunpentown’s nominated representative.
The warranty will be void if the product if modified, misused or repaired by an
unauthorized person.
The warranty after repair will not be extended beyond the original one-year period.
All replacement parts will be new or reconditioned.
Parts, which are replaced, become the property of Sunpentown.
The warranty applies for the use of the product in the USA only.
What is NOT COVERED:
Warranty does not include freight charges.
Incidental or consequential damage caused by possible defects with this product.
Damage to product caused by improper power supply voltage, accident, fire, floods or
acts of nature.
Failure of product resulting from unauthorized modifications to the product.
Improper installation or failure to perform the necessary maintenance.
This GUARANTEE is in addition to your Statutory Rights
Sunpentown Int’l Inc.
21415 Baker Parkway, City of Industry, CA 91789-5236
Tel: 909-468-5288 · Fax: 909-468-5279
service@sunpentown.com www.sunpentown.com
WARNING:
Your safety is important to us. To reduce the risk of fire, electrical shock,
injury to person or damage when using your vacuum cleaner, follow basic
safety precautions including the following:
1. Read this manual before assembling or use your new vacuum cleaner.
2. Use your cleaner only as described in this manual .use only with sale
recommended attachments.
3. To reduce the risk of electric shock – Do not use outdoors or on wet
surfaces.
4. Disconnect electrical supply before service or cleaning out brush area.
Failure to do so could result in electrical shock or brush suddenly starting.
5. Always turn cleaner off before unplugging.
6. Do not unplug by pulling on cord. To unplug, grasp the plug, not the cord.
7. Do not use with damaged cord or plug. If cleaner is not working as it should,
has been dropped, damaged, left outdoors, or dropped into water, return it to
a sale service center /department.
8. Do not pull or carry by cord, use cord as a handle, close a door on cord, or
pull cord around sharp edges or corners. Do not run appliance over cord.
Keep cord away from heated surfaces.
9. Do not leave vacuum cleaner when plugged in. Unplug from outlet when not
in use and before servicing.
10. Do not allow to be used as a toy. Close attention is necessary when used by
or near children.
11. Do not handle plug or vacuum cleaner with wet hands.
12. Do not put any objects into openings.
13. Do not use with any opening blocked, Keep free of dust, lint, hair, and
anything that may reduce airflow.
14. Keep hair, loose clothing, fingers, and all parts of body away from openings
and motor driven brush.
Page 12

- 12/12 -
15. Do not use cleaner without dustbin and /or filters in place. It will damage the
motor
16. Always clean the dust after vacuuming carpet cleaners or freshener, powders
and fine dust. These products clog the filter, reduce airflow and can cause
damage to the cleaner. Failure to clean the dust could cause permanent
damage to the cleaner.
17. Do not use cleaner to pick up sharp hard objects, small toys, pins, paper
clips, etc. they may damage the cleaner or dust bin.
18. Do not use cleaner to pick up anything that is burning or smoking, such as
hot coals, cigarette, or matches.
19. Do not use cleaner to pick up flammable or combustible liquids (cleaning
fluid, gasoline, perfumes, etc.) or use in areas where they may be present.
The fumes from these substances can create a fire hazard or explosion.
20. Use extra care when cleaning on stairs. Do not put on chairs, table, etc. Keep
on floor.
21. You are responsible for making sure that your vacuum cleaner is not used by
anyone unable to operate it properly.
22. If the supply cord is damaged, please return it to the manufacturer for
replacement.
23. Cleaning or maintaining the appliance, such as replacing the driving belt.
24. Disconnect the appliance from the supply before opening.
25. Don’t suck up the water.
Model No.
V-8506
Power Consumption
1,200 Watt s
Horse Power
1.6
Amperage
10
Voltage/Frequency
120V / 60Hz
Dust Capacity
8.5 Liters
Hose length
3.1 ft. (extended)
Cord Length
8 Meters
Filter (Stage)
6
Dimension
15 in x 15 in x 42.5 in
Weight
18.7Lbs.
IMPORTANT
Do not return to the store. For assembly problems or questions, for replacement
of broken or missing items, or to order replacement parts and accessories to be
shipped direct to you contact:
SPTusa Customer Service toll free at 1-800-330-0388.
SPECIFICATIONS
 Loading...