

SPT SD-2201S Instruction Manual
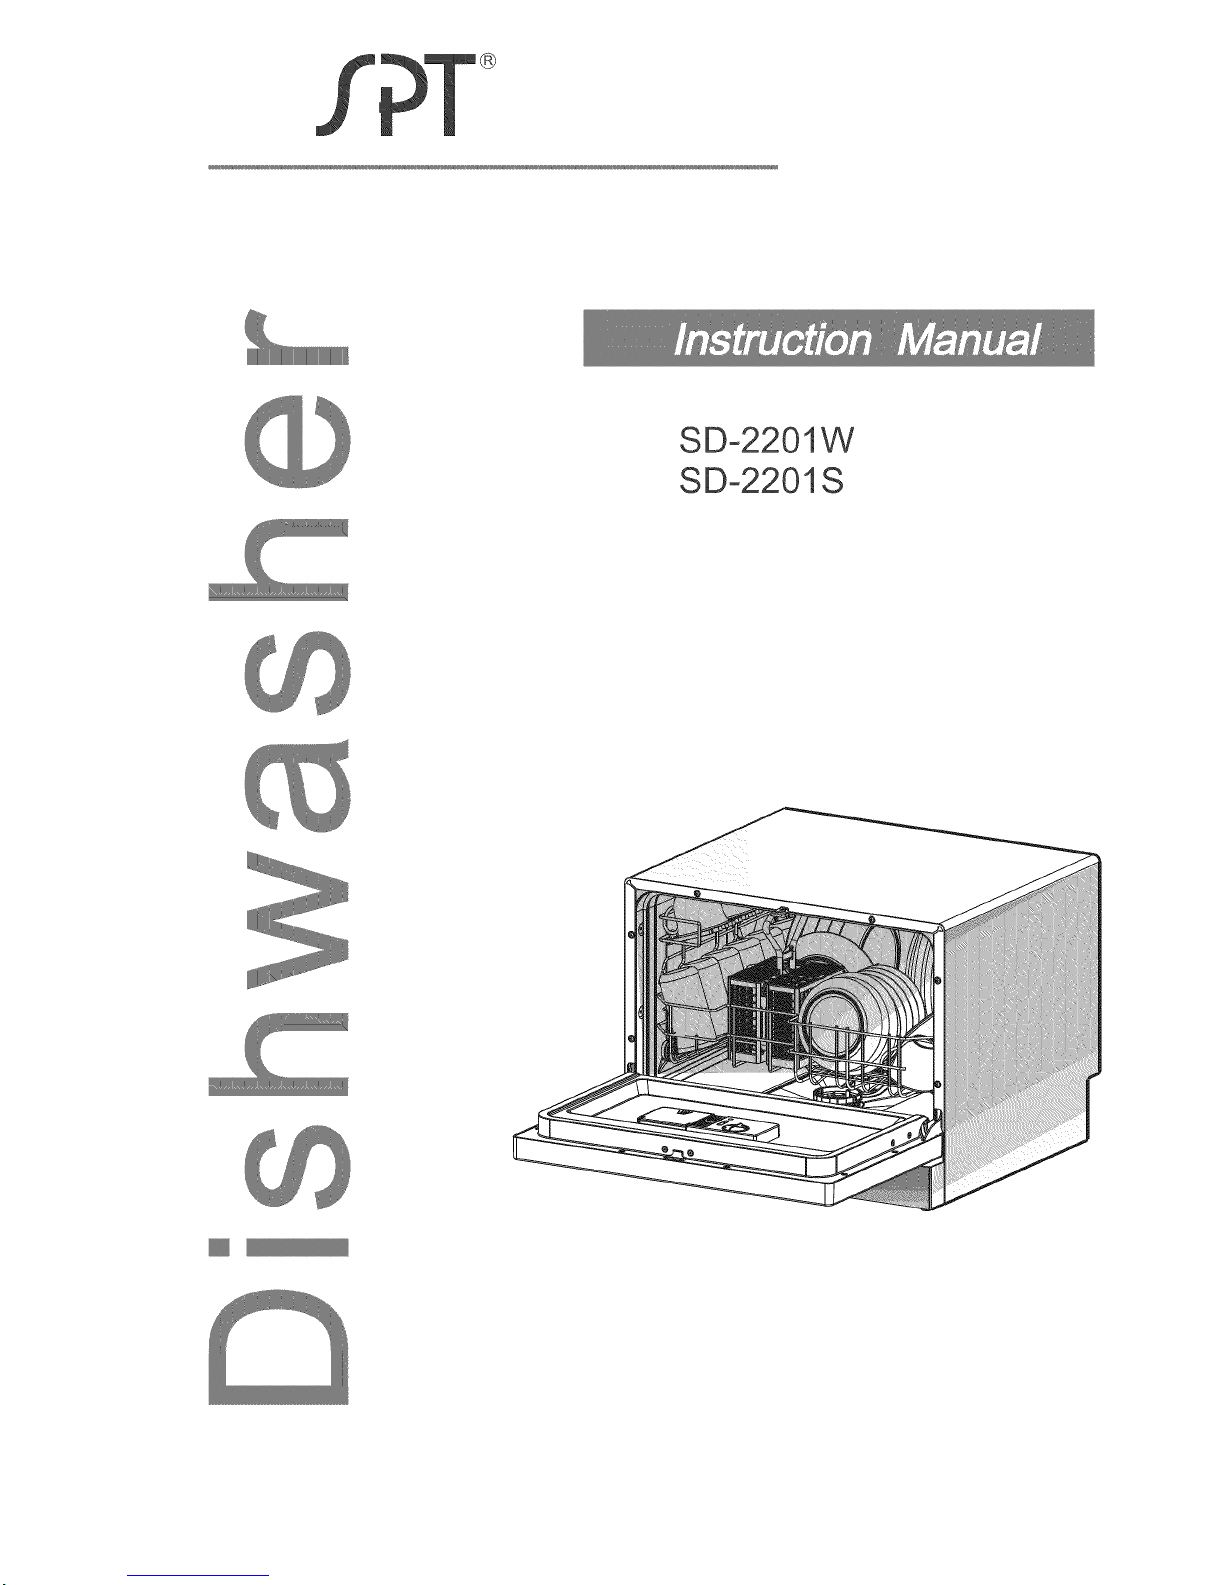
SD-2201W
SD-2201S
.... Read this Manua/
Safety information
Grounding Instruction ............................ 1
Safety Instructions ................................. 1
Dear Customer,
Please read this manual thoroughly before use.
Understanding the unit will help you use and maintain
the dishwasher properly.
Please keep in a safe place for future reference.
Pass it on to any subsequent owner of the appliance.
For your safety, the information detailed in this manual
should be followed. Improper use/handling can cause
serious damage to the appliance and/or to the user,
including but not limited to fire, explosion, electric shock,
resulting in personal injury or death.
for Service
Review the section on Troubleshooting Tips = it may
help you solve some common issues.
If you can not resolve the troubles by yourself,
please ask for the help of professional technicians.
Parts ldentificatien
Front & Back View ................................. 2
Accessories ........................................... 2
Unpacking ............................................. 3
Positioning ............................................. 3
Electrical Requirements ........................ 3
Connecting the Dishwasher ............... 4=5
Disconnecting the Dishwasher .............. 5
Operating lnstruetiens
Checklist ................................................ 6
Control Panel ......................................... 6
Loading the Dishwasher ........................ 7
Cutlery Basket ....................................... 8
Detergent Dispenser .............................. 9
Rinse Aid Dispenser ............................ 10
Wash Cycle Table ................................ 11
Starting a Wash Cycle ......................... 11
Changing the Wash Program .............. 12
Forgot to Add a Dish? .......................... 12
At the End of the Wash Cycle .............. 12
Filter System ....................................... 13
Filter Assembly .................................... 13
Cleaning the Filters ............................. 13
Cleaning the Dishwasher .................... 14
Cleaning the Door ............................... 14
Cleaning the Spray Arm ...................... 14
Protect Against Freezing ..................... 14
Keeping Your Dishwasher in Shape .... 15
....._!!!!!!!!!!!_:::_:_:_:_:_:_:_:_:_:_:_:_...... NOTE"
The manufacturer, following a policy of constant
development and updating of the product, may
make modifications without giving prior notice.
Trou bJesh ootin g ....................... 16=17
Error lndieatiens ........................... 17
Technical lnfermatien ................. 18

GROUNDING INSTRUCTIONS
[] This appliance must be grounded. In the event of a
malfunction or breakdown, grounding wilt reduce
the risk of electric shock by providing a path of
least resistance of electric current. This appliance
is equipped with a cord having an equipment-
grounding conductor and a grounding plug.
[] The plug must be plugged into an appropriate outlet
that is installed and grounded in accordance with
all local codes and ordinances.
WARNING! PROPER USE
[] Use this appliance only for its intended purpose
as described in this manual.
[] This appliance is not intended for use by children.
[] Do not abuse, sit on, or stand on the door or dish
rack of the dishwasher.
[] Do not touch the heating element during or
immediately after use.
(This instruction is only applicable to machines
with a visibal heating element.)
[] Do not operate your dishwasher unless all
enclosure panels are properly in place. Open
the door very carefully if the dishwasher is
operating, there is a risk of water squirting out.
[] Do not place any heavy objects or stand on the
door when it is open. The appliance could tip
forward.
[] When loading items to be washed:
1) Locate sharp items so that they are not likely
to damage the door seal;
2) Warning: Knives and other utensils with
sharp points must be loaded in the basket
with their points down or placed in a
horizontal position.
[] Check that the detergent receptible is empty
after completion of the wash cycle.
[] Do not wash plastic items unless they are marked
dishwasher safe or the equivalent. For plastic items
not marked as dishwasher safe, refer to the
manufacturer's recommendations.
[] Use only detergent and rinse additives
designed for an automatic dishwasher.
[] Never use soap, laundry detergent, or hand
washing detergent in your dishwasher. Keep
these products out of the reach of children.
WARNING!
[] Improper connection of the equipment-grounding
conductor can result in a risk of electric shock.
[] Check with a qualified electrician or service
representative if you are in doubt whether the
appliance is properly grounded. Do not modify the
plug provided with the appliance; If it does not fit the
outlet. Have a proper outlet installed by a qualified
electrician.
[] Keep children away from detergent and rinse aid, keep
children away from the open door of the dishwasher,
there could still be some detergent left inside.
[] This appliance is not intended for use by persons
(including children) with reduced physical, sensory or
mental capabilities, or lack of experience and knowledge,
unless they have been given supervision or instruction
concerning use of the appliance by a person responsible
for their safety.
[] Children should be supervised to ensure that they do
not play with the appliance.
[] Dishwasher detergents are strongly alkaline, they
can be extremely dangerous if swallowed. Avoid
contact with skin and eyes and keep children away
from the dishwasher when the door is open.
[] The door should not be left in the open position
since this could present a tripping hazard.
[] If the supply cord is damaged, it must be replaced
by the manufacturer or its service agent or a
similarly qualified person in order to avoid a
hazard.
[] Remove the door before discarding an old dishwasher.
[] Please dispose of packing materials properly.
[] Use the dishwasher only for its intended function.
[] During installation, the power supply must not
be excessively or dangerously bent or flattened_
Do not tamper with controls.
[] Use new set of hoses to connect this appliance to the
water mains. Do not reuse old hose sets.
[] The maximum number of place settings to be
washed is 6.
[] The maximum permissible inlet water pressure is
1Mpa.
[] The minimum permissible inlet water pressure is
0.04Mpa.
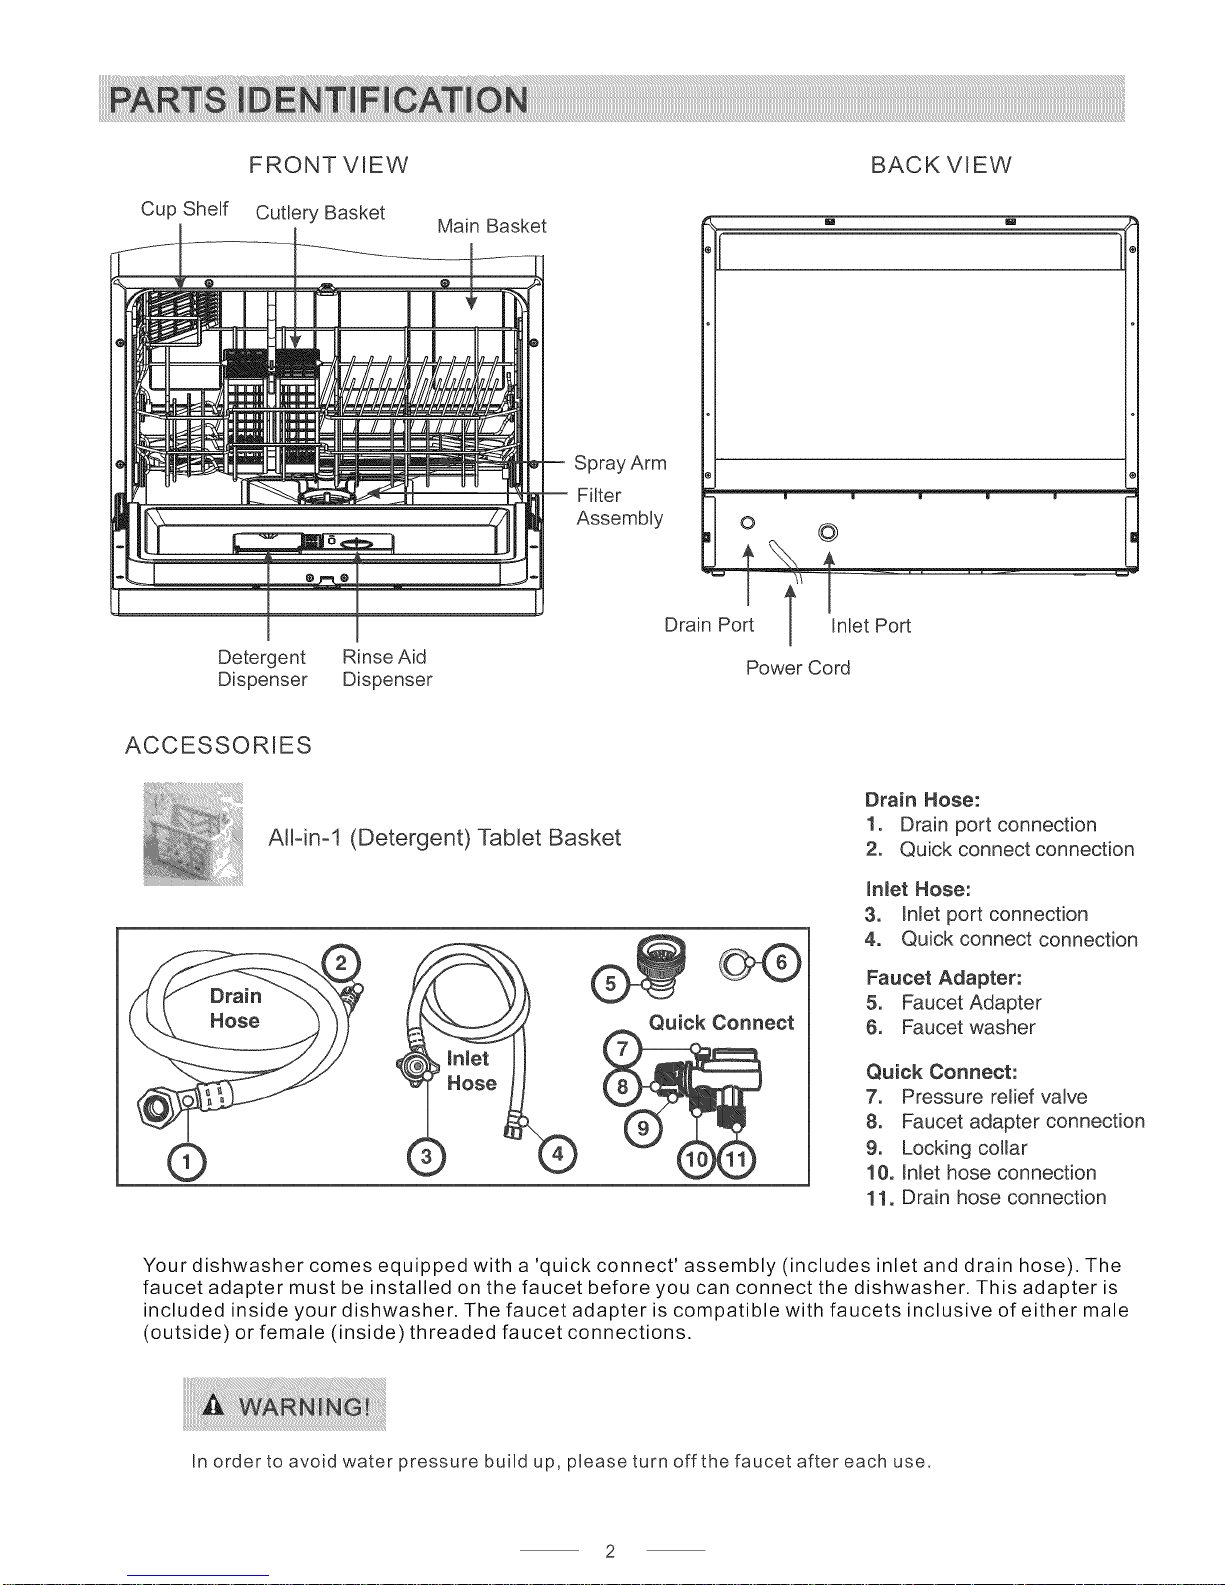
FRONT VIEW BACK VIEW
Cup Shelf Cutlery Basket
Main Basket
_ ,F I :i"°
.1 _ M-
Detergent Rinse Aid
Dispenser Dispenser
ACCESSORIES
iii_i!ii!i_
All-in-1 (Detergent) Tablet Basket
•
Spray Arm
10 O
Drain Port / Inlet Port
Power Cord
Drain Hose:
1. Drain port connection
2. Quick connect connection
Inlet Hose:
3. Inlet port connection
4. Quick connect connection
Faucet Adapter:
5. Faucet Adapter
6. Faucet washer
Quick Connect:
7. Pressure relief valve
8. Faucet adapter connection
d)
Your dishwasher comes equipped with a 'quick connect' assembly (includes inlet and drain hose). The
faucet adapter must be installed on the faucet before you can connect the dishwasher. This adapter is
included inside your dishwasher. The faucet adapter is compatible with faucets inclusive of either male
(outside) or female (inside) threaded faucet connections.
In order to avoid water pressure build up, please turn off the faucet after each use.
9. Locking collar
10. Inlet hose connection
11. Drain hose connection
ttenfion:
The installation of the pipes
and electrical equipments
should be done by professionals,
Electrical Shock Hazard
Disconnect electrical power before
installing dishwasher.
Failure to do so can result in death
or electrical shock.
Unpacking
Have at least two people to move and install the dishwasher to prevent personal injuries.
Remove all packaging materials: shipping tape, foam pieces, etc. before use. Do not use
sharp instruments, rubbing alcohol, flammable fluids or abrasive cleaners. Check and
make sure all parts necessary for installation are included. If parts are missing, please
contact Sunpentown at 1-800-330-0388. The dishwasher must be placed on a level and
flat surface that can support the weight when the dishwasher is fully loaded.
Positioning
This dishwasher is designed for countertop installation. The dishwasher is equipped
with water supply and drain hoses that can be positioned to the right or the left
to facilitate proper installation. Make sure water supply/faucet connection is within
reach of the inlet and drain hose assembly (5 ft).
E|ectrical Requirements
Read all safety precautions listed at the beginning of the manual. Make sure the
electrical outlet is within reach of the power supply cord (4.5 ft). It is recommended
to not use receptacles that can be turned on/off by a switch or pull chain.
Refer to the rating label and be sure the voltage and frequency corresponds to the
power supply. Use a dedicated circuit that is rated for l 0 amps.
The dishwasher is equipped with a power supply cord with a 3-prong grounding plug.
The cord must be plugged into a mating 3-pronged wall receptacle. If a mating wall
receptacle is not available, it is the personal responsibility of the customer to have a
properly grounded, 3-pring wall receptacle installed by a certified electrian.
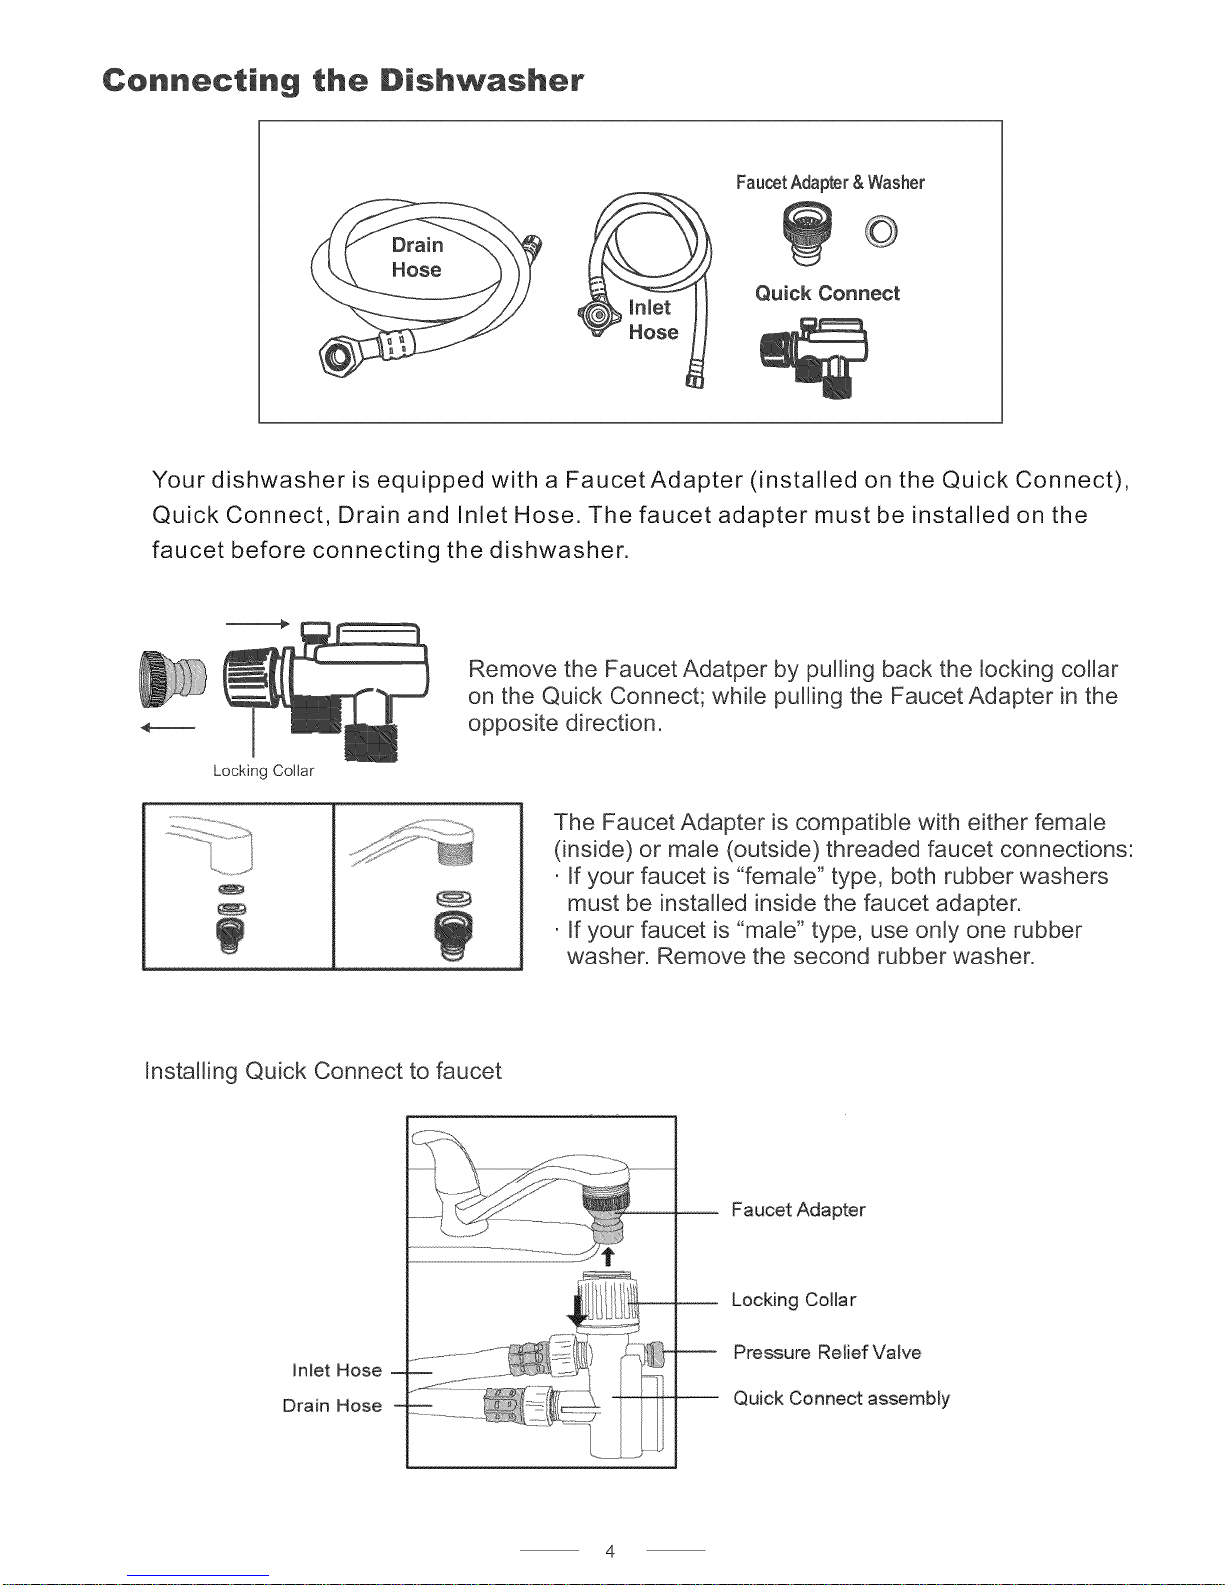
Connecting the Dishwasher
FaucetAdapter&Washer
Quick Connect
Hose
Your dishwasher is equipped with a Faucet Adapter (installed on the Quick Connect),
Quick Connect, Drain and Inlet Hose. The faucet adapter must be installed on the
faucet before connecting the dishwasher.
Remove the Faucet Adatper by pulling back the locking collar
on the Quick Connect; while pulling the Faucet Adapter in the
opposite direction.
Locking Collar
Installing Quick Connect to faucet
The Faucet Adapter is compatible with either female
(inside) or male (outside) threaded faucet connections:
• If your faucet is "female" type, both rubber washers
must be installed inside the faucet adapter.
• If your faucet is "male" type, use only one rubber
washer. Remove the second rubber washer.
Faucet Adapter
Inlet Hose
Drain Hose
Locking Collar
Pressure Relief Valve
Quick Connect assembly
1. Screw the Faucet Adapter onto (or into) the faucet. Check for leaks (use Teflon or plumbers
tape to eliminate any leaks if necessary).
2. Connect the six-sided connection of the Drain Hose to the dishwasher's drain port, located
on back of the dishwasher cabinet. To avoid damage to threads, do not over-tighten.
3. Connect the star-shaped connection of the Inlet Hose to the dishwasher's inlet port, located
on the back of the dishwasher cabinet. Do not over-tighten.
4. Connect the circular connection of the Drain Hose to the longer (bottom) male connection
on the Quick Connect.
5. Connect the circular connection of the Inlet Hose to the shorter (top) male connection on the
Quick Connect.
6. Attach the Quick Connect assembly onto the Faucet Adapter - pull down on the locking collar,
while pushing the Quick Connect assembly upwards onto the Faucet Adapter.
7. Release the locking collar when the Quick Connect Assembly snaps onto the Faucet Adapter.
Verify connection is secure.
8. Slowly turn on the water line and check for any signs of water leak at all connections. If leaks
are located, immediately turn off the water supply and repair hose connections.
• Once you turn on the water supply (even if turned off immediately), the inlet hose will be pressurized.
• To relieve the water pressure (make sure water supply is turned off): press and hold the red
pressure relief button on the Quick Connect until the flow of water stops.
WARN|NG
FAILURE TO RELIEVE WATER PRESSURE, BEFORE DISCONNECTING THE QUICK-CONNECT
FROM THE FAUCET, WILL RESULT IN BACK-PRESSURE OVER-SPRAY. THE TEMPERATURE
OF INCOMING WATER CAN BE VERY HOT, AND BACK-PRESSURE OVER-SPRAY CAN CAUSE
SEVERE BURNS AND/OR SCALDING.
DO NOT LET CHILDREN DISCONNECT THE DISHWASHER; CLOSE SUPERVISION OF
CHILDREN IS ALWAYS IMPORTANT AROUND APPLIANCES.
NOTE:
Hard water conditions will adversely affect the washing performance of your dishwasher. Hard
water conditions will also contribute to 'lime' (white film substance) deposits and/or 'scaling' on the
stainless steel surface of the dishwasher tub and heater element, located in the sump underneath
the removable filter screen. To assist in minimizing these conditions, it is recommended to
periodically operate/rinse the inside of the dishwasher (empty) using 1 cup of white vinegar at least
once a week.
Disconnecting the Dishwasher
1. Turn off water supply at the faucet.
2. Disconnect the power supply cord.
3. Release water pressure inside the inlet hose. Press and hold the red Pressure Relief Valve until
the flow of water stops.
4. Disconnect the Quick Connect assembly by pulling down on the locking collar and release from
Faucet Adapter.
 Loading...