

Page 1
MINI KEGERATOR
MODEL: BD-0538
INSTRUCTION MANUAL
Please read the instruction manual carefully before installing and operating the
beer cooler, and keep it for future reference.
Page 2

INTRODUCTION
This is a household beer cooler, equipped with a CO2 cartridge pressure system to
keep beer fresh. It brings the beer to the best temperature for cold storage (0 to 4ºC /
32 to 39ºF) within 19-21 hours.
The beer cooler can keep the 5L Keg cool for an almost indefinite period. We do,
however, suggest that you initially cool your beer keg for at least 12 hours in your
refrigerator before placing it into the beer cooler.
IMPORTANT SAFETY INSTRUCTION
We have provided many important safety messages in the instruction manual for the
beer cooler. Before use, please read and obey all safety rules and operating
instructions; and keep the instruction manual in a safe place for future reference.
Safety Instruction
Before use, check whether the power cord is well connected; if not, please do not
use and call service center.
If the supply cord is damaged, it must be replaced by the manufacturer, service
agent or a similarly qualified person in order to avoid a hazard.
Before use, check rating and confirm voltage. Dedicated circuit is recommended.
Check that the plug conforms with the socket; if not, please do not use and contact
a qualified electrician.
Do not connect or disconnect the electric plug when your hands are wet.
Place the beer cooler on a dry and horizontal surface.
To ensure proper ventilation for the beer cooler, make sure the beer cooler is at
least 5 inches away from walls/cabinets on all sides to allow proper ventilation.
Do not place near heat sources such as ovens, grills or direct sunlight.
Never cover the beer cooler when it is in operation.
The beer cooler must be installed in an area protected from the elements, such
wind, rain, water spray or drips.
Always turn the unit off and unplug from outlet before cleaning. Failure to do so can
result in electric shock or death.
Do not immerse the beer cooler or power plug in water or other liquid.
Do not use coarse cloth, abrasive stuff to clear the beer cooler
Do not remove beer keg from the beer cooler if the keg is not empty.
Do not remove the CO2 cartridge until the CO2 cartridge is completely empty.
Do not use the CO2 cartridge if the room temperature is over 49ºC/120ºF. Failure to
do so can result in explosion or death.
Never allow children to operate, play with or crawl inside the beer cooler.
This unit is not intended for use by persons, including children, with reduced
physical, sensory or mental capabilities.
This unit is not intended to be used by children. Children should be supervised to
ensure that they do not play with this product.
Page 3
HOW TO SELECT A KEG
Sealed 5L universal mini keg and Heineken mini keg applies only
Pay close attention to safety and storage messages about the keg / on the keg.
Check that the keg is neither damaged, nor out-of-date before purchasing.
Protect the top surface from being damaged. Otherwise it could be difficult to attach
the suction tube.
Keep the keg in a rather cold place for 12 hours, but not freezing (e.g. refrigerator),
until next use.
Never shake the keg before use
Never put the beer keg in direct sunlight
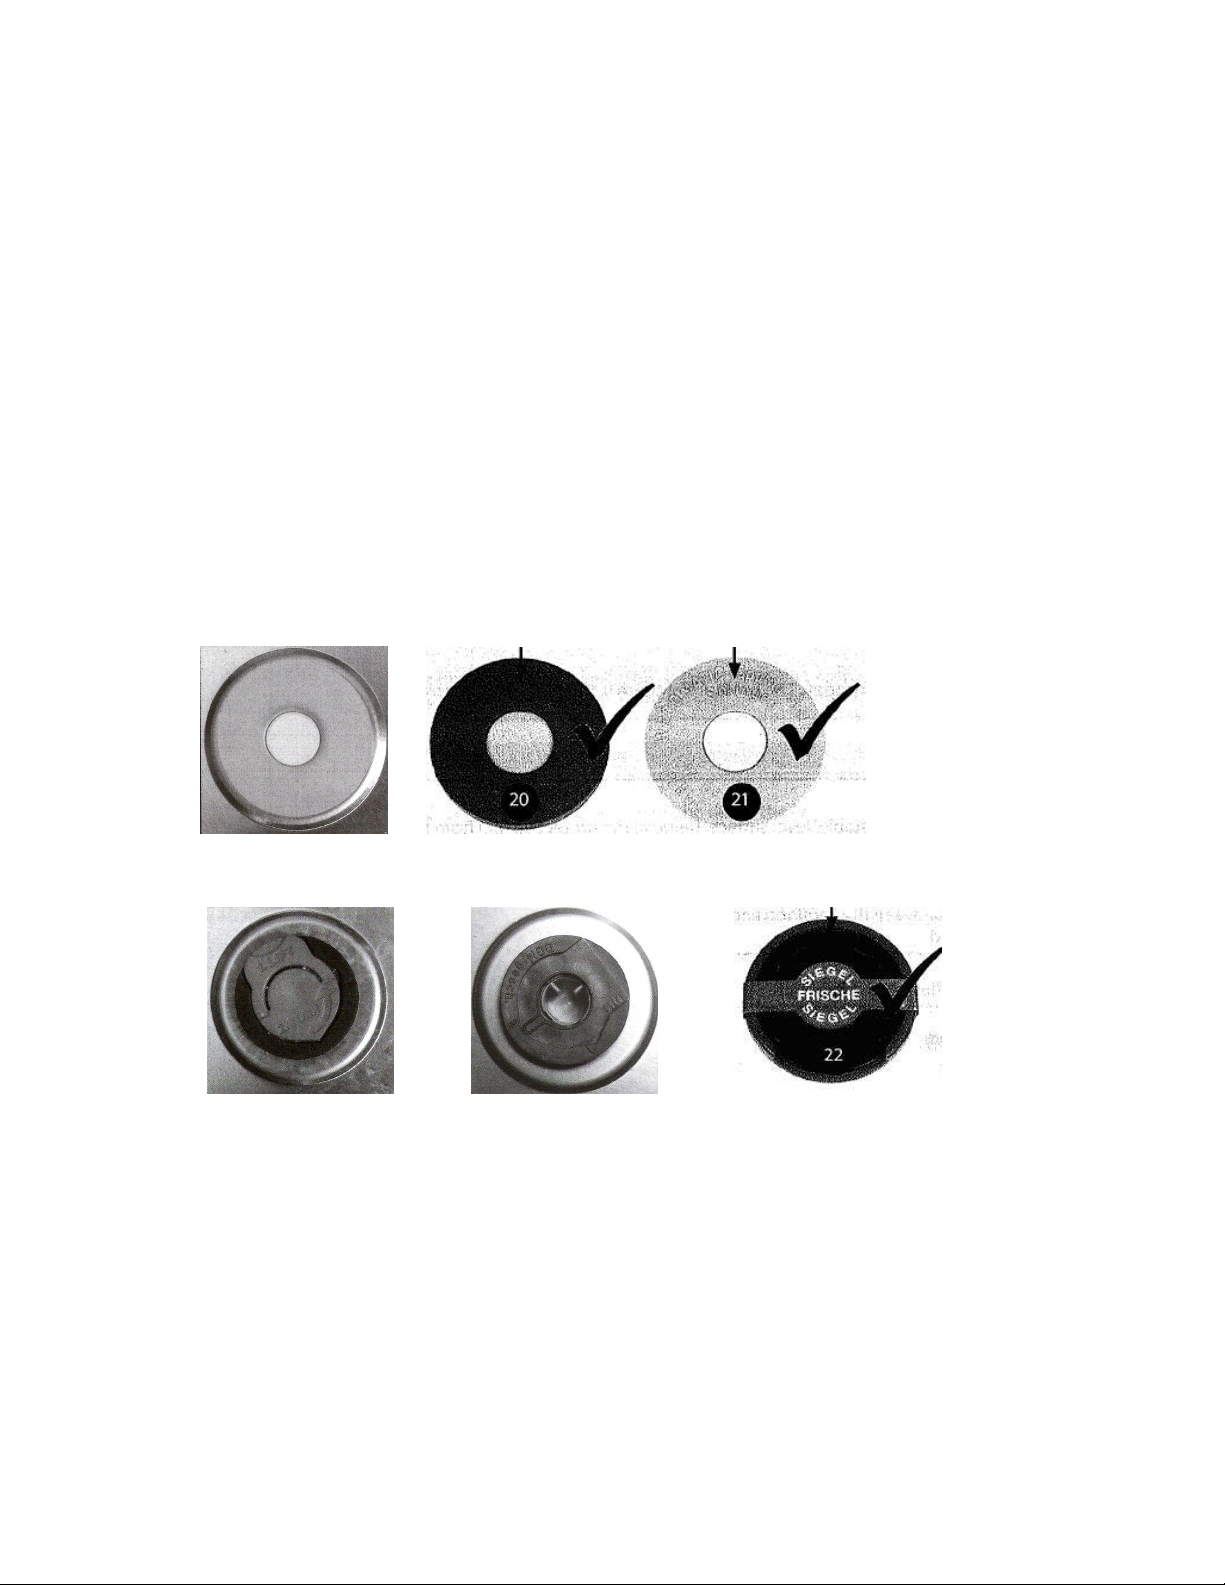
BEER KEG SEALANT
5-Liter beer kegs come with various plug sealants. You can use them with the beer
cooler, however, you should follow the information below for installation.
*The sealants with code No. 20 and 21 can be pierced simply by the cooler piercing
pin.
*The sealants with code No. 22 need to be removed off the marking ring from the
sealant and pierce the keg by cooler piercing pin. (Show as figure 1)
*The difference between code No 23 and 24 is the safety clasp quantity. Pull up the
safety clasp carefully, turn around and take it out from the keg; replaced it by the
sealant (like code No 2 sealant) provided in the beer cooler, attach it to the beer keg,
and pierce it by cooler piercing pin. (Show as Figure 3).
Page 4
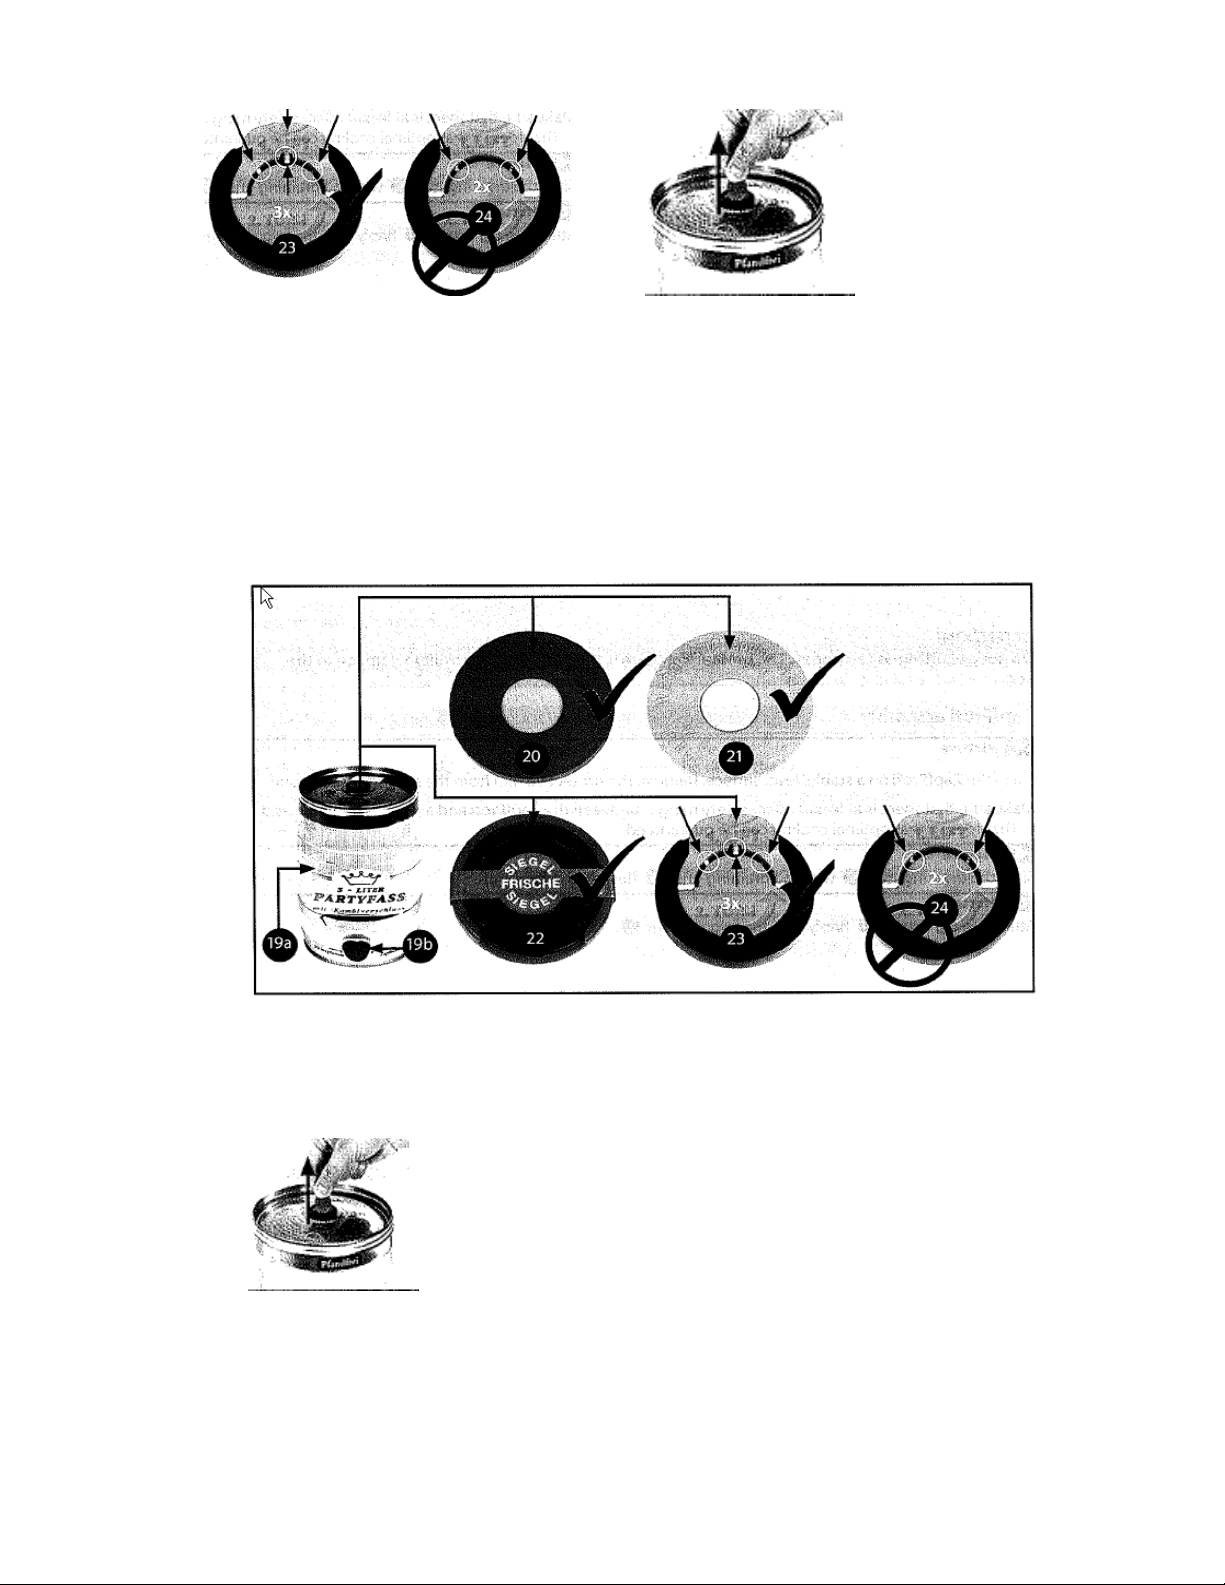
Figure 1
(Important: Before replacing the sealants or piercing the cooler kit, you must always
follow the instructions marked on the keg to eliminate the excess gas and ensure that
the keg has rested long enough to avoid foam coming out through the cooler piercing
pin /tap faucet. There is no need to release the gas and replace the seal rubber if you
use Heineken keg, because Heineken keg has its own CO2 pressure inside. You do
not need to connect the CO2 pressure system with the Heineken keg.
Figure 2
Figure 3
Page 5

SPECIFICATIONS
Item Descriptions Specification
1 Voltage AC 110-120V/60Hz
2 Available capacity 5 liter beer keg
3 Rated operating power 65W
4 Cooling performance 36°F-53°F / 2°C-12°C
5 Noise level
6 Dimensions 10.71W*16.3D*16.93H in
7 Net weight 13.89 lb
8 CO2 pressure out unit √
9 Stainless steel appearance
10 Aluminum radiator system
11 Semi-conductor cooling technology
12 Water conduction cooling system
13 LED display function
14 Manual drainage outfit
15 Detachable water drip tray
16 Temperature adjustable
17 Cool preservation system
18 Climate type
≤38dB(A); (ambient noise ≤25dB(A))
√
√
√
√
√
√
√
√
PU insulation / Weight 310±5g
N/SN
Page 6
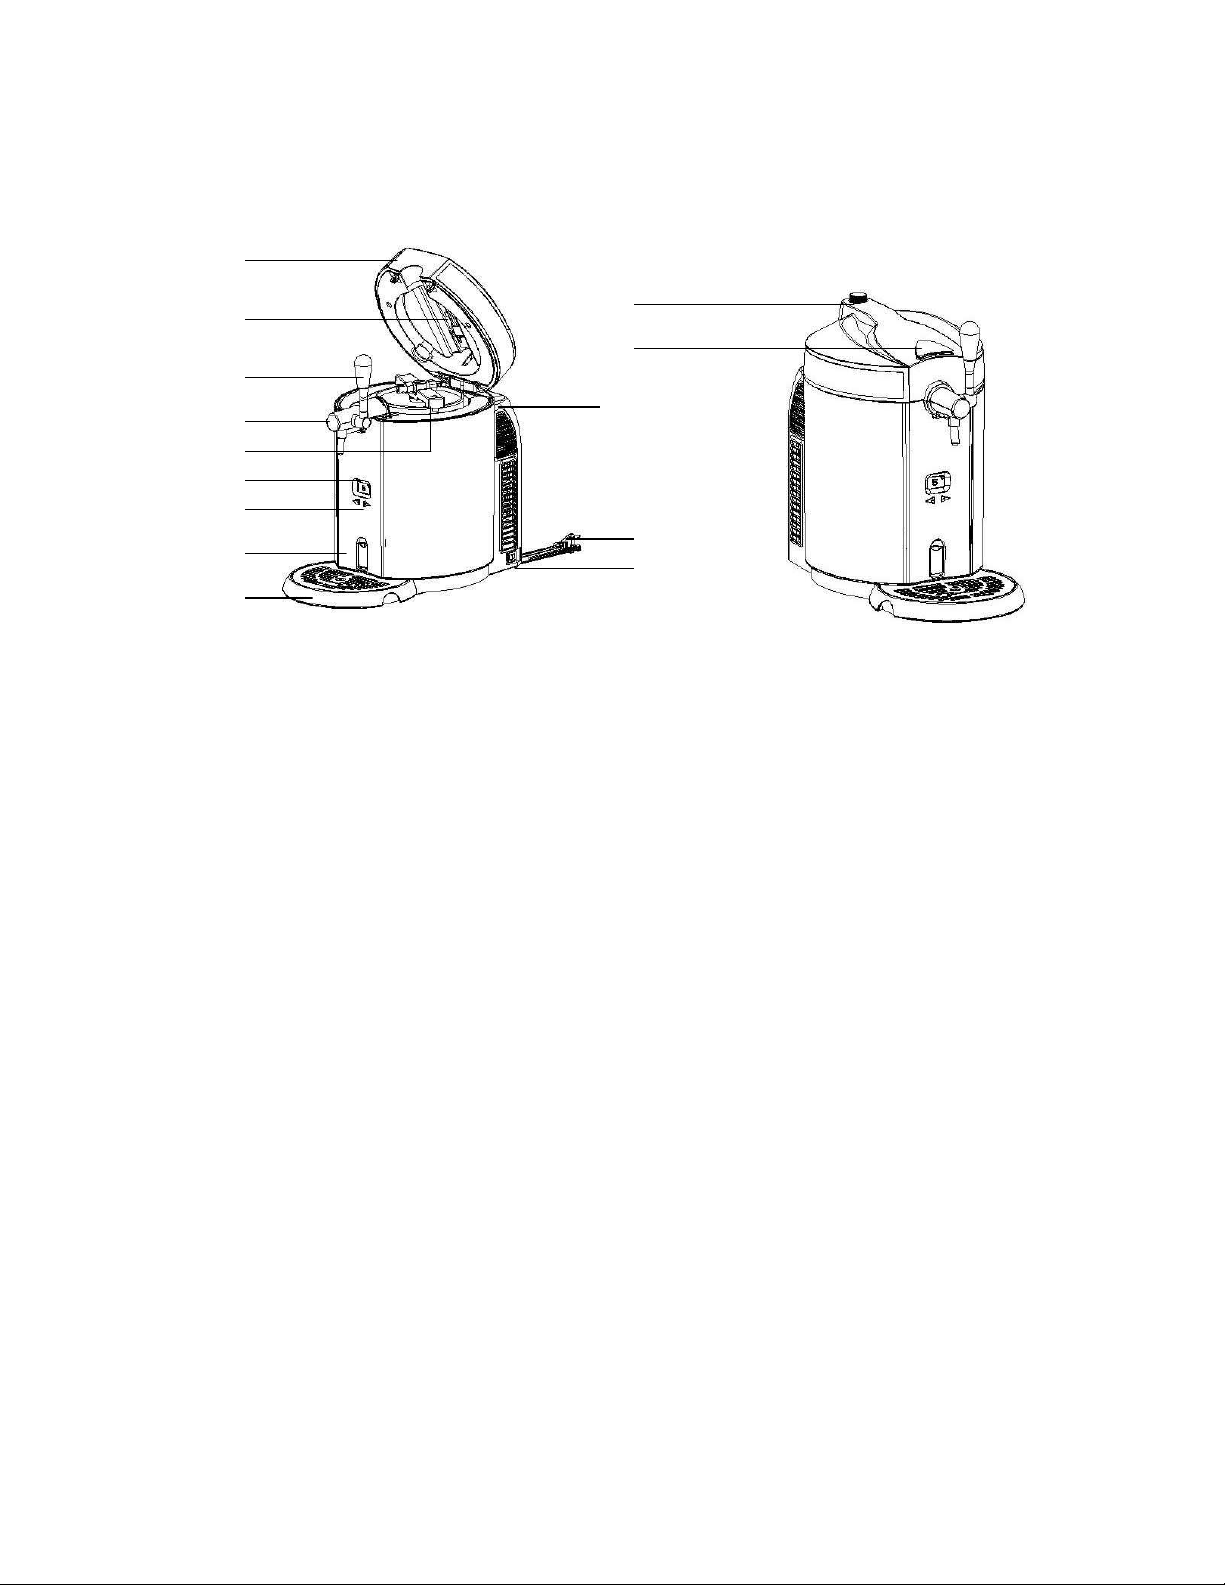
PARTS & FEATURE
1
2
3
4
5
6
7
8
9
Figure four Figure five
1. Top cover 8. Drain switch
2. CO2 cartridge sheath 9. Drip tray
3. Tap handle 10. CO2 pressure relief valve/ knob
4. Tap 11. Door lock button
5. Keg lifter 12. Rear cover
6. LED display 13. Power cord & plug
7. Digital control button 14. AC power switch
10
11
12
13
14
Page 7

T
he max water level
Make sure the drain
”
line
INSTALLATION & OPERATION
A.
INSTALLATION
1. Take the beer cooler out from its package. Place the beer cooler on a sturdy
horizontal (flat) surface. Make sure the beer cooler is at least 5-inches/10 cm away
from other appliances and walls on each side to allow proper ventilation.
Figure 6 Figure 7
2. Install the tap handle to the faucet by turning clockwise, make sure both end fit
together perfectly. (Show as Figure 6)
3. Set the water drip tray into the notch provided.(Show as figure 7)
4. Plug-in the beer cooler.
Note: Do not connect or disconnect the electric plug when your hands are wet. Before
using it, make sure the voltage conforms to the plug mark. Check whether the power
cord is well connected or not; if not, please don’t use it, and call the service center;
5. Put 800ml (27-oz) of water into the cooling cavity. Do not pour the water past the
max mark. (Show as figure 8) Unit can work without water, but cooling performance is
best when used with water.
Note: Make sure the drain switch is at “Off” position, and no extra objects in the cooling
cavity.
Handle
Faucet
switch is at “OFF
position.
Drip tray
Figure 8 Figure 9
Page 8

、、、、
B
OPERATION
Universal 5L beer keg
1. Before piercing the plug on the top of the keg, you must always follow the
instructions marked on the keg to eliminate the excess gas and ensure that the keg has
rested long enough to avoid foam coming out through the tap faucet.
2. With the keg upright, place the piercing pin against the sealant on the upper center
of the keg (you may need to tear off the marking ring or change a proper sealant),
press the piercing pin/keg lifter to poke the seat and then push the piercing pin into the
keg quickly. Press the tap mechanism until you hear a “click” sound that will indicate
the tap mechanism is fixed on the beer keg. (Show as figure 10). Make sure both sides
are securely attached.
Beer dispensing unit
Beer connector
Keg Seal
Figure 10 Figure 11 Figure 12
beer keg
CO2 connector
3. Open the beer cooler, by pressing the door latch button, and place the assembled
keg into the cooling cavity; Connect the CO2 connector tube and beer outlet tube to the
keg lifter tube connector.
NOTES: make sure all connection of tap mechanism is well connected, and without
damage. And make sure tap valve is on close status, and the CO2 pressure regulator
knob is at “Off” status.
排水开关
Close
Open
Figure 13 Figure 14
Page 9

CO2 bottle
4. Loosen the CO2 bottle sheath (Show as figure 15), insert a non-threaded 16 gram
CO2 cartridge in the sheath (Figure 16), and screw the sheath tightly until you hear it
“click” or “pop” (Figure 17), which indicates that the cartridge seal has been pierced
and the CO2 gas can flow into the keg freely. Make sure the CO2 bottle sheath is fixed
tightly to avoid CO2 leakage. Then put CO2 bottle sheath into the top cover.
Regulator assembly
Cover assembly
16gCO2
sheath
Figure 15 Figure16
Figure 17 Figure 18
5. Close the top cover of the beer cooler. When dispensing beer, turn the knob on the
top cover to “+” position to release the CO2 (you will hear a hissing noise). When
done, turn knob back to “-“ position to close the CO2. Please refer to the notice label on
the top cover.
6. Turn on the power switch to “I” position to power on the beer cooler. (“0” position is
off).
NOTES:
Please make sure your hands are dry when you operate the beer cooler, to
avoid electric shock.
1. Connector
2. Switch is on ‘off” status
Figure 19
Page 10

7. It will take 19-21 hours to cool the beer down to 35-50°F at 72-75°F ambient
temperature. And it can keep the temperature as set and displayed on the LED. (The
LED will display the real temperature of the beer). We do, however, suggest that you
initially cool your beer keg for at least 12 hours in your refrigerator before placing it into
the beer cooler, especially when the ambient temperature is higher than 77°F.
Page 11

8. You can set the temperature to fit your taste. The temperature can be set from 36°F
to 53°F (2°C to 12°C). Use the temperature adjustin g buttons (+ and -) located next to
the temperature display. The PCB has memory function, when you power on the cooler,
it memorizes the last set temperature.
The LED will default display the real temperature of beer. You can see the set
temperature by pressing “+” button, it will display the set temperature for 3 seconds
then resume to display the real temperature.
Preset Temperature
The beer cooler has 6 preset temperatures.
Press “-” button 3 seconds, it enter the 6 preset temperatures, then you can press “-”
button to choose a certain preset temperature, 40F, 46F, 48F, 50F, 52F and 54F.
Press “+” button 3 seconds,
9. Adjust the CO2 pressure regulator knob to “+” position, to pour the beer out by
pulling down the tap mechanism, and you can adjust the pressure regulator knob to
control the beer flow rate and beer bubble;
Note: Clean the glass before pouring beer into it, if the beer cup/glass is in high
temperature or if the beer is not cold enough, many bubbles will form when dispensing.
10. When taping the beer, lean your beer glass against the pouring spout and slowly
straighten it up as the beer rises, then open the tap mechanism completely to avoid too
much foam; It is advisable to pour half-glass, make a short pause before continuing the
rest.
NOTES:
Remember to lock the tap after finishing pouring.
11. It is normal to have more foam when pouring the first 3 cups of beer.
12. There will be a sharp and high-speed jet when pouring the last cup of beer from
Please adjust the CO2 pressure regulation knob to “-” position to close the CO2 supply
and reserve the CO2.
Never immerse the pouring spout into the beer glass to avoid excess foam;
keg.
Figure 20
Temperature Scale Display
Press and hold “+” button for 3 seconds to switch temperature display between
Fahrenheit and Celsius.
Page 12

C、
C、
Heineken Keg
C、C、
Heineken kegs are pre-charged with CO2 and do not require the use of a regulator. Do
not install the CO2 cartridge. Leave the control knob in the off, “-”, position
Figure 21
1. The Heineken connectors that come with your beer cooler can work with all
Heineken 5 liter kegs. However you must use a flat head screwdriver to remove the
green base from the keg, if it is already installed, in order to install the new connector
provided with the beer cooler.
2. When installing our connector to the Heineken keg, you must first install the clear
beer connector tube to the connector and one end to the tap mechanism, snap the
beer connector to the Heineken keg adapter then place the adaptor onto the keg.
Figure 22 Figure 23
CO2 connector position
Heineken Adaptor
Heineken keg
Page 13

Note: Please take out the Heineken adaptor with
collect ways, Press it according the arrow
Figure 24 Figure 25
3. Close the top cover; operate it as above step 6-12, as the universal 5 liter keg, but
step 9 is exception.
Beer
connector
、、、、
D
TO CHANGE A NEW BEER KEG
(5 liter universal keg)
When the beer keg runs out follow the instructions below before installing a new
beer keg.
1. Adjust the CO2 pressure regulation knob to “-“ switch to shut off the CO2 supply
and reserve the CO2.
2. Open the top cover of the beer cooler, pull down the tap handle to release the
remaining gas in the keg (there may be some beer bubble).
3. Disconnect the CO2 and Beer connectors from the Piercing Pin/Keg Lifter by
pressing the white release buttons as shown on figure 26.
4.Use the keg lifter and remove the keg from the dispenser.
5.Disconnect the piercing pin from the keg (see figure 27).
6. It is recommended to clean the tap mechanism when changing the beer keg each
time. Please refer to the below contents about cleaning.
7. Follow installation instructions for new keg.
Page 14

n you take out the beer connector and CO2
You must take out
the right fastener at
first, then push the
left fastener out as
arrow indication,
you can pull out
the dispensing unit
When you take out the fastener of beer
dispensing unit, you can move this unit
towards arrow indication
Whe
connector, please press the white button down
Figure 26 Figure 27
E
E.
TO CHANGE THE CO2 CARTRIDGE
EE
Please change the CO2 cartridge when beer cannot be dispensed - the CO2 pressure
knob is at “on” position and there is beer in keg.
1. Turn the CO2 pressure knob to “-“ position to close the CO2 supply.
2. Open the top cover, loosen the cartridge sheath by rotating left (counter-clockwise),
and take out the empty CO2 cartridge.
Insert a new 16g CO2 cartridge in the sheath, and screw the sheath tightly until you
hear a “pops”, which indicates that the cartridge seal has been pierced and the CO2
gas can flow into the keg. Make sure the bottle sheath is fixed tightly to prevent the
CO2 from leaking. Then put CO2 bottle sheath into the top cover.
3. Close the top cover of beer cooler;
3. Turn the CO2 pressure knob to “+“ position to turn on the CO2 supply, cooler is now
ready to dispense beer.
Reminder:
each 16g CO2 cartridge can pressure more than 5 liter of beer.
(Not needed for Heineken keg)
finally.
Page 15

Warning:
B
down
Water
1. Please use a qualified and approved CO2 cartridge. It should be Beverage
grade.
The CO2 cartridge information below is for your reference. Never use a Nitrogen gas
cartridge in the beer cooler to avoid an explosion, because of its much higher pressure.
Also do not use CO2 cartridges designed for air guns as they may contain oils.
2. Do not use any CO2 cartridges that may have been tampered with or are
damaged. Any misuse may cause serious injury.
16g CO2 Cartridge
NW
(g)
15.5
│
16.5
Volume
(ml)
20
GW
(g)
57.0
│
58.6
Cartridge
Weight
(g)
42.0
│
42.6
. A
(mm) B (mm) C (mm) D (mm)
Ø8.6
Ø8.9
88.0
│
89.0
Ø21.7
│
│
Ø22.0
10
│
11
Pressure
(Kgf/cm2)
60 450
Blast
pressure
(bar)
F
F:
REPLACE WATER INSIDE THE COOLING CAVITY
FF
It is recommended to replace the water inside the cavity once a week. (There is no
need to replace the water when switching the beer keg)
Open the drain switch, water flows into the S shape drainpipe from this end
Water flow into drip tray from this end
Figure 28(Sketch map of drain construction)
Lower the drain switch
to a horizontal line.
will start to drain.
Drip tray
Page 16

Cleaning
Beer connector must
dispensing
Please open the faucet when
you are cleaning the beer
Dispensing
unit
connector must connect with
1. Open the drain switch to drain out the water from the cavity into the drip tray. Make
sure the drip tray is inserted into the notch to avoid spilling water on the counter. The
drip tray can hold 15oz (450ml) water so you may need to do this twice.
2. After all the water has drained out, lift the drain switch to closed and put 800ml fresh
water into the cavity.
NOTE: Alternatively, instead of using the drip tray, you may place the drain hole above
your sink or other similar location that allows you to drain all the water at once.
Warning: Clean water is necessary. Make sure the drip tray is inserted into the notch
after draining.
CLEANING BEER TAP MECHANISAM
The Beer cooler hoses should be cleaned often for best results and to avoid any health
hazards. They need to be cleaned before the first use and after long periods of time
between uses. Clean the outside of the machine with dry cloth. Recommended
cleaning steps as follows:
1. Fill the cleaning bottle with warm water.
2. Connect to the end of the piercing pin, squeeze the water into the pin to clean the pin
tube and push the water out from the beer tube. Repeat this until the beer tube is
clean (need 3 bottles warm water at least).
3. Clean the beer tap mechanism as figure 30. Note: Please open the tap when
cleaning. (Show as figure 29)
connect with
unit
This
cleaning bottle
tube
Figure 29 Figure 30
Warning:
Never put the tap mechanism parts in the washing machine or dishwasher;
Never use a chemical cleaning detergent to clean the parts, warm or purified water is
recommended.
bottle
Page 17

CHANGE SPARE PARTS
assembly
ACCESSORIES INCLUDED WITH YOUR BEER COOLER
Items Name Qty. Installment Picture Spare parts
1 Connector seal 6 Regulator valve
5pcs
2 CO2 connector 2 Regulator valve
1pcs
3 Beer tube 2 Beer-out connector
4 Tube seal circle 4 Beer-in pipe
5 Keg seal 2 Standard tub
6 Heineken adaptor 2 Heineken tub
7 CO2 cartridge 3 Regulator valve
assembly
8 Cleaning bottle 1
1pcs
3pcs
2pcs
1set
3pcs
1pcs
、、、、
A
Cartridge Regulator valve: CO2 connector and Connector seal washer
CO2 Cartridge piercing probe and connector seal washer maybe damaged when used
improperly, from general wear and tear, and other reasons.
1、First, pick out the connector seal washer with a tiny metal stick(Show as figure 31),
and take out Cartridge piercing probe. Be careful not damage other parts of regulator.
2、Install a new cartridge piercing probe in the regulator (leave the sharp end facing
outwards), and install the seal washer (Show as figure 32). Don’t remove other parts
of the regulator in the replacing process.
Regulator
Page 18

Empty CO2
Cartridge
connector
Seal circle
Slim metal stick
cartridge
Figure 31 Figure 32
Warning: Remember press the seal circle with empty cartridge instead of new
cartridge, or will cause hazard.
、、、、
B
TO CHANGE BEER TUBE(show as figure 33)
Please replace the beer tube if beer tube is damaged and leaking.
1. Loosen the tube from connection: 1, Pull out the lock setting. Once off, draw the
tube out. (you may need to wiggle the lock setting while pulling)
2. Unscrew the nut at connection 2, and draw the tube out.
3. Replace a new beer tube, and install the beer tube according with reverse
procedure.
NOTES: Don’t move other screws when processing tube replacement, otherwise, it
may cause the beer leakage or gas leakage
1. Lock setting
2. Connector nut
Figure 33
、、、、
C
Replace the seal circle of beer tube(Show as figure 34)
Replace the seal circle of beer tube if the connector has a leak
1. Unscrew the beer tube as indicated in the below figure
2. Take out the seal circle of beer tube
3. Replace a new seal circle in the same position
4. Turn the seal circle tightly to avoid any leakage
Seal circle
Page 19

Beer tube
Figure 34
MAINTENANCE
If the beer cooler does not work properly, please call the service center;
To save time and money, before you call for service, check the Troubleshooting Guide.
It lists cause of minor operation problems that you can correct yourself.
Troubleshooting
Trouble Cause Troubleshooting
The tap does not
work / can’t pour beer
out
Too much bubble
pouring out
Beer flows out too
slowly
1. The pouring tube has a poor
connection or CO2 supply is cut off
2. No keg or no beer in the keg;
3. No gas in the CO2 cartridge
4. The CO2 pressure regulator knob is
closed
1. Use a wrong way to pour beer out
2. The beer temp is high (better at
3-5C)
3. The keg was shaken before usage
4. Almost no beer in the keg
5. Too much pressure in the keg
1. inside CO2 pressure isn’t high
enough
2. The connection tube or pouring
tube is leaking
1. Reconnect the pouring tube and CO2
supply
2. Change a new keg
3. Change a new CO2 cartridge
4. Turn the CO2 pressure regulator knob
on “+” position
1. Use the right way to pour beer out
2. Cool the beer down to 3-5C
3. Put the beer keg aside a while till no
bubble inside
4. Change a new keg
5. Adjust the pressure knob to
“-“ direction to decrease the pressure or
close the knob
1. Adjust the pressure knob to release
more CO2 pressure or replace with a
new one.
2. Check whether the tube is leaking or
not, if so replace the tube
Page 20

Your Guarantee
If this product is found to be faulty as a result of faulty materials or workmanship within one
year from date of purchase, it will be repaired free of charge.
This guarantee is subject to the following terms:
• Sunpentown must be notified of the fault.
• Proof of purchase must be presented to Sunpentown’s nominated representative.
•
The warranty will be void if the product if modified, misused or repaired by an unauthorized
person.
• The warranty after repair will not be extended beyond the original one-year period.
• All replacement parts will be new or reconditioned.
• Parts, which are replaced, become the property of Sunpentown.
•
The warranty applies for the use of the product in the USA only.
What is NOT COVERED:
• Warranty does not include freight charges.
• Damage due to installation error, product abuse and/or misuse.
•
Incidental or consequential damage caused by possible defects with this product.
•
Labor cost incurred for the installation and/or removal of a possible defective unit.
• Damage to product caused by improper power supply voltage, accident, fire, floods or acts of
nature.
• Failure of product resulting from unauthorized modifications to the product.
•
Improper installation or failure to perform the necessary maintenance.
•
Normal wear and tear on parts or replacement of parts designed to be replaced.
• Damage to personal property from use of product.
• Replacement or repair of household fuses, circuit breakers, wiring or plumbing.
This GUARANTEE is in addition to your Statutory Rights
SUNPENTOWN INTERNATIONAL INC.
14625 Clark Ave. City of Industry, CA 91745
Tel: 800-330-0388
service@sunpentown.com
www.sunpentown.com
 Loading...