

Page 1
SP-12
SAMPLING
PERCUSSION SYSTEM
OWNERS MANUAL
By Craig Anderton
Version 2.3
© 1985 E-mu Systems, Inc. Scotts Valley, CA. All Rights Reserved
Page 2

CONTENTS
TABLE OF CONTENTS
INTRODUCTION..............................................................................................6
WHAT IS IT?............................................................................................................. 7
SP-12 GROUND RULES........................................................................................... 8
Activating and De-activating Modules ................................................................... 8
Accessing Functions Within the Module................................................................ 8
What’s a Default?..................................................................................................8
SETTINGS AND VALUES.........................................................................................9
Entering ................................................................................................................ 9
Leading Zeroes..................................................................................................... 9
Segment and Song Modes.................................................................................... 9
THE TRANSITORY NATURE OF SEGMENT MODE.............................................. 10
The Right Arrow/Left Arrow Buttons (stepping and “fast forwarding”).................. 10
The Current Song Display................................................................................... 10
The Current Segment Display............................................................................. 10
BEEP MESSAGES.................................................................................................. 10
PART 1: GETTING READY...........................................................................11
1A SETUP........................................................................................................ 12
1B INSTANT GRATIFICATION!........................................................................ 13
1C BACKGROUND: THE PERFORMANCE MODULE..................................... 14
1D SELECTING DRUM SOUNDS .................................................................... 14
1E ADJUSTING THE MIX................................................................................. 15
1F TUNING THE DRUMS/CHANGING DECAY (SET-UP 18) .......................... 16
1G BACKGROUND: SETTING UP ADDITIONAL SOUNDS.............................. 16
1H ACCESSING/EXITING MULTILEVEL (SET-UP 12 & 13)............................. 17
1I ACCESSING/EXITING MULTIPITCH (SET-UP 11 & 13)............................. 18
1J ACCESSING DYNAMICS (SET-UP 14)....................................................... 19
1K STORING (DEFINING) A MIX (SET-UP 15)................................................ 19
1L AUDITIONING (SELECTING) A MIX (SET-UP 16) ...................................... 20
1M ASSIGNING DRUM SOUNDS TO OUTPUT CHANNELS............................ 20
© E-mu Systems, Inc. 1985 Page 2
Enhanced by The Emulator Archive 2002 www.emulatorarchive.com
Page 3

CONTENTS
1N PLAYING BACK SEGMENTS..................................................................... 21
1O SETTING TEMPO........................................................................................ 22
1P PROGRAMMING THE METRONOME........................................................ 23
PART 2: RECORDING SEGMENTS .............................................................24
2B ERASING A SEGMENT .............................................................................. 26
2C “DIMENSIONING” A SEGMENT.................................................................. 26
Part 1: Standard Dimensioning.................................................................... 27
Part 2: Real-Time Dimensioning.................................................................. 28
2D UNDERSTANDING AUTO CORRECT......................................................... 29
2E SETTING AUTO CORRECT........................................................................ 31
2F RECORDING A SEGMENT IN REAL TIME................................................. 31
2G RECORDING A SEGMENT IN STEP TIME................................................. 33
2H ERASING A SPECIFIC DRUM SOUND....................................................... 34
2I ERASING A SPECIFIC NOTE OF A DRUM TRACK.................................... 34
2J COPYING AND APPENDING SEGMENTS ................................................. 35
2K ADDING SWING.......................................................................................... 36
2L SWAPPING DRUM SOUNDS...................................................................... 37
2M COPYING SOUNDS .................................................................................... 37
2N CLEARING THE MEMORY.......................................................................... 38
2M CHECK REMAINING MEMORY .................................................................. 38
PART 3: CREATING A SONG ......................................................................39
3A CREATING A SONG: OVERVIEW............................................................... 40
3B SELECTING A SONG.................................................................................. 41
3C CHAINING SEGMENTS TOGETHER.......................................................... 42
3D ENDING A SONG........................................................................................ 43
3E EDITING SONGS (STEPPING, INSERTING, DELETING) .......................... 44
3F USING REPEATS........................................................................................ 45
© E-mu Systems, Inc. 1985 Page 3
Enhanced by The Emulator Archive 2002 www.emulatorarchive.com
Page 4

CONTENTS
3G CHANGING THE SONG DRUM SOUND MIX.............................................. 47
3H SETTING SONG TEMPO ............................................................................ 48
3I PROGRAMMING TEMPO CHANGES WITHIN A SONG............................. 49
3J JUMPING TO A SUB-SONG........................................................................50
3K PROGRAMMING TRIGGER OUTPUTS...................................................... 50
3L STARTING AT A SPECIFIED POINT IN THE SONG................................... 51
3M EFFICIENT USE OF MEMORY ................................................................... 52
PART 4: SAMPLING YOUR OWN SOUNDS................................................53
4A SAMPLING: AN OVERVIEW ....................................................................... 54
4B SETTING LEVELS PRIOR TO SAMPLING.................................................. 55
4C ASSIGNING THE SAMPLE..........................................................................56
4D SETTING THE SAMPLING THRESHOLD ................................................... 56
4E SETTING THE SAMPLE LENGTH............................................................... 57
4F INITIATING AND STOPPING SAMPLING ................................................... 57
4G DELETING A USER SOUND....................................................................... 58
4H MODIFYING A SAMPLE VIA TRUNCATION AND LOOP............................ 59
PART 5: SAVING YOUR DATA ....................................................................62
5A BACKGROUND: SAVING DATA.................................................................. 63
5B GENERAL CARE & HANDLING OF DISKS & CASSETTES........................ 63
Labeling ...................................................................................................... 64
Write-protecting disks and cassettes........................................................... 64
5C HOOKING UP THE 1541 DISK DRIVE OR CASSETTE .............................. 66
5D FORMATTING DISKS (CASSETTE/DISK 0) ............................................... 67
5E DISK AND CASSETTE OPERATIONS ........................................................ 68
PART 6: MIDI, SYNC, & SMPTE...................................................................70
6A MIDI CHANNEL AND MODE SELECT ........................................................ 71
6B BACKGROUND: SYNCHRONIZATION ....................................................... 73
© E-mu Systems, Inc. 1985 Page 4
Enhanced by The Emulator Archive 2002 www.emulatorarchive.com
Page 5

CONTENTS
6C INTERNAL SYNC (SYNC 1) ........................................................................ 73
6D MIDI SYNC (SYNC 2).................................................................................. 73
6E SMPTE SYNC (SYNC 3) ............................................................................. 74
6F CLICK SYNC (SYNC 4) ............................................................................... 75
6G WRITING SMPTE TIME CODE ON TAPE................................................... 76
6H WRITING A 24 PPQN CLICK SYNC TRACK ON TAPE .............................. 77
PART 7: MIXING AND PROCESSING..........................................................78
7A MIXING AND PROCESSING: OVERVIEW.................................................. 79
7B PSEUDO AUTOMATED MIXDOWN ............................................................ 79
7C CREATING AMBIENCE............................................................................... 79
7D USING SPECIAL EFFECTS IN THE STUDIO..............................................80
APPENDIX.....................................................................................................81
APPENDIX A: THE ART OF SAMPLING................................................................. 82
PART 1: TAKING THE BEST POSSIBLE SAMPLE............................................ 82
PART 2: MANIPULATING THE SAMPLE ........................................................... 86
APPENDIX C: UNDERSTANDING TIME SIGNATURES......................................... 89
APPENDIX D: UNDERSTANDING MIDI/SMPTE .................................................... 90
What does the MIDI cable do?............................................................................ 90
What does MIDI stand for? ................................................................................. 90
How can information control a synthesizer or drum machine?............................. 90
How does MIDI differentiate between different instruments?............................... 91
16 channels, huh? Sounds like a lot of patch cords to me!.................................. 91
What kind of words does the MIDI language include?......................................... 91
Dealing With “MlDlosyncracies” .......................................................................... 92
SMPTE ............................................................................................................... 92
APPENDIX E: TIPS ON CREATING REALISTIC DRUM PARTS............................ 93
APPENDIX F: TIPS ON USING CASSETTE INTERFACES.................................... 94
APPENDIX G: HOW THE SP-12 WORKS............................................................... 96
APPENDIX H: SPECIAL FUNCTIONS (SET-UP #23)............................................. 97
© E-mu Systems, Inc. 1985 Page 5
Enhanced by The Emulator Archive 2002 www.emulatorarchive.com
Page 6

INTRODUCTION
INTRODUCTION
WHAT IS IT
SP-12 GROUND RULES
SETTINGS AND VALUES
THE TRANSITORY NATURE OF SEGMENT MODE
BEEP MESSAGES
© E-mu Systems, Inc. 1985 Page 6
Enhanced by The Emulator Archive 2002 www.emulatorarchive.com
Page 7

INTRODUCTION
WHAT IS IT?
The SP-12 is the latest member of E-mu’s family of high - technology musical
instruments. It combines the most popular features of our first drum machine, the
Drumulator, along with the Emulator II’s sampling capabilities, modular design, and
extensive use of display messages.
Thanks to 12 bit sound digitizing, the drum sounds have a crispness and dynamic
range unattainable with the more common (and inexpensive) 8 bit digitizing
technology. Best of’ all, despite the wide range of functions the SP-12 is remarkably
easy to learn and use. After even a short period of familiarization, creating drum parts
becomes second nature. We have made every effort to make the SP-12’s operation
as transparent as possible, so that you can get rhythmic ideas from your head into
reality in the shortest possible time.
You’re going to love what the SP-12 can do. Ready? Let’s start.
© E-mu Systems, Inc. 1985 Page 7
Enhanced by The Emulator Archive 2002 www.emulatorarchive.com
Page 8

INTRODUCTION
SP-12 GROUND RULES
Here are all the background terms you will need to know in order to make sense of
the manual.
Activating and De-activating Modules
The SP-12 is organized as seven modules: Set-up, Cassette/Disk, Sync, Sample,
Master Control, Programming, and Performance. The Set-up, Cassette/Disk, Sync,
and Sample modules are used less frequently than the others, and are normally
inactive. To access the functions in one of these modules, it must be activated by
pressing the switch located In the module. When activated, the associated LED will
glow and functions other than those which pertain to the module will be locked out.
After you have finished working with a module, de-activate it by pressing the switch
again (the associated LED will extinguish); or, select a different module.
Accessing Functions Within the Module
The Set-up, Cassette/Disk, Sync, and Sample modules include a printed list of
functions. When the module is active, you can select the desired function by keying
in its number.
Example:
If while the Set-up module is active you wanted to alter the MIDI parameters, you
would key in 22. If you wanted to define a mix, you would key in 15.
What’s a Default?
A default is the setting or value that a function assumes until changed; the default Is
generally the most common option for a given function. Example: Most metronomes
click every quarter note, so the SP-12’s metronome defaults to quarter notes.
However, this default setting can be easily changed to any one of several other
values.
© E-mu Systems, Inc. 1985 Page 8
Enhanced by The Emulator Archive 2002 www.emulatorarchive.com
Page 9

INTRODUCTION
SETTINGS AND VALUES
There are two ways of altering the SP-12’s parameters. One is to alter a slider setting
this is typically done when changing levels, pitch, and so on. The other is to specify a
numeric value with the keypad. This is typically done when telling the SP-12 how
many measures long a segment should be, the time signature, and so on.
Entering
During the process of specifying a setting or value, it is necessary to tell the SP-12’s
computer when the data you select should be entered into memory. For example,
suppose you’re setting the tempo; typically, you would vary the tempo until the
groove sounded “just right”. However, how is the computer going to know that the
tempo you have just selected is the right one?
Pressing the ENTER button tells the computer to write the desired setting or value
you have selected into its memory. Generally the display will confirm what you have
chosen; when it shows the desired setting or value, press ENTER.
Leading Zeroes
You will often need to enter numbers via the keypad.
If the function you have selected requires that you enter a two-digit number, you must
enter a leading zero when entering a single digit number.
Example: Enter 07 instead of 7.
If the function you have selected allows for entering a one-digit number only and
does not accept a two - digit number, do not enter a leading zero.
Segment and Song Modes
The SP-12 has two main operational modes. In segment mode, you create individual
segments of rhythms, typically a few measures long. In song mode, you chain these
segments together to make a complete song. Example: The intro, verse, chorus, and
solo of a song could all be separate segments; combining these together in the
proper order would create a song.
Segment and song modes are selected by the left-most button in the Programming
module. In song mode, the labels above the eight buttons to the right of the
SEGMENT/SONG button apply; in segment mode, the labels below the eight buttons
to the right of the SEGMENT/SONG button apply.
© E-mu Systems, Inc. 1985 Page 9
Enhanced by The Emulator Archive 2002 www.emulatorarchive.com
Page 10

INTRODUCTION
THE TRANSITORY NATURE OF SEGMENT MODE
Segment mode is the SP-12’s “scratchpad” where you work up rhythmic segments
prior to combining them in songs. Therefore, tempos, mixes, and most other segment
parameters set while in segment mode (except tuning and dynamics) are retained
only while you are in segment mode. When going into song mode, the song
parameters for tempo, mix, and so on replace the parameters worked out in segment
mode. If you return to segment mode from song mode, the segment parameters for
tempo, mix, etc. will be those of the last song you selected.
The Right Arrow/Left Arrow Buttons (stepping and “fast forwarding”)
The Right Arrow and Left Arrow buttons step through values shown in the display.
Each time you press one of these buttons you will step through one value. Holding
down these buttons “fast forwards” (in the case of Right Arrow) or “fast backwards”
(in the case of Left Arrow) through the values.
The Current Song Display
When you first turn on the SP-12, the display will show the Current Song and tempo
for that song. The Current Song remains as is until changed.
The Current Segment Display
When you go into segment mode, the display will show the Current Segment and
tempo for that segment. The Current Segment remains as is until changed.
BEEP MESSAGES
The SP-12 confirms certain actions (as described later in the manual) by sending out
a “beep” tone. When monitoring via the MIX OUT jack, the beep level is set by the
METRONOME VOLUME in conjunction with the MIX VOLUME. Since the MIX
VOLUME serves as a master control for all SP-12 sounds (drums and metronome), if
MIX VOLUME is turned down you won’t hear anything -- and that includes beep
messages
.
© E-mu Systems, Inc. 1985 Page 10
Enhanced by The Emulator Archive 2002 www.emulatorarchive.com
Page 11

GETTING READY
PART 1: GETTING READY
1A SETUP
1B INSTANT GRATIFICATION!
1C BACKGROUND: THE PERFORMANCE MODULE
1D SELECTING DRUM SOUNDS
1E ADJUSTING THE MIX
1F TUNING THE DRUMS/CHANGING DECAY
1G BACKGROUND: ADDITIONAL SOUNDS
1H ACCESSING/EXITING MULTILEVEL
1I ACCESSING/EXITING MULTIPITCH
1J ACCESSING DYNAMICS
1K STORING (DEFINING) A MIX
1L AUDITIONING (SELECTING) A MIX
1M ASSIGNING DRUM SOUNDS TO OUTPUT CHANNELS
1N PLAYING BACK SEGMENTS
1O SETTING TEMPO
1P PROGRAMMING THE METRONOME
© E-mu Systems, Inc. 1985 Page 11
Enhanced by The Emulator Archive 2002 www.emulatorarchive.com
Page 12

GETTING READY
1A SETUP
IMPORTANT!! Before you turn on your SP-12: There is a 115/230 Volt selector
switch on the back of the SP-12, next to the ON/OFF switch. Make sure the AC
voltage indicated on the switch agrees with the AC voltage present in your part of the
world. If not, change the switch settings with a small screwdriver.
1. Set up the SP-12 on a hard surface so that the bottom plate ventilation
holes are not obstructed.
2. Patch a standard, guitar type patch cord between the MIX OUT jack on
the rear panel and a high quality amp or mixing console. The better the
sound system, the more life like the sound of the SP-12.
3. Make sure the ON/OFF switch is in the OFF position. Plug the line cord
into a properly wired three-wire AC outlet.
4. Turn the MIX VOLUME and METRONOME VOLUME controls all the way
to the left.
5. Turn the ON/OFF switch to ON; the SP-12 will run a self-test where all
LED’s will light up briefly to show they’re working properly.
6. Press the RUN/STOP switch (located near the lower right hand corner of
the SP-12) to start the drums, and then turn up the MIX VOLUME control
to hear a demo of what this baby can do. Adjust the monitor system levels
to suit. If you hear the drums, all is well to proceed, press RUN/STOP a
second time and the song will stop.
© E-mu Systems, Inc. 1985 Page 12
Enhanced by The Emulator Archive 2002 www.emulatorarchive.com
Page 13

GETTING READY
1B INSTANT GRATIFICATION!
Yes, the SP-12 is an extremely versatile device. But that versatility means that in
order to learn about all the options, you’ll have to spend a few hours with the SP-12
and this manual.
If you’re patient enough to actually do that right now, we salute your willpower.
Chances are, though, you can hardly wait to start making some sounds. So, we’ll
short circuit the learning process a bit with this little exercise. Follow these steps
EXACTLY as given.
1. Hook up the SP-12 as described previously, then turn up the METRONOME
VOLUME control about halfway. MIX VOLUME and the monitor system levels
should be set as described in the previous Section.
2. Push the SONG/SEGMENT button until the SEGMENT light glows.
3. Locate the ten number buttons (0 - 9) towards the right of the SP-12. Press 9
and then press 9 again. The display says Seg 99 and shows the tempo in
Beats per Minute. Seg 99 will have a default length of two measures (which
we’ll leave as is for now).
4. Hold down RECORD and press RUN/STOP; both their LEDs will be lit to
indicate you are in record mode. You should also hear the metronome (if not,
check the METRONOME VOLUME control).
5. The eight large buttons along the bottom of the SP-12 play various drum
sounds -- note that the harder you hit a button, the louder the sound. Play in
time with the metronome, and whatever you play will be recorded. You will
have two measures to play to; they repeat over and over again to allow for
easy multitracking of drum parts. To play additional drum sounds, hit the
SELECT button to audition other banks of drums.
6. For now, you can only play 8th notes; later on, we’ll cover how to play all the
other note values.
7. When you’ve finished recording, press RUN/STOP (the RUN/STOP light goes
out). To play back what you’ve recorded, press RUN/STOP again
(RUN/STOP light glows).
8. Congratulations! You have now experienced about 0.5% of the SP-12’s
capabilities. To find out about the other 99.5%, keep reading.
© E-mu Systems, Inc. 1985 Page 13
Enhanced by The Emulator Archive 2002 www.emulatorarchive.com
Page 14

GETTING READY
1C BACKGROUND: THE PERFORMANCE MODULE
This module is where you select drum sounds, tuning, drum mix, and so on.
All of these adjustments reset to their default values when the SP-12 is turned
off. However, eight different drum mixes may be stored in memory and
recalled when creating a song.
1D SELECTING DRUM SOUNDS
The row of eight large buttons (Drum Play buttons) along the bottom of the SP-12
play the different drum sounds.
The SELECT button (left of Play buttons) chooses between four different banks of
drum sounds. Bank ii consists of sampled drum sounds; these come loaded with
factory sounds, but you can also sample your own sounds.
To audition the drums, select a bank with the SELECT switch, and then play the Play
Buttons. Listen to all four banks to familiarize yourself with the available sounds.
© E-mu Systems, Inc. 1985 Page 14
Enhanced by The Emulator Archive 2002 www.emulatorarchive.com
Page 15

GETTING READY
1E ADJUSTING THE MIX
1. Press the TUNE-MIX-MULTI switch (towards the upper left corner of the
Performance module) until the MIX LED lights. The display graphically shows
the level of each drum in the selected bank.
2. Vary the slider above the corresponding Drum Play button to vary the level of
each individual drum. As soon as you move the slider, the graph in the
display will jump to its new position.
3. Note that MIX settings are not stored while in segment mode. If you come up
with a particularly good mix, you can save the mix as described in Section 1K.
© E-mu Systems, Inc. 1985 Page 15
Enhanced by The Emulator Archive 2002 www.emulatorarchive.com
Page 16

GETTING READY
1F TUNING THE DRUMS/CHANGING DECAY (SET-UP 18)
1. You may tune or change the decay time of any of the drum sounds. Cymbals
may also be tuned, but due to the nature of the SP-12’s tuning change
software, the sound will probably be different from your expectations of a
“tuned cymbal” (SP-12 tuning creates more of a ring modulation type of
effect).
2. Each sound may be programmed to have its tuning or decay (but not both)
varied by its associated slider while the TUNE/DECAY LED is lit. Whether the
slider affects tuning or decay is programmed in the SET-UP module. Activate
SETUP, then key in 18. Play the desired sound. The display will indicate
whether the sound is “TUNED” or “DECAYED”. Key in 1 if you want the slider
to vary the tuning, or 2 if you want the slider to vary the decay. Drums and
claps default to tuning variations, while cymbals default to decay variations.
3. Press the TUNE-MIX-MULTI switch until the TUNE/DECAY LED lights.
Sounds which are set for decay mode have a small diagonal line above the
drum sound number. The display graphically shows the relative tuning or
decay of each drum; the center line indicates normal pitch or decay.
4. Vary the slider above the corresponding Drum Play button to vary the
individual tuning (plus or minus a fifth) for each drum set for tuning change.
As soon as you move the slider, the corresponding display graph will jump to
its new position. The higher-pitched the drum, the taller the bar; the lowerpitched the drum, the shorter the bar. With those sounds set for decay
change, varying the slider changes the amount of decay. The longer the
decay, the taller the bar; the shorter the decay, the shorter the bar.
1G BACKGROUND: SETTING UP ADDITIONAL SOUNDS
This is where things really start to get interesting, thanks to a cute little trick called
multimode and its offshoots, multipitch and multilevel.
Multipitch takes a single drum sound or handclap and “spreads” its pitch over all eight
Drum Play buttons, with the leftmost button playing the highest pitch and the
rightmost button playing the lowest pitch. With cymbals, multipitch spreads the decay
with the leftmost button playing the longest decay and the rightmost button playing
the shortest decay.
Multilevel takes a sound and spreads the level over all eight Drum Play buttons, with
the leftmost button playing the softest level and the rightmost button playing the
loudest level.
© E-mu Systems, Inc. 1985 Page 16
Enhanced by The Emulator Archive 2002 www.emulatorarchive.com
Page 17

GETTING READY
1H ACCESSING/EXITING MULTILEVEL (SET-UP 12 & 13)
1. Activate the SET-UP module by pressing its button. Its LED will glow, and the
display will ask for a function from the list printed to the right of the SET-UP
button.
2. Key in 12 (MULTI-LEVEL). Select the sound to be multileveled by using
SELECT to select the Bank containing the sound, then press the sound’s Play
button.
3. To edit the factory preset levels, select MIX with the TUNE- MIX-MULTI
switch and vary the sliders to change levels. The display shows each sound’s
relative level. When the levels are set as desired, press ENTER.
4. While in multilevel, you may also edit the pitch for each level of the sound (or
the decay if the sound is set up for decay variations instead of tuning
variations). Press the TUNE-MIX- MULTI button and select TUNE/DECAY;
the display shows the relative pitch of each sound. Use the sliders as
described earlier to set the pitch.
Whenever you select the bank containing the multileveled sound, it will still be in
multilevel mode. This will be indicated by the MULTIMODE LED (next to the TUNEMIX-MULTI switch) being on.
To turn off multilevel:
1. Activate the SET-UP module (if it is not already) and select the bank to “de-
multilevel”. The display should be asking “Setup Function?”; if it instead
shows the bar graph, press ENTER to alert the computer it can move on to
the next task.
2. Key in 13 (EXIT MULTI-MODE). When the display asks “Exit Multi Mode?”,
press YES. The Bank will return to its normal preset assignments.
Note: If you later change the mix of a segment or song that contains multilevel
effects, these will all increase or decrease proportionately in level. For example, if
you programmed some soft sounds and medium level sounds, increasing the mix
level will bring up all the sounds by an equivalent amount (within the dynamic range
limits of the drum machine, of course).
© E-mu Systems, Inc. 1985 Page 17
Enhanced by The Emulator Archive 2002 www.emulatorarchive.com
Page 18

GETTING READY
1I ACCESSING/EXITING MULTIPITCH (SET-UP 11 & 13)
1. Activate the SET-UP Module by pressing its switch. Its LED will glow, and the
display will ask for a function from the list printed to the right of the SET-UP
switch.
2. Key in 11 (MULTI-PITCH). Select the sound to be multi-pitched by using
SELECT to select the bank containing the sound, then press the sound’s Play
button. That sound will now be spread across the Play buttons at factory preselected pitches.
3. If you want to edit the factory preset pitches, select TUNE/DECAY with the
TUNE-MIX-MULTI switch and vary the sliders to change pitch. The display
shows the relative pitch of each sound. When the tuning is as desired, press
ENTER.
4. While in multipitch, you may also edit the level for each sound of the
multipitched Bank. Press the TUNE-MIX-MULTI button and select MIX, then
use the sliders as described earlier to set the levels.
5. Whenever you select the bank containing the multipitched sound, it will still be
in multipitch mode. This will be indicated by the MULTIMODE LED (next to
the TUNE-MIX-MULTI switch) being on.
To turn off multi-pitch:
1. Activate the SET-UP module (if it is not already) and select the bank to “de-
multipitch”. The display should be asking “Set-up Function?”; if it instead
shows the bar graph, press ENTER to alert the computer it can move on to
the next task.
2. Key in 13 (EXIT MULTI-MODE). When the display asks “Exit Multi Mode?”,
press YES. The Bank will return to its normal preset assignments.
Notes: Once a segment has been recorded with sounds at particular pitches, these
pitches cannot be modified after the fact for that segment unless you erase the sound
and re-record it.
You can enter and exit multipitch and multilevel modes while recording to gain
additional drum sounds. Pitch changes can also be recorded along with the segment.
© E-mu Systems, Inc. 1985 Page 18
Enhanced by The Emulator Archive 2002 www.emulatorarchive.com
Page 19

GETTING READY
1J ACCESSING DYNAMICS (SET-UP 14)
Yes, the harder you hit the buttons the louder the sound. We did this in such an
incredibly ingenious way that engineers across the country will burst out laughing
when they take the SP-12 apart for the first time.
1. Activate the SET-UP Module by pressing its switch. Its LED will glow, and the
display will ask for a function from the list printed to the right of the SET-UP
switch.
2. Key in 111 (DYNAMIC BUTTONS). The display asks whether you want
dynamic buttons or not; press YES if you do.
3. Hit the buttons to check out the dynamics.
All buttons for all banks are now dynamically responsive. To turn off dynamics, select
Function 1k in the SET-UP module and when the display asks “Dynamic Buttons?”,
press NO.
1K STORING (DEFINING) A MIX (SET-UP 15)
The SP-12 memorizes up to eight different mixes; each mix contains the level data
for all four banks. When creating a song, this mix information can be stored as part of
the song so that different songs (or different sections of the same song) have
different mixes. To store a mix for later use:
1. After perfecting the mix, activate the SET-UP Module by pressing its switch.
Its LED will glow, and the display will ask for a function from the list printed to
the right of the SET-UP switch.
2. Key in 15 (DEFINE MIX). The display will ask “Save Current Mix As Mix #“.
Assign a number from 1 to 8 (do not include leading zeroes in this case);
when the display confirms your choice, press ENTER.
We will describe how to audition a particular mix in the next Section; in Section 3G,
we’ll cover how to select the desired mix when creating a song.
Note that channel assignments (Section 1M) and pitch/decay information
(Section 1F) are also stored with the mix, thereby allowing programmed
channel changes and pitch/decay changes.
© E-mu Systems, Inc. 1985 Page 19
Enhanced by The Emulator Archive 2002 www.emulatorarchive.com
Page 20

GETTING READY
1L AUDITIONING (SELECTING) A MIX (SET-UP 16)
You may select an already defined drum mix (see Section 1K) which will assign the
mix levels to the drum sounds in all four banks.
1. Activate the Set-Up module by pressing its switch. Its LED will glow, and the
display will ask for a function from the list printed to the right of the SET-UP
switch.
2. Key in 16 (SELECT MIX). The display will ask for the desired mix number (as
defined according to the instructions in Section 1K). Enter a number from 1 to
8 (do not include leading zeroes in this ease); when the display confirms your
choice, press ENTER.
1M ASSIGNING DRUM SOUNDS TO OUTPUT CHANNELS
The MIX OUT jack carries a mono mix of the SP-12’s drums; MIX VOLUME
regulates the overall level.
However, the SP-12 also has eight individual output channels. These are typically
used in the studio to send different sounds to different mixing console channels.
Since there are more than eight drum sounds, there is a default pre-set assignment
that determines which drums go to which channels. However, this may be changed in
the following manner:
1. Activate the SET-UP Module by pressing its switch. Its LED will glow, and the
display will ask for a function from the list printed to the right of the SET-UP
switch.
2. Key in 17 (CHANNEL ASSIGN). The display asks you to select a sound;
select it using the appropriate Bank select and Drum Play buttons. Note that
you can consecutively hit different play buttons to see the channels to which
different sounds are assigned.
3. The display now confirms your Drum Sound choice and shows its existing
output channel assignment. To change this assignment, enter a number from
1 to 8 via the keypad. The drum sound will now appear at the like-numbered
output jack on the rear panel. This information is stored with mixes (Section
1K).
Note: Each output Is filtered differently. Channels 1 and 2 have dynamic filters
whose bandwidth varies in time, channels 3 and 14 are muted by a constant amount,
channels 5 and 6 are somewhat less muted, and channels 7 and 8 are unfiltered.
Knowing this can be handy when assigning sampled sounds, as different sampled
sounds may respond better to particular amounts of filtering. To hear the filter effects,
select a drum sound and assign it to each channel in succession, carefully noting the
difference in sound between the different channel assignments.
© E-mu Systems, Inc. 1985 Page 20
Enhanced by The Emulator Archive 2002 www.emulatorarchive.com
Page 21

GETTING READY
1N PLAYING BACK SEGMENTS
You can record and play back 100 rhythm patterns called segments. These are
numbered from 00 through 99. Several segments were loaded into the SP-12 at the
factory; here is how to play them.
1. Press the SONG/SEGMENT button a few times. The SEGMENT light shows
you are in segment mode, and can play back or record segments. The SONG
light shows you are in song mode. For now, choose the segment mode. The
display will show the segment number and tempo In Beats per Minute.
2. To select a different segment, key in two digits with the keypad. Leading
zeroes must be entered for single digit segments (i.e. press 0 then 7 to select
segment 07).
3. Make sure METRONOME LEVEL is up so that you can hear any beep
messages from the SP-12 in subsequent steps.
4. Press RUN/STOP. Several things will happen: the segment will play
continuously, the RUN/STOP light will glow (except for a blink at the
beginning of the segment), and you will hear a metronome clicking along with
the segment (adjust METRONOME LEVEL to suit). If instead of hearing a
rhythm pattern you hear a beep, the segment you’ve selected has never been
put in record mode (which means it cannot contain any drum sounds). Key in
a different segment number. To stop a segment, press RUN/STOP a second
time. A rear panel jack parallels the RUN/STOP switch for remote
applications.
5. Repeat step 2 to select another segment. If the SP-12 is running, the new
segment will begin playing as soon as the current segment ends. If the
current segment ends and the SP-12 stops (RUN/STOP light goes off), the
new segment you’ve selected is empty.
Note: Remember as you go through these examples that the ENTER button, in
addition to its normal enter function, is a failsafe/reset button as long as the display
shows a flashing cursor. For example, if you accidentally enter the wrong first digit of
a segment number, before doing anything else press ENTER. This restores the SP12 to where it was before you hit the wrong key.
© E-mu Systems, Inc. 1985 Page 21
Enhanced by The Emulator Archive 2002 www.emulatorarchive.com
Page 22

GETTING READY
1O SETTING TEMPO
The tempo may be varied from 40 to 240 Beats Per Minute. Segment tempo
settings are “remembered” by the SP-12 only while you are in segment mode.
If you switch over to song mode (as described later), the SP-12 acquires the
tempo of the selected song. If you then switch back to segment mode, the SP12 will retain this song tempo.
1. To change tempo (the SP-12 may be stopped or running), press TEMPO. The
cursor will flash under the first digit of the tempo display. There are five ways
to enter tempo:
Press the Right Arrow button once to increase the tempo by 1 BPM. Hold
the button down to increment through the tempo 1 BPM at a time.
Press the Left Arrow button once to decrease the tempo by 1 BPM. Hold
the button down to decrement through the tempo 1 BPM at a time.
Use the keypad to enter the tempo directly, accurate to 1/10th BPM (four
digits). Leading zeroes must be entered.
Use Slider #1 to vary the tempo.
“Tap” the tempo you want on the TAP/REPEAT button. The SP-12 will
compute the time between taps and translate that to Beats Per Minute. If
desired, you can tap continuously and when the groove feels just right,
stop tapping; the last time interval between taps will be remembered as
the tempo. The rear panel TAP/AUTO REP jack accepts a momentary
action, normally open footswitch if you want to tap with your foot instead
of your hand.
When the display shows the desired tempo press ENTER. This tempo will apply to all
segments when you are in segment mode.
© E-mu Systems, Inc. 1985 Page 22
Enhanced by The Emulator Archive 2002 www.emulatorarchive.com
Page 23

GETTING READY
1P PROGRAMMING THE METRONOME
When playing back or recording segments, you can program the metronome for a
variety of different beats. The metronome produces an accented click on the first
beat of each measure and a softer click on the other beats.
1. The SP-12 must be stopped (RUN/STOP light off), and the SEGMENT light
must be on.
2. Press METRONOMES The Right Arrow and Left Arrow buttons step through
the various metronome options:
Off no metronome output
1/4 quarter notes (this is the default value)
1/4 t quarter note triplets
1/8 eighth notes
1/8 t eighth note triplets
1/16 sixteenth notes
1/16 t sixteenth note triplets
1/32 thirty-second notes
1/32 t thirty-second note triplets
Click sends a 24 pulses-per-quarter-note signal out the rear channel MET
OUT jack for synchronizing other devices to the SP-12.
3. When the display shows the desired metronome value, press ENTER.
Note: The higher metronome speeds are useful when recording a fast, complex
drum part since you may slow the tempo way down, yet still have clicks occurring
regularly enough so that you know where you are in the segment. (If the tempo is
very slow and you select, for example, quarter note clicks, the clicks occur too far
apart to be helpful.)
© E-mu Systems, Inc. 1985 Page 23
Enhanced by The Emulator Archive 2002 www.emulatorarchive.com
Page 24

RECORDING SEGMENTS
PART 2: RECORDING SEGMENTS
2A OVERVIEW
2B ERASING A SEGMENT
2C “DIMENSIONING” A SEGMENT
2D UNDERSTANDING AUTO CORRECT
2E SETTING AUTO CORRECT
2F RECORDING A SEGMENT IN REALTIME
2G RECODING A SEGMENT IN STEP TIME
2H ERASING A SPECIFC DRUM SOUND
2I ERASING A SPECIFIC NOTE OF A DRUM TRACK
2J COPYING AND APPENDING SEGMENTS
2K ADDING SWING
2L SWAPPING DRUM SOUNDS
2M COPYING SOUNDS
2N CLEARING THE MEMORY
© E-mu Systems, Inc. 1985 Page 24
Enhanced by The Emulator Archive 2002 www.emulatorarchive.com
Page 25

RECORDING SEGMENTS
2A RECORDING A SEGMENT - OVERVIEW
There are two ways to record a segment, real time and step time. In both cases,
recording initially consists of:
1. Programming the metronome (if necessary).
2. Erasing previously recorded sounds (if necessary).
3. Defining the segment’s time signature and the number of measures in the
segment (“dimensioning” the segment).
4. Setting Auto Correct (to correct for timing errors in real time recording; this
also determines the step rate in step time recording, and the repeat rate
when recording repetitive “drum rolls” as described in Section 2F).
5. Selecting the desired bank of drum sounds for recording (this may be
changed at any time during the recording process).
6. In real time, entering record mode and playing drum sounds (the SP-12’s
memory remembers what you play) in time with the metronome; in step
time, entering record mode and stepping through each step of the
segment, playing drum sounds as required at the various steps. While in
real time, you can record pitch changes, enter/exit multipitch or multilevel
mode, change Auto Correct, change tempo, or switch banks if desired.
7. After recording the segment, you can make changes with either real time
or step time editing.
We have already covered the first step in recording (programming the metronome),
as well as the fifth step (selecting different drum sounds). Now let’s cover the
remaining steps in the order given above.
© E-mu Systems, Inc. 1985 Page 25
Enhanced by The Emulator Archive 2002 www.emulatorarchive.com
Page 26

RECORDING SEGMENTS
2B ERASING A SEGMENT
Erasing a segment clears out all existing drum sounds, and automatically redimensions the segment to two measures of 4/4. Before erasing a segment, always
check whether that segment already contains something you want to keep. To erase:
1. Stop the SP-12, confirm that you are in segment mode, and press ERASE.
2. The display helpfully mentions that you can erase either a sound or segment.
Erasing a sound will be covered later; to erase a segment, enter the two-digit
segment number. The display will replace the flashing cursor with the number
you entered, and ask you to confirm that this is the segment you want to
erase.
3. If this is the segment to be erased, press YES. If not, press NO and the SP-
12 will return you to step 2.
4. After erasing, the display will return to whatever segment you had keyed in
prior to starting the erase process. For example, if you had first selected
segment 01 but then decided to erase segment 51, after erasing 51 you
would return to 01. If you want to continue working with segment 51, make
sure you key it back in again so that 51 appears in the display.
2C “DIMENSIONING” A SEGMENT (SETTING TIME SIGNATURE AND/OR BAR LENGTH)
“Dimensioning” a segment defines the segment’s time signature (from 1 to 99 beats
per measure), and the number of bars and beats per segment (up to 99 bars and 99
beats; thus, you could have a segment that was, say, 2 measures and 3 beats long).
If desired, each segment may be dimensioned differently. If you are not familiar with
time signature notation, see Appendix B.
After erasing a segment, it assumes a length of two measures and a 4/4 time
signature. If this dimensioning suits your musical needs, skip ahead to the next
section. Otherwise, there are two ways to dimension a segment: standard
dimensioning and real-time dimensioning. Make sure you are in segment mode, and
then proceed with whichever procedure seems more suitable for re-dimensioning the
segment.
© E-mu Systems, Inc. 1985 Page 26
Enhanced by The Emulator Archive 2002 www.emulatorarchive.com
Page 27

RECORDING SEGMENTS
Part 1: Standard Dimensioning
1. Set the time signature by pressing TIME SIGNATURE. The display will
probably show the 04/4 default time signature and a cursor will be flashing
under the first digit. There are three ways to enter the desired time signature
numerator (number of beats per measure):
Press the Right Arrow button once to increase the numerator value by
one. Hold the button down to increment through the tempo one digit at
a time.
Press the Left Arrow button once to decrease the numerator value by
one. Hold the button down to decrement through the tempo one digit
at a time.
Use the keypad to enter the numerator directly. Leading zeroes must
be entered.
2. When the display shows the desired time signature numerator press ENTER.
The cursor will now flash under the first digit of the denominator (i.e. the
rhythmic value of each beat in the measure); the default value is 4.
3. There are four denominator values: 4
(sixteenth note), and 32 (thirty-second note). Tap the Right Arrow key to step
from longer to shorter rhythmic values; tap the Left Arrow key to step from
shorter to longer rhythmic values (or hold the button to “fast forward”).
4. When the display shows the desired time signature denominator press
ENTER. The time signature will now be stored with the segment.
5. To set the number of measures and beats in the segment (segment length),
press SEGMENT LENGTH. The display will probably show the default value
of 02 bars, 00 beats.
6. To increase the number of measures in a segment (up to 99), press Right
Arrow. Tap this button to go forward a digit at time, or hold it down to “fast
forward”. To decrease the number of measures in a segment, (down to 1), tap
or hold Left Arrow. You may also use the keypad to enter the number of bars.
7. When the display shows the desired segment length, press ENTER. You may
now select the number of additional beats in the segment.
8. To increase the number of additional beats in the segment (up to 99), press
Right Arrow. Tap this button to go forward a digit at time, or hold it down to
“fast forward”. To decrease the number of additional beats in the segment,
(down to 1), tap or hold Left Arrow. Or, enter the number of additional beats
with the keypad.
9. When the display shows the desired number of additional beats in the
segment, press ENTER. Dimensioning is now complete. A segment cannot
be re-dimensioned once it has been recorded.
(quarter note), 8 (eighth note), 16
© E-mu Systems, Inc. 1985 Page 27
Enhanced by The Emulator Archive 2002 www.emulatorarchive.com
Page 28

RECORDING SEGMENTS
Part 2: Real-Time Dimensioning
Real-time dimensioning mode is useful when you want a segment’s length to be
other than some number of whole measures and beats (i.e. if you wanted 2
measures, 1 beat, and just a tiny bit more).
1. Press SEGMENT LENGTH then press RUN/STOP; the metronome will click
and the display will count off the beats and measures as they go by.
2. After the appropriate number of beats and measures have gone by, press
RUN/STOP a second time. If you do not press RUN/STOP precisely on the
beat, it will be auto corrected by the SP-12 (see next section for more
information on Auto Correct).
3. If you miss the desired end point of the segment, hit RUN/STOP again to re-
start the process. Press RUN/STOP again when the segment is the desired
length. Also note that you can edit this setting (until the segment is recorded)
by using the Right Arrow, Left Arrow, and keypad buttons (this works similarly
to step 8 in Part 1).
Note: If you dimension to more than an even beat (for example, 2 bars, 1 beat, and
an eighth note), the display will indicate a + sign.
© E-mu Systems, Inc. 1985 Page 28
Enhanced by The Emulator Archive 2002 www.emulatorarchive.com
Page 29
RECORDING SEGMENTS
2D UNDERSTANDING AUTO CORRECT
Auto correct lets you create patterns with perfect timing by placing whatever drum
sound you play on your choice of the nearest eighth note, eighth note triplet,
sixteenth note, sixteenth note triplet, thirty-second note, or thirty-second note triplet.
(For more information on rhythmic notation, see Appendix B.)
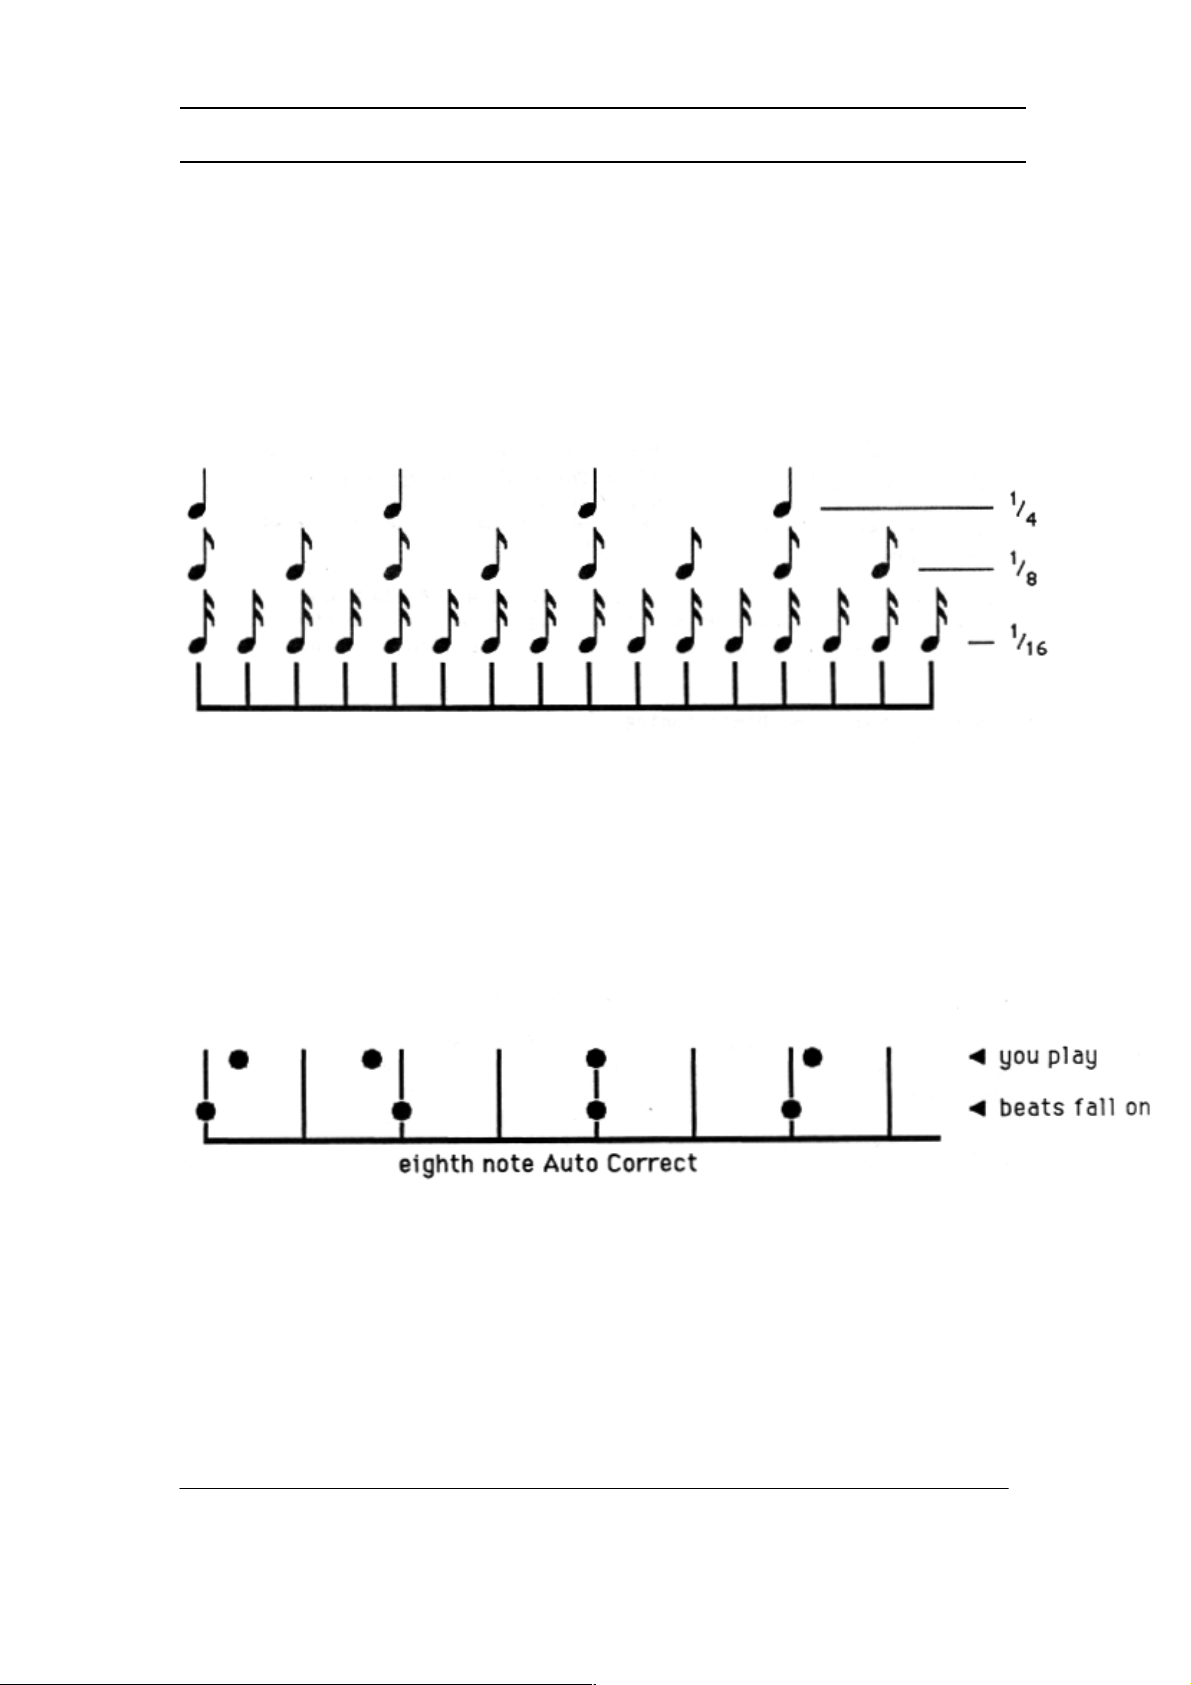
To understand how this works, consider Fig. 2-1, which shows one measure of 4/4
music (there are four quarter notes, eight eighth notes, and sixteen sixteenth notes in
a measure of 4/4.
Fig. 2-1
Suppose you want to record a bass drum on every quarter note, but your sense of
timing is a little shaky. The upper row of dots in Fig. 2-2 shows where you might have
played the four bass drum beats. The first one is a little behind the beat, the second a
little in front of the beat, the third right on the beat, and the fourth slightly behind the
beat. The lower row of dots in Fig. 2-2 shows how setting Auto Correct to eighth note
resolution puts each drum sound on the nearest eighth note, thereby correcting a
not-so-tight bass drum part for perfect timing.
Fig. 2-2
Now consider Fig. 2-3, which shows Auto Correct set to sixteenth note resolution. In
this case, the beats you played have been assigned to the nearest sixteenth note -which is fine on beats 3 and 4 but not on 1 and 2.
© E-mu Systems, Inc. 1985 Page 29
Enhanced by The Emulator Archive 2002 www.emulatorarchive.com
Page 30

RECORDING SEGMENTS
Fig. 2-3
This illustrates an important point: Use the least amount of resolution needed. If you
are recording a simple snare back beat, there’s no point in using an Auto Correct
setting with any more resolution than eighth notes. To record something more
complex, set a finer resolution (such as sixteenth or even thirty-second notes).
You may change Auto Correct while you are in segment mode, whether the SP-12 is
running or stopped. If you change Auto Correct while the SP-12 is running, the
change takes effect at the end of the segment. Changing Auto Correct as desired
takes the pressure off of recording long drum parts -- use low resolution to record
most of a part, and then switch over to finer resolution to record more complex
rhythms. Note that recording triplets is easy; since there are four triplet Auto Correct
options, and that alternating between triplet and non-triplet Auto Correct modes lets
you record complex polyrhythms.
Another option is high-resolution mode, where the SP-12 places beats exactly where
you play them rather than “rounding them off” to the nearest specified note. This
allows syncopation, beats which slightly lead or lag the rhythm, and so on.
When programming in step time, the Auto Correct setting determines the rhythmic
value of’ each step. For example, with an Auto Correct setting of 1/8, you will step
through the song an eighth note at a time. Selecting HiRes mode steps through the
song at a rate equivalent to sixty-fourth note triplets. See later for more information
on step time recording.
© E-mu Systems, Inc. 1985 Page 30
Enhanced by The Emulator Archive 2002 www.emulatorarchive.com
Page 31

RECORDING SEGMENTS
2E SETTING AUTO CORRECT
To set Auto Correct, the SP-12 must be in segment mode. The SP12 can be stopped
or running (recording).
1. Press AUTO CORRECT. The display shows the current Auto Correct value
(default is 1/Il).
2. The Right Arrow and Left Arrow buttons step through the various Auto Correct
options: 1/4 (quarter notes), 1/4t (quarter note triplets), 1/8 (eighth notes), 1/8t
(eighth note triplets), 1/16 (sixteenth notes), 1/16t (sixteenth note triplets),
1/32 (thirty-second notes), 1/32t (thirty-second note triplets), and HiRes (no
auto correction).
3. When the display shows the desired Auto Correct value, press ENTER.
Note: Changing Auto Correct does not affect any parts recorded prior to the
change.
2F RECORDING A SEGMENT IN REAL TIME
Now that you’ve selected a segment and dimensioned it, you’re ready to record drum
patterns into the segment.
1. If necessary, program the metronome and Auto Correct resolution. Set pitch,
mix, and other parameters as desired.
2. While holding down RECORD, push RUN/STOP so that the RUN/STOP light
glows; the metronome will start. The RUN/STOP LED will blink off at the
beginning of the segment, and there will also be an accented metronome beat
at the beginning of each measure.
3. Play the various drums where you want them to occur in the segment. The
segment will repeat over and over, so you may “overdub” as many drum
beats as you like. For example, record a basic bass drum part first, then
snare drum sounds, then some differently tuned snare drum sounds, cowbell,
etc. Any drum sounds you record during one cycle of the segment will play
back on the next cycle of the segment.
4. For drum roll effects (repeat recording), hold down the TAP/REPEAT button
and the Drum Play button. The drum sound will repeat, at the rate set by Auto
Correct, for as long as you hold the TAP/REPEAT and Drum Play buttons. If a
drum is multileveled or multipitched, you can obtain some great effects by
holding down the TAP/REPEAT button and sequentially pressing down the
various Play buttons for the multileveled or multipitched Bank. Plugging a
momentary-action, normally open footswitch into the rear panel TAP/AUTO
REP enables auto repeat for as long as the footswitch is pressed down.
5. Several parameters can be changed while recording for special effects (or
just to make your life easier, for that matter).
a. Switch banks to change drum sounds.
© E-mu Systems, Inc. 1985 Page 31
Enhanced by The Emulator Archive 2002 www.emulatorarchive.com
Page 32

RECORDING SEGMENTS
b. Change tempo by pressing the TEMPO button.
c. Change Auto Correct by pressing AUTO CORRECT and using the
Left and Right Arrow buttons.
d. Change the mix by selecting MIX with the TUNE/MIX/MULTI
button and varying the sliders. Real time level changes are not
recorded along with the segment; to record different drum levels,
either use the dynamic buttons option (Section 1J) or access
multilevel (see step “f” below).
e. Change pitch by selecting TUNE/DECAY with the
TUNE/MIX/MULTI switch. To record pitch changes, vary the slider
as you play the Play buttons. Hint: Don’t forget about the wonders
of Auto Repeat; holding down REPEAT, a drum sound, and
varying its pitch while recording produces some absolutely
fabulous effects (in particular, try the cowbell).
f. Access multimode by activating the SET-UP module (however, its
LED will not light if accessed during recording) and proceed as
described in Sections 1H and Recording Segments, Page 2-10.
You may also exit multimode while recording).
g. Punch out of recording temporarily by pressing RECORD. The
RECORD light will go out. You may now practice a part, check out
drum sounds for sonic compatibility with a segment, and so on. To
resume recording, press RECORD again; the light will go on and
you’re ready to roll.
6. Repeat steps 3 through 5 until you have recorded the complete drum part for
that segment.
© E-mu Systems, Inc. 1985 Page 32
Enhanced by The Emulator Archive 2002 www.emulatorarchive.com
Page 33

RECORDING SEGMENTS
2G RECORDING A SEGMENT IN STEP TIME
Here is an alternate way to record and edit drum sounds which is particularly helpful
with unusual rhythms.
1. If necessary, program the Auto Correct resolution. Auto Correct
determines the rate at which you step through the song; for example,
when set to 1/16th notes you will step through the segment a sixteenth
note at a time. If some notes fall at other Auto Correct times (such as
triplets), you may change Auto Correct at any time to “land” on other
rhythmic values.
Set the initial pitch, mix, and other parameters as desired.
2. Press the STEP PROGRAM button; the SP-12 will automatically go into
step time record mode. There are two ways to step through the segment:
Hold RUN/STOP to run through the segment at the current tempo setting,
or use the Right and Left Arrow buttons to increment a step at a time in
either direction. The display will indicate your exact location in the
segment in measures and beats, and show the step rate. It will also
indicate which sounds are recorded on that beat (up to four sounds; more
than four sounds is indicated by a + symbol in the display).
3. Play the various drums where you want them to occur in the segment, or
hold ERASE and press any Drum Play buttons containing sounds to be
erased. The display will indicate up to four drums at a time. If you record
more than four sounds, a + symbol will appear in the display.
4. Change banks if desired and record more drum parts.
5. Repeat steps 3 and 4 until you have recorded the complete drum part for
that segment. Note that unlike real time recording, you cannot change
pitch, enter/exit multimode, alter level, etc. while in step program mode
(although, of course, a bank set up as a multi-mode bank of drum sounds
will record just like any other bank). Instead, exit step by pressing either
ENTER or STEP PROGRAM, make the desired change, and re-enter step
time.
Note: Step time can also be used to edit or examine segments that have been
recorded in real time, and additional parts can be overdubbed in real time over a
segment recorded in step time.
© E-mu Systems, Inc. 1985 Page 33
Enhanced by The Emulator Archive 2002 www.emulatorarchive.com
Page 34

RECORDING SEGMENTS
2H ERASING A SPECIFIC DRUM SOUND
When you are in segment mode and editing a segment, you may erase a
drum/percussion sound wherever it appears in the segment.
1. Stop the SP-12, confirm that you are in segment mode, and press ERASE.
2. The display helpfully mentions that you can erase either a sound or segment.
To erase a sound, hit the appropriate Play button. The display will replace the
flashing cursor with the name of the sound you entered, and ask you to
confirm that this is the sound you want to erase.
3. If this is the sound to be erased, press YES to return to the Current Segment
display. If not, press NO and the SP-12 will return you to step 2.
2I ERASING A SPECIFIC NOTE OF A DRUM TRACK
Sounds can be erased in either step time or real time. As in the previous section, you
must be in segment mode to erase sounds. To erase specific notes in a drum track in
real time, the SP-12 must be running and in record mode.
1. For real time erasing, set Auto Correct to high resolution mode before
erasing. Otherwise, you will only be able to erase notes on the selected Auto
Correct beats. For step time, select the lowest resolution Auto Correct value
that still steps through all the notes you want to erase; or, choose HiRes,
which steps through the segment at the equivalent of sixty-fourth note triplets.
2. Put the SP-12 into record mode by holding down RECORD and pressing
RUN/STOP so that the RUN/STOP light glows.
3. Press ERASE; while holding down ERASE, press the Play button or buttons
corresponding to the sound or sounds you want to erase. For real-time
erasing, press the Drum Play button(s) down just before the note or series of
notes you want to erase, and release just after the note(s) you want to erase
ends. To erase one note out of a rapid series of notes, tap the Drum Play
button simultaneously with the note to be erased. For step-time erasing, hold
down the ERASE button and press the Play button on the step where the
sound to be erased occurs.
When erasing, you will hear the drum sound in its normal place as it is being erased,
however, the next time the segment cycles the drum sound(s) you erased will be
gone.
Note: For real time erasing, you may use Auto Correct settings other than high
resolution for special effects. For example, suppose you recorded a series of four
sixteenth note snare drum sounds with an Auto Correct of 16. If you erase using an
Auto Correct setting of 8, you could erase only every eighth note; so two of the
sixteenth notes would remain. Returning the Auto Correct to 16 would let you erase
all four sixteenth notes. Note that this technique may be used to advantage if you
want to “thin out” an overly complex drum part.
© E-mu Systems, Inc. 1985 Page 34
Enhanced by The Emulator Archive 2002 www.emulatorarchive.com
Page 35

RECORDING SEGMENTS
2J COPYING AND APPENDING SEGMENTS
You may copy a segment to one or more other segments. For example,
suppose you set up a great hi-hat and bass drum pattern in segment 54. Now
suppose you want segment 55 to contain a snare part recorded over the basic
bass drum/hi-hat pattern, and segment 56 to contain a tom part recorded over
the same basic bass drum/hi-hat part. Rather than having to re-create the hihat and bass drum pattern for segments 55 and 56, you may simply copy
segment 54 to segments 55 and 56 (or any segment to any other segment, of
course). You may also repeat a segment up to 99 times by copying a segment
to itself (“append” mode).
1. You must be in segment mode and the SP-12 must be stopped.
2. Press COPY. The display asks for the two-digit segment number to be
copied, which may be keyed in via the keypad or accessed with the Right
Arrow and Left Arrow buttons. When the display confirms your choice, press
ENTER.
3. The display now asks for the two-digit segment number to be copied to, which
may be keyed in via the keypad or accessed with the Right Arrow and Left
Arrow buttons. When the display confirms your choice, press ENTER.
4. If you entered the same number for both the segment to be copied and the
segment to be copied to (e.g. segment 23 to be copied into segment 23), the
SP-12 will go into append mode and the display will ask you how many times
you want the segment to play, up to 99 times. For example, if you want
segment 23 to play through three times instead of just once, you would enter
03. This number may be keyed in via the keypad or accessed with the Right
Arrow and Left Arrow buttons. When the display confirms your choice, press
ENTER.
Notes: Copying to a segment erases any existing information in the segment to
which you are copying. Therefore, if you copy to a segment that already contains
data the display will ask you whether you want to overwrite or not. Trying to copy
from an empty segment produces the display “segment empty”.
You cannot “unappend” a segment once you’ve appended it. So, if’ you want to keep
a segment but also create a longer, appended version, first copy the segment you
want to append to another segment. Next, append this second segment. The second
segment will contain the appended version of the original segment, yet the original
segment still exists in its unaltered form.
You may re-copy an already copied segment.
Long segments use up a lot of memory. If you plan to repeat a segment several
times, it’s better to use the song mode repeat commands as described in Section 3F.
However, if you plan to modify some parts of the appended segment, then it is
necessary to append.
© E-mu Systems, Inc. 1985 Page 35
Enhanced by The Emulator Archive 2002 www.emulatorarchive.com
Page 36

RECORDING SEGMENTS
2K ADDING SWING
While in segment mode, you may specify that a segment have a particular rhythmic
swing to it. The SP-12 defaults to a “swing factor” of 50%, which means that each
quarter note is weighted so that the first eighth note takes up 50% of the quarter
note, and the second eighth note takes up the other 50%. This is the way you would
normally expect things to be.
However, you may change the swing factor to 514%, 58%, 63%, 67%, or 71%. For
example, with a swing factor of 58%, the first eighth note spreads out slightly to take
up 58% of the quarter note, while the second eighth note shrinks slightly so that it
takes up 142% of the quarter note. This lets you program a swinging, less
metronomic feel to individual segments.
To program a segment for swing, you must be in segment mode. Then, follow these
steps:
1. The SP-12 must be stopped (RUN/STOP light off). Press SWING.
2. The display shows the current swing setting for the selected segment. The
Right Arrow and Left Arrow buttons step through the various swing options.
3. When the display shows the desired swing value, press ENTER.
Notes: Swing can help add a more human “feel” to a series of repeating segments.
For example, if you repeat the same segment four times, try setting a swing factor of
514% for, say, the third segment. This results in a series of segments that are more
psycho-acoustically interesting than merely repeating the same pattern over and
over.
67% is considered the “classic” jazz swing factor, where the first eighth note is 2/3 of
a quarter note, and the second eighth note is 1/3 of a quarter note (i.e. the second
eighth note behaves more like an eighth note triplet). If this sounds too “perfect”, try a
swing factor of 64% instead. The results will be similar, but the “feel” will be slightly
different.
If you’re trying to record or erase in a segment that has a swing factor other than
50%, there are two cautions. To erase a specific note, you have to erase where the
note would normally occur If the segment had a 50% swing factor. If you record while
a segment is in swing mode, the beats may or may not fall where you want them to
fall. Therefore, it’s best to go out of swing mode when recording or erasing, then reenter swing mode after you’ve finished your alterations.
© E-mu Systems, Inc. 1985 Page 36
Enhanced by The Emulator Archive 2002 www.emulatorarchive.com
Page 37

RECORDING SEGMENTS
2L SWAPPING DRUM SOUNDS
After recording the segment, you might come to the realization that a part would
sound better with, say, the Electric Snare than the regular Snare. No problem! Just
swap sounds...
1. Activate the SET-UP module and key in 23 (SPECIAL) then 18 (special
function “swap sound”). The display will ask which original sound you want to
swap. Press the appropriate play button.
2. The display now asks you for the sound you want swapped in place of the
original sound; again, press the appropriate Play button. If the display
confirms your choice, press YES. Otherwise, press NO to stop the swapping
process. Note that if the original sound has pitch or other changes, the
swapped sound will acquire the same characteristics.
Swapping is particularly useful when sampling. Suppose you record a part with one
snare drum sound, and then six months later you sample a new, mind-boggling snare
sound. Simply record the new sample into one of the User sounds, and swap the
existing snare sound for the User sound.
2M COPYING SOUNDS
You may copy any sound into any other sound, thus replacing the original sound with
the copy. Generally this function is used to replace existing sounds with sampled
sounds; it will be described further in Section 4A.
1. Activate the SET-UP module and key in 23 (SPECIAL) then 17 (special
function “copy sound”). The display will ask which sound you want to copy.
Press the appropriate Play button.
2. The display now asks you for the destination (where the sound will be copied
to); again, press the appropriate Play button. If the display confirms your
choice, press YES. Otherwise, press NO to stop the copying process.
Hint: Copying sounds is also useful if you want one sound to go to several outputs.
This lets you do such things as create harmonies.
© E-mu Systems, Inc. 1985 Page 37
Enhanced by The Emulator Archive 2002 www.emulatorarchive.com
Page 38

RECORDING SEGMENTS
2N CLEARING THE MEMORY
If you reach a memory FULL condition (as indicated by the display), save what you
have on cassette or disk. After doing this, you will probably want to clear some or all
data in the SP12’s memory to create more space. Another occasion where you might
want to clear data is if you’ve finished working on a song/segment or group of
songs/segments, saved the data, and want to start over from scratch. Here’s how to
clear data:
1. Activate the SET-UP module by pressing its switch. Its LED will glow, and the
display will ask for a function from the list printed to the right of the SET-UP
switch.
2. Key in 23 (SPECIAL). We hid the memory clearing functions in the SPECIAL
section to make it harder to erase things accidentally. Now move Slider #1 to
catalog the various special functions; note that there are three separate
memory-clearing options.
3. Key in 12 to clear all memory. The display will ask if you really want to do this.
If so, press YES.
4. Key in 15 to clear all sound memory (this erases all samples in the SP-12).
The display will ask if you really want to do this. If so, press YES.
5. Key in 16 to clear all sequence memory. This keeps the samples intact but
erases the various segment and song patterns. The display will ask if you
really want to do this. If so, press YES.
6. 6. De-active the SET-UP module ……… and start filling up the memory again!
2M CHECK REMAINING MEMORY
Whenever the SP-12 is stopped, you may check the remaining amount of memory by
activating the SET-UP module, keying in 23 for the special function menu, and keying
in 13 to select the memory remaining function. The display will show the amount of
sequence memory available (expressed as a percentage) and the amount of sound
(sampling) memory in seconds.
If you find yourself running out of memory often, make sure you read Section 3M
(Efficient Use of Memory)
© E-mu Systems, Inc. 1985 Page 38
Enhanced by The Emulator Archive 2002 www.emulatorarchive.com
Page 39

CREATING A SONG
PART 3: CREATING A SONG
3A CREATING A SONG: OVERVIEW
3B SELECTING A SONG
3C CHAINING SEGMENTS TOGETHER
3D ENDING A SONG
3E EDITING SONGS (STEPPING, INSERTING, DELETING)
3F USING REPEATS
3G CHANGING THE SONG DRUM SOUND MIX
3H SETTING SONG TEMPO
3I PROGRAMMING TEMPO CHANGES WITHIN A SONG
3J JUMPING TO A SUB-SONG
3K PROGRAMMING TRIGGER OUTPUTS
3L STARTING AT A SPECIFIED POINT IN THE SONG
3M EFFICIENT USE OF MEMORY
© E-mu Systems, Inc. 1985 Page 39
Enhanced by The Emulator Archive 2002 www.emulatorarchive.com
Page 40

CREATING A SONG
3A CREATING A SONG: OVERVIEW
There are two ways to create songs using segments. One way is to simply run the
SP-12 and key in each segment just before you want it to appear. However, a far
easier way is to go into song mode (by pressing the SONG/SEGMENT button), and
programming a sequence of segments to create a song.
We suggest first writing out the order of segments on paper, and also noting any
repeats, tempo changes, or mix changes. Writing the song out first makes the whole
process go much more smoothly.
Selecting a song for playback, recording, or editing consists of:
Pressing the SONG/SEGMENT button to go into song mode (the SONG light
glows).
Selecting one of 100 different songs to work on (00 to 99).
When you first enter song mode, the display’s top line shows the current song
number and song tempo.
To play back the song, press RUN/STOP.
To create a song, press the REC/EDIT button to enter EDIT mode (its LED will
light). EDIT mode is a safety feature that prevents accidental song step erasures.
After entering EDIT mode, key in the number of each segment you want chained
together, in the order in which you want them to play. To save memory space,
repeat commands let you repeat a segment (or group of segments) many times.
When creating a song, you are automatically in Edit mode and have the following
editing options:
Stepping sequentially through each step (either up or down).
Inserting an additional step at any place in the song.
Deleting a step at any place in the song.
Choosing a drum mix, for the particular song or any section of the song.
Choosing the tempo for the particular song, including accelerandos and
ritardandos (speeding up and slowing down). This can be done instantly, or over
a selected number of steps.
Adding repeats when a segment plays over many times.
Going to a Sub-song, and returning where you left off after the Sub-song has
played through.
Jump to another song, which can have its own mix, tempo, etc.
© E-mu Systems, Inc. 1985 Page 40
Enhanced by The Emulator Archive 2002 www.emulatorarchive.com
Page 41

CREATING A SONG
Note: When going to song mode from segment mode, segment level and tempo
settings are not transferred over to the song. Instead, each song has its own
programmed tempo (see Section 3H) and can acquire (at any time during the song)
any of the eight previously defined drum sound mixes (see Section 1K).
When it comes time to end the song, you may:
Unconditionally end it.
Repeat the song indefinitely.
Link the end of the song to the beginning of another song.
There are many other features of song mode, such as indefinite repeat, programmed
metronome outputs, and so on. These will be described in detail in this section.
Remember: To work with a song you must be in song mode (press the
SONG/SEGMENT button until the SONG light glows).
3B SELECTING A SONG
To choose a particular song:
1. Press the SONG/SEGMENT button so that the SONG light glows.
2. Key in the two digit song number with the keypad. Leading zeroes must be
entered for single digit song numbers (i.e. press then 7 to select song 07).
The display’s upper line will confirm your choice.
3. To start entering segment numbers, press REC/EDIT. The lower line will
indicate the contents of the first song step -- either END for end (Section 3D),
the number of a segment (Section 3C), a begin repeat (4) sign (Section 3F), a
Mix # (Section 3G), or tempo change command (Section 3I).
© E-mu Systems, Inc. 1985 Page 41
Enhanced by The Emulator Archive 2002 www.emulatorarchive.com
Page 42

CREATING A SONG
3C CHAINING SEGMENTS TOGETHER
As mentioned in the overview, it’s best to write out the order of segments you want to
program into a song. Let’s try a simple example:
Segment # Section of Song
Step 1: 61 Introduction
Step 2: 62 “
Step 3: 61 “
Step 4: 63 “
Step 5: 64 First verse
Step 6: 64 “
Step 7: 64 “
Step 9: End End
Here is how you would write a song using these segments:
1. Make sure you are in song mode (SONG light glows).
2. Select the song you want to program (Section 3B), then press REC/EDIT to
enter EDIT mode.
3. Key in the first segment number (in this case, 61). The display’s lower line
confirms your choice for the first song step.
4. Press ENTER or Right Arrow (whichever you prefer). This enters the first
segment number into step 1, and advances to step 2 (the display’s lower line
now says Step 2: to confirm that you have reached the second step).
5. Key in the next segment number (in this case, 62) in a manner similar to
steps 3 and 4. After you press ENTER or Right Arrow, the display’s lower line
will show Step 3: to indicate that you’re ready to program the next step.
Continue keying in the various segment numbers until the entire eightsegment song has been entered.
6. Proceed to the next section for information on how to end the
© E-mu Systems, Inc. 1985 Page 42
Enhanced by The Emulator Archive 2002 www.emulatorarchive.com
Page 43

CREATING A SONG
3D ENDING A SONG
After programming your song, you have several ways to end it. This assumes that
you’ve already entered all the segments, and that you are one step past the last step
in which you entered a piece of song data (for example, if you’ve entered eight
segments, the display’s lower line should now show Step 9:). Here are your options:
1. To repeat the song indefinitely (loop the song), press END (a flashing cursor
will appear after End), and then press REPEAT. The display’s lower line will
indicate that this step will continuously “loop” the song.
2. To link the end of your first song to the beginning of another song, press END
(a flashing cursor will appear after End), then key in the two-digit number of
the song you want to link. The display’s lower line will confirm your choice by
saying “Link (song number)”.
3. To stop the SP-12 completely after the song, press END (a flashing cursor
will appear after End). Press END a second time; the flashing cursor will
disappear, and the display’s lower line will show End to confirm that the song
ends at this step.
Note: Entering End at step 1 of the song (in other words, pressing END twice as
described above In paragraph 3) erases the song. The display will ask “End Here?
Yes/No” to check if you really want to do this. If you do, press YES.
© E-mu Systems, Inc. 1985 Page 43
Enhanced by The Emulator Archive 2002 www.emulatorarchive.com
Page 44

CREATING A SONG
3E EDITING SONGS (STEPPING, INSERTING, DELETING)
1. Stepping: To change a song step, locate the step with the Right Arrow and
Left Arrow buttons. Pressing Right Arrow increases the step number, Left
Arrow decreases the step number. Tap either key once to move one step at a
time, or hold either key down for a “fast forward” or “fast backward” effect.
When you reach the step you want to change, simply key in the new
information.
2. Inserting: Inserting creates an additional step (or steps) in an existing song.
Consider a situation where you want to insert another segment in a song right
after step 11. First, press Right Arrow or Left Arrow until you reach step 5 (the
step which is right after step 14). Press INSERT. Two things happen: This
step becomes available for entering a song step, and all subsequent steps
are automatically renumbered to reflect the addition of the inserted step (for
example, what used to be step 5 now becomes step 6, step 6 becomes step
7, step 7 becomes step 8, etc.).You may now key in the instruction for the
new step 5 (in this case, it would be a segment number). After entering the
instruction, press ENTER to enter the instruction into the SP- 12’s memory,
unless you want to add more steps. In that case, press INSERT again to add
another insert, and continue as described above.
3. Deleting: Move to the step you want to delete (let’s choose step 8 as an
example) by using the Right Arrow and Left Arrow keys. When step 8 appears
in the left-hand readout, press DELETE. The current step 8 is deleted, and all
subsequent steps are automatically renumbered to reflect the deletion of this
step (step 9 becomes the new step 8, what used to be step 10 becomes step
9, and so on). To delete more steps, continue pressing DELETE.
© E-mu Systems, Inc. 1985 Page 44
Enhanced by The Emulator Archive 2002 www.emulatorarchive.com
Page 45

CREATING A SONG
3F USING REPEATS
You may enclose a segment, or group of segments, inside repeat instructions to
repeat the segment(s) a selected number of times. This not only simplifies song
programming, but also saves memory compared to entering multiple segments. As
you write out the order of steps for a song, take these repeat instruction steps into
account; consider the following song as an example:
Song Step # Segment to
Be Played
Step 1: 61 Step 17: 65
Step 2: 61 Step 18: 66
Step 3: 61 Step 19: 67
Step 4: 61 Step 20: 68
Step 5: 62 Step 21: 65
Step 6: 63 Step 22: 66
Step 7: 67 Step 23: 67
Step 8: 68 Step 24: 68
Step 9: 65 Step 25: 65
Step 10: 66 Step 26: 66
Step 11: 67 Step 27: 67
Step 12: 68 Step 28: 68
Step 13: 65 Step 29: End
Step 14: 66
Step 15: 67
Step 16: 68
Song Step # Segment to
Be Played
© E-mu Systems, Inc. 1985 Page 45
Enhanced by The Emulator Archive 2002 www.emulatorarchive.com
Page 46

CREATING A SONG
We can simplify this by using the repeat function:
Song Step # Segment to be Played or Instruction
Step 1: Begin Repeat
Step 2: 61
Step 3: End repeat 4 (
Step 4: 62
Step 5: 63
Step 6: 67
Step 7: 68
Step 8: Begin Repeat
Step 9: 65
Step 10: 66
Step 11: 67
Step 12: 68
Step 13: End Repeat 5 (
Step 14: End
Here’s how you would use repeat instructions to advantage in this example:
1. At step 1, press REPEAT. The right-hand display shows
sign. Press ENTER to enter this step into the SP-12’s memory. Note that the
SP-12, being such an intelligent fellow, will automatically insert the right kind
of repeat mark -- if there is no begin repeat instruction in the song, it will insert
a begin repeat command when you press REPEAT; if a begin repeat already
exists, then the SP-12 will give you an end repeat command when you press
REPEAT.
2. At step 2, key in the segment number, then press ENTER to enter this step
into the SP-12’s memory.
3. At step 3, press REPEAT; the display’s lower line will show the
sign and the default setting of 02 repeats, with a flashing cursor under the first
digit.
4. Specify the number of times you want the repeat to occur. This can be done
with the keypad, or you can increment the default setting with the Right Arrow
key or decrement the default setting with the Left Arrow key. In this example,
you would key in 04. Leading zeroes must be entered for single-digit repeat
numbers. Finally, press ENTER to enter the number of repeats into the SP12’s memory.
5. Enter segments 62, 63, 67, and 68 as described in Section 3C.
6. When you reach step 8, press REPEAT. The display’s lower line will show a
begin repeat symbol.
7. Enter segments 65, 66, 67, and 68.
┼ 4)
┼ 5)
┼ the begin repeat
┼ end repeat
© E-mu Systems, Inc. 1985 Page 46
Enhanced by The Emulator Archive 2002 www.emulatorarchive.com
Page 47

CREATING A SONG
8. When you reach step 13, press REPEAT to end the repeat, and then press
05 to indicate that you want segments 65, 66, 67, and 68 repeated five times.
Finally, press ENTER to enter this step into the SP-12’s memory.
9. At step 14, press END twice to unconditionally end the song.
10. Now start the SP-12. It will play back the song, with the lower display line
showing each segment as it occurs.
11. Editing: To insert a repeat after entering a series of segments, first stop the
SP-12, and then use the INSERT command to create a new step. You may
then enter a repeat instruction in this new step.
Note: It is possible to create “illegal” repeat commands when using the INSERT and
DELETE buttons, such as having one repeat inside another repeat. The SP-12 will
not follow these illegal commands, but rather, will look for the last begin repeat
command and execute this loop, ignoring any other loops.
3G CHANGING THE SONG DRUM SOUND MIX
A song initially has a default drum sound mix where all drums are at the same level.
However, you may insert a “change mix” command as one of’ the song steps
(usually, the first song step will specify the desired initial mix). Segments, which play
after the change mix command, will reflect the new mix. You may select from any of
the eight drum sound mixes (as defined in Section 1K), and have an unlimited
number of mix changes during the course of a song.
To change a mix, follow these steps:
1. At the song step immediately prior to where you want the mix to change,
press MIX CHANGE. If you have already programmed a song and want to
add a mix change, insert a song step and then press MIX CHANGE. The
display’s lower line will show the song step number and Mix #, with a flashing
cursor after the #.
2. Use the keypad to key in the number representing the desired drum mix (see
Section 1L); leading zeroes are not entered in this case. The display will
confirm your choice of mixes.
3. Press ENTER, Right Arrow, or Left Arrow to enter the change mix command
into the SP-12’s memory.
© E-mu Systems, Inc. 1985 Page 47
Enhanced by The Emulator Archive 2002 www.emulatorarchive.com
Page 48

CREATING A SONG
3H SETTING SONG TEMPO
Each song can have its own programmed tempo from 40 to 240 Beats Per Minute.
1. To change tempo (the SP-12 may be stopped or running and in or out of’
EDIT mode), press TEMPO. (Note: If’ you change tempo while the SP-12 is
running, the tempo setting is not stored and does not loop around if a song
should repeat. For best results, change tempo while the SP-12 is stopped.)
The cursor will flash under the first digit of’ the tempo. There are five ways to
enter tempo:
a. Press the Right Arrow button once to increase the tempo by 1 BPM. Hold
the button down to increment through the tempo 1 BPM at a time.
b. Press the Left Arrow button once to decrease the tempo by 1 BPM. Hold
the button down to decrement through the tempo 1 BPM at a time.
c. Use the keypad to enter the tempo directly, accurate to 1/10th BPM (four
digits). Leading zeroes must be entered.
d. Vary Slider #1.
e. “Tap” the tempo you want on the TAP/REPEAT button. The SP-12 will
compute the time between taps and translate that to Beats Per Minute. If
desired, you can tap continuously and when the groove feels just right,
stop tapping; the last time between taps will be remembered as the
tempo. The rear panel TAP/AUTO REP jack accepts a momentary-action,
normally open footswitch if you want to tap with your foot.
2. When the display shows the desired tempo press ENTER.
© E-mu Systems, Inc. 1985 Page 48
Enhanced by The Emulator Archive 2002 www.emulatorarchive.com
Page 49

CREATING A SONG
3I PROGRAMMING TEMPO CHANGES WITHIN A SONG
The tempo change feature is very handy if you want to program the tempo to speed
up or slow down at specific places in the song. You may introduce tempo changes at
any point in a song; as you write out the song steps, allot a step for each tempo
change instruction.
1. Make sure you are in song mode.
2. At the song step immediately prior to where you want the tempo to change,
press TEMPO CHANGE. If you have already programmed a song and want
to add a tempo change, insert a song step and then press TEMPO CHANGE.
The display will ask you to specify Accelerando (key in 1) or Ritardando (key
in 2).
3. After selecting Accelerando or Ritardando, the display’s lower line will show
the song step number, a quarter note symbol, and +00/00 (for Accelerando)
or -00/00 (for Ritardando). A cursor will be flashing under the first 0.
4. The first pair of digits signifies the tempo increase or decrease In BPM (up to
99, within the constraints of the 140 to 2140 BPM range); the second pair of
digits signifies the number of beats over which this change is to occur (up to
32 beats). Use the keypad to key in the desired BPM change, then press
ENTER. Next, key in the desired number of beats over which the change is to
occur, then press ENTER. Remember to enter leading zeroes if applicable.
The display will confirm your choices.
Example:
+10/08 means that the tempo will increase by 10 BPM over eight
beats.
5. If you want the tempo change to occur instantaneously rather than over a
particular number of measures, the second pair of digits should remain at 00.
6. Press ENTER, Right Arrow, or Left Arrow to enter the tempo change
command into the SP-12’s memory.
Note: As the song plays back, the tempo display will change accordingly to indicate
tempo changes. If a tempo change command is inserted within a repeat, be careful;
the changes will be cumulative with each repeat.
© E-mu Systems, Inc. 1985 Page 49
Enhanced by The Emulator Archive 2002 www.emulatorarchive.com
Page 50

CREATING A SONG
3J JUMPING TO A SUB-SONG
At any point in a song, you may jump to another song. This song will play through in
its entirety, at which point you will return to the first song at the same point at which
you left it. To jump to a Sub-song:
1. When you reach the song step where you want to go to the Sub-song, press
SUB-SONG. The display will ask you for the song to which you want to jump.
2. Key in the desired song number. When the display confirms your choice,
press ENTER.
Note: A song could consist entirely of sub-songs. For example, one “song” could be
programmed to be a first verse, another “song” a second verse, a third “song” an
instrumental, and so on. You could create a song that would simply jump to the
desired sub-songs in order to create a complete song. This technique is very handy
when arranging a song; you can easily shuffle around verses, choruses, intros, and
solos to see which order works best.
Note: If you jump to a sub-song that calls another sub-song, you will not be able to
return to the original song. For example, if song A calls song B which calls song C,
song A will play up to the point where it jumps to song B. Then, song B will play up to
the point where it jumps to song C. When song C has finished playing, it will return to
song B. Song B will then play all the way through without returning to song A.
3K PROGRAMMING TRIGGER OUTPUTS
You may program the SP-12 to output trigger pulses during the course of a song.
This technique allows the SP-12 to generate pulses every quarter note, quarter note
triplet, eighth note, eighth note triplet, sixteenth note, sixteenth note triplet, thirtysecond note, or thirty-second note triplet. These pulses appear at the MET OUT jack
on the back), and can drive arpeggiator inputs on synthesizers, sequencers, and
other drum units for synchro-sonic effects. Best of all, unlike other units where these
pulses start when the song starts and end when the song ends, you can program any
of the six pulse options to occur at any point in the song; you can even program a 24
pulses-per-quarter-note (pqn) output instead of the above-mentioned trigger pulses
for slaving other instruments (such as the Drumulator and Emulator) to the SP-12.
Here’s how to do all these things:
1. When writing out the order of steps for the song, allot one step for each place
you want the trigger pulses to begin, change to a different rate, or stop.
2. Make sure you are in song edit mode. At the song step immediately prior to
where you want the pulses to begin, change, or turn off, press TRIGGER. If
you have already programmed a song and want to add a trigger step, insert a
song step and then press TRIGGER. The display’s lower line will probably
indicate the default setting of Click trigger pulses (TrClick). The Right Arrow
and Left Arrow buttons step through the various trigger options: 0ff, 1/14
(quarter notes), 1/lIt (quarter note triplets), 1/8 (eighth notes), 1/8t (eighth note
triplets), 1/16 (sixteenth notes), 1/16t (sixteenth note triplets), 1/32 (thirtysecond notes), 1/32t (thirty second note triplets), and Click (24 pqn).
© E-mu Systems, Inc. 1985 Page 50
Enhanced by The Emulator Archive 2002 www.emulatorarchive.com
Page 51

CREATING A SONG
3. When the display shows the desired trigger value, press ENTER. When
playing back the song, the trigger pulses will begin (or change, or end,
depending on what you programmed) simultaneously with the next segment
programmed into the song.
4. If you reach a step where you want to change the pulses to a different rate or
stop generating a pulse, repeat steps two and three.
3L STARTING AT A SPECIFIED POINT IN THE SONG
The SP-12 should be stopped. Activate the SET-UP module and key in 21. Enter the
song step where you want the SP-12 to begin; the display’s lower line confirms your
choice. When you press RUN/STOP to start the SP-12, it will begin at the designated
song step.
This starting point will be memorized until changed. For example, if you enter
segment mode and then return to song mode, when you start the song it will begin
playing at the previously specified song step.
Note: If you start in the middle of’ a repeat loop, the repeat instruction will be ignored
by the SP-12, and you will simply proceed to the next step after the repeat
instruction.
© E-mu Systems, Inc. 1985 Page 51
Enhanced by The Emulator Archive 2002 www.emulatorarchive.com
Page 52

CREATING A SONG
3M EFFICIENT USE OF MEMORY
The more efficiently you use memory, the more space you’ll have available for
storing all those wonderful drum patterns. Consider a song where you have
an 8 measure chorus, consisting of 7 identical measures followed by 1
different measure that serves as a “fill”.
The least efficient use of memory would be to treat the entire 8 measure chorus
as one long segment.
A much better use of memory would be to treat the 7 identical measures as 7
distinct song steps, followed by an additional song step for the “fill”.
The best use of memory would be to repeat the Identical measure 7 times (this
only requires three song steps: begin repeat, the segment number of the
measure, and end repeat 7 times), followed by an additional song step for the
“fill”.
Remember, the most efficient way to use memory is to repeat segments
whenever possible. Song steps take up very little memory space compared to the
memory needed to record a segment; any time you can replace segments with
song step instructions, you save considerable amounts of memory.
The shorter the segment, the better. If a segment consists of two identical
measures, change it into one measure and repeat it twice.
Periodically check the remaining percentage of memory (see Section 2M). If you
start getting close to a memory full condition, erase unneeded segments, or
program a smaller number of songs. You may save what you already have on
disk or on tape via the cassette interface (see Part 5).
© E-mu Systems, Inc. 1985 Page 52
Enhanced by The Emulator Archive 2002 www.emulatorarchive.com
Page 53

SAMPLING YOUR OWN SOUNDS
PART 4: SAMPLING YOUR OWN SOUNDS
4A SAMPLING: AN OVERVIEW
4B SETTING LEVELS PRIOR TO SAMPLING
4C ASSIGNING THE SAMPLE TO A PARTICULAR USER NUMBER
AND OUTPUT CHANNEL
4D SETTING THE SAMPLING THRESHOLD
4E SETTING THE SAMPLE LENGTH
4F INITIATING AND STOPPING SAMPLING
4G DELETING (ERASING) A USER SOUND
4H MODIFYING A SAMPLE VIA TRUNCATION AND LOOPING
© E-mu Systems, Inc. 1985 Page 53
Enhanced by The Emulator Archive 2002 www.emulatorarchive.com
Page 54

SAMPLING YOUR OWN SOUNDS
4A SAMPLING: AN OVERVIEW
The SP-12’s sampling capabilities are pretty staggering. Bank 4 has eight sounds
(User 1 through User 8) dedicated to sampled sounds. These samples can come
from acoustic drums, electronic drums, synthesizers, or even records, CDs, and
tapes.
Note that you are not limited to eight sampled sounds; while sounds can only be
sampled into bank 4, once recorded in the bank they may then be copied over to
other banks with the sound copy function. For example, copying bank 4, User 3 to
bank 1, Bass 1 replaces the Bass 1 sound with the sound sampled into User 3.
The original User sound can then be erased to make room for another sound. By
copying and erasing, it’s possible to obtain up to 32 sampled sounds:
Sample eight sounds into bank 14, User 1 through User 8.
Copy these over to bank 1.
Erase the User sounds and record eight new User sounds.
Copy the new User sounds over to bank 2.
Erase the User sounds and record eight new User sounds.
Copy the new User sounds over to bank 3.
Erase the User sounds and record eight new User sounds, which remain in User
1 through User 8.
There is a catch; with the Turbo SP-12 (five seconds of sampling time), the average
length of each sound can only be about 150 milliseconds long (5 seconds divided by
32 sounds). On the other hand, since the SP-12 sounds are so gorgeous it’s doubtful
you would want to replace all of them with sampled sounds anyway. If you’re that
serious about sampling, then give E-mu a call and ask them to tell you about the
Emulator II...
Obtaining high-quality samples, and making optimum use of the standard available
memory sampling space of 1.2 seconds, takes some practice. This Chapter of the
manual gives the basics of sampling, while the Appendix gives additional tips and
techniques to help you create top-quality samples.
Sampling always begins by activating the Sample module.
© E-mu Systems, Inc. 1985 Page 54
Enhanced by The Emulator Archive 2002 www.emulatorarchive.com
Page 55

SAMPLING YOUR OWN SOUNDS
4B SETTING LEVELS PRIOR TO SAMPLING
There are two Sample module functions involved in level setting: VU Mode (SAMPLE
1) and Level (SAMPLE 3). The module’s GAIN control trims the record level, just like
the record level control on a tape recorder.
1. Plug the output of the sound being sampled (microphone, Synth drum output,
etc.) into the rear panel SAMPLE IN jack.
2. Activate the SAMPLE module; this automatically puts the SP-12 in VU mode
(SAMPLE 1). (If you select another SAMPLE function at some point, entering
the data for that function usually returns you automatically to VU mode.)
The left of the display’s top line will show the User Sound number where the
sample will be recorded; this defaults to the lowest available empty User
Sound number.
The right of the display’s top line will show the preamp gain setting, which
defaults to the last selected value (for a new SP- 12, this is +00 dB). +00 dB
is good for line level signals, +20 dB works for most electrified instruments,
and +140 is suitable for mic level signals. For the highest-quality recording,
we recommend using the +00 dB setting exclusively. If additional gain is
required, use a low noise outboard preamp.
The display’s bottom line is a moving-bar VU meter with “peak hold”,
which briefly “holds” the highest level attained. The VU meter may or
may not be showing any activity.
3. Play the sound to be sampled. Note the moving bar display in the lower line;
louder signals will kick the bars further over to the right. If the meter hardly
moves at all, turn up the GAIN control. If you cannot achieve sufficient gain to
get a good signal level, proceed to the next step.
If the meter bar hits the extreme right hand side, the SP-12 is being
overloaded. Turn down the GAIN control so that the peaks are below this
overload point. Generally, you will want to sample at the highest possible
level short of overload.
4. To select between the available preamp gains of +00 dB, +20 dB, and +40
dB, with the module active key in 3. Use the Right Arrow and Left Arrow
buttons to step through the three gain options. After making your selection,
press ENTER to return to VU mode. Check that the sound to be sampled is
now providing sufficient level to the SP-12.
© E-mu Systems, Inc. 1985 Page 55
Enhanced by The Emulator Archive 2002 www.emulatorarchive.com
Page 56

SAMPLING YOUR OWN SOUNDS
4C ASSIGNING THE SAMPLE
The SP-12 default assignment places the sampled sound on the lowest available
empty user number, with the sound appearing on output channel 7 or 8. Both of
these can be changed as follows:
1. With the SAMPLE module active, key in 2. The display’s top line will give the
current User number, with a cursor appearing underneath the number. Key in
the desired User Sound number with the keypad (leading zeroes are not
entered); when the display confirms your choice, press ENTER.
If an asterisk appears next to the User Sound number, it already contains a
sampled sound. If you press ENTER, as a safety measure you will be
asked if you want to erase the existing sampled sound.
2. The bottom line will now show the output channel assignment for the selected
User Sound. A cursor will appear under the output channel number. Key in
the desired output channel number with the keypad (leading zeroes are not
entered); when the display confirms your choice, press ENTER. The output
channel number is stored with the User number until changed.
4D SETTING THE SAMPLING THRESHOLD
There are two ways to initiate sampling: Threshold-sensitive sampling and forced
sampling (SAMPLE 9). With threshold- sensitive sampling, once sampling is “armed”
sampling begins whenever the signal to be sampled exceeds the programmable
threshold level. To set the threshold level:
1. With the SAMPLE module active, key in 4. The display shows the regular bar
graph display on the bottom line, and a single bar on the top line that
represents the threshold. If the threshold has not been adjusted since the
memory was last cleared, the threshold defaults to minimum and the display
advises you to “Use Slider #1”; otherwise, upon selecting SAMPLE 14 the
threshold sits at wherever it had been set previously.
2. To change the threshold level, vary Slider #1. Generally, you will set threshold
just above the residual noise of the sound to be sampled (the display’s lower
line will show this noise, if any, as erratically moving bars towards the left of
the line). Therefore, the noise will not initiate sampling, but a signal that
exceeds the threshold will.
Hint: Set the lowest possible threshold. If the beginning of a sound is cut off, the
threshold is too high. If there’s a delay before the beginning of a sound, the threshold
is too low and the sample was probably triggered by some noise prior to the actual
signal.
Note: Once sampling has begun, the SP-12 will continue sampling even if the signal
falls below the threshold level.
© E-mu Systems, Inc. 1985 Page 56
Enhanced by The Emulator Archive 2002 www.emulatorarchive.com
Page 57

SAMPLING YOUR OWN SOUNDS
4E SETTING THE SAMPLE LENGTH
Once sampling starts, the SP-12 will normally sample until it runs out of memory or is
stopped (Section 4F). However, this function let’s you program a fixed sample time
up to 2.5 seconds; after this time has elapsed, the SP-12 will stop sampling.
1. With the SAMPLE module active, key in 5. The display’s top line indicates the
amount of time available for sampling (with a standard SP-12, this will be 1.2
seconds if the User Sounds are all empty). With the Turbo model, the
maximum settable sample length is 2.5 seconds. Therefore, even if you have
more than 2.5 seconds available, the display will indicate 2.5 seconds. Once
you have less than 2.5 seconds of sampling time left, the display will indicate
the maximum amount of time available for sampling.
2. Vary Slider #1 to change the sample length in 100ms(0.1 second) increments.
When the display confirms your choice, press ENTER. The sample length will
remain as set until changed, or until you select a different User Sound
number.
Notes: The Turbo SP-12 is partitioned into two 2.5 second zones. Sounds cannot
“cross over” from one zone to the other. For example, if you record a 2.0 second
sound, then another 2.0 second sound, there will 0.5 seconds remaining in each
zone. You cannot record a 1.0 second sound at this point, although you can record
two 0.5 second sounds.
To check the remaining memory available for sampling, query the sample length as
described above.
4F INITIATING AND STOPPING SAMPLING
You’ve set the level, the threshold, the sample length, and assigned the sound to be
sampled to the right User Sound and output channel; now it’s time to sample. The
SAMPLE module must be active.
1. To initiate threshold-sensitive sampling, key in 7. The display’s top line says
“Sample Armed”, while the bottom line shows the moving-bar VU meter. As
soon as the level of the signal to be sampled exceeds the threshold, sampling
will begin. Sampling will stop at the end of the programmed sample length or
if the SP-12 runs out of memory.
2. Forced sampling is useful for situations where the signal to be sampled is
more or less continuous (continuous signals greatly complicate the thresholdsetting process described earlier). To initiate forced sampling, key in 9. The
display’s top line says “Sampling”, while the bottom line shows the movingbar VU meter. Sampling will stop at the end of the programmed sample length
or if the SP-12 runs out of memory.
3. After sampling is complete, the SP-12 will check the sample and one of two
messages will appear in the display’s top line. “Sample Overload” indicates
that the sound being sampled exceeded the SP-12’s headroom (however, this
sound is nonetheless available for use if desired). “Sample is good,” indicates
that no overload occurred.
© E-mu Systems, Inc. 1985 Page 57
Enhanced by The Emulator Archive 2002 www.emulatorarchive.com
Page 58

SAMPLING YOUR OWN SOUNDS
4. If you are not satisfied with the sample, try again by keying in 6 to re-sample
the sound.
4G DELETING A USER SOUND
Recording over a User Sound will erase the previous User Sound contents. However,
you might also want to erase a User Sound without recording over it in order to
create more memory space. To erase a User Sound:
1. Activate the SET-UP module and key in 20. The display will ask you which
User Sound you want to delete.
2. Key in the User Sound to be deleted with the keypad. The display will ask you
to confirm your choice by pressing YES (if you press NO, you will remain in
the module, whereupon you can re-select the Delete function or any other
SET-UP module function).
3. After pressing YES, the sample will be deleted.
Note: If you have copied a User sound over to another bank, deleting the original
User sound will not erase the copied sound. The copied sound must itself be
specifically erased. Here’s an example to help get the point across:
Suppose you record a tambourine in User sound 7, and then copy this over to bank
1, cowbell sound. Erasing User 7 will not erase the tambourine sound that replaced
the cowbell sound in bank 1. To erase the bank 1 sound, in step 2 above press the
cowbell play button. The tambourine sound that had been copied over will be erased,
and the cowbell will magically re-appear.
© E-mu Systems, Inc. 1985 Page 58
Enhanced by The Emulator Archive 2002 www.emulatorarchive.com
Page 59

SAMPLING YOUR OWN SOUNDS
4H MODIFYING A SAMPLE VIA TRUNCATION AND LOOP
Truncation shortens a Voice’s length by trimming off parts of the beginning and/or
end. This allows you to cut off unneeded portions of a Voice to save memory, change
instrument characteristics (i.e. remove the attack from a plucked string note), cut off a
long decay (which is great for simulating noise- gated reverb effects on drums), or
isolate a particular section of a sample.
As mentioned in the introduction, the SP-12’s standard memory capacity is 1.2
seconds. Since each second requires 27,500 samples, this works out to a total
available memory space of 33,000 samples. All truncation and looping times are
referenced to samples, not seconds. Example: If you truncate the beginning (start) of
a sound by 2,750 samples, you have cut 1/10th of a second from the start of the
sound (27,500 samples 1 second, so 2,750 samples = 1/10th of a second).
To truncate a sound:
1. It is good practice to set Sliders #1 and #2 all the way down, and Sliders #3
and #4 all the way up, before beginning the truncation process.
2. Activate the SET-UP module and key in 19. The display’s top line will show
the User Sound to be truncated. If this is the desired User Sound, press
ENTER. If not, key in the desired User Sound with the keypad and then press
ENTER.
3. The display’s top line will now show the Start point (which defaults to 00000)
and the User Sound being truncated. The display’s bottom line will show the
End point of the sample (which defaults to the sample length) and Loop
Length (which defaults to NONE). Example: If the End display shows 27500,
then the sample is exactly one second long.
4. Slider #1 gives coarse control over the amount of start truncation, while Slider
#2 gives fine control. Moving the sliders upwards increases the amount of
truncation.
Example:
Adjusting these sliders so that the bottom line indicates E=2750 means that
you have cut 1/10th of a second from the beginning of the sample.
Note that you cannot truncate a sound one sample at a time, but rather, in
groups of samples (even with the fine truncation slider).
5. Slider #3 gives coarse control over end truncation, while Slider #11 gives fine
control. Moving the sliders downwards increases the amount of truncation.
Example: With a 27500 sample length sound, setting these sliders so that
E=13750 means that the end point now occurs halfway through the sample
(27500 divided by 2 = 13750).
As with start truncation, samples are truncated in groups rather than one at a
time, even with the fine truncation slider. As you change truncation, press the
appropriate Play button to hear the results.
© E-mu Systems, Inc. 1985 Page 59
Enhanced by The Emulator Archive 2002 www.emulatorarchive.com
Page 60

SAMPLING YOUR OWN SOUNDS
6. Looping can be set at the same time as truncation, or you can loop a
previously truncated sample. Looping marks off a section (called a loop) of a
User Sound. The display indicates the Loop Length (L=), whose end point is
the end of the sample. With a looped User Sound, the sound plays normally
until it reaches the end of the loop. It then jumps back to the Loop start point
and re-plays through the loop. Upon reaching the loop end, it again re-plays
the loop. Fig. 4-1 indicates a typical looping action. Looping provides “infinite
sustain” effects, extends short samples, and if the loop is rhythmically related
to a composition, produces interesting rhythmic effects.
You might wonder how useful an infinitely sustaining sound is, especially
since this is supposed to be a percussive device...well, don’t forget about
SETUP 18, which lets you alter a sound’s decay time instead of its tuning.
Short decays work great with looped sounds if you want percussive effects.
7. If the display is already showing the truncation/loop parameters, proceed to
step 7. Otherwise, activate the SET-UP module and key in 19. The display’s
top line will show the User Sound to be truncated/looped. If this is the desired
User Sound, press ENTER. If not, key in the desired User Sound with the
keypad and then press ENTER.
8. Slider #5 gives coarse control over the loop length, while Slider #6 gives fine
control. Moving the sliders upwards increases the loop length. Example:
Adjusting these sliders so that L=2750 means that the loop length is 1/10th of
a second long.
Note that you cannot alter loop length a sample at a time, but rather, in
groups of samples (even with the fine loop length slider).
9. If you decide to change the truncation, note that you cannot truncate the
sound shorter than the loop length; you must decrease the loop length in
order to truncate any further. Also, you cannot set a loop length longer than
the total sample time (fair enough).
10. When truncation and looping are set as desired, press ENTER. The display
now asks “Make Truncation Permanent? Y/N.” Press YES to discard the
truncated portions of the sound; this frees up additional sampling memory.
Press NO to retain the current truncation settings, but hold the full sound in
memory. This is useful if you think you might need to return to the original
© E-mu Systems, Inc. 1985 Page 60
Enhanced by The Emulator Archive 2002 www.emulatorarchive.com
Page 61

SAMPLING YOUR OWN SOUNDS
Fig. 4-1
Note: Activating SET-UP and selecting SPECIAL FUNCTION 19 sets a default
decay for all sounds (as set by Slider 1). This is useful if you loop a sound and want it
to decay, but also want to produce different pitched sounds.
© E-mu Systems, Inc. 1985 Page 61
Enhanced by The Emulator Archive 2002 www.emulatorarchive.com
Page 62

SAVING YOUR DATA
PART 5: SAVING YOUR DATA
5A BACKGROUND: SAVING DATA
5B GENERAL CARE AND HANDLING OF DISKS AND CASSETTES
5C HOOKING UP THE 15K1 DISK DRIVE OR CASSETTE
5D FORMATTING DISKS
5E DISK AND CASSETTE OPERATIONS
© E-mu Systems, Inc. 1985 Page 62
Enhanced by The Emulator Archive 2002 www.emulatorarchive.com
Page 63

SAVING YOUR DATA
5A BACKGROUND: SAVING DATA
Since you spend a lot of time working on segments, songs, and sampled sounds, you
should spend the small amount of time necessary to save them. Don’t just save when
you’ve filled up the memory; save periodically in case something goes wrong (yes,
integrated circuits are subject to Murphy’s Law).
There are two ways to save: via cassette or via disk. To save on disk you will require
a Commodore 1541 floppy disk drive, as used with the Commodore 64 computer.
Saving on disk is far faster and generally more reliable than saving to cassette.
The procedures for saving to disk and to cassette are very similar. To specify a disk
function, enter 2 then the desired function (i.e. save, catalog, load, etc.). To specify a
cassette function, enter 1 then the desired function. Most of the time, when you’re
supposed to initiate a particular operation the display will advise you to “Insert Disk
and Press Enter” or “Start Cassette and Press Enter.” As soon as you press ENTER,
the load, save, verify, etc. function will begin. Note: With cassettes, make sure the
cassette is past the non-recording leader tape at the beginning of the cassette.
We will assume that you are a forward-thinking kind of person, and have trotted down
to your local toy store or discount house for a 1541 disk drive. Cassette interface tips
are described in Appendix F.
Important: Sounds and sequences cannot be saved on the same disk or cassette.
Clearly label each disk or cassette as to whether it contains sounds or sequences.
5B GENERAL CARE & HANDLING OF DISKS & CASSETTES
Disks and cassettes represent the sum total of your experience with the SP-12, and
should be handled with care.
Disks and cassettes should never be:
Bent or sat on
Exposed to strong magnetic fields (TVs, speakers, etc.)
Subjected to temperature extremes
Left out in the sun
Touched on any of their magnetic surfaces
Disks and cassettes should always be:
Stored in their protective cases (always store disks vertically)
Kept away from dust, dirt, and smoke
Treated carefully and gently.
© E-mu Systems, Inc. 1985 Page 63
Enhanced by The Emulator Archive 2002 www.emulatorarchive.com
Page 64

SAVING YOUR DATA
The SP-12 requires double-sided, double-density, 48 tracks per inch (TPI) 5.25”
floppy disks. Cassettes should be high-quality data cassettes, not standard audio
cassettes.
Disk drives are somewhat fragile. Before transporting the 1541 (even if it’s only
across the room), always insert and latch either the original packing material or a
“scrap” disk into the drive. This protects the drive from vibration. Do not use a good
disk, as it could become damaged during transit.
When active, the Drive’s red LED will light. Do not try to operate any controls when
the LED is on (why tempt fate?). The mechanism will occasionally make whirring and
“clunking” sounds; these are normal.
Labeling
Labelling your disks and cassettes will save frustration; keep a log of where data is
saved. With disks, write on an adhesive label that you then attach to the disk. Writing
on the disk can damage it; but if you’re the gambling type, at least use a felt- tip pen
and apply very little pressure.
Write-protecting disks and cassettes
Write-protecting a disk turns off the disk drive’s ability to record on to the disk, thus
preventing accidental erasure. To write-protect a disk, fold a small adhesive tab
(usually supplied with the disk) over both sides of the disk so that the write- protect
notch (see Fig. 5-1) is completely covered (see Fig. 5-2). As long as the notch is
covered, you will not be able to accidentally record over the disk. If you try to write on
a disk and cannot, check whether it is write-protected before proceeding.
Write Protect notch
Fig. 5-1
Fig. 5-2
© E-mu Systems, Inc. 1985 Page 64
Enhanced by The Emulator Archive 2002 www.emulatorarchive.com
Page 65

SAVING YOUR DATA
To write-protect a cassette, knock out the little tabs on the back of the case as shown
in Fig. 5-3. These can be covered over with masking tape later if you want to “unwrite-protect” them.
Fig. 5-3
© E-mu Systems, Inc. 1985 Page 65
Enhanced by The Emulator Archive 2002 www.emulatorarchive.com
Page 66

SAVING YOUR DATA
5C HOOKING UP THE 1541 DISK DRIVE OR CASSETTE
1. Power off both the SP-12 and the 1541.
2. Patch the disk cable from the plug above the 1541’s fuse post to the SP-12’s
rear panel disk jack (see Fig. 5-4).
Fig. 5-4
3. Turn on the disk drive, and then turn on the SP-12.
4. To insert the disk in the drive, first make sure that the latch is in the open
position (see Fig. 5-5).
5. Next, insert a disk label side up with the labelled side going in last (see Fig. 5-
6).
Fig. 5-5
© E-mu Systems, Inc. 1985 Page 66
Enhanced by The Emulator Archive 2002 www.emulatorarchive.com
Fig. 5-6
Page 67

SAVING YOUR DATA
Gently push the disk all the way in until it can go no further, then push the latch
downward until, at the end of its travel, it pops forward somewhat.
To hook up the cassette, patch the CASS/SYNC/SMPTE OUT jack to the cassette’s
line level input. Patch the CASS/SYNC/SMPTE IN jack top the cassette’s earphone
or speaker output. As you work with the cassette, note carefully what playback level
gives the most consistent results.
5D FORMATTING DISKS (CASSETTE/DISK 0)
Before a new, disk can record (store) any data it first must be told how to record this
data (called formatting the disk). Run the following formatting procedure on any new
disk, or on “recycled” disks previously used with other systems (such as home
computers) since these will not be formatted correctly for the SP-12.
Note: Formatting a disk that already contains data will “bulk erase” any data on the
disk being formatted. Always check that disks are either blank, or contain nothing you
want to save, before formatting. A disk need only be formatted once unless you want
to use the “bulk erase” aspect of formatting.
We recommend using 5.25” double-sided, double-density 48 TPI floppy disks. Avoid
bargain disks; stick to name brands such as Maxell and Dysan. Buying in quantity
can save you lots of money, so get together with other SP-12 or Emulator II owners
and do group disk purchases for substantial discounts.
1. Activate the Cassette/Disk module.
2. Key in 2 (for disk) then 0 (for format). Keying in any number other than 0 with
a non-formatted disk will produce enough error messages and disk chattering
to make you go back to cassettes.
3. Formatting takes enough time that you can stretch, pet a cat, or just space
out and look at the scenery for a while. After formatting is complete, the
display tells you that the operation is complete. Press ENTER.
© E-mu Systems, Inc. 1985 Page 67
Enhanced by The Emulator Archive 2002 www.emulatorarchive.com
Page 68

SAVING YOUR DATA
5E DISK AND CASSETTE OPERATIONS
Cassettes and Disks have nine operations in common, as printed in the
Cassette/Disk module. Formatting applies only to disks.
Here is a description of each operation, along with which buttons should be pressed
for disk and which should be pressed for cassette. After pressing the indicated
buttons, follow any instructions given in the display, and then press ENTER to initiate
the function.
Two general rules: To immediately stop any of these operations, press NO. Also,
after the operation is complete, you will usually need to press ENTER before
continuing.
Save Sequences Disk: Key in 2 then 1 Cassette: Key 1 then 1
Saves all sequence information (segments and songs).
Save Sounds Disk: Key in 2 then 2 Cassette: Key 1 then 2
Saves all User Sounds currently in memory.
Note: This takes a very, very, very, very, very, long time if you have a Turbo SP-12
and the User sound memory is full. While waiting for the sounds to be saved, you
have an excellent opportunity to learn a new language, become an airline pilot, or
take a brief overseas vacation. And we might as well warn you now...you may need
two disks to save all the sounds. If so, the display will ask you to insert Disk #2; press
YES to continue the saving process. Cheer up, though it doesn’t take anywhere near
as long to save the second disk as the first one. The slow operation is inherent in the
1541 drive, not the SP-12.
Load Sequences Disk: Key in 2 then 3 Cassette: Key 1 then 3
Loads all saved sequences into the SP-12.
Load Segment # Disk: Key in 2 then 11 Cassette: Key 1 then 4
Loads an individual segment into the SP-12; specify the segment number.
Load Sounds Disk: Key in 2 then 5 Cassette: Key 1 then 5
Loads all saved User Sounds into the SP-12. This takes almost as long as it did to
save them in the first place.
Load Sound # Disk: Key in 2 then 6 Cassette: Key 1 then 6
Load an individual sound into the SP-12. When asked which sound to load, specify
the sound via location for example, if a tambourine user sound was in the bank 1
cowbell position, select bank 1 cowbell to load the tambourine sound back into the
SP-12.
© E-mu Systems, Inc. 1985 Page 68
Enhanced by The Emulator Archive 2002 www.emulatorarchive.com
Page 69

SAVING YOUR DATA
Verify Sequences Disk: Key in 2 then 7 Cassette: Key 1 then 7
After saving sequences, run this verify function to make sure that the data was saved
correctly. The display will let you know if all is well.
Verify Sounds Disk: Key in 2 then 8 Cassette: Key 1 then 8
After saving user sounds, run this verify function to make sure that the data was
saved correctly. The display will let you know if all is well.
Catalog Disk: Key in 2 then 9 Cassette: Key 1 then 9
If you’re curious what segments and sounds are on a disk or cassette, this will tell
you. Segments are indicated by numbers, and sounds by their User number (Us1,
Us2, etc.) or by their location if they were copied to a bank other than bank II. If you
have more segments or sounds than can fit on the display, vary Slider #1 to scroll
through the entire list. This function can also be used to tell whether a disk or
cassette is storing sounds or sequences; if sounds, the list contains drum names
(Us1, Bs1, Sn1, etc.); if sequences, segment numbers (01, 22, 45, etc.).
© E-mu Systems, Inc. 1985 Page 69
Enhanced by The Emulator Archive 2002 www.emulatorarchive.com
Page 70

MIDI, SYNC & SMPTE
PART 6: MIDI, SYNC, & SMPTE
6A MIDI CHANNEL AND MODE SELECT (SET-UP 22)
6B BACKGROUND: SYNCHRONIZATION
6C INTERNAL SYNC (SYNC 1)
6D MIDI SYNC (SYNC 2)
6E SMPTE SYNC (SYNC 3)
6F CLICK SYNC (SYNC 4)
6G WRITING SMPTE TIME CODE ON TAPE
6H WRITING A 24 PULSES-PER-QUARTER NOTE CLICK SYNC
TRACK ON TAPE
© E-mu Systems, Inc. 1985 Page 70
Enhanced by The Emulator Archive 2002 www.emulatorarchive.com
Page 71

MIDI, SYNC & SMPTE
OVERVIEW
The SP-12 includes several MIDI functions and synchronization options. We will
describe MIDI options first, then move into synchronization. The non-sync oriented
MIDI functions include select MIDI channel and play drums from MIDI keyboard. MIDI
is a way of exchanging musical information between various electronic music
instruments. If you are not familiar with MIDI basics, refer to Appendix D.
6A MIDI CHANNEL AND MODE SELECT
1. Activate the SET-UP module and key in 22, MIDI PARAMETERS.
2. Specify the Channel Number from 01 to 16 with the Left Arrow and Right
Arrow keys or key in the number via the keypad. This specifies the channel
over which the SP-12 will look for data when in Poly mode. After selecting the
desired Channel Number, press ENTER.
3. You may now select the MIDI mode:
Key in 1 for Omni (the SP-12 will play note information coming in only MIDI
channel)
Key in 2 for Poly mode (the SP-12 will play only note information coming in
over the basic channel specified in step 2).
The SP-12 sounds may now be played from a MIDI keyboard. If the SP-12 is
in Omni mode, it will respond to notes played on the keyboard regardless of
the MIDI keyboard’s transmitting channel. If the SP-12 is in Poly mode, it will
respond to notes only if the keyboard and SP-12 are tuned to the same MIDI
channel. If the MIDI keyboard provides velocity (dynamics) information, the
SP-12 sounds will respond to this data.
Having the SP-12 respond to keyboard notes is handy if you want to treat the
SP-12 solely as a sound generating device and run it from the note
information contained in an existing sequencer. For example, suppose you
have an Emulator II and Drumulator with the MIDI retrofit, and have created a
number of sequences on the Emulator II that send notes through MIDI to the
Drumulator. When you add an SP-12 to your setup, you might want to
continue to run the SP-12 from the same sequences used with the
Drumulator instead of re-programming the sequences into the SP-12. No
problem; just send the sequencer’s MIDI note data to the SP-12. If the SP-12
drum sounds triggered by the sequence are not exactly the ones you desire,
just swap sounds until the right drums correspond to the right notes.
© E-mu Systems, Inc. 1985 Page 71
Enhanced by The Emulator Archive 2002 www.emulatorarchive.com
Page 72

MIDI, SYNC & SMPTE
The following table shows which Emulator II keyboard notes trigger which SP12 drum sounds (of course, other MIDI keyboards may also be used).
Emulator II SP-12
C1 Bass 1
C#1 Cowbell
D1 Bass 2
D#1 Rim
E1 Snare 1
F1 Snare 2
F#1 Hihat 1
G1 El Snare 1
G#1 Hihat 2
A1 El Snare 2
A#1 Hihat 3
B1 Tom 1
C2 Tom 2
C#2 Claps 1
D2 Tom 3
D#2 Claps 2
E2 Tom 4
F2 ElTom 1
F#2 Ride 1
G2 ElTom 2
G#2 Ride 2
A2 ElTom 3
A#2 Crash
B2 ElTom 4
C3 User 1
C#3 User 2
D3 User 3
D#3 User 1
E3 User 5
F3 User 6
F#3 User 7
G3 User 8
After selecting the desired mode, press ENTER.
4. The display now asks whether or not you want the “pitch keys” option. If you
press YES and play and hold a key for a specific sound (see above), then
keys G#3 through B4 - will play the different available pitches for that sound.
If you don’t want pitch keys, press NO. After selecting the desired option,
press ENTER.
© E-mu Systems, Inc. 1985 Page 72
Enhanced by The Emulator Archive 2002 www.emulatorarchive.com
Page 73

MIDI, SYNC & SMPTE
6B BACKGROUND: SYNCHRONIZATION
The SP-12 can synchronize to one of several different tempo references: Internal
clock, external click track, MIDI timing messages, or SMPTE time code. It can also
generate (write) a click track or SMPTE time code signal on tape. Once recorded,
these signals can feed the SP-12 during overdubs to maintain synchronization with
the original tempo.
The SP-12 can also serve as a master timing reference (MIDI, Click, or SMPTE) to
which other instruments may synchronize. The different sync protocols are selected
when the SYNC module is activated.
6C INTERNAL SYNC (SYNC 1)
1. To select internal sync, activate the SYNC module and key in 1. In this
mode, the SP-12 serves as the system master timing reference, at a
rate set by the Tempo function (see Sections 10 and 3H).
A continuous click signal is always present at the SMPTE OUT jack; it
is used mainly for recording a click track on tape (Section 6H). To
send a click output from the SP-12 while it is in segment mode to
another device, program the metronome for a click output (see Section
1P). This click output signal appears at the MET OUT jack, and starts
and stops as a segment is started and stopped using RUN/STOP.
2. To send a click output from the SP-12 while it is in song mode,
program the Click output as described in Section 3K. Note that MIDI
timing signals are generated at the MIDI out jack in song or segment
mode, so the SP-12 can serve as a MIDI system master and generate
a Click output when internal sync is selected.
6D MIDI SYNC (SYNC 2)
1. To select MIDI sync, activate the SYNC module and key in 2. In this mode,
the SP-12 can serve as a system master timing reference, at a rate set by the
Tempo function (see Sections 10 and 3H); MIDI timing information is sent out
the MIDI OUT jack.
2. The SP-12 can also slave to MIDI timing information coming in the MIDI IN
jack. It is not necessary to press RUN/STOP when running from MIDI, as
MIDI systems should include start and stop commands as part of the MIDI
data stream. When slaved to a MIDI device, the MIDI OUT jack echoes
whatever is coming in the MIDI IN jack.
© E-mu Systems, Inc. 1985 Page 73
Enhanced by The Emulator Archive 2002 www.emulatorarchive.com
Page 74

MIDI, SYNC & SMPTE
Note: If for some reason the MIDI device does not send start/stop commands but
does provide timing information, you can set the SP-12 to “ready” mode prior to
receiving the MDI signal. Select the desired SP-12 segment or sequence and press
RUN/STOP. The sync light will flash, indicating that the SP-12 is awaiting sync. As
soon as the MIDI master is started and sends out MIDI tempo information to the SP12, the sync light will go out and the segment or sequence will start playing.
6E SMPTE SYNC (SYNC 3)
1. To select SMPTE sync, activate the SYNC module and key in 3. In this mode,
the SP-12 can slave to SMPTE time code information coming in the
CASS/SYNC/SMPTE IN jack. Tempo is set by the SP-12’s Tempo function
(Sections 1O and 3H).
2. Selecting SMPTE automatically calls up the SMPTE frames-per-second rate
display. Use the Left Arrow and Right Arrow buttons to choose the desired the
SMPTE rate. You have the following choices:
24 = the standard frame rate for film.
25 = the standard frame rate for European television and video.
30 = the standard frame rate for American television and video
(This is the default).
30df = the standard NTSC colour videotape frame rate.
When the display shows the desired SMPTE frame rate, press ENTER.
3. Enter the SMPTE time code point where you want the segment or sequence
to begin. The SMPTE time code format is HH:MM:SS:FF, where H = hours, M
= minutes, S = seconds, and F = frames (one frame is equivalent to 1/30th of
a second at the 30 frames-per- second rate). When the display shows the
SMPTE start point, press ENTER.
4. To sync to SMPTE, select the desired SP-12 segment or song and press
RUN/STOP. The sync light will flash, indicating that the SP-12 is awaiting
SMPTE (the display will confirm this). As soon as SMPTE time code enters
the SP-12 via the CASS/SYNC/SMPTE IN jack, the display will show the
current SMPTE time code reading.
If the SMPTE time code being read from tape is earlier than the SP-12’s SMPTE start
point, the SYNC light will blink until the tape catches up. When the SMPTE time code
reading matches the start point, the SYNC light will go out and the segment or song
will begin playing.
If the SMPTE time code being read from tape is later than the SP- 12’s start point,
the SP-12 will “fast-forward” through the song or segment to catch up with the tape.
The point at which playback begins depends on the start point and tempo.
© E-mu Systems, Inc. 1985 Page 74
Enhanced by The Emulator Archive 2002 www.emulatorarchive.com
Page 75

MIDI, SYNC & SMPTE
Note: The MIDI output “tracks” the SMPTE output, so if you are driving, say, a MIDI
sequencer from the SP-12 MIDI OUT, the sequence will “fast-forward” along with the
SP-12. However, you will not hear the SP-12, as it is muted while fast forwarding.
If the SMPTE time code being read from tape is much later than the SP-l2’s start
point, the SP-l2 may need to “fast-forward” several times through the song or
segment before it catches up with the tape.
6F CLICK SYNC (SYNC 4)
1. To select Click sync, activate the SYNC module and key in 14. In this mode,
the SP-12 syncs to click pulses arriving at the CASS/SYNC/SMPTE IN jack.
2. Selecting Click automatically selects the Click Divisor display. The SP-12 is
designed to run at its programmed tempo with a 214 pulses-per-quarter note
click. However, some devices put out 48 (Linn), 96 (Oberheim), or 384
(Fairlight) pulses-per-quarter note click signals. Use the Left Arrow and Right
Arrow buttons or keypad to key in a divisor between 01 and 99 to divide the
incoming click signal. However, there is one complication -- the SP-12 reads
both the rising and falling edge of a clock pulse. What this means is that it
thinks a 24 pulses-per-quarter note signal is really 48 pulses, a 96 pulse
signal is really 192, and so on. Therefore, if the SP-12 is being driven by a 96
pulses-per-quarter note device, divide this by 08 to obtain a 24 pulses-perquarter note signal; Fairlight fans should divide by 32). After selecting the
clock divisor, press ENTER.
3. To slave to a Click signal, select the desired SP-12 segment or sequence and
press RUN/STOP. The sync light will flash, indicating that the SP-12 is
awaiting sync. As soon as the master is started and sends out Click signals to
the SP-12, the sync light will go out and the segment or sequence will start
playing.
© E-mu Systems, Inc. 1985 Page 75
Enhanced by The Emulator Archive 2002 www.emulatorarchive.com
Page 76

MIDI, SYNC & SMPTE
6G WRITING SMPTE TIME CODE ON TAPE
The SP-12 is a SMPTE time code generator that can write SMPTE time code on tape
(typically one track of a multitrack recorder), to which the SP-12 can later
synchronize. Recording SMPTE on tape is called “striping” the tape.
1. Choose the desired SMPTE start point and frame rate as described in Section
6E. When you write SMPTE time code, it will start from this point and at the
specified frame rate.
2. Set up the tape recorder in record ready mode, and patch the
CASS/SYNC/SMPTE OUT jack to the track on which you want to write the
SMPTE time code (usually an outer tape track such as 8, 16, or 24). Prepare
to write SMPTE by activating the SET-UP module and keying in 23 (special).
Next, key in ill to write SMPTE; the SP-12 will start writing SMPTE from the
specified SMPTE time point, as indicated by the display.
Use this signal to set record levels before rolling tape. A level below –3 VU
seems to work well, although you will probably need to experiment to
determine the optimum level (high enough to provide a strong output signal,
yet low enough to not bleed over to other tracks). After setting levels, press
ENTER to stop writing. Roll the tape back to where you want the SMPTE to
start, go into record mode, leave a few seconds of blank tape, and then press
14 to start recording the time code on tape.
Always record more time code than you think you’ll need. You can erase it
later if you don’t use it, and if you ever need it you’ll be glad it’s there. In fact,
many people simply stripe an entire tape with SMPTE time code as soon as
they take the tape out of the box.
When finished, press ENTER to stop writing.
Hint: After recording SMPTE time code, play it back into the SP-12 via the
CASS/SYNC/SMPTE IN jack and play a segment or song to make sure that the time
code was recorded at the right level and that there are no drop-outs or other
problems. The SMPTE input is optimized to respond to SMPTE signals, and does not
need that much level in order to obtain sync -- even -10 dBV standard gear can drive
the SP-12. If the SMPTE time code track bleeds over into other channels of the tape,
try lowering the record level a bit and amplifying the signal coming from the tape
output.
If the display occasionally flashes “Awaiting SMPTE” while being driven from the
SMPTE track, you have either insufficient level or problems with the tape itself.
Finally, SMPTE signals are rather “fragile.” Avoid putting them through boards or
processors; a direct connection from recorder output to SMPTE reading devices is
preferred.
© E-mu Systems, Inc. 1985 Page 76
Enhanced by The Emulator Archive 2002 www.emulatorarchive.com
Page 77

MIDI, SYNC & SMPTE
6H WRITING A 24 PPQN CLICK SYNC TRACK ON TAPE
The SP-12 can write a Click track to tape (typically one track of a multitrack
recorder), to which the SP-12 can later synchronize.
1. Activate the SYNC module and key in 1 for Internal sync.
2. Program the desired tempo as described in Sections 1O and 3H, and
program the Metronome to generate a 214 pulses-per-quarter note click (this
appears at the rear panel MET OUT jack). If you want the click track to repeat
indefinitely, go into segment mode and press RUN/STOP. If you want to the
click track to last the length of a song, program the Metronome for a click
output, add a trigger output instruction to the song (Section 3K), and play the
song.
With the SP-12 set for Internal sync, SMPTE out generates a continuous 24
pulses-per-quarter note signal. This may also be used for striping tape if you
also need to have a metronome signal present, but generally using the MET
OUT signal is preferred.
3. Set up the tape recorder in record ready mode, and patch the MET OUT jack
to the track on which you want to write the click track (usually an outer track
such as 8, 16, or 24).
4. Press RUN/STOP to generate the click signal. Use this signal to set record
levels before rolling tape. Set about a -3 VU record level. After setting levels,
press RUN/STOP again to stop the click. Roll the tape back to where you
want the click track to start, enter record mode, leave a few seconds of blank
tape, and then press RUN/STOP to start recording the click track on tape.
Note that any tempo changes you make while the segment is running will be
reflected in the click track.
Always record more click track than you think you’ll need. You can erase it
later if you don’t use it, and if you ever need it you’ll be glad It’s there.
When finished, press RUN/STOP to stop writing.
Hint: After recording a click track, play it back into the SP-12 via the
CASS/SYNC/SMPTE IN jack and play a segment or song to make sure that the click
track was recorded at the right level and that there are no drop-outs or other
problems. The SP-12 requires a fairly hefty click in signal; with most -10 dBV
standard gear, the click signal will need to be pre-amplified in order to drive the SP-
12. Most +11 dBm standard gear delivers sufficient output to drive the SP-12. If the
click track bleeds over into other channels of the tape, try lowering the record level a
bit and amplifying the signal coming from the tape output.
© E-mu Systems, Inc. 1985 Page 77
Enhanced by The Emulator Archive 2002 www.emulatorarchive.com
Page 78

MIXING AND PROCESSING
PART 7: MIXING AND PROCESSING
7A MIXING AND PROCESSING: OVERVIEW
7B PSEUDO AUTOMATED MIXDOWN
7C CREATING AMBIENCE
7D USING SPECIAL EFFECTS IN THE STUDIO
© E-mu Systems, Inc. 1985 Page 78
Enhanced by The Emulator Archive 2002 www.emulatorarchive.com
Page 79

MIXING AND PROCESSING
7A MIXING AND PROCESSING: OVERVIEW
Sure, the SP-12 sounds astonishingly realistic...but it doesn’t necessarily sound like
the drum sounds you hear on records. Why? Because when recording engineers
record acoustic drums, the drums become part of a stereo acoustical space
(“ambience”). Also, special effects may be added to various drums to make them
punchier, brighter, fatter, and so on.
The SP-12 can benefit from these same techniques. While you can simply plug the
MIX OUT jack into a tape track or amplifier, a better approach is to plug the different
drum sounds into a stereo mixing board (see Section 1M for information on how to
assign different drum sounds to different output channels). This lets you place the
drums in the stereo field, add special effects, and vary equalization (tone).
Don’t forget that you can also mix one drum sound subtly behind another drum
sound. For example, mixing the low torn sound in behind the snare at a lower volume
level results in a fuller sounding snare, while mixing the open hi-hat in with the ride
cymbal results in a different ride sound.
7B PSEUDO AUTOMATED MIXDOWN
Remember that you can change the song drum mix whenever desired (Section 3G).
By using this feature to change drum levels as required, you can create a sort of
automated mix down effect. You won’t believe how handy this is until you actually try
it.
7C CREATING AMBIENCE
In most cases, you’ll plug the drum outputs right into the mixing console, and pan
these sounds across the stereo field. While that will give you a good, clear sound,
some people may find it too clear and clinical. The solution is to add ambience -- a
feeling of acoustical space -- to help give a more “live” sound.
You may synthesize an acoustic space using delay lines, reverb, acoustic
techniques, or any combination of the three. The author recommends adding at least
one channel of acoustic ambience. The easiest way to do this is to consider the
signal coming from the MIX OUT jack as a sort of “ambience/reverb send” jack -after all, it contains all the drum sounds mixed in their proper proportion. Feed this
output to an amplifier/speaker combination inside an acoustical space (preferably a
large, “live” room with fairly hard surfaces), and turn the sound up pretty loud. You
might also want to cut back on the bass as much as possible to keep the bass drum
out of the ambient mix. Next, put a good quality mic in the same room. This mic
should be at a distance from the speakers, and pointing away from the speakers
towards one of the hard surfaces. Feed the mic output back into the board to mix
some of this ambient sound in with the direct drum sound.
It’s very helpful to have someone who can move the mic around as you listen to the
results of these changes on headphones. You might want to mark the floor with chalk
or tape if you find some particularly sweet spots for mic placement.
© E-mu Systems, Inc. 1985 Page 79
Enhanced by The Emulator Archive 2002 www.emulatorarchive.com
Page 80

MIXING AND PROCESSING
So far, that’s one channel of ambience. You could add a second channel, but another
approach is to split the mono ambient signal into two feeds. One of’ these would be
panned left, while the other would be delayed by about 15 to 80 ms and be panned
right. This gives a uniform ambient sound, yet one that covers the full stereo field.
Connecting more time delay effects (chorusing, flanging, pitch transposers, etc.) in
parallel with the drum sounds adds very pleasing subliminal effects, assuming that
you mix any of these effects in at a relatively low level.
Another popular ambience effect involves noise gating the ambient signal, and
triggering this noise gate from the snare drum and toms. Thus, every time you hit the
snare or a tom, the ambience cuts in; but when the snare and toms aren’t happening,
there’s no spillover or noise from the ambient signal.
7D USING SPECIAL EFFECTS IN THE STUDIO
Here are some special effects that are very useful with electronic drums:
Reverb is a common special effect. Unfortunately, spring reverbs (which are
common in smaller studios) have some limitations, one of which is an inability to
handle sharp bursts of energy -- like drum beats. To minimize this problem, try
limiting the drums before going into the reverb unit. A better choice is to use plate or
digital reverbs.
Splashing is a technique used with reverb. If you want to reverb specific beats,
advance the reverb send control just before the beat, then turn it down after the beat.
That one beat will be sent to the reverb and reverberated.
Echo units, when synched as closely as possible to the tempo of the song, can add
interesting synchro-sonic effects. For example, try feeding the SP-12’s snare output
into an echo unit whose echo time equals a quarter or half note, and whose
regeneration (feedback) is up part way. You can also add double time effects easily
by setting the echo time equal to an eighth
Equalization can perk up the sound of individual drums. Actually, the quality of the
SP-12 sounds is superb, so in practice little equalization is needed. However, a little
extra bottom on the bass drum, some extra sheen on the high hats, and an upper
midrange boost on the snare drum can do for a SP-12 what a little tasteful make-up
can do for a face.
Noise gates, in addition to enhancing ambient effects as described above, can also
clip the decay of drums for a more percussive, clipped sound.
Ring modulators give great outer space and gong-like effects.
Pitch transposers can fatten up a drum sound by adding harmonics or sub-
harmonics to the drum sound. They are especially effective with handclaps.
Chorus units can really enhance handclaps. Drum unit handclaps tend to sound
unrealistic, since after all, no group of humans are going to clap their hands in exactly
the same way every time. One way around this is to set the chorus for maximum
delay (usually around 20 ins), and use modulation to vary the width. As the amount of
delay changes, the handclaps tend to sound thinner or thicker.
© E-mu Systems, Inc. 1985 Page 80
Enhanced by The Emulator Archive 2002 www.emulatorarchive.com
Page 81

APPENDIX
APPENDIX
APPENDIX A: THE ART OF SAMPLING
APPENDIX B: UNDERSTANDING RHYTHMIC NOTATION
APPENDIX C: UNDERSTANDING TIME SIGNATURES
APPENDIX D: UNDERSTANDING MIDI/SMPTE
APPENDIX E: TIPS ON CREATING REALISTIC DRUM PARTS
APPENDIX F: TIPS ON USING CASSETTE INTERFACES
APPENDIX G: HOW THE SP-12 WORKS
© E-mu Systems, Inc. 1985 Page 81
Enhanced by The Emulator Archive 2002 www.emulatorarchive.com
Page 82

APPENDIX
APPENDIX A: THE ART OF SAMPLING
Recording good samples is not always easy; creating a really super set of User
sounds requires patience, practice, and skill. Sure, you can get musically useful
results within a few days after working with the SP-12, but as you learn your craft the
quality of your samples will improve dramatically.
Sampling involves two major processes:
1. Taking the best possible sample.
2. Manipulating the sample within the SP-12 (truncating and looping).
PART 1: TAKING THE BEST POSSIBLE SAMPLE
What comes out of the SP-l2 can only be as good as what you put in: Strive for
maximum fidelity when sampling. Here are some ways to increase sample quality.
GENERAL TIPS
Live sampling: Sample “live” whenever possible, rather than recording a sound on
tape then sampling from the tape.
Beware of overloads: The SP-12 is a digital recording device. Unlike analog
recording devices, distortion does not increase slowly past a certain level; rather, it
increases rapidly above the overload point, and produces a “non-musical”, splattering
type of distortion. Monitor your levels carefully.
Sampling direct vs. sampling via microphone: Whenever possible, sample
electronic instruments directly into the SP-12. Avoid using a recording console, direct
box, or other device in between the instrument and SP-12.
Maintain the instrument to be sampled: Tune your instrument if applicable, and
check that the instrument doesn’t have any loose parts that rattle, squeak, or make
other noises.
Sampling acoustic instruments: Choose the microphone and mic placement as
carefully as you would for any recording project. Musicians sometimes note how hard
it is to get a good “sound” in the studio, but that’s what sampling is all about getting a
good sound, and once you’ve got that sound, keeping it.
Play naturally: Sometimes it’s a lot harder to play one note than several hundred.
Unless you’re trying for a special effect, play the sample as you would normally play
the instrument. It’s often a good idea to play several notes, and use truncation to zero
in on the best of the bunch.
Avoid ground loops: Ground loops occur when electricity can take two different
paths to ground. If there is a resistance difference between the two paths, this can
generate a signal (consisting mostly of digital “hash”) that can work its way into the
recording chain. With all the instruments patched in place and connected to each
other, turn off the SP-12 and insert a ground lift adapter between the SP-12 plug and
the wall. CAUTION:
© E-mu Systems, Inc. 1985 Page 82
Enhanced by The Emulator Archive 2002 www.emulatorarchive.com
Page 83

APPENDIX
Removing the ground connection defeats the safety advantage of using a
three-wire plug. Make sure the SP-12 chassis - some other path to ground
(usually via the audio input and output cables). Having two paths to ground
can cause ground loops, but having no paths to ground can cause a potential
shock hazard if there’s an equipment malfunction in the studio. E-mu cannot
be responsible for the use of ground lifters in improperly or inadequately wired
environments.
Using signal processing while recording: Just as with regular recording, there are
no absolutes about recording signals with or without signal processing. Some
engineers feel that tracks should always be recorded flat to allow for the maximum
number of options during mixdown; others prefer to record with a bit of processing,
especially if the processor might be needed on another track when mixing.
Here are some thoughts about the use of various types of signal processors when
recording samples.
External Preamp: If you need to preamplify the signal being sampled, set the
Sample section GAIN SET to 00 dB and use an external, high-quality preamp to
increase the signal level going into the SP-12. The SP-l2 preamp noise level, while
acceptable, is sometimes not as quiet as an external mic preamp.
Limiting Dynamic Range: Limiting the signal being sampled can put a higher
average signal level into the SP-l2, thus improving the already excellent signal-tonoise ratio. Also, the limit point can be set just under the SP-12 overload point, which
makes level setting less critical.
Equalization: If using EQ gives a better instrument sound, then use it. You want the
best possible sound going into the SP-12, so if a little EQ is indicated, it’s usually
better to add it while recording rather than having to think about it during playback.
Compression: Compression can be helpful when looping sounds since it evens out
level changes, thus reducing any tendency towards loop “glitching” due to abrupt
level changes between the beginning and end points of the loop. If appropriate, use
the SP-12’s decay option to shorten the overall decay time and restore the original
signal dynamics.
© E-mu Systems, Inc. 1985 Page 83
Enhanced by The Emulator Archive 2002 www.emulatorarchive.com
Page 84

APPENDIX
Audio “exciters”: To brighten up a sampled signal, use a device such as an Aphex
Aural Exciter or EXR Projector. Both of these devices add a high-end “sheen” without
adding the stridency encountered with excessive high-frequency equalization.
Using noise reduction: A number of single-ended noise reduction units (such as the
MicMix Dynafex or Rooktron Hush) are now available; these do not require that the
noisy signal have been previously encoded, as is the case with Dolby and dbx. If
your source signal is noisy, one of these devices can help to greatly clean up the
overall sound quality as you sample.
© E-mu Systems, Inc. 1985 Page 84
Enhanced by The Emulator Archive 2002 www.emulatorarchive.com
Page 85

APPENDIX
SAMPLING FROM TAPES
Maintaining sample quality via VCR recording: One excellent way to sample involves
using a VCR and digital audio adapter (sucb as the Sony PCM-F1) for recording
different sounds. Compared to using conventional reel-to-reel tape recorders, this
approach offers several advantages:
Digital-quality fidelity. A VCR/audio adapter combination adds virtually no
degradation to the signal being sampled. Signal-to-noise ratio, wow, flutter, and
dynamic range exceed that of all but the very finest analog recorders. These
tapes of source sounds can serve as “master” library disks.
Lower tape costs. VCR cartridge tape is very inexpensive; you can record hours
and hours of samples for only a few dollars.
Portability. Using a portable VCR and battery powered audio adapter makes for
a very compact and portable package.
Although splicing is not easy with VCR-based audio systems, you can generally do
the required signal splicing and manipulation within the SP-12.
A good alternative to the VCR/adapter approach is to use a Sony Beta Hi-Fi or VHS
Hi-Fi recorder; the audio tracks are of excellent quality.
Maintaining sample quality when sampling from tape recordings:
Follow common-sense recording practice -- be extremely careful about mic
placement, use noise reduction when recording samples on to tape, limit the signal
going on to tape rather than limiting the signal coming off the tape into the SP-12,
and add aural enhancement if desired.
Sampling from Compact Discs: This is a great way to get high quality drum
sounds, especially with so many records having solo drum intros and breaks.
Creative use of multi-tracking: Try multi-tracking sounds on a conventional
recorder, then sampling the combination sound into the SP-12. For example,
combining electronic and acoustic percussion sounds can produce some very useful
results.
© E-mu Systems, Inc. 1985 Page 85
Enhanced by The Emulator Archive 2002 www.emulatorarchive.com
Page 86

APPENDIX
PART 2: MANIPULATING THE SAMPLE
Proper use of truncation and looping can conserve memory and create novel effects;
let’s show how it’s done with an example. Suppose you want to sample a long,
sustaining sound such as a gong. Although this will eat up a fair amount of memory,
here are some suggestions.
Compress the gong sound when sampling to even out level variations. This will
help create the smoothest looping effect.
Set a loop after the initial attack of the gong, and loop as short a section of the
sound as possible to conserve memory (see Fig. Appendix-i).
Truncate that portion of’ the sound after the loop end point.
With looping, the sound will have infinite sustain. For a more realistic effect, use
SET-UP function 18 (DECAY/TUNE SELECT) to set the gong for decay. Use the
slider to set an appropriate decay time.
Looping can also provide echo and DDL effects. Loop a complete sound so that it
continually repeats. Then, use SET-UP function 18 to set a decay time; the repeats
will fade out over the decay time. The effect is very similar to echo.
© E-mu Systems, Inc. 1985 Page 86
Enhanced by The Emulator Archive 2002 www.emulatorarchive.com
Page 87

APPENDIX
© E-mu Systems, Inc. 1985 Page 87
Enhanced by The Emulator Archive 2002 www.emulatorarchive.com
Page 88

APPENDIX
APPENDIX B: UNDERSTANDING RHYTHMIC NOTATION
This extremely brief overview is intended solely as a refresher and memory jogger;
for a detailed description of rhythm notation, see any good book on music theory.
Measures: A piece of music is divided into measures, and each measure is divided
into notes. The number of notes, and rhythmic value of the notes, depends both on
the composition and the time signature (see Appendix C).
Note values: With a measure written in 14/11, there are four beats per measure, with
each beat representing a quarter note. Thus, there are four-quarter notes per
measure of 4/4 music.
There are two eighth notes per quarter note. Thus, there are eight eighth notes per
measure of 4/4 music.
There are four sixteenth notes per quarter note. Thus, there are sixteen sixteenth
notes per measure of 4/4 music.
There are eight thirty-second notes per quarter note. Thus, there are thirty-two thirty
second notes per measure of 4/4 music.
There are also notes that span a greater number of beats than quarter notes. A halfnote equals two quarter notes. Therefore, there are two half notes per measure of 4/4
music. A whole note equals four-quarter notes. Therefore, there is one whole note
per measure of 4/4 music.
Triplets: The above notes divide measures by factors of 2. However, there are some
cases where you want to divide a beat into thirds, giving three notes per beat.
Dividing a quarter note by three results in eighth note triplets. The reason why we
use the term “eighth note triplets” is because the eighth note is closest to the
rhythmic value that we want. Dividing an eighth note by three results in sixteenth note
triplets. Dividing a sixteenth note by three results in thirty-second note triplets.
© E-mu Systems, Inc. 1985 Page 88
Enhanced by The Emulator Archive 2002 www.emulatorarchive.com
Page 89

APPENDIX
APPENDIX C: UNDERSTANDING TIME SIGNATURES
A time signature (also called metric signature) describes the meter of a piece of
music. It consists of two numbers arranged like a fraction, such as 3/4, 4/4, etc. The
top number (numerator) indicates the number of’ beats in each measure, while the
bottom number (denominator) indicates the rhythmic value of each beat. For
example, with a 3/4 time signature the numerator indicates that there are three notes
per measure, while the denominator indicates that each of these notes is a quarter
note. 4/4 indicates that each measure includes four-quarter notes. Usually the
downbeat (first beat) of each measure is emphasized by a metronome to help you
get a feel for the meter.
3/4 and 4/4 are the most common time signatures, but they are by no means the only
ones. In jazz, both 5/4 (where each measure has five 1/4 notes) and 7/4 (where each
measure has seven 1/4 notes) are often used. In practice, complex time signatures
are played like a combination of simpler time signatures; for example, some 7/14
compositions would have you count each measure not as “1, 2, 3, 4,5, 6, 7” but as “1,
2, 3, 4, 1, 2, 3”. It’s often easier for musicians to think of 7/I4 as one bar of 4/4 and
one bar of 3/4, since as we mentioned, 4/4 and 3/4 are extremely common time
signatures.
© E-mu Systems, Inc. 1985 Page 89
Enhanced by The Emulator Archive 2002 www.emulatorarchive.com
Page 90

APPENDIX
APPENDIX D: UNDERSTANDING MIDI/SMPTE
MIDI is causing a certain amount of confusion among musicians. Fear not -- it’s not
all that difficult to understand, and the SP-12 makes it particularly easy to deal with
MIDI.
For those of you who aren’t that familiar with MIDI, we’ll first answer some common
questions. -
What does the MIDI cable do?
An instrument already has an AC cord that carries electrical current, and an audio
cord that carries audio signals to an amplifier. Now you have a third connection: the
MIDI cable. This carries neither audio nor power, but transmits information about the
status of the instrument to, and receives “status reports” from, other MIDI
instruments. This information is coded in a computer language. . a somewhat
primitive language with few words and several dialects, but a language nonetheless.
What does MIDI stand for?
MIDI stands for Musical Instrument Digital Interface. You already know what “musical
instrument” means, so that takes care of the first half of this phrase. Digital means
that the instrument’s information is conveyed in digital, or computer, language.
Interface is the term for the actual link between instruments, where data passes from
one instrument to another. So MIDI is a link between musical instruments that speaks
data in computer language.
How can information control a synthesizer or drum machine?
First we need to know a bit about computers, since MIDI instruments have
microcomputer souls...in fact, MIDI could not exist without microcomputers.
Computers are decision makers, and they base those decisions on the data they
receive. However, to be useable by a computer any data has to first be translated
into a number-based language that the computer can understand. Actually, when you
press a keyboard key with a computer-based instrument, you are not directly
[[controlling the sound source. Instead, each time you close a keyboard switch you’re
sending a number to the computer, and this number tells the computer what note you
want it to play for you.
The computer’s “window on the world,” where it receives and transmits
numerical data, is called its data - The computer looks to see whether any
information is on the data bus, and if so, acts on this data. For example, if it
sees a digital “word” that says “play F#” on the data bus, it will do as the data
commands and control a sound source so that it plays an F#. However, note
that the computer doesn’t care whether this word is placed on the data bus
due to closing a keyboard switch or striking a drum head -- once MIDI
translates a note into computer language, the note becomes compatible with
any device that speaks the same language. MIDI provides access to the
computer’s data bus and selects which device will be “on the bus” at any
© E-mu Systems, Inc. 1985 Page 90
Enhanced by The Emulator Archive 2002 www.emulatorarchive.com
Page 91

APPENDIX
particular moment, thus letting you determine the flow of information from one
MIDI device to another. This is why having a specification which
manufacturers can follow is so important; it insures that a variety of otherwise
incompatible devices will be able to communicate with each other over a
common data bus.
How does MIDI differentiate between different instruments?
MIDI provides 16 independent channels of information suitable for driving up to 16
polyphonic synthesizers or other MIDI devices. There are three modes that
determine bow each MIDI instrument responds to these channels.
In Omni mode, the SP-12 (or any other MIDI device) listens to all channels at once.
No matter how many notes from how many sources make it through the MIDI bus
into the instrument, when in Omni mode it will attempt to play all of them.
In Poly mode, the instrument can “tune in” to one MIDI channel --just like you can
tune in one channel of your television. Having a bunch of’ instruments set to Poly
mode lets you send specific information to different instruments over different MIDI
channels.
Mono mode is considered a “multi-timbral” mode that is applicable to multi-voice
synthesizers. Therefore, mono mode is not implemented in the SP-12.
16 channels, huh? Sounds like a lot of patch cords to me!
MIDI information is transmitted serially, meaning that all data is sent in sequence. As
a result, a single line can carry the MIDI information for all 16 channels, with each
instrument monitoring all the words that pass over the MIDI interface but responding
only to the data on its particular channel. Typically, MIDI instruments include a MIDI
IN, MIDI OUT, and MIDI THRU jack. The instrument receives data over the MIDI IN
jack and transmits data over the MIDI OUT jack; the MIDI THRU jack provides a
replica of the signal at the MIDI IN jack. Therefore, if’ you want to slave three MIDI
devices to a master MIDI device, you would patch the MIDI OUT from the master to
the MIDI IN of the first slave, patch MIDI THRU from the first slave to the MIDI IN of
the second slave, and connect MIDI THRU from the second slave to MIDI IN of the
third slave.
What kind of words does the MIDI language include?
Spoken language is a collection of words that convey a particular set of meanings,
hopefully understood by all those who speak the language. As soon as we start
talking about a musical language, the first question is: What concepts do we want
this language to define? Since musical instruments will be doing the talking, the
language should consist of’ musical terms -- pitch, tempo, and so
on.
© E-mu Systems, Inc. 1985 Page 91
Enhanced by The Emulator Archive 2002 www.emulatorarchive.com
Page 92

APPENDIX
The words of greatest interest to the SP-12 relate to pitch and tempo. The SP-12
sounds can respond to different notes being sent over MIDI (see Section 6A);
therefore, drum sounds can be played by hitting individual notes on a MIDI keyboard.
If the keyboard sends velocity (dynamics) data, the SP-12 will respond to this data.
The SP-12 can also “slave” to tempo data being sent over MIDI from a master, or
serve as a MIDI master to which other MIDI devices refer for tempo information.
Dealing With “MlDlosyncracies”
There are certain compatibility problems between MIDI gear from different
manufacturers; however, many problems are created by operator error and/or a lack
of understanding bow MIDI works. If you transmit information on one channel and
have the “receiver” set up for a different channel, forget it. MIDI is quite unforgiving
that way...you can bit a bum note and not too many people will notice, but send a
computer a wrong number and it will most definitely notice.
MIDI is a lot of fun provided that you don’t get discouraged when things go wrong.
One of the major problems is “data clogging” of the MIDI data stream. If MIDI is
handling drum data, keyboard synthesizer data, timing data, and so on, an excess of
information can cause the system to slow down or possibly malfunction. If this
occurs, try to figure out what data can be “filtered out” of the MIDI stream. For
example, keyboard aftertouch information requires much data; filtering this out of the
data stream leaves more breathing room for other data, such as the timing
information received by the SP-12.
SMPTE
The Society of Motion Picture and Television Engineers adopted SMPTE time code
in order to synchronize audio to video. Basically, SMPTE is a digital code that is
recorded on audio tape or video tape, or “burned into” film. This code outputs time
information as hours, minutes, seconds, and “frames” (1/30th of a second intervals).
For synchronization, sophisticated machines “look” at the SMPTE time code tracks
on the audio and video machines to be synchronized, and correct the speed of one
unit vis-a-vis the other to maintain synchronization. These error corrections are very
subtle and are not noticeable.
The SP-12 uses SMPTE so that songs and sequences may be started at a specific
frame of time code. The SP-12 can also write SMPTE time code on tape.
© E-mu Systems, Inc. 1985 Page 92
Enhanced by The Emulator Archive 2002 www.emulatorarchive.com
Page 93

APPENDIX
APPENDIX E: TIPS ON CREATING REALISTIC DRUM PARTS
If you’re a drummer, you probably don’t need to read this. But for those of you who
are primarily melodic players and are using the SP-12 to augment your recordings or
live act, read on.
Listen to drum parts by good drummers. Whenever a record comes on, study the
drum sound. Note how the drummer not only sets a solid base on which the other
instruments can play, but makes creative use of both notes and spaces.
Keep it simple. Drums are not a melodic instrument, but a rhythmic instrument.
Often a simple backbeat is more effective than trying to do elaborate series of
drum rolls.
Beware the three-armed drummer. Remember that a drummer has two feet and
two hands; therefore, you can’t have a bass drum, high hat, two toms, a snare
drum, and rim sound occurring at the same time. Make sure that your parts are
physically consistent with the way people play drums, or they will not sound
“right”.
Use dynamics creatively. A drum part without dynamics isn’t much of a drum part
at all.
Work carefully with bass instruments. The bass and drums should lock together
into a cohesive sound. If the bass player syncopates in a particular way, try to
match that with the drums.
© E-mu Systems, Inc. 1985 Page 93
Enhanced by The Emulator Archive 2002 www.emulatorarchive.com
Page 94

APPENDIX
APPENDIX F: TIPS ON USING CASSETTE INTERFACES
Here is a collection of background information and tips concerning cassette
interfaces. Note that it might take you some time to set levels properly and get
everything working right. However, once you get the hang of it, using the cassette
interface should be simple and its operation highly reliable.
How they work: Pushing buttons on the SP-12 feeds data on songs and
segments into the SP-12’s “brain”. This data, expressed in digital form, is
conveniently stored in the SP-12’s memory banks, and backed up with a battery
to keep the data intact even when the power is off.
By translating this data into a series of alternating audio tones rather than
voltages, we may store the data on a standard audio tape recorder. Thus, the
recorder stores a complete record of all the segment and song information,
expressed as audio tones. The hardware that records or reads this data to or
from tape is called a cassette interface. Once this data is stored on cassette, it
may then be re-loaded back into the SP-12 at any time in the future.
Use the right kind of tape: Standard audiocassettes, while they may be used
with cassette interfaces, are not recommended for this particular application. First
of all, audio cassettes tend to be fairly long; if you use something like a C- 90, you
can store so much data that sifting out one particular group of sounds or
sequences can take forever.
Another problem is drop-outs. With audiotape, a short drop-out (while annoying)
is no big deal. If that drop-out occurs in the middle of your data, though, look out!
The cassette interface will receive garbled information, and may not even be able
to load the data at all.
A better alternative is the certified data cassette. Certified data cassettes
(available at Radio Shack, computer stores, some office supply stores, etc.) are
terrible for audio, but wonderful for data storage. They come in relatively short
lengths (C-5, C-10, and C-20) so you don’t waste tape, and are not too
expensive. Ask your local computer freak (he’s the nerd with the glasses and
$60,000 salary) for a good local source.
Use one cassette deck consistently: When using cassettes, store and play
back data on the same tape recorder, preferably one with AC power. This gives
the most reliable results, since there might be enough variations between
different machines to cause problems.
Recording data on reel-to-reel recorders: It’ you’re working in the studio on a
song which uses the SP-12, record the SP-12 data either just before or just after
the song. Since reel-to-reel recorders run at higher speeds than cassette
recorders, and use good quality tape, drop-outs and similar hassles should not be
a problem. And, if you come back to the song at a later date, the SP-b2 data will
be right there waiting for you. Reel-to-reel recorders also usually give you more
flexibility in terms of setting input and output levels, thus allowing you to better
match the tape interface to the tape.
© E-mu Systems, Inc. 1985 Page 94
Enhanced by The Emulator Archive 2002 www.emulatorarchive.com
Page 95

APPENDIX
Identify data vocally: Since most small cassette machines have built-in mikes,
and other decks have mic input jacks, it’s easy to record a brief bit of narration
describing the nature of the data saved on the cassette. However, note that the
vocal sounds may cause strange triggering of the cassette interface. So, listen to
the recorder with the interface de-activated (or the cassette output unplugged
from the SP-12) until hitting the vocal announcement. After the narration is over,
plug the cassette player back into the SP-12 and start loading the data. Another
option is to record the voice at a low enough level that the interface simply
ignores it.
Maintain a back-up cassette: Recording multiple saves is one way to prevent
the loss of valuable data; another is maintaining a second cassette on which you
also record the data several times. That way if something drastic happens to the
first cassette, you’ll have a duplicate. Computer owners are very aware of the
need to make back-ups of important data -- and if you ever lose an important
cassette, you’ll appreciate the value of back-ups as well.
Take care of your recorder: Remember to clean the heads, capstan, and pinch
roller, and well as perform regular demagnetization and azimuth alignment.
© E-mu Systems, Inc. 1985 Page 95
Enhanced by The Emulator Archive 2002 www.emulatorarchive.com
Page 96

APPENDIX
APPENDIX G: HOW THE SP-12 WORKS
Here’s a brief idea of how the SP-12 does its magic.
The drum sounds were recorded at a studio using real drums and a human drummer.
These sounds were then converted into digital form (“digitized”), and “recorded” into
computer memory chips. This may sound like an involved process; and it is.
Fortunately, the people at E-mu are experts at digitizing sounds, thanks to their
experience with the Emulator, Drumulator, and Emulator II.
The various control functions are controlled by a built-in microcomputer that is as
powerful, and in some cases more powerful, than some of the “personal” computers
that are now available. Song and segment information is recorded in RAN (random
access memory); although RAM normally loses its data when the power supply is
turned off, the SP-12 includes battery backup, which preserves data in RAM for up to
five years.
The SP-12 is really an amazing example of what current technology, coupled with
creative engineering, can accomplish. We’re proud to offer it to you, and hope that it
helps you further your musical dreams. We thank you for your confidence in E-mu
products, and would greatly appreciate any comments you might have concerning
the SP-12. Contact E-mu at (408) 476-4426 and ask for customer service.
© E-mu Systems, Inc. 1985 Page 96
Enhanced by The Emulator Archive 2002 www.emulatorarchive.com
Page 97

APPENDIX
APPENDIX H: SPECIAL FUNCTIONS (SET-UP #23)
NOTE: In the following feature descriptions the abbreviation “RAM” (Random Access
Memory) means all sounds that are not permanently burned into the factory chips.
These can be User-sampled sounds, or any sound loaded in from cassette or disk.
The term “ROM” (Read Only Memory) refers to those sounds that are permanently
burned into the factory chips. These sounds are easily identified by their printed
names on the front panel, and are stored in banks 1, 2, and 3 of the SP-1 2
11. CATALOG FUNCTIONS Use slider #1 to display the options available in the
special function mode.
12. CLEAR ALL MEMORY This function is used to clear the SP-12 of all segment
and song information, as well as all RAM sounds. In addition, all ROM sounds
will be restored to their original location assignments as printed on the front
panel. If you wish to abort the erase procedure, simply answer “NO” to the
“REALLY? “ prompt in the LCD display.
CAUTION: All information not saved to cassette or disk will be lost forever
when the CLEAR ALL MEMORY function is complete.
13. MEMORY REMAINING The LCD display will show you available sequencer
note memory for segments and songs (in percentage) and available sound
sampling memory (in seconds). Remember that there is a limit of 2.5 seconds
for any one sample although the display may show more than 2.5 seconds of
total sample time available.
14. WRITE SMPTE Please refer to section 6G (page 6-6) of the SP-12 owners
manual.
15. CLEAR SOUND MEMORY This function is used to clear the SP-12 of all RAM
sounds, including those copied to banks 1, 2, and 3. Factory (ROM) sounds are
restored to their original location assignments. Segment and song information is
unaffected. See CAUTION note, function #12.
16. CLEAR SEQUENCES This function is used to clear the SP-12 of all segment
and song information. All sounds (RAM and ROM) will remain intact. See
CAUTION note, function #12.
© E-mu Systems, Inc. 1985 Page 97
Enhanced by The Emulator Archive 2002 www.emulatorarchive.com
Page 98

APPENDIX
17. COPY SOUND This function allows you to move any sound in the SP-12 to any
location (Banks 1 - 4.). You should think of the front panel instrument names
(Bass 1, Rim, User 6, etc.) as locations as well as sounds. For example, if you
want to move the factory COWBELL sound to the RIM location (Bank 1,
location 7), and the USER 1 sound to the COWBELL location (Bank 1, location
8), you would follow the procedure outlined below.
PROCEDURE DISPLAY READS
1. PRESS:
2. PRESS:
3. PRESS:
4. PRESS
5. PRESS:
6. PRESS:
Now the COWBELL sound is found in both the COWBELL and RIM locations.
7. PRESS:
8. PRESS:
9. PRESS:
10. PRESS:
Remember that the LCD display names the location of a sound, not necessarily
the sound itself, thus you will hear the COWBELL even though the display
reads RIM. The RIM sound is still in the SP-12’s memory, but it is no longer
assigned to a location, and therefore cannot be played or heard. To recover the
RIM sound, see Set-up Module function # 20 -“ Delete Sound “, in the SP-12
owners manual.
You can never “lose” the factory (ROM) sounds, they are burned permanently
into chips, but User (RAM) sounds are erased when another sound is written
into their location. Always make sure that you have stored a RAM sound on
disk or cassette before overwriting it.
Set-up module button Set-up function?
(11 -23)
23 (special) on keypad
17 (copy sound) on
keypad
COWBELL button
(the sound to be copied)
RIM button
(the destination location)
YES on keypad (to confirm
and execute copy)
17 (copy sound) on
keypad
USER - 1 button (the
sound to be copied)
COWBELL button (the
destination location)
YES on keypad (to confirm
and execute copy)
Catalog functions
Use slider # 1
Copy sound:
Select sound
Cowbell
Select sound
Cowbell Rim
Confirm? Y/N
Catalog functions
Use slider # 1
Copy sound:
Select sound
User - 1
Select sound
User - 1 Cowbell
Confirm? Y/N
Catalog functions
Use slider # 1
© E-mu Systems, Inc. 1985 Page 98
Enhanced by The Emulator Archive 2002 www.emulatorarchive.com
Page 99

APPENDIX
18. SWAP SOUNDS Please refer to section 2L of the SP-12 owners manual.
19. DEFAULT DECAY This function applies only to RAM sounds in the TUNE
mode (Set-up function # 18 – Decay/Tune Select) that need to be decayed as
well. A decay range of 0 - 31 (short long) is available. Note that all RAM
sounds in the tune mode will be affected by this setting.
20. D K / TUNE RANGE This function applies to RAM sounds only and provides
three ranges of tuning or decay length depending on the selection made in Setup function # 18 (Decay I Tune Select). The three ranges are accessed using
the and buttons. This feature works independently for each RAM sound.
Experiment using this function in conjunction with Special function # 19 (Default
Decay) for the most flexible combination of decay/tune control.
© E-mu Systems, Inc. 1985 Page 99
Enhanced by The Emulator Archive 2002 www.emulatorarchive.com
 Loading...