

Page 1
©2011 Sprint. Sprint and the logo are trademarks of Sprint. Other marks
MOTOROLA TITANIUM
TM
are the property of their respective owners.
6/16/11
User Guide
www.sprint.com
Page 2
Copyright & Trademarks
Motorola Mobility, Inc.
Consumer Advocacy Office
600 N US Hwy 45
Libertyville, IL 60048
www.motorola.com
Note:
Do not ship your product to the above address. If you need
to return your product for repairs, replacement, or warranty
service, ple ase contact the Motorola C ustomer Support
Center at:
1 (800) 453-0920 (United States)
1 (877) 483-2840 (TTY, TDD United States for hearing
impaired)
Certain features, services and applications are network
dependent and may not be available in all areas; additional
terms, conditions and/or charges may apply. Contact your
service provider for details.
All features, functionality, and other product specifications, as
well as the information contained in this guide, are based upon
the latest available information and believed to be accurate at
the time of printing. Motorola reserves the right to change or
modify any information or specifications without notice or
obligation.
NNTN9124A_061611
Note:
The images in this guide are examples only.
MOTOROLA and the Stylized M Logo are trademarks or
registered trademarks of Motorola Trademark Holdings, LLC. All
other product or service names are the property of their
resp ect ive owners.
Important:
© 2011 Motorola Mobility, Inc. All rights reserved.
WARNI NG:
Product ID: MOTOROLA TITANIUM
Manual Number: NNTN9124A
Important Privacy Message:
often do not apply to third-party applications.
Third-party applications may access your
personal information or require Sprint to
disclose your customer information to the
third-party application provider. To find out
how a third-party application will collect,
access, use, or disclose your personal
information, check the application provider's
policies, which can usually be found on their
website. If you aren't comfortable with the
third-party application's policies, don't use the
application.
Motorola does not take responsibility for changes/
modification to the transceiver.
Sprint's policies
Page 3

Table of Contents
Introduction . . . . . . . . . . . . . . . . . . . . . . . . . . . . . . . i
1. Setting Up Service . . . . . . . . . . . . . . . . . . . 1
Setting Up Your Phone . . . . . . . . . . . . . . . . . . . . . . 1
Setting Up Voicemail . . . . . . . . . . . . . . . . . . . . . . . . 4
Account Passwords . . . . . . . . . . . . . . . . . . . . . . . . . 4
Getting Help . . . . . . . . . . . . . . . . . . . . . . . . . . . . . . . 5
2. Phone Basics . . . . . . . . . . . . . . . . . . . . . . . . 6
Your Phone . . . . . . . . . . . . . . . . . . . . . . . . . . . . . . . . 6
SIM Card, M em or y C ard, and B at tery
Information . . . . . . . . . . . . . . . . . . . . . . . . . . . . . . . . 9
Turning Your Phone On and Off . . . . . . . . . . . . . 16
Touchscreen and Keys . . . . . . . . . . . . . . . . . . . . . 16
Home Screen . . . . . . . . . . . . . . . . . . . . . . . . . . . . . 20
Displaying Your Numbers . . . . . . . . . . . . . . . . . . 24
Entering Text . . . . . . . . . . . . . . . . . . . . . . . . . . . . . . 25
Tips and Tricks . . . . . . . . . . . . . . . . . . . . . . . . . . . . 28
Battery Cool Down . . . . . . . . . . . . . . . . . . . . . . . . 29
Dual Microphone Noise Cancellation . . . . . . . . 29
Accessories . . . . . . . . . . . . . . . . . . . . . . . . . . . . . . 30
3. Making and Answering Calls . . . . . . . . . 31
Types of Calls . . . . . . . . . . . . . . . . . . . . . . . . . . . . 31
Phone Calls . . . . . . . . . . . . . . . . . . . . . . . . . . . . . . 32
Nextel Direct Connect . . . . . . . . . . . . . . . . . . . . . . 38
Group Connect . . . . . . . . . . . . . . . . . . . . . . . . . . . 41
Nextel Direct Send . . . . . . . . . . . . . . . . . . . . . . . . 43
Talkgroups . . . . . . . . . . . . . . . . . . . . . . . . . . . . . . . 47
Call Alerts . . . . . . . . . . . . . . . . . . . . . . . . . . . . . . . . 49
Direct Talk . . . . . . . . . . . . . . . . . . . . . . . . . . . . . . . 51
4. Service Features: The Basics . . . . . . . . 56
Receiving Messages . . . . . . . . . . . . . . . . . . . . . . 56
Voicemail . . . . . . . . . . . . . . . . . . . . . . . . . . . . . . . . 57
Messaging . . . . . . . . . . . . . . . . . . . . . . . . . . . . . . . 58
Caller ID Blocking . . . . . . . . . . . . . . . . . . . . . . . . . 64
Call Waiting . . . . . . . . . . . . . . . . . . . . . . . . . . . . . . 65
Making a Second Call . . . . . . . . . . . . . . . . . . . . . 65
Making a Three-Way Call . . . . . . . . . . . . . . . . . . 66
Call Forwarding . . . . . . . . . . . . . . . . . . . . . . . . . . . 66
Making International Calls . . . . . . . . . . . . . . . . . . 68
Special Dialing Codes . . . . . . . . . . . . . . . . . . . . . 68
Sprint Phone Services . . . . . . . . . . . . . . . . . . . . . 69
Page 4

5. Web and Data Services . . . . . . . . . . . . . . 71
Web Browser . . . . . . . . . . . . . . . . . . . . . . . . . . . . . . 71
Downloading Apps . . . . . . . . . . . . . . . . . . . . . . . 77
Email . . . . . . . . . . . . . . . . . . . . . . . . . . . . . . . . . . . . . 79
Google Data Synchronization . . . . . . . . . . . . . . 80
Microsoft™ Office Outlook™ Synchronization . 80
Wi-Fi . . . . . . . . . . . . . . . . . . . . . . . . . . . . . . . . . . . . . 81
6. Settings . . . . . . . . . . . . . . . . . . . . . . . . . . . . 83
Personalize . . . . . . . . . . . . . . . . . . . . . . . . . . . . . . 83
Messaging Settings . . . . . . . . . . . . . . . . . . . . . . . 86
Airplane Mode . . . . . . . . . . . . . . . . . . . . . . . . . . . . 87
Call Settings . . . . . . . . . . . . . . . . . . . . . . . . . . . . . 88
Security Settings . . . . . . . . . . . . . . . . . . . . . . . . . . 89
Resetting Your Phone . . . . . . . . . . . . . . . . . . . . . . 91
Update my phone . . . . . . . . . . . . . . . . . . . . . . . . 92
Troubleshooting . . . . . . . . . . . . . . . . . . . . . . . . . . 93
7. Call Log . . . . . . . . . . . . . . . . . . . . . . . . . . . . 94
About the Call Log . . . . . . . . . . . . . . . . . . . . . . . . 94
Viewing the Call Log . . . . . . . . . . . . . . . . . . . . . . 96
Saving Items From the Call Log . . . . . . . . . . . . . 96
Deleting Items From the Call Log . . . . . . . . . . . . 97
Prepending a Number From the Call Log . . . . . 97
8. Contacts . . . . . . . . . . . . . . . . . . . . . . . . . . . 98
About Contacts . . . . . . . . . . . . . . . . . . . . . . . . . . . 98
Creating Contacts Entries . . . . . . . . . . . . . . . . . . . 99
Viewing Contacts . . . . . . . . . . . . . . . . . . . . . . . . . 101
Adding a Number to an Entry . . . . . . . . . . . . . . 102
Editing Entries . . . . . . . . . . . . . . . . . . . . . . . . . . . . 102
Deleting Entries . . . . . . . . . . . . . . . . . . . . . . . . . . 103
Selecting a Ringtone for an Entry . . . . . . . . . . . 103
Assigning a Picture to an Entry . . . . . . . . . . . . . 103
Import and Export Contacts . . . . . . . . . . . . . . . . 104
9. Tools . . . . . . . . . . . . . . . . . . . . . . . . . . . . . 106
Calendar . . . . . . . . . . . . . . . . . . . . . . . . . . . . . . . . 106
Alarm Clock . . . . . . . . . . . . . . . . . . . . . . . . . . . . . 107
Calculator . . . . . . . . . . . . . . . . . . . . . . . . . . . . . . . 107
Quickoffice . . . . . . . . . . . . . . . . . . . . . . . . . . . . . . 107
Personal Portal . . . . . . . . . . . . . . . . . . . . . . . . . . . 108
Accessibility . . . . . . . . . . . . . . . . . . . . . . . . . . . . . 109
Location . . . . . . . . . . . . . . . . . . . . . . . . . . . . . . . . . 113
Google Talk . . . . . . . . . . . . . . . . . . . . . . . . . . . . . . 117
YouTube . . . . . . . . . . . . . . . . . . . . . . . . . . . . . . . . . 118
Page 5

Social Media . . . . . . . . . . . . . . . . . . . . . . . . . . . . . 119
10. microSD Card . . . . . . . . . . . . . . . . . . . . . 121
Using a microSD Card With Your Phone . . . . 121
microSD Settings . . . . . . . . . . . . . . . . . . . . . . . . . 123
USB and Memory Card . . . . . . . . . . . . . . . . . . . 124
11. Camera . . . . . . . . . . . . . . . . . . . . . . . . . . . 126
Taking Pictures . . . . . . . . . . . . . . . . . . . . . . . . . . . 126
Videos . . . . . . . . . . . . . . . . . . . . . . . . . . . . . . . . . . 128
12. Bluetooth Wireless . . . . . . . . . . . . . . . . . 130
Turning Bluetooth Power
On and Off . . . . . . . . . . . . . . . . . . . . . . . . . . . . . . 130
Connecting and Disconnecting Bluetooth
Devices . . . . . . . . . . . . . . . . . . . . . . . . . . . . . . . . . 131
13. Music . . . . . . . . . . . . . . . . . . . . . . . . . . . . . 133
Music Basics . . . . . . . . . . . . . . . . . . . . . . . . . . . . 133
Set Up Music . . . . . . . . . . . . . . . . . . . . . . . . . . . . 134
Get Music . . . . . . . . . . . . . . . . . . . . . . . . . . . . . . . 134
Play Music . . . . . . . . . . . . . . . . . . . . . . . . . . . . . . . 135
S1. Important Safety Information . . . . . . . . 138
General Precautions . . . . . . . . . . . . . . . . . . . . . . 139
Maintaining Safe Use of and Access to Your
Phone . . . . . . . . . . . . . . . . . . . . . . . . . . . . . . . . . . . 139
Battery Use and Safety . . . . . . . . . . . . . . . . . . . 139
Battery Charging . . . . . . . . . . . . . . . . . . . . . . . . . 141
Third Party Accessories . . . . . . . . . . . . . . . . . . . 141
Driving Precautions . . . . . . . . . . . . . . . . . . . . . . . 141
Seizures/Blackouts . . . . . . . . . . . . . . . . . . . . . . . 142
Caution About High Volume Usage . . . . . . . . 142
Repetitive Motion . . . . . . . . . . . . . . . . . . . . . . . . . 143
Children . . . . . . . . . . . . . . . . . . . . . . . . . . . . . . . . 143
Glass Parts . . . . . . . . . . . . . . . . . . . . . . . . . . . . . . 143
Operational Warnings . . . . . . . . . . . . . . . . . . . . 143
Radio Frequency (RF) Energy . . . . . . . . . . . . . 144
Specific Absorption Rate (IEEE) . . . . . . . . . . . . 146
Information from the World Health
Organization . . . . . . . . . . . . . . . . . . . . . . . . . . . . . 147
FCC Declaration of Conformity . . . . . . . . . . . . . 147
FCC Notice to Users . . . . . . . . . . . . . . . . . . . . . . 147
Industry Canada Notice to Users . . . . . . . . . . . 148
Location Services (GPS & AGPS) . . . . . . . . . . 148
Navigation . . . . . . . . . . . . . . . . . . . . . . . . . . . . . . 149
Smart Practices While Driving . . . . . . . . . . . . . 149
Privacy & Data Security . . . . . . . . . . . . . . . . . . . 150
Use & Care . . . . . . . . . . . . . . . . . . . . . . . . . . . . . . 152
Page 6

Recycling . . . . . . . . . . . . . . . . . . . . . . . . . . . . . . . 152
California Perchlorate Label . . . . . . . . . . . . . . . 153
Hearing Aid Compatibility with Mobile
Phones . . . . . . . . . . . . . . . . . . . . . . . . . . . . . . . . . 153
Software Copyright Notice . . . . . . . . . . . . . . . . 154
Content Copyright . . . . . . . . . . . . . . . . . . . . . . . 154
Open Source Software Information . . . . . . . . . 154
Export Law Assurances . . . . . . . . . . . . . . . . . . . 155
Product Registration . . . . . . . . . . . . . . . . . . . . . . 155
Service & Repairs . . . . . . . . . . . . . . . . . . . . . . . . 155
Owner’s Record . . . . . . . . . . . . . . . . . . . . . . . . . 156
S2. Manufacturer’s Warranty . . . . . . . . . . . . 157
Motorola Limited Warranty for the
United States and Canada . . . . . . . . . . . . . . . . . 157
Index. . . . . . . . . . . . . . . . . . . . . . . . . . . . . . . . . . . 162
Page 7
Introduction
This
User Guide
and all the features of your new phone.
Throughout this guide, you’ll find tips that highlight
special shortcuts and timely reminders to help you
make the most of your new phone and service. The
Table of Contents and Index will also help you quickly
locate specific information.
You’ll get the most out of your phone if you read each
section. However, if you’d like to get right to a specific
feature, simply locate that section in the Table of
Contents and go directly to that page. Follow the
instructions in that section, and you’ll be ready to use
your phone in no time.
introduces you to your wireless service
Note:
Because of updates in phone software, this guide may
not be the most current version for your phone. Visit
www.sprint.com
version of the user guide.
WARNI NG:
and sign in to access the most recent
Please refer to the
section on page 138 to learn about information
that will help you safely use your phone. Failure to
read and follow the Important Safety Information
in this phone guide may result in serious bodily
injury, death, or property damage.
Important Safe ty Information
i
Page 8

Page 9
Setting Up Your Phone
1. Setting Up Service
End/Power
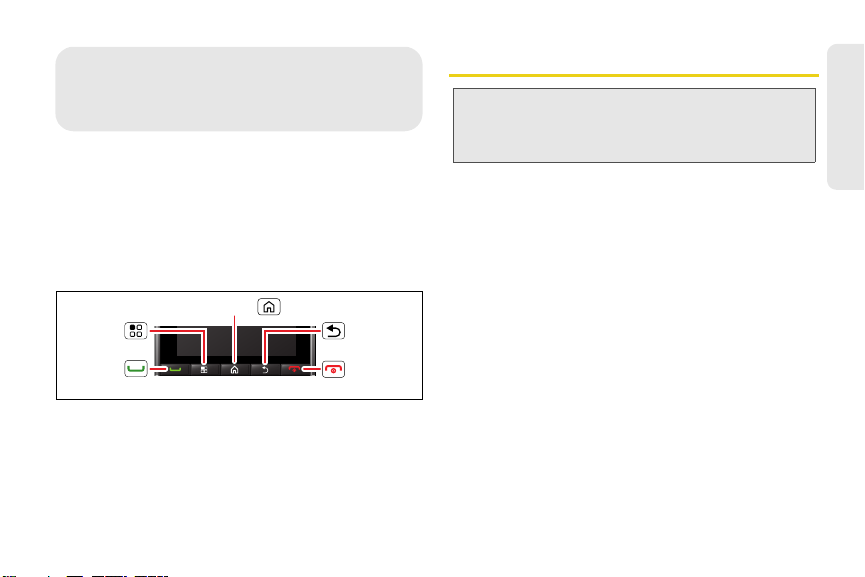
Key
Talk Key
Menu Key Back Key
Home Key
⽧
Setting Up Your Phone (page 1)
⽧
Setting Up Voicemail (page 4)
⽧
Account Passwords (page 4)
⽧
Getting Help (page 5)
Your Phone’s Navigation Pad
CAUTION:
1.
䡲
2.
䡲
3.
Before assembling, charging, or using your
phone for the first time, please read the important
safety, regulatory and legal information in this
guide, beginning on page 138.
Make sure your SIM card is in place.
See “Your SIM Card” on page 9.
Install the battery.
See “Installing the Battery” on page 14.
Press and hold @
End/Power
for two seconds to
Setting Up Service
turn the phone on.
䡲
If your phone is activated, it will turn on, search for
service, and display the setup wizard.
If your phone's SIM PIN is set, you may be
prompted to enter your SIM PIN code when you
Menu
turn on your phone. Press /
four-digit SIM code, and touch
, enter the
OK
to allow phone
transmissions as prompted. (See “SIM Card
Security” on page 89 for more information.)
䡲
If your phone is not yet activated, see “Activating
Your Phone” on page 2 for more information.
1. Setting Up Service 1
Page 10
Use the MOTOROLA TITANIUM setup menu to
4.
select a language, set up an email account, and
import SIM contacts (if applicable).
䡲
See “Setup Wizard” on page 2.
5.
Make your first call.
䡲
Touch
䡲
Press `
Tip:
If your phone screen is locked, drag to the right to
display the home screen.
Note:
Your phone’s battery should have enough charge for
your phone to turn on and find a signal, set up your
voicemail, and make a call. You should fully charge
your battery as soon as possible. See “Charging the
Battery” on page 15 for details.
Tal k
Dialer
and enter phone number.
.
Activating Your Phone
䢇
If you purchased your phone at a Sprint Store, it is
probably activated and ready to use.
䢇
If your phone is not activated, please call Sprint
Customer Service at 1-800-639-6111 from any other
phone.
2 1. Setting Up Service
Tip:
You must be in an area covered by the Sprint National
Network when you first power up your phone.
If you have a SIM card from a previous Sprint phone, go
to a Sprint Store to copy your stored contacts onto the
new SIM card. You can then copy your contacts to your
phone.
䢇
When you power up your phone the first time, it
performs a series of security checks. For example, it
verifies the phone is Sprint-approved and the correct
SIM card is installed. If you don’t pass the security
checks, your phone displays messages and screen
prompts showing what to do next. If you still
encounter security messages, call Sprint Customer
Service at 1-800-639-6111 from any other phone.
Setup Wizard
The first time you turn on your phone, a setup wizard
guides you through:
䢇
Setting up your Wi-Fi connection.
Page 11
䢇
Signing in to your existing Google™ account.
Note:
If you want to change the primary language used by
your phone, touch
Welcome screen and then select a language.
Note:
If you don’t have a Google account, you can create one
using the wizard.
Tip:
Remember to write down your user name and password,
and keep them in a safe place.
䢇
Setting up additional email accounts, such as POP3,
Change language
from the
IMAP, or Microsoft™ Exchange.
䢇
Loading contacts from your SIM card.
䡲
This step is only applicable if you have copied
contacts from a previous Sprint or Nextel SIM
card to your new SIM card at a Sprint Store, and
you want to import contacts stored on the SIM
card to your phone. See “Import and Export
Contacts” on page 104 for further details.
䢇
Selecting your keypad type.
Tip:
To type information in any of the setup steps, touch the
text field and use the QWERTY keyboard. Press c to
access the alternate characters on a key, such as
numbers and punctuation.
To return to the setup menu at any time, touch >
Setup
.
Note:
This phone supports data-intensive applications and
services. It is strongly recommended that you purchase
a data plan that meets your needs. Contact Sprint for
details.
1. Setting Up Service 3
Setting Up Service
Page 12

Setting Up Voicemail
Account Passwords
All unanswered calls to your phone are automatically
transferred to your voicemail, even if your phone is in
use or turned off. Therefore, it is recommended that you
set up your voicemail and personal greeting as soon
as your phone is activated.
1.
Using your MOTOROLA TITANIUM, call your
wireless phone number.
2.
Follow the system prompts to:
䡲
Create your password.
䡲
Record your name announcement.
䡲
Record your greeting.
Note:
Voicemail password:
you create a password when setting up your voicemail
to protect against unauthorized access. Without a
password, anyone who has access to your phone is
able to access your voicemail messages.
It is strongly recommended that
For more information about using your voicemail, (see
“Voicemail” on page 57.)
4 1. Setting Up Service
With Sprint service, you enjoy unlimited access to your
personal account information and voicemail account.
To ensure that no one else has access to your
information, you need to create passwords to protect
your privacy.
Account Username and Password
If you are the account owner, you will create an account
username and password when you sign on to
www.sprint.com
to get started.) If you are not the account owner (if
now!
. (Click
Sign in
and then click
Sign up
someone else receives the bill for your service), you
can get a sub-account password at
www.sprint.com
.
Voicemail Password
You will create your voicemail password when you set
up your voicemail. See “Setting Up Voicemail” on
page 4 for more information on your voicemail
password.
Page 13
Getting Help
Managing Your Account
Online: www.sprint.com
䢇
Access your account information.
䢇
Check your minutes used (depending on your
service plan).
䢇
View and pay your bill.
䢇
Enroll for online billing and automatic payment.
䢇
Purchase accessories.
䢇
Shop for the latest phones.
䢇
View available service plans and options.
From Your MOTOROLA TITANIUM
䢇
Touch
and account balance.
䢇
Touch
䢇
Touch
of your wireless service plan or get answers to other
questions.
Dialer
*2` to check minute usage
Dialer
*3` to make a payment.
Dialer
*4` to access a summary
䢇
Touch
Dialer
*7` to add a new line of
service, upgrade your device, purchase accessories,
or access other account services.
From Any Other Phone
䢇
Sprint Customer Service:
䢇
Business Customer Service:
1-800-639-6111
1-877-639-8351.
.
Operator Services
Operator Services provides assistance when you place
collect calls or when you place calls billed to a local
telephone calling card or third party.
䊳
Touch 0 and then press `.
For more information or to see the latest in products
and services, visit us online at
www.sprint.com
.
1. Setting Up Service 5
Setting Up Service
Page 14
⽧
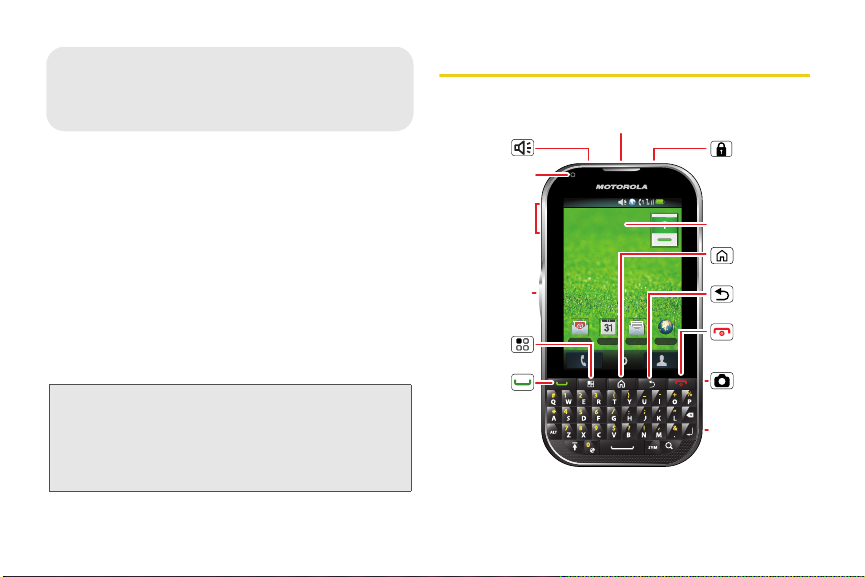
2. Phone Basics
12:00
Email BrowserMessagingCelendar
10. End/
Power
Key
7. Talk Key
6. Menu
Key
11. Back
Key
12. Home
Key
8. Micro USB
Connector
5. Direct
Connect
Button
4. Volume
Buttons
9. Camera
Button
3. Notification
LED
1. 3.5 mm Headset
14. Screen
Lock
Button
2. Speaker
Button
13. Touchscreen
Your Phone (page 6)
⽧
SIM Card, Memory Card, an d Battery Information (page 9)
⽧
Turning Your Phone O n and Off (page 16)
⽧
Home Screen (page 20)
⽧
⽧
⽧
⽧
⽧
⽧
Note:
Displaying Your Numbers (page 24)
Entering Text (page 25)
Tips and Tricks (page 28)
Battery Cool Down (page 29)
Dual Microphone Noise Cancellation (page 29)
Accessories (page 30)
The use of wireless phones while driving may cause
distraction. Discontinue a call if you can’t concentrate
on driving. Additionally, the use of wireless devices and
their accessories may be prohibited or restricted in
certain areas. Always obey the laws and regulations on
the use of these products.
62. Phone Basics
Your Phone
Page 15
For some features, when you
turn your phone, the screen
adjusts for you.
12:00
Email BrowserMessagingCelendar
15. Alternate
Key
16. Shift
Key
17. Space
Key
Email BrowserMessagingCelendar
Email BrowserMessagingCelendar
Key and Connector Functions
1.
3.5mm Headset Jack
2.
Speaker Button
speakerphone on or off during a call. From the
12:00
12:00
home screen, pressing the Speaker Key turns
Direct Connect speaker mode on and off.
3.
Notification LED
messages, and low battery power.
4.
Volume Button
from the home screen, the voice or speaker
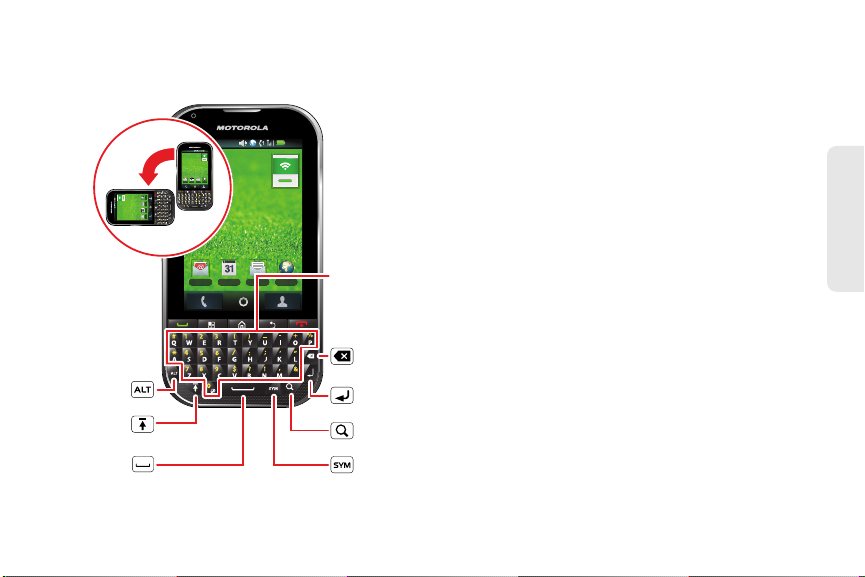
22. QWERTY
Keyboard
volume during a call, and the speaker volume
while using the music player or other applications.
5.
Direct Connect (DC) Button
Direct Connect
21. Delete
Key
20. Return
Key
19. Search
Key
18. Symbol
Key
6.
Menu Key
(including
(/) lets you access the options menus
Settings
context-sensitive menus from other screens.
7.
Talk Key
(`) lets you make or receive calls,
answer Call Waiting, or switch between two calls.
Press and hold to activate Voice Control.
8.
Micro USB Connector
other accessories to your phone.
lets you attach a headset.
()) lets you turn the
alerts you of email, voicemail, text
lets you adjust the ringer volume
®
. (See page 38.)
lets you use Nextel
) from the home screen and
lets you connect a charger or
2. Phone Basics 7
Phone Basics
Page 16

9.
Camera Button
you take pictures.
10.
End/Power Key
hold to open the phone options menu where you
can turn the phone off, turn Airplane mode on or
off, and turn Silent mode on or off.
11.
Back Key
12.
Home Key
screen. Press and hold to display the active apps
menu.
13.
Touchscreen
menus and features, enter text, dial phone
numbers, and more, using just your fingertips.
14 .
Screen Lock Button
the touchscreen.
15.
Alternate Key
characters such as numbers, punctuation, and
special characters.
16.
Shift Key
twice to turn on Shift Lock and type all capital
letters.
17.
Space Key
single space.
18.
Symbol Key
(j) activates the camera and lets
(@) lets you end calls. Press and
(%) returns you to the previous screen.
(X) brings you back to the home
input lets you access all the phone’s
(#) lets you lock and unlock
(c). Press to type alternate
( ). Press to type a capital letter. Press
(f). Press to advance the cursor a
(d). Press to insert symbols into text.
82. Phone Basics
19.
Search Key
application.
20.
Return Key
email or text message.
21.
Delete Key
and hold to delete more than one character.
22.
QWERTY Keyboard
you enter letters, numbers, and punctuation, as
well as navigate through menus.
( ). Press to open the search
(g). Press to begin a new line in an
( ). Press to delete a character. Press
provides a full keyboard. It lets
Page 17

SIM Card, Memory Card, and Battery Information
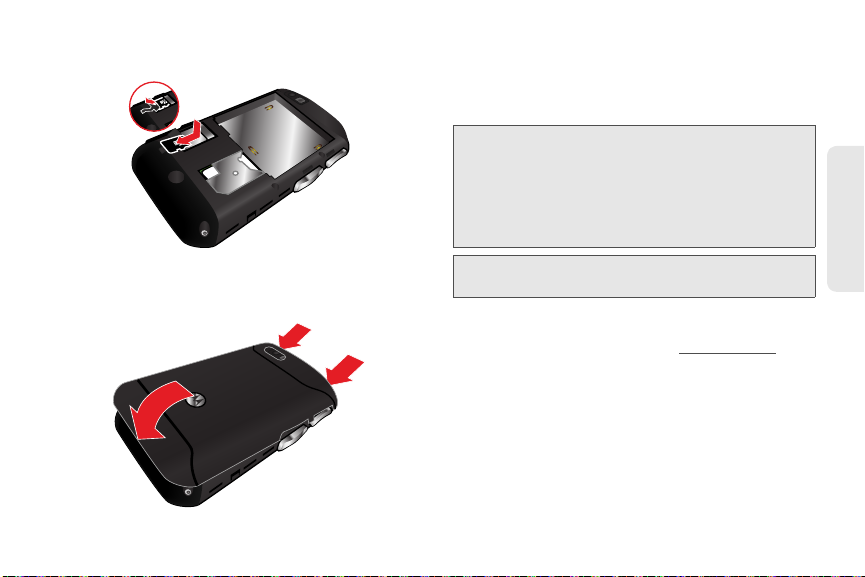
You r S IM Card
Locating the SIM Card
Your SIM (Subscriber Identity Module) card is a small
card inserted into the SIM card holder within your
phone below the battery.
If no SIM card came with your phone, contact Sprint
Customer Service at 1-800-639-6111.
Most users will never need to remove or insert the SIM
card. However, if it becomes necessary, follow the
instructions in “Removing and Inserting the SIM Card”
on page 10.
Important:
Note:
WARNI NG:
The SIM card is designed for optimal Contacts
storage and feature use. For SIM card
compatibility information, visit
www.nextel.com/sim
In some cases, Contacts and Groups may not be
accessible if you move your SIM card to another
phone. Contacts and Groups created with your
MOTOROLA TITANIUM may not be readable by
an older iDEN SIM-based phone.
Your MOTOROLA TITANIUM Contacts are managed
and stored on your phone rather than on the SIM card.
If you are using a SIM card from a previous phone, you
can import your existing contacts from the SIM card to
your MOTOROLA TITANIUM using the SIM Manager.
Likewise, you can export your phone’s Contacts to your
SIM card. See “Import and Export Contacts” on
page 104 for details.
The first time you turn on your phone, your SIM
card is linked to it. If you remove your SIM card
and replace it with a different SIM card, your
phone will perform a master clear when turned
on and all data on the phone will be erased.
.
2. Phone Basics 9
Phone Basics
Page 18
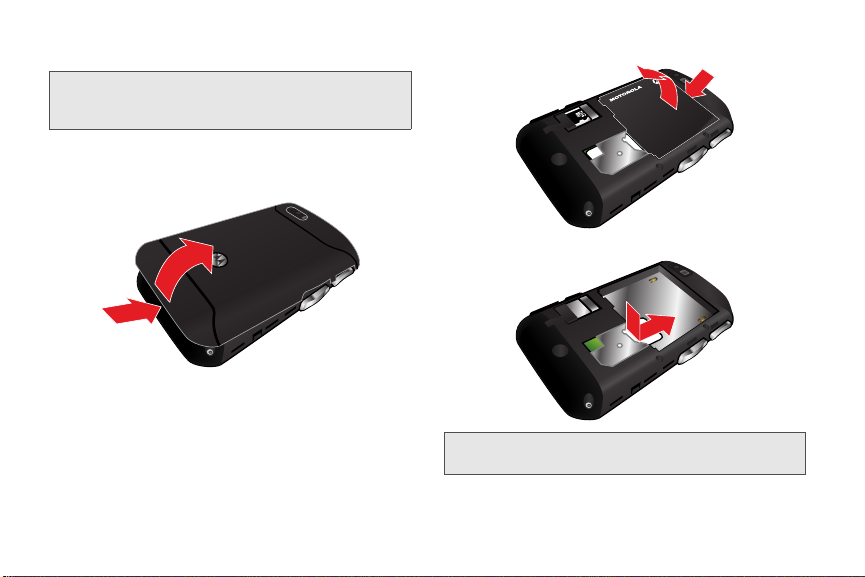
Removing and Inserting the SIM Card
Important:
To remove your SIM card:
1.
10 2. P hon e Ba sics
To avoid losing information stored in your SIM
card, do not remove it from your phone unless
absolutely necessary.
With your phone powered off, lift and remove the
battery door.
2.
Remove the battery.
3.
Slide the SIM card out of its holder.
Note:
Protect your SIM card as you would any delicate object.
Store it carefully.
Page 19
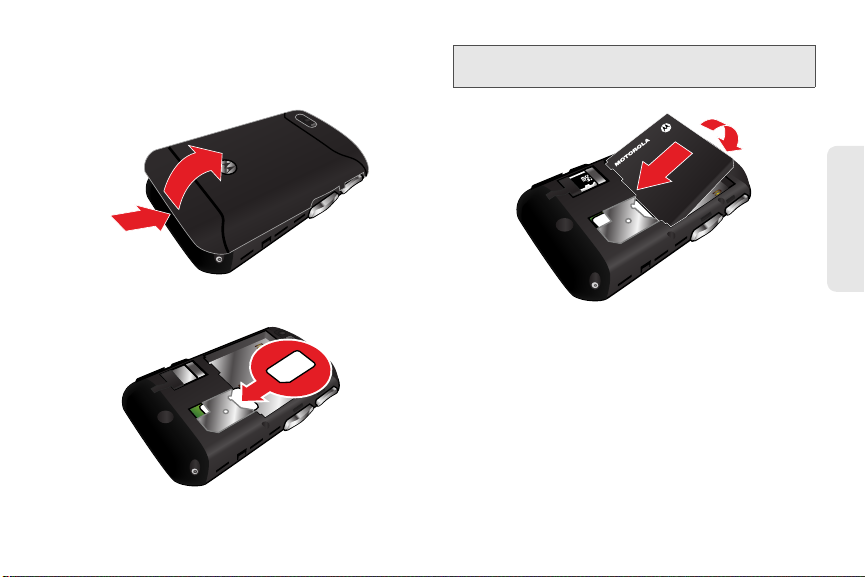
To insert your SIM card:
1.
With your phone powered off, lift and remove the
battery door.
2.
Carefully slide the SIM card into your phone until it
lies flat in the SIM card holder.
Important:
3.
Do not touch the gold-colored areas of your SIM
card.
Insert the battery.
Phone Basics
2. Phone Basics 11
Page 20
Replace the battery door, pressing down firmly on
4.
it to ensure it is secured properly.
12 2. Phon e Basi c s
Memory Card
A microSD memory card is provided with your phone.
Insert the Memory Card
1.
With your phone powered off, lift and remove the
battery door.
Page 21
2.
Open the memory card slot cover and slide in the
memory card until it clicks into place.
3.
Close the memory card slot cover.
4.
Replace the battery door, pressing down firmly on
it to ensure it is secured properly.
For more information about your phone’s memory
card, see see “10. microSD Card” on page 121.
Battery and Charger
WARNI NG:
Caution:
Sprint-approved and Motorola-approved batteries and
accessories can be found at Sprint Stores or through
Motorola. You may order online at
calling 1-866-866-7509.
Your phone’s Lithium Ion (Li-Ion) battery allows you to
recharge it before it is fully drained.
When the battery reaches 5% of its capacity, your
phone makes a sound and displays a message. When
there are approximately two minutes of talk time left, the
phone sounds an audible alert and then turns off.
Use only Sprint-approved or Motorola-approved
batteries and chargers with your phone. The
failure to use a Sprint-approved or Motorola-
approved battery and charger may increase the
risk that your phone will overheat, catch fire, or
explode, resulting in serious bodily injury, death,
or property damage.
Please read “Battery Use and Safety” on
page 139.
www.sprint.com
or by
2. Phone Basics 13
Phone Basics
Page 22
Note:
Long backlight settings, searching for service, vibrate
mode, browser use, and other variables may reduce
the battery’s talk and standby times. See “Battery Tips”
on page 28 for more details on extending battery life.
Tip:
Watch your phone’s battery level indicator and charge the
battery before it runs out of power.
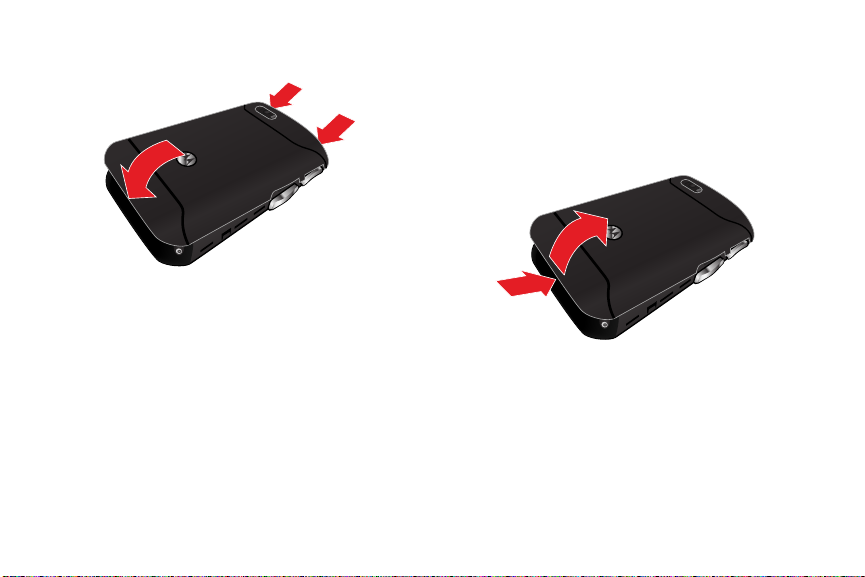
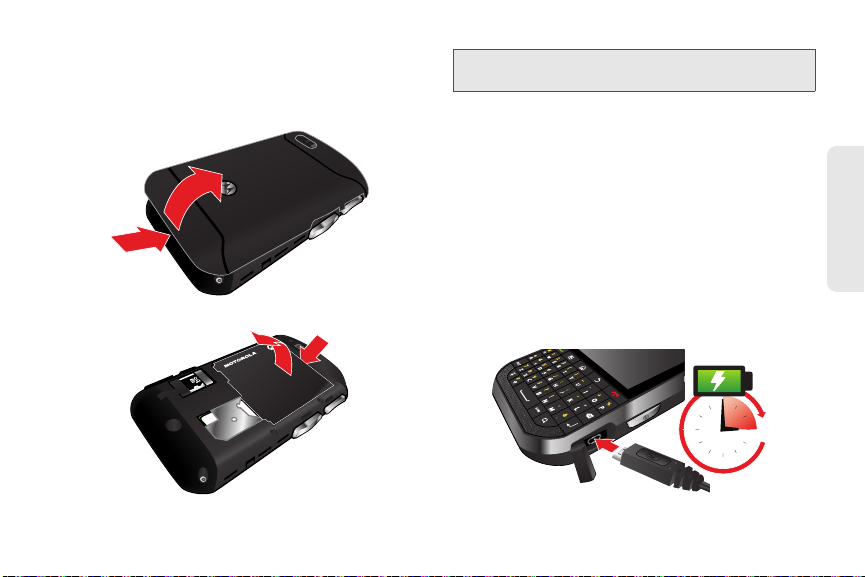
Installing the Battery
1.
With your phone powered off, lift and remove the
battery door.
14 2 . P h on e B a si c s
2.
Insert the battery into the opening, making sure the
connectors align. Gently press down to secure the
battery.
3.
Replace the battery door, pressing down firmly on
it to ensure it is secured properly.
Page 23
Removing the Battery
3H
1.
Make sure the power is off so that you don’t lose
any stored numbers or messages. Remove the
battery door.
2.
Lift the battery to remove it.
WARNI NG:
Do not handle a damaged or leaking battery as
you can be burned.
Charging the Battery
Charge your battery as soon as possible so you can
begin using your phone.
Always use a Sprint-approved or Motorola-approved
desktop charger, travel charger, or vehicle power
adapter to charge your battery.
Using the Phone Charger
䊳
Plug the flat end of the charger into the phone’s
micro USB connector and the other end into the
wall socket connector. Plug the wall socket
connector to an electrical outlet.
2. Phone Basics 15
Phone Basics
Page 24
With the approved Li-Ion battery, you can recharge the
battery before it becomes completely run down.
Touchscreen and Keys
Turning Your Phone On and Off
Turning Your Phone On
䊳
Press and hold @
two seconds.
As your phone connects to the network, you see a
connecting message. Your phone may require you to
enter identifying information to use it or to access
specific features.
Note:
If your phone's SIM PIN is set, you will be prompted to
enter your SIM PIN code when you turn on your phone.
Press /
touch
OK
Turning Your Phone Off
䊳
Press and hold @ to open a phone options menu,
where you can turn off the phone (
Airplane mode
turn
16 2. Phon e Ba sics
End/Power
Menu
, enter the four-digit SIM code, and
to allow phone transmissions as prompted.
or
for approximately
Silent mode
Power off
on or off.
), or
Touchscreen On/Off
Your touchscreen is on when you need it and off when
you don’t.
䢇
To make your touchscreen sleep or wake up, just
press #
䢇
When you hold the phone to your ear during calls,
your touchscreen sleeps to prevent accidental
touches.
䢇
To let the touchscreen adjust brightness
automatically, press
Sound & display
Automatic brightness
Note:
Screen Lock
.
Menu/ >Settings >
>Brightness
and check
.
Your touchscreen
might stay dark if
the sensor just
above it is covered.
Don't use covers
or screen
protectors (even clear ones) that cover this sensor. To
find Motorola accessories for your phone, visit
www.motorola.com/products
.
Page 25
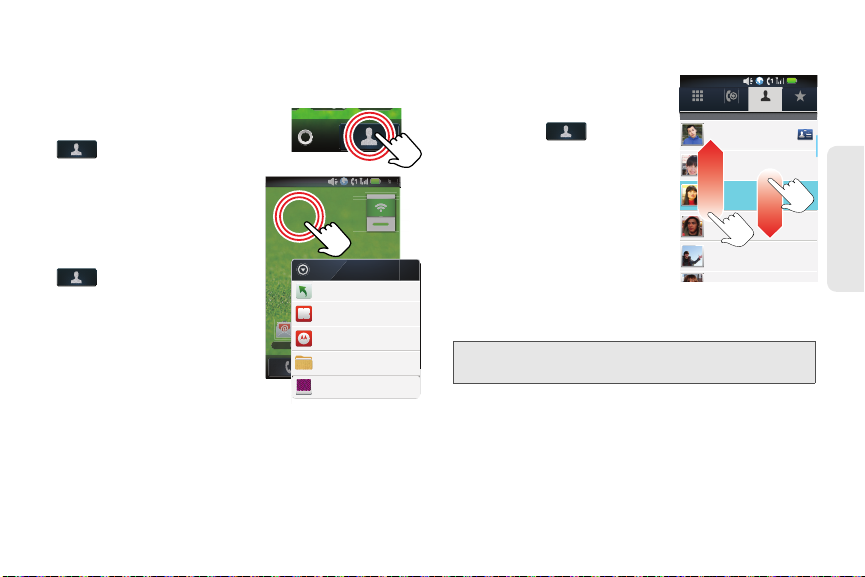
Touch Tips
gg
12:00
Email BrowserMessagingCelendar
:
00
l
Add to Home screen
Android Widgets
Shortcuts
Motorola Widgets
Folders
Wallpapers
To u ch
To choose an icon or option, touch
it. Try it: In the home screen, touch
Contacts
.
Touch and Hold
To open special options,
touch and hold an icon or
other item. Try it: In the home
screen, touch
Contacts
touch and hold a contact to
open options.
, and then
Drag
Contacts
12:00
FavoritesPhone Call Log
Mobile
Mobile
Mobile
PTT
Mobile
Phone Basics
Mobile
To scroll through a list or move
slowly, drag up or down the
touchscreen. Try it: In the home
screen, touch
then drag your
Contacts
Contacts
list up
or down.
When you drag or flick a list, a
scroll bar appears on the right.
Drag the scroll bar to move the
list to a letter.
,
Displaying 121 contacts
Me
Alex Sliveira
Colleen Pham
Dylan Foster
Jeff Cook
Flick
To scroll through a list or move quickly, flick across the
Emai
touchscreen (drag quickly and release).
Tip:
When you flick a long list, touch the screen to stop it from
scrolling.
2. Phone Basics 17
Page 26
My Sign
Messaging Market
N Clark St
Wacker Dr
M
E Ohio St
N Rush St
N Park St
N New St
N Wabash Ave
N Dearborn St
E Grand Ave
E Randolph St
N Micigan Ave
N Micigan Ave
r
D
submul
oC
N
W Lake St W Lake St
E Wacker Pl
State/Lake
Grand Red
Lake
Randolph
St Metra
Randolph/
Wabash
Washington-Blue
E S WaterSt
M
M
M
M
E Randolph St
Ontario St
E Ontario St
p
p
h
h
r
r
a
d
o
e
a
e
Pinch to zoom out.
Draw on your screen to get to your favorite apps. To
open My Sign, touch
Draw the sign for the action you
want. For example, draw an
upsidedown “V” to go to
airplane mode.
To see which actions are already
assigned to gestures, press
> List Gestures
/
see several gestures that are
unassigned.
To assign an action to a gesture,
press /
>List Gestures
an unassigned gesture, then
touch an app from the list.
To create a new gesture, press /
select an action from the list, and draw a gesture to
assign to the action.
18 2. Phon e Ba sics
> My Sign
. You’ll also
, touch
>Add Gesture
.
Toggle airplane mode
Zoom
Get a closer look at maps or pictures. To zoom in,
double-touch the screen. To zoom out, double-touch
the screen again.
12:00
Tip:
For maps you can also touch to zoom in, or to
zoom out.
You can also zoom in or out by pinching your fingers
together or moving them apart on the screen.
,
rborn St
cker Dr
W Lake St W Lak
andolph St
Messaging
State/Lake
M
Lake
M
E Wacker Pl
Randolph/
Wabash
M
ashington-Blue
E S
N Micigan Ave
Page 27
Screen
Lock
Button
Volume
Button
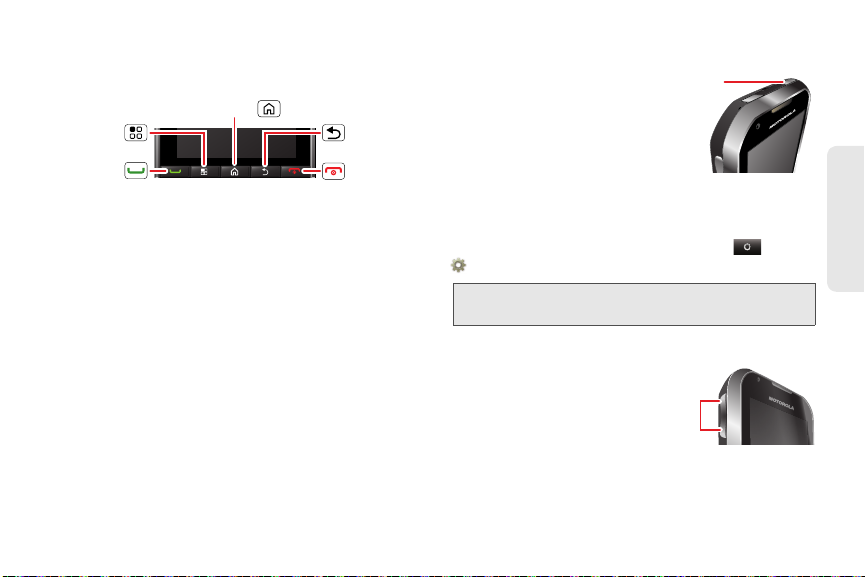
Key Tips
Front Keys
Menu Key Back Key
Talk Key
䢇
Home
X – Press to return to the home screen. Press
and hold to see recently used apps.
䢇
Menu
/ – Open options.
䢇
Tal k
` – Press to start a call, or press and hold to
start voice control.
䢇
End/Power
hold to open the Phone options menu, where you
can turn off the phone (
or
Silent mode
mode
䢇
Back
% – Return to the previous screen.
Home Key
End/Power
Key
@ – Press to end a call or press and
Power off
), or turn
Airplane
on or off.
Sleep and Wake Up
To save your battery, prevent
accidental touches, or when
you want to wipe smudges off
your touchscreen, put the
touchscreen to sleep by
pressing #. To wake up the
touchscreen, just press #
again.
To change how long your phone waits before the
screen goes to sleep automatically, touch
Settings > Sound & display >Screen timeout
Tip:
To make the screen lock when it goes to sleep, use
“Screen Lock” on page 90.
>
.
Adjust Volume
Press the volume keys to
change the ring volume (in
the home screen), or the
earpiece volume (during a
call).
2. Phone Basics 19
Phone Basics
Page 28
Rotate the Screen
12:00
Email BrowserMessagingCelendar
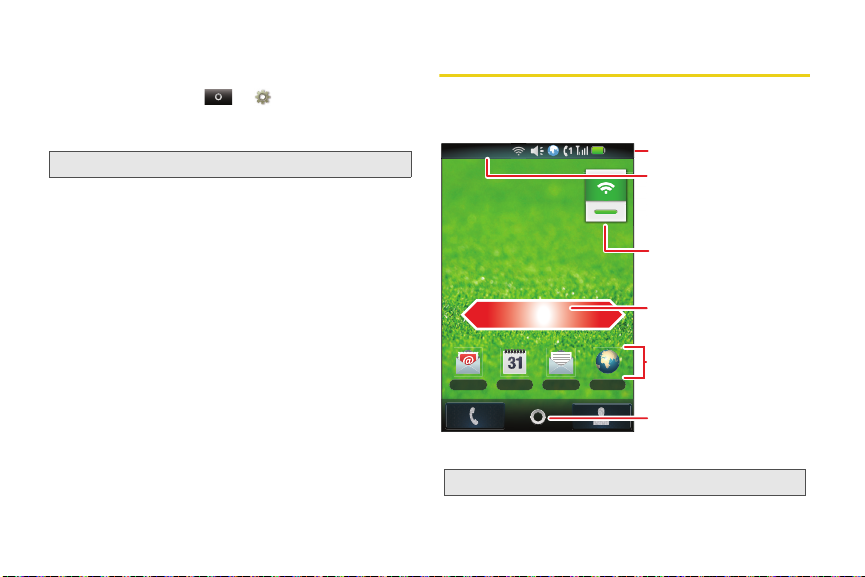
Notifications Bar
Touch & drag this bar down
to check notifications.
Status Indicators
Shortcuts
Touch to open.
Drag up to see
all your apps.
App Menu
Widgets
Touch to open, or touch &
hold to move or delete.
Flick left or right to open more
panels.
To set the touchscreen to stay right-side up when you
turn your phone, touch
Sound & display
and uncheck the
check box.
Note:
Not all applications are designed to rotate.
> Settings >
Orientation
Home Screen
The home screen gives you all your latest information
in one place. It’s what you see when you turn on the
phone or press X
Home
. It’s basically like this:
20 2. Phone Basics
Note:
Your home screen might look a little different.
Page 29
The home screen extends beyond what you see on the
SUN
noon
Lunch
12:00
12
6
39
12:00 12:00
13
SUN
No recent
unseen messages
12:00
12:00
00000
0
12:00
Contacts
Launch PTT
Automatic
Data Sync:
12:00
Email BrowserMessagingCelendar
Type, then touch the
icon for a text search.
Touch for voice
search.
screen to give you more room for adding shortcuts,
widgets, and more. Flick the home screen left and right
to see more panels or to add widgets or shortcuts.
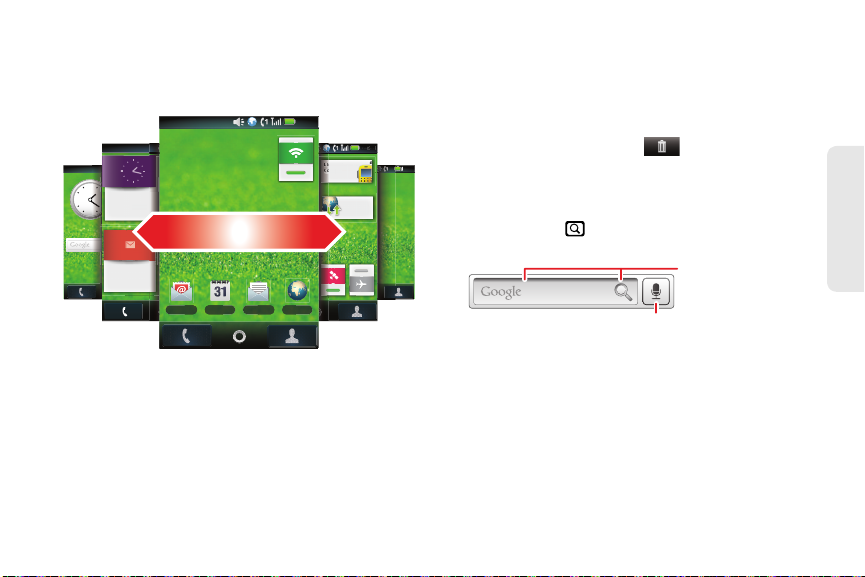
Use and Change Your Home Screen
On your home screen, shortcuts are icons that open
your favorite apps, Web bookmarks, contacts, email, or
music. Widgets show you news, weather, messages,
and other updates.
䢇
To
open
something, touch it. Press
to the home screen.
Home
X to return
䢇
To
add
something or change your wallpaper, touch
and hold an empty spot until you see the
or
menu.
delete
something, touch and hold it until
Home screen
䢇
To
move
Add to
you feel a vibration, then drag it to another spot,
another panel, or the trash at the bottom of the
screen.
Search
To search, press
enter your search using the keyboard.
Search
, touch the text field, and
2. Phone Basics 21
Phone Basics
Page 30
View Notifications and Phone Status
12:00
Email BrowserMessagingCelendar
2
00
Email BrowserMessagingCelendar
lrowse
ss
ag
g
g
g
d
ar
Ready
Ready
Sarah Dion
RE: Trip details
10:07PM
Dylan Foster
Lets meet at the corner of Rand...
10:09PM
Clear
12:00 April 17th, 2011
Notifications
At the top of the screen,
icons on the left notify
you about new
messages or events
(notifications). Icons on
the right tell you about
phone status. Flick the
bar down to show
notification details.
This list identifies the
symbols you’ll see on
your phone’s display
screen:
22 2. Ph on e Basics
Battery Strength
greater charge. The “lightning” icon (bottom
rows) indicates the phone is charging.
Signal Strength
antenna indicate a stronger signal.
No Service
You cannot make or receive any type of call.
Emaillendar
— A fuller battery indicates a
— More bars next to the
— Your phone is without service.
Phone In Use
1
phone call.
Direct Connect In Use
on a Direct Connect call.
Group/Talkgroup In Use
active on a Group Connect or Talkgroup call.
Bluetooth® In Use
Bluetooth. If this icon is black, your phone is in
— Your phone is active on a
— Your phone is active
— Your phone is
— Your phone is using
discoverable mode. If this icon is light gray, a
Emai
len
r
in
Bluetooth connection is active.
Active Phone Line
— 1 indicates phone line 1
is ready to make calls; 2 indicates phone line 2
is ready to make calls.
Call Forward
— Your phone is set to forward
calls. See “Call Forwarding” on page 66.
Ringer Off
— All sound is turned off on your
phone. See “Vibrate All” on page 84.
Speaker Off
— Direct Connect sound is set to
come through the earpiece rather than through
the speaker.
Page 31

Speaker On
come through the speaker rather than through
the earpiece.
Vibrate
to ring.
Internet
or are browsing the Internet using a secure
connection. See “5. Web and Data Services”
on page 71.
Airplane Mode
receive calls and other transmissions. See
“Airplane Mode” on page 87.
TTY
make calls using a TTY (text telephone) device.
See “Telecommunications Relay Service” on
page 68.
Hearing Aid
hearing aid and is active on a phone call. See
“Hearing Aid Compatibility With Mobile
Phones” on page 153.
Text Message
messages. See “Receiving Messages” on
— Direct Connect sound is set to
— Your phone is set to vibrate and not
— You are ready to browse the Internet
— Your phone is set not to
— You are ready to use your phone to
— Your phone is set for use with a
— You have one or more text
Email
— You have one or more emails.
Voic email
Data Sync
and synchronizing your calendar with your
— You have one or more voicemails.
— Your phone is downloading email
personal, Exchange accounts.
GPS
— Your phone’s GPS is active.
Missed Call
calls.
Wi-Fi
network.
Calendar Event
event on you calendar.
Alarm Clock
Chat
— You have one or more missed
— Your phone is connected to a wireless
— Notification for an upcoming
— Your alarm clock is set to ring.
— You have an active Google Talk chat.
Phone Basics
page 56.
2. Phone Basics 23
Page 32

Notification Light
lrowse
g
dar
DC
Contacts List
Touch to view contact
information. Touch &
hold to edit, delete,
and more.
Menu Options
Press to create,
filter, and sync
contacts.
My Info
Your details–always
first in the list.
Your phone has a light
that blinks whenever
you receive voicemail,
email, text message,
have an appointment,
or your battery is low.
App Menu
You can find all of your apps in
one place. From the home
screen, touch the app tab,
to open the app menu.
To close the app menu, press
X or %.
Recent Apps
In the home screen, touch and
hold X to see the most recent
apps you used. Touch an app
to open it, or touch X to return
to the home screen.
24 2. Phon e Ba sics
Browser Calculator Calendar
Alarm Clock
Camcorder Camera Contacts
Call log
Corporate
Directory
Call log
Gmail
Email BrowserMessagingCelendarEmai
DRM
Application
Email Messages
Media
Gallery
len
Email FileManager
Messaging Music
essagin
Displaying Your Numbers
Touch
first contact in the
phone’s information.
Displaying 121 contacts
12:00
12:00
Browser
r
Contacts
Contacts
Contacts
Me
Alex Sliveira
Colleen Pham
Dylan Foster
Jeff Cook
and touch the first contact. The
list will always contain your
12:00
FavoritesPhone Call Log
Mobile
Mobile
Mobile
DC
Mobile
Mobile
Page 33

Entering Text
Delete
Key
Alternate
Key
Shift
Key
Space
Key
Return
Key
Search
Key
Symbol
Key
QWERTY
Keyboard
Your phone gives you the option of entering text using
the full QWERTY keyboard or using one of two
touchscreen keyboards.
Physical Keyboard
General Tips
To…
Enter
symbols
from a list
Enter
in the corners of keys
Enter
characters until you press
Alternate
c
Enter
Enter
until you press
again
Delete
delete more)
Start a
text messaging)
Select text
Paste
chosen
alternate
characters
several alternate
again.
one capital
only capital
letter
letters
Shift
a character (hold to
new line
(email or
,
Cut, Copy
, or
Press d
Press c
Press c
Symbols
Alternate.
Alternate
twice.
Press
Press
Shift
Shift
Press
Press gReturn.
Delete.
Touch and hold a blank
spot in a text entry area.
2. Phone Basics 25
.
.
twice.
Phone Basics
Page 34

Touchscreen Keyboards
Delete
Emoticons
Space
Symbols/Numbers
Shift
Text Entry
Touch to
open
the
touchscreen
keyboard.
Touch a text field to open a touchscreen keyboard.
Press % to close it.
move the cursor
To
a magnifier where you can drag the cursor.
change the keypad
To
text box. A menu opens where you can choose
>
method
, touch and hold a word. This opens
, touch an hold a blank spot in the
Swype
or
Android keyboard
.
Input
Android Keyboard
Use the Android™ keyboard to enter letters one at a
time.
12:00
To
q
as
?123
r
e
w
d
x
z
,
y
t
u
f
h
g
c
b
v
io
j
n
.
Clear
p
l
k
DEL
m
:-)
26 2. Ph on e Basics
Note:
To set your screen to rotate when you turn the phone,
touch
Orientation
>Settings > Sound & display >
.
Page 35

Swype Keyboard
qw
a
EN @#123_%()
!7890
/
?
sdf gh jk
z
SYM
xcvbnm
_
,
‘
.
l
er tyu i op
8$456+:;“
qw
a
EN @#123_%()
!7890
/
?
sdf gh jk
z
SYM
xcvbnm
_
,
‘
.
l
er tyu i op
8$456+:;“
qw
a
EN @#123_%()
!7890
/
?
sdf gh jk
z
SYM
xcvbnm
_
,
‘
.
l
er tyu i op
8$456+:;“
w
4
y
For double
letters,
circle the
letter.
To
capitalize,
go above
the keypad.
book
Who
day
Swype™ lets you enter a word with one continuous
motion. To enter a word, just drag your finger over the
letters.
k
䢇
To enter the small number or symbol at the top of a
key, touch and hold the key.
䢇
To enter several symbols, touch
䢇
To enter apostrophes in common words (like “I’ll”),
SYM
.
drag through the apostrophe key.
䢇
To correct a word, double-tap it. Swype shows a
small menu of other word options. Swype might also
show a menu if it can’t guess your word.
䢇
If Swype doesn’t know a word, touch individual
letters to enter it. Swype remembers, so next time
you can just drag over the letters.
Text Entry Settings
Touch
䢇
To change your Swype settings, touch
䢇
To change the language and the style for your
touchscreen keyboard, touch
䢇
To edit your word suggestion dictionary for the
Android keyboard, touch
䢇
To change your Android keyboard settings, touch
Android keyboard
> Settings > Language & keyboard
Swype
Select locale
User dictionary
.
.
.
2. Phone Basics 27
.
Phone Basics
.
Page 36

䢇
To show the touchscreen keyboard when holding
your phone vertically, touch
.
portrait
䢇
To change the device keyboard settings touch,
Device Keyboard
.
Show soft keypad in
Tips and Tricks
General Tips
To…
Return to the
home screen
See
recently
numbers
dialed
Sleep/wake
your phone
screen
Set
timeout
28 2. Ph on e Basics
Press X.
Press `.
Press #.
Touch
Sound & display >Screen timeout
>Settings >
To…
Tur n
sound
Press and hold @ >
Silent mode
.
on or off
Search
Show
apps
Tur n
mode
last few
used
airplane
on/off
Press .
Press and hold X.
Press and hold @
.
mode
> Airplane
Battery Tips
Your phone is like a small computer, giving you a lot of
information and apps, with a touch display. Depending
on what you use, that can take a lot of power.
To save battery life between charges, you could
reduce:
䢇
Recording or watching videos, listening to music, or
taking pictures.
.
䢇
Widgets that stream information to your home
screen, like news or weather (“Home Screen” on
page 20).
Page 37

䢇
Noise
Cancellation
Microphone
䢇
䢇
䢇
䢇
䢇
Email updates: Touch >
Account Settings > Email check frequency >
Every hour
or
Never
to check for email manually.
Turn off Bluetooth power: touch
Settings > Wireless & networks
Turn off Wi-Fi: touch
Wireless & networks
>Wi-Fi
Google app updates: Touch
Settings > Accounts & sync
Manual
.
Display brightness: Touch
Settings > Sound & display
Email > Menu/ >
>
>Bluetooth
>Settings >
.
>
>
Cellular data sync >
>
>
Brightness >
(dimmer setting).
Display timeout delay: Touch
Settings > Sound & display
>
>
Screen timeout >
(shorter setting).
Battery Cool Down
In very limited circumstances, such as where your
.
phone has been exposed to extreme heat, you may
see “Cool Down” messages. To avoid possible
damage to your battery and phone, you should follow
the onscreen instructions until the phone is within its
recommended temperature range. When your phone is
in “Cool Down” mode, only emergency calls can be
made.
Dual Microphone Noise
Phone Basics
Cancellation
Improve call quality by
removing the ambient
noise around you to
provide a cleaner, clearer
sound to the person you’re
calling.
Note:
Noise cancellation
To turn off
Noise cancellation
Settings > Call settings > Noise cancellation
is on by default.
, touch >
.
2. Phone Basics 29
Page 38

Accessories
Your MOTOROLA TITANIUM comes with the following
accessories:
䢇
A Li-Ion battery and charger.
䢇
A128K SIM card.
䢇
A 2GB microSD card.
Various accessories are available for use with your
MOTOROLA TITANIUM, including cases, vehicle power
chargers, data cables, hands-free accessories, and
more.
To order additional accessories, go to
call1-866-866-7509. You can also stop by any Sprint
Store. For information on Sprint Store locations, go to
www.sprintstorelocator.com
.
30 2. Phone Basics
www.sprint.com
Using a Remote Direct Connect Button
If you are using a headset or other optional accessory
with a remote Direct Connect button, you can use the
remote Direct Connect button for phone calls, Direct
Connect calls, and Group Connect calls.
For phone calls, use the remote Direct Connect button
to answer calls, switch between calls, and end calls.
Hold the remote Direct Connect button for less than
two seconds to answer calls and switch between calls.
Hold the remote Direct Connect button for more than
two seconds to end calls.
For Direct Connect calls and Group Connect calls, use
or
the remote Direct Connect button as you would the
Direct Connect button on your phone.
When using a headset, the Direct Connect button on
your phone works the same way as when you are not
using a headset. Direct Connect and Group Connect
sounds will be heard through the headset.
Page 39

⽧
3. Making and Answering Calls
Types of Calls (page 31)
⽧
Phone Calls (page 32)
⽧
Nextel Direct Connect (page 38)
⽧
Group Connect (page 41)
⽧
Nextel Direct Send (page 43)
⽧
Talkgroups (page 47)
⽧
Call Alerts (page 49)
⽧
Direct Talk (page 51)
Types of Calls
With the Nextel National Network, Nextel Direct
Connect, and your MOTOROLA TITANIUM, you have
the following traditional wireless phone and Nextel
Direct Connect services available to you:
䢇
Digital Wireless Phone Calls
offer clear calls and other
services, such as missed call notification, Three-Way
Calling, and speakerphone.
䢇
Direct Connect Calls
allow two-way radio
communication with another Direct Connect user
within the Nextel National Network (page 38).
䢇
Group Connect Calls
allow coast-to-coast two-way
radio calling to up to 20 Nextel Direct Connect
customers simultaneously (page 41).
䢇
Nextel Direct Send
allows you to send contact
information in Direct Connect and Group Connect
calls and send pictures in Direct Connect calls
(page 43).
䢇
Talkgroup Calls
allow two-way radio calling to up to
200 Nextel Talkgroup customers simultaneously
(page 47).
Note:
To learn more about the differences between Nextel
Group Connect calls and Talkgroup calls, please see
“Difference Between Group Connect and Talkgroup
Calls” on page 47.
䢇
Nextel Direct Talk
allows for two-way radio
communication “off the network” between two or
more phones equipped with this capability (page 51).
3. Making and Answering Calls 31
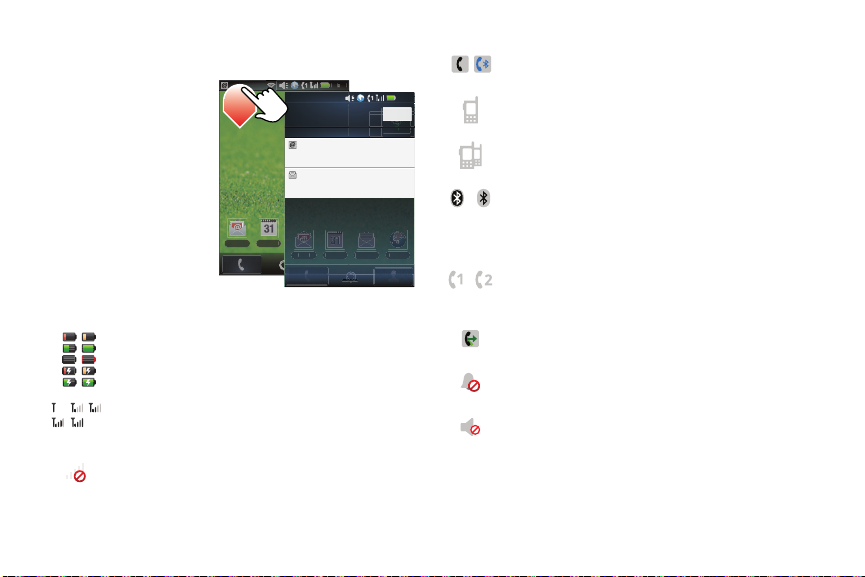
Making Calls
Page 40

Phone Calls
Placing a traditional wireless phone call from your
MOTOROLA TITANIUM is as easy as making a call
from any landline phone.
1.
Touch
press `
2.
Press @
You can also make calls from your phone by selecting
numbers directly from Contacts (page 36) or your Call
log (page 37).
32 3. Making and Answering Calls
Dialer
Tal k
.
End/Power
, enter a number, and then
when you are finished.
12:00
Call Log
Touch to open, then touch the
Call log
Phone
555
ABC DEF
123
123
GHI MNO
GHI MNO
4
4
*#
*#
ABC DEF
JKL
JKL
5
5
TUVPQRS WXYZ
TUVPQRS WXYZ
879
879
+
+
0
0
icon to the right of an entry to
FavoritesContacts
call.
Delete
Touch to delete a digit you
entered.
Call Voicemail
6
6
Talk
Enter a number and touch
to call it.
Voicedial
Answering Calls
䊳
Press ` to answer an incoming call.
Tip:
Depending on your phone’s lock state, you can also
answer calls by dragging to the right or by touching
Answer
.
Page 41

Note:
When your phone is off, calls go directly to voicemail.
Your phone notifies you of incoming calls by any
combination of ringing or vibrating, the backlight
illuminating, or the screen displaying an incoming call
message.
If the incoming call is from a number stored in your
Contacts, the entry’s name is displayed. The caller’s
phone number may also be displayed, if available.
Ending a Call
䊳
To end a call, press @.
Missed Phone Calls
Missed phone calls are forwarded to voicemail. When
you do not answer an incoming call, you will see a
Missed Call notification.
To display a Missed Call entry from the notification bar:
䊳
Drag the notification bar down and touch the
missed call notification.
To display a Missed Call entry from the home screen:
1.
Press ` or touch
Dialer > Call Log
.
2.
Touch an entry.
Emergency Calls
Your phone supports emergency calling. Emergency
phone calls can be made even when your SIM card is
blocked or not in your phone.
䊳
Touch
to be connected to an emergency response center.
If you are on an active call, you must end it before
calling 911. If your phone is locked, touch the
Emergency call
When you make an emergency call, your phone’s GPS
Enabled feature can help emergency service
personnel find you, if you are in a location where your
phone's GPS antenna has established a clear view of
the open sky and your local emergency response
center has the equipment to process location
information. See “Location Services (GPS & AGPS)” on
page 148. Because of the limitations of this feature,
always provide your best knowledge of your location to
the emergency response center when you make an
emergency call.
Dialer
, enter 911 and press `
button at the bottom of the screen.
3. Making and Answering Calls 33
Making Calls
Page 42

Important:
Always report your location to the 911 operator
when placing an emergency call.
designated emergency call takers, known as
Public Safety Answering Points (PSAPs) may not
be equipped to receive GPS location information
from your phone.
If you have not registered on the network,
emergency calls cannot be placed while your
SIM card is in your phone.
If you are bringing your phone number to Sprint
from your previous carrier, you may receive a
temporary telephone number while your Nextel
phone is being programmed with your
permanent phone number. If you make a call to
911 and the call fails, the 911 emergency
response center will not be able to call you back
on your Nextel phone if in the meantime, your
Nextel phone has been programmed with your
permanent telephone number. If the call is
disconnected before location and details have
been provided, call 911 again and advise that you
were disconnected.
34 3. Making and Answering Calls
Some
Note:
Sprint programs one or more emergency phone
numbers that you can call under any circumstances,
even when your phone is locked. Emergency numbers
vary by country. Your pre-programmed emergency
number(s) may not work in all locations, and
sometimes an emergency call cannot be placed due
to network, environmental, or interference issues.
Note:
Your phone can use location based services (GPS and
AGPS) to help emergency services find you. See
“Location Services (GPS & AGPS)” on page 148.
Page 43

In-Call Options
Bluetooth
Mute Speaker
Dialpad
Add call
Active Call 0:12
Colleen Pham
Mobile: (555) 555-1234
End call
12:00
Speaker
Touch to turn the
speakerphone on/off.
Bluetooth
Touch to connect or
disconnect a
Bluetooth device.
Tip:
You can press X or % to leave the active call display.
To reopen it, press `.
Note:
Using a mobile device or accessory while driving may
cause distraction and may be illegal. Always obey the
laws and drive safely.
䢇
Add call
to place a second call.
䢇
End call
䢇
䢇
䢇
to end a call.
Dialpad
to open the dialpad.
Bluetooth
Mute
to disconnect a bluetooth device.
to mute your phone’s microphone. Touch
again to unmute your phone’s microphone.
䢇
Speaker
to route the phone’s audio through the
speaker or the earpiece.
Tip:
You can also press
Speaker
) to turn the speaker on
and off.
WARNI NG:
Because of higher volume levels, do not place the
phone near your ear during speakerphone use.
Call Waiting
When you receive phone call during an active call,
Answer
touch
answer the new call.
To make another call during an active call, touch
to place the current call on hold and dial a new
call
number.
Touch
the call on hold.
to put the current call on hold and
Switch Calls
to move between the active call and
3. Making and Answering Calls 35
Mute
Add
Making Calls
Page 44

Conference Calls
To start a conference call, call the first number. After
they answer, touch
When the next number answers, touch
Add call
and call the next number.
Merge call
.
Unanswered Calls
If you receive a phone call and press @ before it goes
to voicemail, you can send an automatic text message
to the other caller.
䊳
Touch >
Auto text reply > Incoming call
Settings> Call settings >
.
Saving a Phone Number
1.
Touch
press /.
2.
Touch
3.
To store a new entry, touch
– or –
Search for an existing contact name and touch it to
open the contact.
36 3. Making and Answering Calls
Dialer
Add to contacts
, enter a phone number, and
.
Create new contact
4.
Enter or edit information as necessary, and then
scroll to the bottom of the entry and touch
save the Contact.
For more information about Contacts, see “8. Contacts”
on page 98.
Finding a Number
To find Contacts entries, you can either scroll through
the list by dragging your finger up or down the screen,
or you can search Contacts entries by name.
1.
Touch
Contacts
2.
Press /
Tip:
3.
Enter the first few letters of a Contact's name. Your
phone will display a list of matching contact
.
entries.
4.
To display the Contacts entry, touch the contact
name. Touch a phone number to place a call.
> Search
You can also press
.
.
Search
.
Done
to
Page 45

Phone Numbers With Pauses
You can dial or save phone numbers with pauses for
use with automated systems, such as voicemail,
conference call, or credit card billing numbers.
There are two types of pauses available on your phone:
䢇
Wait
sends the next set of numbers when prompted.
䢇
Pause
automatically sends the next set of numbers
after three seconds.
Note:
You can have multiple pauses in a phone number and
combine waits and pauses.
To dial or save phone numbers with pauses:
1.
Touch
2.
Touch and hold * until the letter P appears. The P
represents a three-second pause. For a longer
pause, touch and hold * again to enter more
pauses. Each
– or –
Touch and hold * until the letter
W
means your phone waits before dialing further. A
message appears asking about sending the rest of
the digits.
Dialer
and enter a phone number.
P
represents a three-second pause.
W
appears. The
3.
Enter additional numbers.
4.
Press ` to dial the number.
– or –
Press /
your Contacts.
> Add to contacts
to save the number in
Making a Call From Contacts
1.
Touch
2.
Touch an entry to open it.
3.
Touch a phone number to place a call.
Contacts
.
Making a Call From the Call Log
1.
Touch
2.
To call a number, touch phone call, Direct
Connect call, or group call icon on the right.
Dialer > Call Log
.
Changing a Direct Connect Call
䊳
Touch
Call
initiate a phone call to the other person (if their
mobile phone number is stored in Contacts).
while in an active Direct Connect call to
3. Making and Answering Calls 37
Making Calls
Page 46

Nextel Direct Connect
Sprint offers the following Nextel Direct Connect®
services:
䢇
Direct Connect
communication with another Direct Connect user
anywhere on the Nextel National Network (U.S.).
䢇
International Direct Connect
calling to and from select countries.
䢇
Group Connect
calling to up to 20 other Direct Connect users at
once. (See “Group Connect” on page 41.)
38 3. Making and Answering Calls
®
allows instant two-way radio
allows Direct Connect
®
allows nationwide Direct Connect
䢇
Tal kgr oup
SM
allows Direct Connect calling to up to
200 Nextel subscribers in the same Direct Connect
network. See “Talkgroups” on page 47.
䢇
Nextel Direct Talk
SM
lets you establish off-network, twoway radio communication between two or more
Nextel Direct Talk-capable phones. See “Direct Talk”
on page 51.
www.sprint.com
See
for more details on these Direct
Connect services. Pricing for each of these services is
based on your service contract.
Page 47

Making Direct Connect Calls
Direct
Connect
Button
1.
Touch
number. See “Dialing Direct Connect Numbers” on
page 39.
2.
Press and hold the Direct
Connect (DC) button on
the left side of your
phone. Begin talking
after your phone emits a
chirping sound.
3.
Release the DC button to
listen.
A Direct Connect call ends
automatically after there is no activity on the call for
several seconds.
Dialing Direct Connect Numbers
Every Direct Connect number has three parts:
䢇
An area ID
䢇
A network ID
䢇
A member ID
Dialer
and enter a Direct Connect
An asterisk separates each part (for example:
999*999*9999). When you enter a number containing
all three parts, you must separate them with asterisks.
Note:
The number of digits in each part of a Direct Connect
number may vary. For example, your Direct Connect
number may be formatted as 999*999*9999, while
another valid number may appear as 555*555555*55.
If you are calling or saving a Direct Connect number for
a Sprint phone with Direct Connect capabilities, the
Direct Connect number may be the same as the
wireless phone number. When dialing or saving the
Direct Connect number, insert asterisks in place of
hyphens (913*555*1234).
Tip:
When you store a Direct Connect number in Contacts, be
sure to include the entire number, including the asterisks.
Using Just the Member ID
If you are contacting someone sharing your network
and area IDs, you only need to enter the member ID
(the last part of the number).
1.
Touch
2.
Press and hold the DC button.
Dialer
and enter a member ID.
Making Calls
3. Making and Answering Calls 39
Page 48

Making Direct Connect Calls From Contacts or
the Call Log
If you have numbers stored in Contacts (page 101) or
the Call log (page 96), you can use these numbers to
make calls.
1.
Touch
Call log
2.
Touch an entry and then press and hold the DC
Contacts
, or touch
Dialer >
.
button to call the entry’s Direct Connect number.
Tip:
You can make Direct Connect calls while viewing entry
details on either list. Display the entry details or
from another phone (in the Call log) and press and hold
the DC button.
My Info
Answering Direct Connect Calls
When you receive a Direct Connect call, your phone
emits a tone or vibrates. You then hear the voice of
your caller.
1.
Wait for the caller to finish speaking.
2.
Press and hold the DC button. Continue as you
would on any Direct Connect call.
40 3. Making and Answering Calls
A Direct Connect call ends automatically after there is
no activity on the call for several seconds.
Direct Connect Timeout
You can extend the automatic timeout of a Direct
Connect call by about 30 seconds using the
Resume DC
䊳
setting.
Touch >
Direct Connect settings > Resume DC
Settings > Call settings >
One Touch Direct Connect
You can customize the DC button for quick access to
Direct Connect functions.
䊳
Touch >
Direct Connect settings > One Touch DC
Options
Off
Launch DC
Contact List
DC a selected
contact
Settings > Call settings >
Tur n off
One Touch DC
Open a list of Direct Connect
contacts on your phone.
Start a Direct Connect call with the
selected contact.
.
.
.
Page 49

Options
DC the most
recent number
Tip:
You can also add the
home screen. See “Use and Change Your Home
Screen” on page 21.
Start a Direct Connect call with the
most recent Direct Connect
Call log
number in the
One Touch DC
.
widget to your
Group Connect
A Group Connect call is similar to a Direct Connect call
to one user, but is made to multiple Direct Connect
subscribers at once. You can create Groups from your
phone and call up to 20 other Group Connectcompatible phones* anywhere on the Nextel National
Network. You can create a Group for one-time use or
store it to Contacts so you can call it at any time.
* Not all phones are Group Connect-compatible. See
www.sprint.com for more details on Group Connect.
Note:
In order to store Groups to your MOTOROLA TITANIUM,
you must use the 128K SIM card that came with your
phone. The 128K SIM card is labeled “Nextel 600
Contcs & 25 Grps”. With this SIM card, a maximum of
25 groups can be added to your MOTOROLA
TITANIUM. Group entries created with your MOTOROLA
TITANIUM may not be readable by older iDEN
SIM-based phones.
Making Group Connect Calls
1.
From Contacts or the Call log list, touch a Group to
open it.
2.
Press the DC button.
Answering Group Connect Calls
䊳
Proceed as if answering a Direct Connect call from
one user. Only one person at a time may speak on
a Group Connect call.
3. Making and Answering Calls 41
Making Calls
Page 50

Creating Groups in Contacts
1.
Touch
2.
Touch the check box to the right of the entry
names to select the group members.
3.
Touch
Note:
If you do not assign a name, the Group is named
(Group).
4.
Touch
Contacts >
Save
to store the Group in Contacts.
Done
.
/ >
New group
Adding Group Members
To add member to a Group stored in Contacts:
1.
Touch
open it.
2.
Press /
3.
Touch
4.
Touch
the contact.
42 3. Making and Answering Calls
Contacts
> Edit group
Add members
Done
and then touch
and touch a Group to
.
and select members to add.
Done
again to save
Starting a Group Connect Call With a
.
Direct Connect Number
1.
Touch
New DC group
2.
Select the group members.
3.
Touch
4.
When prompted, press the DC button.
Contacts >
.
Direct Connect
/ >
.
Removing Members or Groups
To remove a member from a Group:
1.
From Contacts, touch a Group to open it, and then
press /
2.
Touch a member’s listing to remove it from the
Group.
3.
Touch
To delete a Group from Contacts:
1.
Touch a Group to open it.
2.
Press / >
3.
Touch OK.
> Edit group
Done.
Delete group
.
.
Page 51

Storing Groups
Speaker
Call
Colleen Pham
PTT: 123*456*789
Share
Direct Connect
Listening
Listening
To store a group to Contacts from the Call log list:
1.
From the Call log list, touch a Group to open it, and
then touch
2.
Touch
3.
Touch
View participant list
Add to contacts
Done
to save the group.
.
.
Group Connect Call Information
While you are in a Group Connect call, the following
appears on the screen:
䢇
The name of the Group.
䢇
The name or the Direct Connect number of the
person speaking.
䢇
The number of members who are participating in the
Group Connect call.
Nextel Direct Send
Nextel Direct Send lets you use
Direct Connect calls to exchange
pictures, My Info, contact
information, and Groups with
other phones that have this
capability.
Nextel Direct Send cannot be
used during Talkgroup calls.
Pictures cannot be sent in Group
Connect calls.
Sending a Picture
Sending a Picture During a Call
You can send a picture at any time during a Direct
Connect call, whether you made or received the call.
(Additional charges may apply.)
You cannot talk or listen on a Direct Connect call while
a picture is being transmitted. Other activities, such as
searching for a picture, do not prevent you from talking
or listening.
3. Making and Answering Calls 43
Making Calls
Page 52

To send a picture during a call:
1.
While in a Direct Connect call, touch
Share picture
. A list of pictures that can be included
Share >
in a Direct Connect call appears.
2.
Select a picture and press the DC button to send it.
3.
Wait while the picture is transmitted. The Direct
Connect call is temporarily interrupted while a
picture is transmitted.
4.
When prompted, press the DC button to resume
the Direct Connect call.
Note:
The first time you send a stored picture after turning the
phone on, the message
appears and you are prompted to respond. Touch
to send the picture. Touch
Picture fees may apply
Cancel
to cancel.
OK
Starting a Call by Sending a Picture
You can start a call by choosing a stored picture from
the Media Gallery.
To do this, you must have the recipient’s Direct Connect
number and IP address stored in your Contacts.
44 3. Making and Answering Calls
Tip:
When a person sends you My Info from his or her phone,
you can then easily store this information to Contacts
from the Call log list.
To start a call by sending a picture:
1.
Touch
2.
Touch and hold a photo, then touch
3.
Touch DC, and touch
> Media Gallery >All Pictures
DC contacts
or
These names have Direct Connect numbers and
IP addresses stored.
4.
Select a name and press the DC button to send
the picture.
5.
When prompted, press the DC button to resume
the Direct Connect call.
Receiving a Picture
When someone sends you a picture using Nextel
Direct Send, your phone emits a tone or vibrates and a
message appears on the display asking you to accept
the picture.
Pictures you receive are saved to your microSD card
and are accessible through the Media Gallery.
Share
.
DC call log
.
.
Page 53

To accept a picture:
1.
When you see the message asking you to accept
the picture, touch
Reject
touch
2.
Wait while the picture is transmitted. The Direct
Accept
. (To decline the picture,
.)
Connect call is temporarily interrupted while a
picture is transmitted.
3.
When prompted, press the DC button to resume
the Direct Connect call.
Note:
The first time you accept a stored picture after turning
the phone on, the message
appears and you are prompted to respond. Touch
to accept the picture. Touch
Tip:
To stop the transmission before it is finished, touch
Cancel
.
Picture fees may apply
Cancel
to cancel.
OK
Sending My Info and Contact Information
When you send My Info or contact information using
Nextel Direct Send, the information you send appears
on the display of the receiving phone. After the call, the
information appears on that phone’s Call log list.
Sending My Info
You can control what portion of the information in My
Info is sent, and whether it is sent automatically in every
Direct Connect call or only when you choose to send it.
Note:
When you send your contact information, certain
information, such as street addresses or custom entries,
chat addresses, organizations, and notes cannot be
included.
The information your phone sends always includes My
Name and Direct Connect.
It may include
depending on how you set your sending options.
ID
Note:
The default setting is
Line 1, Line 2, Direct Connect,
The My Info feature gets its information from your
phone’s contact entry. To add more information to My
Info, edit your phone’s contact entry, and then select the
additional fields in the
Select info to share
Line 1
only.
To change which fields are sent:
1.
Touch
Direct Connect settings > Sharing info >
Select info to share
>Settings > Call settings >
.
3. Making and Answering Calls 45
and
screen.
Group
Making Calls
Page 54

A check mark appears next to the fields that will be
2.
sent. To add or remove the check mark, touch it.
3.
When you are finished, touch
Save
.
To control whether your information is sent automatically:
䊳
Touch
Direct Connect Settings > Sharing info >
Share My Info
Note:
>Settings > Call settings >
.
When you receive your phone, it is set to send your
information automatically.
To send My Info during a call:
1.
While in a Direct Connect call, touch
Share my info
2.
When prompted, press the DC button to send the
.
Share >
information.
To start a call by sending My Info:
1.
Touch
2.
Touch and hold the contacts entry containing your
Contacts
.
phone’s information. This contact will always be the
first entry in the contacts list and will have to
its right.
46 3. Making and Answering Calls
3.
Touch
Share > Share via DC.
4.
Touch a Contact or Call log entry to select it.
5.
When prompted, press the DC button to send the
information.
Sending Contact Information
You can send contact information by selecting a
Contacts entry.
Contacts entries that contain only addresses cannot be
sent. When Contacts entries are received, they do not
include ringtones or pictures.
To send contact information during a call:
1.
While in a Direct Connect call, touch
Share contact
2.
Select a contact to send
3.
When prompted, press the DC button to send the
.
Share >
information.
Page 55

Note:
If the Contacts entry you scrolled to is a Group, you may
be prompted to allow yourself to be a part of the group
being sent. Touch
OK
to become part of the group.
To start a call by sending contact information:
1.
From Contacts, touch and hold a contacts entry.
2.
Touch
Share > Share via DC.
Note:
If the Contacts entry you scrolled to is a Group, you may
be prompted to allow yourself to be a part of the group
being sent. Touch
3.
Select a recipient by touching a DC Contact or DC
OK
to become part of the group.
Call Log entry.
4.
When prompted, press the DC button to send the
information.
Receiving My Info or Contact Information
When you receive My Info or contact information from
another phone, appears on the display.
To view the information while still in the Direct Connect call:
䊳
Press / >
View Contact
.
You can also view My Info from other phones on the
Call log list. See “7. Call Log” on page 94.
Talkgroups
A Talkgroup is a predetermined group of Direct
Connect users, created by an account administrator.
Talkgroups can contain up to 100 members.
Difference Between Group Connect and Talkgroup Calls
In a Group Connect call, you or another caller
determines who can participate in the call. By contrast,
participation in a Talkgroup is determined by an
administrator. Here are the ways Group Connect and
Talkgroup calls differ.
Group Connect Talkgroup
Geography
Maximum
Group Size
Nationwide Limited to local
21 (inc lu ding
originator)
market and network
(fleet)
200
3. Making and Answering Calls 47
Making Calls
Page 56

Group Connect Talkgroup
Setup
Dynamically,
via your phone
Predefined, via Nextel
administrator using
Talkgroup
Management
Joining a Talkgroup
To participate in a Talkgroup, the account administrator
must first add you to the membership and then you
must “join” the Talkgroup.
1.
Touch
open it.
2.
Touch
You can now receive communications from other
members of this Talkgroup.
You will hear all active Talkgroup conversations on your
phone. To silence them, touch
Call settings > Direct Connect settings > Tal kgr oup s >
Silence Talkgroups
48 3. Making and Answering Calls
Join
.
Contacts
and touch a Talkgroup to
.
> Settings >
Adding More Talkgroups
You can be included in additional Talkgroups by doing
one of the following:
䢇
Using Talkgroup Management at
www.nextel.com
must be an account administrator to use Talkgroup
Management.
䢇
Contacting your Nextel Sales Representative at the
time of activation.
Making Talkgroup Calls
1.
Touch
Talkgroup number.
– or –
Select the Talkgroup from Contacts or the Call log
list
.
2.
Press the DC button and continue as if making a
Direct Connect call.
Dialer
, touch +, and then enter the
. You
Page 57

Receiving Talkgroup Calls
䊳
Answer it as you would a regular Direct Connect
call. Only one person at a time may speak on a
Talkgroup call.
During and immediately after a Talkgroup call ends,
press /
> Options
to display any available options.
Call Alerts
Call Alerts let you notify others that you want to
communicate with them using Direct Connect. When a
user receives a Call Alert, the phone sounds a tone
and displays your name or Direct Connect number.
Sending Call Alerts
1.
Touch
number and press /
2.
When prompted, press the DC button to send the
Call Alert.
Dialer
, enter a Direct Connect
> Send alert
.
Note:
You can send a Call Alert from the Call log or Contacts.
Touch an entry with a Direct Connect number and then
touch
Send Alert
.
Responding to a Call Alert
Note:
You can set a distinctive ringer for Call Alerts. See
“Ringtones” on page 83.
To answer a Call Alert:
䊳
Press the DC button. This will start a Direct
Connect call to the sender.
To dismiss a Call Alert:
䊳
Touch
Dismiss
.
To store a Call Alert in Notifications:
䊳
Touch
Later
.
Note:
The Call log list also stores Call Alerts you have
received. They appear as Direct Connect calls. Call
Alerts remain in your Call log list until you delete them
or until they reach the end of the list.
3. Making and Answering Calls 49
Making Calls
Page 58

Using the Call Alert Notification
When you store a Call Alert, it remains in notifications
until you clear the notification by opening it, or go into
Call log
the
Viewing Call Alerts
1.
2.
Viewing Call Alert Date and Time
1.
2.
Responding to Call Alerts in the Queue
After you queue a Call Alert, you can respond to it by
making a Direct Connect call to the sender or sending
a Call Alert to the sender.
To make a Direct Connect call to the sender:
1.
2.
50 3. Making and Answering Calls
.
Drag the Notification bar down from the top of the
screen.
Scroll through the list.
Touch the Call Alert notification.
In the
Call log
screen, touch the Call Alert.
Touch the Call Alert notification to open the
Call log
.
Touch the Call Alert Entry.
3.
Press the DC button to begin the call.
This removes the Call Alert from the queue.
To send a Call Alert to the sender:
1.
Touch
2.
Touch a Call Alert entry to open it and touch
Send Alert
3.
When prompted, press the DC button.
Dialer > Call log
.
.
Deleting Call Alerts
To delete all Call Alerts from Notifications:
1.
Drag the Notification bar down from the top of the
screen.
2.
Touch
Clear
.
Note:
Touching
Clear
just your Call Alerts.
will clear all of your Notifications, not
Page 59

Call Status and Completion
After an failed outgoing Direct Connect call or Call
Alert, you can send a message to the caller or intended
recipient.
To set up a message for incoming or outgoing calls:
1.
Touch
Auto text reply > Outgoing call
2.
Select from
OK
3.
Create a message to be sent, and touch
To send a message after receiving or making a call:
1.
After a failed outgoing Direct Connect call, within
five seconds,
2.
Touch
> Settings > Call settings >
Off
or
Ask me to send text
.
Auto text reply
Send
to send the message.
.
, and touch
Update
box will appear.
.
Direct Talk
Nextel Direct Talk allows for two-way radio
communication “off the network” between two or more
phones equipped with this capability. This feature is
useful in areas without network coverage.
Ch:01 / Cd:01
Direct Talk
Bluetooth settings
Direct Talk
Channel
1
Code
1
Direct Talk Mode Alert
Off
Direct Talk Help
Tip:
The status bar shows your channel and code.
3. Making and Answering Calls 51
12:00
Direct Talk
Touch to turn Mototalk on/off.
Channel
Touch to set channel.
Code
Touch to set code.
Direct Talk Mode Alert
Touch to set mode alert.
Making Calls
Page 60

Note:
Range will vary based on terrain, man-made structures
and atmospheric conditions.
Tip:
To add a quick switch for Direct Talk, touch and hold a
blank spot on your home screen, then touch
Widgets
>
Direct Talk
.
Motorola
You can make:
䢇
Code calls
– two-way radio calls conducted off the
network and using open channels and codes. In
these calls, anyone using your same channel and
code can hear your conversation.
䢇
Private calls
– two-way radio calls conducted off the
network and using the wireless phone numbers of
the participants. In these calls, others using the same
channel cannot listen in.
When using Direct Talk mode, the two phones should
be a minimum of six feet apart to maximize
performance and improve transmission range. You can
only make Direct Talk calls to users located within your
range. This varies according to terrain, man-made
structures, and atmospheric conditions.
Most traditional phone features are not available in
Direct Talk mode, including on-network phone calls;
52 3. Making and Answering Calls
Direct Connect, Group Connect, Talkgroup calls, and
Call Alerts; data services; messaging; call timers; and
call forwarding.
Setting Your Phone to Direct Talk
Before you and another caller can use Direct Talk, both
of your phones must be set to Direct Talk mode.
1.
Touch
2.
Touch
After a few seconds, your channel and code appear on
the display screen. Your phone displays the last
channel and code used for Direct Talk.
To return to network mode from Direct Talk:
1.
Touch
2.
Touch
After a few seconds, your phone returns to network
service.
> Direct Talk
Direct Talk
> Direct Talk
Direct Talk
.
.
.
.
Page 61

Code Direct Talk Calls
To make Direct Talk Code calls, both parties must be
on the same channel and code and have their phones
set to Direct Talk. Anyone within range who is set to the
same code and channel can hear all conversations.
To set a channel:
1.
From the home screen, press /
2.
Touch the
Channel
field, scroll to a channel and
touch to select it.
To set a co de :
1.
From the home screen, press /
2.
Touch the
Code
field, scroll to a code and touch to
select it.
Making Code Calls in Direct Talk Mode
䊳
In Direct Talk mode, press and hold the DC button.
Begin speaking after you hear the Direct Talk tone.
Release the DC Button to listen for a response.
The tone emitted from your phone when making a
Direct Talk call sounds different from the tone heard on
Direct Connect calls conducted on the network.
> Direct Talk
> Direct Talk
.
.
If you receive an error message, this means:
䢇
There may be no parties on your channel or code.
䢇
You are out of range.
Receiving Code Calls in Direct Talk Mode
After hearing the Direct Talk tone, you have six seconds
to reply before the call times out.
To reply to the call, press and hold the DC Button.
Note:
A Direct Talk can be ended at any time by pressing @.
Private Direct Talk Calls
Private Direct Talk allows you to silence all the calls on
a channel that are not directed specifically at you. To
do this, you must first set your phone to Private Only.
To set your phone to Private Only:
1.
From the home screen, press /
2.
Touch the
Code
field, scroll to
touch to select it.
3. Making and Answering Calls 53
> Direct Talk
Private Only
.
and
Making Calls
Page 62

To reach you, other Direct Talk callers must be on your
same channel and dial your ten-digit wireless phone
number to reach you.
Note:
You do not need to set your phone to Private Only to
receive Private calls. If you are on the same channel as
your caller, you can receive Private Direct Talk calls.
Making a Private Direct Talk Call
You can make Private Direct Talk calls to any person on
your same channel. You do not need to set your phone
to Private Only.
To make a private Direct Talk Call:
1.
In Direct Talk mode, enter a ten-digit wireless
phone number. (You can also select a number
from Contacts or Recent Calls.)
2.
Make the call in the same way you make a regular
Direct Connect call.
If you receive an error message, it means:
䢇
You may not be using a valid wireless phone
number.
䢇
The person that you are trying to reach may not be in
Direct Talk mode.
54 3. Making and Answering Calls
䢇
The person that you are trying to reach is set to a
different channel, or is out of range.
Receiving All Calls on a Channel
You can set your phone to receive all Direct Talk
transmissions that are within range and set to the same
channel. Do this by selecting
code.
You cannot initiate a call when the code is set to
Receive All. If you press the DC button to initiate a
Direct Connect call and your code is set to Receive All,
you receive an error message.
To set the code to Receive All:
1.
From the home screen, press /
2.
Touch the
Code
field, scroll to
touch to select it.
Receive All
> Direct Talk
Receive All
, instead of a
.
and
Page 63

Making Emergency Calls While in Direct Talk M o de
If you attempt to make an emergency 911 call while in
Direct Talk mode, your phone automatically exits Direct
Talk mode and attempts to find a network signal.
If you are out of network coverage, your phone cannot
make an emergency 911 call until you return to a
network coverage area. You must wait until the phone
reconnects to a network before attempting to make an
emergency 911 call.
Making Calls
3. Making and Answering Calls 55
Page 64

⽧
4. Service Features: The Basics
Receiving Messages (page 56)
⽧
Voicemail (page 57)
⽧
Messaging (page 58)
⽧
Caller ID Blocking (page 64)
⽧
Call Waiting (page 65)
⽧
Making a Second Call (page 65)
⽧
Making a Three-Way Call (page 66)
⽧
Call Forwarding (page 66)
⽧
Making International Calls (page 68)
⽧
Special Dialing Codes (page 68)
⽧
Sprint Phone Services (page 69)
56 4. Service Features: The Basics
Receiving Messages
When you receive a message, you have two ways to
access the message:
䢇
Respond to the message notification that appears
when the message is received.
䢇
Access the message later through Messaging.
Message Notifications
When you receive a message, your phone notifies you
with an icon in the notification bar and a notification
tone or vibration.
For information on notification options, see “Setting
Message Notification” on page 86.
Page 65

Voicemail
Tip:
To receive voicemail messages, you must first set up your
voicemail box.
If you are bringing your phone number from another
carrier, we suggest you set up your voicemail box after
the number you brought to Sprint is active on your Nextel
phone and your temporary phone number is deactivated.
If you set up your voicemail box prior to this, all messages
and all settings (including your greeting and password)
will be lost when the number you have brought to Sprint
becomes active.
Setting Up Your Voicemail Box
Using your MOTOROLA TITANIUM, dial your ten-digit
Nextel Personal Telephone Number (PTN). For
example: 7035557777. Follow the system instructions
to create a new four- to seven-digit password, record
your name, and record a greeting. When the system
says, “Thank you for using Sprint Voicemail,” your
mailbox is set up.
If you are setting up your voicemail from a phone other
than your MOTOROLA TITANIUM, dial your ten-digit
Nextel PTN. When you hear the greeting, press * to
access your voicemail box. The system will prompt you
to enter your password. Enter the last seven digits of
your Nextel PTN. For example: 5557777. This is your
temporary password. Follow the system instructions to
complete your mailbox setup.
You are in the main voicemail menu when you hear the
voicemail system options.
For details on using your voicemail, follow the audio
prompts provided by the voicemail system.
Playing Messages
䊳
To listen to your voicemail messages,
. You will be connected to your
Dialer >
voicemail box.
䊳
To access your voicemail messages from another
phone, dial your wireless phone number. When
you hear the voicemail greeting, press * and then
enter your voicemail passcode.
4. Service Features: The Basics 57
touch
Service Features
Page 66

Messaging
Bluetooth settings
New message
Compose new message
Messaging
Alex Sliveira (86)
Hey when can you make it... Jan 4
Colleen Pham (4)
Yes Thanks Jan 4
Julie Hay (7)
Just left Jan 2
Peter Green (22)
Happy New Year!!! Jan 1
12:00
Message List
Touch to open a
message. Touch &
hold to view
options.
Touch to create a
new message.
Messaging lets you send and receive messages that
may include text, pictures, and audio recordings.
Your messaging address is PTN@messaging.sprint.com.
Your PTN is your ten-digit Nextel Personal Telephone
Number.
Note:
You messaging address is only needed if someone is
sending you a message from an email account.
Phone-to-phone messages only require your phone
number.
Accessing Messages
䊳
Touch >
Messaging
.
58 4. Ser vice Features: The Basics
To open a message:
䊳
Touch >
message thread.
Messaging
and then touch a
Page 67

Creating and Sending Messages
Each message you create may contain the following
fields:
䢇
To
— the phone numbers or email addresses of one
or more recipients.
䢇
Message
— the body of the message. This may
include text, pictures, ringtones, or voice records.
䢇
Subject
— the subject line. To add a subject, press
> Add subject
/
䢇
Attach
— one or more attachments. These may be
pictures, ringtones, or audio files, including voice
records that you create while creating the message.
To add an attachment, press /
To send a message, you must address it to at least one
recipient. All other message fields are optional and you
can fill them in any order.
Entering Text
In message fields that require you to enter text, touch
the message field to display the onscreen keyboard. If
the keyboard is already displayed, begin typing
whenever the field is highlighted. To use the QWERTY
keyboard, just touch the field and begin typing.
and enter a subject.
> Attach
.
Message Size
You can create and send messages of up to 100 KB,
including attachments, for MMS.
Sending or Canceling
To send the message at any time after it has been
addressed:
䊳
Touch
Send
.
Creating a Message
1.
Touch >
2.
Address the message:
䡲
Touch To. Enter the phone number, contact name
or email address from the keyboard. Use a
comma to separate multiple phone numbers or
email addresses. Once you begin typing, your
phone will show a list of contacts that are possible
matches for the letters you have typed.
3.
Enter or edit the body of the message:
䡲
Touch the message field and then enter text using
the keyboard.
Messaging > New message
.
4. Service Features: The Basics 59
Service Features
Page 68

To send the message without additional options,
4.
touch
Send
.
Adding More Message Options
1.
To create the subject line, press /
enter a subject, and touch
2.
To attach a picture, audio, voice recording, or
video, press /
to attach a file.
3.
To send the message, touch
> Attach
and then select an option
Next
.
Send
> Add subject
.
Replying to a Message
You can reply to a message while you are viewing it.
To reply to a message:
1.
Touch a message to open it.
2.
Touch the message field at the bottom of the page
to enter your message.
3.
Touch
Send
.
60 4. Service Features: The Basics
More Ways to Begin a Message
In addition to beginning a message from Messaging,
you can begin a message from Contacts, the Call log
list, the home screen, or the Media Gallery.
,
To begin a message from Contacts:
1.
From the Contacts list, touch an entry.
2.
Touch to the right of the mobile number.
3.
Create and send the message.
To begin a message from the Call log list:
1.
From the Call log list, touch an entry.
2.
Touch
Send text message
3.
Create and send the message.
To begin a message from the Media Gallery:
1.
From the
video.
2.
Touch
3.
Create and send the message. The selected file is
automatically included as an attachment.
Media Gallery
Share > Messaging
.
, touch and hold a picture or
.
Page 69

Drafts
Messages you are creating are automatically saved as
drafts when you exit the message screen. The
message must be addressed to someone in order for it
to be saved as a draft.
Accessing Saved Drafts
1.
Touch >
2.
Draft messages have “Draft” in red letters next to
them on the right.
3.
Touch the message to open it and finish
composing your message.
Messaging
.
Forwarding Messages
1.
Touch > Messaging
2.
Touch a message thread to open it.
3.
Touch and hold a message and then touch
Forward message
4.
Address, edit, and send your message.
.
.
Receiving a Message
When you receive an MMS message, a message
notification appears on the notification bar.
To view the message:
䊳
Drag the notification bar down from the top of the
screen and touch the message notification.
This icon
that you have a new message.
appears on the display, reminding you
Navigating a Message
As you scroll through a message, numbers, email
addresses, and Web addresses are highlighted.
Pictures and audio recordings are also highlighted.
Attachments
Messages may contain pictures or audio files as
attachments.
If a message contains a picture or audio file as an
attachment, touch the attachment to view the picture or
play the audio file.
4. Service Features: The Basics 61
Service Features
Page 70

Actions for Received Messages
Deleting
To delete messages:
1.
Touch a message thread to open it.
2.
Touch and hold a message and then touch
Delete message
3.
Touch
Delete
To delete message threads:
1.
Touch and hold a message thread and then touch
Delete thread
2.
Touch
Delete
Forwarding
1.
Touch a message thread to open it.
2.
Touch and hold a message and then touch
Forward message
3.
Address, edit, and send your message.
Embedded objects and attachments are included
when you forward a message.
62 4. Service Features: The Basics
.
to confirm.
.
to confirm.
.
Calling a Number in a Message
If any field in a message contains a phone number,
Direct Connect number, or Talkgroup ID, you can call
or send a Call Alert to that number.
To make a call to a number in a message:
1.
View the message.
2.
Touch a number and press ` to make a phone
call or press the DC button to make a Direct
Connect call.
To send a Call Alert to a Direct Connect number in a
message:
1.
View the message.
2.
Touch the Direct Connect number and then press
> Send alert
/
3.
Press the DC button.
To make a Talkgroup call to a Talkgroup ID in a message:
1.
View the message.
2.
Touch the Talkgroup ID and then press / >
Join Tal kgr oup
3.
Press the DC button.
.
.
Page 71

Storing Message Information to Contacts
If a message you receive contains a phone number,
Direct Connect number, Talkgroup ID, or an email
address in any of the fields, you can store this
information to Contacts.
1.
View the message.
2.
Touch and hold the message to display the
message options, and then touch
Add <item> to Contacts
3.
Touch
Create new contact
new entry, or touch an entry to store the
information to an existing entry.
4.
To change the contacts type (Mobile, Home, Work,
etc.), touch the type next to the number or address
and select a type.
5.
Scroll to the bottom of the entry and touch
when you have finished entering the information.
.
to store the number in a
Done
Going to a Website
If a message contains one or more Web addresses,
you can go to the website.
1.
View the message.
2.
Touch the body of the message to display the
Select action
address. The Web page will open in your browser.
Note:
screen, and then touch the Web
The entire Web address must appear in the message.
Otherwise, you cannot go to the website.
Saving Attachments
1.
View a message.
2.
Touch and hold an attachment and then touch
Copy attached to SD card
.
Message Groups
A Message Group allows you to send messages to
groups of up to 20 contacts.
Create Message Groups
1.
Touch
New Message Group
2.
Touch the contacts you want to add to the group.
3.
When you are finished adding members to the
group, touch
Contacts >
Save
/ >
.
.
4. Service Features: The Basics 63
Service Features
Page 72

Touch
Phone
4.
Done
Note:
, enter a group name, and touch
.
If you do not provide a name for the message group,
the default name will be
(Message Group)
To delete a Message Group:
䊳
Touch
message group, then select
.
OK
to confirm.
Contacts
, touch and hold the
Delete group
. Touch
Manage Message Groups
To view a Message Group:
䊳
Touch
group.
To add members:
䊳
Touch
message group, and then touch
Add members
add and touch
To remove members:
䊳
Touch
message group, then touch
minus sign to the right of the member you want to
remove. Touch
64 4. Service Features: The Basics
Contacts
, and touch the message
Contacts
, touch and hold the
Edit group >
. Touch the contact(s) you want to
Save
. Touch
Done
.
Contacts
, touch and hold the
Edit group
Done
.
. Touch the
Caller ID Blocking
Caller ID allows people to identify a caller before
answering the phone by displaying the number of the
incoming call. If you do not want your number
displayed when you make a call, follow these steps.
Per-Call Blocking
To block delivery of your number for a single phone call:
䊳
Press *67 before dialing the call.
Your Nextel phone number cannot be blocked from
calls made to 911, 800, 855, 866, 877, 888, or other
toll-free phone numbers.
Page 73

Per-Line Blocking
You can request that Sprint Customer Service
permanently block delivery of your phone number on
every call you make. In this case, you may need to
display your number for certain calls.
To show your number on a per-call basis:
䊳
Press *82 before dialing the call.
Call Waiting
Call Waiting lets you receive a second call while on an
active call. Call Waiting is always available, unless you
turn it off for a specific call.
If you are on a call and receive a second call, your
phone emits a tone and displays a message.
To accept the second call and put the active call on hold:
䊳
Touch
Answer
.
To decline the second call:
䊳
Touch
Ignore
is forwarded to your voicemail box, unless you set
Call Forward
. If you subscribe to voicemail, the call
or
If Busy
to a different number.
Turn Off Call Waiting
To turn off Call Waiting before a call:
䊳
Press *70 before dialing the call. Call Waiting
is reactivated once the call ends.
Making a Second Call
1.
Place or receive a phone call.
2.
While the call is active, touch
is placed on hold.)
3.
Enter a second phone number and press ` to
place the call.
Note:
For quick ways to enter the number, press /.
To end the second call and make the on-hold call active:
䊳
Press @.
To make the on-hold call active and put the active call on
hold:
䊳
Touch
Switch Calls
.
4. Service Features: The Basics 65
Add call
. (The first call
Service Features
Page 74

Making a Three-Way Call
With Three-Way Calling, you can talk to two people at
the same time. When using this feature, the normal
airtime rates will be charged for each of the two calls.
1.
During an active phone call, touch
first call is placed on hold.)
2.
Enter a second phone number and press `.
3.
Touch
Merge calls
If one of the people you called hangs up during the
call, you and the remaining caller stay connected. If you
initiated the call and are the first to hang up, all callers
are disconnected.
.
Add call
. (The
Call Forwarding
Call Forwarding lets you forward all your incoming calls
to another phone number – even when your phone is
turned off. You can continue to make calls from your
phone when Call Forwarding is activated.
Call Forwarding sends calls to the phone numbers you
specify. You can forward all calls to one number or
66 4. Service Features: The Basics
forward missed calls to different numbers depending
on the reason you missed the call.
Forwarding All Calls
When you set your phone to forward all calls,
appears in the top row of the display:
To forward all calls:
1.
Touch
Call forwarding
2.
Touch
䡲
If you specified a forwarding number for this type
of call before, this number displays. To forward all
calls to this number touch
䡲
If no number is specified, touch the number field
to display the dial pad, enter a phone number
and touch
– or –
Touch the Contacts icon to the right of the
number field and select a number from Contacts.
3.
Touch
screen. All your calls are now forwarded to the
number you specified.
> Settings > Call settings >
.
Always forward
Done
Enable
.
Enable
.
.
and press X to return to the home
Page 75

Turning Off Call Forwarding
1.
Touch
Call forwarding
2.
Touch
Forward when unanswered
unreachable
3.
Touch
>Settings > Call settings >
.
Always forward, Forward when busy
, or
Forward when
.
Disable
.
,
All your calls are now sent to your phone.
Forwarding Missed Calls
Calls you miss are forwarded according to the options
set for missed calls. By default, missed calls are
forwarded to voicemail.
You can specify a forwarding number for each type of
missed call:
䢇
Forward when busy
transferring data.
䢇
Forward when unanswered
the first four rings.
䢇
Forward when unreachable
coverage or powered off.
— Your phone is on a call or
— You do not answer on
— Your phone is out of
Note:
You are charged a higher rate for calls you have
forwarded.
To forward missed calls:
1.
Touch
Call forwarding
Note:
2.
Touch
> Settings > Call settings >
.
If your phone is set to forward all calls, you must first
Always forward
disable
“Turning Off Call Forwarding” on page 67.)
Forward when busy
to access these options. (See
, to specify a forwarding
number for calls received when your phone is
busy.
3.
If you specified a forwarding number for this type
of call before, this number displays.
䡲
To forward calls to this number, touch
Enable
go to step 6.
䡲
To delete this number, touch the text field, and
then touch and hold .
4.
To enter a forwarding number:
䡲
Enter the number and touch
Done
or touch the
Contacts icon to the right to select a number from
Contacts
.
4. Service Features: The Basics 67
, and
Service Features
Page 76

Touch
Enable
5.
6.
Repeat step 2 through step 5 for
unanswered
.
and
Forward when unreachable
Forward when
.
Making International Calls
Your service default is “International Calls Restricted.”
Contact Sprint Customer Service to obtain international
dialing access.
Calls placed between the United States and Canada
do not require an international access code.
Special Dialing Codes
Non-Emergency Numbers
Sprint supports many “non-emergency” numbers
(such as #77, 311, and 511) provided by local and state
governments. These numbers are used to report
non-emergency incidents. If the situation includes
imminent danger or loss of life, you should dial 911.
68 4. Service Features: The Basics
Telecommunications Relay Service
Sprint supports services for communicating with
speech and/or hearing impaired individuals. You can
dial 711 to reach a local Telecommunications Relay
Center. You will then be connected to your destination
number. Relay service works through a
Communications Assistant who reads messages typed
into a TDD/TTY device by a speech or hearing
impaired individual to you. The Communications
Assistant then types your spoken messages to the
hearing or speech impaired individual.
Telecommunications Relay Service is available 24
hours a day, seven days a week, and every call is
strictly confidential.
Note:
Using 711 to reach Telecommunications Relay Service
may not be available in all areas.
To enable TTY mode:
1.
Touch
2.
Touch
䡲
TTY
䡲
VCO
and read text replies on your TTY.
> Settings > Call settings > TT Y
HCO, TTY
– Type and read text on your TTY device.
(Voice Carry-Over) – Speak into the phone
, or
VCO
and then touch OK.
.
Page 77

䡲
HCO
(Hearing Carry-Over) – Type text on your
TTY and listen to voice replies on your phone.
Sprint Phone Services
Contact Sprint Customer Service to obtain these
services or for additional information.
Note:
Some services are not available outside of the
continental United States.
Second Line Service
You can have two different phone numbers on the
same phone. With Second Line Service, you can:
䢇
Get separate bills for each phone line.
䢇
Bring in an existing wireless or home phone number
to Sprint to activate on the second line.
䢇
Have two different area codes (must be in same
market) to convey a local image to callers.
䢇
Use different ringer styles so that you can tell which
line is receiving a call.
䢇
Forward incoming calls to either your primary or
alternate line phone number.
䢇
Choose a Second Line Service plan that fits your
needs.
In order to activate Second Line Service, contact your
Sprint Sales Representative or call Sprint Customer
Service.
To set the active line (primary or alternate):
1.
Press /
2.
Touch a phone line to be active and then
touch
> Settings > Call settings > Phone line
OK
.
.
When incoming calls are made to a non-active line,
they will be sent to voicemail without ringing. (See “Call
Forwarding” on page 66.)
4. Service Features: The Basics 69
Service Features
Page 78

Sprint 411
Dial 411 from your wireless phone to receive
nationwide listings, movie listings and showtimes,
restaurant reservations, and driving directions, as well
as sports scores, stock quotes, and weather conditions.
Spanish speaking operators available. Receive up to
three phone numbers or pieces of information per call,
and be automatically connected at no additional
charge. Airtime and other charges apply.
70 4. Service Features: The Basics
Page 79

⽧
5. Web and Data Services
Web Browser (page 71)
⽧
Downloading Apps (page 77)
⽧
Email (page 79)
⽧
Google Data Synchronization (page 80)
⽧
Microsoft™ Office Outlook™ Synchronization (page 80)
⽧
Wi-Fi (page 81)
Web Browser
With Web access on your phone, you can browse your
favorite websites, making it easier than ever to stay
informed while on the go. Follow sports scores,
breaking news, and weather, and shop on your phone
anywhere on the Nextel National Network.
Your MOTOROLA TITANIUM offers two browser
options.
Opera Mini
is an optimized browser designed
for the Nextel network and performs faster under
WebKit
normal conditions. The
, or Android browser,
provides the full HTML Web experience and is best
suited for Wi-Fi connections. Streaming video can only
WebKit
be played using the
browser.
You can choose which browser works best for you.
Connect
Your phone uses the data capabilities of the Nextel
National Network (over the air) to automatically connect
to the Web. For an even faster Web experience, you
can also set your phone to use available Wi-Fi
networks. (See “Wi-Fi” on page 81 for details on setting
up and using Wi-Fi connections.)
Tip:
Contact Sprint for information on data usage fees and
your service agreement.
5. Web and Data Services 71
Web and Data
Page 80

WebKit Browser
Web Images
Places News
more
http://www.google.co...
Chicago, IL - updated
See places near:
New window
Refresh
Bookmarks
Forward
Windows
More
12:00
Connection
Mobile Network:
Wi-Fi:
Links
Touch to open.
Press to open a menu
where you can open a new
window, your bookmarks,
refresh a page, and more.
Drag or flick to scroll.
Web Address
To go to a URL, touch address
bar and enter Web address.
source/android.com/ - Options
Android Community - Tracking the Android
Platform
application developer sreern
To launch the WebKit browser:
䊳
Touch
Note:
If you can’t connect, contact Sprint.
> Browser
Select Web Links
When you touch a link,
.
your phone outlines it and
goes to that page. If you
touch and hold the link,
your phone shows options, such as
.
window
Open in new
WebKit Browser Options
Press / to see browser options:
Options
New Window
Bookmarks
Windows
Refresh
Back/Forward
Open a new browser window.
(Becomes “Windows” when more
than one are open.)
Add delete and manage
bookmarks.
View the browser windows that are
currently open.
Reload the current page.
Navigate to previously viewed
pages.
72 5. Web and Data Services
Page 81

Options
More
Show browser options, such as
Find on page, Select text, Page info
Share page, Downloads
Settings
.
, and
Going to a Specific Website
To go to a particular website by entering a Web address
(URL):
䊳
Touch the address bar, enter a Web address, and
Go
touch
Note:
.
Not all websites are viewable on your phone.
Creating a Bookmark
Bookmarks allow you to store the address of your
favorite websites for easy access at a later time.
1.
Press /
2.
Confirm or edit the bookmark title, and then
touch
> Bookmarks > Add.
OK
.
Note:
Bookmarking a page does not store the page contents,
just its address.
,
Some pages cannot be bookmarked. Whether a
particular Web page may be marked is controlled by its
creator.
Accessing a Bookmark
1.
Press / >
2.
Touch a bookmark to open the Web page.
Bookmarks
.
Reloading a Web Page
Press /
> Refresh
at the bottom of the screen. (The
browser will reload the current Web page.
Zoom
www.google.com: Google
www.google.com: Google
News results for android
Verizon Droid Success Limited by Android Market -
7 hours ago
The idon't ad campaign pits the Android-based Droid head-to-head
against the formidable iphone. Based on preliminary predictions ..
PC World - 1778 related articles »
5. Web and Data Services 73
Zoom
To zoom in or out,
pinch two fingers
together or apart.
Web and Data
Page 82

Opera Mini Browser
12:00
Links
Touch to open.
Web Address
To go to a URL, touch
Go.
Touch to open a menu.
Drag or flick to scroll.
Connection
Over the air:
Mobile Network:
Wi-Fi:
Back
Forward
Reload
Tabs
Tools
12:00
To launch Opera Mini:
䊳
Touch
74 5. Web and Data Services
> Opera Mini
.
Note:
If you can’t connect, Sprint.
Select Web Links
When you touch a link, your
phone outlines it and goes to
that page. If you touch and
hold the link, your phone
shows options, such as
in new tab
.
Open
Opera Mini Browser Options
Touch
Options
Bookmarks
History
Start Page
Saved Pages
Downloads
Too ls
to see browser options:
Add, delete and manage
bookmarks.
View and clear your browser’s
history.
Takes you to your browser’s start
page.
Save Web pages.
View your downloads.
Page 83

Options
Settings
Open your browser’s settings
menu.
Find in Page
Search Web pages for words or
phrases.
Help
Open your browser’s help menu.
Zoom
Touch the screen once to zoom in. To zoom out touch
the screen twice, or touch at the bottom of the
screen.
Going to a Specific Website
To go to a particular website by entering a Web address
(URL):
1.
Touch the text entry field at the top of the page.
If the text entry field is not visible, press / to bring
it up.
2.
Enter a Web address and then touch Go in the
lower right corner of the keyboard.
Note:
Not all websites are viewable on your phone.
Creating a Bookmark
Bookmarks allow you to store the address of your
favorite websites for easy access at a later time.
1.
Go to a Web page and touch
Bookmarks
2.
Touch
3.
Confirm or edit the bookmark title, choose a folder
.
Add (website name)
to store it in, and then touch
.
Add
at the bottom of
Too ls >
the screen.
Note:
Bookmarking a page does not store the page contents,
just its address.
Some pages cannot be bookmarked. Whether a
particular Web page may be marked is controlled by its
creator.
Accessing a Bookmark
1.
Touch
2.
Touch a bookmark to open the Web page.
Too ls > Bookmarks
.
5. Web and Data Services 75
Web and Data
Page 84

Reloading a Web Page
䊳
Touch
Reload
at the bottom of the screen.
(The browser will reload the current Web page.)
Downloads
WARNI NG:
To download apps:
1.
If you want to download apps from any Web page,
press /
Unknown sources
2.
To launch the browser, touch
3.
Find the app you want to download and touch the
download link.
Note:
76 5. Web and Data Services
Apps downloaded from unknown sources can
include spyware, phishing, or viruses that affect
your phone, phone performance, and personal
data. For security, download apps only from
trusted sites like
> Settings > Applications >
Market
.
.
> Browser
Downloaded apps are stored in your phone’s memory.
Manage Your Downloads
To view files or apps you’ve downloaded in Opera Mini,
touch
To view files or apps you’ve downloaded in the WebKit
browser, touch
More Downloads
.
>
Opera Mini > Tools > Downloads
> Browser >
/ >
.
.
Page 85

Downloading Apps
b
o
od.k
d
r
r
d
g
.
E
Android Market
䊳
Touch
market
Voice Search
Apps
Featured
Finance
Google Inc.
Google Goggles
Google Inc.
Google Maps
Google Maps
Google Inc.
Google Inc
Search My apps
Google Pinyin IME
oogle Pinyin IM
Google Inc.
oogle Inc.
Settings Help
Get all the fun games and cool apps you want! Android
Market™ provides access to applications from
developers worldwide, so you can find the app you
> Market
Voice Search
by
Games
million
ing
FREE
o
Downloads
FREE
FREE
FREE
FREE
.
Touch an app to open
its details or install it.
Touch for a menu
where you can open
search, downloads, or
help.
want. If you need help or have questions about Android
> Help
Market, press /
Note:
The first time you access the Android Market, you will
see a Terms of Service disclaimer. If you agree to the
terms, touch
.
Accept
to continue to Android Market.
You will need a Gmail™ account in order to buy and
download applications from Android Market. See
“Gmail” on page 79.
Browse and Install Apps
Tip:
Choose your apps and updates carefully, from trusted
sites like
performance — see “Choose Carefully” on page 78.
1.
Touch
2.
Select a category or touch
you want. Then, touch
Note:
Market
, as some may impact your phone’s
> Market
.
Search
Install
(if app is free) or
to find the app
Buy
When installing an app, make sure you read the alerts
that tell you what information the app will access. If you
don’t want the app to have access to this information,
cancel the installation.
5. Web and Data Services 77
Web and Data
.
Page 86

Manage and Restore Apps
There are lots of apps available and many are free. So
you might find that you have downloaded and installed
lots of apps on your phone. That’s fine, but you may
want to uninstall apps that you no longer use.
䊳
Touch
䡲
To uninstall touch an app in the list, and then
touch
䡲
To restore an app, touch the app in the list. The
My apps
䡲
For other app management features including
clearing app data and cache, press /
Settings > Applications > Manage applications
> Market > My apps
Uninstall
.
.
list shows previously installed apps.
>
then touch an app in the list.
Choose Carefully
Apps are great. There's something for everyone. Play,
communicate, work, or have fun. But remember,
choose your apps carefully. Here's a few tips:
䢇
To help prevent spyware, phishing or viruses
affecting your phone or privacy, use apps from
trusted sites, like
78 5. Web and Data Services
Market
.
䢇
In
Market
, check the apps’ ratings and comments
before installing.
䢇
If you doubt the safety of an app, don't install it.
䢇
Like all apps, downloaded apps will use up memory,
data, battery, and processing power — some more
than others. For example, a simple battery level
widget will use less than a streaming music player
app. After installing an app, if you're not happy with
how much memory, data, battery or processing
power it's using, uninstall it. You can always install it
again later.
䢇
Just like Web browsing, you may want to monitor
children’s access to apps to help prevent exposure to
,
inappropriate content.
䢇
Certain apps may not provide completely accurate
information. Take care, especially when it comes to
personal health.
Page 87

Gmail
Set up a Gmail Account
If you did not set up a Gmail account when you ran
through the setup wizard (see page 2), you can set it
up now.
䊳
Touch
instructions.
Create a New Email
1.
Touch
2.
Enter the recipient email address and message,
and then touch
Tip:
Press / for options, such as
Gmail Features
To search for email:
䊳
Press /
>Gmail
>Gmail >
Send
.
>Search
in a messages list.
and follow the onscreen
/
>Compose
Attach
or
.
Add Cc/Bcc
.
To control email notifications:
䊳
Press /
>Settings > Email notifications
.
To apply a label to a thread:
䊳
Touch and hold a message, and then touch
Change labels
.
POP/IMAP Email
Set Up an Account
䊳
Touch >
The email setup wizard will guide you through setting
up your email account.
Create a New Email
1.
Touch >
2.
Enter the recipient email address and message,
and then touch
Tip:
Press / for options, such as
Email
.
Email >
/ >
Send
Compose
.
Attach
or
Add Cc/Bcc
.
.
5. Web and Data Services 79
Web and Data
Page 88

Google Data Synchronization
The Google apps on your phone give you access to
the same personal information (emails, events, and
contacts) that you have on a computer using Gmail,
Calendar, and Contacts. It’s easy to synchronize the
Google apps information you want to keep up-to-date.
Select Apps to Synchronize
1.
Touch
2.
Touch your Gmail account under
accounts
3.
Touch an account and select the apps you want to
synchronize, like
>Settings > Accounts & sync
.
Gmail, Calendar
Manage
, or
Contacts
.
.
Microsoft™ Office Outlook™ Synchronization
What Can You Manage?
Email, contacts, and calendar on your phone give you
access to the same personal information that you add,
80 5. Web and Data Services
view, and edit on your computer with the use of
Microsoft™ Outlook™.
You can:
䢇
View Google and Exchange contacts in one list.
䢇
Schedule and respond to meeting requests.
䢇
Access your company directory.
Set Up Synchronization
1.
Touch
account
2.
Enter your user name (username@company.com),
password, email address, and server details
including domain name and security type (server
address is the same URL you use to access your
company’s email using the web on your
computer).
Note:
3.
Touch
4.
Set up your sync options: select email and/or
contacts.
>Settings > Accounts & sync > Add
>
Corporate
Contact your business IT department for server details.
Next
.
.
Page 89

5.
Bluetooth settings
Wi-Fi
Turn on Wi-Fi
Network notification
Notify me when an open network is
available
Your Network
Connected
Add Wi-Fi network
Wi-Fi settings
12:00
Wi-Fi networks
Touch to turn on & scan.
Touch to connect.
Touch
Save & sync
Note:
Set Cellular data sync to manual to extend battery life
.
(see “Battery Tips” on page 28).
Corporate Calendar
䊳
> Calendar
Corporate calendar appointments are shown in the
same calendar as your phone’s calendar
appointments, but each are shown in a different color.
Once you configure your corporate account, you can
start the calendar app to view, add, and manage your
corporate calendar appointments.
Tip:
To see the color codes for your calendar, press / >
More > Calendars
Corporate Directory
To view your company’s directory, touch >
Corporate directory
.
.
.
Wi-Fi
Touch
Wi-Fi settings
Use a wireless network for fast Internet access and to
download data.
> Settings >Wireless & networks >
.
5. Web and Data Services 81
Web and Data
Page 90

Turn Wi-Fi On or Off
Touch
Wi-Fi
Note:
Tip:
> Settings > Wireless & networks >
.
To extend battery life, turn off Wi-Fi power when not in
use.
Turn off Wi-Fi power to extend
battery life or stop connections.
Turn it off and on to search for
networks. To add a quick switch,
touch and hold a blank spot on
your home screen, then touch
WiFi Tog gle
.
Motorola Widgets >
Wi-Fi Search and Connect
To find networks in your range:
1.
Touch
Wi-Fi settings
2.
Touch
on, press /
it finds within range.
82 5. Web and Data Services
> Settings > Wireless & networks >
.
Wi-Fi
to turn on and scan. If Wi-Fi is already
>Scan
. Your phone lists the networks
Tip:
To see your phone’s MAC address or other Wi-Fi details,
>Advanced
press /
3.
Touch a network to connect. If necessary,
Network SSID, Security
enter
password
, and touch
.
Connect
, and
.
Wireless
When your phone is connected to the network, the
wireless indicator appears in the status bar.
Tip:
When you are in range and Wi-Fi is on, you will
automatically reconnect to available networks you’ve
connected to before.
Page 91

⽧
6. Settings
Personalize (page 83)
⽧
Messaging Settings (page 86)
⽧
Airplane Mode (page 87)
⽧
Call Settings (page 88)
⽧
Security Settings (page 89)
⽧
Resetting Your Phone (page 91)
⽧
Update my phone (page 92)
⽧
Troubleshooting (page 93)
Personalize
Display Language
You can choose to display your phone’s onscreen
menus in one of several languages.
1.
Touch
Select locale
2.
Touch a language to select it.
>Settings > Language & keyboard >
.
Sound Settings
Ringtones
Your phone provides a variety of ringer options that
allow you to customize your ring and volume settings.
These options allow you to identify incoming calls and
messages by the ring.
Selecting Ringtones
To personalize your ringtones:
1.
Touch
Phone ringtone, Alert ringtone
ringtone
2.
Touch a ringtone to select it, and touch OK to
assign it. (To preview a ringtone, touch it or use the
Navigation Key to scroll through and hear
samples.)
> Settings >Sound & display >
, or
Notification
.
Settings
6. Settings 83
Page 92

Assigning a Ringtone to a Contact
You can also assign a ringer to a specific contact entry
so you know who's calling without looking at the
phone.
1.
Touch
2.
Touch a contact to open it, and then press /
Options > Ringtone
3.
Touch a ringtone to select it, and touch OK to
Contacts
.
.
assign it. (To preview a ringtone, touch it or use the
Navigation Key to scroll through and hear
samples.)
Vibrate Settings
Vibrate All
The Vibrate All option allows you to be notified of calls
and messages with a vibration instead of an audible
alert.
To activate Vibrate All:
䊳
Press and hold the Volume button down while on
the home screen until the phone vibrates.
84 6. Settings
To deactivate Vibrate All:
䊳
Press and hold the Volume button up.
These icons indicate how the ringer is set:
The phone vibrates instead of making a
>
sound for phone calls.
Direct Connect calls, Group Connect calls,
and Talkgroup calls are heard through the
earpiece, not the speaker.
The ring volume is set to zero for all calls.
Ring and Vibrate
To set your phone to ring and vibrate when you receive
phone calls or Call Alerts:
䊳
Touch
Vibrate
> Settings > Sound & display >
.
Page 93

Silent Mode
The Silent Mode option allows you to mute all sounds
without turning your phone off.
To activate and deactivate Silent Mode:
䊳
Press and hold @ to open the Phone Options
menu and touch
Silent mode
.
Adjusting the Phone’s Volume Settings
Adjust your phone’s volume settings to suit your needs
and your environment.
1.
Touch
2.
Select
3.
Choose a volume level and touch OK.
Tip:
You can adjust the ringer volume while on the home
screen (or the earpiece volume during a call) by using
the Volume button on the left side of your phone.
>Settings >Sound & display
Ringer volume
or
Media volume
.
.
Display Settings
Changing the Screen Timeout
Select how long the display screen remains backlit
after any screen touch or keypress is made.
䊳
Touch
Screen timeout
Note:
Changing the Wallpaper
Choose what you see on the display screen while
powering on or off and while on the home screen.
䊳
From the home screen, press /
Wallpaper gallery
To select a wallpaper from the Wallpaper galler y:
1.
Flick the thumbnail images left or right to select a
wallpaper
2.
Touch
> Settings >Sound & display >
and then touch a duration.
Long backlight settings reduce the battery’s talk and
standby times.
or
Media Gallery
> Wallpaper >
.
.
Set wallpaper
to assign an image.
6. Settings 85
Settings
Page 94

To select a wallpaper from Media Gallery:
1.
Touch
2.
Touch an image to open it.
3.
Crop the picture if prompted, and then touch
Media Gallery
.
to set the image as your wallpaper.
Tip:
You can also set an image as a wallpaper from within
Media Gallery
thumbnail and then touching
by touching and holding the image
Set as > Wallpaper
Changing the Clock Display
Select a format for the time and date display.
䊳
Touch
䡲
Touch
24-hour time display and 12-hour time display.
䡲
Touch
format to assign it.
Note:
86 6. Settings
> Settings > Date & time
Use 24-hour format
Select date format
The time, time zone, and date are set by the network,
and even though they show up as options, they cannot
be changed.
to toggle between
, and then touch a date
Messaging Settings
Messaging settings make messaging easier by letting
Save
.
.
you decide how you would like to be notified of new
messages, create a signature with each sent message,
and create your own preset messages.
Setting Message Notification
When you receive a message, your phone notifies you
by displaying an icon in the notification bar. You can
also choose to be notified with a sound while making a
phone call.
To turn messaging notifications on and off:
䊳
Touch > Messaging >
Notifications
.
To select a message notification ringtone:
䊳
Touch > Messaging>
Select ringtone
then touch
, touch a ringtone to select it, and
OK
.
/
> Settings >
/
> Settings >
Page 95

To set your phone to vibrate when you receive a message:
䊳
Touch > Messaging >
.
Vibrate
/
> Settings >
Setting Reports
You can also choose to receive read and delivery
reports for each message you send.
To receive read reports:
䊳
Touch > Messaging >
Read reports
.
/
> Settings >
To receive delivery reports:
䊳
Touch > Messaging >
Delivery reports
.
/
> Settings >
Airplane Mode
Sometimes you may want to have your phone on, but
turn off its ability to make and receive calls and other
transmissions.
To set your phone so that it cannot make or receive phone
calls, Direct Connect calls, Group Connect calls, Talkgroup
calls, or transfer data:
䊳
Press and hold @ to open the Phone Options
menu and touch
Airplane mode
.
When in Airplane Mode, appears in your
notifications bar.
To turn Airplane Mode off:
䊳
Press and hold @ to open the Phone Options
menu and touch
Note:
When you select airplane mode, all wireless services
are disabled. You can then turn Wi-Fi back on, if
permitted by your airline. Other wireless voice and data
services (such as calls, Bluetooth, and text messages)
remain off in airplane mode. Emergency calls to your
region's emergency number can still be made.
Tip:
To add a quick switch for
Airplane mode
blank spot on your home screen,
then touch
Airplane Mode Toggle
Airplane mode
, touch and hold a
Motorola Widgets >
.
.
6. Settings 87
Settings
Page 96

Call Settings
Setting Prepend Dialing
The Prepend feature lets you set a prefix to be added to
the beginning of all dialed numbers, such as a country
code for international calls.
1.
Touch
2.
Touch
touch
3.
Enter a prefix in the
international calls), and then touch
Note:
Direct Connect Settings
The
Direct Connect settings
phone handles Direct Connect calls, Group Connect
calls, and Talkgroup calls.
To access the Direct Connect settings menu:
䊳
Touch
Direct Connect settings
88 6. Settings
>Settings > Call settings > Prepend
Prepend
to activate this feature, and then
Prefix number
This setting does not apply to 911 or Sprint 411.
.
text
field (such as +1 for
OK
.
menu controls how your
> Settings > Call Settings >
.
䡲
Resume DC
— adds 30 seconds to the DC timeout
so Direct Connect calls do not time out quickly
while you are multitasking.
䡲
One Touch DC
䡲
Sharing info
䡲
Talkgroups
— sets One Touch DC.
— sets info to share.
— lets you silence Talkgroups, define
your Talkgroup area, and manage your Talkgroup
.
areas.
䡲
DC button light
— controls whether or not the
backlight displays when using Direct Connect.
Setting One Touch DC
One Touch DC sets your phone to call the most recent
Direct Connect number or Group on the Call log list, or
a Direct Connect number you choose, every time you
press the DC button. You can also set your phone to
bring up a Direct connect Contacts list when the DC
button is pressed.
1.
Touch
Direct Connect settings > One Touch DC
2.
Touch
contact
touch
> Settings > Call settings >
.
Off, Launch DC Contact List, DC a selected
, or
DC the most recent number
OK
.
, and then
Page 97

Tip:
If you are entering a Talkgroup number, enter # before
the number.
Security Settings
䊳
Touch
Location & security settings
Bluetooth settings
Screen unlock
Set up screen lock
Lock screen with pattern, PIN, or password
SIM card lock
SIM card lock
Set up SIM card lock
Passwords
Visible passwords
Show password as you type
Device administration
Select device administrators
Add or remove device administrators
Credential storagetion
Use secure credentials
Allow applications to access secure
> Settings > Location & security
12:00
Touch to set up screen lock.
Touch to set up SIM card
lock.
Touch to view passwords.
SIM Card Security
Important:
SIM Card’s PIN
.
You can protect access to your phone by using the SIM
card’s PIN (Personal Identification Number). When you
enable SIM PIN, you must enter the PIN each time you
power up the phone. You can change or disable the
SIM PIN.
Lock Your SIM Card
1.
2.
Important:
3.
Entering the PIN
1.
Except for making emergency calls, your phone
does not function without the SIM card.
Touch
> Settings > Location & security >
Set up SIM card lock > Lock SIM card
Enter your SIM PIN code.
The default SIM PIN is 0000. Change your PIN to
prevent fraudulent use of the SIM card.
Touch OK.
Press and hold @ to turn on your phone.
Settings
.
6. Settings 89
Page 98

If necessary, drag to the right to unlock the
2.
screen.
3.
Using the onscreen keypad, enter your SIM PIN,
and touch
Important:
OK
.
If you enter your PIN incorrectly three times, your
SIM card is blocked. See “Unblocking the PIN” on
page 90.
Changing the PIN
Note:
SIM PIN must be turned on in order to access this
feature.
1.
Touch
Set up SIM card lock > Change SIM PIN
2.
Enter the current SIM PIN and touch OK.
3.
Enter the new SIM PIN and touch OK.
4.
Reenter the new SIM PIN to confirm and then
touch
> Settings > Location & security >
OK
.
.
Unblocking the PIN
If you enter your PIN incorrectly three times, your SIM
card is blocked. To unblock your SIM card, you must
contact Sprint Customer Service to get a PIN Unblock
90 6. Settings
Code (PUK). Follow their instructions for unblocking
your SIM PIN.
Important:
If you unsuccessfully enter the PUK code ten
times, your SIM card is permanently blocked and
must be replaced. If this happens, you get a
message to contact Sprint Customer Service.
Except for making emergency calls, your phone
does not function with a blocked SIM card.
Your Phone’s Lock Feature
Screen Lock
Note:
You can make emergency calls on a locked phone
(see “Emergency Calls” on page 33).
To lock the screen:
䊳
Press #
– or –
Let the screen time out (don’t press or touch
anything).
To unlock the screen:
䊳
Press # and then drag to the right.
Screen Lock
on the top of the phone.
Page 99

Security Lock
To access the Security lock menu:
䊳
Touch
Set up screen lock
䡲
To set a password or an unlock pattern that you
>Settings >Location & security >
, and then select an option.
need to draw to unlock your screen, touch
Pattern, PIN
䡲
To turn the lock off, touch
䡲
To change the password or lock pattern, touch
Change screen lock > Pattern, PIN
, or
Password
.
None
.
, or
Password
.
Unlocking Your Phone
䊳
At the “Enter password to unlock” prompt, enter
your password or PIN and touch
Enter
.
– or –
At the “Draw pattern to unlock” prompt, draw the
saved pattern to unlock the phone.
Forgot Your Pattern, PIN, or Password?
When you set up your screen lock, you were asked to
choose two security questions.
If you forgot your pattern, PIN, or password, touch
Forgot password?
and enter your security question
answer to unlock your phone. If you also forgot your
security question answer, touch
enter your Gmail address and password.
Note:
You will need to enter a new pattern, PIN, or password
after your phone is unlocked.
Forgot answer?
Calling in Lock Mode
You can place calls to 911 when in lock mode.
䊳
Touch the
Emergency call
button at the bottom of
the screen, dial 911, and press `.
Resetting Your Phone
Phone Reset
Selecting
their default values, and clears all information (text
messages, contacts, emails, etc.) and downloaded
apps.
Reset phone
resets all phone settings back to
6. Settings 91
, and
Settings
Page 100

Touch
1.
Master Clear > Reset phone
WARNI NG:
2.
Enter your phone’s six-digit security code and
touch
Note:
3.
Read the prompt and touch
> Settings > Privacy >
.
All data on your phone will be deleted.
OK
. (A disclaimer is displayed.)
Your security code is a six-digit number used for
resetting your phone. Please contact Sprint Customer
Service if you do not know your security code.
Erase everything
complete the reset. (Press % to cancel.)
Feature Reset
Selecting
to their default settings.
92 6. Settings
Feature Reset
1.
Touch
SD card & phone storage > Feature Reset >
Feature Reset
resets all phone settings back
> Settings >
.
to
2.
Enter your phone’s six-digit security code and
OK
touch
Note:
3.
Read the prompt and touch
. (A disclaimer is displayed.)
Your security code is a six-digit number used for
resetting your phone. Please contact Sprint Customer
Service if you do not know your security code.
Re-apply All
to
complete the reset. (Press % to cancel.)
Update my phone
Stay up to date with the latest software for your phone.
You can check, download, and install updates using
your phone or your computer:
䢇
Using your phone:
You may get an automatic notification of an available
update on your phone. Follow the instructions to
download and install.
>
To manually check for updates, touch
Settings > About phone > System updates
Your phone downloads any updates over your
mobile network. Remember, these updates can be
quite large (25MB or more) and may not be
available in all countries. If you don’t have an
.
 Loading...