

Page 1

Nextel
iDEN
Digital Multi-Service Data-Capable Phone
®
®
i90c Phone User’s Guide
@NTN9903A@
NTN9903-A
Page 2

90
nextel.com
Page 3

Table of Contents
Introduction .......................................................................................... 1
Welcome to Nextel®.......................................................................................1
Customer Care.................................................................................................2
Ordering Information ......................................................................................3
Driving Safety Tips .........................................................................................3
Getting Started...................................................................................... 7
i90c Phone Features .......................................................................................8
i90c Menu Tree ...............................................................................................9
i90c Icon Glossary.........................................................................................10
Battery ...........................................................................................................11
Turning Your i 90c Phone On/Off ................................................................14
Enabling Security ..........................................................................................15
Receiving Over-the-Air Programming..........................................................16
SIM Card .......................................................................................................17
Status of Your i 90c Phone ............................................................................25
My Information .............................................................................................25
Using T9
Display Essentials ............................................................................... 33
Display Screens.............................................................................................33
Status Icons....................................................................................................35
Text Display Area .........................................................................................37
Call Information Icons...................................................................................37
Menu Icon......................................................................................................37
Display Options.............................................................................................38
Navigating Menus and Lists..........................................................................38
Main Menu Options.......................................................................................39
®
Text Input ....................................................................................26
Phonebook ........................................................................................... 41
Phonebook Entries and Speed Dial Numbers................................................42
Phonebook Icons ...........................................................................................42
i
Page 4

90
Voice Names .................................................................................................43
Accessing Your Phonebook ..........................................................................43
About Phonebook Entries..............................................................................44
Pause Digit Entry...........................................................................................53
Plus Dialing ...................................................................................................54
Address Book ................................................................................................55
Digital Cellular.................................................................................... 57
Making Phone Calls ......................................................................................58
Emergency Calling........................................................................................64
Special Dialing Codes ...................................................................................64
Receiving a Phone Call .................................................................................64
Ending a Phone Call......................................................................................66
Recent Calls...................................................................................................66
Missed Calls ..................................................................................................70
Call Timers....................................................................................................70
Hands-Free Speakerphone.............................................................................71
Mute...............................................................................................................72
Call Waiting ..................................................................................................72
Call Hold .......................................................................................................75
Three-Way Calling........................................................................................76
Call Forwarding.............................................................................................77
Caller ID........................................................................................................81
Alternate Line Service...................................................................................82
Call Restrictions ............................................................................................84
Nextel 411 .....................................................................................................84
Nextel Voice Mail................................................................................87
Setting Up Your Voice Mail Box..................................................................87
Logging Into Voice Mail...............................................................................88
Using Voice Mail ..........................................................................................89
Advanced Voice Mail Features .....................................................................93
Nextel Voice Mail Tree ...............................................................................101
nextel.com
ii
Page 5

Messages ............................................................................................103
Receiving Messages ....................................................................................103
Message Center ...........................................................................................106
Voice Mail Messages ..................................................................................107
Text and Numeric Messaging......................................................................108
Nextel Two-Way Messaging.......................................................................111
Direct Connect ..................................................................................113
Nextel Direct Connect®...............................................................................113
Private Call..................................................................................................113
Call Alerts....................................................................................................117
Group Call ...................................................................................................121
Datebook............................................................................................ 125
Datebook Icons............................................................................................126
Viewing Your Datebook .............................................................................126
About Datebook Events...............................................................................128
Adding New Events.....................................................................................129
Editing Events .............................................................................................133
Deleting Events ...........................................................................................133
Datebook Event Reminders.........................................................................134
Customizing Datebook Set Up....................................................................134
Memo ................................................................................................. 137
Adding a New Memo ..................................................................................137
Viewing a Memo.........................................................................................137
Editing a Memo...........................................................................................138
Deleting a Memo.........................................................................................138
Voice Notes ........................................................................................139
About Voice Notes......................................................................................139
Accessing Voice Notes................................................................................140
Recording a Voice Note..............................................................................140
Playing a Voice Note...................................................................................141
iii
Page 6

90
Adding to a Voice Note...............................................................................141
Labeling a Voice Note.................................................................................141
Deleting Voice Notes ..................................................................................142
Locking/Unlocking a Voice Note................................................................142
Voice Notes Memory ..................................................................................143
Nextel Wireless Web......................................................................... 145
Wireless Web Navigation Keys ..................................................................145
Starting the Microbrowser...........................................................................146
Using Your Phone as a Modem...................................................................147
Java Apps .......................................................................................... 149
Accessing Java Apps ...................................................................................149
Installing Java Apps ....................................................................................150
Running Java Apps......................................................................................150
Downloading Custom Applications ............................................................151
Deinstalling Java Apps................................................................................152
Java Apps Memory......................................................................................152
Customizing the i90c Phone ............................................................ 155
Settings ........................................................................................................155
Styles ...........................................................................................................170
Shortcuts......................................................................................................176
Accessories......................................................................................... 179
Batteries.......................................................................................................179
Travel Chargers ...........................................................................................181
Carry Holster ...............................................................................................182
Universal Serial Bus (USB) ........................................................................183
Other Important Information ......................................................... 185
Nextel Customer Care .................................................................................185
Understanding Status Messages ..................................................................186
Nextel Terms and Conditions of Service ....................................................189
Safety and General Information ..................................................................195
nextel.com
iv
Page 7

Limited Warranty Information ....................................................................205
Patent and Trademark Information..............................................................213
Index .................................................................................................. 215
IMPORTANT!
Read “Nextel Terms and Conditions of Service” on
page 189 and “Safety and General Information” on
page 195 before using your i90c phone.
v
Page 8

90
vi
nextel.com
Page 9

Introduction
Welcome to Nextel
®
Thank you for choosing Nextel as your wireless communications provider. Your
i90c phone enables you to enjoy clear connections through Nextel’s All-Digital
National Network. In addition, with Nextel Worldwide
your i90c phone to roam internationally in select cities using other iDEN
SM
Service, you can use
®
networks.
Nextel gives you more ways than anyone to communicate with everyone.
SM
Your i90c phone offers many innovative features:
• Voice Activated Dialing – Your i90c phone offers state-of-the-art Voice
Activated Dialing.
• Speakerphone – You can enjoy hands-free communication at the touch of
a button. And Speakerphone is especially great for conference calls.
• Phonebook – Your consolidated Phonebook holds up to 250 entries and
allows you to store multiple contact numbers for each person, offering you
various ways to communicate with your business and personal contacts.
• SIM Card – Your phone’s SIM card holds all entries stored in your
Phonebook. In addition, you have a PIN (Personal Identification Number)
to keep your information safe and secure.
• Datebook – Schedule and keep track of appointments using your phone’s
Datebook feature.
• Messages – The Message Center allows you to manage and access your
Voice Mail, Text Messages and Two-Way Messages all from the same
inbox.
• Nextel Direct Connect
®
– With Nextel Direct Connect, you can use your
phone as a digital two-way radio to communicate directly with business
and personal contacts at a fraction of the cost of cellular calls.
• Nextel Wireless Web – Using the Net feature with the built-in
microbrowser, you can access Nextel’s wireless Internet. It offers a suite of
Nextel wireless data products and internet applications to quickly access
the information you need to get business done.
TM
• J2ME
– With the Java Apps feature, you can choose from the many Java
programs developed for Nextel. Download Java applications directly from
the Internet either over the air or using a cable. You can select which
TM
Java
applications will best help you get business done.
1
Page 10

90
• Closed-Cover Features — The external display screen and control buttons
enable you to use many of your i90c phone’s features without opening the
cover.
• Customization – Use the Settings, Styles, and Shortcuts features to
customize your i90c phone to meet your individual needs. Personalize your
main menu order, designate unique ring styles, create a set of behaviors for
your phone to use in certain situations such as meetings or in the car, and
more.
For more information on these and other features of the i90c phone, review this
User’s Guide.
Enjoy using your i90c phone!
Customer Care
For domestic customer care issues, including billing issues, general service
needs, or to order additional services, contact Nextel Customer Care.
Visit nextel.com for a variety of Customer Care services:
• Browse for information on phones, coverage, rates and other Nextel
services. View and download user's guides, try out our interactive virtual
products and service demos, find answers to frequently asked questions,
order accessories, locate service and repair centers, upgrade phone
software, send a message and more.
• For self-service on your Nextel account, click on My Account to view
your account, pay your bill, add phones to your account, reset your Voice
Mail password, add Wireless Web services and more.
• For online assistance, click on Contact Us to send us an email request. Our
representatives are committed to assisting you. Every effort will be made to
address your questions or concerns within 24 hours. Contact us to add
Wireless Web and other services, change rate plans, inquire on your bill,
and more.
Or, call us at 1-800-639-6111 or dial 611 from your Nextel phone.
To complement the i90c phone and Nextel Worldwide Service, Nextel has also
launched International Roaming Customer Care support. When traveling
outside of the U.S. and Canada, call +1 (201) 531-5202 for your Customer Care
Service needs. This Customer Care number will be toll-free from your Nextel
handset both domestically and internationally.
For more information about Nextel or to view this guide on our Web site, visit
us on nextel.com.
nextel.com
2
Page 11

Ordering Information
International and domestic coverage, rates and other information are also
available on nextel.com.
Ordering Information
Nextel Business Networks® allows you to communicate with individuals outside
as well as inside your company. These Networks link Nextel customers in
similar industries or geographies. So, if you need to reach a client, vendor, or
contractor instantly, work smarter by joining the Nextel Business Networks.
Call 1-888-NEXTEL2 (1-888-639-8352).
Various accessories are available for use with your i90c phone, including a
Leather Carry Case, Vehicle Battery Charger, extra Batteries, a variety of
Hands-Free accessories, and more. To order accessories or an accessories
catalog, go to nextel.com or call Nextel Nextday
SM
Accessories at
1-800-914-3240. You can also contact your Nextel Authorized Sales
Representative or stop by any Nextel Store. For information on retail store
locations, go to nextel.com.
Contact Nextel Customer Care to order any of the services discussed in this
guide, including Nextel Wireless Web, Nextel Direct Connect, Additional
Phone Services, Voice Mail, Nextel Mobile Messaging and much more!
SM
For information on Direct Protect
insurance protection for your i90c phone,
call 1-888-352-9182 or contact your Nextel Authorized Representative.
Visit us at nextel.com to learn more about Nextel products and services!
Driving Safety Tips
NOTE: For safety and legal reasons (in many countries), do not use
your phone while driving.
Check and follow the local laws regarding the use of mobile
phones while driving.
Safety — Your most important call. The Wireless Industry reminds you to use
your phone safely when driving.
1. Get to know your wireless phone and its features such as speed dial
and redial. Carefully read your instruction manual and learn to take
advantage of valuable features most phones offer, including automatic
redial and memory. Also, work to memorize the phone keypad so you can
use the speed dial function without taking your attention off the road.
2. When available, use a hands free device. A number of hands free
wireless phone accessories are readily available today. Whether you
choose an installed mounted device for your wireless phone or a speaker
phone accessory, take advantage of these devices if available to you.
3
Page 12

90
3. Position your wireless phone within easy reach. Make sure you place
your wireless phone within easy reach and where you can grab it without
removing your eyes from the road. If you get an incoming call at an
inconvenient time, if possible, let your voice mail answer it for you.
4. Suspend conversations during hazardous driving conditions or
situations. Let the person you are speaking with know you are driving; if
necessary, suspend the call in heavy traffic or hazardous weather
conditions. Rain, sleet, snow and ice can be hazardous, but so is heavy
traffic. As a driver, your first responsibility is to pay attention to the road.
5. Do not take notes or look up phone numbers while driving. If you are
reading an address book or business card or writing a “to do” list while
driving a car, then you are not watching where you are going. It's common
sense. Don't get caught in a dangerous situation because you are reading
or writing and not paying attention to the road or nearby vehicles.
6. Dial sensibly and assess the traffic. If possible, place calls when you
are not moving or before pulling into traffic. Try to plan your calls
before you begin your trip or attempt to coincide your calls with times
you may be stopped at a stop sign, red light or otherwise stationary. But if
you need to dial while driving, follow this simple tip — dial only a few
numbers, check the road and your mirrors, then continue.
7. Do not engage in stressful or emotional conversations that may be
distracting. Stressful or emotional conversations and driving do not mix
— they are distracting and even dangerous when you are behind the
wheel of a car. Make people you are talking with aware you are driving
and if necessary, suspend conversations which have the potential to divert
your attention from the road.
8. Use your wireless phone to call for help. Your wireless phone is one of
the greatest tools you can own to protect yourself and your family in
dangerous situations — with your phone at your side, help is only three
numbers away. Dial 9-1-1 or other local emergency number in the case of
fire, traffic accident, road hazard or medical emergencies. Remember, it is
a free call on your wireless phone!
9. Use your wireless phone to help others in emergencies. Your wireless
phone provides you a perfect opportunity to be a “Good Samaritan” in
your community. If you see an auto accident, crime in progress or other
serious emergency where lives are in danger, call 9-1-1 or other local
emergency number, as you would want others to do for you.
nextel.com
4
Page 13

10. Call roadside assistance or a special wireless nonemergency assistance number when necessary.
Certain situations you encounter while driving may
require attention but are not urgent enough to merit a
call for emergency services. But you still can use your
wireless phone to lend a hand. If you see a brokendown vehicle posing no serious hazard, a broken
traffic signal, a minor traffic accident where no one
appears to be injured or a vehicle you know to be
stolen, call roadside assistance or other special nonemergency wireless numbers.
Driving Safety Tips
5
Page 14

90
nextel.com
6
Page 15

Getting Started
This section will help you get started using your phone. It contains details about
some of the features and functions described in the Getting Started Guide.
This section includes:
i90c Phone Features Page 8
i90c Menu Tree Page 9
i90c Icon Glossary Page 10
Battery Page 11
Turning Your i 90c Phone On/Off Page 14
Enabling Security Page 15
Receiving Over-the-Air Programming Page 16
SIM Card Page 17
Status of Your i90c Phone Page 25
My Information Page 25
Using T9® Text Input Page 26
7
Page 16
90
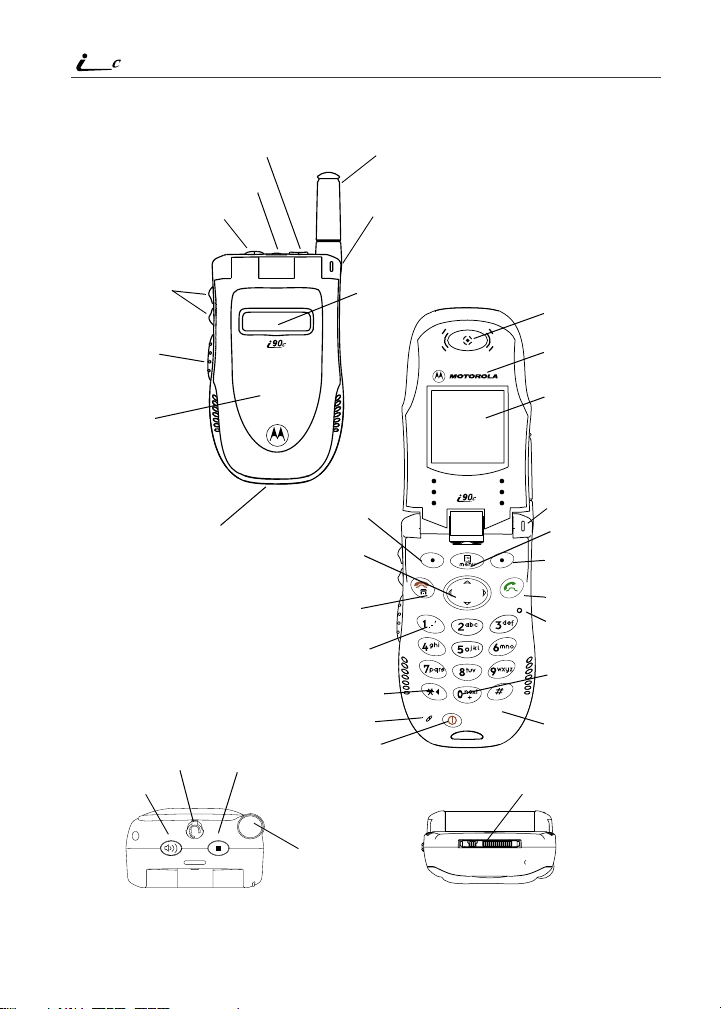
i 90c Phone Features
COVER CLOSED
SmartKey
Headset Jack
Speaker Key
Vol ume
Control
Buttons
Nextel Direct
Connect®
Push-To-Talk
(PTT) Button
Cover
Accessory and Data
Cable Connector
Headset Jack
Speaker Key
SmartKey
Option Key
4-Way
Navigation
Key
End/Home
Key
Punctuation
Key
Back/Pause
Dialing Key
Microphone
Power On/Off
Antenna
Status Light
One-Line
Display
Screen
COVER OPEN
Earpiece
Cover
Full-Sized
Display Screen
Status Light
Menu Key
Option Key
Send Key
Photosensor
Next Word/
International
Plus Dialing Key
AlphaNum eric
Keypad
Accessory and Data
Cable Connector
Antenna
TOP VIEW
BOTTOM VIEW
nextel.com
8
Page 17

i90c Menu Tree
In Call Setup
Security
Personalize
Initial Setup
Voice Volume
Tkgrp Settings
Service Status
Entries (If Any)
Menu
P
New
Capacity
Sort By
New
Edit
View
Delete Record
Delete Number
Capacity
Sort By
All Calls
Detailed
Main Menu Item
Call Forward
;
Shortcuts (If Any)
[New Entry]
Shortcuts
n
Menu
P
Main Menu Item
New
Edit
Reorder
Delete
Delete All
DEINSTALL
Menu
P
Reset System
Format System
Java System
Go to Today
New
Setup
Menu
P
Week View
Main Menu Item
Datebook
H
Voice Mail
Text Msgs
Net Mail
Menu
P
Main Menu Item
Messages
U
Delete All
Memory Meter
Main Menu Item
Call Timers
z
Last Call
Phone Reset
Phone Lifetime
Prvt/Grp Reset
Prvt/Grp LifeTime
Circuit Reset
Circuit LifeTime
Kbytes Reset
Received Call Alerts
(If Any)
Main Menu Item
Menu
P
Call Alert
E
View
Store
Delete
Delete All
Sort By
Recent Calls
Recent Calls (If Any)
Menu
P
Recent Calls
j
Main Menu Item
View
Delete
Delete All
My Info
U
Main Menu Item
Name
Prvt ID
Line 1
Line 2
Carrier IP
IP1 Address
IP2 Address
Ckt
Main Menu Item
Memo
R
CANCEL STORE
(DELETE)
i90c Menu Tree
You can access the main menu options by pressing q from the idle screen. Use to
navigate through the menus and submenus. Press
MenuP
New
New
Memory
Lock/Unlock
Add To
.
Memory
Delete
Delete All
Label
If Busy
To
the desired phone function
Phonebook
New Entry]
[
Main Menu Item
b
MenuP
Main Menu Item
Main Menu Item
oiceNotes
V
New VoiceNote]
[
(
MenuP
Settings
Apps
m
Ring Vibe
Any)
VoiceNotes (If
Phone Setup
C under the display options to perform
Menu
If No Answer
Styles
v
Main Menu Item
If Unreachable
[New Style]
Menu
P
View
Change
Edit
Off
Styles (If Any)
New
Delete All
New
P
Delete
Delete All
Main Menu Item
Main Menu Item
Java Apps
F
Applications (If Any)
Menu
P
Net
7
Your home page displays.
DownloadApps
ABOUT
Store
Call Alert Queue
VoiceNotes
9
Page 18
90
Fax
A
Navigation
d
g
Menu
P
2
Line and Call Info Info
0
1
G
E
X
Mobile
T
Main
N
h
Work
+
Home
C
%
Other
W
Status
s
Z
Y
%
c
i
Locked
M
On Hold
V
Main Menu
Net
j
F
7
Phonebook
b
Settings
m
VoiceNotes
(
Datebook
=
Shortcuts
n
;
z
My
Info
Styles
U
v
Memo
O
Miscellaneous
:
k
>
S
T9
#
$
T9 Alpha
w
Q
'
{
*
-
[
\
y
K
End Call
?
]
<
Phonebook
Pager
a
Connected
6
D
u
R
Messages
R
'
R
Bullet
8
T9 Numer ic
,
T9
Symbols
!
x
e
f
i90c Icon Glossary
You may see these icons while using your i90c phone:
Voice Mail
Text Message
Java Apps
Mobile IP
Signal Strength
Line 1 Active
Line 2 Active
Private ID
Net Mail
Battery Strength
Line 1 Forward
Word
Message Read
Packet Activity
Packet Data
Line 2 Forward
Incoming Call
Call Forward
Private In Use
Phone In Use
Missed Call
Outgoing Call
Talkgroup In Use
T9 Caps Lock
T9 Uppercase
Vibrate All
Speaker Off
IP
Talkgroup ID
|`
Call Timers
Secure Data
Recent Calls
Vibrate Then Ring
Vibrate On
Voice Name
)`
Datebook Alarm
Silent On
Recurring Appt
Check Mark
Call Alert
10
Picker Up
Picker Left
Picker Right
Picker Down
Up Down Arrows
nextel.com
Page 19

Battery
The icon of the main menu feature in use displays in the top left of the status
icon rows. For a list of the main menu options, see “Main Menu Options” on
page 39.
Battery
Your i90c phone comes with a Lithium Ion battery and charger. After attaching
the battery, you must charge it before you use it for the first time. See
“Batteries” on page 179 for the charging times for your phone’s battery. The
first time you charge your phone’s battery, charge for 30 minutes more than the
time shown on page 180. After the initial charging, the battery can be charged in
the time shown on page 180.
Remove the battery from the protective plastic safety tray provided in the
original packaging. When the battery is not attached to the phone, store it in the
original tray.
NOTE: Use only the batteries approved for this product.
11
Page 20
90
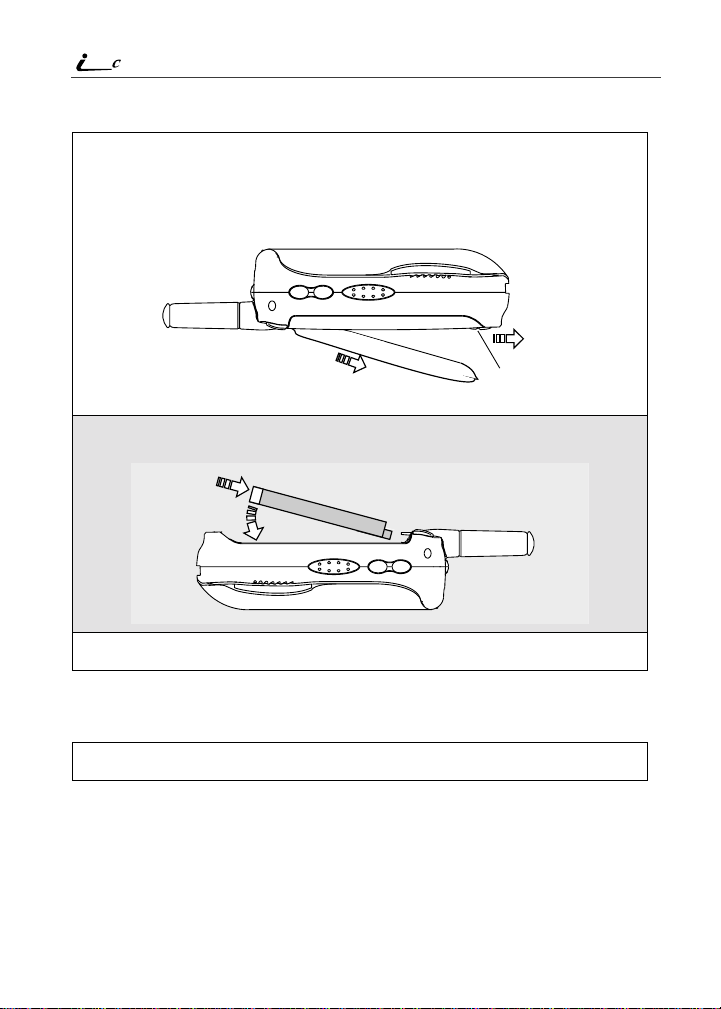
Attaching the Battery
1
Slide the battery cover release button away from the battery cover and
remove the battery cover from the back of the phone.
USER TIP:Holding the battery cover downward allows it to fall
2
Insert the top of the battery into the battery area. Press the bottom of the
easily from the back of the phone without being pulled.
Battery cover
release button
battery to secure it.
3
Replace the battery cover and press it gently until you hear a click.
Detaching the Battery
1
Ensure the phone is powered off before attempting to detach the battery.
12
nextel.com
Page 21
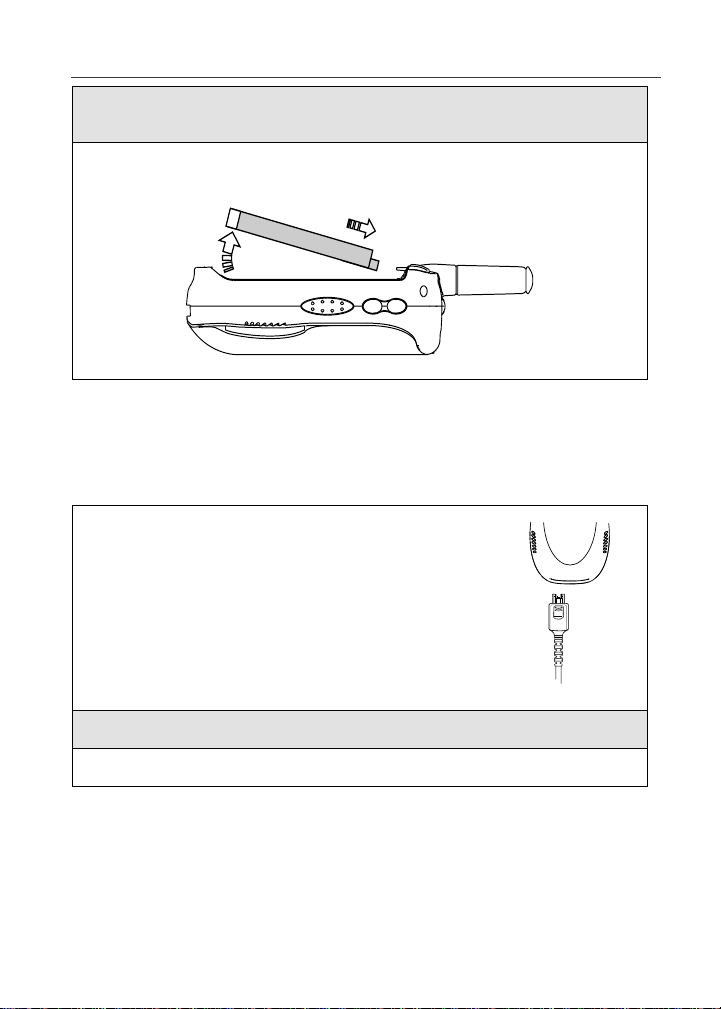
2
Slide the battery cover release button away from the battery cover and
remove the battery cover from the back of the phone.
3
Remove the battery by pushing the battery toward the antenna and
lifting it out of the phone.
Charging the Battery
NOTE:The battery can be charged with the phone either turned on or
off. For best results, charge it with the phone turned off.
1
With your phone’s display screen facing up, plug
the charger’s accessory connector into the left side
of the accessory connector on the bottom of the
phone.
Battery
2
If the charger has folding electrical prongs, flip open the prongs.
3
Plug the charger into an electrical outlet.
13
Page 22
90
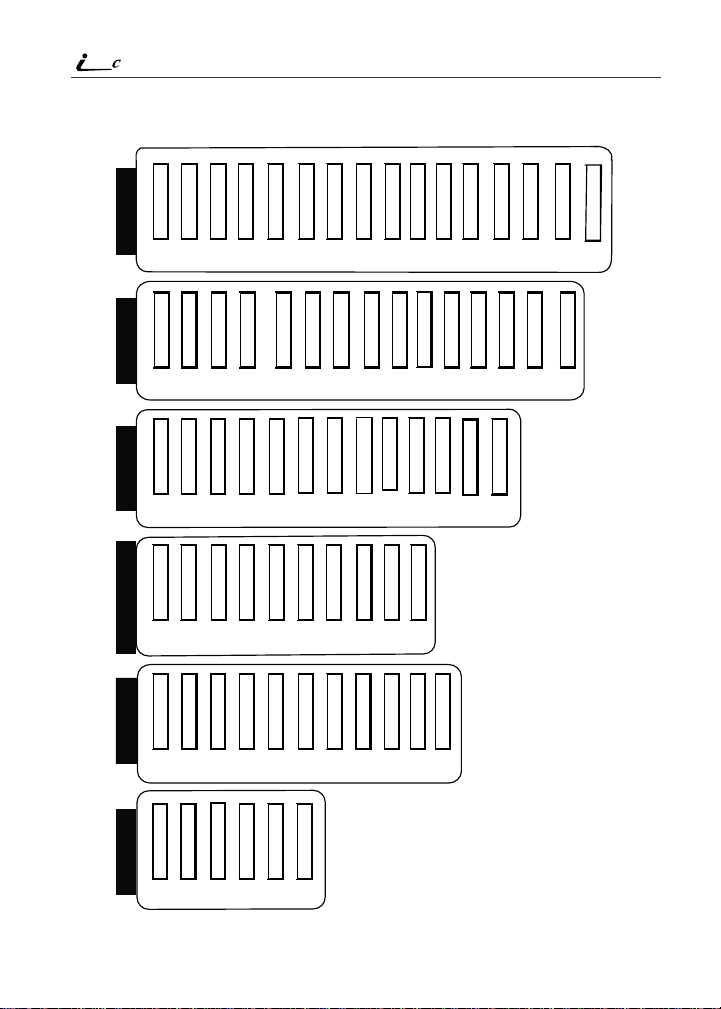
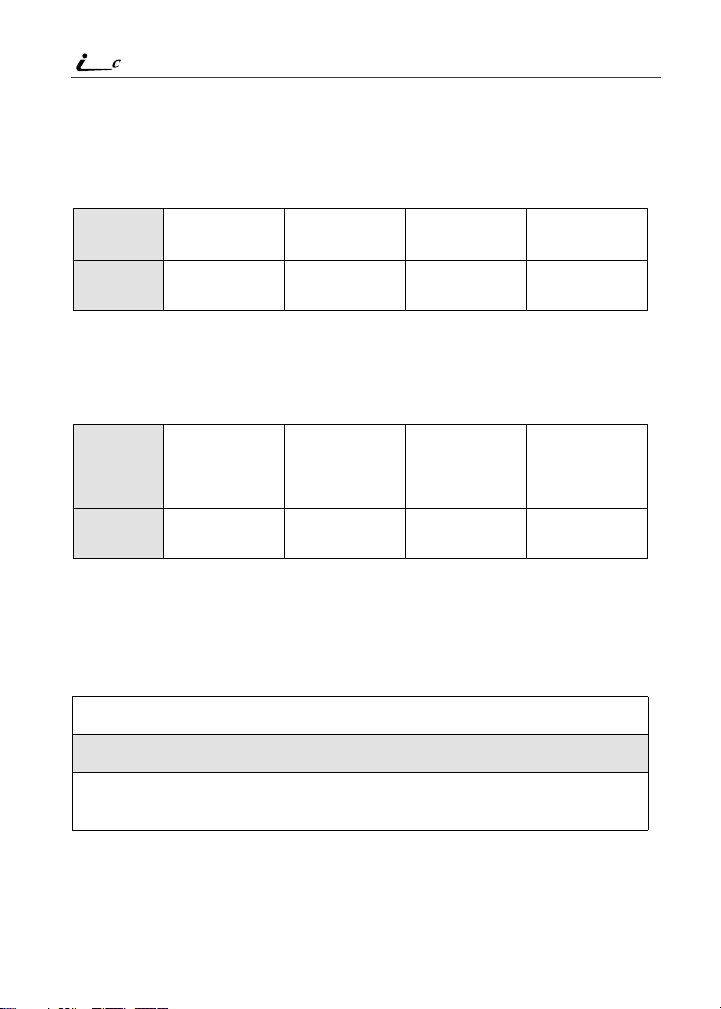
Battery Charging Status
The battery strength indicator icon found on your phone’s display screen shows
the amount of power in the battery.
When Using Phone
Icon
Display
Battery
Strength
A short, chirp-like sound indicates a low battery. The icon flashes to indicate
that you have approximately five minutes of talk time remaining.
abcd
Low
Battery
11% to
40%
41% to
70%
Fully
Charged
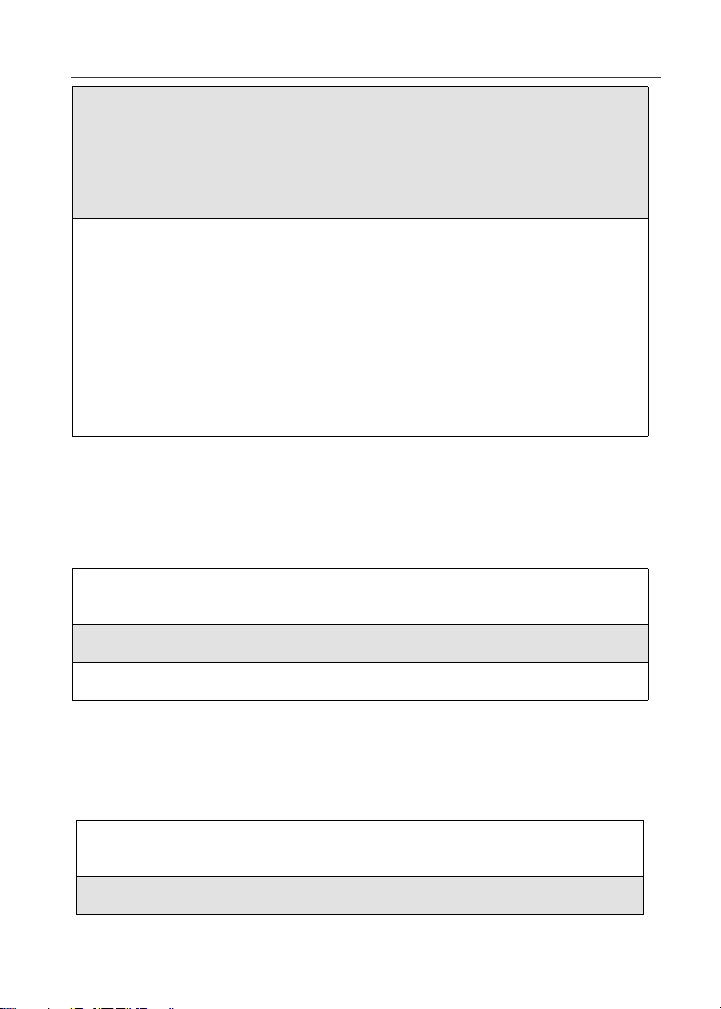
When Charging Battery
Icon
Display
Battery
Strength
efgd
1 flashing bar 1 flashing bar,
Low
Battery
1 continuous bar
31% to
60%
1 flashing bar,
2 continuous bars
61% to
90%
3 continuous bars
Fully
Charged
Turning Your i90c Phone On/Off
NOTE: To register for the first time on the Nextel National Network, you
must turn on your i90c phone in your home market.
To power the phone on:
1
Open the phone cover.
2
For optimal signal strength, extend the antenna.
3
Press and hold p on the keypad until the status light glows red, a tone
briefly sounds, and Powering On displays.
14
nextel.com
Page 23
Enabling Security
4
If you have enabled your SIM PIN security feature (see “Enabling/
Disabling the PIN Security Feature” on page 17), the Enter SIM PIN
Code screen displays. Enter your SIM PIN (see “Entering the PIN” on
page 19).
Press C under OK.
5
As your phone connects to the Nextel
National Network, you will see Wel com e
To Nex t e l and a connecting message.
When the idle screen appears on the
display as shown here, you are ready to
use your i90c phone!
O
If your display reads No Service or doesn’t change to the idle screen when you
turn on your phone, and you know you are in a Nextel coverage area, contact
Nextel Customer Care. For details on Nextel coverage areas, go to nextel.com.
To power the phone off:
1
Press and hold p on the keypad until a tone briefly sounds and
Powering Off displays.
2
Close the phone cover.
3
Push down the antenna.
Enabling Security
The first time you power on your phone (or within 20 days of first activation of
your phone), you must enable security.
1
Turn your phone on (see “Turning Your i90c Phone On/Off” on page
14).
2
From the idle screen, press q.
15
Page 24
90
3
Press S to scroll to Net.
4
Press C under SELECT. A series of screens displays.
5
You are prompted to enable security. Press C under Yes. If you
subscribe to a Nextel Online
6
Press r to return to the idle screen.
SM
Service Plan, your home page displays.
Receiving Over-the-Air Programming
If you have been set up to receive over-the-air programming (OARSS), you will
receive your Private ID and Talkgroup lists for Direct Connect use, your
Personal Telephone Number and the Nextel Customer Care number via a Net
Mail message.
In order to receive your programming, you must enable security (“Enabling
Security” on page 15). Within 24 hours of enabling security, you will receive a
Net Mail message containing your lists.
To accept your phone programming:
1
You will receive a Net Mail alert with the message New Browser
Message - Receive Programming Info.
2
Press C under GOTO.
3
You are prompted to accept changes to your phone's lists. Press C
under OK.
4
A confirmation screen displays. Press C under OK.
5
You are prompted again to accept changes to your phone's lists. Press
C under OK.
6
A confirmation screen displays. Press C under OK.
7
Press r to return to the idle screen.
nextel.com
16
Page 25

SIM Card
SIM Card
Your phone comes with a built-in level of security protection through the use of
the SIM (Subscriber Identity Module) card. The SIM card stores all your
Phonebook information and your Nextel account identification information.
Since this information is stored on the SIM card, not in your phone itself, you
can remove the information by removing the SIM card.
The SIM card is located in the SIM card holder on the back of the phone,
underneath the battery. You can verify the SIM card is in place by removing the
battery and viewing the SIM card through the SIM card cover.
See “Inserting/Removing the SIM Card” on page 22 for information on locating
the SIM card. If there is no SIM card in your phone, notify your Nextel
Authorized Representative.
NOTE: Except for making emergency calls, your phone will not
function without the SIM card.
SIM Card Personal Identification Number (PIN)
To prevent unauthorized use of your account, you can protect your SIM card by
enabling the SIM PIN security feature. With the SIM PIN enabled, you must
enter your PIN each time the phone is powered on. You can change or disable
your PIN if desired.
NOTE: It is recommended that you enable the SIM PIN security feature
to prevent fraudulent use of the SIM card.
Enabling/Disabling the PIN Security Feature
When the PIN security feature is enabled, you are prompted to enter your PIN
each time you turn on your phone. Until a valid PIN is entered, you can use the
phone only to make emergency calls.
After the PIN is accepted, the phone registers on the network and the idle screen
displays.
When the PIN security feature is disabled, the phone can be used without
entering a PIN.
It is recommended that you enable the PIN
security feature to protect personal data on
your SIM card. This prevents anyone from
!
C a u t i o n
using your phone and accessing your
personal data.
17
Page 26
90
1
At the idle screen, press q and then
press R to scroll to Settings.
B
2
Press C under SELECT. The Settings screen displays.
3
Press R to scroll to Security. Press C
under SELECT to access the Security
screen.
C
4
At the Security screen, press R to scroll to SIM PIN. Press C under
SELECT to access the SIM PIN screen.
5
Press R to scroll to On or Off. On enables the SIM PIN security
feature; Off disables the SIM PIN security feature. Press C under
SELECT.
6
At the Verify SIM PIN Code screen, enter the current SIM PIN and
press C under OK.
NOTE: The default SIM PIN is 0000.
Once you have enabled the SIM PIN security feature, it is recommended that
you change your PIN to a number known only to you (see “Changing the PIN”
on page 20).
nextel.com
18
Page 27
SIM Card
Entering the PIN
Incorrectly entering your PIN three times
causes the SIM card to be blocked. To
unblock your SIM card, you must contact
!
C a u t i o n
1
From the Enter SIM PIN Code screen,
enter your 4- to 8-digit PIN. An asterisk
appears for each character entered. The
default SIM PIN is 0000.
NOTE: Other than emergency dialing,
you will be unable to use any of
the phone functions, including
receiving phone calls, until you
enter the PIN.
2
Press C under OK.
If you enter an incorrect PIN, the message SIM PIN incorrect: Try again
appears on your phone’s screen. After three consecutive incorrect attempts, the
SIM card is blocked. Once blocked, the phone will not allow you to enter your
PIN again, even after powering the phone off and back on. If this happens, see
“Unblocking the PIN” on page 21.
Nextel Customer Care. For more
information, see “Unblocking the PIN” on
page 21.
P
Changing the PIN
NOTE: In order to change the PIN, the SIM PIN security feature must be
set to On. See “Enabling/Disabling the PIN Security Feature” on
page 17.
19
Page 28

90
1
From the idle screen, press q and then
press R to scroll to Settings.
B
2
Press C under SELECT. The Settings screen displays.
3
Press R to scroll to Security. Press C
under SELECT to access the Security
screen.
C
4
At the Security screen, press R to scroll to New Passwords. Press C
under SELECT to access the New Passwords screen.
5
At the New Passwords screen, press R to scroll to SIM PIN and press
C under SELECT.
6
At the Enter Old SIM PIN Code screen, enter the current SIM PIN
and press C under OK.
NOTE: The default SIM PIN is 0000.
nextel.com
20
Page 29
SIM Card
7
At the Enter New SIM PIN Code screen, enter a new 4- to 8-digit SIM
PIN and press C under OK.
8
At the Re-enter New SIM PIN Code screen, re-enter the new SIM PIN
to confirm, and press C under OK.
NOTE: The default SIM PIN is 0000.
Unblocking the PIN
If you forget your PIN and unsuccessfully enter it three times, access to your
phone will be blocked.
NOTE:Before you begin, obtain the PIN Unblocking Key (PUK) code
from Nextel Customer Care, then read and understand the PIN
unblocking sequence. When entering the key press sequence,
each key press must occur within 5 seconds of the prior key
press.
If you unsuccessfully enter the PUK code
ten times, the SIM card is permanently
blocked and must be replaced. If this
!
C a u t i o n
happens, all data will be lost. You will get a
message to contact your service provider.
Contact Nextel Customer Care for
assistance. If the SIM card is blocked, the
i90c phone only allows outgoing Emergency
calls.
To unblock the PIN:
1
Press * * 0 5s.
2
Enter the 8-digit PUK code.
3
Press s.
4
Enter a new 4- to 8-digit SIM PIN and press s.
5
Re-enter your SIM PIN and press s.
If you entered the codes properly, the SIM Unlocked screen displays.
21
Page 30
90
Inserting/Removing the SIM Card
If you remove your SIM card and insert
another SIM card into your phone, the
following information is erased when you
!
C a u t i o n
!
C a u t i o n
Inserting SIM Card
use the phone with the new SIM card:
• Datebook events
• Recent Calls list
•Voice Notes
• Voice names for Phonebook entries and
Shortcuts
• Call Forwarding settings
• Call filtering settings in Styles
• Net Mail alerts
• Information stored in Memo
All Phonebook information will remain
stored on your original SIM card.
Do not touch the gold-colored areas of the
SIM card.
To avoid loss or damage, do not remove
your SIM card from your phone unless
absolutely necessary.
1
With the phone powered off, remove the battery cover and battery. See
“Detaching the Battery” on page 12.
nextel.com
22
Page 31

2
With the antenna facing away from you
and the back of the phone exposed and
facing up, locate the SIM card holder.
3
Hold the SIM card with the gold contact
side facing down and the cut corner in the
lower left. Do not touch the gold-colored
areas of the SIM card.
4
Carefully slide the SIM card to the right and into
the phone, until it lies flat in the SIM card holder.
cut corner
SIM Card
SIM card
holder
23
Page 32

90
Removing SIM Card
NOTE: To remove your SIM card, you will need a ballpoint pen.
1
With the phone powered off, remove the battery cover and battery. See
“Detaching the Battery” on page 12.
2
With the antenna facing away from you
and the back of the phone exposed and
facing up, insert the tip of a ballpoint pen
into the slot to the right of the SIM card,
along the right edge of the SIM card.
3
With your other hand, gently press the
PUSH tab to the left of the SIM card. Hold
this tab down.
slot
tab
4
While holding the tab down, slide the SIM card to the left by moving
the ballpoint pen to the left within the slot.
nextel.com
24
Page 33

Status of Your i90c Phone
5
When the ballpoint pen has moved the SIM card to the left as far as
possible, very carefully lift the SIM card out of the phone. Do not touch
the gold-colored areas of the SIM card.
NOTE: Protect the SIM card as you would any delicate object. When
the SIM card is not in the phone, you should store it in
something protective, such as a mailing envelope.
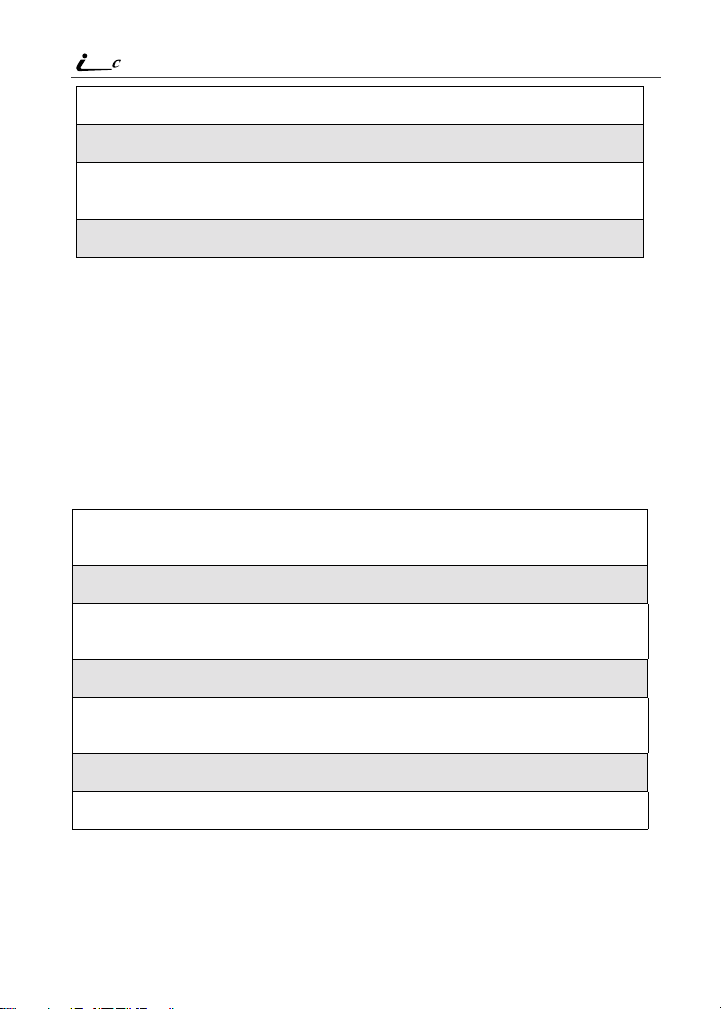
Status of Your i90c Phone
Your i90c phone’s status light is located on the top right side of the phone, near
the cover hinge. The status light indicates the status of your connection.
Status Light
Indicator
Solid Red Signing on to the network. Please wait.
Flashing Red No service or out of coverage area.
Flashing
Green
Solid Green In use.
i90c Phone Status
If you are in a coverage area, keep your phone
on and it will attempt to connect to the network
every two minutes. If the phone does not
connect after 15 minutes or more, contact
Nextel Customer Care.
In service/Ready to use.
NOTE: Nextel Direct Connect is only
available in your home calling area.
My Information
You can select My Info from the main menu to display or edit the following:
• Name — enter your name in this field.
• Private ID — your Private ID is displayed in this field. Your Private ID is
your Nextel Direct Connect number and is composed of three parts: Area
ID*NetworkID*Member ID. For example: 999*999*9999.
25
Page 34

90
NOTE: The asterisks are part of your Private ID.
• Phone Numbers of Lines 1 and 2 — your phone’s numbers are displayed in
these fields. Your phone number is automatically entered when you receive
your first phone call.
• IP Addresses — these fields display the IP addresses you use to access the
Internet with your phone.
• Circuit Data Number (Ckt) — you can enter your circuit data number in
this field.
Viewing/Editing My Information
1
From the idle screen, press q.
2
Press Q to scroll to My Info. Press C under SELECT. The My
Information screen displays.
3
Use S to scroll through the fields.
4
To edit the displayed information, press C under CHANGE. Edit
information as desired, and press C under OK to save the changes.
To return to the idle screen, press C under EXIT.
Using T9® Text Input
Your i90c phone has embedded software, called T9® Text Input, that makes
typing on a phone keypad much like typing on a computer keyboard: it
eliminates the traditional “multi-tap” method of text entry. As you type, you
press only one key per letter. T9 Text Input matches your keystrokes to words in
its linguistic database of approximately 60,000 words and proper names. You
may also store additional words you frequently use in your own user database,
which is incorporated into the T9 database.
T9 Text Input is available when you are typing information into your phone (for
example, in the Phonebook or Datebook) and while using Nextel Wireless Web
services.
26
nextel.com
Page 35

Using T9® Text Input
T9 Text Input Entry Modes
Four text entry modes are available in T9 Text Input: Alpha, Word, Symbols,
and Numeric. When you are using T9 Text Input, an icon in the top right corner
of your phone’s display screen (next to the battery strength indicator icon)
indicates the T9 Text Input entry mode you are using:
Icon* T9 Entry Mode
Used For...
Name
w Alpha Standard “multi-tap” keypad
text entry.
# Word Entering words and
punctuation with one keypress per character.
! Symbols Entering punctuation and
symbols such as “@” or “?”.
, Numeric Entering keypad numbers.
* T9 icons do not display while you are using Nextel Wireless Web services.
Choosing a Text Entry Mode on Wireless Web
When you are using Nextel Wireless Web services, T9 Text Input becomes
available whenever you access a screen that requires you to enter text. The right
display option on your the phone’s screen indicates your current T9 Text Input
text entry mode:
• ALPHA and alpha for Alpha mode
• WORD or word for Word mode
• SYM1, SYM2, SYM3, or SYM4 for Symbols mode
• NUM for Numeric mode
To change text entry modes, press the C under text entry mode until the desired
mode displays.
NOTE:The rest of the instructions for using T9 Text Input apply only to
entering text in applications other than Nextel Wireless Web
applications (for example, Phonebook or Datebook). See the
Nextel Wireless Web User’s Guide for instructions on using T9
Text Input for Nextel Wireless Web services.
27
Page 36

90
Choosing a Text Entry Mode
You can select your text entry mode from a menu available whenever the phone
is displaying a screen that requires you to enter text (for example, the Name
screen or Title screen).
To choose a text entry mode:
1
From any screen that requires text input, press q to access the Entry
Method menu.
A check mark appears next to the current text entry mode. When you
access a screen that requires text input, the default text entry mode is
Alpha.
2
Press S to scroll to the desired text entry mode.
3
Press C under SELECT.
The phone returns to the text entry screen. The icon displays indicating
the active text entry mode.
Choosing a Language
To change the language of the T9 Text Input database:
1
From any screen that requires text input, press q to access the Entry
Method menu.
2
Press S to scroll to Languages.
3
Press C under SELECT.
4
Press S to scroll to the language you want T9 Text Input to use.
5
Press C under SELECT.
NOTE: This feature is not available when using T9 Text Input with
Nextel Wireless Web services.
nextel.com
28
Page 37

Using T9® Text Input
Using Alpha Mode
To enter text (letters and numbers) while in Alpha text entry mode:
• Press any key on the alphanumeric keypad to enter the letters and numbers
on that key. For example, to enter the letter Y, press 9 three times.
• Press Q or press and hold the key to capitalize a letter.
• Pause briefly to leave the currently displayed character in place and move
on to the next place in the text entry field.
• Press P to create a space in the text entry field.
• Press C under DELETE to delete one character. Press and hold C under
DELETE to delete an entire entry.
Using Word Mode
In Word mode, T9 Text Input analyzes the letters on the keypad button you
press and arranges them to create words. As you type, T9 Text Input matches
your keystrokes to words in its database and will display the most commonly
used matching word.
Special Key Functions
Some of your phone’s keys assume different functions while in T9 Text Input
Word mode.
Backspace and Erase
Press C under DELETE once to backspace or to erase a single character. Press
and hold C under DELETE to erase the entire text entry field.
Space
Press R once to accept a word and insert a space when entering text.
Next Word in Database
Press 0 to display more words in the database that match the keystroke
sequence you entered.
Shift and Caps Lock
Press # to make the next letter typed uppercase (Shift), to make all subsequent
letters types uppercase (Caps Lock), or to go back to lowercase letters.
29
Page 38

90
These icons appear in the top row of your display screen:
• $ for Shift to uppercase
• x for Caps Lock
When neither of these icons appear, letters typed are lowercase.
Punctuation
In Word mode, T9 Text Input uses Smart Punctuation to quickly apply basic
rules of grammar to insert the correct punctuation within a word and at the end
of a sentence.
Press 1 to insert punctuation. One of eight basic punctuation symbols will be
inserted (. , - ’ @ : ? ;).
Press 0 to change the inserted punctuation symbol to another of the eight basic
punctuation symbols.
Press R to accept the punctuation and continue typing.
NOTE: Additional punctuation symbols are available in Symbols mode.
Entering a Word
To enter a word using Word mode:
1
Choose Word as your text entry mode.
2
Type a word by using one key press per desired letter.
For example, to type “test” press 8 3 7 8.
NOTE: The displayed word may change as you type it. Do not try to
correct the word as you go. Type to the end of the word
before editing.
3
After you have finished typing the word, if the word that appears is not
the desired word, press 0 to change the word on the display to the
next most likely word in the database.
Repeat until the desired word appears.
If the desired word does not appear, you can add it to the database of
words by deleting the displayed word and using the following
instructions in “Adding Words to the User Database” on page 31.
nextel.com
30
Page 39

Using T9® Text Input
Adding Words to the User Database
To add words to the T9 database:
1
Change from Word text entry mode to Alpha text entry mode (see
“Choosing a Text Entry Mode” on page 28).
2
Type the word using Alpha text entry mode.
3
Return to Word text entry mode.
4
Press R to add a space.
The word you typed in Alpha text entry mode is now in the database.
NOTE: You can not store alphanumeric combinations, such as Y2K.
Using Symbols Mode
To use Symbols text entry mode:
1
Choose Symbols as your text entry mode.
A row of 32 symbols appears along the bottom of your phone’s display
screen, just above the display options and menu icon. (Press T to view
the complete row.)
2
Press T to highlight the symbol you want to enter into the text entry
field.
3
Press C under SELECT to enter the symbol.
Using Numeric Mode
To use Numeric text entry mode, choose Numeric as your text entry mode and
press the number buttons on your keypad to enter numbers.
31
Page 40

90
32
nextel.com
Page 41

Display Essentials
Your i90c phone’s two display screens tell you what you need to know as you
use your phone.
This section includes:
Display Screens Page 33
Status Icons Page 35
Text Display Area Page 37
Call Information Icons Page 37
Menu Icon Page 37
Display Options Page 38
Navigating Menus and Lists Page 38
Main Menu Options Page 39
Display Screens
Any time your phone is powered on, the display screens provide you with
information and options.
When your phone cover is open, the full-sized display screen on the inside of the
cover provides detailed information about all of your phone’s functions.
When your phone cover is closed, the one-line display screen on the outside of
the cover provides brief information about your phone’s status, incoming and
outgoing calls, Call Alerts, message notifications, Voice Mail, and Datebook
events.
33
Page 42

90
Opening and Closing Phone Cover
If you are viewing information on your phone’s one-line display screen, you can
always open the phone cover to view more detailed information on the full-sized
display screen. However, if you are viewing information on the full-sized
display screen, closing the phone cover terminates any activity your phone is
engaged in — except powering up, transferring data through a cable, and
running Java applications.
Full-Sized Display Screen
The full-sized display screen consists of:
• status icon rows — the top two rows
display status. See “Status Icons” on
page 35.
• text display area — displays up to
seven lines of text and icons. See
“Text Display Area” on page 37.
O
• menu icon — see “Menu Icon” on
page 37.
• display options — see “Display
Options” on page 38.
One-Line Display Screen
The one-line display screen displays limited
text and one icon on each side of the text.
The text displayed is a shortened version of
information displayed on the full-sized
screen. To see more complete information,
open the phone cover.
The icon area on the left may display:
• signal strength icon. See “Status Icons” on page 35.
• call information icon. See “Call Information Icons” on page 37.
• recent call icon. See “Recent Calls Icons” on page 66.
• message icon. See “Messages” on page 103.
• missed call icon. See “Missed Calls” on page 70.
1
Stat us
Stat us
Stat us
Stat us
Stat us
Stat us
icon
icon
icon
icon
icon
icon
rows
rows
rows
rows
rows
rows
Text
Text
Text
Text
Text
Text
display
display
display
display
display
display
area
area
area
area
area
area
Menu
Menu
Menu
Menu
Menu
Menu
icon
icon
icon
icon
icon
icon
Display
Display
Display
Display
Display
Display
options
options
options
options
options
options
34
nextel.com
Page 43

Status Icons
The icon area on the right may display:
• battery strength icon. See “Status Icons” on page 35.
• Phonebook type icon for your current call or most recent call. See
“Phonebook Icons” on page 42.
The Idle Screen
The illustration of the full-sized display screen shows the idle screen. The idle
screen displays NEXTEL, the time and date, and any active styles (see “Styles”
on page 170). The illustration of the one-line display screen shows the one-line
equivalent of the idle screen.
The idle screen displays any time the phone is powered on, but not engaged in
some activity. You must start at the idle screen to access many of your phone’s
features and functions. You can always access the idle screen by pressing r.
USER TIP:When your phone cover is open, closing the phone cover
and re-opening the phone cover accesses the idle screen.
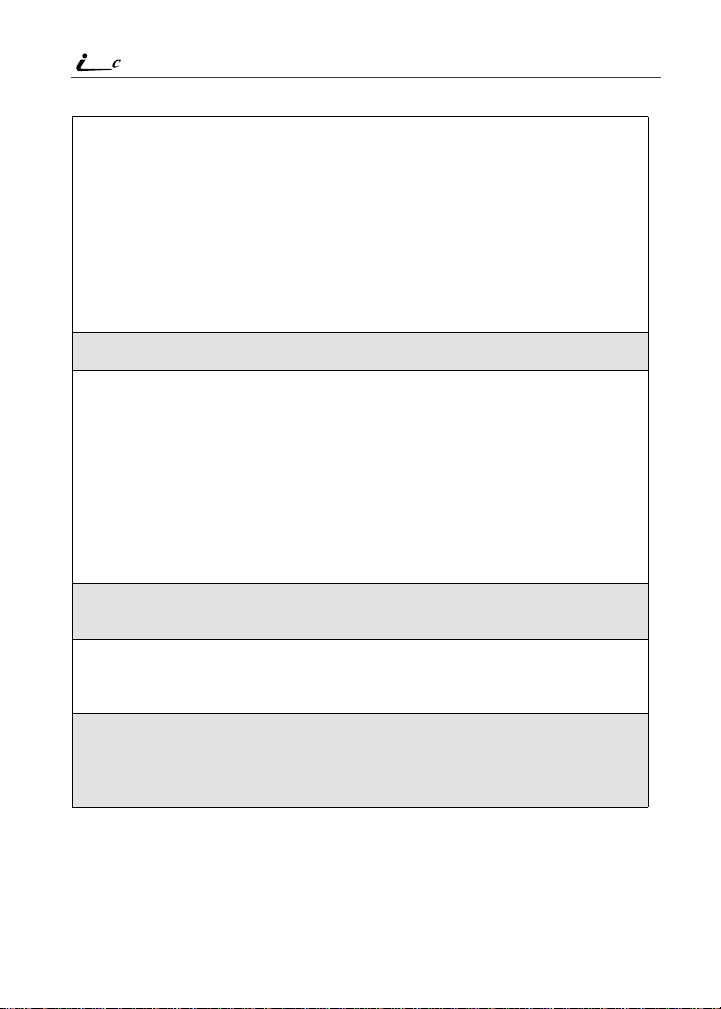
Status Icons
Status icons appear in the two rows at the top of the full-sized display screen.
Some appear at all times. Others appear only when your phone is engaged in
certain activities or when you have activated certain features.
Icon Indicates...
abcd
efgd
opqrs Signal Strength — strength of the network
01
GHI
JKL
Battery Strength — remaining battery
charge. More bars on the battery indicate a
greater charge. See “Battery Charging
Status” on page 14.
signal. More bars next to the antenna
indicate a stronger signal. Four bars is the
maximum.
Active Line — currently active phone line;
0 indicates Line 1 is active; 1 indicates
Line 2 is active.
Call Forward — phone is set to forward
calls. See “Call Forwarding” on page 77.
35
Page 44

90
c Phone In Use — phone is connected on an
h Private In Use — number being called is a
% Talkgroup In Use — phone is active on a
Y Packet Data Ready — phone is ready to
Z Packet Data Activity — phone is
] Mobile IP — phone is ready to access the
{ Secure Data — phone is accessing the
. Text Message — you have one or more
y Voice Mail — you have one or more
u Speaker Off — phone’s speaker is off.
-[\* Ring/Vibe — you have customized the
active call.
Private ID.
Group Call.
receive data through a data cable.
transmitting data.
Internet.
Internet using a secure connection.
unread Text Messages or Net Mail
messages.
unheard Voice Mail messages.
way in which the phone is set to notify you
when you receive calls and other types of
messages. See “Ring Style and Notification
Type” on page 157.
w#,!
$x
The icon of the main menu feature in use always appears in the top left of the
status icon rows. For a list of the main menu icons, see “Main Menu Options” on
page 39.
T9 Text Input — you are using T9 Text
Input to enter text. See “Using T9® Text
Input” on page 26.
nextel.com
36
Page 45

Text Display Area
Text Display Area
The full-sized display screen’s text display area displays menu options,
messages, names, phone numbers, and other information.
The number of lines of text shown in the text display area depends on which
display view is selected — Standard view, Compressed view, or Zoom view. In
Standard view, five lines of text are displayed.
NOTE: Standard view is the default display setting. Unless otherwise
noted, illustrations in this User’s Guide depict Standard view.
Call Information Icons
Each of the following icons appears on the left side of the text display area of the
one-line screen or the full-sized screen, providing you with information about
your calls.
Icon Indicates...
D In Call - phone is on an active call.
E Incoming Call - phone is receiving an
X Outgoing Call - phone is placing an
V On Hold - phone has a call on hold.
? End Call - phone has ended the active call.
incoming call.
outgoing call.
Menu Icon
The menu icon S appears on any screen from which a menu can be accessed.
To access a menu, press q on your keypad.
Menus are context sensitive. The menu that appears depends on the screen you
access it from, and the items on the menu apply to the task you are currently
performing.
Press q from the idle screen to access the main menu.
37
Page 46

90
Display Options
On the full-sized display screen, two display options appear at the bottom of
most screens. These options enable you to perform a wide variety of actions,
including changing, saving and viewing information, running programs, and
canceling previous actions. You activate a display option by pressing C below
it.
NOTE: Throughout this User’s Guide, the option keys A and B will
be represented by
The idle screen display options provide quick access to two main menu features.
By default, the Phonebook (PHBK) and Messages (MESG) display options
appear on the idle screen. You can control which display options appear on the
idle screen using the phone’s Personalize feature in the Settings menu (see
“Changing Idle Screen Options” on page 162).
The display options on screens other than the idle screen cannot be customized.
C.
Navigating Menus and Lists
The i90c phone is menu driven. By navigating menus, you access submenus
which lead to all of the functions and features that are built into your phone. Use
the menus to store calls, manage your Phonebook and Datebook, change your
phone settings, browse the Internet, and more.
Some features include lists of names, numbers, or other information. These list
items can be accessed the same way menu options are.
To access the items in a menu or list, scroll using the four-way navigation key at
the top of your keypad. Scroll down by pressing the lower portion of the
navigation key R. Scroll up by pressing the upper portion of the navigation key
Q. Holding down the appropriate part of the navigation key speeds up
scrolling. If you continue scrolling after you have reached the bottom or top of a
menu or list, you “wrap-around” to the opposite end.
38
nextel.com
Page 47

Main Menu Options
If more items appear in a menu or list than can be displayed in the text area, a
down arrow or up arrow appears in the left side of the screen indicating that
more options may be accessed by scrolling up or down.
Down arrow Up arrow
B
Main Menu Options
By default, the main menu options appear in the order shown in this table. You
can change the order in which they appear by using the Personalize feature (see
“Reordering Main Menu” on page 162).
To access the main menu, press q from the idle screen:
Menu Item Use to ...
7 Net Browse the Nextel Wireless Web.
F Java Apps Run pre-installed and download custom
Java applications on your phone.
m Settings Customize your phone: Ring/Vibe, Phone
Setup, In Call Setup, Security, Personalize,
Initial Setup, Voice Volume, and Talkgroup
Settings.
( VoiceNotes Record personal messages or the incoming
portion of phone calls to play back at a later
time.
b Phonebook Store and retrieve a list of stored entries for
calling, editing, viewing, and deleting.
S
39
Page 48

90
R Messages Receive, store, access, and manage Voice
; Call Forward Settings for forwarding calls in various
= Datebook Schedule and organize events, by the day
O Memo Input and store numbers to access later.
z Call Timers Display the duration of phone calls, Private
j Recent Calls Access a list of the last 20 sent, received, or
n Shortcuts Associate a menu option with a number on
U My Info View the name, Private ID, phone numbers
v Styles Create or edit a group of settings and save
Mail, Text Messages, and Net Mail.
situations.
or the month, such as appointments and
meetings.
or Group Calls, circuit data use, and
Kilobytes sent and received.
missed calls. Calls can be made from this
list.
the alphanumeric keypad for quick and
easy access.
for lines 1 and 2, IP address, and circuit
data number of your phone.
them as one for use in different
environments.
: Call Alert Store received Nextel Direct Connect Call
To choose the highlighted main menu selection, press C under SELECT. To
exit the main menu and return to the idle screen, press C under EXIT, press r,
or close the phone cover.
Alerts to respond to at your convenience.
nextel.com
40
Page 49

Phonebook
The Phonebook allows you to store up to 250 frequently used names and
numbers.
When you store information in your Phonebook, it is saved on your SIM card. If
you move your SIM card to another Nextel SIM-based phone, you can access
information in your Phonebook from that phone.
NOTE: If you use a different SIM card in your phone, some information
stored in the phone will be lost. See “Inserting/Removing the
SIM Card” on page 22.
This section includes:
Phonebook Entries and Speed Dial Numbers Page 42
Phonebook Icons Page 42
Voice Names Page 43
Accessing Your Phonebook Page 43
About Phonebook Entries Page 44
Viewing Phonebook Entries Page 44
Sorting Phonebook Entries Page 45
Adding Phonebook Entries Page 46
Editing Phonebook Entries Page 52
Deleting Phonebook Entries Page 53
Pause Digit Entry Page 53
Plus Dialing Page 54
Address Book Page 55
41
Page 50

90
Phonebook Entries and Speed Dial Numbers
Your Phonebook can store multiple numbers to a single name. For example, you
can enter someone’s name into your Phonebook once and then add that person’s
home, office, mobile phone and fax numbers to the name. You can store up to
seven phone numbers, a Private ID, and an IP address.
Each number stored in your Phonebook is automatically assigned a Speed Dial
number that corresponds to its location in your Phonebook. Each phone number
uses one Speed Dial location, even if it is assigned to the same name as other
phone numbers. The phone number stored in location 1 is assigned Speed Dial
number 1, the phone number stored in location 2 is assigned Speed Dial number
2, and so forth, to location 250.
NOTE: Private IDs and Talkgroup numbers do not have associated
Speed Dial numbers.
Phonebook Icons
Icons that appear to the right of entries in your Phonebook convey information
about those entries.
When you enter a number in your Phonebook, you can designate the number’s
type using any of the following icons:
W Mobile
h Private ID
q Wor k
42
Q Main
L Home
b Pager
K Fax
Z Other
n Talkg rou p
|
nextel.com
IP Address
Page 51

Voice Names
NOTE: The Mobile icon automatically appears to the right of the first
number assigned to a name unless you choose another icon.
For more information on entering numbers into your Phonebook, see “Adding
Phonebook Entries” on page 46.
The “picker” arrows appearing around the number type icon indicates multiple
numbers stored under one name:
ef pickers
The Voice Name icon appearing to the left of one of the number type icons
indicates that a voice name is associated with the Phonebook entry:
p Voi ce Na m e
Voice Name s
A voice name is an audio recording you assign to a number in your Phonebook
by speaking into your i90c phone. You can then dial the number by speaking the
words you recorded into the phone. See step 6 of “Adding Phonebook Entries”
on page 46 for more information on creating a voice name.
Accessing Your Phonebook
If PHBK is one of your display options:
From the idle screen, press C under PHBK.
If PHBK is not one of your display options:
1
From the idle screen, press q.
2
Press R to scroll to Phonebook.
3
Press C under SELECT.
43
Page 52

90
USER TIP:You can also access the Phonebook while you are on an
active call. Press
Phonebook and press
This brings you to the Phonebook screen. From this screen, you can view, sort,
add, edit, and delete Phonebook entries, check Phonebook capacity, or make
calls.
q and then press R to scroll to
C under SELECT.
About Phonebook Entries
Each Phonebook entry may contain the following information:
• The name associated with the entry: Typically, this is the name of the
person whose number you are storing in the Phonebook.
• The type of number to be stored: Mobile, Private, Work, Main, Home,
Pager, IP, Fax, Other, or Talkgroup. If you don’t choose a type, the number
is assigned type Mobile, unless a Mobile number has already been assigned
to the name.
• The number to be stored: Every Phonebook entry must contain a number.
This number may be any type of phone number, Private ID or Talkgroup
number, or an IP address.
• A Speed Dial number: You may accept the default Speed Dial number or
assign a different one.
• A voice name audio recording for voice-activated dialing.
Viewing Phonebook Entries
Names with more than one number assigned to them appear with ef
surrounding the icon to the right of the name. For example, if you had stored a
home and work number for Joe Smith, the entry for Joe Smith’s home phone
number would look like this:
Joe Smith eLf
When the name is highlighted, press T to scroll to the icons representing each
of the numbers assigned to that name.
To view any of the numbers assigned to a name:
1
From the Phonebook screen, press S to scroll to the name associated
with the number you want to see.
2
Press T to view the icons representing the numbers assigned to that
name.
nextel.com
44
Page 53

About Phonebook Entries
3
When the icon representing the number you want to view is displayed,
press C under VIEW.
Or,
If there is a Private ID or a Talkgroup number stored for the entry, press
q. Then press R to scroll to View and press C under SELECT.
4
Press S to view the other numbers stored for this name.
Sorting Phonebook Entries
You can sort your Phonebook entries by:
• Name — the name you entered for the entry.
• Speed No. — the Speed Dial location of the entry.
NOTE: Private IDs and Talkgroup numbers cannot be accessed from
the Phonebook when sorted by Speed Dial location.
• Voice Name — all entries with voice names appear at the top of the list.
To sort your Phonebook list:
1
From the Phonebook screen, press q to
view the Phonebook Menu screen.
2
Press R to scroll to Sort By.
3
Press C under SELECT.
}
45
Page 54

90
4
Press R to scroll to the desired sorting method: Name, Speed No., or
Voic e N a me .
5
Press C under SELECT.
Checking Phonebook Capacity
Your Phonebook can store up to 250 separate numbers. To see how many
entries are stored in your Phonebook:
1
From the Phonebook screen, press q to view the Phonebook Menu
screen.
2
Press R to scroll to Capacity.
3
Press C under SELECT.
The Capacity screen shows how many storage spaces in your
Phonebook are in use and how many are empty.
Adding Phonebook Entries
Using the following instructions, you will enter the information in the order the
items appear on the Phonebook Entry Details screen. However, you can enter
this information in any order by pressing S to scroll through the items on the
Entry Details screen.
You can leave any item blank (except number) or unchanged by pressing S to
scroll past it on the Entry Details screen. Only a number is required for a valid
Phonebook entry.
To cancel a Phonebook entry at any time, press r to return to the idle screen.
46
nextel.com
Page 55

To add a Phonebook entry:
I
1
Access the Entry Details screen:
From the Phonebook screen, with [New
Entry] highlighted, press C under
SELECT.
Or,
From the Phonebook screen, press q.
Then press R to scroll to New and press
C under SELECT.
2
If you want to assign a name to your
Phonebook entry:
With the Name field highlighted, press C
under CHANGE.
From the Name screen, enter the name
using the alphanumeric keypad.
See “Using T9® Text Input” on page 26 for
information about entering text into this
field.
When you are finished, press C under OK.
About Phonebook Entries
H
The Entry Details screen returns with the Type field highlighted.
47
Page 56

90
3
To accept the number type Mobile, press R to scroll to the No. field.
If you want to assign a number type other
than Mobile to your Phonebook entry:
With the Typ e field highlighted, press C
under CHANGE.
From the Typ e E d i t o r screen, press S to
scroll to the type of number you want to
assign to the Phonebook entry.
Press C under SELECT.
The Entry Details screen returns with the No. field highlighted.
4
Assign a number to your Phonebook entry:
With the No. field highlighted, press C under CHANGE.
Type the number using the alphanumeric keypad. For phone numbers,
use the 10-digit format. For Private IDs use
Area ID*Network ID*Member ID (the asterisks must be included as
part of the Private ID).
To delete a digit, press C under DELETE.
See “Pause Digit Entry” on page 53 and
“Plus Dialing” on page 54 for information
on using these features when storing
phone numbers in your Phonebook.
J
NOTE: The number can be up to 20
characters long.
When you are finished, press C under
OK.
The Entry Details screen returns with the
Speed No. field highlighted.
nextel.com
48
K
Page 57

About Phonebook Entries
5
The default Speed Dial number assigned
to the phone number is displayed in the
Speed No. field. This is always the next
available Speed Dial location.
NOTE: Private IDs and Talkgroup
numbers do not have
associated Speed Dial numbers.
To accept the default Speed Dial location,
press R to scroll to the Vo i c e N a m e
field.
If you want to assign the phone number to a different Speed Dial
location:
With the Speed No. field highlighted, press C under CHANGE.
Press C under DELETE to delete the current Speed Dial number.
Type the new Speed Dial number using the alphanumeric keypad.
When you are finished, press C under OK.
NOTE: If you change the Speed Dial number to one already in use,
you will be prompted to overwrite the entry that is currently
in that location. Pressing
existing entry from your Phonebook.
C under YES will delete the
L
49
Page 58

90
6
If you want to assign a voice name to the
number:
With the Voi c e Na m e field highlighted,
press C under RECORD.
As directed by the screen prompts, say and
repeat the name you want to assign to the
number. Speak clearly into the
microphone.
M
USER TIP:For best results, use voice
An ) icon appears in the Voice Name field indicating that the voice
name has been recorded.
If you do not want to store a voice name for this number, continue to the
next step.
names such as “Joe Home”
or “Susan Work” and record in a quiet environment.
50
nextel.com
Page 59

About Phonebook Entries
U
7
If you want to store more numbers to the
name associated with this Phonebook
entry:
Press R to scroll to MORE at the bottom
of the Entry Details screen and then press
C under SELECT.
A new Type field appears for the additional
number.
Enter the information for the additional
number using step 3 through step 7.
NOTE: Each name in your Phonebook may have up to seven phone
numbers, one Private ID, and one IP address associated with
it.
8
When you have entered all the information
for this Phonebook entry, press C under
DONE.
N
Storing Numbers Fast
Your phone gives you two ways to store numbers quickly: from the idle screen
and from the Recent Calls list.
To store a number from the idle screen:
1
From the idle screen, use the alphanumeric keypad to enter the number
you want to store. For phone numbers, use the 10-digit format. For
Private IDs, use Area ID*Network ID*Member ID.
2
Press q to access the Dialing Menu screen.
51
Page 60

90
3
With Store Numbe r highlighted, press C under SELECT.
This displays the Entry Details screen with the No. field filled in with
the number you typed.
4
If you want to add more information to the Phonebook entry, follow the
applicable instructions in “Adding Phonebook Entries” on page 46.
5
Press C under DONE.
To store a number from the Recent Calls list:
1
From the Recent Calls screen, press R to scroll to the number you
want to store.
2
Press C under STORE.
Or,
Press q to access the Rec. Calls Menu. Press R to scroll to Sto re .
Press C under SELECT.
This displays the Entry Details screen with the No. field filled in with
the number of the recent call.
3
If you want to add more information to the Phonebook entry, follow the
applicable instructions in “Adding Phonebook Entries” on page 46.
4
Press C under DONE.
Editing Phonebook Entries
1
From the Phonebook screen, press R to scroll to the entry you want to
edit.
2
Press q to view the Phonebook Menu.
3
Press R to scroll to Edit.
nextel.com
52
Page 61

Pause Digit Entry
4
Press C under SELECT. The Entry Details screen displays.
5
Follow the applicable instructions in “Adding Phonebook Entries” on
page 46 to edit the various fields.
NOTE: To add additional numbers to an existing entry, press R to
scroll to MORE. Press
applicable instructions in “Adding Phonebook Entries” on
page 46.
C under SELECT. Follow the
Deleting Phonebook Entries
1
From the Phonebook screen, press R to scroll to the entry you want to
delete.
2
Press q to view the Phonebook Menu.
3
Press R to scroll to Delete Record or Delete Number.
Delete Record deletes the name and all numbers associated with that
name.
Delete Number deletes the number associated with the icon that is
currently displayed in the Phonebook list for the name. The name and
all the other numbers will remain.
4
Press C under SELECT. A warning screen displays requiring you to
confirm the deletion.
Pause Digit Entry
When storing a number, you can program your phone so it will not only dial a
number but also pause before entering another series of numbers such as a
personal identification number (PIN) or password. This feature is particularly
useful for accessing automated services such as voice mail and banking systems
from your i90c phone.
Example: Let’s say you have a company voice mail account that you frequently
check while traveling. And, to access that account you must do the following:
• dial your work number
53
Page 62

90
• press # while the voice mail greeting is being played
• enter your PIN to access your messages
You can program your phone to enter all of the above information for you by
separating each entry with a pause. The stored data would look like this:
17035551234P#P1234. In this example, the first eleven digits represent the
number that must be dialed to access your voice mail. The P represents a 3
second pause. The # interrupts your greeting. The second P represents another 3
second pause. The last four digits represent your PIN.
To create a three-second pause, follow the steps below:
Press and hold * for two seconds. The pause symbol (P) will appear
on the display screen.
NOTE: You can enter up to 20 characters in a single entry, stored or
dialed. You can program your phone to pause for more than 3
seconds. Performing the above step twice will program two
pauses and cause your phone to wait 6 seconds before entering
the next set of numbers.
Plus Dialing
This feature enables you to place an international call from most countries —
without entering the local international access code. Use Plus Dialing for all
Phonebook entries if you plan to travel outside the United States. Begin by
following the instructions for “Adding Phonebook Entries” on page 46. Before
you type the phone number to be stored:
1
Press and hold 0 for two seconds. A “0” appears, then changes to a
“+”.
NOTE: The network translates the “+” into the appropriate
international access code needed to place the call.
2
Enter the country code, city code, or area code (as needed), and phone
number.
3
Follow the rest of the instructions for “Adding Phonebook Entries” on
page 46.
nextel.com
54
Page 63

Address Book
Address Book
Manage your contact information with Address Book. Address Book provides
easy maintenance and entry of contact information and access to that
information from your i90c phone or nextel.com. Address Book is a Nextel
Wireless Web service and requires the activation of a Nextel Online
Plan. To order, contact Nextel Customer Care.
For instructions on how to use this application, see “Address Book” in the
Nextel Wireless Web User’s Guide.
SM
Service
55
Page 64

90
56
nextel.com
Page 65

Digital Cellular
The i90c phone utilizes Nextel’s All-Digital National Network for digital
cellular service. You can also use this phone to roam internationally on other
iDEN networks using Nextel Worldwide Service. See nextel.com for coverage.
This section includes:
Making Phone Calls Page 58
Emergency Calling Page 64
Special Dialing Codes Page 64
Receiving a Phone Call Page 64
Ending a Phone Call Page 66
Recent Calls Page 66
Call Timers Page 70
Hands-Free Speakerphone Page 71
Mute Page 72
Call Waiting Page 72
Call Hold Page 75
Three-Way Calling Page 76
Call Forwarding Page 77
Caller ID Page 81
Alternate Line Service Page 82
Call Restrictions Page 84
Nextel 411 Page 84
57
Page 66

90
Making Phone Calls
Your i90c phone provides the following features for making phone calls:
• Direct Dial
• Phonebook
• Recent Calls
• Most Recent Call
• Speed Dial
•Turbo Dial
• Voice-Activated Dialing
• Last Number Redial
• TTY — your phone supports TTY devices and communications.
Using Direct Dial
1
From the idle screen, use the keypad to enter the 10-digit phone number
you want to call.
2
Press s to place the call.
3
Press r or close phone cover to end the call.
NOTE: See “Plus Dialing” on page 54 for information on making
If you make a mistake:
• To clear one digit, press C under DELETE.
• To clear all digits, press and hold C under DELETE.
• To insert a digit, press T to move the cursor.
• To cancel, press r.
®
international calls.
Making Calls from the Phonebook
After you have entered phone numbers into your Phonebook, you can use these
numbers to make phone calls. For information on entering numbers into your
Phonebook, see “Adding Phonebook Entries” on page 46.
nextel.com
58
Page 67

Making Phone Calls
To make calls from the Phonebook:
1
From the idle screen, if PHBK is one of your display options, press C
under PHBK.
Or,
From the idle screen, press q, then press R to scroll to Phonebook.
Press C under SELECT.
2
Press S to scroll through the names in your Phonebook.
Or,
Use the alphanumeric keypad to enter the first letter of the name and
press R to scroll through the names beginning with that letter.
Stop when the name of the person you want to call is highlighted.
3
If more than one number is stored for the person you want to call, ef
appears around the icon to the right of the person’s name.
Press T to scroll through the icons representing the numbers stored for
that person.
Or,
Press C under VIEW to view all the numbers stored for this person.
Then press R to scroll to the number you want to call.
Or,
If there is a Private ID stored for this person, press q. When the
Phonebook Menu appears, press R to scroll to View and press C
under SELECT. Then press R to scroll to the number you want to call.
For more information on assigning multiple numbers to one person, see
“Adding Phonebook Entries” on page 46.
4
Press s to place the call.
5
Press r or close phone cover to end the call.
59
Page 68

90
Making Calls from the Recent Calls List
Your phone stores the numbers of the last 20 calls you received or sent in the
Recent Calls list.
1
From the idle screen, press R.
Or,
From the idle screen, press q. Press S to scroll to Recent Calls.
Press C under SELECT.
2
Press S to scroll through the list of received or sent recent calls until
you reach the desired call.
3
To view additional information about the call:
Press C under VIEW.
Or,
Press q to access the Rec. Calls Menu. Then press R to scroll to
View and press C under SELECT.
4
Press s to place the call.
5
Press r or close phone cover to end the call.
Most Recent Call
You can view and call the number of the most recent call you received or sent
with the phone cover closed:
1
To view your most recent call, press . on the top of your phone.
2
To place the call, press t on the top of your phone.
The call will be placed with speakerphone on. See “Hands-Free
Speakerphone” on page 71.
3
To end the call, press . again.
nextel.com
60
Page 69

Making Phone Calls
Using Speed Dial
Each phone number stored in your Phonebook is assigned a Speed Dial number.
You can use the Speed Dial number to quickly place a call.
1
From the idle screen, enter the Speed Dial number assigned to the
phone number you want to call.
2
Press #. The number’s Phonebook entry information will display.
3
Press s to place the call.
4
Press r or close phone cover to end the call.
Using Turbo Dial
Turbo Dial allows you to call the numbers in your Phonebook associated with
Speed Dial numbers 1 through 9 by pressing and holding the corresponding
numeric key on the keypad.
Press and hold a number key (1 through 9).
NOTE: Turbo Dial cannot be accessed while the browser is active, nor
while Keypad Lock or SIM Lock is active.
Making Calls Using Voice-Activated Dialing
If you have recorded a voice name for a phone number in your Phonebook (see
“Voice Names” on page 43), you can use this feature to call the number.
USER TIP: If you have difficulty making phone calls using a voice
name, try assigning a longer voice name to the number. For
example, if the voice name “Joe” fails to place a call to Joe
Smith’s number, try assigning the voice name “Joe Smith”
to the number.
61
Page 70

90
Cover Open
1
From the idle screen, press and hold t on the top of your phone until
the phone beeps and the Say Name Now screen appears, then release.
2
Speaking into the microphone, say the voice name assigned to the
phone number you want to call.
3
Your phone will play the name back to you.
The call will automatically be placed.
Cover Closed
1
Press and hold t on the top of your phone until the phone beeps and
Say Name appears.
NOTE: If you do not want to complete the call, press . at any time
before the call is placed.
2
Say the voice name assigned to the phone number you want to call.
3
Your phone will play the name back to you.
The call will automatically be placed, with speakerphone on. See
“Hands-Free Speakerphone” on page 71.
Last Number Redial
Press and hold s to redial the last number you called.
NOTE: If you receive “System Busy, Try Later,” press s to redial the
number automatically. You will hear a ring-back tone when the
call is successfully placed.
nextel.com
62
Page 71

Making Phone Calls
Making TTY Calls
You can use your phone to make calls using a TTY device.
When you make TTY call, the call begins in the TTY mode you last selected.
You can change the TTY mode during a call. For more information on choosing
a TTY mode, see “Setting TTY Mode” on page 168.
To make a call using a TTY device:
1
Connect one end of a 2.5mm cable into the jack on the phone. (To locate
the jack, see page 8.) Connect the other end of the cord into your TTY
device.
2
Enter the phone number you wish to call and press s.
Placing International Phone Calls
When making an international call, you can either enter the international access
code directly (for example, 011 in the United States) or use Plus Dialing.
You can make international calls from your Phonebook if you have stored the
numbers with Plus Dialing. See “Adding Phonebook Entries” on page 46 and
“Plus Dialing” on page 54 for more information.
NOTE: Your service default is “International Calls Restricted.”
Contact Nextel Customer Care to obtain international dialing
access.
To make an international call using Plus Dialing:
1
Press and hold 0 for two seconds. A “0” appears, then changes to a
“+”.
NOTE: The network translates the “+” into the appropriate
international access code needed to place the call.
2
Enter the country code, city code, or area code (as needed), and phone
number.
3
Press s to place the call.
4
Press r or close phone cover to end the call.
63
Page 72

90
Emergency Calling
Your phone supports emergency calling. Emergency calls can be made even
when the SIM card is blocked or not in the phone.
To place a call in an emergency, press 911s. You will be connected to
the nearest emergency dispatch center. If you are on an active call, you must end
it before calling 911.
NOTE: If you have enabled the Keypad Lock feature, you must unlock
the phone’s keypad before any calls can be made, including 911
emergency calls.
Special Dialing Codes
Non-Emergency Numbers
Nextel supports many “non-emergency” numbers (such as #77, 311,...) provided
by local and state governments. These numbers are used to report
non-emergency incidents. If the situation includes imminent danger or loss of
life, you should dial 911.
Telecommunications Relay Service
Nextel supports services for communicating with speech and/or hearing
impaired individuals. You can press 711 to reach a local
Telecommunications Relay Center. You will then be connected to your
destination number. Relay service works through a Communications Assistant
who reads messages typed into a TDD/TTY device by a speech or hearing
impaired individual to you. The Communications Assistant then types your
spoken messages to the hearing or speech impaired individual.
Telecommunications Relay Service is available 24 hours a day, seven days a
week, and every call is strictly confidential.
NOTE: Using 711 to reach Telecommunications Relay Service may not
be available in all areas.
Receiving a Phone Call
Incoming calls are indicated by a ring, vibration, or backlight illumination.
The screen will display:
• the caller’s name if stored in your Phonebook, or
• the 10-digit phone number if Caller ID information is available.
nextel.com
64
Page 73

Receiving a Phone Call
Otherwise, the screen will display Incoming Call.
Cover Open
Press s or any key on the keypad, or press C under YES to answer
the call.
Cover Closed
Press t on the top of your phone.
The call will be activated with speakerphone on. See “Hands-Free
Speakerphone” on page 71.
Or,
Open the phone cover to use the earpiece.
USER TIP:You can turn down the ringer volume by pressing the
volume buttons on the side of your phone while the phone is
ringing.
Transferring Calls to Voice Mail
Cover Open
Press r or press C under NO while your phone is ringing to transfer
incoming calls directly to Voice Mail.
Cover Closed
Press . while your phone is ringing to transfer incoming calls directly
to Voice Mail.
65
Page 74

90
Ending a Phone Call
Cover Open
Press r or close the phone cover.
Cover Closed
Press . on the top of your phone.
NOTE: The Recent Calls list displays briefly after each phone call.
Recent Calls
The Recent Calls feature stores the numbers of the 20 most recent calls you have
made and received, including Private and Group Calls. You can also view your
most recent call on the one-line display screen without opening your phone
cover.
With the phone cover open, you can access Recent Calls list to:
• view your recent calls
• store numbers to the Phonebook
• delete recent calls
• call numbers on the Recent Calls list
With the phone cover closed, you can access your most recent call to:
• view the number
• call the number
NOTE: The Recent Calls list displays briefly on the full-sized display
screen after you end a call. The most recent call displays briefly
on the one-line display screen.
Recent Calls Icons
For Private Calls, Group Calls, and phone numbers stored in your Phonebook,
an icon appears to the right of the name or number indicating the Phonebook
type of the number used in the call. See “Phonebook Icons” on page 42 for more
information about Phonebook types.
nextel.com
66
Page 75

Recent Calls
For phone calls, an icon appears to the left of the name or number indicating the
type of call:
• N indicates an incoming call
• a indicates an outgoing call
• V indicates a missed call. (Missed calls
appear on your Recent Calls list only if
you have Caller ID.)
For Nextel Direct Connect calls, an icon
appears to the left of the name or number
indicating the type of call:
• h indicates a Private Call
• n indicates a Group Call
Viewing Recent Calls
If the number of the recent call is stored in your Phonebook, the name associated
with the number displays.
Cover Open
To view your Recent Calls list:
1
From the idle screen, press R.
Or,
T
From the idle screen, press q. Press S to scroll to Recent Calls.
Press C under SELECT.
2
Press S to scroll the list of recent calls.
Cover Closed
To view your most recent call:
Press . on the top of your phone.
Press . again to return to the idle screen.
67
Page 76

90
Getting Detailed Information About Recent Calls
To get more information about a recent call:
1
From the Recent Calls screen, press S to scroll to the call you want
more information on.
2
Press C under VIEW.
Or,
Press q to access the Rec. Calls Menu. Then press R to scroll to
View and press C under SELECT.
The screen that appears displays information such as the name associated with
the number of the recent call, the number, the date, time, and duration of the
call.
Storing a Recent Call Number to the Phonebook
To store a number from the Recent Calls list to the Phonebook:
1
From the Recent Calls screen, press S to scroll to the number you
want to store.
2
Press C under STORE.
Or,
Press q to access the Rec. Calls Menu. Press R to scroll to Sto re .
Press C under SELECT.
This displays the Phonebook Entry Details screen with the No. field
filled in with the number of the recent call.
3
If you want to add more information to the Phonebook entry, follow the
applicable instructions in “Adding Phonebook Entries” on page 46.
Calling From the Recent Calls List
See “Making Calls from the Recent Calls List” on page 60.
nextel.com
68
Page 77

Deleting Recent Calls
To delete a recent call:
1
From the Recent Calls screen, press S to scroll to the call you want to
delete.
2
Press q to access the Rec. Calls Menu.
3
Press R to scroll to Delete.
4
Press C under SELECT.
5
Press C under YES to confirm the deletion.
To delete all calls on the Recent Calls list:
1
From the Recent Calls screen, press q to access the Rec. Calls
Menu.
2
Press R to scroll to Delete All.
3
Press C under SELECT.
4
Press C under YES to confirm the deletion.
Recent Calls
Accessing Voice Notes From Recent Calls
You can access the Voice Notes feature from Recent Calls and use it to record
spoken messages that you can listen to later.
1
From the Recent Calls screen, press q to access the Rec. Calls
Menu.
2
Press S to scroll to Voi c eN ot e s.
3
Press C under SELECT.
For more information about Voice Notes, see “Voice Notes” on page 139.
69
Page 78

90
Missed Calls
If you miss a call when your phone cover is closed, the one-line screen displays
the missed call icon V and text indicating the number of calls you have missed.
If you open the cover, the Recent Calls list appears on the full-sized screen.
If you do not open the cover, pressing . dismisses the missed call message.
Pressing . again displays the most recent call, allowing, you to call the number
(see “Most Recent Call” on page 60).
Call Timers
Call Timers measure the duration of your phone calls, Private or Group Calls,
and circuit data use, as well as the number of Kilobytes sent and received by
your phone.
The Call Timers menu displays the following options:
• Last Call — displays the duration of your most recent phone call.
• Phone Reset — keeps a running total of your phone call minutes, until you
reset it.
• Phone Lifetime — displays the total minutes of all your phone calls.
• Prvt/Grp Reset — keeps a running total of all of your Private and Group
Call minutes, until you reset it.
• Prvt/Grp Lifetime — displays the total minutes of all your Private and
Groups Calls.
• Circuit Reset — keeps a running total of all of your circuit data use, until
you reset it.
• Circuit Lifetime — displays the total minutes of all of your circuit data
use.
• Kbytes Reset — keeps a running total of the number of Kilobytes sent and
received by your phone, until you reset it.
To view the Call Timers menu:
1
From the idle screen, press q.
2
Press R to scroll to Call Timers.
3
Press C under SELECT.
70
nextel.com
Page 79

Hands-Free Speakerphone
To view or reset a Call Timers option:
1
From the Call Timers menu, press S to scroll to the Call Timers
option you want to view or reset.
2
Press C under SELECT.
3
If the feature does not include an option to reset or you do not wish to
reset the option, press C under DONE when you are finished viewing.
To reset a feature, press C under RESET. When the confirmation
screen appears, press C under YES to confirm the reset.
NOTE: The values displayed by Call Timers are not intended for billing
purposes.
Hands-Free Speakerphone
The i90c phone provides the convenience of a hands-free speakerphone for
holding impromptu meetings or placing safer phone calls.
NOTE: During speakerphone operation, you may either speak or listen,
but you cannot do both at the same time.
Cover Open
The speakerphone option (SPEAKER) is available whenever you are on an
active call with the phone cover open.
To turn the speakerphone on:
While on an active call, press C under SPEAKER.
While speakerphone is on, Spkrphone On appears in the text display area.
To turn the speakerphone off:
Press C under SPEAKER.
71
Page 80

90
Cover Closed
Speakerphone is always on when you are on an active call with the cover closed
(unless you are using an audio accessory). If you open the cover, speakerphone
is turned off and the call will be heard through the earpiece.
Mute
Use the Mute feature to listen to incoming audio without allowing sound from
your phone’s microphone to be transmitted over the phone line. The mute option
(MUTE) is only available when you are on an active call with the phone cover
open.
To turn mute on:
While on an active call, press C under MUTE.
While mute is on, UNMUTE appears as a display option.
To turn mute off:
Press C under UNMUTE.
Call Waiting
Call Waiting allows you to receive a second call while you are talking on the
phone. You can switch between calls so you never have to miss a call. By
default, Call Waiting is always on unless you turn it off for a specific call.
If you’re on a call and you receive a second call, you will:
•hear a tone
• see a message on your display informing you of another incoming call
72
nextel.com
Page 81

Call Waiting
Cover Open
If you have your phone cover open when you receive a second call, the screen
will display the caller’s name (if stored in your Phonebook), the caller’s number
(if Caller ID information is available), or Incoming Call:
e
Cover Closed
If you have the phone closed when you receive a second call, the screen will
display the caller’s name (if stored in your Phonebook), the caller’s number (if
Caller ID information is available), or Incoming Call:
You must open the phone cover to accept or decline the second call. Opening
the cover turns speakerphone off.
Accepting Calls
Press C under YES. The first call is placed on hold.
To end the active call and accept the second call:
Press
r. Then press s or press C under YES.
4
73
Page 82

90
Switching Between Calls
When you accept a second call while you are talking on the phone, your display
shows the name or number of each call. An icon appears to the left of each name
or number indicating that the call is on hold V or active D:
[
Press C under SWITCH to switch between calls.
Declining Calls
Cover Open
Press C under NO. If you subscribe to Voice Mail, the call will be
forwarded to your Voice Mail box.
Cover Closed
Press . on the top of your phone. If you subscribe to Voice Mail, the
call will be forwarded to your Voice Mail box.
Ending the Active Call
r.
Press
NOTE: If you have an active call and another call waiting, closing the
phone cover ends both calls.
nextel.com
74
Page 83

Call Hold
Turning Off Call Waiting
If you do not want to be interrupted during a call, you can turn Call Waiting off
prior to making/receiving a call.
1
From the idle screen, press q. Press R to scroll to Settings, and
press C under SELECT.
2
Press R to scroll to In Call Setup and press C under SELECT.
3
Press R to scroll to Call Waiting and press C under CHANGE.
4
Press R to scroll to Off and press C under SELECT.
Call Waiting is now disabled for the next call. It will automatically reset
to On when you end the call.
Call Hold
When you are on an active call, you can place the call on hold and make a
second call.
To place an active call on hold:
1
Press q to access the Call Menu.
2
Press R to scroll to Hold.
3
Press C under SELECT.
4
If you have not placed a second call, you can resume this call by
pressing C under RESUME.
To place a second call while the first call is on hold:
1
Enter the second phone number you want to call.
Or, select the number from your Phonebook by pressing q and
selecting Phonebook.
2
Press s to place the second call.
75
Page 84

90
To toggle between the two calls:
Press C under SWITCH.
To end the active call:
Press r. The call on hold becomes active.
NOTE: Closing the phone cover ends both the active call and the call
on hold.
Three-Way Calling
Using Three-Way Calling, you can combine two ongoing phone calls into one
conversation. While on an active call, you can make a second call and combine
the two calls.
To make a three-way call:
1
Place or receive a phone call.
2
While on the call, press q to access the Call Menu.
3
Press R to scroll to 3 Way.
4
Press C under SELECT. The first call will be placed on hold.
5
Enter the second phone number and press s to place the second call.
Or, access the number from your Phonebook:
Press q and then press R to scroll to Phonebook.
Press C under SELECT.
To place the call, see “Making Calls from the Phonebook” on page 58.
6
After you reach the second individual, press q.
nextel.com
76
Page 85

Call Forwarding
7
Press S to scroll to 3 Way.
8
Press C under SELECT.
Both calls will appear on your display.
Call Forwarding
Nextel’s Call Forwarding features forward calls to the number you designate.
The following Call Forwarding options are available:
• All Calls — When this option is turned on, all calls will be sent
automatically to a number you specify. When this option is turned off,
your Detailed options will be activated.
• Detailed — Choosing this option enables you to forward calls you missed
to Voice Mail, or other numbers, depending on why you missed each call:
• Busy — your phone is engaged in other activities.
• No Answer — you do not answer. The phone will ring 4 times before
forwarding the call.
• Unreachable — your phone is out of coverage or powered off.
NOTE: For you to receive Voice Mail messages, the All Calls option
must be set to Off and the Detailed options must be set to your
Voice Mail access number. Your Voice Mail access number is
the first six digits of your 10-digit phone number followed by
6245. This is the default setting.
You can forward Line 1 and Line 2 independently. For more information on
using two lines, see “Alternate Line Service” on page 82.
When your phone is set to forward All Calls, one of the following icons appears
on the top row of your display screen to indicate the call forwarding option you
have chosen:
Icon Indicates...
G Line 1 is active; calls from Line 1 are being
forwarded.
H Line 1 is active; calls from Line 2 are being
forwarded.
77
Page 86

90
W
I Line 1 is active; calls from Line 1 and Line
J Line 2 is active; calls from Line 1 are being
K Line 2 is active; calls from Line 2 are being
L Line 2 is active; calls from Line 1 and Line
Turning On Call Forwarding
1
Press q then press R to scroll to Call Forward.
2
Press C under SELECT.
3
At the Call Forward screen, the Forward
field is highlighted. Press C under
CHANGE.
2 are being forwarded.
forwarded.
forwarded.
2 are being forwarded.
4
Press S to scroll to All Calls.
5
Press C under SELECT.
6
Press R to scroll to the To field and press C under CHANGE.
78
nextel.com
Page 87

Call Forwarding
7
To activate a call forwarding number:
If you have never used Call Forwarding before, the Forward screen
appears. To enter a call forwarding number, type the number on your
phone’s keypad or press C under SEARCH to select from numbers
stored in your phone. Press C under OK.
Or,
If you have used Call Forwarding before, the call forwarding number
you last used is displayed. Press C under CHANGE to access the
Forward screen.
To forward your calls to this number, press C under OK.
To forward your calls to a different number, press and hold C under
DELETE to erase the displayed number. Type the new number on your
phone’s keypad or press C under SEARCH to select from numbers
stored in your phone. Press C under OK.
Your calls will now be forwarded to the number that you selected.
Turning Off Call Forwarding
1
Press q then press R to scroll to Call Forward.
2
Press C under SELECT.
The Call Forward screen displays with the Forward field highlighted.
79
Page 88

90
{
3
Press R to scroll to the To field and press C under CHANGE.
4
Press S to scroll to Off and press C
under SELECT.
You will now receive all calls on your phone. When you are unavailable, your
calls will be forwarded according to your Detailed Call Forwarding settings. By
default, the Detailed option is set to forward your calls to Voice Mail.
Setting Call Forwarding to Voice Mail
In most cases, turning off Call Forwarding restores your ability to receive Voice
Mail messages when you are unavailable (see “Turning Off Call Forwarding”
on page 79). If you have completed those steps but are still not able to receive
Voice Mail messages, you can reset Call Forwarding to Voice Mail.
For you to receive Voice Mail messages, Call Forwarding must be set to
Detailed with your Voice Mail access number:
1
Press q then press R to scroll to Call Forward.
2
Press C under SELECT.
The Call Forward screen displays with the Forward field set to
Detailed.
3
Press R to scroll to the If Busy field and press C under CHANGE.
4
The call forwarding number you last used is displayed. Press C under
CHANGE. If this is your Voice Mail access number (the first six digits
of your 10-digit phone number followed by 6245), go to step 7.
80
nextel.com
Page 89

Caller ID
5
Press and hold C under DELETE to erase the displayed number.
6
Enter your Voice Mail access number.
Your Voice Mail access number is the first six digits of your 10-digit
phone number, followed by 6245. (For example 7035556245.)
7
Press C under OK.
8
Repeat step 3 through step 7 for the If No Answer field and the If
Unreachable field.
9
When finished, press C under EXIT.
NOTE: You can use the Detailed setting to forward calls to other
numbers if desired. However, it is recommended that you leave
Detailed set to the Voice Mail access number and use the All
Calls setting if you wish to forward your calls to another
number.
Additional Phone Features
In addition to the standard features that are included for all Nextel Digital
Cellular subscribers, there are also several features available for an additional
monthly or per-use fee. See the following sections for more information on
these services. Contact Nextel Customer Care for additional information.
NOTE: Some services are not available outside the continental United
States.
Caller ID
If you subscribe to Caller ID, your phone automatically displays the phone
number or name (if the 10-digit phone number is stored in your Phonebook) of
the person calling (unless blocked by the caller), enabling you to decide whether
to take the call or forward it to Voice Mail.
NOTE: Caller ID information is not available on all calls.
81
Page 90

90
Displaying the Caller’s Name
A caller’s name is displayed if you have entered the person’s number into your
Phonebook (see “Adding Phonebook Entries” on page 46). Otherwise, the
caller’s phone number will be displayed.
Maintaining Your Privacy with Per-Call and Per-Line
Blocking
Nextel provides two methods to prevent those you call from seeing your number
on their own Caller ID displays.
NOTE: Your Nextel phone number cannot be blocked from calls made
to 911, 800, 855, 866, 877, 888, or other toll-free phone numbers.
Per-Call Blocking
You can block delivery of your phone number to other Caller ID units for a
single phone call.
To set:
Press * 6 7 before dialing the call.
Per-Line Blocking
You can permanently block delivery of your phone number on every call you
make. You must order this feature by contacting Nextel Customer Care.
To disable on a per-call basis:
Press * 8 2 before the call.
Alternate Line Service
As an Alternate Line customer, you will be given a separate phone number for
each line. With alternate lines, you can separate business and personal calls, or
designate one as a priority line.
Nextel Mobile Messaging and Nextel Wireless Web services use the Line 1
phone number. You only need to subscribe to Caller ID or Voice Mail once —
these services will be available on both lines. Forwarding Line 2 to Line 1 will
send Line 2 incoming calls directly to Voice Mail without ringing.
nextel.com
82
Page 91

Alternate Line Service
The following settings are independent for each phone line. When you enable
one of these settings, it applies only to the active line:
• Call Forwarding
• Ring/Vibe
• In Call Setup
• Call Timers
•Auto Answer
Selecting the Alternate Line
From the idle screen:
1
Press q, then press R to scroll to
Settings. Press C under SELECT.
Line2
B
2
Press R to scroll to Phone Setup. Press C under SELECT.
3
With the current line highlighted, press C under CHANGE.
4
Press R to scroll to the desired line and press C under SELECT.
Receiving Calls on Your Alternate Line
You can receive calls on either line, regardless of the active line setting. The
screen displays Line 1 or Line 2 to indicate which line the call is being received
on (if Caller ID information is not available).
83
Page 92

90
Call Restrictions
You can prevent your phone from making or receiving specific types of calls.
Nextel currently offers three types of Call Restrictions:
• no long distance calls allowed
• no incoming calls
• no outgoing calls (except 911)
Contact Customer Care for more information.
Nextel 411
Nextel 411 provides friendly services for on-the-go professionals including:
White Page Listings
You can request a telephone number for any person, business, or government
agency in the continental United States and Hawaii. Operators can also provide
address information if available.
Yellow Page Listings
You can ask the operator to perform a search by category if the specific business
name is unknown. For example, you can request information for the nearest
copy center to your hotel while on business travel.
Nationwide Call Completion
Nextel 411 operators can connect you to any listing in the continental United
States and Hawaii. If requested, the operator will stay on the line while
connecting to the number.
Driving Directions
Nextel 411 operators are able to provide directions to reach a specific
destination. Operators will work with you to determine your starting point and
provide clear directions to the destination.
nextel.com
84
Page 93

Nextel 411
Restaurant Reservations
Nextel 411 operators can assist in finding a restaurant and then coordinate
reservations. A Nextel 411 operator will confirm your reservation information
through a return phone call. For your convenience, the reservation will be in
your name.
Movie Listings and Showtimes
Nextel 411 operators have access to movie listings at most theaters in the
continental United States and Hawaii. You only need to ask for a specific movie
or movie theater to get current movies, locations or showtimes. Additional
information such as running time, synopsis, and ratings are also available.
Showtimes and listings are available 24-48 hours in advance.
Local Event Information
You can request information on local events such as sporting events, concerts,
state and county fairs and other current events. Nextel 411 operators can
provide dates, times, and locations for these events.
Simply press 4 1 1 s from your Nextel phone anywhere within the
continental United States and Hawaii.
85
Page 94

90
86
nextel.com
Page 95

Nextel Voice Mail
Nextel Voice Mail is a flexible, easy-to-use system that takes messages when
you’re not available — so you never miss an important call.
This section includes:
Setting Up Your Voice Mail Box Page 87
Logging Into Voice Mail Page 88
Using Voice Mail Page 89
Advanced Voice Mail Features Page 93
Nextel Voice Mail Tree Page 101
This section covers the most commonly used Voice Mail features. Once you log
into Voice Mail, there are a number of innovative features you can access. They
are also covered in this section. After you access Voice Mail, an automated
system tells you each menu option and which button to press to make a menu
selection. See “Nextel Voice Mail Tree” on page 101.
Setting Up Your Voice Mail Box
You must set up your Voice Mail box before you can listen to messages. The
following steps will tell you how to setup your mailbox. Before getting started,
see “Recording Your Active Greeting” on page 92 for information you may
want to include in your greeting.
87
Page 96

90
1
Using your i90c phone, dial your 10-digit Nextel Personal Telephone
Number (PTN). For example: 7035557777.
If you are calling from a phone other than your i90c phone, dial your
10-digit Nextel Personal Telephone Number (PTN). When you hear the
greeting, press * to access your Voice Mail box.
2
The system will prompt you to Enter your password. Enter the last
seven digits of your Nextel Personal Telephone Number. For example:
5557777. This is your temporary password.
3
Follow the system instructions to:
• Create a new four- to seven-digit password (see “Changing Your
Password” on page 91).
• Record your name (see “Recording Your Name” on page 92).
• Record a greeting (see “Recording Your Active Greeting” on page
92).
4
When the system says Enjoy using Nextel Voice Mail, your mailbox is
set up.
Logging Into Voice Mail
To log into Voice Mail, you must first access the Message Center on your
phone.
If MESG is one of your display options:
From the idle screen, press C under MESG.
If MESG is not one of your display options:
1
From the idle screen, press q.
2
Press R to scroll to Messages.
3
Press C under SELECT.
nextel.com
88
Page 97

Using Voice Mail
The Message Center screen displays numbers of new and total Voice Mail
messages.
g
From the Message Center screen, log into Voice Mail:
1
Press S to scroll to Voi ce M a i l . The numbers of new and total Voice
Mail messages display.
2
Press C under CALL to log into Nextel Voice Mail. Calling displays
as you are connected to the network.
NOTE: If your hear a message that says, “Enter the phone number
of the subscriber you are trying to reach,” enter your own
10-digit Nextel Personal Telephone Number. When the
greeting plays, press
3
When prompted, enter your password.
* to receive a password prompt.
NOTE: You must receive a message before you can access Voice Mail
for the first time from your i90c phone. (Tip: You can leave
yourself a message.)
Using Voice Mail
The following sections explain how to use Voice Mail after you have logged in.
For information on receiving notification of Voice Mail messages, transferring
calls to Voice Mail, and accessing messages, see “Messages” on page 103.
89
Page 98

90
Main Voice Mail Menu
You are at the main Voice Mail menu when you hear the options listed below.
• To play your messages, press 1
or saved messages.)
• To record a message, press 2.
• To change your greeting, press 3.
• To access your personal options press 4.
If you press * while you are in a sub-menu, you will go to the previous menu.
If you press **, you will go to the main Voice Mail menu.
From the main Voice Mail menu, press # to exit Voice Mail. At any time, you
may end the call by pressing r or closing the phone cover.
Playing Messages
When you receive a new Voice Mail message, you can either listen to it
immediately or later. Press C under CALL to listen now or press C under
EXIT to listen later.
Options available while listening to your messages:
Replay previous six seconds. Press 1
Rewind to beginning of message. Press 1 1
Pause/continue the current message. Press 2
. (This option plays only if you have new
Fast forward 6 seconds. Press 3
Fast forward to end of message. Press 3 3
Play the date and time stamp. Press 5 5
Options available while a message is playing or after it has played:
Copy the message to another subscriber. (See
“Recording, Copying and Replying to
Messages” on page 96.)
Delete the message. Press 7
nextel.com
Press 6
90
Page 99

Using Voice Mail
Reply to a message. Press 8
Save the message. Press 9
Skip to the next message. Press #
Saving and Deleting Messages
While a message is playing or after you have finished listening to it, you can
save it or delete it. To save a message, press 9. To delete a message, press 7.
To have messages automatically saved, see “Automatic Playback” on page 95.
Messages that are not saved or deleted remain in your mailbox as new messages.
All messages are automatically deleted after 30 days.
Recovering Deleted Messages
To retrieve deleted messages, press * 3. This option only applies to the
current Voice Mail session. If you hang up, the messages will be permanently
deleted.
After exiting the Voice Mail session, you
cannot recover deleted messages.
!
C a u t i o n
Changing Your Password
To change your current password:
1
From the main Voice Mail menu, press 4 to access Personal Options.
2
Press 4 to access Personal Preferences.
3
Press 1 to modify password.
4
Enter your new password. This password must be all numbers. It must
be 4 to 7 digits long.
5
Press ** to return to the main menu.
91
Page 100

90
NOTE: If you forget your password, contact Customer Care.
For security purposes, it is recommended that
you do not choose sequential or repeated digits
!
!
W A R N I N G
Recording Your Name
When you send, reply to, or copy a message, your name response precedes the
message. To record or re-record your name at any time:
1
From the main Voice Mail menu, press 4 to access Personal Options.
2
Press 4 to access Personal Preferences.
3
Press 3 to access the Record Your Name option.
4
Press 2 to record your name.
5
Press ** to return to the main menu.
Recording Your Active Greeting
Through Nextel Voice Mail service, there are a number of ways in which people
can reach you. You may want to include one or all of the following options in
your greeting so that callers will know they are available.
• Press 1 to send a numeric message.
• Press 2 to send an operator assisted message. (This option is available only
if you are a subscriber of Operator Assisted Messaging. Contact Nextel
Customer Care for more information.)
• Press # to skip the greeting and record a message immediately.
like 1-2-3-4 or 5-5-5-5 for your password.
92
nextel.com
 Loading...