

Page 1

Digital Multi-service Data-capable Phone
@NNTN6058A@
NNTN6058A
Nextel
iDEN
i
355 Phone User’s Guide
Page 2

Page 3

i
Contents
Getting Started........................................... 1
Removing the Battery Door ...............................2
Locating Your SIM Card....................................3
Battery ............................................................... 3
Powering On and Off......................................... 6
Activating Service ..............................................6
Enabling Security ..............................................6
Phone Programming .........................................7
Finding Your Phone Number and Direct
Nextel
Nextel Worldwide
Customizing Features .......................................8
Phone Basics .................................................... 8
SIM Card Security ...........................................12
Locking the Keypad .........................................15
Antenna ...........................................................16
Accessories.....................................................16
Wireless Local Number Portability: Bringing
®
Connect
Your Phone Number From Another
Carrier .........................................................17
Number.........................................7
®
Voice Mail.............................................7
®
Service ...............................7
®
Nextel
Customer Care...................................18
Understanding Status Messages ....................18
Making Calls .............................................19
Phone Calls.....................................................19
Direct Connect
Group Connect
Talkgroup Calls ............................................... 24
Receiving Calls ...............................................26
Choosing a Number to Call ............................. 26
Missed Phone Calls ........................................28
Using Speakerphone.......................................28
Using Mute ......................................................28
Making Emergency Phone Calls .....................28
®
Calls .....................................19
SM
Calls...................................20
Recent Calls..............................................30
Calls and Call Alerts........................................30
My Info From Other Phones ............................30
Contact Information From Other Phones ........31
Viewing the Recent Calls List..........................31
Storing Items to Contacts ................................32
Deleting Items .................................................32
Making Calls From the Recent Calls List ........32
Page 4

ii
Call Alerts ................................................. 34
Sending Call Alerts ..........................................34
Receiving Call Alerts .......................................34
Using the Call Alert Queue..............................34
Direct TalkSM............................................ 36
Off-Network Walkie-Talkie...............................36
Channels and Codes.......................................37
Private Direct Talk
Making Emergency Calls in
Direct Talk
SM
Calls..............................39
SM
Mode ....................................40
Setup Options..................................................40
Entering Text ............................................ 42
Using Alpha Mode ...........................................42
Using Word Mode............................................42
Special Function Keys.....................................43
Using Numeric Mode .......................................44
Using Symbols Mode ......................................44
Contacts ................................................... 45
Viewing Contacts.............................................46
Creating Entries...............................................47
Storing Numbers Faster ..................................48
Editing Entries .................................................49
Deleting Entries ...............................................49
Checking Capacity ..........................................49
Creating Pauses and Waits.............................49
International Numbers .....................................50
Memo .........................................................51
Call Forwarding ........................................52
Forwarding All Calls ........................................ 52
Turning Off Call Forwarding ............................53
Forwarding Missed Calls .................................53
Viewing Call Forwarding Settings ...................54
Advanced Calling Features .....................55
Call Waiting .....................................................55
Switching Between Calls .................................55
Putting a Call on Hold .....................................56
Calling 2 People ..............................................56
Creating Pauses and Waits While Dialing.......57
Making International Calls ...............................57
Setting One Touch Direct Connect
Call Timers ......................................................58
®
...............57
Page 5

iii
Using Your Phone as a Modem ......................59
Making TTY Calls ............................................60
Special Dialing Codes .....................................61
Nextel® Phone Services.......................... 62
Caller ID ..........................................................62
Per-Call Blocking.............................................62
Per-Line Blocking ............................................62
Alternate Line Service .....................................62
Call Restrictions ..............................................63
®
Nextel
411 .....................................................63
Ring Tones ............................................... 64
Setting Your Phone to Vibrate .........................64
Ring and Vibrate..............................................65
Assigning Ring Tones to Contacts ..................65
Viewing Ring Tone Assignments.....................65
Downloading More Ring Tones .......................66
Managing Memory...........................................66
Deleting Custom Ring Tones ..........................66
Message Center....................................... 67
Accessing the Message Center.......................67
Message Center Options ................................ 67
Receiving Messages ................................68
Message Notifications ..................................... 68
Retrieving Messages.......................................69
Voice Mail Messages................................70
Receiving a Message ......................................70
Accessing Voice Mail from
the Message Center ...................................70
Sending Unanswered Calls to Voice Mail .......70
Nextel® Voice Mail ....................................71
Setting Up Your Voice Mail Box ......................71
Playing Messages ...........................................71
Changing Your Password ...............................72
Recording Your Name .....................................72
Recording Your Active Greeting ......................73
Advanced Voice Mail Features .......................73
®
Nextel
Voice Mail Tree ..................................78
Multimedia Messages ..............................79
Navigating the Inbox, Drafts, and Sent Items..79
Creating and Sending Messages ....................79
Page 6

i
Drafts...............................................................89
Sent Items .......................................................89
Receiving a Message ......................................90
Navigating a Message.....................................91
Viewing Received Messages
from the Message Center ...........................91
Actions for Received Messages ......................92
Customizing MMS ...........................................95
Managing Memory...........................................98
SMS Messages ......................................... 99
Receiving a Message ......................................99
Reading From the Message Center ................99
Calling and Storing Numbers ..........................99
Wireless Data Services ......................... 101
Wireless Data Services .................................101
Accessing Wireless Data Services
From Your Phone .....................................102
Navigation Keys ............................................102
Guides and Demos........................................103
My Pictures............................................. 104
Viewing Pictures............................................104
v
Getting File Information .................................104
Deleting Pictures ...........................................104
Managing Memory ........................................104
My Info ..................................................... 105
Viewing My Info ............................................. 105
Editing My Info ..............................................105
Setting Sending Options ............................... 106
Using Direct SendSM..............................107
Sending My Info and Contact Information.....107
Voice Records ........................................109
Creating Voice Records ................................109
Playing Voice Records .................................. 109
Labeling Voice Records ................................109
Deleting Voice Records.................................110
Locking Voice Records ................................. 110
Managing Memory ........................................110
Java Applications...................................111
Installing Applications ....................................111
Running Applications ....................................111
Suspending Applications ...............................111
Page 7

Resuming Applications..................................112
Ending Applications.......................................112
Downloading Applications .............................112
Deleting Applications..................................... 112
Managing Memory.........................................113
Shortcuts on the Main Menu .........................113
Java Applications and GPS Enabled.............114
Digital Rights Management (DRM)....... 117
Managing Items.............................................117
GPS Enabled .......................................... 119
IMPORTANT: Things to Keep in Mind ..........119
Making an Emergency Call ...........................120
Viewing Your Approximate Location ............. 121
Enhancing GPS Performance .......................122
Updating Satellite Almanac Data...................124
Setting Privacy Options .................................124
Using GPS with Map Software ...................... 126
Datebook ................................................ 128
Viewing Datebook ......................................... 128
Creating Events.............................................129
Editing Events ...............................................131
Deleting Events ............................................. 132
Receiving Reminders ....................................132
Making Calls From Datebook and
Datebook Reminders................................133
Customizing Datebook Setup ........................134
Customizing Your Phone.......................135
Setting the Volume ........................................135
Setting Your Phone to Vibrate.......................135
Changing the Look of Your Phone ................135
Airplane Mode—
Temporarily Turning Off Calls...................137
Using Settings ...............................................137
Profiles ....................................................142
Viewing Profiles.............................................142
Switching Profiles ..........................................142
How Changing Settings Affects Profiles........142
Temporary Profiles ........................................143
Creating Profiles............................................144
Editing Profiles ..............................................144
Deleting Profiles ............................................144
Setting Call Filtering ......................................145
v
Page 8

i
Shortcuts ................................................ 147
Creating a Shortcut .......................................147
Using a Shortcut............................................147
Editing a Shortcut ..........................................148
Deleting Shortcuts .........................................148
Using a Headset ..................................... 149
Attaching a Headset......................................149
Using a Remote PTT
TM
Button ..................... 149
Nextel® Customer Care ......................... 150
Domestic Customer Care ..............................150
Nextel Worldwide
Nextel® Terms and
Conditions of Service ........................ 151
®
Customer Care ...............150
Safety and General Information ........... 173
RF Operational Characteristics .....................173
Portable Radio Product Operation and
EME Exposure..........................................173
Electromagnetic Interference/Compatibility...176
Medical Devices ............................................176
Operational Warnings....................................177
v
Operational Cautions ....................................178
Accessory Safety Information .......................179
MOTOROLA LIMITED WARRANTY .......181
Patent and Trademark Information.......185
Page 9

ii
DECLARATION OF CONFORMITY
Per FCC CFR 47 Part 2 Section 2.1077(a)
Responsible Party Name: Motorola, Inc.
Address: 8000 West Sunrise Boulevard
Plantation, FL 33322 USA
Phone Number: 1 (800) 453-0920
Hereby declares that the product:
i
Product Name:
Model Number: H72XAH6RR1AN
Conforms to the following regulations:
FCC Part 15, subpart B, section 15.107(a),
15.107(d) and section 15.109(a)
Class B Digital Device
As a personal computer peripheral, this device
complies with Part 15 of the FCC Rules. Operation
is subject to the following two conditions: (1) this
device may not cause harmful interference, and (2)
this device must accept any interference received,
including interference that may cause undesired
operation.
355
Note: This equipment has been tested and
found to comply with the limits for a Class
B digital device, pursuant to part 15 of the
FCC Rules. These limits are designed to
provide reasonable protection against
harmful interference in a residential
installation. This equipment generates,
uses and can radiate radio frequency
energy and, if not installed and used in
accordance with the instructions, may
cause harmful interference to radio
communications. However, there is no
guarantee that interference will not occur
in a particular installation.
If this equipment does cause harmful
interference to radio or television reception,
which can be determined by turning the
equipment off and on, the user is
encouraged to try to correct the interference
by one or more of the following measures:
• Reorient or relocate the receiving
antenna.
• Increase the separation between the
equipment and receiver.
• Connect the equipment into an outlet on
a circuit different from that to which the
receiver is connected.
• Consult the dealer or an experienced
radio/TV technician for help.
v
Page 10

Page 11
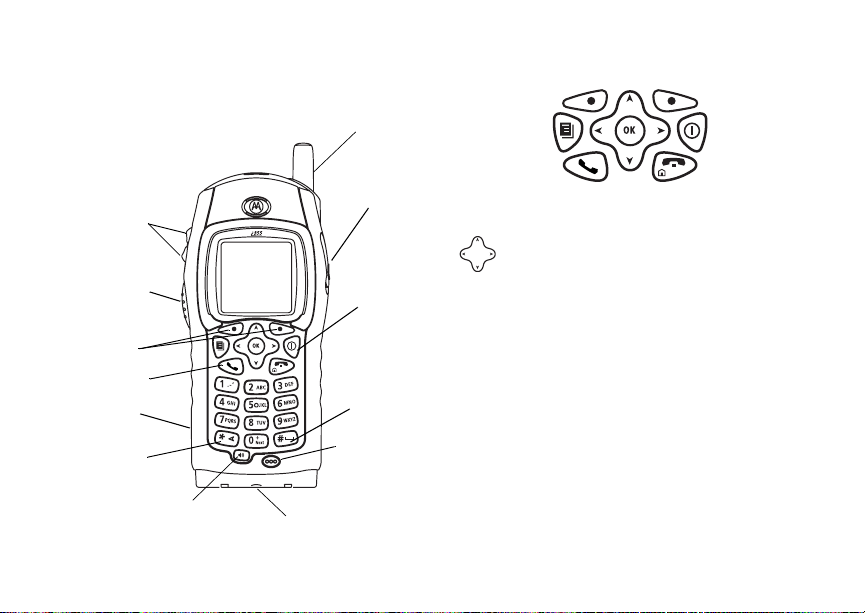
Getting Started
volume
controls
send key
speaker
(in back)
back key
push to talk
(PTT) button
option keys
DIRECT CONNECT® /
GROUP CONNECTTM speaker
on/off
retractable
antenna
audio
jack
power
button
space key
microphone
accessory connector
p Power button.
Navigation key — press the arrows to
scroll through menus and lists.
O OK key — selects highlighted item;
answers calls.
m Menu key — accesses context-sensitive
menus.
A Option key — selects the option
appearing above it on the display.
Note: Throughout this User Guide, the
option keys will be represented
by A.
s Send key — places phone calls.
e End key — ends phone calls; returns to
idle screen; in browser mode, returns to
Net main menu.
1
Page 12

Getting Started
To start using your i355 phone:
• Make sure your SIM card is in place.
• Charge the battery.
• Activate your service.
• Enable security.
Removing the Battery Door
1 Make sure the phone is powered off. See
“Powering On and Off” on page 6.
2 Slide the release button forward until it releases
the battery door.
release
button
speaker
2
3 If the release button does not slide forward to
release the battery door, rotate counter
clockwise the circular piece in the center of the
release button to unlock it.
4 Remove the battery door from the back of your
phone.
Page 13
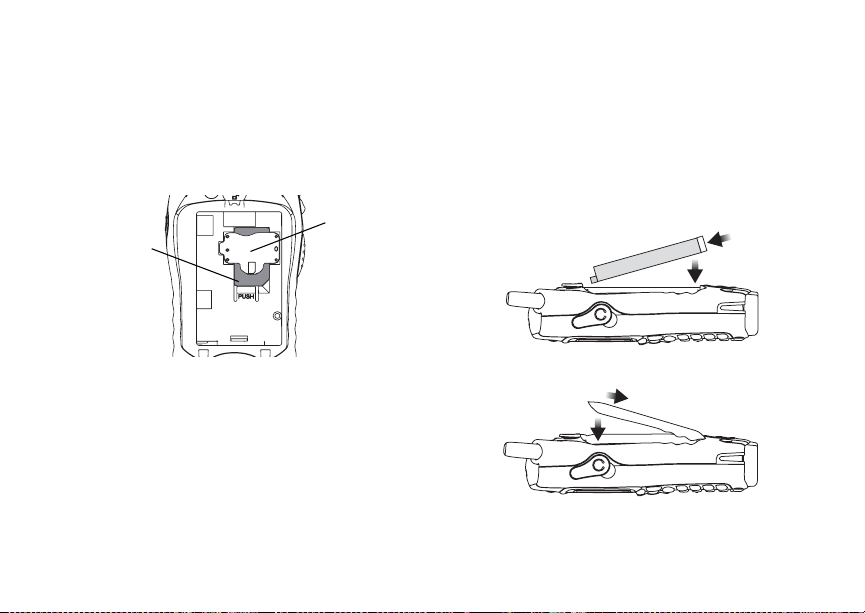
Locating Your SIM Card
Locating Your SIM Card
Your SIM (Subscriber Identity Module) card is a
small piece of plastic located in the SIM card
holder in the back of your phone, underneath the
battery.
SIM car d
SIM card
If there is no SIM card in your phone, contact
Nextel Customer Care at 1-800-639-6111.
If you want to use a SIM card other than the one
that is in your phone, please contact Nextel
Customer Care to verify that the SIM card you want
to use is compatible with your phone.
holder
Battery
Inserting the Battery
Your phone comes with a High Capacity Lithium
Ion battery.
1 Remove the battery door.
2 Insert the top of the battery into the battery area.
Press the bottom of the battery to secure it.
3 Replace the battery door and press it gently until
you hear a click.
3
Page 14
Getting Started
4 If you want to ensure the battery door does not
accidentally come off, rotate clockwise the
circular piece in the center of the release button
to lock it.
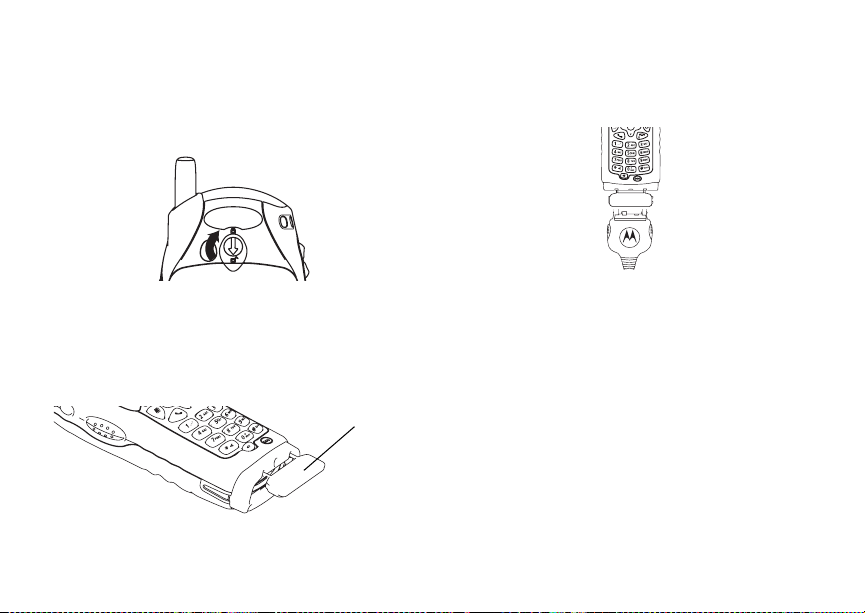
Charging the Battery
Your phone comes with a rapid travel charger.
1 Plug the charger into an electrical outlet.
2 Open the connector cover.
connector cover
4
3 Plug the other end of the charger into the
accessory connector.
Charger Attached or Device Attached appears
on the internal display.
Tip: To remove the charger from the accessory
connector: Press the buttons on the sides
of the plug. Pull the plug straight out.
4 If you have purchased optional batteries or
chargers, see “Charging Times” on page 5.
Page 15
Battery
Charging Times
Check your battery and charger type against the
grid below to determine appropriate charging
times.
Battery Charger
Rapid Standard
Slim Lithium
Ion
Standard
Lithium Ion
High
Capacity
Lithium Ion
For best results, charge the batteries within the
temperature range of 50°F to 104°F (10°C to
40°C).
Prolonged charging is not recommended.
2 hours 3 hours
2 hours 4 hours
3.5 hours 7.5 hours
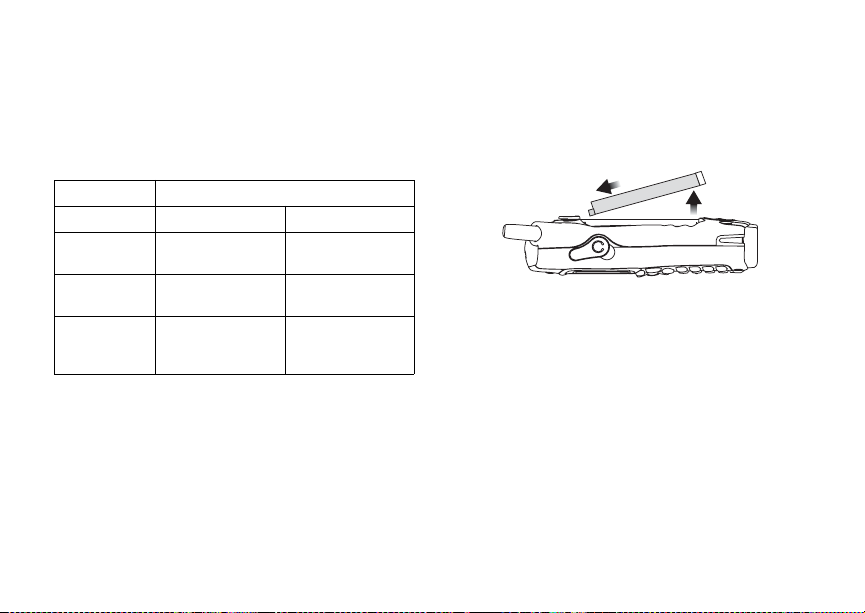
Removing the Battery
1 With the phone powered off, remove the battery
door.
2 Remove the battery by pushing the battery
toward the antenna and lifting it out.
Battery Use and Maintenance
• The Motorola iDEN Approved Lithium Ion
chargers provide optimum performance. Other
chargers may not fully charge the iDEN Lithium
Ion battery or may yield a reduced number of
lifetime charge cycles.
• Extreme temperatures degrade battery
performance. Do not store the battery where
temperatures exceed 140°F (60°C) or fall below
4°F (-20°C).
• Lithium Ion batteries have a self discharge rate
and without use, lose about 1% of their charge
per day.
5
Page 16
Getting Started
• The battery capacity is degraded if the battery is
stored for long periods while fully charged. If
long term storage is required, store at half
capacity.
Powering On and Off
To power your phone on:
Press p.
As your phone connects to the network, you will
see a connecting message. When the idle screen
appears, the phone is ready to use.
To power your phone off:
Press and hold p.
6
Activating Service
The first time you power your phone on, your
service is activated.
A screen then appears prompting you to select Ok
to update your browser information, which enables
security. This screen will only appear during initial
activation.
Enabling Security
You must enable security the first time you power
on your phone or within 10 days of first activation of
your phone.
1 Press A under Ok.
Note: If you press A under Later, the idle
screen will appear. The next time you
select Net from the main menu, you will
be prompted to enable security before you
can use Wireless Data Services.
2 You are prompted to enable security. Press A
under Yes. A series of screens followed by the
default homepage displays.
3 Press e to return to the idle screen.
Page 17

Phone Programming
Phone Programming
Within 24 hours of enabling security, you will
receive an alert notification containing your
Personal Telephone Number (PTN), Nextel
Customer Care number, Direct Connect number,
and Talkgroups.
1 When you receive an alert notification saying
New Browser Message - Receive
Programming Info, press A under Goto.
2 You are prompted to accept changes to your
lists. Press A under Ok.
3 You are prompted again to accept changes to
your lists. Press A under Ok.
4 A confirmation screen displays. Press A under
Ok.
5 Press e to return to the idle screen.
Finding Your Phone Number and Direct Connect® Number
My Info lets you view your phone number, Direct
Connect number, and other phone information.
1 Press m to access the main menu.
2 Scroll to My Info.
3 Press O.
4 Scroll to see your information:
Line 1 and Line 2 are your phone numbers. Direct
Connect is your Direct Connect number, the
number that others use to contact you using Direct
®
Connect
appear when you receive your alert notification
after enabling security on your phone.
See “My Info” on page 105 for more information
about this feature.
walkie-talkie service. These numbers
Nextel® Voice Mail
You must set up your voice mail box before you
can retrieve messages. See “Setting Up Your
Voice Mail Box” on page 71.
Nextel Worldwide® Service
You can use your phone to make calls
internationally in select cities using other iDEN®
networks by calling Nextel Customer Care to
activate international dialing on your account.
Countries in which you can use your phone include
Argentina, Brazil, Canada, Israel, Jordan, Mexico,
Peru, the Philippines, and Singapore*.
* Credit approval may be required. Other conditions may apply.
7
Page 18
Getting Started
Customizing Features
You can control many features of your phone,
including the size of the text on the display, the way
you access main menu items, and the volume of
incoming sound, rings, and other tones. See
“Customizing Your Phone” on page 135.
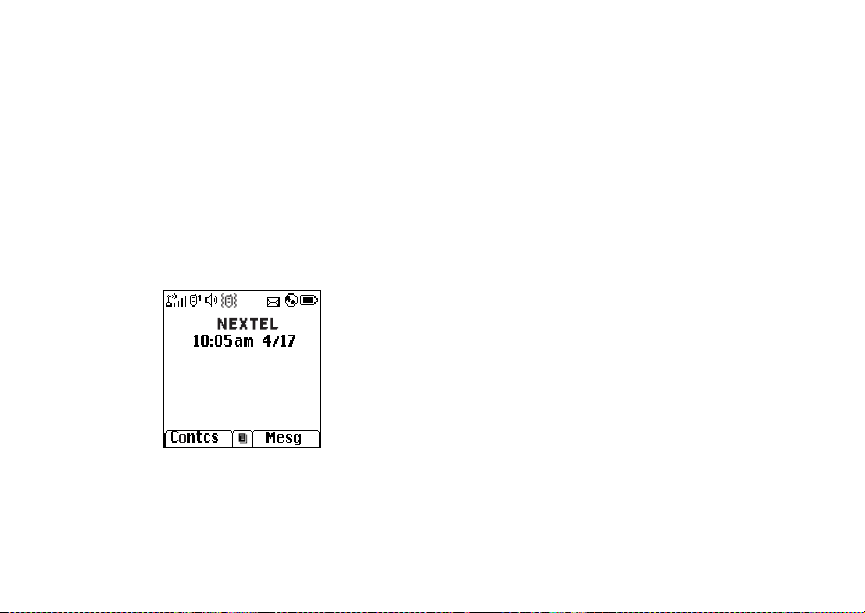
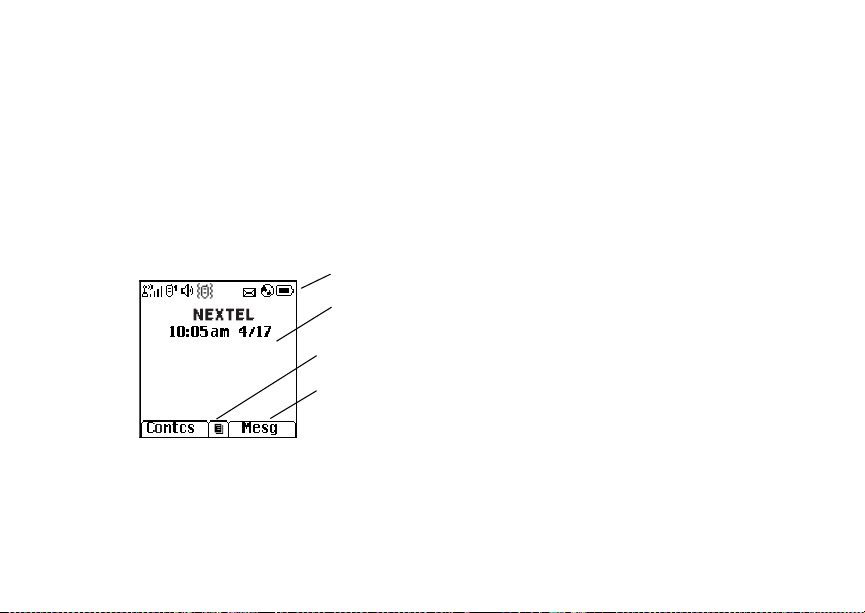
Phone Basics
Any time your phone is powered on, the display
provides you with information and options.
The screen shown above is the idle screen. The
idle screen appears when your phone is on, but not
engaged in any activity.
8
status icons
text area
menu icon
display options
Text Area
This area displays menus, messages, names,
phone numbers, and other information.
Display Options
Two display options appear at the bottom of most
screens. You select a display option by pressing
the option key below it.
Menus and Lists
Your phone’s features are arranged in menus,
submenus, and lists.
To access the items in a menu or list, scroll using
the navigation key at the top of your keypad. This
key lets you scroll up, down, left, or right. Holding
down the appropriate part of the navigation key
speeds up scrolling.
In this guide, this symbol > tells you to select a
menu or list item. For example, Settings >
Security means:
1 Scroll to Settings on the main menu.
2 Press O to see the Settings screen.
3 Scroll to Security.
4 Press O to see the Security screen.
Page 19

Phone Basics
Quick Access to Main Menu Items
Each arrow in the navigation key and O can be
used to access a main menu item from the idle
screen. Each of these keys is assigned to a main
menu item when you receive your phone. To
assign different main menu items, see “Personalize
Features” on page 139.
OK Key
Pressing O:
• Selects the highlighted menu item or list item
• Sets options
• Confirms actions
• Places and answer calls
• From the idle screen, accesses ring tones list.
This is the default setting. You can assign a
different main menu item to O.
Menu Key
Many features provide context-sensitive menus
that let you access related features and actions.
This icon
menu is available. Press m to access the menu.
S appears any time a context-sensitive
Main Menu
All your phone’s features can be accessed through
the main menu. You can set the main menu to
appear as a list or as large icons (see “Setting the
Menu View” on page 136).
Net Access to Wireless Data
a
Java Apps Java applications on your
q
Settings Customize your phone.
b
Ring Tones Assign ring tones and turn
m
My Pictures Access stored pictures.
[
VoiceRecord Record and play audio
c
My Info View personal phone
j
Services. See page 101.
phone. See page 111.
See page 135.
ringer off. See page 64.
See page 104.
messages. See page 109.
information, including
phone number and Direct
Connect number. See
page 7.
9
Page 20

Getting Started
n Downloads Provides a catalog of ring
GPS Find your approximate
l
Contacts Create, view, store, edit
d
Messages Access messages. See
e
Call Forward Set call forwarding options.
f
Datebook Schedule appointments.
o
Memo Store a number to access
g
Call Timers Phone usage information.
h
10
tones, wallpaper, games
and Java applications that
you can download directly
to your phone. Items in this
catalog change frequently,
so check regularly for fresh
content. See page 66.
geographical location. See
page 119.
Contacts and Groups. See
page 45.
page 67.
See page 52.
See page 128.
later. See page 51.
See page 58.
Recent Calls Lists recent calls. See
i
Shortcuts Create shortcuts to
s
Profiles Groups of settings you
p
m DirecTalk Launch Direct Talk
Call Alert Lists call alerts. See
k
page 30.
screens. See page 147.
apply together. See
page 142.
SM
Access Setup and Help.
See page 36.
page 34.
.
Status Icons
Status icons appear at the top of the display. Some
appear at all times. Others appear only when your
phone is engaged in certain activities or when you
have activated certain features.
abcd
efgd
o p q
r s
Battery Strength — A shaded
battery indicates a greater charge.
Signal Strength — More bars next
to the antenna indicate a stronger
signal.
Page 21

Phone Basics
A
B
S
C
1 2
m Direct Talk — Your phone is off
G L
J
I
K
H
RM
Q
Phone In Use — Your phone is
active on a phone call.
Direct Connect In Use — Your
phone is active on a Direct Connect
call.
Group In Use— Your phone is
active on a Group Connect Plus
call.
Talkgroup In Use — Your phone is
active on a Group Connect call.
Active Phone Line — 1 indicates
phone line 1 is ready to make calls;
2 indicates phone line 2 is ready to
make calls.
network and set to Direct Talk
mode.
Call Forward — Your phone is set
to forward calls. See “Call
Forwarding” on page 52.
Ringer Off — Your phone is set not
to ring. See “Setting Your Phone to
Vibrate” on page 64.
u
w xT
yz
ljik
mXnW
DE
U
Speaker Off — Sets Direct Connect
and Group Connect sound to come
through the earpiece rather than
through the speaker.
Messages — You have one or
more messages. See page 67.
T9 Text Input — You are using T9
Text Input to enter text. See
“Entering Text” on page 42.
Internet — You are ready to
browse the internet or are browsing
the internet using a secure
connection.
Airplane Mode — Your phone is
set to Airplane Mode. See “Airplane
Mode—Temporarily Turning Off
Calls” on page 137.
11
Page 22

Getting Started
Y Z
N O
Packet Data — You are ready to
transfer packet data or are
transferring packet data. See “Using
Your Phone as a Modem” on page
59.
TTY — You are ready to use your
phone to make calls using a
teletypewriter device. See “Making
TTY Calls” on page 60.
SIM Card Security
Your SIM card stores all your Contacts and
protects your personal information. Since this
information is stored on your SIM card, not in your
phone, you can remove the information by
removing your SIM card.
Note: Except for making emergency calls, your
phone will not function without the SIM
card.
To prevent unauthorized use of your phone, your
SIM card is protected by a PIN that you enter each
time the phone is powered on. You can change the
PIN or turn off the requirement that it be entered.
12
Turning the PIN Requirement On and
Off
When the SIM PIN requirement is off, your phone
can be used without entering a PIN.
Important: When the SIM PIN requirement is off,
When the SIM PIN requirement is on, you are
prompted to enter your PIN each time you power
on your phone.
Note: If a SIM PIN is required, your phone will
1 From the main menu, select Settings >
Security > SIM PIN.
2 Select On or Off.
3 Enter the current SIM PIN.
Note: The default SIM PIN is 0000. Change your
4 Press A under Ok.
the personal data on your SIM card is
not protected. Anyone can use your
phone and access your personal data.
not function until the SIM PIN is entered,
except for making emergency calls.
PIN to prevent fraudulent use of the SIM
card (see “Changing the PIN” on page
13).
Page 23

SIM Card Security
Entering the PIN
1 When the Enter SIM PIN Code screen appears
after you power on your phone, enter your SIM
PIN.
2 Press A under Ok.
The message SIM Unlocked displays.
Important: If you enter your PIN incorrectly 3
times, your SIM card is blocked. To
unblock your SIM card, you must
contact Nextel Customer Care. See
“Unblocking the PIN” on page 13.
Changing the PIN
Note: The SIM PIN requirement must be turned
on in order to access this feature.
1 From the main menu, select Settings >
Security > Change Password > SIM PIN.
2 At the Enter Old SIM PIN screen, enter the
current SIM PIN.
3 Press A under Ok.
4 At the Enter New SIM PIN screen, enter the
new 4- to 8-digit SIM PIN.
5 Press A under Ok.
6 At the Re-enter New SIM PIN screen, re-enter
the new SIM PIN to confirm.
7 Press A under Ok.
Changed: SIM PIN displays.
Unblocking the PIN
If you enter your PIN incorrectly 3 times, your SIM
card is blocked. To unblock your SIM card, you
must contact Nextel Customer Care to get a PIN
Unblock Code (PUK).
Important: If you unsuccessfully enter the PUK
To unblock the PIN:
1 Press * # m 1.
2 At your Nextel Customer Care representative’s
request, provide the information needed to give
you a PUK code.
3 Select Unblock PIN.
4 Enter the PUK code.
5 Enter a new 4- to 8-digit SIM PIN.
6 Re-enter your SIM PIN.
Note: These steps must be performed in quick
code 10 times, your SIM card is
permanently blocked and must be
replaced. If this happens, all data is
lost. You will get a message to contact
Nextel Customer Care. Except for
making emergency calls, your phone
will not function with a blocked SIM
card.
succession.
13
Page 24

Getting Started
If you entered the codes properly, SIM Unlocked
appears on the display.
Inserting and Removing Your SIM
Card
Important: Do not touch the gold-colored areas of
The SIM card is designed for optimal Contacts
storage and feature use. For Nextel SIM card
compatibility information, visit nextel.com/sim.
Note: In some cases, Contacts and Groups
If you remove your SIM card and use it with
another phone, or use another SIM card with your
phone, the following information is erased:
• The recent calls list
• Call forwarding settings
• Net alerts
• MMS messages
• Options set using the MMS Setup menu
• Information stored in Memo
14
your SIM card.
(created for Group Connect Plus) may not
be accessible if you move your SIM card
to another phone. Contacts and Groups
created with your
readable by an older iDEN SIM-based
phone.
i
355 phone are not
• Images in My Pictures
• 3 most recent GPS Enabled locations
• Voice records
• Voice names
• Datebook events
• Options set using the Personalize menu
• Groups (Groups created for Group Connect Plus
will appear as Unknown)
Inserting Your SIM Card
1 With your phone powered off, remove the
battery door and battery.
2 Hold your SIM card as shown.
cut corner
Page 25

Locking the Keypad
3 Carefully slide your SIM card into your phone,
until it lies flat in the SIM card holder.
SIM car d
holder
Removing Your SIM Card
Important: To avoid loss or damage, do not
1 With your phone powered off, remove the
battery door and battery.
2 While holding the tab down, slide your SIM card
out of the SIM card holder.
remove your SIM card from your phone
unless absolutely nece ssary.
SIM card
holder
tab
Note: Protect your SIM card as you would any
delicate object. Store it carefully.
Locking the Keypad
Locking the phone’s keypad prevents its buttons
from being functional when pressed. When the
keypad is locked, you can only:
• Power the phone on and off
• Unlock the keypad
• Respond to incoming calls, messages, and
alerts
Important: Emergency calls cannot be placed
To lock the keypad:
1 From the idle screen, press m.
2 Press *.
while the keypad is locked.
15
Page 26

Getting Started
If you press a key while the keypad is locked,
instructions for unlocking the keypad display
briefly.
To unlock the keypad:
1 From the idle screen, press m.
2 Press *.
You also have the option of setting your phone to
automatically lock the keypad if there has been no
activity for a specified time.
1 From the main menu, select Settings >
Security > Keypad Lock.
2 To lock the keypad immediately, select Lock
Now. You will be given the option to press m and
* to lock and unlock the keypad.
3 To set a specific time for the keypad to lock if
there has been no activity, select Auto Lock
and then select a time.
The keypad can be set to lock in 5, 10, 15 or 20
minutes if the keypad is not touched during the
specified time. To turn the auto lock off, repeat
step 3 and select Off.
Antenna
The retractable antenna on your i355 phone is
designed to be extended during calls.
16
To extend the antenna, pull gently on the rounded
tip until the antenna is fully extended and clicks into
position.
When finished with a call, retract the antenna by
pushing gently on the rounded tip until the antenna
clicks into place.
To optimize your phone’s performance, extend the
antenna when you make or receive a call, and
avoid touching the antenna with any body part.
Important: Failure to fully ex tend or retract the
antenna until the antenna clicks into
place causes severely degraded
performance, which may result in
missed calls, dropped calls, or garbled
audio.
Accessories
Your phone comes with a High Capacity Lithium
Ion Battery, rapid travel charger, and holster.
Various accessories are available for use with your
i
355 phone, including cases, vehicle power
charger, data cables, Hands-Free accessories and
more.
Page 27

Wireless Local Number Portability: Bringing Your Phone Number From Another Carrier
To order additional accessories, go to nextel.com
or call 1-800-Nextel6. You can also contact your
Nextel Authorized Sales Representative or stop by
any Nextel-owned Retail Store. For information on
Nextel retail store locations, go to nextel.com.
Wireless Local Number
Portability: Bringing Your
Phone Number From Another
Carrier
If you are bringing your phone number from
another carrier, your new phone will be active as
soon as you receive it. Nextel will provide you with
a temporary phone number so that you can begin
using your phone immediately. Once the number
you have brought to Nextel is activated, your
temporary phone number will be deactivated and
service with your previous carrier will be cancelled
automatically. You will receive a text message on
your Nextel phone letting you know that activation
is complete. Simply turn your phone off and back
on again to complete activation.
Here is additional information you need to be
aware of until the number you have brought to
Nextel is active on the Nextel network:
Nextel® Voice Mail
We suggest you set up your voice mail box after
the number you brought to Nextel is active on your
Nextel phone and your temporary phone number is
deactivated. If you set up your voice mail box prior
to this, all messages and all settings (including
your greeting and password) will be lost when the
number you have brought to Nextel becomes
active.
Text Messaging
During the activation process, it is possible that text
messages may not be properly routed to your
Nextel phone.
911 Calls
Nextel continues to make efforts to ensure that all
911 calls are minimally impacted by this process. If
you make a call to 911 from your temporary phone
number and the call fails, the 911 emergency
response center will not be able to call you back on
your Nextel phone if in the meantime your Nextel
phone has been programmed with your permanent
phone number. As with any wireless 911 call, if
your call is disconnected before location and
details have been provided, be sure to call 911
again and advise that you were disconnected.
Go to nextel.com/wlnp for more details.
17
Page 28

Getting Started
Nextel® Customer Care
Nextel Customer Care: 1-800-639-6111 or dial 611
from your
Nextel Worldwide Customer Care:
+1-360-662-5202 (toll-free from your
i
355 phone.
i
355 phone).
Understanding Status Messages
You may receive status messages under certain
conditions. Before contacting Nextel Customer
Care, note the message, numeric code, and the
conditions under which it appeared. You can go to
nextel.com for additional information about status
messages.
18
Page 29

Making Calls
Your i355 phone makes two types of calls: digital
cellular phone calls and Direct Connect calls. With
Direct Connect calls, you use your phone as a
long-range, digital walkie-talkie.
Phone Calls
1 Enter the number you want to call.
2 To place the call:
Press s. -or-
If you entered the number from the idle screen,
press O.
3 To end the call, press e.
Direct Connect® Calls
Nextel offers the following Direct Connect
walkie-talkie services:
• Local Direct Connect — allows walkie-talkie
calling within your local coverage area.
• Nationwide Direct Connect
coast-to-coast walkie-talkie calling to Nextel
users from anywhere on the Nextel National
Network (U. S.) to anywhere on the National
Network.
SM
— allows
• International Direct ConnectSM — allows
walkie-talkie calling to and from select countries.
• Group Connect
walkie-talkie calling to up to 20 Nextel customers
simultaneously. (See See “Group ConnectSM
Calls” on page 20).
• Talkgroups — allows walkie-talkie calling to up
to 100 Nextel customers.
See www.nextel.com for more details on these
Direct Connect walkie-talkie services. Pricing for
each of these services is based on your service
contract.
To make a Direct Connect call:
1 Enter the Direct Connect number you want to
call.
2 Press and hold the PTT button on the side of
your phone. Begin talking after your phone emits
a chirping sound.
3 Release the PTT button to listen.
A Direct Connect call ends automatically if there is
no activity on the call for a few seconds.
Tip: To let someone know you want to talk to
him or her on a Direct Connect call, send a
call alert. See See “Call Alerts” on page 33.
SM
— allows coast-to-coast
19
Page 30

Making Calls
Dialing Direct Connect® Numbers
Every Direct Connect number has 3 parts — an
area ID, a network ID, and a member ID — with an
asterisk between each of these parts. For example:
999*999*9999.
When you place a Direct Connect call, you must
enter the whole Direct Connect number including
the asterisks.
Tip: When you store a Direct Connect number in
Contacts, it is good pr actice to include the
whole Direct Connect number, including the
asterisks.
Group ConnectSM Calls
A Group Connect call is similar to a Direct Connect
call, but is made to multiple Direct Connect users
at once. You can create Groups from your phone
and call up to 20 Nextel users anywhere on the
Nextel national network to other Group
Connect-compatible phones*. You can create a
Group for one-time use or store it to Contacts so
you can call it at any time.
* Not all phones are Group Connect-compatible. See
www.nextel.com for more details on Group Connect.
20
Note: In order to store Groups to your i355, you
must use the 128K SIM card that came
with your phone. The 128K SIM card is
labeled "Nextel 600 Contcs & 25 Grps".
With this SIM card, a maximum of 25
groups can be added to your
entries created with your
not readable by an older iDEN SIM-based
phone.
Group Talkgroup
Group Icons
Geography Nationwide Limited to local
Maximum
Group Size
Set-up Dynamically,
Voice
Activated
Dialing
S
21 (including
originator)
via your phone
Yes No
i
355. Group
i
355 phone are
I
market and
network (fleet)
100
Predefined, via
Nextel
administrator
using Talkgroup
Management
Page 31

Group ConnectSM Calls
Creating Groups in Contacts
1 From the main menu, select Contacts.
2 Select [New Group].
3 If you want to assign a name to the Group, enter
the name.
Note: If you do not assign a name, the Group is
named “Group” followed by the number of
members in the Group. For example,
“Group (8)” for a group with 8 members.
4 Add Group members. See “Adding Group
Members”.
5 If you want to create a voice name for the
Group, select [Options] > Voice Name. As
directed by the screen prompts, say and repeat
the voice name you want to assign to the Group.
Speak clearly into the microphone.
6 Press A under Save.
Adding Group Members
You can add Group members that have a Direct
Connect number and Group Connect-compatible
phone to your Group by selecting them from
Contacts, the recent calls list, memo, or manually
entering the Direct Connect number from your
keypad. You can also add all members in an
existing Group to another Group by selecting the
Group name from Contacts.
To add Group members from Contacts, Recent
Calls, or Memo:
1 While creating a Group, select [Add Member].
-orSelect [Add Number] and press A under
Browse.
Note: Move between Contacts, the recent calls
list, and Memo by scrolling left or right, or
pressing * or #.
2 Scroll to the members you want from Contacts,
the recent calls list, or Memo and press O. A
check mark appears next to each selected
member.
Note: To deselect a member, scroll to a selected
member and press O.
3 Press A under Done.
To add Group members manually from the
keypad:
1 While creating a Group, select [Add Number].
2 Enter the Direct Connect number using the
keypad.
3 Press O.
Making Group Calls
1 From Contacts or the recent calls list, scroll to or
select the Group you want. -or-
21
Page 32

Making Calls
Press and hold t until a prompt appears telling
you to say the voice name. Say the voice name
assigned to the Group you want.-or-
Enter or select a Direct Connect number and
add more Direct Connect numbers. See
“Starting a Group Call with a Direct Connect®
Number”.
2 Press the PTT button.
Receiving Group Calls
To answer a Group call:
Proceed as if answering a Direct Connect call.
Only one person at a time may speak on a
Group call.
Starting a Group Call with a Direct
Connect® Number
You can start a Group call with any Direct Connect
number you want to call.
1 Choose the first Direct Connect number that you
want in the Group call:
From the idle screen, enter the Direct Connect
number. -or-
From the Contacts list, scroll to an entry
containing the Direct Connect number. -or-
22
From the recent calls list, scroll to an entry
containing the Direct Connect number.
2 Press m.
3 Select Call New Group.
4 Add more Group members. See See “Adding
Group Members” on page 21.
5 If you want to save the Group you have created:
Press m. Select Store Group.
6 To make the call, press the PTT button. -or-
Press A under Done.
Removing Members or Groups
To remove a member from a Group:
1 From Contacts, scroll to the group you want to
delete the member from.
2 Select Edit.
3 Scroll to the member you want to remove.
4 Press m.
5 Select Remove Member.
6 Select Save.
To remove all members from a Group:
1 From the Group screen, press m.
2 Select Remove All Members.
Page 33

Group ConnectSM Calls
To delete a Group from Contacts:
1 From Contacts, scroll to the Group you want to
delete.
2 Press m.
3 Select Delete Group.
Storing Groups
From Recent Calls
1 From the recent calls list, select the Group you
want.
2 Press A under Store.
3 If you want, add more information to the entry.
4 Press A under Save.
From an Active Group Call
1 During an active Group call, press m.
2 Select Store Group.
3 If you want, add more information to the entry.
Note: You cannot record a voice name during
an active call.
4 Press A under Save.
Group Call Information
While you are in a Group call, the following
appears on the screen:
• The name of the Group
• The name or the Direct Connect number of the
person speaking
• The number of members who are participating in
the Group call
Group Call Details
During a Group call, you can view details about the
other group members, such as their name or Direct
Connect number, and their status on the call.
To view Group call details, press A under
Details.
In the Details view, these icons appear next to
member names or Direct Connect numbers:
The member of the Group who is speaking.
T
A member of the Group who is active on the
A
Group call, but not speaking.
A member of the Group who has exited the
O
call.
A member of the Group who could not be
U
reached on the Group call.
A member of the Group whose status is
u
unknown.
23
Page 34

Making Calls
Sending Groups Using Nextel Direct
SM
Send
You can send a Group using Direct Send so that
the person who receives the Group can use the
list.
1 From Contacts or the recent calls list, scroll to or
select the Group you want.
2 Press m.
3 Select Send Group.
4 To include yourself in the Group, press A
under Yes. -or-
To exclude yourself from the Group, press A
under No.
Note: If you choose to include yourself and the
Group already contains 20 members, you
will be prompted that the list is full. You
will be excluded from the list.
5 Enter the Direct Connect number of the person
you want to send the Group to. -or-
Select Browse to select a contact from Recent
Calls, Contacts, or Memo.
6 Press O.
7 To send the Group, push the PTT button.
The Group will display in the recent calls list on
the phone that you send the Group to.
24
Talkgroup Calls
Using Predefined Talkgroups
A Talkgroup is a predetermined group that has
been provisioned by Nextel or an account
administrator. Talkgroups are limited by network
(fleet) and local markets. They can accomodate
groups up to 100 members in the local market.
Before you can make or receive Talkgroup calls, a
Talkgroup must be established. After the Talkgroup
is established, you must join the Talkgroup.
Joining a Talkgroup
When you enable security, you receive a list of
Talkgroups that have been set up for you if you
subscribe to this service. The Talkgroup list is
saved to Contacts.
To receive Talkgroup calls made to any of these
Talkgroups, you must join the Talkgroup.
1 Press A under Contcs. -or-
From the main menu, scroll to Contacts and
press O.
2 Scroll to the Talkgroup you want to join.
3 Press A under Join.
Page 35

Talkgroup Calls
Note: You will now be able to receive
communications from this Talkgroup only.
You can only monitor one Talkgroup at a
time.
Setting Up More Talkgroups
You can set up more Talkgroups in 3 ways:
• Using Talkgroup Management* on MyNextel at
www.nextel.com
* You must be an account administrator to use Talkgroup
Management.
• Contacting your Nextel Sales Representative at
the time of activation
• Using Wireless Manager to create, manage, and
delete Talkgroups
When you create your Talkgroups, you can select
your own Talkgroup numbers.
You can join a new Talkgroup by pressing # and
entering the number using the keypad. Then press
A under Join.
Making Talkgroup Calls
1 Press #. Then enter the Talkgroup number
using the keypad. -or-
Choose the Talkgroup name from Contacts or
recent calls list.
2 Proceed as if making a Direct Connect call.
Receiving Talkgroup Calls
To answer a Talkgroup call:
Proceed as if answering a Direct Connect call.
Only one person at a time may speak on a
Talkgroup call.
The Direct Connect number or name of the
person who is speaking will appear on the
display below the Talkgroup number.
Turning off Talkgroup Calls
To set your phone to prevent you from hearing
your Talkgroup calls:
1 From the main menu, select Settings > DC/GC
Options > Tkgrp Silent.
2 Set this option On.
To set your phone to let you hear your Talkgroup
calls:
Set Tkgrp Silent to Off in step 2.
25
Page 36

Making Calls
Receiving Calls
Phone Calls
When you receive a phone call, your phone rings,
vibrates, or lights up its backlight.
Answering
Press s. -or-
Press O. -or-
Press A under Yes. -or-
Press any number key.
To answer a call by pressing any number key, you
must have the Any Key Ans feature turned on (see
See “Phone Calls Features” on page 144).
Sending to Voice Mail
Press e. -or-
Press A under No.
Ending
Press e.
Direct Connect® Calls
When you receive a Direct Connect call, your
phone emits a chirping sound or vibrates.
26
Answering
1 Wait for the caller to finish speaking.
2 Press and hold the PTT button on the side of
your phone. Begin talking after your phone emits
a chirping sound.
3 Release the PTT button to listen.
Ending
Press e. -or-
Press A under Exit.
A Direct Connect call ends automatically if there is
no activity on the call for a few seconds.
Choosing a Number to Call
You can choose the number you want to call in
many ways:
• Enter the number on the keypad.
• Say a voice name into your phone. See “Using a
Voi ce N ame”.
• Use Speed Dial or Turbo Dial
call. See See “Using Speed Dial and Turbo
Dial®” on page 27.
• Redial the last phone number called. See See
“Redialing the Last Number” on page 28.
®
to make a phone
Page 37

Choosing a Number to Call
• Select the number from the recent calls list. See
See “Making Calls From the Recent Calls List”
on page 31.
• Select the number from Contacts. See See
“Contacts” on page 44.
• Select a number stored in Datebook. See See
“Making Calls From Datebook and Datebook
Reminders” on page 139.
• Use One Touch Direct Connect to make a Direct
Connect call. See See “Setting One Touch
Direct Connect®” on page 57.
• Use the number in Memo. See See “Memo” on
page 51.
• Select the number in a text message you have
received. See See “Calling a Number in a
Message” on page 94 and See “Calling and
Storing Numbers” on page 100.
Using a Voice Name
If you have created a voice name in Contacts for
the number you want to call, say the voice name
into your phone to enter the number. See page 45
for information on voice names.
You can use a voice name to enter a number.
1 Press and hold t until a prompt appears telling
you to say the voice name.
2 Speaking into the microphone, say the voice
name assigned to the number you want to call.
Your phone plays the name back to you.
3 If you are making a phone call, the call is placed
automatically.
Tip: To stop a phone call from being completed,
press e.
If you are making a Direct Connect call, press
and hold the PTT button to place the call.
Using Speed Dial and Turbo Dial
Each phone number stored in Contacts is assigned
a Speed Dial number which you can use to call that
number.
Speed Dial
1 From the idle screen, use the keypad to enter
the Speed Dial number assigned to the phone
number you want to call.
2 Press #.
3 Press s.
Turb o Dial
From the idle screen, press and hold the Speed
Dial number (1 through 9) assigned to the phone
number you want to call.
®
27
Page 38

Making Calls
Redialing the Last Number
Press and hold s to place a call to the last phone
number you called.
Missed Phone Calls
When you miss a call, this icon V and the number
of phone calls you have missed appear briefly.
If you want to dismiss the missed call message,
press A under Back. -or-
If you want to view the missed call on the recent
calls list, press A under View.
Using Speakerphone
Turning on speakerphone makes incoming sound
come out of the phone’s speaker instead of the
earpiece. Speakerphone is available whenever you
are on an active phone call.
To turn speakerphone on or off:
Press A under Spkr. -or-
Press t.
28
Using Mute
Muting calls lets you listen to incoming sound
without transmitting sound. Mute is available
whenever you are on an active call.
To turn mute on:
Press A under Mute.
While mute is on, Unmute appears as a display
option.
To turn mute off:
Press A under Unmute.
Making Emergency Phone Calls
Your phone supports emergency calling.
Emergency phone calls can be made even when
your SIM card is blocked or not in your phone.
Dial 911 to be connected to an emergency
response center. If you are on an active call, you
must end it before calling 911.
When you make an emergency call, your phone’s
GPS Enabled feature can help emergency service
personnel find you, if you are in a location where
your phone's GPS antenna has established a clear
view of the open sky and your local emergency
Page 39

Making Emergency Phone Calls
response center has the equipment to process
location information. See See “GPS Enabled” on
page 125, and particularly See “IMPORTANT:
Things to Keep in Mind” on page 125 and See
“Making an Emergency Call” on page 126, for more
information on the limitations of this feature.
Because of the limitations of this feature, always
provide your best knowledge of your location to the
emergency response center when you make an
emergency call.
Important: Emergency calls cannot be placed
Important: If you have not registered on the
while the keypad is locked.
network, emergency calls cannot be
placed while your SIM card is in your
phone.
Important: If you are bringing your phone number
to Nextel from your previous carrier,
you may receive a temporary telephone
number while your Nextel phone is
being prog rammed with your
permanent phone number. If you make
a call to 911 and the call fails, the 911
emergency response center will not be
able to call you back on your Nextel
phone if in the meantime, your Nextel
phone has been programmed with your
permanent telephone number. If the call
is disconnected before location and
details have been provided, call 911
again and advise that you were
disconnected.
29
Page 40

Recent Calls
The recent calls list stores information associated
with calls you have made and received and call
alerts you have received. It also stores My Info and
contact information sent to you from other phones.
The recent calls list stores up to 20 items.
Calls and Call Alerts
The recent calls list stores the numbers of up to 20
of the most recent calls you have made and
received.
If the number of a recent call is stored in Contacts,
the following information appears:
• The name assigned to the number
• The Contacts type icon associated with the
number. If the Contacts entry containing the
number has more than one number or address
<> surrounds the Contacts type icon.
stored,
For information on Contacts types, see page 44.
The Direct Connect number Contacts type icon
appears when you receive a Direct Connect call or
call alert, even if the number is not stored in
Contacts.
30
Call alerts you have received appear as Direct
Connect calls. Like all items in the recent calls list,
they remain listed until you delete them or until
they reach the end of the list.
For phone calls, an additional icon appears giving
information about the call:
A call you made.
X
A call you received.
W
A missed call. Missed calls appear on the
V
recent calls list only if you have Caller ID.
When you select a call to view its details, you see
information such as the name associated with the
call, the number, date, time, and duration of the
call.
My Info From Other Phones
The recent calls list stores My Info from other
phones. See “Sending My Info and Contact
Information” on page 112.
This icon
phones on the recent calls list, along with the
Direct Connect number of the person who sent the
information.
j appears with My Info from other
Page 41

Contact Information From Other Phones
When you select My Info from other phones to view
its details, you see all the information sent.
If you receive My Info from the same phone more
than once, only the most recently sent version
appears in the recent calls list.
Contact Information From
Other Phones
The recent calls list stores contact information sent
from other phones. This information comes from
the other phone’s Contacts list or recent calls list.
See “Sending My Info and Contact Information” on
page 112.
This icon
the recent calls list.
Contact information in the recent calls list displays:
• The name contained in the contact information
• The Contacts type icon associated with the
d appears with contact information on
number or address contained in the contact
information. If the item contains more than one
number or address stored,
Contacts type icon.
<> surrounds the
The name or Direct Connect number of the person
who sent the contact information appears as a
separate item on the recent calls list, above the
information sent. If one person sends you more
than one item of contact information, all the items
appear below the person’s name or Direct Connect
number.
When you select contact information to view its
details, you see the name or Direct Connect
number of the person who sent the information and
all the information in the item.
If you receive contact information with the same
name from the same phone more than once, only
the most recently sent version appears in the
recent calls list.
Viewing the Recent Calls List
1 From the main menu, select Recent Calls.
2 Scroll through the list.
To view the details of an item on the list:
From the recent calls list, select the item you
want information on.
Tip: To view the details of more items, keep
scrolling.
31
Page 42

Recent Calls
Storing Items to Contacts
1 From the recent calls list, scroll to or select the
item you want to store.
2 Press A under Store. -or-
If Store is not one of your options: Press m.
Select Store or Update Contacts.
Tip: If the item you want to store is a call, Store
does not appear if the number is already
stored in Contacts.
3 To store the item as a new entry, select [New
Contact]. -or-
To store the number to an existing entry, select
the entry.
Note: Storing My Info or contact information
from another phone to a Contacts entry
that has a name assigned to it does not
change the name of the Contacts entry.
4 If the item you want to store is a call, you must
assign a Contacts type to the number:
With the Contacts type field highlighted, scroll
left or right to display the Contacts type you want
to assign the number.
5 If you want to add more information to the entry,
follow the applicable instructions in “Creating
Entries” on page 46.
32
6 Press A under Done.
Deleting Items
To delete an item from the recent calls list:
1 From the recent calls list, scroll to or select the
item you want to delete.
2 Press A under Delete. -or-
If Delete is not one of your options: Press m.
Select Delete.
3 Press O or press A under Yes to confirm.
To delete all items on the recent calls list:
1 From the recent calls list, press m.
2 Select Delete All.
3 Press O or press A under Yes to confirm.
Making Calls From the Recent Calls List
1 From the main menu, select Recent Calls.
2 Scroll to the item containing the number you
want to call.
• If you scroll to a call, you can make a call to
the number that made the call. If the number
is stored in Contacts, you can make a call to
any of the numbers stored with it.
Page 43

Making Calls From the Recent Calls List
• If you scroll to My Info from another phone,
you can make a call to the Direct Connect
number of the phone that sent the
information.
• If you scroll to contact information from
another phone, you can make a call to any of
the numbers in the contact information.
3 To place the call now, go to step 4. -or-
Scroll left or right to display the Contacts type for
the number you want to call.
4 To make a phone call, press s. -or-
To make a Direct Connect call, press the PTT
button.
You can also make calls while viewing the details
of an item on the recent calls list:
1 From the recent calls list, select the item
containing the number you want to call.
• If you select a call or contact information from
another phone, you can make a call to the
number shown first on the details screen.
• If you scroll to My Info from another phone,
you can make a call to the Direct Connect
number of the phone that sent the
information.
2 To make a phone call, press s. -or-
To make a Direct Connect call, press the PTT
button.
33
Page 44

Call Alerts
Sending a call alert lets the recipient know you
want to talk to him or her on a Direct Connect call.
When you send a call alert, the recipient’s phone
emits a series of beeps, or vibrates, and displays
your name or Direct Connect number.
The recipient can:
• Answer — begin a Direct Connect call with the
sender
• Queue — store the call alert to the call alert
queue, which is a list of call alerts
• Clear — dismiss and delete the call alert
Sending Call Alerts
1 Enter the Direct Connect number you want to
send to, as you would when making a Direct
Connect call.
2 Press A under Alert. Ready to Alert appears
on the display.
3 Press the PTT button until Alert Successful
appears on the display.
Note: If the alert is not successful, this may
mean the person you are trying to reach is
on a call or has the phone turned off.
34
Receiving Call Alerts
When you receive a call alert, you must answer,
queue, or clear it. You cannot receive phone calls
or Direct Connect calls until you do.
To answer a call alert:
Press the PTT button to make a Direct Connect
call to the sender.
To queue a call alert:
Press A under Queue.
To clear a call alert:
Press O. -or-
Press A under Clear.
Note: The recent calls list also stores call alerts
you have received. They appear as Direct
Connect calls. Call alerts remain in your
recent calls list until you delete them or
until they reach the end of the list.
Using the Call Alert Queue
When you queue a call alert, it remains in the call
alert queue until you make a Direct Connect call to
the sender or delete it.
Page 45

Using the Call Alert Queue
Viewing Call Alerts
1 From the main menu, select Call Alert.
2 Scroll through the list.
Viewing Date and Time
To view the date and time a call alert was received:
1 From the main menu, select Call Alert.
2 Select the call alert you want information on.
Responding to Call Alerts in the
Queue
After you queue a call alert, you can respond to it
by making a Direct Connect call to the sender or
sending a call alert to the sender.
Making a Direct Connect Call to the Sender
1 From the main menu, select Call Alert.
2 Scroll to the call alert you want to respond to.
3 Press the PTT button to begin the call.
This removes the call alert from the queue.
Sending a Call Alert to the Sender
1 From the main menu, select Call Alert.
2 Scroll to the call alert you want to respond to.
3 Press A under Alert. Ready to Alert appears
on the display.
4 Press the PTT button until Alert Successful
appears on the display.
Deleting Call Alerts
To delete a call alert from the queue:
1 From the call alert queue, scroll to the call alert
you want to delete.
2 Press m.
3 Select Delete.
4 Press O or press A under Yes to confirm.
To delete all call alerts from the queue:
1 From the call alert queue, press m.
2 From the call alert menu, select Delete All.
3 Press O or press A under Yes to confirm.
Sorting Call Alerts
Tip: You must have at least one call alert in the
queue to access this feature.
To sort call alerts by the order they were received:
1 From the main menu, select Call Alert.
2 Press m.
3 Select Sort By.
4 Select First on Top or Last on Top.
35
Page 46

Direct Talk
SM
Off-Network Walkie-Talkie
Direct Talk allows direct two-way phone-to-phone
communications between two or more phones
equipped with Direct Talk. You can make and
receive Direct Talk calls even when network
service is not available. You can talk to anyone on
your code and channel within your range.
Note: Range will vary based on terrain,
man-made structures and atmospheric
conditions.
Direct Talk allows you to:
• Use code or private mode operation
• Use up to 10 channels
Note: Direct Talk is not compatible with older
Family Radio Services products.
The following features and main menu items will
not be available while in Direct Talk mode:
• On-network phone calls
• On-network Direct Connect calls or Group
Connect Calls
• Wireless Data Services
• Data transmission
36
• Incoming message notification
• Musical ring tones
• Call forwarding
• Messages
• Call Timers
• Call alerts
• Voice records
Using Direct Talk
To set your phone to Direct Talk:
1 From the main menu, scroll to DirecTalk and
press A under Select.
2 Select Go To DirecTalk.
Switching to DirecTalk Please Wait displays.
After a few seconds, the Direct Talk idle screen
appears. DT Ready appears on the first line of the
display. The code you are set to appears on the
second line of the display. The channel you are set
to appears on the third line of the display.
Note: When switching from the network to Direct
Talk, the last channel and code that were
set appear on the idle screen.
While in Direct Talk, this icon m appears on the
display, indicating there is no network signal and
Direct Talk is active.
SM
Page 47

Exiting Direct Talk
To set your phone to network mode when Direct
Talk is active:
1 From the Direct Talk idle screen, press m.
2 Scroll to DT Options and press A under
Select.
3 Select Exit DirecTalk.
Switching to Network Please Wait displays. After
a few seconds, the network idle screen appears.
SM
Talk Range
Phones used in Direct Talk mode should be a
minimum of 6 feet apart to maximize performance
and improve transmission range.
Channels and Codes
Your phone has 10 channels and 15 codes.
Channels are divided into sets of frequencies that
allow you to make and receive Direct Talk calls.
Other parties may also be talking on the same
channel.
Codes help minimize interference from unwanted
messages and other disturbances when you are on
the same channel as others.
Channels and Codes
To have a conversation, all parties must be on the
same channel and code. For private Direct Talk
calls, the person you are calling must be in Direct
Talk and set to the same channel to which you are
set in order to receive your call.
Note: When making a code call, all parties that
are on your code and channel can hear
your conversation.
To set a channel:
1 From the Direct Talk idle screen, press A
under Edit.
2 Scroll to Channel.
3 Press A under Edit.
4 Select a channel.
5 When you are finished, press A under Back to
return to the idle screen.
To set a code:
1 From the Direct Talk idle screen, press A
under Edit.
2 Scroll to Code.
3 Press A under Edit.
4 Select a code.
5 When you are finished, press A under Back to
return to the idle screen.
37
Page 48

Direct Talk
SM
Making and Receiving Code Calls in
Direct Talk
To make a code call using Direct Talk:
1 Press and hold the PTT button. DT Transmit
appears on the first line of the display. Begin
speaking after your phone emits the Direct Talk
tone.
2 Release the PTT button to listen.
The tone emitted from your phone when making a
Direct Talk call is 4 beeps and sounds different
from the standard tone heard with on-network
Direct Connect and Group Connect calls.
If you receive an er ror message:
• There may be no parties on your channel or
code.
• You are out of range.
When you receive a code call using Direct Talk, DT
Receive appears on the first line of the display.
38
SM
Mode
Receive All
You can set your phone to receive Direct Talk
transmissions from any phone that is set to the
same channel, regardless of the code (1-15), by
setting the code to Receive All. When you receive
transmissions with the code set to Receive All,
the display changes from Receive All to the code
on which the transmission was received.
Note: You cannot initiate a code call when the
code is set to Receive All. If you press
the PTT button with the code set to
Receive All, you will receive an error
message.
To set the code to Receive All:
1 From the Direct Talk idle screen, press A
under Edit.
2 Scroll to Code.
3 Press A under Edit.
4 Select Receive All.
5 When you are finished, press A under Back to
return to the idle screen.
Page 49

Private Direct TalkSM Calls
Private Direct TalkSM Calls
You can have a private conversation with another
person using Direct Talk. When on a private Direct
Talk call, no other parties can hear your
conversation. In order to make a private Direct Talk
call, you must use the valid Nextel 10-digit
Personal Telephone Number (PTN) of the person
you are calling. The person you are calling must be
in Direct Talk mode and set to the same channel to
receive your call.
If you receive an er ror message:
• You may not be using a valid PTN.
• The person that you are trying to reach may not
be in Direct Talk mode.
• The person that you are trying to reach is set to
a different channel or is out of range.
Private Only
To limit Direct Talk to private conversation only, set
your code to Private Only. In this mode, code calls
will be ignored and only private calls can be made
or received.
Note: You will be required to enter a valid PTN
before pressing the PTT button.
To set the code to Private Only:
1 From the Direct Talk idle screen, press A
under Edit.
2 Scroll to Code.
3 Press A under Edit.
4 Select Private Only.
Making a Private Direct TalkSM Call
1 Enter the 10-digit PTN of the person you want to
call on your channel. -or-
Scroll to a number or name in Contacts. -or-
Scroll to a number in the recent calls list.
2 Press and hold the PTT button. Begin speaking
after your phone emits the Direct Talk tone.
3 Release the PTT button to listen.
The number or name of the person you are calling
will appear in the first line of the display.
Receiving a Private Direct TalkSM Call
The number or name of the person who initiated
the call will appear in the first line of the display.
Ending a Private Direct TalkSM Call
A private Direct Talk call will end if there is no
communication for 6 seconds.
The display will return to the idle screen.
39
Page 50

Direct Talk
SM
Making Emergency Calls in Direct TalkSM Mode
Emergency phone calls can be made in Direct Talk
mode as long as you are within a Nextel coverage
area.
Dial 911 to be connected to an emergency
response center. If you are on an active Direct Talk
call, you must end it before calling 911.
Setup Options
Direct Talk setup options are available in the DT
Options screen in both network and Direct Talk
modes.
To access Setup Options in network:
1 From the main menu, select DirecTalk.
2 Select Setup.
To access Setup Options in Direct Talk:
1 From the main menu, select DT Options.
2 Select Setup.
You can set your phone to:
• Launch directly into Direct Talk when you select
DirecTalk from the main menu.
40
• Notify you periodically with a tone that you are in
Direct Talk.
Using Direct Launch
To set your phone to launch into Direct Talk when
you select DirecTalk from the main menu:
1 From the setup screen, scroll to Direct Launch
and press A under Change.
2 Select On.
Note: If Direct Launch is set to On, you will not
see DT Options when you select
DirecTalk from the main menu. In order to
have access to your setup options, Direct
Launch must be set to Off. Or you can
access setup options while in Direct Talk
mode by pressing m and selecting DT
Options.
To turn off Direct Launch:
1 From the setup screen, scroll to Direct Launch
and press A under Change.
2 Select Off.
Your phone now displays DT Options when you
select DirecTalk from the main menu.
Page 51

Using State Tone
To set your phone to notify you with a tone that you
are in Direct Talk:
1 From the setup screen, scroll to State Tone and
press A under Change.
2 Select the time frame during which you want to
be notified that you are in Direct Talk.
For example, if you select 1 hour, you will be
notified every hour that you are in Direct Talk.
To turn off State Tone:
1 From the setup screen, scroll to State Tone and
press A under Change.
2 Select Off.
Setup Options
41
Page 52

Entering Text
You can enter text into your phone using the
traditional method of pressing a key several times
for each character, or by pressing a key once for
each letter while words likely to be the one you
want are chosen from a database. You can also
enter symbols and numbers into a text field.
In screens that require you to enter text, you see
the following icons. These icons tell you which text
input mode you are using:
Alpha — Press a key several times for each
l
character.
Word — Press a key once for each letter
j
while words likely to be the one you want are
chosen from a database.
Symbols — Enter punctuation and other
i
symbols.
Numeric — Enter numbers.
k
When you access a screen that requires you to
enter text, you start in the mode last used.
To choose a text input mode:
1 At a screen that requires you to enter text,
press m.
42
2 Select the text input mode you want to use. A
checkmark appears next to the current mode.
Using Alpha Mode
• Press any key on the keypad to enter the letters,
numbers, and symbols on that key. For
example, to enter the letter Y, press 9 three
times.
• Type a letter then scroll up to make that letter
uppercase, or type a letter then scroll down to
make that letter lowercase.
• See “Special Function Keys” on page 43 for
more information on adding spaces,
capitalization, and punctuation.
Using Word Mode
In Word mode, T9 Text Input analyzes the letters
on the keypad button you press and arranges them
to create words. As you type, T9 Text Input
matches your keystrokes to words in its database
and displays the most commonly used matching
word. You can add you own words to this
database.
Entering a Word
1 Select Word as your text input mode.
Page 53

Special Function Keys
2 Type a word by pressing one key for each letter.
For example, to type “test” pr ess 8 3 7 8.
The displayed word may change as you type it.
Do not try to correct the word as you go. Type to
the end of the word before editing.
3 If the word that appears is not the desired word,
press 0 to change the word on the display to
the next most likely word in the database.
Repeat until the desired word appears.
If the desired word does not appear, you can add it
to the database.
Adding Words to the Database
1 Select Alpha as your text input mode.
2 Type the word using Alpha mode.
3 Select Word as your text input mode.
4 Press #.
The word you typed in Alpha text entry mode is
now in the database.
Note: You cannot store alphanumeric
combinations, such as Y2K.
Choosing a Language
To change the language of the database:
1 At a screen that requires you to enter text,
press m.
2 Select Languages.
3 Select the language you want for your database.
Special Function Keys
Some of the phone’s keys assume different
functions while in Alpha or Word mode.
Spaces
Press # for a space.
Capitalization
When you press and hold the # key, it acts as a
3-way toggle. Press and hold # to make the next
letter typed uppercase (shift), to make all
subsequent letters typed uppercase (caps lock), or
to go back to lowercase letters.
These icons appear in the top row of your display:
m or X
n or W
Shift is on.
Caps lock is on.
43
Page 54

Entering Text
When neither of these icons appear, letters typed
are lowercase. Scrolling up after typing a letter
makes that letter uppercase.
Note: Your phone automatically makes the first
letter of a sentence uppercase.
Punctuation
Press 1 or 0 to insert punctuation. Continue to
press the key to view the list of symbols available
through that key. Pause to select the symbol you
want.
Note: Additional punctuation symbols are
available in Symbols mode.
Using Numeric Mode
1 Select Numeric as your text input mode.
2 Press the number buttons on your keypad to
enter numbers.
Using Symbols Mode
1 Select Symbols as your text input mode.
A row of symbols appears along the bottom of
the phone’s display. Scroll right to view the
complete row.
2 Press O to select the highlighted symbol.
44
Page 55

Contacts
Contacts stores up to 600 numbers or addresses.
Each Contacts entry can store several numbers or
addresses.
Information stored in Contacts is saved on your
SIM card.
A Contacts entry contains:
• A name — A name is required if you are storing
more than one number or address to the entry;
otherwise, it is optional. Typically, this is the
name of the person whose contact information is
stored in the entry.
• A ring tone — You can assign a ring tone to
each entry. This is the sound your phone makes
when you receive phone calls or call alerts from
any of the numbers stored in the entry.
• A Contacts type — Each number or address
stored must be assigned a Contacts type:
Mobile phone number
A
DC Direct Connect number
B
Work1 phone number
C
Work2 phone number
D
Home phone number
E
Email email address
F
Fax phone number
G
Pager phone number
H
Talkgroup Talkgroup number
I
Group Group
S
IP IP address
J
Other phone number
K
45
Page 56

Contacts
• A number or address — Each Contacts entry
must contain a number or address. This may be
any type of phone number, Direct Connect
number, Group number, Talkgroup number,
email address, or IP address.
Note: You can store numbers up to 64 digits
long, but every 20 digits must be
separated by a pause or wait. See
“Creating Pauses and Waits” on page 49.
• A Speed Dial number — When you store a
phone number, it is assigned a Speed Dial
number. You can accept the default Speed Dial
number or change it.
• A voice name — If you create a voice name for a
number, you can then dial that number by
saying the voice name into your phone. This
icon
P appears to the left of the Contacts type
icon if a voice name is assigned.
Viewing Contacts
To access Contacts:
From the main menu, select Contacts. -or-
If you are on a call: Press m. Select Contacts.
To view entries:
1 From the Contacts list, scroll to the entry you
want to view.
46
2 If an entry has more than one number or
address stored,
icon. Scroll left or right to view the icon for each
number stored in the entry.
3 Press O to view the entry.
4 Scroll to view the other numbers and addresses
stored for the entry.
Tip: To view more entries, continue scrolling.
<> surrounds the Contacts type
Searching for a Name
To search for a name in Contacts:
1 From the Contacts list, press A under Search.
-or-
If Search is not one of your options: Press m.
Select Search.
2 Enter the name you want to see.
3 Press O.
Your phone finds the name you entered or the
nearest match.
Showing Only Direct Connect®
Numbers, Groups, and Talkgroups
To set Contacts to show only entries that contain
Direct Connect numbers, Groups, and Talkgroups:
1 From the Contacts list, press m.
Page 57

Creating Entries
2 Select Filter.
3 Set this option to Show DC.
To set Contacts to show all entries:
1 From the Contacts list, press m.
2 Select Filter.
3 Set this option to Show All.
Creating Entries
A number or address and a Contacts type are
required for all Contacts entries. Other information
is optional. You may enter the information in any
order by scrolling through the entry details.
After you have entered the number or address,
Contacts type, and any other information you want,
you can press A under Done to save the entry to
Contacts.
To cancel a Contacts entry at any time press, e to
return to the idle screen.
To create a Contacts entry:
1 To access the entry details screen:
Select Contacts > [New Contact]. -or-
From the Contacts list, press m. Select New
Contact.
2 If you want to assign a name to the entry:
Select Name.
Enter the name. When you are finished,
press O.
Tip: Press A under Browse to select a name
already in Contacts.
3 If you want to assign a ring tone to the name:
Select Ringer.
Select the ring tone you want to assign.
4 To assign a Contacts type to the number or
address being stored:
Select the Contacts type field.
Select the Contacts type you want to assign.
Note: For information about creating Groups,
see “Creating Groups in Contacts” on
page 42.
5 To store a number or address:
Select the # field (or ID for an email address, or
IP for an IP address).
Enter the number or address. For phone
numbers, use the 10-digit format. For email
addresses, see “Entering Text” on page 42.
Tip: Press A under Browse to select a
number or address from Contacts, the
recent calls list, or Memo.
47
Page 58

Contacts
When you are finished, press O.
6 If you want to assign more options to the
number, select [Options]. See “Assigning
Options”.
7 If you want to add more numbers or addresses
to the entry:
Scroll past the information you already entered.
Enter the additional information for the entry
using step 2 through step 6. You must assign a
name to the entry, if you have not already.
8 Press A under Done.
Assigning Options
1 If you have not already, select [Options].
2 The default Speed Dial number assigned to a
phone number is displayed in the Sp eed # field.
This is always the next available Speed Dial
location.
If you want to assign the phone number to a
different Speed Dial location:
With the Speed # field highlighted, press O.
Press A under Delete to delete the current
Speed Dial number.
Enter the new Speed Dial number using the
keypad.
48
When you are finished, press O.
3 If you want to create a voice name for a phone
number, select Vo ic e Na m e .
As directed by the screen prompts, say and
repeat the name you want to assign to the
number. Speak clearly into the microphone.
4 When you are finished, press A under Back.
Storing Numbers Faster
To store numbers to Contacts from the recent calls
list, see “Storing Items to Contacts” on page 32.
To store numbers to Contacts from Memo, see
“Memo” on page 51.
To store numbers to Contacts from the idle screen:
1 Use the keypad to enter the number you want to
store.
2 Press m.
3 Select Store N umber.
4 To store the number as a new entry, select [New
Contact]. -or-
To store the number to an existing entry, select
the entry.
5 With the Contacts type field highlighted, scroll
left or right to display the Contacts type you want
to assign the number.
Page 59

Editing Entries
6 If you want to add more information to the entry,
follow the applicable instructions in “Creating
Entries” on page 47.
7 Press A under Done.
Editing Entries
1 From the Contacts list, scroll to the entry you
want to edit.
2 Press A under Edit. -or-
If Edit is not one of your options: Press m. Select
Edit.
The entry details screen displays.
3 Follow the applicable instructions in “Creating
Entries” on page 47 to edit the various fields.
Deleting Entries
Delete an Entry
1 From the Contacts list, scroll to the entry you
want to delete.
2 Press m.
3 To delete the entire entry, select Delete
Contact.
4 Press O or press A under Yes to confirm.
Delete a Number or Address
1 From the Contacts list, scroll to the entry that
contains the number or address you want to
delete.
2 Scroll left or right to display the Contacts type for
the number you want to delete.
3 Press m.
4 Select Delete Number.
5 Press O or press A under Yes to confirm.
Note: If an entry contains only one number or
address, deleting the number or address
deletes the entry.
Checking Capacity
To see how many numbers are stored in Contacts:
1 From the Contacts list, press m.
2 Select Capacity.
Creating Pauses and Waits
When storing a number, you can program your
phone to pause or wait between digits while
dialing. A pause makes your phone pause for 3
seconds before dialing further. A wait makes your
phone wait for your response before dialing further.
49
Page 60

Contacts
This feature is useful when using voice mail or
other automated phone systems that require you to
dial a phone number and then enter an access
number.
To program a pause:
Press and hold * until the letter P appears.
The P represents a 3-second pause.
If you store 17035551235P1234, when you select
this number and make a call, your phone dials the
first 11 digits, pauses for 3 seconds, then dials the
last 4 digits.
If you want a pause longer than 3 seconds, press
and hold * more than once. Each P represents a
3-second pause.
To program a wait:
Press and hold * until the letter W appears.
The W means your phone waits before dialing
further.
If you store 17035551235W1234, when you select
this number and make a call, your phone dials the
first 11 digits and then waits. A message appears
asking if you want to send the rest of the digits.
Press A under Yes to dial the last 4 digits.
50
Tip: You can create pauses and waits while
dialing a number from the keypad. See
“Creating Pauses and Waits While Dialing”
on page 57.
International Numbers
When storing a number that you plan to use for
international calls, use Plus Dialing:
1 Press and hold 0 for two seconds. A “0”
appears, then changes to a “+”.
Note: The network translates the “+” into the
appropriate international access code
needed to place the call.
2 Enter the country code, city code or area code,
and phone number.
For information about making international calls,
see “Making International Calls” on page 57.
Page 61

Memo
Memo lets you store a number, make a call to that
number, and save it to Contacts.
To create a memo:
1 From the main menu, select Memo.
2 Enter the number using your keypad.
3 Press O.
To view the memo later:
1 From the main menu, select Memo.
To delete the memo:
1 From the main menu, select Memo.
2 Press and hold A under Delete.
3 Press O.
To edit the memo:
1 From the main menu, select Memo.
2 Enter the new number.
3 Press O.
To make a call to the memo number:
1 From the main menu, select Memo.
2 To make a phone call, press s. -or-
To make a Direct Connect call, press the PTT
button.
To store the memo number to Contacts:
1 From the main menu, select Memo.
2 Press m.
3 Select Sto re t o Cntcs.
4 To store the number as a new entry, select [New
Contact]. -or-
To store the number to an existing entry, select
the entry.
5 With the Contacts type field highlighted, scroll
left or right to display the Contacts type you want
to assign the number.
6 Press A under Done.
51
Page 62

Call Forwarding
Call forwarding sends calls to the phone numbers
you specify. You can forward all calls to one
number or forward missed calls to different
numbers depending on the reason you missed the
call.
You can forward phone lines 1 and 2
independently.
Forwarding All Calls
When you set your phone to forward all calls, an
icon appears in the top row of the display:
Phone line 1 is active; calls to phone line 1
G
are being forwarded.
Phone line 1 is active; calls to phone line 2
I
are being forwarded.
Phone line 1 is active; calls to phone lines 1
H
and 2 are being forwarded.
Phone line 2 is active; calls to phone line 1
J
are being forwarded.
Phone line 2 is active; calls to phone line 2
L
are being forwarded.
52
Phone line 2 is active; calls to phone lines 1
K
and 2 are being forwarded.
To forward all calls:
1 From the main menu, select Call Forward >
Forward > All Calls.
2 Select To.
If you specified a forwarding number for all calls
before, this number displays.
To forward calls to this number, press A under
Back.
To delete this number, press O, then press and
hold A under Delete.
3 To enter the number you want to forward calls
to:
Enter the number using your keypad. -or-
Press A under Search. Select Contacts,
Recent Calls, or Memo. Select the number you
want to enter.
4 Press O.
All your calls are now forwarded to the number you
specified.
Page 63

Turning Off Call Forwarding
Turning Off Call Forwarding
If you don’t want all your calls forwarded, turn the
feature off:
1 From the main menu, select Call Forward > To.
2 Set this option to Off.
All your calls are now sent to your phone.
Calls you miss are forwarded according to the
options set for missed calls. By default, missed
calls are forwarded to voice mail.
Forwarding Missed Calls
You can specify a forwarding number for each type
of missed call:
•If Busy — Your phone is on a call or transferring
data.
• If No Answer — You do not answer on the first
4 rings.
• If Unreachable — Your phone is out of
coverage or powered off.
Note: If you want a type of missed call sent to
voice mail, the call forwarding number for
that type of missed call must be your
voice mail access number. In most cases,
your voice mail access number is your
area code + first 3 digits of your PTN +
MAIL (6245). To verify your voice mail
access number, contact Nextel Customer
Care.
To forward missed calls:
1 From the main menu, select Call Forward >
Forward > Detailed.
2 Select If Busy to specify a forwarding number
for calls received when your phone is busy.
3 If you specified a forwarding number for this type
of call before, this number displays.
To forward calls to this number, press A under
Back and go to step 6. -or-
To delete this number, press O, then press and
hold A under Delete.
4 To enter the number you want to forward this
type of call to:
Enter the number using your keypad. -or-
Press A under Search. Select Contacts,
Recent Calls, or Memo. Select the number you
want to enter.
53
Page 64

Call Forwarding
5 Press O.
6 Repeat step 2 through step 5 for If No Answer
and If Unreachable.
7 When you are finished, press A under Back.
Viewing Call Forwarding Settings
1 From the main menu, select Call Forward >
Forward > All Calls.
2 With To highlighted, press A under Status.
54
Page 65

Advanced Calling Features
Call Waiting
Call Waiting lets you receive a second call while on
an active call. Call Waiting is always available,
unless you turn it off for a specific call.
If you are on a call and receive a second call, your
phone emits a tone and displays a message saying
you are receiving a second call.
To accept the second call and put the active call on
hold:
Press A under Yes.
To accept the second call and end the active call:
1 Press e.
Your phone rings with the second call.
2 Answer the second call.
To decline the second call:
Press A under No. If you subscribe to voice
mail, the call is forwarded to your voice mail box,
unless you set Call Forward for If Busy to a
different number.
Turn Off Call Waiting
To turn off Call Waiting during a call:
1 Press m.
2 Select In Call Setup > Call Waiting.
3 Set this option to Off.
Tip: To turn Call Waiting back on while still on
the call, set this option to On.
To turn off Call Waiting for the next call you make
or receive:
1 From the main menu, select Settings > Phone
Calls > Call Waiting.
2 Set this option to Off.
Call Waiting is turned back on when you end the
call.
Switching Between Calls
Any time you have one call active and one call on
hold, to make the call on hold active and put the
active call on hold:
Press A under Switch. -or-
If Switch is not one of your options: Press m.
Select Switch.
55
Page 66

Advanced Calling Features
Putting a Call on Hold
1 While on an active call, press m.
2 Select Hold.
If you want to make the call active again, press A
under Resume.
Calling 2 People
Putting a Call on Hold, Making a
Second Call
1 Place or receive a phone call.
2 While the call is active, press m.
3 Select 2nd Call. This puts the call on hold.
4 Enter the second phone number you want to
call.
Tip: For quick ways to enter the number,
press m.
5 Press s to place the call.
To end the second call and make the call on hold
active again:
Press e.
To make the call on hold active and put the active
call on hold:
Press A under Switch.
56
Merging 2 Calls into a 3-Way Call
After you put a call on hold and place a second
call, you can combine these calls into a 3-way call:
1 Press m.
2 Select Join.
All 3 people in the call can speak to and hear each
other.
Making a 3-Way Call
1 Place or receive a phone call.
2 While the call is active, press m.
3 Select 3 Way. This puts the call on hold.
4 Enter the second phone number you want to
call.
Tip: For quick ways to enter the number,
press m.
5 Press s to place the call.
6 Press A under Join.
All 3 people in the call can speak to and hear each
other.
Page 67

Creating Pauses and Waits While Dialing
Creating Pauses and Waits
While Dialing
You can enter a pause or wait while dialing a
number. For information on using pauses and
waits, see “Creating Pauses and Waits” on page
49.
To create a pause while dialing a phone number:
1 From the keypad, enter the digits you want to
occur before the pause.
2 Press m.
3 Select Insert Pause.
4 Enter the digits you want to occur after the
pause.
To create a wait while dialing a phone number:
1 From the keypad, enter the digits you want to
occur before the wait.
2 Press m.
3 Select Insert Wait.
4 Enter the digits you want to occur after the wait.
Making International Calls
Your service default is “International Calls
Restricted.” Contact Nextel Customer Care to
obtain international dialing access.
Calls placed between the United States and
Canada do not require an international access
code.
Plus Dialing lets you place an international call to
most countries without entering the local
international access code.
1 Press and hold 0 for two seconds. A “0”
appears, then changes to a “+”.
Note: The network translates the “+” into the
appropriate international access code
needed to place the call.
2 Enter the country code, city code or area code,
and phone number.
Setting One Touch Direct
Connect
One Touch Direct Connect sets your phone to call
the most recent Direct Connect number or Group
on the recent calls list, or a Direct Connect number
or Group you choose, every time you press the
PTT button.
To set your phone to call the most recent Direct
Connect number or Group on the recent calls list:
1 From the main menu, select Settings > DC/GC
Options > One Touch DC.
2 Set this option to Last Call.
®
57
Page 68

Advanced Calling Features
To set your phone to call a Direct Connect number
or Group you choose:
1 From the main menu, select Settings > DC/GC
Options > One Touch DC > Assigned
Number.
2 To enter the Direct Connect number or Group
number you want your phone to call every time
you press the PTT button:
Enter the number using your keypad. -or-
Press A under Search. Select Contacts,
Recent Calls, or Memo. Select the number you
want to enter.
Tip: If you are entering a Talkgroup number,
enter # before the number.
3 Press O.
To turn off One Touch Direct Connect:
1 From the main menu, select Settings > DC/GC
Options > One Touch DC.
2 Set this option to Off.
58
Call Timers
Call timers measure the duration of your phone
calls, Direct Connect or Group Connect calls, and
circuit data use, as well as the number of Kilobytes
sent and received by your phone:
•Last Call — displays the duration of your most
recent phone call.
• Phone Reset — keeps a running total of your
phone call minutes, until you reset it.
• Phone Lifetime — displays the total minutes of
all your phone calls.
• DC/GC Reset — keeps a running total of all of
your Direct Connect and Group Connect call
minutes, until you reset it.
• DC/GC Lifetime — displays the total minutes of
all your Direct Connect and Group Connect
calls.
• Circuit Reset — keeps a running total of all of
your circuit data use, until you reset it.
• Circuit Lifetime — displays the total minutes of
all of your circuit data use.
•Kbytes Reset — keeps a running total of the
number of Kilobytes sent and received by your
phone, until you reset it.
Page 69

Using Your Phone as a Modem
To view or reset a timer:
1 From the main menu, select Call Timers.
2 Select the feature you want to view or reset.
3 To view a feature without resetting: Press O
when you are finished viewing. -or-
To reset a feature: Press A under Reset.
Press O or press A under Yes to confirm.
Note: The values displayed by Call Timers
should not be used for billing. Call timers
are estimates only.
Using Your Phone as a
Modem
To use your phone as a modem with a laptop,
handheld device, or desktop computer:
1 Open the connector cover.
connector cover
2 With the phone’s display facing up, insert a data
cable’s connector into the accessory connector,
until you hear a click.
3 Insert the data plug into the data port of the
other device.
When used as a modem, your phone has these
data transfer modes:
• Circuit data — used for sending and receiving
faxes and for transferring large files
• Packet data — used for small file transfers such
as email
To use these services, you must install the iDEN
Wireless Data Services software (available
separately) and subscribe to a Nextel Wireless
Web access plan. For more information on setting
up your computer and your
and circuit data calls, go to nextel.com and click on
Wireless Data Services/ Wireless Web Access
under the Services tab.
i
355 phone for packet
59
Page 70

Advanced Calling Features
Making TTY Calls
To use your phone to make phone calls using a
teletypewriter (TTY) device:
1 Connect one end of a 2.5mm cable into the
audio jack on your phone. Connect the other
end of the cable to your TTY device.
2 Make sure that your phone’s TTY feature is on
and select the TTY mode you want to use.
3 Use your phone to enter phone numbers and
make calls.
When you make a TTY call, these icons appear on
the phone’s display:
Phone call is active.
N
Phone call is on hold.
O
TTY device features such as Turbo-Code,
High-Speed, and Interruption are not supported by
your phone. These features must be turned off or
disabled to use your TTY device with your phone.
Turning On the TTY Feature
Your phone’s TTY feature must be on if you want
to make TTY calls, set the TTY mode, or change
the TTY baud rate. To make sure the TTY feature
is on:
60
From the main menu, select Settings > Phone
Calls > TTY > Use TTY. This field must say On.
Choosing a Mode
Your phone supports these TTY modes:
•TTY — You type and read text on your TTY
device.
•VCO (Voice-Carry-Over) — You speak into your
phone and read text replies on your TTY device.
• HCO (Hearing-Carry-Over) — You type text on
your TTY device and listen to voice replies on
your phone speaker.
To change mode while not in a call:
1 From the main menu, select Settings > Phone
Calls > TTY > Type.
2 Select the TTY mode you want.
When you make a TTY call, the call begins in the
TTY mode you last selected.
To change mode during a call using your phone:
1 Press m.
2 Select In Call Setup > TTY > Type.
3 Select the mode you want.
To change mode during a call using your TTY
device, issue one of the following commands:
Page 71

Special Dialing Codes
• “VCO please” — to select VCO mode
• “HCO please” — to select HCO mode
• “HCO off please” — to turn off HCO mode
Important: When you are using HCO, the sound
coming from your phone speaker may
be uncomfortably loud. Use caution
when putting the phone to your ear.
(For information on setting the volume
of your phone speaker, see “Setting the
Volume” on page 135.)
Changing the TTY Baud Rate
By default, your phone’s TTY baud rate is set to
45.45, the baud rate required for TTY calls within
the U.S. To make calls outside the U.S., set your
TTY baud rate to 50.0.
To change the TTY baud rate:
1 From the main menu, select Settings > Phone
Calls > TTY > Baud.
2 Select the baud rate for your location.
Special Dialing Codes
Non-Emergency Numbers
Nextel supports many “non-emergency” numbers
(such as #77, 311,...) provided by local and state
governments. These numbers are used to report
non-emergency incidents. If the situation includes
imminent danger or loss of life, you should dial
911.
Telecommunications Relay Service
Nextel supports services for communicating with
speech and/or hearing impaired individuals. You
can dial 711 to reach a local Telecommunications
Relay Center. You will then be connected to your
destination number. Relay service works through a
Communications Assistant who reads messages
typed into a TDD/TTY device by a speech or
hearing impaired individual to you. The
Communications Assistant then types your spoken
messages to the hearing or speech impaired
individual. Telecommunications Relay Service is
available 24 hours a day, seven days a week, and
every call is strictly confidential.
Note: Using 711 to reach Telecommunications
Relay Service may not be available in all
areas.
61
Page 72

Nextel® Phone Services
Contact Nextel Customer Care to obtain these
services or for additional information:
Note: Some services are not available outside
of the continental United States.
Caller ID
Your phone can automatically display the phone
number or name (if the 10-digit phone number is
stored in your Contacts) of the person calling
(unless blocked by the caller), enabling you to
decide whether to take the call or forward it to voice
mail.
Caller ID information is not available on all calls.
Per-Call Blocking
You can block delivery of your phone number to
other Caller ID units for a single phone call:
Press * 6 7 before dialing the call.
Your Nextel phone number cannot be blocked from
calls made to 911, 800, 855, 866, 877, 888, or
other toll- free phone numbers.
62
Per-Line Blocking
You can permanently block delivery of your phone
number on every call you make.
To show your number on a per-call basis:
Press * 8 2 before dialing the call.
Alternate Line Service
With Alternate Line Service you can:
• Get separate bills for each phone line.
• Bring in an existing wireless or home phone
number to Nextel to activate on the second line.
• Have two different area codes (must be in same
market) to convey a local image to callers.
• Use different ringer styles so that you can tell
which line is receiving a call.
• Forward incoming calls to either your primary or
alternate line phone number.
• Choose an Alternate Line Service plan that fits
your needs.
In order to activate Alternate Line Service, contact
your Nextel Sales Representative or call Nextel
Customer Care.
Page 73

To set the active line (primary or alternate):
1 From the main menu, select Settings > Phone
Calls > Set Line.
2 Select the phone line you want to be the active
line.
When incoming calls are made to a non-active line,
these calls will be sent to voice mail without
ringing. See “Call Forwarding” on page 52.
Call Restrictions
You can prevent your phone from making or
receiving long distance, incoming, and outgoing
(except 911) calls.
Nextel® 411
You can call Nextel 411 within the continental
United States and Hawaii. Services include white
and yellow page listings, driving directions,
restaurant reservations, movie listings and
showtimes, and local event information.
You can get information listings, restaurant
information, and movie listings sent to you as a text
message.
Call Restrictions
63
Page 74

Ring Tones
To set the ring tone your phone makes when you
receive phone calls, message notifications, or call
alerts:
1 From the main menu, select Ring Tones.
2 Make sure Vib eAll is set to Off.
3 Scroll through the list of ring tones and select the
one you want to assign. Vibrate sets your phone
to vibrate instead of making a sound; Silent sets
your phone to neither vibrate nor make a sound.
Tip: Highlighting a ring tone lets you hear it.
4 Select the features you want to assign the ring
tone to.
5 When you are finished, press A under Done.
Note: This icon
set your phone to neither vibrate nor make
a sound for phone calls.
Setting Your Phone to Vibrate
You can set your phone to vibrate instead of
making a sound when you receive all phone calls,
Direct Connect calls, Group Connect calls, Group
Connect Plus calls, messages notifications, and
call alerts.
64
M appears on the display if you
1 From the main menu, select Ring Tones >
Vibe All.
2 Set this option to On.
Tip: Pressing the volume controls to turn down
the volume as far as possible sets VibeAll
to On.
To set your phone to vibrate instead of making a
sound for some features but not others:
1 From the main menu, select Ring Tones.
2 Make sure VibeAll is set to Off.
3 Select Vibrate from the list of ring tones.
4 Select the features you want to set to make no
sound.
5 When you are finished, press A under Done.
Note: To set ring options for Direct Connect calls
and Group Connect calls, see “Setting
Your Phone to Vibrate” on page 135.
Page 75

Ring and Vibrate
These icons indicate how the ringer is set.
Q The phone always vibrates instead of making
a sound.
The phone vibrates instead of making a
R
sound for phone calls.
Direct Connect calls, Group Connect calls,
u
and Group Connect Plus calls are heard
through the earpiece, not the speaker.
These icons may appear at the same time.
Ring and Vibrate
To set your phone to ring and vibrate when you
receive phone calls or call alerts:
1 From the main menu, select Ring Tones.
2 Make sure Vib eAll is set to Off.
3 Scroll through the list of ring tones and highlight
the one you want to assign.
4 Press m.
5 Select Assign w/Vibe.
6 Select the features you want to set to ring and
vibrate.
7 When you are finished, press A under Done.
This icon
S appears on the display.
Assigning Ring Tones to Contacts
You can set the ring tone your phone makes when
you receive phone calls or call alerts from
someone you have stored in Contacts.
1 From the main menu, select Ring Tones.
2 Make sure VibeAll is set to Off.
3 Scroll through the list of ring tones and select the
one you want to assign.
4 Select A Contact.
5 Select the Contacts entry you want to assign the
ring tone to.
Viewing Ring Tone Assignments
1 From the main menu, select Ring Tones.
2 Make sure VibeAll is set to Off.
3 Highlight any ring tone.
4 Press m.
5 Select Overview.
6 Scroll to view ring tones assigned to features
and Contact entries.
65
Page 76

Ring Tones
Downloading More Ring Tones
If you want to use other ring tones, you can
download them into your phone for a fee. Check
the Downloads menu option on your phone for a
catalog of additional items available for purchase
and download directly from your phone.
You can also go to www.nextel.com/downloads for
a wide selection of available ring tones and
downloading instructions.
Note: If you delete a ring tone from your phone,
you must purchase it again to download it
again.
Managing Memory
To view the amount of memory available for
custom ring tones:
1 From the main menu, select Ring Tones.
2 Make sure Vib eAll is set to Off.
3 Highlight any ring tone.
4 Press m.
5 Select Memory Usage.
Deleting custom ring tones frees memory.
66
Note: Ring tones are stored in your phone using
the same memory space used to store
messages, voice records, Java
applications, pictures, and wallpaper
images. Deleting some of these other
items frees memory for ring tones.
Deleting Custom Ring Tones
Deleting a ring tone from the list of ring tones
deletes it from all parts of your phone, including
Contacts.
To delete a custom ring tone:
1 From the main menu, select Ring Tones.
2 Make sure VibeAll is set to Off.
3 Scroll to the ring tone you want to delete.
4 Press m.
5 Select Delete.
6 Press A under Yes to confirm.
Page 77

Message Center
The message center manages your messages.
When you receive the following types of
messages, you can access them through the
message center:
• Voice mail messages
• Multimedia Messaging Service (MMS)
messages
• Short Message Service (SMS) messages
You can listen to or view these messages, delete
them, or continue to store them in the message
center.
The message center also lets you create and send
MMS messages. It stores messages you have sent
and lets you save drafts of messages you are
creating.
Accessing the Message Center
From the main menu, select Messages.
Message Center Options
After accessing the message center, select the
option you want:
•[Create Mesg] — begin creating an MMS
message.
• Voice Mail — access voice mail messages you
have received.
• Inbox — access MMS messages you have
received.
•Drafts — access MMS messages you have
created and saved but not sent.
•Sent Items — access MMS messages you have
created and sent.
•Net Alert — access over-the-air alerts that you
receive from Nextel.
•SMS — access SMS messages you have
received.
67
Page 78

Receiving Messages
When you receive a voice mail message,
Multimedia Messaging Service (MMS) message,
Short Message Service (SMS) message, or Net
alert, you have 2 ways to access the message:
• Respond to the message notification that
appears when the message is received.
• Dismiss the message notification and access
the message later through the message center.
Message Notifications
When you receive a message, your phone notifies
you with text on the display and a notification tone
or vibration. You can access the message or
dismiss the notification.
If you dismiss the notification, the message is not
deleted. It can be accessed through the message
center.
If you are not on a phone call when you receive a
message, your phone sounds a notification tone
every 30 seconds until you access the message,
you dismiss the notification, or the alert time-out
expires.
68
When you are on a phone call, you can receive
message notifications for all types of messages
except MMS messages. For other types of
messages, your phone may sound a notification
tone during the call or after you end the call,
depending on how you set your notification
options.
Setting Notification Options
To control whether your phone sounds message
notification tones while you are on phone calls:
1 From the main menu, select Settings > Phone
Calls > Notifications.
2 Select the option you want:
• Receive All — Tones sound during calls for
all types of messages except MMS
messages.
• Msg Mail Only — Tones sound during calls
for SMS messages; tones for all other types
of messages are held until you end calls.
• Delay All — Tones for all types of messages
are held until you end calls.
Note: Delay All is the default setting.
Tip: To set notification options during a call:
Press m. Select In Call Setup >
Notifications.
Page 79

Retrieving Messages
All your messages are stored in the message
center. The message center shows how many
messages you have of each type.
To retrieve your messages through the message
center:
1 From the main menu, select Messages.
2 Scroll to the type of message you want to
access.
3 Press O or press A under the display option
on the left.
Note: In order for you to access voice mail for
the first time you must access it by dialing
into your voice mail box using your PTN. If
there is already a message in your voice
mail box, then you can access your voice
mail through the message center.
Retrieving Messages
69
Page 80

Voice Mail Messages
Receiving a Message
When you receive a voice mail message, New
Voice Mail Message appears on the display.
To call Nextel’s voice mail system and listen to the
message:
Press A under Call.
To dismiss the message notification:
Press O or press A under Back.
If the caller leaves a message, this icon
appears on the display, reminding you that you
have a new message.
Accessing Voice Mail from the Message Center
From the main menu, select Messages > Voice
Mail.
Sending Unanswered Calls to Voice Mail
To send a phone call to voice mail instead of
answering it:
70
y
Press e. -or-
Press A under No.
Page 81

Nextel® Voice Mail
Note: To receive voice mail messages, you
must first set up your voice mail box.
Note: If you are bringing your phone number
from another carrier, we suggest you set
up your voice mail box after the number
you brought to Nextel is active on your
Nextel phone and your temporary phone
number is deactivated. If you set up your
voice mail box prior to this, all messages
and all settings (including your greeting
and password) will be lost when the
number you have brought to Nextel
becomes active.
Setting Up Your Voice Mail Box
Using your i355 phone, dial your 10-digit Nextel
Personal Telephone Number (PTN). For example:
7035557777. Follow the system instructions to
create a new 4- to 7-digit password, record your
name, and record a greeting. When the system
says, “Thank you for using Nextel Voice Mail,” your
mailbox is set up.
If you are calling from a phone other than your
i
355, dial your 10-digit Nextel PTN. When you hear
the greeting, press the star key to access your
voice mail box. The system will prompt you to enter
your password. Enter the last seven digits of your
Nextel PTN. For example: 5557777. This is your
temporary password.
You are in the main voice mail menu when you
hear the options listed below.
• To play your messages, press 1. (This option
plays only if you have new or saved messages.)
• To record a message, press 2.
• To change your greeting, press 3.
• To access your personal options, press 4.
If you press * while you are in a sub-menu, you
will go to the previous menu. If you press **,
you will go to the main voice mail menu. From the
main voice mail menu, press # to exit voice mail.
At any time, you may end the call by pressing e.
Playing Messages
When you receive a new voice mail message, you
can either listen to it immediately by pressing A
under Call, or later by pressing A under Back.
These are options available while you are listening
to your messages:
71
Page 82

Nextel® Voice Mail
• Backup — press 1.
• Rewind to beginning of message — press
11.
• Pause or continue the current message —
press 2.
• Fast forward — press 3.
• Fast forward to end of message — press 33.
• Play the date and time stamp — press 55.
These options are available while a message is
playing or after it has played:
• Forward the message to another subscriber —
press 6.
• Delete the message — press 7.
• Reply to a message — press 8.
• Save the message — press 9.
• Skip to the next message — press #.
Messages that are not saved or deleted remain in
your mailbox as new messages. All messages are
automatically deleted after 30 days.
To retrieve deleted messages, press * 3. This
option only applies to the current voice mail
session. If you end the call, the messages will be
permanently deleted.
72
Important: After exiting the voice mail session, you
cannot recover deleted messages.
Changing Your Password
1 From the main voice mail menu, press 4 to
access personal options.
2 Press 4 to access personal preferences.
3 Press 1 to modify password.
4 Enter your new password. It must be 4 to 7 digits
long.
Note: It is important that you choose a number
that is easy for you to remember, but hard
for someone else to guess. Passwords
using all the same digits, for example
4,4,4,4 or a sequential series of digits,
1,2,3,4, will not be accepted.
5 Press ** to return to the main menu.
Note: If you forget your password, contact
Nextel Customer Care.
Recording Your Name
When you send, reply to, or copy a message, your
name response precedes the message. To record
or re-record your name at any time:
1 From the main voice mail menu, press 4 to
access personal options.
Page 83

Recording Your Active Greeting
2 Press 4 to access personal preferences.
3 Press 3 to access the record your name
option.
4 Press 2 to record your name.
5 Press ** to return to the main menu.
Recording Your Active Greeting
You may want to include one or all of the following
options in your greeting so that callers will know
they are available.
• Press 1 to send a numeric message.
• Press 2 to send an operator-assisted message.
(This option is available only if you are a
subscriber of Operator Assisted Messaging.
Contact Nextel Customer Care for more
information.)
• Press # to skip the greeting and record a
message immediately.
To record or alter your greeting at any time:
1 From the main voice mail menu, press 3 to
change your greeting.
2 Press 1 to play, press 2 to record or
re-record, or press 7 to delete your active
greeting.
3 Record your greeting and press # when you
have finished.
4 Press ** to return to the main menu.
Advanced Voice Mail Features
Multiple Greetings
You can create up to five different greetings and
designate which greeting will be your active
greeting at any given time. The greeting that was
recorded during your initial voice mail box setup is
greeting 1. This is your default active greeting.
To record additional greetings:
1 From the main voice mail menu, press 3 to
access the greetings menu.
2 Press 4 to modify greetings.
3 Enter the greeting number you wish to create or
modify.
4 Press 2 to record a greeting.
5 Record your greeting and press # when you
have finished.
6 Press ** to return to the main menu.
To select your active greeting:
1 From the main voice mail menu, press 3 to
access the greetings menu.
2 Press 3 to select another greeting to be active.
73
Page 84

Nextel® Voice Mail
3 Enter the number of the greeting that you would
like to be active. The system will confirm your
active greeting number.
4 Press 1 to play your active greeting.
5 Press ** to return to the main menu.
Greetings Schedule
You can choose to have your greetings
automatically activated based on a pre-determined
time schedule. By activating the Greeting
Schedule, Greetings 1, 2, and 3 will automatically
play according to the time schedule listed below.
Greeting 1 Evenings and
Greeting 2 Weekday
Greeting 3 Weekday
To activate the greeting schedule:
1 From the main voice mail menu, press 3 to
access the greetings menu.
2 Press 9 to activate your greeting schedule.
3 Press ** to return to the main menu.
74
Weekends
Mornings
Afternoons
5:00 pm – 7:59 am,
Monday – Friday
24-hours, Saturday
and Sunday
8:00 am – 11:59 am
Monday – Friday
Noon – 4:59 pm
Monday – Friday
Note: The greeting schedule, when on, will
override any other greeting that you may
set as active. If a greeting is not recorded,
a system standard greeting will be played.
Automatic Playback
By default, the playback mode of your voice mail
service is set to normal. This feature automatically
plays and saves new messages when you log in.
To activate automatic playback:
1 From the main voice mail menu, press 4 to
access personal options.
2 Press 4 to access personal preferences.
3 Press 2 to access playback preferences.
4 Press 2 to switch between automatic and
normal playback.
5 Press ** to return to the main menu.
Changing the Playback Order of Messages
You can select the order in which you want
unheard messages to be played. You may listen to
the last received message first, or you may listen to
the first received message first. To select the order
in which new messages should be played:
1 From the main voice mail menu, press 4 to
access personal options.
2 Press 4 to access personal preferences.
Page 85

Advanced Voice Mail Features
3 Press 2 to access playback preferences.
4 Press 1 to switch between the playback
orders.
5 Press ** to return to the main menu.
Recording, Forwarding, and Replying to
Messages
These functions allow you to record and send,
reply to, or forward a message to an assigned
destination address or group list number. If you
record a complete or partial message, but do not
send it, Nextel Voice Mail service will refer to this
message as an “in preparation” message.
To record and send a message:
1 From the main voice mail menu, press 2 to
record a message.
2 Record your message and press # to end the
message.
3 Press 9 at the prompt to indicate that you want
to send the message or press 5 for delivery
options.
4 Enter the mailbox number and/or group list
number(s). (A mailbox number is the 10-digit
Nextel PTN of a Nextel customer. The Nextel
customer must be in your local calling area. The
name of the recipient plays if it is recorded.)
5 Press # to send.
6 Press ** to return to the main menu.
Note: You can only send messages using this
method to Nextel customers in your home
market.
Delivery Options
After you have created a message, you can assign
the message to a category before you send it.
Below is a list of the options that can be applied to
a message:
•Urgent — Recipient will hear this message
before other messages.
•Private — Recipient cannot copy the message
to another mailbox or phone number.
• Notification of Non-Delivery — You will be
notified if the recipient has not listened to your
message by a certain date and time.
• Future Delivery — You can specify a time and
date (up to three months in advance) for the
message to be delivered.
Note: All dates must have digits in the MM/DD
format (2 digits for the month and 2 digits
for the date). For example, January 2nd
would be 0102.
Important: Once a message has been sent for
future delivery, it cannot be retrieved or
deleted.
75
Page 86

Nextel® Voice Mail
To set a special delivery option:
1 After recording your message, but before
sending it, press 5 for delivery options.
2 Press the number that corresponds with the
desired delivery option:
• Press 1 for urgent.
• Press 2 for private.
• Press 3 for notification of non-delivery. At
prompt, specify time and date.
• Press 4 for future delivery of messages. At
prompt, specify time and date.
• Press 9 to send the message immediately.
3 The list of options will be presented again.
Select an additional option or press 9 to send
the message.
4 Enter the destination mailbox or group list
number of the recipient(s).
5 Press # to send.
6 Press ** to return to the main menu.
76
Working With Group Lists
This feature enables you to create a list and assign
it a unique name. Then, you can add mailbox
numbers, group lists, or individuals. Once you
create a list you can send a voice message to
everyone on the list by entering the group list
number. You can have up to 40 group lists. Each
list can hold up to 50 addresses.
To set up a group list:
1 From the main voice mail menu, press 4 to
access personal options.
2 Press 2 to access your Group Lists.
3 Press 2 to create a Group List.
4 Enter the 1- or 2-digit group list number and
press #.
5 Record a name for the list and press #.
6 Select group members by mailbox number,
group list, or name.
7 Press # to save all entries added to the list.
8 Press ** to return to the main menu.
To modify a group list:
1 From the main voice mail menu, press 4 to
access personal options.
2 Press 2 to access group lists.
Page 87

Advanced Voice Mail Features
3 Press 4 to modify a group list. Enter the
number of the group list you want to modify.
4 Press 1 to add a new recipient.
5 Press # to save your changes.
6 Press ** to return to the main menu.
Deleting a group list:
1 From the main voice mail menu, press 4 to
access personal options.
2 Press 2 to access group lists.
3 Press 3 to delete a group list.
4 Enter the number of the group list you want to
delete. The system will play the name of the
group list.
5 Press # to delete the list.
6 Press ** to return to the main menu.
Message Forwarding
Note: You can only forward messages to Nextel
customers in your home market.
This feature allows you to program your phone to
automatically forward incoming messages to
another mailbox. There are two types of
forwarding: notified and silent. Notified forwarding
prompts the caller that the message will be
forwarded. Silent forwarding does not prompt the
caller that the message will be forwarded.
To modify forwarding options:
1 From the main voice mail menu, press 4 to
access personal options.
2 Press 5 to modify forwarding options.
3 Select the applicable option below:
• To create a forwarding number, press 2.
• If you have already created a forwarding
number, press 2 to modify the number.
• To enable or disable message forwarding,
press 3.
• To change the forwarding type, press 2.
4 Press ** to return to the main menu.
77
Page 88
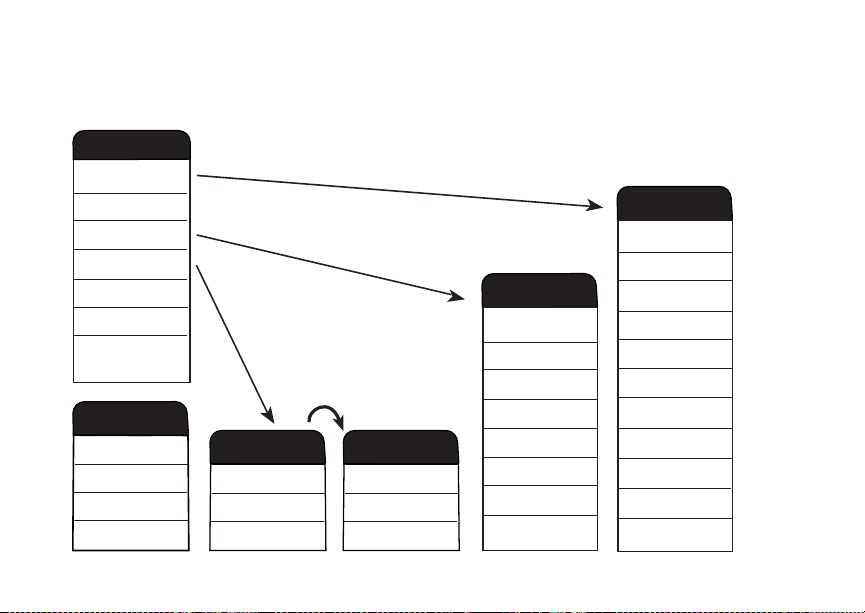
Nextel® Voice Mail
Nextel® Voice Mail Tree
Main Menu
Play
1
Messages
Record
2
Messages
Change
3
Greetings
Personal
4
Options
Retrieve
* 3
Deleted Msgs
Unheard
1 1
Messages
Nextel
0 0
Customer
Care
Global
*
* *
* 3
0
78
Commands
Previous
Menu
Main
Menu
Undelete
Messages
Additional
Info (Help)
2
4
5
Personal
Options
Access
Group Lists
Personal
Preferences
Forwarding
Options
Personal
Preferences
1
2
3
Change
Password
Playback
Preferences
Name
4
1
2
3
5
7
8
9
8
Change
Greetings
Play Active
Greeting
Record Active
Greeting
Select Active
Greeting
Edit
Greetings
Skip Toggle
Delete Active
Greeting
Review
Schedule
Activate
Schedule
1
1 1
2
3
3 3
5 5
6
7
8
9
#
Play
Messages
Backup
Replay
Message
Pause/
Continue
Fast Forward
Forward to
End
Play Date
and Time
Forward
Message
Delete
Message
Reply to
Message
Save
Message
New Message/
Keep as New
Page 89

Multimedia Messages
Multimedia Messaging Service (MMS) lets you
send and receive messages that may include text,
pictures, and audio recordings. You can send and
receive these messages from your phone, through
any email account, and from nextel.com.
Your phone's MMS address is your
PTN@messaging.nextel.com. Your PTN is your
Nextel 10-digit Personal Telephone Number.
Navigating the Inbox, Drafts, and Sent Items
You can access MMS messages through the
following options in the message center:
• Inbox — MMS messages you have received
•Drafts — MMS messages you have created and
saved but not sent
•Sent Items — MMS messages you have
created and sent
The messages in the Inbox, Drafts, and Sent Items
are grouped in pages of 9 messages. Scroll to view
the messages on a page.
To go to the next page:
Scroll right. -or-
Press #. -or-
Scroll to the end of the page and select MORE.
To go to the previous page:
Scroll left. -or-
Press *.
To open a message on the current page:
Select the message you want to open. -or-
Press the number on the keypad corresponding
to the number of the message.
Creating and Sending Messages
Each message you create may contain the
following fields:
•To — the phone numbers or email addresses of
one or more recipients
•Mesg — the body of the message. This may
include text, pictures, ring tones, or voice
records.
•Subject — the subject line
79
Page 90

Multimedia Messages
•Attach — one or more attachments. These may
be pictures, ring tones, or voice records,
including voice records that you create while
creating the message.
•Cc — the phone numbers or email addresses of
more recipients
•Priority — sets the priority of the message to
normal or high.
•Report — lets you receive a report confirming
that your message was delivered.
• Valid Until — sets a date after which no more
attempts are made to deliver the message.
To send a message, you must address it to at least
one recipient. All other message fields are optional.
You can fill in the message fields in any order.
Entering Text
In message fields that require you to enter text, you
can begin entering the text from the keypad when
the field is highlighted.
While entering text, you can always choose a text
input mode from the context-sensitive menu.
For information on ways to enter text from the
keypad, see “Entering Text” on page 42.
80
Message Size
You can create and send messages of up to 100
KB, including attachments.
To see the size of a message you are creating:
1 Scroll to any field in the message.
2 Press m.
3 Select Message Size.
Sending or Canceling
To send the message at any time after it has been
addressed:
Press A under Send. -or-
If Send is not one of your options: Press m.
Select Send.
To cancel the message at any time:
At the message screen, press A under
Cancel. -or-
Press e to cancel the message and save it in
Drafts.
Page 91

Creating and Sending Messages
Creating a Message
1 To begin creating a message:
From the main menu, select Messages >
[Create Mesg]. -or-
Select [Create Mesg] from Inbox, Drafts, or
Sent Items. -or-
Begin creating a message from Contacts, the
recent calls list, or the idle screen. See “More
Ways to Begin a Message” on page 83. -or-
Reply to a received message. See “Replying to
a Message” on page 83.
2 To address the message:
Select To.
Enter the phone number or email address from
the keypad and press O. Repeat this action to
enter more phone numbers or email addresses.
-or-
Select recipients from Contacts or the recent
calls list. See “More Ways to Address a
Message” on page 84.
Tip: To remove a phone number or email
address from the list of message recipients,
scroll to the phone number or email
address and press A under Remove.
When you are finished addressing the message,
press A under Back.
3 To enter or edit the body of the message:
Select Mesg.
Note: If you have created a signature, the
signature automatically appears in this
field. Text you enter appears before your
signature. See “Customizing MMS” on
page 95.
Enter text from the keypad. -or-
Use a Quick Note. See “Quick Notes” on
page 88. -or-
Insert a picture, a ring tone, or a voice record.
See “Inserting Pictures, Ring Tones, and Voice
Records” on page 86.
When you are finished, press O.
4 If you want to send the message now, press A
under Send. -or-
If Send is not one of your options: Press m.
Select Send. -or-
To fill in more message fields, see “Adding More
Message Options” on page 82.
81
Page 92

Multimedia Messages
Adding More Message Options
1 To view more message fields in a message you
are creating, select MORE. -or-
Press A under More.
2 If you want to create or edit the subject line:
Select Subject.
Enter text from the keypad. -or-
Select a Quick Note. See “Quick Notes” on
page 88.
When you are finished, press O.
3 If you want to attach a picture, a ring tone, or a
voice record, see “Attaching Pictures, Ring
Tones, and Voice Records” on page 87.
When you are finished, press A under Done.
4 If you want to add more recipients in addition to
those in the To field:
Select Cc.
Enter the phone number or email address from
the keypad and press O. Repeat this action to
enter more phone numbers or email addresses.
-or-
Select recipients from Contacts or the recent
calls list. See “More Ways to Address a
Message” on page 84.
82
When you are finished addressing the message,
press A under Back.
5 If you want to set the priority of the message:
Select Priority.
Select the priority you want.
6 If you want to receive a report confirming that
your message was delivered:
Select Report > On Delivery.
7 If you want to set a date after which attempts to
deliver the message end:
Select Valid Until.
Select a date by scrolling or entering numbers.
Press O. -or-
To set no date, press A under No Date.
8 To send the message, press A under Send.
-or-
If Send is not one of your options: Press m.
Select Send.
Page 93

Creating and Sending Messages
Replying to a Message
You can reply to a received message while you are
viewing it. If you have already viewed a message,
you can also reply to it while it is highlighted in the
message center. You cannot reply to unread
messages.
For information on viewing received messages,
see “Receiving a Message” on page 90 and
“Viewing Received Messages from the Message
Center” on page 91.
When you reply to a message you received, some
of the fields in your reply message are filled in
automatically:
•To — the phone number or email address of the
sender of the message you are replying to. If
you are sending a reply to all, some recipients
may be in this field.
•Mesg — the first 40 characters of the message
you are replying to. Text you add to the body of
your message appears above this.
•Subject — “Re:” followed by the subject line of
the message you are replying to, if any.
•Cc — If you are sending a reply to all, some
recipients may be in this field.
To reply to a message:
1 View the message you want to reply to. -or-
If you have already viewed the message, scroll
to it.
2 To reply to the sender only, press A under
Reply. -or-
To reply to the sender and all recipients: Press
m. Select Reply All.
3 A list of short phrases is displayed. Select any of
these phrases to add it to the body of your
messages. -or-
Select [Create Reply] to begin the body of your
message without using any of these phrases.
4 Edit any message fields you want to change.
5 Send the message.
Tip: To create new reply phrases to use in later
reply messages, see “Customizing MMS”
on page 95.
More Ways to Begin a Message
In addition to beginning a message from the
message center, you can begin a message from
Contacts, the recent calls list, or the idle screen.
83
Page 94

Multimedia Messages
From Contacts
1 From the Contacts list, scroll to the entry
containing the phone number or email address
you want to send the message to.
2 Scroll left or right to view the Contacts types until
you see the icon for the phone number or email
address you want to send a message to.
3 Press A under Create. -or-
If Create is not one of your options: Press m.
Select Create Message.
4 Create and send the message. The message is
automatically addressed to the phone number or
email address you chose.
From the Recent Calls List
1 From the recent calls list, scroll to the entry you
want to send a message to.
2 If the entry has more than one phone number
stored, view the phone number you want to send
the message to.
3 Press A under Create. -or-
If Create is not one of your options: Press m.
Select Create.
4 Create and send the message. The message is
automatically addressed to the phone number
you chose.
84
From the Idle Screen
1 Using the keypad, enter the number you want to
send a message to.
2 Press m.
3 Select Create. The message is automatically
addressed to the phone number you chose.
From My Pictures
1 From My Pictures, scroll to or select the picture
you want to include in your message.
2 Press A under Send. -or-
If Send is not one of your options: Press m.
Select Send.
3 Create and send the message. The picture you
selected is automatically included as an
attachment.
More Ways to Address a Message
When you are filling in the To and Cc message
fields, you can select recipients from Contacts and
the recent calls list.
You can select more than one recipient from
Contacts and the recent calls list. A checkmark
appears next to each selected item.
Tip: To deselect a selected item: Scroll to a
selected item and press O.
Page 95

Creating and Sending Messages
From Contacts
When you select recipients from Contacts,
Contacts entries containing phone numbers or
email addresses are displayed.
Tip: You can search for an entry name as you
would when viewing Contacts otherwise.
See “Searching for a Name” on page 46.
1 While you are creating a message, scroll to or
select To or Cc:
2 Press A under Contcs. -or-
If Contcs is not one of your options: Press m.
Select Contacts.
3 Select the entry containing the phone number or
email address you want to send the message to.
4 If the entry contains more than one phone
number or email address, select the ones you
want to send the message to.
When you are finished selecting items within the
entry, press A under Done.
5 When you are finished selecting entries, press
A under Done.
From the Recent Calls List
When you select recipients from the recent calls
list, phone calls are displayed.
Direct Connect calls are displayed only if the Direct
Connect number is stored in Contacts and its
Contacts entry also contains a phone number or
email address.
1 While you are creating a message, scroll to or
select To or Cc.
2 Press m.
3 Select Recent Calls.
4 Select the entry containing the phone number or
email address you want to send the message to.
5 If the entry contains more than one phone
number or email address, select the ones you
want to send the message to.
When you are finished selecting items within the
entry, press A under Done.
6 When you are finished selecting entries, press
A under Done.
Quick Notes
When you are filling in the Mesg and Subject
message fields, you can add ready-made words or
short phrases called Quick Notes. After you add
these words or phrases, you can edit them as you
would any other text.
1 While you are creating a message, scroll to or
select Mesg or Subject.
85
Page 96

Multimedia Messages
2 Press A under QNotes. -or-
If QNotes is not one of your options: Press m.
Select Insert Quick Notes.
3 Select the Quick Note you want to insert into the
message.
Tip: To create new Quick Notes to use in later
messages, see “Customizing MMS” on
page 95.
Inserting Pictures, Ring Tones, and
Voice Records
When you are filling in the Mesg field, you can
insert pictures, ring tones, and voice records into
the body of the message.
You can insert more than one of these objects into
a message. You may include text in the body of
your message in addition to these objects.
Note: For information on how objects inserted
into the body of a message appear when
a message is received, see “Embedded
Objects and Attachments” on page 91.
Pictures
You can insert pictures from My Pictures.
Pictures that you download to your phone or
receive in a message may be forward locked,
meaning they cannot be included in a message.
86
Note: If this icon ] appears next to a picture,
you can not send it in a message.
1 While you are filling in the Mesg field, press m.
2 Select Insert Picture.
A list of pictures that can be included in a
message appears.
3 Select the picture you want to insert.
Ring Tones
You can insert ring tones from your list of ring
tones.
Ring tones that are pre-loaded on your phone
cannot be included in a message.
Ring tones that you download to your phone or
receive in a message may be forward locked,
meaning they cannot be included in a message.
1 While you are filling in the Mesg field, press m.
2 Select Insert Ring Tone.
A list of ring tones that can be included in a
message appears.
3 Select the ring tone you want to insert.
Tip: To hear a ring tone before inserting it,
highlight the ring tone.
Page 97

Creating and Sending Messages
Voi ce R e cords
You can insert voice records from your list of voice
records.
Voice records created by recording a phone call
cannot be including in a message.
1 While you are filling in the Mesg field, press m.
2 Select Insert VoiceRec.
A list of voice records that can be included in a
message appears.
3 Select the voice record you want to insert.
Tip: To hear a voice record before inserting it,
highlight the voice record and press A
under Play.
Attaching Pictures, Ring Tones, and
Voice Records
You can attach one or more pictures, ring tones,
and voice records to a message.
Note: For information on how attachments
appear when a message is received, see
“Embedded Objects and Attachments” on
page 91.
Pictures
You can attach pictures from My Pictures.
Pictures that you download to your phone or
receive in a message may be forward locked,
meaning they cannot be included in a message.
Note: If this icon ] appears next to a picture,
you can not send it in a message.
1 While you are creating a message, select
Attach.
2 Select New Attachment.
3 Select My Pictures.
A list of pictures that can be included in a
message appears.
4 Select the picture you want to attach.
Ring Tones
You can attach ring tones from your list of ring
tones.
Ring tones that are pre-loaded on your phone
cannot be included in a message.
Ring tones that you download to your phone or
receive in a message may be forward locked,
meaning they cannot be included in a message.
1 While you are creating a message, select
Attach.
87
Page 98

Multimedia Messages
2 Select New Attachment.
3 Select Ring Tones.
A list of ring tones that can be included in a
message appears.
4 Select the ring tone you want to attach.
Tip: To hear a ring tone before attaching it,
highlight the ring tone.
Voi ce R e cords
You can attach voice records from your list of voice
records.
Voice records created by recording a phone call
cannot be including in a message.
1 While you are creating a message, select
Attach.
2 Select New Attachment.
3 Select Vo ic eR ec .
A list of voice records that can be included in a
message appears.
4 Select the voice record you want to attach.
Tip: To hear a voice record before attaching it,
highlight the voice record and press A
under Play.
88
Removing an Attachment
To remove an attachment in a message you are
creating:
1 While you are creating a message, select
Attach.
2 Scroll to the attachment you want to remove.
3 Press m.
4 Select Unattach.
Attaching New Voice Records
While you are creating a message, you can create
voice records and attach them to the message.
Creating a New Voice Record
1 While you are creating a message, select
Attach > [New Attachment].
2 Select Vo ic eR ec ord .
3 Select [New Vo ic eR ec ].
4 Say the message you want to record into the
microphone.
5 When you are finished recording, press O.
6 Scroll to the new voice recording and press O.
7 When you are finished, press A under Done if
Done is one of your options.
The voice record is attached to the message and
the list of voice records.
Page 99

Drafts
Drafts
While you are creating a message, you can save it
in Drafts before you send it.
You can view, edit, send, or delete saved drafts.
Saving a Message in Drafts
1 While you are creating a message, press m.
2 Select Save In Drafts.
You can continue to create the message. The
version you saved in Drafts will not change.
Sending a Draft
1 From the main menu, select Messages >
Drafts.
2 Scroll to the draft you want to send.
3 Press m.
4 Select Send.
Editing a Draft
1 From the main menu, select Messages >
Drafts.
2 Select the draft you want to edit.
3 Continue as you would when creating a
message.
Deleting
When you send a draft, it is deleted from Drafts.
To delete a message in Drafts without sending it:
1 Scroll to the message you want to delete.
2 Press A under Delete.
3 Press O or press A under Yes to confirm.
Drafts Icons
M Draft.
w High priority.
L Attachment.
y High priority with an attachment.
Sent Items
Messages you have sent or tried to send are
stored in Sent Items.
Forwarding Sent Items
1 From the main menu, select Messages > Sent
Items.
2 Scroll to the message you want to forward.
3 Press m.
89
Page 100

Multimedia Messages
4 Select Forward.
5 Edit and send your message.
You can add to and edit the message you are
forwarding.
Resending
If a message was not sent from your phone, you
can resend it.
1 From the main menu, select Messages > Sent
Items.
2 Scroll to the message you want to resend.
3 Press A under Resend.
Note: If your message was sent successfully,
Resend will not appear as an option.
Checking Delivery Status
If a message was successfully sent and you set the
message to give a report confirming delivery, you
can check the delivery status:
1 From the main menu, select Messages > Sent
Items.
2 Scroll to the message you want to view.
3 Press m.
4 Select Delivery Status.
90
Deleting
1 Scroll to the message you want to delete. -or-
View the message you want to delete.
2 Press A under Delete.
3 Press O or press A under Yes to confirm.
Sent Items Icons
t Successfully sent.
v Unsuccessfully sent.
w High priority.
L Attachment.
z High priority and locked.
y High priority with an attachment.
Receiving a Message
When you receive an MMS message, a message
notification appears on the display.
To view the message:
1 Press O or press A under the display option
on the left.
 Loading...