

Page 1

Sprint® Service
Sprint Power VisionSM Smart Device
Tre o™ 7 55
Getting Started Guide
www.sprint.com
© Sprint Nextel. All rights reserved. No
reproduction in whole or in part without prior
written approval. SPRINT and other trademarks
are trademarks of Sprint Nextel.
P by Palm
Page 2

Intellectual Property Notices
© 2007 Palm, Inc. All rights reserved. Trademark, copyright, patent, and other intellectual property notices are
set forth on page ii within Yo ur S pri nt P owe r Vi sio n
www.palm.com/mypalm/755psprint
.
SM
Smart Device Treo™ 755P by Palm User Guide available at
Disclaimer and Limitation of Liability
Palm, Inc. and its suppliers assume no responsibility for any damage or loss resulting from the use of this guide.
Palm, Inc. and its suppliers assume no responsibility for any loss or claims by third parties that may arise
through the use of this software. Palm, Inc. and its suppliers assume no responsibility for any damage or loss
cause d by deleti on of data as a result of malfunctio n, dead battery, or re pairs. Be s ure to make ba ckup copies of
all important data on other media to protect against data loss.
Page 3

Table of Contents
Introduction . . . . . . . . . . . . . . . . . . . . . . . . . . . . . . . . . . . . . . . . . . . . . . . . . . . . . . . . . . . . . . . . . . . . . 1
About This Guide . . . . . . . . . . . . . . . . . . . . . . . . . . . . . . . . . . . . . . . . . . . . . . . . . . . . . . . . . . . . . . . . . . . . . . . . . . . . . . . . 2
Where to Learn More . . . . . . . . . . . . . . . . . . . . . . . . . . . . . . . . . . . . . . . . . . . . . . . . . . . . . . . . . . . . . . . . . . . . . 2
Contacting Sprint. . . . . . . . . . . . . . . . . . . . . . . . . . . . . . . . . . . . . . . . . . . . . . . . . . . . . . . . . . . . . . . . . . . . . . . . . 3
What You Need . . . . . . . . . . . . . . . . . . . . . . . . . . . . . . . . . . . . . . . . . . . . . . . . . . . . . . . . . . . . . . . . . . . . . . . . . . . . . . . . . . 5
Creating Sprint Account Passwords. . . . . . . . . . . . . . . . . . . . . . . . . . . . . . . . . . . . . . . . . . . . . . . . . . . . . . . . 6
Device and Phone Basics . . . . . . . . . . . . . . . . . . . . . . . . . . . . . . . . . . . . . . . . . . . . . . . . . . . . . . . . . . . 7
Your New Treo™ 755P Smart Device by Palm . . . . . . . . . . . . . . . . . . . . . . . . . . . . . . . . . . . . . . . . . . . . . . . . . . . . . . 8
Inserting the Battery . . . . . . . . . . . . . . . . . . . . . . . . . . . . . . . . . . . . . . . . . . . . . . . . . . . . . . . . . . . . . . . . . . . . . . . . . . . . 12
Charging the Battery . . . . . . . . . . . . . . . . . . . . . . . . . . . . . . . . . . . . . . . . . . . . . . . . . . . . . . . . . . . . . . . . . . . . . . . . . . . . 13
Turning Your Device On and Off . . . . . . . . . . . . . . . . . . . . . . . . . . . . . . . . . . . . . . . . . . . . . . . . . . . . . . . . . . . . . . . . . 16
Moving Around the Device Screen . . . . . . . . . . . . . . . . . . . . . . . . . . . . . . . . . . . . . . . . . . . . . . . . . . . . . . . . . . . . . . . 18
Using the Keyboard . . . . . . . . . . . . . . . . . . . . . . . . . . . . . . . . . . . . . . . . . . . . . . . . . . . . . . . . . . . . . . . . . . . . . . . . . . . . . 22
Opening Applications . . . . . . . . . . . . . . . . . . . . . . . . . . . . . . . . . . . . . . . . . . . . . . . . . . . . . . . . . . . . . . . . . . . . . . . . . . . 25
Using the Phone . . . . . . . . . . . . . . . . . . . . . . . . . . . . . . . . . . . . . . . . . . . . . . . . . . . . . . . . . . . . . . . . . . . . . . . . . . . . . . . . 27
Opening the Phone Application . . . . . . . . . . . . . . . . . . . . . . . . . . . . . . . . . . . . . . . . . . . . . . . . . . . . . . . . . 27
Making Calls . . . . . . . . . . . . . . . . . . . . . . . . . . . . . . . . . . . . . . . . . . . . . . . . . . . . . . . . . . . . . . . . . . . . . . . . . . . 28
Using Voicemail . . . . . . . . . . . . . . . . . . . . . . . . . . . . . . . . . . . . . . . . . . . . . . . . . . . . . . . . . . . . . . . . . . . . . . . . 32
What Can I Do When I’m On a Call?. . . . . . . . . . . . . . . . . . . . . . . . . . . . . . . . . . . . . . . . . . . . . . . . . . . . . . 33
Using Sprint Voice Command . . . . . . . . . . . . . . . . . . . . . . . . . . . . . . . . . . . . . . . . . . . . . . . . . . . . . . . . . . . 37
Defining Favorite Buttons . . . . . . . . . . . . . . . . . . . . . . . . . . . . . . . . . . . . . . . . . . . . . . . . . . . . . . . . . . . . . . . 38
Using a Phone Headset . . . . . . . . . . . . . . . . . . . . . . . . . . . . . . . . . . . . . . . . . . . . . . . . . . . . . . . . . . . . . . . . . 40
Selecting Ringtones. . . . . . . . . . . . . . . . . . . . . . . . . . . . . . . . . . . . . . . . . . . . . . . . . . . . . . . . . . . . . . . . . . . . . 43
Resetting Your Device . . . . . . . . . . . . . . . . . . . . . . . . . . . . . . . . . . . . . . . . . . . . . . . . . . . . . . . . . . . . . . . . . . . . . . . . . . . 45
iii
Page 4

Information Management Tools . . . . . . . . . . . . . . . . . . . . . . . . . . . . . . . . . . . . . . . . . . . . . . . . . . . 47
Synchronizing Information—The Basics . . . . . . . . . . . . . . . . . . . . . . . . . . . . . . . . . . . . . . . . . . . . . . . . . . . . . . . . . 48
Personal Information Management . . . . . . . . . . . . . . . . . . . . . . . . . . . . . . . . . . . . . . . . . . . . . . . . . . . . . . . . . . . . . 51
Managing Your Contacts. . . . . . . . . . . . . . . . . . . . . . . . . . . . . . . . . . . . . . . . . . . . . . . . . . . . . . . . . . . . . . . . 51
Creating and Viewing Your Calendar . . . . . . . . . . . . . . . . . . . . . . . . . . . . . . . . . . . . . . . . . . . . . . . . . . . . 53
Managing Your Tasks . . . . . . . . . . . . . . . . . . . . . . . . . . . . . . . . . . . . . . . . . . . . . . . . . . . . . . . . . . . . . . . . . . . 56
Working With Your Pictures and Videos . . . . . . . . . . . . . . . . . . . . . . . . . . . . . . . . . . . . . . . . . . . . . . . . . . . . . . . . . 57
Listening to Music . . . . . . . . . . . . . . . . . . . . . . . . . . . . . . . . . . . . . . . . . . . . . . . . . . . . . . . . . . . . . . . . . . . . . . . . . . . . . . 62
Working With Your Office Files . . . . . . . . . . . . . . . . . . . . . . . . . . . . . . . . . . . . . . . . . . . . . . . . . . . . . . . . . . . . . . . . . . 67
Installing Applications . . . . . . . . . . . . . . . . . . . . . . . . . . . . . . . . . . . . . . . . . . . . . . . . . . . . . . . . . . . . . . . . . . . . . . . . . . 68
Using Expansion Cards . . . . . . . . . . . . . . . . . . . . . . . . . . . . . . . . . . . . . . . . . . . . . . . . . . . . . . . . . . . . . . . . . . . . . . . . . . 71
Customizing Your Device . . . . . . . . . . . . . . . . . . . . . . . . . . . . . . . . . . . . . . . . . . . . . . . . . . . . . . . . . . . . . . . . . . . . . . . . 73
Locking Your Keyboard and Screen . . . . . . . . . . . . . . . . . . . . . . . . . . . . . . . . . . . . . . . . . . . . . . . . . . . . . . . . . . . . . . . 75
Wireless Features . . . . . . . . . . . . . . . . . . . . . . . . . . . . . . . . . . . . . . . . . . . . . . . . . . . . . . . . . . . . . . . . 77
Using Sprint Vision . . . . . . . . . . . . . . . . . . . . . . . . . . . . . . . . . . . . . . . . . . . . . . . . . . . . . . . . . . . . . . . . . . . . . . . . . . . . . . 78
Working With Sprint Power Vision . . . . . . . . . . . . . . . . . . . . . . . . . . . . . . . . . . . . . . . . . . . . . . . . . . . . . . . . . . . . . . . 80
Using Email . . . . . . . . . . . . . . . . . . . . . . . . . . . . . . . . . . . . . . . . . . . . . . . . . . . . . . . . . . . . . . . . . . . . . . . . . . . . . . . . . . . . . 81
What Email Applications Can I Use on My Smart Device? . . . . . . . . . . . . . . . . . . . . . . . . . . . . . . . . . 81
The VersaMail Application . . . . . . . . . . . . . . . . . . . . . . . . . . . . . . . . . . . . . . . . . . . . . . . . . . . . . . . . . . . . . . 81
Sending and Receiving Text and Picture Mail Messages . . . . . . . . . . . . . . . . . . . . . . . . . . . . . . . . . . . . . . . . . . 84
Browsing the Web . . . . . . . . . . . . . . . . . . . . . . . . . . . . . . . . . . . . . . . . . . . . . . . . . . . . . . . . . . . . . . . . . . . . . . . . . . . . . . 88
Watching Sprint TV . . . . . . . . . . . . . . . . . . . . . . . . . . . . . . . . . . . . . . . . . . . . . . . . . . . . . . . . . . . . . . . . . . . . . . . . . . . . . 92
Connecting to Devices With Bluetooth® Wireless Technology . . . . . . . . . . . . . . . . . . . . . . . . . . . . . . . . . . . . 94
Beaming Information . . . . . . . . . . . . . . . . . . . . . . . . . . . . . . . . . . . . . . . . . . . . . . . . . . . . . . . . . . . . . . . . . . . . . . . . . . . 97
Important Safety Information . . . . . . . . . . . . . . . . . . . . . . . . . . . . . . . . . . . . . . . . . . . . . . . . . . . . . 99
General Precautions . . . . . . . . . . . . . . . . . . . . . . . . . . . . . . . . . . . . . . . . . . . . . . . . . . . . . . . . . . . . . . . . . . . . . . . . . . . . 100
Maintaining Safe Use of and Access to Your Device . . . . . . . . . . . . . . . . . . . . . . . . . . . . . . . . . . . . . . . . . . . . . . 101
iv
Page 5

Using Your Phone With a Hearing Aid Device . . . . . . . . . . . . . . . . . . . . . . . . . . . . . . . . . . . . . . . . . . . . . . . . . . . 104
TTY Use With Sprint Service . . . . . . . . . . . . . . . . . . . . . . . . . . . . . . . . . . . . . . . . . . . . . . . . . . . . . . . . . . . . . . . . . . . . 107
Caring for the Battery . . . . . . . . . . . . . . . . . . . . . . . . . . . . . . . . . . . . . . . . . . . . . . . . . . . . . . . . . . . . . . . . . . . . . . . . . . 109
Radiofrequency (RF) Energy . . . . . . . . . . . . . . . . . . . . . . . . . . . . . . . . . . . . . . . . . . . . . . . . . . . . . . . . . . . . . . . . . . . . 111
Static Electricity, ESD, and Your Device . . . . . . . . . . . . . . . . . . . . . . . . . . . . . . . . . . . . . . . . . . . . . . . . . . . . . . . . . . 114
Owner’s Record . . . . . . . . . . . . . . . . . . . . . . . . . . . . . . . . . . . . . . . . . . . . . . . . . . . . . . . . . . . . . . . . . . . . . . . . . . . . . . . . 116
User’s Guide Proprietary Notice . . . . . . . . . . . . . . . . . . . . . . . . . . . . . . . . . . . . . . . . . . . . . . . . . . . . . . . . . . . . . . . . 116
Index . . . . . . . . . . . . . . . . . . . . . . . . . . . . . . . . . . . . . . . . . . . . . . . . . . . . . . . . . . . . . . . . . . . . . . . . . .117
v
Page 6

vi
Page 7

Introduction
In This Section
⽧ About This Guide
⽧ What You Need
Introduction
Introduction 1
Page 8
About This Guide
This guide provides an overview of the key features and functionality of your Sprint Power
SM
Smart Device Treo™ 755P by Palm. It can help you get started with using your
Vision
device’s most popular and most important features.
Where to Learn More
For a Quick Introduction
䢇 Quick Tour: The Quick Tour introduces you to many of your Treo device’s features. It is
already installed on your device, and you can open it anytime. Press Applications ,
and select Quick Tour .
While Using Your Device
䢇 User Guide: The User Guide provides complete information on using your device,
including descriptions of advanced features not included in this Getting Started Guide.
To down l o ad the User Guide, go to
You can also download and view a copy of the User Guide right on your device. Press
Applications , select My Treo , select the Support tab, and then select User
Guide.
䢇 Tips: Many of the built-in applications include helpful tips for getting the most out of
your device. To view these tips, open an application, press Menu , and select Tips
from the Options menu.
䢇 Information: Many screens have a Tips icon in the upper-right corner. Select the Tips
icon to learn about the tasks you can perform in the dialog box that contains the Tips
icon.
䢇 Online support from Palm: For up-to-date downloads, troubleshooting, and support
information, go to
www.palm.com/treo755psprint-support.
www.palm.com/mypalm/755psprint.
2 Introduction
Page 9

䢇 Setup help: If you need help with setup, call 1-866-750-PALM (7256). This service is FREE
within 90 days of purchase. Our support staff can help you set up your device and get
you up and running. We can best assist you if your device is fully charged and you call
from a phone other than your Treo device.
If You Need More Information
䢇 Vista users: For information on using your device and desktop software with Windows
Vista, visit www.palm.com/windowsvista
䢇 Books: Many books on Palm OS devices are available in local or online book retailers
(look in the computers section), or visit
䢇 Online forums: Consult online Treo device user discussion groups to swap information
and learn about topics you may find nowhere else. Visit
.
www.palm.com.
www.palm.com for details.
Contacting Sprint
Visiting the Sprint Web Site
You can get up-to-date information on Sprint services and options by signing on to the
Sprint Web site at www.sprint.com
When you visit Sprint online, you can:
䢇 Review coverage maps.
䢇 Learn how to use voicemail.
䢇 Access your account information.
䢇 Purchase accessories.
䢇 Add more options to your service plan.
䢇 Check out frequently asked questions.
䢇 And more.
.
Introduction
Introduction 3
Page 10

Reaching Sprint Customer Service
You can reach Sprint Customer Service many different ways:
䢇 On your device, press Phone ; enter *2, and then press Talk .
䢇 Sign on to your account at www.sprint.com.
䢇 Call toll-free at 1-888-211-4727 (consumer customers),
–or–
1-888-788-4727 (business customers).
䢇 Write to Sprint Customer Service, P.O. Box 8077, London, KY 40742.
Sprint 411
You have access to a variety of services and information through Sprint 411, including
residential, business, and government listings; assistance with local or long-distance calls;
movie listings; and hotel, restaurant, shopping, and major local event information. There is
a per-call charge and you will be billed for air time.
䢇 Press Phone , enter 411, and then press Tal k .
Sprint Operator Services
Sprint Operator Services provides assistance when you are placing collect calls or placing
calls billed to a local telephone calling card or third party.
䢇 Press Phone , enter 0, and then press Tal k .
For more information or to see the latest in products and services, visit Sprint online at
www.sprint.com
.
4 Introduction
Page 11

What You Need
Your smart device box contains the following:
Hardware
䢇 Treo devi ce.
䢇 Rechargeable battery.
䢇 AC charger.
䢇 USB sync cable.
䢇 Stereo headset.
䢇 Sprint
Documentation
䢇 Read This First poster.
䢇 Welcome to Sprint brochure.
䢇 Getting Started Guide (this guide).
䢇 Setting Up Email booklet.
䢇 Experience Sprint Power Vision guide.
䢇 Terms & Conditions.
䢇 War rant y.
䢇 Software License Agreement.
Software
䢇 Palm Software Installation CD (includes desktop synchronization software, links to
You’ll also need the following items for completing the installation and activation:
䢇 An activated Sprint service plan.
䢇 A location with wireless coverage for your device.
®
charger adapter.
bonus software for your device, and a link to the comprehensive User Guide).
Introduction
Introduction 5
Page 12

䢇 An electrical outlet.
䢇 The computer with which you will synchronize your personal information.
Creating Sprint Account Passwords
As a Sprint customer, you have unlimited access to your personal account information, your
voicemail account, and your Sprint Power Vision account. To ensure that no one else has
access to your information, you need to create passwords to protect your privacy.
Account Password
If you are the account owner, you’ll have an account password to use when signing on to
www.sprint.com
is the last four digits of your Social Security number. If you are not the account owner (if
someone else pays for your Sprint service), you can get a sub-account password at
www.sprint.com
Voi cem ail Passw ord
You’ll create your voicemail password when you set up your voicemail. See “Setting Up Your
Voicemail” on page 32.
Sprint Power Vision Password
With your smart device, you can choose to set up a Sprint Power Vision password. You can
use this optional password to authorize the purchase of Premium Services content and to
protect your personal information on multi-phone accounts.
To find more information or to change your passwords, sign on to www.sprint.com
Sprint Customer Service at 1-888-211-4727.
and when calling Sprint Customer Service. Your default account password
.
or call
6 Introduction
Page 13

Device and Phone Basics
In This Section
⽧ Your New Treo™ 755P Smart Device by Palm
⽧ Inserting the Battery
⽧ Charging the Battery
⽧ Turni ng Your Devi ce On and Off
⽧ Moving Around the Device Screen
⽧ Using the Keyboard
⽧ Opening Applications
⽧ Using the Phone
⽧ Resetting Your Device
Basics
Basics 7
Page 14
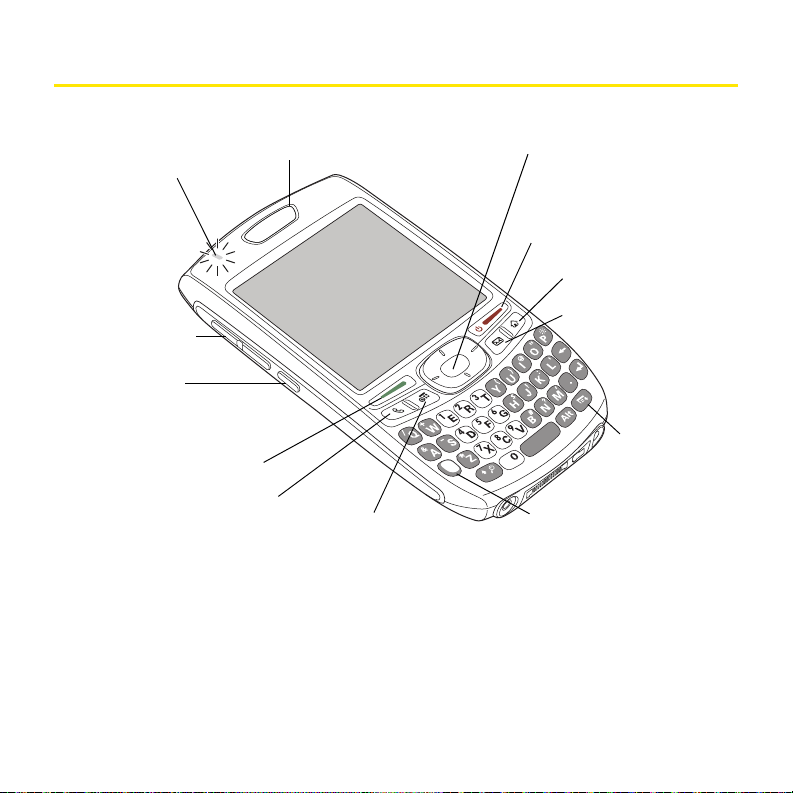
Your New Treo™ 755P Smart Device by Palm
1. Indicator
Light
3. 5-way
Navigator
4. Power/End
11. Talk
10. Phone
12. Side
Button
2. Earpiece
13. Volume
Button
7. Menu
9. Calendar
5. Applications
6. Messaging
8. Option
You r D evi ce ’s F ea tu re s: Fro nt Vie w
1. Indicator Light provides status information for your device based on the color of the
light and the blink state. The indicator is visible only when the light is on.
2. Earpiece serves as the speaker on your device when you are not using the
speakerphone feature or a headset.
3. 5-way Navigator gives you one-handed access to moving around the device screen
and selecting options. See “Moving Around the Device Screen” on page 18 for
instructions.
8 Basics
Page 15

4. Power/End turns the device’s phone on and off, wakes up and turns off the screen,
and hangs up calls.
5. Applications opens Applications view.
6. Messaging opens the Messaging application.
7. Menu opens the application menus.
8. Option activates the secondary function of a key or button. See “Using the Keyboard”
on page 22 for details.
9. Calendar opens the Calendar application.
10. Phone opens the Phone application.
11. Tal k dials when a phone number is selected or entered, and answers an incoming
phone call.
12. Side Button records voice memos by default, and performs context-sensitive actions
when an application is open, such as playing or pausing MP3 files in the Pocket
Tunes™ application. You can also reassign this button to open your favorite
application.
13. Volume Button adjusts the earpiece, speaker, and ringer volume levels.
Basics
Basics 9
Page 16
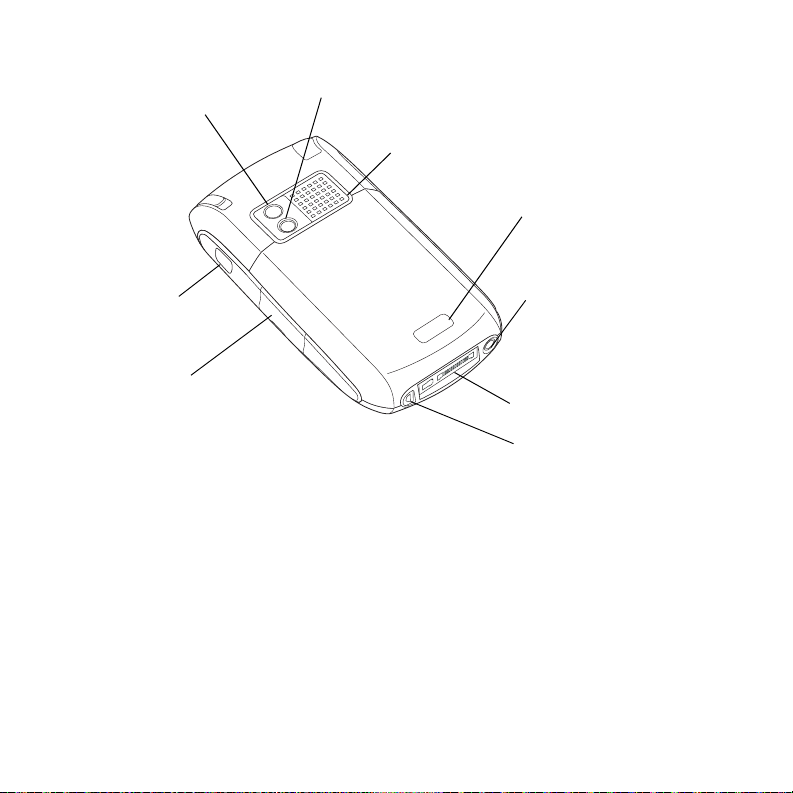
You r D evi ce ’s F ea tu re s: Ba ck Vi ew
15. Camera Lens
(camera version only)
17. Battery Door
Release
19. Multi-connector
16. Speaker
14. Self-Portrait
Mirror
18. Headset
Jack
20. Microphone
21. Expansion
Card Slot
22. Infrared
(IR) Port
14. Self-Portrait Mirror helps you to take a picture of yourself (if your device includes a
camera).
15. Camera Lens enables you to take pictures using the built-in camera (if included).
There are two models of the Treo 755
camera and the other does not. The packaging for your device indicates whether a
P Smart Device by Palm: One comes with a
camera is included.
16. Speaker plays ringtones and alarms, and serves as the speaker for the speakerphone
feature.
17. Battery Door Release opens the battery compartment.
10 Basics
Page 17

18. Headset Jack enables you to connect a hands-free headset. Use only headsets that are
24. Stylus
23. Ringer Switch
compatible with your device.
19. Multi-connector enables you to attach the USB sync cable and AC charger to your
device.
20. Microphone serves as the mouthpiece on your device’s phone.
21. Expansion Card Slot allows you to expand the capabilities of your device by using
miniSD card. See “Using Expansion Cards” on page 71 for details.
22. Infrared (IR) Port uses infrared technology to transmit information to and receive
information from other infrared-enabled devices that use compatible software.
You r D evi ce ’s F ea tu re s: Top Vi ew
23. Ringer Switch controls the ringer setting. See “Selecting Ringtones” on page 43 for
details on changing the settings. Silencing the ringer turns off all system sounds,
including alarms.
24. Stylus allows you to tap options on your device’s screen. To use the stylus, slide it out
of the slot and hold it as you would a pen or pencil.
Basics
Basics 11
Page 18

Inserting the Battery
Battery
Contacts
Battery
Compartme nt
Contacts
Battery Door
Release
WAR NIN G:
1. Use one hand to press the Battery Door Release, and use your other hand to slide the
battery door downward to remove it from your device.
2. Align the battery contacts with the battery compartment contacts.
3. Insert the battery into the compartment at a 45-degree angle, and then press it into
place.
4. Slide the battery door onto the back of the device until it clicks into place.
Use only batteries and chargers that are approved by Sprint or Palm for
use with your device. Failure to use an approved battery or charger
may increase the risk that your device will overheat, catch fire, or
explode, resulting in serious bodily injury, death, or property damage.
12 Basics
Page 19
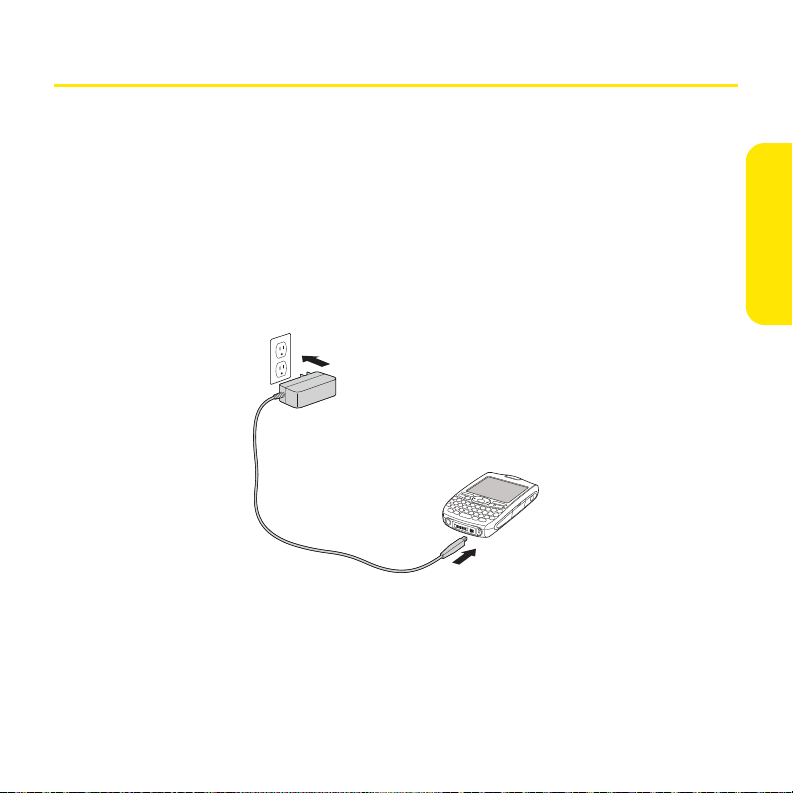
Charging the Battery
The battery comes with a sufficient charge to complete the setup process and activate your
phone. After activation, we recommend charging your device for three and a half hours to
give it a full charge.
1. Plug the AC charger into a wall outlet.
2. Connect the charger cable to the charger jack on the bottom of the device. Make sure
the arrow on the connector is facing up, toward your device screen.
3. To confirm that your device is charging, check the indicator light.
䡲 Red indicates that your device is charging.
䡲 Green indicates that your device is fully charged.
If the battery is fully drained, it may take a few moments for the indicator light to turn on
while the battery is charging.
Basics
Basics 13
Page 20
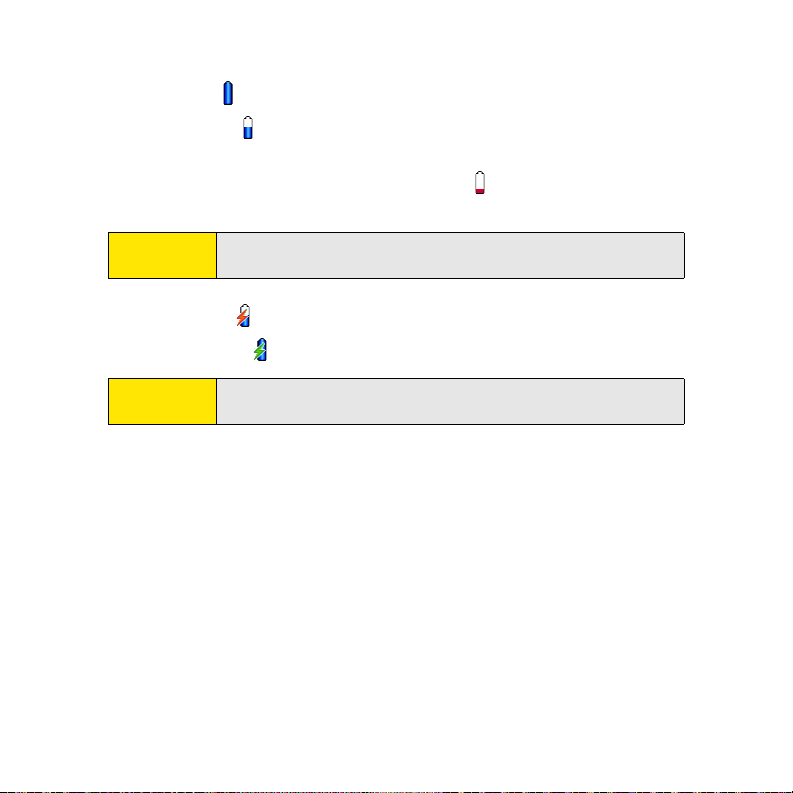
The onscreen battery icon displays the power status:
䢇 Full battery icon : Battery is not connected to a wall outlet and is fully charged.
䢇 Partial battery icon : Battery is not connected to a wall outlet and has some power but
is not fully charged.
䢇 Almost-empty battery icon with red at the bottom : Battery needs to be charged
immediately.
Note:
Your device’s indicator light blinks red when the battery needs to be
charged.
䢇 Red lightning bolt : Battery is connected to a wall outlet and is charging.
䢇 Green lightning bolt : Battery is connected to a wall outlet and is fully charged.
Tip:
To see exactly how much power is left in your battery, tap the onscreen
battery icon.
14 Basics
Page 21
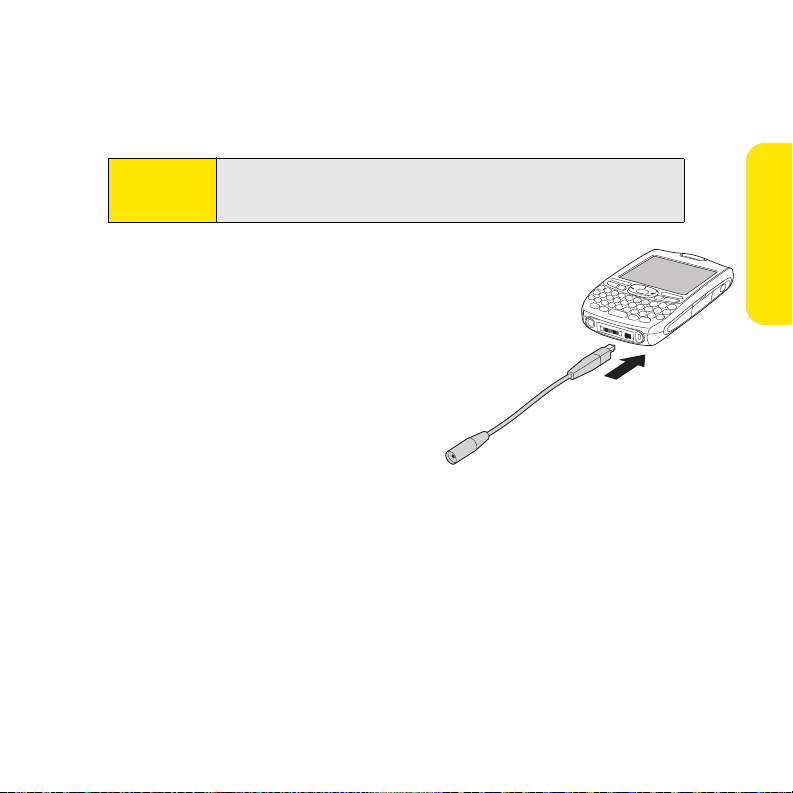
Using a Sprint Charger Adapter
Sprint Charger Adapter
If the connector on your 1 Amp AC charger or vehicle charger is approved by Sprint and it
doesn’t fit into the connector on the bottom of your device, use the included Sprint charger
adapter.
WAR NIN G:
Use only with 1 Amp AC chargers distributed by Sprint for your device.
Using any unapproved AC charger may destroy the AC charger and
cause a fire.
1. Plug the AC charger into a power source.
2. Connect the Sprint charger adapter to the
charger jack on the bottom of your smart
device.
3. Connect the charger cable to the Sprint
charger adapter.
4. Charge your smart device. See “Charging
the Battery” on page 13.
Basics 15
Basics
Page 22
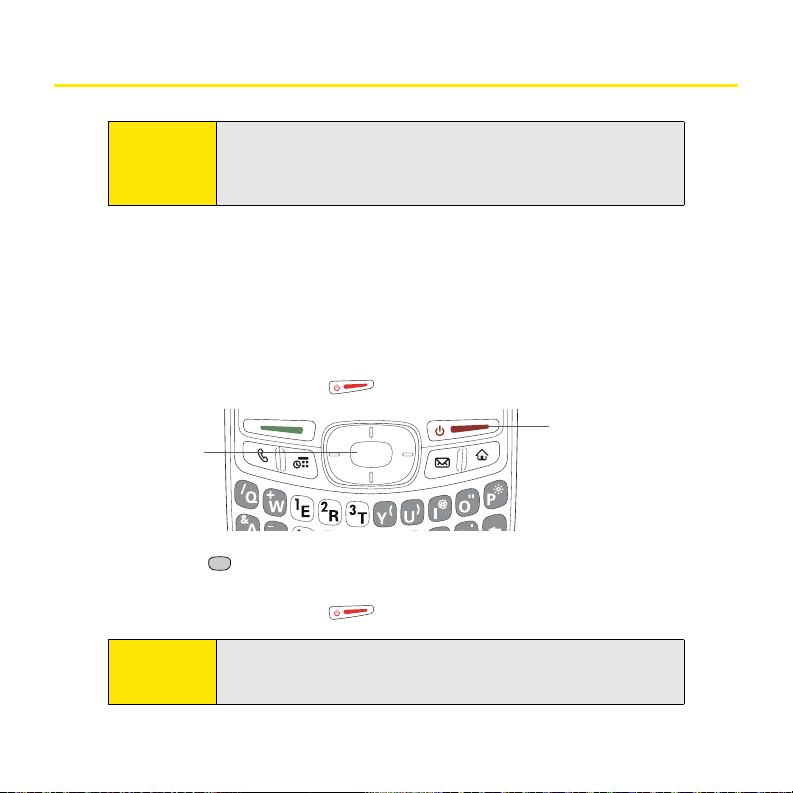
Turning Your Device On and Off
Center
Power/End
Note:
Throughout this guide the term device is used to describe your Treo
smart device and its physical attributes. The term phone is used to
describe the feature of your smart device that enables you to connect
to the Sprint National Network.
You can turn on your device screen and your phone independently. For example, the device
screen can be off while the phone is on, or the device screen can be on while the phone is
off. You can also have both the device screen and the phone turned on or off at the same
time.
Waking Up the Screen
When your device screen is off, you need to wake up the screen.
1. Press and release Power/End to wake up the screen.
2. Press Center to turn off Keyguard. For more information about turning Keyguard
on and off, see “Locking Your Keyboard (Keyguard)” on page 75.
3. Press and release Power/End to turn off the screen.
Note:
You can also press any of the application quick buttons on the front of
your device to wake up the screen and to go directly to the application
associated with that button.
16 Basics
Page 23

Turning Your Device’s Phone On and Off
When your phone is on, it is connected to the Sprint National Network (provided you are in
a coverage area) so that you can make and receive phone calls and use wireless services,
such as email, messaging, and the Web browser. During initial setup, your phone is on by
default, so you can use wireless services right away.
If you turn off your phone, you can still use the organizer features such as Contacts and
Calendar, as well as the media features such as the Pocket Tunes™ music application and
Pics&Videos. This is sometimes referred to as flight mode and is ideal for using your device
on airplanes and for maximizing battery life.
1. Wake up the screen.
2. Press and hold Power/End . (You hear a series of ascending tones and see a
“Welcome” screen. When your device locates a signal, “Sprint” and the
signal-strength icon appear at the top of the Phone application screen, indicating
that you can use the phone and Internet features, if they are supported by the local
network.)
3. Press and hold Power/End again to turn off your phone. (You hear a series of
descending tones and see a “Powering off” screen. When your phone is off, Phone Off
appears at the top of the Phone application screen. You can still use the nonwireless
features of your device, such as Contacts, Calendar, Tasks, and Memos.)
Basics
Basics 17
Page 24
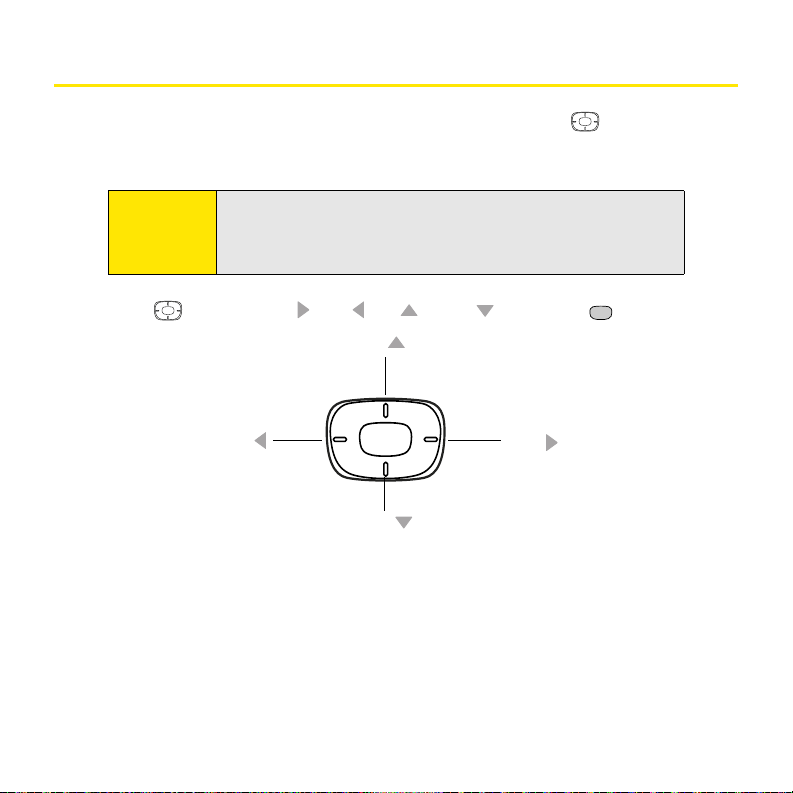
Moving Around the Device Screen
Up
Down
Left
Right
To move around the device screen, you can use the 5-way navigator for one-handed
navigation, or you can tap items on the screen with the stylus. With use, you will find your
own favorite way to scroll, highlight, and select menu items.
Note:
The 5-way includes Right , Left , Up , Down , and Center buttons.
18 Basics
Some third-party applications may not work with the 5-way, and you
must use the stylus instead. In this guide, arrow icons are used to
indicate directions on the 5-way. These arrows are different from any
onscreen scroll arrows or pick list arrows.
Page 25

Scrolling Through Screens
As on a computer, you scroll on the device to move from field to field or page to page, or in
some cases to highlight an item or option in a list.
You can also scroll using the stylus. Tap an onscreen scroll arrow, or drag the slider of an
onscreen scroll bar.
Highlighting and Selecting Items
On most screens, one item—a button, a list entry, or a check box—is highlighted by default.
The highlight indicates which item is affected by your next action. Use the 5-way to
move the highlight from one item to another before opening or selecting it.
After highlighting an item, you can select or activate it by pressing Center or by tapping
the item with the stylus.
Accessing Command Buttons
In most applications, command buttons such as New, OK, and Details appear at the bottom
of the screen. In many cases, you can jump directly to these buttons instead of scrolling to
them.
Basics
Note:
For detailed information on navigating with the 5-way, see the User
Guide.
Basics 19
Page 26

Selecting Menu Items
Menu Shortcut
Many applications have menus to provide access to additional
features. These menus are usually hidden from view, but they
appear when you press Menu . To get the most out of your
device, it’s a good idea to familiarize yourself with the additional
features available through the various application menus.
1. Press Menu to open an application’s menus.
2. Press Right and Left to switch between menus.
3. Press Up and Down to highlight a menu item.
4. Press Center
to select the menu item, or press Menu
to close the menus and cancel your selection.
Tip:
Most menu items have menu shortcuts listed in the menu. To use a
menu shortcut, press Menu plus the shortcut letter. You don’t have to
see the menu item to use the menu shortcut. For example, when
you’re in Calendar, you can press Menu + N to create a new event.
20 Basics
Page 27
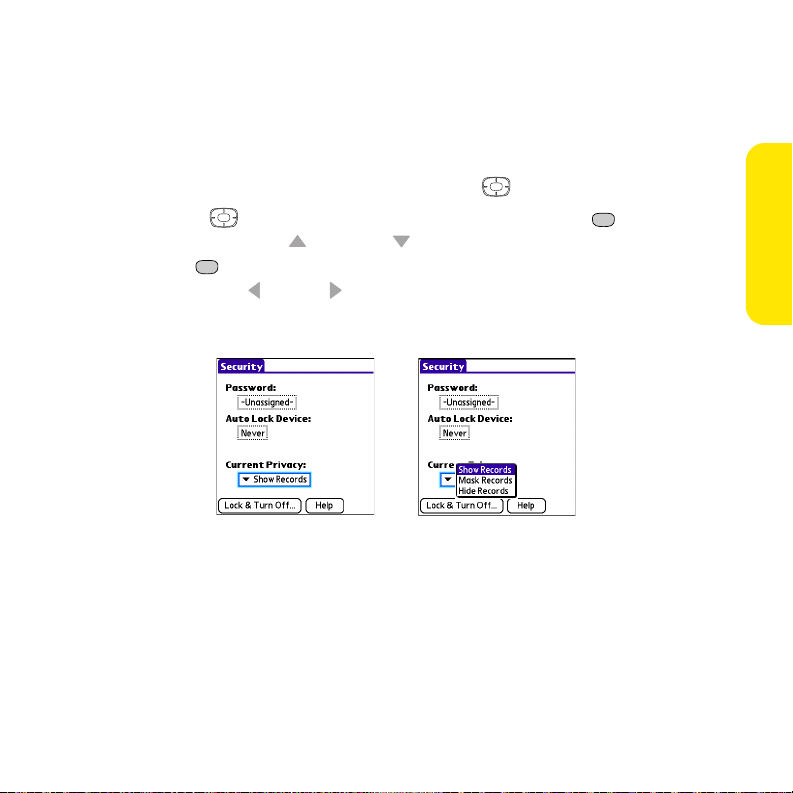
Selecting Options in a Pick List
A range of options is often presented in a type of menu called a pick list, which can be
identified by a downward-pointing arrow. Pick lists are different from the application
menus previously described. The application menus give you access to additional features,
while pick lists enable you to select the contents for a particular field.
You can select an option from a pick list with the 5-way or the stylus:
䢇 Use the 5-way to highlight the pick list, and then press Center to display the
items in the list. Press Up and Down to highlight the item you want, and then
press Center
to select the highlighted item. To exit the pick list without making a
selection, press Left or Right .
䢇 Use your stylus to tap the pick list, and then tap the item you want from the list. To exit
the pick list without making a selection, tap outside the list.
Basics 21
Basics
Page 28
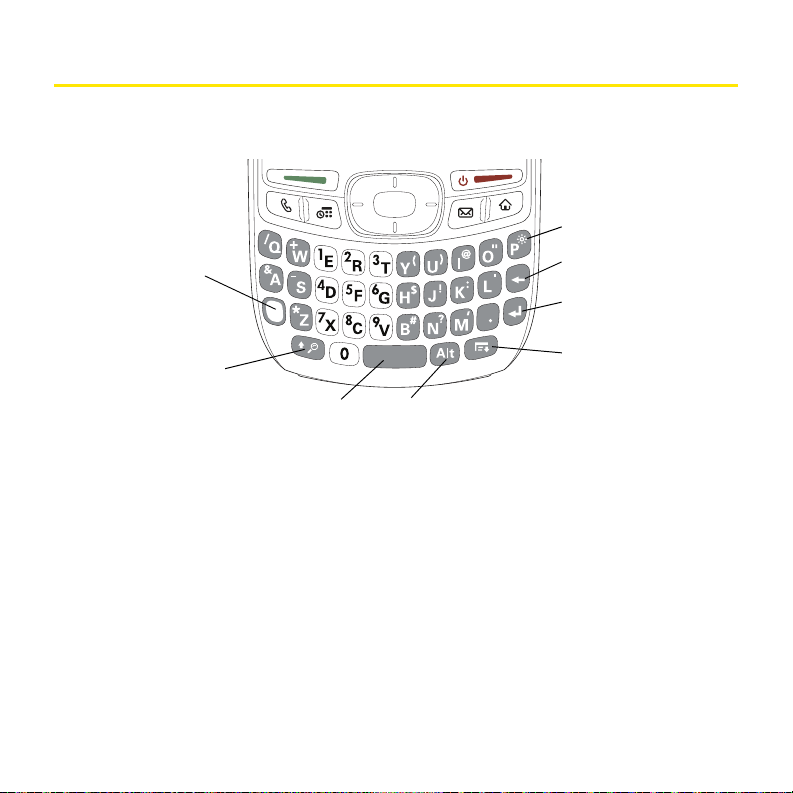
Using the Keyboard
Option
Shift/Find
Alt
Space
Backspace
Return
Backlight
Menu
When using the keyboard, most people find it easiest to hold the device with two hands
and use the tips of both thumbs to press the keys.
The Backspace, Return, Space, and Shift keys, as well as the letter keys, work in the same
way as the same keys on any computer keyboard. In addition, your device offers several
special function keys.
22 Basics
Page 29
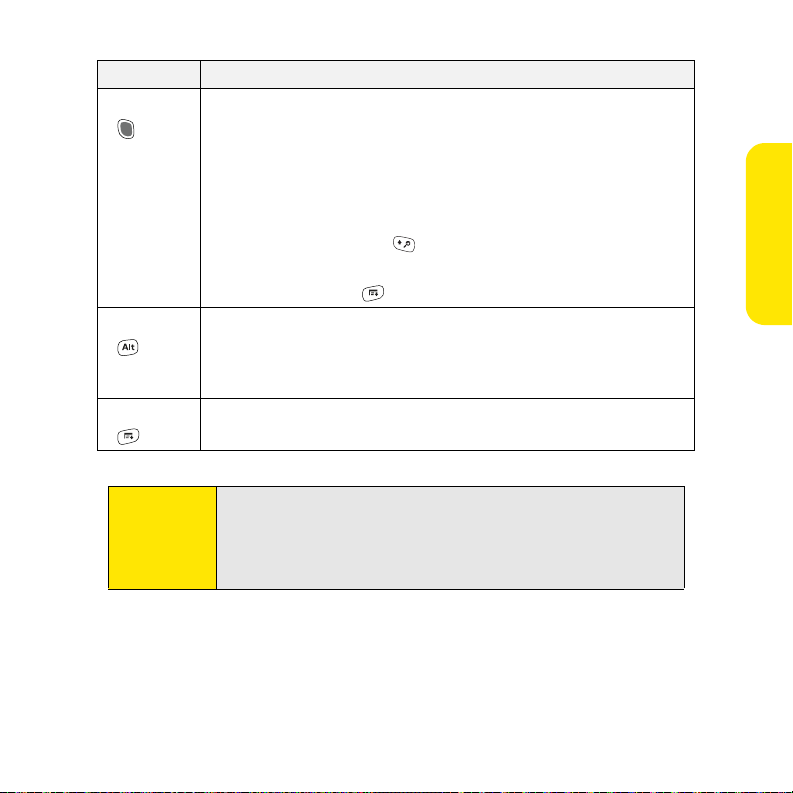
Key Function
Option When pressed in conjunction with a second key, gives that key a
secondary function. For example:
䢇 Option + <any lettered key> enters the symbol or number
displayed at the top of the key.
䢇 Option + <any quick button> opens a secondary application
(see “Using the Quick Buttons” on page 25).
䢇 Option + Shift/Find opens the Find feature (see the User
Guide for information on using
䢇 Option + Menu dims the device screen.
Find).
Alt When pressed in conjunction with a lettered key, the period key,
or the zero key, displays a variety of alternate characters that
you can enter using that key. See the User Guide for details. For
example, pressing
R + Alt displays the ® character.
Menu Opens application menus. See “Selecting Menu Items” on
page 20 for details.
Basics
Tip:
Your device includes a keyboard backlight that turns on and off when
the screen turns on or off. Press Option + P to adjust screen and
keyboard backlight brightness. The backlight also dims when an active
call lasts longer than a specified period of time. See the User Guide for
details.
Basics 23
Page 30
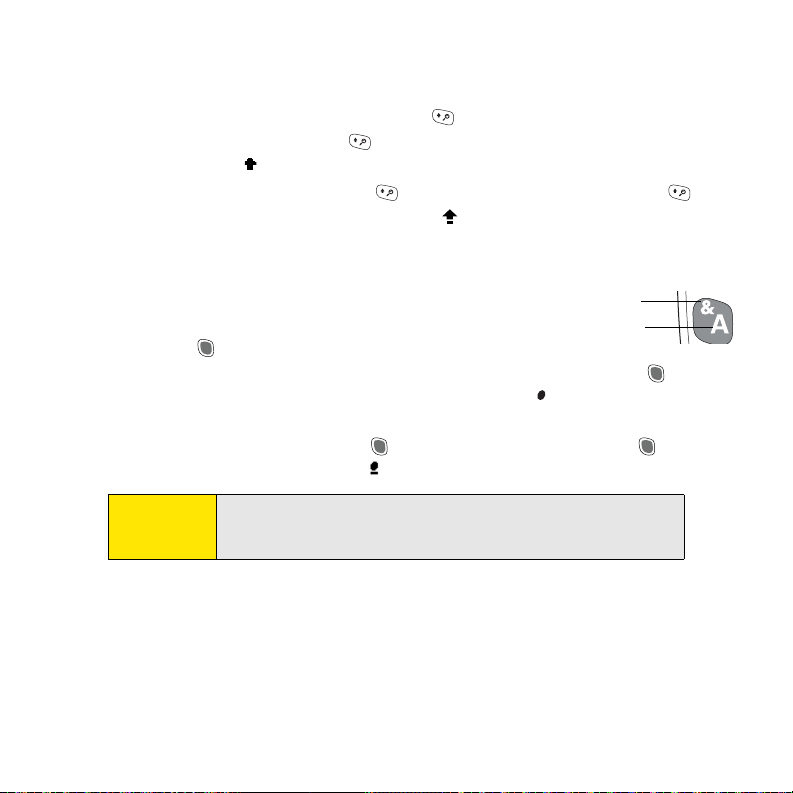
Entering Lowercase and Uppercase Letters
Letter
Symbol
䢇 To enter lowercase letters, press the desired keys.
䢇 To enter an uppercase letter, press Shift/Find and then press a letter key. You don’t
need to press and hold Shift/Find while entering uppercase letters. When Shift is
active, an up arrow appears in the lower-right corner of the screen.
䢇 To turn Caps Lock on, press Shift/Find twice. To turn it off, press Shift/Find once.
When Caps Lock is on, an underlined up arrow appears in the lower-right corner of
the screen.
Entering Numbers, Punctuation, and Symbols
To enter the characters that appear above the letters on the keys, do
one of the following:
䢇 Press Option and then press the key with the desired
character shown above the letter. You don’t need to press and hold Option while
pressing the second key. When Option is active, the symbol appears in the
lower-right corner of the screen.
䢇 To turn Option Lock on, press Option twice. To turn it off, press Option once.
When Option Lock is on, the symbol appears in the lower-right corner of the screen.
Tip:
24 Basics
Some application views automatically default to Option Lock, such as
the Dial Pad view of the Phone application, or the Calculator. In this
case, you do not need to press Option to enter numbers.
Page 31

Opening Applications
Phone
Calendar Messaging
Applications
Option
When you open an application using either a quick button or Applications view, you
automatically close the application you were previously using.
Using the Quick Buttons
The front of your device has three buttons that you can use to open specific applications.
The fourth button opens Applications view, which allows you to access all the applications
on your device. You can also press any of the quick buttons or the Applications button to
wake up your device screen.
Each of the three quick buttons opens an application. When you press Option first, each
quick button opens a secondary application.
Button Primary Application Secondary Application
Phone
Calendar
Messaging
+ Web
+ World Clock
+ Email
Basics
Basics 25
Page 32

Using Applications View
You can access all available applications through Applications view.
1. Press Applications .
2. Use the 5-way to highlight the application you want
to open.
3. Press Center
to open the selected application.
In Applications view, you can also do any of the following:
䢇 Press Applications repeatedly to cycle through various
categories of applications. See the User Guide for more
information on categories.
䢇 Enter the first few letters of the application’s name to highlight it. For example, if you
enter “p,” it highlights Phone; if you then enter “r,” it highlights Prefs. If you pause and
then enter “r,” it highlights the first application that starts with “r.”
26 Basics
Page 33

Using the Phone
Favorite Buttons
Dial Pad
Status Icons
Look Here for
Your Phone
Number
Opening the Phone Application
䊳 Press Phone to open the Main view of the Phone application.
Checking Signal Strength and Phone Status
You can monitor the status of your device’s signal strength and several other items, using
the icons in the title bar of the Phone application. See the User Guide for details.
What’s My Phone Number?
1. Make sure your phone is on (see “Turning Your
Device’s Phone On and Off” on page 17 for
information).
2. Press Phone .
3. Press Menu .
4. Select Options and then select Phone Info.
Basics
Basics 27
Page 34

Making Calls
Your device offers several options for making phone calls. As you become familiar with your
device, you’ll discover which method you prefer.
Dialing Using the Onscreen Dial Pad
1. Press Phone .
2. Enter the phone number by tapping the onscreen Dial Pad
with the stylus.
3. Do any of the following to make the call:
䡲 Ta p Dial.
䡲 Press Tal k .
䡲 Press Center .
Dialing With the Keyboard
1. Press Phone .
2. Press the numbered keys to enter the phone number.
(You don’t need to press Option .)
3. Press Tal k to make the call.
28 Basics
Page 35

Dialing by Contact Name
Characters You Enter
Appear Here
You need to have names and numbers in your contact list before you can dial a call by using
a contact name (see “Adding a Contact” on page 51). You can also import names and
numbers by synchronizing (see “Synchronizing Information—The Basics” on page 48).
1. Press Phone .
2. Select the Contacts favorite button.
3. Using the keyboard, start entering one of the following for
the contact you want to call:
䡲 First name (JOH for John).
䡲 Last name (SMI for Smith).
䡲 First initial and last name (JSM for John Smith).
For example, entering SM might display Smilla Anderson,
John Smith, and Sally Martin. Entering JSM finds only John
Smith.
4. Select the number you want to call, and press Talk to make the call.
Basics
Tip:
To see more information for a contact, highlight the name and press
Center on the 5-way. To restart your search, press Backspace to delete
letters you’ve entered, or select Cancel to return to Main view.
Basics 29
Page 36

Dialing With a Speed-Dial Favorite Button
Vol um e
Button
For information on speed-dial favorite buttons, see “Defining
Favorite Buttons” on page 38.
1. Press Phone .
2. Press Down
3. Use the 5-way
to access your favorite buttons.
to highlight the desired speed-dial
favorite button. (Speed-dial favorite buttons are indicated by
the icon
.)
4. Press Center or tap the speed-dial favorite button to call the number associated
with the selected button.
Tip:
To view more favorite buttons, press Right or Down on the 5-way. If the
highlighted favorite was added from Contacts, press Space to view all
numbers associated with that contact.
Adjusting Call Volume
While a call is in progress, press the Volu me
button on the side of your device to adjust the
call volume.
䢇 To increase the volume, press the upper half
of the Vol um e button.
䢇 To decrease the volume, press the lower half
of the Vol um e button.
30 Basics
Page 37

Receiving Calls
To receive calls, your device’s phone must be on. This is different from having only the
screen turned on (see “Turning Your Device’s Phone On and Off” on page 17). When your
phone is off, your calls go to voicemail.
Answering Calls
䢇 Press Tal k .
–or–
Using the 5-way , select the onscreen Answer button.
–or–
If the headset is attached, press the headset button.
Sending Calls to Voicemail
䢇 Press Power/End .
–or–
Using the 5-way , select the onscreen Ignore button.
䢇 Using the 5-way , select the onscreen Ignore with Text button. This option sends
the call to voicemail and opens a text message addressed to the caller.
Basics
Tip:
Do not press Power/End to ignore a call-waiting alert; this hangs up
your active call (the call-waiting alert then changes to an incoming-call
alert). Use the 5-way method instead.
Adjusting Ringer Volume
䢇 When you are not on a call, press the Volu me button on the side of your device to adjust
the ringer volume, and then press the Side button to confirm the change.
Basics 31
Page 38

Silencing the Ring of an Incoming Call
䢇 Press any key on your device except Tal k , Power/End , or the 5-way .
–or–
To immediately silence all system sounds including the ringer, slide the Ringer switch to
Sound Off (see “Silencing Sounds” on page 73).
If music is playing and a call arrives, the phone rings softly and the music automatically
pauses. The music resumes if you ignore the call; if you answer the call, the music resumes
when you hang up.
Using Voicemail
Setting Up Your Voicemail
The first time you call voicemail, you are prompted to enter your voicemail password.
If necessary, contact Sprint for your password.
1. Make su re your phone is turned on (see “ Turning Your Device’s
Phone On and Off” on page 17).
2. Press Phone .
3. Press and hold 1, or select the Vo ice ma il favorite button, to
call the automated voicemail system.
4. Follow the voice prompts to set up your voicemail.
Retrieving Your Voicemail Messages
1. Press Phone .
2. Press and hold 1, or select the Vo ice ma il favorite button, to call the voicemail system.
3. Enter your voicemail password by using the keyboard, or select Extra Digits if you
defined this option (see “Defining Favorite Buttons” on page 38 for details on
defining extra digits). Remember that you do not need to press Option to enter
numbers, an asterisk ( * ), or a pound sign ( # ) while on a call.
32 Basics
Page 39

Tip:
Caller’s Name
and Number
Current Duration
of Call
Dial Pad
Mute
Accessing Your Voicemail From Another Phone
1. Dial your wireless phone number.
2. Press * when your voicemail answers.
3. Enter your password, and then press #.
If the Voicemail icon appears in the title bar of the Main view of the
Phone application, you can select this icon to retrieve your voicemail.
What Can I Do When I’m On a Call?
When you make or receive a call, Active Call view appears. Use the 5-way to access the
onscreen buttons in this view.
The onscreen buttons in Active Call view perform the following functions:
Ends the call immediately. You can also press the headset button
(if the headset is attached).
Turns on the speakerphone. When the speakerphone is on, you can
take the device away from your ear and use other features during
a call. For example, you can check your calendar or look up contact
information.
Basics
Basics 33
Page 40

Turns off the speakerphone when it is on.
Replaces the Spkr-phone button when a Bluetooth® hands-free
device, such as a headset or car kit, is attached. Select this button
to transfer the call from the Bluetooth hands-free device to the
built-in earpiece.
Places the current call on hold.
Enables you to make another call while the first call is on hold. For
information on making a second call, see the User Guide.
Opens the Dial Pad so you can manually dial additional numbers,
such as an extension or a response to a voice prompt.
Dials any extra digits (such as a password or an extension) that
you assigned to a favorite button. This button replaces the Dial
Pad button during outgoing calls to numbers that include
predefined extra digits. See “Defining Favorite Buttons” on
page 38 for information on defining extra digits.
Mutes the microphone so that you cannot be heard.
Tip:
To avoid accidentally activating onscreen buttons while holding the
device to your ear, you can disable the screen’s touch-sensitive feature
during active calls (see “Locking Your Screen” on page 76).
34 Basics
Page 41

Ending a Call
Do one of the following to end a call:
䢇 Press Power/End .
䢇 Select Hang Up All.
䢇 Press the button on the headset (if the headset is attached).
Note:
Tip:
If the End Call dialog box appears, select OK to continue.
When a call lasts longer than two minutes, the screen dims. Press any
key except Power/End to restore the screen brightness, and then press
Power/End to hang up the call. Be careful not to press Power/End to
wake up the screen, because this will accidentally end the call.
Saving Phone Numbers
After you complete an outgoing call to a number that is not in your Contacts list, you are
prompted to add the number to your Contacts list. You are also prompted to add new
numbers from incoming calls with caller ID.
䢇 To create a new contact entry for this number, select Create a
New Contact, and enter the contact’s information.
䢇 To add this number to an existing contact entry, select Add to a
Contact and then select the contact. The number is pasted into
the first available phone number field for that contact.
䢇 To decline adding this number, select Cancel.
䢇 To disable the Add New Number prompt, check the Don’t ask me
this again box.
Basics 35
Basics
Page 42

Tip:
You can re-enable the Add New Number prompt if you’ve disabled it. In
the Phone application, press Menu, select Options, and then select
Phone Preferences. Check the Ask to add unknown phone numbers
after calls box.
Answering a Second Call (Call Waiting)
When you are on a call, you can receive a second call. When the second call comes in, you
hear a call-waiting tone and the Call Waiting dialog box appears. You can do any of the
following to handle the second call:
䢇 To place the current call on hold and answer the new call, press Talk or use the
5-way to select Answer.
䢇 To send the new call to voicemail, use the 5-way to select Ignore.
䢇 To send the new call to voicemail and send the caller a text message, use the 5-way
to select Ignore with Text.
䢇 To hang up the current call and answer the new call, press Power/End . When the
incoming call message reappears, select Answer or press Talk .
Tip:
Once you have answered a second call, to switch back and forth
between the original call and the call you answered, use the 5-way to
select Swap.
Note:
When you answer a second call and then select the Hang Up All
button, it ends both calls. In this situation, if the first caller has not yet
hung up the phone, the Sprint National Network automatically redials
your number from the first caller’s number and you see an incoming
call alert. You can answer to continue your call with the first caller.
36 Basics
Page 43

Using Sprint Voice Command
If you subscribe to the Sprint Voice Command service, you can call a number by just saying a
name. (There is a monthly charge for this service.)
To activate Sprint Voice Command:
1. Make sure your phone is turned on (see “Turning Your Device’s Phone On and Off” on
page 17).
2. Press Phone .
3. Press *, press 2, and then press Tal k to contact Sprint Customer Service and
sign up.
To use Sprint Voice Command, you must set up your personal address book.
1. From the Main view of the Phone application, press *, and then press Tal k .
Follow the system prompts.
2. Say “Add Name” to begin setting up your personal address book, and then follow the
voice prompts.
To make a call with Sprint Voice Command
1. From the Main view of the Phone application, press *, and then press Tal k .
(You’ll hear a tone followed by the prompt “Ready.”)
2. After the prompt, say “Call” and the name you’ve assigned to the number you want to
call. (Your request will be repeated and you will be asked to verify it.)
3. Say “Yes” to make the call. Say “No” to cancel.
Basics
Basics 37
Page 44

Defining Favorite Buttons
Your device provides 70 programmable favorite buttons for quick
access to common tasks such as dialing a phone number (speed
dial); opening an application; accessing a Web page; addressing a
text, email, or Picture Mail message; or accessing voicemail.
Sprint may preset favorite buttons on your device that are
customized for their services. You can customize all favorite
buttons except Voicemail—either delete and reassign existing
favorite buttons or create new ones—to perform any of the
supported tasks.
Creating a Speed-Dial Favorite Button
1. Press Phone .
2. Use the 5-way to select a blank favorite button.
Tip:
If there are no blank favorite buttons on the current Favorites page,
press Right on the 5-way to scroll through the other pages.
3. Enter a label for the favorite.
䡲 If the entry is for an existing contact, select Lookup. Start
entering the contact’s last name, and then select the
number you want for the contact when it appears in the
lookup list.
䡲 If the entry is for a new contact, enter the Label, press
Down , and enter the Number.
4. (Optional) Enter a Quick Key, a letter that you can press and
hold from the Main, Dial Pad, or Favorites view of the Phone application, to call this
speed-dial number.
5. Select OK.
38 Basics
Page 45

Creating Other Types of Favorite Buttons
1. Press Phone .
2. Use the 5-way to select a blank favorite button.
3. Select the Typ e pick list and select Call Log, Dial Pad, Contacts, Application, Message,
Email, or Web Link.
4. Enter a label for the favorite and enter any other necessary information on the screen.
5. (Optional) Enter a Quick Key, a letter that you can press and hold from the Main, Dial
Pad, or Favo rites view of the Phone application, to open the favorite.
6. Select OK.
Basics
Basics 39
Page 46

Using a Phone Headset
Microphone
Headset
Button
Speakers
You can connect a phone headset for hands-free operation. If you need to use your device
while driving and this is permitted in your area, we recommend using a phone headset
(wired headset included) or a hands-free car kit (sold separately).
Note:
Check the specifications for your headset or car kit to confirm compatibility. Please note
that you cannot use stereo headphones with Bluetooth wireless technology to listen to
music files.
Using a Wired Headset
When using the headset that is included with your device, you can press the headset
button to answer an incoming call or a call-waiting call, pick up a call that is on hold, switch
between an active call and a call on hold (if the second call is incoming), and more.
40 Basics
For a list of compatible hands-free devices, go to
www.palm.com/treo755psprint-support.
Page 47

Connecting to a Bluetooth Hands-Free Device
Once you set up a partnership with a Bluetooth hands-free device such as a headset or car
kit, you can communicate with that device whenever it is turned on and within range.
Bluetooth range is up to 30 feet (10 meters) in optimum environmental conditions.
Performance and range may be reduced by physical obstacles, radio interference from
nearby electronic equipment, and other factors.
Note:
In the documentation for the other device, a partnership might be
referred to by a term such as trusted pair, trusted device, or pairing.
1. Press Applications and select Bluetooth , or tap the
Bluetooth icon in the title bar.
2. Select Bluetooth On.
3. (Optional) Enter a device name that identifies your device
when it is discovered by other Bluetooth devices.
Basics
Note:
Use the same device name for all your Bluetooth connections. If you
change the device name, you need to recreate any partnerships you
have already created.
4. Prepare your hands-free device to accept a connection from
another Bluetooth device. (For instructions, see the
documentation that came with your hands-free device.)
5. Select Setup Devices.
6. Select Hands-free Setup.
7. Follow the onscreen instructions to create a partnership with
the specific hands-free device. When prompted, enter a
passkey.
Basics 41
Page 48
Important:
Some hands-free devices have a predefined passkey. If your device has
a predefined passkey, you can find the passkey in the documentation
for that device. Other devices provide a screen where you enter a
passkey that you make up. In either case, you must use the same
passkey on both your Treo device and your hands-free device. We
recommend that, where possible, you make up a passkey of 16
alphanumeric characters (letters and numerals only) to improve the
security of your Treo device. The longer the passkey, the more difficult
it is for the passkey to be deciphered.
8. After you finish setting up the device, select Done to return to Trusted Devic es view.
Note:
For some car kits, you need to initiate a Bluetooth connection from
your Treo device to complete the partnership process. To do this,
highlight the car kit in
Connec t
select
.
Tru st ed De vic es
view, press
Menu
, and then
9. (Optional) Enable advanced hands-free features by pressing the multifunction button
(MFB) on the hands-free device.
You know that the connection is successful when you see a light-blue headset icon in the
title bar of the Phone application. You can now use your Treo device with the Bluetooth
hands-free device.
Using a Bluetooth Hands-Free Device
After you create a partnership with your Bluetooth hands-free device and you turn it on
within range (up to 30 feet or 10 meters), your Treo device automatically routes all calls to
the hands-free device instead of to the earpiece on your Treo device. When a call comes in,
your Treo device rings and the hands-free device beeps. Even if you answer the call on your
Treo device, the call goes to the hands-free device. If you prefer to route calls to the earpiece
on your Treo device, you can change the settings on your Treo device to do this; see the User
Guide for information on customizing advanced settings for your hands-free device.
42 Basics
Page 49

The features of a hands-free device vary by model. Check the documentation for your
hands-free device for details about these features. Your Treo device can support the
following actions, provided that your hands-free device also supports them:
䢇 Answer an incoming call.
䢇 Hang up a call and answer a call-waiting call.
䢇 Place a call on hold and answer a call-waiting call.
䢇 Hang up a single call.
䢇 Transfer a call from the earpiece on your Treo device to the hands-free device.
䢇 Ignore an incoming call.
䢇 Redial the last number you called from the hands-free device.
Selecting Ringtones
You can set various tones for various types of incoming phone calls.
1. Press Phone .
2. Press Menu .
3. Select Options and then select Sound Preferences.
4. Select the Application pick list, and then select Ring Tones.
5. Select the Vol um e pick list, and then select the volume level.
6. Select the Vibrate pick list, and the n select when you want the
vibrate option to turn on.
7. (Optional) Check the Escalate ring tone volume box if you want the ringtone to play
softly and then increase to full volume the longer it rings.
Basics
Basics 43
Page 50

8. Select ringtones from the following pick lists:
䡲 Known Caller for an incoming call from someone in your Contacts or Favorites.
䡲 Unknown Caller for an incoming call from someone identified by caller ID who is
not in your Contacts or Favorite s.
䡲 Roaming for incoming calls when you’re outside the Sprint National Network.
9. Select Done.
44
Page 51

Resetting Your Device
If your device is not responding or you have trouble synchronizing with your computer, a
soft reset may help. All your information is retained when you perform a soft reset.
1. Press Power/End to turn off the screen.
2. Press the battery door release, and slide the battery door downward to remove it
from your device.
3. Remove the battery from the battery compartment.
4. Align the metal contacts on the battery with the contacts inside the battery
compartment, insert the battery at a 45-degree angle, and then press it into place.
5. Slide the battery door onto the back of your device until it clicks into place.
Basics
Tip:
Basics 45
If the phone and Bluetooth signals were on before a reset, these
signals automatically turn on after the reset.
If your device still does not respond after a soft reset, you may need to
do a system reset or a hard reset. See the User Guide.
Page 52

46
Page 53

Information Management Tools
In This Section
⽧ Synchronizing Information—The Basics
⽧ Personal Information Management
⽧ Working With Your Pictures and Videos
⽧ Listening to Music
⽧ Working With Your Office Files
⽧ Installing Applications
⽧ Using Expansion Cards
⽧ Customizing Your Device
⽧ Locking Your Keyboard and Screen
Information Management
Information Management 47
Page 54

Synchronizing Information—The Basics
Synchronizing means that information that is entered or updated in one place (your device
or your computer) is automatically updated in the other, so there’s no need to enter the
information twice. We strongly recommend that you synchronize your Treo™ 755
Device by Palm with your computer or corporate server frequently to keep your information
up-to-date (and backed up) in both locations.
P Smart
Important:
Windows XP users: To sync your information, you must install the
software from the Palm Software Installation CD that came with your
device—even if you sync with Outlook (sold separately) or another
third-party application. See the User Guide for information.
Windows Vista users: Before inserting the Palm Software Installation CD,
please visit www.palm.com/windowsvista. You’ll find installation
instructions, along with the most current information on using your
device and desktop software with Windows Vista.
Information from all the following applications is updated by default each time you
synchronize your device with your desktop software:
Tip:
You can also set up the VersaMail® application to synchronize email on
your device with email on your computer. See the User Guide for the
VersaMail Application at www.palm.com/mypalm/755psprint for
information.
48 Information Management
Page 55

How each application syncs depends on your computer type and the desktop software you
are using, as follows:
Computer Desktop What Syncs and Where
Windows Outlook
䢇 Calendar, Contacts, Memos, and
Tasks sync with Outlook.
䢇 Pics&Videos syncs with
®
Desktop software.
Palm
Windows Palm Desktop software All applications sync with
Palm Desktop.
Mac Palm Desktop software All applications sync with
Palm Desktop.
Information Management
Tip:
You can download a trial version of Microsoft Outlook and learn about
discount offers by visiting:
www.palm.com/mypalm/755psprint-bonus.
1. Connect your device to your computer. See the User Guide for instructions.
Note:
If you’re performing initial setup, your device should already be
connected to your computer and you should have already installed
the desktop synchronization software from the Palm Software
Installation CD.
Information Management 49
Page 56

2. Press the sync button on the sync cable.
Sync
Button
Messages appear on both your device and your computer, indicating that
synchronization is in progress.
3. Wait for messages indicating that the process is complete before you disconnect the
sync cable.
If you’re finishing your initial setup, you now have the option to install bonus software on
your device. See “Installing Applications” on page 68 for additional information on
installing your bonus software.
Note:
For more information on synchronization, as well as troubleshooting
tips, see the User Guide.
50 Information Management
Page 57

Personal Information Management
Managing Your Contacts
Adding a Contact
1. Press Phone .
2. Select the Contacts favorite button.
Tip:
3. Select New Contact.
4. Use the 5-way to move between fields as you enter
information.
5. (Optional) Do any of the following:
䡲 Add a caller ID photo: Select the Picture box, and then do
one of the following:
l Select Camera to take a picture and add it to this
contact when you save the picture (camera version
only).
l Select Photos to add an existing picture to this contact.
䡲 Add a caller ID ringtone: Select the Ringtone pick list and select a ringtone from
the list to give incoming calls from this contact a distinctive ring.
䡲 Place the entry in a category or mark it private: Select Details (see the User Guide
for more information).
䡲 Add a note to an entry: Select Note .
䡲 Display additional fields for this contact: Select Plus .
6. After you enter all the information, select Done.
You can also open Contacts from Applications view.
Information Management
Information Management 51
Page 58

Viewing or Changing Contact Information
1. In the Contacts list, begin entering one of the following for the contact you want to
view or edit:
䡲 First name (JOH for John).
䡲 Last name (SMI for Smith).
䡲 First initial and last name (JSM for John Smith).
2. Select the name of the entry you want to open.
3. Select Edit.
4. Make changes to the entry as necessary, and then select Done.
Defining Your Business Card
1. Create a new contact with your own business card information.
2. Open the contact entry containing your business card information.
3. Press Menu .
4. Select Select Business Card from the Record menu.
®
After you define your business card, you can beam it to other Palm OS
devices. In Contacts
or in any Phone view, press Menu and select Beam Business Card from the Record
menu.
52 Information Management
Page 59

Creating and Viewing Your Calendar
Displaying Your Calendar
䢇 Press Calendar repeatedly to cycle through the various views:
䡲 Agenda view shows your daily schedule, the number of
unread email messages, and any items on your Tasks list
that are overdue or due today. If there’s room, Agenda
view also shows your schedule for the next dates that
have events scheduled.
䡲 Day view shows your daily schedule one day at a time.
䡲 Week view shows your schedule for an entire week. The time frames are based on
the Start Time and End Time settings in Calendar Preferences.
䡲 Month view shows your schedule for a whole month.
䢇 From any Calendar view, open the Options menu and select Ye ar view to view a
calendar for an entire year.
䢇 From any Calendar view (except Agenda view), use the 5-way or stylus to move to
another day, week, month, or year (based on the current view).
䢇 From any Calendar view (except Agenda view), select Go To, and then select a date from
the calendar.
Information Management
Tip:
You can customize your phone to display the most current Calendar
event on the Main view in the Phone application. Press Phone, press
Menu, and then select Options. Select Phone Display Options and
check the Show Calendar Event box.
Information Management 53
Page 60

Creating an Event
Selected Date
Selected Day
1. Press Calendar until Day view appears.
2. Press Left or Right to select the desired day.
3. Select New.
4. Using the keyboard, enter a starting hour and minute for the event. (For example,
enter 545 for 5:45.)
5. Select the End Time box, and then select the ending hour and minute for the event.
6. (Optional) To assign a time zone to the event, select the Time Zone pick list and select
a city in the time zone you want.
7. Select OK.
8. Enter a description for the event.
54 Information Management
Page 61

Scheduling a Repeating Event
This Icon
Indicates a
Repeating
Event
1. Create an event, and then select it.
2. Select Details.
3. Select the Repeat pick list, and then select a repeat interval. (If the interval you need
doesn’t appear on the list, select Other to define a custom interval.)
4. For weekly events, select the day(s) the event is repeated; for monthly events, select
Day or Date to indicate the repeating method.
5. If the event has an ending date, select the End on pick list, select Choose Date, and
then select the ending date.
6. Select OK.
Information Management
Tip:
To enter a birthday or anniversary, add the information to the person’s
Contacts
entry and it automatically appears in your
Calendar
.
Information Management 55
Page 62

Managing Your Tasks
Adding a Task
1. Press Applications and select Tas ks .
2. Select New to create a new task.
3. Enter a description of the task. (The text can be longer than
one line.)
4. (Optional) Select Details to customize this task, or select Note
to add a note to this task.
Note:
56 Information Management
Selecting Details lets you set a priority, category, due date, alarm, repeat
interval, and privacy status for the selected task.
Page 63

Working With Your Pictures and Videos
Album
Pick List
Your devi ce comes w ith an easy-to-use, built-in , 1.3-megap ixel camera with 2x di gital zoom
(camera version only). You can also receive and view photos and videos, send photos and
videos to other people as attachments or as Sprint Picture Mail, and use photos to
personalize your device.
Taking a Picture
1. Press Applications and select Camera .
2. By default, the Camera application stores your pictures in the Palm album on your
device. If you have an expansion card inserted into your device’s expansion card slot,
the Camera application creates a Palm album on the card and stores pictures there. To
store the picture in a different location, select the album pick list in the lower-right
corner of the screen, and then do one of the following:
䡲 Select <Album name> to store the picture in the selected
album. The storage location is based on the location of the
album (device or expansion card).
䡲 Select New Albums to open a dialog box where you can
enter an album name and select the storage location
(device or expansion card).
3. (Optional) Adjust the zoom setting by pressing Up to select
2x or by pressing Down to select 1x.
4. Point the lens on the back of your device at the subject you
want to photograph.
Information Management 57
Information Management
Page 64

5. Press Center
to take the picture.
6. Select one of the following icons:
Saves the picture in the location you selected
in step 2.
Deletes the picture.
Lets you add an audio caption.
Opens a list of options for sending the picture:
䢇 Select Send with PictureMail to send the
picture as part of a Picture Mail message
(see “Creating and Sending a Sprint Picture
Mail Message” on page 85).
䢇 Select Send with Online Services to send
the picture using one of the available
Sprint Vision Online Services (see the User
Guide for information).
䢇 Select Upload to Online Albums to upload
the picture to your online album (see the
User Guide for information).
58 Information Management
Page 65

Recording a Video
Album
Pick List
1. Press Applications and select Camcorder .
2. By default, the Camcorder application stores your videos in the Palm album on your
device. If you have an expansion card inserted into your device’s expansion card slot,
the Camcorder application creates a Palm album on the card and stores videos there.
To store the video in a different location, select the album pick list in the lower-right
corner of the screen, and then do one of the following:
䡲 Select <Album name> to store the video in the selected
album. The storage location is based on the location of
the album (device or expansion card).
䡲 Select New Albums to open a dialog box where you can
enter an album name and select the storage location
(device or expansion card).
3. Adjust the position of your device until you see the subject
you want to record on the screen.
4. Press Center
5. After you finish recording, press Center
to start recording.
again to stop.
Information Management
Information Management 59
Page 66

6. Select one of the following icons:
Begins playback.
Saves the video in the location you selected in
step 2.
Deletes the video.
Opens a dialog box where you can adjust the
volume during playback.
Opens a list of options for sending the video:
䢇 Select Send with PictureMail to send the
video as part of a Picture Mail message (see
“Creating and Sending a Sprint Picture Mail
Message” on page 85).
䢇 Select Send with Online Services to send
the video using one of the available Sprint
Vision Online Services (see the User Guide
for information).
䢇 Select Upload to Online Albums to upload
the video to your online album (see the User
Guide for information).
Note:
The video recording screen displays the approximate recording time
you have left, based on the space available on your device or expansion
card. Actual recording time may vary depending on how fast you are
moving, how many colors you are recording, and so on.
60 Information Management
Page 67

Viewing a Picture
In addition to viewing the pictures you capture with the built-in camera, you can view
pictures captured on many popular digital cameras or downloaded from the Internet.
1. Press Applications and select Pics&Videos .
2. Select the album that contains the picture you want to see.
3. Select the picture you want to view.
4. Press Right or Left to scroll to the next item in the album.
5. If the picture has an audio caption, select to hear it.
6. Tap the photo or press Center to return to Thumbnail view.
Viewing a Video
In addition to viewing the videos you capture with the built-in camcorder, you can view
videos captured on many popular digital video cameras.
1. Press Applications and select Pics&Videos .
2. Select the album that contains the video you want to see.
3. Select the video you want to view. Playback begins automatically.
4. Hold down Right or Left to seek within the current video, or press Right or
Left to scroll to the next item in the album.
5. Tap the video or press Center to return to Thumbnail view.
Information Management
Information Management 61
Page 68

Listening to Music
Click
Properties
Select Your
Device
Setting Up Windows Media Player for MP3
On a Windows computer, you need to set Windows Media Player settings to save your
music files in MP3 format in order for the files to be compatible with the Pocket Tunes
music application on your device.
The version of Pocket Tunes that is included with your device is compatible with Windows
Media Player version 9 and version 10; it is not compatible with Windows Media Player
version 11.
™
Note:
1. Connect your device to your computer with the sync cable.
2. On your device, press Applications and select pTunes .
3. On your computer, open Windows Media Player, and then click the full-screen icon in
the upper-right corner to maximize the window.
4. Click To ol s and then click Options.
5. Click the Rip Music tab, click the Format
pick list, and then select mp3. Click OK.
6. Click To ol s and then click Options.
7. Click the Devices tab, select your Treo
device from the Devices list, and then
click Properties.
62 Information Management
For information on using your device and desktop software with
Windows Vista, visit www.palm.com/windowsvista.
Page 69

Uncheck
Box
8. Click the Quality tab and uncheck the
Convert files as required by this handheld
(recommended) box. Click Apply.
9. Click OK and then click OK again.
Setting Up iTunes for MP3
On a Mac, use iTunes (included with OS X) to
convert music from a CD to MP3 format. For
more information on using the iTunes software,
see the documentation that came with your Mac.
1. On your Mac, open iTunes.
2. Select Preferences.
3. Click the Advanced button at the top of the window, and then click Importing.
4. Click the Import Using pop-up menu and select MP3 Encoder.
5. (Optional) Click the Setting pop-up menu and select Good Quality.
Transferring MP3 Files From Your Computer
The Poc ket Tunes so ftware that co mes wi th your de vice is co mpatible with t he pop ular M P3
audio file format. If your MP3 files are already on your computer’s hard drive, you need to
transfer them to your device to listen to them on your device.
If an expansion card is inserted into the device, on a Windows computer, Windows Media
Player copies the MP3 files to the expansion card. If you don’t have an expansion card
inserted, the MP3 files are copied to device memory.
If you are transferring MP3 files from a Mac computer, you must insert an expansion card
into the device. You cannot transfer MP3 files to device memory from a Mac.
Important:
You must synchronize your device with your computer at least once
before you can transfer MP3 files from your computer.
Information Management
Information Management 63
Page 70

1. Connect your device to your computer with the USB sync cable.
2. On your device, press Applications and select pTunes .
3. If you are transferring from a Mac computer, insert an expansion card into your
device. This step is optional for Windows users.
4. Do one of the following:
䡲 Windows. Open Windows Media Player on your computer. Select the
Sync tab, and then select Palm Handheld from the drop-down list.
Select Start Sync. The files are transferred to your device or to an
expansion card automatically; do not press the sync button on the sync cable.
䡲 Mac. Drag and drop the MP3 files onto the Send To Handheld droplet in the Palm
folder. Select your device name (username), the file name, and the destination
(card). Click OK. Synchronize your device with your computer. Be patient;
transferring music to an expansion card can take several minutes.
Note:
Tip:
There may be restrictions that prevent you from downloading,
viewing, and/or copying a video or music file (for example, a DVD, CD,
or MP3 file). You may also be prohibited from providing copies of the
video or music file to any third person. It is your responsibility to
ensure that you have obtained the legal right to use the video or music
file for personal use and to honor any restrictions imposed by the
original content providers.
You can also use a card reader accessory (sold separately) to transfer
MP3 files from your computer to your expansion card. Create a
Music_Audio folder in the root directory of the card, and store your MP3
files in this folder.
64 Information Management
Page 71

Listening to Music on Your Device
Previous Song
Next Song
Vol um e
Choose Songs
Progress Indicator
Play/Pause
1. Press Applications and select pTunes .
2. Do any of the following:
䡲 To play the current song, select Play or press Space .
䡲 To play the next song, select Next Song .
䡲 To play the previous song, select Previous Song .
䡲 To play a different song, select Choose Songs and select a song from the list.
䡲 To adjust the volume during playback, press the Vol um e button on the side of
your device.
䡲 To pause playback, select Pause .
Information Management
Tip:
You can also use the 5-way to navigate among songs, pause and
resume playback, and adjust the volume during playback.
Information Management 65
Page 72

Pocket Tunes continues playing until it reaches the end of your list or until you select
Pause . Music continues to play even if you switch to another application or turn off your
screen. If you want to stop playing music when you exit Pocket Tunes, press Menu ,
select Background Prefs on the Prefs menu, uncheck the Enable Background Playback box,
and then select OK.
Tip:
If you don’t hear anything when you play a song, make sure the
Ringer switch is in the Sound On position. See “Silencing Sounds” on
page 73 for more information.
66 Information Management
Page 73

Working With Your Office Files
With the Documents To Go® application on your device, you can take your important office
information with you. You can create, view, and edit Microsoft Word (DOC and TXT)
documents and Excel (XLS) spreadsheets directly on your device. You can also view and
manage PowerPoint (PPT) presentations and Adobe Acrobat (PDF) files.
Note:
The version of Documents To Go that comes with your device does not
support Microsoft Office 2007. To access Office 2007 files on your
device, you must save the files in Office 2003 format. For information
about an upgrade that supports Office 2007, go to
www.dataviz.com/office2007 (additional fees may apply).
Opening a Document
1. Press Applications and select Documents .
2. Select the document you want from the list.
Tip:
If you install the Documents To Go desktop software (from
www.palm.com/mypalm/755psprint), you can use Documents To Go
to transfer files to your device when you synchronize. For complete
information on the Documents To Go application, install the
Documents to Go desktop software, click the Documents To Go icon on
your computer, and then click Help; or go to www.dataviz.com.
Information Management 67
Information Management
Page 74

Installing Applications
Your device comes with several built-in and ready-to-use applications. You can also install
free bonus software, such as business software, games, and more. You can install the bonus
software wirelessly, using the My Treo application on your device. You can also download
the bonus software from
then synchronize to install it on your device. You can use similar methods to purchase and
install other third-party Palm OS
Installing Bonus Software From My Treo on Your Device
My Treo lets you download and install bonus software that you can use on your device. If
the bonus software has both a desktop component in addition to a device component, you
need to download the software to your computer first. See “Installing Bonus Software From
My Palm on Your Computer” on page 69 for details.
1. Press Applications and select My Treo .
2. Select the Bonus tab.
3. Select the Install link below the name of the application you want to install.
4. Repeat step 3 to install additional applications.
Installing applications from the Internet
You can use the Web browser on your smart device to install Palm OS files (PRC or PDB)
directly from the Internet. When you download a PRC or PDB file, it is automatically
installed on your smart device. If a file is compressed (ZIP or SIT), you need to download it to
your computer and expand the file before installing it on your smart device.
www.palm.com/mypalm/755psprint-bonus to your computer and
®
applications as well.
Note:
The instructions in this section tell you how to install basic PRC (Palm
OS application) and PDB (Palm OS database) files on your smart device.
Some Palm OS software uses an installer or wizard to guide you
through the process. For details, consult the documentation that came
with the software.
68 Information Management
Page 75

1. Open the Web browser (see “Viewing a Web Page” on page 88).
2. Go to the page that contains the link to the application you want to download.
3. Press Left or Right to highlight the link to the file, and then press Center to
initiate the download process.
4. Follow the onscreen instructions to accept and install the application.
Installing Bonus Software From My Palm on Your Computer
Some bonus software applications require the installation of a desktop component. To
install these applications, you must first install Palm
®
Desktop software from the Palm
Software Installation CD that came with your device, and then download the applications
to your computer.
1. On your computer, go to
www.palm.com/mypalm/755psprint-bonus.
2. Follow the onscreen instructions to download the applications you want to install.
3. Synchronize your device with your computer to install the application(s) on your
device.
Installing Other Third-Party Applications From a Computer
To install other third-party applications from a computer, you must first install
Palm Desktop software from the Palm Software Installation CD that came with your device.
Information Management
Important:
Windows Vista users: Before inserting the Palm Software Installation CD,
please visit www.palm.com/windowsvista. You’ll find installation
instructions, along with the most current information on using your
device and desktop software with Windows Vista.
When you download an application to your computer, it may be in a compressed format
such as a ZIP or SIT file. If the file is compressed, you need to use a decompression utility on
your computer, such as WinZip or Allume StuffIt Expander, before you install the
application on your device.
Information Management 69
Page 76

1. On a Windows computer, drag and drop the application file(s) onto the
Palm™ Quick Install icon on the Windows desktop.
On a Mac computer, drag and drop the application file(s) onto the Send To
Handheld droplet in the Palm folder.
2. Select your device name from the User list, and then click OK.
3. Synchronize your device with your computer to install the application(s) on your
device.
Tip:
You can open a window that lets you select whether to install files on
your device or on an expansion card. On a Windows computer,
double-click the Palm Quick Install icon. On a Mac computer, open the
HotSync menu and select Install Handheld files.
70 Information Management
Page 77

Using Expansion Cards
The expansion card slot on your device enables you to insert miniSD cards (sold separately)
to extend the storage capacity of your device. For example, expansion cards can store
pictures, MP3 files, email attachments, games, eBooks, Microsoft Office files, Adobe
Acrobat files, applications, databases, and more.
Inserting an Expansion Card
1. Open the door of the expansion card slot.
2. Hold your device with the screen facing you,
and hold the card with the label facing you.
(The notch on the card should be in the
lower-left corner next to the keyboard.)
3. Insert the card into the expansion card slot
until you feel the card lock into place.
4. Close the door of the expansion card slot.
Removing an Expansion Card
1. Open the door of the expansion card slot.
2. Press the card into the expansion card slot to
release it from the slot.
3. After you feel the expansion card slot eject the
card, remove it from the slot.
4. Close the door of the expansion card slot.
Information Management
Tip:
Information Management 71
Your device has a push-push mechanism: push in gently to insert a
card; push in gently to remove it.
If the Ringer switch is in the Sound On position, you hear a confirmation
tone when you insert or remove an expansion card.
Page 78

Opening Applications on an Expansion Card
1. Insert the expansion card into the expansion card slot.
Applications view automatically appears.
2. Select the icon for the application you want to open.
3. Press Center to open the application.
Copying Applications Between an Expansion Card and Your Device
1. Make sure the card is not write-protected. (For details, see the instructions that came
with your card.)
2. Press Applications .
3. Press Menu .
4. Select Copy on the App menu.
5. Select the Copy To pick list and select the destination: <card
name> or Phone.
6. Select the From pick list and select the location of the
application you want to copy: <card name> or Phone.
7. Highlight the application you want to copy.
8. Select Copy.
72 Information Management
Page 79
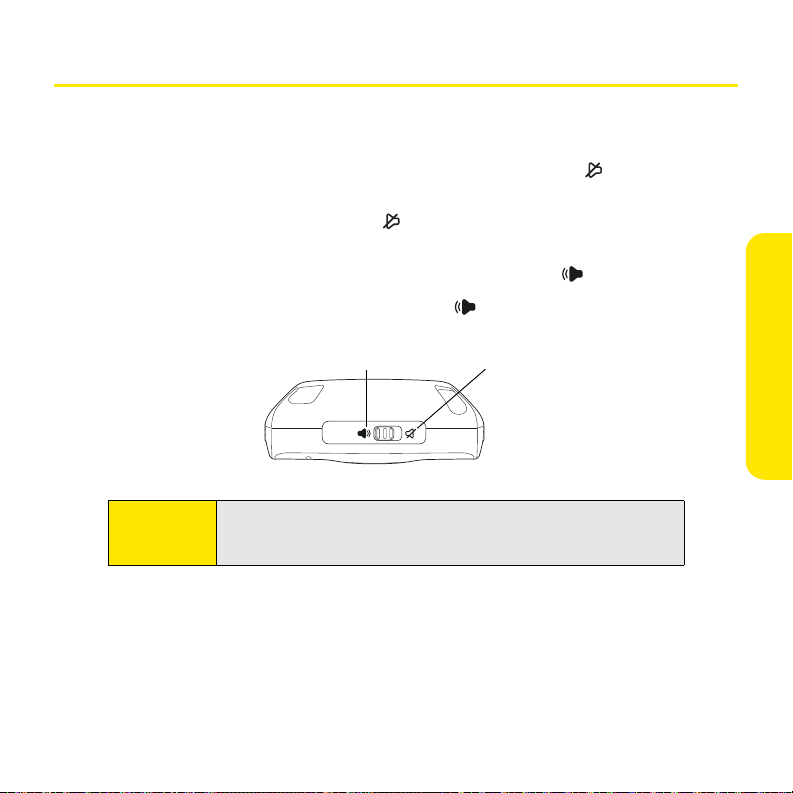
Customizing Your Device
Sound Off
Sound On
Silencing Sounds
You can immediately silence all alerts, ringtones, music that plays through the built-in
speaker, and system sounds by sliding the Ringer switch to Sound Off . This does not,
however, mute the audio during a phone call.
1. Slide the Ringer switch to Sound Off . Your device vibrates once to let you know
that you’ve turned sounds off.
2. To hear all sounds again, slide the Ringer switch to Sound On .
When you slide the Ringer switch back to Sound On , it restores the previous sound
settings.
Information Management
Tip:
Information Management 73
Your device includes a silent alarm that can vibrate even when the
Ringer switch is in the Sound Off position. For information on setting
the vibrate option, see the User Guide.
Page 80

Adjusting the Brightness
Backlight
Depending on the lighting conditions when you’re using your device, you may need to
adjust the brightness of the screen and keyboard backlight.
1. Press Option and then press Backlight .
2. Press Left and Right to adjust the brightness.
3. Select Done.
Aligning the Screen
Occasionally, if the wrong feature is activated when you tap the screen, your device screen
may need to be readjusted.
1. Press Applications and select Prefs .
2. Select To uc h sc re e n.
3. Follow the onscreen instructions and tap the screen
where indicated.
4. Select Done.
74 Information Management
Page 81
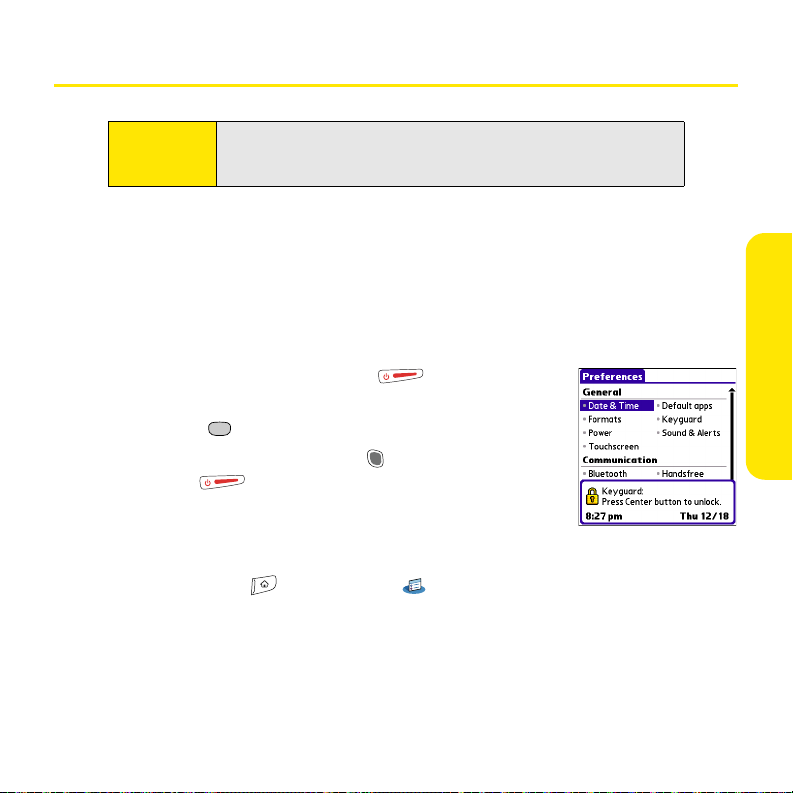
Locking Your Keyboard and Screen
Tip:
In addition to locking your keyboard and screen as described here, you
can also lock your phone, your device, and individual entries. See the
User Guide for details.
Locking Your Keyboard (Keyguard)
The Keyguard feature locks the keyboard so that buttons aren’t accidentally pressed or
items on the screen aren’t activated while your device is in a pocket or bag.
By default, Keyguar d turns on whenever the screen is off. Each time you wake up the
screen, you must turn off Keygu ard to unlock the keyboard and use your device.
To tu r n off Key guard, do the following:
1. If the screen is off, press Power/End to wake up the
screen.
2. Press Center to turn off Keyguard.
䊳 To t ur n o n Keyguard, press Option and then press
Power/End .
You can change how quickly Keyguard turns on, or you can disable
the feature altogether. To change the Keygu ard settings, do the
following:
1. Press Applications and select Prefs .
2. Select Keyg uard.
Information Management
Information Management 75
Page 82

3. Select the Auto-Keyguard pick list, and then do one of the following:
䡲 Select how quickly you want Keyguard to turn on: When power is turned off,
5 seconds after power off, or 30 seconds after power off.
䡲 Select Disabled to completely disable the Keygua rd feature until you turn it on
again.
4. Select Done.
Locking Your Screen
You can set your device to automatically lock the screen’s touch-sensitive features in
certain situations.
1. Press Applications and select Prefs .
2. Select Keyg uard.
3. Do one or both of the following:
䡲 Check the Incoming calls received box to disable the screen when the phone rings.
When this box is checked, you must use the 5-way to select the onscreen
Answer and Ignore buttons, or press Tal k to answer the call or
Power/End to ignore the call.
䡲 Check the On a call box to disable the screen after you answer a call. When this
box is checked, you must use the 5-way to select the onscreen buttons during
the call. Use this setting to avoid accidentally activating onscreen buttons while
you’re holding your device near your ear to speak.
4. Select Done.
76 Information Management
Page 83

Wireless Features
In This Section
⽧ Using Sprint Vision
⽧ Working With Sprint Power Vision
⽧ Using Email
⽧ Sending and Receiving Text and Picture Mail Messages
⽧ Browsing the Web
⽧ Watching Sprint TV
⽧ Connecting to Devices With Bluetooth® Wireless Technology
⽧ Beaming Information
Wireless
Wireless 77
Page 84

Using Sprint Vision
Sprint Vision provides wireless access to the Internet anywhere on the Sprint National
Network. To sign up for Sprint Vision services or to access complete instructions, visit
www.sprint.com
Enabling Sprint Vision
1. Make sure your device’s phone is turned on, as described in “Turning Your Device’s
Phone On and Off” on page 17.
2. Press Option and then press Phone .
3. When the Connect to the Internet dialog box appears, select Ye s to open your device’s
Web browser and make a Sprint Vision connection.
䡲 If you have not already done so, select Now when the Preparing Vision Services
䡲 If you want to cancel the connection, select No.
.
dialog box appears. This initiates a one-time process to configure your Sprint
Vision services. At the end of this two-minute process, your device connects to the
Sprint Vision home page.
Tip:
To byp as s the Connect to the Internet dialog box in the future, check
the Don’t ask me again box.
4. Use the 5-way to scroll around and select from a variety of online services.
5. Press Applications to exit the browser and end your session.
78 Wireless
Page 85

Sprint Vision Features
With Sprint Vision services, you have access to additional features, better performance,
faster Web connections, and a wider variety of online services. Features such as Web access
and sending/receiving digital images are available on your Treo™ 755
P smart device by Palm
through the Sprint National Network.
䢇 Sprint Picture Mail
SM
lets you instantly shoot, share, and print sharp, high-resolution
digital pictures, and take and send short video clips with your device.
䢇 Messaging lets you send and receive email, text, and multimedia messages, or chat.
䢇 Sprint TV
SM
lets you watch live Mobile Digital TV (MDTV) on the go with full-motion
video and vivid sound.
䢇 Web lets you experience full-color graphic versions of popular Web sites.
䢇 On Demand lets you set and then receive customized, up-to-date information on sports,
weather, news, money, and more, on demand—the way you want it.
Wireless
Wireless 79
Page 86

Working With Sprint Power Vision
Sprint Power Vision combines unmatched visual and sound clarity with broadband-like
speeds on your wireless phone. Utilizing the fastest commercially available wireless
network technology (1x and EVDO) and leveraging continued investment in handset and
application development, Sprint Power Vision offers the ultimate in wireless
entertainment, real imaging solutions, instant communication, and personalized
information at broadband-like speeds. Your device is equipped with the latest in
multimedia, imaging, and processing technology, and offers exclusive services, such as
Sprint TV and On Demand. If you sign up for the Sprint Power Vision Phone as Modem plan,
you can also use your device’s phone as a modem to access the Internet from your
computer.
For information on the On Demand service and using your phone as a modem, see the
Experience Sprint Power Vision guide.
80 Wireless
Page 87

Using Email
What Email Applications Can I Use on My Smart Device?
Your device includes two email application options:
䢇 The VersaMail
䢇 Good Mobile Messaging™.
You can also access Web-based email from your device’s Web browser.
For information on setting up Good Mobile Messaging and the Web browser to work with
email, see the Setting Up Email booklet.
®
application.
Note:
An email application is not an email provider. It works with an account
from a provider—your Sprint account, for example—or a corporate
account to transfer messages to your device.
The VersaMail Application
VersaMail enables you to access up to eight email accounts—personal or corporate. Before
you can use VersaMail, you need to enter your email account settings. Then see the User
Guide for the VersaMail
on sending and receiving messages and customizing your VersaMail settings.
How Do I Get Started?
1. If you’re entering settings for an email account on a Microsoft Exchange server, a
Lotus Notes server, or a Microsoft MAPI server, see the User Guide for the VersaMail
Application at
2. If your email provider is listed here, skip to “Setting Up VersaMail to Work With
Common Providers” on page 83.
Wireless 81
®
Application at www.palm.com/mypalm/755psprint for information
www.palm.com/mypalm/755psprint for setup steps.
Wireless
Page 88

Tip:
Your email provider is the service you use to send and receive email.
Your email provider’s name appears between the @ symbol and the
dot symbol in your email address.
AOL Concentric NetZero
Apple.Mac Covad RCN
AT&T Global Cox Central SBC/PacBell
AT&T Worldnet Cox East SBC/Prodigy
BellSouth Cox West Speakeasy
Cablevision EarthLink USA.net
Charter Gmail Verizon DSL
Comcast Juno Yahoo! Mail Plus
CompuServe Mail.com
(fee-based accounts only)
3. If your email provider’s name is not listed in step 2, see the User Guide for the
VersaMail Application at
www.palm.com/mypalm/755psprint for setup steps.
82 Wireless
Page 89

Setting Up VersaMail to Work With Common Providers
1. Press Applications and select Email .
2. If the Initial Setup dialog box appears, select Continue.
3. Make up a name that describes this account and enter it in the Account Name field.
For example, Work Email.
Tip:
If the Account Setup screen does not appear, press Menu, select Accounts,
select Account Setup, and then select New.
4. Select the Mail Service pick list, select your email provider,
such as Earthlink, and then select Next.
5. Enter the username for your email account. (Your username
appears before the @ symbol in your email address.)
6. Select the Password box, enter your email account password,
select OK, and then select Next.
7. Select Next and then select Done.
8. If prompted, select Ye s to overwrite settings for this account.
9. On the Account Setup screen, select OK to go to the Inbox of this account.
Wireless 83
Wireless
Page 90

Sending and Receiving Text and Picture Mail Messages
You can exchange brief text messages with other wireless phones that have text
messaging capability. You can also send Sprint Picture Mail messages (including images,
videos, voice memos, and text) to other users. Before you use your device to send or receive
messages, please verify pricing and availability with Sprint, and make sure your phone is
turned on, as described in “Turning Your Device’s Phone On and Off” on page 17.
Creating and Sending a Text Message
1. Press Messaging .
2. Select New.
3. Select the To field to address the message:
䡲 Press Center . If the recipient’s name appears in the
list of recent addresses, select it from the list.
䡲 If the recipient is in your Contacts list, enter the first initial
and last name (no spaces), and then select the recipient’s
phone number or email address, depending on where you
want to send the message.
䡲 If the recipient’s name isn’t in the list of recent addresses
or your Contacts list, enter the phone number or email address.
Tip:
If you see numbers when you expect to see letters (or the other way
around), you need to turn Option Lock on by pressing Option twice or
turn it off by pressing Option once.
4. Press Down to jump to the body of the message.
5. Enter your message or select QuickText to insert predefined phrases. To insert
emoticons, select .
6. Select Send.
84 Wireless
Page 91

Creating and Sending a Sprint Picture Mail Message
Sprint Picture Mail messages consist of pictures, videos, text, and sounds. You can include
pictures and videos you captured with the built-in camera (camera version only) as well as
any of the following items:
䢇 Pictures.
䢇 Videos.
䢇 Text messages.
䢇 Voice m emos.
The first time you share a picture or video, you are prompted to establish a Sprint Picture
Mail account and password. Enter a four- to eight-digit, alphanumeric password and press
Center . Once you receive confirmation, you can continue to send or upload pictures and
videos.
1. Press Messaging .
2. Select New.
3. Select the To field to address the message:
䡲 Press Center . If the recipient’s name appears in the list of recent addresses,
select it from the list.
䡲 If the recipient is in your Contacts list, enter the first initial and last name (no
spaces), and then select the recipient’s phone number or email address,
depending on where you want to send the message.
䡲 If the recipient’s name is not in the list of recent addresses or in your Contacts list,
enter the mobile number or email address.
Wireless
Tip:
You may need to press Option to enter letters or numbers. The Option
Lock setting defaults to the setting you used the last time you
addressed a message.
Wireless 85
Page 92
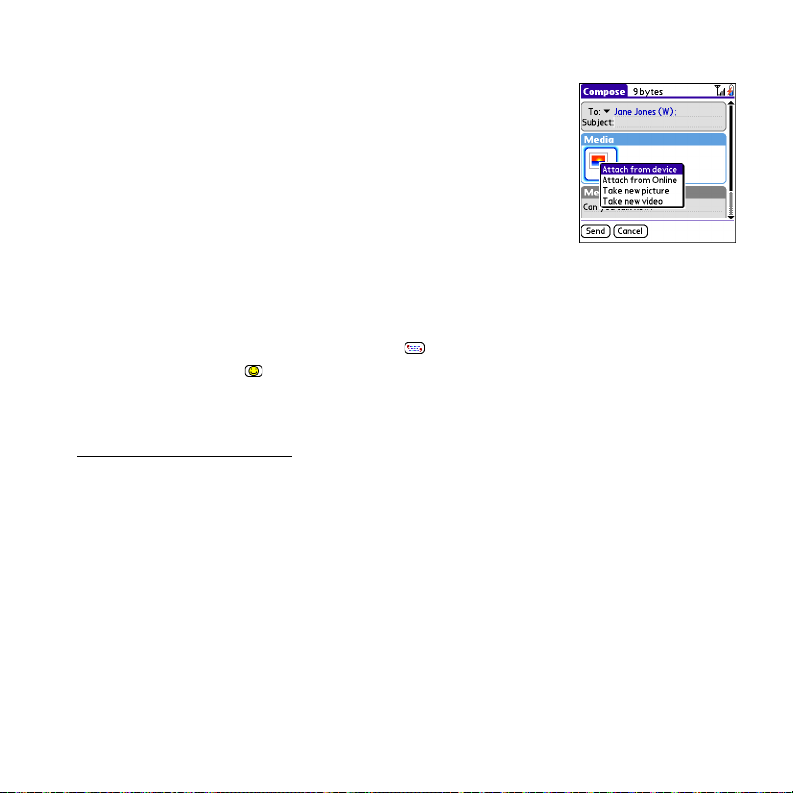
4. Select Add media.
5. Select the Media icon and select one of the following:
䡲 Attach from device lets you attach a picture or video from
your device.
䡲 Attach from Online lets you attach a picture or video from
your online album. See the User Guide for information.
䡲 Take ne w pic ture prompts you to take a new picture with
the built-in camera and attach it to the message (camera
version only).
䡲 Take ne w vide o prompts you to capture a new video with the built-in camcorder
and attach it to the message (camera version only).
6. Repeat step 5 for each item you want to attach.
7. Enter your message or select QuickText to insert predefined phrases. To insert
emoticons, select .
8. Select Send.
Your device uploads the pictures or videos to the Sprint Picture Mail Web site
(www.sprint.com/picturemail
), creates a private Guest Book for the recipient on the Sprint
Picture Mail Web site, and sends your message to the recipient.
86 Wireless
Page 93

Receiving Messages
When your phone is on and is in an area of wireless coverage, you automatically receive
new text messages.
The new message alert may include any of the following buttons:
䢇 OK dismisses the alert and places the message in your Inbox.
䢇 Reply opens Chat view, where you can reply to a text message.
To send a multimedia message reply, select Add from Chat view.
䢇 Call Back dials the sender’s phone number.
䢇 Go To Msg opens the message so you can view its full contents.
䢇 Go To URL opens the Web browser so you can view the full
contents of the message in your online Sprint Picture Mail
account. See the User Guide for details.
䢇 Delete removes the received message from your device.
Wireless
Wireless 87
Page 94

Browsing the Web
Viewing a Web Page
The Web browser optimizes Web pages for your device, so that you can see most of the
content without scrolling left or right.
1. Make sure your phone is turned on (see “Turning Your Device’s Phone On and Off” on
page 17).
2. Press Applications and confirm that data services are available. You should see
either the or the icon.
Note:
If you do not see either of the above icons, data services are not
available in your current location and you cannot connect to the
Internet.
3. Select Web .
4. Enter a Web page address (URL) in the address bar and select
Go. If you browse to a secure Web page, a lock appears in
the address bar.
5. Do any of the following to navigate within the Web page:
䡲 View a page in wide layout format (as on your computer):
Press Menu , select Options, and then select Wide
Page Mode.
䡲 Scroll through the page: In Optimized Mode (the default
format, which is optimized for your device screen), press Up or Down . In
Wide Page Mode, press Up , Down , Left , or Right to scroll in all directions.
88 Wireless
Page 95

䡲 Follow a link to another Web page: In Optimized Mode, highlight the link by
pressing Up , Down , Left , or Right , and then press Center to go to the
selected page.
Tip:
䡲 Submit a form: Enter the information and then select the onscreen button to
In Wide Page Mode, use the stylus to tap a link.
submit the form. If the form doesn’t have an onscreen button, press Return .
6. Use the 5-way
Tip:
to access any of the following icons in the title bar:
To quickly jump to the title bar from anywhere on a Web page, press
Space to go to the address bar, and then press Up on the 5-way.
Goes to your home page.
Opens a dialog box where you can enter a Web address you want
to go to or view a list of recently viewed Web pages.
Goes to the previous Web page.
Goes to the next Web page.
Refreshes the page with the latest content from the Internet.
Opens a list where you can select Fast Mode (no images or style
sheets) or Normal Mode (with images and style sheets).
Wireless
Wireless 89
Page 96

Downloading Files From a Web Page
The Web browser lets you download files that are recognized by one of the applications on
your device.
Item Supported File Types
Pictures JPEG, BMP, WBMP, GIF, PNG
Videos MP4, 3G2, ASF
Ringtones MIDI, QCELP, AAC, AAC+
Music MP3
1. Go to the page that contains the link to the file you want to download.
2. Press Left or Right to highlight the link to the file, and then press Center .
3. If prompted, select what you want to do with the file: Play, Save To Device, or Save
To Ca r d.
4. Select Ye s.
90 Wireless
Page 97

Creating Bookmarks
With bookmarks, you can quickly access a Web page without
entering the address every time.
1. Navigate to the Web page you want to bookmark.
2. Press Menu .
3. Select Add Bookmark from the Page menu.
4. (Optional) Change the entries in the Name and Description
fields.
5. Select OK and then select OK again.
Viewing a Bookmark
1. Select the Bookmarks view
2. Select the bookmark or saved page you want to view.
icon at the top of a Web page.
Wireless
Wireless 91
Page 98

Watching Sprint TV
The Sprint TV application enables you to view streamed audio and video media from
various channels on your device.
Accessing Streamed Media
1. Press Applications and select Sprint TV .
2. On the Media Player screen, select the channel list you want.
3. To stream audio or video content, select a channel. The icon indicates audio
content; the icon indicates video content. The icon indicates that the channel
contains multiple content items. Select the channel to view all items.
Tip:
92 Wireless
Select the arrows to the left and right of the channel list name to scroll
to other channel lists. Select the Web browser’s home icon to return to
the Media Player screen.
Page 99

Viewing Streamed Media
Once you connect to the server, playback begins immediately. Use the following controls
when viewing or listening to streaming media:
䢇 Select to return to the channel list.
䢇 Select or press Center to pause playback of nonlive
content such as videos on demand.
䢇 Select or press Center to stop playback of live content.
䢇 Select or press Center to resume playback after
pausing.
䢇 Select or press Left to view the channel list with the first
channel highlighted.
䢇 Select or press Right to view the channel list with the last channel highlighted.
䢇 Select to zoom the image in and out.
䢇 A few seconds after playback begins, the toolbar is hidden and you can view the content
on the full screen. Press Up or Down to display the toolbar; press Up or Down
again to hide the toolbar again.
䢇 Press the Vol um e button on the side of your device to adjust the volume.
Wireless
Wireless 93
Page 100

Connecting to Devices With Bluetooth® Wireless Technology
With your device’s built-in Bluetooth® wireless technology, you can connect to a number of
Bluetooth devices, such as a headset, car kit, printer, or GPS receiver, as well as to other
phones and handhelds that are equipped with Bluetooth wireless technology. If your
computer is enabled with Bluetooth wireless technology, you can also synchronize
wirelessly or use your device as a wireless modem. See the User Guide for details.
You can create a list of Bluetooth devices that you trust to communicate with your Treo
device. When communicating with trusted devices, your Treo device skips the discovery
process and creates a secure link as long as the Bluetooth device is within range. Bluetooth
range is up to 30 feet (10 meters), depending on environmental conditions, including
obstacles, radio interference from nearby electronic equipment, and other factors.
Entering Basic Bluetooth Settings
To use your Treo device’s Bluetooth functionality, you need to turn the Bluetooth feature
on, and you may need to make your device either temporarily or permanently visible. You
can also enter a name for your device.
1. Press Applications and select Bluetooth .
2. Select Bluetooth On.
3. (Optional) Enter a device name that identifies your Treo device
when it is discovered by other Bluetooth devices.
Note:
94 Wireless
Use the same device name for all your Bluetooth connections. If you
change the device name, you need to recreate any partnerships you
have already created.
 Loading...