

Installation Instructions
WHOLE HOUSE FILTER &
SALT-BASED WATER SOFTENER
MODELS: CSS1, CSS4, CSS+
You get the best of both worlds when you combine the
benefits of our traditional salt-based water softener and
our whole house water filter, which uses the highest
quality coconut shell catalytic carbon that targets the
contaminants that we find in our water supplies today!
CUSTOMER SERVICE IS AVAILABLE MON-FRI 9AM-6PM EST
800-589-5592
WWW.SPRINGWELLWATER.COM
1
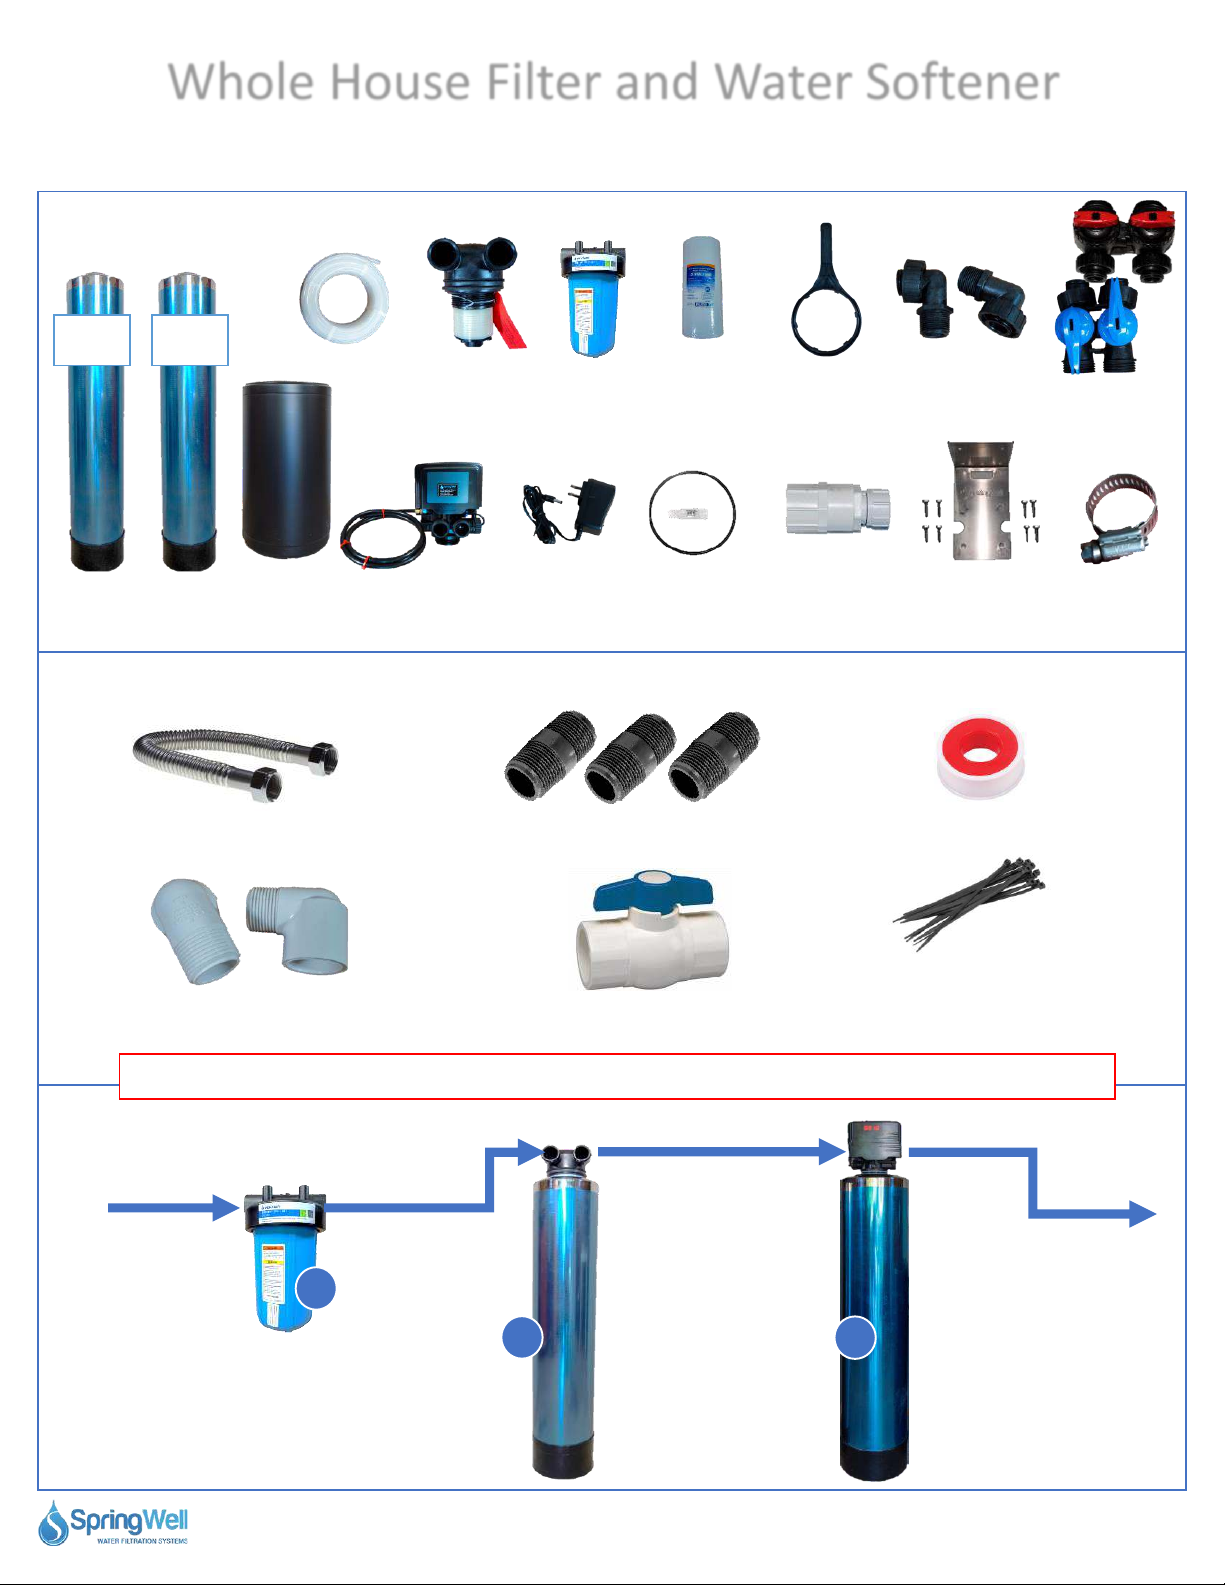
Whole House Filter and Water Softener
System Contents
Setup And Installation
Tank
1
Carbon
Filter Tank
Tank
2
Softener
Tank
50’ Drain Line
Brine
Tank
Tank Head
for (CF)
Electronic
Head for (SS)
Recommended Supplies
1-inch (24-inch Long) Corrugated
Water Connectors (x4)
1-inch (3-inch long) PVC Nipples
Pre-Filter
Power
Supply
Sediment
Gasket and
(x3)
Filter
Lube
Spanner
Wrench
Hose Bib
Assembly
MNPT Fittings
(x4)
Mounting
Bracket
1 Roll Plumbers Tape
Valve (x2)
Bypass
Hose
Clamp
1-inch threaded connectors for pre-
plumb (slip/threaded elbows shown)
*The quantities are suggestions. Yoursystem configuration may vary depending on installation area.
System Configuration
Water Source
From Outside Home
1
(1) Water from your
source will begin by
entering the Pre-Filter
1-Inch PVC Shut Off Valve
2
Questions? Call (800)-589-5592 2
(2) The Carbon Filter
will be the second tank
and will remove
chemicals such as
chlorine
3
Zip Ties
Filtered and softened
Water Into Home
(3) The Softener will be
the third tank and will
soften using ion exchange
Whole House Filter and Water Softener
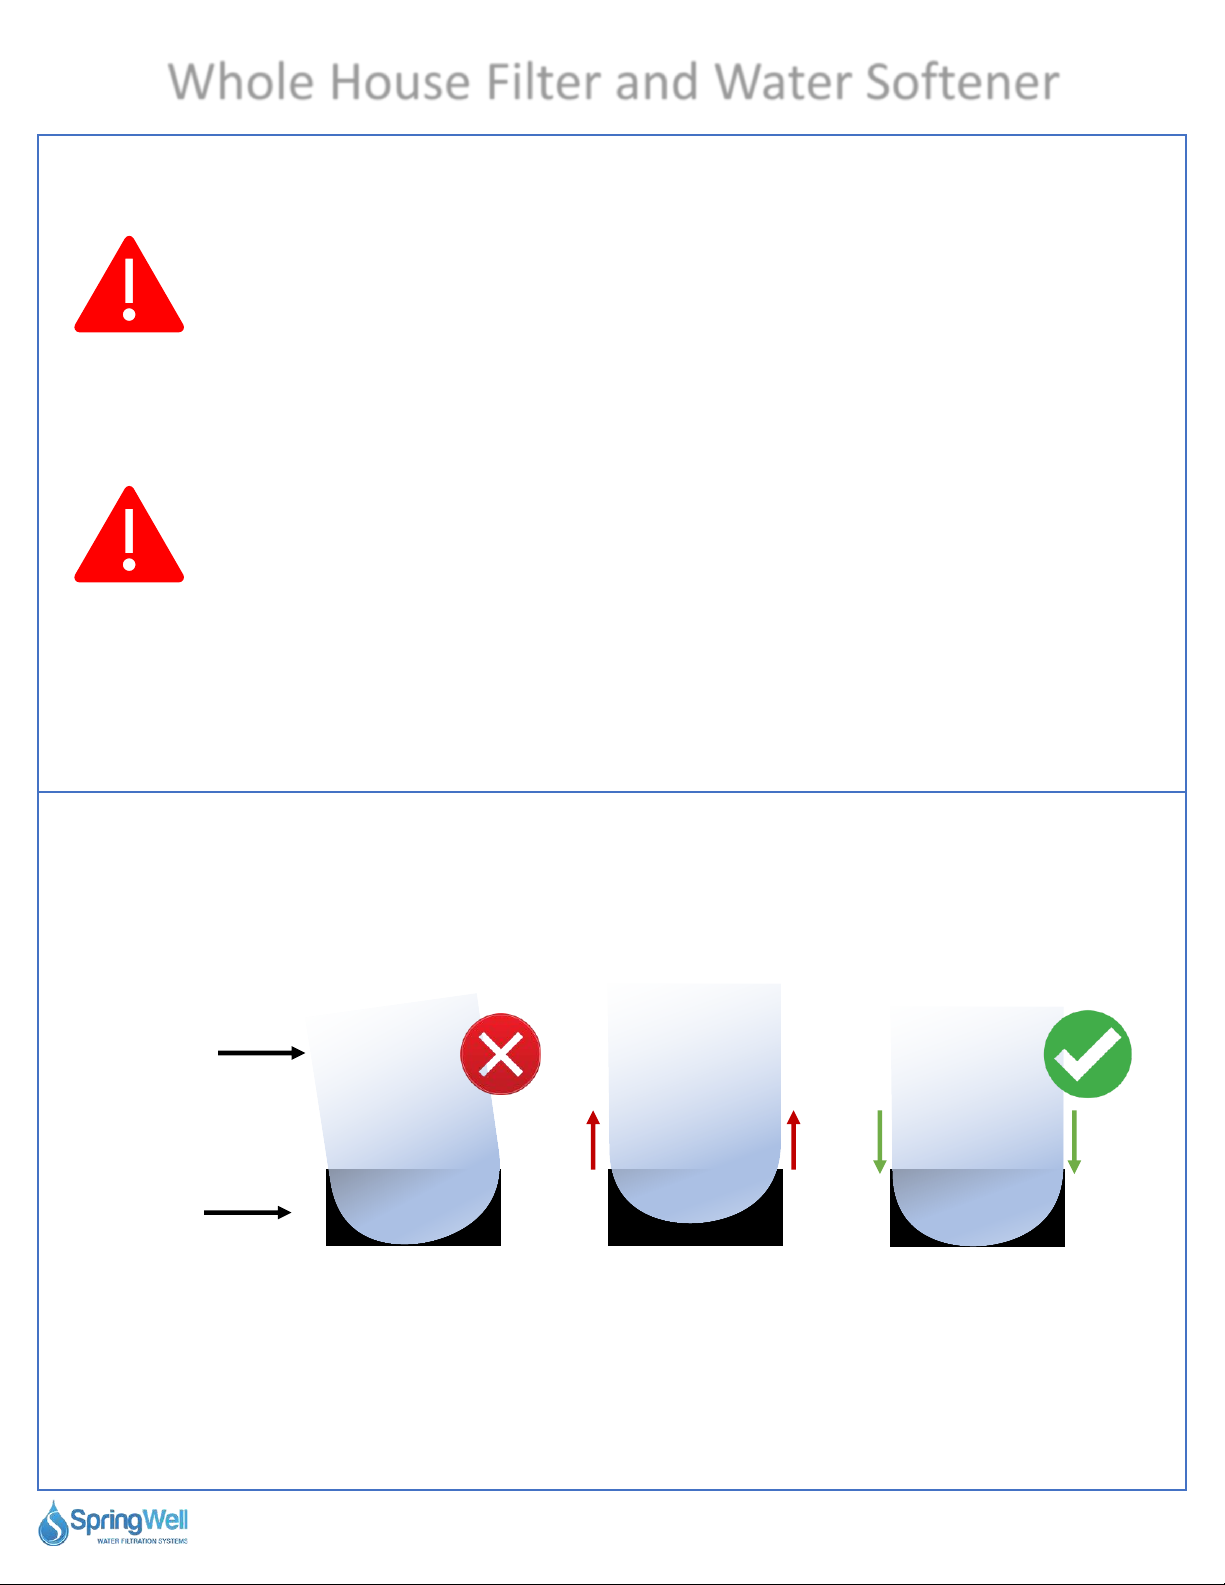
PLEASE READ INSTRUCTIONS FULLY PRIOR TO ATTEMPTING INSTALLATION. Be sure to follow
all applicable plumbing codes. The system must be installed on a main water supply line
Caution: Do not install on well water unless you have spoken to a customer service
representative first.
Level Tanks
Leaning Tank
Tank Boot
If the tank is not perfectly straight, carefully lift the tank straight up a few inches and tap it on the ground until
the tank stands vertically and fits snuggly into the tank boot.
Questions? Call (800)-589-5592 3

Whole House Filter and Water Softener
System Specifications
SS1
Tank Width 9”
Tank Height 48” (57” with Head)
Flow Rate 11 GPM Service
Connection Size 3/4”
Backwash Rate 2 GPM
Operating Pressure 25-80 PSI
Operating
Temperatures
pH Range 6.5 - 10
Grain 32k
Brine Tank 18”(w) x 33”(h)
36 – 120 F
SS4
Tank Width 10”
Tank Height 54” (63” with Head)
Flow Rate 13 GPM Service
Connection Size 3/4”
Backwash Rate 2.4 GPM
Operating Pressure 25-80 PSI
Operating
Temperatures
pH Range 6.5 – 10
Grain 48k
Brine Tank 18”(w) x 33”(h)
36 – 120 F
CF1
Tank Width 9”
Tank Height 48” (52” with Head)
Flow Rate 9 GPM Service
Connection Size 1”
Operating Pressure 25-80 PSI
Operating
Temperatures
Pre-Filter
Change/Replacement
Media
Change/Replacement
36 – 120 F
Every 6-9 Months
Every 6 years or 1
Million Gallons
CF4
Tank Width 10”
Tank Height 54” (58” with Head)
Flow Rate 11 GPM Service
Connection Size 1”
Operating Pressure 25-80 PSI
Operating
Temperatures
Pre-Filter
Change/Replacement
Media
Change/Replacement
36 – 120 F
Every 6-9 Months
Every 6 years or 1
Million Gallons
Questions? Call (800)-589-5592 4
Whole House Filter and Water Softener
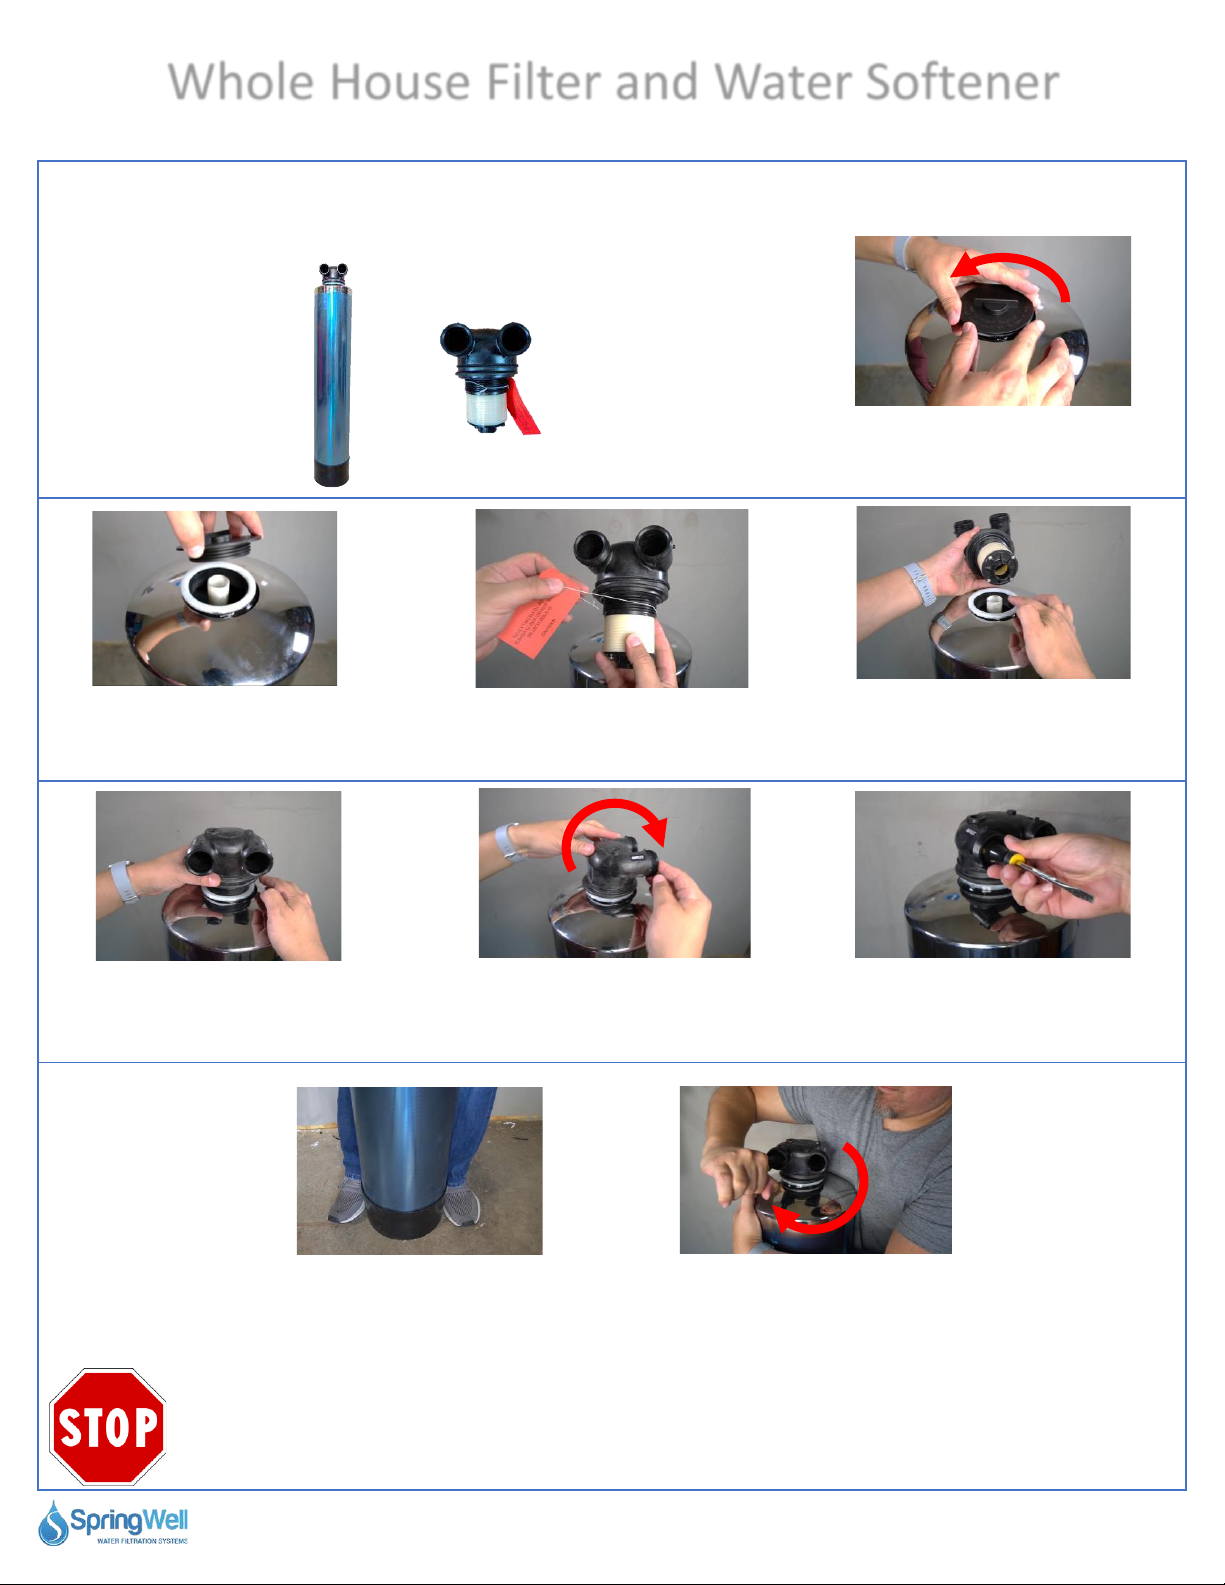
Installing the Head on the CF (Carbon Filter) Tank
This step will require the materials listed below
Carbon Filter
Tank
2) Discard the cap as it is no
longer required.
5) Press the tank head down
to allow the threads to
catch.
Tank Head
3) Locate the tank head and
remove the shipping label.
6) Turn the tank head
clockwise until it is fully
tightened.
1) Unscrew the cap on top of
the carbon filter tank.
4) Align the opening on the
bottom of the tank head with
the pipe inside the tank.
7) Insert a blunt tool into one of
the connections on the head. A
screwdriver handle will work.
8) Use your feet around the
boot to add grip to the tank.
ONCE THE HEAD ATTACHES TO THE PIPE INSIDE THE TANK IT IS PERMANENT. Do not attempt
to unscrew or remove the head from the tank or it will cause the components within the tank
to separate causing damage and potentially cause resin to seep from the tank into your home
plumbing.
Questions? Call (800)-589-5592 5
9) Grip the tank and use the
screwdriver as leverage to
fully tighten the head.

Whole House Filter and Water Softener
IMPORTANT! The carbon media inside the filter system MUST soak in water for a minimum of
48 hours prior to installation
Carbon Soak Instructions (48 Hours Prior)
This step will require the materials listed below
Tank
1
Red Bypass Valve
Carbon Filter
Tank (CF)
Hose Bib
Assembly
MNPT Fittings
(x2)
Lawn Hose
Connected to Faucet
Bypass Operation
Bypass on, water does
not flow through tank
Bypass off, water
flows through tank
10) Insert the bypass valve onto
the top of the tank.
13) Use the hose bib to attach
the lawn hose to the inlet on the
first tank. Ensure the bypass is
off to allow water flow through
the tank.
11) Fully tighten the fasteners
on both valve connections
securing the bypass valves.
14) Turn on the water to the
hose halfway until water
exits the tank. Turn off the
water and disconnect the
hose and hose bib.
12) Attach and tighten a MNPT
Fitting onto the connections on
each of the bypass valves.
15) Switch the tank to bypass
and store for 48 hours.
Questions? Call (800)-589-5592 6
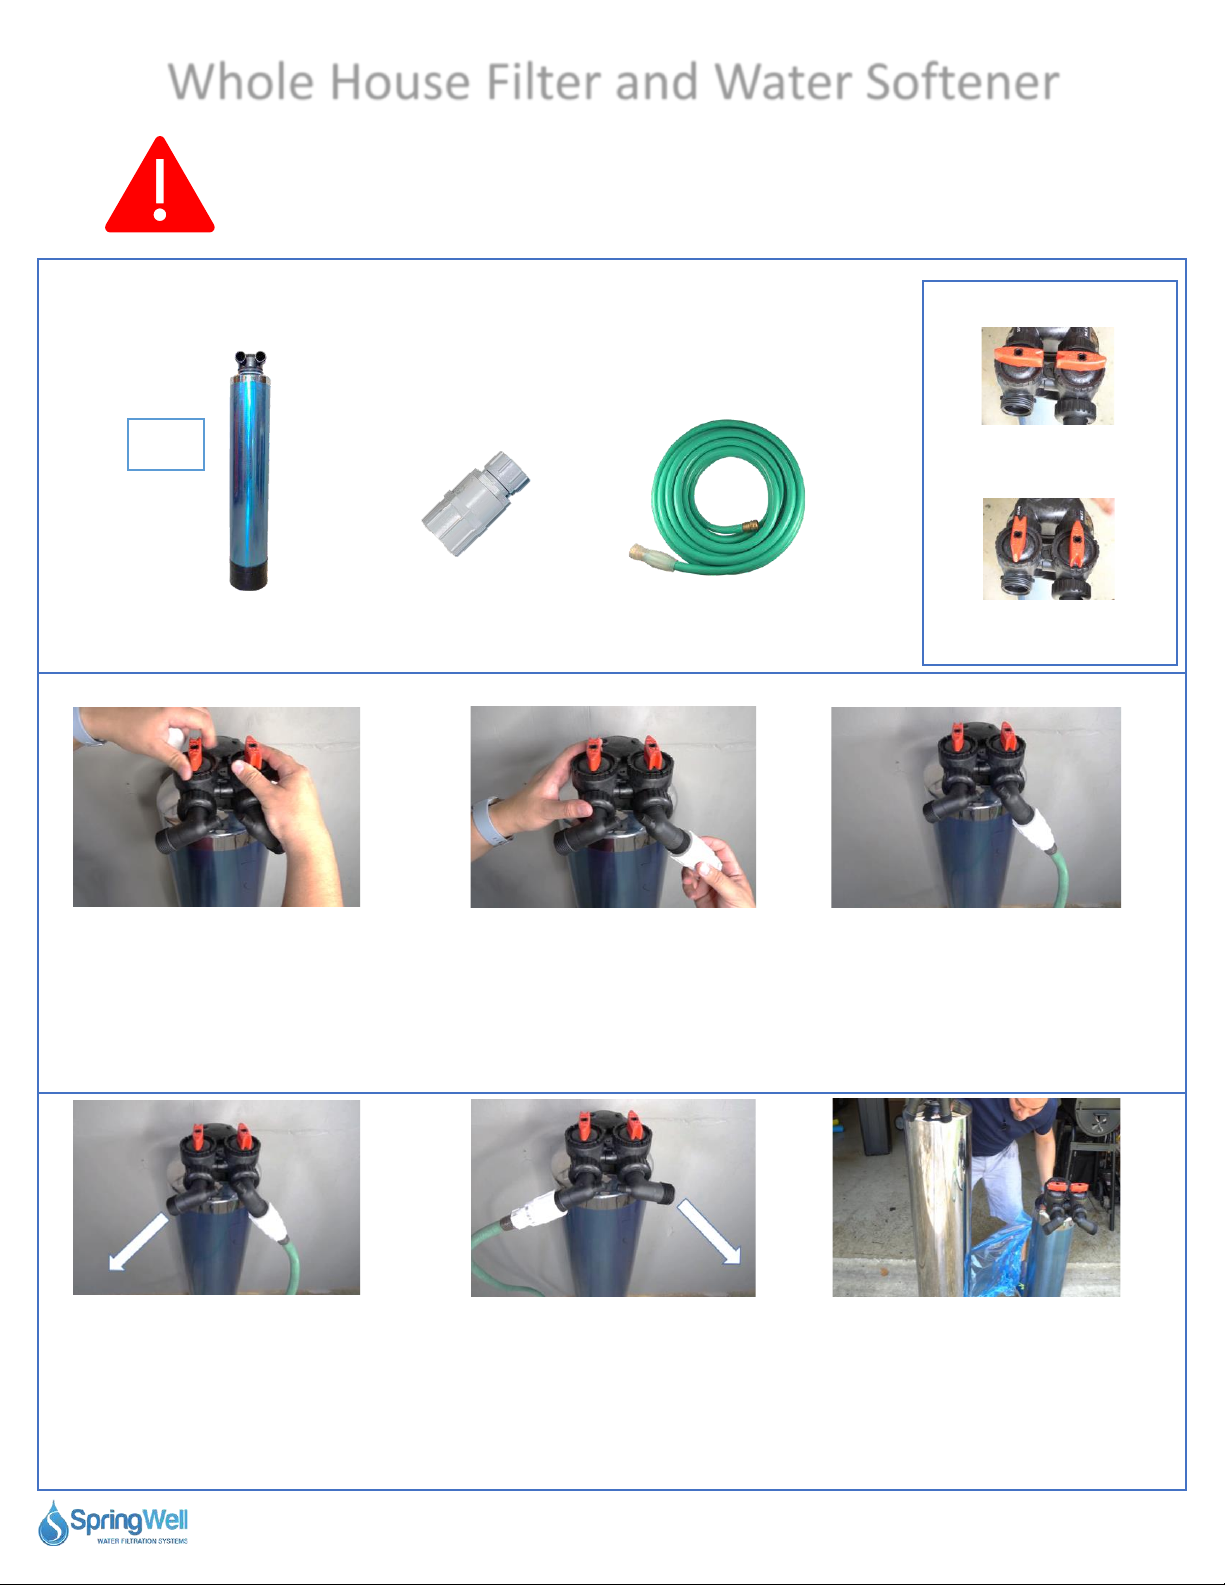
Whole House Filter and Water Softener
IMPORTANT! The carbon media must be flushed on both tanks prior to install
Carbon Flush Instructions
This step will require the materials listed below
Tank
1
Carbon Filter
Tank (CF)
Hose Bib
Assembly
Lawn Hose
Connected to Faucet
Bypass Operation
Bypass on, water does
not flow through tank
Bypass off, water
flows through tank
16) Switch off the bypass on the
tank. Note: Some water may be
released from the 48-hour presoak.
19) Run water through the tank
until the water runs clear.
17) Attach the hose bib
assembly onto the inlet port
on the tank.
20) Switch the hose and
hose bib to the outlet side
now and flush with water in
the opposite direction until
the water runs clear.
18) Connect the hose to the
hose bib assembly.
Note: The tank has a stainless-steel
sleeve that is covered in protective
plastic. Please remove the plastic
prior to install. The sleeve can be
maintained and polished using
automobile wax.
Questions? Call (800)-589-5592 7

Whole House Filter and Water Softener
Prepping the Pre-Filter
This step will require the materials listed below
Pre-Filter Housing Sediment Filter O-Ring w/Lube
21) Unscrew the lid from the
pre-filter Housing.
24) Flip the O-Ring over and
lubricate the opposite side as
well.
22) The O-ring will now be laid
into the groove around the top
of the pre-filter Housing tank.
25) Insert the Sediment Filter
into the pre-filter Housing.
23) Squeeze lubricant onto the
O-ring then spread it using your
finger.
26) Replace the lid and fully
tighten it
Questions? Call (800)-589-5592 8

Whole House Filter and Water Softener
Installing the Pre-Filter
Wrench and Pliers
Drill with 3/16” drill bit
Prepped Pre-Filter
Housing
Spanner
Wrench
Mounting
Bracket
This step will require the materials listed below
1-Inch PVC Shut Off
Valve*
1-inch (24-inch Long) Corrugated
Water Connectors (x1)
Plumbers Tape
1-inch (3-inch long)
PVC Nipples (x3)*
27) Note: Plumbers tape will
need to be applied to all PVC
threads during the installation.
30) Use a 3/16” drill bit to predrill the holes for the pre-filter
mounting bracket.
28) Install a PVC nipple onto
each the inlet and outlet of the
pre-filter housing. Fully tighten
using pliers avoiding damage to
the threads on the PVC nipples.
31) Use 4 of the provided bolts
and washers to secure the bracket
to the wall using a 1/2” socket.
29) Identify the optimal area to mount
the pre-filter. Ensure that it aligns to
allow a connection from the pre-plumb
into the inlet of the pre-filter. Mark
your holes for pre-drilling.
32) Before mounting the prefilter, identify the inlet and
outlet by using the markings on
top. Be sure to orient it so the
incoming water can be
connected to the inlet.
Questions? Call (800)-589-5592 9

Whole House Filter and Water Softener
Installing the Pre-Filter (cont.)
IMPORTANT! Be sure to turn off the water main to your home
before proceeding to the next steps!
33) Use the remaining 4 bolts to
secure the pre-filter to the
mounting bracket.
36) Point the threaded adapter
for the opposite end of the preplumb towards the tank
connections.
34) Expose the pre-plumb and
prep to install the threaded
adapters.
NOTE: Plumbers tape will need
to be applied to every thread
when connecting all corrugated
pipes.
35) Install a 1” threaded adapter
on the incoming water supply and
point the threads towards the
pre-filter.
37) Connect the PVC shut off
valve onto the threaded adapter
on the incoming water supply.
38) Connect a PVC nipple to the
other end of the PVC shut off
valve.
39) Connect a corrugated pipe
to the PVC nipple.
Questions? Call (800)-589-5592 10
40) Connect the other end of the
corrugated pipe to the inlet on
the pre-filter.

Whole House Filter and Water Softener
Installing the Softener Electronic Head
This step will require the materials listed below
Tank
2
Electronic
Head
Softener
Tank
41) Unscrew the cap on top of
the softener tank.
44) Align the opening on the
bottom of the tank head with
the pipe inside the tank.
42) There is a blue cap inside
that also needs to be removed.
Both caps can be discarded.
45) Press the tank head
down to allow the threads to
catch.
43) Locate the opening at the
bottom of the electronic head.
46) Turn the tank head
clockwise until it is fully
tightened. Hand tight is OK.
Questions? Call (800)-589-5592 11

Whole House Filter and Water Softener
Installing the Softener Electronic Head
47) Install the blue bypass valves
onto the connections on the
electronic head.
50) Attach and tighten a MNPT
Fitting onto the connections on
each of the bypass valves.
48) Insert the rubberized
connections into the electronic
head openings and press it in
place.
51) Apply plumbers' tape to
both MNPT Fittings.
49) Fully tighten the fasteners on both
valve connections securing the bypass
valves.
Questions? Call (800)-589-5592 12

Whole House Filter and Water Softener
Installing the Tanks
This step will require the materials listed below
Tank
1
Carbon Filter
Tank
53) Position the carbon filter
tank next to the Pre-Filter.
Ensure the connections on the
tank are on the backside against
the wall.
Tank
2
Softener
Tank
Plumbers Tape
Wrench
1-inch (24-inch Long) Corrugated
Water Connectors (x3)
54) Connect the corrugated
pipe to the outlet on the prefilter.
52) Apply plumbers' tape to the
inlet and outlet connections on
the carbon filter tank.
55) Connect the other end of that
pipe to the inlet on the carbon
filter tank.
56) Position the softener tank
next to the carbon filter tank
with its connections facing back.
Out
57) Take note that the outlet
and inlet connections on the
tanks are on opposite sides.
Questions? Call (800)-589-5592 13
In
58) Connect a corrugated pipe
to the outlet on the carbon
filter tank.

Whole House Filter and Water Softener
Installing the Tanks
59) Connect the other end of the
corrugated pipe to the inlet on
the softener tank
60) Connect another
corrugated pipe to the other
end of the pre-plumb.
From Water
Main
61) Connect the other end to the
outlet on the softener tank.
Into Home
Your system connections should look similar to this.
Questions? Call (800)-589-5592 14

Whole House Filter and Water Softener
Additional Softener Head Steps
This step will require the materials listed below
Tank
2
50’ Drain Line
Zip Ties
9V Battery
62) Locate the drain on the left
side of the electronic tank head
on the softener tank,
Softener Tank
(Already Installed)
63) Pull out the blue tab behind
the drain valve, then pull the
valve out from the tank head.
Power
Supply
Hose
Clamp
64) Slide the provided hose
clamp over the end of the drain
line.
65) Press the drain line over the
barbed end of the drain valve you
pulled out of the tank head.
66) Align the hoes clamp over
the connection, then align the
screw on the hose clamp so that
it runs parallel to the connection
on the drain valve. Tighten the
clamp.
67) Insert the drain valve back
into the tank head. Ensure the
drain line isn’t pinched.
Questions? Call (800)-589-5592 15
68) Insert the blue tab to lock
the drain valve back in position.

Whole House Filter and Water Softener
Additional Softener Head Steps
69) Before turning the water
back on to the home, use the
provided spanner wrench to
fully tighten the pre-filter
housing.
IMPORTANT! Ensure the drain lines you installed are not pinched or kinked or it will impede
the flow of water from the system.
72) Insert the drain line into the
zip tie loops and secure in pace.
The excess can then be trimmed
off the zip ties.
70) To ensure the drain line doesn’t
come out from the drain a pair of
zip ties are recommended. They
can be inserted through two pairs
of holes drilled high up in the
drainpipe.
73) The power cord will be
connected to the connection
on the far left beneath the
electronic tank head.
71) Pushing the zip ties inwards will
create a loop.
74) The power adapter will then
be plugged into a power supply
that isn’t controlled by a switch.
75) Lift off the cover to the
electronic head.
76) Locate the batter
connection beneath the
display.
Questions? Call (800)-589-5592 16
77) Replace the tank head
cover.

Whole House Filter and Water Softener
Installing the Brine Tank
This step will require the materials listed below
Tank
2
50’ Drain Line
Zip Ties
78) Position the brine tank next to
the softener tank with the drain
valve pointing towards the
softener.
Softener Tank
(Already Installed)
79) Press the remaining drain
line over the barbed valve
leading out from the brine tank.
Brine
Tank
80) Thread the drain line into
the drainpipe and trim off the
excess drain line.
81) Use the previous steps to
secure the drain line to the
drainpipe.
82) Remove the lid from the
brine tank.
83) Remove the white cap from
the brine well inside the brine
tank.
Questions? Call (800)-589-5592 17
84) Release the regen line from
the softener head by removing
the zip ties. Use care not to
damage the line.

Whole House Filter and Water Softener
Installing the Brine Tank
85) Insert the regen line into the
brine tank through the opening
above the drain line you
installed earlier.
Fill
88) The brine tank will need to
be filled with 4 to 5 bags of salt
pellets.
86) The regen line will be
inserted to the connection just
inside the brine well. Push the
line all the way in. Once
inserted it will be secure.
89) The lid to the brine tank cab
be replaced.
87) Replace the lid to the brine
well.
90) The system can now be
tested.
Questions? Call (800)-589-5592 18

Whole House Filter and Water Softener
Testing the System
91) Before turning the water
back on to the home, use the
provided spanner wrench to
fully tighten the pre-filter
housing.
Bypass Bypass
92) While the water is still off,
open a cold bathtub faucet all
the way.
Off
93) Before turning on the water to
the home ensure the shut off valve
to the system is in the off position.
94) Ensure that the valves on
both tanks are set to bypass.
97) If no leaks are detected
from the bypass, turn off the
bypass to the carbon filter tank
and allow water to flow
through it.
95) Turn on the water to the
home and inspect the shut off
valve for any leaks.
98) Turn off the bypass to the
softener tank and allow water
to flow through it.
If you notice water leaking from the carbon filter tank head
collar, please proceed to page 23 for directions on how to
adjust.
96) If no leaks are detected,
open the bypass valve to allow
water flow through the tank
bypasses.
99) Allow water to run through
the system for 5-10 minutes. It is
normal to see a small amount of
sediment during this time.
Questions? Call (800)-589-5592 19

Whole House Filter and Water Softener
Setting Softener Values
This step will require the materials listed below
Tank
2
Note: The electronic tank head
must be powered and installed
prior to setting the tank values.
Softener Tank
(Already Installed)
100) Look up
“Legacy View” in the
app store and install
it.
101) Open the app
and select your
softener from the
list.
Mobile
Device
102) Tap “Time of
Day on Unit” to
change the time.
103) Select “OK” to
set the time on to
the same time as
your device.
104) To modify the
regen time tap on
that tile. 2:00am is
the default time.
105) Note: You want
the system to regen
while water is not
being used.
Questions? Call (800)-589-5592 20
106) Tap “Water
Hardness” to correct
the value to your
conditions.
107) Enter the value
from your hard
water test.

Whole House Filter and Water Softener
Setting Softener Values
108) Select the
menu icon in the
upper left-hand
corner.
112) Tap “Reserve
Capacity.”
109) Select “Advanced
Settings.”
113) Change the value
to 10%.
110) Tap
“Regeneration Day
Override.”
Next Steps
114 to 118
are for SS1
Systems.
Skip to step 119
for SS4 systems.
111) Change the
value to 14 days.
114) Tap “Resin
Grains Capacity.”
115) Change the
value to 32 for
32,000.
116) Select “Brine
Refill.”
Questions? Call (800)-589-5592 21
117) Change the
value to 8 min.
118) Recap of
settings for SS1
system.

Whole House Filter and Water Softener
Setting Softener Values
Next Steps
119 to 123
are for SS4
Systems.
Refer to step 114
for SS1 systems.
122) Set the value to
10 minutes.
119) Tap “Resin
Grains Capacity.”
123) Correct values for
SS4 system.
120) Enter 48 for
48,000.
Steps
from here
apply to
both
versions
121) Select “Brine
Refill.”
124) Tap the menu
icon in the upper
left-hand corner.
125)The next step
will force you to
regen your system.
During this time you
will not be able to
use your water for
90 minutes.
126) Select “Regenerate
Now.”
Questions? Call (800)-589-5592 22
127) Select “OK”
from the pop up and
the system will
regen for 90
minutes.
128) Once the regen
is done, your system
is ready to use.

Whole House Filter and Water Softener
Water Leak from Tank Head
Water leaking from the tank
head collar indicates the head is
either not tight enough, or that
the O-ring became bunched.
Slowly unthread the head from
the tank approx. half a rotation.
Turn the shut off valve to the
off position.
You only need to expose a
small gap between the tank
collar and the tank head.
Disconnect the carbon filter tank from
the system
Fully re-tighten the head onto
the tank. The O-ring will now
be able to reseat.
Reconnect the tank to the system
and proceed back to page 19 to
test the system again.
Questions? Call (800)-589-5592 23
 Loading...