

Page 1

Head-up Display Navigator
Installation Guide
Company Statement
This device was jointly developed with Conserve & Associates, Inc., then
manufactured and marketed by Springteq Electronics Corp.
The illustrations of product accessories in this manual are for reference only, and
the actual contents of the shipped product package may differ. Springteq
Electronics Corp. reserves the right to change or update the product’s
specifications or design without additional notice.
Copyright
The contents of this manual are the property of Springteq Electronics Corp.
Reproduction of this document, in whole or in part, by any means including
photography, transcription, translation, reprinting or other archival methods (such
as electromagnetic recording) without the prior express written consent of
Springteq Electronics Corp. is prohibited.
Page 2

2
Table of Content
Package Contents .................................................................................................... 3
iHUD System Details ............................................................................................... 4
The iHUD’s base stand ........................................................................................... 5
Installing the slide rails ............................................................................................ 5
Installing/removing the base stand ........................................................................ 5
Installing iHUD on a dashboard ............................................................................. 6
Adjusting the angle ................................................................................................... 6
How to connect iHUD with smartphones .............................................................. 7
How to use customized MHL cable (see it in iHUD package) ........................... 9
Connecting to power ................................................................................................ 9
Adjusting the lens cover .......................................................................................... 9
Affixing the reflective film ...................................................................................... 10
Product Specifications ........................................................................................... 11
Page 3
3
Thank you for purchasing this product. To help familiarize yourself with its
operation, please read this manual carefully before attempting to use the product,
and save this manual for future reference.
Multimedia Head Up Displayer.
iHUD is the world's first high resolution HUD capable for Smartphones, 2-Din
Car System or any composite/ HDMI video/audio outputted device. Mainly
display any contains from any video/ audio devices into HUD mode to project
onto the windshield while driving, therefore, driver can always easily have the
key information such as Speed, Road Information, OBDII, Incoming Calls,
Webcam Calls, or Navigations without any inattention by leaving eyes on the
road which greatly enhances driving safety.
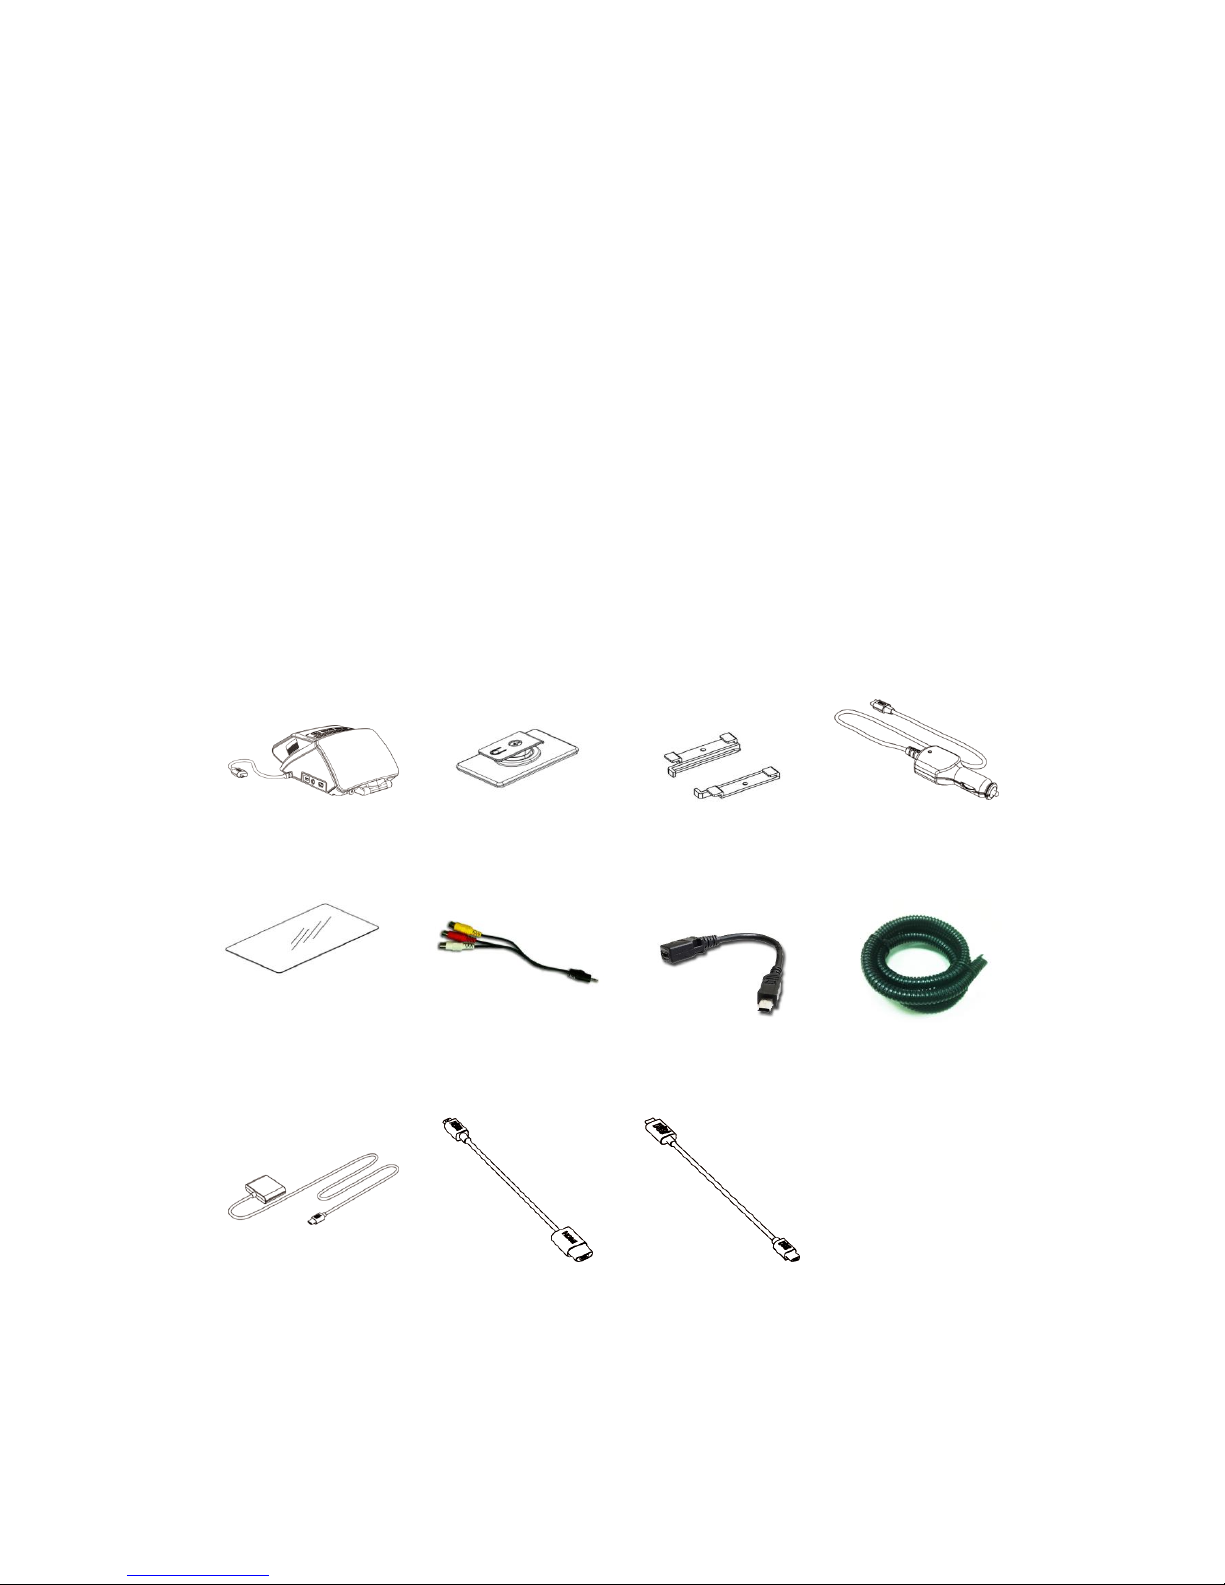
Package Contents
Please verify that the package contains the following items. If any item is missing
or damaged, please contact your local distributor immediately.
1. IHUD System
unit
(x1)
2. Base stand
(x1)
3. Slide rails (x2)
4. Cigarette
lighter adapter
(x1)
5. Reflective film
(x1)
6.CVBS cable (x
1)
7. USB to mini
USB(x 1)
8.Cable organizer
(x 1)
9.MHL Adapter
(x 1)
10.HDMI to micro
HDMI cable (x 1)
11.micro USB to
mini USB (x 1)
Page 4
4
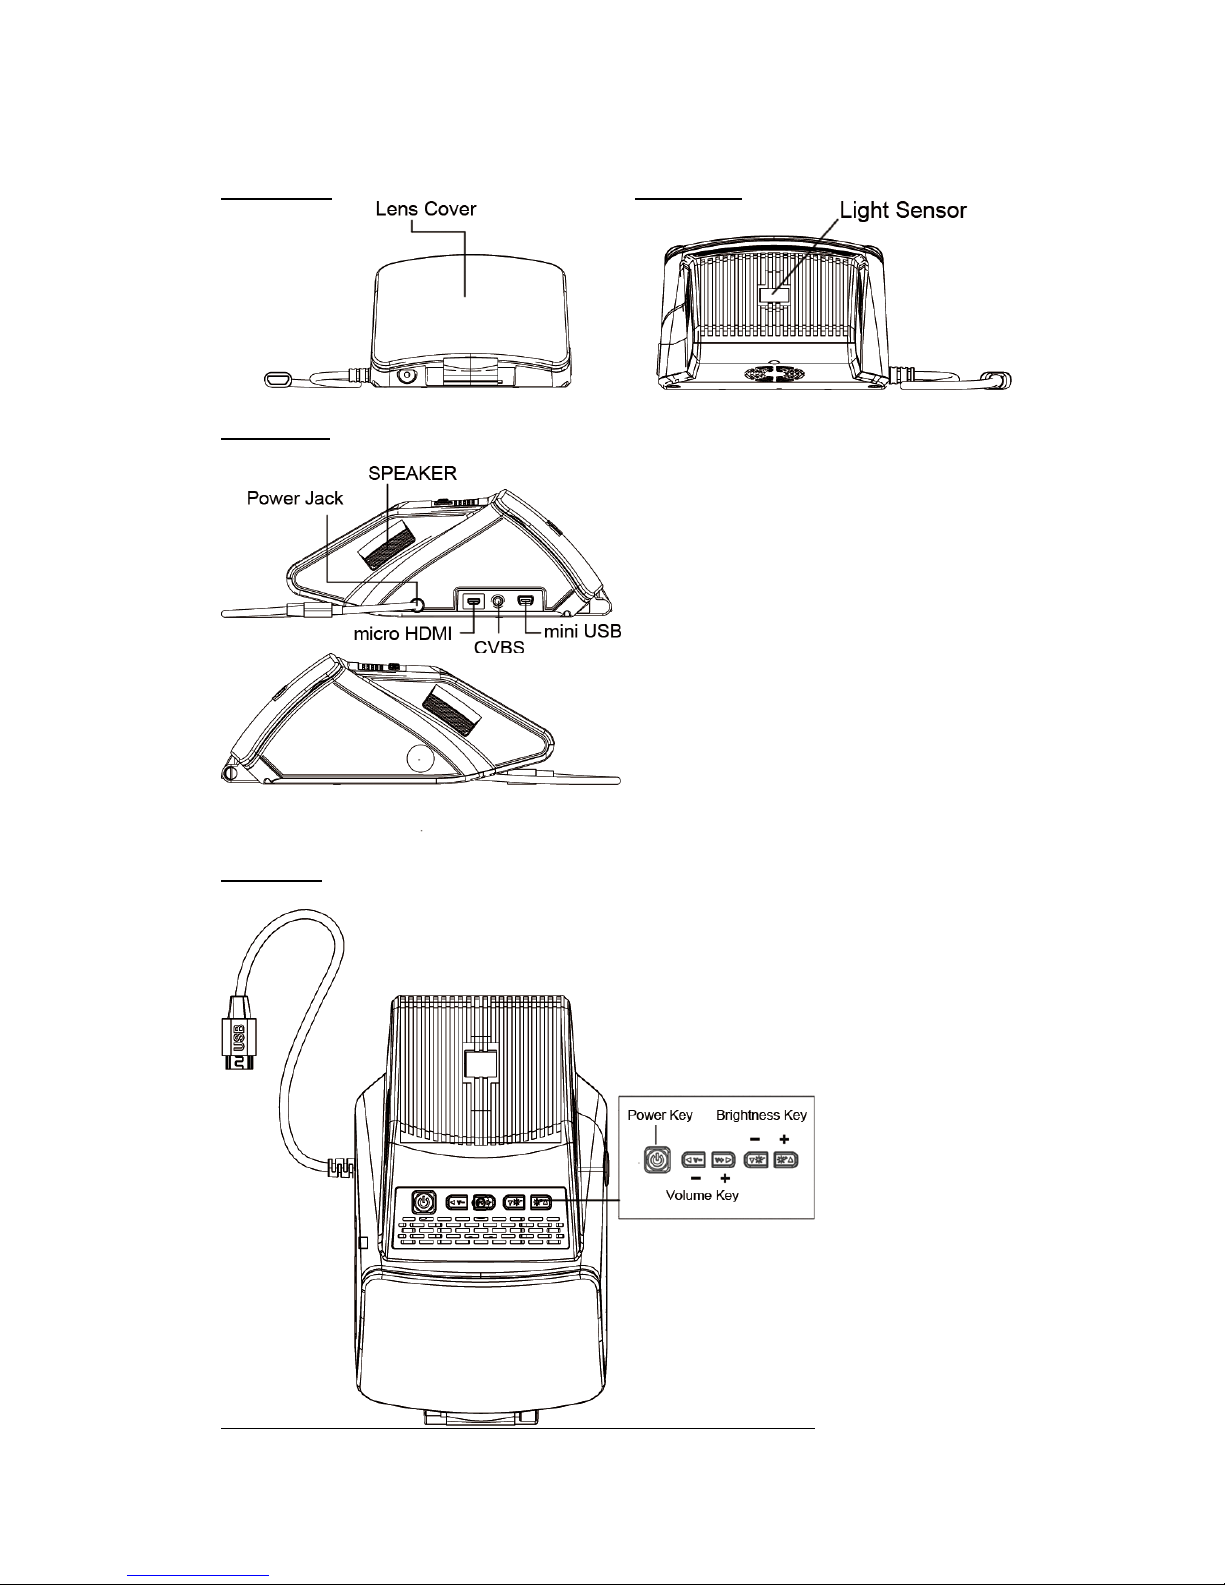
iHUD System Details
Front view:
Rear view:
Side view :
Top view :
Page 5
5
The iHUD’s base stand
The base stand for iHUD does not require modifying the interior of the car, and
no tools are needed for attaching it to most dashboards. In addition, the base
stand allows for adjustments to the viewing angle of the iHUD system unit to suit
the height of the driver and the slope of the windshield or dashboard surface. The
base stand’s design uses screw that can be loosened or tightened with a coin for
ease and convenience.
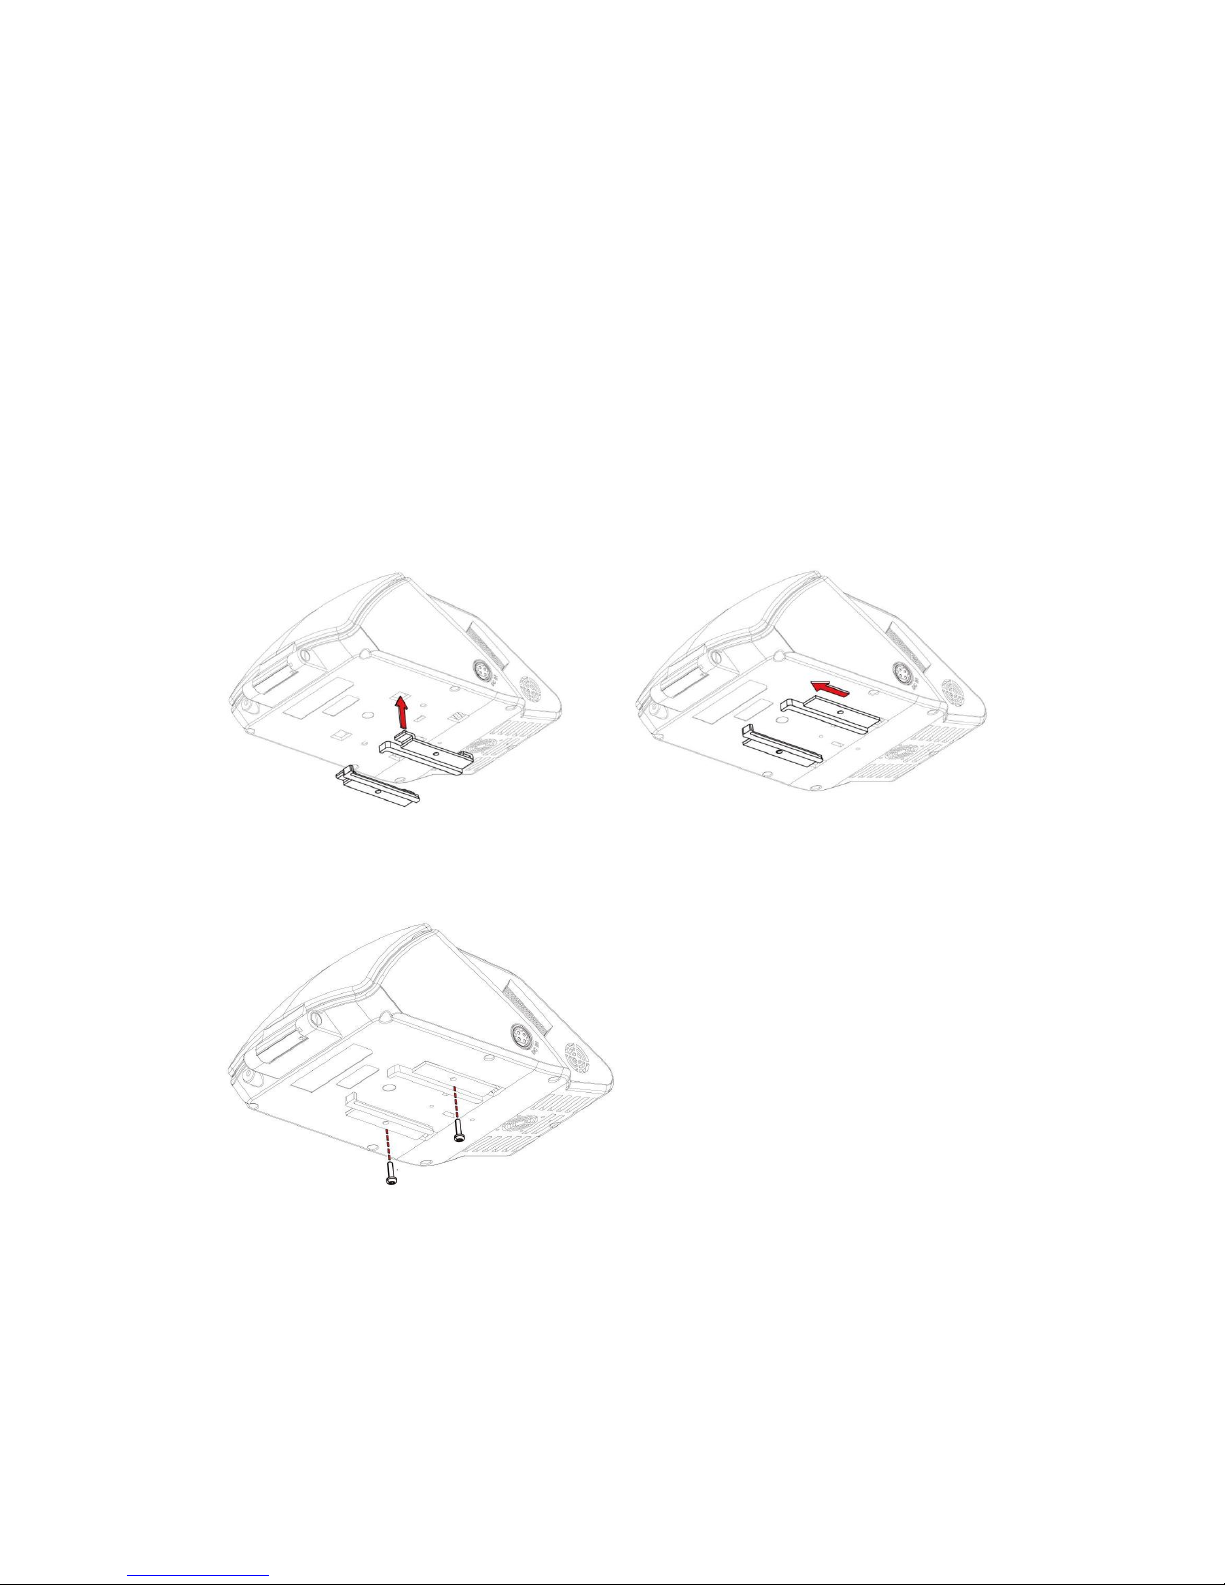
Installing the slide rails
1. Insert the included slide rails () into the sets of four holes on the bottom of
IHUD system unit (), then slide them in the direction of the lens until they snap
into place.
2. Secure the slide rails in position with the two screws included in the product
package.
Installing/removing the base stand
Slide the base stand () onto the slide rails attached previously until it locks into
place. Reverse directions to detach the IHUD system unit.
Page 6
6
Installing iHUD on a dashboard
1. Because of the materials used for the surface of a car’s dashboard are
typically smooth and often coated with varnish, making it difficult to achieve a
strong adhesive bond, it is recommended that before installation, a piece of
cloth moistened with alcohol be used to wipe the surface to the dashboard.
2. Before installation, the protective film on the base stand’s PVC pad must be
peeled off. (It is recommended that you keep this protective film for future use
in case you decide to remove the base stand and wish to prevent dust from
sticking to it.)
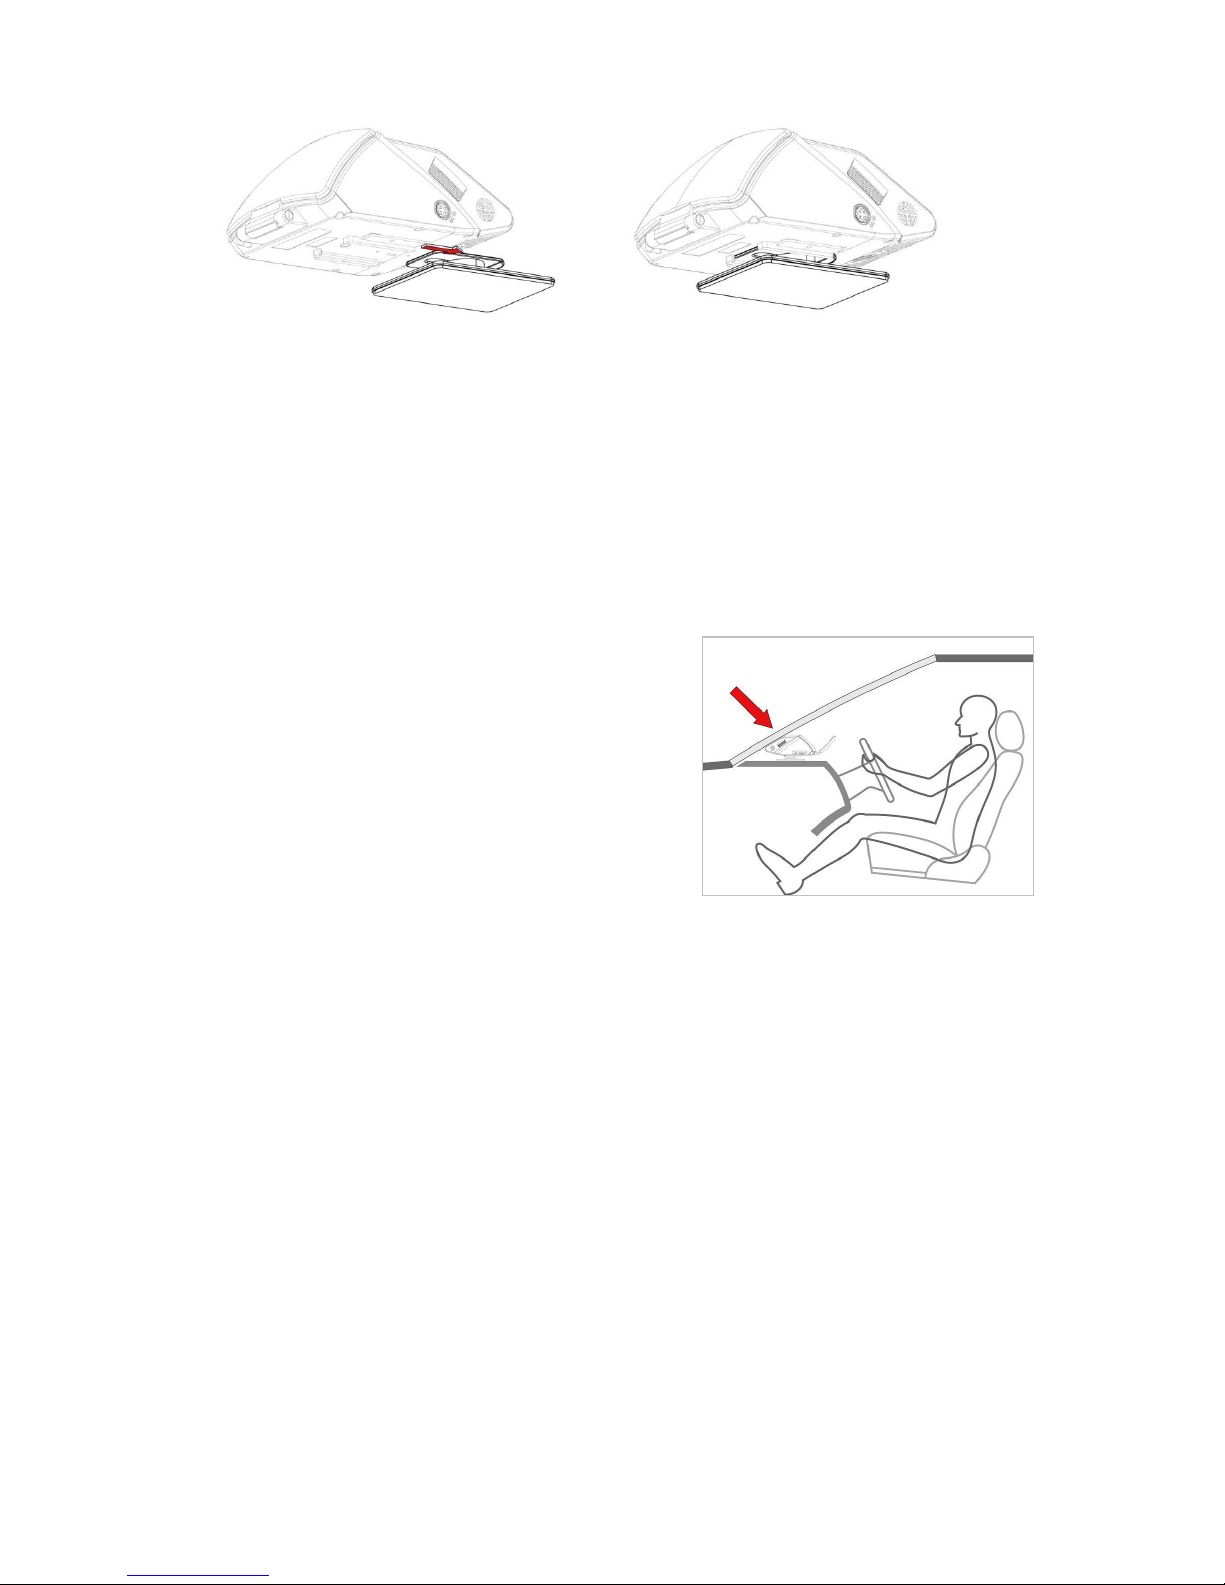
3. Press the iHUD system unit against the
surface of the car’s dashboard (with the
lens cover pointing toward the driver) to
attach it. (If space allows, it is
recommended that you position it close to
the windshield.)
4. If you need to adjust the tilt of the iHUD
system unit, remove the iHUD and tighten
the quick-release screw to appropriate
tightness on the base stand. and then reattach the iHUD system unit to adjust the
angle by moving main device.
5. When you need to remove the base stand, simply use your hand to lift up one
corner of the PVC pad.
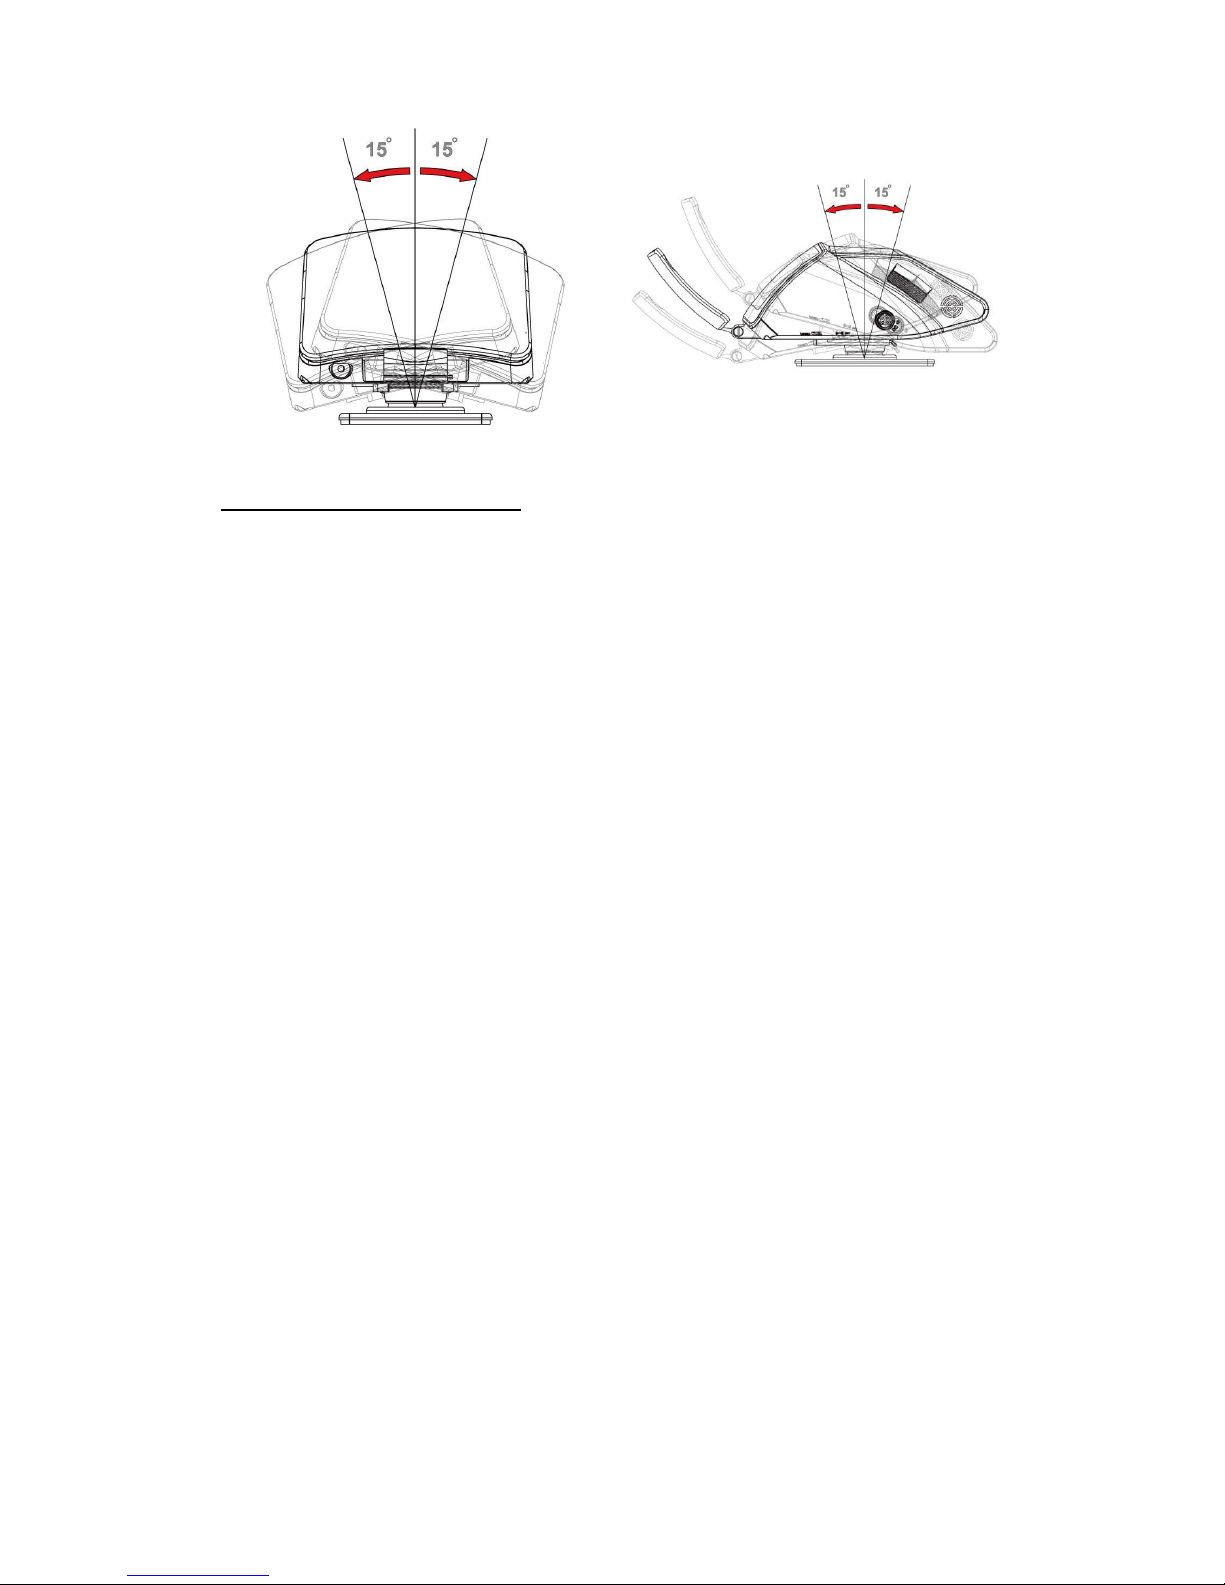
Adjusting the angle
To accommodate different dashboards, the angle of the iHUD’s base stand can
be adjusted based on the driver’s height, and the angle of the windshield or
dashboard (up to a maximum of 15° in either direction).
Page 7
7
Other points to be aware of:
Before affixing the base stand to the dashboard, there should be no dust or
other debris on either surface that may affect the adhesive bond.
After being used for a period of time, dust may accumulate on the base
stand’s PVC pad, affecting the adhesive bond. Use a damp cloth to wipe
the pad and remove dust and grime. When the pad is dry, it is ready for
use again.
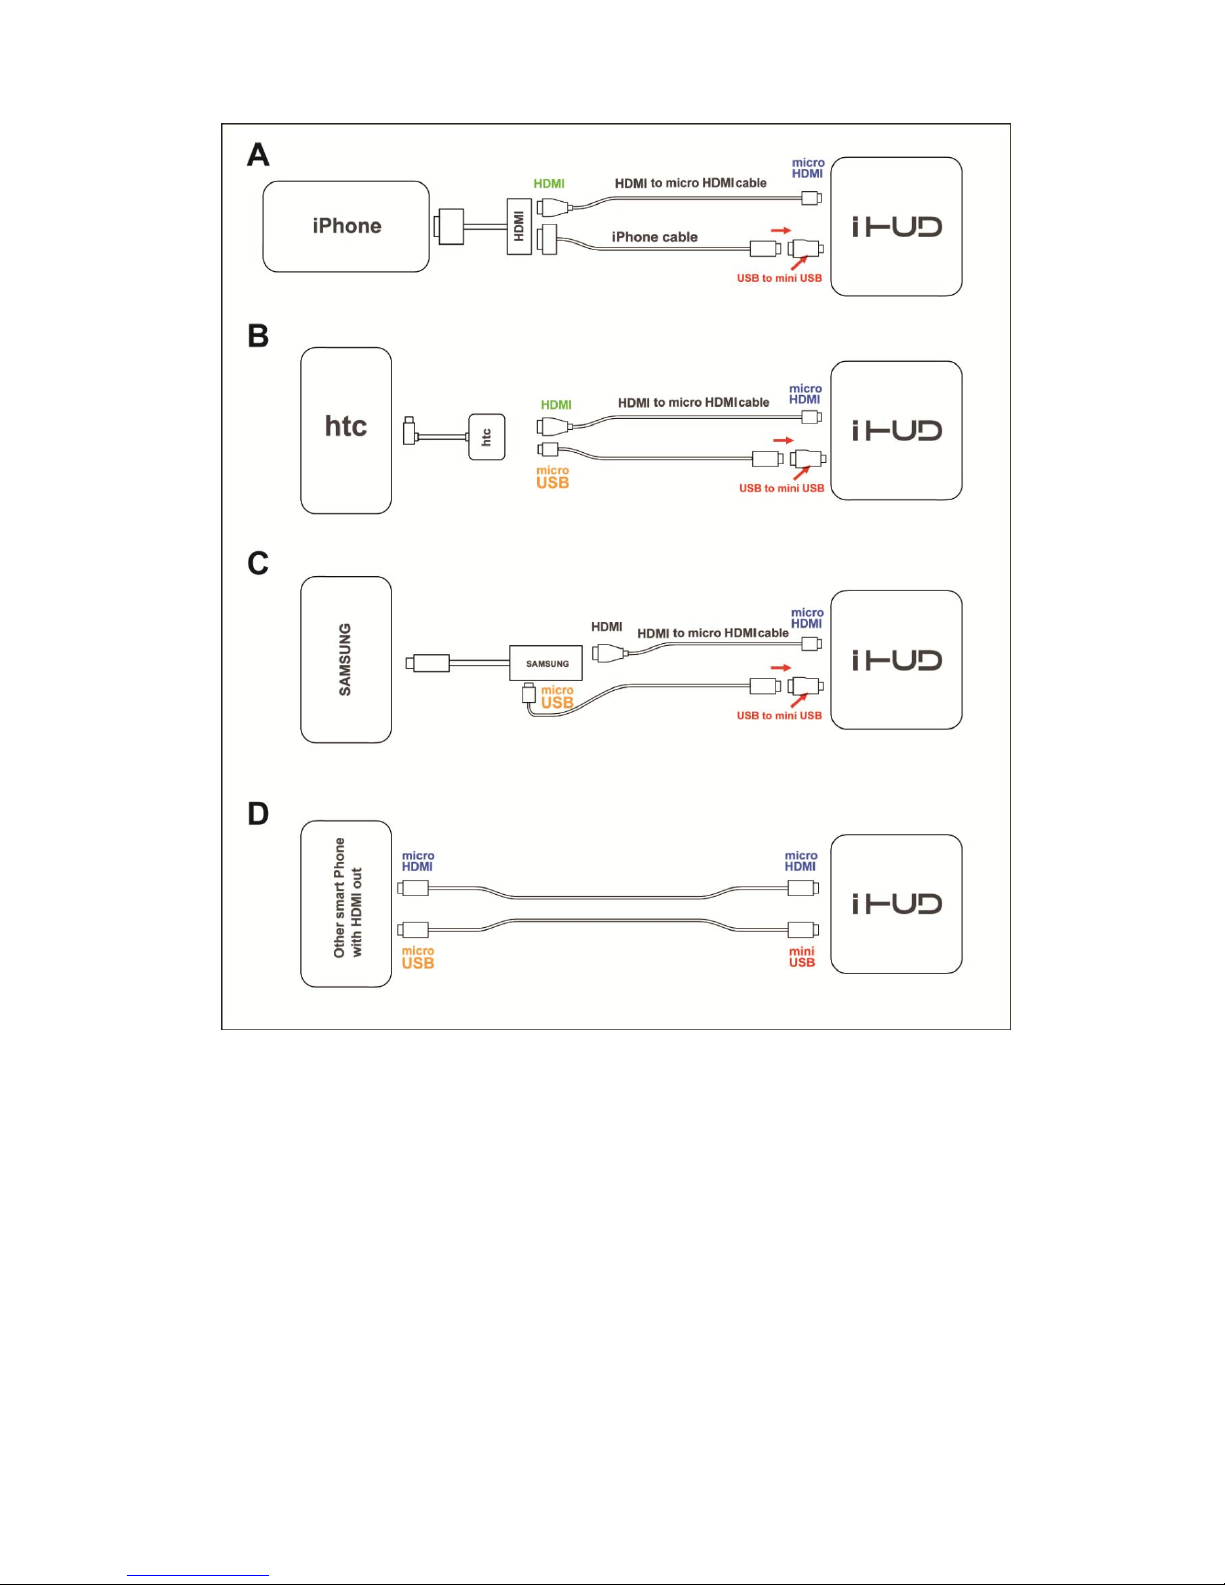
How to connect iHUD with smartphones
Page 8
8
1. Connecting iPhone 4S ~ Please purchase original Apple authorized
HDMI cable and HDMI (male) to micro HDMI (male) cable then connect
Apple data transfer cable (provided when purchase iPhone ) and mini USB
cable (provided with iHUD package). Please see above picture as Section
A.
2. Connecting HTC/ SAMSUNG(MHL)~ Please purchase MHL cable
from original authorized and HDMI(male) to micro HDMI(male)cable
then connect to HTC data transfer cable (provided when purchase HTC)
and mini USB cable (provided with iHUD package). Please see above
picture as Section B &C.
Page 9
9
3. Connecting all other HDMI out Smartphones ~Please purchase micro
HDMI(male)to micro HDMI(male)data transfer cable 、micro USB
(male) to mini USB(male) cable. Please see above picture as Section D.
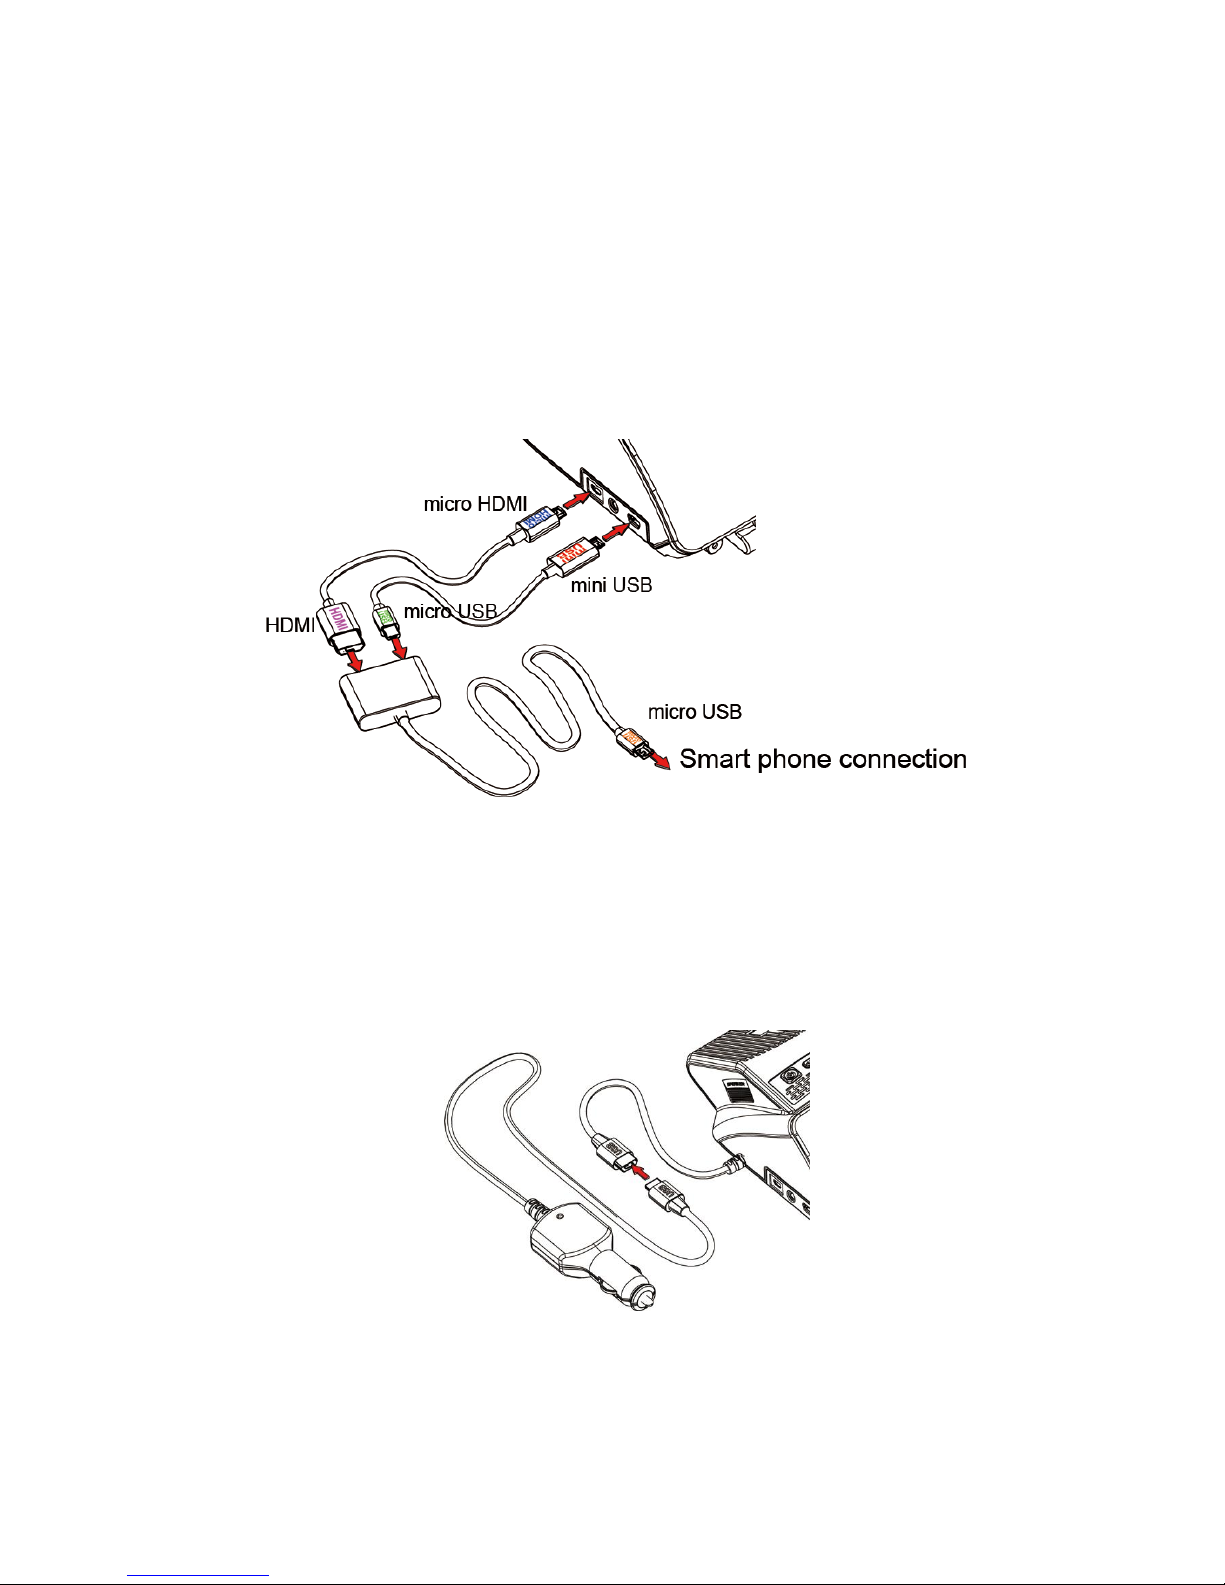
How to use customized MHL cable (see it in iHUD package)
iHUD package is including a customized MHL cable,this cable is special
made for the smartphones come with MHL connector, please see the
following introduction picture to know how to connect it with iHUD.
Connecting to power
Insert one end of the cigarette lighter adapter () that comes with the IHUD into
the system unit’s power adapter socket, and the other into the car’s cigarette
lighter.
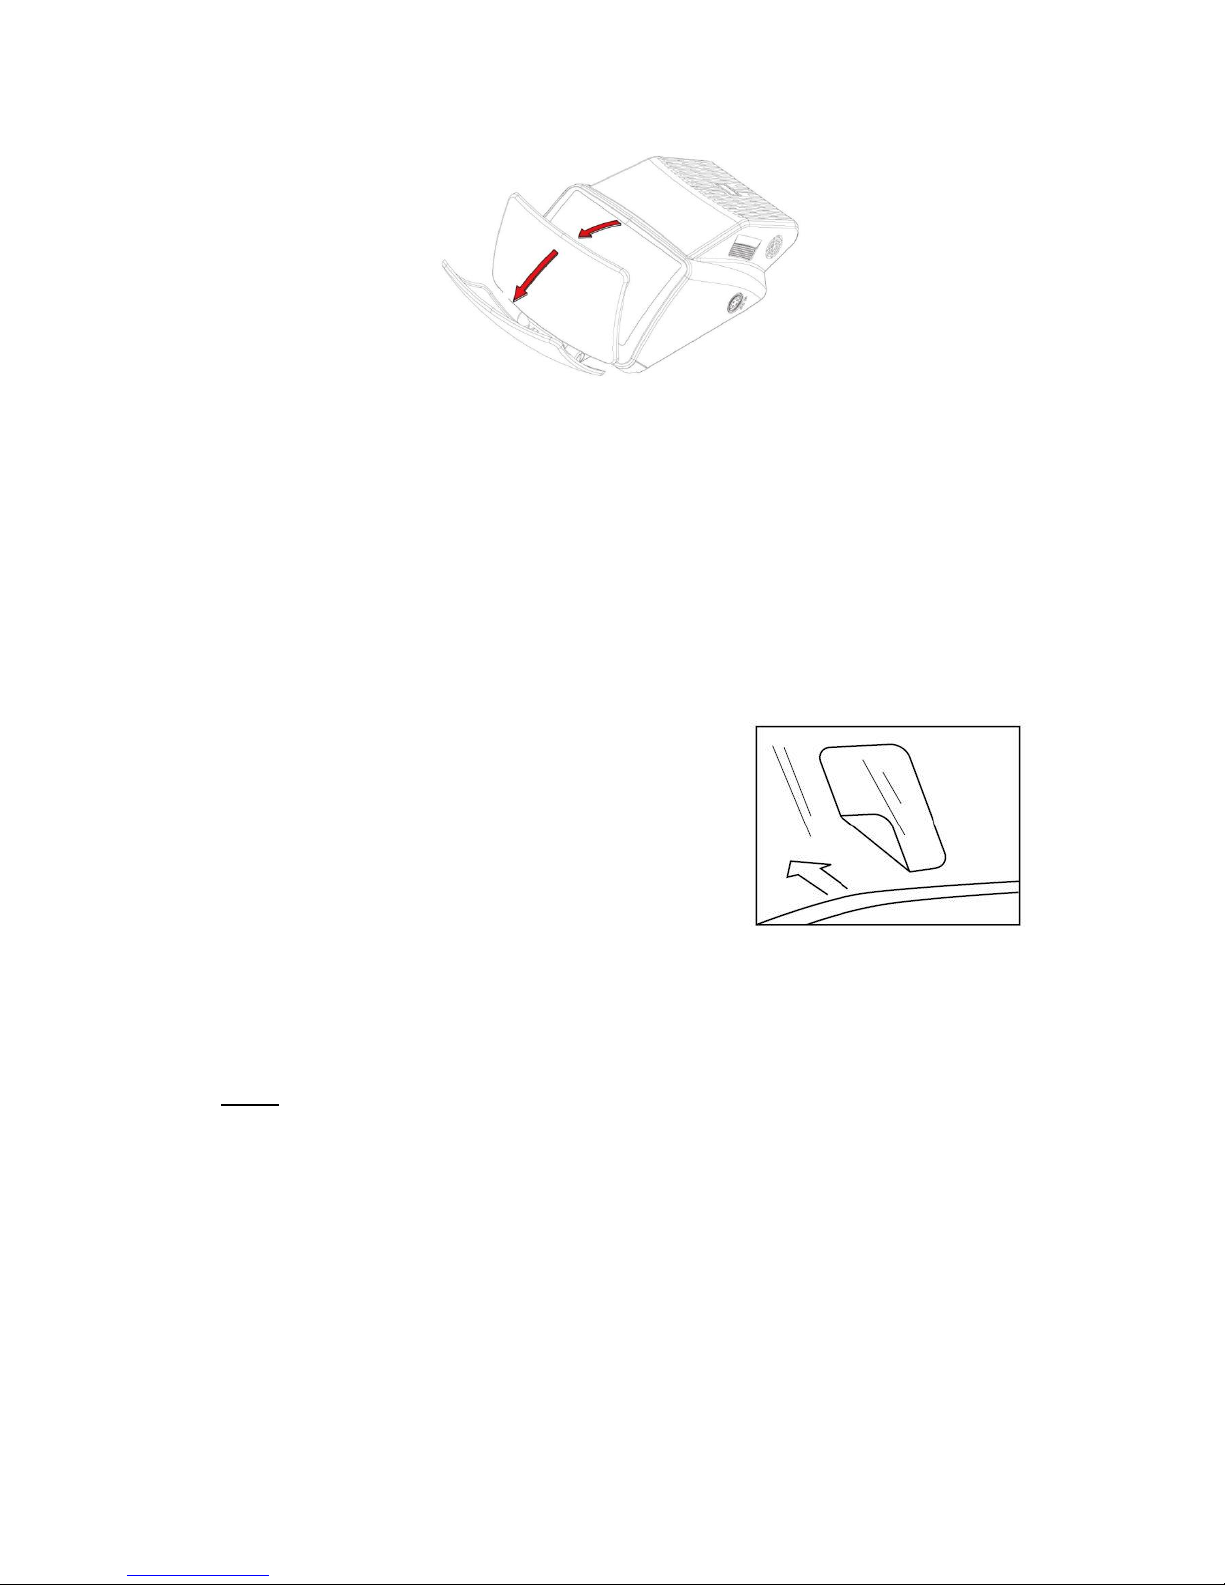
Adjusting the lens cover
The lens cover serves both to protect the lens and to prevent glare. When using
the IHUD, you must first open the lens cover, and then adjust the angle
appropriately. When not using the IHUD, close the lens cover over the lens to
protect it from scratching by foreign matter.
Page 10
1
Affixing the reflective film
Please use the following steps to affix the reflective film ():
1. Mix a few drops of dishwashing liquid and some water, then set aside for later
use as a sealant.
2. Use a clean cloth to wipe the area on the glass where the reflective film will be
affixed.
3. Remove the protective film from the reflective film, and spray on the sealant
prepared earlier.
4. Lightly place the moistened reflective film against the windshield at the
location where the IHUD’s projected image appears.
5. Sit in the driver’s seat in the attitude you would
normally take when driving, and then make any
adjustments in the position of the reflective film
to obtain an optimal view.
6. With one hand, gently press a corner of the
reflective film and with the other hand use a
plastic scraper or other flat plastic object (such
an ATM card or credit card), and moving from the
center to the edges on each side, press out any
excess water or air bubbles and ensure there is no foreign matter trapped
under the film. (If there is, it will cause refraction interference.)
7. When the water has dried, use a clean cloth to wipe away any water marks on
the film.
Note:
Due to the optical properties of windshield glass, a head-up display that
performs perfectly in one car may exhibit ghosting artifacts in another car. If
you are experiencing this problem, it is recommended that you use the steps
described above to affix the reflective film.
The concept of HUD display contains would request the dark background of
image, therefore, switching the displaying APP or contains to night vision is
strongly recommended.
Page 11
1
Product Specifications
Power
Car charger.
Input voltage: 9V ~ 16V (2.2A)
Signal Input
2.5mm Audio & Video Jack & Mini USB
Capable
Smartphones (Any brands with TV out funtions), 2-Din Car
System, OBDII Bluetooth Device, Side View Camera, Reserve
Cam, MP3 Players, PCs, DVD Players, Digital Cameras, ..
Etc. (Or any devices come with HDMI/ CVBS signal).
Light source
High Brightness LED X 4, Lifetime 50000 hours
Auto Light Sensor
Auto 10 tiers back light adjustment (20 tiers of manually)
Audio
1W Speaker
Screen
Full Color 4.5" (virtual image)
Resolution: 400 x 240
Brightness: 3,000 cd/m2 (Max)
Operating
Environment
Working Temperature: -10°C ~ +60°C
Storage Temperature: -20°C ~ +70°C
Dimension
189(L) x 110(W) x 74(H) mm
Weight
388 g (System unit base excluded), 845 g(Completed packed)
Accessories
2.5mm Ear Phone Jack Connector.
mini USB Connector (Cable)
Adjustable Base
Slide Rails
Car Chargers.
Reflect Films
Joint Developer:
Conserve & Associates, Inc.
Manufacturing & Sales:
Springteq Electronics Corp.
13F-5, No. 872, Chung Cheng Road, Chung Ho
District, New Taipei City, Taiwan 235, R.O.C.
Tel: +886-2-8228-1239 Fax: +886-2-82277189
http://www.springteq.com
 Loading...