

Page 1
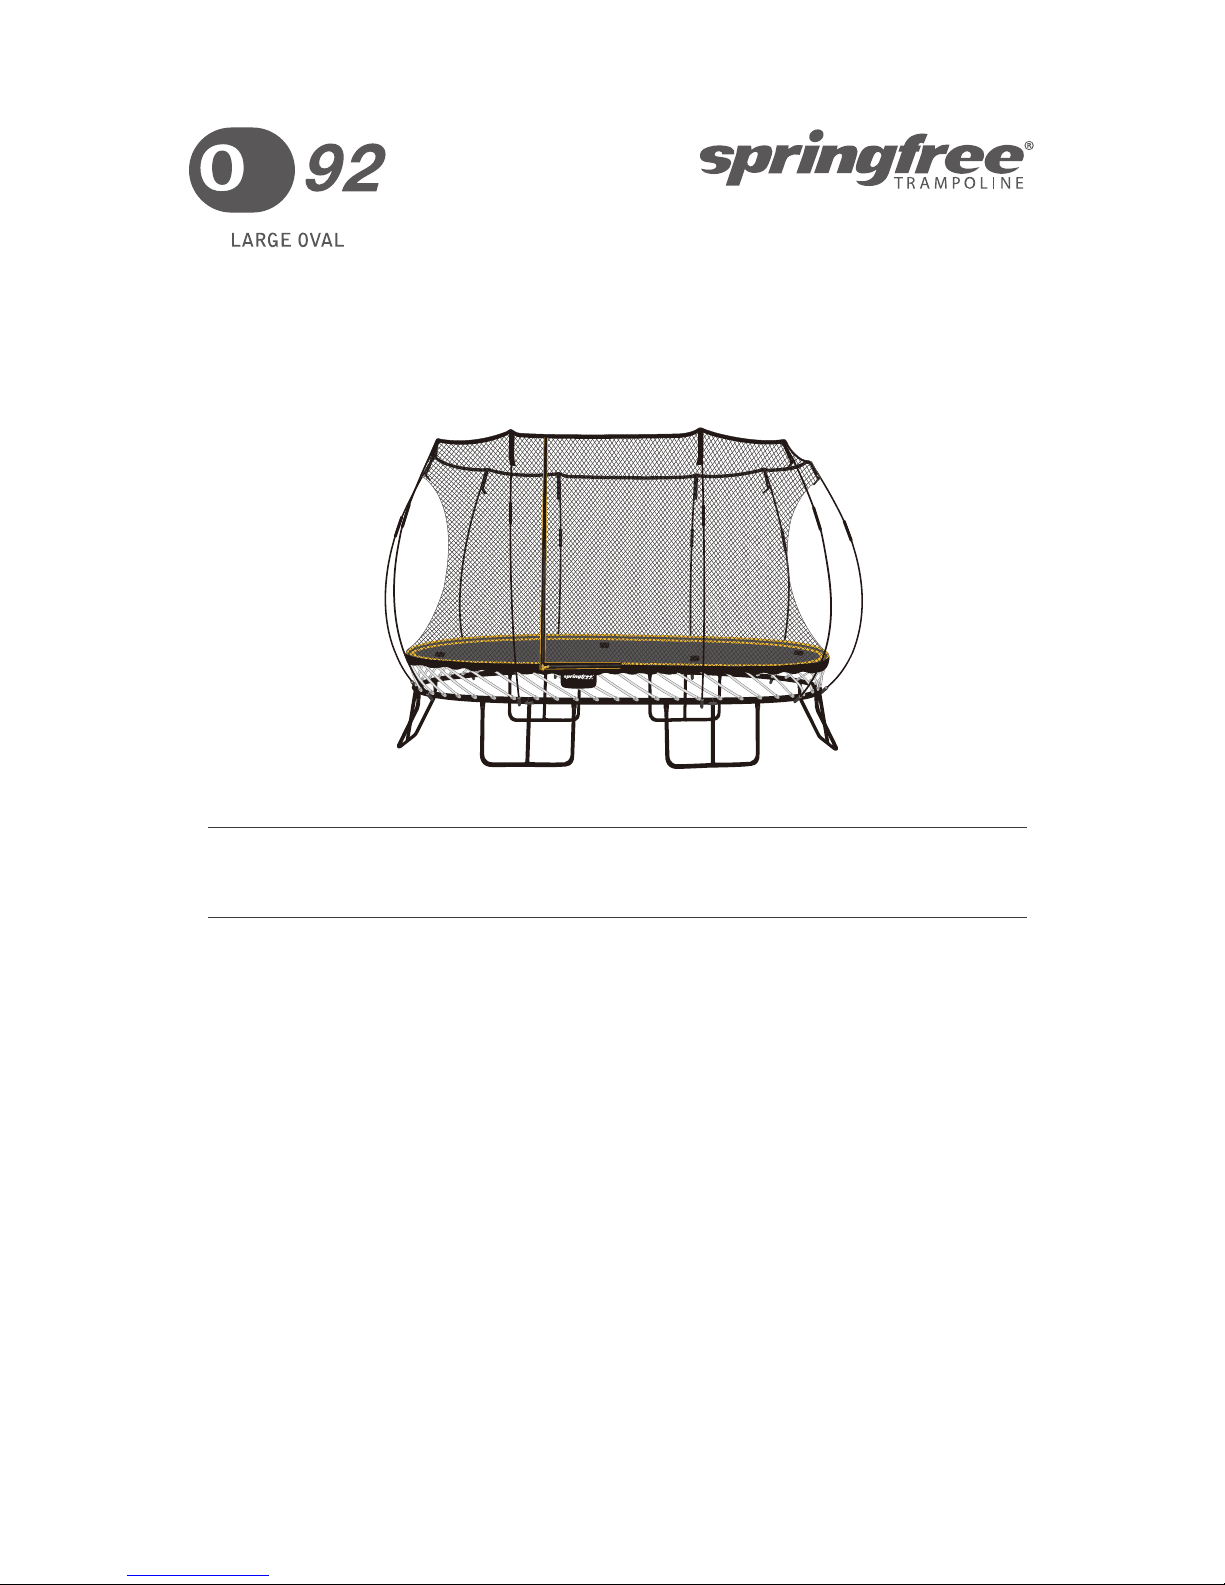
Assembly and Disassembly Instructions
for Trampoline and Enclosure
THE SMART TRAMPOLINE
TM
The information in this document is subject to change without notice.
© Copyright Springfree® Trampoline Inc. 2005, 2017. All rights reserved.
736804
7.8 x 13.3 (2.4 m x 4 m)
MAT
DIAMETER
220 lbs (100 kg)
MAXIMUM USER
WEIGHT
3 (0.9 m)
MAT HEIGHT FROM
GROUND
6 (1.8 m)
MINIMUM NET HEIGHT
FROM MAT
WANTTO JUMP
?DO
ITSAFE!ONE ATATIME.
ENVIEDESAUTER?FAITES-LEENTOUTE SÉCURITÉ! UNEÀ LA FOIS.
Page 2
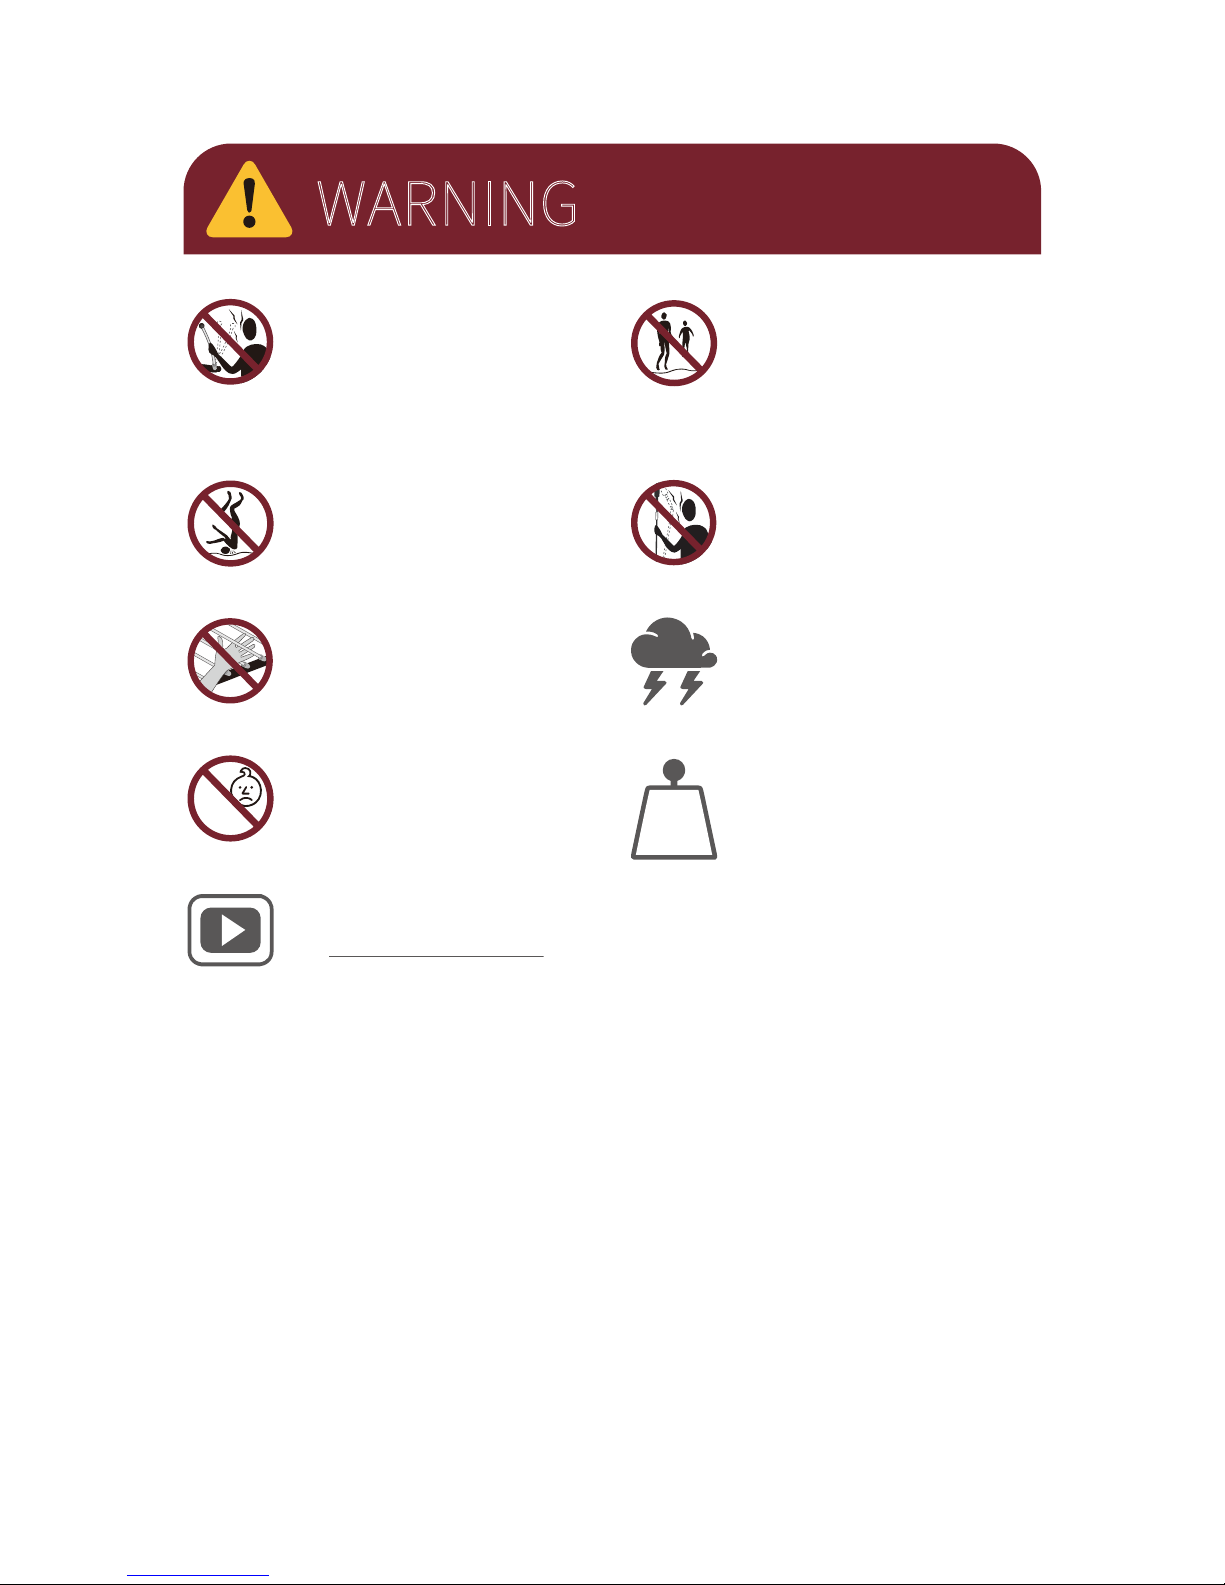
The Maximum User Weight for this
trampoline is located on the front
panel of this manual. Jumpers at or
near the Maximum User Weight should
take extra precautions in their
manoeuvres to ensure they do not
initiate contact with the ground while
jumping as this can cause serious
injury.
KG
LBS
Entrapment and choking hazard
possible for children under 6 years of
age.
0-6
We have helpful demonstration videos
that will guide you through each step.
Visit http://springfr.ee/install-ov or
scan the code in Step 1 to get started.
No more than one person at a time.
Multiple jumpers increase the chances
of loss of control and collision and can
result in serious head, neck, back, leg,
arm or other injuries.
Treat any loaded rod with caution
until you are sure it is properly
installed or uninstalled. Keep face
clear of loaded rods. An improperly
installed rod could release and cause
facial injury or blindness.
Never attempt to remove a black net
rod from its net pocket or disengage
(unlock) the rod sleeve while the black
net rod is under tension.
No somersaults or flips. Landing on
the head or neck can cause serious
injury, paralysis, or death, even when
landing in the middle of the bed.
WARNING
Read the warnings on this page and those
contained in the User Guide before you assemble
and use the trampoline and enclosure.
Do not hold onto, or place fingers
between the rods while someone is
jumping on the trampoline.
If you anticipate severe weather,
consider lowering the enclosure,
moving the trampoline to a sheltered
location or disassembling the trampoline completely.
Page 3

Two people are required for assembly. Installation
typically takes two hours to complete.
Keep small children at least 25 (7.5 m) away while
assembling the trampoline; they could be injured by
improperly assembled rods releasing and ejecting
from the frame.
Do not attempt to use the trampoline until it is
completely assembled.
Be aware that when loaded, the rods can spring back
and may cause injury. Keep your face well clear of
the rods during assembly or disassembly. An
improperly installed rod could release and cause
facial injury or blindness.
The sleeves on the rods are intended to provide
protection from fibres or splinters. Do not remove. If
they are damaged, replace them.
Maintain a minimum clearance of 16.5 . (5 m) above
the mat [in USA and Canada, 24 (7.3 m) above the
trampoline from ground level] in order to prevent
users from inadvertently contacting overhead
hazards such as electric wires, tree limbs or
clothesline.
Maintain a minimum clearance of 5 (1.5 m) [in EU
countries, 6.5 (2.0 m)] on all sides of the trampoline. This area should not include concrete, bitumen,
brick or other hard surfaces or be in the proximity of
other conflicting installations (e.g. pools, swings,
slides, climbing frames) as these can cause serious
injuries if users fall o the trampoline.
A.
B.
C.
D.
E.
F.
G.
Do not locate the trampoline on top of other
objects or store anything underneath the
trampoline bed.
Place the trampoline in a well-lit area.
Record the date of purchase on the enclosure label
in the space provided.
Only use approved Springfree® Trampoline
accessories, and install in accordance to installation instructions. Do not make modifications to the
trampoline or accessories.
Secure the trampoline against unauthorized and
unsupervised use.
The owner and supervisors of the trampoline are
responsible to make all users aware of practices
specified in the User Guide.
Trampoline enclosure is supplied as part of the
trampoline. Do not install enclosures that are not
suited to your product.
The trampoline is intended for indoor/outdoor
usage. Refer to Trampoline location information in
the User Guide for more details.
Use only with mature, knowledgeable supervision.
Enforce all safety rules.
Record the purchase date of your trampoline on
the net serial number tag. It is located under the net
warnings, which are sewn into the edge of the net
next to the entrance.
H.
I.
J.
K.
L.
M.
N.
O.
P.
Q.
WARNING
Please read the following precautions carefully
before beginning the assembly process. Retain for
future reference.
Page 4
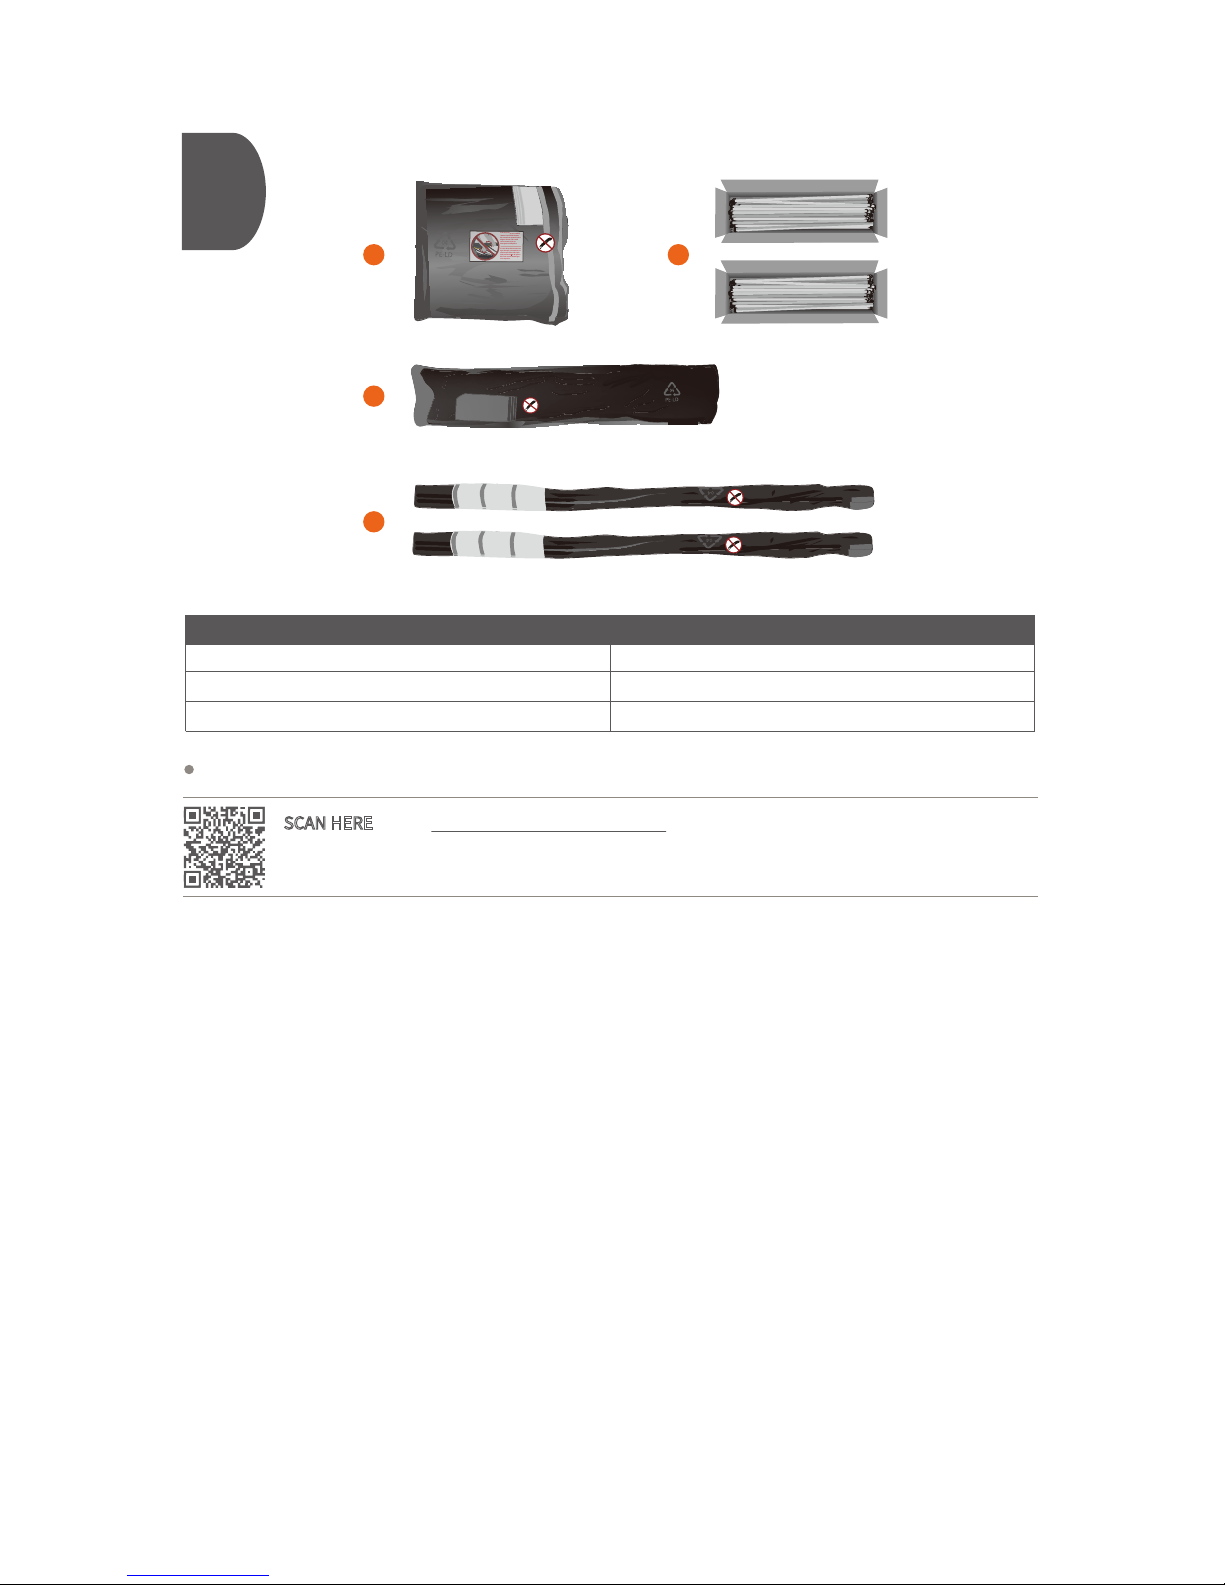
1
If for any reason you need to
remove a rod from the mat,
do not twist or rotate the mat
edge as shown. This could
cause serious injury or
damage the trampoline.
Si vous devez désinstaller une
tiges du tapis, ne tordez et ne
tournez pas le bord du tapis.
Cela peut entra ner de graves
blessures ou des dommages
au trampoline.
Lay out the parts as shown.
SCAN HERE
or visit http://springfr.ee/g4-install-ov for a helpful installation overview video.
Black Net Rods + Horizontal Rods
Part Quantity Part Quantity
Mat
White Mat Rods
Net
1
58
1
10 + 2
1
3
D.
Spare Small Bolt & Nut
Spare C-clips
A.
B.
C.
A
C
D
B
Page 5
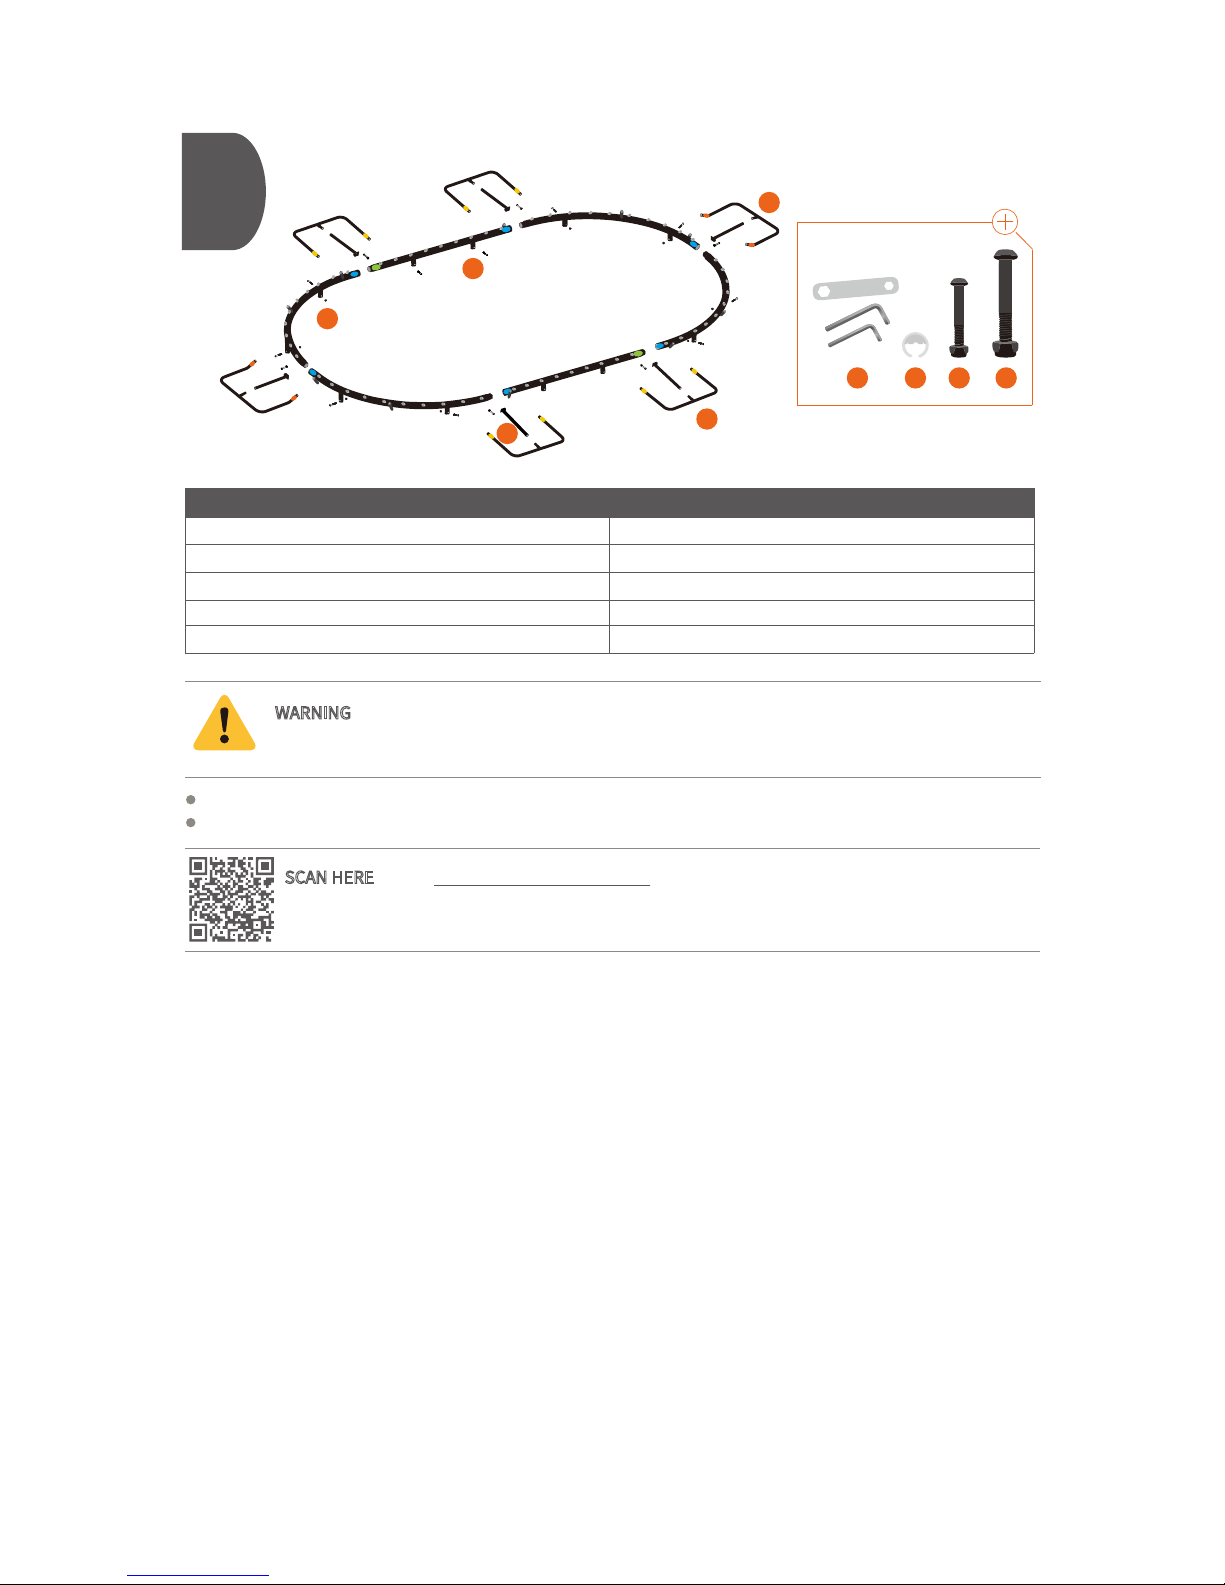
2
Part Quantity Part Quantity
Wrenches
C-clips (Attached to Frame)
Small Bolts & Nuts
Large Bolts & Nuts
Curved Frame Sections
Straight Frame Sections
Orange Bent Legs
Yellow Legs
Center Posts
A.
B.
C.
D.
E.
F.
G.
H.
I.
4
2
2
4
6
3
10
12
6
Lay out the remaining parts as shown. The colored stickers all face upwards.
If you are missing any parts please contact Springfree Trampoline directly.
WARNING - Use the tools provided to fasten the nuts. Do not over tighten the nuts. Do not
use power driver, torque wrench, or drill.
SCAN HERE or visit http://springfr.ee/g4-step-2 for a helpful installation video for Step 2.
F G H I
A
B
C
D
E
Page 6
3
55
2
1
1
4
3
2
6
5
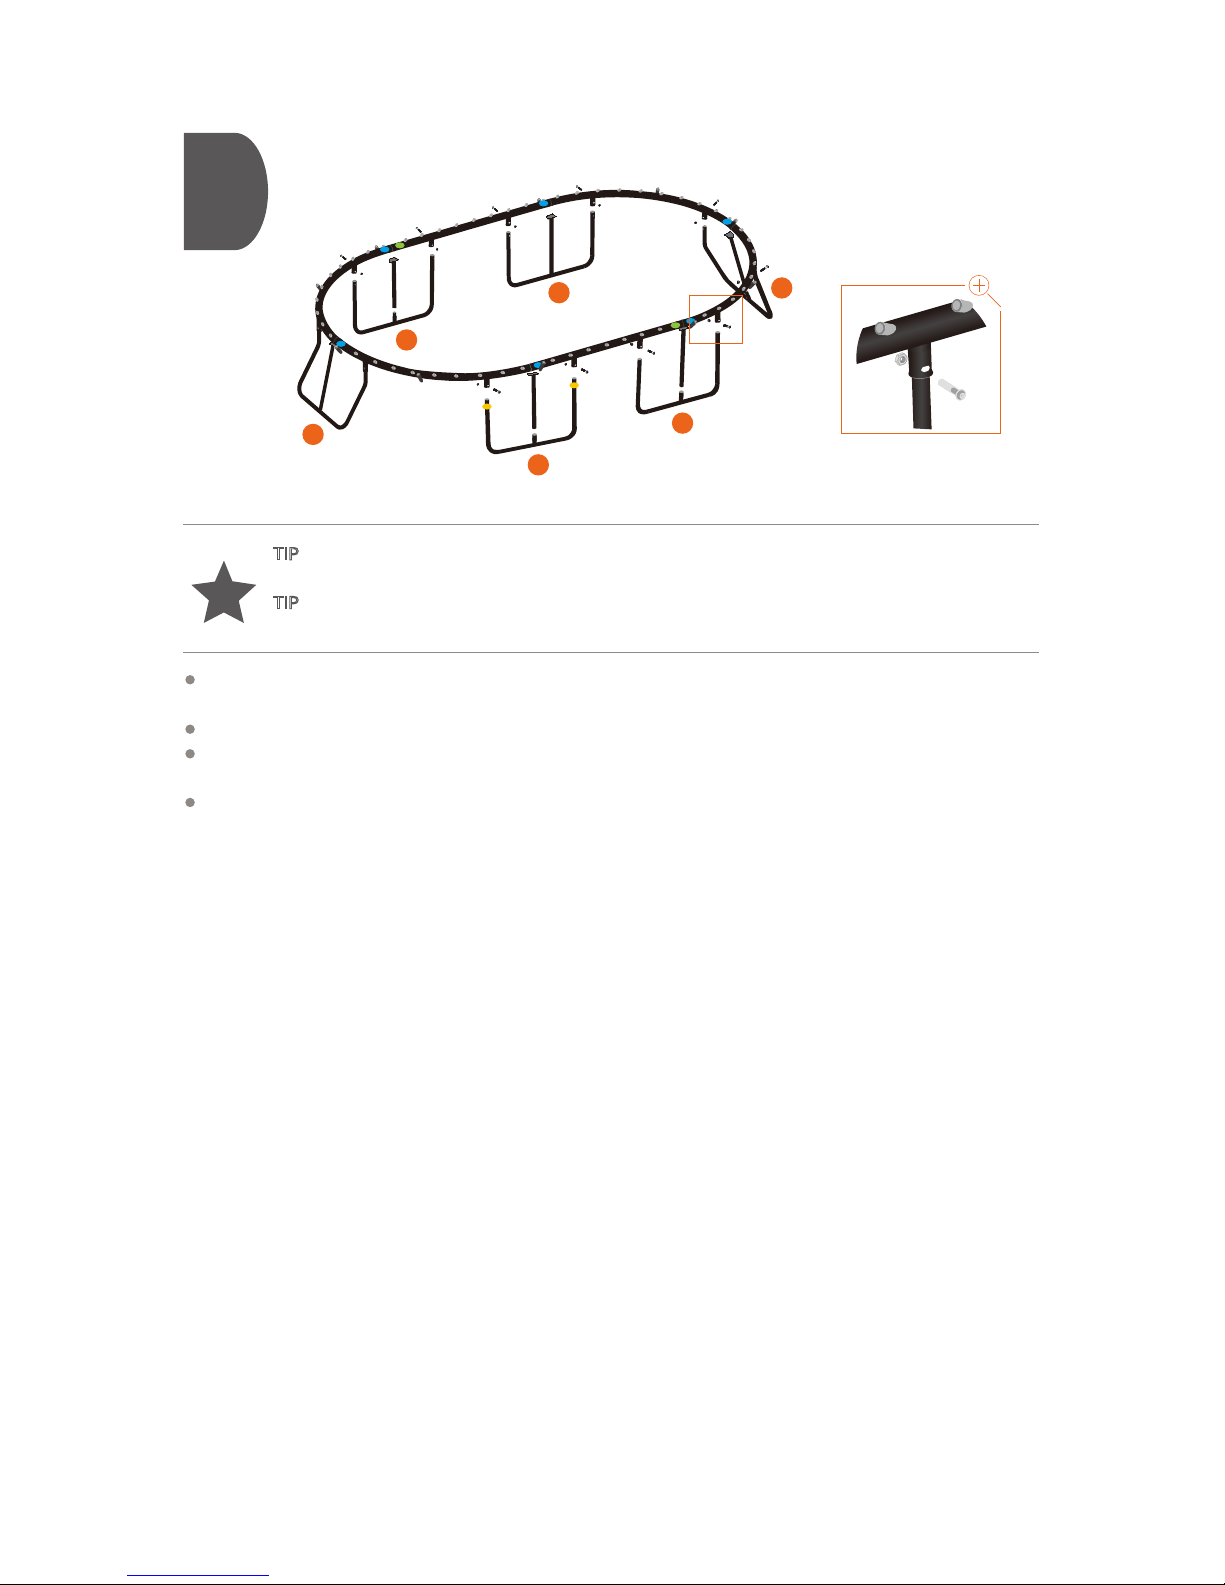
TIP - Fastening the final two frame sections oen requires additional eort. Two people are
required for assembly.
TIP - When installing the legs, it is easiest when one person to holds the frame up and horizontal
while the other person inserts the legs into the leg sockets.
Connect and fasten frame sections using the large nuts and bolts. When finished, the bolt head should be
flush with the frame and the nut should face the center of the trampoline.
Attach a center post to the middle of each leg section.
Then, in the order shown, carefully li the frame and evenly insert the legs into the leg sockets on the
underside of the frame.
Fasten each leg to the frame using the small nuts and bolts before going to the next leg.
Page 7
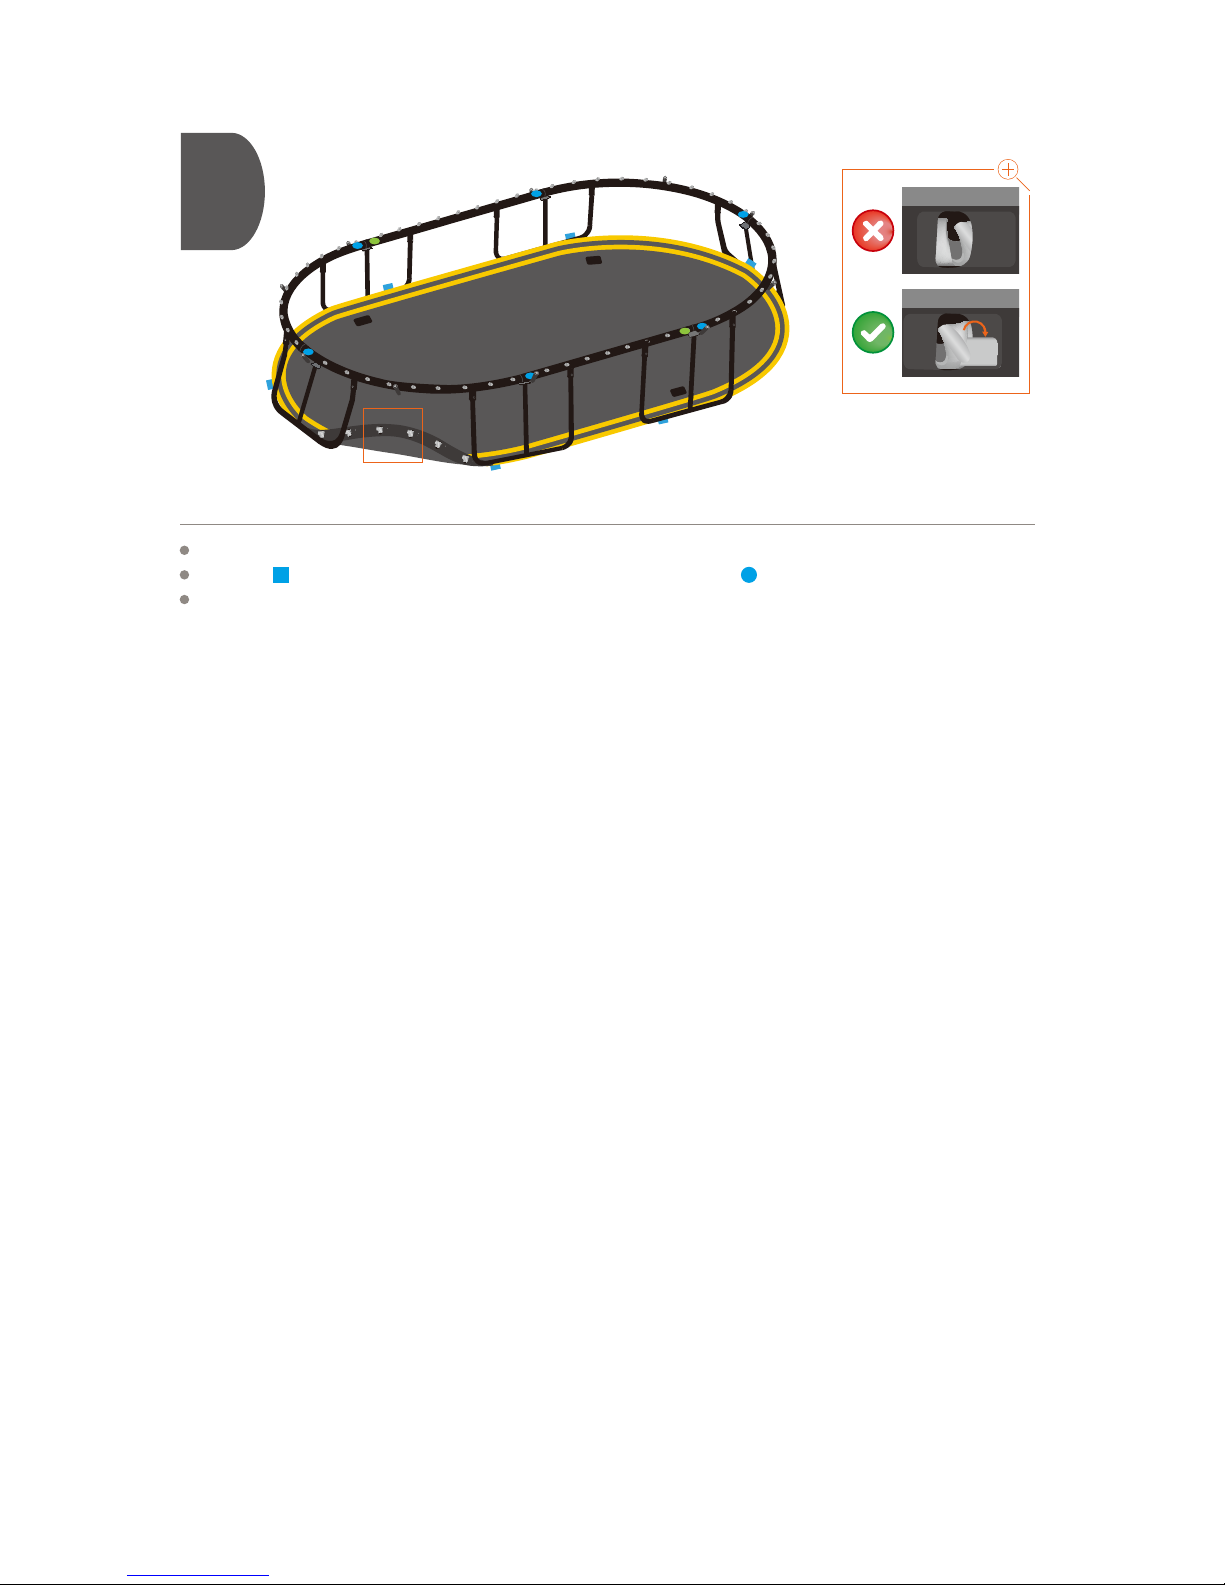
Lay out the mat with the yellow stripes facing upwards inside the trampoline frame.
The blue tags on the mat should approximately align with the blue stickers on the frame.
Before moving to the next step, ensure that the mat rod holders are correctly positioned with the mat
rod holder tag outside the mat rod holder pocket, as per the insert. If the mat rod holder tag is under
the pocket, adjust accordingly.
4
Page 8
5
SCAN HERE or visit http://springfr.ee/g4-step-5 for a helpful installation video for Step 5.
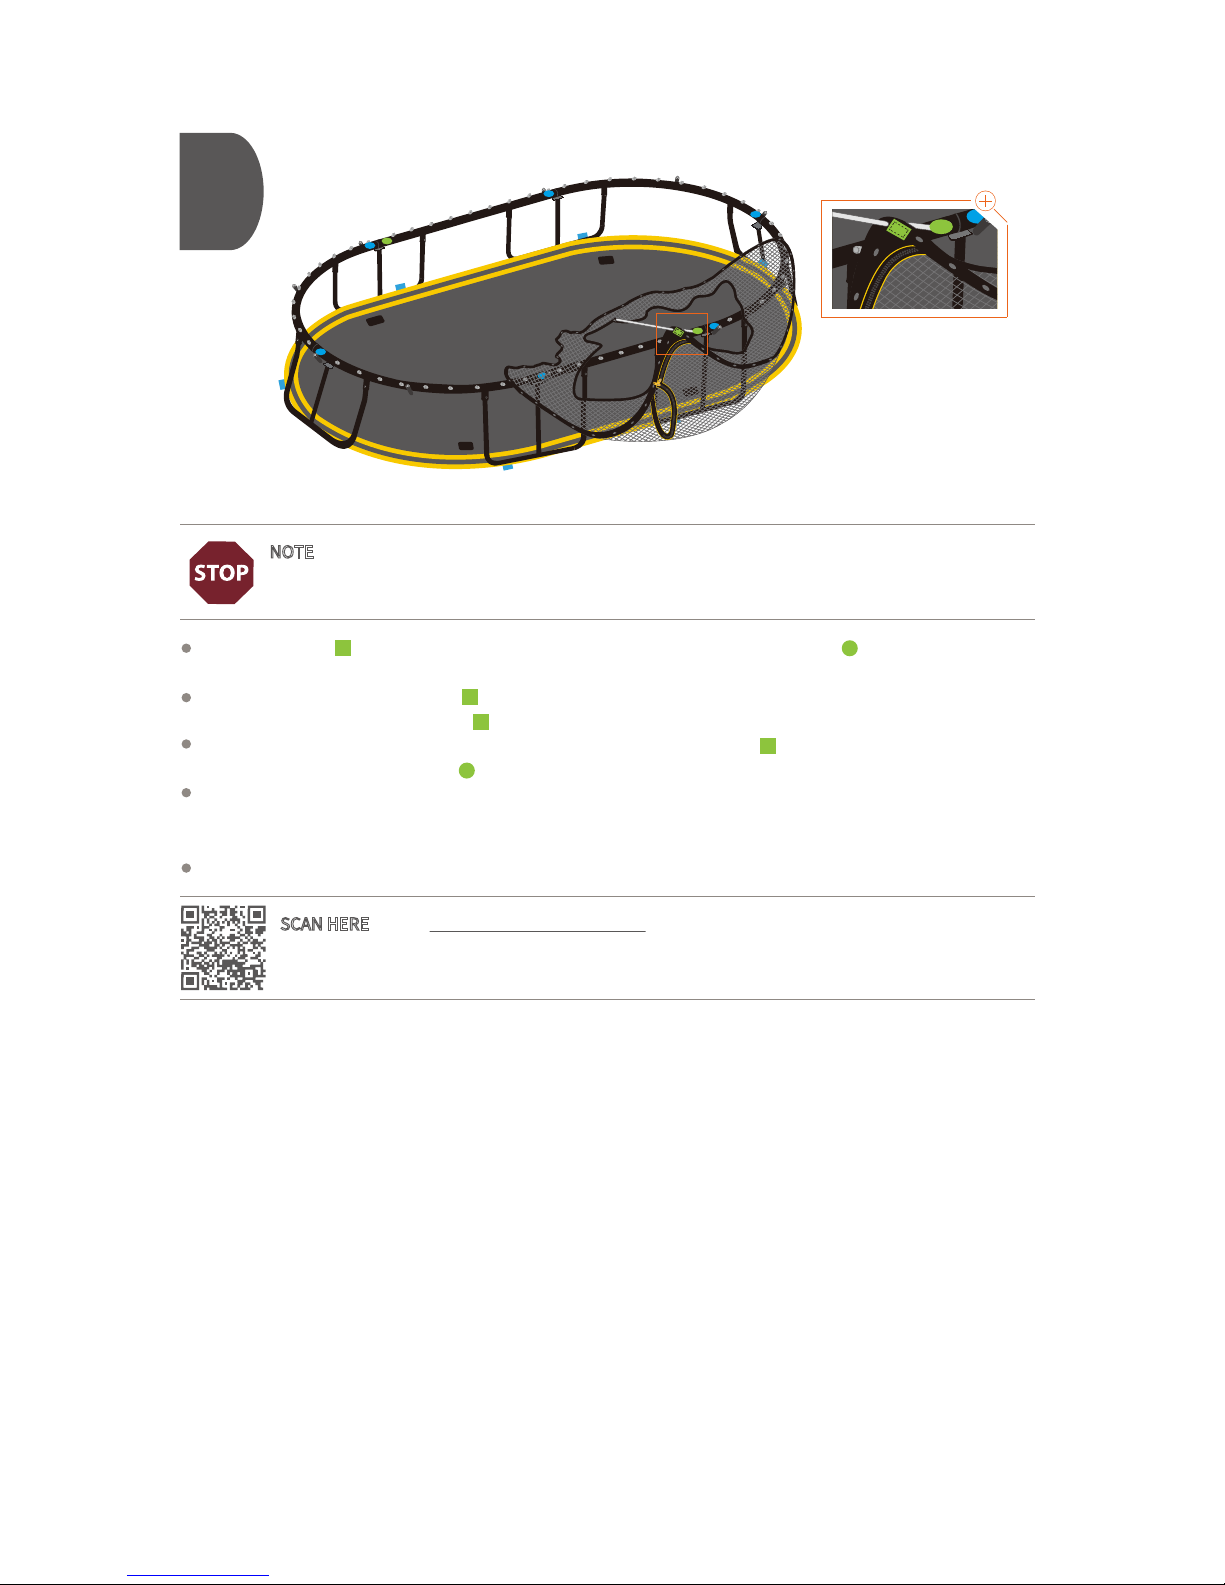
NOTE - As you install the white mat rods into the mat rod sockets the net will become tight
against the frame. Handle the net with care and be sure that it does not get caught or it may
tear.
Locate the green tag on the bottom edge of the net and match it with any green sticker on your
trampoline frame.
Holding the net so that the green tag is facing you, gently place the rest of the net inside the frame as
shown. DO NOT let go of the green tag.
Put a white mat rod through the hole to the immediate le of the green tag in the net and then into the
mat rod socket next to the green sticker.
Then, working carefully around the frame, insert the remaining white mat rods through the net holes and
into the corresponding mat rod socket. When finished, the net should be stretched tightly around the
OUTSIDE of the frame.
Be sure that the white mat rods are seated down to the bottom of each mat rod socket.
Page 9
6a
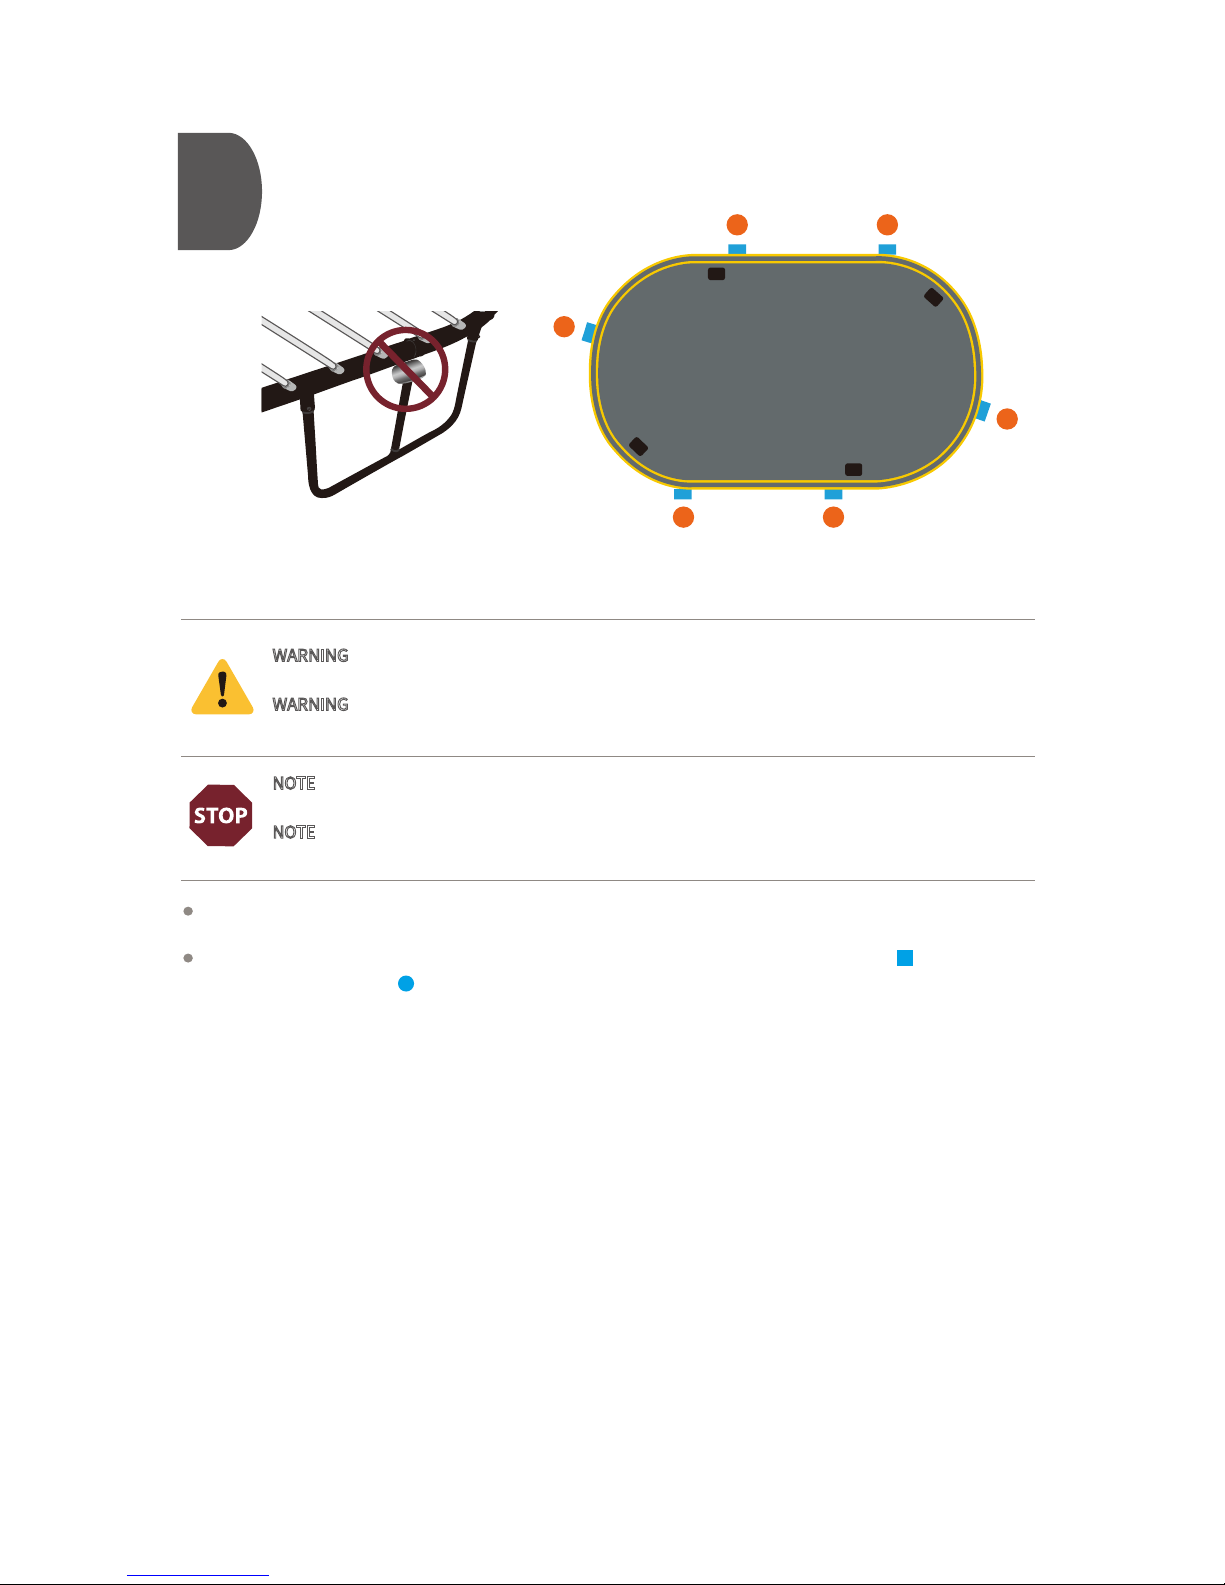
Check that the center posts of the leg sections are correctly seated under the trampoline frame. If they
are not, adjust them now.
To install the mat, begin by attaching one white mat rod at each location where the blue tags on the
mat match with the blue stickers on the frame.
WARNING - Treat any loaded rod with caution until you are sure it is properly installed or
uninstalled. Keep your face well away from any loaded rod.
WARNING - Both people must maintain a steady grip on the rod until it is securely installed in
the mat rod holder.
NOTE - Before you install the first white mat rod into a mat rod holder, read the instructions in
Step 6b and 6c.
NOTE - Following the sequence shown spreads the tension evenly across the mat. If you do not
follow this sequence, it will be very diicult to attach the mat.
1
4 5
6 3
2
TOP VIEW
Page 10
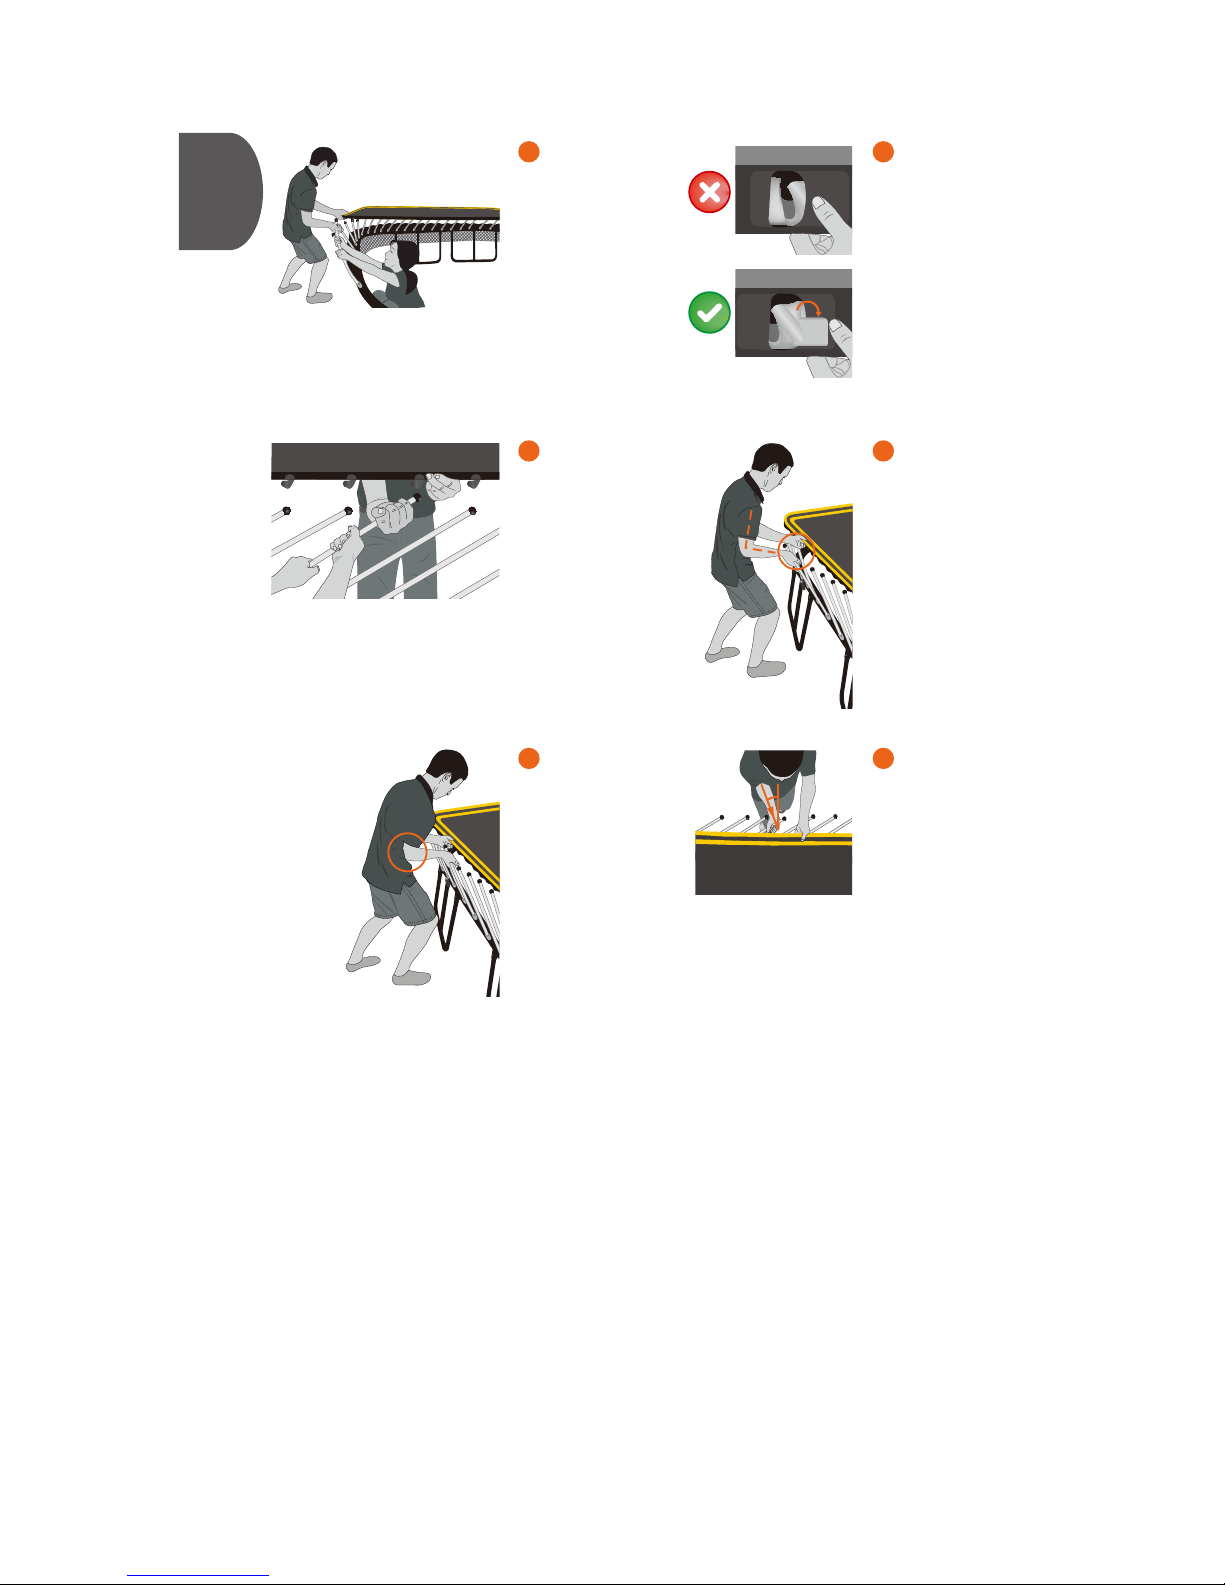
6b
Have one person
position themselves
inside the frame of
the trampoline
while the other
stands outside as
shown.
Inside Person:
Ensure that the mat
rod holder is correctly positioned with
the small tag
positioned outside
the mat rod holder
pocket.
Inside Person:
Take hold of the rod
with both hands and
maintain a steady
grip until it is
securely installed in
the mat rod holder.
Outside Person:
Stand with one leg
forward and bend
your knees. Push
your elbow into
your hip.
Outside Person:
Hold the white mat
rod with your palm
facing up and bend
your arm at a right
angle.
Outside Person:
Pushing across your
body in the direction
shown will make it
easier to get the mat
rods in or out of the
mat rod holders.
1
2
3
5
4
6
Page 11
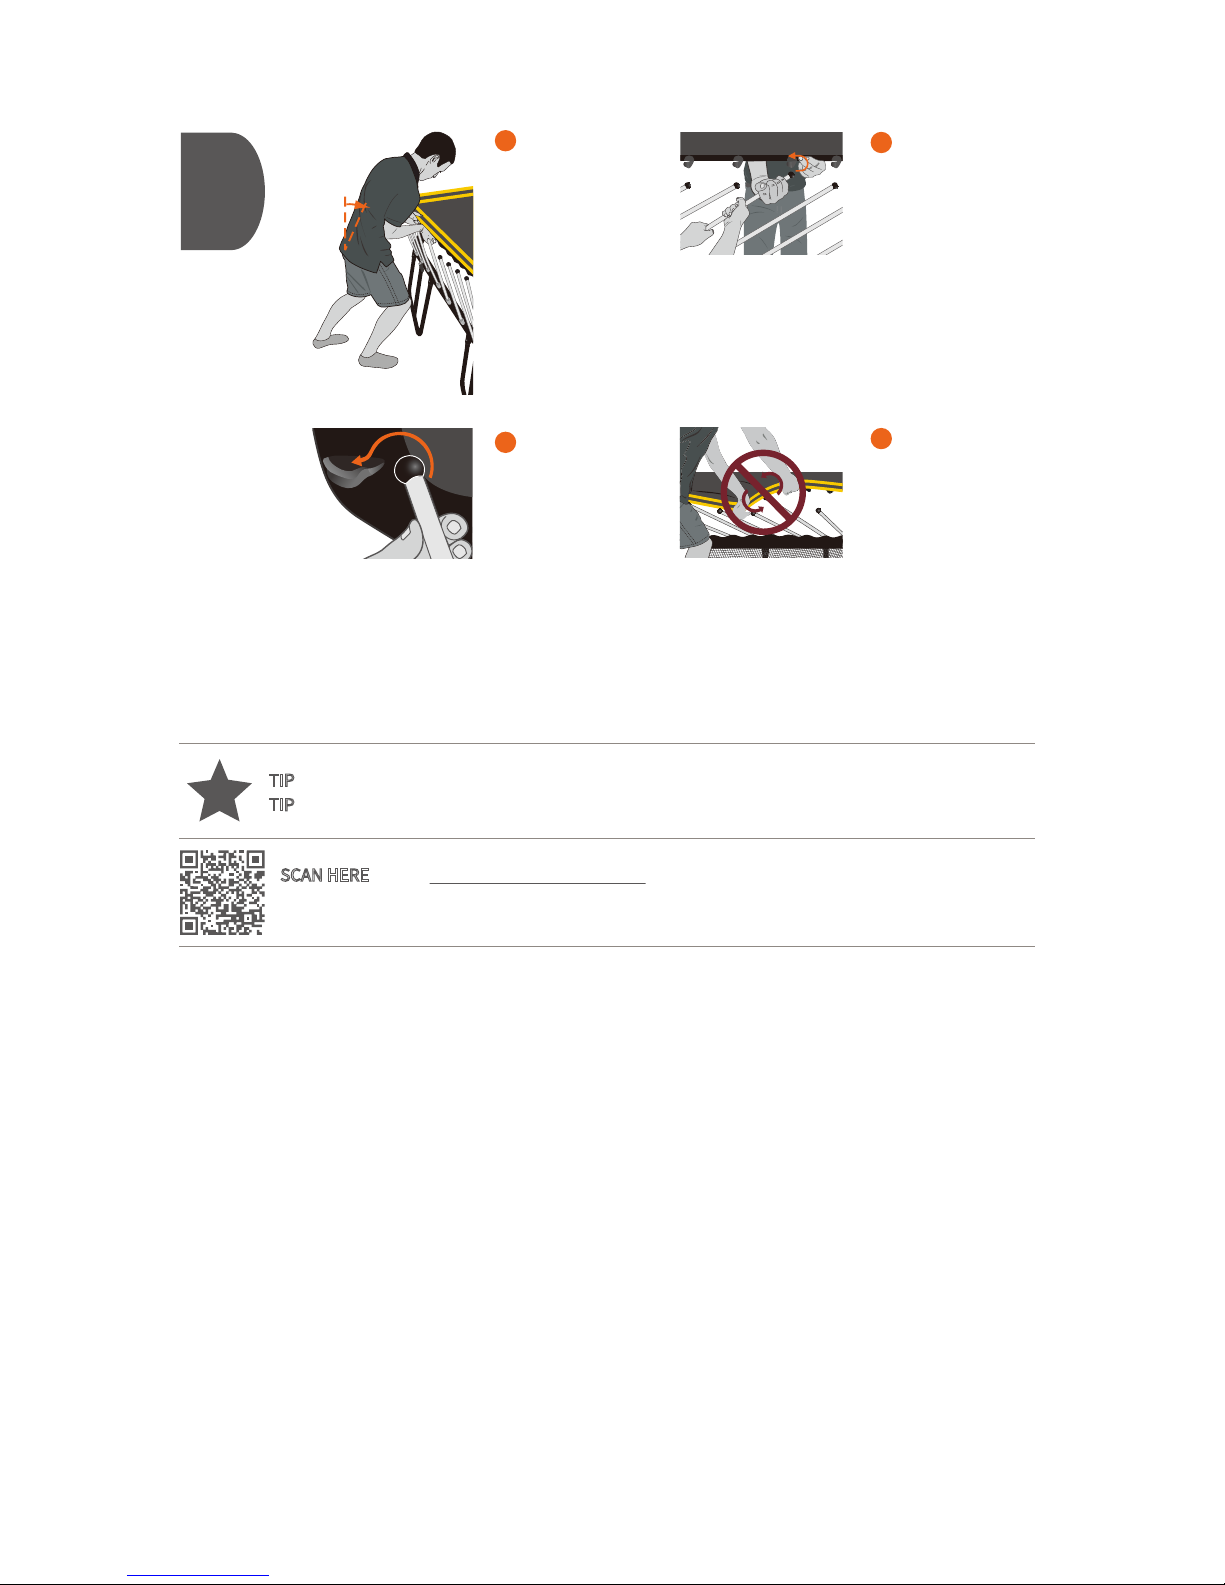
TIP - Keep the mat level when you install or uninstall the white mat rods.
TIP - If you need to uninstall a white mat rod, see the Disassembly Instructions on the reverse.
SCAN HERE or visit http://springfr.ee/g4-step-6 for a helpful installation video for Step 6.
6c
Outside
Person: Rocking
from your heels to
the balls of your
feet, use your
body weight to
push the white
mat rod towards
the center of the
mat.
Inside Person:
As the outside
person pushes,
carefully pull the
rod in and up in the
direction of the mat
rod holder.
Outside Person:
Do not twist or
rotate the mat to
remove a rod from a
mat rod holder. This
could cause serious
injury or damage
the trampoline.
7
8
10
Inside Person:
Guide the white
mat rod up and
over the back edge
of the mat rod
holder and into
position. Check that
the rod is fully
seated in the mat
rod holder before
continuing.
9
Page 12
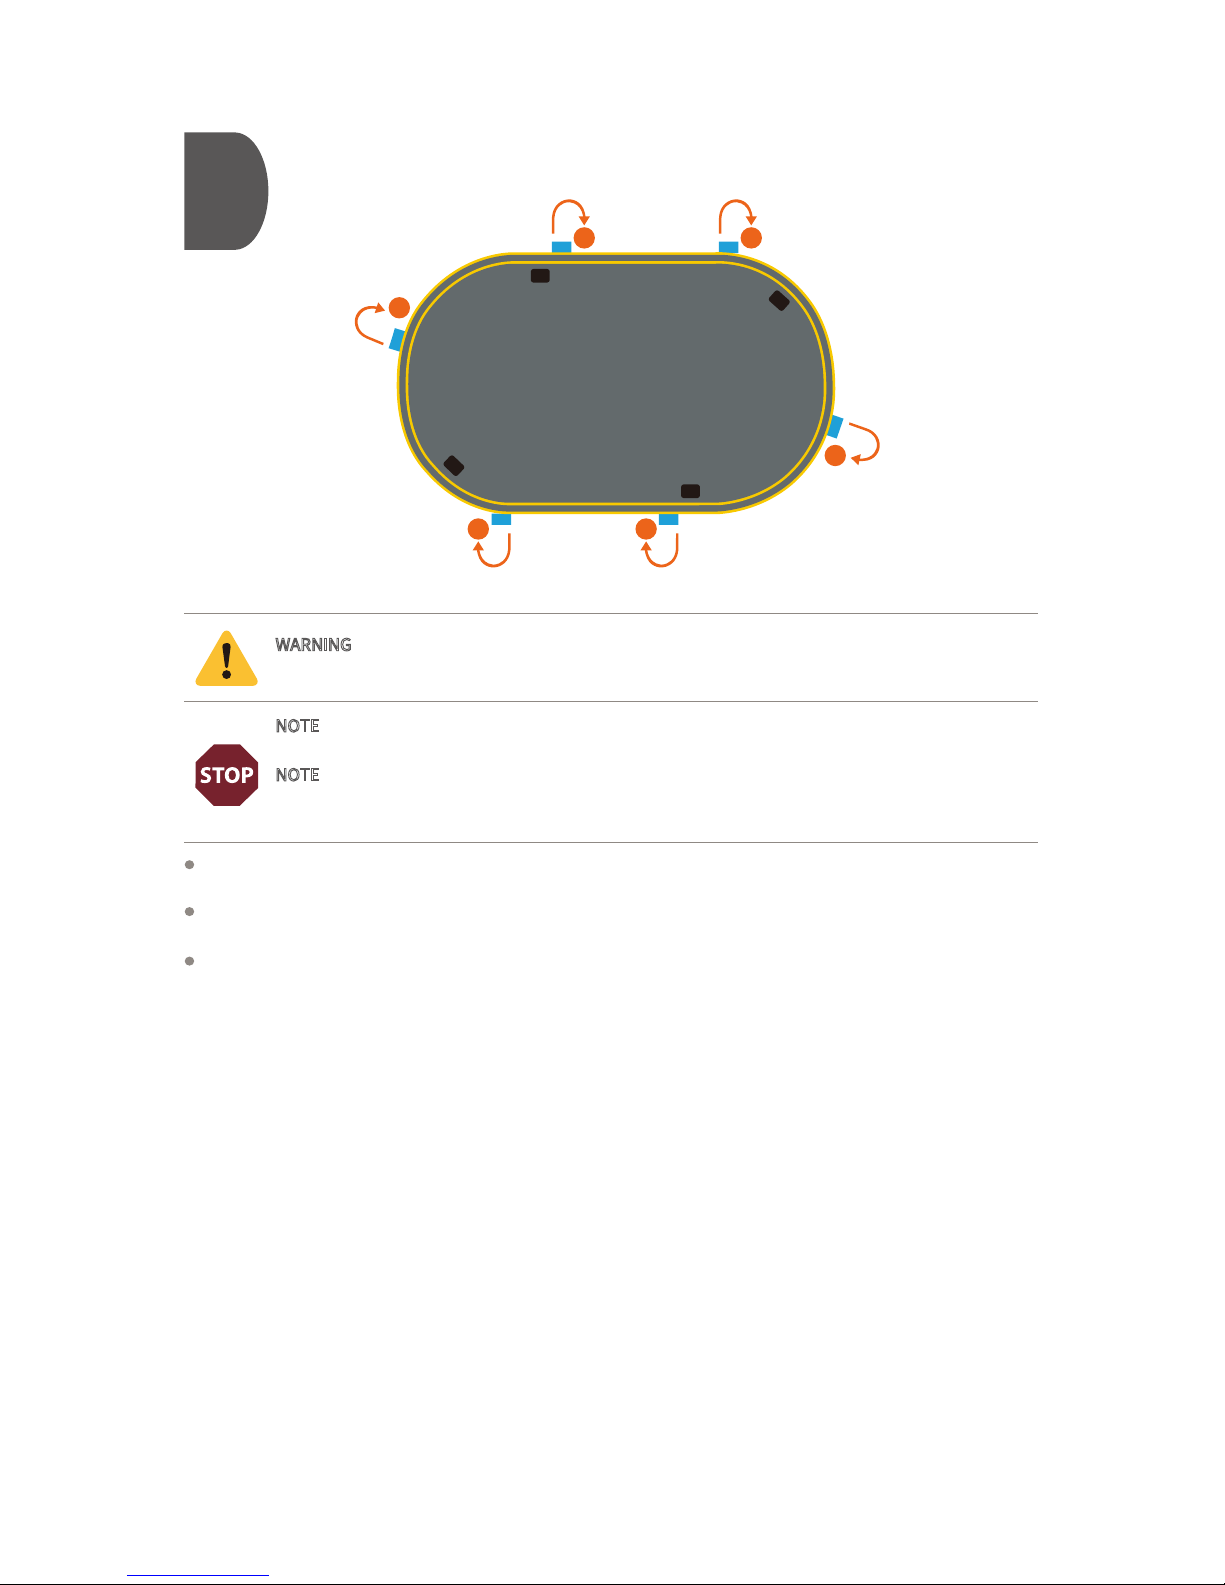
7
NOTE - Follow the mat rod installation sequence. Do not install multiple mat rods in one
location. If you do not follow this sequence, it will be very diicult to attach the mat.
NOTE -
Each time you circle the trampoline, check that the center posts of the leg sections
are correctly seated under the trampoline frame. If they are not, adjust them before installing
any more rods. You may need to uninstall rods to release the tension.
Go back to the very first rod you attached to the mat in Step 6a. Now, moving clockwise, attach ONE white
mat rod next to the initially installed rod.
Moving clockwise around the trampoline, attach ONE additional rod next to each of the already installed
rods as shown above.
Continue circling the trampoline several more times following this sequence, installing only ONE rod per
grouping, until all the white mat rods are attached to the mat.
WARNING - Treat any loaded rod with caution until you are sure it is properly installed or
uninstalled. Keep your face well away from any loaded rod.
TOP VIEW
8 9
10
1112
7
Page 13
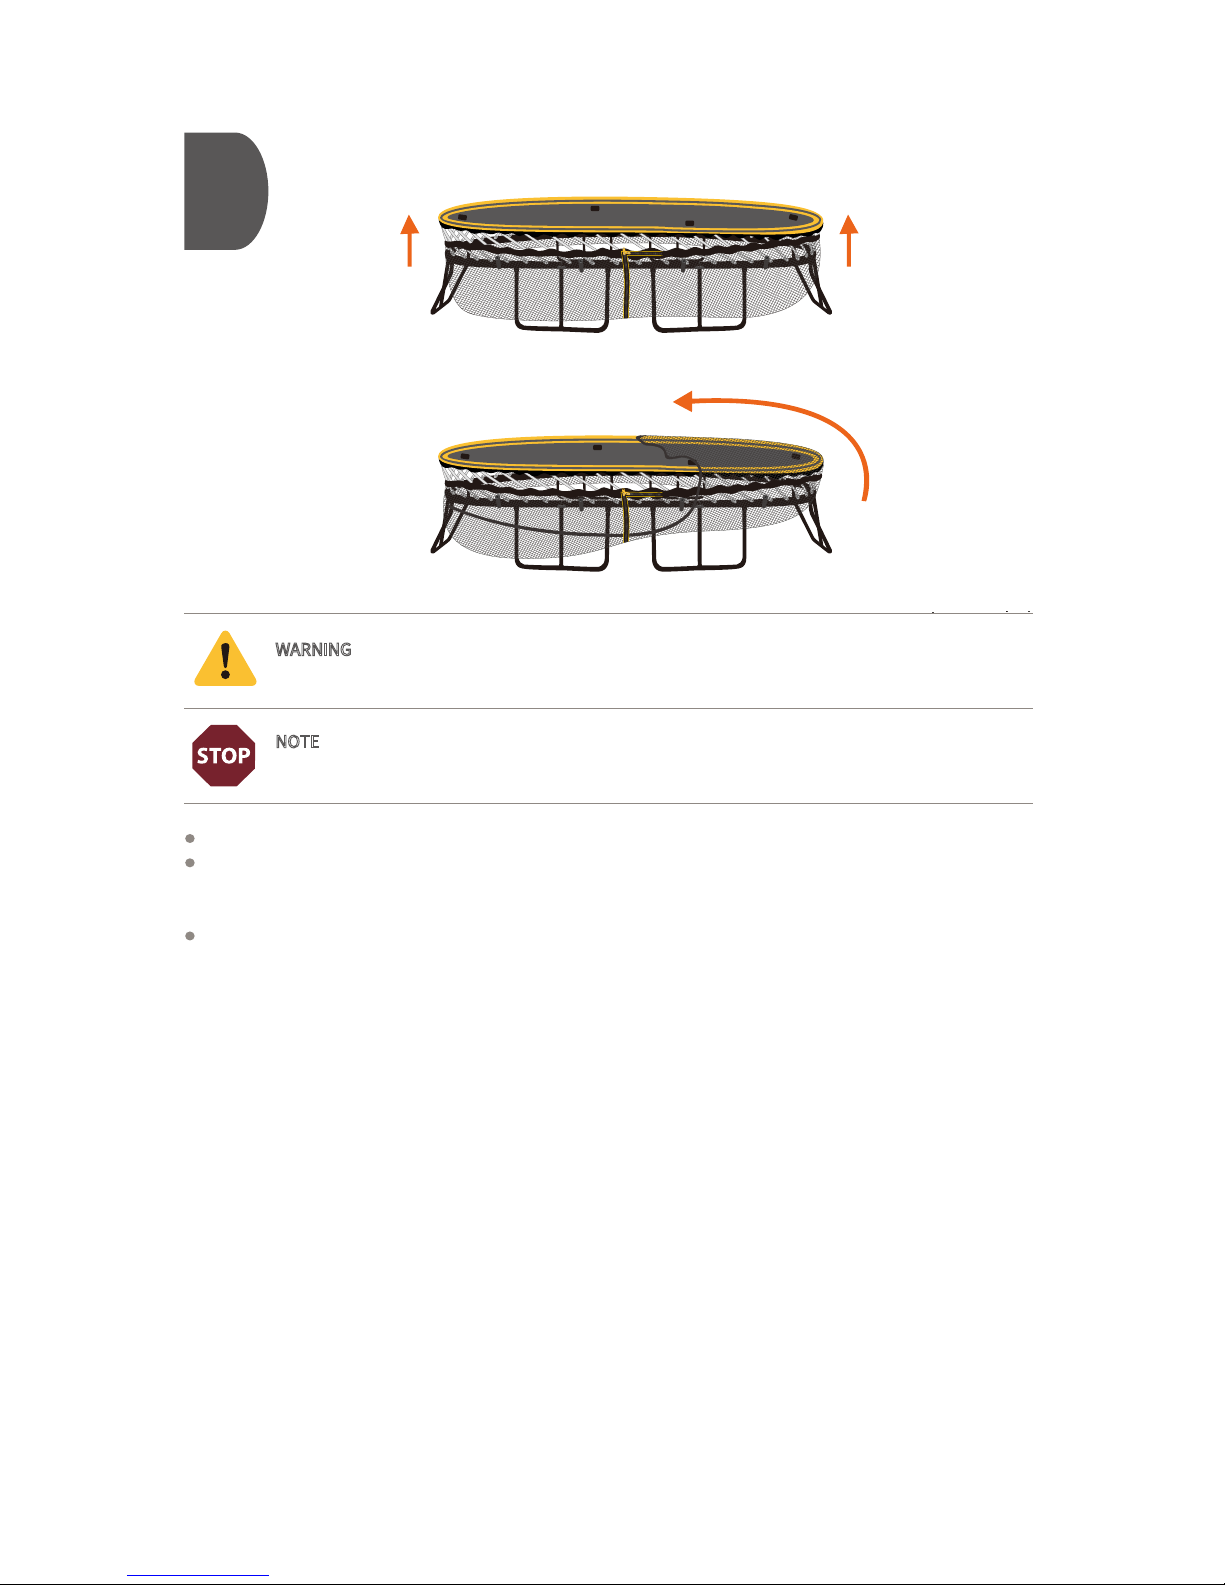
8
WARNING - Do not use the trampoline until it is completely assembled. Failure to follow these
instructions may cause rods to break or eject from the trampoline frame.
NOTE - Check that the net is not caught on the trampoline frame or the bolts – if the net catches,
it may tear.
Moving clockwise around the frame, carefully slide the net up to the top of the white mat rods.
Then, starting at one of the blue stickers on the curved frames, gently and slowly pull the net up and over the
edge of the mat. It is normal for the net to be tight. Take extra care not to tug the net and check that the net
is not snagged on the trampoline frame or the bolts.
Working slowly around the frame, carefully li the rest of the net over the edge of the mat until the bottom
band of the net is pulled all the way to the top of the white mat rods.
Page 14
9
NOTE - If you purchased a FlexrHoopTM with your trampoline, you could stop and install it right
now. This will save you a couple of steps later.
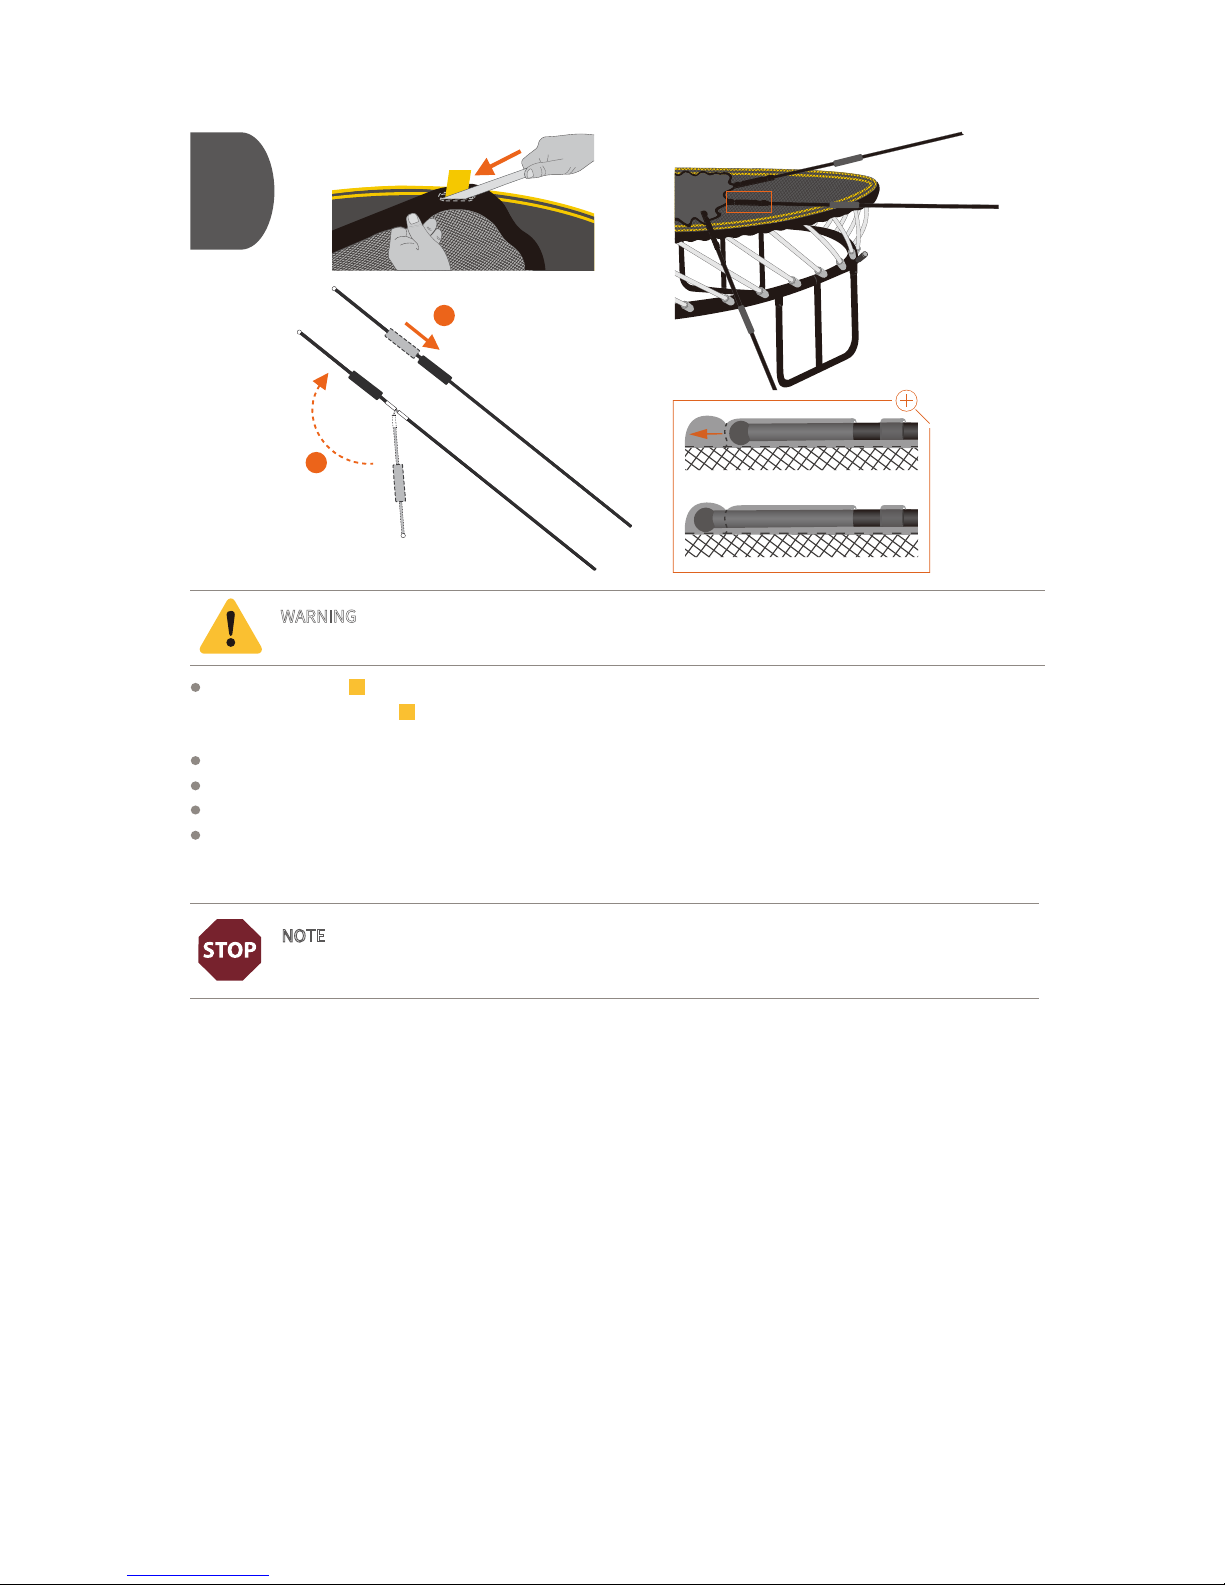
Locate the yellow tags along the top edge of the net. Select one of the horizontal net rods and slide it into
the pocket at the yellow tag. It is normal for the rod to be a tight fit. Once fully inserted, tuck the end of the
rod into the pocket and check that the rod is centered within the pocket.
Repeat on the other sides of the trampoline.
Assemble the black net rods as shown.
Locate the pockets at the top edge of the net and install all of the black net rods.
Take care to fully push the ball of the black net rod into the pocket as shown. There is an internal catch at
the top of the pocket and the ball must be pushed past this internal catch or else it will come out. You will
feel some resistance as the ball is pushed through.
WARNING - Treat any loaded rod with caution until you are sure it is properly installed or
uninstalled. Keep your face well away from any loaded rod.
Unfold
and align
Secure
1
2
Page 15
SCAN HERE or visit http://springfr.ee/g4-step-10 for a helpful installation video for Step 10.
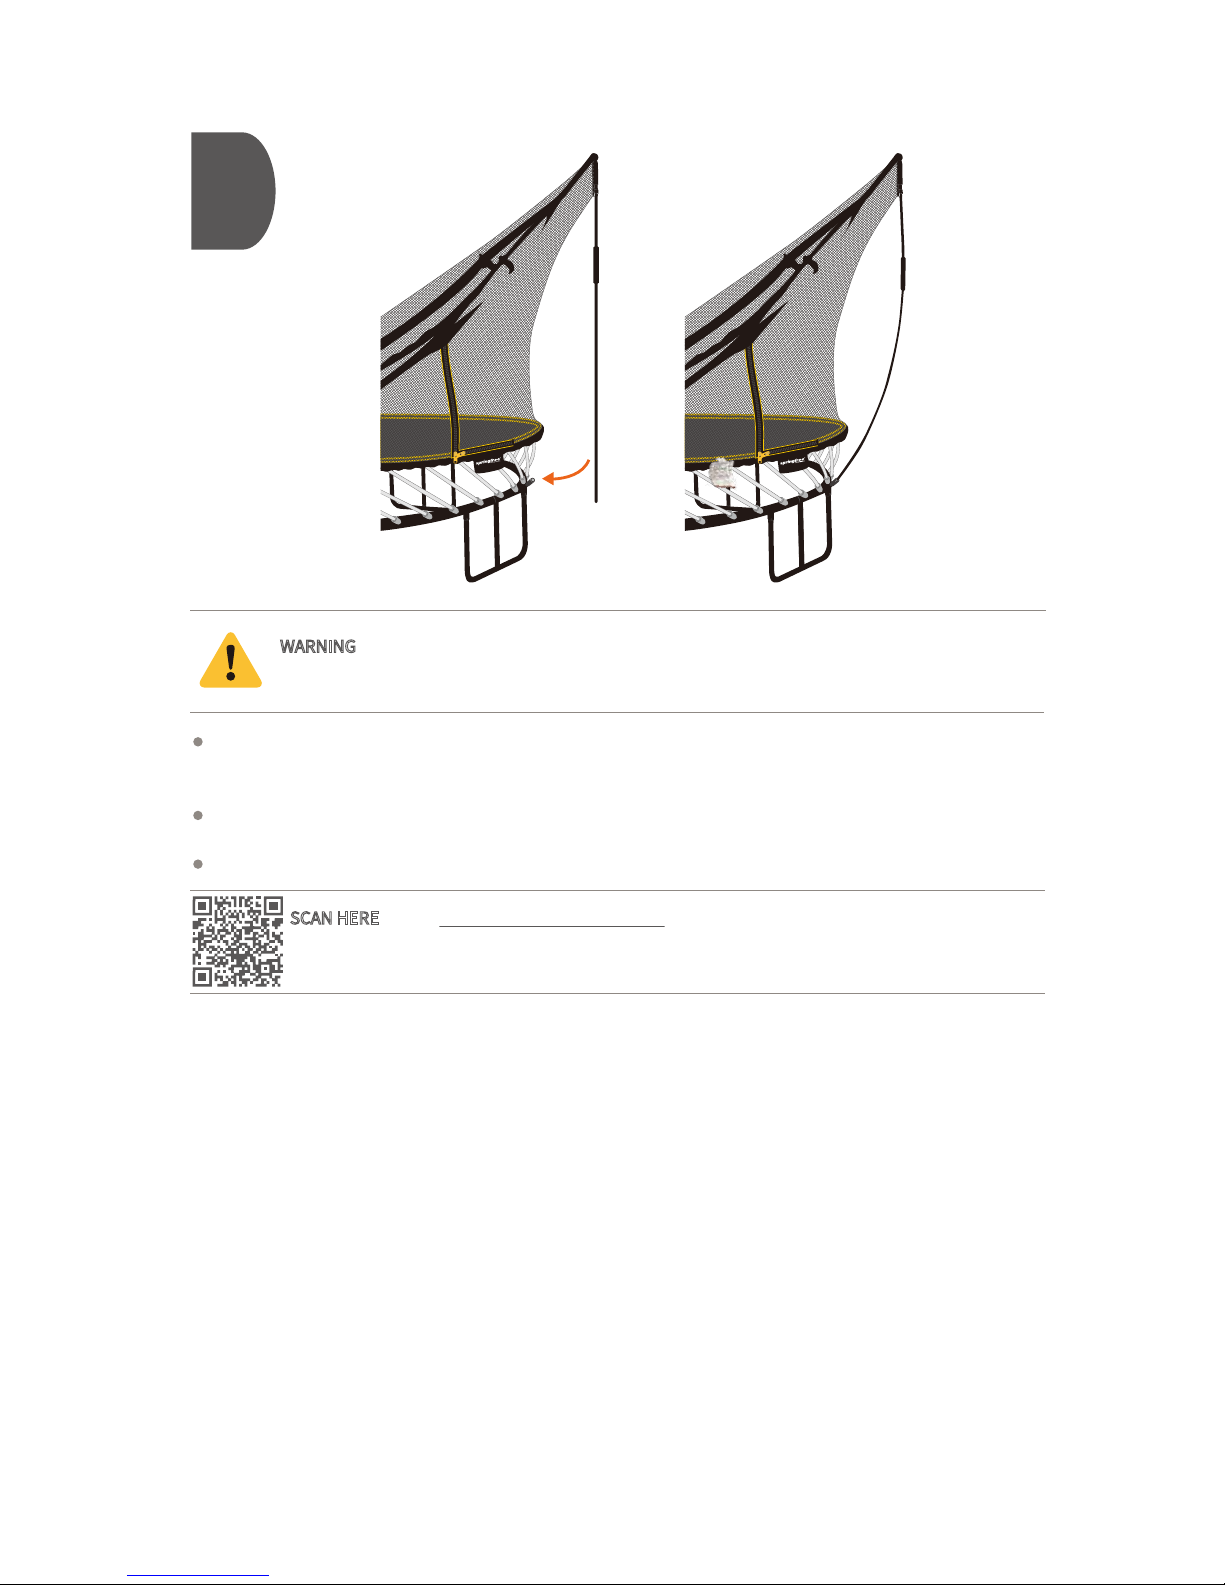
To install the net, raise the black net rods and carefully flex the bottom of the rods into the corresponding
net rod socket on the trampoline frame. Take care to completely insert the net rod into the socket. You will
hear a click when the net rod is fully seated.
For increased stability, your trampoline comes with sandbags. Fill these with sand and place over the
trampoline legs as required.
Congratulations! You have successfully installed your trampoline. Happy bouncing!
WARNING
- Never attempt to remove a black net rod from its net rod pocket or disengage (unlock)
the rod sleeve while the black net rod is under tension.
10
WANT TO JUMP?DO IT SAFE!ONE AT A TIME.
ENVIE DE SAUTER? FAITES-LE EN TOUTE SÉCURITÉ!UNE À LA FOIS.
WANT TO JUMP?DO IT SAFE!ONE AT A TIME.
ENVIE DE SAUTER? FAITES-LE EN TOUTE SÉCURITÉ!UNE À LA FOIS.
Page 16
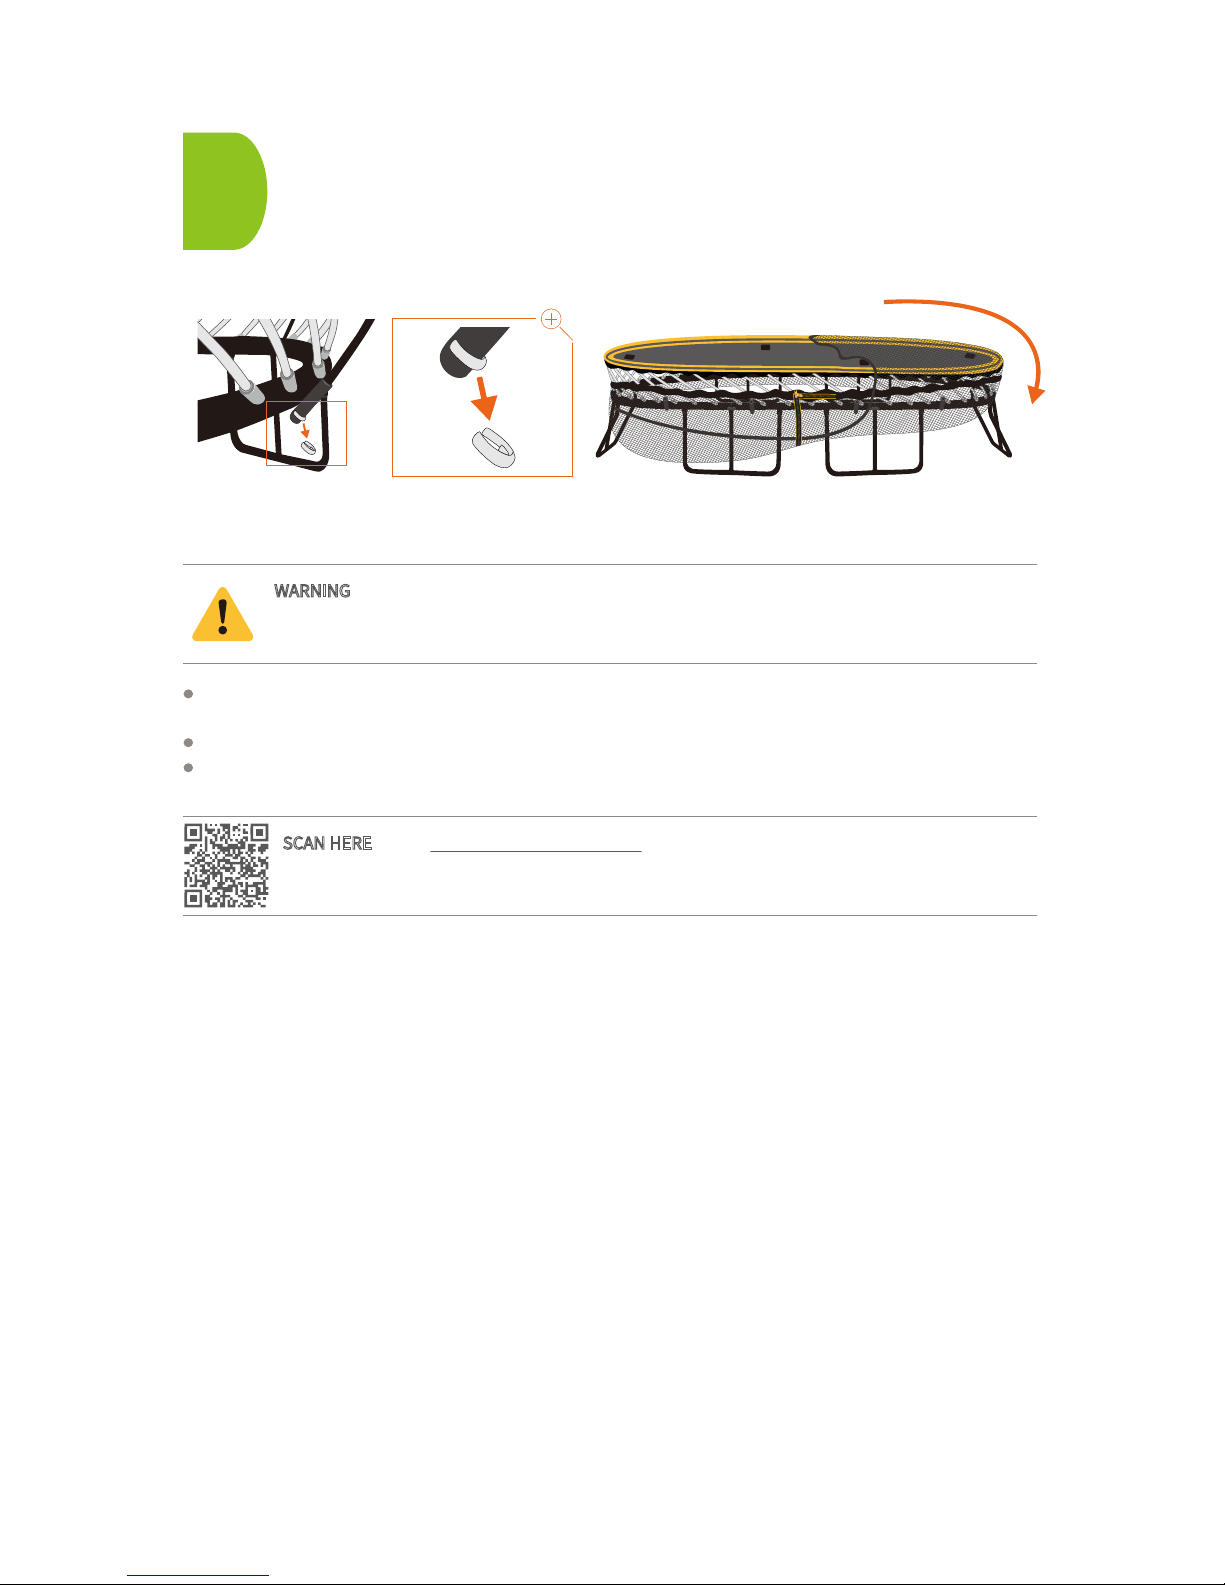
WARNING - Never remove a black net rod from its net rod pocket or disengage (unlock) the rod
sleeve while the black net rod is under tension. First, remove the net rod from the net rod socket
on the frame. Always ensure a solid grip when handling and do not stand directly in front of the rods.
Outside Person: Remove the white c-clips located on the net rod sockets. Li the bottom end of the black
net rods out of the net rod sockets and lower the net.
Outside Person: Remove the black net rods from the net rod pockets.
Outside Person: Starting at a corner, carefully pull the top edge of the net down over the edge of the mat.
Continue around the trampoline until the net is sitting at the bottom of the mat rods.
SCAN HERE
or visit http://springfr.ee/disassem for a helpful disassembly demonstration
video.
Disassembly
1
Page 17
2a
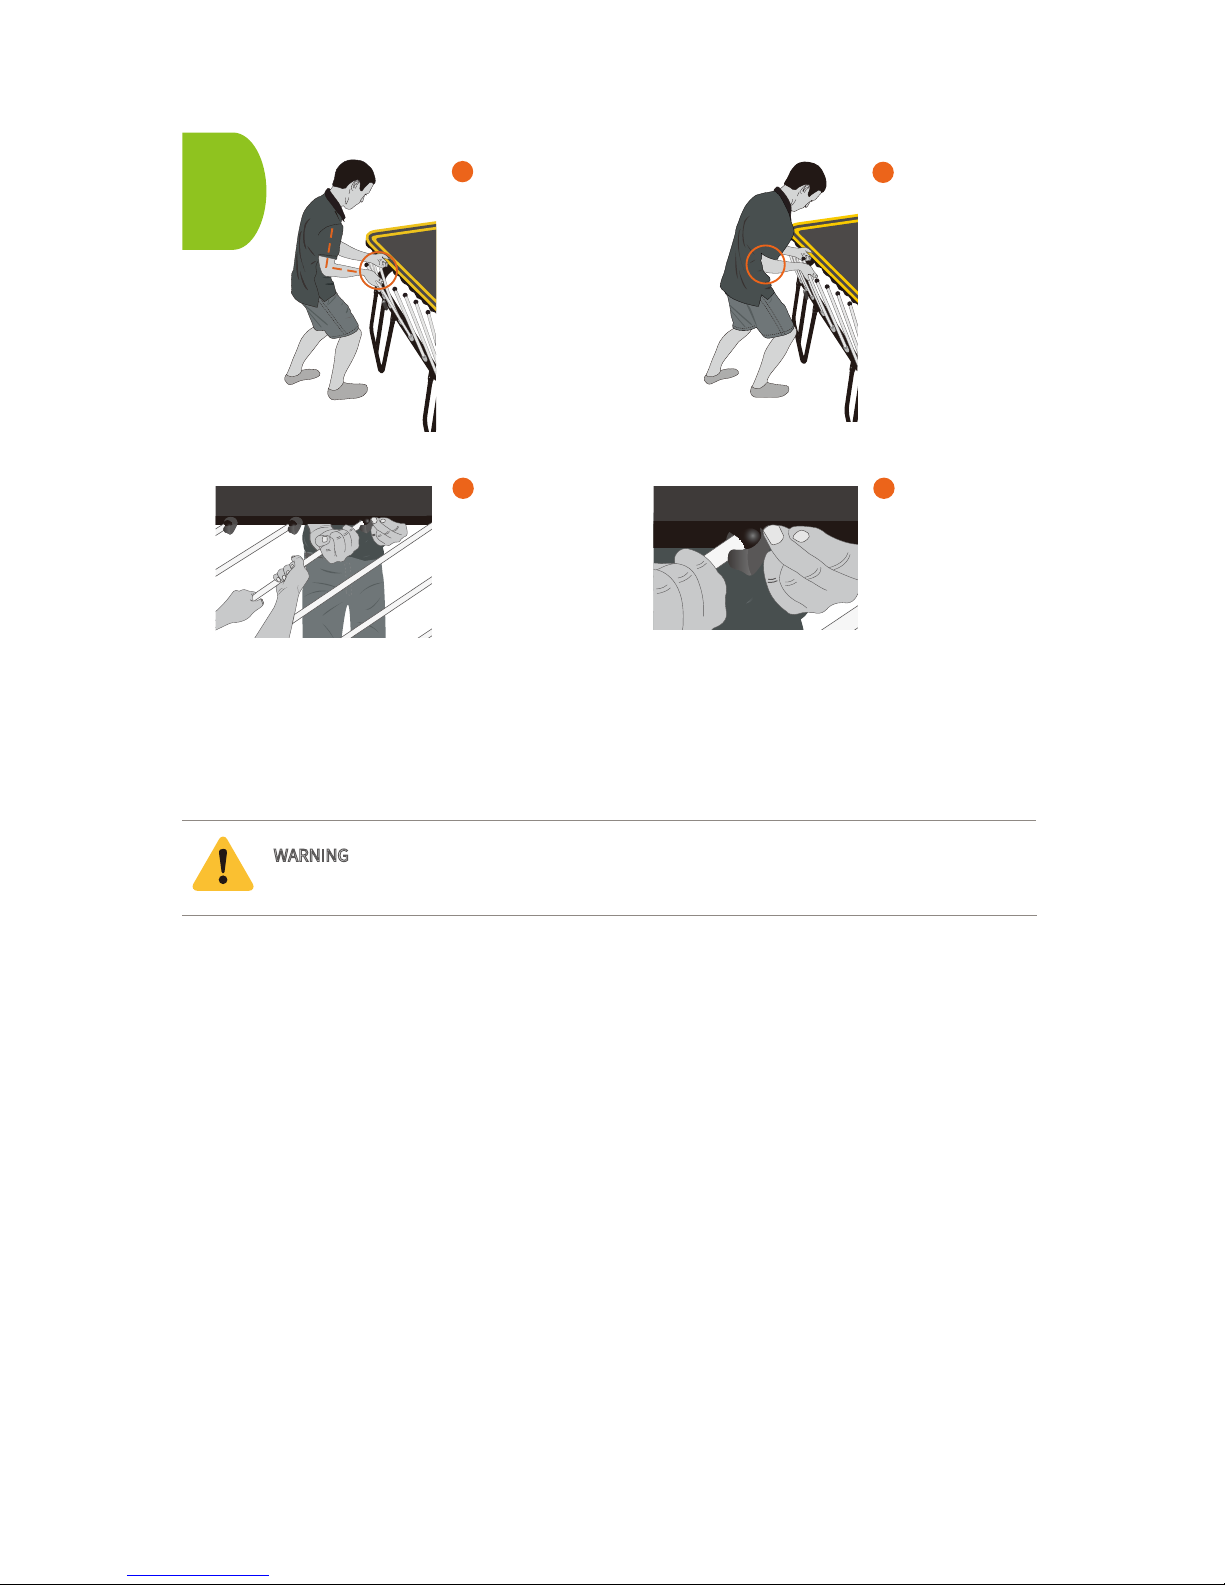
Outside Person:
Hold the white mat
rod with your palm
facing up and bend
your arm at a right
angle.
1
Outside Person:
Stand with one leg
forward and bend
your knees. Push
your elbow into
your hip.
2
Inside Person:
Take hold of the rod
with both hands.
3
Inside and
Outside Person:
Ensure the outside
person's hands are
positioned as
shown. Check that
their le hand is
tight against the
corner of the mat
rod holder but not
obstructing the
opening.
4
WARNING - Treat any loaded rod with caution until you are sure it is properly installed or
uninstalled. Keep your face well away from any loaded rod.
Page 18
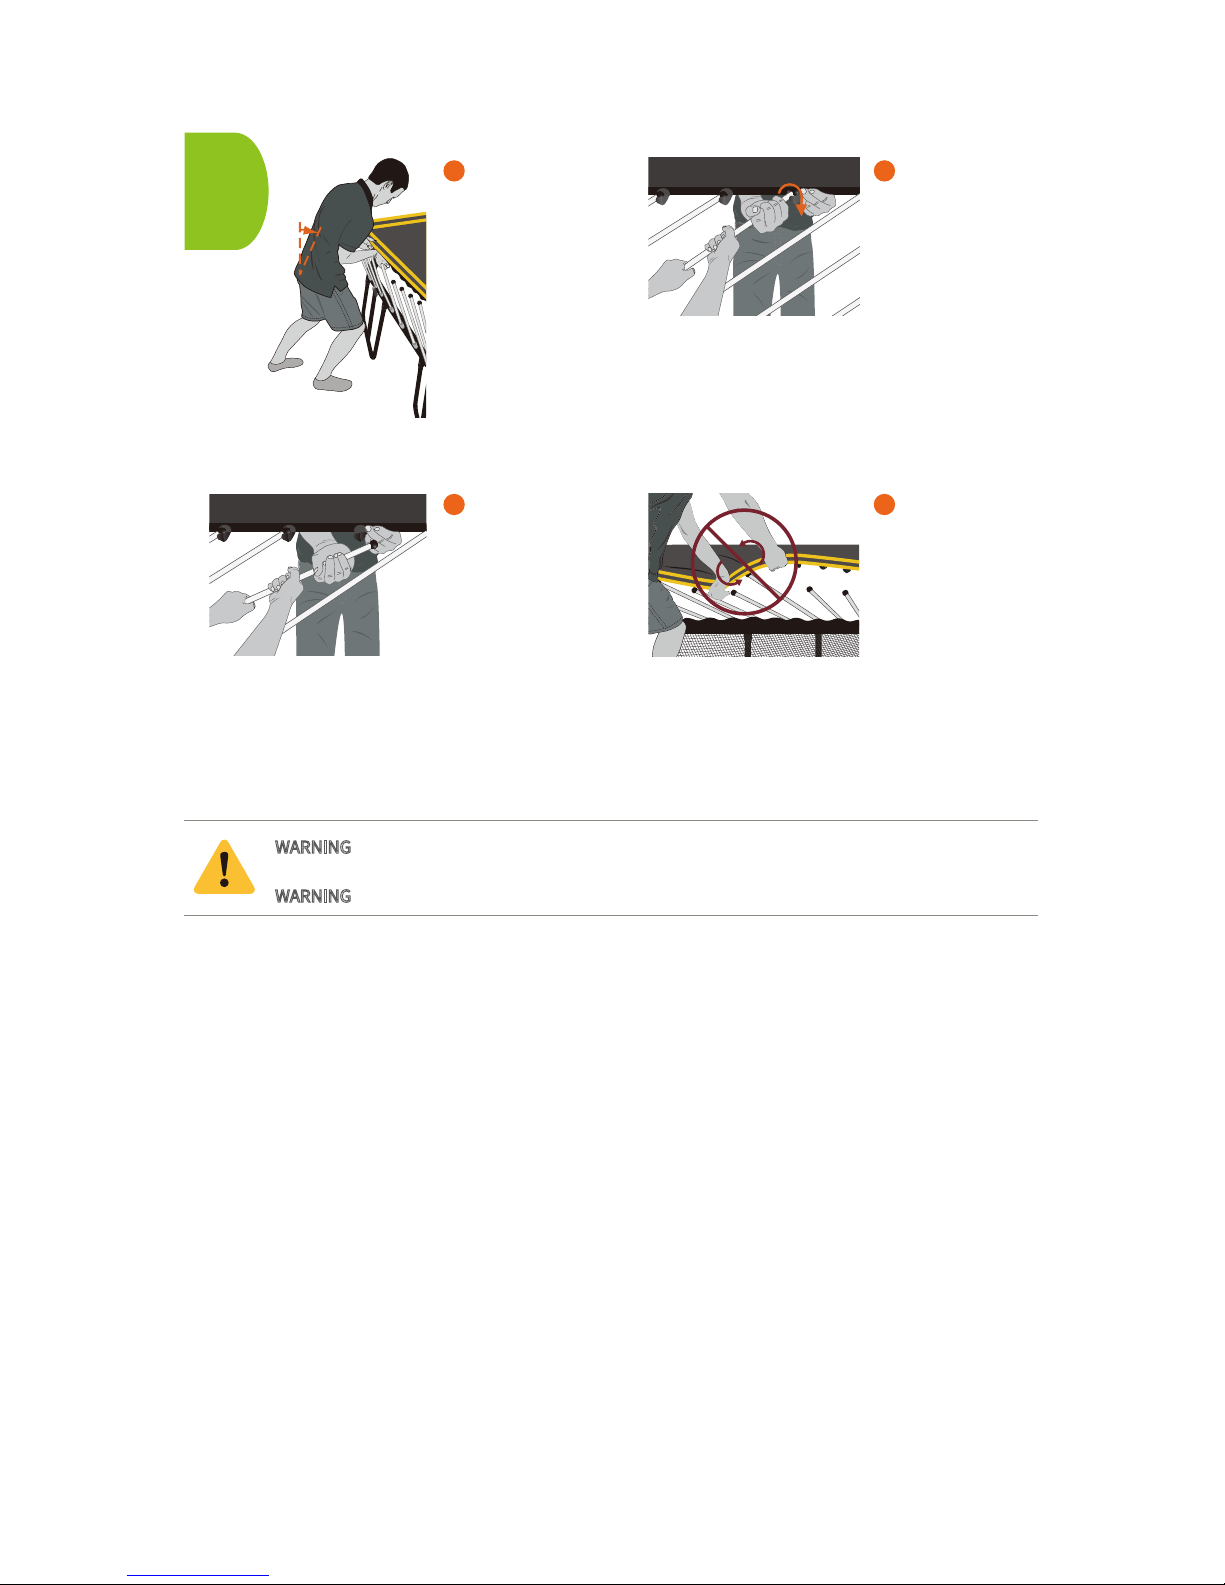
2b
WARNING - Treat any loaded rod with caution until you are sure it is properly installed or
uninstalled. Keep your face well away from any loaded rod.
WARNING - Both people must maintain a steady grip on the rod until it is in its resting position.
Outside Person:
Push forward,
rocking from your
heels to the balls of
your feet, using the
weight of your body
to push the white
mat rod over the
back edge of the mat
rod holder. Keep the
mat edge horizontal
with your other hand.
5
Inside Person:
Once the ball comes
to the back edge of
the mat rod holder,
pull the white mat
rod down and out.
Sometimes a
forceful pull is
needed to dislodge
the ball from the
mat rod holder.
6
Inside and Outside
Person: Lower the
white mat rod and
carefully ease it to a
resting position.
7
Outside Person:
When you remove a
rod from the mat, do
not twist or rotate
the mat edge as
shown. This could
cause serious injury
or damage the
trampoline.
8
Page 19
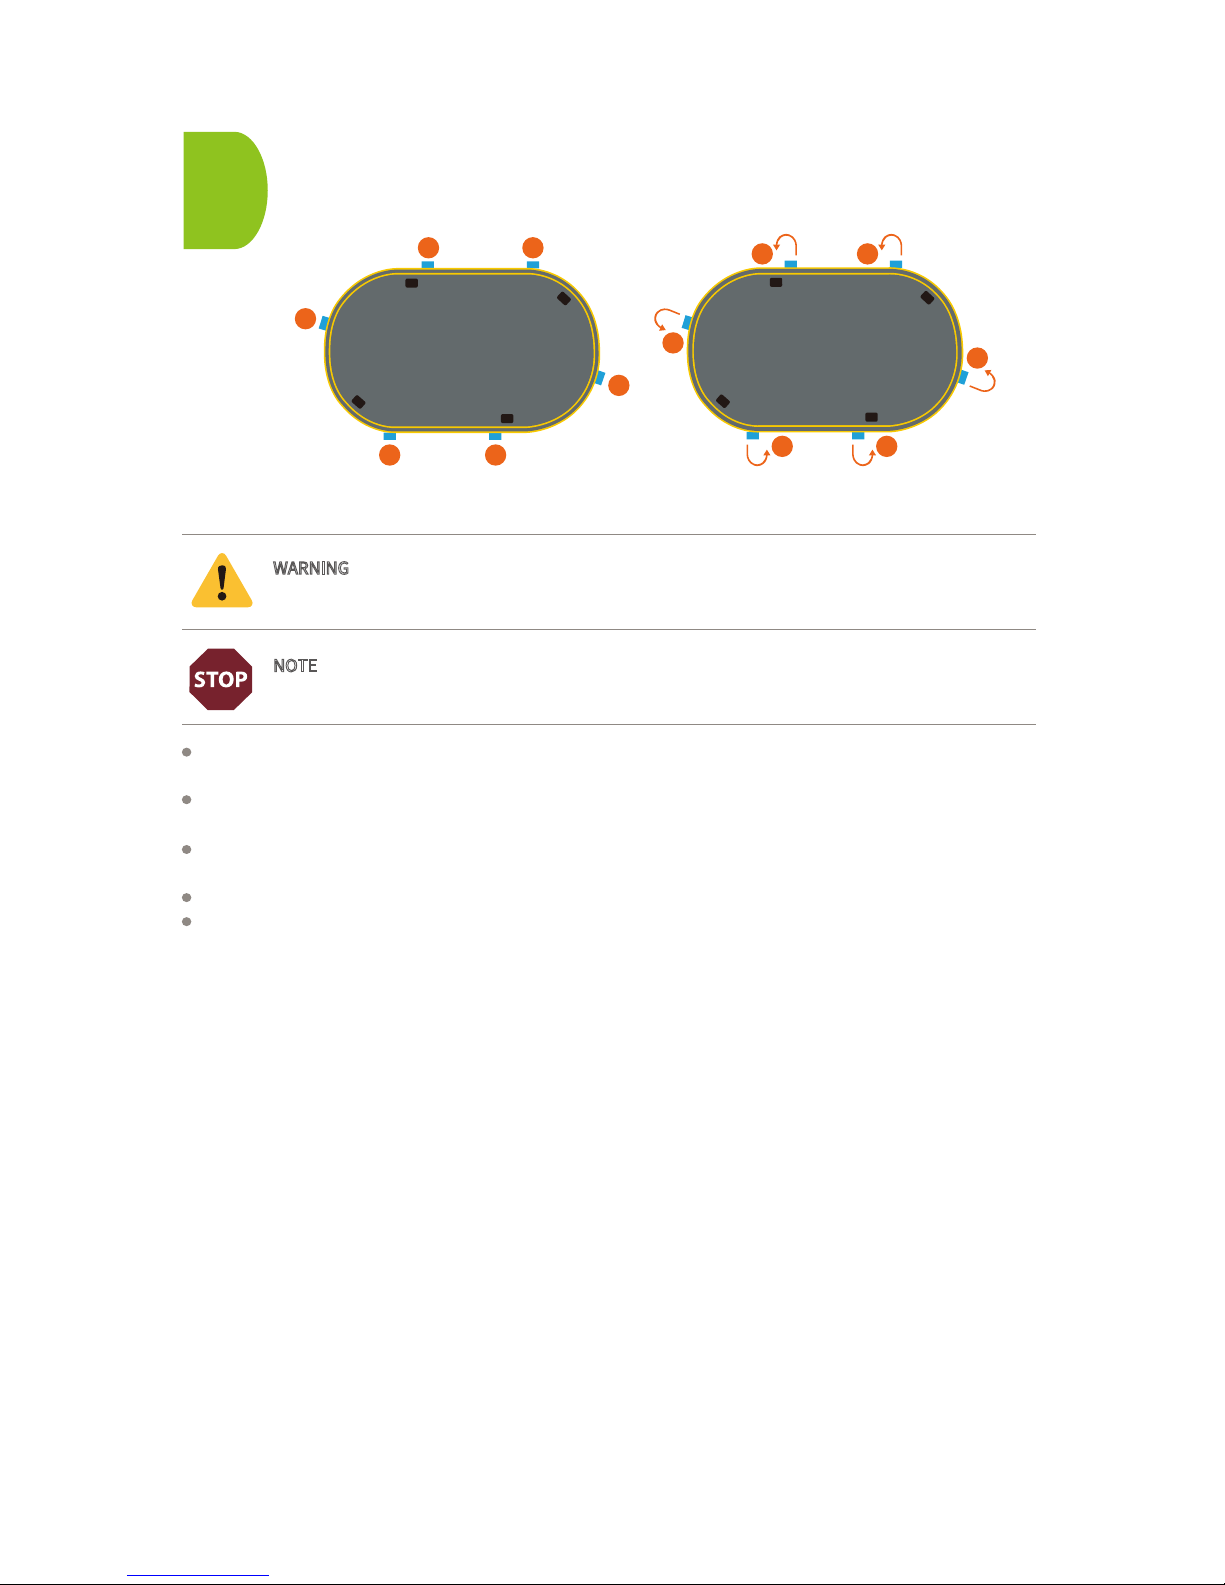
3
WARNING - Treat any loaded rod with caution until you are sure it is properly installed or
uninstalled. Keep your face well away from any loaded rod.
NOTE
- Following the sequence shown spreads the tension evenly across the mat. If you do not
follow this sequence, it will be very diicult to remove the mat.
Following the sequence show in Image A and moving in a counter-clockwise direction, uninstall ONE
white mat rod at each blue tag.
Then following the sequence shown in Image B and still moving in a counter-clockwise direction,
uninstall ONE additional rod next to each of the already uninstalled in figure A.
Continue circling the trampoline in a counter-clockwise direction several more times following this
sequence until all the white mat rods have been uninstalled.
Remove the white mat rods from the frame and then pack the net, mat and rods.
Disassemble the frame in the reverse order to which it was assembled.
1
2
6
4
5
3
A
TOP VIEW
B
11
10 9
8
712
TOP VIEW
Page 20
Springfree is the world’s first and only Smart Trampoline. The four black sensor top plates
on your mat mean that your trampoline is digitally enabled to create an interactive Smart
Play experience when you purchase the tgoma game system. To find out how you can add
tgoma to your Springfree, visit us online at www.springfree.com.
If you purchased tgoma® for your trampoline, scan here or visit http://springfr.ee/s2tgoma-install for a helpful installation instructions. Alternatively, follow the instructions
in your tgoma manual.
 Loading...