

Page 1
Installation Manual for Springfree O77 Trampoline
The information in this document is subject to change without notice.
© Copyright tgoma NZ Ltd., 2016. All rights reserved.
729702
Your Product Serial Number is:
Installing the tgoma can be challenging if you
don’t carefully follow these instructions. To
make it easier, we have demonstration
videos that will guide you through each step.
Visit www.tgoma.com/support to get started.
Page 2
2
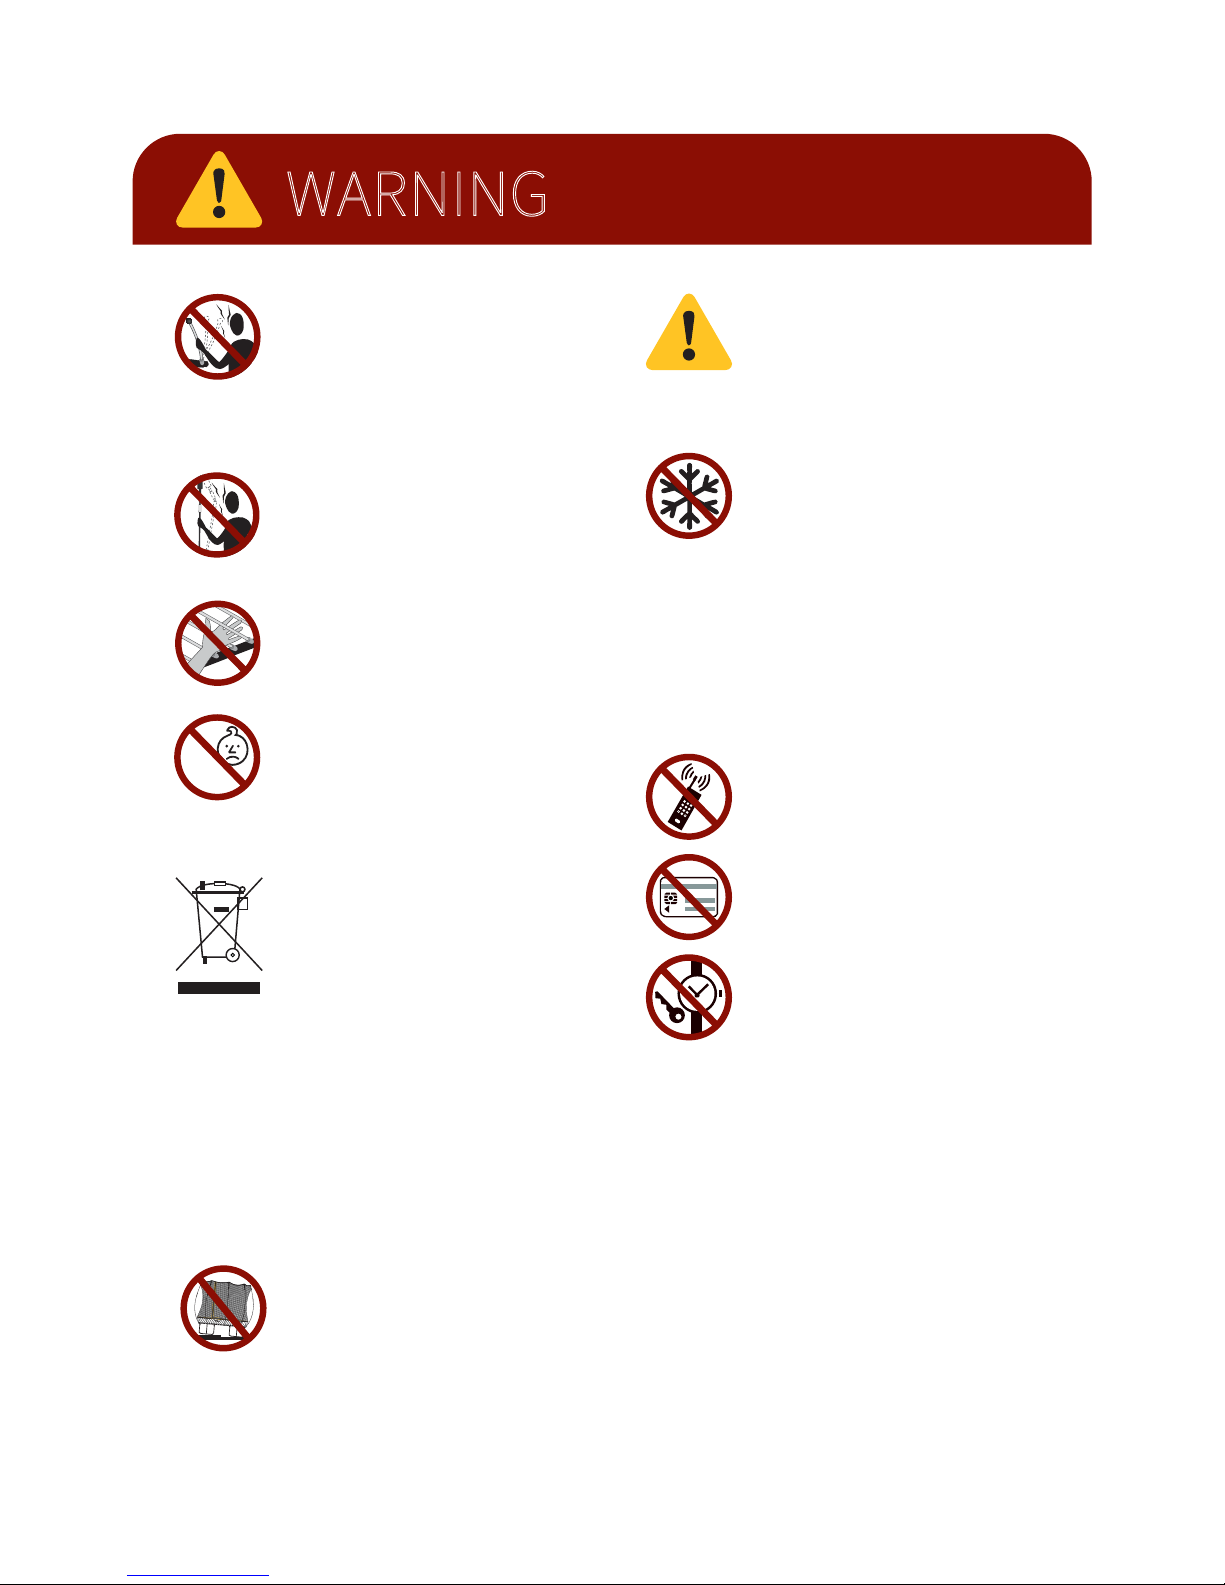
Treat any loaded rod with caution
until you are sure it is properly
installed or uninstalled. Keep face
clear of loaded rods. An improperly
installed rod could release and cause
facial injury or blindness.
Never attempt to remove a black net
rod from its net pocket or disengage
(unlock) the rod sleeve while the black
net rod is under tension.
In regions where there is an accumulation of snow and ice and/or temperatures drop below 14 degrees Fahrenheit
(-10 degrees Celsius), we recommend
the removal of the controller from the
trampoline. The cables do not need to
be removed, however, please ensure
that the plugs at the end of the cables
are tightly sealed in plastic (e.g. inside a
plastic bag) and positioned in such a
way that no moisture can enter.
Do not hold onto, or place fingers
between the rods while someone is
jumping on the trampoline.
WARNING
Please read the Installation Manual before using
your tgoma® game system and keep it for future
reference.
This game system uses sensors to detect
your position on the trampoline mat.
They read most accurately when the
trampoline is installed on a flat, level
surface. If your trampoline is installed on
a surface that is more than 100mm out of
level from one side of the trampoline to
another, we recommend that you level
the trampoline.
The controller and battery pack attach
with powerful magnets. Keep away
from electronic devices and magnetic
strips to avoid damaging eects.
This game system should be disposed
of separately from household waste
and according to local laws. When
disposing of this equipment, please
take it to a designated collection point.
Incorrect disposal of items can be
hazardous to the environment. Many
items can be recycled. Follow all local
regulations for any disposal. Packaging
elements of this product have been
labelled to assist your choice of
recycling options. In particular, always
dispose of the (user supplied) batteries
in full accord with the battery
manufacturer’s instructions.
Assembly and disassembly of the
trampoline in any way other than what
is set out in these instructions could
cause serious injury or damage the
trampoline.
The trampoline and tgoma game
system are not intended for children
under 6 years of age as certain parts
could represent a choking or
entrapment hazard.
0-6
Page 3
Please read the following precautions carefully
before you assemble and use the trampoline,
enclosure, and tgoma game system.
Check all trampoline components for wear or
damage prior to reassembly and use.
Keep small children at least 25 (7.5 m) away while
assembling or disassembling the trampoline; they
could be injured by improperly assembled rods
releasing and ejecting from the frame.
Be aware that when loaded, the rods can spring back
and may cause injury.
Treat any loaded rod with caution until you are sure
it is properly uninstalled. In particular, keep your face
well clear of the rods during assembly or disassembly. An improperly installed rod could release and
cause facial injury or blindness.
No somersaults or flips. Landing on the head or neck
can cause serious injury, paralysis, or death, even
when landing in the middle of the bed.
No more than one person at a time. Multiple jumpers
increase the chances of loss of control and collision
and can result in serious head, neck, back, leg, arm
or other injuries.
Use only with mature, knowledgeable supervision.
Enforce all safety rules.
Do not exceed the maximum user weight.
The trampoline and tgoma game system is not
intended for children under 6 years of age as
entrapment hazards may result.
The cable attachment system utilizes small plastic
cable clips. When not installed, keep out of reach of
small children as they could represent a choking
hazard.
The tgoma game system contains small magnets.
Swallowed magnets can stick to intestines causing
serious injury or death. Seek immediate medical
attention if magnets are swallowed or inhaled.
Ensure adequate supervision of children while
inserting and removing the tablet from the tablet
clamp. tgoma takes no responsibility for damages to
portable electronic devices resulting from incorrect
use or negligence.
Trampolines and portable electronic devices were
intended for separate purposes. Take extra precautions while jumping on the trampoline with a tgoma
game system installed as it may interfere with or
cause the jumper to fall awkwardly.
Do not use the mat/bed when it is wet. Do not use
the tgoma game system in rainy or wet conditions.
The tablet holder is water resistant, however, it is not
designed to provide a completely waterproof shade
for the tablet. Do not leave your portable electronic
device outside in wet weather.
During play with the tgoma game system, keep
players face away from the tablet holder. Serious
injury can occur if teeth/face come in contact with
the tablet or tablet holder.
When not using the tgoma game system, remove the
tablet holder from the enclosure as it represents a
potential impact point.
Do not use the trampoline as a springboard to other
objects. Use the trampoline only for trampoline style
bouncing.
Ensure the enclosure system is attached and in good
condition before use.
Inspect trampoline enclosure and tgoma game
system prior to each use and replace any worn or
damaged parts. Take extra precaution to ensure that
the cable ties that hold the sensor top plates are not
damaged. Replace any that appear worn or
damaged. The sensor top plates contain small
prongs that could puncture the skin if they disengage
from the sensor mount as a result of a worn or
damaged cable tie.
Enclosure systems are designed to prevent users
falling o the trampoline. Do not allow users to
intentionally bounce towards or o the barrier, as
this can unbalance the trampoline and continual
impact may damage the enclosure. Do not hang,
kick, cut or climb on the enclosure or tgoma game
system. Do not attempt to jump over the enclosure.
Wear comfortable clothing that won’t become
entangled in the trampoline’s components and
become a strangulation hazard. Do not wear jewelry
or drawstrings/cords that can catch on the trampoline or the tgoma game system and create a strangulation hazard. Remove shoes as they may damage
the bed and increase the risk of injury.
Avoid jumping too high or for too long. Always
control your jump.
Please read and ensure your trampoline complies to
the Installation and Placement instructions in your
trampoline User Guide.
Only for domestic use.
tgoma game system is intended for indoor and
outdoor usage.
A.
B.
C.
D.
E.
F.
G.
H.
I.
J.
K.
L.
M.
N.
O.
P.
Q.
R.
S.
T.
U.
V.
W.
X.
Y.
Z.
WARNING
Please read the Installation Manual before using
your tgoma® game system and keep it for future
reference.
3
Page 4
1
4
FA
C
B
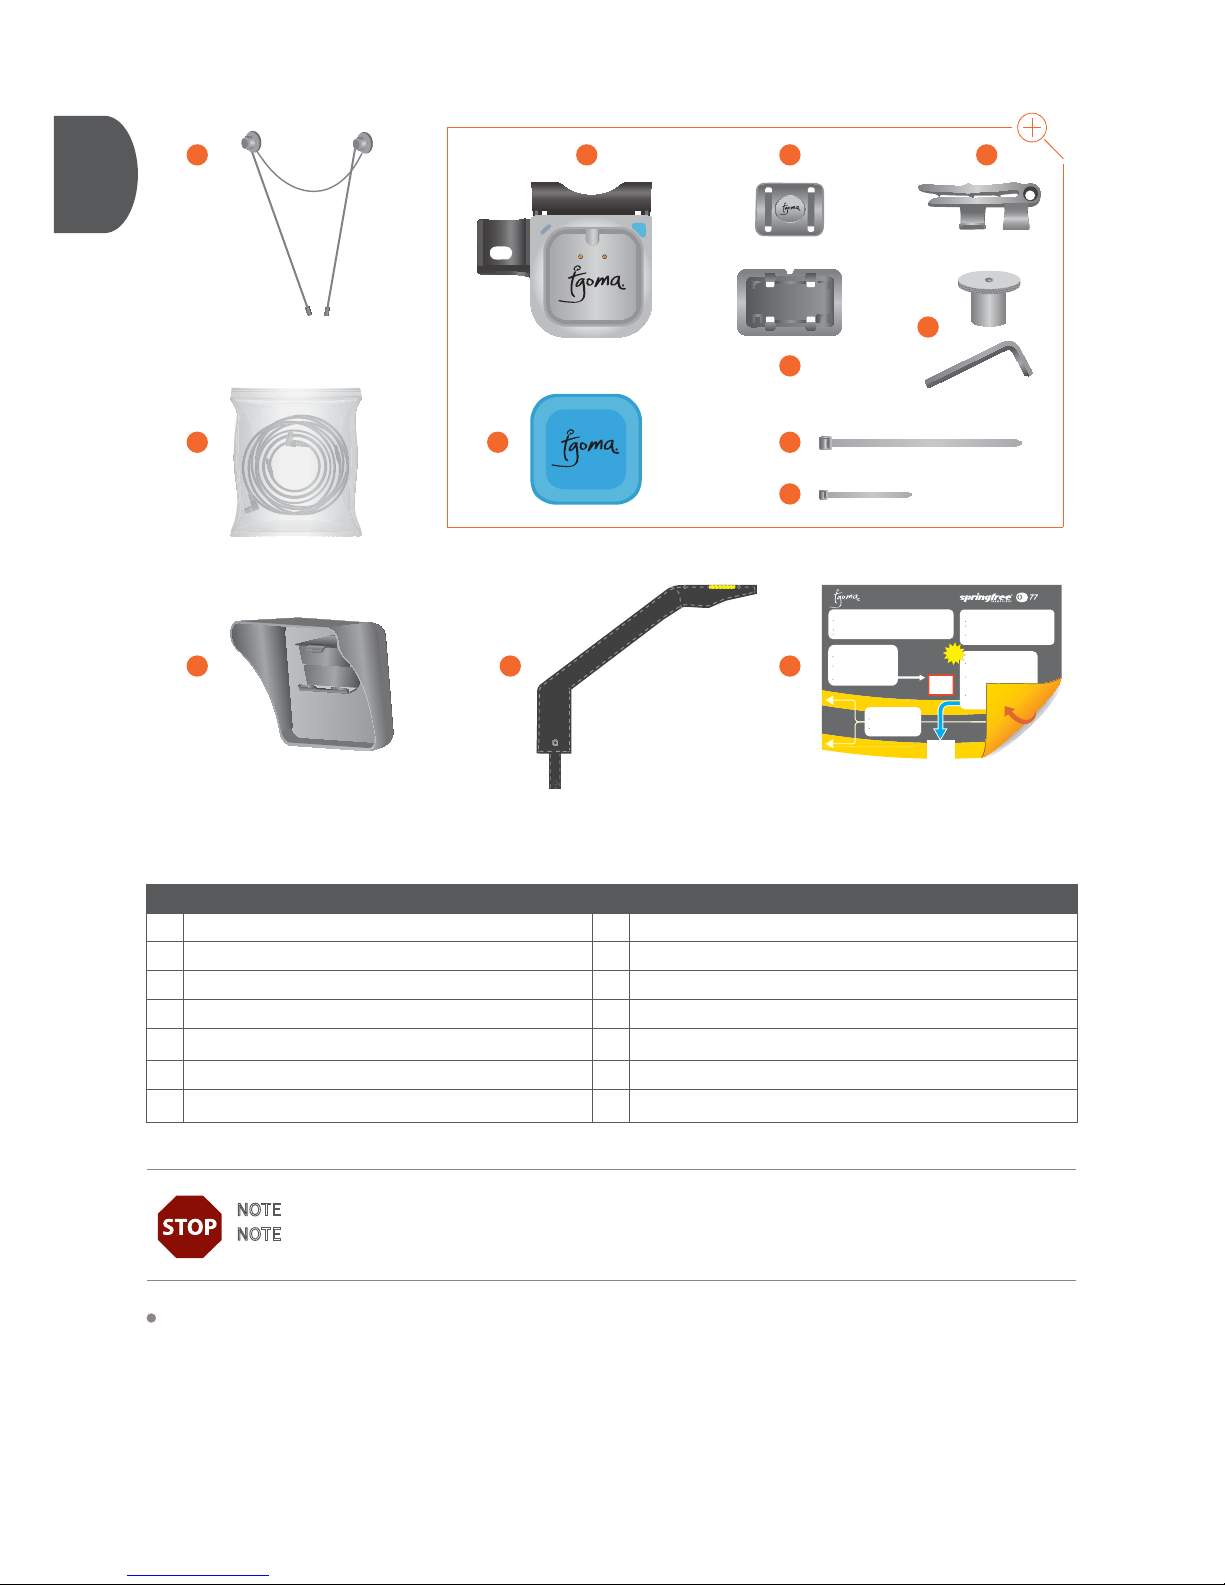
Layout all parts listed as shown.
Part Description
A
B
C
D
E
F
G
Tablet Holder Rods
Sensor Cables
Tablet Holder
Sensor Cable Tube
Locating Template
Controller
Battery Pack
1
2
1
1
1
1
1
Part Description
H
I
J
K
L
M
N
Sensor Top Plate
Sensor Mount
Cable Clips
Nut and Hex Key
Large Cable Ties
Small Cable Ties
Spare Small Cable Ties and Cable Clips
4
4
37
1
2
10
8+4
G
B
ED
L
M
J
K
NOTE - TWO people are required for assembly.
NOTE
- Installation typically takes ONE hour to complete.
H
I
LOCATING TEMPLATE
for
A
2: Outside Person
Align yellow banding on the
mat with these yellow stripes.
Re-check blue arrow alignment.
3: Outside Person
Place a sensor top plate in this hole,
prongs down.
Firmly push prongs through the gaps in
the mat material until the sensor top
plate is at on the mat.
Remove this template.
4: Inside Person
While the outside person holds the sensor top plate rm, position a sensor
mount under the mat, at side up.
Align the sensor mount holes with the sensor top plate prongs.
Press the two parts rmly together.
5: Inside and Outside Person
Repeat steps 1 - 4 at position 3.
Upon completion, turn this template over to position the
remaining two sensors.
The tgoma game system will not work unless you install
position two and four using side B of this template.
ST
ART
HERE
1: Outside Person
Starting at position 1 identied in the manual,
count three rods to the LEFT
(not counting the rod under the tag).
Feel for the raised bump on top of the yellow
banding on the mat where the third rod
connects to the mat rod holder under the
mat.
Place this template at on the mat and align
the blue arrow with the center of the raised
bump.
e ma
at rod hholder un
pl
te
e at
at on
at on
t onaton
the mat and
the mat an
e mat and align
w
ithhthe
e cecenter of the r
aised
ised
Page 5
5
2
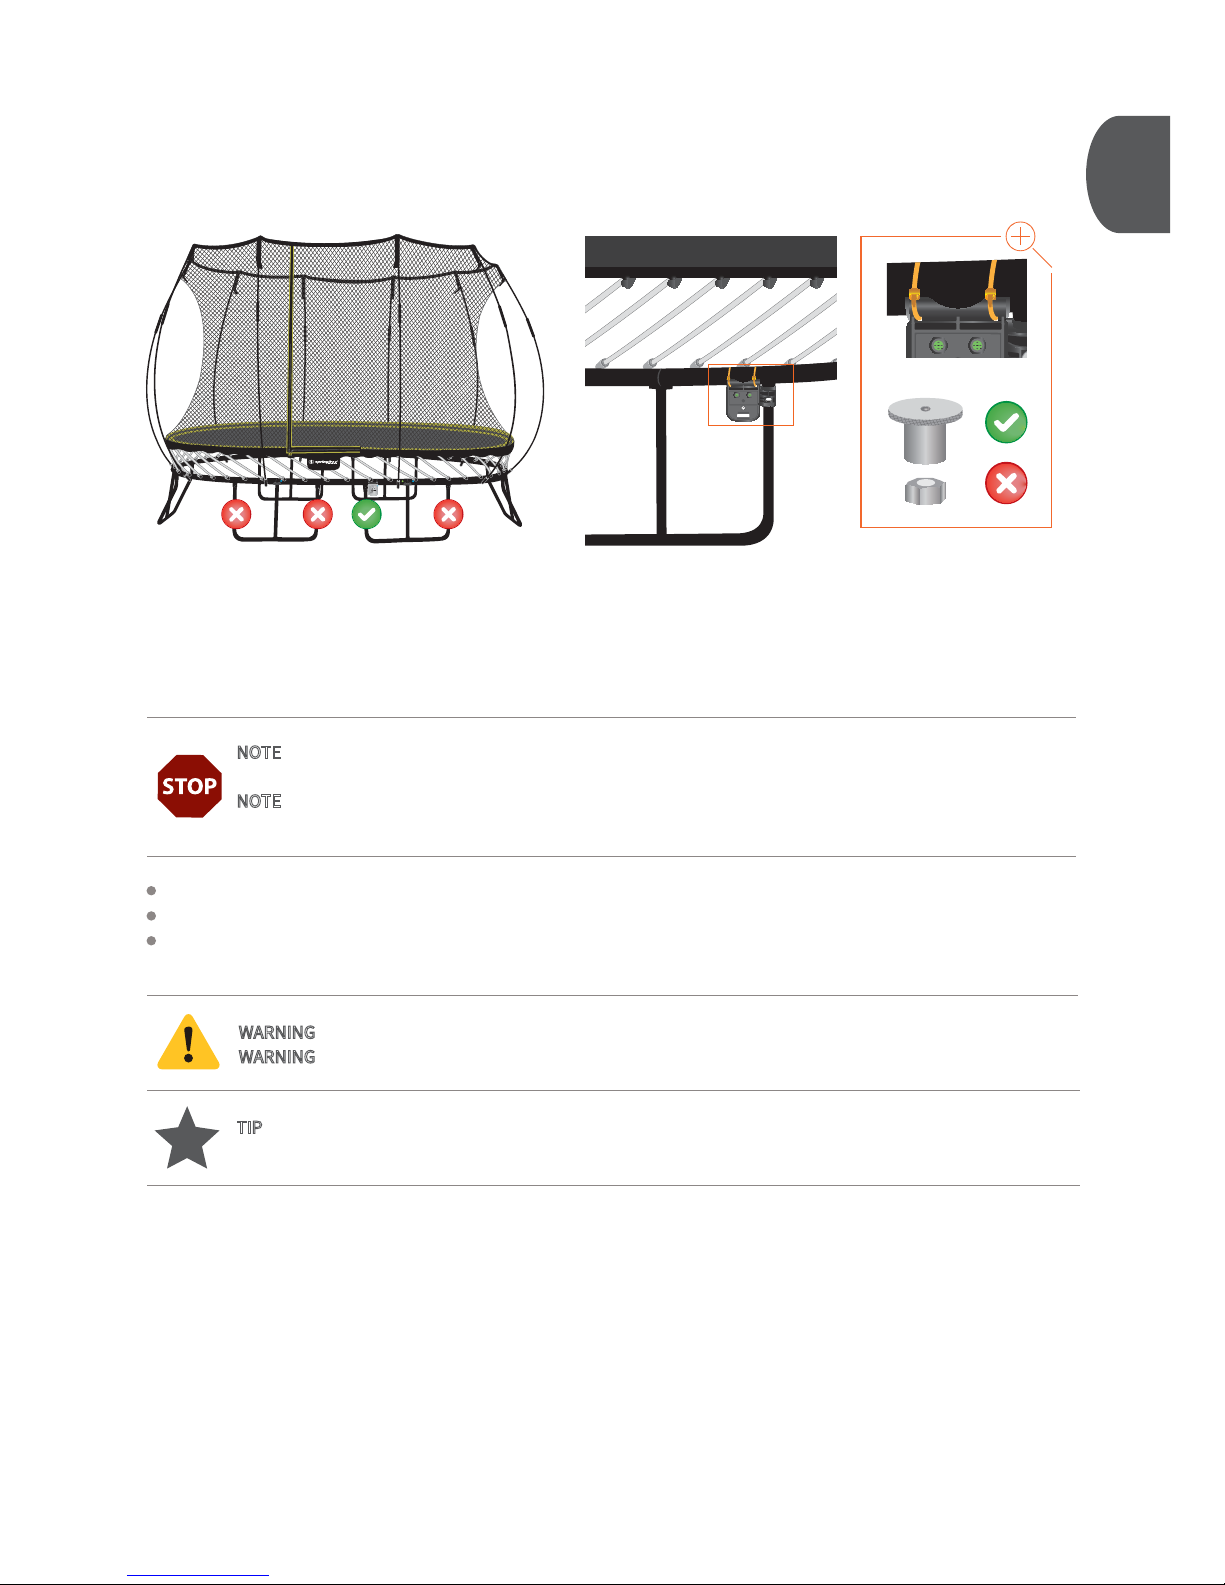
Inside Person: Locate the nut on the back of the leg shown above. Remove the nut but DO NOT remove the bolt.
Inside Person: Position the controller as shown and fasten with the new nut provided. Tighten with the hex key.
Inside Person: Feed a large cable tie through each of the two holes and around the frame. Rotate the head of the
cable tie so that it is not visible from outside the trampoline, then fasten.
WARNING - Do not remove the bolt from the leg as this could cause serious injury.
WARNING
- Do not over tighten the nut. Do not use power driver, torque wrench, or drill.
NOTE - Have one person position themselves under the trampoline (hereaer known as the Inside
Person) while the other person works around the outside of the trampoline (Outside Person).
NOTE - Be sure to position the controller at the correct leg position, as indicated. If installed in the wrong
location, you will be unable to complete the following steps correctly.
INSIDE VIEWOUTSIDE VIEW
TIP
- Throughout this manual, certain images contain parts that have been colored orange. This is meant
to bring specific attention to a particular installation step and is not a representation of their actual color.
AB
Page 6
6
3
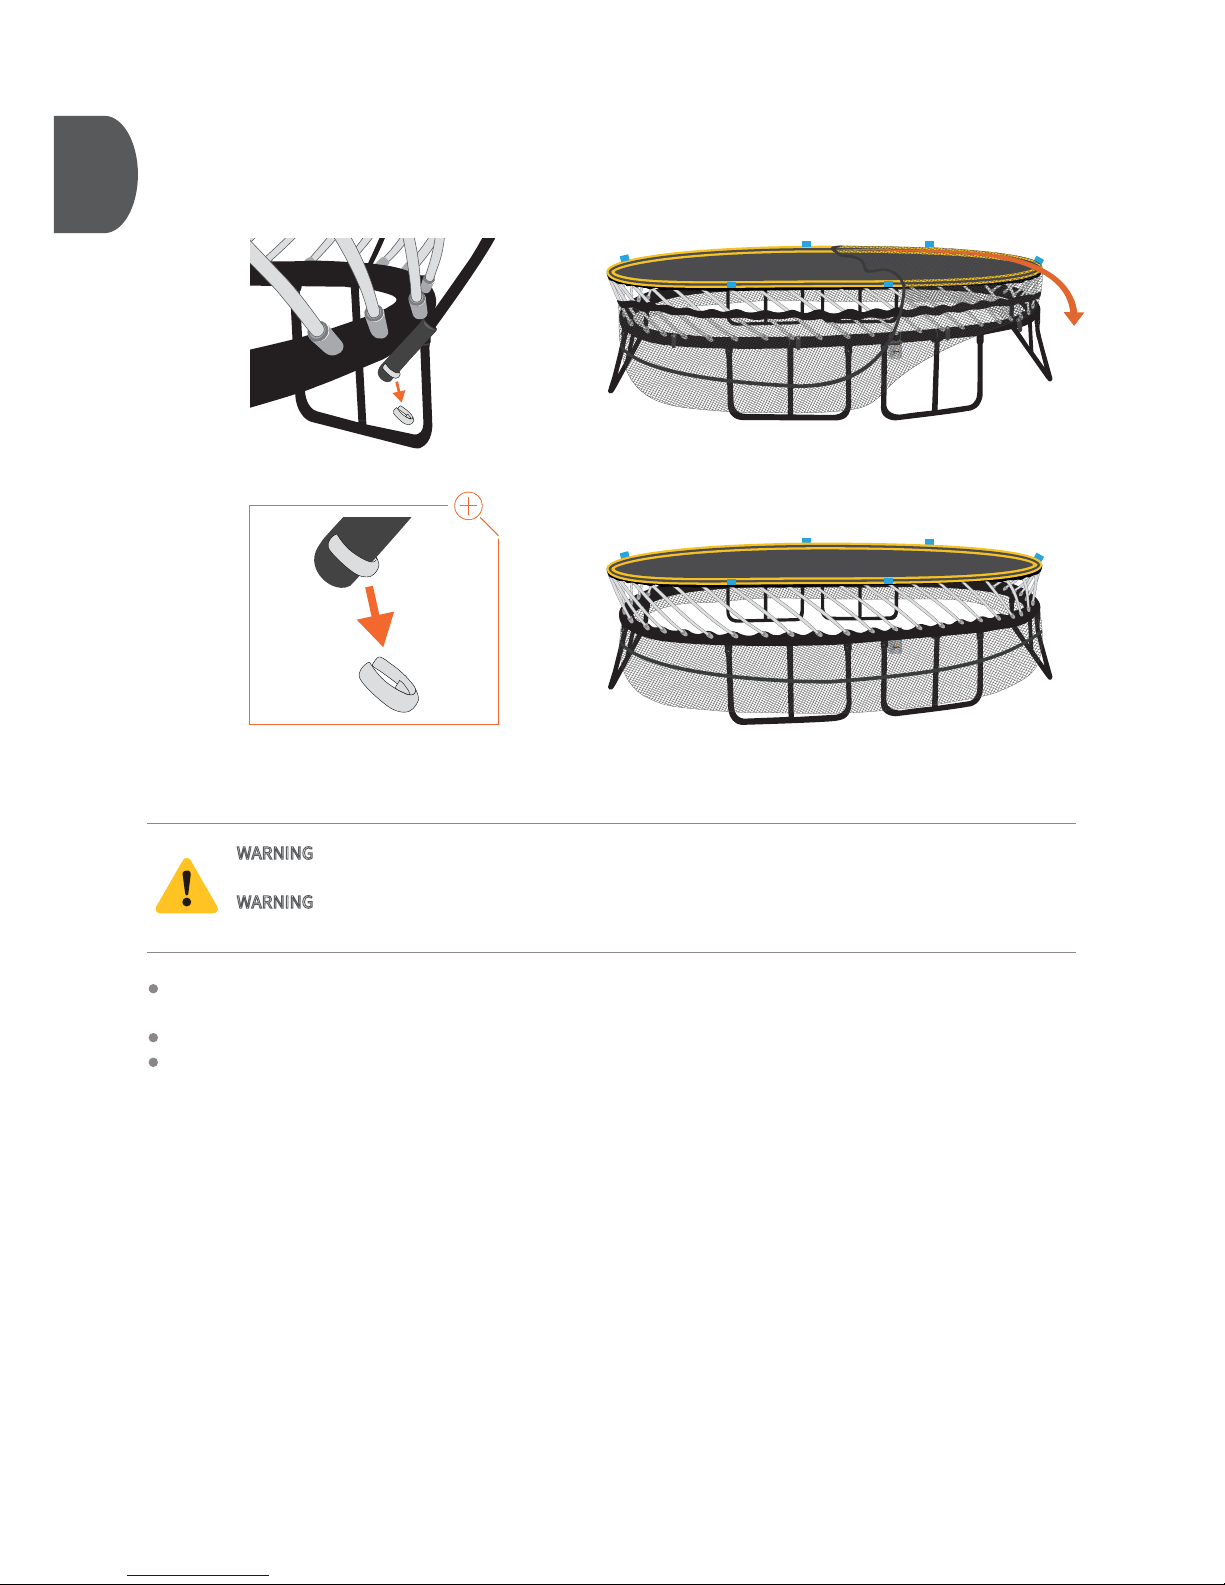
WARNING - Treat any loaded rod with caution until you are sure it is properly installed or uninstalled.
Keep your face well away from any loaded rod.
WARNING
- Do not use the trampoline unless it is completely assembled. Failure to follow these instructions
may cause rods to break or eject from the trampoline frame.
Outside Person: Remove the white c-clips located on the net rod sockets. Li the bottom end of the black net rods
out of the net rod sockets and lower the net.
Outside Person: Remove the black net rods from the net rod pockets.
Outside Person: Starting at a corner, carefully pull the top edge of the net down over the edge of the mat.
Continue around the trampoline until the net is sitting at the bottom of the mat rods.
OUTSIDE VIEW
Page 7
7
4
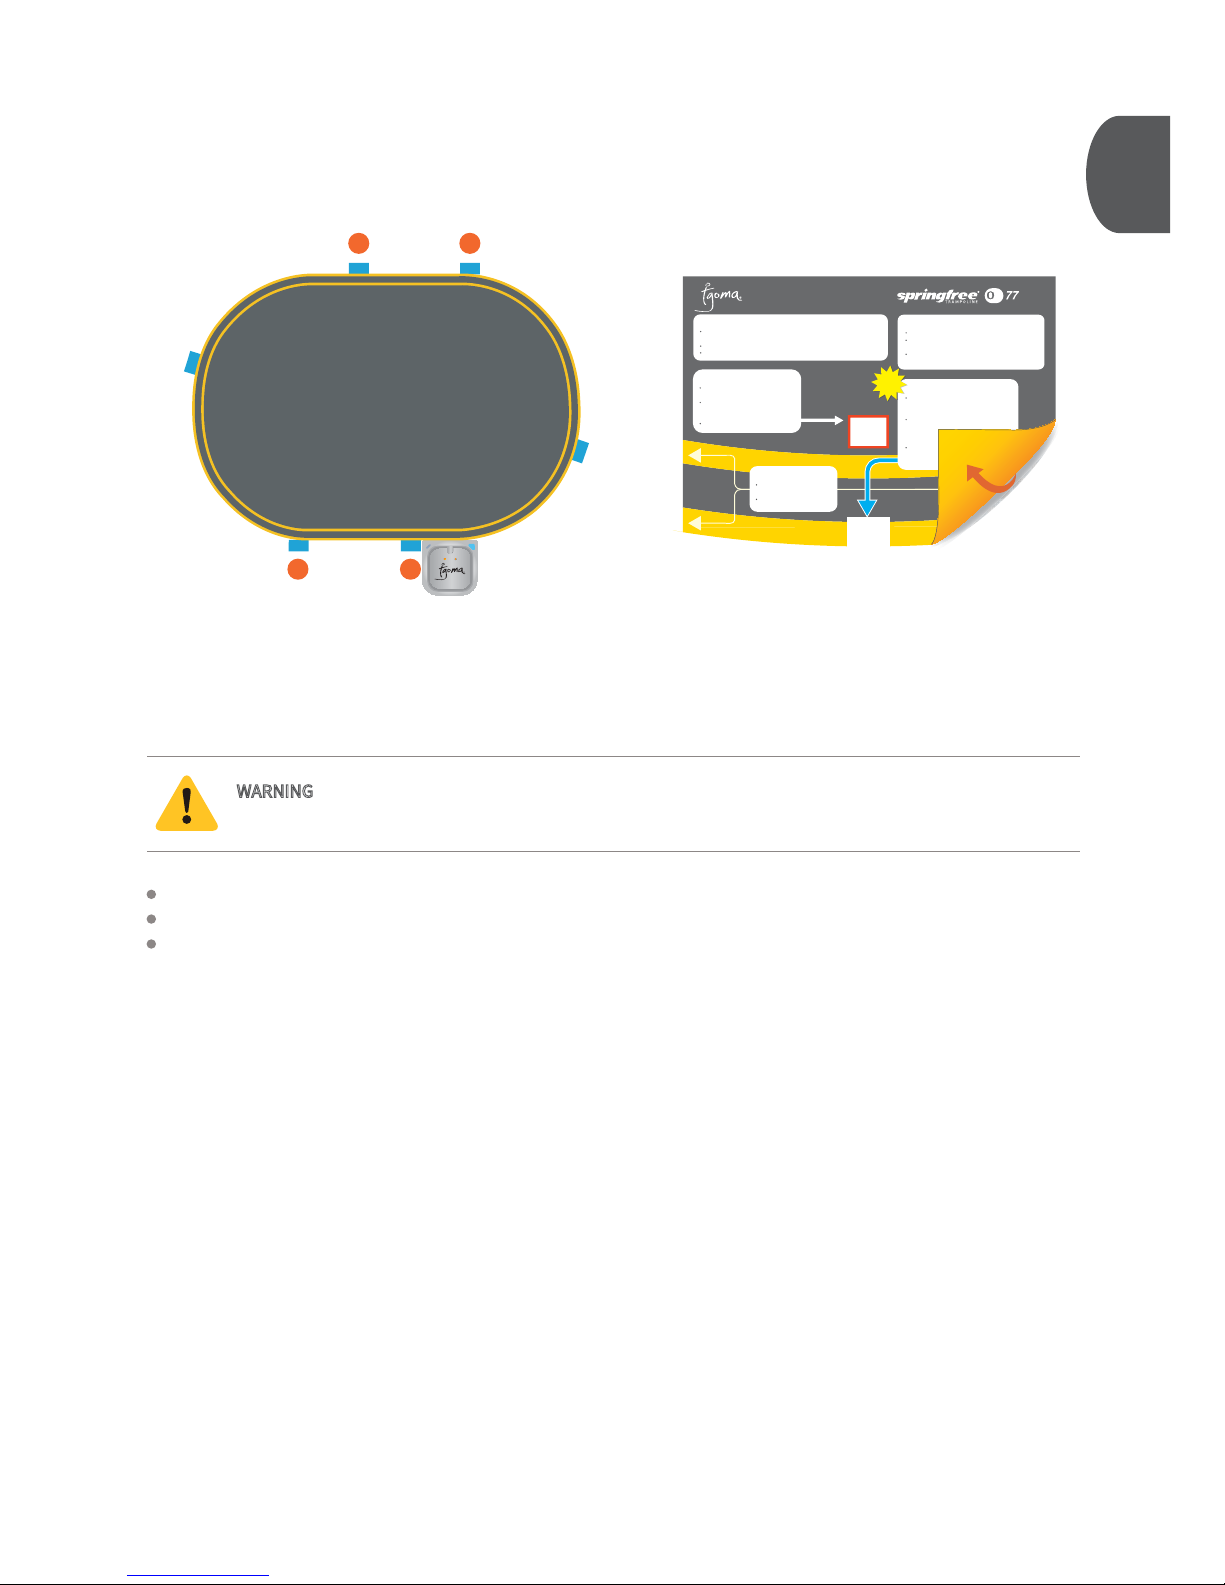
Outside Person: Locate the blue tags on the mat as shown.
Outside Person: Wipe the surface of the mat around the blue tags with a clean, dry cloth so that it is clear of debris.
Inside and Outside Person: Starting at the first blue tag position shown above, follow the steps on the locating
template to install the sensor mounts and top plates. Be sure to start on side A and find the “START HERE” icon for
the first step.
WARNING - Treat any loaded rod with caution until you are sure it is properly installed or uninstalled.
Keep your face well away from any loaded rod.
OUTSIDE VIEW
41
2 3
LOCATING TEMPLATE
for
A
2: Outside Person
Align yellow banding on the
mat with these yellow stripes.
Re-check blue arrow alignment.
3: Outside Person
Place a sensor top plate in this hole,
prongs down.
Firmly push prongs through the gaps in
the mat material until the sensor top
plate is at on the mat.
Remove this template.
4: Inside Person
While the outside person holds the sensor top plate rm, position a sensor
mount under the mat, at side up.
Align the sensor mount holes with the sensor top plate prongs.
Press the two parts rmly together.
5: Inside and Outside Person
Repeat steps 1 - 4 at position 3.
Upon completion, turn this template over to position the
remaining two sensors.
The tgoma game system will not work unless you install
position two and four using side B of this template.
S
T
ART
HERE
1: Outside Person
Starting at position 1 identied in the manual,
count three rods to the LEFT
(not counting the rod under the tag).
Feel for the raised bump on top of the yellow
banding on the mat where the third rod
connects to the mat rod holder under the
mat.
Place this template at on the mat and align
the blue arrow with the center of the raised
bump.
m
holder u
ateat
at
on the m
at and align
wwititth
h t
center of the ra
ised
Page 8
5
8
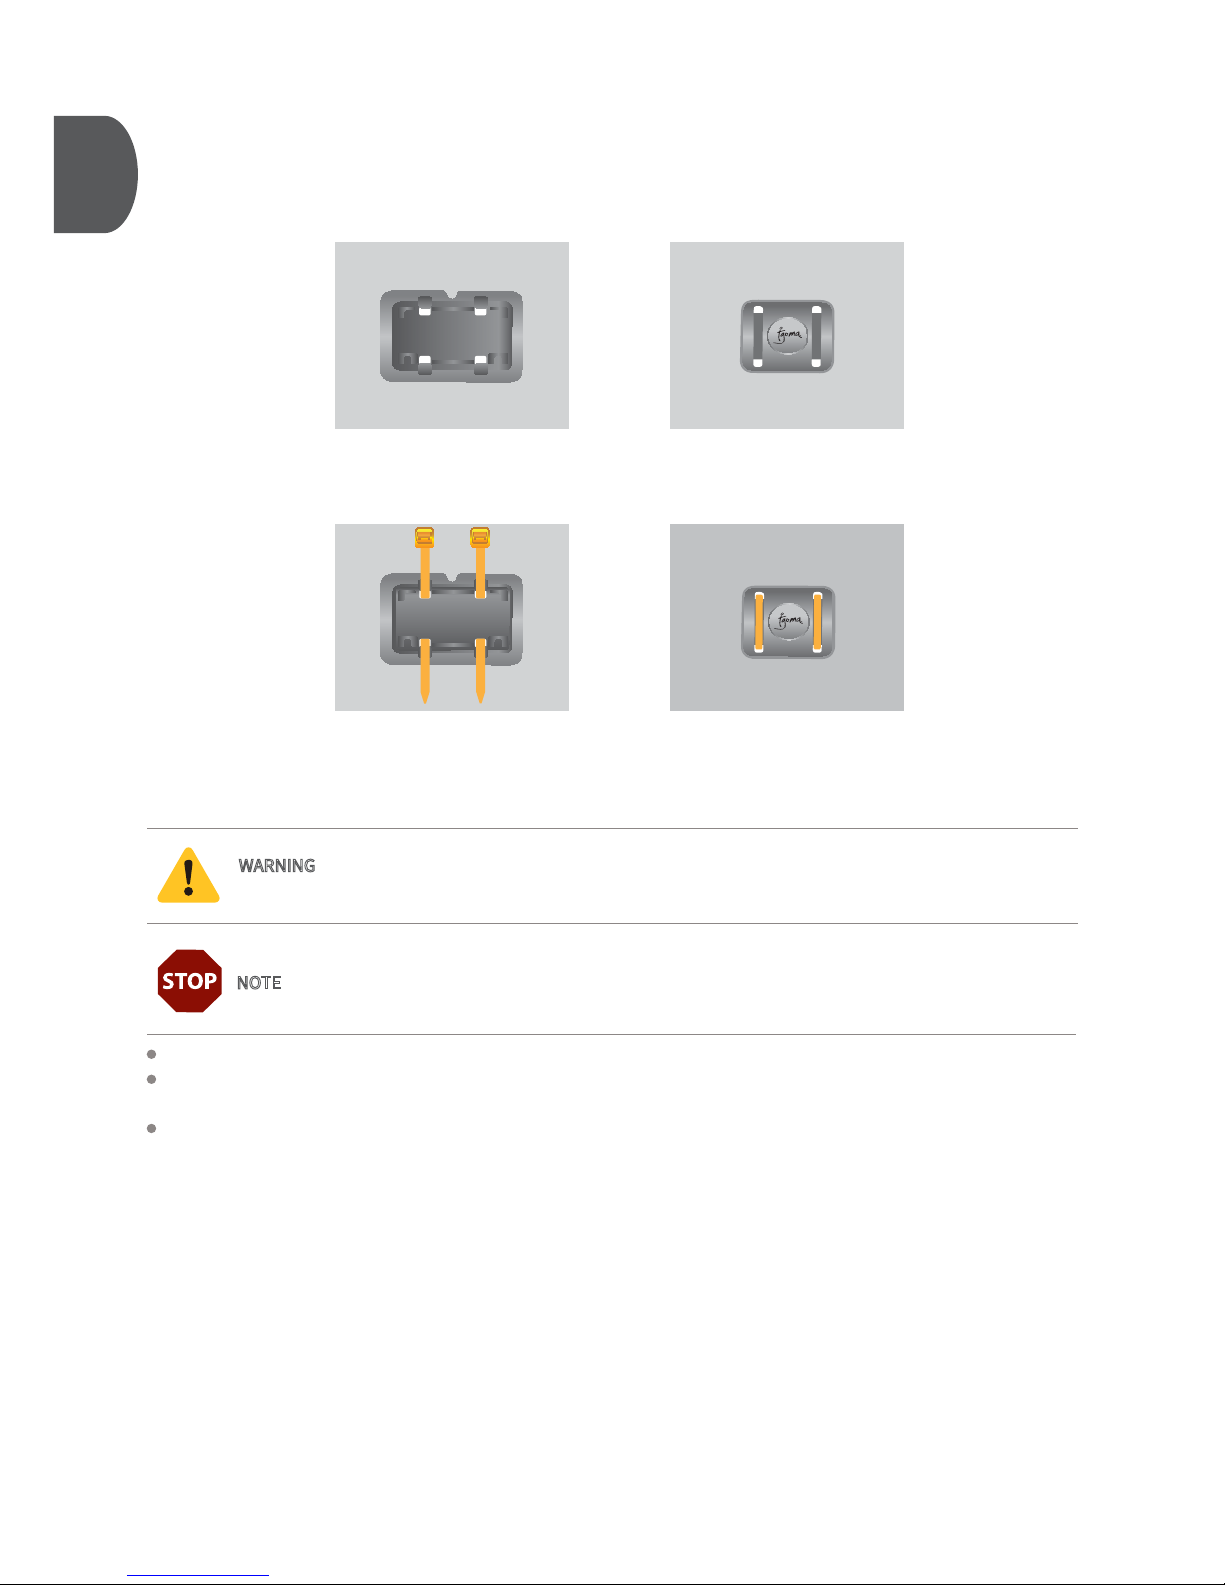
Inside Person: Feed a small cable tie up through one of the holes in the sensor mount.
Outside Person: Pull the cable tie across the channel and down through the corresponding hole. DO NOT fasten the
cable ties, this will be done later.
Inside and Outside Person: Repeat for the other end of the sensor mount and for the remaining three sensor
positions.
NOTE - Be sure not to fasten the small cable ties during this step.
WARNING - Treat any loaded rod with caution until you are sure it is properly installed or uninstalled.
Keep your face well away from any loaded rod.
BOTTOM VIEW BEFORE TOP VIEW BEFORE
BOTTOM VIEW AFTER TOP VIEW AFTER
Page 9
9
6
INSIDE VIEW
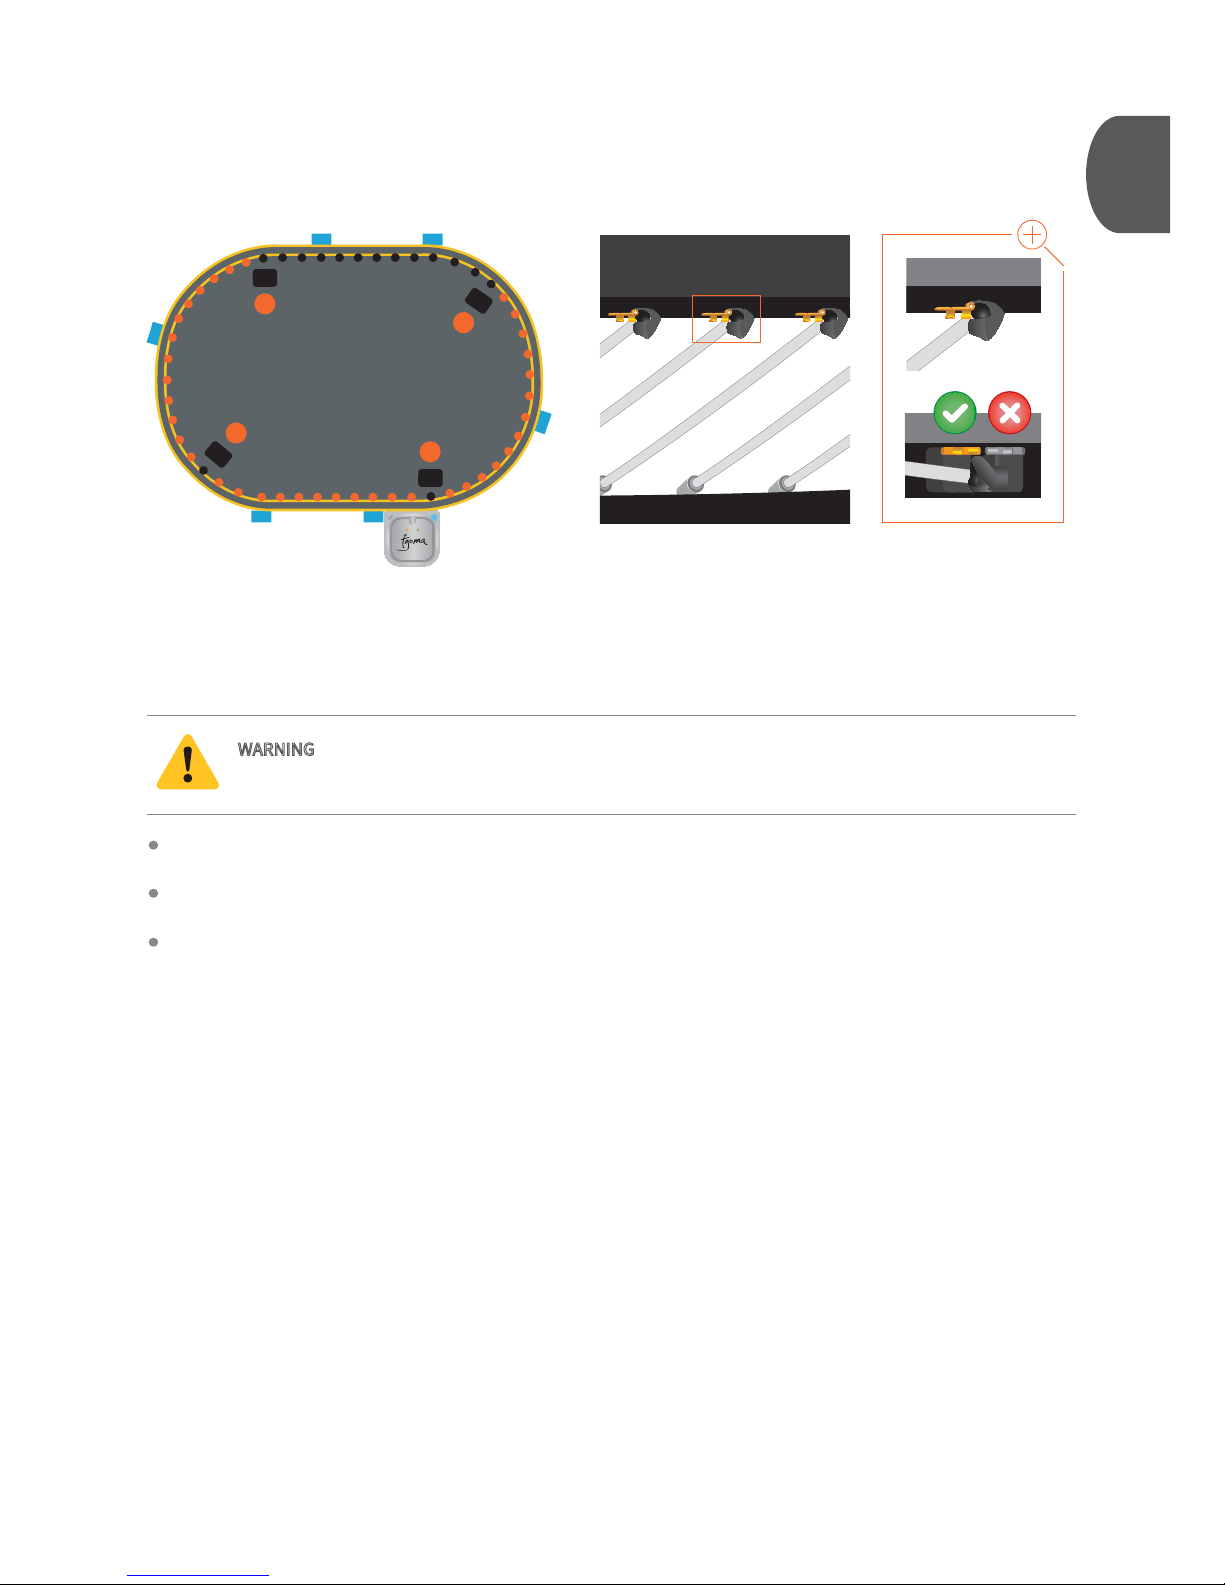
Inside Person: Starting at sensor position 2, locate the first mat rod holder to the le. Install a cable clip at the front
of the mat rod holder pocket, as shown.
Inside Person: Moving to the le around the trampoline, install ONE cable clip in front of each mat rod holder
pocket between sensor positions 2 and 1. Do not install a cable clip in front of any of the sensor positions.
Inside Person: Repeat this process from sensor positions 1 to 4 and 4 to 3.
WARNING - Treat any loaded rod with caution until you are sure it is properly installed or uninstalled.
Keep your face well away from any loaded rod.
OUTSIDE VIEW
4
2
3
1
Page 10
10
7
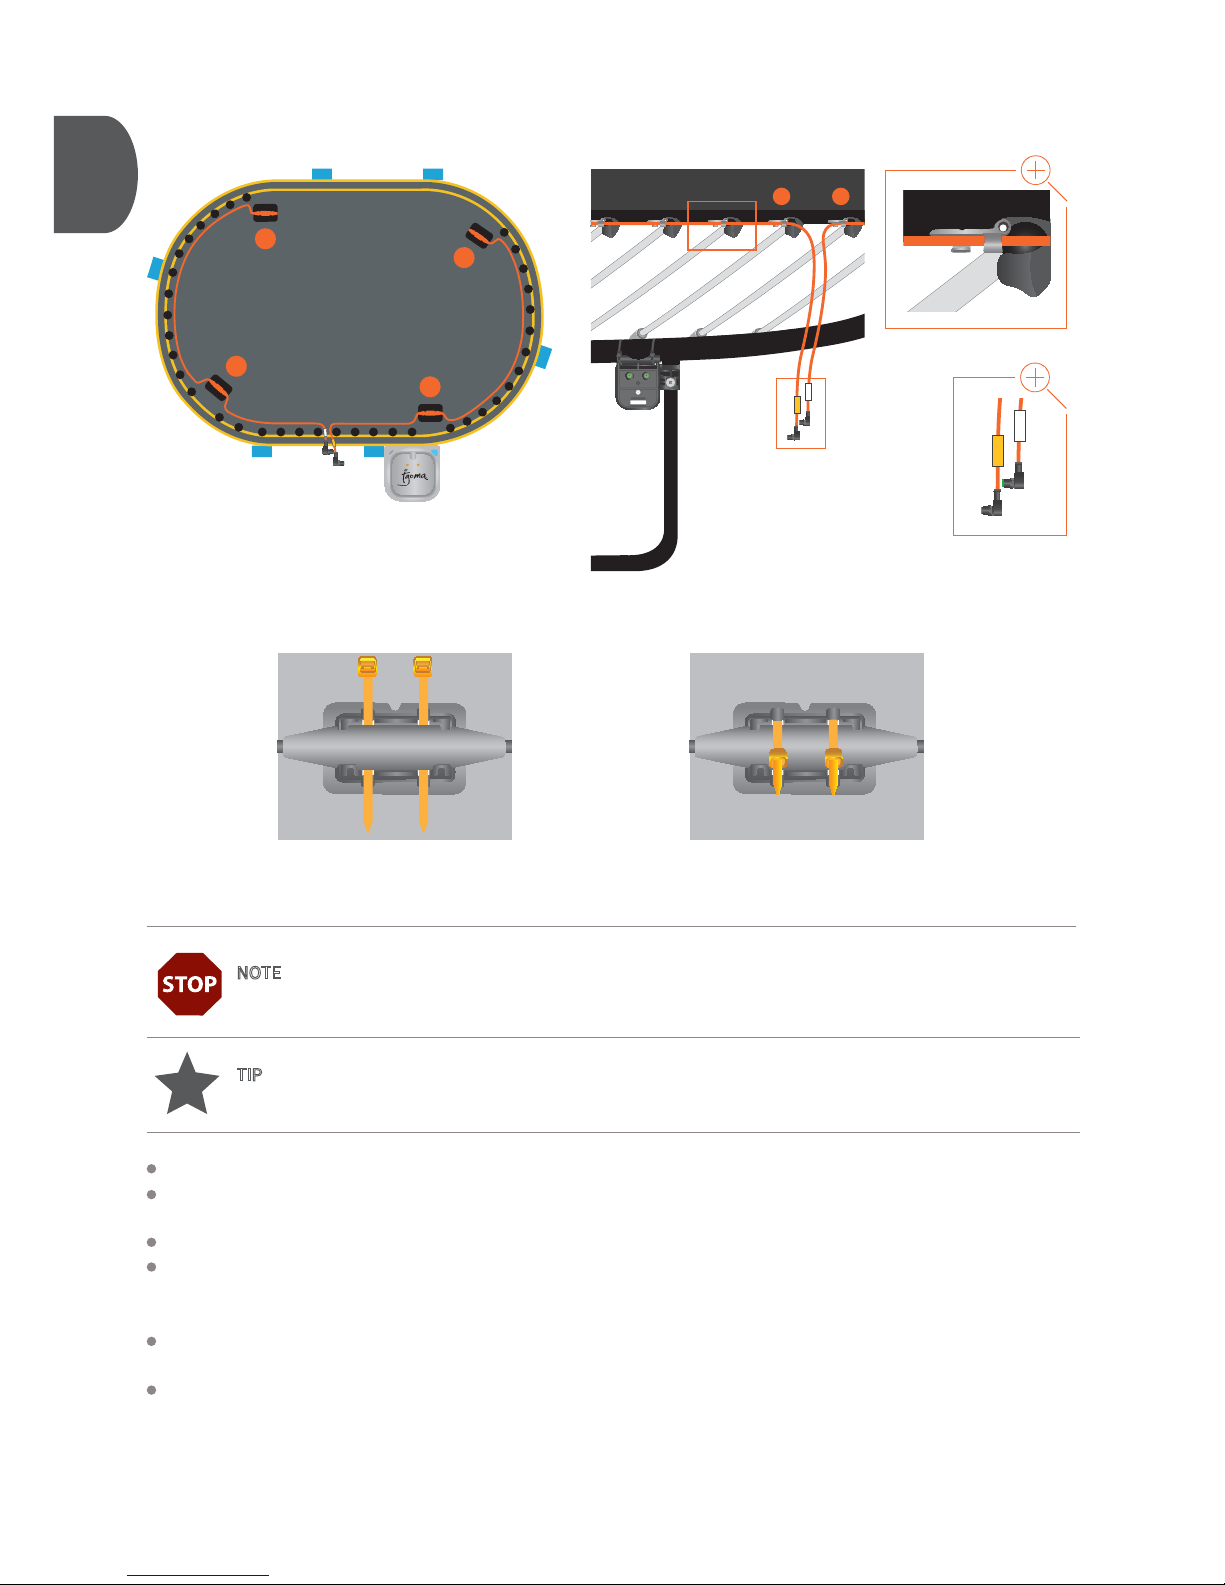
NOTE - Before proceeding, double check that each cable clip is pushed fully onto the edge of its pocket and
that there are no cable clips installed in front of any of the sensor positions.
TIP - If you are having trouble inserting the cable sensors into the sensor mounts, try flipping them over.
They are designed to only fit one way.
OUTSIDE VIEW
BOTTOM VIEW BEFORE BOTTOM VIEW AFTER
4
2
3
1
Inside Person: Before installing the cables, note that they are dierent lengths and have dierent color labels.
Inside Person: Starting at sensor position 2, take the cable with the white tag and install the end cable sensor into
the sensor mount. Once it is in place, fasten the cable ties as shown.
Inside Person: Then, working towards sensor position 1, install the cable into each cable clip, as shown.
Inside Person: At sensor position 1, install the middle cable sensor into the sensor mount and fasten the cable ties.
If the middle cable sensor does not align with the sensor mount, double check that you have the correct cable and
that the sensor mounts are installed in the correct positions relative to the blue tags.
Inside Person: Continue installing the cable into the cable clips until you reach position B as shown above. Leave
the end of the cable hanging down towards the controller.
Inside Person: Starting at sensor position 3, take the cable with the yellow tag and repeat the above process to
sensor position 4 and then to position A. Be sure to fasten the cable ties at each sensor. At position A, the end of the
cable should be hanging down towards the controller.
INSIDE VIEW
AB
A B
Page 11
11
8
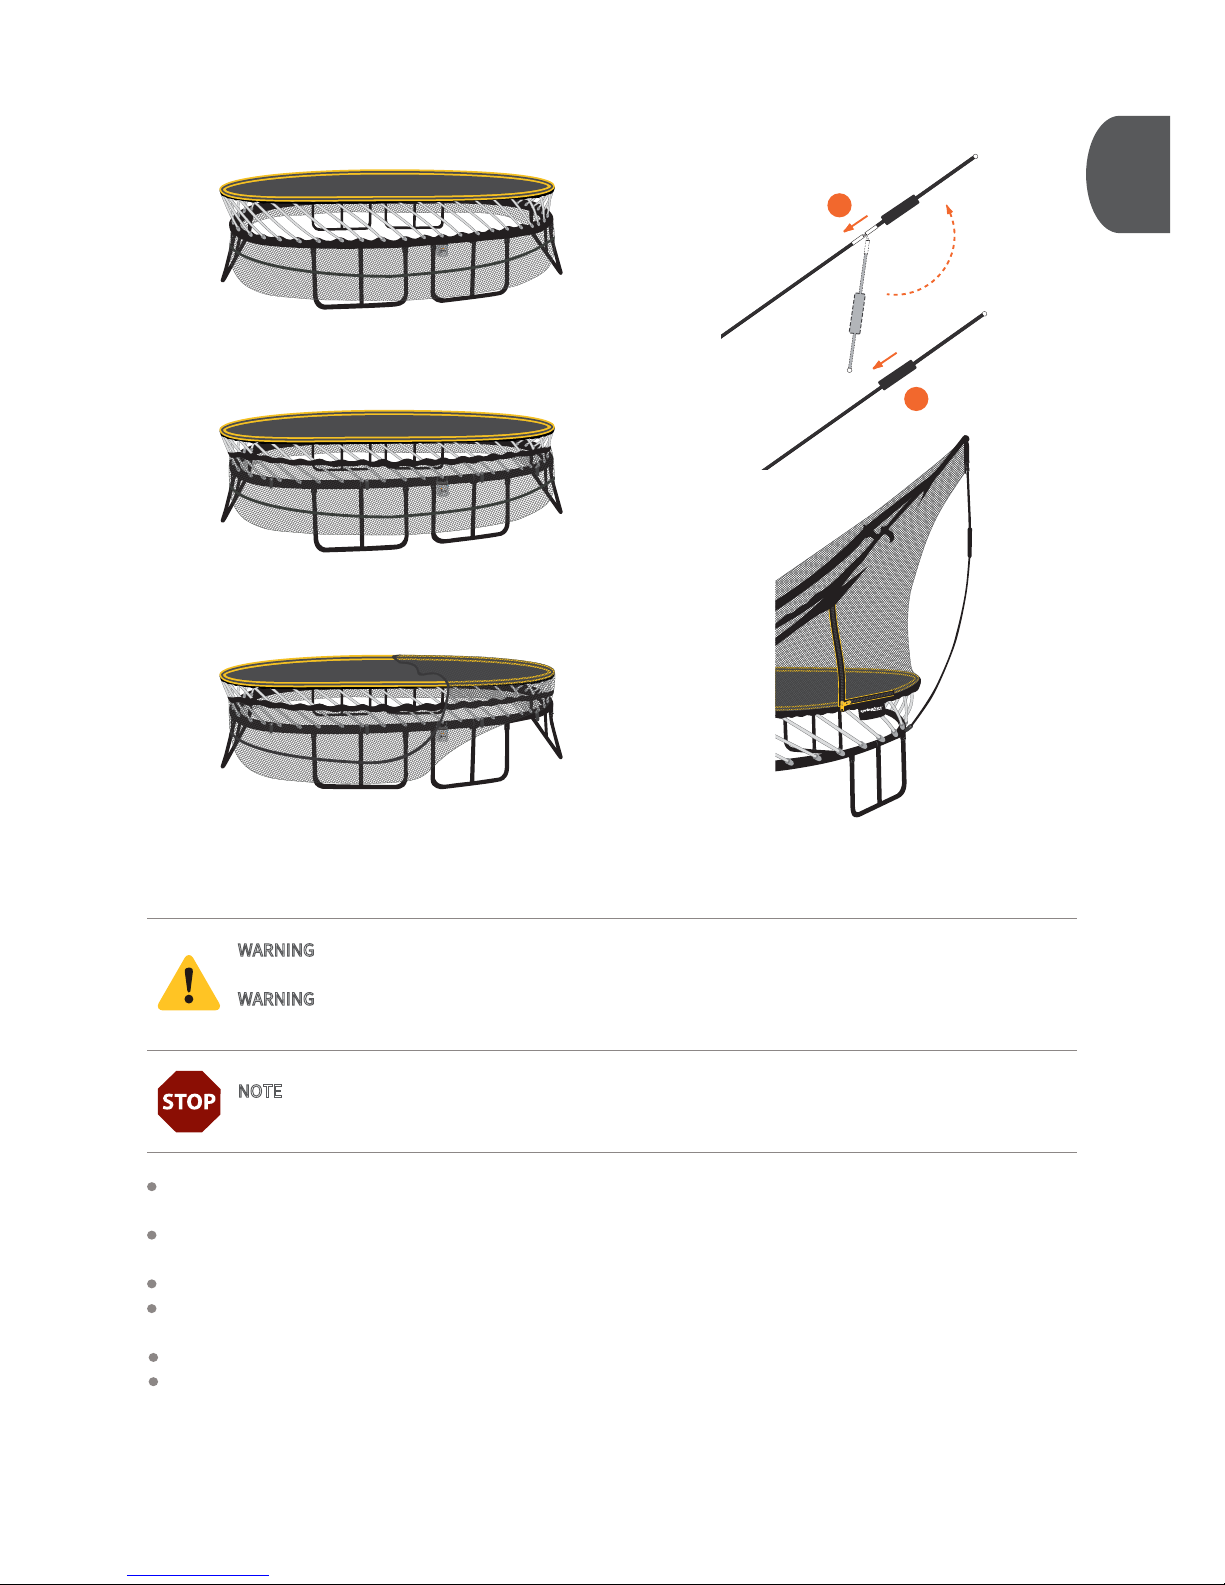
NOTE - Refer to step 8, 9, and 10 in the Trampoline & Enclosure Assembly Instructions for more
information.
Outside Person: Starting at a corner, carefully pull the net up over the edge of the mat. It is normal for the net to be
tight.
Outside Person: Working around the frame, li the rest of the net into the center of the mat. Ensure that the bottom
band of the net is pulled all the way to the top of the white mat rods.
Outside Person: Re-assemble the black net rods as shown.
Outside Person: Insert ALL of the black net rods into the net rod pockets at the top edge of the net. Push the rod up
into the pocket and past the catch. You will feel some resistance as the ball is pushed through.
Outside Person: Ensure all of the C-clips are installed and fully seated.
Outside Person: Insert the bottom end of the black net rod into the net rod socket on the trampoline frame. You will
hear a click when the black net rod is fully seated.
WARNING - Treat any loaded rod with caution until you are sure it is properly installed or uninstalled. Keep
your face well away from any loaded rod.
WARNING
- Never attempt to remove a black net rod from its net rod pocket or disengage (unlock) the rod
sleeve while the black net rod is under tension.
OUTSIDE VIEW
WANT
T
O JUMP
?
DO
IT
SA
FE
!
O
N
E
AT
A
TI
M
E
.
ENVIE
DE
S
A
U
TE
R
?
F
A
ITE
S
-LE
E
N
TO
U
TE
SÉCU
R
I
T
É
!
UN
E
À
L
A FOIS
.
2
1
Page 12
12912
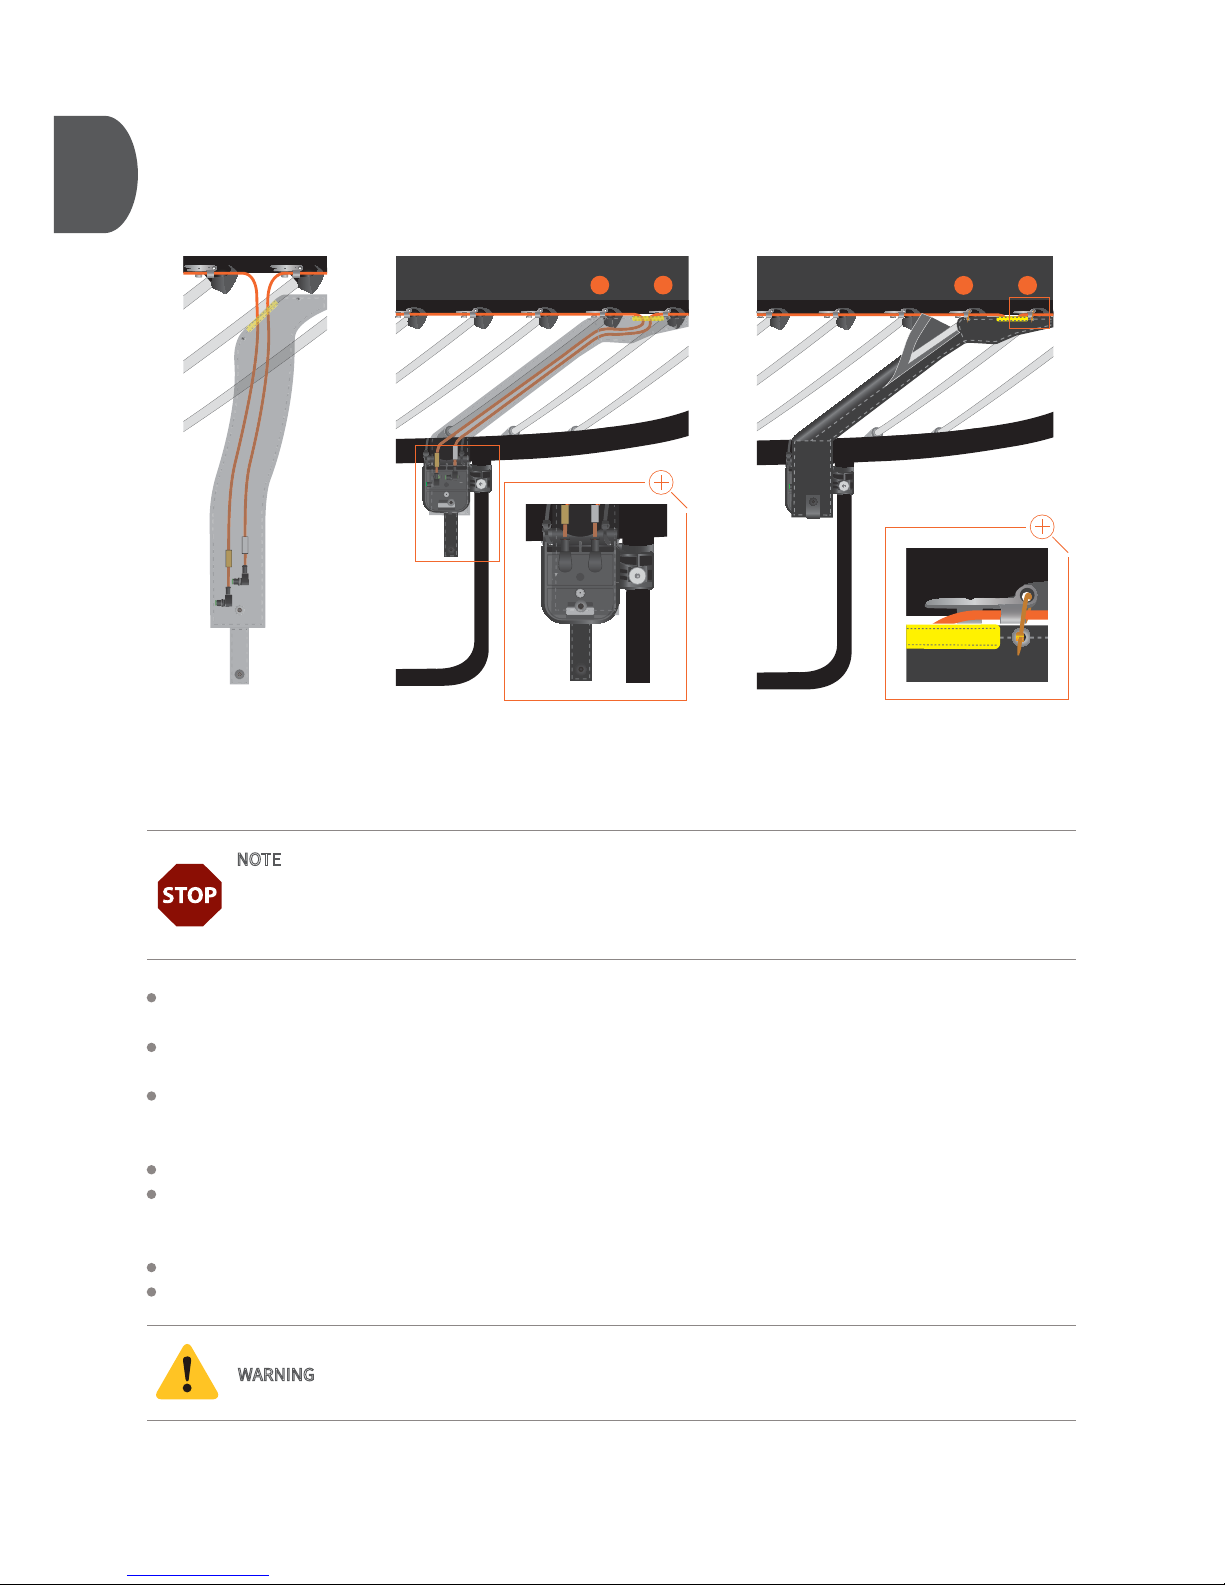
Inside Person: Locate the ends of the cables that are hanging down at cable clip A and B. Cable A should be on the
le and have the yellow tag. Cable B should be on the right and have the white tag.
Inside Person: Next, locate the yellow strip along the top edge of the sensor cable tube. At the yellow strip, feed
cable A (yellow) through the top of the tube until it comes out the end.
Inside Person: Repeat with cable B (white). When the end of the cable comes out the end of the tube, plug it into
socket B on the back of the controller and tighten the collar. Then, plug the end of cable A (yellow) into socket A and
tighten.
Inside Person: Undo the Velcro® strip on the sensor cable tube, wrap it around the mat rod, and refasten, as shown.
Inside Person: Next, locate the eyelets beside the yellow strip along the top edge of the sensor cable tube. Pass a
small cable tie through an eyelet and the corresponding hole in the cable clip, as shown, then fasten. Repeat for all
three eyelets.
Inside Person: Fasten the strap at the bottom of the sensor cable tube through the back of the controller.
Inside and Outside Person: The remaining steps can be completed by just one person.
NOTE - Cable A with the yellow tag must be plugged into socket A and cable B with the white tag into
socket B. The cable plugs and controller sockets are ‘keyed’ (ie, they will only fit correctly in one position).
Line up the green post in the cable plug with the slot in the controller socket. Do not force the plug into the
socket; when you have correctly keyed them they will slide together easily.
WARNING - If there is any excess cable, loop it and tuck it back up into the sensor cable tube.
AB
A B
B
A B
AB
A
B
INSIDE VIEW INSIDE VIEWINSIDE VIEW
Page 13
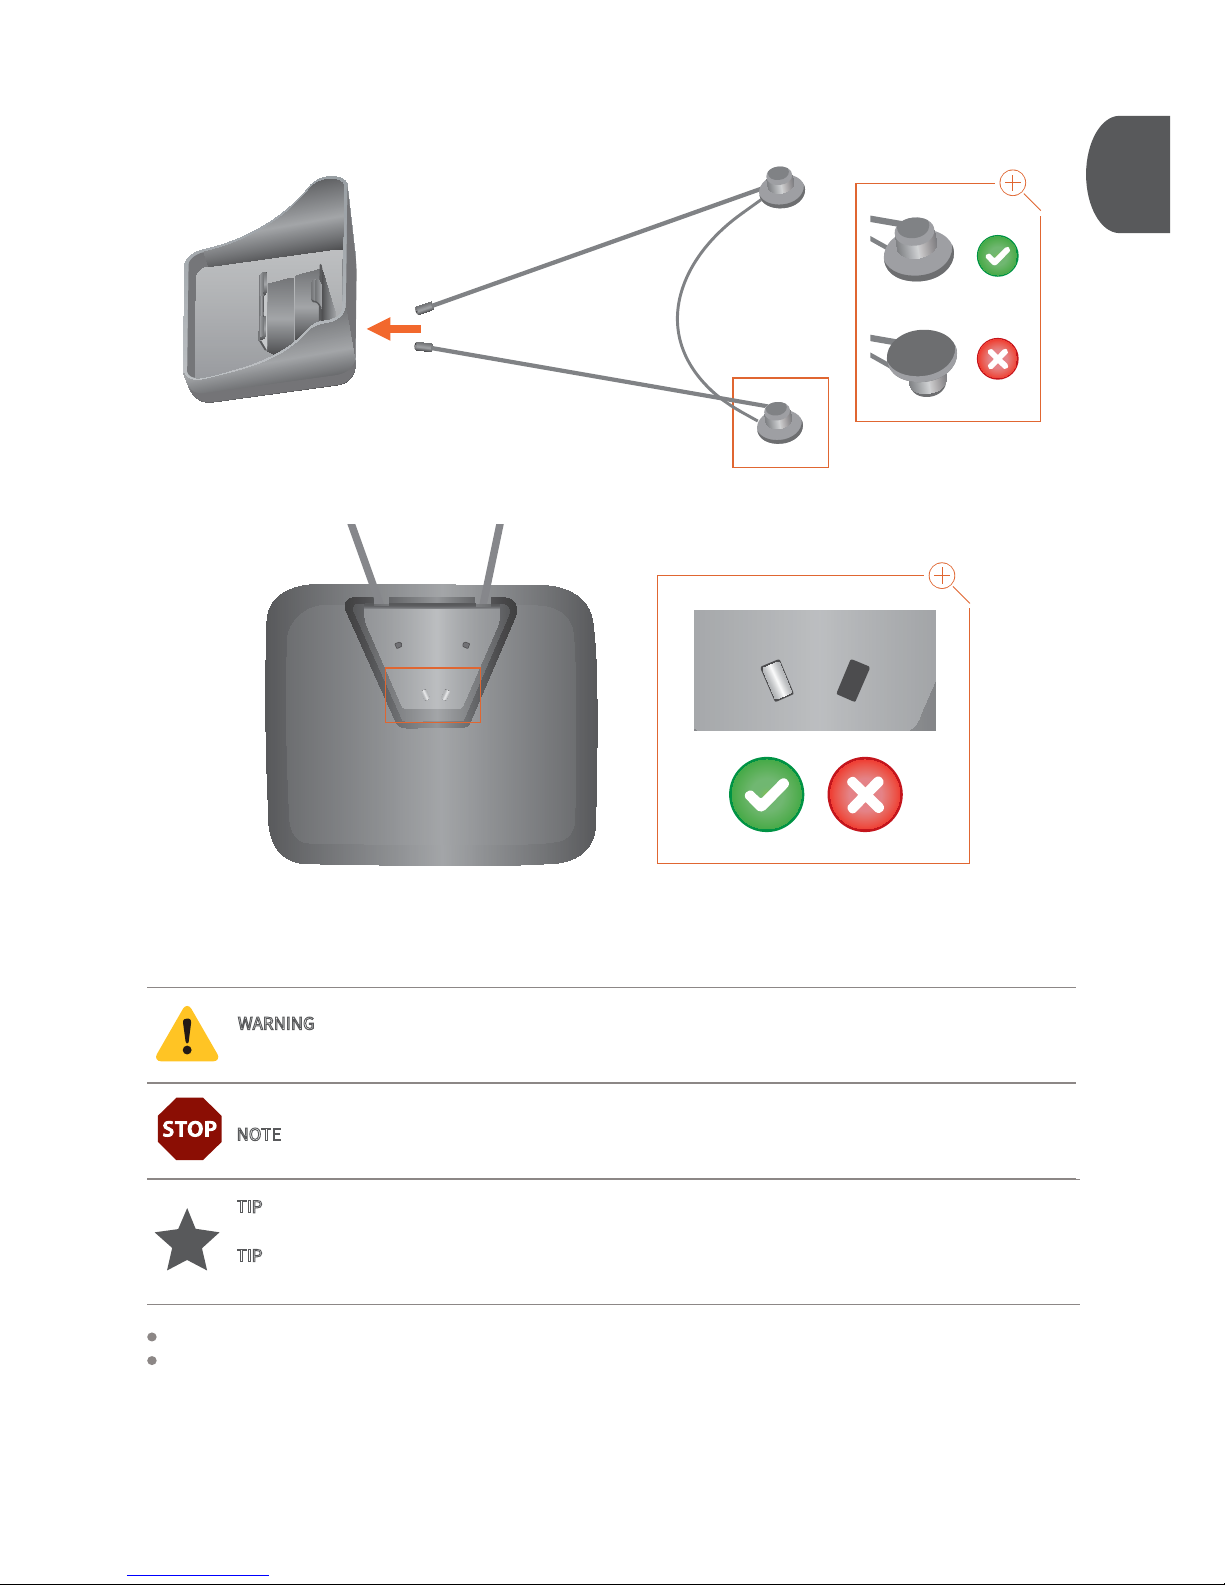
Orient your tablet holder rods relative to the tablet holder, as shown.
Insert the rods into the back of the tablet holder. When assembled, the rods will click into place. When fully
inserted, you should be able to see the ends of the rods through the slots and the rods will not easily come lose.
WARNING - Treat any loaded rod with caution until you are sure it is properly installed or uninstalled.
Keep your face well away from any loaded rod.
NOTE - Ensure the tablet holder is in the correct orientation.
TIP - The soware’s default position for the tablet holder is opposite the door. Consult your
Soware User Guide for how to position the tablet holder in alternative locations.
TIP
- If you accidentally install the rods with the incorrect orientation, push a key into each slot on the back of
the plastic part of the tablet shade and pull the rods free.
13
10
Page 14
14
11
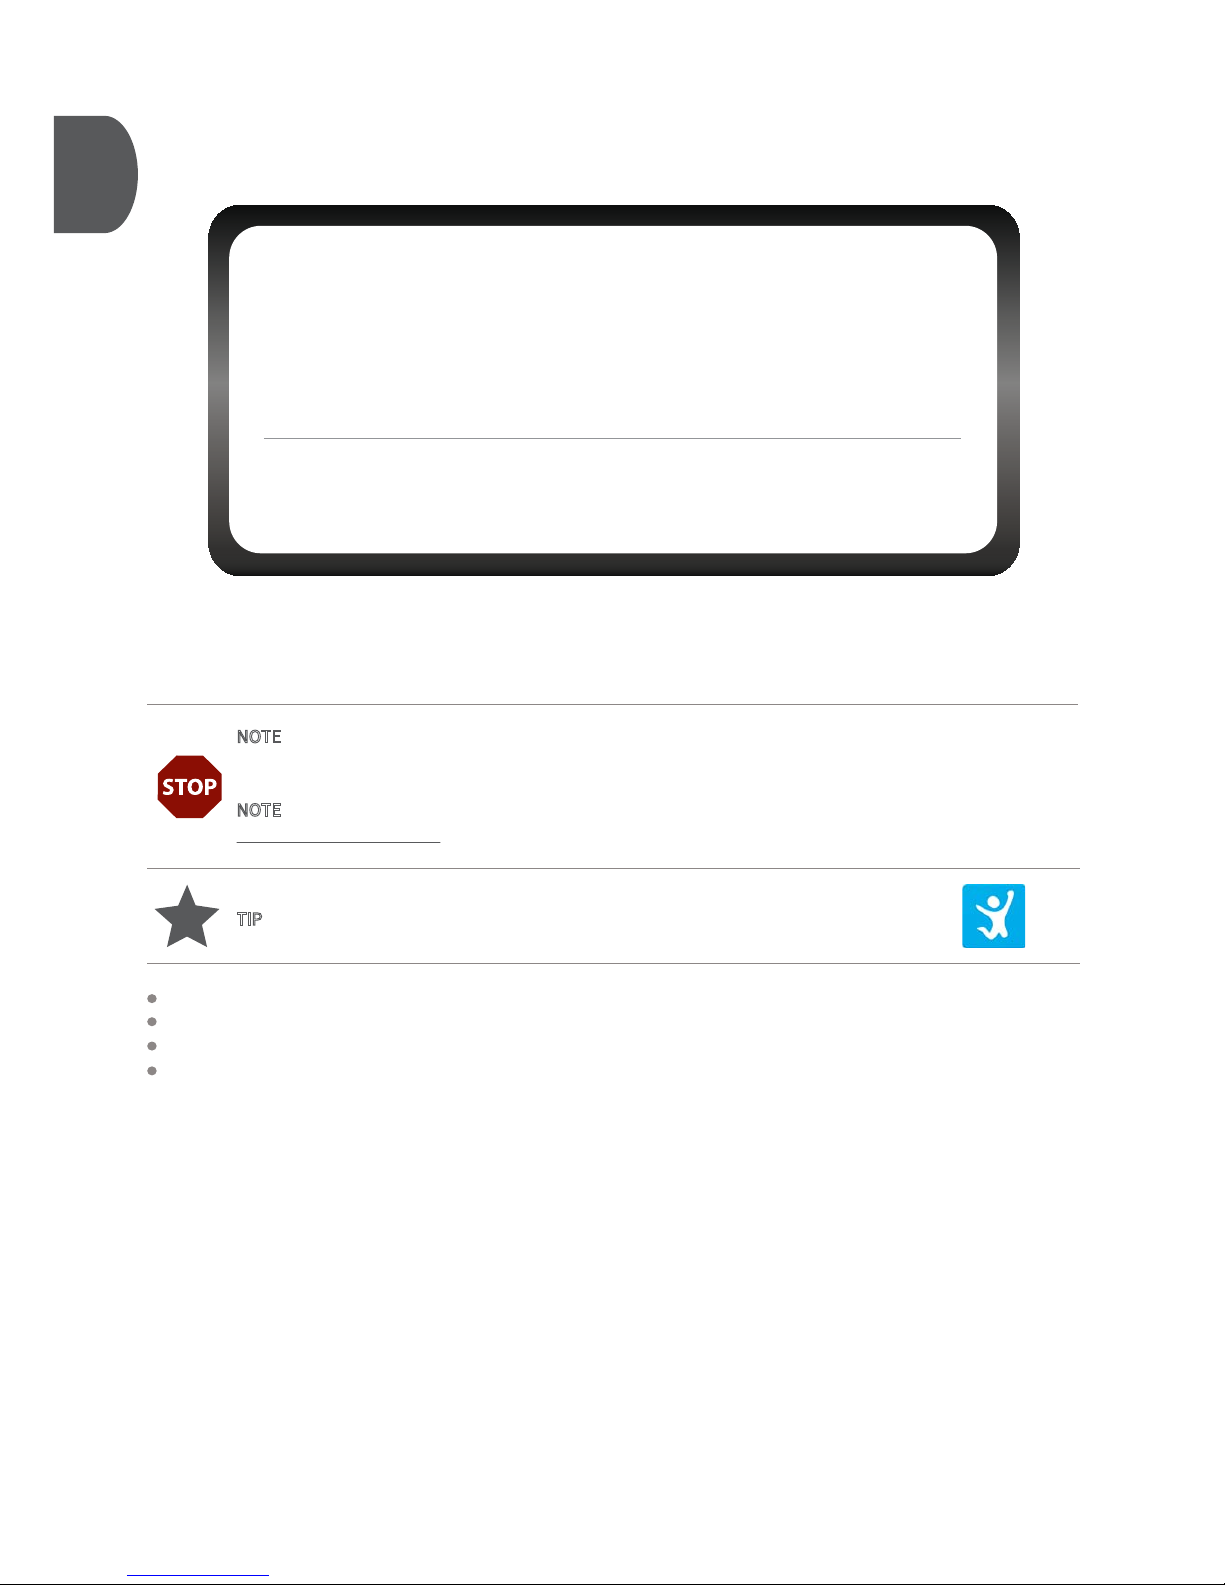
NOTE - tgoma Soware is designed to operate on tablets with the minimum specifications listed above.
If you are trying to use tgoma on any device outside of these specs tgoma will not work correctly. Note:
Windows tablets are not supported.
NOTE - We recommend you read the full Soware User Guide, which can be downloaded from
www.tgoma.com/support.
Ensure your tablet is connected to WiFi.
If using an Apple tablet, go to iTunes Store and search ‘tgoma’.
If using an Android tablet, go to Google Play and search ‘tgoma’.
Follow on-screen instructions to download and install tgoma. The tgoma icon will appear in the tablet’s app list.
Tap to open.
TIP - When searching for the tgoma app on iTunes® Store or Google Play™, look for this icon:
• iPad 3 or more recent, iPad Mini & iPad Air.
• Bluetooth
®
4 (also known as LE) or more recent
(NOTE: iPads 1 and 2 cannot be used because they do
not have Bluetooth 4).
• Tablets with screen size between 7” and 11” (not phones).
• Android operating system 4.4 or more recent.
• Bluetooth 4 (also known as LE) or more recent.
• Tablets with screen size between 7” and 11” (not phones).
Apple
®
Tablets:
Android
TM
Tablets:
Minimum Tablet Specifications
Page 15
15
12
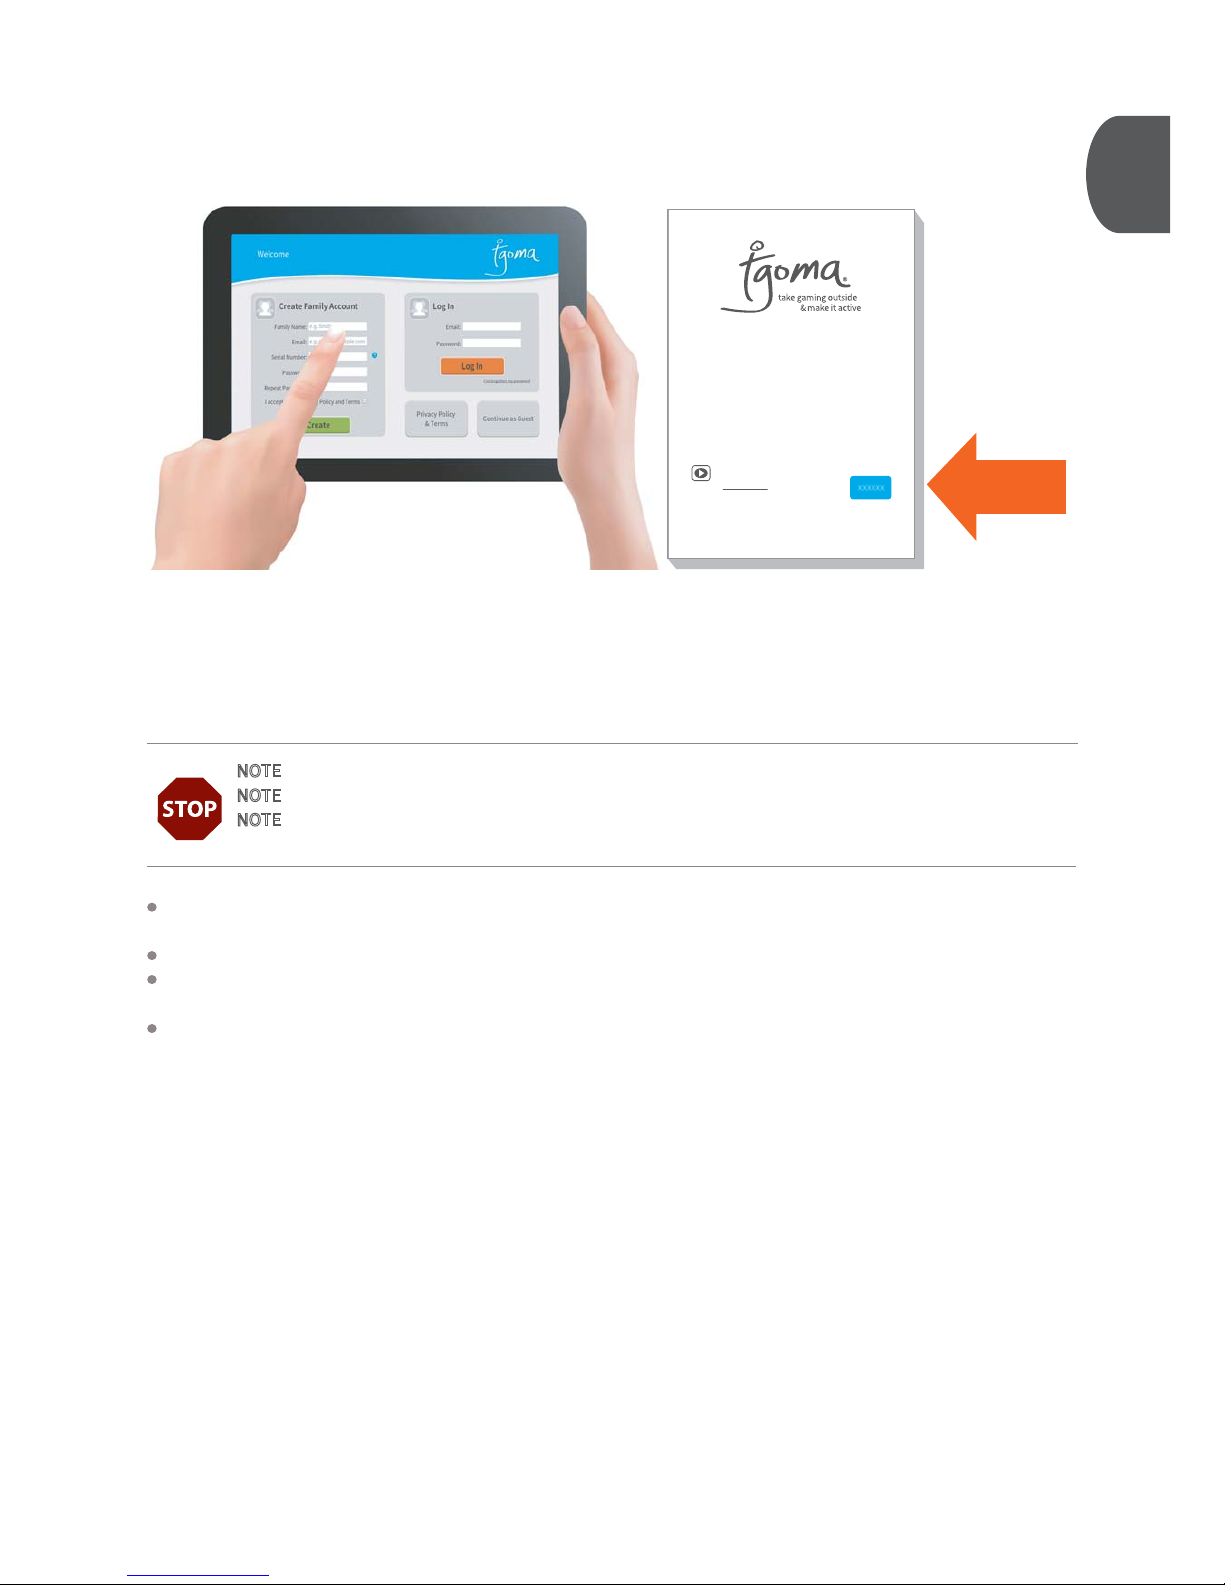
Get started with tgoma by setting up your account. Although it is possible to use tgoma as a Guest, to access games
and the full range of features tgoma oers, you will need to create a Family Account.
Use a password you will remember. This will be asked for when downloading new games.
Enter the serial number from the sticker attached to your Installation Manual (or tgoma packaging) – this will help
our customer care team assist you should you need it.
Follow Set-Up steps on-screen.
NOTE - Ensure your tablet is connected to WiFi while you are setting it up.
NOTE - Once set up you do not need a WiFi signal to use tgoma.
NOTE - Ensure you complete all of the Set Up steps. It is important you have selected both the correct
trampoline model and position for your tablet (these are steps in the Set Up process).
Installation Manual for Springfree Trampoline
The information in this document is subject to change without notice.
© Copyright tgoma NZ Ltd., 2016. All rights reserved.
727502
Your Product Serial Number is:
Installing the tgoma can be challenging if you
don’t carefully follow these instructions. To
make it easier, we have demonstration
videos that will guide you through each step.
Visit www.tgoma.com/support to get started.
Your serial number
is located on the
front of manual.
Page 16
16
13
NOTE - When you turn the controller on to connect to your tablet, ensure there is nobody standing/sitting
on, or leaning against, the trampoline for 15 seconds. This allows the controller to correctly set the sensors
for accuracy. This wait time should be observed each time aer the trampoline is moved.
WARNING - To protect the batteries store the battery pack indoors when not in use.
NOTE - The RED light will begin pulsing if there is an error with the system. The error will be described
underneath Tech Info on the General Settings page of the tgoma app.
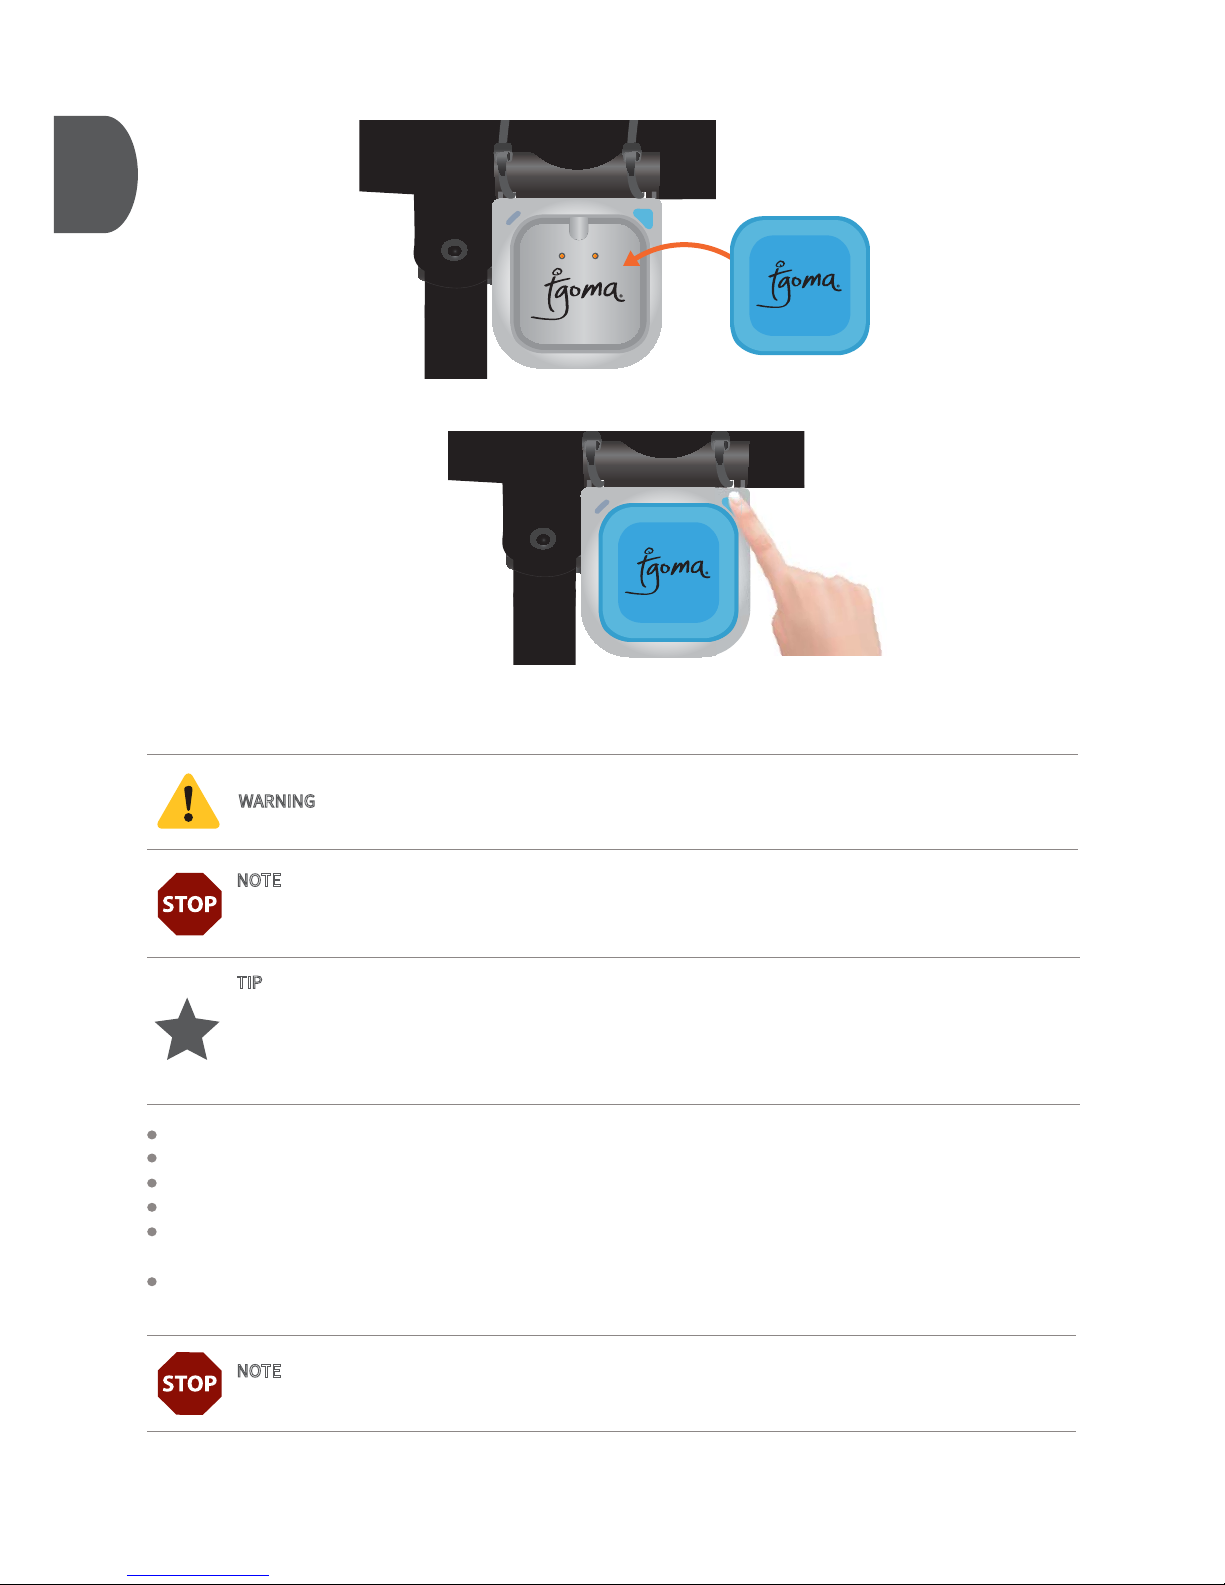
Ensure your tablet has Bluetooth turned on. Take the tablet out to your trampoline.
Install 4 AA batteries into the battery pack and place the battery pack on the controller.
Make sure nobody is on or leaning against the trampoline.
Turn on the controller by pressing the button on the front and wait for it to connect to your tablet.
The GREEN light should now be pulsing, indicating that the controller is running. Please wait for at least 15 seconds
to allow the system to calibrate the sensors before touching the trampoline.
Start the tgoma app on your tablet. Aer a few seconds the BLUE light should begin pulsing, indicating that the
Bluetooth connection is established.
TIP
- tgoma is designed to work across a wide range of tablets. Not all versions of Android connect to
Bluetooth in the same way. Your tablet should automatically connect to a tgoma controller when you
start the tgoma app and turn the controller on. If the BLUE light on the controller does not light up aer
approximately 30 seconds, you may need to power o the tablet and restart it. This should allow the
Bluetooth connection to be established.
Page 17
17
14
WARNING - Do not leave your tablet outside in wet weather.
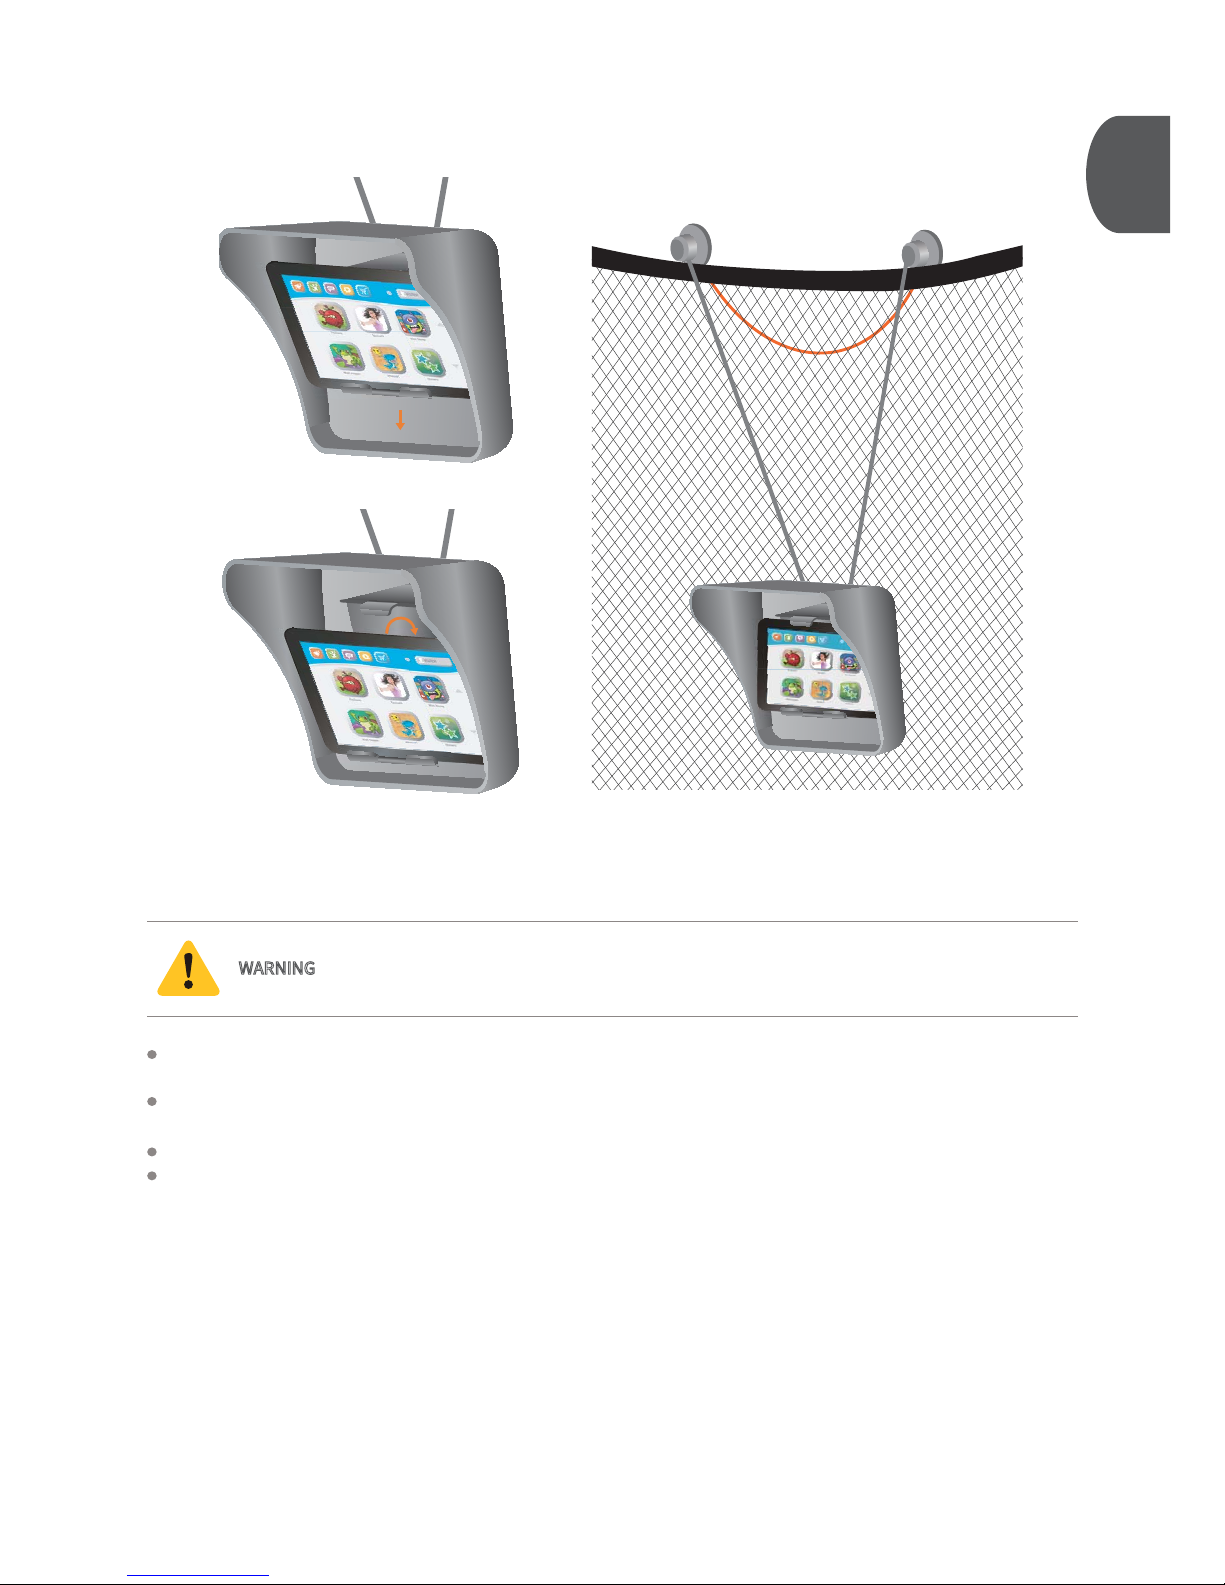
Once you have completed setting up your tgoma on your tablet, hold your tablet in a landscape orientation and
place the bottom edge onto the bottom jaw of the clamp.
Pull the tablet down on the bottom jaw until the clamp opens wide enough for the tablet to fit between the top and
bottom jaws of the clamp.
Push the tablet back into position, and release.
Hook the tablet holder onto the inside of the trampoline net, opposite the entrance.
Page 18
18
15
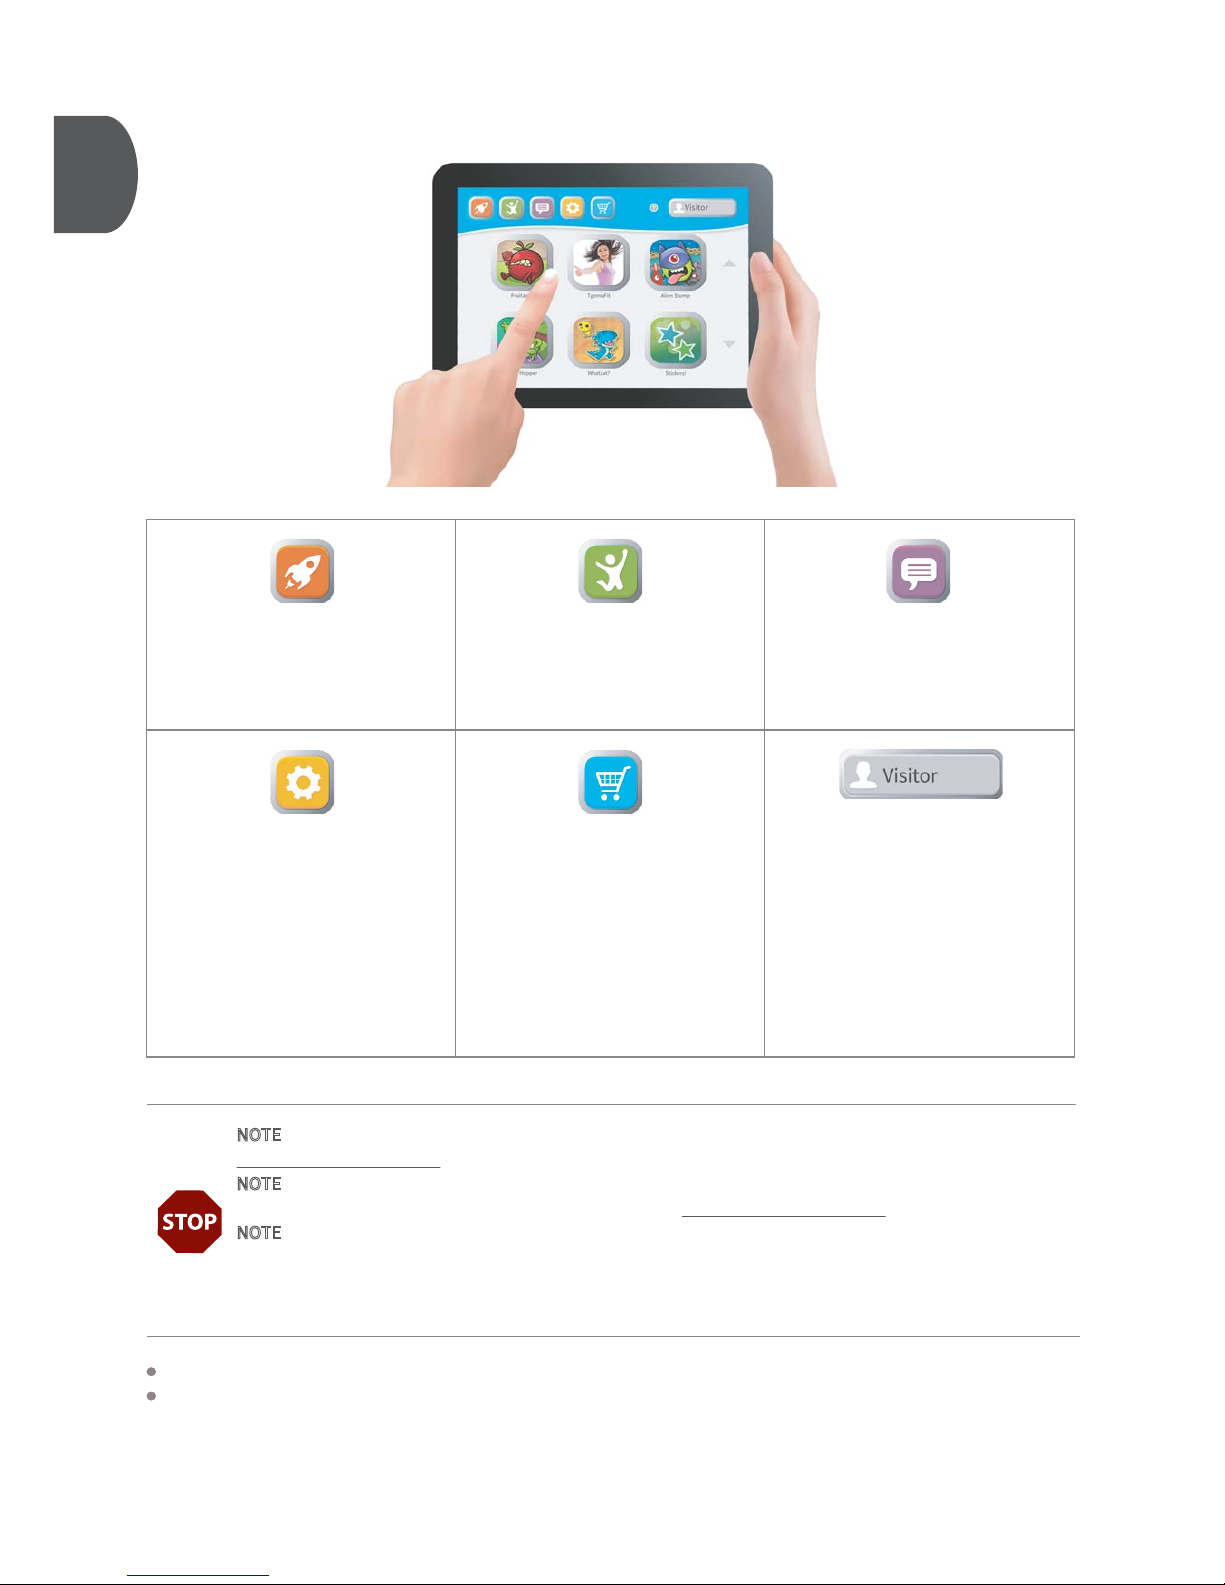
Settings: where you set up
tgoma (make sure you select
your trampoline model in
General Settings before using it).
Users: tap this to create a new
user. Accurately setting the user
weight will allow tgoma to more
accurately calculate your energy
burn rate. Once users are set up
they can compete in
competitions and events, and
track their activity in the
JumpTracker.
Store: where you preview all
the games and apps available.
New games are added
frequently so check this area
regularly.
Games: where your games and
apps live once you’ve downloaded them.
JumpFit: where you access
your jump stats via the
JumpTracker, or set goals to
achieve.
News & Events: where you see
news and events to participate
in.
Explore tgoma by tapping through the buttons in the menu bar shown above.
Congratulations! You have successfully installed your tgoma game system! Happy bouncing!
NOTE - If you need to disassemble your tgoma game system or your trampoline, please go to
www.tgoma.com/support for detailed instructions.
NOTE - If you are experiencing any issues, or if you have any questions regarding the installation or
performance of your tgoma gaming system, please go to www.tgoma.com/support.
NOTE - When the tgoma controller is powered on it will broadcast its availability to any tablets within an
approximate range of 160 (50 m). Any tablet running the tgoma application can connect to the controller.
Where multiple tablets have the tgoma app installed, close the tgoma app on all tablets except the one
being used on the trampoline. This will stop unintended Bluetooth connections occurring.
Page 19
19
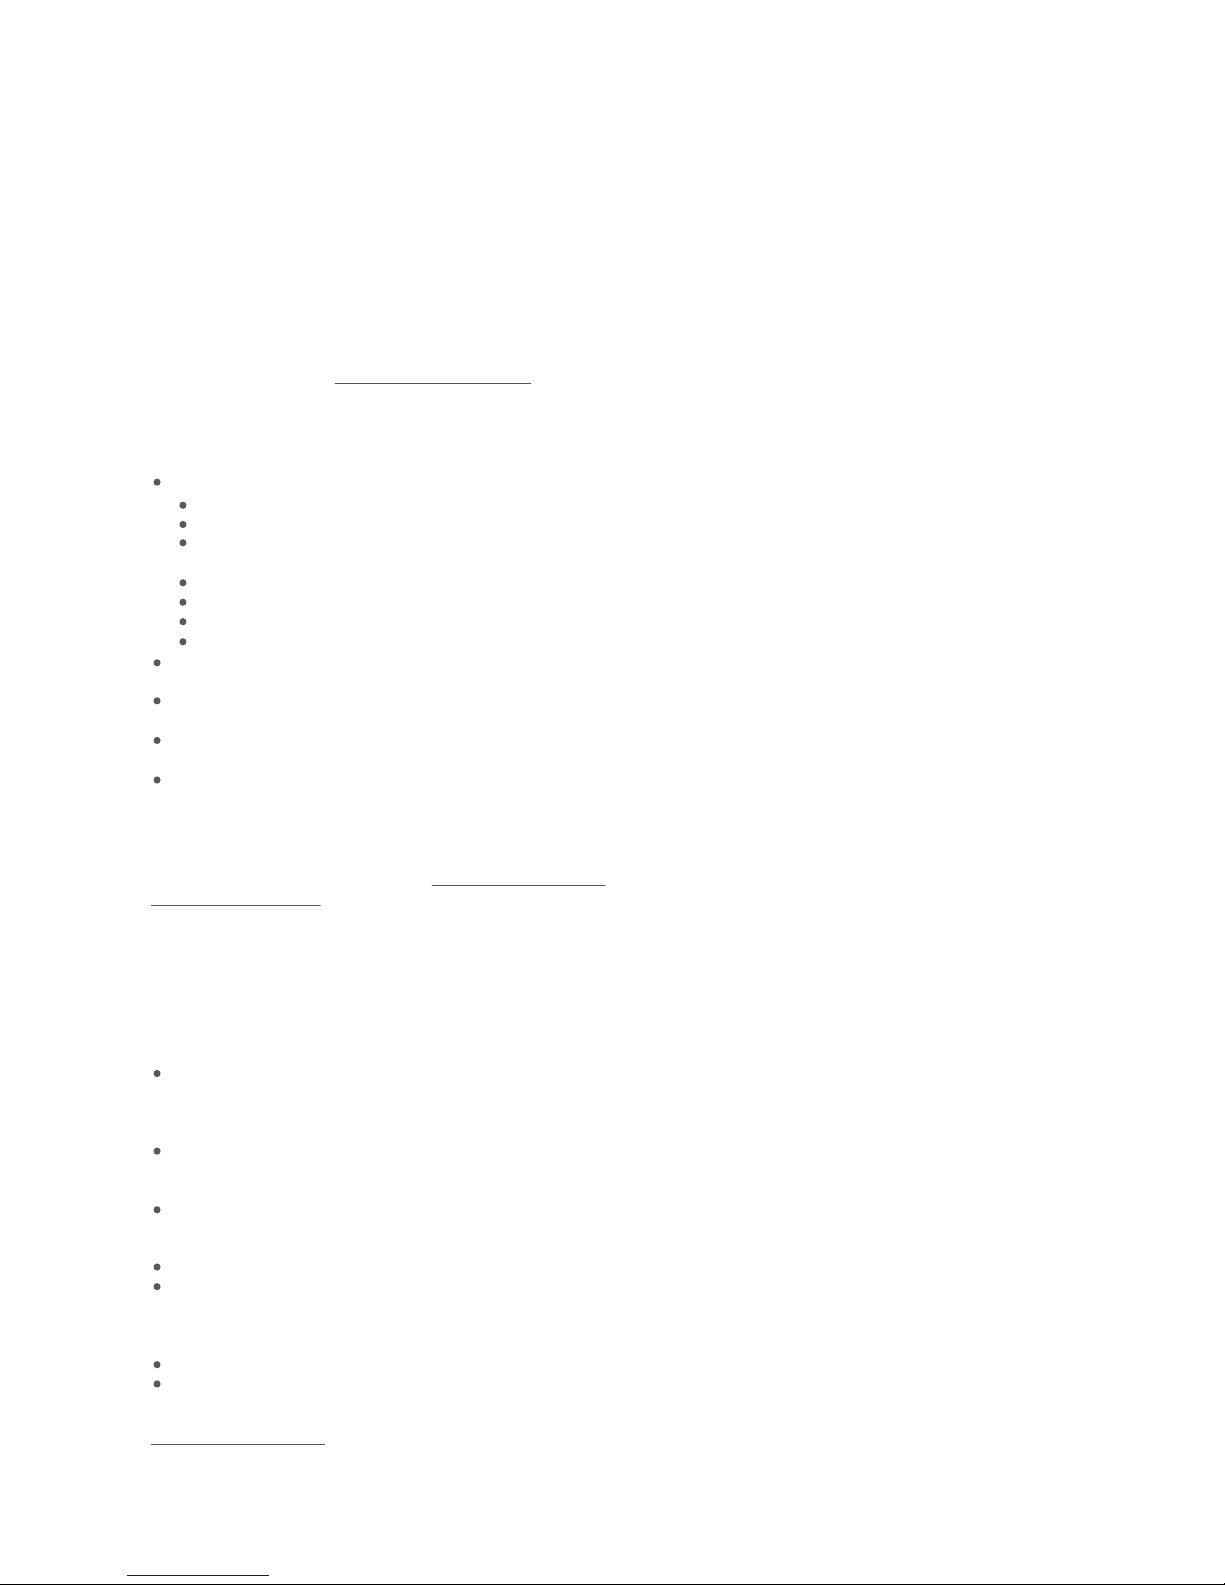
The tgoma game controller and sensor cables are UL listed under file E481698
tgoma is a registered trademark of tgoma NZ Ltd.
The Bluetooth® word, trademark and logos are owned by the Bluetooth SIG, Inc. and any use of such marks is under
license. Android™, Google Play™ and the Google Play logo are trademarks of Google Inc. Apple iTunes® and iPad™ are
registered trademarks of Apple Inc. Other trademarks and trade names are those of their respective owners.
Patents pending.
All rights reserved. No part of this publication may be reproduced, stored in a retrieval system, or transmitted, in any
form or by any means, without the prior written permission from tgoma NZ Ltd.
tgoma NZ Ltd reserves the right to make changes at any time without notification. While every care has been exercised
in compiling and publishing the information contained in these pages, tgoma NZ Ltd accepts no responsibility for errors
or omissions to the information.
FCC RF Radiation Exposure Statement:
Contains Transmitter Module FCC ID: QOQBLE113
This equipment complies with part 15 of the FCC radiation exposure limits set forth for an uncontrolled environment.
End users must follow the specific operating instructions for satisfying RF exposure compliance. This transmitter meets
both portable and mobile limits as demonstrated in the RF Exposure Analysis. This transmitter must not be co-located
or operating in conjunction with any other antenna or transmitter except in accordance with FCC multi-transmitter
product procedures.
Déclaration d’IC:
Contient module émetteur IC: 5123A-BGTBLE113
Cet appareil ISM est conforme à la norme NMB-001 du Canada
Ce dispositif est conforme aux normes RSS exemptes de licence d’Industrie Canada. Son fonctionnement est assujetti
aux deux conditions suivantes: (1) ce dispositif ne doit pas provoquer de perturbation et (2) ce dispositif doit accepter
toute perturbation, y compris les perturbations qui peuvent entraîner un fonctionnement non désiré du dispositif.
IC Statements:
Contains Transmitter Module IC: 5123A-BGTBLE113
This ISM device complies with Canadian ICES-001.
This device complies with Industry Canada license-exempt RSS standard(s). Operation is subject to the following two
conditions: (1) this device may not cause interference, and (2) this device must accept any interference, including
interference that may cause undesired operation of the device.
Contains Transmitter Module FCC ID: QOQBLE113
Contient module émetteur IC: 5123A-BGTBLE113
Contains Transmitter Module IC: 5123A-BGTBLE1
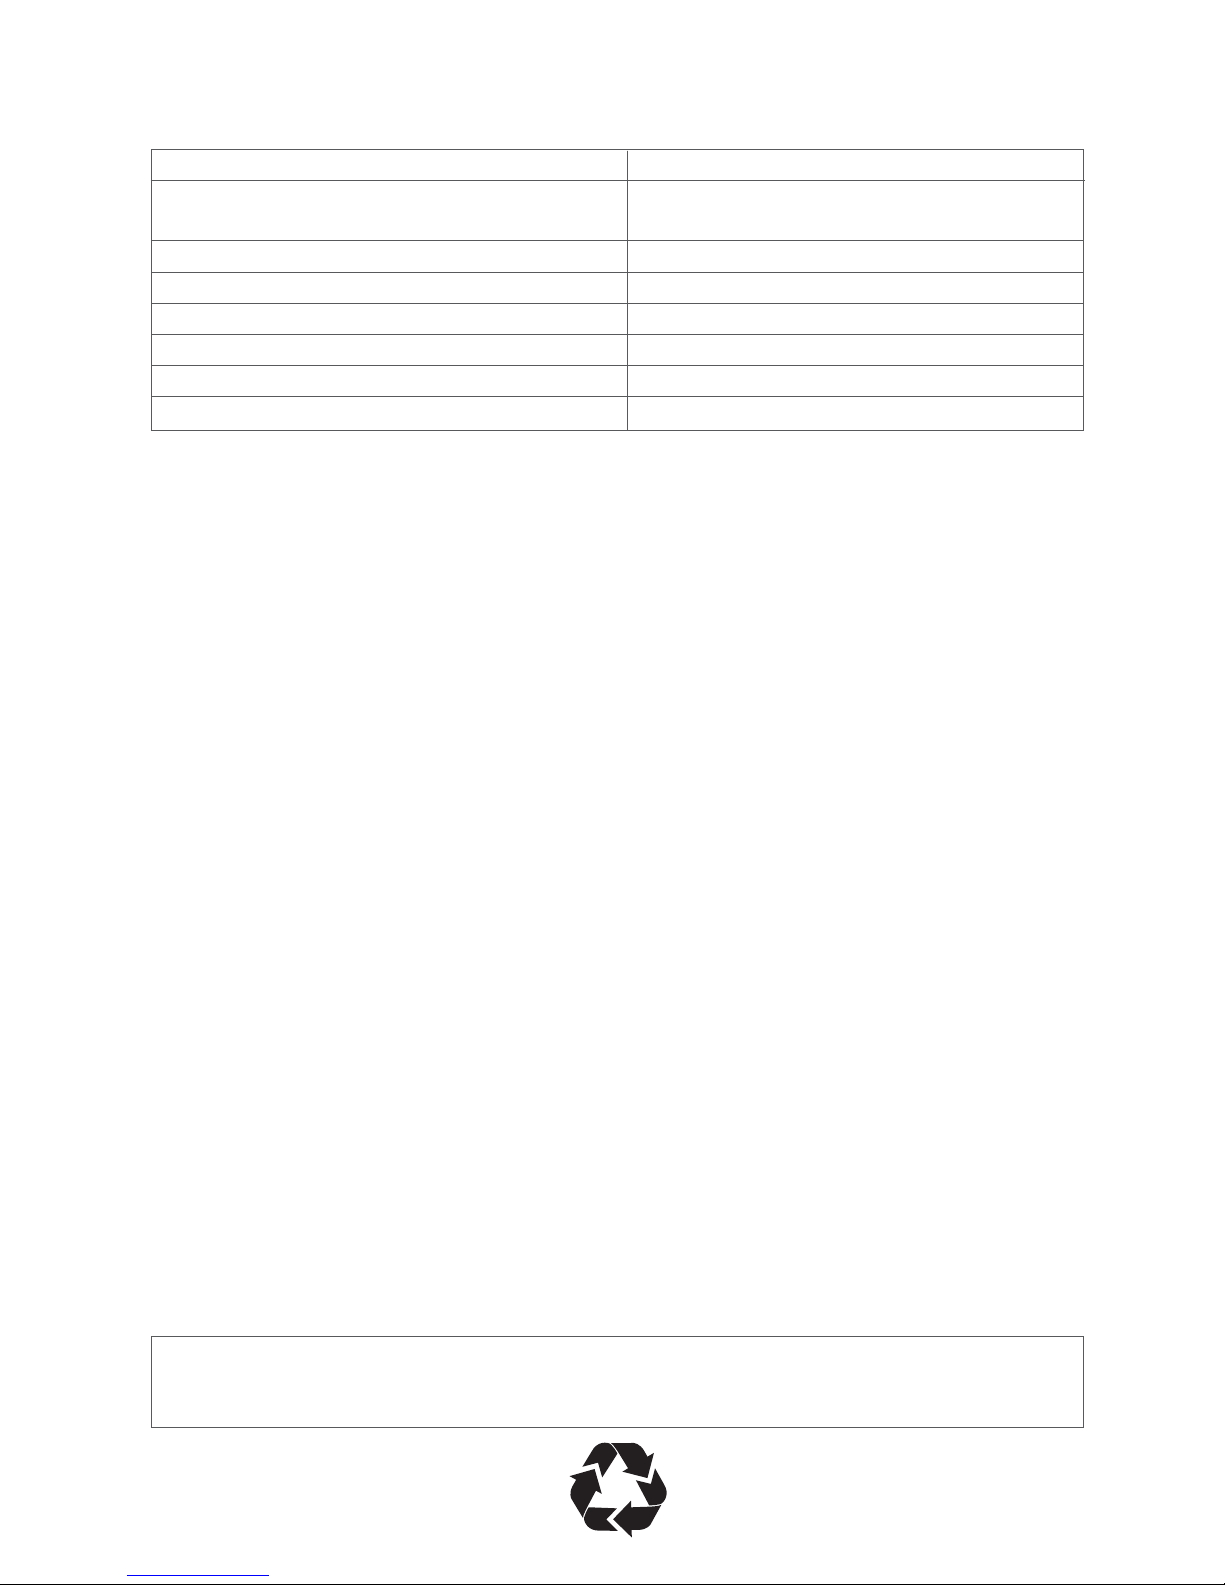
PRODUCT SPECIFICATION TABLE
Name of product as described in the marketing literature
Part number(s)
Operating temperature range
Storage temperature range
Operating humidity
RF Compliances
Safety agency approvals
Power
tgoma Game System
TGR54000, TGR79000, TGO77000, TGO92000,
TGS113000, TGS155000
0°C to +40°C (+32°F to +104°F)
0°C to +40°C (+32°F to +104°F)
10% to 90% non-condensing
FCC class B; IC class B; EN/CE class B
TBD but UL60950 etc.
4 x user supplied AA (alkaline preferred) batteries
Part
Page 20
tgoma® Game System Limited Warranty
DO NOT USE YOUR PRODUCT UNTIL YOU HAVE READ THE TERMS OF THE WARRANTY. IF YOU DO NOT AGREE TO THE TERMS
OF THE WARRANTY, DO NOT USE THE PRODUCT AND RETURN IT WITHIN 7 DAYS TO THE STORE OR THE AUTHORIZED
DISTRIBUTOR WHERE YOU PURCHASED IT FOR A REFUND.
WHAT IS COVERED
tgoma NZ Ltd. and its authorized service partners warrant this product against original defects in material and workmanship for a period of
ONE (1) YEAR. The warranty period begins from the date of purchase (proof of purchase required). This warranty is only valid when used for
private household purposes in accordance with the tgoma® Assembly Instructions. This warranty provides, at no extra cost to you, all parts
necessary to ensure your accessory is in proper working condition throughout the warranty period. For information related to the warranty
and tgoma soware, check www.springfree.com/tgoma.
WHAT IS NOT COVERED
This warranty is subject to the following terms:
tgoma NZ Ltd. shall not be liable for costs, damages or repairs incurred as a result of:
Product purchased from an unauthorized distributor.
Improper installation not in accordance with the provided tgoma Assembly Instructions.
Careless operation or handling, accident, abuse, misuse and/or lack of maintenance not in accordance with the tgoma Assembly
Instructions.
External sources such as weather, the, fire damage, cuts or vandalism.
Damage caused by repairs carried out by unauthorized parties or agents.
Damage resulting from opening the controller box and tampering with the hardware.
Use other than for private household purposes. For example, for commercial or rental purposes.
This warranty does not apply to consumable parts, such as batteries or protective coatings that are designed to diminish over time,
unless failure has occurred due to a defect in materials or workmanship.
This warranty does not apply to cosmetic damage or minor imperfections that meet design specifications or do not materially alter
functionality.
This warranty does not cover expenses related to on-site labor, travel, assembly or disassembly or other charges associated with the
repair or replacement of covered components.
This warranty does not apply to any non-tgoma products or any soware.
SUBMITTING YOUR WARRANTY CLAIM
If you believe your product has a manufacturing fault or a product defect and you need to make a warranty claim, locate and contact your
nearest tgoma customer service center at www.tgoma.com/support. Alternatively, you can lodge your warranty claim online at
http://springfr.ee/wclaim.
The terms of the warranty require that you contact tgoma NZ Ltd. with your model name, serial number, date and place of purchase and a
scan of your purchase receipt. Shipping costs associated with approved warranty claims lodged within 45 days from the date of purchase
will be covered by tgoma NZ Ltd. Beyond this 45-day period, all shipping costs are the responsibility of the customer. Replacement parts
provided under this warranty do not extend the period of the warranty.
WARRANTY LIMITATIONS
tgoma NZ Ltd. is not responsible or liable for indirect, special or consequential damages arising out of or in connection with the use or
performance of the product or any other damages with respect to any economic loss, loss of property, loss of revenue or profits, loss of
enjoyment or use, cost of removal, installation, disassembly or other consequential damages. This limitation is not allowed by some
states, provinces or territories and so this limitation may not apply to you.
tgoma NZ Ltd. will not be liable for any consequential damages or incidental damages you may incur in connection with the tgoma game
system, any portable electronic devices (tablet, phone, etc.) or trampoline or accessories. This limitation is not allowed by some states,
provinces, or territories and so this limitation may not apply to you.
Any implied warranties relating to your product, including but not limited to warranty of merchantability or warranty of fitness for a
particular purpose, are to the duration of this warranty. This limitation is not allowed by some states, provinces or territories and so this
limitation may not apply to you.
This warranty gives you specific legal rights. You may also have other rights which vary by state, province or territory.
For customers in Australia, our goods come with guarantees that cannot be excluded under the Australian Consumer Law. You are
entitled to a replacement or refund for a major failure and compensation for any other reasonably foreseeable loss or damage. You are
also entitled to have the goods repaired or replaced if the goods fail to be of acceptable quality and the failure does not amount to a
major failure.
This warranty is not transferable and applies only to the consumer who originally purchased the accessory.
This warranty does not extend to any portable electronic devices (tablet, phone, etc.) or trampoline or accessories.
If you have any questions or concerns regarding this warranty, locate and contact your nearest tgoma customer service center at
www.tgoma.com/support. If you need replacement parts but your warranty has expired, you can purchase them by contacting your nearest
tgoma customer service center.
20
 Loading...