

Page 1

User Manual
Alex™ eReader
Model DS-10
Page 2

Alex™ eReader DS-10
2
Table of Contents
1. Getting Started .....................................................................4
EPD (Electronic Paper Display) ....................................................... 4
Front View .............................................................................................. 5
Back View ............................................................................................... 6
Touch screen LCD ................................................................................ 7
Button de nitions ............................................................................... 9
Starting up & Shutting down ........................................................10
Using LCD touch screen ..................................................................12
Power Saving Features ....................................................................13
System Update ...................................................................................15
EPD status bar ....................................................................................16
2. Home screen ...................................................................... 17
Customize Home screen wallpaper ............................................17
Noti cation and connection status icons ................................18
Noti cations panel ...........................................................................19
3. Settings ............................................................................... 21
Wireless controls ...............................................................................21
Sound & display .................................................................................24
Security ................................................................................................. 26
Applications ........................................................................................ 28
MicroSD card & reader storage ....................................................29
Date & time..........................................................................................30
About your Alex eReader ...............................................................30
4. Entering Text ...................................................................... 33
5. Browser ............................................................................... 36
Opening the Browser.......................................................................36
Browser Usage Modes .....................................................................36
Un-sync mode ....................................................................................36
Sync mode ...........................................................................................37
General Browsing and Navigating of Web pages ..................39
Page 3

Table of Contents
3
Open pages in separate windows ...............................................41
Manage bookmarks .........................................................................44
Links in Web pages ...........................................................................46
Additional Menu Options ..............................................................47
Browser settings ................................................................................48
6. Email .................................................................................... 52
Add an email account......................................................................52
Use your POP3 and IMAP e-mail account ................................53
Remove an email account .............................................................57
Edit account settings .......................................................................57
Add more email accounts ..............................................................58
7. Music ................................................................................... 59
Supported music formats ..............................................................59
Load music onto your MicroSD card ..........................................60
Play back music .................................................................................61
Playlists .................................................................................................63
Delete music .......................................................................................65
8. Gallery ................................................................................. 66
Load pictures and videos onto your MicroSD card...............66
View your pictures and videos .....................................................67
Zoom and navigate ..........................................................................68
Gallery options ...................................................................................68
Play slideshow ....................................................................................70
Picture settings ..................................................................................70
9. Google Books ..................................................................... 72
Search books ......................................................................................72
About this book .................................................................................73
Download books ...............................................................................73
10. Calculator ......................................................................... 74
11. Wi-Fi ................................................................................... 76
Appendix –
Product Safety Warnings ...................................... 77
Page 4

Alex™ eReader DS-10
4
1. Getting Started
This section reviews all of the physical features of the Alex™
eReader and covers the basics of using the Alex eReader
buttons.
On the front of your Alex eReader are the EPD (Electronic
Paper Display) on top, the LCD (Liquid Crystal Display) on
the bottom, and the navigational buttons. All these features
are described in more detail below.
EPD (Electronic Paper Display)
The Alex eReader uses a revolutionary display technology
called Electronic Paper Display (EPD), which uses electronic
ink technology. It works just as ink on paper does, except
that the ink can be electronically changed so that the single
display can continuously show dynamic information. An
electronic paper display is re ective, which means it uses
surrounding light just the way a piece of paper does. You
can see the contents on the display from any angle. And
unlike with most displays, you can read it clearly and comfortably even in bright sunlight, without eye strain. Also,
an electronic paper display does not need power to keep
and show the same content; power is needed only when
the display is updated to show something new. That is why
electronic paper displays are known for their low power
usage, making them ideal for electronic readers.
The Alex eReader uses a state-of-the-art 6” monochrome
EPD with 16 gray levels. The page ash you see when you
turn a page is a unique characteristic of the technology and
is completely normal.
Page 5

1. Getting Started
5
Sync/Unsync
EPD and LCD
Screens
Headphone Jack
Next Page/Menu
Options
Power/
LCD On/O
Previous Page
Charging Indicator
USB Port
Back/Home
EPD
Electronic
Paper Display
Front View
LCD
Liquid Crystal
Display
Page 6

Alex™ eReader DS-10
6
Label
Speaker
MicroSD
Memory Card Slot
Reset
Speaker
Back View
Page 7

1. Getting Started
7
Touch Screen LCD
The Alex eReader has a 3.5” full color, touch screen LCD.
The touch screen LCD allows you to interact with the Alex
eReader in natural and instinctive ways with the touch
of your nger, like many other mobile devices, such as
smart phones. The LCD also allows you to enjoy colorful
multimedia content, something that is impossible to do on
other electronic readers. The Alex eReader brings together
the comfort and e ciency of reading on the EPD with
the responsiveness of navigating on the LCD. This is the
fundamental di erence between Alex and other electronic
readers.
Button De nitions
Note
The buttons on the Alex eReader are used in two ways: “press” and
“long press.” To press a button, simply push the button and release
it. To long press a button, press and hold it for three seconds, then
release it.
POWER button
Press POWER button to turn on your Alex eReader.
Press to turn o the LCD and put your Alex in power-sav-
ing reading mode.
Press to turn on the LCD if your Alex has been in power-
saving reading mode.
To turn on Screen Lock mode, which locks all the control but-
tons and LCD screen from accidental touch activation, long
press . From the menu that opens, select Screen lock. Alex
then goes to sleep and a screen image appears on the EPD
display.
LCD
Page 8

Alex™ eReader DS-10
8
Press to wake up your Alex from Screen Lock mode, and
then long press
to unlock the screen (if the unlock pattern
has not been set).
To turn your Alex eReader completely o , long press
. From
the menu that opens, select Power o . Powering o is not
necessary.
Tip
Your Alex automatically turns on Screen Lock mode after ve min-
utes if you are not using it. To wake up your Alex eReader from
Screen Lock mode, press to wake up the screen and long press
to unlock the screen (if the unlock pattern has not been set).
BACK button
Press to go back to the previous LCD screen, or to dismiss a
dialog box or menu.
Long press to return to the Home screen from any applica-
tion.
SYNC/UNSYNC button
Press this button to synchronize or unsynchronize the con-
tents between the LCD and the EPD.
PREVIOUS PAGE button
Press to go to the previous page in your reading material
on the EPD. This button is used for EPD control only and can
work in power-saving reading mode.
NEXT PAGE button
Press
to go to the next page in your reading material on
the EPD. This button can work in power-saving reading mode.
Long press
to display the Menu for the application you are
Page 9

1. Getting Started
9
using on the LCD touch screen. The Menu appears at the bottom of the screen. To hide the menu, long press
again.
Charge Indicator light
An LED light on the Alex eReader indicates charging status:
Solid red Battery is charging
Solid green Battery is fully charged (while USB charging
cable is connected)
No light USB charging cable is not connected
USB port
Plug in the included USB cable to transfer content between
your computer and your Alex eReader. Your Alex will also
accept a small trickle charge over the USB that may extend
your battery life if your computer’s USB port or powered
USB hub provides power.
Headphone Jack
Plug in headphones to listen to an audiobook or background music. Attaching headphones turns o the speaker.
RESET button
Press this button to reset your Alex eReader. Alex will take a
few minutes to restart. You should not normally need to use
this button.
Speaker
The speaker allows you to listen to audiobooks or background music. Attaching headphones turns o the speaker.
Page 10

Alex™ eReader DS-10
10
Starting Up
Press to turn on your
Alex eReader.
At start up, the LCD displays Alex logo, as shown
on the right, while the
system is loading.
Alex is starting up. Please wait...
Home Screen
After start up, Alex Home
screen shows on the LCD,
as in the following illustration.
Page 11

1. Getting Started
11
Shutting down
Long press . From the menu that opens, select Power o .
Page 12

Alex™ eReader DS-10
12
Using LCD touch screen
Selection
To select an item or button on the screen:
Touch the item directly with your ngertip. You know that an
item on the screen is selected when its color changes, usually
to yellow or orange.
Scroll
To scroll up or down a list or page on the screen:
Slide your nger up or down on the screen. With repeated
short, quick brushing gestures, you can accelerate the scroll.
Touch the screen to stop the scrolling.
Touch
When you want to (1) type using the onscreen keyboard,
(2) select items onscreen such as applications and settings
icons, or (3) press onscreen buttons, simply touch them
with your nger.
Touch and hold
To open the available options for an item (for example, to
link to a webpage), simply touch and hold the item.
Swipe or slide
To swipe or slide means to quickly drag your nger vertically or horizontally across the screen.
Flick
Flicking the screen is similar to swiping, except that you
Page 13

1. Getting Started
13
need to swipe your nger in light, quicker strokes. This
nger gesture is always in a vertical direction, such as when
icking a message list.
Drag items
In some contexts you can drag items on the screen with
your ngertip. To drag an item:
Touch & hold the item you want to drag with your ngertip.
Without lifting your ngertip, move your nger to the new
location where you want the item to be placed.
Zoom in or out
To zoom in (e.g., on a web page or a full-screen picture.):
Touch the screen to open the zoom-in/zoom-out controls 1
Touch 2 control to zoom in. Each touch zooms in closer.
To zoom out (e.g., on a webpage or a full-screen picture):
Touch the screen to open the zoom-in/zoom-out controls 1
Touch 2 control to zoom out. Each touch zooms out fur-
ther.
Power-saving features
The Alex eReader is optimized for reading, especially for
reading on an EPD, which can hold display contents without
power consumption. Alex takes advantage of this feature,
and minimizes power consumption while you are reading.
The following power states are designed to minimize power
usage on the LCD.
Page 14

Alex™ eReader DS-10
14
LCD dimming
If the LCD on Alex is not used for a certain time, the screen
automatically dims. Touch anywhere on the LCD, or press
the BACK button to turn the LCD back on.
LCD timeout
After the LCD has dimmed, if there is another period of
inactivity, the touch screen automatically turns o . Press the
POWER button to turn the LCD touch screen back on.
Screen Lock
Screen Lock locks the control buttons and LCD screen from
accidental touch activation.
Long press
. A context menu pops up as in the following
illustration.
From the menu that opens, select Screen lock. Your Alex
then goes into power-saving mode. The LCD turns o , and
the EPD display continues to display the current contents.
The Alex eReader also enters Screen Lock mode automati-
Page 15

1. Getting Started
15
cally after the screen has timed out and another period of
inactivity has occurred. The automatic screen lock timer is
preset and cannot be altered.
You can increase the security of your Alex eReader by setting a screen unlock pattern. Once you have set this pattern,
you’ll need to draw the correct unlock pattern to unlock
your screen.
System updates
When a new system image is available, the Alex eReader
downloads it automatically in the background. Alex
prompts you to update the system after the system image is
downloaded. The system update does not a ect your data.
The Alex eReader checks to see if a new system image is
available for system update after the network connectivity is turned on for the rst time. After that, Alex checks to
see if there is a new system image every 24 hours while
network connectivity is available. If network connectivity is
Page 16

Alex™ eReader DS-10
16
unavailable, Alex checks for a new system image as soon as
network connectivity is available again.
The system image downloads automatically. When downloading is nished, a dialog box pops up to notify you.
Select Update now to install the new system. If you choose
Update later, the system noti es you again after 30 minutes.
If you skip it again, the dialog box does not reappear.
EPD status bar
The details of the EPD status bar are as follows.
Page 17

2. Home Screen
17
2. Home Screen
Home screen overview
The Home screen on the LCD is your starting point for using
the applications on your Alex eReader.
Simply touch an icon to use the application it represents.
Tip
Wherever you are and whatever you’re doing on Alex LCD screen,
simply long press the
button to return to Home screen.
Customizing the Home screen wallpaper
Wallpaper your Home screen with pictures you have stored
in the Alex eReader’s internal memory, or select a picture
from the Wallpaper gallery that comes preinstalled:
Select Pictures to open your picture album. Note that if this 1
is the rst time you have viewed the pictures stored in Alex
internal memory, it may take a few moments for the pictures
to load.
Navigate to nd the picture you want to use, and select it.
The cropper appears. Touch and hold an edge of the cropper
to reveal the sizing arrows, then drag the edge in or out to size
Status bar
Page 18

Alex™ eReader DS-10
18
the picture. Touch and drag the center of the cropper to move it
within the picture.
When you’re happy with the cropped area, select Save.
Alex then applies the wallpaper you’ve selected.2
Noti cation and connection status icons
Along the top of the LCD screen is the status bar. On the left
side of the status bar are noti cation icons that represent
various operational modes, reminders, or special messages.
On the right side of the status bar are connection and battery status icons.
Noti cations
Noti cation icons report the arrival of new email, alarms set,
and ongoing settings. You can open the Noti cations panel
to open email, reminders, or event noti cations and see the
wireless service provider name.
New email message
Wi-Fi service connected, network available
Battery indicators: full , half-full , low , very low
Battery is charging
Song is playing
Data is syncing
Memory is full!
Uploading/downloading
Content downloaded
More (undisplayed) noti cations
Sign-in/sync error
Page 19

2. Home Screen
19
Noti cations panel
Opening the Noti cations panel
When a new noti cation icon appears in the status bar,
touch and hold the status bar, then slide your nger downward to open the Noti cations panel.
If you have several noti cations, you can scroll down the
screen to view more noti cations.
Tip
You can also open the Noti cations panel on the Home screen by
long pressing button and then touching Noti cations.
Closing the Noti cations panel
Touch and hold the bottom bar of the Noti cations panel,
then slide your nger up the screen, or press
.
Reading your noti cations
When you see a noti cation in the status bar, touch the bar
and slide your nger down the screen to open the list of
noti cations displayed in the sliding window.
Page 20

Alex™ eReader DS-10
20
Ongoing noti cations report activities that are still in prog-
ress, such as application or content downloading, or music
playing.
Noti cations report the completed events, such as a success-
fully completed download. You can clear the noti cations list
by selecting Clear noti cations at the top of the Noti cations
window.
To open a noti cation, touch the item. To close the noti cations window, slide your nger up the screen. You can also
open the noti cations window by pressing and holding the
Back button and selecting Noti cations.
Page 21
3. Settings
21
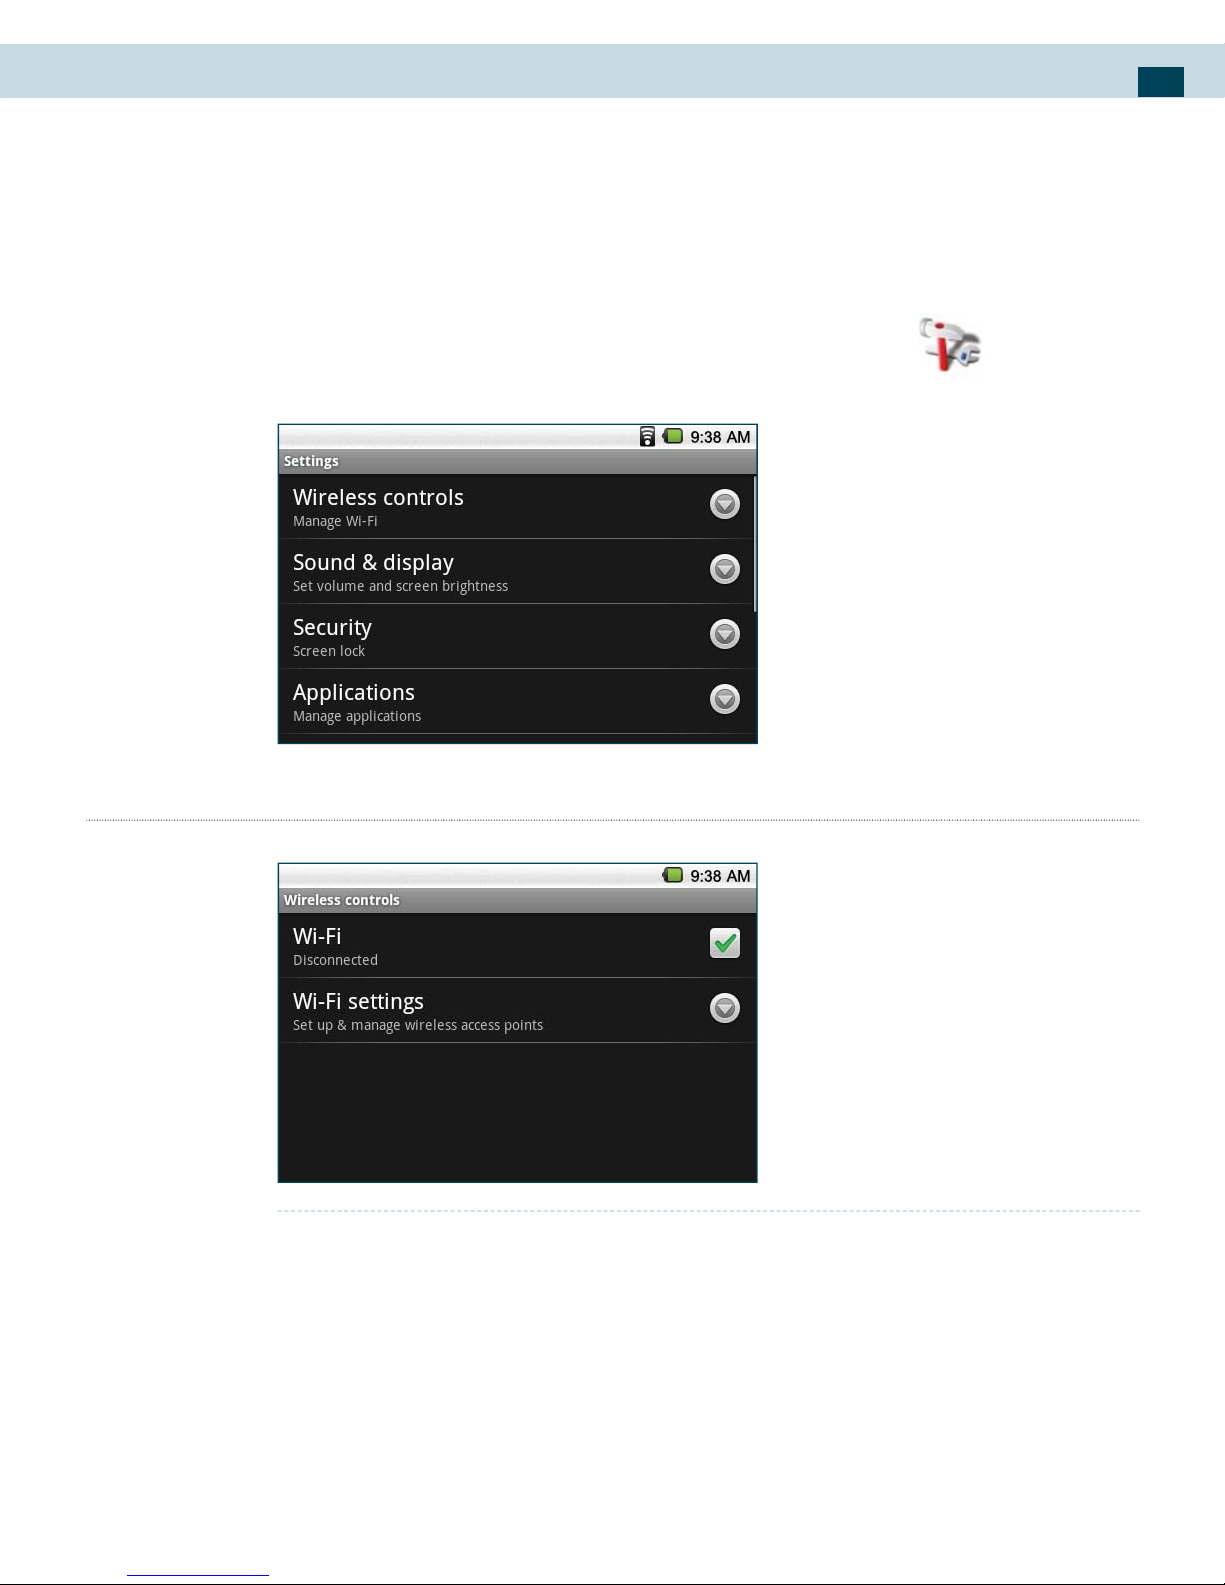
3. Settings
The Settings screen on the LCD allows you to set a variety of
control parameters for your reader.
To select this screen, touch the Settings icon
on the
Home screen. The LCD then displays the following:
Wireless controls screen
Turning Wi-Fi on and o
To use Wi-Fi for your data connection, do the following.
Touch the Settings icon, then touch Wireless controls.1
Select the Wi-Fi check box to turn on Wi-Fi. The Alex eReader 2
then scans for available wireless networks.
Page 22

Alex™ eReader DS-10
22
Wi-Fi settings screen
Open the Wi-Fi settings screen by selecting Wi-Fi settings on
the Wireless controls screen.
To view and scan for available networks, long press the
button and then select Scan.
To connect to a network, select it from the network list. Pro-
vide your username or password if required.
Note
The next time your Alex eReader connects to a previously accessed
secured wireless network, you will not be prompted to enter the WEP
key again, unless you reset your Alex to its factory default settings.
Wi-Fi networks are self-discoverable, which means no additional
steps are required for your Alex to connect to a Wi-Fi network. It may
be necessary to provide a username and password for certain closed
wireless networks.
Checking the wireless network status
You can check the current wireless connection status in two
ways, from the Status bar or the Wi-Fi settings screen.
1. Status bar
When your Alex is connected to a wireless network, the WiFi icon
appears in the Status bar, indicating the approxi-
Page 23

3. Settings
23
mate signal strength by the number of bands that light up.
If Network noti cation in Wi-Fi settings is enabled, this icon
appears in the Status bar whenever an available wireless
network is within range.
2. Wi-Fi networks
On the Wireless controls screen, touch Wi-Fi settings, then
touch the wireless network to which the Alex eReader is
currently connected. The Wi-Fi network name, status, speed,
signal strength, security information, and IP address are
then displayed.
Note
If you want to remove this wireless network setting on your reader,
touch Forget on this window. You will need to enter the settings
again if you want to connect to this wireless network.
Turning Network noti cation on or o
Select the Network noti cation check box if you would like
to be noti ed when there is an open network available.
Connecting to another Wi-Fi network
On the Wireless controls screen, touch Wi-Fi settings. Detect-1
ed Wi-Fi networks are then displayed in the Wi-Fi networks
section.
Page 24

Alex™ eReader DS-10
24
Tip
To scan manually for available Wi-Fi networks, on the Wi-Fi settings
screen, long press
button, and then touch Scan.
Touch another Wi-Fi network to connect to it.
2
Note
If the wireless network you want to connect to is not in the list of
detected networks, scroll down the screen, then touch Add Wi-Fi
network. Enter the wireless network settings, then touch Save.
Sound & display screen
Sound settings screen
Media volume: To adjust the volume of music, videos, and
voice recordings on the Alex rReader, select Media volume,
then slide your nger along the volume bar to set the volume.
Audible selection: To have the Alex make a clicking sound
when you select an item on the LCD touch screen, touch this
check box.
Display settings
Animation: To have the Alex LCD show animated opening and
closing windows, touch this check box.
Brightness: To adjust the brightness of the Alex eReader LCD
screens, slide your nger along the brightness bar to set the
level. Under bright light conditions or sunlight, increase the
level. From the Alex Reader Home screen, do the following.
Touch Settings.1
Touch Sound & display, scroll down the screen, then touch 2
Brightness.
Drag the brightness slider to the left to decrease or to the right to 3
increase the screen brightness.
Touch OK.4
Page 25

3. Settings
25
LCD timeout: To set the amount of time the LCD must be
inactive before the LCD screen turns o , use this setting. LCD
timeout length includes LCD dimming time, so make sure the
duration you set is longer than that of the LCD dim timeout
setting. You can select Never timeout if you wish, but battery
life decreases when the LCD does not time out. To set the LCD
timeout duration from the Alex eReader Home screen, do the
following.
Touch Settings.1
Select Sound & display.2
Scroll down to the Display settings section and select LCD tim-3
eout. Select an amount of time, or select Never timeout, from the
menu.
Tip
At any time, to turn o the screen before the LCD times out, press the
POWER button .
LCD dim timeout: To set the amount of time the LCD must be
inactive before the LCD backlight is turned o , use this setting. This duration must always be shorter than the setting for
the LCD timeout. From the Alex eReader Home screen, do the
following.
Touch Settings.1
Select Sound & display.2
Scroll down to the Display settings section and select LCD dim-3
ming. Select a time from the menu.
Page 26

Alex™ eReader DS-10
26
Note
LCD timeout and LCD dim timeout are designed to reduce power
consumption by the LCD, but you can continue reading on the EPD
and navigate through the reading material with PREVIOUS PAGE,
NEXT PAGE, and Text Size buttons.
Wallpaper: To customize the wallpaper on the Alex Home
screen, use this option. (See “Home Screen” in Section 2 of this
user manual for instructions.)
Security
Screen lock
Screen lock timeout: To adjust the delay of Screen Lock after
the LCD screen turns o , use this option.
Screen unlock pattern
Require Pattern: Select this check box to require drawing a
pattern to unlock the LCD screen.
You can set your Screen unlock pattern as follows:
Touch Settings.1
Select Security, then scroll down to the Screen unlock pattern 2
section.
Select the Require pattern check box.3
Set or change your unlock pattern by selecting either Set unlock 4
pattern or Change unlock pattern, as applicable.
Follow the prompts to de ne your pattern. 5
Note
Slide your nger along the screen to create the pattern; do not select
individual dots. Connect at least four dots.
Page 27

3. Settings
27
When you unlock the screen, if you want your pattern to be hid-6
den as you draw it, clear the Use visible pattern check box.
Use visible pattern: Select this check box to make the pattern
visible as you draw it on the screen.
Tip
Clear the Use visible pattern check box if you do not want the unlock
pattern to display on the screen when you unlock it.
Change unlock pattern: To change your unlock screen pattern,
use this option.
Passwords
Visible passwords: Select this check box to display your pass-
word as you type it.
Page 28

Alex™ eReader DS-10
28
Applications
The Applications tab holds all applications on your reader.
All applications that you download and install from the web
are also added to the Home screen.
Unknown sources
Select this check box if you want the ability to download
applications from the Web. To ensure that your personal
data on the Alex eReader remain secure, it is recommended
that you DO NOT select this check box.
Manage applications
View all the applications stored on your Alex eReader and
how much space they occupy. If you’ve downloaded an application from the Web, you can uninstall it from this screen.
Select a speci c application to:
Clear Data: Use this option to clear your user data (if you have
any associated with a particular application).
Clear Defaults: Use this option to associate the application
with any actions. For example, you may have chosen to use
Music to open any Browser links to music les. If you’d like to
use another application to open music links, simply select the
Clear defaults button. The next time you try to perform that
action, you’ll be shown a dialog box so that you can select an
application. To make it the default, make sure you select Use
by default for this action check box on this dialog box before
you select the application.
Uninstall: If you’ve downloaded an application from the Web,
you can uninstall it from this screen by selecting Uninstall.
Page 29

3. Settings
29
MicroSD card & reader storage
This option allows you to view and manage the data storage on your Alex eReader. Alex has a total of 2GB internal
ash memory.
MicroSD card
Monitor and manage the use of your MicroSD card by using
the following.
Total space – This line reports the total storage of the
MicroSD card.
Available space – This line reports how much MicroSD
storage is free.
Unmount MicroSD card - Unmount your memory card
from your reader for safe removal. Note that when your Alex
rReader is connected to your computer via USB, you cannot
use the Alex to read books, view pictures, or play any media
stored on the card.
Format MicroSD card – Erase all data on the MicroSD card.
Internal reader storage
Reports internal memory status
Available space - Reports how much internal storage is free
Factory data reset - Select to reset your reader to factory set-
tings. This will erase all the additional application and data
that you have installed yourself. All factory installed applications and data will remain, however, you must sign in and go
through the set up process to use any of the factory installed
applications.
Page 30

Alex™ eReader DS-10
30
Date and time
Set date, time, time zone, and the format in which to view
date and time information.
Touch Settings.1
Scroll down the screen, then touch Date & time.2
Set date – Click to set the date using the pop up window. On the
Change date window, touch
or to adjust the date, month,
and year, then touch Set when nished.
Set time zone – Click to set or change the time zone by choosing
the appropriate location. Set time zone, then select the time zone
in the list. Scroll down the list to view more time zones.
Set time – Click to set the time using the pop up window. On the
time window, touch
or to adjust the hour and minute,
then touch AM to change to PM or vice versa. Touch Set when
nished.
Time format - Select from Use 24-hour formats.
Select date format - Select from a variety of formats to show date
information
About your reader
View general reader information
Status
View your reader Status. This screen lists a variety of information, including
Battery status (Possible options are: full, half full, low, very
low)
Serial number
Wi-Fi address(es) that you’re connected to
Page 31

3. Settings
31
Legal Information
Select Legal information for copyright and licensing information, as well as the Google Terms of Service for the
Google applications on your reader.
Register/Deregister
Turn on Wi-Fi.1.
In home screen, touch Settings > 2.
About your reader
Touch Register3.
Enter your Spring ID and password, 4.
and press Sign in
Page 32
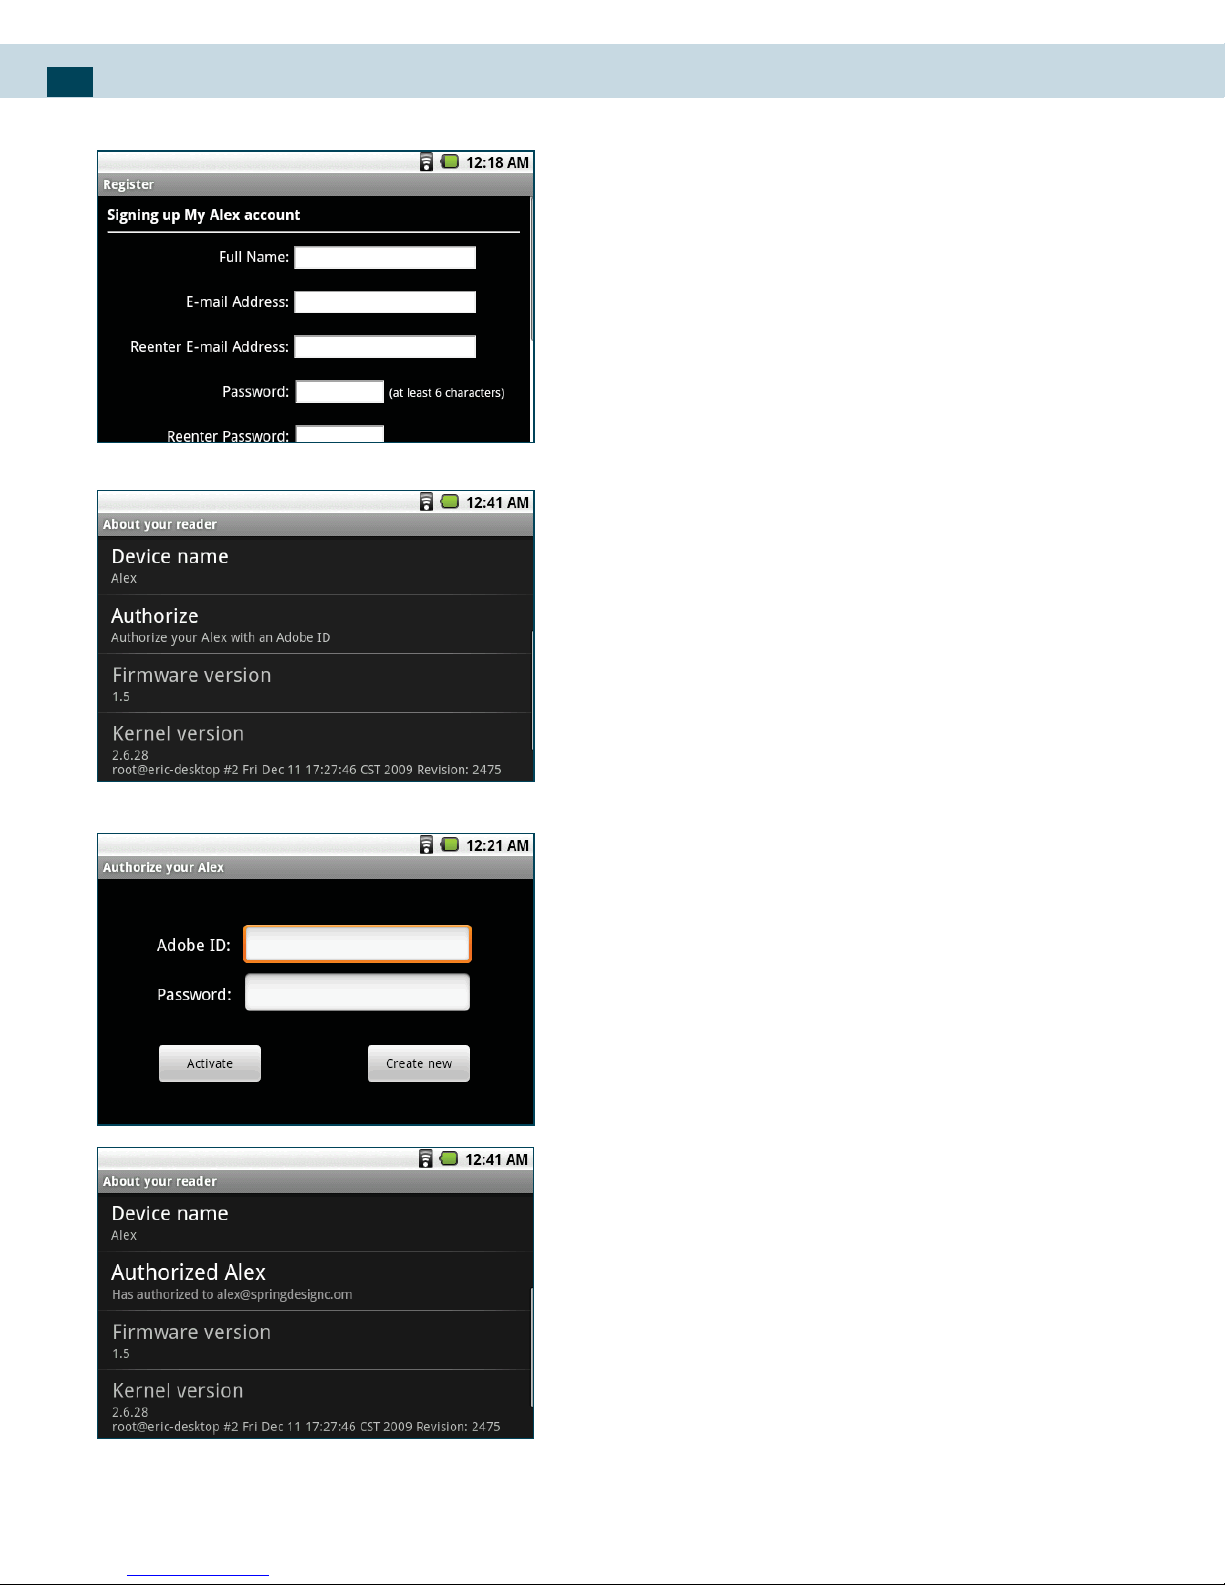
Alex™ eReader DS-10
32
If you don’t have Spring ID, please 5.
press Not a member to apply for Spring
ID.
In order to deregister your Alex, press
6.
Deregister, then Spring ID will be
changed to be Null.
Device name – Edit your current
device name. In default, device name
is “Alex.”
Authorize – Authorize your Alex with
an Adobe ID
Press Settings->About your Reader1.
Touch Authorize, users can input 2.
Adobe ID and its password, then press
activate to authorize Alex.
If he or she doesn’t have an Adobe ID,
he or she can press “Create new” to
register from: http://www.adobe.com/
cfusion/membership
Authorized Alex3.
View additional information about
your reader
Model number
Firmware version number
Kernel version number
Build number
Page 33

4. Entering Text
33
4. Entering Text
Tex t
When you start a program or select a eld that requires text
or numbers, the virtual keyboard becomes available.
The keyboard is similar to a standard keyboard on your
computer.
Tip
When you do not need the keyboard, you can close it by pressing
BACK. To show the keyboard again, touch a text box virtual or when
a text eld is selected.
Tip
Touch the text on virtual to position the cursor next to the character
you want to edit.
Note
The available keys on the keyboard will be di erent depending on
the current text eld selected. For example, in Browser, when you
are in the URL eld, some keys at the bottom row are replaced with
alternate keys (for example, .com key) to make it faster for you to
type web addresses.
Page 34

Alex™ eReader DS-10
34
Adjusting keyboard settings
Set virtual keyboard options such as vibrate and/or emit
a sound when you touch a key, auto-capitalization, autocomplete, and more.
To set virtual keyboard options
Touch Settings > Locale & text > Android keyboard.1
Set the options you want to use for the virtual keyboard. 2
Tip
If you select the Quick xes, Show suggestions, and Auto-complete
options, the reader o ers you smart word suggestions as you type,
so you can enter text more quickly and accurately on the virtual
keyboard.
Entering numbers and symbols
Switch to the numeric and symbol virtual keyboard to let
you enter numbers and common symbols such as parentheses, braces, currency signs, punctuation marks, special
characters, and more.
Page 35

4. Entering Text
35
Text Settings
Auto-replace – Select this check box to automatically correct
commonly mistyped words. This feature is not a spell-checker.
Auto-cap – Select this check box to automatically capitalizes
the rst letter in a text eld, or the rst letter after a period (.),
question mark (?), or exclamation point (!).
Auto-punctuate – Select this check box to automatically in-
serts a period (.) when you type two spaces in succession.
Page 36

Alex™ eReader DS-10
36
5. Browser
Browser is a full-featured web browser with dual screen
functionality exhibiting our patented “Touch and Project”
concept. When using Browser, the LCD is primarily used for
easy navigation through various web pages, and the EPD is
used for reading the content of the web pages.
Opening the Browser
To open the Browser, touch the Browser icon in home
screen.
The Browser always opens to the last Web page you were
viewing. The rst time you enter the Browser after powering
on, your default home page will display. You can change
your default home page by long pressing NEXT PAGE button
and selecting More > Settings > Set home page.
Browser Usage Modes
The browser operates in two di erent modes: un-sync (LCD
only) and Sync. Each of the modes will be described in more
detail in the following sections.
Un-sync mode
The Browser uses Un-sync mode as the default mode of
operations until Sync mode is engaged. In Un-sync mode,
you can browse various web pages just as you would on any
other mobile browser, and all contents are shown exclusively on the LCD. Un-sync mode is generally used for quick
browsing and navigation purposes.
Page 37

5. Browser
37
The menu of Un-sync mode is like the following:
Sync mode
In Sync mode, web page content is projected onto the EPD
for easy and comfortable reading, while the LCD helps you
navigate the web page. Move on LCD and corresponding
content will change on EPD after movement stops.
Entering Sync Mode
To enter Sync mode from Un-sync mode, press SYNC/
UNSYNC button
.
Once the Sync mode is entered, the LCD displays a reduced
size view of the full web page:
Page 38

Alex™ eReader DS-10
38
The EPD is refreshed to show the content on the current
web page. EPD display is like the following.
Navigating in Sync mode
If you are satis ed with the portion of content shown on
the EPD, you can read using the EPD, and use the PREVIOUS
PAG E
or NEXT PAGE
buttons to continue to move up
or down the web page along the same column. In order to
navigate the view area on EPD, you can move the webpage
in LCD, scroll up/down, left/right. As soon as you release,
the content on EPD will be updated.
Exiting the Sync Mode
To exit Sync mode, press SYNC/UNSYNC button .
Page 39

5. Browser
39
General Browsing and Navigating of Web pages
Open Browser to start sur ng the web. Browser is fully
optimized and comes with advanced functionalities that let
you enjoy Internet browsing on your reader.
Note You must have Wi-Fi connection to access the Internet.
To open Browser
Long press Back button, then touch Browser.
Note
Browser automatically opens when you touch a web link in an email
or text message.
Go to a Web page
Make sure the focus is not on a text box and then start typ-1
ing the URL. Or, long press
button and select Go.
The Go to window opens. Possible matches appear in the
2
drop-down menu.
Select a match or continue typing the URL.
Press GO to go to the page.3
Refresh a Web page
Long press NEXT PAGE button
and select Refresh to
refresh the contents of the current page.
Page 40

Alex™ eReader DS-10
40
Back
Simply press the BACK button to move backwards to see
the previous web page.
Forward
Long press NEXT PAGE button
and select Forward to
move forward to see the next web page previously loaded.
Home Page
You can change your default home page by long pressing
Back button
and selecting More > Settings > Set home
page.
Zoom in
Touch the screen to open the zoom-in/zoom-out controls.1
Touch 2 to zoom in. With each touch you zoom in closer.
Zoom out
Touch the screen to open the zoom-in/zoom-out controls.1
Touch 2 to zoom out. With each touch you zoom out fur-
ther.
Page 41

5. Browser
41
Sync
Slide your nger in any direction to shift your page view, gen-
erally in the opposite direction that you want to view.
To scroll to a particular location quickly on a reduced sized
view of the web page:
Touch the screen to reveal the zoom controls and the “scale & 1
scroll” icon
at the bottom right of the screen .
Touch the icon. A miniaturized version of the entire Web page 2
will display on the LCD and the magnifying window will open.
Drag the window to the portion of the web page you want view, 3
then release. An expanded version of that portion of the web
page will be displayed on the LCD.
Open pages in separate windows
You can keep more than one Web page open by using
multiple windows to display the pages. You can open up to
eight windows.
Open a new window
From a web page, long press NEXT PAGE button 1
and select Windows. The Current windows screen opens, showing
the Web page you started from, plus a “new window”.
Select New window.
2
Page 42

Alex™ eReader DS-10
42
Your home page opens in a new window.3
To return to one of the other windows, long press 4
button
and select Windows. Select the window you want to view.
View the page in a window
Browser o ers a host of features that let you view web
pages just like on a desktop computer.
To select a window to view it full-screen, you can use the
context menu:
From a web page, long press 1
and select Windows. The
current available windows screen appears.
Touch the window you want to view.
2
OR
Touch & hold the window you want to view. From the con-3
text menu that opens, select View.
Close a window
From a web page, long press 1
and select Windows. The
current available windows screen appears.
Touch the
2 in the lower-right corner of the window you
want to close.
Or
Touch & hold the window you want to close. From the con-3
text menu that opens, select Close.
Bookmark the page displayed in a window
From a web page, long press 1
and select Windows. The
Current windows screen appears.
Touch & hold the window whose page you want to book-
2
mark. The context menu opens.
Page 43

5. Browser
43
Select Bookmark.3
Con rm the URL and name, and then select OK.4
View page info
From a Web page, long press 1
and select Windows. The
Current windows screen appears.
Touch & hold the window whose page you want to view
2
more information about that page. The context menu opens.
Select Page info.
3
When you’re nished reading the information, select OK.4
To switch between browser windows
On a browser window, long press 1
and then touch Win-
dows.
On the Current windows screen, touch the browser window 2
you want to view.
To close a browser window, touch on the browser window you want to close.
To copy text on a web page
Copy text from web pages and then paste them on emails.
Open the web page where you want to copy text. 1
Page 44

Alex™ eReader DS-10
44
Locate the text you want to copy and then long press 2
and then touch More > Select text.
Tip
Zoom out of the page before you select text.
Position your nger at the start of the text you want to copy
3
and then drag to the end of the text you want to copy. Copied text is highlighted in pink.
Release your nger from the screen.
4
To paste text on an email, touch and hold the text box on
an email and then touch Paste on the options menu.
Manage bookmarks
Add a bookmark
Bookmark the Web page you are currently viewing:
Long press 1
and select Bookmarks.
From the Bookmarks screen, select New bookmark.
2
Con rm the URL and name, then select OK.3
OR
Go to a Web page you want to bookmark.1
Long press 2
and select Bookmarks.
Page 45

5. Browser
45
Long press 3
and select Bookmark last-viewed page. The
Bookmark link dialog box opens.
Con rm or edit the information, then select OK.
4
Bookmark any page
Long press 1
and select Bookmarks.
Select New bookmark.
2
Type a name and location (URL) in the dialog box.3
Select OK.4
Bookmark a highlighted link on a Web page:
Touch & hold the highlighted link to open the context menu.1
Select Bookmark link.2
You can save as many bookmarks as you like in the Browser.
View bookmarked pages
Long press 1
and select Bookmarks. The Bookmarks screen
opens. All the previously saved bookmarks appear as a list.
Touch & hold the bookmark you want to open. The context
2
menu opens.
Select View page or Open in new window.
3
Edit bookmark
Long press 1
and select Bookmarks.
Touch & hold the bookmark you want to edit. The context
2
menu opens.
Select Edit bookmark. The edit bookmark dialog box opens.
3
Type your change and select OK.4
Page 46

Alex™ eReader DS-10
46
Delete a bookmark
Long press 1
and select Bookmarks.
Touch & hold the bookmark you want to send. The context
2
menu opens.
Select Delete bookmark. You will be asked to con rm that
3
you want to delete the bookmark.
Links in Web pages
To go to a link, select the link by touching it with your ngertip on the LCD. Links are outlined in yellow when highlighted. Click on a link to load the URL. Additional options
are available for each link. Touch & hold a link to open the
context menu and the available options are:
Open – Open the link to load the URL in the current LCD win-
dow. This is the same e ect as simply touching the link.
Open link in new window – A new window on LCD will be
opened to load the URL speci ed by the link. See Open pages
in separate windows section for more details on switching
between various windows on LCD.
Bookmark the link – The link will be saved as a bookmark.
See Manage bookmarks section for more details on other
ways of adding bookmarks to web pages.
Copy the link to the clipboard – Save the URL address tem-
porarily in the clipboard, and the address can be pasted at a
later time.
Page 47

5. Browser
47
Additional Menu Options
History
The Recently-visited pages (history) screen lists the last 250
sites you’ve visited on the Web. To view your browser history:
From the Browser screen, long press 1
and select More >
History.
Select a web site from the Recently-visited pages list to go to
2
the site.
Tip
You can also check your most visited web pages by long pressing
Back button and then touching Bookmarks > Most visited tab.
Downloads
Before you download any les or applications using the
Browser, you must explicitly “allow” downloading in settings.
Long press 1 , then long press
and select Settings.
Select Applications, then on the Application settings screen,
2
select the Unknown sources check box.
All items downloaded form the Web are stored on your SD
card, so be sure you have a card installed in your reader
before you download from the Browser.
The Browser will only allow you to download items that are
supported by an application installed on the reader.
Warning
Applications downloaded from the Web can be from unknown
sources. To protect your reader and personal data, only download
applications from sources you trust, such as Alex Market.
Page 48

Alex™ eReader DS-10
48
View your downloads
To see which les or applications you have downloaded:
Within the Browser, long press 1
and select More > Down-
loads.
The Download history screen appears with the list of down-
2
loads. If you have no downloads, nothing will be shown on
this screen.
View Page info
To see the information about a web page:
From a Web page, long press 1
and select More > Page info.
Additional information will be shown regarding the web
2
page.
When you’re nished reading the information, select OK.
3
Browser settings
To set Browser preferences, within the Browser, long press
and select More > Settings.
Page content settings
Text size
Select to open the Text size menu. Default setting is Normal,
but you can increase the size to Larger or Largest, or decrease to Smaller or Smallest.
Block pop-up windows
Select this check box if you want pop-up windows to be
blocked.
Page 49

5. Browser
49
Load images
Select this check box if you want images on Web pages to
load. For faster page loading, clear this check box.
Auto- t pages
Select to size pages to the screen automatically.
Enable JavaScript
Select to enable JavaScript on pages. Disabling JavaScript
may cause some Web pages to not work properly.
Open in background
Select if you want links to new pages to always open in a
new window in the background.
Set home page
Your currently-set default home page is shown on the
Settings screen. To change your home page, select Set
home page, type the URL for your desired home page, then
select OK.
Privacy settings
Clear Data
Select the appropriate option to clear the following:
Browser cache
Browser page-visited history
Stored cookie data
Saved form data
Page 50

Alex™ eReader DS-10
50
Clear History
Clear the browser navigation history
Accept cookies
Select this check box if you want the Browser to save cookies. Some Web sites might not work properly with cookies
disabled.
Accept cookies
Clear all the browser cookies
Remember form data
Select this check box if you want the Browser to remember
text you have typed in forms, so that you can select the
same text later rather than retyping it.
Clear form date
Security settings
Remember passwords
Select this check box to save usernames and passwords to
various Web sites.
Clear passwords
Select Clear passwords to clear all your saved passwords.
Show security warnings
Select this check box if you want a warning to be displayed
when you are going to an insecure Web site.
Page 51

5. Browser
51
Advanced settings
Enable Google Gears™ open source browser plugin
Select to enable the Gears Browser plugin. Google Gears
extends the Browser with APIs to create a richer platform for
Web applications.
Gears settings
View permissions granted to Web sites to use Gears.
Reset to default
Select if you want to reset all Browser settings to factory
default values, except for your home page.
Page 52

Alex™ eReader DS-10
52
6. Email
The Email application allows you to set up email accounts
on your reader and access all your emails from your Alex
Reader.
To use email, you must set up your email accounts.
Add an email account
You can download messages from up to ve POP3 or IMAP
accounts. Follow these steps:
Long press Back button 1 , then select the Email icon .
The Set up new account screen appears.
2
Type your account email address and password.3
Page 53

6. Email
53
If you want, select the Send email from this account by 4
default check box. This setting only applies if you have more
than one POP3 or IMAP account set up.
Select Next.
5
If you have a popular email account, the application will set ev-
erything up for you! Before you go to your Inbox, you can name
the account (if you don’t, your email address will be used). You are
also asked to type your name as you want it to display on outgoing messages. You must complete this eld before you can select
Next and go to your Inbox.
For less popular accounts, follow the prompts to type the email
server, protocol, and other account information yourself. After
your account settings have been veri ed, select Next to go to your
Inbox.
To add more accounts (up to ve), from Inbox or your Ac-6
counts screen, long press
and select Add account.
Use your POP3 and IMAP email account
Once you’ve set up an account, you can do the following:
Refresh Inbox
From the Inbox, long press
and then select Refresh to up-
date your Inbox with any previously not downloaded email.
Read email
You can display or collapse the messages in your Inbox by
selecting Inbox.
Unread messages display with a colored band. (Each ac-
Page 54

Alex™ eReader DS-10
54
count you add will use a di erent color.)
Forward, Reply, Reply all
You can forward, reply, or reply all to an email message from
either the Inbox or the Read view:
From the Read view, long press
and select the action you
want to take.
From the Inbox, touch & hold the message to open its context
menu. Select the action you want to take.
Page 55

6. Email
55
Compose new
To compose and send a new message, from your Inbox:
Long press 1
and select Compose.
Add recipients by typing a name or address in the To eld. 2
Matching contacts will appear. Select the recipient or continue typing the address. Add as many recipients as you wish.
Note
If you want to send a carbon copy (Cc) or a blind carbon copy (Bcc)
of the email to other recipients, long press
button and then
touch Add Cc/Bcc.
Type a subject and the message.
3
Select Send, Save as draft, or Discard. Pressing the BACK 4
button will also save the existing message as draft unless
you have not typed anything.
Page 56

Alex™ eReader DS-10
56
Tip
If you want to add a picture attachment, long press
, touch At-
tach, and then touch the picture you want to attach.
Note
While composing the message, touch Save as draft to save it as a
draft. To view your draft email messages, in the Inbox, long press
and then touch View labels > Drafts.
Delete message
From the Inbox:
Expand the Inbox to display the messages.1
Touch & hold the message you want to delete.2
Select Delete.3
Your message is moved to the Trash.4
Empty Trash
Once you’ve moved a message to the Trash, a Trash folder
will display below your Inbox. To empty messages in the
Trash you must delete each message individually:
Expand the Trash folder to display the messages.1
Touch & hold the message you want to delete.2
Select Delete. Note that the message is only deleted from 3
your reader, not from the account server.
Page 57

6. Email
57
Remove an email account
You can always remove a POP3 or IMAP email account from
your reader by doing the following:
Go to your Inbox.1
Long press 2
and select Accounts. Your Accounts screen
opens.
Touch & hold the account you want to remove.
3
Select Remove account.4
You will be asked to con rm before the account is removed.5
Edit account settings
To open your Account settings screen, do the following:
From your account Inbox, long press 1
and select Account
settings.
The Account settings screen appears. You can do the follow-
2
ing from this screen:
Account name – Select to change the name of your account as it
appears on your Accounts screen.
Your name – Select to change your name as it appears in outgo-
ing emails.
E-mail check frequency – Select this pop-up menu to set how
frequently your email account is checked for new messages. Note
that whenever you open a folder, email is refreshed, regardless of
this setting.
Default account – If you have more than one POP3 or IMAP email
account set up on your reader and want to use this account by
default when selecting Compose from the Accounts screen, select
this check box.
E-mail noti cations – If you want
icon to appear in the status
bar when a new message arrives, select this check box.
Page 58

Alex™ eReader DS-10
58
Incoming server settings – Select Incoming settings if you need
to edit the username/password, server, port, or option to delete
email from server.
Outgoing server settings – Select Outgoing settings if you need to
edit the SMTP server, port, security type, option to require sign-in,
or username/password.
Add another POP3 or IMAP account – To add another account
(you can have up to ve), select Add another account.
To save your settings, press 3 button.
Add more email accounts
On the Your accounts screen, long press
and then touch
Add account.
Page 59

7. Music
59
7. Music
The Music application allows you to enjoy music on your
Alex eReader.
To open your music Library, long press Back button
and
select the Music icon
.
Your music is organized into four categories: Artists,
Albums, Songs, and Playlists. Select a category to view the
lists within each. Once in a category, keep selecting until
you nd the music you want to play. For example, if you select the Artists category, you will see a list of artists in alphabetical order. If you select an artist, the list opens to display
that artist’s albums. Select an album, and the album’s song
list displays.
Since Music only plays audio les saved on the SD card, you
must copy your audio les to the SD card before you open
Music.
Supported music formats
The Music application will play the following music le
formats:
MP3
M4A (iTunes® application AAC, DRM-free)
AMR
WMA (8)
MIDI
WAV
OGG Vorbis
Page 60

Alex™ eReader DS-10
60
Load music onto your MicroSD card
All the music you can listen to on your reader is stored on a
MicroSD card. Follow the instructions below to add music to
your MicroSD card. Read more about inserting or removing
a MicroSD card in “MicroSD card slot”.
Mount your microSD card to your computer by doing one of 1
the following:
Remove the SD card and insert it into a card reader attached to
your computer; or,
Attach your reader to your computer using a USB cable that came
in the original box. If you use this method, make sure the Home
> Settings > MicroSD card & reader storage > Use for USB storage
check box is selected. It is checked by default.
On your computer, nd the mounted USB drive and open it.2
Although your reader will nd all music les on your Mir-3
coSD card, it’s advisable to keep the number of les or folders at the root level to a minimum. So, if you wish, create a
folder at the top-level called “music” (or whatever you want)
to store your les.
Open this folder and copy music les into it. (See above
4
section on “Supported music formats”) If you want, create
folders within “music” to organize your music further.
If you want to use certain music les as noti cation or alarm
5
ringtones, then create the following folders:
Noti cations - Music les copied to the “noti cations” folder will
display in the noti cations ringtone menu.
Alarms - Music les copied to the “alarms” folder will display in the
Alarm ringtone menu.
Note
If you do not want a ringtone to appear in your music Library but
still want it to be available as a noti cation or alarm ringtone, create
the “noti cations” or “alarms” folder outside of your “music” folder.
Page 61

7. Music
61
When nished copying, close the USB drive window and 6
un-mount or eject the drive as required by your computer’s
operating system. Or, if you connected your reader directly
to your computer, remove the USB cable from your reader.
Play back music
At any level in your Library, touch & hold a listing (a song,
artist, album, or playlist) to open the context menu. Select
Play to begin play and go to the Playback screen.
Shu e
Volume
Pause/Resume
Rewind
Play List
Fast Forward
Repeat
Artist
Album
Song
Progress Bar
You can also do the following using the Playback screen:
Shu e songs: Shu e plays songs in random order. Touch
to turn on and o . When the icon is grey, shu e is o .
Repeat mode: Touch
to step through repeat modes:
Repeat all songs
Repeat current song
Don’t repeat
Page 62

Alex™ eReader DS-10
62
Go to Slide to go to any point in a song
Pause
Touch to pause
Play
Touch to resume play
Fast forward
Touch & hold
Go to next song
Touch once
Rewind
Touch & hold
Go to beginning
Touch once
Go to previous song: Touch twice
Volume Touch to set music volume
Current playlist
Touch once
Party shu e: To start “party shu e” (all the songs in your
library are added to a playlist in random order), long press
NEXT PAGE button
and select Party shu e.
To exit party shu e, long press
and select Party shu e
o . Edit the playlist as you would any other playlist.
If a song is playing while you are on the Library screen, you
can switch to the Playback screen quickly by selecting the
lower song bar.
Page 63

7. Music
63
Playlists
You can create as many playlists as you wish. Note that the
“Recently added” playlist is a system playlist and cannot be
deleted or renamed.
Create a playlist on your reader
From the Library, select a category.1
From the list that appears, navigate to the artist, album, or 2
song that you want on a playlist.
Touch & hold the artist, album, or song to open the context
3
menu.
Select Add to playlist.
4
In the Add to playlist menu that opens, select New to create 5
a new playlist, or one of the existing playlists.
The song(s) are added.
6
Manage your playlists
Go to the Library screen and select Playlists.1
All your playlists appear. You can do the following from this 2
screen:
Play songs in list - Select the playlist.
Delete playlist
Touch & hold the playlist to open the context menu.1
Select Delete.2
Edit playlist (rearrange songs)
Touch & hold the playlist to open the context menu.1
Select Edit.2
Touch & hold next to the song you want to move, then slide it to 3
its new position and release.
Rename playlist
Page 64

Alex™ eReader DS-10
64
Touch & hold the playlist to open the context menu.1
Select Rename.2
Open the virtual keyboard (if not already open) and type the new 3
name.
Select Save.4
Load your own playlists - You can create your own playlists then
load them on your MicroSD card for access through the Music
Player. The playlist formats supported are M3U, WPL, and PLS.
To create a M3U playlist, do the following:
On your computer, open a simple text le for editing.1
On separate lines, list all the music le names you want in-2
cluded in your playlist.
Note
The names you list in the le should be the names that appear when
you view the contents of your SD card through your computer’s
le system, not the names that appear in the list of songs on your
reader. Your reader will simplify the names and not include track
numbers or le extensions, like .mp3.
Your M3U playlist could look something like this:
3
All Is Quiet.mp3
01 Amazing Grace.mp3
04 Angel Food.mp3
Artist’s Life (new).mp3
Save the text le, using .m3u as the le name extension (e.g., 4
MySongs.m3u).
Follow the instructions in “Load music onto your SD card” to
5
copy the le to your MicroSD card or directly to your reader.
You don’t have to, but it’s advisable to copy the playlist to a
“Playlist” folder in your “Music” folder.
Page 65

7. Music
65
Delete music
All the music you play on your reader is stored on the
inserted MicroSD card. From your reader, you can delete
music stored on the card:
From the Library screen, select either the Artists, Albums, or 1
Songs category.
Go to the screen that shows the artist, album, or song that
2
you want to delete.
Touch & hold the item to open the context menu.
3
Select Delete. You will be asked to con rm that you want to 4
delete the item from your SD card.
Page 66

Alex™ eReader DS-10
66
8. Gallery
Gallery is an application that allows you to view pictures
and videos on your Alex Reader.
Load pictures and videos onto your MicroSD card
Follow the instructions below to add pictures and videos to
your MicroSD card.
Mount your microSD card to your computer by doing one of 1
the following:
Remove the MicroSD card and insert it into a card reader attached
to your computer; or,
Attach your reader to your computer using a USB cable that came
in the original box. If you use this method, make sure the Home
> Settings > MicroSD card & reader storage > Use for USB storage
check box is selected. It is selected by default.
On your computer, nd the mounted USB drive and open it.2
Create a folder at the top-level called “Pictures” or “videos” or 3
some other descriptive name and open it.
Copy .jpg or other image les or videos into this folder. To
4
organize pictures into albums that will display in the Gallery
application, create a folder and copy the content there for
each album you want to display.
When nished, close the USB drive window and un-mount
5
or eject the drive as required by your computer’s operating
system. You can also go to Home > Settings > MicroSD card
& reader storage, and clear the Use for USB storage check
box. Or, if you connected your reader directly to your computer, remove the USB cable from your reader and computer.
Page 67

8. Gallery
67
View your pictures and videos
To view the pictures and videos you’ve stored on your
MicroSD card, go to the Gallery application:
To open Gallery, long press Back button1 and select the
Gallery icon
.
Depending on how many pictures you’ve stored, they may
2
take a few minutes to load.
If you’ve stored your pictures in folders on your MicroSD
3
card, then the folders will display as separate “albums”. The
top left album always contains all the pictures in all the
albums.
Select an album to view the pictures and videos.
The individual pictures and videos display in a grid in
4
thumbnail format. You can select to display smaller or large
thumbnails in Settings.
To open a picture or video in full-screen view, touch the
5
picture or video. Once in full-screen, select the arrows to
scroll through the pictures or videos within that album. If the
arrows disappear, touch the picture or video again to reveal
the arrows and zoom controls.
Page 68

Alex™ eReader DS-10
68
Zoom and navigate
When viewing a picture or video in full-screen view, you can
zoom in and out, and navigate around the picture when it
doesn’t t within the screen:
Zoom in
Touch the screen to open the zoom-in/zoom-out controls. 1
Touch 2 control to zoom in. With each touch you zoom in
closer.
Zoom out
Touch the screen to open the zoom-in/zoom-out controls 1
Touch 2 control to zoom out. Each touch zooms out fur-
ther.
Navigate in zoomed-in view
Slide your ngertip in any direction to shift your view.
Scroll through pictures in full-screen view
Touch the screen to reveal the left and right arrows, touch
an arrow to go to the previous or next picture.
Gallery options
You can do the following while in Gallery.
Note
In all the instructions below, you can touch & hold a picture or video
to open the context menu to access all actions, rather than open the
picture or video in full-screen view.
Page 69

8. Gallery
69
View full-screen
Select a picture or video to open it in full-screen view.
Set as wallpaper
In full-screen view, long press NEXT PAGE button 1
and
select More > Set as.
From the menu that opens select Wallpaper.
2
Touch & hold an edge of the cropper to reveal the sizing ar-3
rows, then drag the edge in or out to size. Touch & drag the
center of the cropper to move it within the picture.
When you’re happy with the cropped area, select Save or
4
press the BACK button .
Crop picture
In full-screen view, long press 1
and select More > Crop.
Touch & hold an edge of the cropper to reveal the sizing ar-
2
rows, then drag the edge in or out to size. Touch & drag the
center of the cropper to move it within the picture or video.
When you are happy with the cropped area, select Save.
3
Select Discard to cancel the crop.
The cropped picture or video is saved to Gallery as a copy.
4
Your original is not touched.
Rotate picture
In full-screen view, long press 1
and select Rotate.
Select from Rotate left (counter-clockwise) or Rotate right
2
(clockwise).
Your picture or video rotates and is saved automatically.
3
Page 70

Alex™ eReader DS-10
70
Delete picture
In full-screen view, long press 1
and select More > Delete.
The picture or video will be removed from the MicroSD card
2
after you con rm.
View picture or video details
In full-screen view, long press 1
and select More > Details.
The picture video details window opens. You can see the
2
title, resolution, le size, and date of the picture.
Play slideshow
Slideshows include all the pictures in your albums. Before
you play a slideshow, you may want to adjust the slideshow
settings, described in “Slideshow” section under Picture
Settings.
In full-screen view, long press 1
and select Slideshow.
Your slideshow begins! While your slideshow is playing, the
2
status bar is dimmed.
To stop the slideshow you can do one of the following:
3
Press BACK - Takes you to thumbnail view.
Touch the screen - Shows picture in full-screen view.
To begin the slideshow again, long press NEXT PAGE button 4
and select Slideshow. If you stopped the slideshow, it will
resume where you left o .
Picture settings
To view picture settings, you must be viewing one of your
albums, then long press
and select Settings.
Page 71

8. Gallery
71
Picture view
Picture size – You can select from Large or Small picture dis-
play sizes.
Picture sort – You can select to sort pictures with the newest
pictures rst or newest pictures last.
Con rm deletions – Select this check box if you want a
con rmation dialog box to appear after you select to delete a
picture from Gallery and the MircoSD card.
Slideshow
Slideshow interval – Select how long each slide plays: two,
three, or four seconds.
Slideshow transition – Select the transition you want to use
between each slide during the slideshow: Fade in & out, Slide
left-right, Slide up-down, and Random (uses all transitions in
random order).
Repeat slideshow – Select this check box to repeat the slide-
show until you explicitly stop it.
Shu e slides – Select this check box to shu e your pictures
in the slideshow.
Page 72

Alex™ eReader DS-10
72
9. Google Books
Touch Google Books in home screen to open the Google
Books main screen.
Search books
Input search word for books or authors in input box, press
search, then you can retrieve the search result (ePub books)
from Google Books.
Page 73

9. Google Books
73
About this book
Download books
Press Download button in About this book screen, a con rming dialog box will be popped up.
Select OK in the con rming dialog box, downloading will be
started and its status
is displaying in the left top corner.
After downloading, you can nd the downloaded books in
Viewer->Unread folder.
Page 74

Alex™ eReader DS-10
74
10. Calculator
To open Calculator, long press Back button to return to
Home screen
and select the Calculator icon .
The Calculator o ers two panels: basic and advanced.
Switch back and forth between panels by long press Back
button and selecting Advanced panel or Basic panel, as you
would like.
Calculator panels
Two calculator panels are available: basic and advanced.
Basic
Use the Basic panel
to enter numbers and
perform basic addition,
subtraction, multiplication, and division.
Advanced
Use the Advanced
panel to insert advanced operators or
delimiters, such as sine,
cosine, tangent, square
root, parentheses, etc.
Page 75
10. Calculator
75
Switch back and forth between calculator panels by long
press Back button and selecting Advanced panel or Basic
panel, as you would like. As soon as you select an advanced
operator, the panel switches back to Basic, where your
operator appears.
When you touch a key on the screen, the key ashes red to
let you know the selection was made. Make sure you see
the red ash before entering your next number or completing the operation.
Operation history
To scroll through your operations.
To clear your operation history, long press
button and
select Clear history.
Page 76

Alex™ eReader DS-10
76
11. Wi-Fi
Wi-Fi o
If Wi-Fi is in the OFF state, press this application icon to
turn on Wi-Fi and the application icon changes to ON state.
Wi-Fi on
If Wi-Fi is in the ON state, press this application icon to
turn o Wi-Fi and the application icon changes to OFF state.
Page 77

Appendix
77
Appendix – Product Safety Warnings
SAFETY AND COMPLIANCE INFORMATION
Use responsibly. Read all instructions and safety information before use
to avoid injury.
BATTERY SAFETY
Charge battery only in temperatures ranging from 32°F to 95°F (0°C to 35°C).
CAUTION: Danger of explosion if battery is incorrectly replaced. Replace
only with the same or equivalent type of battery recommended by
the manufacturer. Dispose of used batteries according to battery
manufacturer’s instructions.
WI-FI SAFETY
Turn WIFI o in areas where WIFI use is prohibited or when it may cause
interference or danger, such as in airplanes while ying.
CARE AND MAINTENANCE
Your Alex Reader is an electronic product and should be treated with
care. To reduce the risk of re, electronic shock, or product damage,
Do not expose this device to rain, moisture, and all types of liquids that will corrode
electronic circuits. If you device gets wet, immediate turn the power o . Allow the
device to dry completely before using it again.
Clean the two displays with a soft cloth and be careful not to wipe the displays with
anything abrasive. When carrying your Alex Reader in a bag, keep it in the included
cover to avoid scratches.
Don’t expose your device to extreme heat or cold. For example, do not leave it in the
trunk of your car in sub-zero or high heat conditions.
Do not attempt to open the device other than as instructed in this manual.
Do not drop, knock, or shake the device, Rough handling can break internal circuitry.
Do not use harsh chemicals, cleaning solvents, or strong detergents to clean the
device.
Use only the recommended accessories.
Page 78

Alex™ eReader DS-10
78
Always create a backup of data you want to keep.
RECYCLING
In some areas, the disposal of certain electronic devices is regulated.
Make sure you dispose of or recycle the device and its batteries in accordance with your local laws and regulations.
SMALL CHILDREN
Your device and its accessories may contain small parts. Keep them out of
reach of small children.
Page 79

Appendix
79
FCC Notice
This device has been tested and found to comply with the limits for a
Class B digital device pursuant to Part 15 of the FCC Rules. These limits
are designed to provide reasonable protection against harmful interference in a residential installation. This device generates, uses, and can
radiate radio frequency energy and, if not installed and used in accordance with the instructions, may cause harmful interference to radio
communications.
However, there is no guarantee that interference will not occur in a particular installation. If this device does cause harmful interference to radio
or television reception, which can be determined by turning the device
o and on, the user is encouraged to try to correct the interference by
one or more of the following measures:
Reorient or relocate the receiving antenna •
Increase the separation between the device and receiver •
Connect the device into an outlet on a circuit di erent from that to •
which the receiver is connected
Consult the dealer or an experienced radio/television technician for •
help
Conditions of Use
This device complies with Part15 of the FCC Rules. Operation is subject
to the following two conditions: (1) This device may not cause harmful
interference, and (2) This device must accept any interference received,
including interference that may cause undesired operation.
Note
The manufacturer is not responsible for any radio or TV interference
caused by unauthorized modi cations to this equipment. Such modi cations could void the user!ˉsauthority to operate the equipment.
Caution
The Equipment complies with FCC radiation exposure limits set forth for
an uncontrolled environment.
Page 80

© 2010 Spring Design Inc. All rights reserved. Reproduction in whole or in part without written permission is prohibited. The Spring logo,
Alex logo, the Alex Reader logo, Alex, Spring, Duet Navigator and Linked Notes are trademarks of Spring Design. All other marks are the
property of their respective owners. Portions of this page are reproduced from work created and shared by Google and used according
to terms described in the Creative Commons 3.0 Attribution License. All other trademarks or registered trademarks are the property of
the respective owners.
 Loading...