

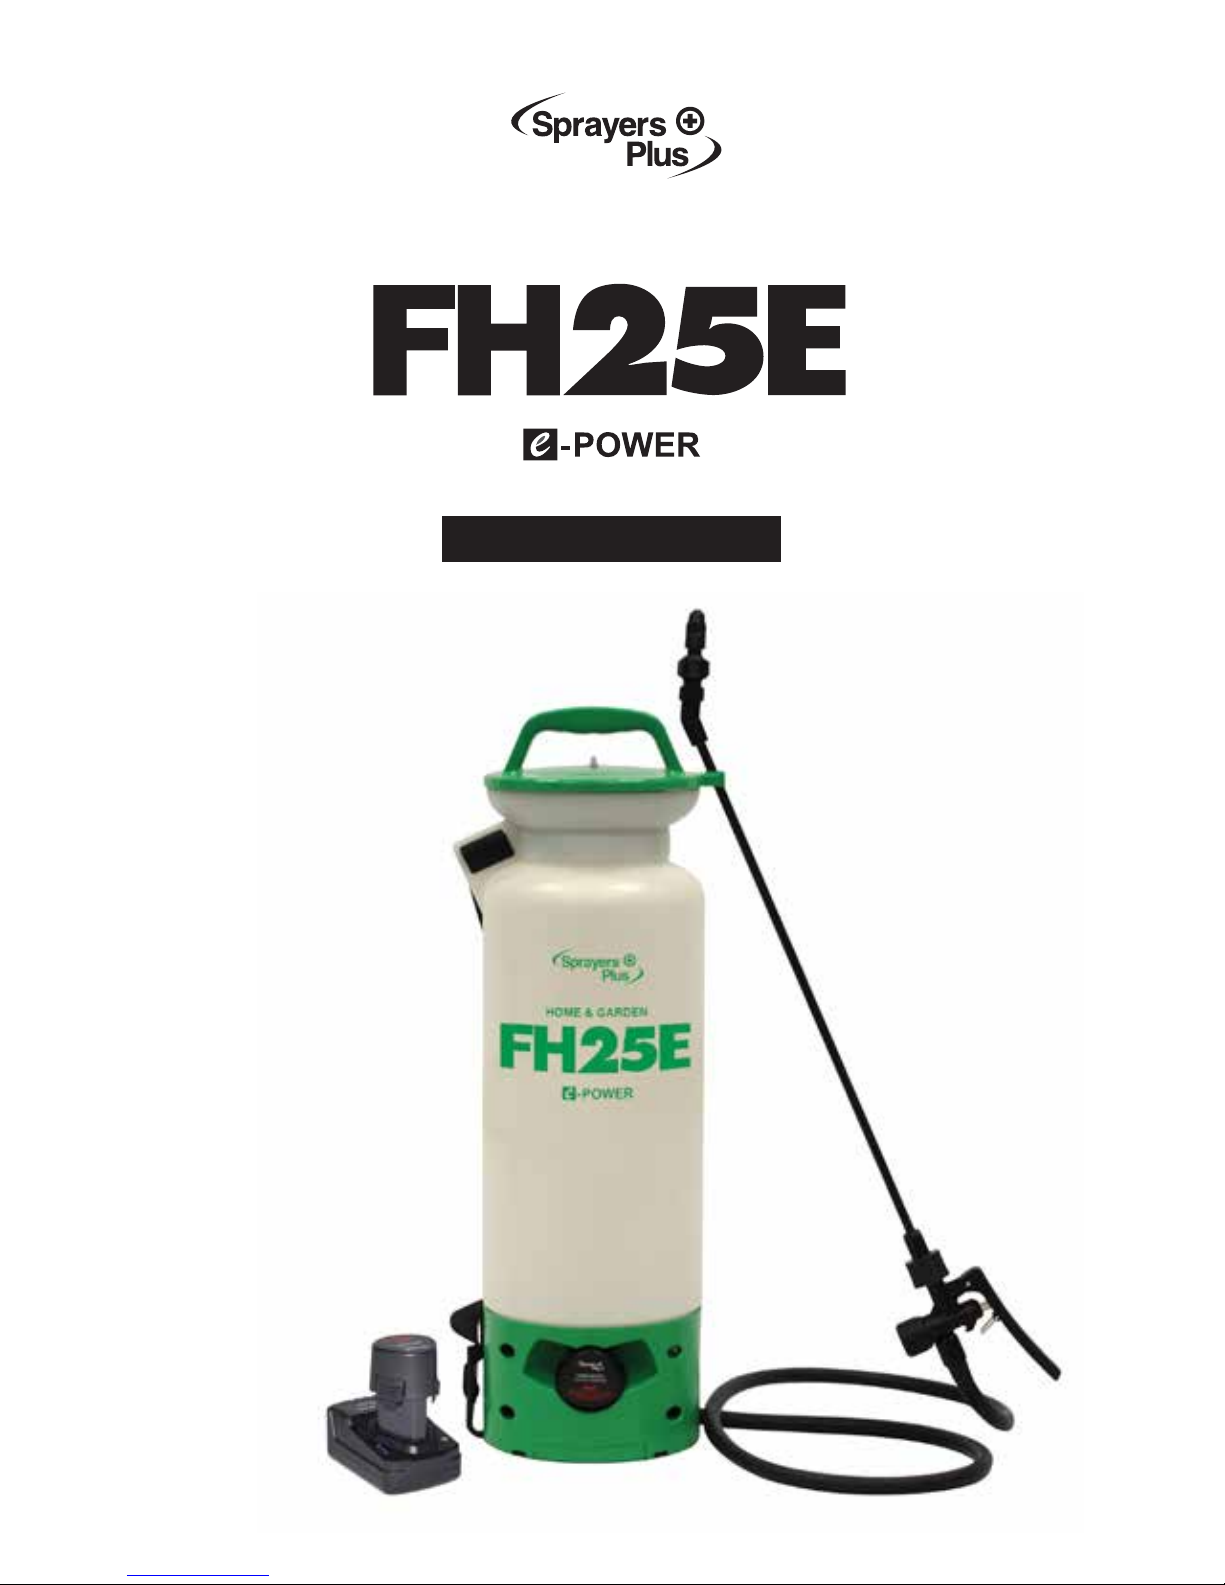
Instruction Manual
HOME & GARDEN

Index
P.1 ................ Index
P.2 ................
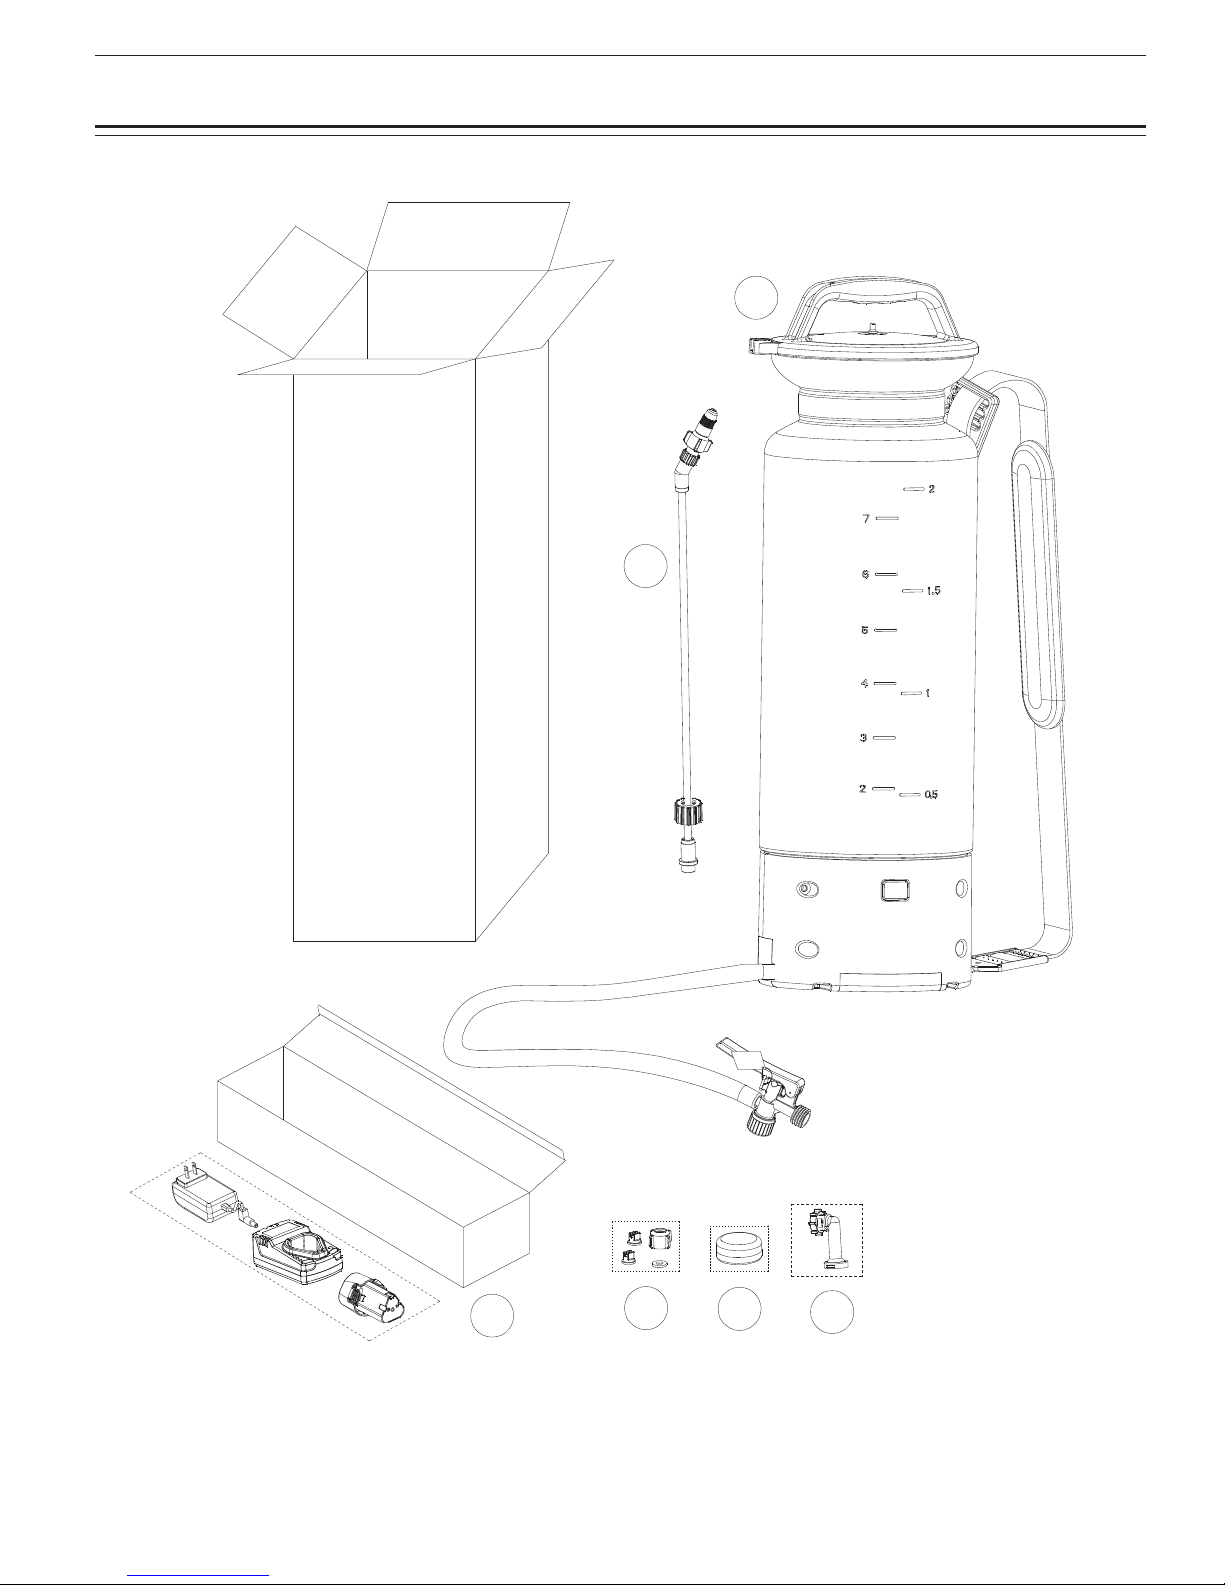
Unpacking
P.4 ................
4. Charging Procedure
P.5 ................
5. Turn On/Off the sprayer
P.9 .................
9. Important Return
Safety Instructions
10. Statement of Limited
Warranty
11. Maintenance
P.10 ......... . ....
12. Troubleshooting
P.3 .................
1. Introduction
2. Specifications
3. General Power
Tool Safety Warnings
P.6 ................
6. Nozzle & Performance
7. Application
P.7..................8. Parts Breakdown
P. 2
Unpacking
1) Sprayer
4) Nozzles
2) Wand
5) Silicone Grease
3) 12V Charger & Transformer
6) Black Screen Filter
1
2
3
4
5
6

2. Specications
WARNING:
IMPROPER USE OR FAILURE TO FOLLOW INSTRUCTIONS CAN
RESULT IN EXPLOSION CAUSING SERIOUS EYE OR OTHER INJURIES.
FOR THE SAFE USE OF THIS, YOU MUST READ AND FOLLOW ALL
INSTRUCTIONS.
Do not leave a pressurized sprayer in the hot sun. Heat can cause
pressure build up, resulting in possible explosion. Do not store or
leave solution in the tank after use. Always wear goggles, gloves,
long sleeve shirt, long pants and full foot protection while
spraying. Do not attempt to modify this sprayer. Replace parts only
with manufacturer’s original parts. Never spray ammable, caustic,
acidic, chlorine, bleach or other corrosive solutions. Always read
and follow manufacturer’s instructions before using this sprayer
because some chemicals may be hazardous when used with this
sprayer.
Handling the brass parts of this product will expose you to a
chemical known to the state of California to cause birth defects or
other reproductive harm.
Wash hands after handling.
CAUTION:
・PRE-USE CHECK: Before each use, check the tightness of the hose
to ensure the hose is securely attached to the shut-o assembly.
Ensure that all nozzles and wand connections are tight.
・ Do not exceed a tank solution temperature of 120ºF / 49ºC.
NOTE: Residual water may be present in the tank and hose due to
quality and performance testing performed on the sprayer.
This sprayer is designed to operate with a 12V lithium-ion battery
ONLY. Use of any other batteries with the sprayer may cause serious
harm or injury to the operator and serious damage to the sprayer.
WARNING:
For safe operation of the charger, read this manual before use.
The battery pack does not come fully charged out of the box.
Before operating the battery pack and charger, read the safety
instructions and follow the charging procedures outlined below.
IMPORTANT SAFETY INSTRUCTIONS FOR BATTERY PACKS
(a) Do not incinerate the battery pack even if it is severely damaged or is
completely worn out. The battery pack can explode if exposed to flames or
high heat.Toxic fumes and materials are created when battery packs are
burned.
(b) Do not charge or use battery in explosive atmospheres, such as in the
presence of flammable liquids, gases or dust. Inserting or removing the
battery from the charger may ignite the dust or fumes.
(c) If battery contents come into contact with skin, immediately wash area
with mild soap and water. If battery liquid gets into the eye, rinse water over
the open eye for 15 minutes or until irritation ceases. If medical attention is
needed, see a doctor immediately. The battery electrolyte for lithium-ion
batteries is composed of a mixture of liquid organic carbonates and lithium
salts.
Target Market
Power
Capacity US Gallons (Ltr)
Dry Weight lbs. (kg)
Seals & O-Rings
Spray Gun
Wand
Hose
Max PSI
Working PSI
Standard Nozzle
Fan Nozzle
Shoulder Strap
Mouth Opening inch
Warranty
Home & Garden
12V Lithium-ion Battery
2 (7.6)
6.2 (2.8)
High Grade Proprietary Material
Sprayers Plus™ with
Lock Pin
20” Fiberglass
51” Premium Flex Rubber
30
30
- Plastic Adjustable
- Plastic 90º / 110º
Polypropylene /
Adjustable Strap
6.25" QuickFill
1 Year
(Commercial & Residential)
SAFETY GUIDELINES - DEFINITIONS
It is important for you to read and understand this manual. The
information it contains relates to protecting YOUR SAFETY and
PREVENTING PROBLEMS. The symbols below are used to help
you recognize this information.
DANGER!
Indicates an imminently hazardous situation which, if
not avoided will result in death or serious injury.
WARNING!
Indicates a potentially hazardous situation which, if not
avoided, could result in death or serious injury.
CAUTION
Indicates a potentially hazardous situation which, if not
avoided, may result in minor or moderate injury.
1. Introduction 3. General Power Tool Safety Warnings
3.1 Battery Safety
This manual contains information for the proper assembly,
operation and care of your sprayer. Carefully read and follow the
instructions contained in this manual before using your sprayer.
P. 3

P. 4
(d) Contents of opened battery cells may cause respiratory irritation. If
respiratory irritation is experienced due to exposure, move person to a
well-ventilated area immediately. If symptoms persist, seek medical
attention.
WARNING:
Burn hazard. Battery liquid may be flammable if exposed to sparks or
flames.
• Charge the battery packs only in Sprayers Plus chargers.
• DO NOT splash or immerse in water or other liquids. This may cause
premature cell failure.
• DO NOT store or use the tool and battery pack in locations where the
temperature may reach or exceed 105ºF(40ºC) (such as outdoor sheds or
metal buildings in the summer season).
Never attempt to open the battery pack for any reason. If battery pack
casing is cracked or damaged, do not insert into charger. Do not crush,
drop or damage battery pack. Do not use a battery pack or charger that has
received a sharp blow, been dropped, run over or damaged in any way.
Damaged battery packs should be returned to a service center for
recycling.
WARNING:
Fire hazard. Do not store or carry the battery in such a way that metal
objects can contact exposed battery terminals. For example, do not place
battery in aprons, pockets, toolboxes, product kit boxes, drawers, etc.
To prevent fire risk while transporting batteries, ensure battery terminals do
not come in contact with conductive materials such as keys, coins, hand
tools and the like. The US Department of Transportation’s Hazardous
Material Regulations (HMR) prohibits the transport of lithium-ion batteries
in commerce or on airplanes (i.e., packed in suitcases and carry-on
luggage) UNLESS they have proper short-circuit protection. When
transporting individual batteries, make sure that the battery terminals are
protected and well insulated from materials that could contact them and
cause a short circuit.
NOTE: Lithium- ion batteries should NOT be put in checked baggage.
The charger and battery pack can be left connected with the green LED
light glowing. The charger will keep the battery pack fresh and fully
charged.
The longest life and best performance can be obtained if the battery
pack is charged in an environment where the air temperature is
between 65ºF and 75ºF (18ºC-24º). DO NOT charge the battery pack
in an environment where the air temperature drops below 40ºF
(+4.5ºC), or rises above +105ºF (+40.5ºC). Follow these guidelines to
prevent serious damage to the battery pack.
The charger and battery pack may become warm to touch while
charging. This is normal and does not indicate a problem. To facilitate
the cooling of the battery pack after use, avoid placing the charger or
battery pack in a warm environment such as in a metal shed or an
uninsulated trailer.
If the battery pack does not charge properly:
a.) Check current at the outlet or receptacle by plugging in a lamp or
other appliance.
b.) Check to see if outlet or receptacle is connected to a light switch
which turns the power off when you turn off the lights.
c.) Move charger and battery pack to a location where the surrounding
air temperature is between approximately 65ºF and 75ºF(18º-24ºC)
d.) If charging problems persist, take the tool, battery pack and charger
to your local service center.
The battery pack should be recharged when it fails to produce sufficient
power on jobs that were previously easy to complete. DO NOT
CONTINUE with use under these conditions. Follow the charging
procedure to recharge the battery. You may also charge a battery used
pack when ever you desire with no adverse effect to the battery pack.
Foreign materials of a conductive nature such as, but not limited to,
steel wool, aluminum foil, or any buildup of metallic particles should be
kept away from charger cavities. Always unplug the charger from the
power supply when there is no battery pack in the cavity. Unplug
charger before attempting to clean.
Do not freeze or immerse charger in water or any other liquid.
WARNING:
Shock hazard. Do not allow any liquid to get inside charger.
Never attempt to open the battery pack for any reason. If the
plastic housing of the battery pack breaks or cracks, return to
a service center for recycling.
The best storage place is one that is cool and dry — away from direct
sunlight and excess heat or cold.
Long-term storage will not harm the battery pack or charger.
3.2 Storage Recommendations
4.1 IMPORTANT CHARGING NOTES
4. Charging Procedure
LEAVING THE BATTERY IN THE CHARGER
(1)
(2)
(3)
(4)
(5)
(6)
Li-ion 12V 2.2Ah/23.76wh
WARNING
POWER BATTERY
To reduce the risk of fire or burns, do not
disassemble, crush, puncture or short
external contacts.
Sprayers Plus chargers are designed to charge Sprayers Plus 12V battery
packs only.
Charging lights
1. Plug the charger into an appropriate outlet before inserting the battery pack.
2. A (fast) flashing red light indicates that the charger is ready to be used.
3. Insert the battery pack into the charger.
4. An illuminated red light indicates that the battery is being charged.
5. When the illuminated light changes from red to green, the battery is fully
charged.
6. A (slow) flashing red light indicates a charging error. Go to dealer for help.
Battery power light
(only works when charger is not plugged into the power outlet)
1. The 3 blue LED lights indicate the battery power.
2. 3 illuminated lights indicate that the battery is fully charged.
3. 1 illuminated light indicates low battery levels.
• 12V
Lithium-ion battery
( Parts: K7048 )
• 12V Charger
( Parts: K8002 )

P. 5
NOTE: Before starting to spray, retighten the hose clamps to avoid
contamination of the operator and of the environment.
4.2 INSTALLING AND REMOVING THE
BATTERY PACK FROM THE SPRAYER
WARNING:
Make sure switch is in the off position.
To install battery pack:
Insert battery pack into tool until a "click" is heard. Make sure battery pack
is fully seated and latched into position.
To remove the battery pack:
Depress the battery release button and pull battery pack out of tool.
Pull by the plug rather than pulling by the cord when disconnecting
charger. This will reduce risk of damage to electric plug and cord.
Do not use an extension cord unless it is absolutely necessary. Use of
an improper extension cord could result in risk of fire, electric shock, or
electrocution.
An extension cord must have adequate wire size (AWG or American
Wire Gauge) for safety. The smaller the gauge number of the wire, the
greater the capacity of the cable, that is 16 gauge has more capacity
than 18 gauge. When using more than one extension to make up the
total length, be sure each individual extension cord contains at least the
minimum wire size required.
Do not operate charger with a damaged cord or plug – please have
them replaced immediately.
Do not operate charger if it has received a sharp blow, been dropped, or
damaged in any way. Take it to an authorized service center.
Do not disassemble charger; take it to an authorized service center
when service or repair is required. Incorrect reassembly may result in
risk of electrocution or fire.
Disconnect the charger from the outlet before attempting any cleaning.
This will reduce the risk of electric shock. Removing the battery pack will
not reduce the risk.
NEVER attempt to connect 2 chargers together.
The charger is designed to operate on standard household electrical
power(120 Volts). Do not attempt to use it on any other voltage.
•
•
•
•
•
•
•
•
•
4.3 IMPORTANT SAFETY INSTRUCTIONS
FOR BATTERY CHARGERS
CAUTION:
When the charger is plugged into the power supply under certain
conditions, the charger can be shorted by foreign material. Foreign
materials of a conductive nature such as, but not limited to, steel wool,
aluminum foil, or any build up of metallic particles should be kept away from
charger cavities. Always unplug the charger from the power supply when
there is no battery pack in the cavity. Unplug charger before attempting to
clean.
Shock hazard. Do not allow any liquid to get inside charger.
Do not attempt to charge the battery pack with any chargers other than
the ones included in this manual. The charger and battery pack are
specifically designed to work together.
These chargers are not intended for any uses other than charging
rechargeable batteries. Any other uses may result in risk of fire or
electrocution.
Do not expose charger to rain or snow
•
•
•
•
WARNING:
5. Turn On/O the sprayer
OFF ON
To install the battery
Insert the battery into tool until an audible click is heard.
To remove the battery
Apply pressure to the trigger on both sides. Release
the battery by pulling out from tool.
(1)
(1)
(2)
To Turn on the sprayer:
1. Turn on the sprayer using the ON/OFF switch. LED light will illuminate to
indicate that the sprayer is ON.
2. When power switch is on, an audible motor sound will be heard. The
Internal pump will operate continuously, solution will circulate through the
pump and back in the tank (if any).
3. Place the lance with the trigger valve pressed above the base of the
sprayer until the spray jet begins to spray continuously.
4. Direct the spray lance to a safe position and open the trigger valve to
begin spraying.
To turn off the sprayer:
1. Shut off the trigger valve. The Internal pump will operate continuously,
solution will circulate through the pump and back in the tank (if any).
2. Turn off the sprayer using the ON/OFF switch. LED light will turn off to
indicate that the sprayer is OFF.
3. Direct the spraying lance to a safe position and open the trigger valve to
release pressure before storing the sprayer.

Type Sprayer Model
100, 101, 103, 201, 202, 401, 402,
YT10, YT20, YT30, 20C,
35C, PS20, 105E, 105Ex
40/2.8 1300 1950 3.6'x3.6' 33.4'
Pressure (psi/kg)
Mist setting output
(ml/ min)
Steam setting output
(ml/ min)
Coverage @
3.3' height
Horizontal reach
(Steam setting)
Brass Cone
(1.9mm Orice)
Yellow Fan 90º
100, 101, 103, 201, 202, 301, 302,
401, 402, 403, 20C, 35C, 10ACID,
20ACID, 20ACT, 35ACT, BL20, PS20,
YT10, YT20, YT30, FH10, FH20, FH30
40/2.8 1000
BL25E, FH25E, YT25E 24/1.6 700
100, 101, 103, 201, 202, 301, 302,
401, 402, 403, 20C, 35C, 10ACID,
20ACID, 20ACT, 35ACT, BL20, PS20,
YT10, YT20, YT30, FH10, FH20, FH30
40/2.8 1150
BL25E, FH25E, YT25E 24/1.6 850
105E, 105Ex 30/2.0 1050
Gray Fan 135º 105E, 105Ex 30/2.0 1650
YT25E 24/1.6 600 890 2.6'x2.6' 31'
Brass Cone
(1.3mm Orice)
30/2.0 475 1000 3.2'x3.2' 36.7'
Black Cone
(1.5mm Orice)
301, 302, 403, 10ACID, 20ACID,
FH10, FH20, FH30,
BL20, 20ACT, 35ACT,
BL25E, FH25E
24/1.6 370 650 2.2'x2.2' 31'
n/a n/a n/a
n/a n/a n/a
n/a n/a n/a
n/a n/a n/a
n/a n/a n/a
n/a n/a n/a
Gray Cone
(1.0mm Orice)
Blue Fan 110º
6. Nozzle & Performance
WARNING:
Use of individual protective clothing and safety
equipment is required.
WARNING:
Use the correct dose and volume of chemical
according to the product label.
WARNING:
Do not spray near people who are not using
PPE, springs, lakes and rivers.
WARNING:
In case of an accident, remove the sprayer immediately.
• Protective equipments for handling chemicals
is obligatory
Head Protector
Eyes Protector
Dust Mask
Long-Sleeved Shirt
Smock
Gloves
Long Pants
Boots
7. Application
P. 6

P. 7
8. Parts Breakdown
K1026
K7044
K4002
K5008
K7045
K7047
K1027
K1027
K7053
K7051
K7050
K7053
K7062
K3007
K3014
K8002
K4025
K3019
K7057
K4025
K4041
K3027
K7089
K4039
K4047
K7055
K7053
K1027
K7048
K7046
K7046
K7118

P. 8
PART LIST
K1026 LID SET --- GREEN
K1027 STRUCTURE SET --- GREEN
K3007 PLASTIC SPINDLE SET (VITON)
K3014 PLUG SET
K3019 FIBERGLASS WAND - 20"
K3027 NOZZLE HOLDER
K4002 CHECK VALVE
K4025 WASHERS SET FOR SPRAY GUN
K4039 O-RING, & WASHER SET FOR SPINDLE
K4041 O-RING FOR ADJUSTABLE NOZZLE
K4047 SILICONE GREASE
K5008 SHOULDER PADS-----LONGER
K7044 LID SEAL
K7045 SCREEN FILTER TUBE SET
K7046 12V PUMP UNIT
K7047 CONNECTION HOSE SET FOR 12V PUMP
K7048 12v BATTERY PACK
K7050 LED ON/OFF SWITCH
K7051 POWER SWITCH SEAL COVER
K7053 12 PCS SCREWS SET FOR BASE STRUCTURE
K7055 BATTERY EJECT SPRING
K7057 ADJUSTABLE PLASTIC NOZZLE
K7062 SPRAY GUN WITH HOSE SET
K7089 PLASTIC SPRAY TIP SET
K7118 ORANGE INSULATION COVERS
K8002 12V CHARGER & TRANSFORMER

P. 9
9. Important Return Safety Instructions
10.1 Warranty period
11.1 Lubrication
11.2 Clean and Wash
10. Statement of Limited Warranty
1 (one) year from the date of sale to the original purchaser.
If it is necessary to return the sprayer for repair, always perform
the following tasks before returning the sprayer::
1. In an approved containment area, ush chemical residue
from the pump, tank and hoses.
2. Circulate fresh water through the tank, pump and hoses.
3. Indicate the type of chemicals that have been in the sprayer
with a label or tag.
4. Include complete description of operation problem, such as
how sprayer was used, symptoms of malfunction, how many
working hours per day, etc.
5. Remove the battery from the sprayer and keep it in clean and
dry conditions. Battery must accompany the sprayer when it
is returned for repairs.
Since the sprayer can contain residues of toxic chemicals, these
steps are necessary to protect the people who handle return
shipments, and to help identify issues and solutions.
Sprayers Plus shall warrant the equipment described in this
manual and shall repair or replace parts and components which,
under normal operation and wear, in accordance with technical
recommendations, show DEFECTS IN MATERIAL OR WORKMANSHIP, based on the following conditions.
11. Maintenance
To prolong the life and maintain good performance of the
product, follow the lubrication point(s) and lubricates all
moveable rubber pieces with silicone grease.
Follow the cleaning point(s) and clean your sprayer thoroughly
after each use. Soap can be also added to the water for better
cleaning result.
11.3 Long-term Storage
To ensure adequate moisture is retained for the pump during
long-term storage (over two months), follow these steps:
1. Remove black screen lter from the water inlet.
2. Insert orange insulation plug to retain moisture.
10.2 Warranty Registration
Please visit: www.sprayers-plus.com/warranty
Sprayers Plus shall honor this warranty, free of charge, if any part
or component shows defect in MATERIAL OR WORKMANSHIP,
after nal analysis at the factory.
10.3 This Warranty shall be null & void
in case of:
Misuse of the equipment against specications in this
manual, overwork or accidents.
Preventive / remedial maintenance performed by unauthorized people or parties.
Use of parts and components not supplied by Sprayers Plus.
Modication of the equipment or any characteristic of the
original design.
•
•
•
•
10.4 This Warranty shall exclude
Parts which show wear and tear due to use: spray nozzle,
lters, seals, rechargeable battery, hydraulic pump, electronic
panel, charger and its cables, agitator lever, belt, UNLESS
THEY SHOW DEFECTS IN WORKMANSHIP, ASSEMBLY OR
MATERIAL.
Damages resulting from accidents.
Transportation or freight of the equipment, parts, and
components in case such warranty is not approved.
Transportation and travel time of technician.
•
•
•
•
• Orange insulation plug
(Part #K7118)

If sprayer is not working as expected, consider the following table before contacting technial assistance.
12. Troubleshooting
Fault Status
Pump is working, but
uid is not coming
out of the sprayer
Pump is not working
(no audible noise from pump)
while sprayer is turned ON
Spray pressure is weak
Spraying was normal
but stopped suddenly
Battery duration time is
shorter than usual or
battery failed to charge
-
Trigger valve is not released Trigger valve is shut Release trigger valve
Pump suction inside the
chemical tank is blocked
Contact for technical assistance
Suction hose is blocked
or disconnected
Pump or hoses are leaking
Nozzle or nozzle lter is blocked Clean or replace nozzle/lter
Trigger valve is released
Cause Solution
Trigger valve is not released Trigger valve is shut Release trigger valve
ON/OFF was pressed
No audible noise when pumping
Used battery with more than
300 charge cycles
New Battery
Pump reached maximum pressure
and pressure switch activated
Pump wiring is loose,
damaged or disconnected
Nozzle is plugged.
Rinse with clean water.
Charge the battery until indication
light on the charger turns green
Check pump wiring
Use Sprayers Plus certied charger
Use Sprayers Plus certied pump
Replace with new charger
Replace with new battery
Pump electrical connector
is disconnected
Nozzle or nozzle lter is blocked
Pump wiring is broken
Pump is damaged
Battery is fully discharged
Recharge battery with
Sprayers Plus charger
Place the lance with the trigger
valve pressed above the base of
the sprayer until the spray jey
begins to spray continuously
Battery is damaged and/or
electronic module is damaged
Connect pump electrical connector
Clean or replace nozzle/lter
Contact for technical assistance
Contact for technical assistance
Remove obstruction and circulate
clean water to clean the hoses
Circulate clean water to clean hoses
Contact for technical assistance
Clean or replace nozzle/lter
Trigger valve is released
Air accumulation inside the lance
Pump suction inside the chemical
tank is partially blocked
Suction hose is partially blocked
Battery is not fully charged
Using third-party charger
Using third-party pump
Damaged cords/plugs on charger
Battery is damaged. (e.g. became
wet, cracked, broken terminal)
Battery has exceeded its
optimal number of charge cycles
Pump or hoses are leaking
Nozzle or nozzle lter is
blocked or damaged
P.10

www.sprayers-plu s .com
E-mail: info@sprayers-plus.com
 Loading...