


TML-3DG
MULTI-LINE LASER
INSTRUCTION MANUAL

2
SAFETY
Read the following safety instructions before
attempting to operate this product.
Keep these instructions in a safe place or store
in the carry case for future reference.
SAVE ALL WARNINGS AND INSTRUCTIONS FOR
FUTURE REFERENCE.
WARNING: Read and understand all
instructions.
• Use the laser only with the specifically designated
batteries.
• Store the laser out of reach of children and other
untrained persons. Lasers are dangerous in the
hands of untrained users.
• Use only accessories that are recommended for
your model.
• Tool service must be performed only by qualified
repair personnel. Repairs, service or maintenance
performed by unqualified personnel will void the
warranty. Only approved and authorised service
technicians can carry out warranty repairs.
• Do not use optical tools such as a telescope or
transit to view the laser beam. Serious eye injury
could result.
• Do not place the laser in a position which may
cause anyone to intentionally or unintentionally
stare into the laser beam. Serious eye injury could
result.
• Do not position the laser near a reflective surface
which may reflect the laser beam toward anyone’s
eyes. Serious eye injury could result.
• Do not use optical tools to view the laser beam.
• Do not set up the tool at a position where the laser
beam can cross any person at head height.
!

3
• Do not let children come in contact with the laser.
• Turn the laser off when it is not in use. Leaving
the laser on increases the risk of staring into the
laser beam.
• Do not operate the laser around children or allow
children to operate the laser. Serious eye injury
may result.
• Do not remove or deface warning labels.
• Position the laser securely on a level surface.
Damage to the laser or serious injury could result
if the laser falls.
WARNING: Do Not Disassemble
The Laser.
There are no user serviceable parts inside.
Disassembling the laser will void all warranties on
the product. Do not modify the product in any way.
Modifying the tool may result in hazardous laser
radiation exposure.
!
!
CAUTION: Class 2 Laser Product
• Never look into the laser beam directly and
intentionally.
• Do not use optical tools to view the laser beam.
• Do not set up the tool at a position where the
laser beam can cross any person at head height.
• Do not let children come in contact with the laser.
4
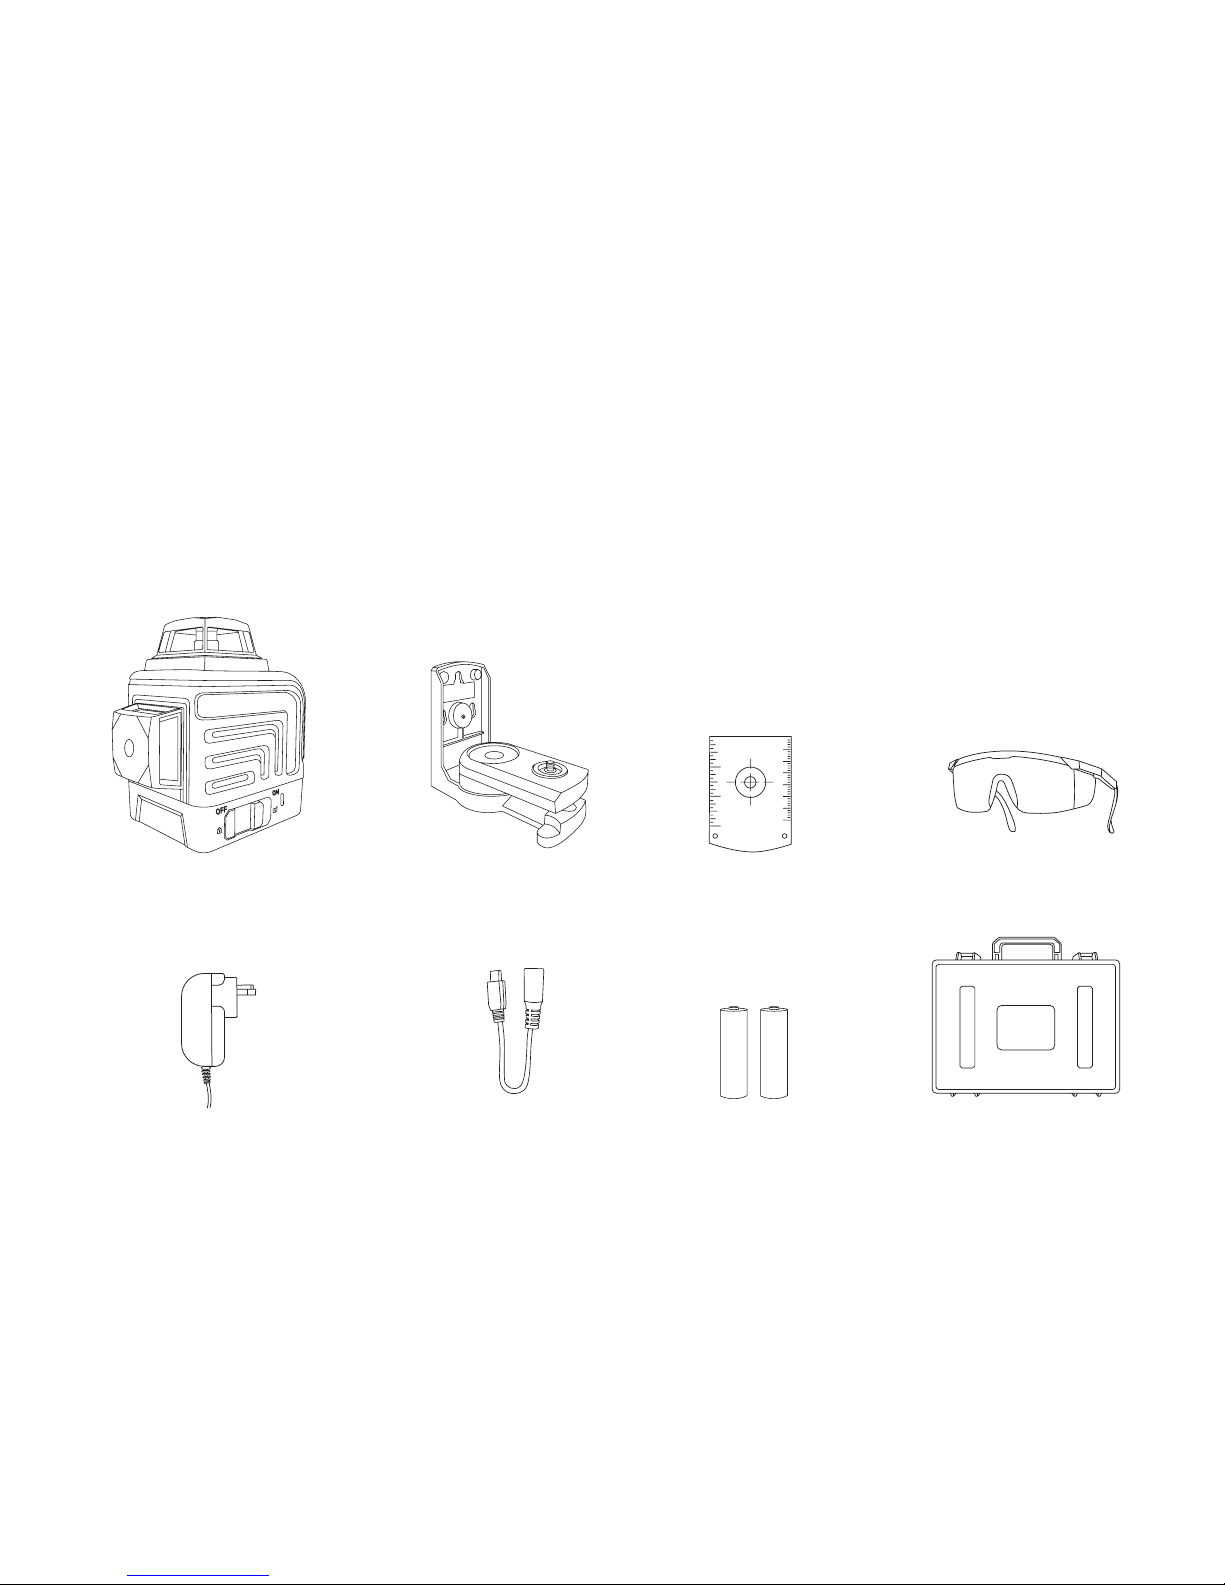
ITEM CHECKLIST
Please ensure the following items are included with your laser level.
If anything is missing please contact your retailer.
Carry caseLi-ion
batteries
Mains power adaptor /
indoor charger
Micro USB charging
adaptor
General Titanium
Series TML- 3DG
Laser glassesLaser target
INCHES
CM
1
1
2
3
4
5
6
7
2
3
Magnetic mount
5
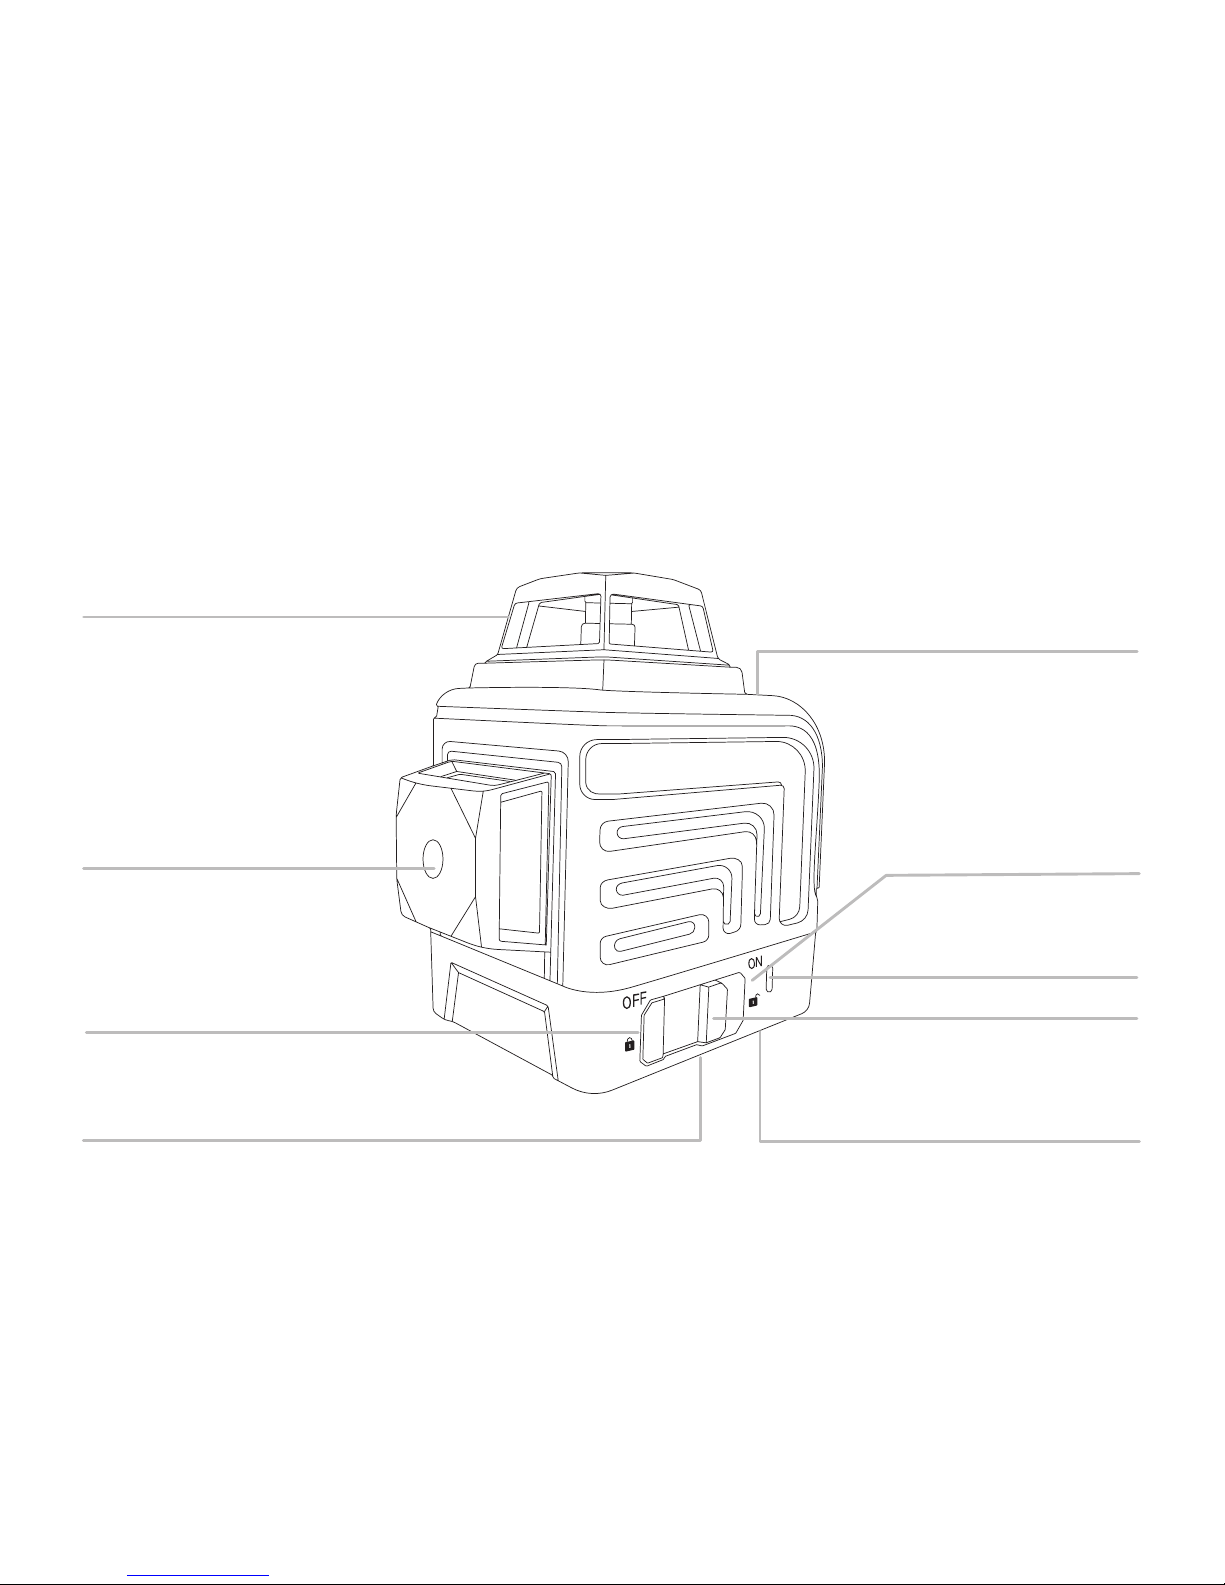
LASER OVERVIEW
Laser port
Power / locking switch
Micro USB charging port
Battery door cover
1/4” tripod thread
Control panel
Laser port
Unlocked position
(power on / self levelling)
Locked position (power off)
6
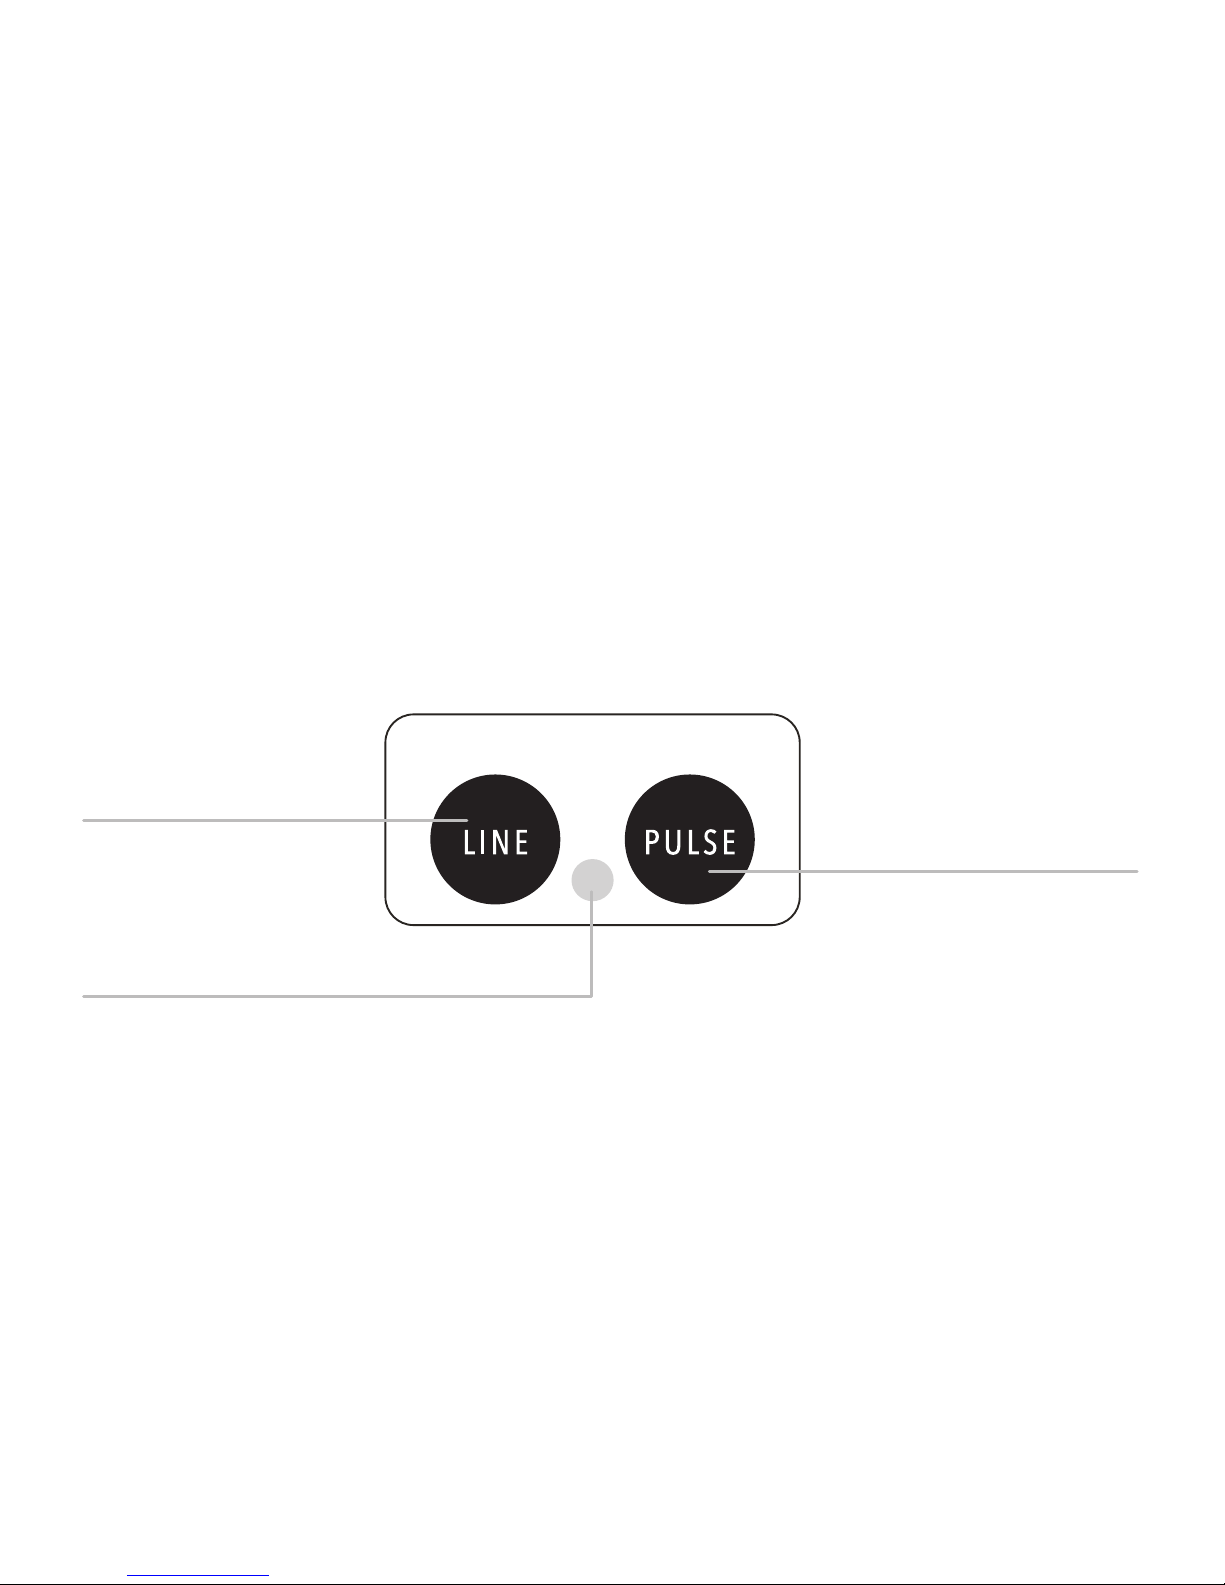
LASER OVERVIEW: CONTROL PANEL
Pulse mode
Power indicator
Line mode
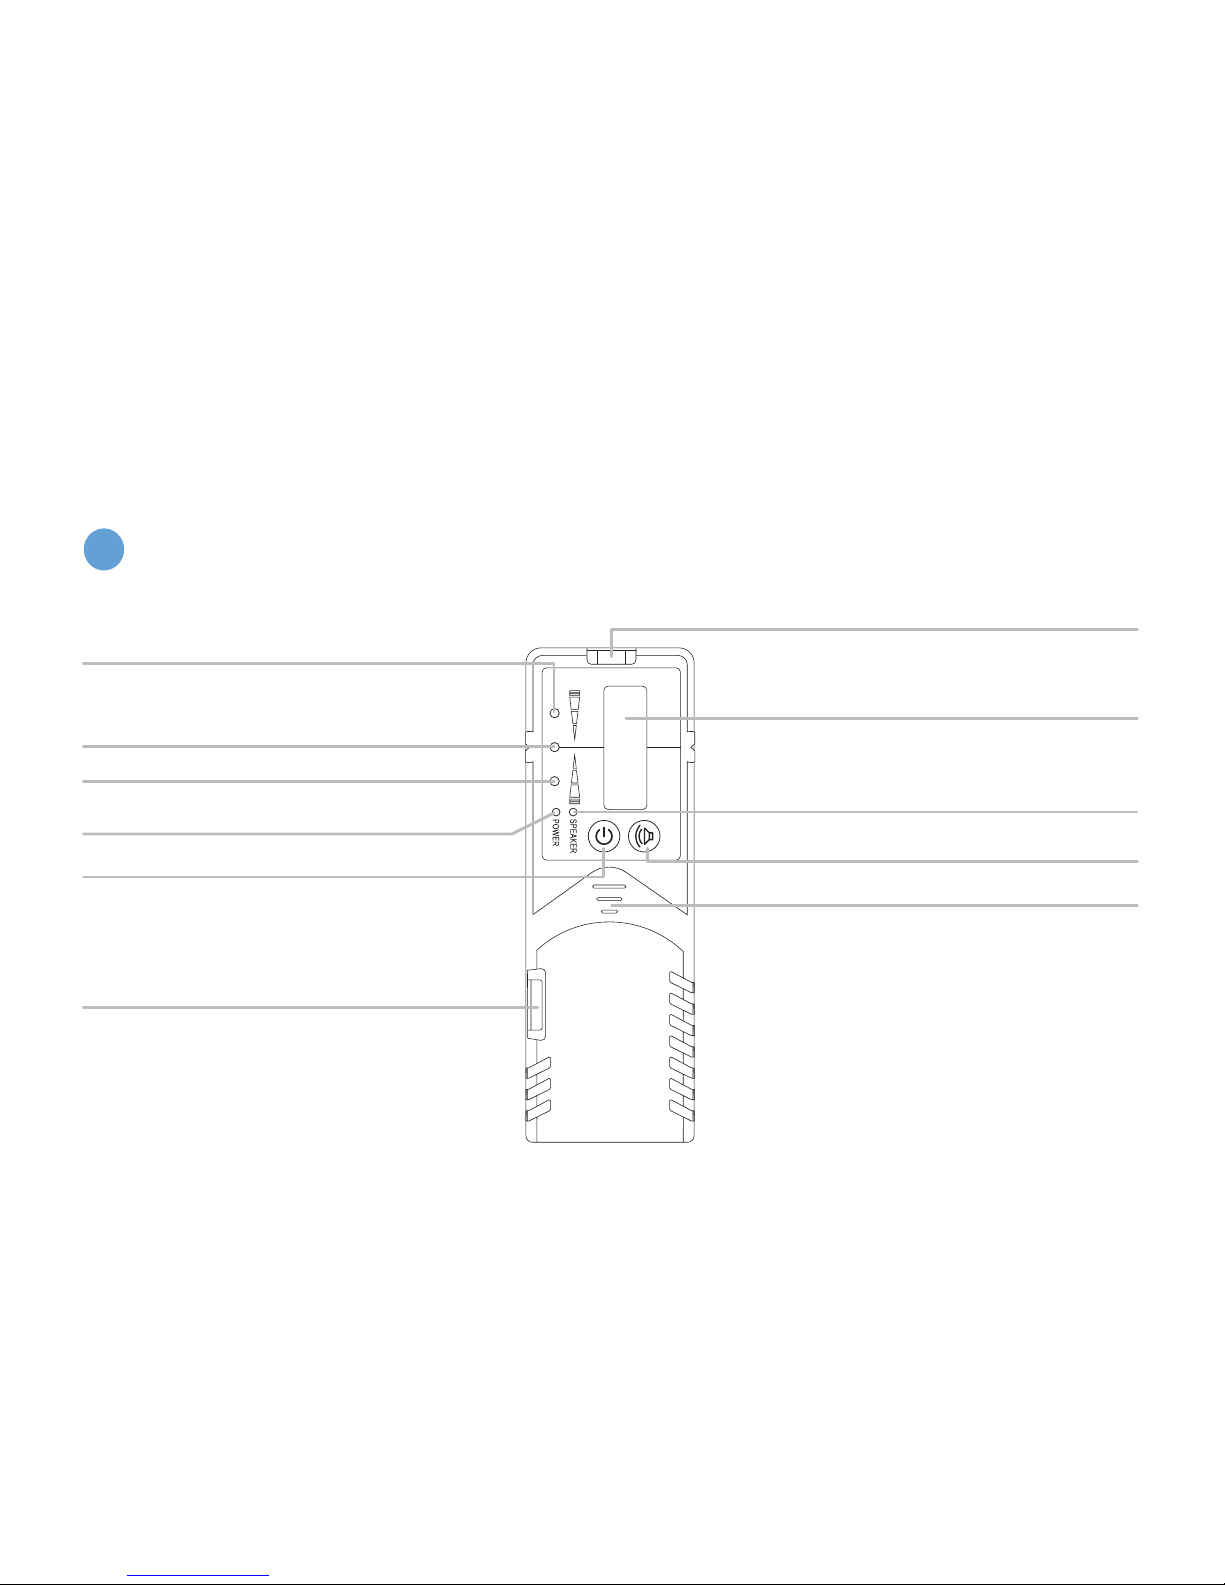
7
Speaker
Sound on / off
LED speaker indicator
Laser sensor
Power
Bubble vial
LED power indicator
LED direction indicator
LED direction indicator
LED centre indicator
Bubble vial
The detector is an optional accessory
which can be purchased from your retailer.
i
DETECTOR OVERVIEW: FRONT

8
USING YOUR LASER
POWER SUPPLY
• The instrument is supplied with two li-ion batteries
as its power source.
• The instrument also has the ability to run using
mains power as an alternative power source.
Inserting or replacing the li-ion battery
• Open the battery cover door.
• Insert the li-ion battery according to polarity and
close the battery door.
Charging the li-ion battery
• Insert the mains power adaptor / charger into the
Micro USB charging adaptor.
• Insert the Micro USB charging adaptor into the
micro USB port. Plug the charger into a power
source. (See image on page 9).
• Charging time is approximately 5 hours for a
depleted battery.
The instrument will continue to operate while
the battery is charging however charging time
will dramatically increase.
i
9
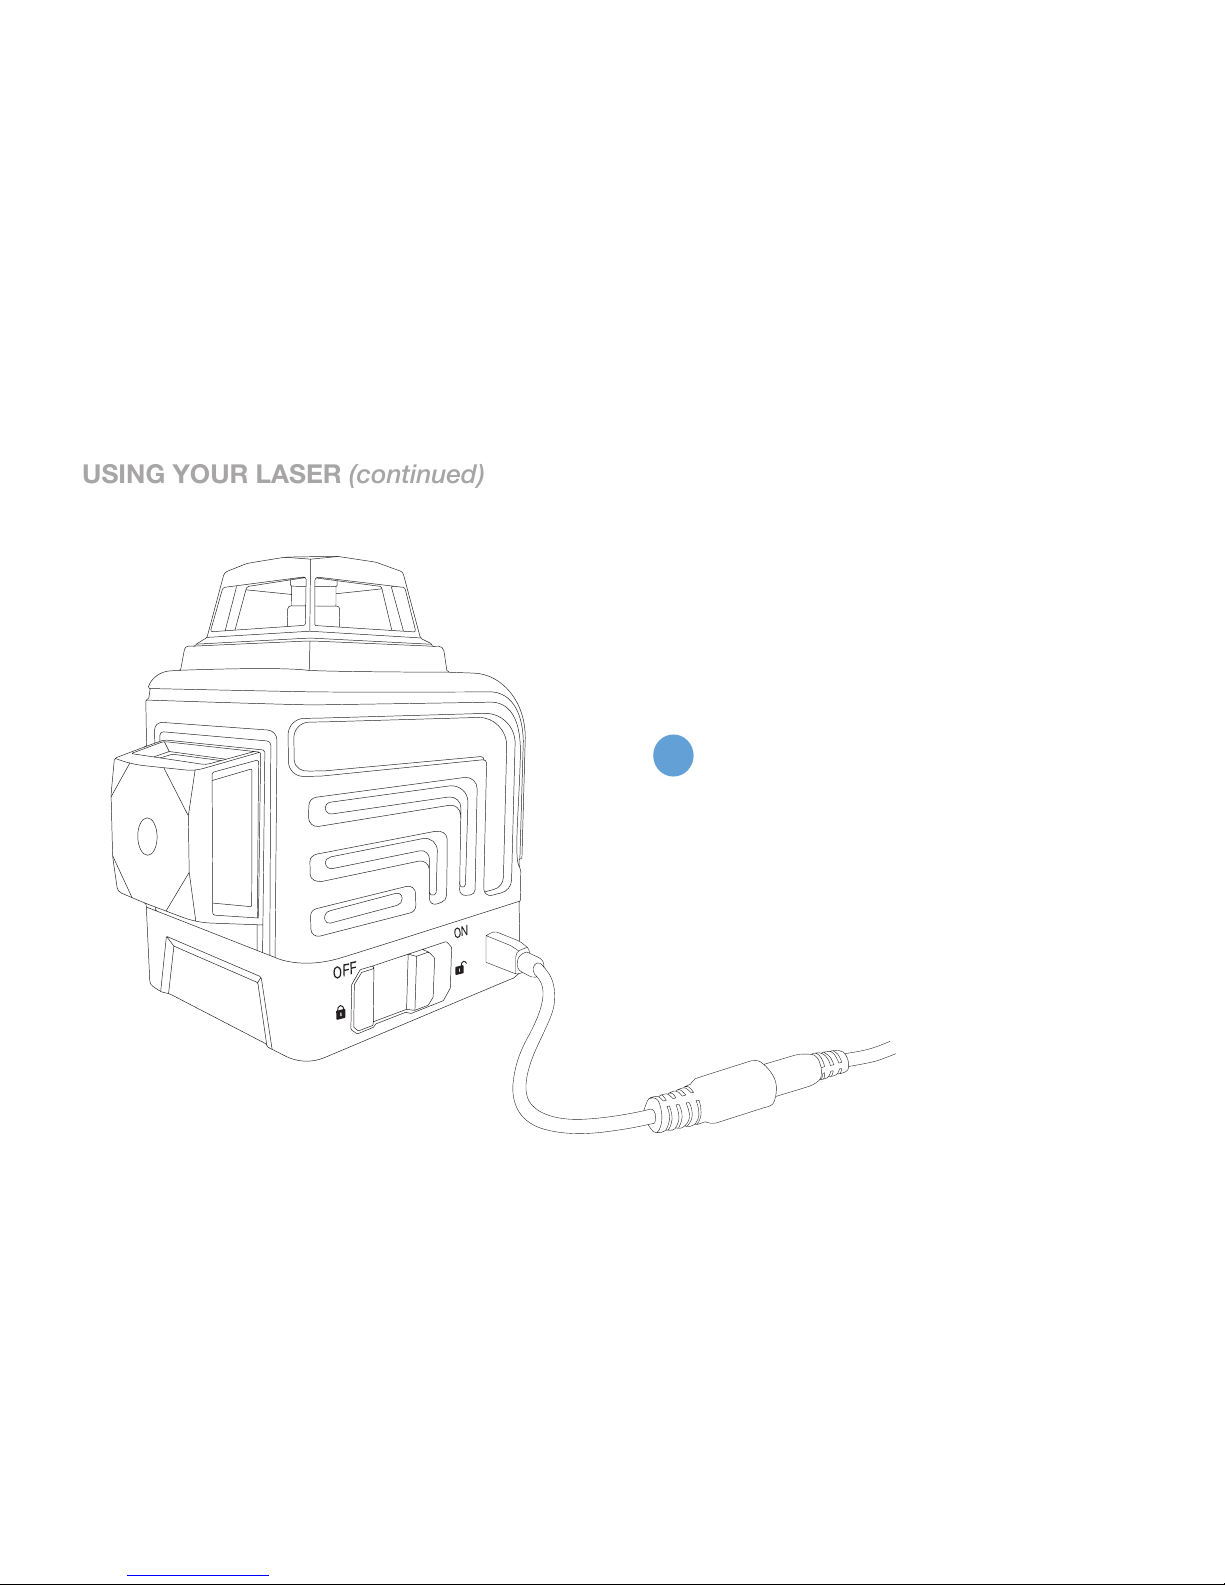
USING YOUR LASER (continued)
Mains power operation
• Insert the mains power adaptor / charger into
the micro USB charging adaptor.
• Insert the micro USB charging adaptor into the
micro USB port. Plug the charger into a power
source.
The instrument will operate without a
battery inserted.
i

10
SET UP
• Select a place as close as practical to the work
site. Ensure the location is clear of traffic.
• Place the laser on a level surface such as a bench
or mount.
OPERATION
Powering on (self levelling)
• To turn the instrument on, slide the power /
locking switch to the “on / unlocked” position.
Self levelling will commence and the horizontal
beam will activate.
• Press the line mode button on the control panel
to cycle through the active beams.
• If the instrument is outside the self levelling range
the instrument will not level causing the laser to
beep and the beam to flash on and off repeatedly.
If this occurs, reposition the instrument onto a
level surface until the instrument can level off.
Powering off (self levelling)
• To turn the instrument on, slide the power /
locking switch to the “locked” position.
USING YOUR LASER (continued)

11
USING THE MAGNETIC MOUNT
Mounting onto a magnetic surface
• Attach the instrument to the mount using the
1/4” thread.
• Attach the mount to a metal surface, ensuring
that the mount has a strong hold before releasing
your hands.
• Rotate the plate to position the instrument
as desired.
Mounting via screw fixing points
• Attach the instrument to the mount using the 1/4”
thread.
• Fix a screw into a secure surface and hook the
mount over the screw. Ensuring that the mount has
a strong hold before releasing your hands.
• Rotate the plate to position the instrument as
desired.
Mounting onto a tripod
• Attach the mount onto the tripod via the 5/8”
or 1/4” thread.
• Attach the instrument to the mount using the
1/4” thread.
• Rotate the plate to position the instrument
as desired.

12
USING YOUR DETECTOR
• Press the pulse mode button on the top of the
instrument to enter into pulse mode.
• Switch the detector on by pressing the power
button. The speaker will beep indicating the
instrument is operating.
• Move the detector into the path of the laser beam.
• Hold the detector upright for horizontal beams.
Rotate the detector 90° for vertical beams.
• The LED direction indicators will indicate the
position of the laser beam. The centre LED will
indicate alignment with the beam.
The detector is an optional accessory which
can be purchased from your retailer.
i
Detector position for horizontal beams
Detector position for vertical beams

13
TROUBLE SHOOTING
Error Cause & Solution
Laser does not turn on
• Check the battery. It may be in the wrong way or need replacing.
• Check the battery compartment for signs of damage.
Ensure it is clean and not bent.
Laser does not remain on
for long periods of use.
• Check the battery.
• Check the battery compartment for signs of damage.
Ensure it is clean and not bent.
Laser does not level off
• Instrument may be outside its self levelling range.
Adjust the instrument or tripod so it is level.
• Instrument may have impact damage.

14
CARE AND MAINTENANCE
• This is a precision measuring instrument
and should always be handled with care and
transported within the carry pouch provided.
• Always slide the power / locking switch to
the “locked” position when transporting the
instrument or moving around the job site.
• Whenever possible, store the instrument in a dry,
shady location.
• Calibration of the instrument is recommended:
every six months, if ongoing accurate levelling is
required, or an impact has occurred.
• The operator should check the accuracy of the
instrument before precision levelling is attempted.
Failure to do so may result in inaccurate
measurements.
• Clean the instrument with a dry, soft cloth after
use in dusty, damp or wet conditions before
storing.
• Smudges and fingerprints may be removed
with a damp tissue or a soft, lint-free cloth.

15
WARRANTY
3 YEAR STANDARD WARRANTY PERIOD
1. The warranty period for your tool is 3 years from
the date of purchase.
2. The warranty period for batteries, battery packs
and chargers is 1 year from the date of purchase.
3. Calibrations are not covered under warranty as
they are deemed wear and tear.
4. All products have a standard warranty period, you
do not have to register your products to obtain the
standard warranty period.
5. To claim under this warranty, the date of purchase
of the tool must be documented by an invoice/
receipt.
7 YEAR EXTENDED WARRANTY PERIOD
1. The extended warranty is available on selected
tools only.
2. You may extend the warranty period for your
tool to 7 years from the date of purchase. This
excludes batteries, battery packs and chargers.
3. Calibrations are not covered under warranty as
they are deemed wear and tear.
4. To obtain the extended warranty, the registration
process must be completed within 30 days from
the date of purchase.
5. Failure to register your product online and/or
submission of a valid invoice/receipt will void the
warranty extension.
6. Please ensure ALL information submitted/
uploaded is correct.
7. Extended warranty is ONLY available via online
registration, offline (mailing in of warranty
registration) will not be accepted.

16
Australia
“Our goods come with guarantees that cannot be
excluded under the Australian Consumer Law. You
are entitled to a replacement or refund for a major
failure and for compensation for any other reasonably
foreseeable loss or damage. You are also entitled to
have the goods repaired or replaced if the goods fail
to be of acceptable quality and the failure does not
amount to a major failure.”
For more information please visit consumerlaw.gov.au
New Zealand
For more information please visit
consumerprotection.govt.nz
WARRANTY (continued)

17
To assist you with any queries or technical questions
please contact customer support
Australia: 1300 658 338
New Zealand: 0800 367 527
CUSTOMER SUPPORT

18
SPECIFICATIONS
Specications TML-3DG
Product code 88610
Warranty 7 Years*
Accuracy ±2mm at 10m
Operating range 50m (with optional detector)
Levelling range ±4°
Laser class 2 Green
Battery life 5 hours+
Battery type Li-ion (4.2V 2600mAh)
Vertical lines 2
Horizontal lines 1
IP rating 54
Weight (kg) 0.41
Dimensions (mm) 100 x 80 x 110
*With online registration. Please refer to page 16 for details.

19
NOTES

www.spoton.com.au
 Loading...